
Exotics, Legendaries, Perks, and more!
Author: sick skills
Destiny 2 Update 9.1.5.5
The one about Liminality
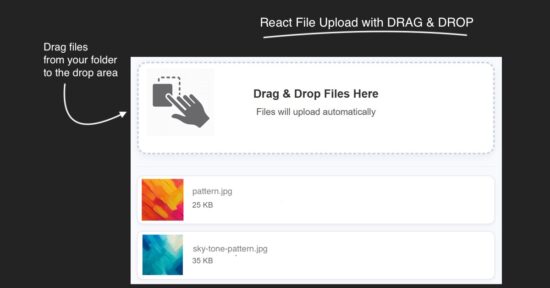
React File Upload with Preview and Drag-and-Drop Support
by Vincy. Last modified on November 20th, 2025.
This example contains a React drag-and-drop file upload with file type and size validation. It connects backend to upload files to the server via Axios.
The workflow allows users to drop files to upload and shows file preview below the drop area. This file upload example includes the following featured functionalities.
- Drag and drop
- File validation
- Uploading to backend
- Saving file path to database
- Preview after upload
- Error handling
It is easy to integrate into any React application, since it is structured with separate components for the upload and preview UI.

React UI with file upload interface
Two React components created for this file upload UI. Those are UploadBox and FilePreview.
The UploadBox is the drop area for dragged files to be uploaded. Once upload completed, file thumbnails are shown in a preview box by using the FilePreview component.
The FileUpload JSX handles the following processes before uploading a file.
- File validation about its extension and size.
- Handling errors or success acknowledgement for UI.
- Preparing form data with the file binaries.

src/components/FileUpload.jsx
import { useState } from "react";
import axios from "axios";
import SERVER_SIDE_API_ROOT from "../../config";
import FilePreview from "./FilePreview";
import UploadBox from "./UploadBox";
import "../../public/assets/css/style.css";
const FileUpload = () => { const [files, setFiles] = useState([]); const [dragActive, setDragActive] = useState(false); const [uploading, setUploading] = useState(false); const [errorMsg, setErrorMsg] = useState(""); const allowedExtensions = ["jpg", "jpeg", "png", "gif", "pdf", "doc", "docx", "txt"]; const MAX_FILE_SIZE = 2 * 1024 * 1024; const uploadFiles = async (fileList) => { setErrorMsg(""); const safeFiles = []; const rejectedFiles = []; fileList.forEach((file) => { const ext = file.name.split(".").pop().toLowerCase(); if (!allowedExtensions.includes(ext)) return rejectedFiles.push("Invalid file type"); if (file.size > MAX_FILE_SIZE) return rejectedFiles.push("Maximum file size is 2MB."); if (file.size <= 0) return rejectedFiles.push("Empty file"); safeFiles.push(file); }); if (rejectedFiles.length > 0) { setErrorMsg(rejectedFiles[0]); setUploading(false); return; } if (!safeFiles.length) return; const formData = new FormData(); safeFiles.forEach((file) => formData.append("files[]", file)); setUploading(true); const delay = new Promise((resolve) => setTimeout(resolve, 800)); try { const res = await Promise.all([ axios.post(`${SERVER_SIDE_API_ROOT}/file-upload.php`, formData, { headers: { "Content-Type": "multipart/form-data" }, }), delay, ]); const uploadedFiles = res[0].data.files.filter((f) => f.status === "uploaded"); setFiles((prev) => [...prev, ...uploadedFiles.map(f => safeFiles.find(sf => sf.name === f.name))]); } catch { setErrorMsg("Server error — please try again later."); } setUploading(false); }; const handleDrop = async (e) => { e.preventDefault(); setDragActive(false); await uploadFiles(Array.from(e.dataTransfer.files)); }; return ( <div className="upload-wrapper"> <UploadBox dragActive={dragActive} uploading={uploading} errorMsg={errorMsg} handleDrop={handleDrop} setDragActive={setDragActive} > </UploadBox> <FilePreview files={files} uploading={uploading} /> </div> );
};
export default FileUpload;
PHP file upload endpoint
The PHP script validates the received file binary before uploading to the server directory. If the validation passes, this script give name to the file with a unique random id.
Once the PHP move_uploaded_file() saves the files to the directory, this code inserts the target path to the database.
drag-drop-file-upload-api/file-upload.php
<?php
header("Access-Control-Allow-Origin: *");
header("Access-Control-Allow-Methods: POST, GET, OPTIONS");
header("Access-Control-Allow-Headers: Content-Type");
include "db.php";
$uploadDir = "uploads/";
$response = [];
if (!file_exists($uploadDir)) { mkdir($uploadDir, 0777, true);
}
$allowedExtensions = ['jpg', 'jpeg', 'png', 'gif', 'pdf', 'txt', 'doc', 'docx'];
$maxFileSize = 2 * 1024 * 1024; foreach ($_FILES['files']['name'] as $key => $name) { $tmpName = $_FILES['files']['tmp_name'][$key]; $extension = strtolower(pathinfo($name, PATHINFO_EXTENSION)); $size = $_FILES['files']['size'][$key]; if (!in_array($extension, $allowedExtensions)) { $response[] = [ "name" => $name, "status" => "blocked", "message" => "File type not allowed (.{$extension})" ]; continue; } if ($size > $maxFileSize) { $response[] = [ "name" => $name, "status" => "blocked", "message" => "Maximum file size is 2M." ]; continue; } if ($size <= 0) { $response[] = [ "name" => $name, "status" => "blocked", "message" => "Empty file" ]; continue; } $uniqueName = uniqid() . "_" . basename($name); $targetPath = $uploadDir . $uniqueName; if (move_uploaded_file($tmpName, $targetPath)) { $stmt = $conn->prepare("INSERT INTO uploaded_files (file_name, file_path) VALUES (?, ?)"); $stmt->bind_param("ss", $uniqueName, $targetPath); $stmt->execute(); $response[] = [ "name" => $name, "path" => $targetPath, "status" => "uploaded" ]; } else { $response[] = [ "name" => $name, "status" => "failed", "message" => "Error moving uploaded file." ]; }
}
echo json_encode(["success" => true, "files" => $response]);
?>
Drop area to place the dragged files
It contains UI elements to define the file drop area. The drop box uses onDragOver callback to highlight the drop area on hover.
And, the onDrop callback prepares the form data to post the dropped file binary to the server.

src/components/UploadBox.jsx
const UploadBox = ({ dragActive, uploading, errorMsg, handleDrop, setDragActive }) => ( <> <div className={`upload-box ${dragActive ? "active" : ""}`} onDragOver={(e) => { e.preventDefault(); setDragActive(true); }} onDragLeave={() => setDragActive(false)} onDrop={handleDrop} > <h3 className="upload-title">Drag & Drop Files Here</h3> <p className="upload-text">Files will upload automatically</p> </div> {uploading && <p className="uploading-text">Uploading...</p>} {errorMsg && <p className="error-text">{errorMsg}</p>} </>
); export default UploadBox;
Showing file preview with thumbnails
The FilePreview component displays the uploaded files in a list format. It will show its thumbnail, name and size.
If an image upload, the preview will show the image thumbnail. It a document type file is uploaded, the default icon is shown to the preview screen.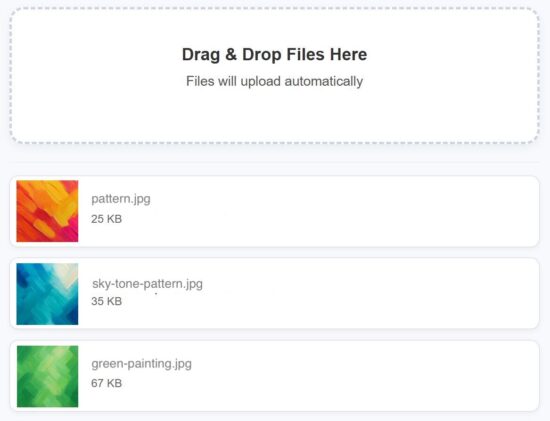
src/components/FilePreview.jsx
const FilePreview = ({ files, uploading }) => { if (!files.length) return null; return ( <div className="preview-list"> {files.map((file, i) => ( <div key={i} className="preview-row"> {file.type?.startsWith("image/") ? ( <div className="preview-thumb-wrapper"> <img src={URL.createObjectURL(file)} alt={file.name} className={`preview-thumb ${uploading ? "blurred" : ""}`} /> {uploading && ( <div className="preview-loader"> <img src="/assets/image/loader.svg" alt="Loading..." /> </div> )} </div> ) : ( <div className="file-icon"></div> )} <div className="file-info"> <p className="file-name">{file.name}</p> <p className="file-size">{Math.round(file.size / 1024)} KB</p> </div> </div> ))} </div> );
};
export default FilePreview;
How to set up this application
The below steps help to set up this example to run in your environment. After these steps, start the npm dev server and run the React drag and drop app.
- Download the source and unzip into your computer.
- Copy the
drag-drop-file-upload-apiinto the PHP web root. - Create a database
file_upload_dband import the SQL script in thedrag-drop-file-upload-api/sql - Configure database details with
db.php - Configure the PHP endpoint URL in React in
src/config.js
Conclusion
I hope the React code provides a modern file upload interface. The drag-and-drop, file validation, preview rendering and database insert is a stack of features enriches the example code. This code well-structured and ready to integrate with an application easily. If you want any add-on feature to this example, please let me know.
References:

Written by Vincy, a web developer with 15+ years of experience and a Masters degree in Computer Science. She specializes in building modern, lightweight websites using PHP, JavaScript, React, and related technologies. Phppot helps you in mastering web development through over a decade of publishing quality tutorials.
Join Us for the Fedora Linux 43 Release Party!

The Fedora community is coming together once again to celebrate the release of Fedora Linux 43, and you’re invited! Join us on Friday, November 21, 2025, from 13:00 to 16:00 UTC on Matrix for our virtual Fedora 43 Release Party.
This is our chance to celebrate the latest release, hear from contributors across the project, and see what’s new in Fedora Workstation, KDE, Atomic Desktops, and more. Whether you’re a long-time Fedora user or new to the community, it’s the perfect way to connect with the broader community, learn more about Fedora, and hang out in Matrix chat with your Fedora friends.
We have a lineup of talks and updates from across the Fedora ecosystem, including updates directly from teams who have been working on changes in this release. We’ll kick things off with Fedora Project Leader Jef Spaleta and Fedora Community Architect Justin Wheeler, followed by sessions with community members like Timothée Ravier on Atomic Desktops, Peter Boy and Petr Bokoč on the new Fedora Docs initiative, and Neal Gompa and Michel Lind discussing the Wayland-only GNOME experience. You’ll also hear from teams across Fedora sharing insights, demos, and what’s next for the project.
Registration is free but required to join the Matrix event room. Once registered, you’ll receive an invitation in your Matrix account before the event begins.
Sign up on the Fedora Linux 43 Release Party event page. We can’t wait to see you there to come celebrate Fedora 43 with us!
Build a Multi-Step Form in React with Validation and Progress Bar

by Vincy. Last modified on November 18th, 2025.
A multi-step form is one of the best ways to replace a long form to make the customer feel easy. Example: a student enrolment form will usually be very long. If it is partitioned into multi-steps with section-wise sub forms, it encourages enduser to proceed forward. And importantly the merit is that it will increase your signup rate.
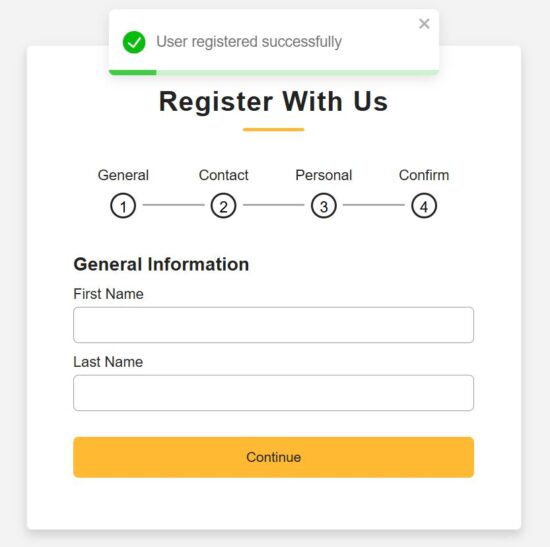
In this React tutorial, a registration form is partitioned into 4 steps. Those are to collect general, contact, personal, and authentication details from the users. Each step loads a sub-form with corresponding sections. Each subform is a separate component with proper structure and easy maintainability.

Rendering multi-step registration form
This RegisterForm is created as a parent React Form component. It loads all the sub-components created for rendering a multi-step form with validation and a progress bar.
It requires the following custom React component created for this example.
- GeneralInfo – to collect basic information, first and last names.
- ContactInfo – to collect phone or WhatsApp numbers.
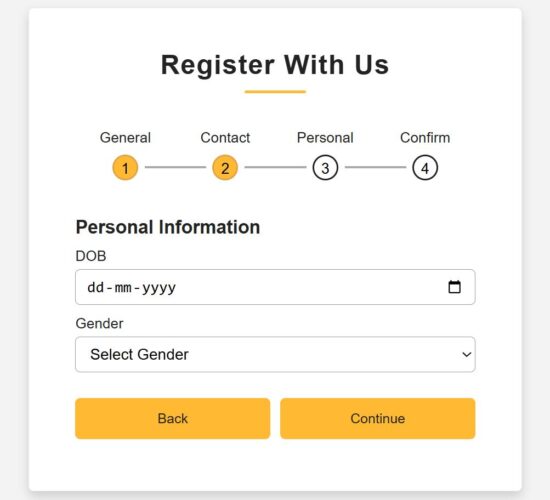
- PersonalInfo – to collect a person’s date of birth and gender.
- ConfirmInfo – is a last step to register confidential information and confirm registration.
All information is stored in the formData by using the corresponding handleChange hook.
Additionally, this JSX has a Toast container to display success or error responses on the user-entered data.
There is a step navigation interface that helps to move along the registration steps. The step navigation helps to verify the data before clicking confirmation.
src/components/RegisterForm.jsx
import { useState } from "react";
import { ToastContainer } from "react-toastify";
import "react-toastify/dist/ReactToastify.css";
import ProgressBar from "./ProgressBar";
import GeneralInfo from "./FormSteps/GeneralInfo";
import ContactInfo from "./FormSteps/ContactInfo";
import PersonalInfo from "./FormSteps/PersonalInfo";
import Confirmation from "./FormSteps/Confirmation";
import "../../public/assests/css/RegisterForm.css";
const RegisterForm = () => { const [step, setStep] = useState(1); const [formData, setFormData] = useState({ first_name: "", last_name: "", email: "", phone: "", dob: "", gender: "", username: "", password: "", terms: false, }); const nextStep = () => setStep(prev => prev + 1); const prevStep = () => setStep(prev => prev - 1); const handleChange = (e) => { const { name, value, type, checked } = e.target; setFormData({ ...formData, [name]: type === "checkbox" ? checked : value, }); };
return (
<div className="container"> <header>Register With Us</header> <ProgressBar step={step} /> <div className="form-outer"> {step === 1 && <GeneralInfo formData={formData} handleChange={handleChange} nextStep={nextStep} />} {step === 2 && <ContactInfo formData={formData} handleChange={handleChange} nextStep={nextStep} prevStep={prevStep} />} {step === 3 && <PersonalInfo formData={formData} handleChange={handleChange} nextStep={nextStep} prevStep={prevStep} />} {step === 4 && <Confirmation formData={formData} handleChange={handleChange} prevStep={prevStep} setFormData={setFormData} setStep={setStep} />} </div> <ToastContainer position="top-center" autoClose={3000} hideProgressBar={false} newestOnTop closeOnClick pauseOnHover/>
</div>
);
};
export default RegisterForm;
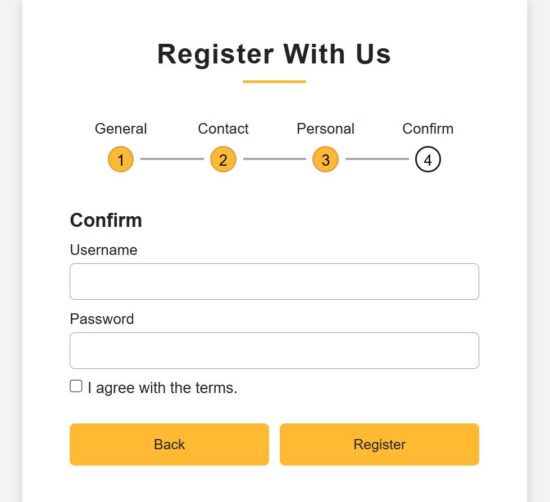
Form progress bar with numbered in-progress state of registration
When a multi-step form interface is used, the progress bar and prev-next navigation controls are very important usability.
This example provides both of these controls which will be useful to learn how to make this for other similar cases.
The progress bar contains circled, numbered nodes represent each step. This node is a container that denotes the title and the step number. It checks the useState for the current step and highlights the node accordingly.
The conditional statements load the CSS className ‘active’ dynamically when loading the progress bar to the UI.
All the completed steps are highlighted by a filled background and shows clarity on the current state.
src/components/ProgressBar.jsx
const ProgressBar = ({ step }) => {
return (
<div className="progress-bar"> <div className={`step ${step >= 1 ? "active" : ""}`}> <p>General</p> <div className={`bullet ${step > 1 ? "active" : ""}`}> <span className="black-text">1</span> </div> </div> <div className={`step ${step >= 2 ? "active" : ""}`}> <p>Contact</p> <div className={`bullet ${step > 2 ? "active" : ""}`}> <span className="black-text">2</span> </div> </div> <div className={`step ${step >= 3 ? "active" : ""}`}> <p>Personal</p> <div className={`bullet ${step > 3 ? "active" : ""}`}> <span className="black-text">3</span> </div> </div> <div className={`step ${step >= 4 ? "active" : ""}`}> <p>Confirm</p> <div className="bullet"> <span className="black-text">4</span> </div> </div>
</div>
);
};
export default ProgressBar;
React Form components collecting types of user information
We have seen all 4 sub-form components created for this React example. Those component purposes are described in the explanation of the parent React container.
Each form component accepts the formData, handleChange, nextStep references. The parent component has the scope of reading all the sub-form field data. It supplies the data with the corresponding handleChange hook to each step.
The main RegisterForm JSX contains conditional statements to check the current step. Then, it load the corresponding sub form components based on the in-progressing step managed in a React useState.
Step 1 – Collecting general information
src/components/FormSteps/GeneralInfo.jsx
import { useState } from "react";
const GeneralInfo = ({ formData, handleChange, nextStep }) => { const [errors, setErrors] = useState({}); const validate = () => { const newErrors = {}; if (!formData.first_name.trim()) newErrors.first_name = "First name is required"; if (!formData.last_name.trim()) newErrors.last_name = "Last name is required"; setErrors(newErrors); return Object.keys(newErrors).length === 0; }; return ( <div className="page slidepage"> <div className="title">General Information</div> <div className="field"> <div className="label">First Name</div> <input type="text" name="first_name" value={formData.first_name} onChange={handleChange} className={errors.first_name ? "is-invalid" : ""} /> {errors.first_name && <div className="ribbon-alert">{errors.first_name}</div>} </div> <div className="field"> <div className="label">Last Name</div> <input type="text" name="last_name" value={formData.last_name} onChange={handleChange} className={errors.last_name ? "is-invalid" : ""} /> {errors.last_name && <div className="ribbon-alert">{errors.last_name}</div>} </div> <div className="field nextBtn"> <button type="button" onClick={() => validate() && nextStep()}> Continue </button> </div> </div> );
};
export default GeneralInfo;
Step 2: Collecting contact information

src/components/FormSteps/ContactInfo.jsx
import { useState } from "react";
const ContactInfo = ({ formData, handleChange, nextStep, prevStep }) => { const [errors, setErrors] = useState({}); const validate = () => { const newErrors = {}; const emailRegex = /^[^\s@]+@[^\s@]+\.[^\s@]+$/; if (!formData.email.trim()) newErrors.email = "Email is required"; else if (!emailRegex.test(formData.email)) newErrors.email = "Enter a valid email address"; if (formData.phone.length < 10) newErrors.phone = "Phone number must be at least 10 digits"; setErrors(newErrors); return Object.keys(newErrors).length === 0; }; return ( <div className="page"> <div className="title">Contact Information</div> <div className="field"> <div className="label">Email Address</div> <input type="text" name="email" value={formData.email} onChange={handleChange} className={errors.email ? "is-invalid" : ""} /> {errors.email && <div className="ribbon-alert">{errors.email}</div>} </div> <div className="field"> <div className="label">WhatsApp Number</div> <input type="number" name="phone" value={formData.phone} onChange={handleChange} className={errors.phone ? "is-invalid" : ""} /> {errors.phone && <div className="ribbon-alert">{errors.phone}</div>} </div> <div className="field btns"> <button type="button" onClick={prevStep}>Back</button> <button type="button" onClick={() => validate() && nextStep()}>Continue</button> </div> </div> );
};
export default ContactInfo;
Step3 – Collecting personal information
src/components/FormSteps/PersonalInfo.jsx
import { useState } from "react";
const PersonalInfo = ({ formData, handleChange, nextStep, prevStep }) => { const [errors, setErrors] = useState({}); const validate = () => { const newErrors = {}; if (!formData.dob) newErrors.dob = "Please select your date of birth"; if (!formData.gender) newErrors.gender = "Please select your gender"; setErrors(newErrors); return Object.keys(newErrors).length === 0; };
return ( <div className="page"> <div className="title">Personal Information</div> <div className="field"> <div className="label">DOB</div> <input type="date" name="dob" value={formData.dob} onChange={handleChange} className={errors.dob ? "is-invalid" : ""} /> {errors.dob && <div className="ribbon-alert">{errors.dob}</div>} </div> <div className="field"> <div className="label">Gender</div> <select name="gender" value={formData.gender} onChange={handleChange} className={errors.gender ? "is-invalid" : ""} > <option value="">Select Gender</option> <option>Male</option> <option>Female</option> <option>Other</option> </select> {errors.gender && <div className="ribbon-alert">{errors.gender}</div>} </div> <div className="field btns"> <button type="button" onClick={prevStep}>Back</button> <button type="button" onClick={() => validate() && nextStep()}>Continue</button> </div> </div>
);
};
export default PersonalInfo;
Step 4 – Collecting user consent and confidential information
src/components/FormSteps/Confirmation.jsx
import { useState } from "react";
import { toast } from "react-toastify";
import "react-toastify/dist/ReactToastify.css";
import axios from "axios";
import SERVER_SIDE_API_ROOT from "../../config";
const Confirmation = ({ formData, handleChange, prevStep, setFormData, setStep }) => { const [errors, setErrors] = useState({}); const handleSubmit = async (e) => { e.preventDefault(); const newErrors = {}; if (!formData.username) newErrors.username = "Username is required"; if (!formData.password) newErrors.password = "Password is required"; else if (formData.password.length < 6) newErrors.password = "Password must be at least 6 characters"; if (!formData.terms) newErrors.terms = "You must agree to the terms"; setErrors(newErrors); if (Object.keys(newErrors).length > 0) return; try { const res = await axios.post(`${SERVER_SIDE_API_ROOT}/multi-step-form.php`, formData); if (res.data.success) { toast.success(res.data.message || "User registered successfully!"); setFormData({ first_name: "", last_name: "", email: "", phone: "", dob: "", gender: "", username: "", password: "", terms: false, }); setStep(1); setErrors({}); } else { toast.error(res.data.message || "Registration failed!"); } } catch (err) { console.error(err); toast.error("Error while saving user data."); } }; const renderError = (field) => errors[field] ? <div className="ribbon-alert">{errors[field]}</div> : null;
return ( <div className="page"> <div className="title">Confirm</div> <div className="field"> <div className="label">Username</div> <input type="text" name="username" value={formData.username} onChange={handleChange} className={errors.username ? "is-invalid" : ""} /> {renderError("username")} </div> <div className="field"> <div className="label">Password</div> <input type="password" name="password" value={formData.password} onChange={handleChange} className={errors.password ? "is-invalid" : ""} /> {renderError("password")} </div> <div className="field-terms"> <label> <input type="checkbox" name="terms" checked={formData.terms} onChange={handleChange} />{" "} I agree with the terms. </label> {renderError("terms")} </div> <div className="field btns"> <button type="button" onClick={prevStep}>Back</button> <button type="submit" onClick={handleSubmit}>Register</button> </div> </div>
);
};
export default Confirmation;
PHP endpoint processing multi-step form data
It is a usual PHP file which not need to describe if you are already familiar with how the PHP user registration works. It reads the form data posted by the front-end multi-step React form.
With this form data, it builds the database insert query to save the user-entered information to the backend.
This example has the server-side validation for a few fields. If the validation process catches any problem with the submitted data, then it composes an error response to the React frontend.
Mainly, it validates email format and password-strength (minimally by its length). Password strength checking has no limitations. Based on the application sensitivity we are free to add as much validation as possible which is good for a security point of view.
Note: The SQL script for the user database is in the downloadable source code attached with this tutorial in multi-step-form-validation-api/users.sql.
multi-step-form-validation-api/multi-step-form.php
<?php
header("Access-Control-Allow-Origin: *");
header("Access-Control-Allow-Headers: Content-Type");
header("Access-Control-Allow-Methods: POST");
header("Content-Type: application/json");
include 'db.php';
$data = json_decode(file_get_contents("php://input"), true);
$firstName = $data["first_name"] ?? "";
$lastName = $data["last_name"] ?? "";
$email = $data["email"] ?? "";
$phone = $data["phone"] ?? "";
$dob = $data["dob"] ?? "";
$gender = $data["gender"] ?? "";
$username = $data["username"] ?? "";
$password = $data["password"] ?? "";
if (!$firstName || !$email || !$password) { echo json_encode(["success" => false, "message" => "Required fields missing"]); exit;
}
if (!filter_var($email, FILTER_VALIDATE_EMAIL)) { echo json_encode(["success" => false, "message" => "Invalid email"]); exit;
}
if (strlen($password) < 6) { echo json_encode(["success" => false, "message" => "Password too short"]); exit;
}
$hashedPassword = password_hash($password, PASSWORD_BCRYPT);
$stmt = $conn->prepare("INSERT INTO users (first_name, last_name, email, phone, dob, gender, username, password) VALUES (?, ?, ?, ?, ?, ?, ?, ?)");
$stmt->bind_param("ssssssss", $firstName, $lastName, $email, $phone, $dob, $gender, $username, $hashedPassword);
if ($stmt->execute()) { echo json_encode(["success" => true, "message" => "User registered successfully"]);
} else { echo json_encode(["success" => false, "message" => "DB insert failed"]);
}
?>
How to set up this application
The below steps help to set up this example to run in your environment.
- Download the source code into your React project directory.
- Copy the multi-step-form-validation-api into your PHP root.
- Create a database
multistep_form_validation_dband import the user.sql - Configure database details with db.php
- Configure the PHP endpoint URL in React in
src/config.js - Run
npm installand then,npm run dev. - Copy the dev server URL and run it to render the React Multi-step form.
Conclusion:
So, we have seen a simple React example to understand how to create and manage the state of a multi-step form. By splitting the mail and sub form components we had a structural code base that is more feasible for enhancements.
The navigation between steps gives a scope for verification before confirm the signup. And the progress bar indicates the state in progress at a quick glance.
Definitely, the PHP validation and database processing can have add-on features to make the backend more solid. If you have a requirement to create a multi-step form in React, share your specifications in the comments.
Written by Vincy, a web developer with 15+ years of experience and a Masters degree in Computer Science. She specializes in building modern, lightweight websites using PHP, JavaScript, React, and related technologies. Phppot helps you in mastering web development through over a decade of publishing quality tutorials.
This Week In Destiny – 11/06/2025
Preparing for the Lawless Frontier
Cosplay Cosmodrome has returned
On time for Renegades!
Hello Developer: November 2025

In this edition: Catch the new design in the wild, and let Apple experts show you how to quickly and easily bring it to your apps. Plus, get the latest on the Swift Student Challenge 2026, and check out new developer videos available on demand.
Also, explore new activities all over the world, get your apps and games ready for the holidays, and browse the latest news, documentation, and Technotes.
Send Email from React Using EmailJS (No Backend Required)

by Vincy. Last modified on November 13th, 2025.
EmailJS is a cloud service that supports to enable the frontend to send email without any backend. All we need is to create an EmailJS account and configure it to the frontend application.
This tutorial shows the step-by-step procedure to learn how to enable email sending in a React application using EmialJS.

Steps to allow EmailJS to send mail
1. Signup with EmailJS service
First signup and login with EmailJS dashboard. It’s a free and enables mail sending via various services supported.

2. Choose service provider via Add New Service -> Select Service
It supports various services like Gmail, Yahoo and etc. It also have settings to configure custom SMTP server with this online solution.
3. Design mail template by Email Templates -> Create New Template -> Select Template
There are various built-in templates in the EmailJS dashboard. I selected the “Contact Us” template for this example.
Template edit interface has the option to change the design and the content. It allows to add dynamic variables as part of the mail content.
When calling the EmailJS service, the request will have values to replace this variables. This feature will help to send a personalized email content.
Copy the Template ID once created an email template.

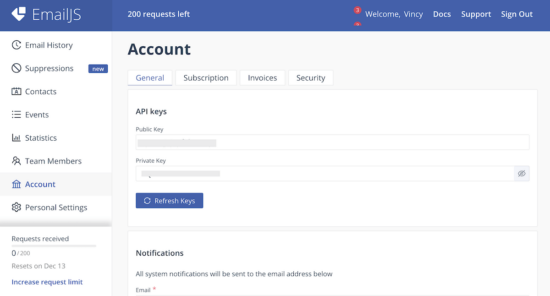
4. Get EmailJS API Public Key
Added Service ID, Template ID the EmailJS Public Key is also need to initiate the library class from the frontend React App.
Navigate via Account using the left menu to open the API keys section. Copy Public Key from the EmailJS dashboard.
Initiate EmailJS library to React App
Create a React app and install the EmailJS library to it using this command.
npm install emailjs-com
This example code contains this library installed. So, just run npm install to bring the dependancies into your node_modules.
Then, import the emailjs-com to the React JSX and initiate the EmailJS service as shown below. This script shows how the emailjs instance is used in the form handle submit.
import emailjs from "emailjs-com"; const handleSubmit = (e) => { e.preventDefault(); const SERVICE_ID = "Your Serivce ID"; const TEMPLATE_ID = "Your Template ID"; const PUBLIC_KEY = "EmailJS API Public key here"; emailjs .send(SERVICE_ID, TEMPLATE_ID, formData, PUBLIC_KEY) .then(() => { toast.success("Email sent successfully!", { position: "top-center" }); setFormData({ name: "", email: "", message: "" }); }) .catch(() => { toast.error("Failed to send email. Please try again.", { position: "top-center", }); }); };
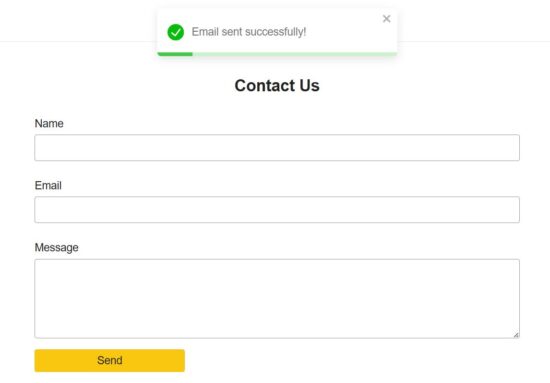
Example React form to send email
This example provides component for the email sending form fields. The fields UI code is moved to a separate file and made as a component. It is imported into the parent container in the EmailForm component.
It renders Name, Email and Message fields. Each fields is validated with a handleChange hook.
src/components/EmailFormFields.jsx
const EmailFormFields = ({ formData, handleChange }) => {
return ( <> <div className="form-group"> <label className="form-label">Name</label> <input type="text" name="name" value={formData.name} onChange={handleChange} className="form-input" required /> </div> <div className="form-group"> <label className="form-label">Email</label> <input type="email" name="email" value={formData.email} onChange={handleChange} className="form-input" required /> </div> <div className="form-group"> <label className="form-label">Message</label> <textarea name="message" value={formData.message} onChange={handleChange} className="form-input" rows="6" required ></textarea> </div> </>
);
};
export default EmailFormFields;
React JSX to load EmailJS and EmailFormFields Component
This JSX defines the handleChange and handleSubmit hooks for validation and mail sending respectively.
The form container includes the <EmailFormFields />, Submit button and a <ToastContainer />.
After sending email via emailjs, the handleSubmit action resets the form and make it ready for the next submit.
When submitting the form, the handleSubmit function sends the formData with the API keys and IDs. Configure your EmailJS keys and IDs to this React script to make this example to send email.
src/components/EmailForm.jsx
import { useState } from "react";
import emailjs from "emailjs-com";
import { ToastContainer, toast } from "react-toastify";
import "react-toastify/dist/ReactToastify.css";
import "../../public/assets/css/phppot-style.css";
import EmailFormFields from "./EmailFormFields"; const EmailForm = () => { const [formData, setFormData] = useState({ name: "", email: "", message: "", }); const handleChange = (e) => { const { name, value } = e.target; setFormData((prev) => ({ ...prev, [name]: value })); }; const handleSubmit = (e) => { e.preventDefault(); const SERVICE_ID = "Your Serivce ID"; const TEMPLATE_ID = "Your Template ID"; const PUBLIC_KEY = "EmailJS API Public key here"; emailjs .send(SERVICE_ID, TEMPLATE_ID, formData, PUBLIC_KEY) .then(() => { toast.success("Email sent successfully!", { position: "top-center" }); setFormData({ name: "", email: "", message: "" }); }) .catch(() => { toast.error("Failed to send email. Please try again.", { position: "top-center", }); }); }; return ( <div className="form-wrapper"> <h2 className="form-title">Contact Us</h2> <form onSubmit={handleSubmit} className="payment-form"> <EmailFormFields formData={formData} handleChange={handleChange} /> <button type="submit" className="submit-btn"> Send </button> </form> <ToastContainer /> </div> );
};
export default EmailForm;
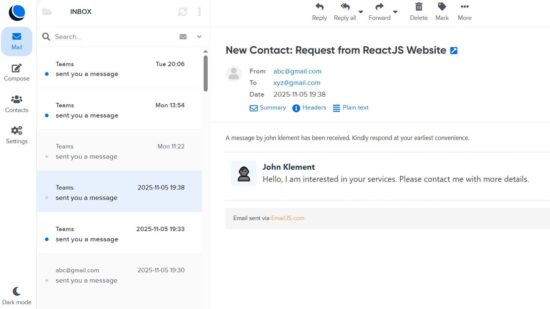
Note: Form data is in an associate array format, where the array keys matches the email template variables. For example, if the email template body in the EmailJS dashboard contains Hi {{name}}, then the form data will have the key-value as name: submitted-name to replace the variable.
The receive email signature and the mail body design will be as configured in the EmailJS dashboard. The following diagram shows the received email output.
Conclusion
Thus, we have created a frontend in React for sending email without any backend set up. I hope, you find EmailJS very simple to integrate into an application. And its registration process is very simple. And, the features to customize the email body is very useful to have a thematic email template for different applications.
Written by Vincy, a web developer with 15+ years of experience and a Masters degree in Computer Science. She specializes in building modern, lightweight websites using PHP, JavaScript, React, and related technologies. Phppot helps you in mastering web development through over a decade of publishing quality tutorials.
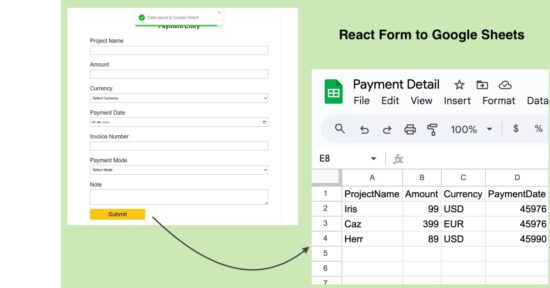
Save React Form Data to Google Sheets Without a Backend (Step-by-Step Guide)

by Vincy. Last modified on November 12th, 2025.
React form can be tied to a Google Sheets to store the submitted data. It maintains the form responses in an Excel format without database. This can be done by deploying a Google App Script for the target sheet.
In this tutorial, you will learn the steps to create a new Google App Script and deploy it for a Google Sheets.
The Google Sheets will have columns relevant to the React form fields. The Google web app script URL parameters are in the same order as the column. In a previous tutorial, we saw how to connect Google Sheets via API from a PHP application.
Steps to get Google Sheets URL to post form data
There are 5 simple steps to get the Google Sheets web app URL by registering an app script for a target sheet. At the end of these 5 steps, it will generate a URL that has to be configured in the React frontend code.
In the frontend, this URL will have a form data bundle to process the data row insertion as coded in the app script.
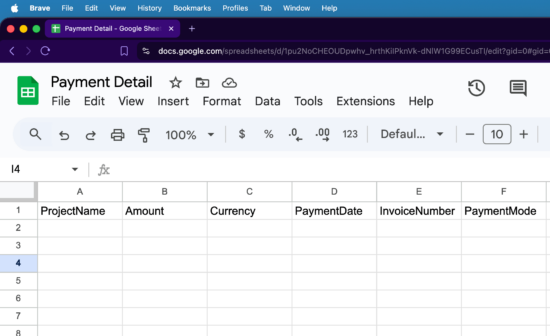
1. Create a Google sheet with the column relevant to the React form
2. Navigate Extension -> App Script to add JS script to build row to insert

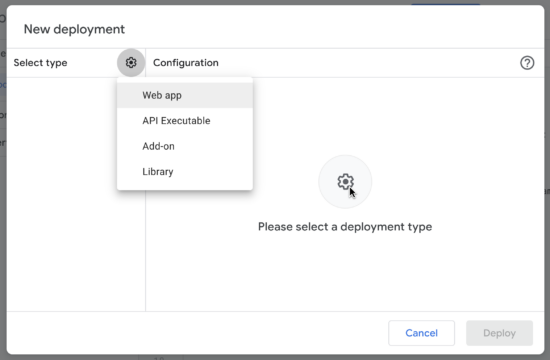
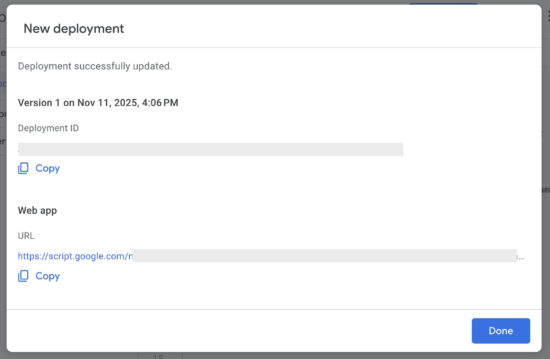
3. Choose Deploy -> New Deployment to configure web app
4. Set ownership configurations and authorize the app
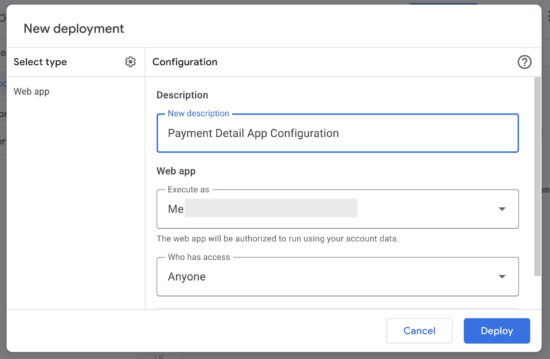
5. Click Deploy and copy the Google Sheets web app URL
React frontend form JSX with required handlers
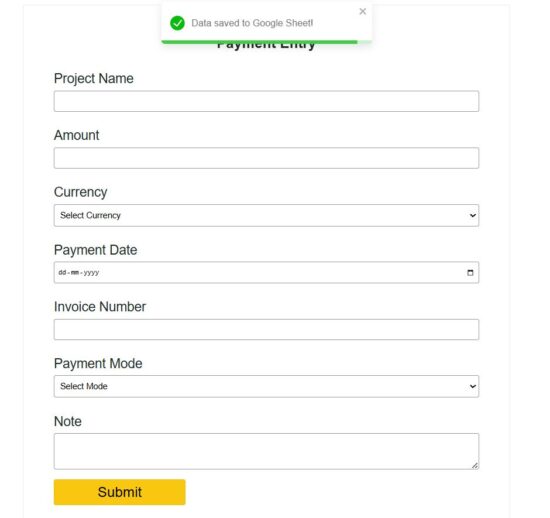
The ReactForm JSX component includes the form UI and hooks to process the form submit. This simple form collects payment details to store in the Google Sheets.
In the above steps we get the Google App script URL to target the sheet from the frontend. This URL is used in this JSX with the form’s handleSubmit function. This URL is added to the GOOGLE_SHEET_URL variable and used in the form action hook.
The URLSearchParams builds the argument list with the submitted React form data. Google Sheets URL will receive these arguments in key1=value1&key2=value2.. format.
Once the submitted data is added to the Google Sheets, the frontend will clear the form and show a success toast message to the user.
src/components/ReactForm.jsx
import { useState } from "react";
import axios from "axios";
import { ToastContainer, toast } from "react-toastify";
import "react-toastify/dist/ReactToastify.css";
import "../../public/assets/css/react-style.css";
import PaymentFormFields from "./PaymentFormFields";
const GOOGLE_SHEET_URL = "Paste your Google Apps Script Web App URL here";
const ReactForm = () => { const [formData, setFormData] = useState({ projectName: "", amount: "", currency: "", paymentDate: "", invoiceNumber: "", paymentMode: "", note: "", }); const handleChange = (e) => { const { name, value } = e.target; setFormData((prev) => ({ ...prev, [name]: value })); }; const handleSubmit = async (e) => { e.preventDefault(); try { const params = new URLSearchParams(formData).toString(); const response = await axios.post(`${GOOGLE_SHEET_URL}?${params}`); if (response.data.status === "success") { toast.success("Data saved to Google Sheet!", { position: "top-center" }); setFormData({ projectName: "", amount: "", currency: "", paymentDate: "", invoiceNumber: "", paymentMode: "", note: "", }); } else { toast.error("Failed to save data. Try again.", { position: "top-center" }); } } catch (error) { console.error("Error:", error); toast.error("Something went wrong while submitting.", { position: "top-center", }); } }; return ( <div className="form-wrapper"> <h2 className="form-title">Payment Entry</h2> <form onSubmit={handleSubmit} className="payment-form"> <PaymentFormFields formData={formData} handleChange={handleChange} /> <button type="submit" className="submit-btn disabled={loading}"> {loading ? "Processing..." : "Submit"} </button> </form> <ToastContainer /> </div> );
};
export default ReactForm;
src/components/PaymentFormFields.jsx
const PaymentFormFields = ({ formData, handleChange }) => { return ( <> <div className="form-group"> <label className="form-label">Project Name</label> <input type="text" name="projectName" value={formData.projectName} onChange={handleChange} className="form-input" required /> </div> <div className="form-group"> <label className="form-label">Amount</label> <input type="number" name="amount" value={formData.amount} onChange={handleChange} className="form-input" required /> </div> <div className="form-group"> <label className="form-label">Currency</label> <select name="currency" value={formData.currency} onChange={handleChange} className="form-input" required > <option value="">Select Currency</option> <option value="USD">USD</option> <option value="INR">INR</option> <option value="EUR">EUR</option> </select> </div> <div className="form-group"> <label className="form-label">Payment Date</label> <input type="date" name="paymentDate" value={formData.paymentDate} onChange={handleChange} className="form-input" required /> </div> <div className="form-group"> <label className="form-label">Invoice Number</label> <input type="text" name="invoiceNumber" value={formData.invoiceNumber} onChange={handleChange} className="form-input" required /> </div> <div className="form-group"> <label className="form-label">Payment Mode</label> <select name="paymentMode" value={formData.paymentMode} onChange={handleChange} className="form-input" required > <option value="">Select Mode</option> <option value="Cash">Cash</option> <option value="Bank Transfer">Bank Transfer</option> <option value="Credit Card">Credit Card</option> <option value="UPI">UPI</option> </select> </div> <div className="form-group"> <label className="form-label">Note</label> <textarea name="note" value={formData.note} onChange={handleChange} className="form-input" rows="3" ></textarea> </div> </> );
}; export default PaymentFormFields;
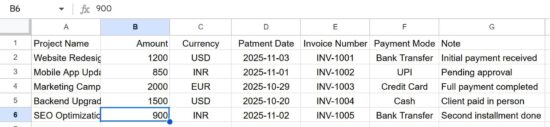
Appending new row to the Google Sheets using the Web App Script
I gave the web app script in the downloadable source code added to this tutorial. This JS script is added to the Google Sheets App script extension.
This script will be executed when the form post action calls the web app URL. The doPost() function builds the Google Sheets row instance with the parameters posted from the form.
With the line sheet.appendRow(row); we can return the ContentService with a success response.
The formatOnly step is optional to maintain all the rows with the same styles as the sheet header has. For example, if you highlight any column with a bright background, that will be carried over to the next rows added by the app script.
google-sheet-app/app-script-target.js
function doPost(e) { if (!e || !e.parameter) { return ContentService .createTextOutput(JSON.stringify({ status: "error", message: "No parameters received" })) .setMimeType(ContentService.MimeType.JSON); } const sheet = SpreadsheetApp.getActiveSpreadsheet().getSheetByName("Sheet1"); const row = [ e.parameter.projectName || "", e.parameter.amount || "", e.parameter.currency || "", e.parameter.paymentDate || "", e.parameter.invoiceNumber || "", e.parameter.paymentMode || "", e.parameter.note || "", ]; sheet.appendRow(row); const lastRow = sheet.getLastRow(); const lastColumn = sheet.getLastColumn(); const headerRange = sheet.getRange(1, 1, 1, lastColumn); const newRowRange = sheet.getRange(lastRow, 1, 1, lastColumn); headerRange.copyTo(newRowRange, { formatOnly: true }); return ContentService .createTextOutput(JSON.stringify({ status: "success" })) .setMimeType(ContentService.MimeType.JSON);
}
Conclusion
By linking a React form to a Google Sheets via the Google Apps Script, form data is stored in excel format. This will be very useful to maintain form responses without a backend database. The App Script created for this tutorial provided a feature to keep the row column formatting with the newly added rows.
As an enhancement, we can extend this code to read Google sheets and show the latest records to the UI.
References
Written by Vincy, a web developer with 15+ years of experience and a Masters degree in Computer Science. She specializes in building modern, lightweight websites using PHP, JavaScript, React, and related technologies. Phppot helps you in mastering web development through over a decade of publishing quality tutorials.