Posted on Leave a comment

PHP 8.3.28 Released

The PHP development team announces the immediate availability of PHP
8.3.28. This is a bugfix release. All PHP 8.3 users are encouraged to upgrade to this version. For source downloads of PHP 8.3.28 please visit our downloads page:
https://www.php.net/downloads
Windows source and binaries can be found at
https://windows.php.net/download
The list of changes is recorded in the ChangeLog:
https://www.php.net/ChangeLog-8 Many thanks to all the contributors and supporters!
Jakub Zelenka, Eric Mann and Pierrick Charron Release Manifest here and below: https://gist.github.com/bukka/b994baba89beab5ff753691f2ccdcfb3 php-8.3.28.tar.bz2
SHA256 hash:
d5b385ee351ec463c85d47eeb53b51156f3483eaf3ff43a7ad5080c2b6d4c557
PGP signature:
-----BEGIN PGP SIGNATURE----- iHUEABYKAB0WIQTCjZN1dWA+tKu3JYYcB3ncXAqd5AUCaRzw/QAKCRAcB3ncXAqd
5IiFAP96ro6J68/8pft8OL2tHo/iTbg0v++QtjS8YNN8yH1b0AD+MXY3tTKs7/vD
koRji/rH437wew8LMuHn5J1z4h6NVg0=
=OcSt
-----END PGP SIGNATURE----- php-8.3.28.tar.gz
SHA256 hash:
2f7dda35bbef2842ec61510aaefe52c78361a61f9cfabd99a7789204d6383d9f
PGP signature:
-----BEGIN PGP SIGNATURE----- iHUEABYKAB0WIQTCjZN1dWA+tKu3JYYcB3ncXAqd5AUCaRzw/QAKCRAcB3ncXAqd
5FNAAP9+NI3GqClKftUE/tVnyP9K8OdYAVOQ/zKjEH3txpUiNAD8C8Q6loYbwVbz
be/5MiLJ2wo9/ibOK1EUuufn+8wQ7AE=
=ImzR
-----END PGP SIGNATURE----- php-8.3.28.tar.xz
SHA256 hash:
25e3860f30198a386242891c0bf9e2955931f7b666b96c3e3103d36a2a322326
PGP signature:
-----BEGIN PGP SIGNATURE----- iHUEABYKAB0WIQTCjZN1dWA+tKu3JYYcB3ncXAqd5AUCaRzw/QAKCRAcB3ncXAqd
5FlLAQCEBsjpzwxpBFmGZUkWjnzvtD7tATsQCYmiLp85oIN4TAD8CiYAqjxV0XTP
KUeahYikB6wPSV3XOEletMoBXxXMbAI=
=TbWr
-----END PGP SIGNATURE-----

Thread (1 message)

  • Jakub Zelenka
Posted on Leave a comment

App Store Award finalists announced

A white App Store logo set against a deep blue background

Every year, the App Store Awards celebrate exceptional apps and games that improve people’s lives while showcasing the highest levels of technical innovation, user experience, design, and positive cultural impact. This year, the App Store Editorial team is proud to recognize 49 outstanding finalists. Winners will be announced in the coming weeks.

Learn about the finalists

Posted on Leave a comment

Integrate Google Maps in React for Real-Time Location Tracking

by Vincy. Last modified on November 28th, 2025.

Integrating Google Maps into a React app is a powerful location-based feature. It helps for live user tracking to delivery routes, geo-fencing, and real-time movement progression. It is one of the simplest jobs with the help of the Google Maps JavaScript API and React libraries.

Real-time location tracking improves the usability of your apps. It can be implemented for dashboards, for tracking location on Duty, or anything that involves dynamic location-based requirements.

This React example helps to integrate Google Maps into React. It renders dynamic maps to the UI and displays markers to pinpoint the live location. It continuously updates the user’s position using the browser’s Geolocation API.

React Google Maps Realtime Location Tracking

Google Maps Integration steps

These are the few steps to enable required Google API services and configure the key credentials with the React App. This process builds a channel between the enduser and the Google cloud services for which they are registered with.

google cloud api library services

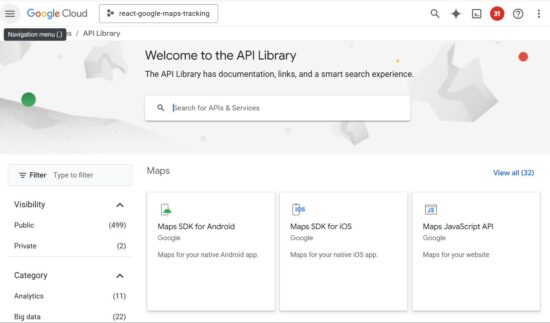
  1. Login with Google Cloud Console and create a new project.
  2. Choose APIs and Services and enable Maps JavaScript API.
  3. Go to Credentials menu and CREATE CREDENTIALS -> API Key to generate API key.
  4. Install React Google Maps library in your app using npm install @react-google-maps/api.
  5. Configure this key to your React app when loading React Google Maps JS library.

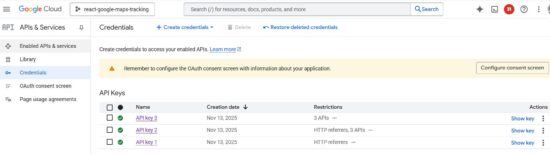
The credentials page shows the list of API keys generated. You can restrict the keys for specific domains or for using particular Google API services.

google cloud api credential

Rendering Google Maps with current location

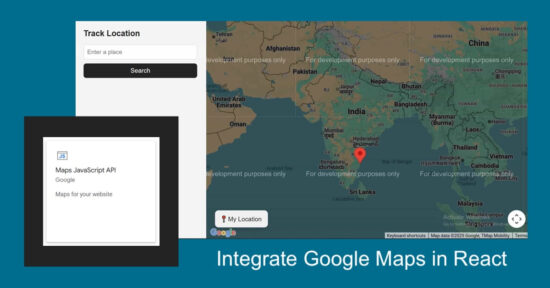
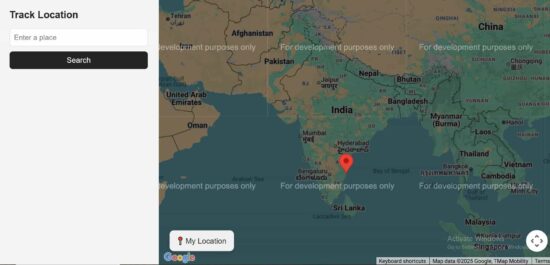
The TrackLocation JSX shows HTML components for displaying the Google Map and a location search option.

If the location search is not applied, it is showing the marker on the users current location.

react google map landing page

src/components/TrackLocation.jsx

import { useState } from "react";
import SearchBox from "./SearchBox";
import MapContainerComponent from "./MapContainerComponent"; export default function TrackLocation() { const [searchQuery, setSearchQuery] = useState("");
return ( <div style={{ display: "flex" }}> <SearchBox onSearch={setSearchQuery} /> <MapContainerComponent searchQuery={searchQuery} /> </div> );
}

React Google Maps Component

This is the main component which initiates the React Google Maps library by configuring the Google Cloud API service key.

It manages React states for having the Map instance, map marker location and the searched location. The marker location is depends on two factors. It will be changed dynamically to show the real-time location of the user. Also, it is changed when the search is applied.

With the help of the client side Geo location capabilities, navigator.geolocation gets the latitude and longitude of the user’s position. Then it is used to build the location object to plot the marker to the map.

src/components/MapContainerComponent.jsx

import { useEffect, useState } from "react";
import { GoogleMap, useJsApiLoader } from "@react-google-maps/api";
import LocationMarker from "./LocationMarker"; export default function MapContainerComponent({ searchQuery }) { const [map, setMap] = useState(null); const [userLocation, setUserLocation] = useState(null); const [searchLocation, setSearchLocation] = useState(null); const { isLoaded } = useJsApiLoader({ googleMapsApiKey: "YOUR API KEY", libraries: ["places"], }); useEffect(() => { if (navigator.geolocation) { const watchId = navigator.geolocation.watchPosition( (pos) => { const newLoc = { lat: pos.coords.latitude, lng: pos.coords.longitude, }; setUserLocation(newLoc); if (map && !searchLocation) { map.setCenter(newLoc); map.setZoom(13); } }, (err) => console.error("Location error:", err), { enableHighAccuracy: true, maximumAge: 1000 } ); return () => navigator.geolocation.clearWatch(watchId); } else { console.error("Geolocation not supported"); } }, [map, searchLocation]); useEffect(() => { if (!searchQuery || !window.google || !map) return; const geocoder = new window.google.maps.Geocoder(); geocoder.geocode({ address: searchQuery }, (results, status) => { if (status === "OK" && results[0]) { const loc = results[0].geometry.location; const newSearchLoc = { lat: loc.lat(), lng: loc.lng() }; setSearchLocation(newSearchLoc); if (userLocation) { const bounds = new window.google.maps.LatLngBounds(); bounds.extend(userLocation); bounds.extend(newSearchLoc); map.fitBounds(bounds); } else { map.setCenter(newSearchLoc); map.setZoom(12); } } else { console.warn("Location not found for:", searchQuery); } }); }, [searchQuery, map, userLocation]); const zoomToLocation = (loc) => { if (!map || !loc) return; map.panTo(loc); map.setZoom(15); }; return ( <div className="map-container"> {isLoaded && ( <GoogleMap mapContainerStyle={{ width: "100%", height: "100vh" }} center={userLocation || { lat: 20.5937, lng: 78.9629 }} zoom={userLocation ? 13 : 5} onLoad={setMap} options={{ streetViewControl: false, mapTypeControl: false, fullscreenControl: false, }}> <LocationMarker position={userLocation} title="Your Location" onClick={() => zoomToLocation(userLocation)} /> <LocationMarker position={searchLocation} title="Tracked Location" onClick={() => zoomToLocation(searchLocation)} /> </GoogleMap> )} {userLocation && ( <button className="floating-btn" onClick={() => zoomToLocation(userLocation)}> My Location </button> )} </div> );
}

This LocationMarker component is part of the main React component that accepts the users location or searched location. It pins the marker to the Map based on the location details.

src/components/LocationMarker.js

import React from "react";
import { Marker } from "@react-google-maps/api"; export default function LocationMarker({ position, title, onClick }) { return position ? <Marker position={position} title={title} onClick={onClick} /> : null;
}

Google Maps Search feature

The search form contains interface to enter the place to mark on the Map. When the search is applied, the LocationMarker rendered with the position:searchLocation shows the marker on the right place.

src/components/SearchBox.jsx

import { useState } from "react"; export default function SearchBox({ onSearch }) { const [query, setQuery] = useState(""); const handleSubmit = (e) => { e.preventDefault(); if (query.trim()) onSearch(query); }; return ( <div className="search-sidebar"> <h3 className="sidebar-title">Track Location</h3> <form onSubmit={handleSubmit}> <input type="text" placeholder="Enter a place" value={query} onChange={(e) => setQuery(e.target.value)} className="search-input" /> <button type="submit" className="search-btn"> Search </button> </form> </div> );
}

Conclusion

Real-time location tracking in React becomes easy with the joint capabilities of the Geolocation API and Google Maps. It changes the user’s position on movement. This example enriches user experience with a live movement tracking feature. And, it will be easy to use in a location-based React application that needs to render users’ live locations.

References:

  1. React Google Maps API wrapper.
  2. Google Maps rendering best practices.

Download

Vincy
Written by Vincy, a web developer with 15+ years of experience and a Masters degree in Computer Science. She specializes in building modern, lightweight websites using PHP, JavaScript, React, and related technologies. Phppot helps you in mastering web development through over a decade of publishing quality tutorials.

↑ Back to Top

Posted on Leave a comment

Fedora at Kirinyaga University – Docs workshop

Kirinyaga University students group photo

We did it again, Fedora at Kirinyaga university in Kenya. This time, we didn’t just introduce what open source is – we showed students how to participate and actually contribute in real time.

Many students had heard of open source before, but were not sure how to get started or where they could fit. We did it hands-on and began with a simple explanation of what open source is: people around the world working together to create tools, share knowledge, and support each other. Fedora is one of these communities. It is open, friendly, and built by different people with different skills.

We talked about the many ways someone can contribute, even without deep technical experience. Documentation, writing guides, design work, translation, testing software, and helping new contributors are all important roles in Fedora. Students learned that open source is not only for “experts.” It is also for learners. It is a place to grow.

Hands-on Documentation Workshop

A room full of kirinyaga students on a worskhop

After the introduction, we moved into a hands-on workshop. We opened Fedora Docs and explored how documentation is structured. Students learned how to find issues, read contribution instructions, and make changes step-by-step. We walked together through:

  • Opening or choosing an issue to work on
  • Editing documentation files
  • Making a pull request (PR)
  • Writing a clear contribution message

By the end of the workshop, students had created actual contributions that went to the Fedora project. This moment was important. It showed them that contributing is not something you wait to do “someday.” You can do it today.

“This weekend’s Open Source Event with Fedora, hosted by the Computer Society Of Kirinyaga, was truly inspiring! 💻

Through the guidance of Cornelius Emase, I was able to make my first pull request to the Fedora Project Docs – my first ever contribution to the open-source world. 🌍
– Student at Kirinyaga University

Thank you note

Huge appreciation to:

  • Jona Azizaj — for steady guidance and mentorship.
  • Mat H. — for backing the vision of regional community building.
  • Fedora Mindshare Team — for supporting community growth here in Kenya.
  • Computer Society of Kirinyaga — for hosting and bringing real energy into the room.

And to everyone who played a part – even if your name isn’t listed here, I see you. You made this possible.

Growing the next generation

The students showed interest, curiosity, and energy. Many asked how they can continue contributing and how to connect with the wider Fedora community. I guided them to Fedora Docs, Matrix community chat rooms, and how they can be part of the Fedora local meetups here in Kenya.

We are introducing open source step-by-step in Kenya. There is a new generation of students who want to be part of global technology work. They want to learn, collaborate, and build. Our role is to open the door and walk together(I have a discourse post on this, you’re welcome to add your views).

A group photo of students after the workshop

What Comes Next

This event is part of a growing movement to strengthen Fedora’s presence in Kenya. More events will follow so that learning and contributing can continue.

We believe that open source becomes strong when more people are included. Fedora is a place where students in Kenya can learn, grow, share, and contribute to something global.

We already had a Discourse thread running for this event – from the first announcement, planning, and budget proposal, all the way to the final workshop. Everything happened in the open. Students who attended have already shared reflections there, and anyone who wants to keep contributing or stay connected can join the conversation.

You can check the events photos submitted here on Google photos(sorry that’s not FOSS:))

Cornelius Emase,
Your Friend in Open Source(Open Source Freedom Fighter)

Posted on Leave a comment

Introducing the App Store Mini Apps Partner Program

Today, we’re introducing the Mini Apps Partner Program, which expands on the App Store’s ongoing support for apps that offer mini apps. Mini apps are self-contained experiences that are built using web technologies like HTML5 and JavaScript. This program is designed to help developers who host mini apps grow their business and further the availability of mini apps on the App Store — all while providing a great customer experience.

Participating developers may benefit from a reduced commission rate of 15% on the sales of qualifying In-App Purchases. To be eligible for this reduced commission rate, participating apps must support certain App Store technologies, including the Declared Age Range API and the Advanced Commerce API in order to help provide a safe and seamless experience for customers of all ages.

Learn more about the Mini Apps Partner Program and eligibility

Posted on Leave a comment

Updated App Review Guidelines now available

The App Review Guidelines have been revised to support updated policies and to provide clarification. Please review the changes below:

  • 1.2.1(a): This new guideline specifies that creator apps must provide a way for users to identify content that exceeds the app’s age rating, and use an age restriction mechanism based on verified or declared age to limit access by underage users.
  • 2.5.10: This language has been deleted (“Apps should not be submitted with empty ad banners or test advertisements.”).
  • 3.2.2(ix): Clarified that loan apps may not charge a maximum APR higher than 36%, including costs and fees, and may not require repayment in full in 60 days or less.
  • 4.1(c): This new guideline specifies that you cannot use another developer’s icon, brand, or product name in your app’s icon or name, without approval from the developer.
  • 4.7: Clarifies that HTML5 and JavaScript mini apps and mini games are in scope of the guideline.
  • 4.7.2: Clarifies that apps offering software not embedded in the binary may not extend or expose native platform APIs or technologies to the software without prior permission from Apple.
  • 4.7.5: Clarifies that apps offering software not embedded in the binary must provide a way for users to identify content that exceeds the app’s age rating, and use an age restriction mechanism based on verified or declared age to limit access by underage users.
  • 5.1.1(ix): Adds crypto exchanges to the list of apps that provide services in highly regulated fields.
  • 5.1.2(i): Clarifies that you must clearly disclose where personal data will be shared with third parties, including with third-party AI, and obtain explicit permission before doing so.

Translations of the guidelines will be available on Apple Developer website within one month.

Posted on Leave a comment

How to Build a Responsive React Navbar with Dropdown and Mobile Menu

by Vincy. Last modified on November 25th, 2025.

A responsive navigation bar is a one of a must-needed requirement of any modern web application. It is an easy job if the navigation bar contains single level menu and action controls. But, it will be complex it is a multi-level menu to fit the layout into a small viewport.

With this React example code you’ll learn how to build a responsive React navbar. It includes a multi-level dropdown menu for different view port. It will a plugable and reusable React component for your different application frontend.

Responsive React Navbar Dropdown Mobile Menu

Responsive navbar in React header

This React JSX code has the a responsive navigation bar component. It provides 1) menu bar with Desktop and mobile variants, 2)sub menu bar with click-to-expand effect.

The menuData contains the array of multi-level menu items. The image shown below renders the horizontal menu on the site header.

react drop down navbar

src/components/Navbar/Navbar.jsx

import { useState } from "react";
import menuData from "./MenuData";
import Dropdown from "./DropDown";
import "../../../public/assets/css/style.css"; const Navbar = () => { const [menuOpen, setMenuOpen] = useState(false); const [openIndex, setOpenIndex] = useState(null); const toggleSubmenu = (index, e) => { if (window.innerWidth <= 768) { e.preventDefault(); setOpenIndex(openIndex === index ? null : index); } };
return ( <nav className="navbar"> <div className="navbar-container"> <h2 className="logo"></h2> <button className="menu-toggle" onClick={() => setMenuOpen(!menuOpen)} aria-label="Toggle menu" > ☰ </button> <ul className={`menu ${menuOpen ? "open" : ""}`}> {menuData.map((menu, i) => ( <li key={i} className="menu-item has-submenu"> <a href="#" onClick={(e) => toggleSubmenu(i, e)}> {menu.title} <span className="expand">▼</span> </a> {menu.subMenu && ( <Dropdown items={menu.subMenu} className={openIndex === i ? "open" : ""} /> )} </li> ))} </ul> </div> </nav>
);
};
export default Navbar;

These are the main and submenu items defined for this React example.

src/components/Navbar/MenuData.js

const menuData = [ { title: "Popular Toys", subMenu: [ { title: "Video Games", subMenu: [ { title: "Car", subMenu: ["Racing Car", "Toy Car", "Remote Car"] }, "Bike Race", "Fishing" ] }, "Barbies", "Teddy Bear", "Golf Set" ] }, { title: "Recent Toys", subMenu: [ "Yoyo", "Doctor Kit", { title: "Fun Puzzle", subMenu: ["Cards", "Numbers"] }, "Uno Cards" ] }, { title: "Toys Category", subMenu: [ "Battery Toys", { title: "Remote Toys", subMenu: ["Cars", "Aeroplane", "Helicopter"] }, "Soft Toys", "Magnet Toys" ] }
]; export default menuData;

React menu dropdown hooks to toggle submenu

A component Dropdown returns the submenu look-and-feel. The React state openIndex has the menu open/close state by its index.

The Dropdown component’s expand/collapse state is depends on the menuOpen set with a toggle action. The menu toggle effect is for the mobile view to slide down the menu options on clicking a burger icon.

react drop down navbar menu

src/components/Navbar/DropDown.jsx

import { useState } from "react"; const Dropdown = ({ items, className }) => { const [openIndex, setOpenIndex] = useState(null); const toggleSubmenu = (index, e) => { if (window.innerWidth <= 768) { e.preventDefault(); setOpenIndex(openIndex === index ? null : index); } }; return ( <ul className={`dropdown ${className || ""}`}> {items.map((item, i) => typeof item === "string" ? ( <li key={i}> <a href="#">{item}</a> </li> ) : ( <li key={i} className="has-submenu"> <a href="#" onClick={(e) => toggleSubmenu(i, e)}> {item.title} <span className="expand">›</span> </a> {item.subMenu && ( <Dropdown items={item.subMenu} className={openIndex === i ? "open" : ""} /> )} </li> ) )} </ul> );
};
export default Dropdown;

Mobile menu navbar view

This heading shows the mobile view of this responsive navbar. In the mobile view, a burger icon will be appeared on the top right corner of the web layout.

This icon’s click event is bound to toggle a sliding menu. In this sliding menu, each menu items are vertically expandable to show its submenu.
react drop down navbar mobile responsive

References:

  1. Navigation bar modals with Material Design.
  2. Free navigation bar templates by Figma.

Download

Vincy
Written by Vincy, a web developer with 15+ years of experience and a Masters degree in Computer Science. She specializes in building modern, lightweight websites using PHP, JavaScript, React, and related technologies. Phppot helps you in mastering web development through over a decade of publishing quality tutorials.

↑ Back to Top