Navidrome is an open-source music server that lets you stream your personal audio collection anywhere. It gives you freedom to listen to your music collection from any browser or mobile device. It’s like your personal Spotify!
In this guide, we will explore how to get Navidrome up and running securely using Podman on Fedora Linux. Best of all, because Navidrome builds official multi-architecture container images including, linux/amd64, linux/arm64, and linux/arm/v6/v7, this setup is highly portable. Whether your hardware is a standard x86 PC server or a low-powered ARM-based Raspberry Pi, this walk-through has you covered.
For the official image for Navidrome Music Server go to:
Using the official container images with Podman and Podman Compose
Container images are available for the linux/amd64, linux/arm/v6, linux/arm/v7 and linux/arm64 platforms. They include everything needed to run Navidrome
If you have SELinux enabled on your Fedora Linux server, then add the container_file_t SELinux context to the Data and Music directories and its contents.
[nico@stamfordbridge navidrome]$ sudo semanage fcontext -a -t container_file_t '/home/nico/navidrome/Data(/.\*)?' [nico@stamfordbridge navidrome]$ sudo semanage fcontext -a -t container_file_t '/home/nico/navidrome/Music(/.\*)?'
Apply the SELinux policy to the Data and Music directories.
Create a podman-compose.yml file with the following content (or add the navidrome service below to your existing file):
[nico@stamfordbridge navidrome]$ cat podman-compose.yml
version: "3"
services: navidrome: image: deluan/navidrome:latest user: 1000:1000 # should be owner of volumes ports: - "4533:4533" restart: unless-stopped environment: # Optional: put your config options customization here. Examples: ND_SCANSCHEDULE: 1h ND_LOGLEVEL: info ND_SESSIONTIMEOUT: 24h ND_BASEURL: "" volumes: - "/home/nico/navidrome/Data:/data" - "/home/nico/navidrome/Music:/music:ro"
Start the navidrome container with podman-compose up -d.
[nico@stamfordbridge navidrome]$ podman-compose up -d
Note that the environment variables above are just an example and are not required. The values in the example are already the defaults
Using podman command line tool:
[nico@stamfordbridge navidrome]$ podman run -d - name navidrome - restart=unless-stopped - user $(id -u):$(id -g) -v /home/ec2-user/navidrome/Music:/music -v /home/ec2-user/navidrome/Data:/data -p 4533:4533 -e ND_LOGLEVEL=info deluan/navidrome:latest
c00c31d49ec5e0f0a0141aef9e2b69abf6a1b5f0604515bc7111f3e0ef398237 [nico@stamfordbridge navidrome]$ podman ps -a
CONTAINER ID IMAGE COMMAND CREATED STATUS PORTS NAMES
c00c31d49ec5 docker.io/deluan/navidrome:latest 9 seconds ago Up 9 seconds 0.0.0.0:4533->4533/tcp navidrome
Customization
The user argument should ideally reflect the UID:GID of the owner of the music library to avoid permission issues. For testing purposes you could omit this directive, but as a rule of thumb you should not run a production container as root.
Remember to change the volumes paths to point to your local paths. /data is where Navidrome will store its DB and cache, /music is where your music files are stored.
Configuration options can be customized with environment variables as needed. For podman-compose just add them to the environment section or the yml file. For podman CLI use the -e parameter. e.g.: -e ND_SESSIONTIMEOUT=24h.
If you want to use a configuration file with Navidrome running in Podman, you can create a navidrome.toml config file in the /data folder and set the option ND_CONFIGFILE=/data/navidrome.toml.
The Anaconda installer in Fedora 45 will introduce a new option for storage configuration: Stratis, a modern solution for local storage management.
Stratis isn’t a completely new technology, it uses existing tools and technologies like device mapper, LUKS, and XFS and integrates them into an easy to use package. The idea is to provide modern storage features while hiding the often complex logic behind them. Adding support to the installer brings these features even closer to Fedora users.
There are only two basic structures or layers you need to know when working with Stratis: pools and filesystems. Pools represent an abstract layer on top of existing block devices (disks, partitions, RAID arrays etc.). A pool can consist of one or more devices (for systems with multiple disks, for example). Features like encryption or over-provisioning are also configured on the pool level. Multiple filesystems can be created on the pool. These are devices that will serve as your root or home volumes. Some additional features supported by Stratis include snapshots, caching, and for encrypted pools, multiple unlocking methods like TPM or Clevis/Tang. Caching and encryption without a passphrase are not currently supported by Anaconda, but these can be easily enabled after the installation.
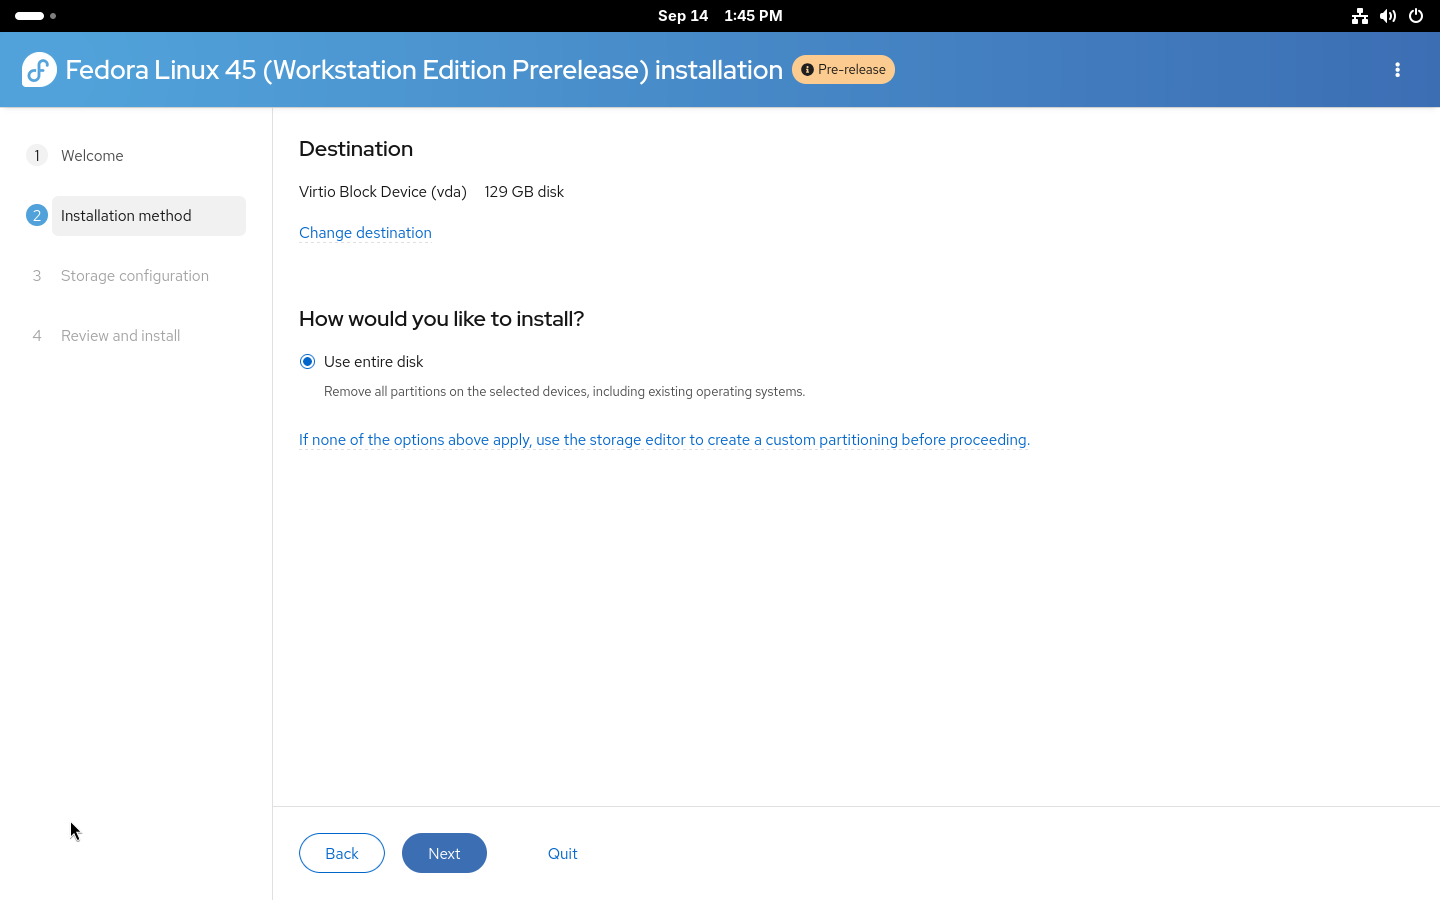
The new web-based user interface for the Anaconda installer currently doesn’t allow selecting which type of storage technology will be used for the automated and guided partitioning options. The storage layout you will get depends on the Fedora variant you choose to install. But if you want to use Stratis, you still have an option in the graphical installation. Any storage layout can be created manually using the Cockpit storage module, which is integrated into the installer. To enter it, simply select the If none of the options above apply… option on the Installation Destination step.
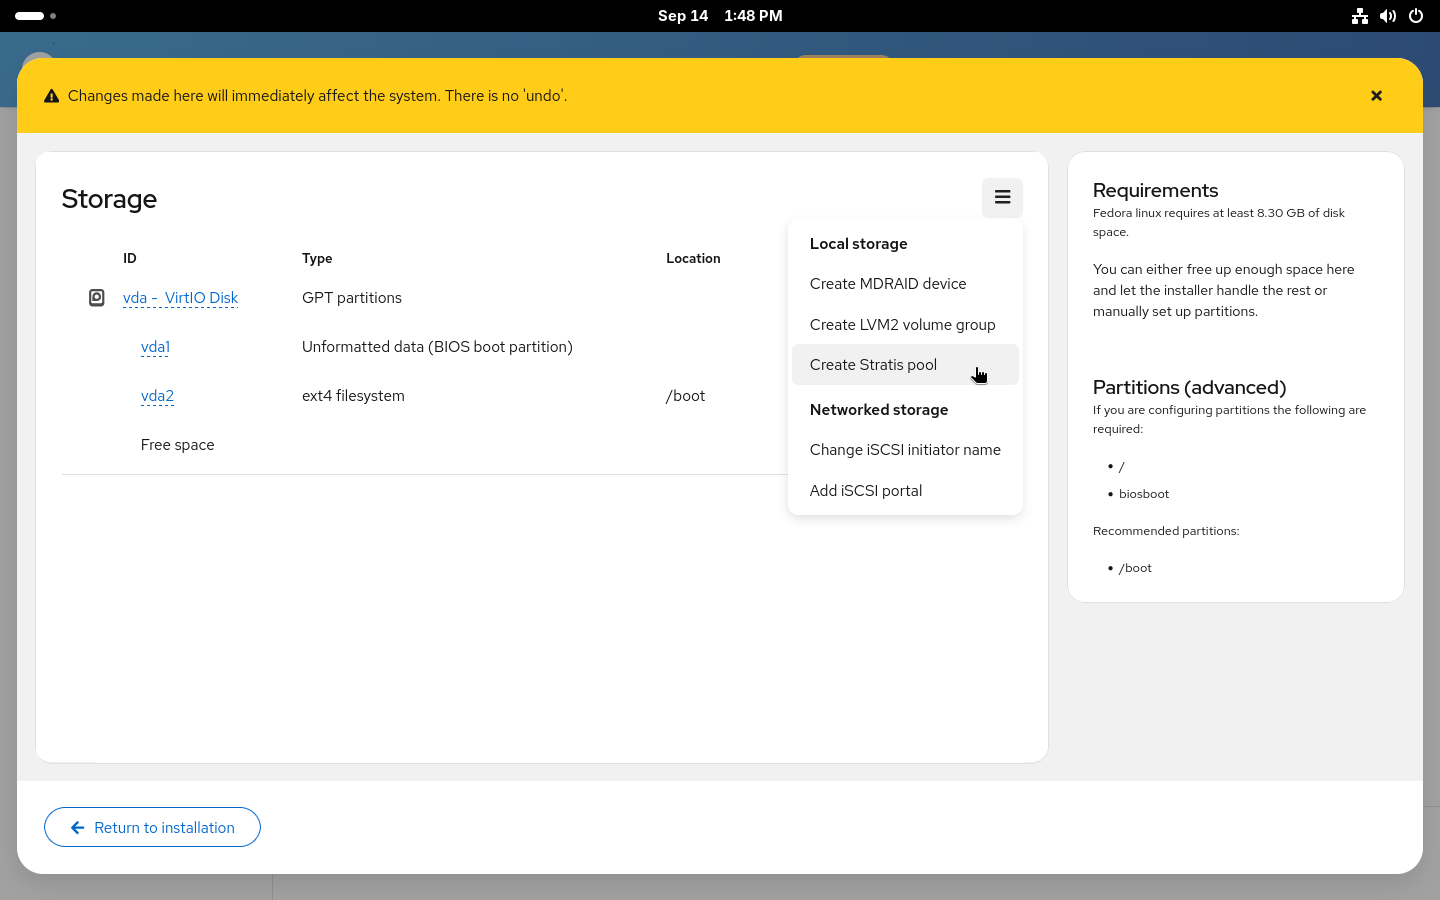
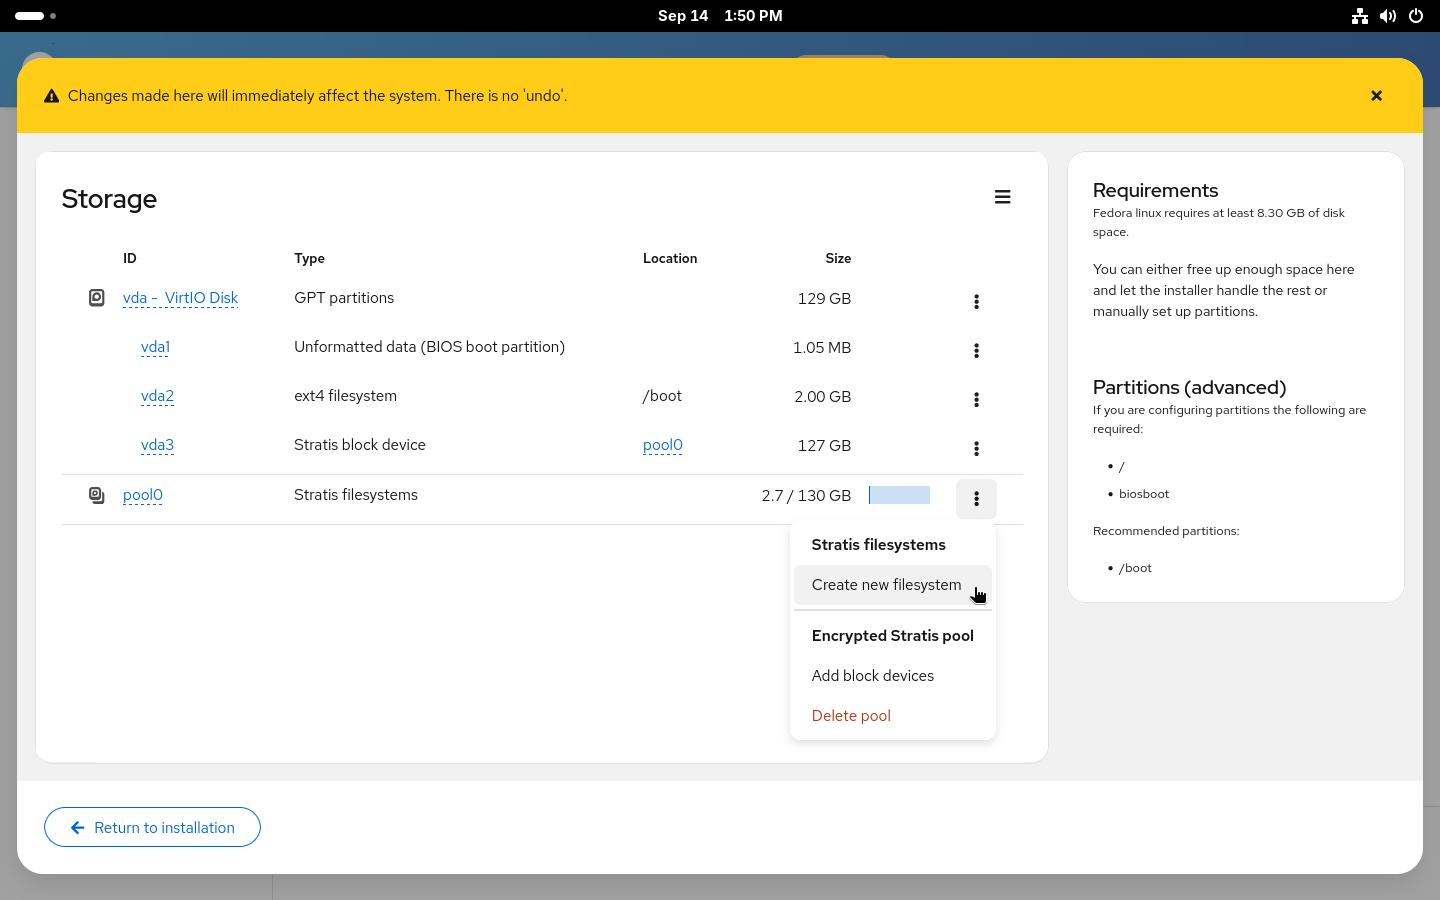
The Cockpit storage module supports a wide variety of storage configurations and Stratis is one of the supported technologies. Do not forget that with manual partitioning, you need to create all required partitions so first create partitions required for booting (/boot and /boot/efi or biosboot, based on your system configuration). After that, simply create a new Stratis pool from the menu.
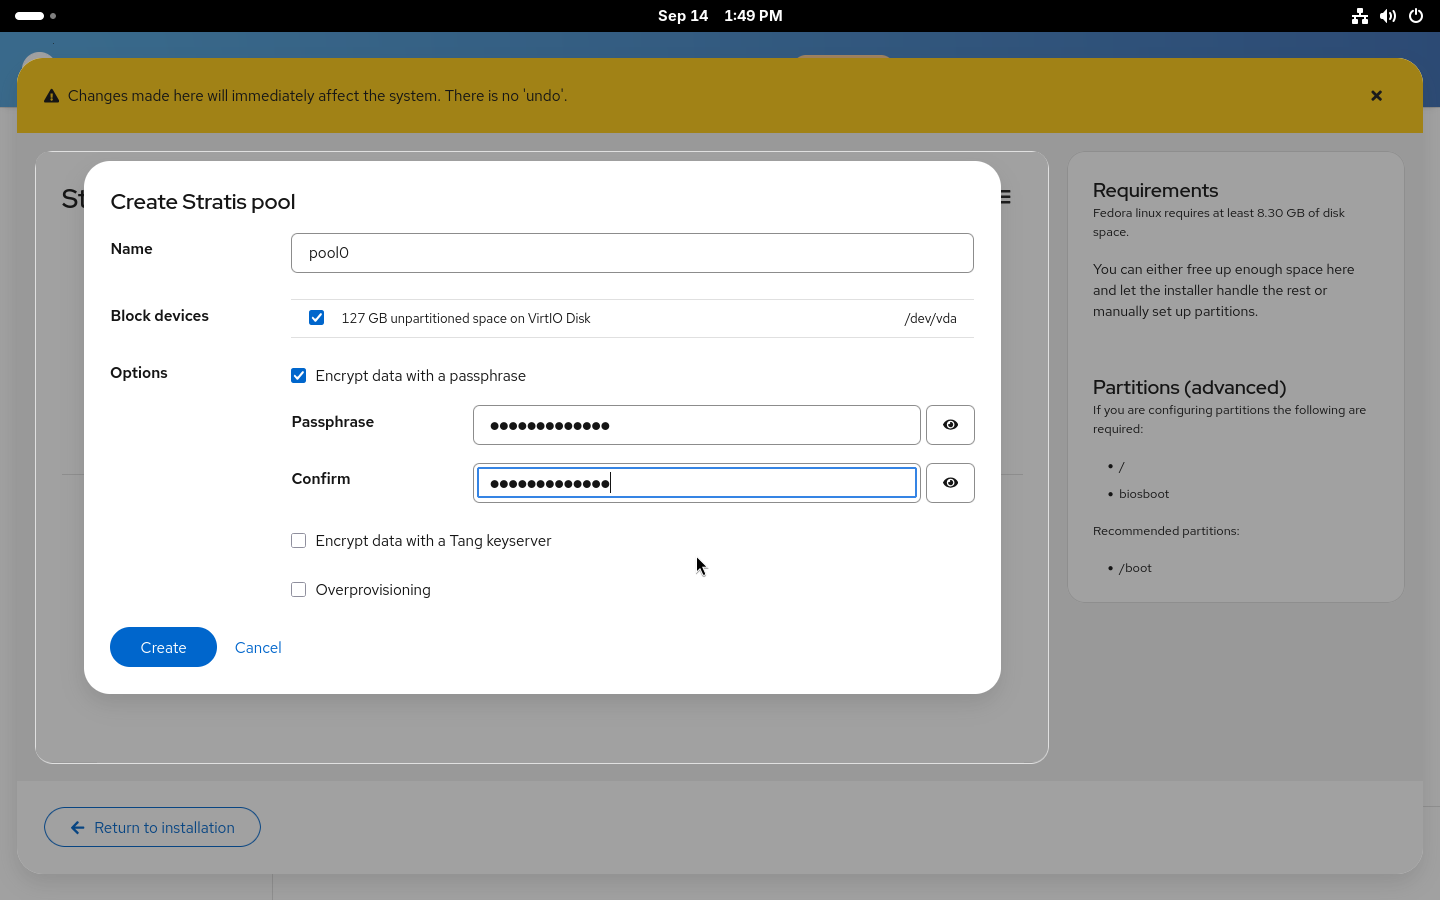
Creating stratis pool
After selecting a name for the pool and the disk (or disks) it will be placed on, you can decide whether to enable encryption and over-provisioning for the pool. Over-provisioning allows allocation of more space for the filesystems created on the pool. Similarly to how LVM thin provisioning and Btrfs work. With over-provisioning enabled, there is no need to worry about running out of space in root with still plenty of free space in /home. It also allows greater flexibility when using snapshots. On the other hand, you actually need to be aware that you don’t really have terabytes of space and you need to make sure you won’t actually run out of space on your disk. Both encryption and over-provisioning can also be enabled or disabled after the installation.
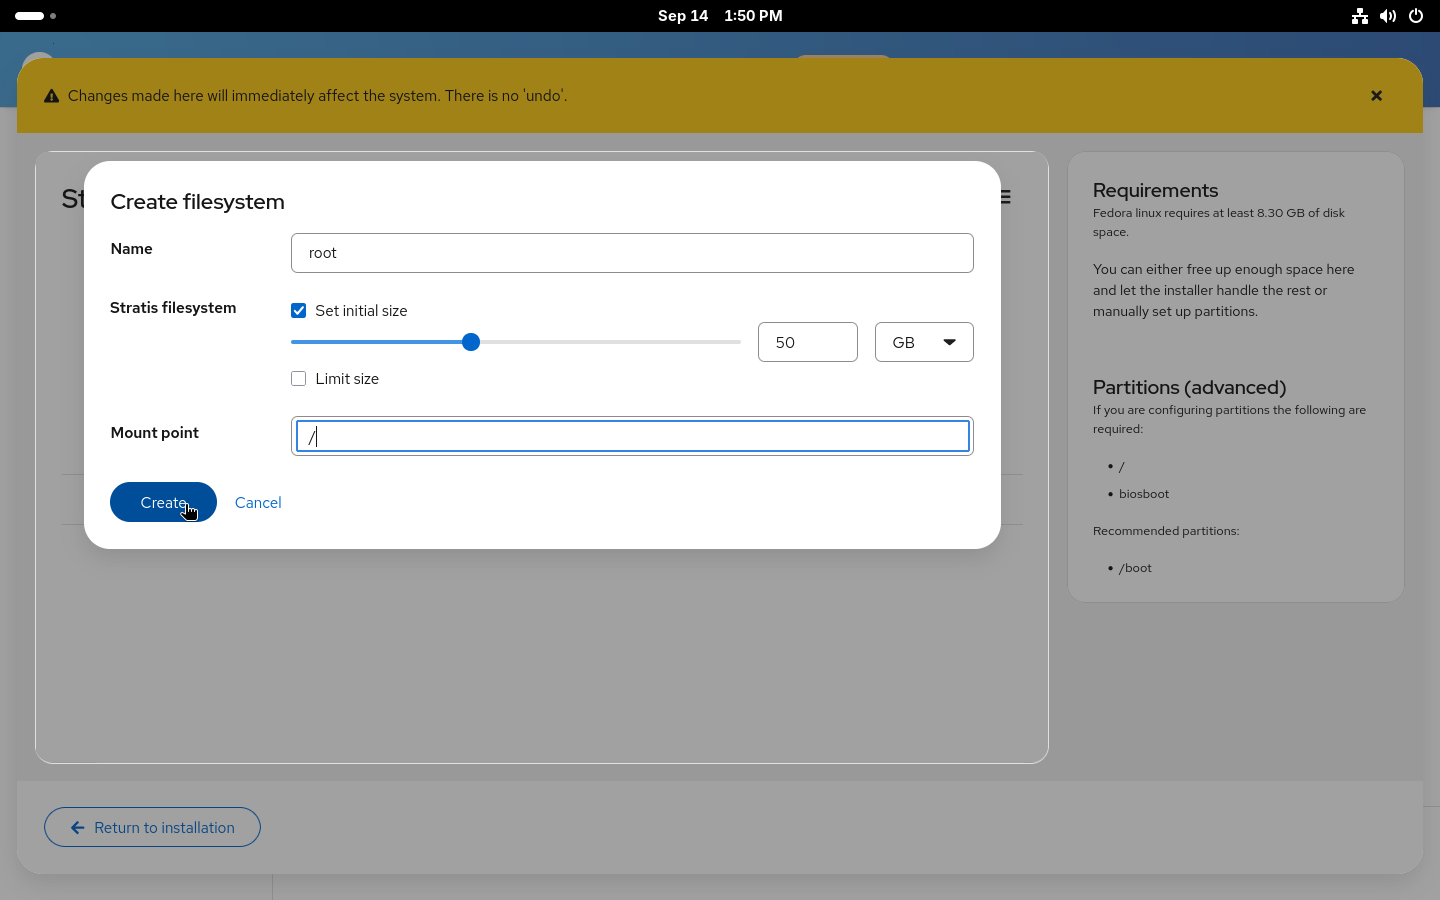
Creating stratis filesystems
With the new pool created, you now need to add some filesystems to it. You’ll most likely want the standard two separate filesystems for your / and /home. But you can also create a separate filesystem for your /var, for example.
If you enable over-provisioning on your pool, you can also decide to not specify sizes for the filesystems and use the 1 TiB default size with over-provisioning or set a size limit for the filesystem to prevent it from automatically growing if you ever run out of space.
Using the configured layout
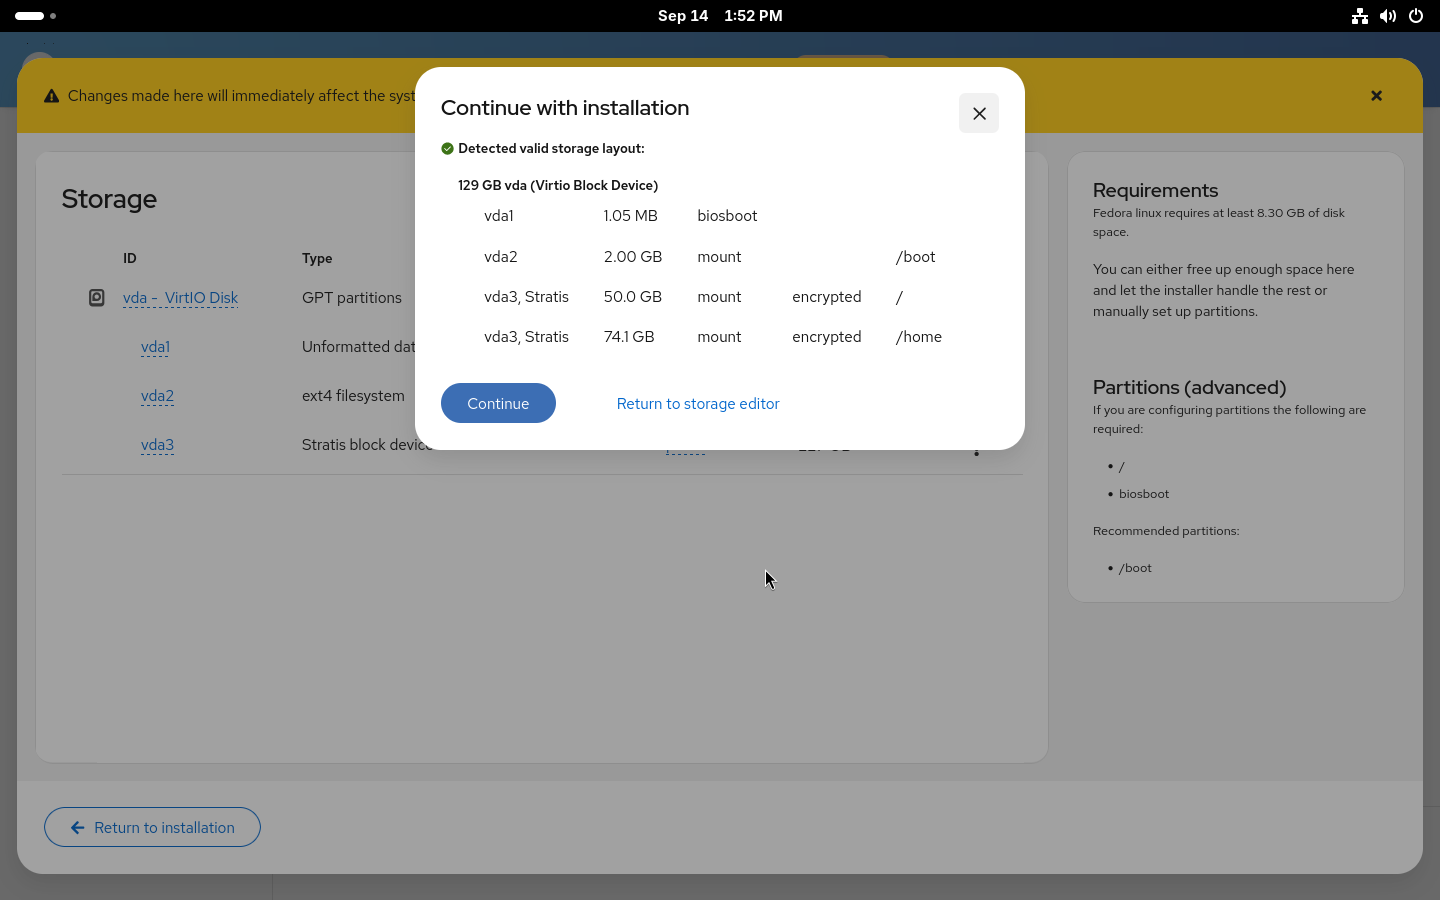
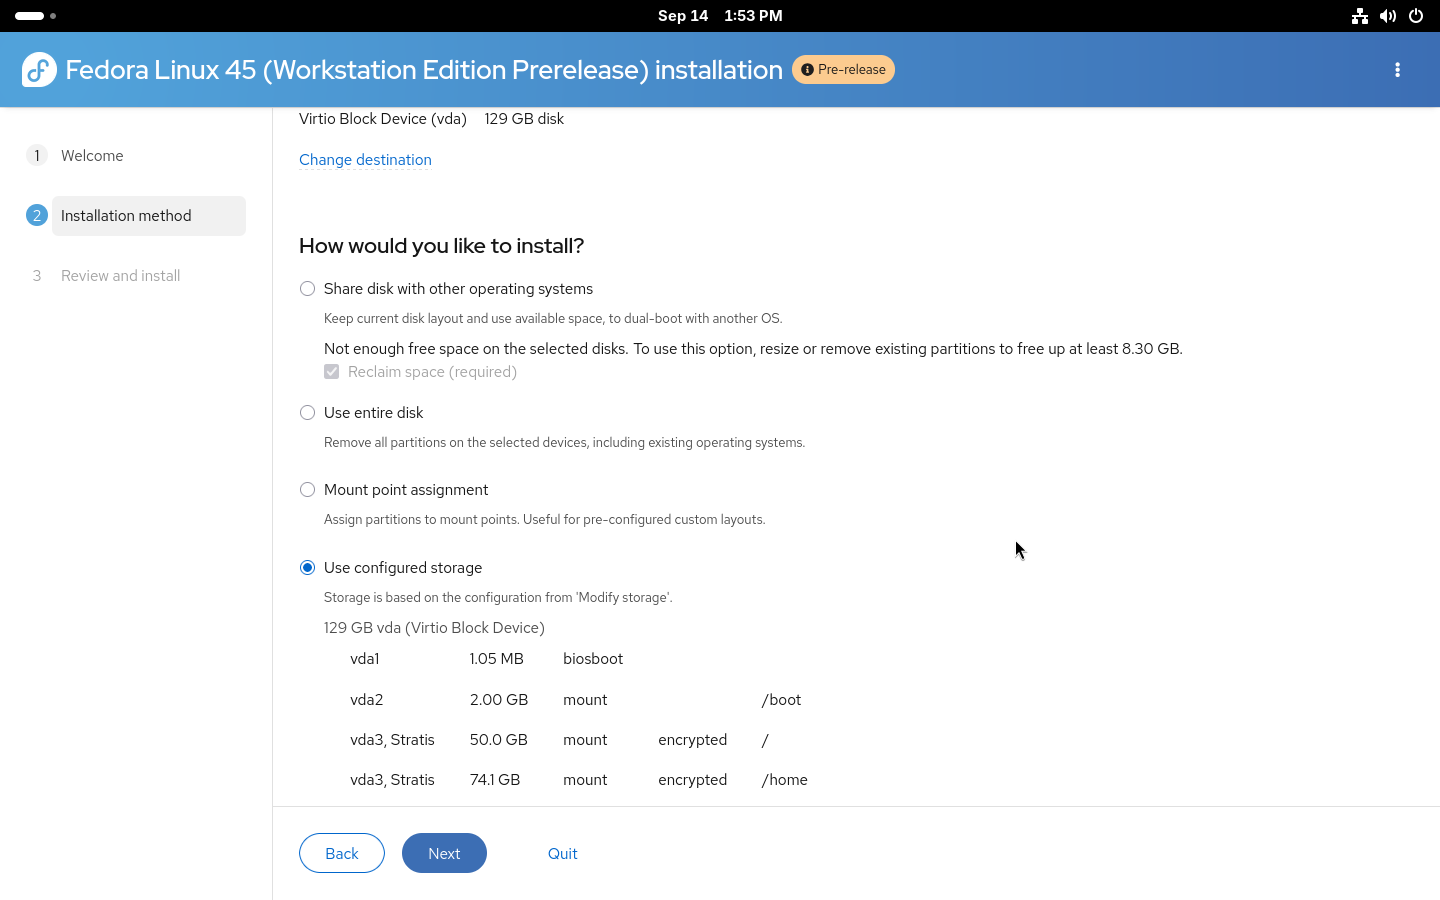
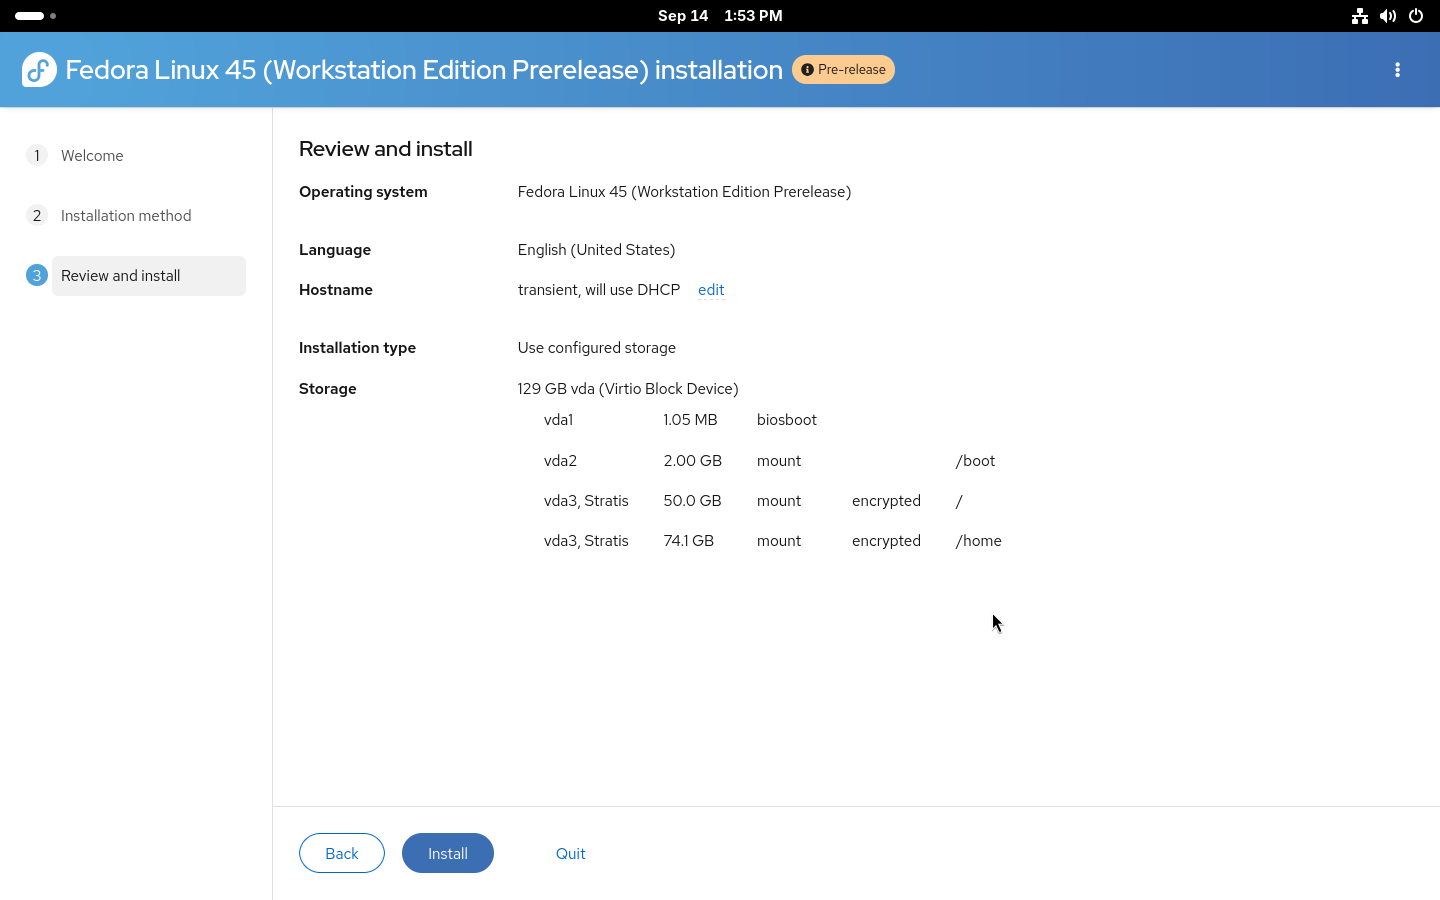
With all the filesystems created, you can Return to installation. Anaconda will check the created devices to make sure all requirements are met and return you to the Installation destination page where a new Use configured storage option will be preselected with the devices that were just created.
That is the storage part of the installation done. You can double-check on the Review and install page that everything is correctly set and start the installation.
Installation using kickstart
For advanced users who wish to use automated installations, full kickstart support for Stratis is also available. Both automatic and manual partitioning are available via kickstart.
Automatic partitioning is simple: the existing autopart command can be used with –type=stratis to create the default Stratis storage layout fully automatically. A storage section in kickstart, for setting up an encrypted Stratis layout, could look like this:
Manual partitioning requires building the entire storage layout manually from bottom up. Two new Stratis kickstart commands were added: stratispool for creating and managing Stratis pools and stratisfs for creating and managing Stratis filesystems. Usage of these commands and most of the options are similar to how kickstart partitioning works with LVM. An example of a more advanced Stratis layout can be found below.
Here we are creating a pool called fedora on top of two disks, vda and vdb, with two filesystems. One called root for / and a second called home for /home. The –grow tells the installer to use all available free space when creating the devices. For more details about the commands see the kickstart documentation.
Conlusion
The newly introduced Stratis support in Anaconda offers an easy way to take advantage of the modern storage features offered by Stratis. With the Web UI support available through Cockpit storage, you can now easily use Stratis on your system. We plan to simplify the process even more in future releases and enable even more advanced Stratis features.
If you run into any issues or have feedback, both the Anaconda and Stratis teams would love to hear from you.
The Fedora CoreOS and QA teams are gearing up for Fedora 45, and we need your help! We are organizing a Fedora CoreOS Test Week starting on September 21, 2026.
This event is a great opportunity for the community to test Fedora CoreOS (FCOS) based on Fedora 45 content before it officially reaches the testing and stable streams. By participating, you help us ensure a smooth and reliable experience for all users.
How does a Test Week work?
A Test Week is an event where anyone can help verify that the upcoming release works as expected. If you’ve been looking for a way to get started with Fedora contribution, this is the perfect entry point.
To participate, you simply need to:
Download the Fedora CoreOS test images.
Follow the step-by-step test cases provided.
Report whether the tests passed or failed on your hardware or VM.
The Wiki Page is your primary source of information for this event. It contains information on what to download (and from where), what and how to test, who you can contact if necessary, and where to report any bugs you may find. Once you have completed your tests, please log your results there!
Your contribution, big or small, makes a huge difference. Let’s work together to make Fedora CoreOS 45 a great release. Happy testing!
We are happy to announce the availability of Fedora Linux Asahi Remix 45 Beta. This pre-release will bring the freshly announced Fedora Linux 45 Beta to Apple Silicon Macs. We expect to announce general availability of Fedora Linux Asahi Remix 45 in about a month. This will coincide with the overall Fedora Linux 45 release.
Fedora Linux Asahi Remix is developed in close collaboration with the Fedora Asahi SIG and the Asahi Linux project. Fedora Asahi Remix 45 Beta includes all of the Changes from Fedora Linux 45. Notably, this is the first Fedora Asahi Remix release to include out of the box initial support for Apple M3, M3 Pro and M3 Max systems, which are now officially supported by Asahi Linux upstream. The GPU drivers to enable performant 3D acceleration on these M3 systems are not included at this point and will be available via a Mesa update in the future. This release also includes support for hardware accelerated H.264 and VP9 video decoding for all Apple Silicon systems; additionally, Apple M3 systems include support for AV1 decoding.
You can try out Fedora Asahi Remix 45 Beta today by following our installation guide. Existing systems, running Fedora Asahi Remix 43 or 44, can be updated following the usual Fedora upgrade process. Upgrades via Fedora Workstation’s Software application are unfortunately not supported and DNF’s System Upgrade plugin has to be used.
Since this is a beta release, we expect that you may encounter bugs or missing features. Please report any Remix-specific issues in our tracker. You may also reach out in our Discourse forum or our Matrix room for user support.
Fedora Linux 45 Beta is here! On Tuesday, 15 September 2026 you can download or upgrade your systems from your usual spots to start enjoying what F45 has to offer early.
How to get the beta release
You can download F45 Beta, or our pre-release edition versions, from any of the following places:
You can also update an existing system to the beta using DNF system-upgrade.
The Fedora Linux 45 Beta release content is also available for Fedora Atomic Desktops, Spins and Labs, with the exception of the following:
MiracleWM (x86_64 and aarch64 isos)
Budgie-Atomic iso
Sway-Atomic iso
Fedora Linux 45 Beta highlights
Fedora Linux 45 replaces the legacy in-kernel console with kmscon, bringing smooth rendering, better Unicode/font support, and enhanced system stability.
Fedora Linux 45 now requires valid package signatures by default before installation, preventing unsigned packages from being installed unintentionally.
Desktop secret management has also been standardized across environments with oo7, replacing legacy backend implementations like GNOME Keyring and KWallet.
Fedora Linux 45 Beta has a lot of new versions available, including Podman 6, Pandas 3, MySQL and MariaDB, to name but a few, and boasts early access to updated toolchains and runtimes, including Python 3.15, Go 1.27, GCC 16.2, and glibc 2.44.
Atomic Desktop ISO builds also now use image-builder, and Fedora Linux 45 beta adds systemd-oomd and zram swap support to Fedora CoreOS.
Anaconda now has initial WebUI installation flows for Atomic Desktops, and native support for partitioning stratis filesystems.
More information
Visit the Fedora Linux 45 Change Set page for more details on the changes in store for this release.
Recently, Framework announced their new Laptop 12, which optionally comes with the KDE Edition of Fedora Linux pre-installed. Framework’s modular hardware has long captured the hearts of tinkerers, and many Framework users were already running Fedora Linux. Giving community members the option to unbox a hardware-validated, pre-installed Fedora KDE system is the culmination of months of effort from both Framework and dedicated Fedora community members. I’d like to take a moment to reflect on the hard work of the Fedora community that’s made this possible
The Perfect Match: Fedora KDE Plasma & Convertible Hardware
The Framework Laptop 12 is a 12.2” 2-in-1 convertible laptop complete with a touchscreen and stylus support. Delivering a seamless experience on a form factor like this requires an interface that excels across traditional, touch, and pen modes.
Enter Fedora KDE Plasma Desktop.
Over recent release cycles, the Fedora KDE Special Interest Group (SIG) and upstream KDE contributors have poured immense effort into refining the user interface. This includes touch navigation, gesture support, virtual keyboards, and digital pen input under Wayland. Combined with the brand-new Intel Core Series 3 architecture, Thunderbolt 4, Wi-Fi 7, and options for a backlit keyboard and fingerprint reader, the hardware and software form a cohesive unit.
“The Fedora KDE Plasma Desktop contributors work hard to make the Fedora KDE Plasma Desktop edition the premier KDE experience for users. It’s great to see Framework customers have the choice to have it pre-installed.”
— Jef Spaleta, Fedora Project Lead
Community Collaboration at its Finest
Bringing a brand-new hardware platform with bleeding-edge components (like Intel’s Core Series 3 chips and BE213 Wi-Fi 7 modules) to pre-built availability doesn’t happen by accident. It takes rigorous testing, community bug hunting, and close collaboration.
Long before today’s announcement, Framework provided pre-release hardware to Fedora QA and SIG contributors to ensure day-one hardware enablement:
Kernel 7.1 Integration: Core Series 3 and Wi-Fi 7 R2 radios rely on recent upstream kernel drivers. Fedora contributors verified boot stability, power states, and Wi-Fi throughput on early builds to ensure seamless out-of-the-box performance.
Fingerprint Sensor Support via libfprint: The new power-button fingerprint reader required driver verification and early integration into libfprint. This work allows users to instantly set up biometrics during the initial Plasma setup wizard.
Display, Touch, and Stylus Calibration: Fedora QA and KDE community testers ran extensive Test Day scenarios to validate palm rejection, active stylus pressure sensitivity, and automatic screen rotation when flipping the device into tablet mode.
Open-Source Firmware (ZMK): The updated backlit keyboard uses a reprogrammable controller running open-source ZMK firmware. This firmware aligns perfectly with Fedora’s “Four Foundations” (Features, Friends, Freedom, First).
What This Means for the Linux Desktop
Starting at $699 USD for the Fedora pre-built configuration, the Framework Laptop 12 demonstrates that a fully modular, repairable, open-source-friendly laptop can be accessible, performant, and ready to go from day one.
Thank you to every member of the Fedora Quality Assurance team, the Fedora KDE SIG, and the broader upstream community who submitted test reports, verified kernel patches, and helped make this launch a massive success!
Disclosure: We used generative AI to outline and draft this post, but real humans shaped, verified, and reviewed it.
A few short how-to’s with screenshots, showing easy ways to boot up off a USB live ISO and return back to previous points in timewith BTRFS.
Many Linux distributions now default to BTRFS as the standard installation filesystem. Fedora Linux is no exception to that.
2022/23 saw a lot of articles extolling its virtues of easy rollback, stability and so forth. All complete with paragraphs of command line instructions.
Times have changed, the BTRFS infrastructure has matured, and there are now easy to use GUI tools at our fingertips.
No special tools or skills
You may use any standard Fedora Linux ISO image and USB stick.
This article is for people new to Fedora Linux and for those who are familiar with ext4 and Timeshift.
Easy to follow instructions
My experience with Linux goes back quite a long way.
There used to be a time when the Fedora Linux help links often routed to Red Hat Enterprise. This generally targeted the needs of network managers and other system professionals.
Thankfully, for ordinary users the situation has now improved. The Fedora Magazine is one of those reasons.
In the last few years I have been using Fedora Linux as test-bed virtual machines and I have been using Fedora Kinoite on a secondary laptop.
As a daily driver, the thing that most recently stopped me switching to Fedora Linux was not being able to find easy to follow instructions on snapshot recovery during system boot failure.
This article lists the solutions that I finally pieced together.
How to start
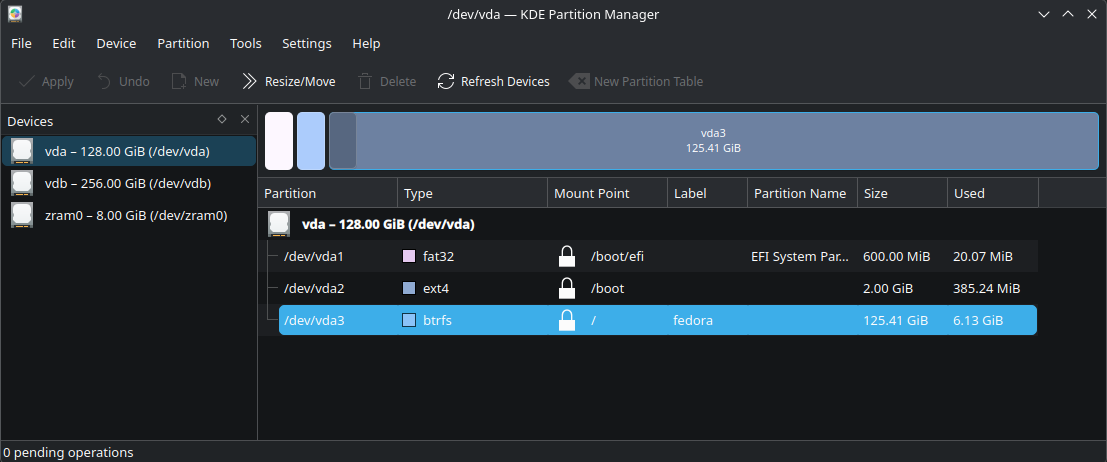
First, make sure that you do actually have your OS running with BTRFS.
This is now normally the case but if you have had your installation for a few years, or someone else installed it for you, it is wise to check.
On Fedora Workstation, with Gnome, try disks or gparted. These two will also install readily on KDE and many users actually prefer them to the KDE partion manager.
Many people welcomed the 2025 decision by the Fedora steering committee to promote KDE to parity status with (Gnome) Workstation. This guide covers both official versions.
If you don’t have Fedora Linux yet, there are also a few notes on general setup as well.
Getting help from the assistant
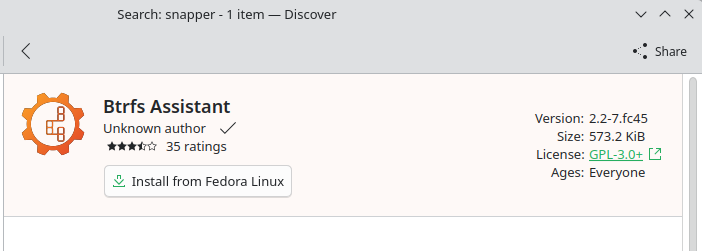
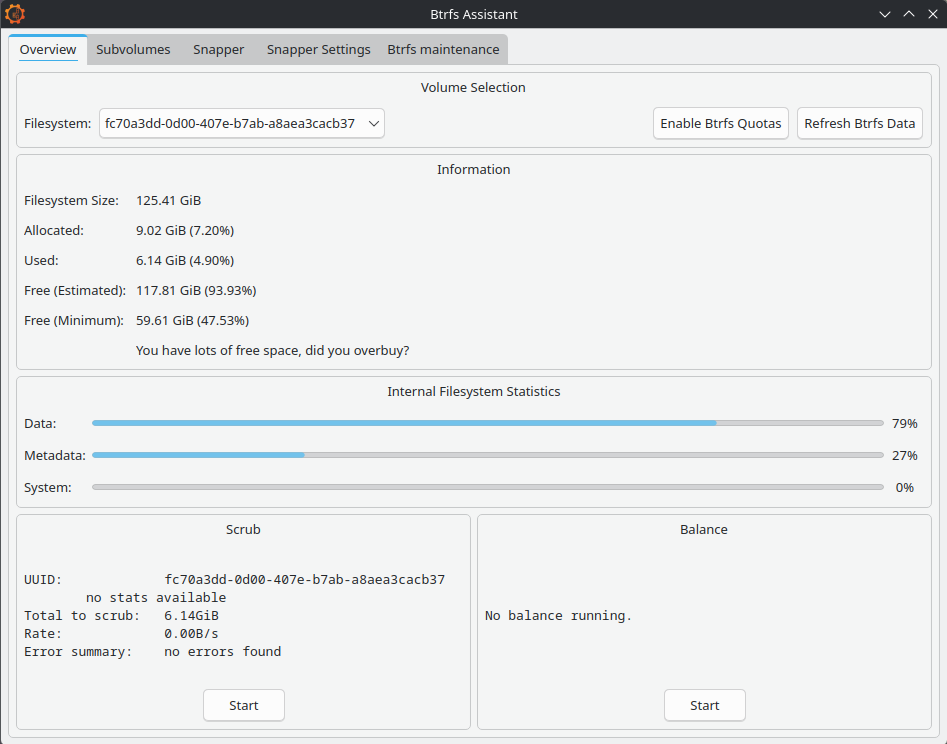
You may have seen btrfs-assistant mentioned in forum discussions. If you don’t already havethis program installed, then now is the time to look at doing it.
The package only takes a tiny amount of space and also installs snapper. About 4MB in total. Either Gnome Software or KDE Discover are fine. Or you can use dnf on the the command line.
Up and running:
Sub-Volumes
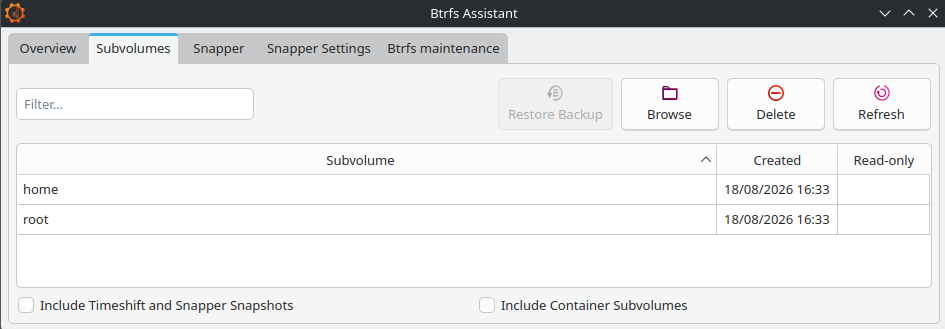
Registration of existing sub-volumes is automatic:
By default, Fedora creates two sub-volume sections on standard installation. We can only see them in the file manager when we boot via a USB live ISO, otherwise we see the volume contents only.
Partition managers such as gparted may show the partition as complete but the file system won’t work unless we have set up the logical sub-volume overlay inside of it.
If you are using Gnome Workstation you may probably see an additional sub-volume ‘/root/var/lib/machines‘ which, unless you are working with container built machines, will be empty. It’s just there to exclude temporary files from any snapshot processes and can be ignored too.
Alternative layouts
Anaconda is the in-house installer and I have been quite impressed with its recent incarnations.
The default installation route is decidedly the easier option at present.
However, for users wanting to add extra sub-volumes, the best method may be right at the start when you are offered the Storage Editor option. If using pre Fedora Linux 45, you can also find it at the top right corner of the interface.
Fedora Linux will happily install alongside your current setup if you want to try things out.
I have found that the best method is to use gparted to prepare a section of non-allocated disk space to offer the installer to work with, rather than offering it a ready made partition.
Post-install adjustments
Creating new sub-volumes requires the command line. This is for advanced users only.
In theory, Blivet-gui claims to be able to do this task but I am yet to be convinced. Btrfs-assistant leaves this bit well alone, which is what we are going to do.
Backups
There isn’t much that we can do with the actual sub-volumes, as they stand. The Copy On Write (CoW) mechanism is there and working. That’s about it.
But backups are always good to have, so make sure that you have got one before you start setting things up for real. We’ll have a look at this in detail later on.
There are btrfs command line methods for sub-volumes using send and receive but the concepts can get quite complex.
Making standard partition backups are much easier using dd or Gnome Disks, just as if we were using ext4, and they are equally effective for basic needs.
Snapshots
These are what really sets BTRFS rollback into a totally different league compared to using Timeshift.
To get this working we are going to use Snapper:
You may find mention on forums about using Timeshift on Fedora Linux BTRFS with Ubuntu style @ sub-volumes. This now no longer works unless you are using something like Linux Mint. It was never probably a good idea to start with but it does illustrate the extents to which people have gone to, and just to get some kind of easy GUI recovery setup going.
We need to set up Snapper before things go wrong.
If you have arrived at this article through a web search and are in difficulties, unless you have previously setup snapshots, you are going to be restricted to using the command line.
Command line btrfs is actually the foundation program used to create and manage the overlay sections. Snapper helps us work with the btrfs snapshots.
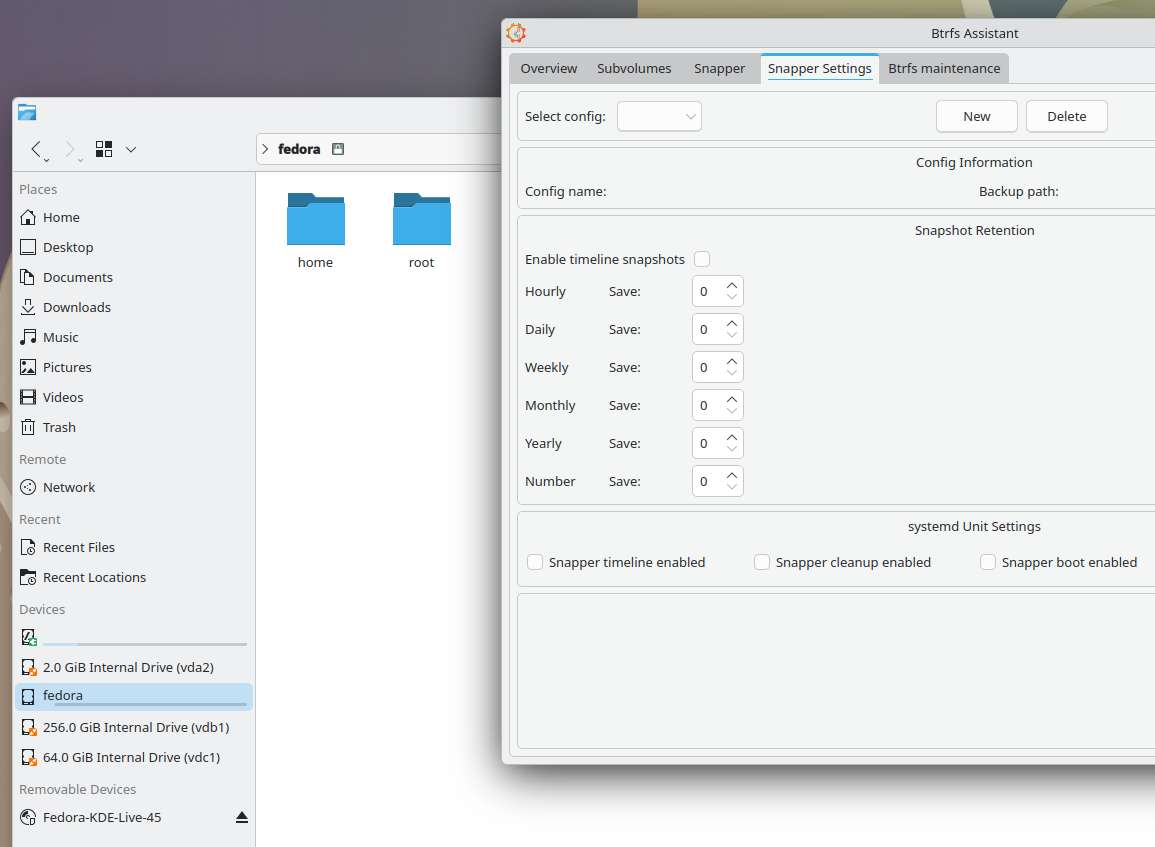
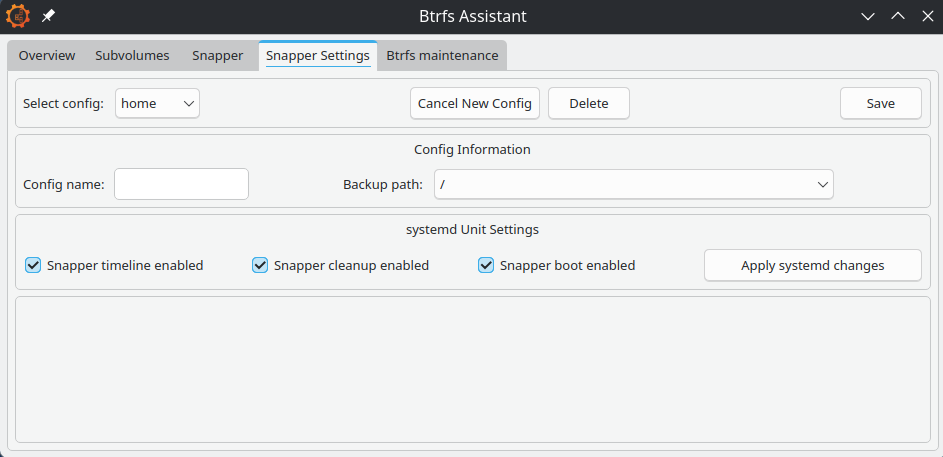
The place to start is at the Snapper Settings tab. Click ‘new’ and fill in the details, one for ‘root’ and one for ‘home’:
The backup and target paths must both be on the same partition. Otherwise, the docs say that you can place sub-volumes anywhere. BTRFS uses hidden sub-volumes, so placing ‘root’ at ‘/’ and ‘home’ at ‘/home’ is as good a place as any, probably.
In our setup, root means everything except the home folder. And the home folder will neatly hold the home snapshots.
Snapper will place its config files at ‘/etc/snapper’ if you need to find them.
Enable timeline, cleanup and boot. Click the save button.
Numbers
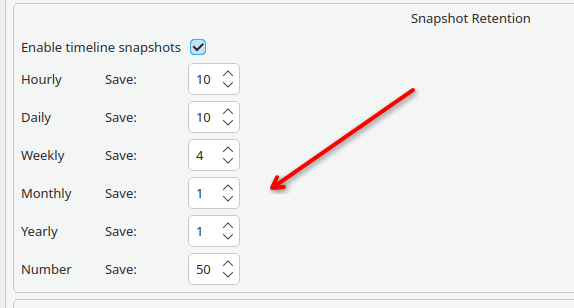
The first config save will set up the config file. We now have to set the numbers.
I don’t know if is intentional for Snapper to default to saving 10 whole years of snaps and nothing weekly. Perhaps it’s something to do with openSUSE and and their long term server support program?
For everyday use, these figures need changing. And the root volume needs to be treated differently from the home one.
I am currently evaluating the above set for root, with 15, 10, 5, 3, 1, 50 for home. Although, I am wondering if these these figures could be a bit too high …
The number defines how many snapshots the timeline cleanup algorithm should keep, counting from the youngest.
When done, save again, then apply systemd changes.
Hoarding Junk
Make sure that you don’t get carried away. Snapshots are very easy to take. We’ve all probably seen stories of people filling their houses with 20 years of old newspapers.
One or two snapshots of old kernels and firmware updates might get us out of problems but we don’t really need to keep Gigabytes of these for months on end. Conversely, it could be invaluable to find some small but important documents that got accidentally deleted a few months back without us realizing.
The dangers of system bloat could well be one of the reasons that Fedora Linux doesn’t have snapper already installed.
Creating the snapshots
This is normally fully automated and happens in micro-seconds. A very different scale to ext4 and Timeshift where we are frequently talking of minutes.
Manual snaps are great as well. Maybe just before doing something that could go wrong is a good idea.
If you set up the Snapper boot config option, an instant snapshot will be taken at every boot time, so any errant updates can be very easy to reverse too.
Different copy on write file systems can have both subtle or major differences but the basic b-tree principles tend to remain. If you want a deep dive into the theory, there’s lots out there.
The BTRFS system is continually working on records of what is happening, so data processing requirements are very small. In simpleterms we can look at this as making tag at a point in time on a type of continuous and interconnected meta-data event log. When we roll back, we return to the tag and restart the recording on a new branch.
Browsing
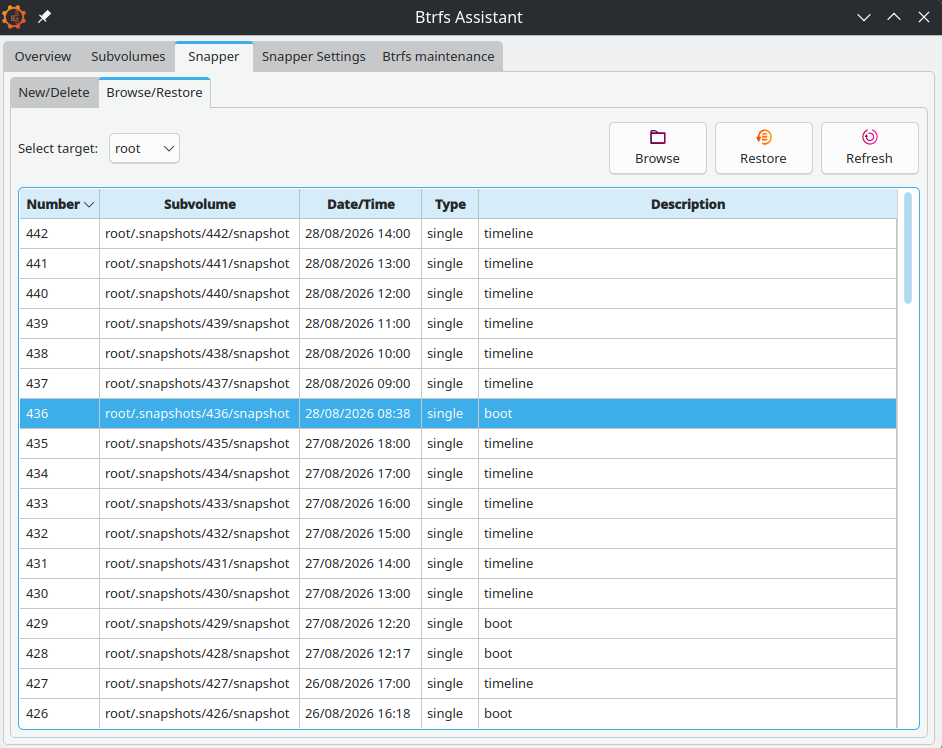
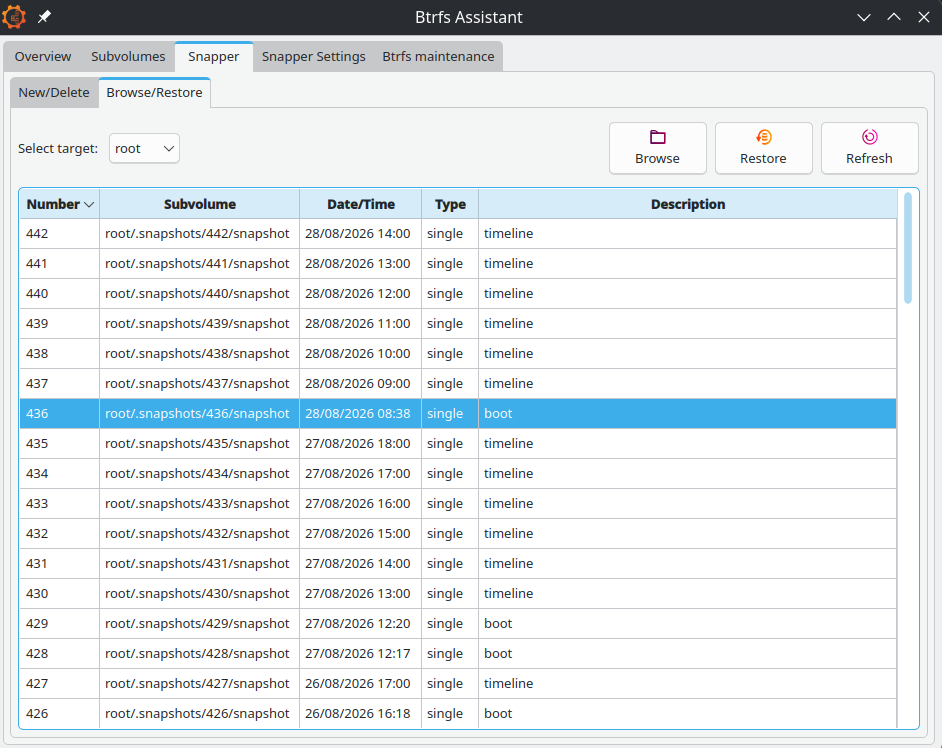
Select the Snapper tab and then the sub-tab for Browse/Restore:
Find the snapshot that you think you need and click on Browse to see what’s in there. The Browse function also lets you restore individual files rather than whole snaps. Keep an eye on the target drop down which will change when you switch tabs.
Deleting
BTRFS is night and day faster than the qcow2 systems used on virtual machines. The same for Timeshift. Only a couple of seconds are needed, even for very old snapshots.
Maintenance
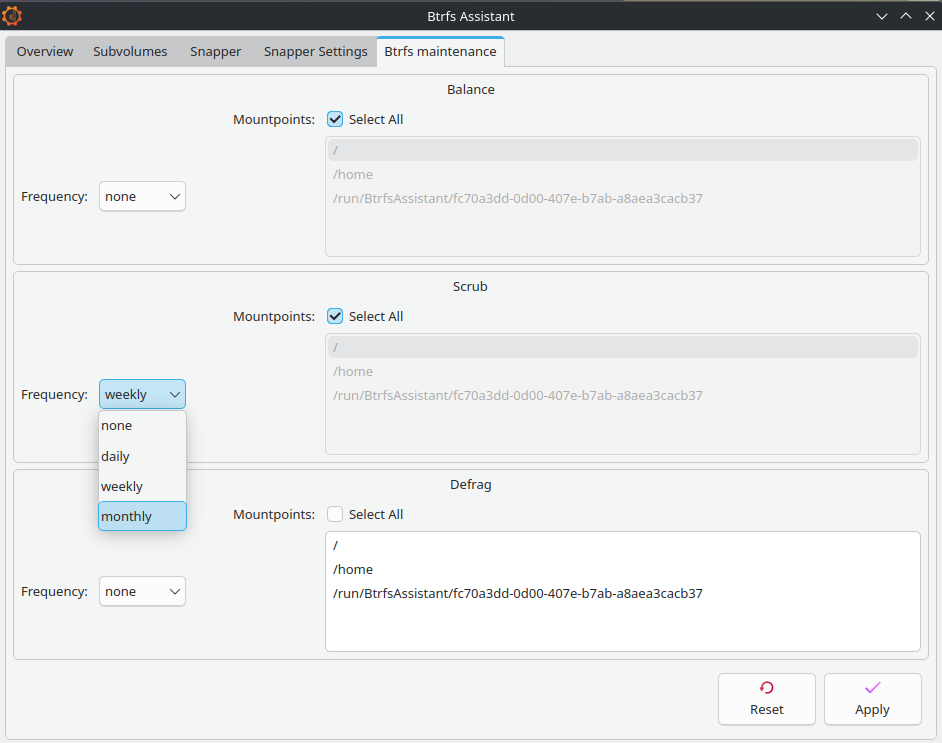
On this tab, scrub is probably the only important one. The docs say this should run at least monthly. If you have done a lot of snapshot rewinding then a manual scrub is a good idea.
Balance is for balancing RAID devices and you only really need defrag if you are running on a mechanical hard drive. An SSD will have its own optimising system built in but you could run defrag manually every year or two if you want.
Live booting
There are some operations that we simply can’t do on an operating system when it’s in use. Instead, we need to use Fedora Media Writer or Gnome Disks to put a downloaded Live ISO onto a USB stick and run things from there. For Disks, right click on the ISO and select open-with Disk Image Writer.
Many of you will be very familiar with this process. But not everybody is aware that many live ISO’s will also allow you to install small amounts of software onto them. This little trick will in fact go on to form a keystone to how we do our system failure recovery.
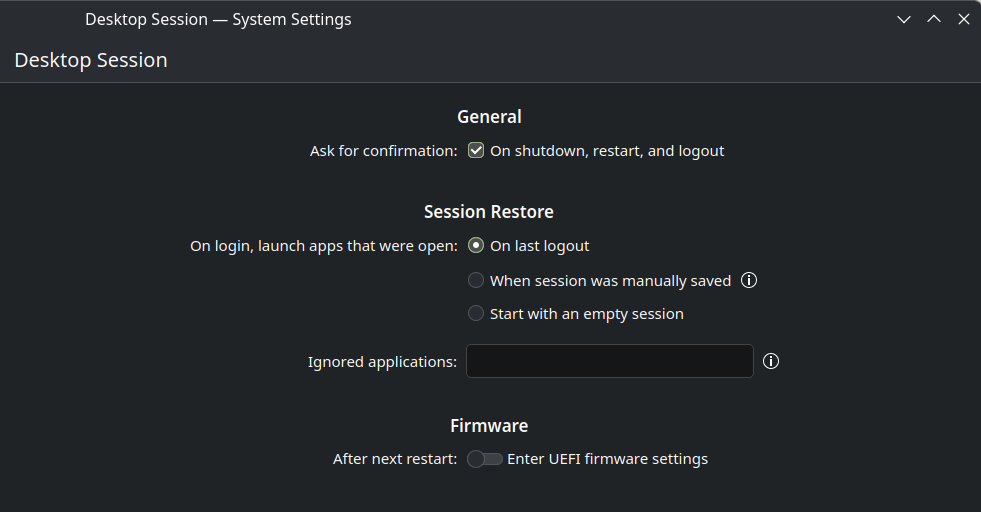
The next stage is to get your computer to boot with the USB; you will need to have either already set your UEFI/BIOS to allow a trigger key during initial starting, usually delete, or you will need to go to the OS settings and request a UEFI restart there:
Staying safe
It’s basic standard good practice to have a recent full backup when doing anything to your system.
Once you have booted the live ISO, if you don’t have a backup, then make sure that you do.
Using Disk‘s GUI interface allows the making of partition images to be fairly straight forward. Gnome Workstation ISO’s will already have Disks ready for you to use. If you are using KDE, set it up using KDE Discover. Otherwise use dnf. The installation is just a few MB.
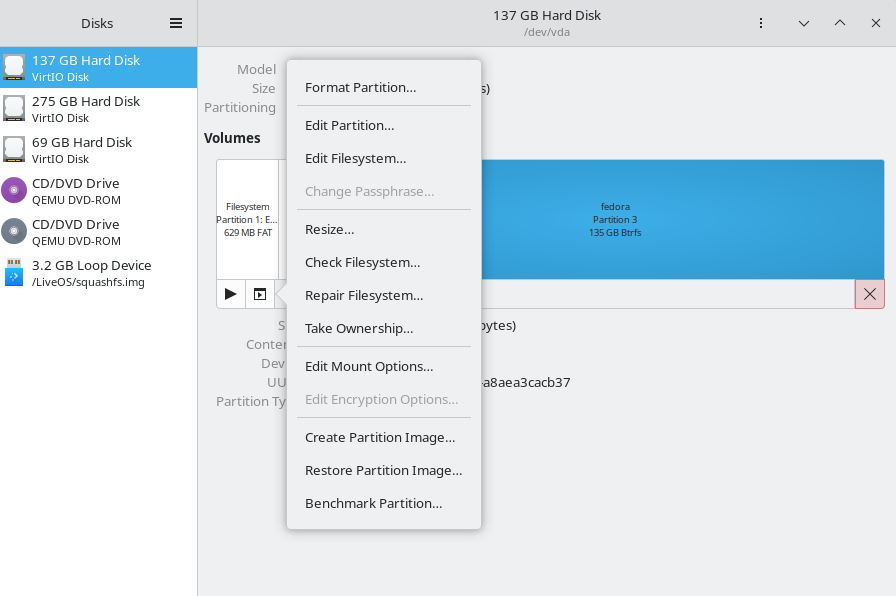
Select the partition, standard click the options button and choose ‘create partition image’.
Backup the boot partitions too. BTRFS makes no copies of these.
The usual cautions if you are thinking of using dd and have never used it before. You need to always pay attention to your input ‘if=’ and your output ‘of=’ or it changes from being a useful disk duplicator into it’s other guise of disk destroyer ….
Also, place your backups on to something reliable. A good quality USB hard-drive is generally viewed as a good choice. They are more resistant to time fading than SSD’s even if they are slower. If you have not heard of ‘bit rot’ there are lots of articles on the web. SSD’s will lose data if they are not regularly powered up.
Partition sizes
You may want to consider partition size adjustment at this point. But do the initial backup first, if you can.
Keeping the size of the OS partition reduced down will make backing up much easier. And you are still going to need further full backups, even with Copy On Write running things.
For more experienced users, there are methods to compress partition backups using dd. Also creating a ‘/dev/zero‘ temp file will help compress even more. You can save lots of space but the .img files have to be fully decompressed in order to mount them, which is a slight down side.
Virtual machines
Problems with computer speed and with excess data can occur when having a two concurrent CoW systems running together. A kind of snowball effect from the host system continually backing up copies of the other backups.
According to the Qemu docs, when keeping virtual machines on a BTRFS partition it is recommend to use the ‘nocow‘ option to avoid performance issues.
For those of you using Gnome Boxes, which comes pre-installed on Workstation, any adjustment of the config files and VM locations is not needed.
Boxes likes to keep its virtual machines out of view in a hidden home folder called ‘.local/share/gnome-boxes/images’ and it tends to work best when left that way. All the image files will already have had CoW disabled.
I can’t say that I have noticed any significant problems when I have carried out short tests. However, the issue is there nevertheless and a general look on the web will yield some quite lively discussion on the matter.
Advanced users may wish to consider running their VMs on a separate ext4 partition as another option.
The nocow +C flag can be easily checked by using lsattr against the image file, if required.
Swap files
Fedora Linux now uses the faster and more modern zram system which compresses the RAM data instead of swapping it to storage.
BTRFS snapshotting will not work if traditional swap files are present in the sub-volume.
If you are running short of RAM, your first option should be adjusting the zram allocation ratios. If you still find that you need a swap file, you will need to create a separate sub-volume to contain it.
Recovery
Having arrived at this point, you should now find this section to be fairly intuitive.
However, do remember to pay attention to root/home continuity. Remember that home will still contain hidden system and config files that are used by programs installed in the root section.
For small problems, where the system still boots, load btrfs-assistant on standard load and roll back to a previous good point.
Importantly, for USB running, start the file manager and mount the partition that you need to fix before installing or running btrfs-assistant or it will fail to work.
In both cases you will be advised to reboot for the request to take effect. The whole process is fairly quick and compared to Timeshift, pretty much instant.
Choosing the right tools
System failure happens to the best of us, given enough time to press enough buttons or to adjust one configuration file too many. But sometimes the failures are caused from upstream, from an unnoticed upstream bug perhaps.
If you are still able to boot into your system, Fedora Linux already features a very quick package reversal system as built-in standard. Sometimes we don’t need to use snapshots at all.
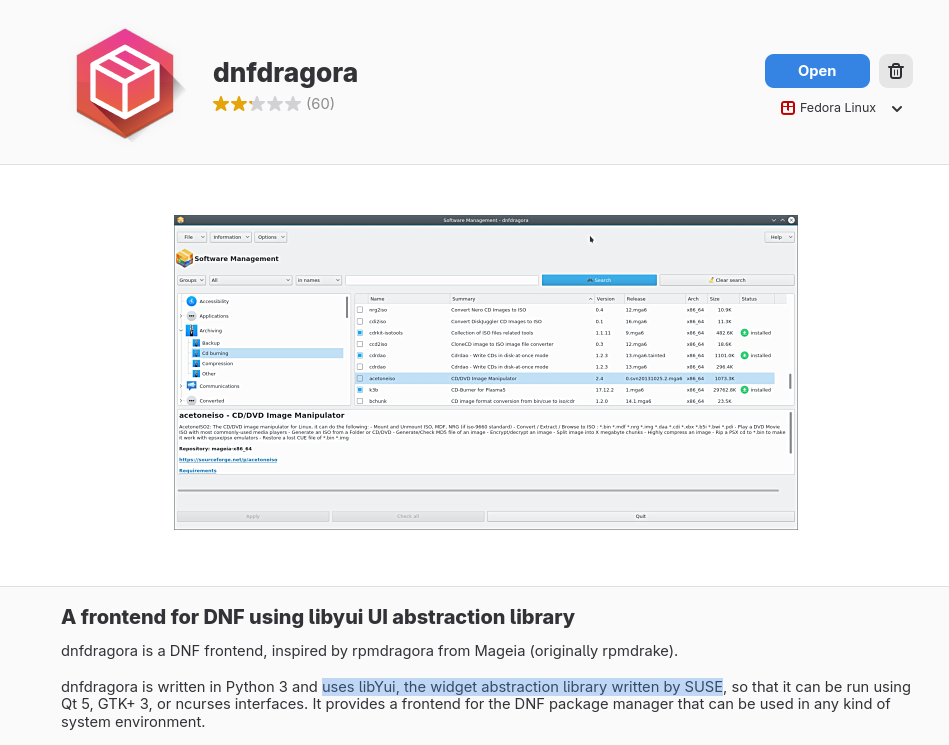
There is a GUI program to run this called dnfdragora:
For the sake of completeness, this does need mentioning. However, I would probably argue that in this case the command line is quicker and more intuitive:
Downgrades work on a simple temporary basis only, so there is no need to re-instate anything at a later stage. When the next batch of updates are available, hopefully with a fix, the package and its associated files become automatically re-upgraded.
Conclusion
This article hopefully updates us to the start of H2 2026.
Should Red Hat support Fedora Linux putting their support behind btrfs-assistant and should we have snapper and snapshots already setup on new installations?
I think the answer to that is yes, and that this is probably going to be happening. But for exactly how and when, we will have to wait to see.
Further improvements will always be in the pipeline.
If you’ve ever needed to install Fedora Linux on a headless server, a Raspberry Pi, or any machine without a monitor attached, you’ve probably reached for VNC or RDP. They work – but as the installer moves to a web-based interface, there’s a new opportunity to do something more native to that model. We’re building it, and we want your input before we go too far down a path that’s hard to reverse.
Why This Is Happening
The Anaconda installer’s Web UI first landed in Fedora Linux 42 Workstation and was extended to all Live spins in Fedora Linux 43. It’s a full graphical installer built on Cockpit tooling and using PatternFly widgets. The GUI is rendered in a fullscreen browser window – but until now, that browser had to be running on the same machine you’re installing onto.
Here’s the thing: VNC and RDP were built around the GTK interface. While RDP could technically work with the Web UI too (it operates at the display level), a remote browser is a much better fit – orders of magnitude less data and much lower UI latency. As the Web UI becomes the primary installer interface across Fedora Linux editions, it needs its own native remote access story.
On top of that, there are two more forces pushing in the same direction.
As browsers move toward Flatpak packaging – already the reality for atomic desktops and derivatives like Bazzite – remote installation opens an opportunity for shipping focused, smaller boot images that don’t need to bundle a local browser at all. A lightweight ISO aimed at headless and network install scenarios, where the assumption is that you’re connecting from another machine.
And once you have a browser-rendered installer, serving it to a remote browser is the natural next step anyway. A headless ARM SBC doesn’t need to run a GPU-accelerated browser locally just to show you a disk partitioning screen. Your laptop can do that for it.
What It Actually Is
The concept is pretty straightforward: Anaconda’s Web UI, already built on Cockpit, gets served over HTTPS. You point a browser at the machine you’re installing, authenticate with a PIN, and you’re controlling the installation remotely. No VNC client, no RDP client, no X forwarding. Just a browser.
If you’ve used Cockpit to manage a server, you already have a feel for the experience. The difference is that the machine you’re connecting to is mid-install, not running a full OS.
Use Cases
The ones we’ve talked through most:
Headless servers – You’re installing onto a server in a rack with no attached display. You expose the Web UI over the network and control everything from your workstation.
Lightweight ARM SBCs – Devices like Raspberry Pi have limited resources. With remote rendering, the Pi just runs the installer backend; all the UI rendering happens on whatever machine you’re connecting from.
Remote monitoring – Even if you’re not fully headless, being able to watch an installation from another machine is genuinely useful. Kick off a server install, go make coffee, check progress from your laptop.
The Design Decisions So Far
We’ve had some meaty discussions about how this should work, and a few things are now settled.
Authentication: You set a PIN through kickstart or boot options, and type it into the browser login page. Same pattern as VNC and RDP – the user provides the password, not the system.
TLS with self-signed certificates: The connection is encrypted, but the certificate is generated on the fly at boot. That means your browser will show the “this certificate isn’t trusted” warning. We’ve accepted this tradeoff – shipping a private key on installation media is a security risk, and the IP address isn’t known ahead of time, so standard PKI doesn’t really apply. For environments that need proper certificates (say, a university deploying at scale), Image Builder is likely the right path to embed custom certs. That’s a later problem.
Single connection only: Only one browser session can connect at a time. Two concurrent sessions could genuinely conflict – one session starting installation while another changes the storage configuration. So: one connection, full stop.
Reconnection behavior: If you disconnect and reconnect, what happens depends on where the installation was. Before the review screen – the point of no return – you start from step one. After the review screen (installation actually running), you land on the progress view. Simple two-state model, covers the critical cases.
Config isolation and port: All Cockpit configuration specific to remote installation lives in /etc/anaconda/cockpit/, not the default Cockpit paths – otherwise the config could leak into the installed system. We’re leaning toward port 443 by default so you can just point your browser at the machine’s IP without specifying a port, but the port will also be configurable.
How This Compares to VNC and RDP
VNC has been around in Anaconda for years; RDP support was added more recently. Both work by screen-sharing the GTK interface. Technically, RDP could work with the Web UI too – it operates at the display level, scraping pixels from the screen. But a remote browser is simply better: you send orders of magnitude less data and get much lower UI latency compared to streaming a full desktop.
Beyond performance, there are practical advantages. No client is required – any modern browser works. No VNC viewer to install, no RDP client to configure, no protocol quirks across platforms. And it’s the same Web UI we’re already actively developing, so features and fixes automatically benefit the remote experience. With VNC or RDP, you’re screen-sharing a separate GTK codebase – a separate maintenance burden.
VNC and RDP aren’t going away for now – they still work with the GTK legacy interface. But as the Web UI becomes the default across more Fedora Linux editions, browser-based remote access is where the investment goes.
Where We Are Right Now
This is a developer preview. Here’s what’s working:
Custom login page with PIN-based authentication
Separate socket-activated systemd unit for auth (clean separation from the main Cockpit process)
Session cookies that survive tab closes, require re-login on browser close
Cockpit config in an isolated, anaconda-owned path
Here’s what’s still open:
Single-connection enforcement (this will likely require close collaboration with the Cockpit team)
Backend detection of whether installation is already running (this is needed for proper reconnection behavior)
If you want to see the PoC in action, there’s a draft PR at rhinstaller/anaconda-webui#1274 with the authentication setup – custom login page, pin-based auth script, socket-activated systemd units, and the Cockpit config override. To try it yourself, clone the PR branch, build an updates image, and boot it with virt-install:
This is a proof of concept, not production-ready code. The PIN is hardcoded to 1234, there’s no TLS, and single-connection enforcement isn’t in place yet. Don’t use this for real installations – it’s meant to show the direction and let you poke at the approach. Once the installer boots, point a browser at the VM’s IP and enter 1234 on the login page. It’s rough, but it runs.
What We Want to Hear From You
We’re sharing this now because some of these decisions are hard to unwind once the feature ships, and community input is more useful now than after the fact. A few things we’re genuinely thinking about:
Remote installation is opt-in – you enable it through boot options or kickstart. But here’s a question we’re genuinely considering: should we ship a lightweight boot ISO without a local browser, with remote installation enabled by default? A minimal image aimed at headless and network install scenarios, where the assumption is that you’re connecting from another machine. Would that be useful to you? And if you’re using VNC or RDP for remote installation today, would this replace them? What would it need to do that it doesn’t yet?
At the Flock 2026 Birds of a Feather session, poetically named FFFwF (or, for us lazy people, Forging Fedora’s Future with Forgejo), we discussed the current state of our migration effort to the new forge. I asked the obligatory question: Who still has things on pagure.io?!
A few brave contributors raised their hands, some with an uneasy look in their eyes. Miro swiftly pointed out that everybody is affected by one particular repository; looking at you, `fedora-scm-requests`. Luckily, the RelEng folks have it in their sights. Sure, there are a few other repos lying around the old faithful, but it is time for the Fedora Project to move on and embrace the Forge.
Our new home is currently running on the LTS branch in v15.0.2. We are going to stick with it in production, and our next LTS upgrade will be to v19.
What is going to happen next?
Pagure itself as a project is hosted on pagure.io, and that service is going to be decommissioned at the end of July 2026. What does that mean for you? Well, that depends on when you are reading this.
If you just came back from Flock 2026 and you still have active repositories on pagure.io, here is what you need to do:
Check out the existing organizations in the Forge. If your project fits into any of the existing ones, ask its owners for a migration.
If it doesn’t fit, open a ticket with the forge team, and we will help you decide the best path forward.
Some of us have commits in projects that point back to pagure.io. Don’t worry, we are not going to break your links, for foreseeable future. We will explore options for implementing redirects so your historical links successfully point to their current locations.
The best way to handle the transition after your move, right now, is to inform your users about your new home. Add a BIG BOLD ANNOUNCEMENT to your README, close all open issues, and create a single pinned issue with your migration announcement.
Note: Do not expect to be able to log in to pagure.io after July 2026.
Wait… and what about `dist-git`?
Well, that is the next target in the scopes of the Forge team. As I showed you in the room, we have 11 Features that define the transition. The biggest task at hand is a bit more sneaky. We are missing multiple enhancements to the upstream project that will require a lot of coordination and Go code. So, if you find yourself in possession of spare cycles and a particular need to help us make it better and faster, Forgejo is waiting for you!
A road-map with all the tasks for the move will land in the Forge soon. (See resource list below.)
Important Links & Resources
Check out the new home: Browse existing organizations on the new Fedora Forge
Want to write some Go? Contribute to the upstream Forgejo project.
Track our progress: Migration roadmap will be posted here soon
AI Disclaimer: Grammar and formatting were done with the help of robots; all the original brain-farts are my own.
AI coding agents such as Claude code or Codex get more capable every month. This is great for productivity, but approving all commands gets annoying really quickly. On the other hand, allowing agents to run any command on your work machine is not a great idea. They are really good at exploring your production cluster using kubectl or running remote commands at your production servers over SSH.
Fortunately, Linux distributions come with plenty of options for process isolation. You can run agents as a completely different user, in a container, or in a VM. This article shows how to use microVMs to run coding agents.
Security concerns
Running AI agents in unattended mode is like running untrusted code. Companies behind these agents, such as Anthropic or Google, are not trying to steal credentials, but people keep coming up with new attack vectors like Slopsquatting or prompt injections virtually anywhere.
The coding agents themselves ship with built-in mitigations that try to refuse prompt injections as described, for example, here.
Lightweight sandboxing technologies are another layer of defense in coding agents. On Linux, bwrap is one of the possible implementations. This raises the bar, yet sandbox escapes are still a problem. Take a look at CVE-2026-39861 as an example of multi-platform sandbox escape.
You could use containers to isolate the agent in their own namespace, but they still share the host kernel. Some of the the recent kernel vulnerabilities resulted in privilege escalation (switching from regular user to root) suggesting that containers are not enough as a security boundary.
In the rest of this article, I describe how to use microVMs to easily sandbox coding agents on your Fedora Linux.
Exploring microVMs
First of all, let’s take a look at what microVMs are. Just like any VM, they have their own kernel, one per each microVM. Compared to traditional VMs they start in very short time (hundreds of milliseconds) but don’t offer all the features of full VMs.
This article explains usage of krun runtime for podman. This approach offers the same well-known workflow as containers, but simply runs every container as a microVM.
Start by installing the runtime:
dnf install crun-krun
To run a microVM, simply run podman with –runtime=krun in your terminal:
podman run --runtime=krun --rm -it fedora:44 /bin/bash
Things to watch out for
A microVM is not a regular container, so a few things might behave differently. First, allocate enough CPU and RAM with krun annotations. The defaults are too small and might result in OOM (Out Of Memory) kills. Second, make sure you have libkrun version >= 1.8. Older versions have a bug which prevents you from pressing Enter in your coding agent. Third, the microVM ignores the USER set in the Dockerfile and always boots as root. Either switch to the correct user manually or put the switch into an entrypoint script.
Case study: sandboxing Claude Code for a Python project
This section outlines a simple setup for a Python project managed by uv. It uses podman-compose to mount the project into the microVM. Compared to containers, this podman compose needs additional annotations for UID/GID translation, SELinux labeling, and HW resources. The final setup is very similar to what you would need for containers.
To install podman compose from official Fedora repositories, run:
dnf install podman-compose
The setup has 3 parts:
Dockerfile
docker-compose.yaml
entrypoint.sh
Dockerfile
As mentioned above, podman with krun runtime still runs containers, but spawns each of them in a microVM. This example container includes uv package manager, claude code and a few additional RPM packages. Define your own container based on your project dependencies and programming language.
Make sure to create an unprivileged user and use it for running the agent.
FROM fedora:44 ARG HOST_UID=1000
ARG HOST_GID=1000 # Create group and user matching host UID/GID
RUN groupadd -g ${HOST_GID} appuser && \ useradd -u ${HOST_UID} -g ${HOST_GID} -m appuser RUN mkdir -p /venv && chown appuser:appuser /venv
RUN mkdir -p /home/appuser/.claude && chown appuser:appuser /home/appuser/.claude USER appuser # Rarely-changing tooling. Kept above the dnf layer so editing the RPM list
# below does not invalidate (and re-run) these installs.
RUN curl -LsSf https://astral.sh/uv/install.sh | sh && \ curl -fsSL https://claude.ai/install.sh | bash
USER root # Frequently-changing RPMs. Kept last so adding a package only rebuilds from here down.
RUN dnf install git make vim free libpq-devel python3-devel gcc -y && \ dnf clean all COPY --chown=appuser entrypoint.sh /entrypoint.sh
RUN chmod +x /entrypoint.sh USER appuser
WORKDIR /app # This is needed because entrypoint does not have .local/bin in the PATH
ENV PATH="/home/appuser/.local/bin:$PATH"
ENTRYPOINT ["/entrypoint.sh"]
CMD ["/bin/bash"]
docker-compose.yaml
The compose file defines how to mount the project directory into the microVM. This is where most of the magic happens, because podman needs to translate UID/GID and manage SELinux labels, otherwise the files would not be accessible inside of the microVM or they would end up being owned by a different user.
services: claude: container_name: project-name-claude annotations: run.oci.handler: krun krun.ram_mib: "4096" krun.cpus: "4" user: "${HOST_UID}:${HOST_GID}" userns_mode: keep-id # optional, for rootless host build: context: . args: HOST_UID: "${HOST_UID}" # use UID and GID from the host so that files created in the container have correct permissions HOST_GID: "${HOST_GID}" volumes: - ../:/app:U,z # bind mount your project - project-name-venv-cache:/venv:U,z - claude-config:/home/appuser/.claude:U,z # persistent claude credentials/config working_dir: /app stdin_open: true tty: true environment: - CLAUDE_CONFIG_DIR=/home/appuser/.claude - UV_LINK_MODE=copy - UV_PROJECT_ENVIRONMENT=/venv/env # This is inside the cached volume - UV_PYTHON_INSTALL_DIR=/venv/python # So that uv-managed python installations are not in home but cached in /venv - TERM=xterm-256color - COLORTERM=truecolor volumes: project-name-venv-cache: claude-config: external: true name: claude-config
There are 3 key parts:
annotations – these select krun as a runtime and specify HW requirements
user and userns_mode – this tells podman to translate UID/GID so that the files created in the microVM end up owned by your user on the host
volume labels – z tells podman to relabel the files with a shared SELinux label. Otherwise SELinux would prevent the process inside the microVM from touching the files in the volume. U tells podman to recursively chown all files.
entrypoint.sh
The entrypoint creates a virtual environment for the Python project, because we don’t want dynamic dependencies baked into the container image. It also runs the switch from root to regular user because podman with krun runtime ignores the USER directive from the container.
#!/bin/bash
set -e echo "Sandbox started as user: $(id -un) in directory: $(pwd)" if [ "$(id -un)" != "appuser" ]; then runuser -u appuser -- uv sync echo "Running ${@} as appuser" exec runuser -u appuser -- "$@"
fi uv sync
exec "$@"
Then create the external volume and run the claude container interactively:
$ podman volume create claude-config
$ HOST_UID=$(id -u) HOST_GID=$(id -g) podman-compose -f .agent-sandbox/docker-compose.yaml run --rm claude
Sandbox started as user: root in directory: /app
Resolved 3 packages in 6ms
Checked 3 packages in 1ms
Running /bin/bash as appuser
tty: ttyname error: Inappropriate ioctl for device
[appuser@3bd1234b9a77 app]$
You can now check that the kernel is different by running uname -a inside of the microVM.
Putting it together: single script to create the whole setup
Creating the same setup manually for every project is not the greatest user experience, but you can automate the setup using a simple script like this. It installs a new sbx command that wraps the setup described above into 3 simple command options: init, build, and run.
A word of caution — microVM is not a bulletproof boundary
A microVM raises the bar considerably, but it is not perfect isolation, and it would be irresponsible to present it as such. Take a look at the libkrun git repository to read more about the security model.
If you want to run software that might be dangerous, prefer using a full VM or even cloud VM.
Conclusion
MicroVMs seem like a sweet spot for running AI Agents. They provide a familiar workflow of containers, but the agents run on their own kernel behind a hypervisor. This article describes workflow based on podman and krun runtime because Fedora Linux ships both of them natively, but there are plenty of other options available for any platform (for example dockersandbox).
Note about AI usage: I wrote this article myself. I used Claude (Anthropic) to significantly refine the grammar, wording, and sentence structure; the technical content and all claims are my own and tested.



docker.io/deluan/navidrome:latest