Posted on — Leave a comment

Installing Fedora 45 on Stratis storage

The Anaconda installer in Fedora 45 will introduce a new option for storage configuration: Stratis, a modern solution for local storage management.

Stratis isn’t a completely new technology, it uses existing tools and technologies like device mapper, LUKS, and XFS and integrates them into an easy to use package. The idea is to provide modern storage features while hiding the often complex logic behind them. Adding support to the installer brings these features even closer to Fedora users.

There are only two basic structures or layers you need to know when working with Stratis: pools and filesystems. Pools represent an abstract layer on top of existing block devices (disks, partitions, RAID arrays etc.). A pool can consist of one or more devices (for systems with multiple disks, for example). Features like encryption or over-provisioning are also configured on the pool level. Multiple filesystems can be created on the pool. These are devices that will serve as your root or home volumes. Some additional features supported by Stratis include snapshots, caching, and for encrypted pools, multiple unlocking methods like TPM or Clevis/Tang. Caching and encryption without a passphrase are not currently supported by Anaconda, but these can be easily enabled after the installation.

Management of Stratis devices can be done using the stratis command. For more information, check our older, but still valid, article Getting started with Stratis or the Stratis project how-to.

Installation using Web UI

The new web-based user interface for the Anaconda installer currently doesn’t allow selecting which type of storage technology will be used for the automated and guided partitioning options. The storage layout you will get depends on the Fedora variant you choose to install. But if you want to use Stratis, you still have an option in the graphical installation. Any storage layout can be created manually using the Cockpit storage module, which is integrated into the installer. To enter it, simply select the If none of the options above apply… option on the Installation Destination step.
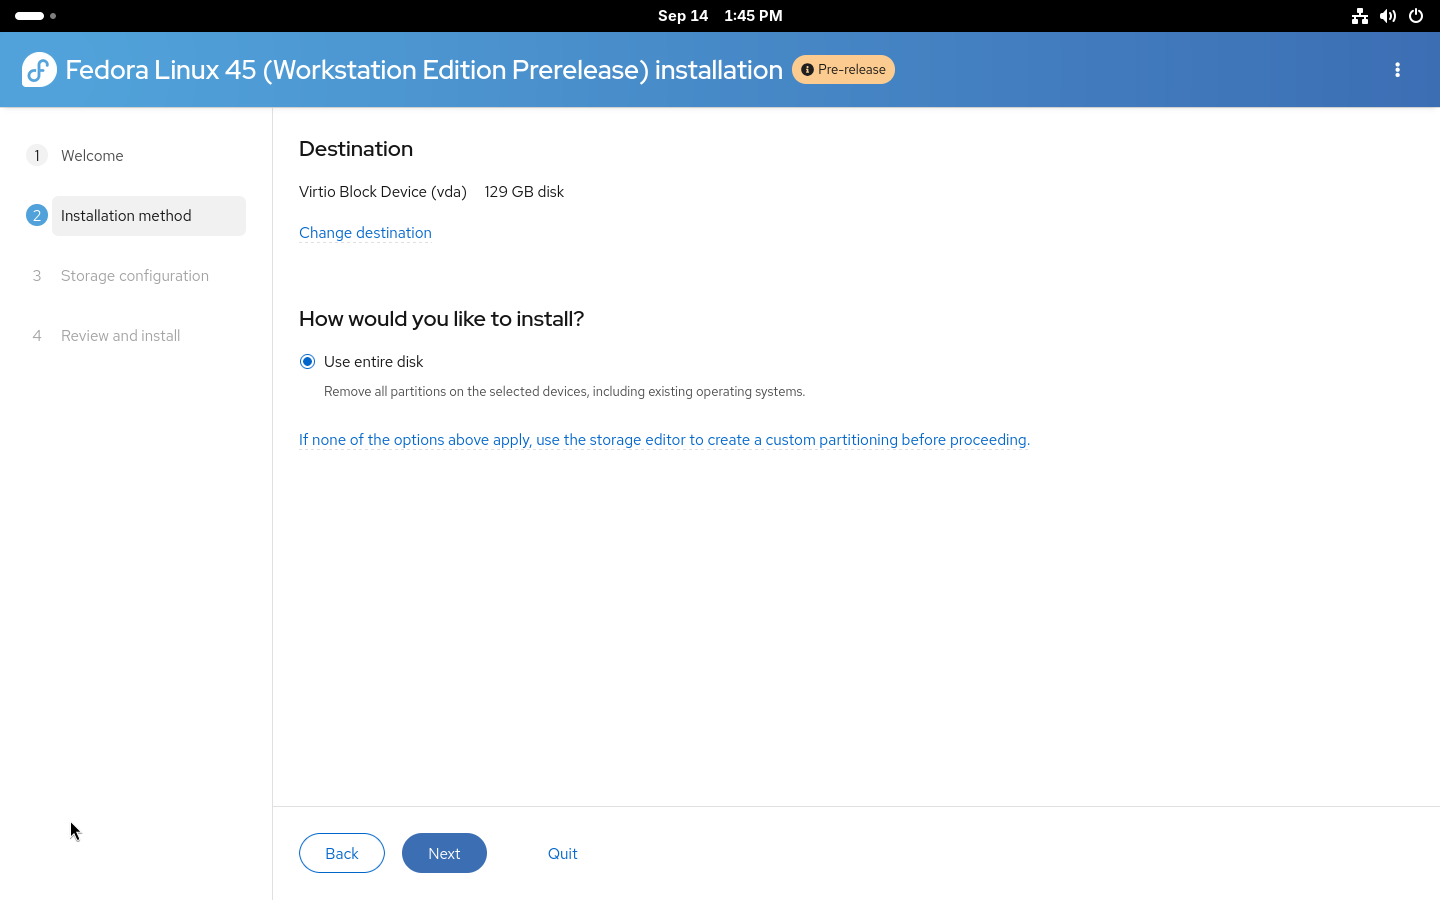
Installation method page in the Anaconda installer

The Cockpit storage module supports a wide variety of storage configurations and Stratis is one of the supported technologies. Do not forget that with manual partitioning, you need to create all required partitions so first create partitions required for booting (/boot and /boot/efi or biosboot, based on your system configuration). After that, simply create a new Stratis pool from the menu.
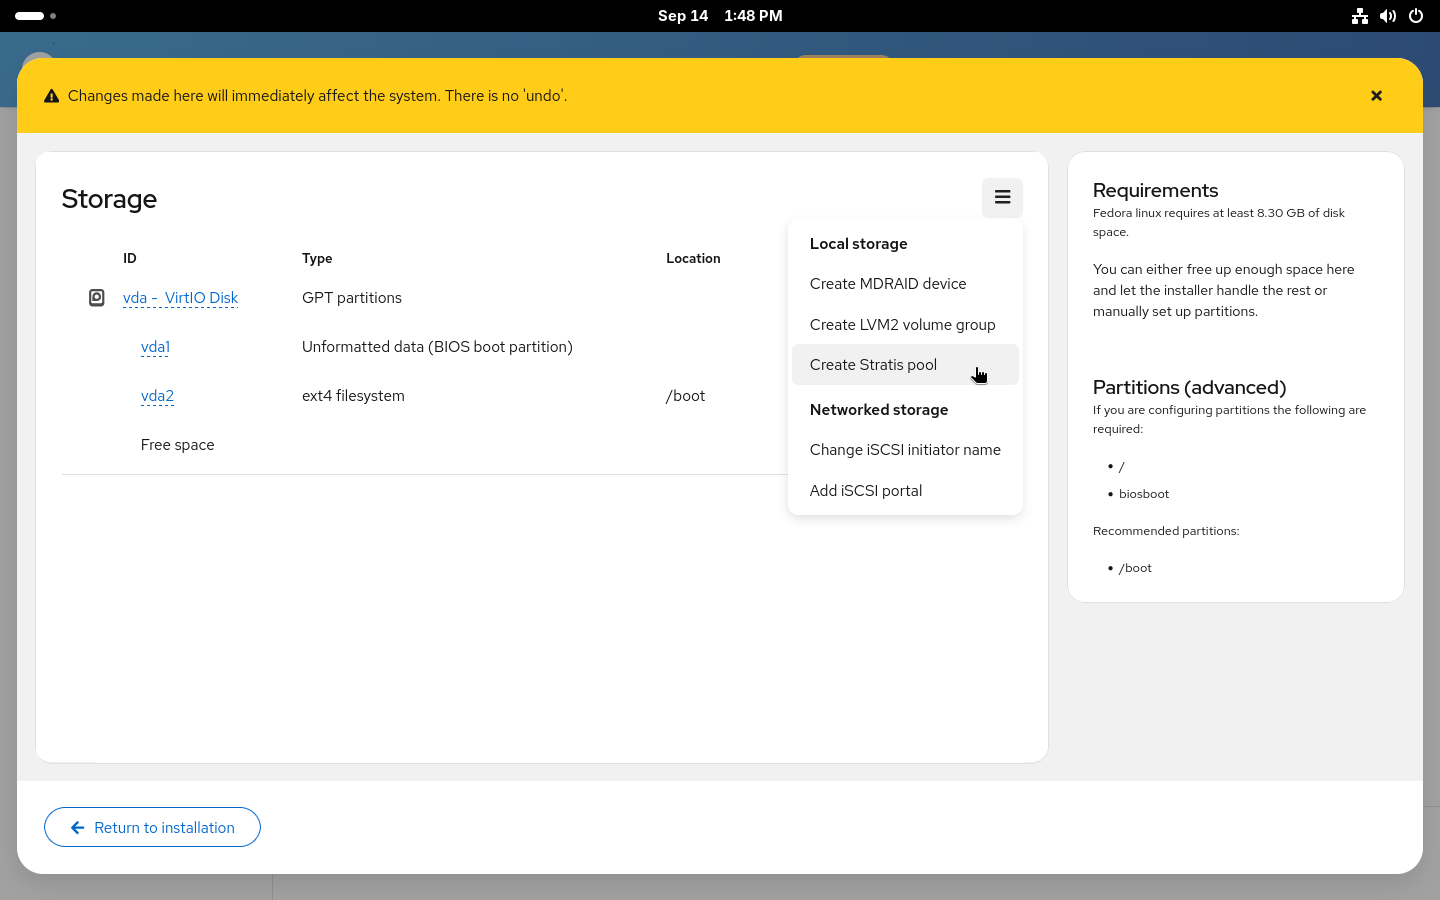
Local storage menu in the manual partitioning editor

Creating stratis pool

After selecting a name for the pool and the disk (or disks) it will be placed on, you can decide whether to enable encryption and over-provisioning for the pool. Over-provisioning allows allocation of more space for the filesystems created on the pool. Similarly to how LVM thin provisioning and Btrfs work. With over-provisioning enabled, there is no need to worry about running out of space in root with still plenty of free space in /home. It also allows greater flexibility when using snapshots. On the other hand, you actually need to be aware that you don’t really have terabytes of space and you need to make sure you won’t actually run out of space on your disk. Both encryption and over-provisioning can also be enabled or disabled after the installation.
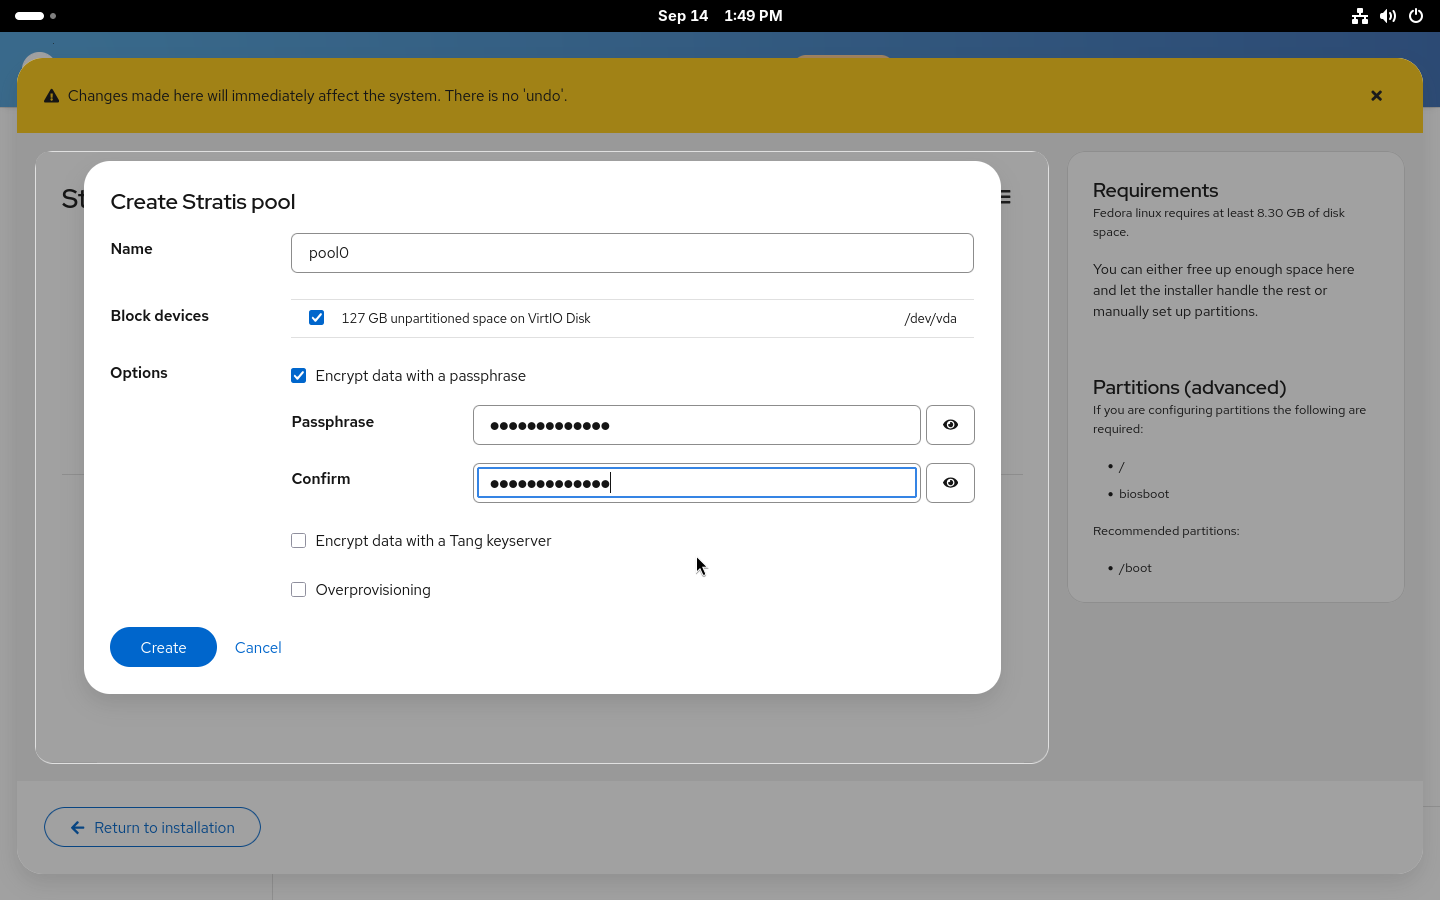
Creating Stratis pool in the manual partitioning

Creating stratis filesystems

With the new pool created, you now need to add some filesystems to it. You’ll most likely want the standard two separate filesystems for your / and /home. But you can also create a separate filesystem for your /var, for example.
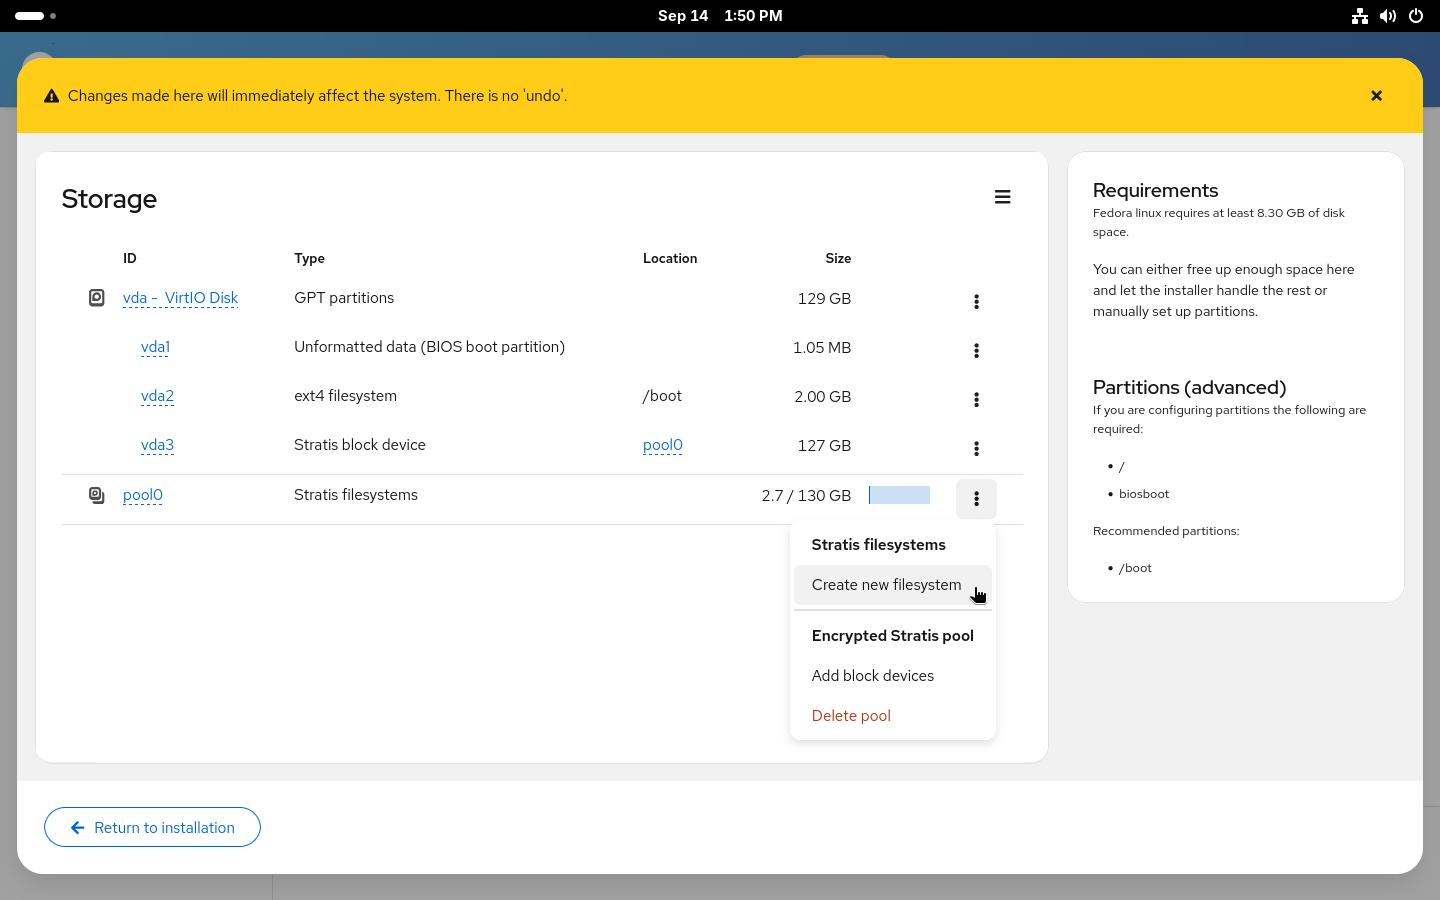
If you enable over-provisioning on your pool, you can also decide to not specify sizes for the filesystems and use the 1 TiB default size with over-provisioning or set a size limit for the filesystem to prevent it from automatically growing if you ever run out of space.
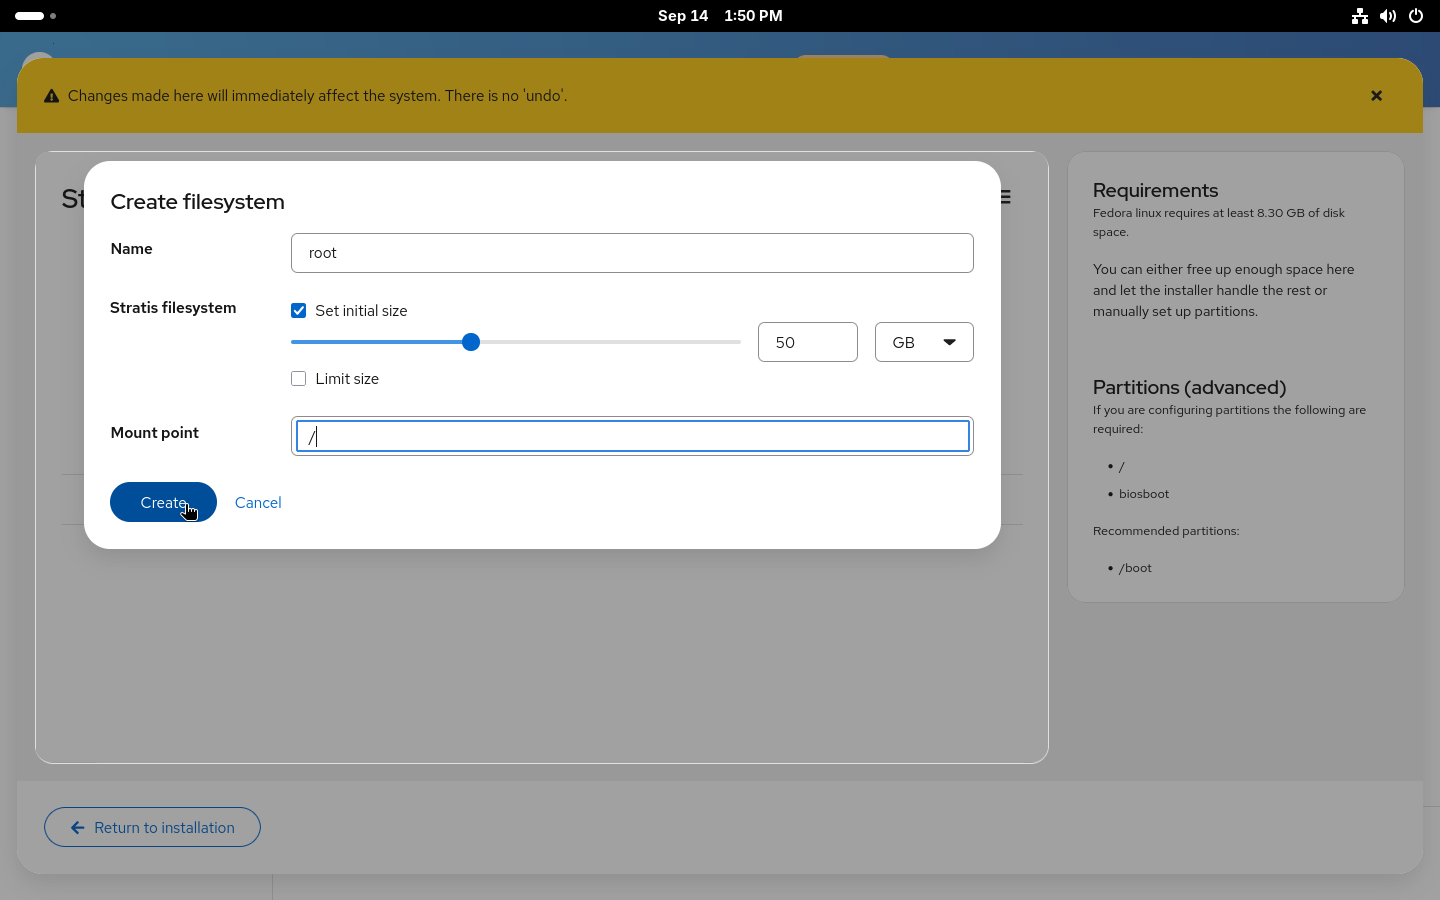
Creating Stratis filesystem in the manual partitioning

Using the configured layout

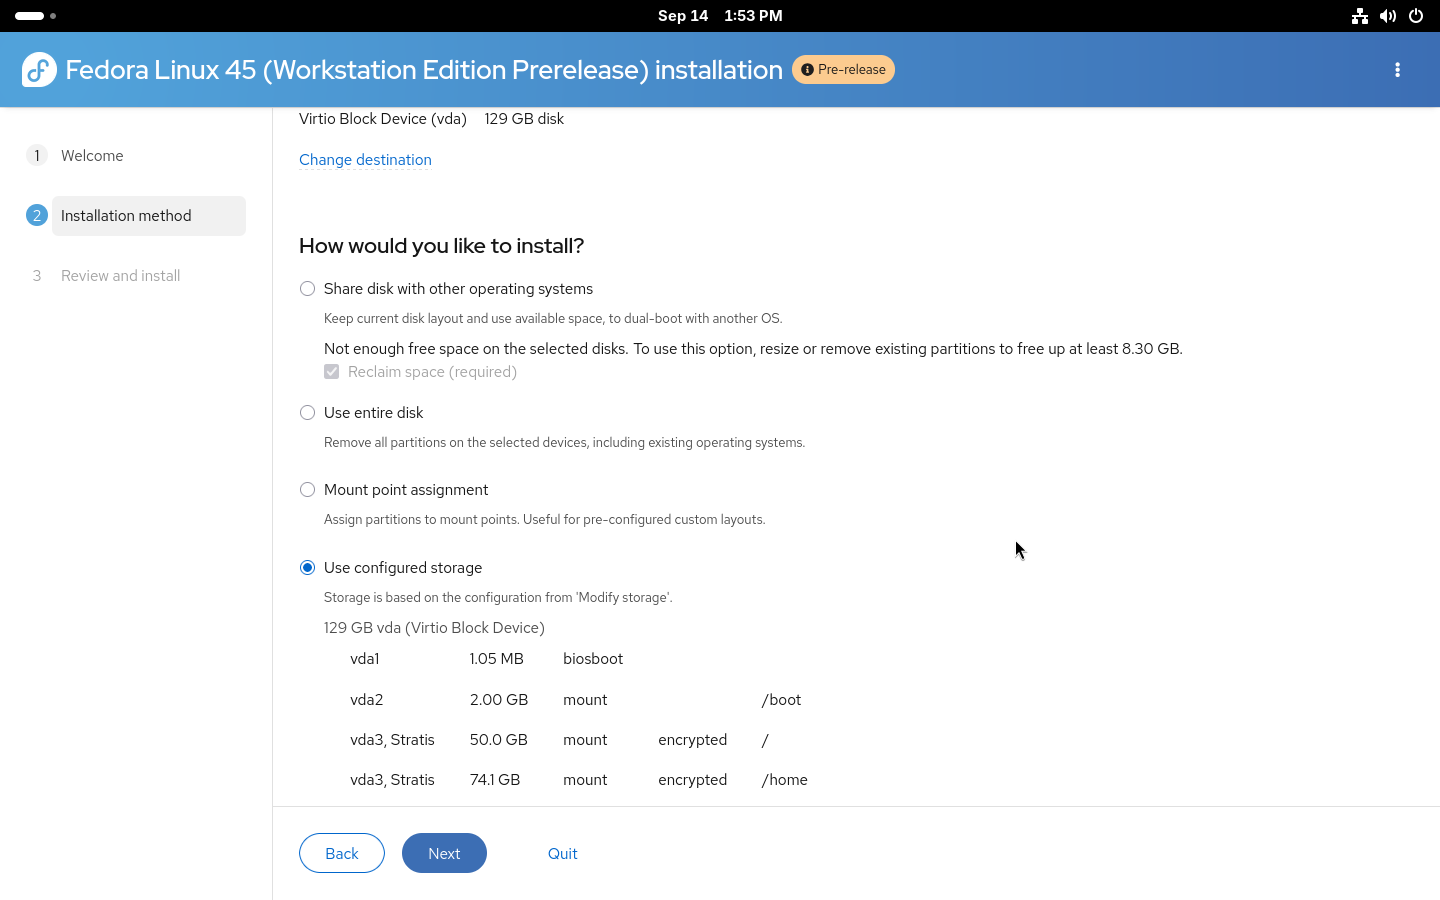
With all the filesystems created, you can Return to installation. Anaconda will check the created devices to make sure all requirements are met and return you to the Installation destination page where a new Use configured storage option will be preselected with the devices that were just created.
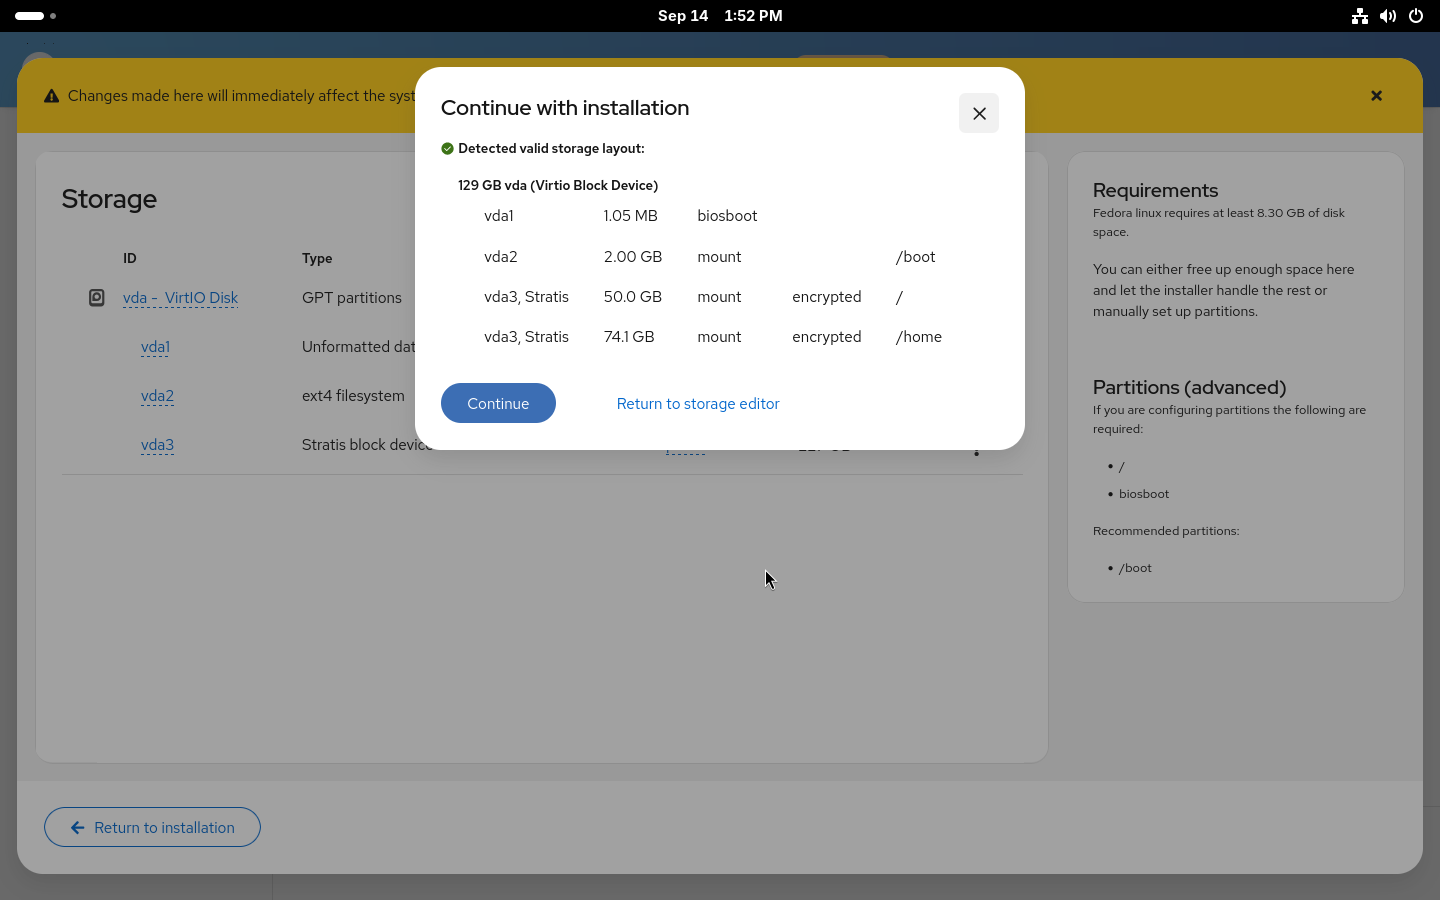
Confirmation dialog with validated storage layout in the manual partitioning
Using configured storage in the Anaconda installer

That is the storage part of the installation done. You can double-check on the Review and install page that everything is correctly set and start the installation.
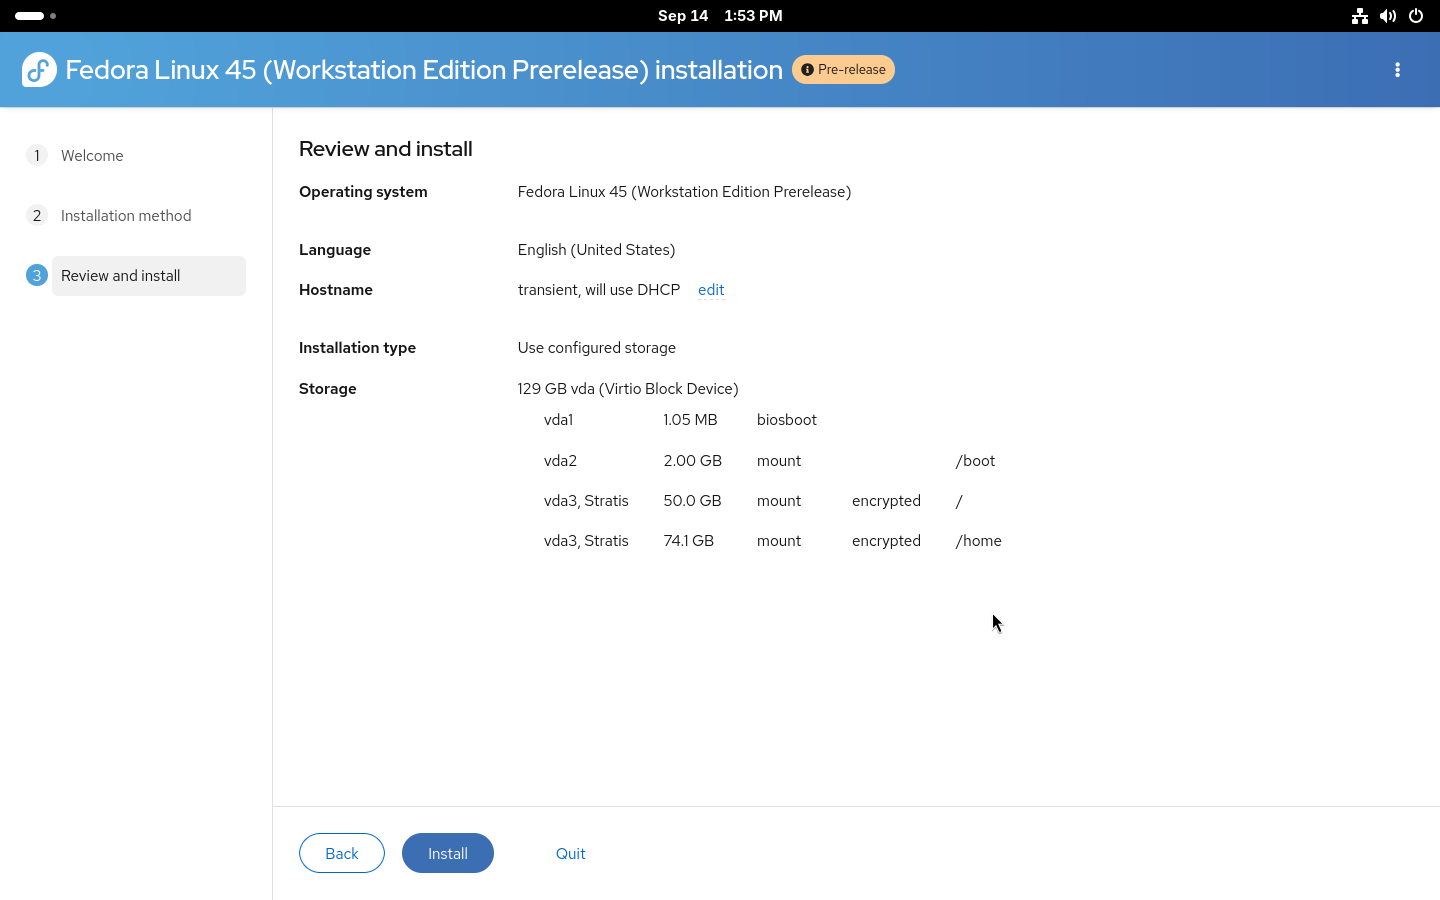
Summary of the installer configuration before starting the installation

Installation using kickstart

For advanced users who wish to use automated installations, full kickstart support for Stratis is also available. Both automatic and manual partitioning are available via kickstart.

Automatic partitioning is simple: the existing autopart command can be used with –type=stratis to create the default Stratis storage layout fully automatically. A storage section in kickstart, for setting up an encrypted Stratis layout, could look like this:

zerombr
clearpart --all --initlabel
autopart --type=stratis --encrypted --passphrase="passphrase"

Manual partitioning requires building the entire storage layout manually from bottom up. Two new Stratis kickstart commands were added: stratispool for creating and managing Stratis pools and stratisfs for creating and managing Stratis filesystems. Usage of these commands and most of the options are similar to how kickstart partitioning works with LVM. An example of a more advanced Stratis layout can be found below.

reqpart
part /boot --fstype=ext4 --size=500
part stratis.01 --size=1 --grow --ondisk=vda
part stratis.02 --size=1 --grow --ondisk=vdb
stratispool fedora stratis.01 stratis.02
stratisfs / --name=root --poolname=fedora --size=5000 --grow
stratisfs /home --name=home --poolname=fedora --size=1 --grow

Here we are creating a pool called fedora on top of two disks, vda and vdb, with two filesystems. One called root for / and a second called home for /home. The –grow tells the installer to use all available free space when creating the devices. For more details about the commands see the kickstart documentation.

Conlusion

The newly introduced Stratis support in Anaconda offers an easy way to take advantage of the modern storage features offered by Stratis. With the Web UI support available through Cockpit storage, you can now easily use Stratis on your system. We plan to simplify the process even more in future releases and enable even more advanced Stratis features. 

If you run into any issues or have feedback, both the Anaconda and Stratis teams would love to hear from you.
Posted on — Leave a comment

Log Detective in Packit

Log Detective analysis is coming to Packit.

Starting this month, Log Detective will provide an analysis of failed Packit-triggered scratch Koji builds on dist-git pull-requests.

Packit will keep on doing what it’s good at, integrating upstream projects with downstream distributions.
Only now, it will have Log Detective to explain package build failures.

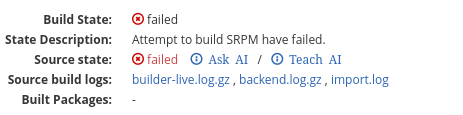
In Copr, the user can already request a Log Detective analysis by clicking on the “Ask AI” button.

In Packit, a build failure triggers a request for analysis automatically and presents the result in the dashboard, when it is ready.

The analysis does not require any additional setup. It is not necessary to choose which logs to send or to tune a prompt. Our service handles everything for you.

Log parsing and analysis derivation

Starting with version 4.0, the Log Detective works as an agent written in the BeeAI Framework.

The agent receives all logs and other build artifacts, as a part of the analysis request. Log Detective then uses a variety of tools, mostly based around the Drain template mining algorithm, to extract potentially useful snippets from the files. These snippets represent only a small fraction of the original log file size.

By extracting and using snippets, instead of entire original logs, we save tokens and limit the time needed for the analysis to finish. We also limit the amount of useless information in the model context.

This approach allows us to use even relatively small models and still get good results.

Communication architecture

Packit service handles failed Koji builds in the same way as before.
However, Packit now also requests an analysis of a failed build by sending a request to the Log Detective
interface server. The interface server, designed as a lightweight containerized service, handles all communication between the Log Detective and Packit services.

Packit sends a request for analysis to the Log Detective server. When the results are ready, the interface server posts them on the Fedora Messaging bus where Packit collects them.

Result presentation

An analysis from Log Detective consists of a statement of what, if anything, went wrong during the package build, and optionally, a suggestion of a solution. In the current configuration, Log Detective does not use sources other than build logs for the analysis.

Packit dashboard links Log Detective results to the PR that has triggered them.

Purpose and limitations

Since Log Detective uses a general purpose model, and lacks access to other information sources, it is obviously limited. Therefore it is not, and cannot be a substitute for years of experience in package maintenance in the Fedora ecosystem. If you have been building packages for a while, it probably has little to offer you.

It is intended to help those who don’t have such experience, and hopefully make their job a little easier.

Future development

Log Detective is under active development and we are looking into ways to improve it.
We are continually revising the Log Detective system prompt to improve response quality, while periodically comparing the overall performance against a selection of annotated build logs, which we are collecting on our website.

We also plan to reuse a select part of this dataset to create an additional information source for Log Detective, to further improve the quality of the analysis we provide.

In the future, we also plan to provide an analysis for Copr builds handled by Packit.

We are also considering ways of improving the presentation of an analysis, such as expanding the Packit dashboard results to include not only the final analysis, but also extracted log snippets that were used to derive it.

Posted on — Leave a comment

Fedora Hummingbird: Taking the Hummingbird model to the full operating system

At Red Hat Summit 2026, we’re announcing Fedora Hummingbird — a new container-based rolling Fedora Linux distribution. This distribution provides access to the latest software as soon as it’s available upstream, which ensures that it’s up to date and secure.

Fedora Hummingbird primarily utilizes an image-based workflow, similar to containers, but also runs in virtual machines and even on bare metal. If you’ve been following Project Hummingbird‘s work on container images, or Project Bluefin’s work on the operating system, you already know the model. Fedora Hummingbird applies this model all the way down to the host OS.

The foundation for Fedora Hummingbird already ships today from the Hummingbird containers repository. You can pull and boot it right now.

What is Project Hummingbird?

The central goal of Project Hummingbird is to get as close to zero CVE reports as possible in every container image it ships, and to stay there continuously. The team made every architectural decision, including distroless images, minimal package footprints, hermetic builds, and the degree of pipeline automation, in service of that goal. “Distroless” means no package manager, no shell, just the application and what it strictly needs to run.

Why does this matter? When you pull a third-party container image today, you inherit its vulnerabilities and you’re on the hook for managing them. Pull a Hummingbird image and the team’s pipeline has already done the CVE triage, the patching, and the rebuild – you get to skip CVE hell. (If you’re curious, current CVE status across all images and variants is published live at the Hummingbird catalog).

Over the past eight months, the team has built a catalog of 49 unique minimal, hardened, distroless container images (that’s 157 variants including FIPS and multi-arch) covering Python, Go, Node.js, Rust, Ruby, OpenJDK, .NET, PostgreSQL, nginx, and dozens more. Distroless means no package manager, no shell, just the application and what it strictly needs to run.

How it’s built

The infrastructure behind this is a Konflux-based pipeline. It uses fully isolated, reproducible builds from pinned package lists, efficient incremental updates via chunkah (a tool the Hummingbird team built to ensure the system re-downloads only changed parts of an image), and continuous vulnerability scanning via Syft and Grype. When a vulnerability is patched upstream, the pipeline finds it, rebuilds, tests, and ships.

95%+ of the packages in every Hummingbird image come straight from Fedora Rawhide, unmodified. The build system pulls the remaining packages directly from upstream when Rawhide doesn’t yet carry them or isn’t new enough, and the team contributes changes back into Fedora. If that sounds like Fedora CoreOS, that’s because it’s a related idea, but serving a different use case. CoreOS is a minimal host for orchestrated workloads. Hummingbird serves developers who need to deploy multiple versions of runtimes (Python 3.11–3.14, Go 1.25–1.26, Node.js 20–25) in parallel and manage each version’s lifecycle independently.

The Hummingbird factory independently builds packages so they carry their own identity. This means each package can have a separate life cycle, patching policy, and CVE feed (specifically, a vulnerability feed that Red Hat’s Product Security team maintains). Every package ships with machine-readable vulnerability data that tells you not just which CVEs exist, but which ones actually affect your workload.

The OS as a container image

The challenges that Project Hummingbird seeks to address in userspace exist at the OS level as well, so we want to apply the same approach to addressing those challenges. This is where Fedora Hummingbird comes in. This image is already live at https://quay.io/repository/hummingbird-community/bootc-os. The team delivers this full Linux OS as an OCI image, and they build it using the same Konflux pipeline and hermetic RPM-locking approach as the rest of the Hummingbird catalog. Multi-arch: x86_64 and aarch64.

Under the hood, Fedora Hummingbird will use the ARK kernel (Always Ready Kernel) from the CKI project (already running in Fedora today) which tracks Linus’ mainline directly. The benefit of leveraging the CKI project is the curated kernel configuration and elaborate engineering framework that includes extensive testing around a fast-moving kernel stream.

The Fedora bootable containers initiative laid out the groundwork for all of this. The idea is that the OS is an OCI image, built and distributed like any other container, and updated atomically with rollback built in. No partial update states. No configuration drift. The root filesystem is read-only. Any writeable state lives in /var and /etc, cleanly separated from the OS content.

The Hummingbird bootc OS image boots today. What’s still in progress is the integration work. The image is currently a mix of Hummingbird-built RPMs and Fedora packages, and we’re working out how to bring the two closer together. That’s exactly the kind of work we’d love to collaborate on.

Hummingbird in the Fedora community

Many members of the Hummingbird team are already Fedora contributors and package maintainers – maintainers of Podman, and other container tools that Fedora and the broader Linux ecosystem depend on, as well as maintainers of Fedora CoreOS. Members of the Fedora community contributed the bootable containers work that underpins Fedora Hummingbird. Now those members are continuing the work as part of Hummingbird. Moving forward, we’d like to make Hummingbird a part of the Fedora Project so that it can benefit and grow within that same community.

The Hummingbird pipeline already builds and publishes a set of container images based entirely on Fedora Rawhide at quay.io/organization/hummingbird-rawhide. The team has already started bringing improvements back to Fedora. These include container-specific optimizations, bugs found in .spec files, and more. The vulnerability feed that ships with Hummingbird packages is something we think could benefit the broader Fedora ecosystem too.

Getting started

Here are some quick-start instructions for getting a virtual machine up and running:

1. Create the image

sudo podman run --rm --privileged --pull=newer \ --security-opt label=type:unconfined_t \ -v /tmp/bib-config.toml:/config.toml:ro \ -v /var/lib/libvirt/images:/output \ -v /var/lib/containers/storage:/var/lib/containers/storage \ quay.io/centos-bootc/bootc-image-builder:latest \ --type qcow2 --rootfs ext4 \ quay.io/hummingbird-community/bootc-os:latest

2. Rename the image

sudo mv /var/lib/libvirt/images/qcow2/disk.qcow2 \ /var/lib/libvirt/images/fedora-hummingbird.dc2.crunchtools.com \ && sudo rmdir /var/lib/libvirt/images/qcow2

3. Create a virtual machine

sudo virt-install --connect qemu:///system \ --name fedora-hummingbird.dc2.crunchtools.com \ --memory 4096 --vcpus 2 \ --disk /var/lib/libvirt/images/fedora-hummingbird.dc2.crunchtools.com,format=qcow2 \ --import --os-variant fedora-unknown \ --network network=default,model=virtio \ --graphics vnc --noautoconsole

Get involved

When you’re ready to try it, there’s no registration form, no subscription-manager, no entitlements required. The code is already there and the pipeline is already running — we’d love more eyes on it. Here’s how to jump in:

  • Try the image: You can find instructions on using the image on Quay
  • File issues and feedback: anything broken, missing, or surprising is worth reporting at this stage
  • Contribute: the project currently lives at gitlab.com/redhat/hummingbird/containers — establishing a home in Fedora’s own infrastructure is part of the work ahead
  • Join the conversation: visit the SIG page for info on our getting-started sessions.

Fedora has always been where the community proves out new Linux ideas before they matter everywhere else. Fedora Hummingbird is an experiment for image-based, continuously-maintained operating systems, and we think it’s ready for the community to kick the tires.

Posted on — Leave a comment

What’s New in Fedora KDE Plasma Desktop 44

Fedora has released Fedora KDE Plasma Desktop Edition 44 to the public.

The Fedora KDE Plasma Desktop Edition is suitable for many needs.  It combines the reliable and trusted Fedora Linux base with the KDE Plasma Desktop environment.  It provides a selection of KDE applications that are simple by default, but powerful when needed.

KDE Plasma 6.6

The KDE community makes your life easier with the latest release of KDE Plasma. It builds upon the foundations of Plasma 6 to provide a seamless, friendly, and familiar experience.

Fedora KDE 44 ships with Plasma 6.6.4 featuring:

  • Custom global theme creation by saving the current theme setup
  • More options for using color accent in windows with tint intensity for window frames
  • Support for connecting to Wi-Fi networks by scanning QR codes
  • Per-application volume adjustment from the task manager
  • New grayscale filter for colorblindness correction
  • New screen magnifier feature that tracks the mouse pointer
  • New “Slow keys” and “reduced motion” settings
  • Spectacle can do OCR scanning of images to capture text
  • Per-window filter from screencast through the menu in the title bar

There’s so much more detail available in the Plasma 6.6 release announcement.

Fedora KDE 44 specific updates

Beyond just the updates included in KDE Plasma 6.6, there are some major new features with Fedora KDE on Fedora Linux 44.

  • Fresh installations now use the brand-new Plasma Setup and Plasma Login Manager. These provide a more cohesive and integrated experience from the moment the computer is powered on the first time. The installation process has been simplified. It now enables you to easily set up a computer with Fedora KDE Plasma Desktop for a friend or a loved one.
  • The on-screen keyboard uses the new Plasma Keyboard, providing a fresh and future-forward implementation for keyboard input.

Fedora Linux 44 general updates

Some broader changes in Fedora Linux also directly impact Fedora KDE Plasma Desktop Edition, notably:

  • PackageKit now uses version 5 of the DNF package manager as the backend.
  • Support for select Qualcomm-based laptops.
  • The /etc/pki/tls/cert.pem file no longer exists by default. This may impact some programs that expect this file to provide system CA certificates instead of leveraging behaviors built into cryptographic security libraries to offer this information.

Fedora Ready is ready for Fedora KDE

The Fedora KDE Plasma Desktop 44 edition is fully supported within the Fedora Ready program. Fedora KDE is actively engaging with hardware vendors to support Fedora KDE Plasma Desktop on their devices.

We are pleased to announce that Star Labs offers preinstalled Fedora KDE Plasma Desktop as an option for their portfolio of devices. As makers of computers with an open source ethos embedded into the core of their products with even open source firmware powered by Coreboot, they share many of the same principles the Fedora community values. This is a very exciting moment for Fedora KDE and we look forward to deepening our collaboration with Fedora Ready participants and extending to other vendors. If you are a vendor potentially interested in Fedora Ready, please reach out!

Wrap-up

The Fedora KDE SIG hopes that you’ll find the Fedora KDE Plasma Desktop 44 to be a wonderful experience. When you’re ready to try it, click here for download links and verification instructions. If you’d like to learn more, check out the Fedora KDE Plasma Desktop website.

Posted on — Leave a comment

Sealed Fedora Atomic Desktop bootable container images

I’m happy to announce that we have sealed bootable container images ready for testing for the Fedora Atomic Desktops!

What are sealed bootable container images?

Sealed bootable container images include all the components needed to create a fully verified boot chain, from the firmware to the operating system composefs image. This relies on Secure Boot and thus only supports system booting with UEFI on x86_64 & aarch64.

The components are:

  • systemd-boot as bootloader
  • a Unified Kernel Image (UKI) which includes the Linux kernel, an initrd and the kernel command line
  • a composefs repository with fs-verity enabled. This is managed by bootc.

Both systemd-boot and the UKI are signed for Secure Boot. The images are test images so the components are not signed with the official keys from Fedora.

The main direct benefit that we will get from this support is that we will be able to enable passwordless disk unlocking using the TPM in a way that will be reasonably secure by default.

How do I test those images?

See the instructions at github.com/travier/fedora-atomic-desktops-sealed on how to give the pre-built container and disk images a try and how to build your own.

We welcome testing and feedback! Please see the list of known issues and report new issue at github.com/travier/fedora-atomic-desktops-sealed. We’ll redirect them as needed to the right upstream projects.

Beware, those are testing images. The root account does not have a password set and sshd is enabled, by default, to make debugging easier. The UKI and systemd-boot are signed for Secure Boot but, since those are test images, they are not signed with the official keys from Fedora. Don’t use those images in production.

Where can I get more details about how this works?

If you want to know more about how sealed images work (i.e. how we make bootable containers, UKI and composefs work together to create a verified boot chain), see the following presentations and documentation:

Thanks to all the contributors that made this possible, notably (but non exhaustively) from the following projects: bootc & bcvk, composefs & composefs-rs, chunkah, podman & buildah and systemd.

Posted on — Leave a comment

What’s New in Fedora Workstation 44

This article highlights a few noteworthy changes in the latest release of Fedora Workstation that we think you will love. Upgrade today from the official website, or upgrade your existing install using GNOME Software or through the terminal with dnf system-upgrade.

GNOME 50

Fedora Linux 44 Workstation ships with the latest GNOME release, GNOME 50. This comes with a long list of refinements to your desktop, including everything from accessibility, to color management and remote desktop.

As part of the Digital Wellbeing initiative, new native Parental Controls let you set screen time limits and bedtimes directly from Settings.

Many of the applications that are installed by default on the Fedora Workstation have also seen improvements, from the Document Viewer to the File Manager and the Calendar.

To learn more about these and other changes, you can read the GNOME 50 release notes.

Wrap-up

Be sure to check out the Fedora Linux 44 Change Set wiki for even more details about all the features and changes that went into Fedora Linux 44. Use the Fedora Discussion forum or Fedora’s Matrix chat server if you want to converse with the Fedora community about this new release!

Posted on — Leave a comment

The Fedora Linux 44 Release is Here!

I’m excited to announce that Fedora Linux 44 is here! Keep reading to discover highlights of Fedora Linux 44, or if you are ready, just jump right in and give Fedora Linux 44 a try!

Thanks to everyone who helped!

Thank you and congrats to everyone who has contributed to this release. And thanks to everyone who showed up for the virtual release party last Friday. We celebrated a little early this year, just after the go/no-go meeting made the release official. If you weren’t able to join us live, you can watch the recording and hear about some of the great work from the contributors involved.

Looking to upgrade?

If you have an existing system, Upgrading Fedora Linux to a New Release is easy. In most cases, it’s not very different from just rebooting for regular updates, except you’ll have a little more time to grab a coffee.

Ready to Fresh Install?

If this is your first time running Fedora Linux, or if you just want to start fresh with Fedora, download the install media for our flagship Editions (Workstation, KDE Plasma Desktop, Cloud, Server, CoreOS, IoT), or one of our Atomic Desktops (Silverblue, Kinoite, Cosmic, Budgie, Sway), or alternate desktop options (like Cinnamon, Xfce, Sway, or others).

What’s new?

As usual with Fedora Linux, there are just too many individual changes and improvements to go over in detail. You’ll want to take a look at the release notes for that.

Notable User Visible Changes

Anaconda

For those of you installing fresh Fedora Linux 44 Spins, you may notice a change in how Anaconda handles network devices. Anaconda now only creates network profiles for devices configured during installation (by boot options, kickstart, or interactively in UI) instead of providing default profiles for all devices. This change will simplify post-installation network configuration for users who need to customize after installation.

Workstation

Fedora Linux 44 Workstation ships with the latest GNOME release, GNOME 50. This comes with a long list of refinements to your desktop, including everything from accessibility to color management and remote desktop. Many of the applications that are installed by default on Fedora Workstation have also seen improvements, from Document Viewer to File Manager and Calendar. To learn more about these and other changes, you can read the GNOME 50 release notes.

KDE Plasma Desktop

KDE Plasma Desktop: If you are a KDE user, you should also notice a couple of very obvious changes. Fedora KDE Plasma Desktop 44 is based on the latest Plasma 6.6, which includes the new Plasma Login Manager and Plasma Setup to provide a more cohesive and integrated experience from the moment the computer is powered on for the first time. The installation process has been simplified, enabling you to easily set up Fedora KDE Plasma Desktop for a computer for a friend or a loved one.
 

Plumbing Upgrades

Beyond the user-visible changes, there are some important plumbing changes user should be aware of.

OpenSSL Cert File Handling Improvements

The loading time of OpenSSL has been improved by making use of directory-hash support for ca-certificates. This improvement required changes to where some certificate bundles are stored on the filesystem. You can read the specific Change details for more information.

The MariaDB default version is now 11.8

MariaDB packages use a versioned package layout, which allows Fedora to deliver both, mariadb-10.11 and mariadb-11.8 for users.  The “distribution default” unversioned MariaDB packages now install the 11.8 versions in Fedora Linux 44. User doing upgrades to Fedora Linux 44 won’t notice the change in the default. For new users installing MariaDB for the first time, unless you specify the version, you’ll now get 11.8 by default.

Wine NTSYNC

The NTSYNC kernel module is enabled for select packages by package recommendation (notably Wine and Steam), which can improve compatibility and performance when running Windows applications (especially games).  When packages that recommend the wine-ntsync package are installed, the package recommendation ensures NTSYNC is configured automatically on subsequent boots, so that users don’t have to manually enable NTSYNC.

Fedora Cloud boot partition using Btrfs

The /boot partition has been replaced with a Btrfs subvolume for Fedora Cloud images that support it.  This results in better space utilization and smaller images.

If you hit a snag

If you run into a problem, visit our Ask Fedora user support forum. This forum includes a category where we collect common issues and solutions or work-arounds.

Just drop by and say “hello”

Drop by our “virtual watercooler” on Fedora Discussion and join a conversation, share something interesting, and introduce yourself. We’re always glad to see new people!

Posted on — Leave a comment

Fedora Asahi Remix 43 is now available

We are happy to announce the general availability of Fedora Asahi Remix 43. This release brings Fedora Linux 43 to Apple Silicon Macs.

Fedora Asahi Remix is developed in close collaboration with the Fedora Asahi SIG and the Asahi Linux project. This release incorporates all the exciting improvements brought by Fedora Linux 43. Notably, package management is significantly upgraded with RPM 6.0 and the new DNF5 backend for PackageKit for Plasma Discover and GNOME Software ahead of Fedora Linux 44. It also continues to provide extensive device support. This includes newly added support for the Mac Pro, microphones in M2 Pro/Max MacBooks, and 120Hz refresh rate for the built-in displays for MacBook Pro 14/16 models.

Fedora Asahi Remix offers KDE Plasma 6.6 as our flagship desktop experience. It contains all of the new and exciting features brought by Fedora KDE Plasma Desktop 43. It also features a custom Calamares-based initial setup wizard. A GNOME variant is also available, featuring GNOME 49, with both desktop variants matching what Fedora Linux offers. Fedora Asahi Remix also provides a Fedora Server variant for server workloads and other types of headless deployments. Finally, we offer a Minimal image for users that wish to build their own experience from the ground up.

You can install Fedora Asahi Remix today by following our installation guide. Existing systems running Fedora Asahi Remix 41 or 42 should be updated following the usual Fedora upgrade process. Upgrades via GNOME’s Software application are unfortunately not supported. Either KDE’s Plasma Discover or DNF’s System Upgrade command must be used.

Please report any Remix-specific issues in our tracker, or reach out in our Discourse forum or our Matrix room for user support.

Posted on — Leave a comment

Contribute to Fedora 44 KDE and GNOME Test Days

test days

Fedora test days are events where anyone can help make certain that changes in Fedora Linux work well in an upcoming release. Fedora community members often participate, and the public is welcome at these events. If you’ve never contributed to Fedora before, this is a perfect way to get started.

There are two test periods occurring in the coming days:

  • Monday February 2 through February 9 is to test the KDE Plasma 6.6.
  • Wednesday February 11 through February 13 is to test GNOME 50 Desktop.

Come and test with us to make Fedora 44 even better. Read more below on how to do it.

KDE Plasma 6.6

Our Test Day focus on making KDE work better on all your devices. We are improving core features for both Desktop and Mobile, starting with Plasma Setup, a new and easy way to install the system. This update also introduces the Plasma Login Manager to startup experience feel smoother, along with Plasma Keyboard—a smart on-screen keyboard made for tablets and 2-in-1s so you can type easily without a physical keyboard.

GNOME 50 Desktop

Our next Test Day focuses on GNOME 50 in Fedora 44 Workstation. We will check the main desktop and the most important apps to make sure everything works well. We also want you to try out the new apps added in this version. Please explore the system and use it as you normally would for your daily work to see how it acts during real use.

What do I need to do?

  • Make sure you have a Fedora Account (FAS).
  • Download test materials in advance where applicable, which may include some large files.
  • Follow the steps on the wiki test page one by one.
  • Send us your results through the app.

KDE Plasma 6.6 Test Day begins February 2nd: https://fedoraproject.org/wiki/Test_Day:2026-02-02_KDE_Plasma_6.6

GNOME 50 Test Day begins February 11th: https://fedoraproject.org/wiki/Test_Day:2026-02-11_GNOME_50_Desktop

Thank you for taking part in the testing of Fedora Linux 44!

Posted on — Leave a comment

Introducing the new bootc kickstart command in Anaconda

Anaconda installer now supports installation of bootc based bootable container images using the new bootc command. It has supported several types of payload to populate the root file system during installation. These include RPM packages (likely the most widely used option), tarball images you may know from Fedora Workstation, ostree, and rpm-ostree containers. The newest addition to the family, from a couple of weeks ago, is bootc-based bootable containers.

The difference is under the hood

We have added a new bootc kickstart command to Anaconda to support the new feature. This is very similar to the ostreecontainer command that has been present for some time. From the user’s perspective the two are very similar. The main difference, however, is under the hood.

One of the most important setup steps for a deployment is to create a requested partitioning in both cases. When the partitioning is ready, the ostreecontainer command makes Anaconda deploy the image onto the root filesystem using the ostree tool. It also executes the bootupctl tool to install and set up the bootloader. By contrast, with bootc containers installed using the bootc kickstart command, both the filesystem population and bootloader configuration is performed via the bootc tool. This makes the deployment process even more integrated.

The content of the container images used for installation is another difference. The bootc-enabled images are somewhat more versatile. Apart from installation using Anaconda, they provide a self-installing option via the bootc command executed from within a running container.

On the other hand, both options provide you with a way to install an immutable system based on a container image. This option may be useful for particular use cases where regular installation from RPM packages is not desired. This might be due to potentially lower deployment speed or inherent mutability of the resulting system.

A simple how-to

In practice, you’d likely use a custom container with pre-configured services, user accounts and other configuration bits and pieces. However, if you want to quickly try out how the new Anaconda’s feature works, you just need to follow a few simple steps. Starting with a Fedora Rawhide ISO:

First, take an existing container from a registry and create a minimal kickstart file instructing Anaconda to install the bootable container image:

# Beware that this kickstart file will wipe out the existing disk partitions.
# Use it only in an experimental/isolated environment or edit it accordingly!
zerombr
clearpart --all --initlabel
autopart lang en_US.UTF-8
keyboard us timezone America/New_York --utc
rootpw changeme bootc --source-imgref=registry:quay.io/fedora/fedora-bootc:rawhide

As a next step, place the kickstart file in some reachable location (e. g. HTTP server), point Anaconda to it by appending the following on the kernel command line:

inst.ks=http://url/to/kickstart 

Now start the installation.

Alternatively, you may use the mkksiso tool provided by the lorax package to embed the kickstart file into the installation ISO.

When installation and reboot is complete, you are presented with an immutable Fedora Rawhide system. It will be running on your hardware (or VM) installed from a bootable container image.

Is there anything more about bootc in Anaconda?

You may ask if this option is limited to Fedora Rawhide container images. Technically speaking, you can use the Fedora Rawhide installation ISO to install, for instance, a CentOS Stream container image:

bootc --source-imgref=registry:quay.io/centos-bootc/centos-bootc:stream10

Nevertheless, keep in mind that for now Anaconda will handle it as Fedora installation in such a case. This is because it runs from a Fedora Rawhide boot ISO. This may result in unforeseen problems, such as getting a btrfs-based partitioning that CentOS Stream won’t be able to boot from. This particular issue is easily overcome by explicitly telling Anaconda to use some different partitioning type, e. g. autopart –fstype=xfs. We would like to address the lack of container images handling based on the contained operating system or flavour in the future. For now, one just needs to take the current behavior into consideration when using the bootc command.

There are a couple more known limitations in Anaconda or bootc at this point in time. These include lack of support for partitioning setups spanning multiple disks, support for arbitrary mount points, or for installation from authenticated registries. But we hope it won’t take long to solve those shortcomings. There are also plans to make the new bootc command available even on the RHEL-10 platform.

We invite you to try out this new feature and share your experience, ideas or comments with the Installer team. We are looking forward to hearing from you in a thread on discussion.fedoraproject.org!