It’s time to show our appreciation of the amazing contributors who help shape the Feodra community.
The Fedora Project thrives through the devotion, guidance, and tireless drive of the contributors who consistently perform. From developing testcases to onboarding contributors, from technical writing to coordinating events, it is these vital champions who ensure that the community flourishes. In coordination with the Fedora Mentor Summit 2026, we will be returning to Flock To Fedora 2026 to announce the winners. This wiki reflects the deep gratitude and careful thought behind this community recognition program.
As we prepare to spotlight exceptional mentors and contributors across the Fedora Project, we invite you to help us appreciate the amazing contributors who help shape the community. Whether it is a veteran mentor who helped you begin your journey or a contributor whose efforts have truly reshaped the community’s landscape, now is the moment to celebrate them! Discover more about the nomination guidelines and submit your entry using the link provided below:
Let us appreciate the amazing contributors who help shape the community. Your nomination could be the recognition that might enable them to do more – and a moment of achievement for the entire community.
Writing a real-time audio plugin on Linux often conjures up images of a complex environment: C++, toolchains, CMake, CLAP / VST3 / LV2 SDK, ABI…
However, there is a much simpler approach : JSFX
This article offers a practical introduction to JSFX and YSFX on Fedora Linux: we’ll write some small examples, add a graphical VU meter, and then see how to use it as an CLAP / VST3 plugin in a native Linux workflow.
JSFX (JesuSonic Effects – created by REAPER [7]) allows you to write audio plugins in just a few lines, without compilation, with instant reloading and live editing.
Long associated with REAPER, they are now natively usable on Linux, thanks to YSFX [3], available on Fedora Linux in CLAP and VST3 formats via the Audinux repository ([4], [5]).
This means it’s possible to write a functional audio effect in ten lines, then immediately load it into Carla [8], Ardour [9], or any other compatible host, all within a PipeWire / JACK [11] environment.
A citation from [1] (check the [1] link for images):
In 2004, before we started developing REAPER, we created software designed for creating and modifying FX live, primarily for use with guitar processing.
The plan was that it could run on a minimal Linux distribution on dedicated hardware, for stage use. We built a couple of prototypes.
These hand-built prototypes used mini-ITX mainboards with either Via or Intel P-M CPUs, cheap consumer USB audio devices, and Atmel AVR microcontrollers via RS-232 for the footboard controls.
The cost for the parts used was around $600 each.
In the end, however, we concluded that we preferred to be in the software business, not the hardware business, and our research into adding multi-track capabilities in JSFX led us to develop REAPER. Since then, REAPER has integrated much of JSFX’s functionality, and improved on it.
So, as you can see, this technology is not that new. But the Linux support via YSFX [3] is rather new (Nov 2021, started by Jean-Pierre Cimalando).
A new programming language, but for what ? What would one would use JSFX for ?
This language is dedicated to audio and with it, you can write audio effects like an amplifier, a chorus, a delay, a compressor, or you can write synthesizers.
JSFX is good for rapid prototyping and, once everything is in place, you can then rewrite your project into a more efficient language like C, C++, or Rust.
JSFX for developers
Developing an audio plugin on Linux often involves a substantial technical environment. This complexity can be a hindrance when trying out an idea quickly.
JSFX (JesuSonic Effects) offers a different approach: writing audio effects in just a few lines of interpreted code, without compilation and with instant reloading.
Thanks to YSFX, available on Fedora Linux in CLAP and VST3 formats, these scripts can be used as true plugins within the Linux audio ecosystem.
This article will explore how to write a minimal amplifier in JSFX, add a graphical VU meter, and then load it into Carla as a CLAP / VST3 plugin.
The goal is simple: to demonstrate that it is possible to prototype real-time audio processing on Fedora Linux in just a few minutes.
No compilation environment is required: a text editor is all you need.
YSFX plugin
On Fedora Linux, YSFX comes in 3 flavours :
a standalone executable ;
a VST3 plugin ;
a CLAP plugin.
YSFX is available in the Audinux [5] repository. So, first, install the Audinux repository:
Here is a screenshot of YSFX as a VST3 plugin loaded in Carla Rack [8]:
You can :
Load a file ;
Load a recent file ;
Reload a file modified via the Edit menu ;
Zoom / Unzoom via the 1.0 button ;
Load presets ;
Switch between the Graphics and Sliders view.
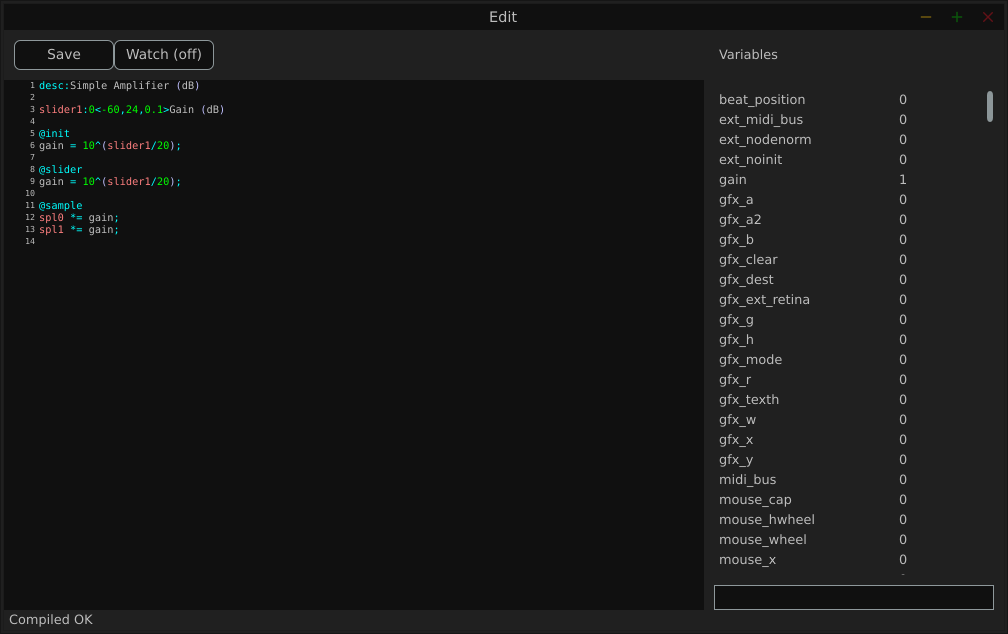
Here is a screenshot of the Edit window:
The Variables column displays all the variables defined by the loaded file.
Examples
We will use the JSFX documentation available at [4].
JSFX code is always divided into section.
@init : The code in the @init section gets executed on effect load, on samplerate changes, and on start of playback.
@slider : The code in the @slider section gets executed following an @init, or when a parameter (slider) changes
@block : The code in the @block section is executed before processing each sample block. Typically a block is the length as defined by the audio hardware, or anywhere from 128-2048 samples.
@sample : The code in the @sample section is executed for every PCM (Pulse Code Modulation) audio sample.
@serialize : The code in the @serialize section is executed when the plug-in needs to load or save some extended state.
@gfx [width] [height] : The @gfx section gets executed around 30 times a second when the plug-ins GUI is open.
A simple amplifier
In this example, we will use a slider value to amplify the audio input.
desc:Simple Amplifier
slider1:1<0,4,0.01>Gain @init
gain = slider1; @slider
gain = slider1; @sample
spl0 *= gain;
spl1 *= gain;
slider1, @init, @slider, @sample, spl0, spl1 are JSFX keywords [1].
Description:
slider1: create a user control (from 0 to 4 here);
@init: section executed during loading;
@slider: section executed when we move the slide;
@sample: section executed for each audio sample;
spl0 and spl1: left and right channels.
In this example, we just multiply the input signal by a gain.
Here is a view of the result :
An amplifier with a gain in dB
This example will create a slider that will produce a gain in dB.
desc:Simple Amplifier (dB)
slider1:0<-60,24,0.1>Gain (dB) @init
gain = 10^(slider1/20); @slider
gain = 10^(slider1/20); @sample
spl0 *= gain;
spl1 *= gain;
Only the way we compute the gain changes.
Here is a view of the result :
An amplifier with an anti-clipping protection
This example adds protection against clipping and uses a JSFX function for that.
desc:Simple Amplifier with Soft Clip
slider1:0<-60,24,0.1>Gain (dB) @init
gain = 10^(slider1/20); @slider
gain = 10^(slider1/20);
function softclip(x) ( x / (1 + abs(x));
); @sample
spl0 = softclip(spl0 * gain);
spl1 = softclip(spl1 * gain);
Here is a view of the result :
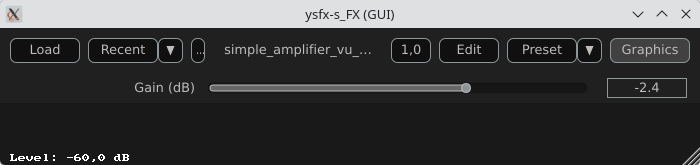
An amplifier with a VU meter
This example is the same as the one above, we just add a printed value of the gain.
desc:Simple Amplifier with VU Meter
slider1:0<-60,24,0.1>Gain (dB) @init
rms = 0;
coeff = 0.999; // RMS smoothing
gain = 10^(slider1/20); @slider
gain = 10^(slider1/20); @sample
// Apply the gain
spl0 *= gain;
spl1 *= gain;
// Compute RMS (mean value of the 2 channels)
mono = 0.5*(spl0 + spl1);
rms = sqrt((coeff * rms * rms) + ((1 - coeff) * mono * mono)); @gfx 300 200 // UI part
gfx_r = 0.1; gfx_g = 0.1; gfx_b = 0.1;
gfx_rect(0, 0, gfx_w, gfx_h); // Convert to dB
rms_db = 20*log(rms)/log(10);
rms_db < -60 ? rms_db = -60; // Normalisation for the display
meter = (rms_db + 60) / 60;
meter > 1 ? meter = 1; // Green color
gfx_r = 0;
gfx_g = 1;
gfx_b = 0; // Horizontal bar
gfx_rect(10, gfx_h/2 - 10, meter*(gfx_w-20), 20); // Text
gfx_r = gfx_g = gfx_b = 1;
gfx_x = 10;
gfx_y = gfx_h/2 + 20;
gfx_printf("Level: %.1f dB", rms_db);
The global structure of the code:
Apply the gain
Compute a smoothed RMS value
Convert to dB
Display a horizontal bar
Display a numerical value
Here is a view of the result :
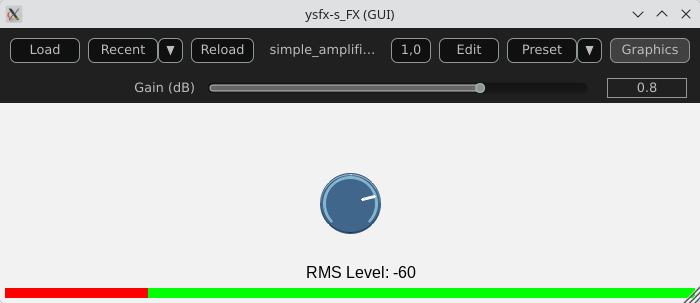
An amplifier using the UI lib from jsfx-ui-lib
In this example, we will use a JSFX UI library to produce a better representation of the amplifier’s elements.
Import and setup: The UI library is imported and then allocated memory (ui_setup) using @init;
UI controls: control_dial creates a thematic potentiometer with a label, integrated into the library;
Integrated VU meter: A small graph is drawn with ui_graph, normalizing the RMS value between 0 and 1;
UI structure: ui_start(“main”) prepares the interface for each frame. ui_push_height / ui_pop organize the vertical space.
Here is a view of the result :
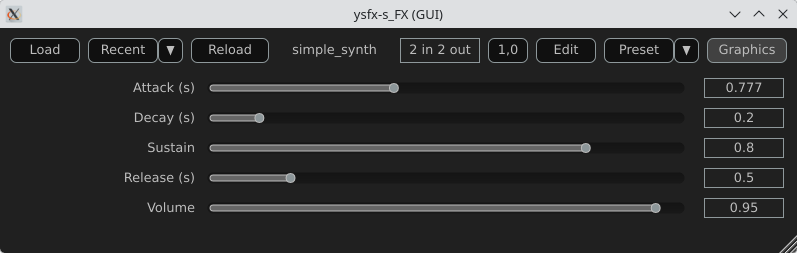
A simple synthesizer
Now, produce some sound and use MIDI for that.
The core of this example will be the ADSR envelope generator ([10]).
desc:Simple MIDI Synth (Mono Sine)
// Parameters
slider1:0.01<0.001,2,0.001>Attack (s)
slider2:0.2<0.001,2,0.001>Decay (s)
slider3:0.8<0,1,0.01>Sustain
slider4:0.5<0.001,3,0.001>Release (s)
slider5:0.5<0,1,0.01>Volume @init
phase = 0;
note_on = 0;
env = 0;
state = 0; // 0=idle,1=attack,2=decay,3=sustain,4=release @slider
// Compute the increment / decrement for each states
attack_inc = 1/(slider1*srate);
decay_dec = (1-slider3)/(slider2*srate);
release_dec = slider3/(slider4*srate); @block
while ( midirecv(offset, msg1, msg23) ? ( status = msg1 & 240; note = msg23 & 127; vel = (msg23/256)|0; // Note On status == 144 && vel > 0 ? ( freq = 440 * 2^((note-69)/12); phase_inc = 2*$pi*freq/srate; note_on = 1; state = 1; ); // Note Off (status == 128) || (status == 144 && vel == 0) ? ( state = 4; ); );
); @sample
// ADSR Envelope [10]
state == 1 ? ( // Attack env += attack_inc; env >= 1 ? ( env = 1; state = 2; );
); state == 2 ? ( // Decay env -= decay_dec; env <= slider3 ? ( env = slider3; state = 3; );
); state == 3 ? ( // Sustain env = slider3;
); state == 4 ? ( // Release env -= release_dec; env <= 0 ? ( env = 0; state = 0; );
); // Sine oscillator
sample = sin(phase) * env * slider5;
phase += phase_inc;
phase > 2*$pi ? phase -= 2*$pi; // Stereo output
spl0 = sample;
spl1 = sample;
Global structure of the example:
Receives MIDI via @block;
Converts MIDI note to frequency (A440 standard);
Generates a sine wave;
Applies an ADSR envelope;
Outputs in stereo.
Here is a view of the result :
Comparison with CLAP / VST3
JSFX + YSFX
Advantages of JSFX:
No compilation required;
Instant reloading;
Fast learning curve;
Ideal for DSP prototyping;
Portable between systems via YSFX.
Limitations:
Less performant than native C++ for heavy processing;
Less suitable for “industrial” distribution;
Simpler API, therefore less low-level control.
CLAP / VST3 in C/C++
Advantages:
Maximum performance;
Fine-grained control over the architecture;
Deep integration with the Linux audio ecosystem;
Standardized distribution.
Limitations:
Requires a complete toolchain;
ABI management/compilation;
Longer development cycle.
Conclusion
A functional audio effect can be written in just a few lines, adding a simple graphical interface, and then loaded this script as an CLAP / VST3 plugin on Fedora Linux. This requires no compilation, no complex SDK, no cumbersome toolchain.
JSFX scripts don’t replace native C++ development when it comes to producing optimized, widely distributable plugins. However, they offer an exceptional environment for experimentation, learning signal processing, and rapid prototyping.
Thanks to YSFX, JSFX scripts now integrate seamlessly into the Linux audio ecosystem, alongside Carla, Ardour, and a PipeWire-based audio system.
For developers and curious musicians alike, JSFX provides a simple and immediate entry point into creating real-time audio effects on Fedora Linux.
Available plugins
ysfx-chokehold
A free collection of JS (JesuSonic) plugins for Reaper.
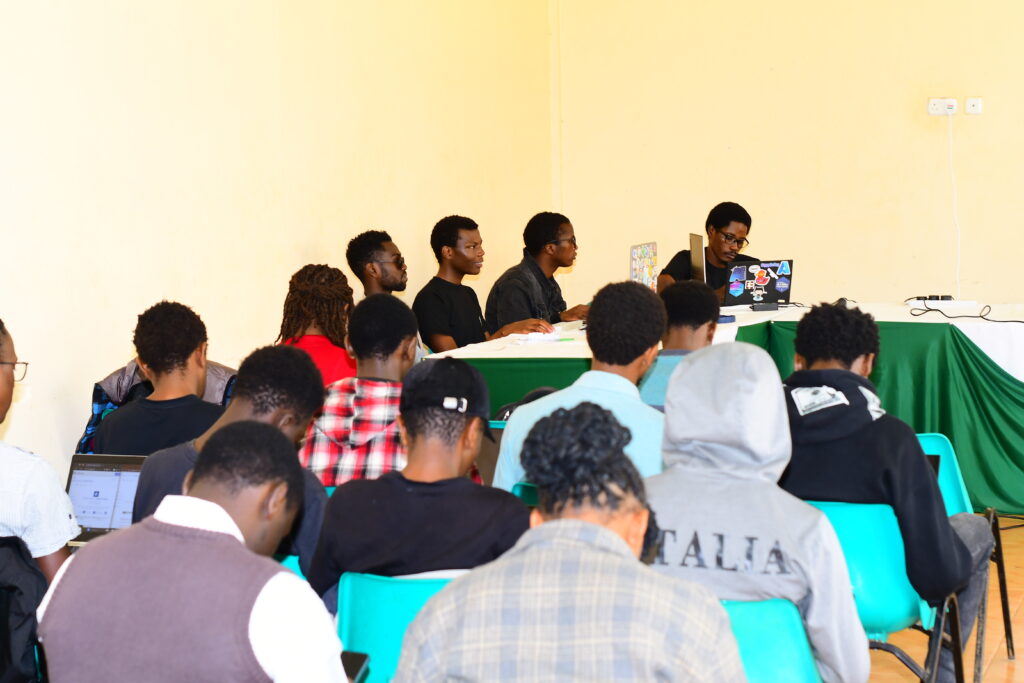
We did it again, Fedora at Kirinyaga university in Kenya. This time, we didn’t just introduce what open source is – we showed students how to participate and actually contribute in real time.
Many students had heard of open source before, but were not sure how to get started or where they could fit. We did it hands-on and began with a simple explanation of what open source is: people around the world working together to create tools, share knowledge, and support each other. Fedora is one of these communities. It is open, friendly, and built by different people with different skills.
We talked about the many ways someone can contribute, even without deep technical experience. Documentation, writing guides, design work, translation, testing software, and helping new contributors are all important roles in Fedora. Students learned that open source is not only for “experts.” It is also for learners. It is a place to grow.
Hands-on Documentation Workshop
After the introduction, we moved into a hands-on workshop. We opened Fedora Docs and explored how documentation is structured. Students learned how to find issues, read contribution instructions, and make changes step-by-step. We walked together through:
Opening or choosing an issue to work on
Editing documentation files
Making a pull request (PR)
Writing a clear contribution message
By the end of the workshop, students had created actual contributions that went to the Fedora project. This moment was important. It showed them that contributing is not something you wait to do “someday.” You can do it today.
Through the guidance of Cornelius Emase, I was able to make my first pull request to the Fedora Project Docs – my first ever contribution to the open-source world. ” – Student at Kirinyaga University
Thank you note
Huge appreciation to:
Jona Azizaj — for steady guidance and mentorship.
Mat H. — for backing the vision of regional community building.
Fedora Mindshare Team — for supporting community growth here in Kenya.
Computer Society of Kirinyaga — for hosting and bringing real energy into the room.
And to everyone who played a part – even if your name isn’t listed here, I see you. You made this possible.
Growing the next generation
The students showed interest, curiosity, and energy. Many asked how they can continue contributing and how to connect with the wider Fedora community. I guided them to Fedora Docs, Matrix community chat rooms, and how they can be part of the Fedora local meetups here in Kenya.
We are introducing open source step-by-step in Kenya. There is a new generation of students who want to be part of global technology work. They want to learn, collaborate, and build. Our role is to open the door and walk together(I have a discourse post on this, you’re welcome to add your views).
What Comes Next
This event is part of a growing movement to strengthen Fedora’s presence in Kenya. More events will follow so that learning and contributing can continue.
We believe that open source becomes strong when more people are included. Fedora is a place where students in Kenya can learn, grow, share, and contribute to something global.
We already had a Discourse thread running for this event – from the first announcement, planning, and budget proposal, all the way to the final workshop. Everything happened in the open. Students who attended have already shared reflections there, and anyone who wants to keep contributing or stay connected can join the conversation.
You can check the events photos submitted here on Google photos(sorry that’s not FOSS:))
Cornelius Emase, Your Friend in Open Source(Open Source Freedom Fighter)
The official dates and location are set for Flock to Fedora 2026, the premier annual conference for Fedora Project contributors. The event will take place from 14-16 June 2026, in Prague, Czechia.
For Flock 2026, we are returning to the Vienna House by Wyndham Andel’s Prague, located at:
Stroupeznickeho 21 Prague, 150 00 Czech Republic
While all three days will be full conference days, the arrangement of the schedule will change slightly in 2026. Sunday, 14 June, will be designated as Day 0, featuring workshops, team meetups, and hands-on contributor sessions. The main conference activities, including streamed content, the opening keynote, and other sessions, are scheduled for Monday, 15 June, and Tuesday, 16 June.
Coordinated Scheduling with DevConf CZ
Following community feedback from last year, Flock 2026 has been scheduled to align more closely with DevConf.CZ. The conference will conclude just before DevConf.CZ begins in Brno (18-20 June 2026). This compressed travel schedule is intended to make it easier for community members who wish to attend both events.
Call for Proposals & Conference Themes
The Call for Proposals (CFP) for Flock 2026 will open in early December 2025 and close shortly after FOSDEM 2026 (31 January – 1 February). Speaker confirmations are scheduled to be sent in March 2026.
For Flock 2026, we are taking a more focused approach to session content. The Fedora Council, FESCo, and the Mindshare Committee are shaping key themes for the CFP. All presentation and workshop submissions should align with one of these themes. More details will be shared when the CFP opens.
Planning for Flock 2026
Here is what you need to know to plan your attendance:
Registration: Conference registration is scheduled to open in January 2026.
Sponsorship: Is your company or organization interested in sponsoring Flock 2026? Our sponsorship prospectus for Flock 2026 is now available on the Flock 2026 website. Organizations interested in supporting Flock and the Fedora community are encouraged to review the prospectus and contact the organizing team with any questions.
Hotel Block: A discounted block of rooms is arranged at the conference hotel. More information about the discounted hotel block can be found on the Flock website.
Travel Day & Connections: 17 June is designated as a free travel day between Flock to Fedora 2026 and DevConf.CZ. Frequent bus and train connections are available for travel between Prague and Brno.
Sponsored Travel: We intend to offer sponsored travel again for Flock to Fedora 2026. More details will follow in December 2025.
Get Involved & Ask Questions
The official Flock to Fedora 2026 Matrix room, #flock:fedoraproject.org, is the best place to connect with organizers and other community members. We encourage you to join the channel for the latest updates and to ask any questions you may have.
We recognize that returning to the same city and venue for a second consecutive year is a departure from Flock’s tradition. This decision was made intentionally with two key goals in mind.
First, by working with a familiar venue, our organizing team can optimize its processes and plan further in advance. This stability for Flock to Fedora 2026 will give us more opportunity to improve our internal processes and explore new ways to incorporate community input into the design of Fedora’s flagship contributor conference.
Second, this allows us to plan for a significant change in 2027. The Flock organizing team is committed to exploring new locations for Flock 2027, with a particular focus on regions outside of North America and Europe. We acknowledge the travel difficulties many of our contributors in regions like LATAM and APAC face. We learned valuable lessons from past planning cycles and are eager to achieve this goal, while also recognizing that unforeseen circumstances can impact our plans. We will work with community members in these regions to explore possible options and conduct thorough research on pricing and availability for 2027.
We look forward to seeing you in Prague for Flock 2026, 14-16 June.
The kernel team is working on final integration for Linux kernel 6.3. This version was just recently released, and will arrive soon in Fedora Linux. As a result, the Fedora Linux kernel and QA teams have organized a test week from Sunday, May 07, 2023 to Sunday, May 14, 2023. Refer to the wiki page in this article for links to the test images you’ll need to participate. Please continue reading for details.
How does a test week work?
A test week is an event where anyone can help make sure changes in Fedora Linux work well in an upcoming release. Fedora community members often participate, and the public is welcome at these events. If you’ve never contributed before, this is a perfect way to get started.
To contribute, you only need to be able to do the following things:
Download test materials, which include some large files
Read and follow directions step by step
The wiki page for the kernel test day has a lot of good information on what and how to test. After you’ve done some testing, you can log your results in the test day web application. If you’re available on or around the days of the event, please do some testing and report your results. We have a document which provides all the necessary steps.
Happy testing, and we hope to see you on one of the test days.
Use the %autorelease and %autochangelog tags simplify package maintenance and make it easier to contribute packages to the Fedora Project. These rpmautospec tags cause no noticeable difference in the packages from the end user’s perspective. As of the Fedora Linux 38 release, package maintainers should use these new tags.
Information about package history
Every package in a distribution carries identifying information. For example, the latest version of Firefox is available as firefox-110.0-3.fc38.x86_64. This can be unpacked as:
a name (firefox),
a version (110.0),
a “release tag”, consisting of a packaging release version + a distribution marker + an architecture tag (3.fc38.x86_64).
In modern practice, the name and the version are supplied directly by the project upstream and unambiguously identify what was built. The release tag describes the downstream distro build (where, which distro, build count). This may sound natural, but in the past packagers would split parts of the upstream version into the release tag according to some rather complicated rules.
A package also contains useful information in its changelog.
Continuing with the Firefox example:
$ rpm -q --changelog firefox-110.0-3.fc38.x86_64 | head -n5
* Tue Feb 14 2023 Martin Stránský <stransky@redhat.com>- 110.0-3
- Updated to 110.0 build 3 * Mon Feb 13 2023 Martin Stránský <stransky@redhat.com>- 110.0-2
- Added fix for orca
The changelog is created by package maintainers. It describes changes to the package that are relevant to a user. New software versions, modified file paths, and important bugfixs are examples of things that would be mentioned in the changelog. Whitespace changes in packaging scripts and other cleanups are examples of things that would not be mentioned in the changelog. When things go well, users generally do not look at the changelog. However, the changelog is useful when a bug is found and people need to track down what changed, when, and why.
All this changelog information must be provided by the maintainer. When the maintainer builds a rpm package, they must provide this information in the appropriate fields of the package’s spec file.
For example, the firefox.spec might look like this:
Name: firefox
Version: 110.0
Release: 3%{dist}
...
%changelog
* Tue Feb 14 2023 Martin Stránský <stransky@redhat.com>- 110.0-3
- Updated to 110.0 build 3 * Mon Feb 13 2023 Martin Stránský <stransky@redhat.com>- 110.0-2
- Added fix for orca
...
This is the traditional way. Every time the maintainer makes a new build, they update the number in the Release field and add a corresponding entry in the %changelog section. For example, for the 110.0-3.fc38 build, Martin would have changed Release: 2%{dist} → Release: 3%{dist} and added the first paragraph under %changelog.
Packages in Fedora are maintained using git. This means that after making changes to the package, and adding some text to the changelog, the maintainer would also write a description of the changes in the git commit message. Often this is exactly the same text as the changelog. For example, for the 110.0-3.fc38 build, Martin wrote “Updated to latest 110.0 upstream build” in the git commit message. It should be noted that every commit in git also contains a name, the email address of the author, and a timestamp for the change. If this sounds a bit repetitive, that’s because it is. Thankfully, some of this can now be automated.
rpmautospec
The rpmautospec method takes advantage of the fact that the spec file is maintained in a git repository:
The purpose of the Release field is to identify the distro build number for a specific upstream Version. The Release field should be set to %autorelease and never changed again. The %autorelease macro provides a count of commits since the last commit that changed the Version field. This is nifty. Every time the packager changes the spec file, they have to make a commit to “save” the changes and do a build and the number in %autorelease will be incremented. When the Version is changed, the autorelease number is reset to 1.
The purpose of the git commit message is to summarize changes to the contents of the repository. The purpose of the %changelog section is to summarize changes to the package. The %autochangelog macro takes a git commit message, the author name, and the commit timestamp, and formats them in a way that is suitable for the %changelog section.
If Martin were to do another build, let’s say with a patch added, he would adjust the spec file adding a Patch line, and create a commit with:
$ git commit -a -m 'Add patch to fix rhbz#1000002'
The %autorelease field would be automatically increased by one, and the %autochangelog text would now start with:
* Thu Mar 23 2023 Martin Stránský <stransky@redhat.com>- 110.0-4
- Add patch to fix rhbz#1000002
What are the effects of the new workflow?
It is easiest to consider the effect for the users: no change. %autorelease and %autochangelog get replaced by “real” content before the package is built, and the binary package downloaded by users looks exactly the same.
For the packager, there is less busywork. The Release field is constant and the git commit text is reused for the changelog. I’ve glossed over the details here, but the git commit text can contain parts which are not included in the changelog text. It can even have commits that are completely elided from the changelog.
This automation also makes some mistakes less likely. For example:
The maintainer makes changes, but forgets to bump Release, and the build fails because a previous build with the same version-release already exists.
The maintainer makes changes, but forgets to describe them in %changelog, and users don’t know what changed.
The maintainer makes a changelog entry, but writes Tue instead of Thu, and rpm complains about an invalid date.
On the other hand, the packager has to be more disciplined. The text in the git commit message ends up visible to users. So it must be formatted accordingly. Every commit in git bumps the number in the release tag. The changelog is now formatted in the same specific style in all packages. Arguably, those are not huge limitations, but some adjustment of packager habits is required.
Using rpmautospec has a positive effect for external contributors. In Fedora, anyone who wants to contribute a change to the package is encouraged to open a pull request.
Unfortunately, for changes that touch the spec file, with traditional Release and %changelog, we have a conundrum. If the contributor does not update those in their commit, the maintainer has to do this before the build, and effectively the contribution is incomplete. If the contributor does update those in their commit, and the pull request is not merged immediately, it is likely that by the time it is merged the Release number will be out of date, the date in the %changelog will be in the past, and the spec file may even already have entries with later dates, and git will always show a merge conflict in the %changelog section.
With rpmautospec, all these problems go away. The release number is counted automatically. The date in the changelog is derived from the timestamp of when the patch was merged. And the changelog is generated from the stream of commits so there is no conflict to be had.
A specific variant of this contributor workflow occurs when the maintainer wants to copy (cherry-pick in git parlance) a commit to another branch. For example, because the important bugfix that was necessary in F38 also needs to be applied in F37, it is likely that, with rpmautospec, the commit can be applied without any changes to a different packaging branch.
Wrap-up
%autorelease and %autochangelog have been available for a while, but have now reached a level where they work nicely for common maintenance patterns and a great majority of packages; even if some some complicated corner cases are not yet supported. With Fedora 38, rpmautospec is now the recommended method. Hopefully, we will have happier maintainers and contributors with no negative changes noted by the users.
The kernel team is working on final integration for kernel 5.10. This version was just recently released, and will arrive soon in Fedora. As a result, the Fedora kernel and QA teams have organized a test week from Monday, January 04, 2021 through Monday, January 11, 2021. Refer to the wiki page for links to the test images you’ll need to participate. Read below for details.
How does a test week work?
A test week is an event where anyone can help make sure changes in Fedora work well in an upcoming release. Fedora community members often participate, and the public is welcome at these events. If you’ve never contributed before, this is a perfect way to get started.
To contribute, you only need to be able to do the following things:
Download test materials, which include some large files
Read and follow directions step by step
The wiki page for the kernel test day has a lot of good information on what and how to test. After you’ve done some testing, you can log your results in the test day web application. If you’re available on or around the day of the event, please do some testing and report your results. We have a document which provides all the steps written.
Happy testing, and we hope to see you on test day.
This article shows the reader how easy it is to get started using pods with Podman on Fedora. But what is Podman? Well, we will start by saying that Podman is a container engine developed by Red Hat, and yes, if you thought about Docker when reading container engine, you are on the right track. A whole new revolution of containerization started with Docker, and Kubernetes added the concept of pods in the area of container orchestration when dealing with containers that share some common resources. But hold on! Do you really think it is worth sticking with Docker alone by assuming it’s the only effective way of containerization? Podman can also manage pods on Fedora as well as the containers used in those pods.
Podman is a daemonless, open source, Linux native tool designed to make it easy to find, run, build, share and deploy applications using Open Containers Initiative (OCI) Containers and Container Images.
From the official Podman documentation at http://docs.podman.io/en/latest/
Why should we switch to Podman?
Podman is a daemonless container engine for developing, managing, and running OCI Containers on your Linux System. Containers can either be run as root or in rootless mode. Podman directly interacts with an image registry, containers and image storage.
Install Podman:
sudo dnf -y install podman
Creating a Pod:
To start using the pod we first need to create it and for that we have a basic command structure
$ podman pod create
The command above contains no arguments and hence it will create a pod with a randomly generated name. You might however, want to give your pod a relevant name. For that you just need to modify the above command a bit.
$ podman pod create --name climoiselle
The pod will be created and will report back to you the ID of the pod. In the example shown the pod was given the name ‘climoiselle’. To view the newly created pod is easy by using the command shown below:
$ podman pod list
Newly created pods have been deployed
As you can see, there are two pods listed here, one named darshna and the one created from the example named climoiselle. No doubt you notice that both pods already include one container, yet we sisn’t deploy a container to the pods yet.
What is that extra container inside the pod? This randomly generated container is an infra container. Every podman pod includes this infra container and in practice these containers do nothing but go to sleep. Their purpose is to hold the namespaces associated with the pod and to allow Podman to connect other containers to the pod. The other purpose of the infra container is to allow the pod to keep running when all associated containers have been stopped.
You can also view the individual containers within a pod with the command:
$ podman ps -a --pod
Add a container
The cool thing is, you can add more containers to your newly deployed pod. Always remember the name of your pod. It’s important as you’ll need that name in order to deploy the container in that pod. We’ll use the official ubuntu image and deploy a container using it running the top command.
$ podman run -dt --pod climoiselle ubuntu top
Everything in a Single Command:
Podman has an agile characteristic when it comes to deploying a container in a pod which you created. You can create a pod and deploy a container to the said pod with a single command using Podman. Let’s say you want to deploy an NGINX container, exposing external port 8080 to internal port 80 to a new pod named test_server.
$ podman run -dt --pod new:test_server -p 8080:80 nginx
Created a new pod and deployed a container together
Let’s check all pods that have been created and the number of containers running in each of them …
$ podman pod list
List of the containers, their state and number of containers running into them
Do you want to know a detailed configuration of the pods which are running? Just type in the command shown below:
podman pod inspect [pod's name/id]
Make it stop!
To stop the pods, we need to use the name or ID of the pod. With the information from podman’s pod list command, we can view the pods and their infra id. Simply use podman with the command stop and give the particular name/infra id of the pod.
$ podman pod stop climoiselle
Hey take a look!
My pod climoiselle stopped
After following this short tutorial, you can see how quickly you can use pods with podman on fedora. It’s an easy and convenient way to use containers that share resources and interact together.
We recently interviewed Ben Cotton on how he uses Fedora. This is part of a series on the Fedora Magazine. The series profiles Fedora users and how they use Fedora to get things done. Contact us on the feedback form to express your interest in becoming an interviewee.
Who is Ben Cotton?
If you follow the Fedora’ Community Blog, there’s a good chance you already know who Ben is.
Ben’s Linux journey started around late 2002. Frustrated with some issues on using Windows XP, and starting a new application administrator role at his university where some services were being run on FreeBSD. A friend introduced him to Red Hat Linux, when Ben decided it made sense to get more practice with Unix-like operating systems. He switched to Fedora full-time in 2006, after he landed a job as a Linux system administrator.
Since then, his career has included system administration, people management, support engineering, development, and marketing. Several years ago, he even earned a Master’s degree in IT Project Management. The variety of experience has helped Ben learn how to work with different groups of people. “A lot of what I’ve learned has come from making mistakes. When you mess up communication, you hopefully do a better job the next time.”
Besides tech, Ben also has a range of well-rounded interests. “I used to do a lot of short fiction writing, but these days I mostly write my opinions about whatever is on my mind.” As for favorite foods, he claims “All of it. Feed me.”
Additionally, Ben has taste that spans genres. His childhood hero was a character from the science fiction series “Star Trek: The Next Generation”. “As a young lad, I wanted very much to be Wesley Crusher.” His favorite movies are a parody film and a spy thriller: “‘Airplane!’ and ‘The Hunt for Red October’” respectively.
When asked for the five greatest qualities he thinks someone can possess, Ben responded cleverly: “Kindness. Empathy. Curiosity. Resilience. Red hair.”
Ben wearing the official “#action bcotton” shirt
His Fedora Story
As a talented writer who described himself as “not much of a programmer”, he selected the Fedora Docs team in 2009 as an entry point into the community. What he found was that “the Friends foundation was evident.” At the time, he wasn’t familiar with tools such as Git, DocBook XML, or Publican (docs toolchain at the time). The community of experienced doc writers helped him get on his feet and freely gave their time. To this day, Ben considers many of them to be his friends and feels really lucky to work with them. Notably “jjmcd, stickster, sparks, and jsmith were a big part of the warm welcome I received.”
Today, as a senior program manager, he describes his job as “Chief Cat Herding Officer”- as his job is largely composed of seeing what different parts of the project are doing and making sure they’re all heading in the same general direction.
Despite having a huge responsibility, Ben also helps a lot in his free time with tasks outside of his job duties, like website work, CommBlog and Magazine editing, packaging, etc… none of which are his core job responsibilities. He tries to find ways to contribute that match his skills and interests. Building credibility, paying attention, developing relationships with other contributors, and showing folks that he’s able to help, is much more important to him than what his “official” title is.
When thinking towards the future, Ben feels hopeful watching the Change proposals come in. “Sometimes they get rejected, but that’s to be expected when you’re trying to advance the state of the art. Fedora contributors are working hard to push the project forward.“
The Fedora Community
As a longtime member of the community, Ben has various notions about the Fedora Project that have been developed over the years. For starters, he wants to make it easier to bring new contributors on board. He believes the Join SIG has “done tremendous work in this area”, but new contributors will keep the community vibrant.
If Ben had to pick a best moment, he’d choose Flock 2018 in Dresden. “That was my first Fedora event and it was great to meet so many of the people who I’ve only known online for a decade.”
As for bad moments, Ben hasn’t had many. Once he accidentally messed up a Bugzilla query resulting in accidental closure of hundreds of bugs and has dealt with some frustrating mailing list threads, but remains positive, affirming that “frustration is okay.”
To those interested in becoming involved in the Fedora Project, Ben says “Come join us!” There’s something to appeal to almost anyone. “Take the time to develop relationships with the people you meet as you join, because without the Friends foundation, the rest falls apart.”
Pet Peeves
One issue he finds challenging is a lack of documentation. “I’ve learned enough over the years that I can sort of bumble through making code changes to things, but a lot of times it’s not clear how the code ties together.” Ben sees how sparse or nonexistent documentation can be frustrating to newcomers who might not have the knowledge that is assumed.
Another concern Ben has is that the “interesting” parts of technology are changing. “Operating systems aren’t as important to end users as they used to be thanks to the rise of mobile computing and Software-as-a-Service. Will this cause our pool of potential new contributors to decrease?”
Likewise, Ben believes that it’s not always easy to get people to understand why they should care about open source software. “The reasons are often abstract and people don’t see that they’re directly impacted, especially when the alternatives provide more immediate convenience.”
What Hardware?
For work, Ben has a ThinkPad X1 Carbon running Fedora 33 KDE. His personal server/desktop is a machine he put together from parts that runs Fedora 33 KDE. He uses it as a file server, print server, Plex media server, and general-purpose desktop. If he has some spare time to get it started, Ben also has an extra laptop that he wants to start using to test Beta releases and “maybe end up running rawhide on it”.
What Software?
Ben has been a KDE user for a decade. A lot of his work is done in a web browser (Firefox for work stuff, Chrome for personal). He does most of his scripting in Python these days, with some inherited scripts in Perl.
Notable applications that Ben uses include:
Cherrytree for note-taking
Element for IRC
Inkscape and Kdenlive when he needs to edit videos.
Vim on the command line and Kate when he wants a GUI
The kernel team is working on final integration for kernel 5.9. This version was just recently released, and will arrive soon in Fedora. As a result, the Fedora kernel and QA teams have organized a test week from Monday, October 26, 2020 through Monday, November 02, 2020. Refer to the wiki page for links to the test images you’ll need to participate. Read below for details.
How does a test week work?
A test week is an event where anyone can help make sure changes in Fedora work well in an upcoming release. Fedora community members often participate, and the public is welcome at these events. If you’ve never contributed before, this is a perfect way to get started.
To contribute, you only need to be able to do the following things:
Download test materials, which include some large files
Read and follow directions step by step
The wiki page for the kernel test day has a lot of good information on what and how to test. After you’ve done some testing, you can log your results in the test day web application. If you’re available on or around the day of the event, please do some testing and report your results. We have a document which provides all the steps written.
Happy testing, and we hope to see you on test day.


 Find more information here: https://fedoraproject.org/wiki/Contributor_Recognition_Program_2026
 Deadline: 15th May 2026
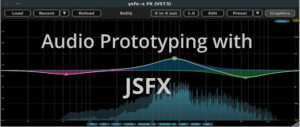


 ”
”