Posted on Leave a comment

PHP curl_multi: Send Multiple API Requests Concurrently

Calling one API from PHP is simple. Calling three APIs one after another is also simple, but it can make the user wait far longer than necessary. Each request gets its own private turn. Very polite. Not very fast.

Suppose a page needs a customer profile, recent orders, and notifications. If those APIs take 700, 1,100, and 900 milliseconds, sequential requests need about 2.7 seconds. With PHP curl_multi, the requests can run concurrently. The total time then stays close to the slowest request, which is about 1.1 seconds in this example.

This tutorial builds a working benchmark that compares both approaches. It also handles timeouts, HTTP status codes, cURL errors, invalid JSON, and connection limits. If you need a refresher on individual requests first, see this PHP cURL guide.

Quick Answer

Use curl_multi_init() to create a multi handle. Add each request with curl_multi_add_handle(), drive the transfers with curl_multi_exec(), and wait efficiently with curl_multi_select().

The requests perform network I/O concurrently. This is not PHP multithreading, and it does not make CPU-heavy work run in parallel.

<?php $urls = [ 'profile' => 'https://api.example.com/profile', 'orders' => 'https://api.example.com/orders', 'notifications' => 'https://api.example.com/notifications'
]; $multiHandle = curl_multi_init();
$handles = []; foreach ($urls as $name => $url) { $handle = curl_init($url); curl_setopt_array($handle, [ CURLOPT_RETURNTRANSFER => true, CURLOPT_CONNECTTIMEOUT => 3, CURLOPT_TIMEOUT => 10 ]); curl_multi_add_handle($multiHandle, $handle); $handles[$name] = $handle;
} do { $status = curl_multi_exec($multiHandle, $running); if ($status !== CURLM_OK) { throw new RuntimeException(curl_multi_strerror($status)); } if ($running > 0 && curl_multi_select($multiHandle, 1.0) === -1) { usleep(1000); }
} while ($running > 0); $responses = []; foreach ($handles as $name => $handle) { $responses[$name] = curl_multi_getcontent($handle); curl_multi_remove_handle($multiHandle, $handle); curl_close($handle);
} curl_multi_close($multiHandle);

This is the basic flow. The complete project adds response validation, individual error reporting, timing data, and safer request settings.

What This PHP curl_multi Example Builds

The example creates a small dashboard that requests data from three independent API endpoints:

  • A customer profile endpoint with a simulated delay of 700 milliseconds
  • An orders endpoint with a simulated delay of 1,100 milliseconds
  • A notifications endpoint with a simulated delay of 900 milliseconds

The first benchmark sends these requests sequentially. PHP waits for one response before starting the next request.

API request Simulated response time
Customer profile 700 ms
Recent orders 1,100 ms
Notifications 900 ms
Approximate sequential time 2,700 ms

The second benchmark starts all three requests through one cURL multi handle. While one endpoint is waiting, the other transfers can continue. The total time is therefore close to the slowest response, instead of the sum of all three responses.

Request method Approximate total time
Sequential cURL requests 2.7 seconds
Concurrent curl_multi requests 1.1 seconds
Time saved About 1.6 seconds

These numbers are not hard-coded into the dashboard. PHP measures both runs with hrtime(). Small differences between runs are normal, but the concurrent version should remain much closer to the longest individual request.
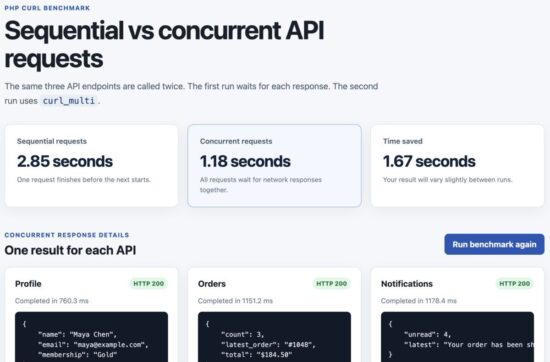
PHP curl_multi sequential and concurrent API request benchmark

PHP curl_multi completes three concurrent API requests faster than sequential cURL requests.

The performance improvement comes from overlapping network wait time. It does not make an individual API respond faster. If one endpoint takes ten seconds, the complete group can still take about ten seconds. PHP cannot persuade a slow API to drink more coffee.

How PHP curl_multi Works

A normal curl_exec() call blocks the PHP script until that transfer finishes. When several calls are placed inside a loop, the waiting time grows with every request.

The cURL multi interface changes the flow. It keeps several individual cURL handles inside one multi handle and lets their network activity progress together.

  1. Create one normal cURL handle for each API URL.
  2. Create a multi handle with curl_multi_init().
  3. Add every request with curl_multi_add_handle().
  4. Call curl_multi_exec() until no transfer is running.
  5. Use curl_multi_select() while waiting for network activity.
  6. Read each response with curl_multi_getcontent().
  7. Remove and close all handles.

Why curl_multi_exec() Runs Inside a Loop

A single call to curl_multi_exec() does not mean every request has finished. It only asks libcurl to perform the work that is currently possible.

The $running argument receives the number of active transfers. PHP must keep calling the function until that value reaches zero.

do { $status = curl_multi_exec($multiHandle, $running);
} while ($running > 0);

This loop works, but it has a problem. It can repeatedly call curl_multi_exec() while nothing is ready, wasting CPU time.

Use curl_multi_select() to Avoid a Busy Loop

curl_multi_select() pauses the script until one of the active connections can make progress or the timeout expires. This is more efficient than checking the transfers continuously.

do { $status = curl_multi_exec($multiHandle, $running); if ($status !== CURLM_OK) { throw new RuntimeException(curl_multi_strerror($status)); } if ($running > 0) { $ready = curl_multi_select($multiHandle, 1.0); if ($ready === -1) { usleep(1000); } }
} while ($running > 0);

The short sleep handles a lesser-known edge case. Some libcurl builds can return -1 when no file descriptor is ready. Without the sleep, the loop may spin quickly and consume unnecessary CPU.

Multi Errors and Request Errors Are Different

The result from curl_multi_exec() reports errors affecting the complete multi stack. A CURLM_OK result does not guarantee that every API request succeeded.

Each completed handle must still be checked separately for:

  • Connection failures reported by curl_error()
  • Timeouts and other transfer errors
  • HTTP error responses such as 404 or 500
  • Empty or invalid JSON response bodies

This distinction is easy to miss. The multi operation may succeed perfectly while one API quietly returns an error page wearing a JSON name tag.

PHP curl_multi Project Structure

This example uses plain PHP. It does not need a framework, Composer package, JavaScript library, or database.

The project keeps the HTTP client separate from the page that displays the benchmark. It also includes a local mock API, so the timing test does not depend on an external service.

php-curl-multi/
├── config.php
├── mock-api/
│ └── index.php
├── public/
│ ├── assets/
│ │ └── style.css
│ └── index.php
├── src/
│ └── ApiClient.php
└── README.md
  • config.php contains the API URL, timeouts, and connection limit.
  • mock-api/index.php returns sample JSON responses with controlled delays.
  • src/ApiClient.php sends sequential and concurrent requests.
  • public/index.php runs the benchmark and displays the results.
  • public/assets/style.css provides the small responsive layout.

Create the Configuration File

The configuration keeps values that may change between development and production outside the HTTP client class.

<?php declare(strict_types=1); return [ 'api_base_url' => rtrim( getenv('DEMO_API_BASE_URL') ?: 'http://127.0.0.1:8001', '/' ), 'connect_timeout_ms' => 1000, 'request_timeout_ms' => 5000, 'max_concurrent_requests' => 5,
];

The connection timeout controls how long cURL may spend establishing a connection. The request timeout covers the complete transfer.

The concurrency limit prevents the application from opening an excessive number of connections at once. This demo sends only three requests, but keeping the limit in the configuration makes the client safer to reuse.

Create the Local Mock API

The mock API accepts a resource query parameter. It returns profile, order, or notification data after a short delay.

Create mock-api/index.php with the following code:

<?php declare(strict_types=1); header('Content-Type: application/json; charset=utf-8');
header('Cache-Control: no-store'); $resource = $_GET['resource'] ?? ''; $responses = [ 'profile' => [ 'delay_ms' => 700, 'data' => [ 'name' => 'Maya Chen', 'email' => 'maya@example.com', 'membership' => 'Gold', ], ], 'orders' => [ 'delay_ms' => 1100, 'data' => [ 'count' => 3, 'latest_order' => '#1048', 'total' => '$184.50', ], ], 'notifications' => [ 'delay_ms' => 900, 'data' => [ 'unread' => 4, 'latest' => 'Your order has been shipped.', ], ],
]; if (!isset($responses[$resource])) { http_response_code(404); echo json_encode([ 'error' => 'Unknown API resource.', ], JSON_THROW_ON_ERROR); exit;
} $response = $responses[$resource]; usleep($response['delay_ms'] * 1000); echo json_encode([ 'resource' => $resource, 'simulated_delay_ms' => $response['delay_ms'], 'data' => $response['data'],
], JSON_THROW_ON_ERROR | JSON_UNESCAPED_SLASHES);

The delay is intentional. It makes the difference between sequential and concurrent requests easy to see. In a real project, the waiting time would usually come from a remote API, database-backed service, payment gateway, or another server.

The API also returns a proper 404 response for an unknown resource. This gives the client a realistic HTTP error to handle instead of assuming that every response will be successful.

Create the Reusable PHP API Client

Create src/ApiClient.php. This class contains both request methods, so the benchmark can compare them under the same timeout and response-handling rules.

<?php declare(strict_types=1); final class ApiClient
{ public function __construct( private readonly int $connectTimeoutMs = 1000, private readonly int $requestTimeoutMs = 5000, private readonly int $maxConcurrentRequests = 5 ) { } public function fetchSequential(array $requests): array { $startedAt = hrtime(true); $responses = []; foreach ($requests as $name => $url) { $handle = $this->createHandle($url); $body = curl_exec($handle); $responses[$name] = $this->buildResponse( $handle, $body ); curl_close($handle); } return [ 'duration_ms' => $this->elapsedMilliseconds($startedAt), 'responses' => $responses, ]; } public function fetchConcurrent(array $requests): array { $startedAt = hrtime(true); $multiHandle = curl_multi_init(); $handles = []; curl_multi_setopt( $multiHandle, CURLMOPT_MAX_TOTAL_CONNECTIONS, $this->maxConcurrentRequests ); try { foreach ($requests as $name => $url) { $handle = $this->createHandle($url); $handles[$name] = [ 'handle' => $handle, ]; $status = curl_multi_add_handle( $multiHandle, $handle ); if ($status !== CURLM_OK) { throw new RuntimeException( curl_multi_strerror($status) ); } } do { $status = curl_multi_exec( $multiHandle, $running ); if ($status !== CURLM_OK) { throw new RuntimeException( curl_multi_strerror($status) ); } if ($running > 0) { $ready = curl_multi_select( $multiHandle, 1.0 ); if ($ready === -1) { usleep(1000); } } } while ($running > 0); $responses = []; foreach ($handles as $name => $item) { $handle = $item['handle']; $body = curl_multi_getcontent($handle); $responses[$name] = $this->buildResponse( $handle, $body ); } return [ 'duration_ms' => $this->elapsedMilliseconds( $startedAt ), 'responses' => $responses, ]; } finally { foreach ($handles as $item) { curl_multi_remove_handle( $multiHandle, $item['handle'] ); curl_close($item['handle']); } curl_multi_close($multiHandle); } } private function createHandle(string $url): CurlHandle { $handle = curl_init($url); curl_setopt_array($handle, [ CURLOPT_RETURNTRANSFER => true, CURLOPT_FOLLOWLOCATION => false, CURLOPT_CONNECTTIMEOUT_MS => $this->connectTimeoutMs, CURLOPT_TIMEOUT_MS => $this->requestTimeoutMs, CURLOPT_HTTPHEADER => [ 'Accept: application/json' ], CURLOPT_USERAGENT => 'PHPpot-curl-multi-demo/1.0', CURLOPT_PROTOCOLS => CURLPROTO_HTTP | CURLPROTO_HTTPS, ]); return $handle; } private function buildResponse( CurlHandle $handle, string|bool $body ): array { $curlError = curl_error($handle); $statusCode = (int) curl_getinfo( $handle, CURLINFO_RESPONSE_CODE ); $durationMs = round( (float) curl_getinfo( $handle, CURLINFO_TOTAL_TIME ) * 1000, 1 ); if ($body === false || $curlError !== '') { return [ 'ok' => false, 'status' => $statusCode, 'duration_ms' => $durationMs, 'data' => null, 'error' => $curlError !== '' ? $curlError : 'The request failed.', ]; } if ($statusCode < 200 || $statusCode >= 300) { return [ 'ok' => false, 'status' => $statusCode, 'duration_ms' => $durationMs, 'data' => null, 'error' => 'The API returned HTTP status ' . $statusCode . '.', ]; } try { $data = json_decode( $body, true, 512, JSON_THROW_ON_ERROR ); } catch (JsonException $exception) { return [ 'ok' => false, 'status' => $statusCode, 'duration_ms' => $durationMs, 'data' => null, 'error' => 'Invalid JSON response: ' . $exception->getMessage(), ]; } return [ 'ok' => true, 'status' => $statusCode, 'duration_ms' => $durationMs, 'data' => $data, 'error' => null, ]; } private function elapsedMilliseconds( int $startedAt ): float { return round( (hrtime(true) - $startedAt) / 1_000_000, 1 ); }
}

How the Sequential Method Works

fetchSequential() creates and executes one handle at a time. The next loop iteration cannot begin until curl_exec() returns.

This is useful as the baseline. It shows how much time the application would spend if it made the same API calls without concurrency.

How the Concurrent Method Works

fetchConcurrent() creates the same individual handles, but adds them to one multi handle before execution begins.

The associative request name is kept with each handle. This lets the method return predictable keys such as profile, orders, and notifications, even if the responses finish in a different order.

The finally block removes and closes every handle even when an exception occurs. Network code has enough ways to misbehave without leaving cleanup to good luck.

Validate Every API Response

The buildResponse() method treats transport errors, HTTP errors, and invalid JSON as separate failures. This makes error messages more useful during debugging.

Successful HTTP transport does not guarantee valid JSON. The example uses JSON_THROW_ON_ERROR so malformed responses cannot silently become null. For more examples, see the PHPpot guide to PHP JSON encode and decode.

Each result follows the same structure:

[ 'ok' => true, 'status' => 200, 'duration_ms' => 703.4, 'data' => [ // Decoded API response ], 'error' => null,
]

A consistent response format keeps the display code simple. It also prevents successful data and error messages from becoming an exciting collection of special cases.

Build the Benchmark Page

Create public/index.php. This page defines the three API requests, runs both client methods, and displays the measured time.

<?php declare(strict_types=1); require_once dirname(__DIR__) . '/src/ApiClient.php'; $config = require dirname(__DIR__) . '/config.php'; $error = null;
$sequential = null;
$concurrent = null; if (!extension_loaded('curl')) { $error = 'The PHP cURL extension is not enabled.';
} else { $requests = [ 'profile' => $config['api_base_url'] . '/?resource=profile', 'orders' => $config['api_base_url'] . '/?resource=orders', 'notifications' => $config['api_base_url'] . '/?resource=notifications', ]; try { $client = new ApiClient( $config['connect_timeout_ms'], $config['request_timeout_ms'], $config['max_concurrent_requests'] ); $sequential = $client->fetchSequential($requests); $concurrent = $client->fetchConcurrent($requests); } catch (Throwable $exception) { $error = $exception->getMessage(); }
} function escape(mixed $value): string
{ return htmlspecialchars( (string) $value, ENT_QUOTES | ENT_SUBSTITUTE, 'UTF-8' );
} function seconds(float $milliseconds): string
{ return number_format( $milliseconds / 1000, 2 ) . ' seconds';
} $timeSaved = $sequential && $concurrent ? max( 0, $sequential['duration_ms'] - $concurrent['duration_ms'] ) : 0;
?>
<!DOCTYPE html>
<html lang="en">
<head> <meta charset="UTF-8"> <meta name="viewport" content="width=device-width, initial-scale=1.0" > <title>PHP curl_multi API Benchmark</title> <link rel="stylesheet" href="assets/style.css">
</head>
<body>
<main class="page-shell"> <header class="page-header"> <p class="eyebrow">PHP cURL benchmark</p> <h1>Sequential vs concurrent API requests</h1> <p class="intro"> The same three API endpoints are called twice. The first run waits for each response. The second run uses <code>curl_multi</code>. </p> </header> <?php if ($error !== null): ?> <div class="message message-error"> <strong>Unable to run the benchmark.</strong> <span><?= escape($error) ?></span> </div> <?php else: ?> <section class="benchmark-grid" aria-label="Benchmark results" > <article class="metric-card"> <span class="metric-label"> Sequential requests </span> <strong> <?= escape( seconds($sequential['duration_ms']) ) ?> </strong> <small> One request finishes before the next starts. </small> </article> <article class="metric-card metric-card-highlight" > <span class="metric-label"> Concurrent requests </span> <strong> <?= escape( seconds($concurrent['duration_ms']) ) ?> </strong> <small> All requests wait for network responses together. </small> </article> <article class="metric-card"> <span class="metric-label"> Time saved </span> <strong> <?= escape(seconds($timeSaved)) ?> </strong> <small> Your result will vary slightly between runs. </small> </article> </section> <section class="results-section"> <div class="section-heading"> <div> <p class="eyebrow"> Concurrent response details </p> <h2>One result for each API</h2> </div> <a class="button" href="index.php"> Run benchmark again </a> </div> <div class="response-grid"> <?php foreach ( $concurrent['responses'] as $name => $response ): ?> <article class="response-card"> <div class="response-title"> <h3> <?= escape(ucfirst($name)) ?> </h3> <span class="status <?= $response['ok'] ? 'status-ok' : 'status-error' ?>"> HTTP <?= escape($response['status']) ?> </span> </div> <p class="response-time"> Completed in <?= escape( $response['duration_ms'] ) ?> ms </p> <?php if ($response['ok']): ?> <pre><?= escape( json_encode( $response['data']['data'], JSON_PRETTY_PRINT | JSON_UNESCAPED_SLASHES ) ) ?></pre> <?php else: ?> <div class="message message-error" > <?= escape( $response['error'] ) ?> </div> <?php endif; ?> </article> <?php endforeach; ?> </div> </section> <?php endif; ?>
</main>
</body>
</html>

Run the Same Request List Twice

Both methods receive the same associative array of API URLs. This keeps the comparison fair and makes it easy to connect each response to its purpose.

The total duration is measured inside the client. The page subtracts the concurrent duration from the sequential duration to calculate the time saved.

Escape API Data Before Displaying It

API responses are external input. Even a trusted service can return unexpected content after a configuration mistake or security incident.

The escape() function applies htmlspecialchars() before values are printed into the page. JSON shown inside the response cards is escaped as well. Receiving JSON does not make its values automatically safe for HTML output.

The page also checks whether the cURL extension is available. If it is missing, the user sees a useful message instead of PHP introducing the problem with a fatal error.

Run the PHP curl_multi Project Locally

Make sure PHP 8.1 or later is installed and the cURL extension is enabled.

You can confirm the extension from the command line:

php -m | grep curl

If cURL is enabled, the command prints curl.

Start the Mock API

Open a terminal in the project directory. On macOS or Linux, start the mock API with multiple PHP development-server workers:

PHP_CLI_SERVER_WORKERS=4 php -S 127.0.0.1:8001 -t mock-api

The mock API is now available at URLs such as:

http://127.0.0.1:8001/?resource=profile
http://127.0.0.1:8001/?resource=orders
http://127.0.0.1:8001/?resource=notifications

Start the Demo Page

Open a second terminal in the same project directory:

php -S 127.0.0.1:8000 -t public

Then open the following URL in a browser:

http://127.0.0.1:8000

The page runs both benchmarks automatically. With the supplied delays, the sequential test should take about 2.7 seconds. The concurrent test should finish in about 1.1 seconds.

Important PHP Development Server Caveat

PHP’s built-in development server uses one worker by default. A single worker can process only one request at a time.

If the benchmark page and mock endpoints are placed on the same single-worker server, the requests may become sequential. They may even wait forever because the current PHP request is trying to call another URL handled by the worker it already occupies.

This is why the example uses two ports and starts the mock API with multiple workers. It is not merely decorative terminal activity.

Run the Project with XAMPP, MAMP, or Apache

You can also place the project inside your local web root. Apache normally has multiple workers available, so it can serve the mock API requests concurrently.

For example, the URLs may be:

Demo page:
http://localhost/php-curl-multi/public/ Mock API:
http://localhost/php-curl-multi/mock-api/

Update api_base_url in config.php:

'api_base_url' => 'http://localhost/php-curl-multi/mock-api',

You can also set the API URL through an environment variable:

export DEMO_API_BASE_URL="http://localhost/php-curl-multi/mock-api"

If the concurrent result is almost as slow as the sequential result, check the mock API server first. The most common cause is a local server that still processes the API requests one at a time.

When Concurrent API Requests Improve Performance

curl_multi works best when a PHP page needs several independent HTTP responses before it can continue.

Good examples include:

  • Loading profile, order, and notification data from separate services
  • Collecting prices from several supplier APIs
  • Checking the status of multiple remote servers
  • Fetching reports from independent endpoints
  • Sending the same webhook payload to several destinations

The important word is independent. If one request needs data returned by another request, those two calls cannot start together.

Independent Requests Can Run Concurrently

$requests = [ 'profile' => $profileUrl, 'orders' => $ordersUrl, 'notifications' => $notificationsUrl,
]; $results = $client->fetchConcurrent($requests);

None of these URLs depends on another response. They are good candidates for curl_multi.

Dependent Requests Must Keep Their Order

$loginResponse = sendRequest($loginUrl); $accessToken = $loginResponse['access_token']; $profileResponse = sendAuthenticatedRequest( $profileUrl, $accessToken
);

The profile request needs the access token returned by the login request. Starting both calls together would only help them fail faster.

When curl_multi Will Not Help

Situation Why curl_multi does not solve it
One slow API request There is no other network wait time to overlap.
CPU-heavy PHP calculations curl_multi manages network transfers, not PHP computation.
Requests that depend on earlier responses Later calls cannot start until the required data exists.
An API with strict rate limits More simultaneous requests may trigger throttling.
A server that handles one request at a time The remote side still processes the calls sequentially.

The Slowest Request Still Sets the Pace

Concurrent requests reduce the total from approximately the sum of all response times to approximately the longest response time.

For three requests taking one, two, and five seconds:

  • Sequential time is approximately eight seconds.
  • Concurrent time is approximately five seconds.

The five-second API remains a five-second API. curl_multi simply stops the other requests from waiting in line behind it.

Do Not Send Hundreds of Requests at Once

Concurrency needs a limit. Opening too many connections can increase memory use, overload the remote service, or cause HTTP 429 responses.

The example limits the complete multi handle with:

curl_multi_setopt( $multiHandle, CURLMOPT_MAX_TOTAL_CONNECTIONS, 5
);

Choose the limit based on the API documentation, server capacity, and rate policy. Five or ten concurrent requests may be reasonable for one service. Five hundred is usually a creative way to meet its security team.

Common PHP curl_multi Errors and Fixes

curl_multi_exec() Returns CURLM_OK, but a Request Failed

CURLM_OK means the multi stack operated correctly. It does not mean every individual transfer succeeded.

Check each handle after execution:

$curlError = curl_error($handle); $statusCode = (int) curl_getinfo( $handle, CURLINFO_RESPONSE_CODE
); if ($curlError !== '') { echo 'cURL error: ' . $curlError;
} if ($statusCode < 200 || $statusCode >= 300) { echo 'HTTP error: ' . $statusCode;
}

A request can time out, fail DNS lookup, or return HTTP 500 while the multi handle itself remains perfectly content.

curl_multi_select() Returns -1

Some libcurl builds may return -1 when no file descriptor is ready. Add a short sleep before continuing the loop:

$ready = curl_multi_select($multiHandle, 1.0); if ($ready === -1) { usleep(1000);
}

This prevents the loop from repeatedly checking the connections and consuming unnecessary CPU.

The Concurrent Version Is Not Faster

Check whether the requests are truly independent and whether the API server can process more than one request at a time.

During local testing, a single-worker PHP development server is a common cause. Use multiple API workers or run the mock endpoints through Apache or Nginx.

Concurrency may also provide little improvement when:

  • The API responses are already extremely fast.
  • Most of the time is spent processing data after download.
  • The remote server queues requests from the same client.
  • The API applies a low concurrency limit.

A Request Never Finishes

Every handle should have both a connection timeout and a total timeout:

curl_setopt_array($handle, [ CURLOPT_CONNECTTIMEOUT_MS => 1000, CURLOPT_TIMEOUT_MS => 5000,
]);

The connection timeout covers DNS lookup and connection setup. The total timeout limits the complete request.

Without these values, one unresponsive endpoint can keep the entire group waiting. Concurrent does not mean immortal.

The API Returns HTTP 429

HTTP 429 means the service is rate-limiting the client. Reduce the concurrency limit and inspect the response headers for retry information.

A production client may need to:

  • Respect the API’s documented request limit.
  • Wait for the duration given by a Retry-After header.
  • Retry only safe requests.
  • Use exponential backoff instead of retrying immediately.

Do not treat retries as permission to hammer the same endpoint with greater determination.

json_decode() Returns null

A response may contain invalid JSON, an empty body, or an HTML error page. Use JSON_THROW_ON_ERROR to make the failure visible:

try { $data = json_decode( $body, true, 512, JSON_THROW_ON_ERROR );
} catch (JsonException $exception) { $error = 'Invalid JSON response: ' . $exception->getMessage();
}

Check the HTTP status before decoding. A server returning an HTML 500 page is not a JSON parsing mystery. It is an HTTP error wearing the wrong outfit.

Responses Are Matched to the Wrong Request

Do not depend on completion order. A fast endpoint may finish before a request that was added earlier.

Store each handle with a stable name:

foreach ($requests as $name => $url) { $handle = curl_init($url); $handles[$name] = $handle; curl_multi_add_handle( $multiHandle, $handle );
}

When reading the results, use the same name as the response key. This keeps profile data attached to profile, even when notifications finish first.

Security Considerations

Concurrent requests do not introduce a completely new security model, but they can multiply the effect of a bad URL, missing timeout, or leaked credential. Apply the same controls to every handle.

Do Not Accept Arbitrary Request URLs

The example builds its URLs from a trusted configuration value. Do not pass a URL from $_GET, $_POST, or another untrusted source directly to curl_init().

// Unsafe
$url = $_GET['url'] ?? ''; $handle = curl_init($url);

This can create a server-side request forgery vulnerability. An attacker may try to access internal services, cloud metadata endpoints, or private network addresses through your server.

For a production integration, keep API endpoints in configuration or restrict requests to an explicit list of trusted hosts.

function isAllowedApiUrl( string $url, array $allowedHosts
): bool { $parts = parse_url($url); if ( !isset($parts['scheme'], $parts['host']) || $parts['scheme'] !== 'https' ) { return false; } return in_array( strtolower($parts['host']), $allowedHosts, true );
} $allowedHosts = [ 'api.example.com', 'payments.example.com',
]; if (!isAllowedApiUrl($url, $allowedHosts)) { throw new InvalidArgumentException( 'The API URL is not allowed.' );
}

A hostname allowlist is only one layer. Applications that fetch user-influenced URLs should also protect against hostnames resolving to private IP addresses and DNS rebinding.

Restrict Supported Protocols

Limit cURL to the protocols the application actually needs:

CURLOPT_PROTOCOLS => CURLPROTO_HTTP | CURLPROTO_HTTPS,

This prevents an unexpected URL from switching to protocols such as FTP or local file access.

Handle Redirects Carefully

The example disables automatic redirects:

CURLOPT_FOLLOWLOCATION => false,

A trusted public URL can redirect to an untrusted or private address. If redirects are required, validate every destination and set a small redirect limit.

CURLOPT_FOLLOWLOCATION => true,
CURLOPT_MAXREDIRS => 3,
CURLOPT_REDIR_PROTOCOLS => CURLPROTO_HTTP | CURLPROTO_HTTPS,

Protocol restriction alone does not stop redirects to private HTTP addresses. The destination still needs validation.

Keep TLS Verification Enabled

For HTTPS APIs, PHP cURL verifies the certificate and hostname by default. Do not disable these checks to silence a certificate error.

// Do not use these settings in production.
CURLOPT_SSL_VERIFYPEER => false,
CURLOPT_SSL_VERIFYHOST => 0,

Fix the server certificate or local certificate store instead. Disabling verification allows a network attacker to intercept API credentials and responses.

Keep API Credentials Outside the Source Code

Read tokens from environment variables or a secret manager:

$apiToken = getenv('API_TOKEN'); if (!$apiToken) { throw new RuntimeException( 'The API token is not configured.' );
} curl_setopt($handle, CURLOPT_HTTPHEADER, [ 'Accept: application/json', 'Authorization: Bearer ' . $apiToken,
]);

Do not print authorization headers in browser errors or write complete tokens into application logs.

Limit Time, Connections, and Response Size

Timeouts and connection limits protect application resources when an API becomes slow or unavailable. For APIs that may return large files or untrusted content, also enforce a maximum response size.

Without limits, five concurrent requests can become five simultaneous ways to exhaust memory.

Escape Response Data

JSON values are not safe HTML merely because they arrived from an API. Escape values with htmlspecialchars() before placing them on a page.

This matters even for a trusted service. Accounts can be compromised, stored data can contain markup, and APIs occasionally return surprises that were not included in the integration meeting.

Developer FAQ

Is PHP curl_multi truly parallel?

curl_multi performs concurrent network transfers. Several requests can make progress during the same period, but your PHP code is not executing in multiple CPU threads.

For HTTP requests, concurrent is the more accurate term. Developers often search for “parallel cURL requests,” so both descriptions are commonly used.

Does curl_multi_exec() run in the background?

No. The PHP script still waits until the multi loop finishes. The difference is that it waits for several active transfers together instead of completing them one by one.

If work must continue after the web request ends, use a queue, worker, scheduled job, or another background-processing system.

Can curl_multi send POST requests?

Yes. Each handle can have its own HTTP method, headers, and request body.

$handle = curl_init($url); curl_setopt_array($handle, [ CURLOPT_POST => true, CURLOPT_POSTFIELDS => json_encode( $payload, JSON_THROW_ON_ERROR ), CURLOPT_HTTPHEADER => [ 'Content-Type: application/json', 'Accept: application/json', ], CURLOPT_RETURNTRANSFER => true,
]);

The configured handle can then be added with curl_multi_add_handle(). See the PHP cURL POST example for more details about sending form data and JSON request bodies.

Can GET and POST requests be mixed in one multi handle?

Yes. Every easy handle keeps its own options. One handle can send GET, another can send POST, and another can include authentication headers.

The multi handle manages when their network transfers progress. It does not require every request to use the same method or destination.

Are responses returned in the same order as the URLs?

Requests may finish in any order. Do not assume that the first completed response belongs to the first URL.

Store each handle with a stable associative key and return results using that key. The example uses profile, orders, and notifications.

How many concurrent requests should PHP send?

There is no universal safe number. It depends on the remote API, response size, available memory, connection limits, and rate policy.

Start with a small value such as five. Measure the result and respect any limits documented by the API provider. More concurrency is not automatically more performance.

Why use curl_multi_select() instead of usleep() in every loop?

curl_multi_select() waits for actual network activity. A fixed sleep may pause longer than necessary or wake repeatedly when no transfer can make progress.

A short usleep() is used only when curl_multi_select() returns -1.

Does curl_multi make a slow API faster?

No. It reduces unnecessary waiting between independent requests. The complete group still depends on its slowest request.

If one API is consistently slow, improve that service, add appropriate caching, request less data, or move nonessential work to a background process.

Can curl_multi be used for file downloads?

Yes. It can download several files concurrently. For large files, write each response directly to a file instead of keeping every body in memory.

Also limit concurrency and maximum file size. A small JSON response and a two-gigabyte archive have very different opinions about available memory.

Final Takeaway

PHP curl_multi is useful when one operation needs responses from several independent APIs. It starts the transfers together, waits efficiently for network activity, and reduces total waiting time to roughly the duration of the slowest request.

The important parts are not limited to calling curl_multi_exec(). A reliable implementation should also:

  • Use curl_multi_select() to avoid a busy loop.
  • Set connection and total-request timeouts.
  • Check cURL errors for every handle.
  • Validate HTTP status codes separately.
  • Handle invalid JSON responses.
  • Keep responses associated with stable request names.
  • Limit the number of concurrent connections.
  • Restrict URLs, protocols, and redirects.

Concurrency is not helpful for every problem. It will not accelerate CPU-heavy PHP code, remove API rate limits, or make a single slow endpoint respond faster. But when several independent HTTP calls are holding up a page, it can remove a surprising amount of avoidable waiting.

Download the PHP curl_multi Project

The downloadable ZIP contains the complete working project, including the reusable API client, local mock API, benchmark page, stylesheet, configuration, and setup instructions.

Download the PHP curl_multi concurrent API requests project

Extract the ZIP, follow the instructions in README.md, and run the mock API and demo page on separate local ports.
Posted on Leave a comment

Secure File Upload in PHP 8: A Production-Ready Implementation Guide

Why File Uploads Are a High Risk Attack Surface

File uploads are one of the most common features in web applications. They are also one of the most exploited.

In PHP 8, securely handling file uploads requires far more than calling move_uploaded_file(). A production ready implementation must validate MIME types using finfo, restrict file size, whitelist allowed formats, generate cryptographically safe file names, store files outside the public directory, and enforce server level execution restrictions.

That is the technical summary. But the real story is deeper.

File uploads look harmless.

A resume upload field.
A profile picture form.
An assignment submission box in an LMS.
A document attachment in a billing system.

Years ago, a small business site was compromised. The attacker did not brute force passwords. They did not exploit SQL injection. They uploaded a file named invoice.pdf.php. The system trusted the extension, saved it inside the public folder, and allowed the web server to execute it.

Within minutes, the server was running malicious scripts.

The feature designed to collect documents became the entry point.

The problem was not PHP.
No programming language is insecure by default. Insecure assumptions create insecure systems.

Developers often:

  • Trust file extensions
  • Trust $_FILES['type']
  • Store uploads inside public directories
  • Skip server hardening
  • Focus on making it work instead of making it safe

File upload security is not about one validation check. It is about layered defense. Just like preventing SQL injection in PHP, file uploads require strict validation.

In this guide, we will design a production ready, security first file upload implementation in PHP 8. We will examine the attack surface, define strict validation rules, isolate storage, apply server level hardening, and build a clean, minimal uploader class suitable for real world backend systems.

Because in backend engineering, the most dangerous vulnerabilities are often hidden behind the simplest features. If you are looking for a basic file upload example, see this simple PHP file upload tutorial.

How PHP Handles File Uploads Internally

Before securing file uploads, we must understand how PHP handles them.

When a user submits a form with enctype="multipart/form-data", the browser sends the file to the server along with the other form fields.

PHP does not immediately store the file in your project folder.

Instead, it saves the file in a temporary directory on the server. This location is defined by the upload_tmp_dir setting in php.ini. If not defined, PHP uses the system default temp folder.

After the upload is complete, PHP creates an entry inside the $_FILES superglobal array.

A typical $_FILES structure looks like this:

Array
( [document] => Array ( [name] => resume.pdf [type] => application/pdf [tmp_name] => /tmp/phpYzdqkD [error] => 0 [size] => 124532 )
)

Each key has a meaning:

  • name → Original file name from the user. Do not trust this.
  • type → MIME type reported by the browser. Do not trust this.
  • tmp_name → Temporary file path created by PHP.
  • error → Upload status code. Must be checked.
  • size → File size in bytes. Should be validated.

It is important to understand this clearly.

The browser controls name and type. The user can manipulate them.

Only tmp_name is generated by the server.

To permanently store the file, you must call:

move_uploaded_file($file['tmp_name'], $destination);

You can read more in the official PHP documentation for move_uploaded_file().

This function moves the file from the temporary directory to your chosen location.

If you skip validation and directly move the file, you are trusting user input. That is where problems start.

There are also PHP configuration limits that affect uploads:

  • upload_max_filesize
  • post_max_size
  • max_file_uploads

These limits are helpful, but they are not security controls. They only restrict size and quantity.

Understanding this upload lifecycle is important. Security mistakes usually happen between reading $_FILES and calling move_uploaded_file().

File upload forms should also be protected against CSRF attacks.

In the next section, we will see the common vulnerabilities that arise during this phase.

Common File Upload Vulnerabilities

File uploads fail not because of one mistake.
They fail because of small assumptions.

Here are the most common problems.

1. Trusting the File Extension

Many systems check only the extension.

Example:


resume.pdf
image.jpg

Looks safe.

But an attacker can upload:


shell.php
shell.php.jpg
invoice.pdf.php

If your system only checks .jpg or .pdf, it can be bypassed.

Extensions are easy to fake. They are just text.

Never trust extension alone.

2. Trusting $_FILES[‘type’]

Some developers check:

if ($_FILES['file']['type'] === 'image/jpeg')

This is not safe.

The browser sends this value. The user can change it.

PHP provides the finfo extension for detecting the real MIME type. You must detect MIME type on the server using finfo.

We will see that later.

3. Storing Files Inside Public Directory

This is very common.

Example:

/var/www/html/uploads/

If someone uploads malicious.php and your server allows execution, the attacker can run:

https://example.com/uploads/malicious.php

Now your server runs attacker code. This is how many small sites get compromised. Uploads should not be executable.

4. No File Size Limit

If you do not restrict size:

Someone can upload 2GB file.

  • Disk space gets full.
  • Server becomes slow.
  • Application crashes.

Size must be restricted:

  • In php.ini
  • In application logic

Both.

5. Path Traversal

If you build file paths like this:

$destination = 'uploads/' . $_FILES['file']['name'];

An attacker may try:

../../config.php

This can overwrite important files. Always control the final file name yourself. Never use user file name directly.

6. Race Conditions

If you validate first and then move later, sometimes files can be swapped or replaced.

This is rare but possible in poorly designed systems. Validation and moving must be done carefully and quickly.

7. Allowing Dangerous File Types

Some file types should never be allowed:

  • .php
  • .phtml
  • .phar
  • .exe
  • .sh

If your application does not need them, block them completely. Whitelist approach is safer than blacklist. Allow only what is required.

File upload security is not one rule. It is many small rules working together. In the next section, we will build a clear set of security principles.

Core Security Principles for Safe File Uploads

Security is not one check. It is layers.

We will apply rules in order. Do not skip steps.

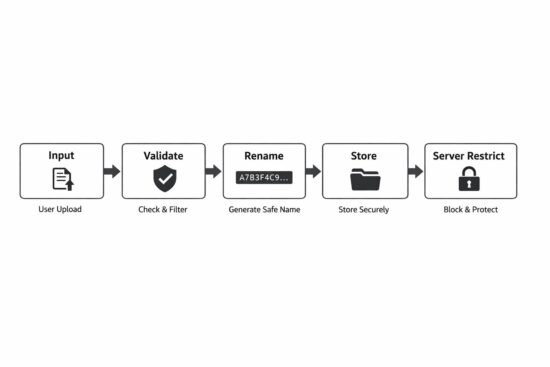
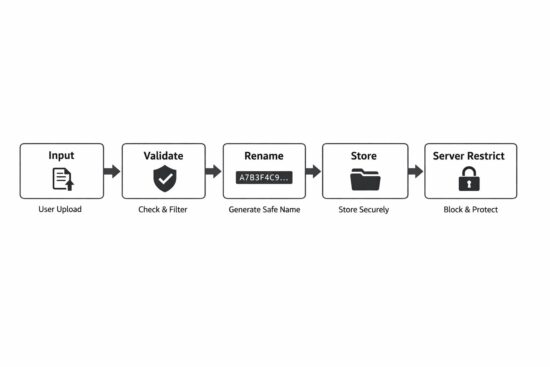
Secure File Upload Steps

1. Always Check Upload Errors First

Before anything, check the error code.

if ($file['error'] !== UPLOAD_ERR_OK) { throw new RuntimeException('Upload failed.');
}

If there is an error:

  • File may be incomplete
  • File may not exist
  • Size may exceed server limit

Do not continue if error is not zero.

2. Restrict File Size in Application Code

Do not depend only on php.ini.

Add your own limit.

$maxSize = 2 * 1024 * 1024; // 2MB if ($file['size'] > $maxSize) { throw new RuntimeException('File too large.');
}

Even if server allows 10MB, your app may allow only 2MB. Control it at application level.

3. Detect MIME Type Using finfo

Do not trust $_FILES['type']. Use server side detection.

$finfo = new finfo(FILEINFO_MIME_TYPE);
$mime = $finfo->file($file['tmp_name']);

This checks actual file content. It is more reliable.

4. Use a Whitelist of Allowed Types

Never allow everything except few types. Allow only what is required.

Example:

$allowed = [ 'image/jpeg' => 'jpg', 'image/png' => 'png', 'application/pdf' => 'pdf',
];
if (!array_key_exists($mime, $allowed)) { throw new RuntimeException('Invalid file type.');
}

Whitelist is safer. Blacklist can miss something.

5. Generate a Safe Random File Name

Never use original file name. User can manipulate it. Generate your own name.

if (!array_key_exists($mime, $allowed)) { throw new RuntimeException('Invalid file type.');
}

This gives:
Random name,
No collisions
No injection risk

6. Store Files Outside Public Web Root

Do not store here:

/var/www/html/uploads

Better:

/var/www/storage/uploads

Files should not be directly accessible. If you need to serve them, use a controlled download script.

7. Use move_uploaded_file()

Do not use rename().

move_uploaded_file($file['tmp_name'], $destination);

This function verifies that the file came from PHP upload. Safer.

8. Disable Script Execution in Upload Folder

Even if you validate, add server protection. Disable execution using:

  • .htaccess for Apache
  • location rules for Nginx

Defense in depth.

These principles are simple. But many systems skip one or two. That is enough for compromise.

In the next section, we will combine everything and build a minimal SecureUploader class in PHP 8. Clean. Small. Production ready.

The OWASP File Upload Cheat Sheet also provides useful security recommendations.

Building a Minimal SecureUploader Class in PHP 8

Now we combine everything. The goal is simple:

  • Validate
  • Restrict
  • Rename
  • Store safely

No framework. No heavy abstraction. Just clear PHP 8 code.


<?php declare(strict_types=1); final class SecureUploader
{ private string $uploadDir; private int $maxSize; private array $allowedMimeTypes; public function __construct(string $uploadDir, int $maxSize, array $allowedMimeTypes) { $this->uploadDir = rtrim($uploadDir, '/'); $this->maxSize = $maxSize; $this->allowedMimeTypes = $allowedMimeTypes; } public function upload(array $file): string { $this->validateError($file); $this->validateSize($file); $mime = $this->detectMimeType($file['tmp_name']); $extension = $this->validateMime($mime); $filename = $this->generateFileName($extension); $destination = $this->uploadDir . '/' . $filename; if (!move_uploaded_file($file['tmp_name'], $destination)) { throw new RuntimeException('Failed to move uploaded file.'); } return $filename; } private function validateError(array $file): void { if (!isset($file['error']) || $file['error'] !== UPLOAD_ERR_OK) { throw new RuntimeException('Upload error.'); } } private function validateSize(array $file): void { if ($file['size'] > $this->maxSize) { throw new RuntimeException('File too large.'); } } private function detectMimeType(string $tmpPath): string { $finfo = new finfo(FILEINFO_MIME_TYPE); $mime = $finfo->file($tmpPath); if ($mime === false) { throw new RuntimeException('Cannot detect MIME type.'); } return $mime; } private function validateMime(string $mime): string { if (!array_key_exists($mime, $this->allowedMimeTypes)) { throw new RuntimeException('Invalid file type.'); } return $this->allowedMimeTypes[$mime]; } private function generateFileName(string $extension): string { return bin2hex(random_bytes(16)) . '.' . $extension; }
}

Example Usage


$uploader = new SecureUploader( __DIR__ . '/../storage/uploads', 2 * 1024 * 1024, [ 'image/jpeg' => 'jpg', 'image/png' => 'png', 'application/pdf' => 'pdf', ]
); $filename = $uploader->upload($_FILES['document']);

Why This Design Is Good

  • Strict types enabled
  • No global variables
  • Clear separation of validation steps
  • No original file name used
  • No public directory storage
  • No silent failure

Small class. Easy to maintain. Easy to test. You can extend later if needed.

Security should be simple. Complex security often fails.

Server-Level Hardening

Even if your PHP code is perfect, server configuration matters.

Defense should not depend on one layer only.

1. Apache Hardening (.htaccess)

If you use Apache and your uploads are inside a web-accessible folder, disable script execution.

Create a .htaccess file inside the upload directory:

php_flag engine off
Options -ExecCGI
AddType text/plain .php .phtml .php3 .php4 .php5 .php7 .phar

This prevents PHP files from executing. Even if someone manages to upload a .php file, it will not run. It will be treated as plain text. That is important.

2. Nginx Hardening

In Nginx, you usually configure this in your server block.

Example:

location /uploads/ {
autoindex off;
types { }
default_type text/plain;
}

Or more strictly, block script execution:

location ~* ^/uploads/.*\.(php|phtml|phar)$ {
deny all;
}

This blocks access to executable scripts inside uploads.

3. Why This Matters

Many real attacks succeed because:

  • Code validation failed once.
  • Or developer made a mistake.
  • Or a new file type was allowed accidentally.

Server-level restriction reduces damage. Even if application logic has a bug, server can stop execution. That is called defense in depth.

4. Best Practice

Best approach is:

  • Store uploads outside public directory.
  • If that is not possible, disable execution.
  • Always use both application and server validation.

Never depend on one protection only.

Security is layers. Code layer. Server layer. Configuration layer.

Additional Safeguards for Production Systems

Basic validation is not enough for high traffic or sensitive systems. Here are extra protections you should consider.

1. Re-Encode Uploaded Images

If you allow images, do not store them directly. Attackers can hide malicious code inside image metadata.

Better approach:

  • Open image using GD or Imagick
  • Re-save it
  • Discard original file

Example idea:

$image = imagecreatefromjpeg($tmpPath);
imagejpeg($image, $destination, 90);
imagedestroy($image);

This removes hidden metadata. You keep only clean image data.

2. Virus Scanning

For document uploads like PDF or DOC files, consider scanning. You can use tools like ClamAV

Upload file.
Scan file.
If infected, reject it.

This is useful for:

  • LMS platforms
  • HR portals
  • Customer document systems

3. Rate Limiting Uploads

If someone uploads 1000 files per minute, it can overload the system.

Add rate limits:

  • Per user
  • Per IP
  • Per session

Even simple limits help.

4. Logging Upload Activity

Do not ignore uploads.

Log:

  • User ID
  • File name generated
  • Timestamp
  • IP address

If something goes wrong, logs help investigation. Security without logs is blind.

5. Limit Number of Files

If your form allows multiple files, control it. Do not allow unlimited uploads. Set clear limits.

6. Set Proper File Permissions

When storing files, ensure correct permissions.

Example:

  • Files should not be executable
  • Use minimal required permissions

Do not use full permissions like 777. Keep it restricted.

These safeguards are not complicated. But many systems skip them.

Security is habit. Not one time effort.

Secure File Upload Checklist

Use this checklist before deploying file upload to production.

Validation

  • Check UPLOAD_ERR_OK before processing.
  • Reject file if error code is not zero.
  • Restrict file size in application code.
  • Do not trust $_FILES[‘type’].
  • Detect MIME type using finfo.
  • Use whitelist of allowed MIME types only.

File Handling

  • Never use original file name.
  • Generate random file name using random_bytes.
  • Store files outside public web root.
  • Use move_uploaded_file() only.
  • Do not use rename() for uploads.

Server Configuration

  • Disable script execution in upload folder.
  • Block .php, .phtml, .phar in uploads.
  • Set proper file permissions.
  • Do not allow directory listing.

Production Safeguards

  • Re-encode images before storing.
  • Scan documents for malware if needed.
  • Limit upload rate per user or IP.
  • Log upload activity.

If your system follows all the above, risk is reduced significantly.

No system is 100 percent secure. But layered protection makes attacks much harder.

FAQ

Is move_uploaded_file() secure in PHP?

Yes, when used correctly. The function itself verifies that the file was uploaded through HTTP POST. But it does not validate file type, size, or safety. You must combine it with MIME validation, file size checks, and safe storage practices.

Is checking file extension enough for secure upload?

No. File extensions can be renamed easily. A file named image.jpg can actually contain PHP code. Always validate the real MIME type using finfo on the server.

Should uploaded files be stored inside the public folder?

It is not recommended. If stored inside a public directory, the file may become directly accessible through URL. Store files outside the web root when possible. If not possible, disable script execution in the upload folder.

What is the safest way to handle file uploads in PHP?

Use layered validation. Check upload errors. Restrict file size. Detect MIME type using finfo. Whitelist allowed types. Generate random file names. Store files outside the web root. Apply server-level restrictions.

Conclusion

File uploads look small. But they carry real risk. Many security problems do not come from advanced attacks. They come from simple assumptions. Trusting the file extension. Trusting the browser MIME type. Storing files inside a public folder. Skipping server restrictions. These small mistakes open the door.

Secure file upload is not about one function. It is about discipline. Check errors. Restrict size. Detect the real MIME type. Allow only required formats. Generate safe file names. Store files outside the web root. Disable execution at the server level. Each step is simple. Together, they make the system strong.

PHP is not insecure. Insecure design is. If you treat file uploads as an attack surface and not just a feature, your application becomes safer. Keep it simple. Keep it strict. Do not trust user input. That is enough.

Posted on Leave a comment

The Hidden React Pattern No One Talks About Why Micro Interactions Boost UI Trust Instantly

by Vincy. Last modified on December 16th, 2025.

Developers uses most of the React patterns without even thinking of the patterns greatness in creating user interfaces. We are going to see some of those patterns no one talks about, but uses unintentionally, that boost the UI trust.

When using them, the developers put no intentional effort to uplift the UI trust. But it happens. Those are micro interactions that help for detailing the UI by sending feedback based on user actions. These hidden micro interactions make the UI rich, intuitive and improve the user experience.

A simple React-State-driven micro interaction

This tiny React example manages a button’s press state. It triggers class based on the pressed/released state change of the button element.

//Button press down micro-instruction
const [pressed, setPressed] = useState(false); // button elment to render on the interface
<button
onMouseDown={() => setPressed(true)}
onMouseUp={() => setPressed(false)}
className=className={`
transition-transform duration-150 ${pressed ? "scale-95" : "scale-100"}
`}
>
Save
</button>

This example code 1) allows mouse-down and mouse-up action -> 2) change the 'pressed' state -> 3) triggers class

React Micro Interactions UI Trust

Common React Micro-Interactions that increase user trust

Micro interactions are added in React just like that. These are created by React patterns that are hidden to explain in most of the documentations and tutorials. They are treated as small UX detailing process rather than known as patterns. But, these are greatly contributing in UI enrichment. They helps to improve the UI to make users trust the interface.

The list below show the different micro interaction techniques to send feedback to the UI.

  1. Press down micro interaction when clicking a button.
  2. Dynamic validation on input.
  3. On hovering micro interaction to change the background or add shadow.
  4. Showing spinner on processing background job.
  5. Shaking animation for Reacting to errors.

Press down/up Effect

This Pressable React wrapper is about to have a child clickable element. It consistantly perform the following micro interaction loop for user action.

  • It captures user’s click.
  • Acknowledge by calling on-press event handler.
  • Then send feedback by enabling the press effect via class.
  • Let the user trust the UI.

This React article has the code for using this Pressable wrapper for a ButtonPending component. That component enables the button ‘disabled’ logic based on the ‘loading’ state. If the ‘loading = true’, it will make the button to caption to show “Subscribing…”.

The complete child component of this Pressable wrapper is clickable. This feature increases the success rate of capturing the user-click.

src/components/Pressable.jsx

export default function Pressable({ children, onPress, className }) { return ( <div className={`pressable ${className || ''}`} onClick={onPress}> {children} </div> );
}

react micro form loader animation

src/components/ButtonPending.jsx

export default function ButtonPending({ loading, children, onClick }) { return ( <button className="button-pending" disabled={loading} onClick={onClick}> <span style={{ flex: 1, textAlign: 'center' }}> {loading ? 'Subscribing...' : children} </span> </button> );
}

Micro interaction feedback with Ripple effect

The Ripple effect create an expanded, faded circular view around the click-point. It strongly acknowledges user-click action using this feedback. User will trust the UI by getting this instant visual confirmation.

The click co-ordinates are captured by getBoundingClientRect() to create the absolute positioning of the Ripple.

This component has the reference for the the click target by using React useRef. When the user click on the containerRef, an active ripple instance is created and disappears.

src/components/Ripple.jsx

import { useState, useRef } from 'react'; export default function Ripple({ children }) { const [ripples, setRipples] = useState([]); const containerRef = useRef(null); const addRipple = (e) => { const rect = containerRef.current?.getBoundingClientRect(); if (!rect) return; const size = Math.max(rect.width, rect.height); const x = e.clientX - rect.left - size / 2; const y = e.clientY - rect.top - size / 2; const ripple = { id: Math.random(), x, y, size }; setRipples((prev) => [...prev, ripple]); setTimeout(() => setRipples((prev) => prev.filter((r) => r.id !== ripple.id)), 650); }; return ( <div className="ripple-container" ref={containerRef} onMouseDown={addRipple}> {ripples.map((r) => ( <div key={r.id} className="ripple" style={{ left: r.x, top: r.y, width: r.size, height: r.size }} /> ))} {children} </div> );
}

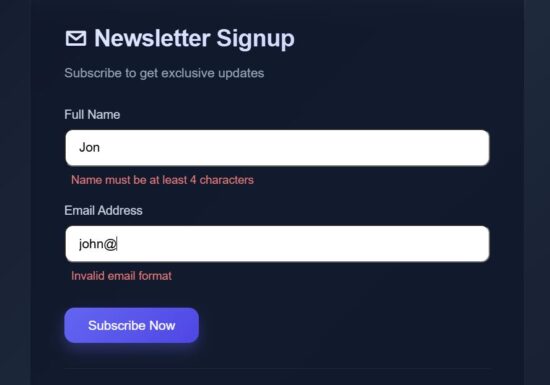
Dynamic validation shows error on form section

Form validation is called at the moment when users giving input. It will send feedback by showing validation error immediately. This will build trust by showing instant feedback.

react micro interaction validation error

This React FormSection component has the reference for all the React state variables needed for enabling this micro interaction concept.

This section accepts form data and call a field level validation on typing the input. This example validates the Name and Email fields. Once the user enters wrong data or giving input in wrong format, then the field level validation error will be managed in the fieldErrors.

The field onchange handler update only the current field data with the formData state then calls the field specific validation.

src/components/FormSection.jsx

export default function FormSection({ formData, fieldErrors, loading, setFormData, validateField, setError }) { return ( <> <div className="form-group"> <label>Full Name</label> <input type="text" placeholder="John Doe" value={formData.name} onChange={(e) => { const val = e.target.value; setFormData({ ...formData, name: val }); validateField("name", val); setError(false); }} disabled={loading} /> {fieldErrors.name && <p className="field-error">{fieldErrors.name}</p>} </div> <div className="form-group"> <label>Email Address</label> <input type="email" placeholder="john@example.com" value={formData.email} onChange={(e) => { const val = e.target.value; setFormData({ ...formData, email: val }); validateField("email", val); setError(false); }} disabled={loading} /> {fieldErrors.email && <p className="field-error">{fieldErrors.email}</p>} </div> </> );
}

React micro interaction on hover

On hovering an element, the animation effect can be given in different ways. The HoverLift and HoverApplyBorder wrapper helpers are most frequently used micro interaction techniques.

These functions encloses hovered target with the lift effect or border.

src/components/HoverLift.jsx

export default function HoverLift({ children }) { return <div className="hover-lift">{children}</div>;
}

react micro button hover border

src/components/HoverApplyBorder.jsx

export default function HoverApplyBorder({ children }) { return ( <div className="hover-border"> {children} </div> );
}

Micro interaction pattern used during progressing user request

When submitting a form, the user request is taken to the backend and the process will be going on. During the processing time, the useDelayedLoader will be shown to the form near the button. Also, the FadePresence wrapper is applied to the form component to dim the UI. It lets the user know that the form-action request is taken for processing. It will build trust about the user interface.

src/components/useDelayedLoader.js

import { useState, useEffect } from 'react';
export default function useDelayedLoader(isLoading, delay = 450) { const [showLoader, setShowLoader] = useState(false); useEffect(() => { let timer; if (isLoading) { timer = setTimeout(() => setShowLoader(true), delay); } else { // defer state update to next tick to avoid ESLint warning timer = setTimeout(() => setShowLoader(false), 0); } return () => clearTimeout(timer); }, [isLoading, delay]); return showLoader;
}

src/components/FadePresence.jsx

export default function FadePresence({ show, children }) { return ( <div className="fade-presence" style={{ opacity: show ? 1 : 0.5, transform: show ? 'translateY(0)' : 'translateY(10px)', pointerEvents: show ? 'auto' : 'none', }} > {children} </div> );
}

Show response or progressing state of the form submission

src/components/StatusSection.jsx

export default function StatusSection({ loading, showLoader, success, error }) { return ( <div className="status-box"> {showLoader && loading && ( <div className="loader"> <div className="loader-spinner" /> <span>Subscribing...</span> </div> )} {!loading && success && ( <div className="success"> <span className="success-icon">✓</span> <p>Check your email to confirm</p> </div> )} {!loading && error && ( <div className="error-box"> <span className="error-icon">!</span> <p>Please fill all fields</p> </div> )} </div> );
}

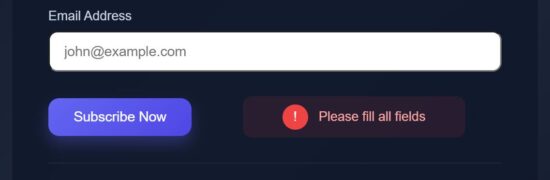
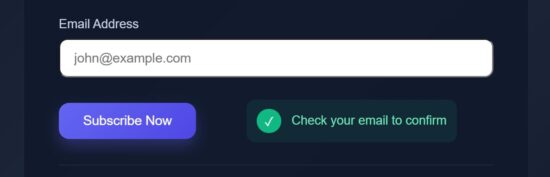
Send feedback effect on success or failure

react micro form validation error

src/components/ShakeOnError.jsx

export default function ShakeOnError({ isError, children }) { return <div className={isError ? 'shake' : ''}>{children}</div>;
}

react micro form validation success

src/components/PulseOnSuccess.jsx

export default function PulseOnSuccess({ success, children }) { return <div className={success ? 'pulse' : ''}>{children}</div>;
}

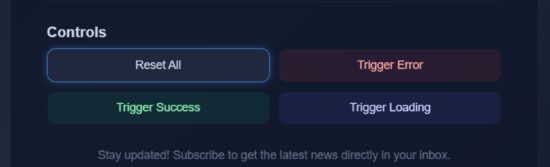
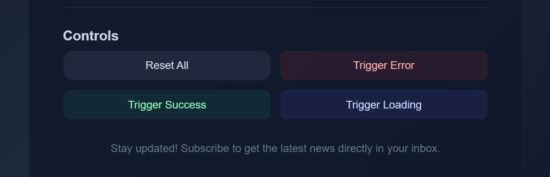
Button controls that triggers React micro interaction loop

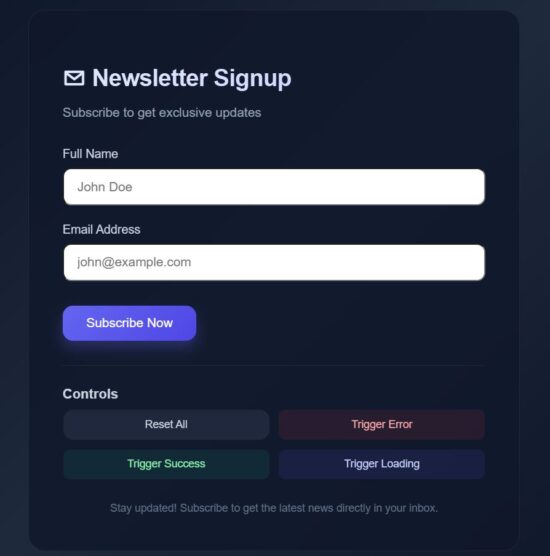
Most of the micro interactions are added to the “Subscribe Now” button. Added to that, an additional button interfaces are provided in the code to have a quick experiment with the effects.

These controls will show you the hover lift effect and update the status section without completing the form.

react micro interactions controls

src/components/ControlsSection.jsx

import HoverApplyBorder from "./HoverApplyBorder";
import Ripple from "./Ripple";
export default function ControlsSection({ setError, setSuccess, setLoading, setFormData, setFieldErrors }) { return ( <div className="controls"> <h3 className="controls-title">Controls</h3> <div className="button-grid"> <HoverApplyBorder> <Ripple> <button className="control-btn reset" onClick={() => { setError(false); setSuccess(false); setLoading(false); setFormData({ email: "", name: "" }); setFieldErrors({ name: "", email: "" }); }}> Reset All </button> </Ripple> </HoverApplyBorder> <HoverApplyBorder> <button className="control-btn error" onClick={() => { setError(false); setTimeout(() => setError(true), 50); setSuccess(false); setLoading(false); }}> Trigger Error </button> </HoverApplyBorder> <HoverApplyBorder> <button className="control-btn success" onClick={() => { setSuccess(false); setTimeout(() => setSuccess(true), 50); setError(false); setLoading(false); }} > Trigger Success </button> </HoverApplyBorder> <HoverApplyBorder> <button className="control-btn loading" onClick={() => { setLoading(true); setTimeout(() => setLoading(false), 2000); }} > Trigger Loading </button> </HoverApplyBorder> </div> </div> );
}

React frontend form uses micro interaction techniques

This is the landing page JSX that uses all the components and wrapper classes we have seen above. This script will be useful how the micro interaction wrapper are used in the React frontend components.

src/App.jsx

import { useState } from "react";
import Pressable from "./components/Pressable";
import ShakeOnError from "./components/ShakeOnError";
import FadePresence from "./components/FadePresence";
import PulseOnSuccess from "./components/PulseOnSuccess";
import HoverLift from "./components/HoverLift";
import ButtonPending from "./components/ButtonPending";
import useDelayedLoader from "./components/useDelayedLoader"; import FormSection from "./components/FormSection";
import StatusSection from "./components/StatusSection";
import ControlsSection from "./components/ControlsSection"; export default function App() { const [loading, setLoading] = useState(false); const [error, setError] = useState(false); const [success, setSuccess] = useState(false); const [formData, setFormData] = useState({ email: "", name: "" }); const [fieldErrors, setFieldErrors] = useState({ name: "", email: "" }); const showLoader = useDelayedLoader(loading, 450); const handleSubmit = () => { setSuccess(false); setError(false); const isNameEmpty = !formData.name.trim(); const isEmailEmpty = !formData.email.trim(); if (isNameEmpty || isEmailEmpty) { setTimeout(() => setError(true), 20); return; } if (validateField("name", formData.name, true) || validateField("email", formData.email, true)) { return; } setLoading(true); setTimeout(() => { setLoading(false); setSuccess(true); setTimeout(() => { setFormData({ email: "", name: "" }); setFieldErrors({ name: "", email: "" }); }, 1500); }, 1300); }; const validateField = (field, value, returnOnly = false) => { let message = ""; if (field === "name") { if (!value.trim()) message = "Name is required"; else if (value.trim().length < 4) message = "Name must be at least 4 characters"; } if (field === "email") { const emailRegex = /^[^\s@]+@[^\s@]+\.[^\s@]+$/; if (!value.trim()) message = "Email is required"; else if (!emailRegex.test(value)) message = "Invalid email format"; } if (!returnOnly) { setFieldErrors((prev) => ({ ...prev, [field]: message })); } return message; }; return ( <div className="container"> <main> <ShakeOnError isError={error}> <PulseOnSuccess success={success}> <div className="card"> <header> <h1>✉ Newsletter Signup</h1> <p className="subtitle">Subscribe to get exclusive updates</p> </header> <FadePresence show={!loading}> <FormSection formData={formData} fieldErrors={fieldErrors} loading={loading} setFormData={setFormData} validateField={validateField} setError={setError}/> </FadePresence> <div className="action-row"> <HoverLift> <Pressable onPress={handleSubmit}> <ButtonPending loading={loading}>Subscribe Now</ButtonPending> </Pressable> </HoverLift> <StatusSection loading={loading} showLoader={showLoader} success={success} error={error} /> </div> <div className="divider"></div> <ControlsSection setError={setError} setSuccess={setSuccess} setLoading={setLoading} setFormData={setFormData} setFieldErrors={setFieldErrors} /> <footer>Stay updated! Subscribe to get the latest news directly in your inbox.</footer> </div> </PulseOnSuccess> </ShakeOnError> </main> </div> );
}

Output:

react micro interaction validation effects

Some of the libraries to build micro-interaction and animation in React

These are some of the useful libraries that ease the process of building React app with micro-interaction techniques and smooth animation effects.

  • Framer Motion – It is suitable to use for its perfect result for on hover or on Press effects, enter or exit transition, layout shift micro-interactions.
  • React Spring – It is known for its smooth drag and drop, expand-collapse, and toggle effects.
  • AutoAnimate – It is popularly known for its auto DOM changes with minimal config.
  • GSAP – GreenSock animation is recommended for an embedding platform for imposing complex animation on the frontend. The example for the complex animations are, chained effects, SVG morphing and more.

Conclusion

We have seen how do micro-interactions increase UI trust. An interactive and intuitive web interface impresses endusers and encourages them to use it. React web app using micro interaction patterns earns user trust by sending appropriate feedback to the interface.

The feedbacks close the loop to let the users understand that their actions are taken for processing. Various kind of feedbacks are used to acknowledge the users. These are the commonly used techniques in gain the user’s trust.

  • Displaying feedback messages.
  • Animation effects like shaking login when entering wrong credentials.
  • Animated icons to show tick on successful payment transactions.

We see some of the micro interaction techniques to show status, progress bar, or to shake UI if something went wrong.

References:

  1. Power of response time and its limits in UI/UX.
  2. Role of micro interaction in modern UI.

Download

Vincy
Written by Vincy, a web developer with 15+ years of experience and a Masters degree in Computer Science. She specializes in building modern, lightweight websites using PHP, JavaScript, React, and related technologies. Phppot helps you in mastering web development through over a decade of publishing quality tutorials.

↑ Back to Top

Posted on Leave a comment

React Charts and Graphs with Recharts: Visualize Data Beautifully

by Vincy. Last modified on December 3rd, 2025.

Representing data in a chart view is a huge subject in Mathematics and Computer Science. If you have the skill to transform raw numbers into a chart view, it’s a brilliant representation that makes users understand any complex data quickly.

Learning to build a chart in React will elevate your UI and make your application feel truly professional.

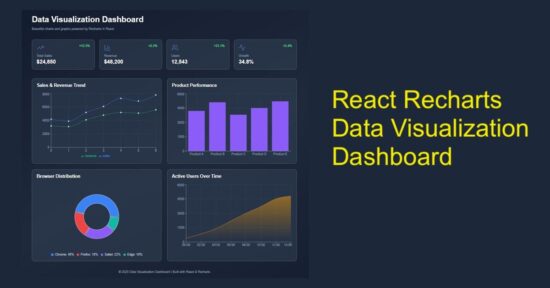
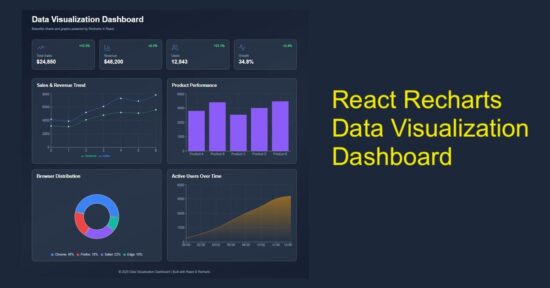
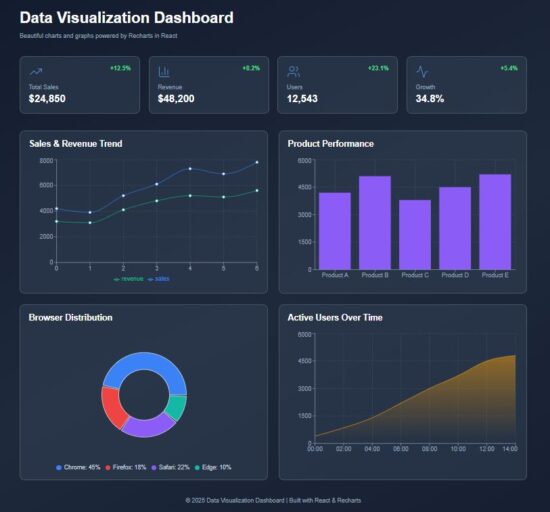
This React example includes dashboard visualization to display the following chart view.

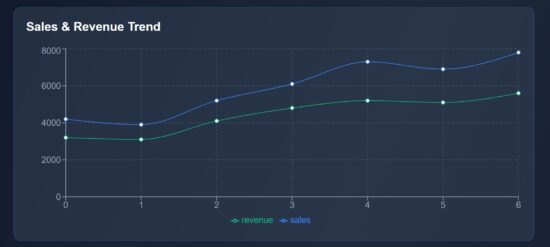
  1. Sales & revenue trend in the form of line chart.
  2. Product-wise performance using column chart.
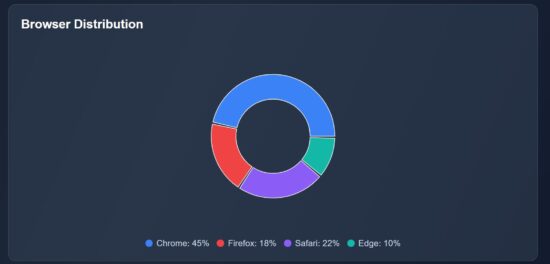
  3. Browser distribution in pie chart.
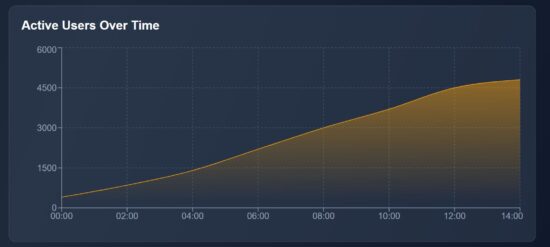
  4. Area chart to visualize users’ active time.

It uses Recharts library to show the raw data in a graph or chart form, as shown below.

React Charts Graphs Recharts Data Visualization

Main React component containing chart components

The DataVisualization component manages React states and useEffect. It manages the separate state variables for each type of charts.
The React useEffect fetches the JSON data and set them to bind for the charts.

The chart UI are created as separate components and used in the dashboard wrapper.

src/components/DataVisualization.jsx

import { useState, useEffect } from "react";
import Header from "../components/Header";
import StatsCards from "../components/StatsCards";
import LineChartBox from "../components/LineChartBox";
import BarChartBox from "../components/BarChartBox";
import PieChartBox from "../components/PieChartBox";
import AreaChartBox from "../components/AreaChartBox";
import Footer from "../components/Footer"; const DataVisualization = () => { const [lineData, setLineData] = useState([]); const [barData, setBarData] = useState([]); const [pieData, setPieData] = useState([]); const [areaData, setAreaData] = useState([]); useEffect(() => { fetch("/data/dashboard.json") .then((res) => res.json()) .then((data) => { setLineData(data.lineData); setBarData(data.barData); setPieData(data.pieData); setAreaData(data.areaData); }) .catch((err) => console.error("Error loading data:", err)); }, []); return ( <div className="dashboard-wrapper"> <div className="dashboard-container"> <Header /> <StatsCards /> <div className="charts-grid"> <LineChartBox data={lineData} /> <BarChartBox data={barData} /> <PieChartBox data={pieData} /> <AreaChartBox data={areaData} /> </div> <Footer /> </div> </div> );
};
export default DataVisualization;

Chart visualization header with trending data cards

In this code, the chart components are created for rendering in a dashboard. Added to the chart representation, the dashboard shows cards to display trending data.

You can replace it with your applications progressive data in this cards. For demonstration purpose, they are all static data from the client-side. It’s a matter of minute to plug your dynamic data from the database.
react chart graph visualization header

src/components/Header.jsx

const Header = () => ( <header className="dashboard-header"> <h1>Data Visualization Dashboard</h1> <p>Beautiful charts and graphs powered by Recharts in React</p> </header>
);
export default Header;

react chart graph statscards

src/components/StatsCards.jsx

import { TrendingUp, BarChart3, Users, Activity } from "lucide-react";
const StatsCards = () => { const stats = [ { icon: <TrendingUp strokeWidth={1} />, label: "Total Sales", value: "$24,850", change: "+12.5%" }, { icon: <BarChart3 strokeWidth={1} />, label: "Revenue", value: "$48,200", change: "+8.2%" }, { icon: <Users strokeWidth={1} />, label: "Users", value: "12,543", change: "+23.1%" }, { icon: <Activity strokeWidth={1} />, label: "Growth", value: "34.8%", change: "+5.4%" }, ]; return ( <div className="stats-grid"> {stats.map((stat, index) => ( <div key={index} className="stat-card"> <div className="stat-top"> <span className="stat-icon">{stat.icon}</span> <span className="stat-change">{stat.change}</span> </div> <p className="stat-label">{stat.label}</p> <p className="stat-value">{stat.value}</p> </div> ))} </div> );
};
export default StatsCards;

Line chart to show the sales revenue graph

This script imports the Recharts component required for rendering a line chart. The following components are mostly required for all the charts.

  • XAxis, YAxis
  • Tooltip and Legend
  • CartisanGrid
  • ResponsiveContainer

The chart is rendered in a ResponsiveContainer block which support chart scaling based on the viewport size. The Tooltip and CartisanGrid will be shown on hovering the chart. The X,Y axis and chart legend are very usual part of the chart view.

The LineChart and Line components are exclusive to this type of chart. It accepts Recharts attributes to set the stroke width and color of the line graph.

react data visualization line chart

src/components/LineChartBox.jsx

import { LineChart, Line, XAxis, YAxis, Tooltip, CartesianGrid, Legend, ResponsiveContainer } from "recharts";
const LineChartBox = ({ data }) => ( <div className="chart-card"> <h2>Sales & Revenue Trend</h2> <ResponsiveContainer width="100%" height={300}> <LineChart data={data}> <CartesianGrid strokeDasharray="3 3" stroke="#475569" /> <XAxis stroke="#94a3b8" /> <YAxis stroke="#94a3b8" /> <Tooltip /> <Legend /> <Line type="monotone" dataKey="sales" stroke="#3b82f6" strokeWidth={1} /> <Line type="monotone" dataKey="revenue" stroke="#10b981" strokeWidth={1} /> </LineChart> </ResponsiveContainer> </div>
);
export default LineChartBox;

Bar chart fir showing performance graph

The BarChart and Bar component of the Recharts library are used in this script. The BarChart accepts chart data and Bar element requires the color specification to fill the column bar.

src/components/BarChartBox.jsx

import { BarChart, Bar, XAxis, YAxis, Tooltip, CartesianGrid, ResponsiveContainer } from "recharts";
const BarChartBox = ({ data }) => ( <div className="chart-card"> <h2>Product Performance</h2> <ResponsiveContainer width="100%" height={300}> <BarChart data={data}> <CartesianGrid strokeDasharray="3 3" stroke="#475569" /> <XAxis dataKey="category" stroke="#94a3b8" /> <YAxis stroke="#94a3b8" /> <Tooltip /> <Bar dataKey="value" fill="#8b5cf6" /> </BarChart> </ResponsiveContainer> </div>
);
export default BarChartBox;

Pie chart – Recharts – showing browser distribution

This Recharts component accepts the inner-radius, outer-radius, cy, cx properties to draw the pie chart.

This chart type will have a Pie component which is to draw the pie wedges in the wrapper. The Cell is to draw each pie slices.

It receives the data and datakey in the <Pie /> component of this Recharts library.

react data visualization pie chart

src/components/PieChartBox.jsx

import { PieChart, Pie, Tooltip, ResponsiveContainer, Cell } from "recharts";
const PieChartBox = ({ data }) => ( <div className="chart-card"> <h2>Browser Distribution</h2> <ResponsiveContainer width="100%" height={300}> <PieChart> <Pie data={data} dataKey="value" innerRadius={60} outerRadius={100} paddingAngle={2} cx="50%" cy="50%" > {data.map((entry, i) => ( <Cell key={i} fill={entry.color} /> ))} </Pie> <Tooltip /> </PieChart> </ResponsiveContainer> <div className="pie-legend"> {data.map((item, i) => ( <div key={i} className="legend-item"> <span className="legend-color" style={{ background: item.color }} /> <span>{item.name}: {item.value}%</span> </div> ))} </div> </div>
);
export default PieChartBox;

Area chart using the Recharts library

In this graph, it shows the active users count by time. It represents how many users are actively using your app at a particular point of time. It will help to monitor the spikes and drop in the traffic, product or services usages and more.

The AreaChart is the wrapper that contains the Area element which is to show the shaded part of the chart as shown below.

The JSON data contains the time and user count for each level of the graph. The area is highlighted within a LinearGadient definition.

react data visualization area chart

src/components/AreaChartBox.jsx

import { AreaChart, Area, XAxis, YAxis, Tooltip, CartesianGrid, ResponsiveContainer } from "recharts";
const AreaChartBox = ({ data }) => ( <div className="chart-card"> <h2>Active Users Over Time</h2> <ResponsiveContainer width="100%" height={300}> <AreaChart data={data}> <defs> <linearGradient id="colorUsers" x1="0" y1="0" x2="0" y2="1"> <stop offset="5%" stopColor="#f59e0b" stopOpacity={0.8} /> <stop offset="95%" stopColor="#f59e0b" stopOpacity={0} /> </linearGradient> </defs> <CartesianGrid strokeDasharray="3 3" stroke="#475569" /> <XAxis dataKey="time" stroke="#94a3b8" /> <YAxis stroke="#94a3b8" /> <Tooltip /> <Area type="monotone" dataKey="users" stroke="#f59e0b" fill="url(#colorUsers)" /> </AreaChart> </ResponsiveContainer> </div>
);
export default AreaChartBox;

react chart graph data visualization

Conclusion

The React charts provide graphical view to understand your trending data. The line chart plots the performance range over time, the pie chart slices down browser distribution at a quick view, and the area chart visualizes the user activity patterns. By using Recharts responsive wrapper, each graph fit for different screen size. Overall, these charts transform raw numbers into visual stories to help efficient decision making.

References:

  1. Recharts library documentation
  2. Best chart libraries for React

Download

Vincy
Written by Vincy, a web developer with 15+ years of experience and a Masters degree in Computer Science. She specializes in building modern, lightweight websites using PHP, JavaScript, React, and related technologies. Phppot helps you in mastering web development through over a decade of publishing quality tutorials.

↑ Back to Top

Posted on Leave a comment

Integrate Google Maps in React for Real-Time Location Tracking

by Vincy. Last modified on November 28th, 2025.

Integrating Google Maps into a React app is a powerful location-based feature. It helps for live user tracking to delivery routes, geo-fencing, and real-time movement progression. It is one of the simplest jobs with the help of the Google Maps JavaScript API and React libraries.

Real-time location tracking improves the usability of your apps. It can be implemented for dashboards, for tracking location on Duty, or anything that involves dynamic location-based requirements.

This React example helps to integrate Google Maps into React. It renders dynamic maps to the UI and displays markers to pinpoint the live location. It continuously updates the user’s position using the browser’s Geolocation API.

React Google Maps Realtime Location Tracking

Google Maps Integration steps

These are the few steps to enable required Google API services and configure the key credentials with the React App. This process builds a channel between the enduser and the Google cloud services for which they are registered with.

google cloud api library services

  1. Login with Google Cloud Console and create a new project.
  2. Choose APIs and Services and enable Maps JavaScript API.
  3. Go to Credentials menu and CREATE CREDENTIALS -> API Key to generate API key.
  4. Install React Google Maps library in your app using npm install @react-google-maps/api.
  5. Configure this key to your React app when loading React Google Maps JS library.

The credentials page shows the list of API keys generated. You can restrict the keys for specific domains or for using particular Google API services.

google cloud api credential

Rendering Google Maps with current location

The TrackLocation JSX shows HTML components for displaying the Google Map and a location search option.

If the location search is not applied, it is showing the marker on the users current location.

react google map landing page

src/components/TrackLocation.jsx

import { useState } from "react";
import SearchBox from "./SearchBox";
import MapContainerComponent from "./MapContainerComponent"; export default function TrackLocation() { const [searchQuery, setSearchQuery] = useState("");
return ( <div style={{ display: "flex" }}> <SearchBox onSearch={setSearchQuery} /> <MapContainerComponent searchQuery={searchQuery} /> </div> );
}

React Google Maps Component

This is the main component which initiates the React Google Maps library by configuring the Google Cloud API service key.

It manages React states for having the Map instance, map marker location and the searched location. The marker location is depends on two factors. It will be changed dynamically to show the real-time location of the user. Also, it is changed when the search is applied.

With the help of the client side Geo location capabilities, navigator.geolocation gets the latitude and longitude of the user’s position. Then it is used to build the location object to plot the marker to the map.

src/components/MapContainerComponent.jsx

import { useEffect, useState } from "react";
import { GoogleMap, useJsApiLoader } from "@react-google-maps/api";
import LocationMarker from "./LocationMarker"; export default function MapContainerComponent({ searchQuery }) { const [map, setMap] = useState(null); const [userLocation, setUserLocation] = useState(null); const [searchLocation, setSearchLocation] = useState(null); const { isLoaded } = useJsApiLoader({ googleMapsApiKey: "YOUR API KEY", libraries: ["places"], }); useEffect(() => { if (navigator.geolocation) { const watchId = navigator.geolocation.watchPosition( (pos) => { const newLoc = { lat: pos.coords.latitude, lng: pos.coords.longitude, }; setUserLocation(newLoc); if (map && !searchLocation) { map.setCenter(newLoc); map.setZoom(13); } }, (err) => console.error("Location error:", err), { enableHighAccuracy: true, maximumAge: 1000 } ); return () => navigator.geolocation.clearWatch(watchId); } else { console.error("Geolocation not supported"); } }, [map, searchLocation]); useEffect(() => { if (!searchQuery || !window.google || !map) return; const geocoder = new window.google.maps.Geocoder(); geocoder.geocode({ address: searchQuery }, (results, status) => { if (status === "OK" && results[0]) { const loc = results[0].geometry.location; const newSearchLoc = { lat: loc.lat(), lng: loc.lng() }; setSearchLocation(newSearchLoc); if (userLocation) { const bounds = new window.google.maps.LatLngBounds(); bounds.extend(userLocation); bounds.extend(newSearchLoc); map.fitBounds(bounds); } else { map.setCenter(newSearchLoc); map.setZoom(12); } } else { console.warn("Location not found for:", searchQuery); } }); }, [searchQuery, map, userLocation]); const zoomToLocation = (loc) => { if (!map || !loc) return; map.panTo(loc); map.setZoom(15); }; return ( <div className="map-container"> {isLoaded && ( <GoogleMap mapContainerStyle={{ width: "100%", height: "100vh" }} center={userLocation || { lat: 20.5937, lng: 78.9629 }} zoom={userLocation ? 13 : 5} onLoad={setMap} options={{ streetViewControl: false, mapTypeControl: false, fullscreenControl: false, }}> <LocationMarker position={userLocation} title="Your Location" onClick={() => zoomToLocation(userLocation)} /> <LocationMarker position={searchLocation} title="Tracked Location" onClick={() => zoomToLocation(searchLocation)} /> </GoogleMap> )} {userLocation && ( <button className="floating-btn" onClick={() => zoomToLocation(userLocation)}> My Location </button> )} </div> );
}

This LocationMarker component is part of the main React component that accepts the users location or searched location. It pins the marker to the Map based on the location details.

src/components/LocationMarker.js

import React from "react";
import { Marker } from "@react-google-maps/api"; export default function LocationMarker({ position, title, onClick }) { return position ? <Marker position={position} title={title} onClick={onClick} /> : null;
}

Google Maps Search feature

The search form contains interface to enter the place to mark on the Map. When the search is applied, the LocationMarker rendered with the position:searchLocation shows the marker on the right place.

src/components/SearchBox.jsx

import { useState } from "react"; export default function SearchBox({ onSearch }) { const [query, setQuery] = useState(""); const handleSubmit = (e) => { e.preventDefault(); if (query.trim()) onSearch(query); }; return ( <div className="search-sidebar"> <h3 className="sidebar-title">Track Location</h3> <form onSubmit={handleSubmit}> <input type="text" placeholder="Enter a place" value={query} onChange={(e) => setQuery(e.target.value)} className="search-input" /> <button type="submit" className="search-btn"> Search </button> </form> </div> );
}

Conclusion

Real-time location tracking in React becomes easy with the joint capabilities of the Geolocation API and Google Maps. It changes the user’s position on movement. This example enriches user experience with a live movement tracking feature. And, it will be easy to use in a location-based React application that needs to render users’ live locations.

References:

  1. React Google Maps API wrapper.
  2. Google Maps rendering best practices.

Download

Vincy
Written by Vincy, a web developer with 15+ years of experience and a Masters degree in Computer Science. She specializes in building modern, lightweight websites using PHP, JavaScript, React, and related technologies. Phppot helps you in mastering web development through over a decade of publishing quality tutorials.

↑ Back to Top

Posted on Leave a comment

How to Build a Responsive React Navbar with Dropdown and Mobile Menu

by Vincy. Last modified on November 25th, 2025.

A responsive navigation bar is a one of a must-needed requirement of any modern web application. It is an easy job if the navigation bar contains single level menu and action controls. But, it will be complex it is a multi-level menu to fit the layout into a small viewport.

With this React example code you’ll learn how to build a responsive React navbar. It includes a multi-level dropdown menu for different view port. It will a plugable and reusable React component for your different application frontend.

Responsive React Navbar Dropdown Mobile Menu

Responsive navbar in React header

This React JSX code has the a responsive navigation bar component. It provides 1) menu bar with Desktop and mobile variants, 2)sub menu bar with click-to-expand effect.

The menuData contains the array of multi-level menu items. The image shown below renders the horizontal menu on the site header.

react drop down navbar

src/components/Navbar/Navbar.jsx

import { useState } from "react";
import menuData from "./MenuData";
import Dropdown from "./DropDown";
import "../../../public/assets/css/style.css"; const Navbar = () => { const [menuOpen, setMenuOpen] = useState(false); const [openIndex, setOpenIndex] = useState(null); const toggleSubmenu = (index, e) => { if (window.innerWidth <= 768) { e.preventDefault(); setOpenIndex(openIndex === index ? null : index); } };
return ( <nav className="navbar"> <div className="navbar-container"> <h2 className="logo"></h2> <button className="menu-toggle" onClick={() => setMenuOpen(!menuOpen)} aria-label="Toggle menu" > ☰ </button> <ul className={`menu ${menuOpen ? "open" : ""}`}> {menuData.map((menu, i) => ( <li key={i} className="menu-item has-submenu"> <a href="#" onClick={(e) => toggleSubmenu(i, e)}> {menu.title} <span className="expand">▼</span> </a> {menu.subMenu && ( <Dropdown items={menu.subMenu} className={openIndex === i ? "open" : ""} /> )} </li> ))} </ul> </div> </nav>
);
};
export default Navbar;

These are the main and submenu items defined for this React example.

src/components/Navbar/MenuData.js

const menuData = [ { title: "Popular Toys", subMenu: [ { title: "Video Games", subMenu: [ { title: "Car", subMenu: ["Racing Car", "Toy Car", "Remote Car"] }, "Bike Race", "Fishing" ] }, "Barbies", "Teddy Bear", "Golf Set" ] }, { title: "Recent Toys", subMenu: [ "Yoyo", "Doctor Kit", { title: "Fun Puzzle", subMenu: ["Cards", "Numbers"] }, "Uno Cards" ] }, { title: "Toys Category", subMenu: [ "Battery Toys", { title: "Remote Toys", subMenu: ["Cars", "Aeroplane", "Helicopter"] }, "Soft Toys", "Magnet Toys" ] }
]; export default menuData;

React menu dropdown hooks to toggle submenu

A component Dropdown returns the submenu look-and-feel. The React state openIndex has the menu open/close state by its index.

The Dropdown component’s expand/collapse state is depends on the menuOpen set with a toggle action. The menu toggle effect is for the mobile view to slide down the menu options on clicking a burger icon.

react drop down navbar menu

src/components/Navbar/DropDown.jsx

import { useState } from "react"; const Dropdown = ({ items, className }) => { const [openIndex, setOpenIndex] = useState(null); const toggleSubmenu = (index, e) => { if (window.innerWidth <= 768) { e.preventDefault(); setOpenIndex(openIndex === index ? null : index); } }; return ( <ul className={`dropdown ${className || ""}`}> {items.map((item, i) => typeof item === "string" ? ( <li key={i}> <a href="#">{item}</a> </li> ) : ( <li key={i} className="has-submenu"> <a href="#" onClick={(e) => toggleSubmenu(i, e)}> {item.title} <span className="expand">›</span> </a> {item.subMenu && ( <Dropdown items={item.subMenu} className={openIndex === i ? "open" : ""} /> )} </li> ) )} </ul> );
};
export default Dropdown;

Mobile menu navbar view

This heading shows the mobile view of this responsive navbar. In the mobile view, a burger icon will be appeared on the top right corner of the web layout.

This icon’s click event is bound to toggle a sliding menu. In this sliding menu, each menu items are vertically expandable to show its submenu.
react drop down navbar mobile responsive

References:

  1. Navigation bar modals with Material Design.
  2. Free navigation bar templates by Figma.

Download

Vincy
Written by Vincy, a web developer with 15+ years of experience and a Masters degree in Computer Science. She specializes in building modern, lightweight websites using PHP, JavaScript, React, and related technologies. Phppot helps you in mastering web development through over a decade of publishing quality tutorials.

↑ Back to Top

Posted on Leave a comment

React File Upload with Preview and Drag-and-Drop Support

by Vincy. Last modified on November 20th, 2025.

This example contains a React drag-and-drop file upload with file type and size validation. It connects backend to upload files to the server via Axios.

The workflow allows users to drop files to upload and shows file preview below the drop area. This file upload example includes the following featured functionalities.

  1. Drag and drop
  2. File validation
  3. Uploading to backend
  4. Saving file path to database
  5. Preview after upload
  6. Error handling

It is easy to integrate into any React application, since it is structured with separate components for the upload and preview UI.

React File Upload Preview Drag Drop

React UI with file upload interface

Two React components created for this file upload UI. Those are UploadBox and FilePreview.

The UploadBox is the drop area for dragged files to be uploaded. Once upload completed, file thumbnails are shown in a preview box by using the FilePreview component.

The FileUpload JSX handles the following processes before uploading a file.

  1. File validation about its extension and size.
  2. Handling errors or success acknowledgement for UI.
  3. Preparing form data with the file binaries.

react file upload empty state

src/components/FileUpload.jsx

import { useState } from "react";
import axios from "axios";
import SERVER_SIDE_API_ROOT from "../../config";
import FilePreview from "./FilePreview";
import UploadBox from "./UploadBox";
import "../../public/assets/css/style.css";
const FileUpload = () => { const [files, setFiles] = useState([]); const [dragActive, setDragActive] = useState(false); const [uploading, setUploading] = useState(false); const [errorMsg, setErrorMsg] = useState(""); const allowedExtensions = ["jpg", "jpeg", "png", "gif", "pdf", "doc", "docx", "txt"]; const MAX_FILE_SIZE = 2 * 1024 * 1024; const uploadFiles = async (fileList) => { setErrorMsg(""); const safeFiles = []; const rejectedFiles = []; fileList.forEach((file) => { const ext = file.name.split(".").pop().toLowerCase(); if (!allowedExtensions.includes(ext)) return rejectedFiles.push("Invalid file type"); if (file.size > MAX_FILE_SIZE) return rejectedFiles.push("Maximum file size is 2MB."); if (file.size <= 0) return rejectedFiles.push("Empty file"); safeFiles.push(file); }); if (rejectedFiles.length > 0) { setErrorMsg(rejectedFiles[0]); setUploading(false); return; } if (!safeFiles.length) return; const formData = new FormData(); safeFiles.forEach((file) => formData.append("files[]", file)); setUploading(true); const delay = new Promise((resolve) => setTimeout(resolve, 800)); try { const res = await Promise.all([ axios.post(`${SERVER_SIDE_API_ROOT}/file-upload.php`, formData, { headers: { "Content-Type": "multipart/form-data" }, }), delay, ]); const uploadedFiles = res[0].data.files.filter((f) => f.status === "uploaded"); setFiles((prev) => [...prev, ...uploadedFiles.map(f => safeFiles.find(sf => sf.name === f.name))]); } catch { setErrorMsg("Server error — please try again later."); } setUploading(false); }; const handleDrop = async (e) => { e.preventDefault(); setDragActive(false); await uploadFiles(Array.from(e.dataTransfer.files)); }; return ( <div className="upload-wrapper"> <UploadBox dragActive={dragActive} uploading={uploading} errorMsg={errorMsg} handleDrop={handleDrop} setDragActive={setDragActive} > </UploadBox> <FilePreview files={files} uploading={uploading} /> </div> );
};
export default FileUpload;

PHP file upload endpoint

The PHP script validates the received file binary before uploading to the server directory. If the validation passes, this script give name to the file with a unique random id.

Once the PHP move_uploaded_file() saves the files to the directory, this code inserts the target path to the database.

drag-drop-file-upload-api/file-upload.php

<?php
header("Access-Control-Allow-Origin: *");
header("Access-Control-Allow-Methods: POST, GET, OPTIONS");
header("Access-Control-Allow-Headers: Content-Type");
include "db.php";
$uploadDir = "uploads/";
$response = [];
if (!file_exists($uploadDir)) { mkdir($uploadDir, 0777, true);
}
$allowedExtensions = ['jpg', 'jpeg', 'png', 'gif', 'pdf', 'txt', 'doc', 'docx'];
$maxFileSize = 2 * 1024 * 1024; foreach ($_FILES['files']['name'] as $key => $name) { $tmpName = $_FILES['files']['tmp_name'][$key]; $extension = strtolower(pathinfo($name, PATHINFO_EXTENSION)); $size = $_FILES['files']['size'][$key]; if (!in_array($extension, $allowedExtensions)) { $response[] = [ "name" => $name, "status" => "blocked", "message" => "File type not allowed (.{$extension})" ]; continue; } if ($size > $maxFileSize) { $response[] = [ "name" => $name, "status" => "blocked", "message" => "Maximum file size is 2M." ]; continue; } if ($size <= 0) { $response[] = [ "name" => $name, "status" => "blocked", "message" => "Empty file" ]; continue; } $uniqueName = uniqid() . "_" . basename($name); $targetPath = $uploadDir . $uniqueName; if (move_uploaded_file($tmpName, $targetPath)) { $stmt = $conn->prepare("INSERT INTO uploaded_files (file_name, file_path) VALUES (?, ?)"); $stmt->bind_param("ss", $uniqueName, $targetPath); $stmt->execute(); $response[] = [ "name" => $name, "path" => $targetPath, "status" => "uploaded" ]; } else { $response[] = [ "name" => $name, "status" => "failed", "message" => "Error moving uploaded file." ]; }
}
echo json_encode(["success" => true, "files" => $response]);
?>

Drop area to place the dragged files

It contains UI elements to define the file drop area. The drop box uses onDragOver callback to highlight the drop area on hover.

And, the onDrop callback prepares the form data to post the dropped file binary to the server.

react file upload error state

src/components/UploadBox.jsx

const UploadBox = ({ dragActive, uploading, errorMsg, handleDrop, setDragActive }) => ( <> <div className={`upload-box ${dragActive ? "active" : ""}`} onDragOver={(e) => { e.preventDefault(); setDragActive(true); }} onDragLeave={() => setDragActive(false)} onDrop={handleDrop} > <h3 className="upload-title">Drag & Drop Files Here</h3> <p className="upload-text">Files will upload automatically</p> </div> {uploading && <p className="uploading-text">Uploading...</p>} {errorMsg && <p className="error-text">{errorMsg}</p>} </>
); export default UploadBox;

Showing file preview with thumbnails

The FilePreview component displays the uploaded files in a list format. It will show its thumbnail, name and size.

If an image upload, the preview will show the image thumbnail. It a document type file is uploaded, the default icon is shown to the preview screen.
React File Upload Success Case Output

src/components/FilePreview.jsx

const FilePreview = ({ files, uploading }) => { if (!files.length) return null; return ( <div className="preview-list"> {files.map((file, i) => ( <div key={i} className="preview-row"> {file.type?.startsWith("image/") ? ( <div className="preview-thumb-wrapper"> <img src={URL.createObjectURL(file)} alt={file.name} className={`preview-thumb ${uploading ? "blurred" : ""}`} /> {uploading && ( <div className="preview-loader"> <img src="/assets/image/loader.svg" alt="Loading..." /> </div> )} </div> ) : ( <div className="file-icon"></div> )} <div className="file-info"> <p className="file-name">{file.name}</p> <p className="file-size">{Math.round(file.size / 1024)} KB</p> </div> </div> ))} </div> );
};
export default FilePreview;

How to set up this application

The below steps help to set up this example to run in your environment. After these steps, start the npm dev server and run the React drag and drop app.

  1. Download the source and unzip into your computer.
  2. Copy the drag-drop-file-upload-api into the PHP web root.
  3. Create a database file_upload_db and import the SQL script in the drag-drop-file-upload-api/sql
  4. Configure database details with db.php
  5. Configure the PHP endpoint URL in React in src/config.js

Conclusion

I hope the React code provides a modern file upload interface. The drag-and-drop, file validation, preview rendering and database insert is a stack of features enriches the example code. This code well-structured and ready to integrate with an application easily. If you want any add-on feature to this example, please let me know.

References:

  1. HTML drag and drop UI
  2. Axios API request config option

Download

Vincy
Written by Vincy, a web developer with 15+ years of experience and a Masters degree in Computer Science. She specializes in building modern, lightweight websites using PHP, JavaScript, React, and related technologies. Phppot helps you in mastering web development through over a decade of publishing quality tutorials.

↑ Back to Top

Posted on Leave a comment

Build a Multi-Step Form in React with Validation and Progress Bar

by Vincy. Last modified on November 18th, 2025.

A multi-step form is one of the best ways to replace a long form to make the customer feel easy. Example: a student enrolment form will usually be very long. If it is partitioned into multi-steps with section-wise sub forms, it encourages enduser to proceed forward. And importantly the merit is that it will increase your signup rate.

In this React tutorial, a registration form is partitioned into 4 steps. Those are to collect general, contact, personal, and authentication details from the users. Each step loads a sub-form with corresponding sections. Each subform is a separate component with proper structure and easy maintainability.

React Multi Step Form Validation Progress Bar

Rendering multi-step registration form

This RegisterForm is created as a parent React Form component. It loads all the sub-components created for rendering a multi-step form with validation and a progress bar.

It requires the following custom React component created for this example.

  1. GeneralInfo – to collect basic information, first and last names.
  2. ContactInfo – to collect phone or WhatsApp numbers.
  3. PersonalInfo – to collect a person’s date of birth and gender.
  4. ConfirmInfo – is a last step to register confidential information and confirm registration.

All information is stored in the formData by using the corresponding handleChange hook.

Additionally, this JSX has a Toast container to display success or error responses on the user-entered data.

There is a step navigation interface that helps to move along the registration steps. The step navigation helps to verify the data before clicking confirmation.

src/components/RegisterForm.jsx

import { useState } from "react";
import { ToastContainer } from "react-toastify";
import "react-toastify/dist/ReactToastify.css";
import ProgressBar from "./ProgressBar";
import GeneralInfo from "./FormSteps/GeneralInfo";
import ContactInfo from "./FormSteps/ContactInfo";
import PersonalInfo from "./FormSteps/PersonalInfo";
import Confirmation from "./FormSteps/Confirmation";
import "../../public/assests/css/RegisterForm.css";
const RegisterForm = () => { const [step, setStep] = useState(1); const [formData, setFormData] = useState({ first_name: "", last_name: "", email: "", phone: "", dob: "", gender: "", username: "", password: "", terms: false, }); const nextStep = () => setStep(prev => prev + 1); const prevStep = () => setStep(prev => prev - 1); const handleChange = (e) => { const { name, value, type, checked } = e.target; setFormData({ ...formData, [name]: type === "checkbox" ? checked : value, }); };
return (
<div className="container"> <header>Register With Us</header> <ProgressBar step={step} /> <div className="form-outer"> {step === 1 && <GeneralInfo formData={formData} handleChange={handleChange} nextStep={nextStep} />} {step === 2 && <ContactInfo formData={formData} handleChange={handleChange} nextStep={nextStep} prevStep={prevStep} />} {step === 3 && <PersonalInfo formData={formData} handleChange={handleChange} nextStep={nextStep} prevStep={prevStep} />} {step === 4 && <Confirmation formData={formData} handleChange={handleChange} prevStep={prevStep} setFormData={setFormData} setStep={setStep} />} </div> <ToastContainer position="top-center" autoClose={3000} hideProgressBar={false} newestOnTop closeOnClick pauseOnHover/>
</div>
);
};
export default RegisterForm;

Form progress bar with numbered in-progress state of registration

When a multi-step form interface is used, the progress bar and prev-next navigation controls are very important usability.

This example provides both of these controls which will be useful to learn how to make this for other similar cases.

The progress bar contains circled, numbered nodes represent each step. This node is a container that denotes the title and the step number. It checks the useState for the current step and highlights the node accordingly.

The conditional statements load the CSS className ‘active’ dynamically when loading the progress bar to the UI.

All the completed steps are highlighted by a filled background and shows clarity on the current state.

src/components/ProgressBar.jsx

const ProgressBar = ({ step }) => {
return (
<div className="progress-bar"> <div className={`step ${step >= 1 ? "active" : ""}`}> <p>General</p> <div className={`bullet ${step > 1 ? "active" : ""}`}> <span className="black-text">1</span> </div> </div> <div className={`step ${step >= 2 ? "active" : ""}`}> <p>Contact</p> <div className={`bullet ${step > 2 ? "active" : ""}`}> <span className="black-text">2</span> </div> </div> <div className={`step ${step >= 3 ? "active" : ""}`}> <p>Personal</p> <div className={`bullet ${step > 3 ? "active" : ""}`}> <span className="black-text">3</span> </div> </div> <div className={`step ${step >= 4 ? "active" : ""}`}> <p>Confirm</p> <div className="bullet"> <span className="black-text">4</span> </div> </div>
</div>
);
};
export default ProgressBar;

React Form components collecting types of user information

We have seen all 4 sub-form components created for this React example. Those component purposes are described in the explanation of the parent React container.

Each form component accepts the formData, handleChange, nextStep references. The parent component has the scope of reading all the sub-form field data. It supplies the data with the corresponding handleChange hook to each step.

The main RegisterForm JSX contains conditional statements to check the current step. Then, it load the corresponding sub form components based on the in-progressing step managed in a React useState.

Step 1 – Collecting general information

react registered multi step form

src/components/FormSteps/GeneralInfo.jsx

import { useState } from "react";
const GeneralInfo = ({ formData, handleChange, nextStep }) => { const [errors, setErrors] = useState({}); const validate = () => { const newErrors = {}; if (!formData.first_name.trim()) newErrors.first_name = "First name is required"; if (!formData.last_name.trim()) newErrors.last_name = "Last name is required"; setErrors(newErrors); return Object.keys(newErrors).length === 0; }; return ( <div className="page slidepage"> <div className="title">General Information</div> <div className="field"> <div className="label">First Name</div> <input type="text" name="first_name" value={formData.first_name} onChange={handleChange} className={errors.first_name ? "is-invalid" : ""} /> {errors.first_name && <div className="ribbon-alert">{errors.first_name}</div>} </div> <div className="field"> <div className="label">Last Name</div> <input type="text" name="last_name" value={formData.last_name} onChange={handleChange} className={errors.last_name ? "is-invalid" : ""} /> {errors.last_name && <div className="ribbon-alert">{errors.last_name}</div>} </div> <div className="field nextBtn"> <button type="button" onClick={() => validate() && nextStep()}> Continue </button> </div> </div> );
};
export default GeneralInfo;

Step 2: Collecting contact information

React Contact Info Form

src/components/FormSteps/ContactInfo.jsx

import { useState } from "react";
const ContactInfo = ({ formData, handleChange, nextStep, prevStep }) => { const [errors, setErrors] = useState({}); const validate = () => { const newErrors = {}; const emailRegex = /^[^\s@]+@[^\s@]+\.[^\s@]+$/; if (!formData.email.trim()) newErrors.email = "Email is required"; else if (!emailRegex.test(formData.email)) newErrors.email = "Enter a valid email address"; if (formData.phone.length < 10) newErrors.phone = "Phone number must be at least 10 digits"; setErrors(newErrors); return Object.keys(newErrors).length === 0; }; return ( <div className="page"> <div className="title">Contact Information</div> <div className="field"> <div className="label">Email Address</div> <input type="text" name="email" value={formData.email} onChange={handleChange} className={errors.email ? "is-invalid" : ""} /> {errors.email && <div className="ribbon-alert">{errors.email}</div>} </div> <div className="field"> <div className="label">WhatsApp Number</div> <input type="number" name="phone" value={formData.phone} onChange={handleChange} className={errors.phone ? "is-invalid" : ""} /> {errors.phone && <div className="ribbon-alert">{errors.phone}</div>} </div> <div className="field btns"> <button type="button" onClick={prevStep}>Back</button> <button type="button" onClick={() => validate() && nextStep()}>Continue</button> </div> </div> );
};
export default ContactInfo;

Step3 – Collecting personal information

react personal info form

src/components/FormSteps/PersonalInfo.jsx

import { useState } from "react";
const PersonalInfo = ({ formData, handleChange, nextStep, prevStep }) => { const [errors, setErrors] = useState({}); const validate = () => { const newErrors = {}; if (!formData.dob) newErrors.dob = "Please select your date of birth"; if (!formData.gender) newErrors.gender = "Please select your gender"; setErrors(newErrors); return Object.keys(newErrors).length === 0; };
return ( <div className="page"> <div className="title">Personal Information</div> <div className="field"> <div className="label">DOB</div> <input type="date" name="dob" value={formData.dob} onChange={handleChange} className={errors.dob ? "is-invalid" : ""} /> {errors.dob && <div className="ribbon-alert">{errors.dob}</div>} </div> <div className="field"> <div className="label">Gender</div> <select name="gender" value={formData.gender} onChange={handleChange} className={errors.gender ? "is-invalid" : ""} > <option value="">Select Gender</option> <option>Male</option> <option>Female</option> <option>Other</option> </select> {errors.gender && <div className="ribbon-alert">{errors.gender}</div>} </div> <div className="field btns"> <button type="button" onClick={prevStep}>Back</button> <button type="button" onClick={() => validate() && nextStep()}>Continue</button> </div> </div>
);
};
export default PersonalInfo;

Step 4 – Collecting user consent and confidential information

react confirm info form

src/components/FormSteps/Confirmation.jsx

import { useState } from "react";
import { toast } from "react-toastify";
import "react-toastify/dist/ReactToastify.css";
import axios from "axios";
import SERVER_SIDE_API_ROOT from "../../config";
const Confirmation = ({ formData, handleChange, prevStep, setFormData, setStep }) => { const [errors, setErrors] = useState({}); const handleSubmit = async (e) => { e.preventDefault(); const newErrors = {}; if (!formData.username) newErrors.username = "Username is required"; if (!formData.password) newErrors.password = "Password is required"; else if (formData.password.length < 6) newErrors.password = "Password must be at least 6 characters"; if (!formData.terms) newErrors.terms = "You must agree to the terms"; setErrors(newErrors); if (Object.keys(newErrors).length > 0) return; try { const res = await axios.post(`${SERVER_SIDE_API_ROOT}/multi-step-form.php`, formData); if (res.data.success) { toast.success(res.data.message || "User registered successfully!"); setFormData({ first_name: "", last_name: "", email: "", phone: "", dob: "", gender: "", username: "", password: "", terms: false, }); setStep(1); setErrors({}); } else { toast.error(res.data.message || "Registration failed!"); } } catch (err) { console.error(err); toast.error("Error while saving user data."); } }; const renderError = (field) => errors[field] ? <div className="ribbon-alert">{errors[field]}</div> : null;
return ( <div className="page"> <div className="title">Confirm</div> <div className="field"> <div className="label">Username</div> <input type="text" name="username" value={formData.username} onChange={handleChange} className={errors.username ? "is-invalid" : ""} /> {renderError("username")} </div> <div className="field"> <div className="label">Password</div> <input type="password" name="password" value={formData.password} onChange={handleChange} className={errors.password ? "is-invalid" : ""} /> {renderError("password")} </div> <div className="field-terms"> <label> <input type="checkbox" name="terms" checked={formData.terms} onChange={handleChange} />{" "} I agree with the terms. </label> {renderError("terms")} </div> <div className="field btns"> <button type="button" onClick={prevStep}>Back</button> <button type="submit" onClick={handleSubmit}>Register</button> </div> </div>
);
};
export default Confirmation;

PHP endpoint processing multi-step form data

It is a usual PHP file which not need to describe if you are already familiar with how the PHP user registration works. It reads the form data posted by the front-end multi-step React form.

With this form data, it builds the database insert query to save the user-entered information to the backend.

This example has the server-side validation for a few fields. If the validation process catches any problem with the submitted data, then it composes an error response to the React frontend.

Mainly, it validates email format and password-strength (minimally by its length). Password strength checking has no limitations. Based on the application sensitivity we are free to add as much validation as possible which is good for a security point of view.

Note: The SQL script for the user database is in the downloadable source code attached with this tutorial in multi-step-form-validation-api/users.sql.

multi-step-form-validation-api/multi-step-form.php

<?php
header("Access-Control-Allow-Origin: *");
header("Access-Control-Allow-Headers: Content-Type");
header("Access-Control-Allow-Methods: POST");
header("Content-Type: application/json");
include 'db.php';
$data = json_decode(file_get_contents("php://input"), true);
$firstName = $data["first_name"] ?? "";
$lastName = $data["last_name"] ?? "";
$email = $data["email"] ?? "";
$phone = $data["phone"] ?? "";
$dob = $data["dob"] ?? "";
$gender = $data["gender"] ?? "";
$username = $data["username"] ?? "";
$password = $data["password"] ?? "";
if (!$firstName || !$email || !$password) { echo json_encode(["success" => false, "message" => "Required fields missing"]); exit;
}
if (!filter_var($email, FILTER_VALIDATE_EMAIL)) { echo json_encode(["success" => false, "message" => "Invalid email"]); exit;
}
if (strlen($password) < 6) { echo json_encode(["success" => false, "message" => "Password too short"]); exit;
}
$hashedPassword = password_hash($password, PASSWORD_BCRYPT);
$stmt = $conn->prepare("INSERT INTO users (first_name, last_name, email, phone, dob, gender, username, password) VALUES (?, ?, ?, ?, ?, ?, ?, ?)");
$stmt->bind_param("ssssssss", $firstName, $lastName, $email, $phone, $dob, $gender, $username, $hashedPassword);
if ($stmt->execute()) { echo json_encode(["success" => true, "message" => "User registered successfully"]);
} else { echo json_encode(["success" => false, "message" => "DB insert failed"]);
}
?>

How to set up this application

The below steps help to set up this example to run in your environment.

  1. Download the source code into your React project directory.
  2. Copy the multi-step-form-validation-api into your PHP root.
  3. Create a database multistep_form_validation_db and import the user.sql
  4. Configure database details with db.php
  5. Configure the PHP endpoint URL in React in src/config.js
  6. Run npm install and then, npm run dev.
  7. Copy the dev server URL and run it to render the React Multi-step form.

Conclusion:

So, we have seen a simple React example to understand how to create and manage the state of a multi-step form. By splitting the mail and sub form components we had a structural code base that is more feasible for enhancements.

The navigation between steps gives a scope for verification before confirm the signup. And the progress bar indicates the state in progress at a quick glance.

Definitely, the PHP validation and database processing can have add-on features to make the backend more solid. If you have a requirement to create a multi-step form in React, share your specifications in the comments.

Download

Vincy
Written by Vincy, a web developer with 15+ years of experience and a Masters degree in Computer Science. She specializes in building modern, lightweight websites using PHP, JavaScript, React, and related technologies. Phppot helps you in mastering web development through over a decade of publishing quality tutorials.

↑ Back to Top

Posted on Leave a comment

Send Email from React Using EmailJS (No Backend Required)

by Vincy. Last modified on November 13th, 2025.

EmailJS is a cloud service that supports to enable the frontend to send email without any backend. All we need is to create an EmailJS account and configure it to the frontend application.

This tutorial shows the step-by-step procedure to learn how to enable email sending in a React application using EmialJS.

Send Email From React Using EmailJS

Steps to allow EmailJS to send mail

1. Signup with EmailJS service

First signup and login with EmailJS dashboard. It’s a free and enables mail sending via various services supported.

Select Email Sending Service

2. Choose service provider via Add New Service -> Select Service

It supports various services like Gmail, Yahoo and etc. It also have settings to configure custom SMTP server  with this online solution.
Permit EmailJS To Access Mail Account

3. Design mail template by Email Templates -> Create New Template -> Select Template

There are various built-in templates in the EmailJS dashboard. I selected the “Contact Us” template for this example.

Template edit interface has the option to change the design and the content. It allows to add dynamic variables as part of the mail content.

When calling the EmailJS service, the request will have values to replace this variables. This feature will help to send a personalized email content.

Copy the Template ID once created an email template.

Design EmailJS Template

4. Get EmailJS API Public Key

Added Service ID, Template ID the EmailJS Public Key  is also need to initiate the library class from the frontend React App.

Navigate via Account using the left menu to open the API keys section. Copy Public Key from the EmailJS dashboard.

Get EmailJS Account Public Key

Initiate EmailJS library to React App

Create a React app and install the EmailJS library to it using this command.

npm install emailjs-com

This example code contains this library installed. So, just run npm install to bring the dependancies into your node_modules.

Then, import the emailjs-com to the React JSX and initiate the EmailJS service as shown below. This script shows how the emailjs instance is used in the form handle submit.

import emailjs from "emailjs-com"; const handleSubmit = (e) => { e.preventDefault(); const SERVICE_ID = "Your Serivce ID"; const TEMPLATE_ID = "Your Template ID"; const PUBLIC_KEY = "EmailJS API Public key here"; emailjs .send(SERVICE_ID, TEMPLATE_ID, formData, PUBLIC_KEY) .then(() => { toast.success("Email sent successfully!", { position: "top-center" }); setFormData({ name: "", email: "", message: "" }); }) .catch(() => { toast.error("Failed to send email. Please try again.", { position: "top-center", }); }); };

Example React form to send email

This example provides component for the email sending form fields. The fields UI code is moved to a separate file and made as a component. It is imported into the parent container in the EmailForm component.

It renders Name, Email and Message fields. Each fields is validated with a handleChange hook.

react send mail form

src/components/EmailFormFields.jsx

const EmailFormFields = ({ formData, handleChange }) => {
return ( <> <div className="form-group"> <label className="form-label">Name</label> <input type="text" name="name" value={formData.name} onChange={handleChange} className="form-input" required /> </div> <div className="form-group"> <label className="form-label">Email</label> <input type="email" name="email" value={formData.email} onChange={handleChange} className="form-input" required /> </div> <div className="form-group"> <label className="form-label">Message</label> <textarea name="message" value={formData.message} onChange={handleChange} className="form-input" rows="6" required ></textarea> </div> </>
);
};
export default EmailFormFields;

React JSX to load EmailJS and EmailFormFields Component

This JSX defines the handleChange and handleSubmit hooks for validation and mail sending respectively.

The form container includes the <EmailFormFields />, Submit button and a <ToastContainer />.

After sending email via emailjs, the handleSubmit action resets the form and make it ready for the next submit.

When submitting the form, the handleSubmit function sends the formData with the API keys and IDs. Configure your EmailJS keys and IDs to this React script to make this example to send email.

src/components/EmailForm.jsx

import { useState } from "react";
import emailjs from "emailjs-com";
import { ToastContainer, toast } from "react-toastify";
import "react-toastify/dist/ReactToastify.css";
import "../../public/assets/css/phppot-style.css";
import EmailFormFields from "./EmailFormFields"; const EmailForm = () => { const [formData, setFormData] = useState({ name: "", email: "", message: "", }); const handleChange = (e) => { const { name, value } = e.target; setFormData((prev) => ({ ...prev, [name]: value })); }; const handleSubmit = (e) => { e.preventDefault(); const SERVICE_ID = "Your Serivce ID"; const TEMPLATE_ID = "Your Template ID"; const PUBLIC_KEY = "EmailJS API Public key here"; emailjs .send(SERVICE_ID, TEMPLATE_ID, formData, PUBLIC_KEY) .then(() => { toast.success("Email sent successfully!", { position: "top-center" }); setFormData({ name: "", email: "", message: "" }); }) .catch(() => { toast.error("Failed to send email. Please try again.", { position: "top-center", }); }); }; return ( <div className="form-wrapper"> <h2 className="form-title">Contact Us</h2> <form onSubmit={handleSubmit} className="payment-form"> <EmailFormFields formData={formData} handleChange={handleChange} /> <button type="submit" className="submit-btn"> Send </button> </form> <ToastContainer /> </div> );
};
export default EmailForm;

Note: Form data is in an associate array format, where the array keys matches the email template variables. For example, if the email template body in the EmailJS dashboard contains Hi {{name}}, then the form data will have the key-value as name: submitted-name to replace the variable.

The receive email signature and the mail body design will be as configured in the EmailJS dashboard. The following diagram shows the received email output.

React Received Web Mail

Conclusion

Thus, we have created a frontend in React for sending email without any backend set up. I hope, you find EmailJS very simple to integrate into an application. And its registration process is very simple. And, the features to customize the email body is very useful to have a thematic email template for different applications.

Download

Vincy
Written by Vincy, a web developer with 15+ years of experience and a Masters degree in Computer Science. She specializes in building modern, lightweight websites using PHP, JavaScript, React, and related technologies. Phppot helps you in mastering web development through over a decade of publishing quality tutorials.

↑ Back to Top

Posted on Leave a comment

Save React Form Data to Google Sheets Without a Backend (Step-by-Step Guide)

by Vincy. Last modified on November 12th, 2025.

React form can be tied to a Google Sheets to store the submitted data. It maintains the form responses in an Excel format without database. This can be done by deploying a Google App Script for the target sheet.

In this tutorial, you will learn the steps to create a new Google App Script and deploy it for a Google Sheets.

The Google Sheets will have columns relevant to the React form fields. The Google web app script URL parameters are in the same order as the column. In a previous tutorial, we saw how to connect Google Sheets via API from a PHP application.

React Google Sheets No Backend Form

Steps to get Google Sheets URL to post form data

There are 5 simple steps to get the Google Sheets web app URL by registering an app script for a target sheet. At the end of these 5 steps, it will generate a URL that has to be configured in the React frontend code.

In the frontend, this URL will have a form data bundle to process the data row insertion as coded in the app script.

1. Create a Google sheet with the column relevant to the React form

Target Google Sheet

2. Navigate Extension -> App Script to add JS script to build row to insert

Append Row via JavaScript

3. Choose Deploy -> New Deployment to configure web app

Configure Web App Type

4. Set ownership configurations and authorize the app

Configure Web App Restriction Settings

5. Click Deploy and copy the Google Sheets web app URL

Web App URL Generation

React frontend form JSX with required handlers

The ReactForm JSX component includes the form UI and hooks to process the form submit. This simple form collects payment details to store in the Google Sheets.

In the above steps we get the Google App script URL to target the sheet from the frontend. This URL is used in this JSX with the form’s handleSubmit function. This URL is added to the GOOGLE_SHEET_URL variable and used in the form action hook.

The URLSearchParams builds the argument list with the submitted React form data. Google Sheets URL will receive these arguments in key1=value1&key2=value2.. format.

Once the submitted data is added to the Google Sheets, the frontend will clear the form and show a success toast message to the user.

react google sheet form

src/components/ReactForm.jsx

import { useState } from "react";
import axios from "axios";
import { ToastContainer, toast } from "react-toastify";
import "react-toastify/dist/ReactToastify.css";
import "../../public/assets/css/react-style.css";
import PaymentFormFields from "./PaymentFormFields";
const GOOGLE_SHEET_URL = "Paste your Google Apps Script Web App URL here";
const ReactForm = () => { const [formData, setFormData] = useState({ projectName: "", amount: "", currency: "", paymentDate: "", invoiceNumber: "", paymentMode: "", note: "", }); const handleChange = (e) => { const { name, value } = e.target; setFormData((prev) => ({ ...prev, [name]: value })); }; const handleSubmit = async (e) => { e.preventDefault(); try { const params = new URLSearchParams(formData).toString(); const response = await axios.post(`${GOOGLE_SHEET_URL}?${params}`); if (response.data.status === "success") { toast.success("Data saved to Google Sheet!", { position: "top-center" }); setFormData({ projectName: "", amount: "", currency: "", paymentDate: "", invoiceNumber: "", paymentMode: "", note: "", }); } else { toast.error("Failed to save data. Try again.", { position: "top-center" }); } } catch (error) { console.error("Error:", error); toast.error("Something went wrong while submitting.", { position: "top-center", }); } }; return ( <div className="form-wrapper"> <h2 className="form-title">Payment Entry</h2> <form onSubmit={handleSubmit} className="payment-form"> <PaymentFormFields formData={formData} handleChange={handleChange} /> <button type="submit" className="submit-btn disabled={loading}"> {loading ? "Processing..." : "Submit"} </button> </form> <ToastContainer /> </div> );
};
export default ReactForm; 

src/components/PaymentFormFields.jsx

const PaymentFormFields = ({ formData, handleChange }) => { return ( <> <div className="form-group"> <label className="form-label">Project Name</label> <input type="text" name="projectName" value={formData.projectName} onChange={handleChange} className="form-input" required /> </div> <div className="form-group"> <label className="form-label">Amount</label> <input type="number" name="amount" value={formData.amount} onChange={handleChange} className="form-input" required /> </div> <div className="form-group"> <label className="form-label">Currency</label> <select name="currency" value={formData.currency} onChange={handleChange} className="form-input" required > <option value="">Select Currency</option> <option value="USD">USD</option> <option value="INR">INR</option> <option value="EUR">EUR</option> </select> </div> <div className="form-group"> <label className="form-label">Payment Date</label> <input type="date" name="paymentDate" value={formData.paymentDate} onChange={handleChange} className="form-input" required /> </div> <div className="form-group"> <label className="form-label">Invoice Number</label> <input type="text" name="invoiceNumber" value={formData.invoiceNumber} onChange={handleChange} className="form-input" required /> </div> <div className="form-group"> <label className="form-label">Payment Mode</label> <select name="paymentMode" value={formData.paymentMode} onChange={handleChange} className="form-input" required > <option value="">Select Mode</option> <option value="Cash">Cash</option> <option value="Bank Transfer">Bank Transfer</option> <option value="Credit Card">Credit Card</option> <option value="UPI">UPI</option> </select> </div> <div className="form-group"> <label className="form-label">Note</label> <textarea name="note" value={formData.note} onChange={handleChange} className="form-input" rows="3" ></textarea> </div> </> );
}; export default PaymentFormFields;

Appending new row to the Google Sheets using the Web App Script

I gave the web app script in the downloadable source code added to this tutorial. This JS script is added to the Google Sheets App script extension.

This script will be executed when the form post action calls the web app URL.  The doPost() function builds the Google Sheets row instance with the parameters posted from the form.

With the line sheet.appendRow(row); we can return the ContentService with a success response.

The formatOnly step is optional to maintain all the rows with the same styles as the sheet header has. For example, if you highlight any column with a bright background, that will be carried over to the next rows added by the app script.

react google sheet form data

google-sheet-app/app-script-target.js

function doPost(e) { if (!e || !e.parameter) { return ContentService .createTextOutput(JSON.stringify({ status: "error", message: "No parameters received" })) .setMimeType(ContentService.MimeType.JSON); } const sheet = SpreadsheetApp.getActiveSpreadsheet().getSheetByName("Sheet1"); const row = [ e.parameter.projectName || "", e.parameter.amount || "", e.parameter.currency || "", e.parameter.paymentDate || "", e.parameter.invoiceNumber || "", e.parameter.paymentMode || "", e.parameter.note || "", ]; sheet.appendRow(row); const lastRow = sheet.getLastRow(); const lastColumn = sheet.getLastColumn(); const headerRange = sheet.getRange(1, 1, 1, lastColumn); const newRowRange = sheet.getRange(lastRow, 1, 1, lastColumn); headerRange.copyTo(newRowRange, { formatOnly: true }); return ContentService .createTextOutput(JSON.stringify({ status: "success" })) .setMimeType(ContentService.MimeType.JSON);
}

Conclusion

By linking a React form to a Google Sheets via the Google Apps Script, form data is stored in excel format. This will be very useful to maintain form responses without a backend database. The App Script created for this tutorial provided a feature to keep the row column formatting with the newly added rows.

As an enhancement, we can extend this code to read Google sheets and show the latest records to the UI.

References

  1. Google Apps Script Web App documentation.
  2. Bundling form data with URL parameters.

Download

Vincy
Written by Vincy, a web developer with 15+ years of experience and a Masters degree in Computer Science. She specializes in building modern, lightweight websites using PHP, JavaScript, React, and related technologies. Phppot helps you in mastering web development through over a decade of publishing quality tutorials.

↑ Back to Top