
Posted on — Leave a comment

Installing Fedora 45 on Stratis storage

The Anaconda installer in Fedora 45 will introduce a new option for storage configuration: Stratis, a modern solution for local storage management.

Stratis isn’t a completely new technology, it uses existing tools and technologies like device mapper, LUKS, and XFS and integrates them into an easy to use package. The idea is to provide modern storage features while hiding the often complex logic behind them. Adding support to the installer brings these features even closer to Fedora users.

There are only two basic structures or layers you need to know when working with Stratis: pools and filesystems. Pools represent an abstract layer on top of existing block devices (disks, partitions, RAID arrays etc.). A pool can consist of one or more devices (for systems with multiple disks, for example). Features like encryption or over-provisioning are also configured on the pool level. Multiple filesystems can be created on the pool. These are devices that will serve as your root or home volumes. Some additional features supported by Stratis include snapshots, caching, and for encrypted pools, multiple unlocking methods like TPM or Clevis/Tang. Caching and encryption without a passphrase are not currently supported by Anaconda, but these can be easily enabled after the installation.

Management of Stratis devices can be done using the stratis command. For more information, check our older, but still valid, article Getting started with Stratis or the Stratis project how-to.

Installation using Web UI

The new web-based user interface for the Anaconda installer currently doesn’t allow selecting which type of storage technology will be used for the automated and guided partitioning options. The storage layout you will get depends on the Fedora variant you choose to install. But if you want to use Stratis, you still have an option in the graphical installation. Any storage layout can be created manually using the Cockpit storage module, which is integrated into the installer. To enter it, simply select the If none of the options above apply… option on the Installation Destination step.
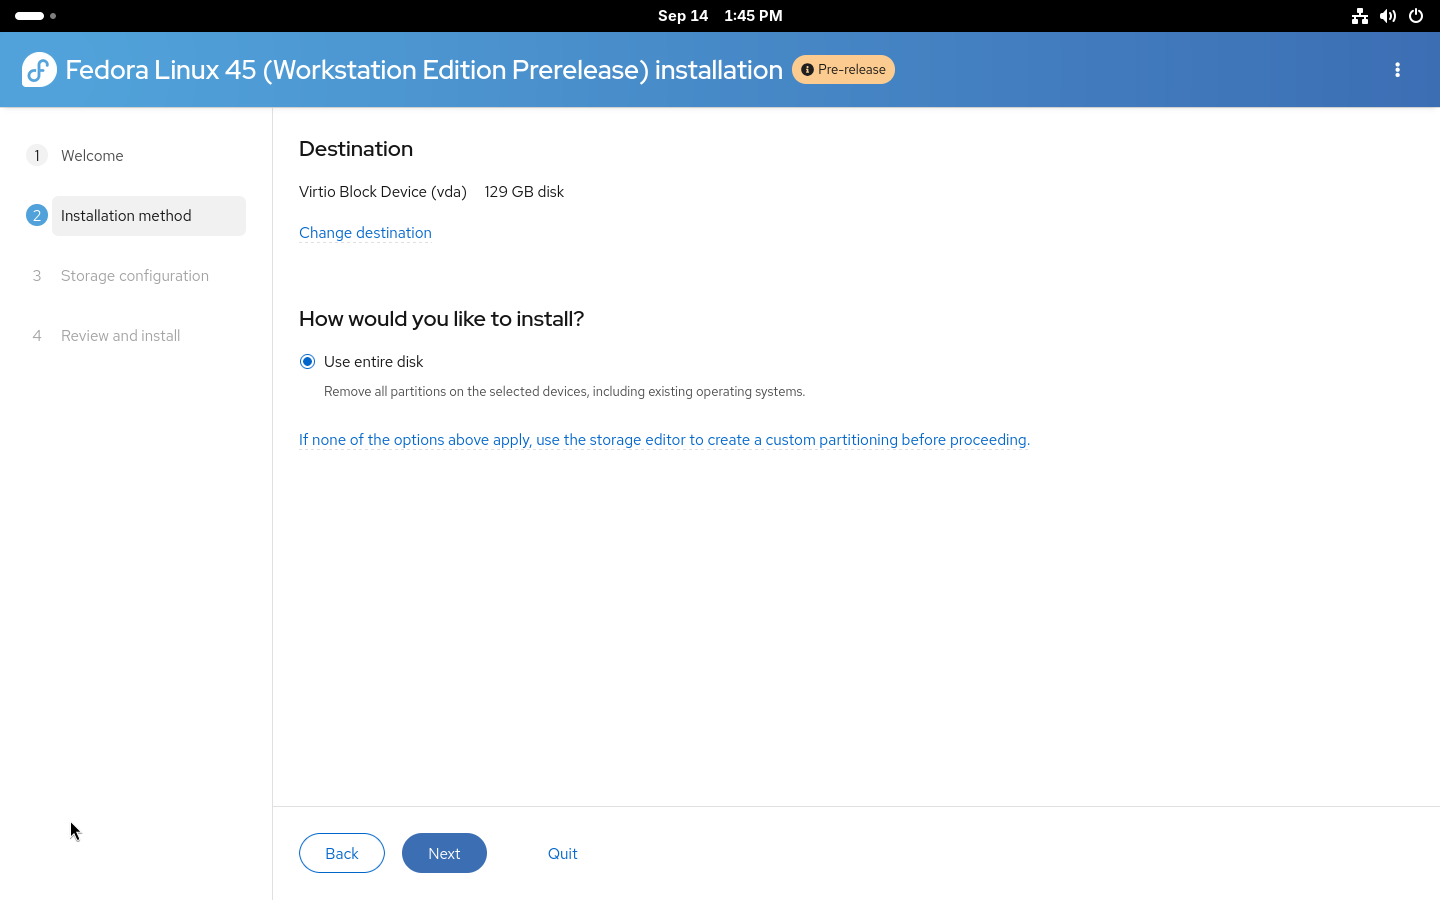
Installation method page in the Anaconda installer

The Cockpit storage module supports a wide variety of storage configurations and Stratis is one of the supported technologies. Do not forget that with manual partitioning, you need to create all required partitions so first create partitions required for booting (/boot and /boot/efi or biosboot, based on your system configuration). After that, simply create a new Stratis pool from the menu.
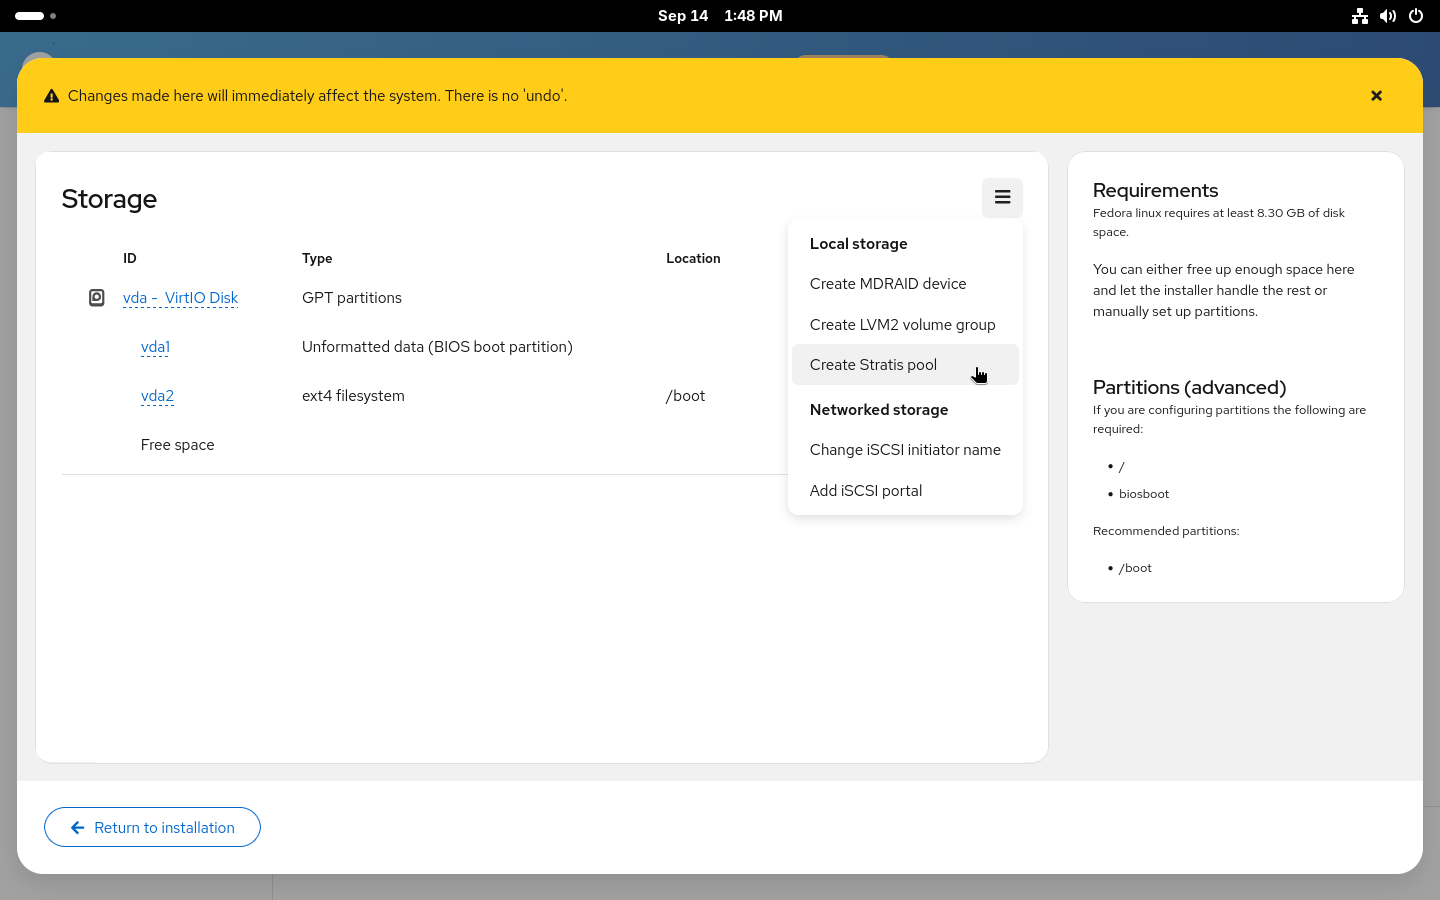
Local storage menu in the manual partitioning editor

Creating stratis pool

After selecting a name for the pool and the disk (or disks) it will be placed on, you can decide whether to enable encryption and over-provisioning for the pool. Over-provisioning allows allocation of more space for the filesystems created on the pool. Similarly to how LVM thin provisioning and Btrfs work. With over-provisioning enabled, there is no need to worry about running out of space in root with still plenty of free space in /home. It also allows greater flexibility when using snapshots. On the other hand, you actually need to be aware that you don’t really have terabytes of space and you need to make sure you won’t actually run out of space on your disk. Both encryption and over-provisioning can also be enabled or disabled after the installation.
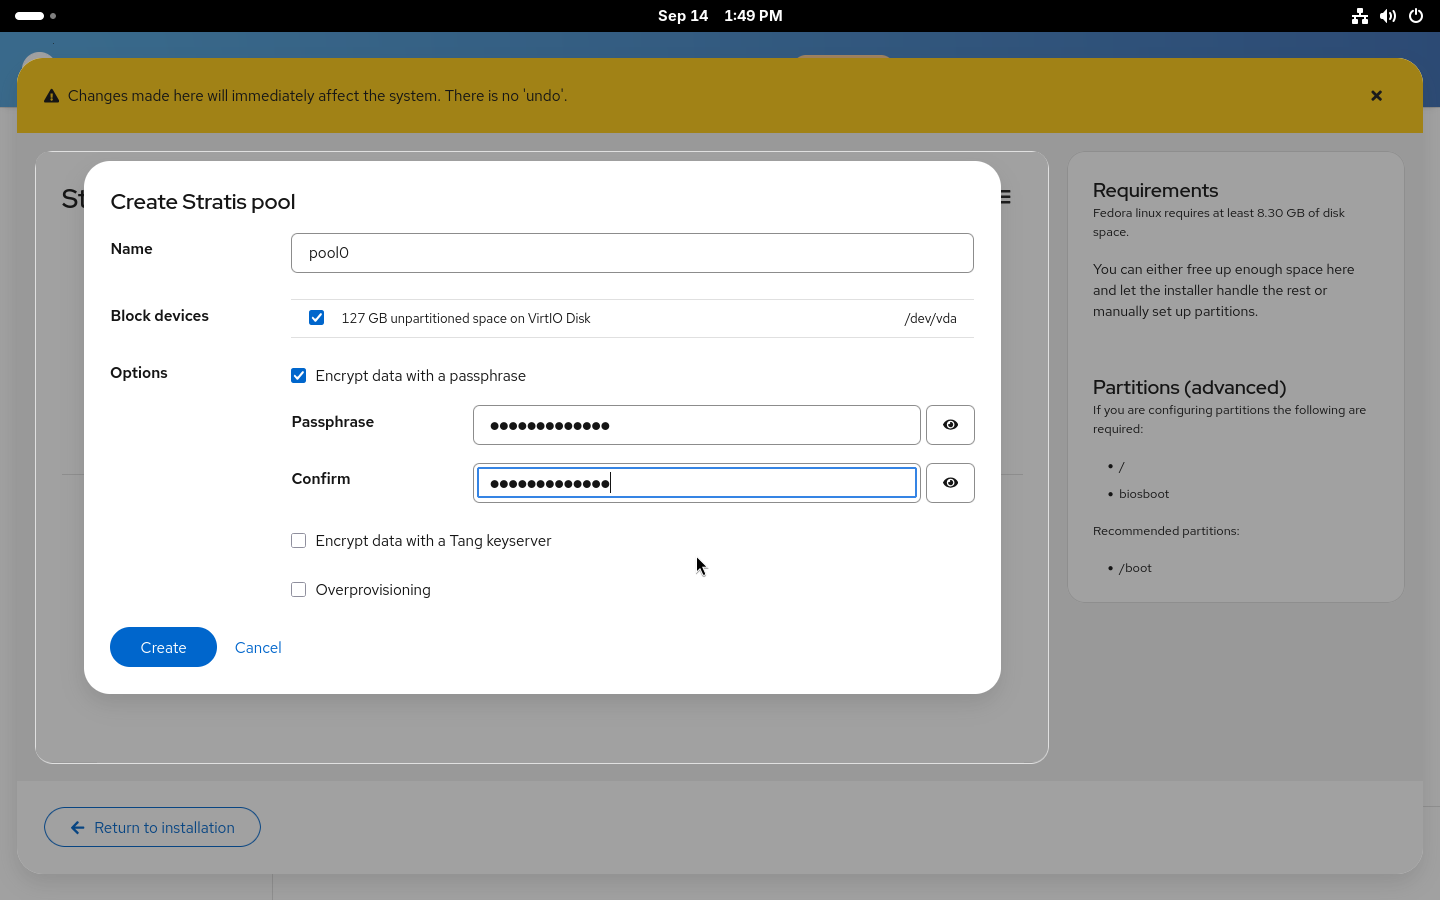
Creating Stratis pool in the manual partitioning

Creating stratis filesystems

With the new pool created, you now need to add some filesystems to it. You’ll most likely want the standard two separate filesystems for your / and /home. But you can also create a separate filesystem for your /var, for example.
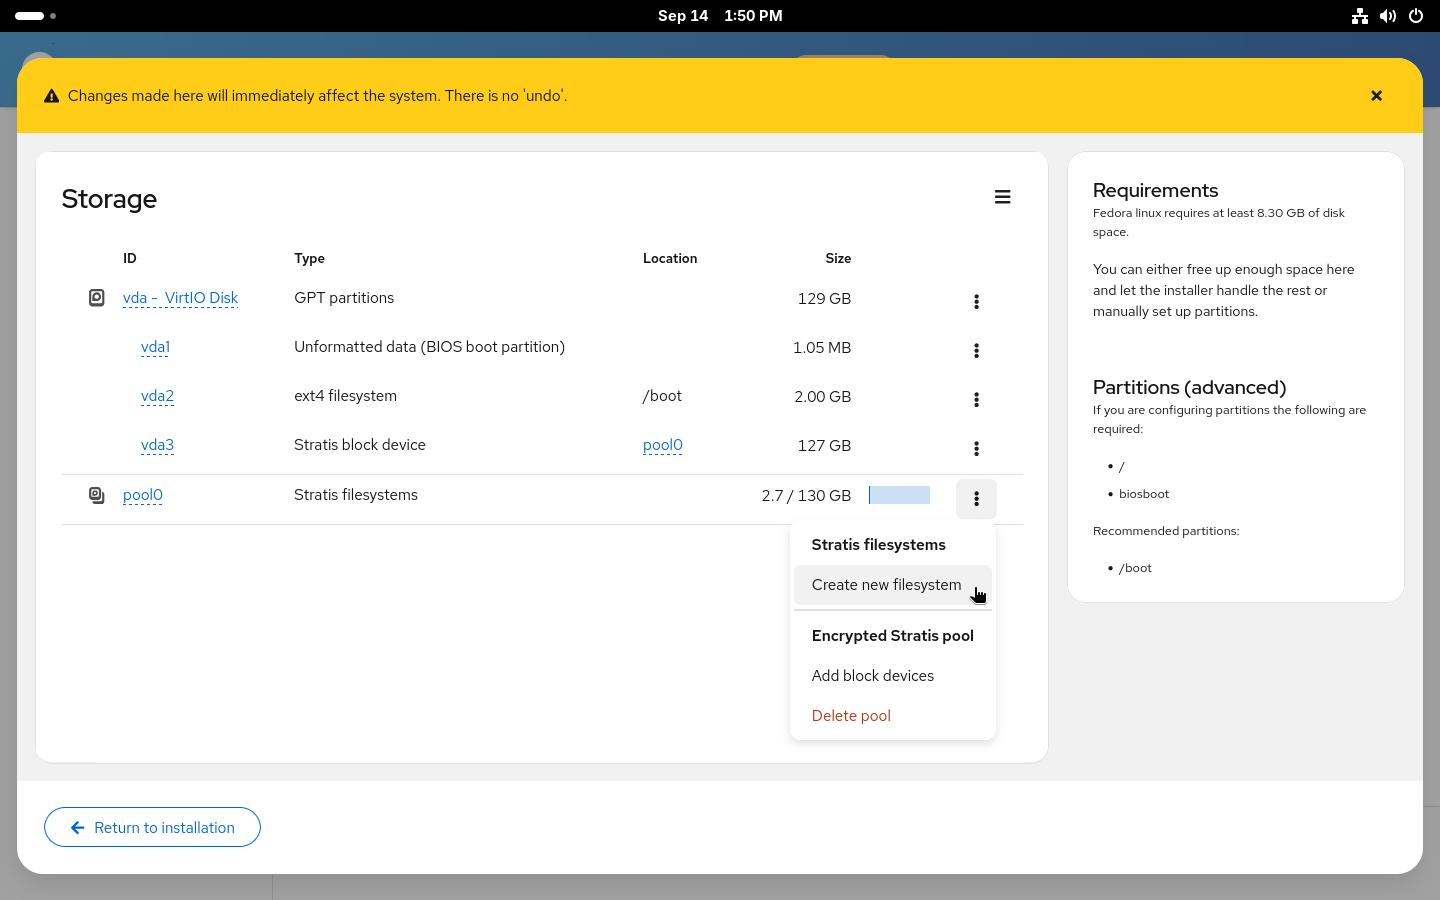
If you enable over-provisioning on your pool, you can also decide to not specify sizes for the filesystems and use the 1 TiB default size with over-provisioning or set a size limit for the filesystem to prevent it from automatically growing if you ever run out of space.
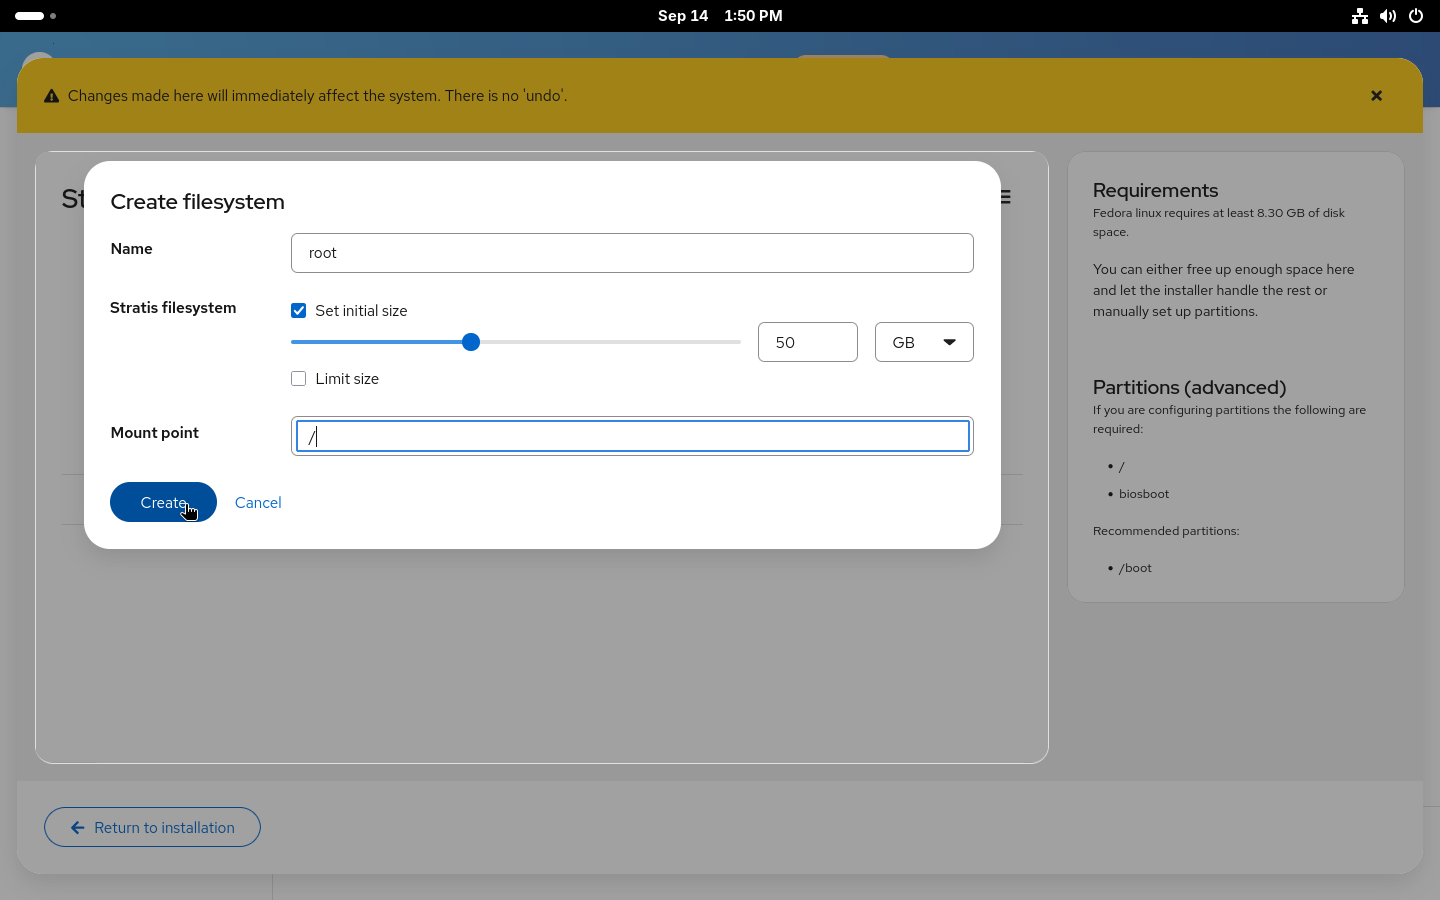
Creating Stratis filesystem in the manual partitioning

Using the configured layout

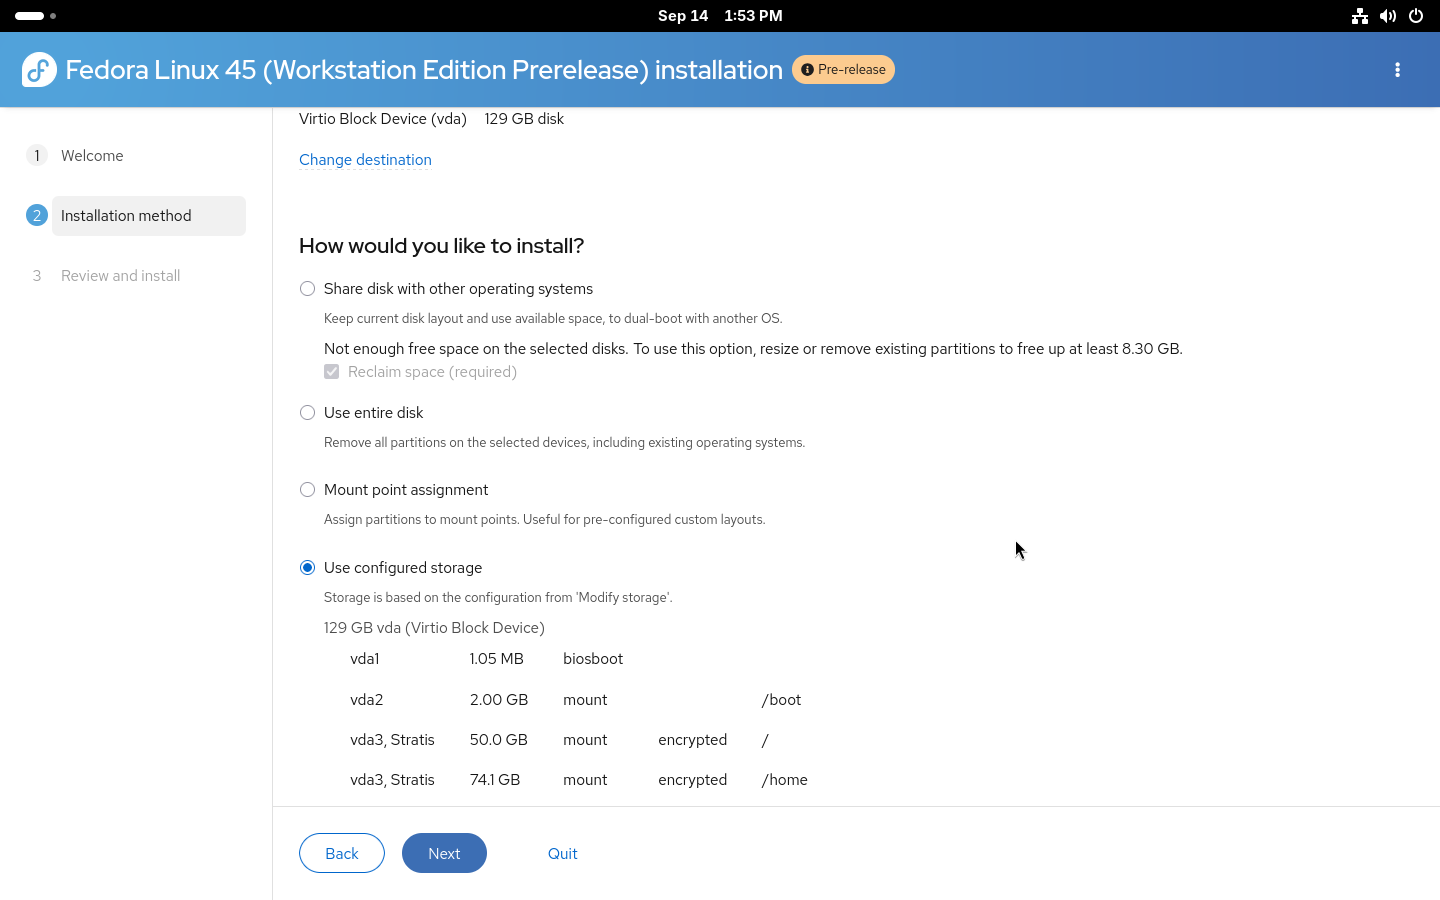
With all the filesystems created, you can Return to installation. Anaconda will check the created devices to make sure all requirements are met and return you to the Installation destination page where a new Use configured storage option will be preselected with the devices that were just created.
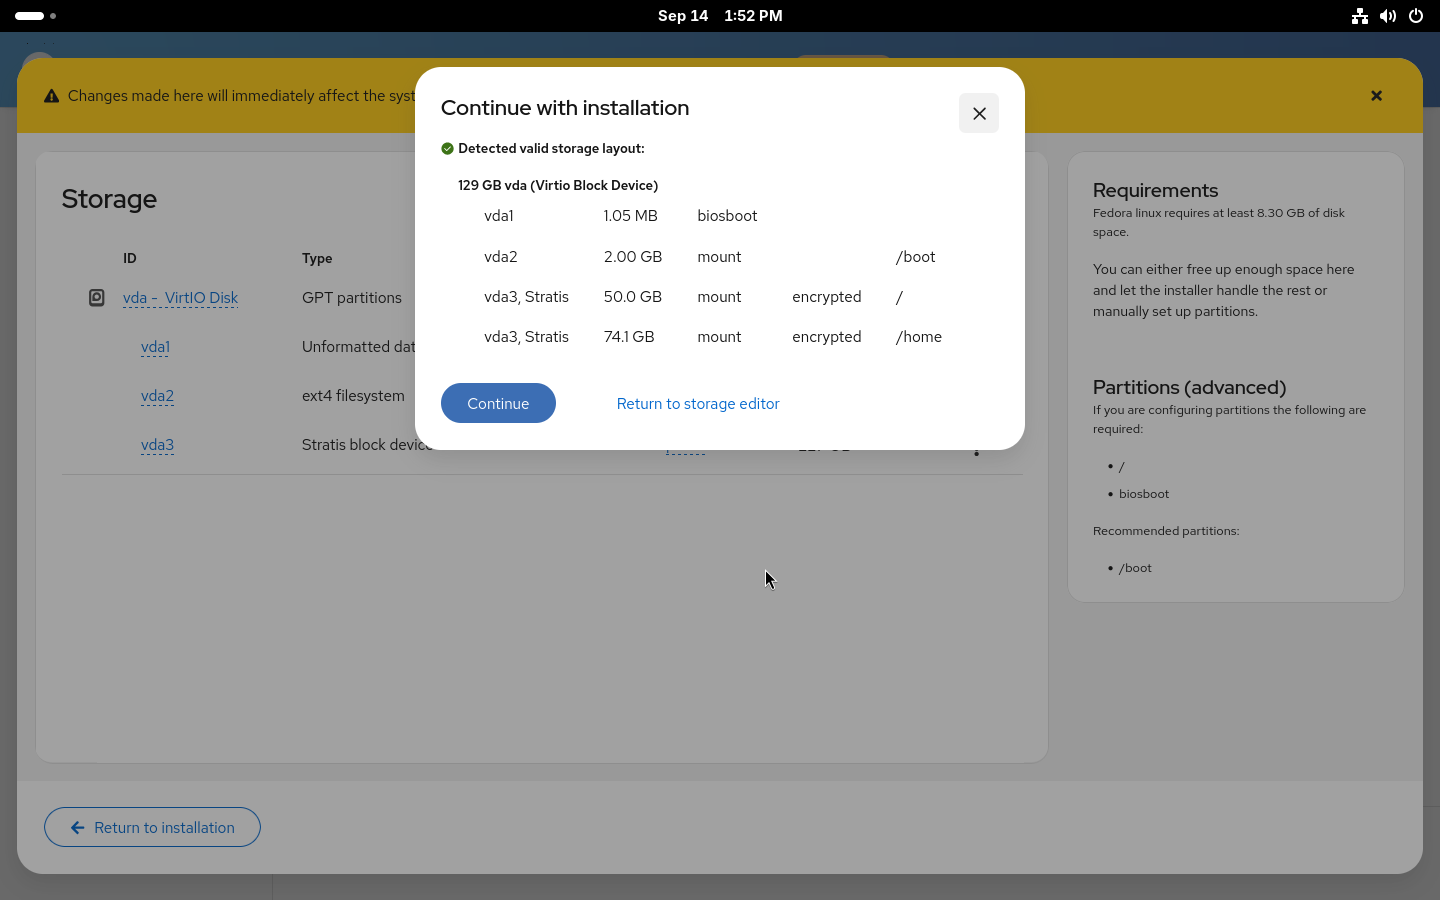
Confirmation dialog with validated storage layout in the manual partitioning
Using configured storage in the Anaconda installer

That is the storage part of the installation done. You can double-check on the Review and install page that everything is correctly set and start the installation.
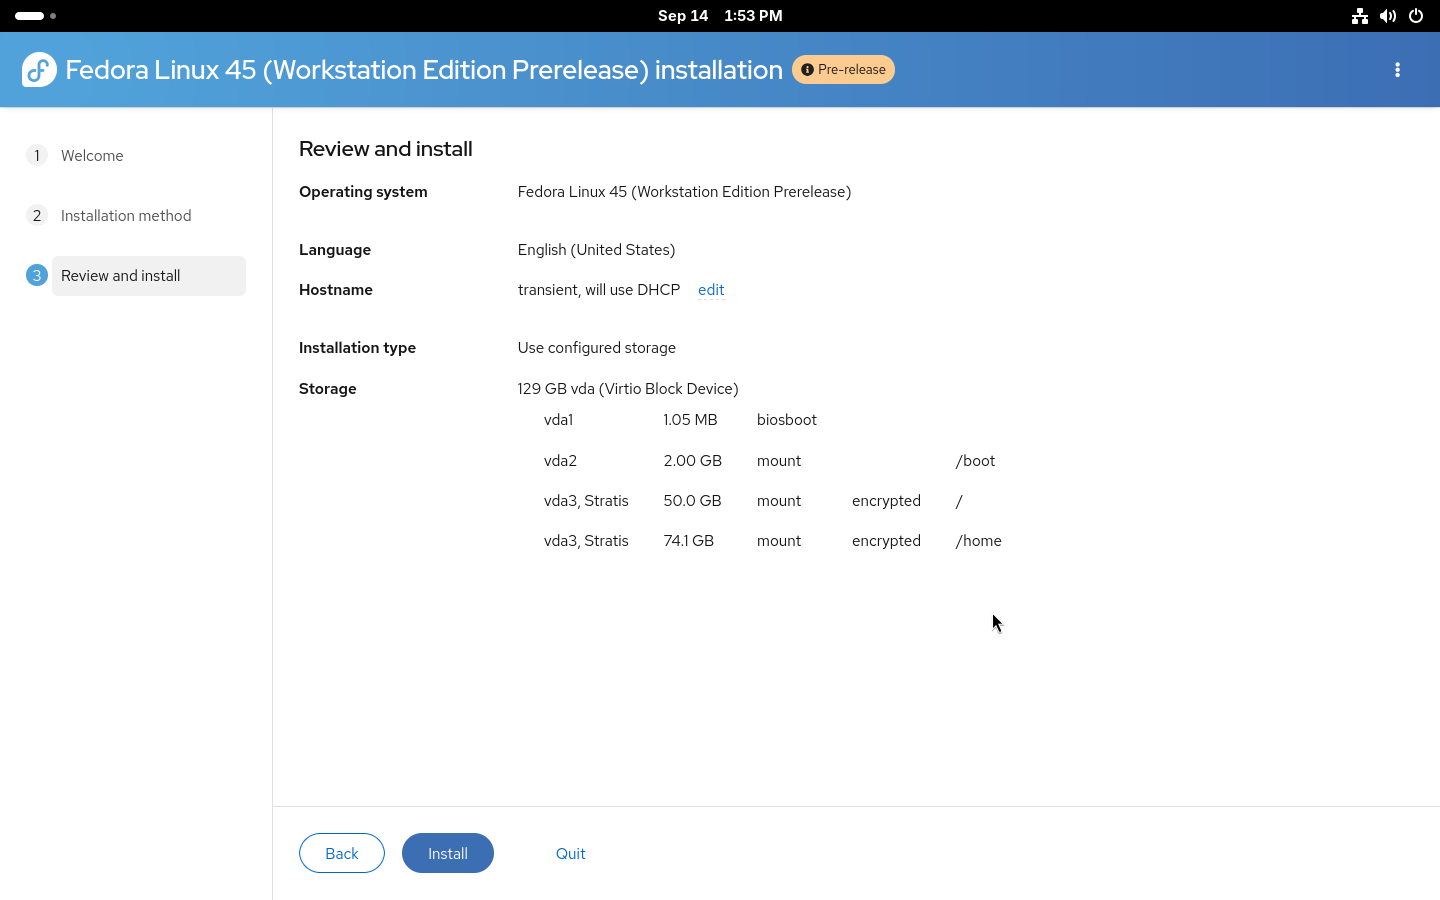
Summary of the installer configuration before starting the installation

Installation using kickstart

For advanced users who wish to use automated installations, full kickstart support for Stratis is also available. Both automatic and manual partitioning are available via kickstart.

Automatic partitioning is simple: the existing autopart command can be used with –type=stratis to create the default Stratis storage layout fully automatically. A storage section in kickstart, for setting up an encrypted Stratis layout, could look like this:

zerombr
clearpart --all --initlabel
autopart --type=stratis --encrypted --passphrase="passphrase"

Manual partitioning requires building the entire storage layout manually from bottom up. Two new Stratis kickstart commands were added: stratispool for creating and managing Stratis pools and stratisfs for creating and managing Stratis filesystems. Usage of these commands and most of the options are similar to how kickstart partitioning works with LVM. An example of a more advanced Stratis layout can be found below.

reqpart
part /boot --fstype=ext4 --size=500
part stratis.01 --size=1 --grow --ondisk=vda
part stratis.02 --size=1 --grow --ondisk=vdb
stratispool fedora stratis.01 stratis.02
stratisfs / --name=root --poolname=fedora --size=5000 --grow
stratisfs /home --name=home --poolname=fedora --size=1 --grow

Here we are creating a pool called fedora on top of two disks, vda and vdb, with two filesystems. One called root for / and a second called home for /home. The –grow tells the installer to use all available free space when creating the devices. For more details about the commands see the kickstart documentation.

Conlusion

The newly introduced Stratis support in Anaconda offers an easy way to take advantage of the modern storage features offered by Stratis. With the Web UI support available through Cockpit storage, you can now easily use Stratis on your system. We plan to simplify the process even more in future releases and enable even more advanced Stratis features. 

If you run into any issues or have feedback, both the Anaconda and Stratis teams would love to hear from you.

Posted on — Leave a comment

Getting started with Stratis – up and running

When adding storage to a Linux server, system administrators often use commands like pvcreate, vgcreate, lvcreate, and mkfs to integrate the new storage into the system. Stratis is a command-line tool designed to make managing storage much simpler. It creates, modifies, and destroys pools of storage. It also allocates and deallocates filesystems from the storage pools.

Instead of an entirely in-kernel approach like ZFS or Btrfs, Stratis uses a hybrid approach with components in both user space and kernel land. It builds on existing block device managers like device mapper and existing filesystems like XFS. Monitoring and control is performed by a user space daemon.

Stratis tries to avoid some ZFS characteristics like restrictions on adding new hard drives or replacing existing drives with bigger ones. One of its main design goals is to achieve a positive command-line experience.

Install Stratis

Begin by installing the required packages. Several Python-related dependencies will be automatically pulled in. The stratisd package provides the stratisd daemon which creates, manages, and monitors local storage pools. The stratis-cli package provides the stratis command along with several Python libraries.

# yum install -y stratisd stratis-cli

Next, enable the stratisd service.

# systemctl enable --now stratisd

Note that the “enable –now” syntax shown above both permanently enables and immediately starts the service.

After determining what disks/block devices are present and available, the three basic steps to using Stratis are:

  1. Create a pool of the desired disks.
  2. Create a filesystem in the pool.
  3. Mount the filesystem.

In the following example, four virtual disks are available in a virtual machine. Be sure not to use the root/system disk (/dev/vda in this example)!

# sfdisk -s
/dev/vda: 31457280
/dev/vdb:   5242880
/dev/vdc:   5242880
/dev/vdd:   5242880
/dev/vde:   5242880
total: 52428800 blocks

Create a storage pool using Stratis

# stratis pool create testpool /dev/vdb /dev/vdc
# stratis pool list
Name Total Physical Size  Total Physical Used
testpool 10 GiB 56 MiB

After creating the pool, check the status of its block devices:

# stratis blockdev list
Pool Name   Device Node Physical Size   State  Tier
testpool  /dev/vdb            5 GiB  In-use  Data
testpool  /dev/vdc            5 GiB  In-use  Data

Create a filesystem using Stratis

Next, create a filesystem. As mentioned earlier, Stratis uses the existing DM (device mapper) and XFS filesystem technologies to create thinly-provisioned filesystems. By building on these existing technologies, large filesystems can be created and it is possible to add physical storage as storage needs grow.

# stratis fs create testpool testfs
# stratis fs list
Pool Name  Name  Used Created        Device            UUID
testpool  testfs 546 MiB  Apr 18 2020 09:15 /stratis/testpool/testfs  095fb4891a5743d0a589217071ff71dc

Note that “fs” in the example above can optionally be written out as “filesystem”.

Mount the filesystem

Next, create a mount point and mount the filesystem.

# mkdir /testdir
# mount /stratis/testpool/testfs /testdir
# df -h | egrep 'stratis|Filesystem'
Filesystem Size Used Avail Use% Mounted on
/dev/mapper/stratis-1-3e8e[truncated]71dc  1.0T  7.2G 1017G   1% /testdir

The actual space used by a filesystem is shown using the stratis fs list command demonstrated previously. Notice how the testdir filesystem has a virtual size of 1.0T. If the data in a filesystem approaches its virtual size, and there is available space in the storage pool, Stratis will automatically grow the filesystem. Note that beginning with Fedora 34, the form of device path will be /dev/stratis/<pool-name>/<filesystem-name>.

Add the filesystem to fstab

To configure automatic mounting of the filesystem at boot time, run following commands:

# UUID=`lsblk -n -o uuid /stratis/testpool/testfs`
# echo "UUID=${UUID} /testdir xfs defaults 0 0" >> /etc/fstab

After updating fstab, verify that the entry is correct by unmounting and mounting the filesystem:

# umount /testdir
# mount /testdir
# df -h | egrep 'stratis|Filesystem'
Filesystem Size Used Avail Use% Mounted on
/dev/mapper/stratis-1-3e8e[truncated]71dc  1.0T  7.2G 1017G   1% /testdir

Adding cache devices with Stratis

Suppose /dev/vdd is an available SSD (solid state disk). To configure it as a cache device and check its status, use the following commands:

# stratis pool add-cache testpool  /dev/vdd
# stratis blockdev
Pool Name   Device Node Physical Size  State   Tier
testpool   /dev/vdb            5 GiB  In-use   Data
testpool   /dev/vdc            5 GiB  In-use   Data
testpool   /dev/vdd            5 GiB  In-use  Cache

Growing the storage pool

Suppose the testfs filesystem is close to using all the storage capacity of testpool. You could add an additional disk/block device to the pool with commands similar to the following:

# stratis pool add-data testpool /dev/vde
# stratis blockdev
Pool Name Device Node Physical Size   State   Tier
testpool   /dev/vdb           5 GiB  In-use   Data
testpool   /dev/vdc           5 GiB  In-use   Data
testpool   /dev/vdd           5 GiB  In-use  Cache
testpool   /dev/vde           5 GiB  In-use   Data

After adding the device, verify that the pool shows the added capacity:

# stratis pool
Name      Total Physical Size   Total Physical Used
testpool             15 GiB           606 MiB

Conclusion

Stratis is a tool designed to make managing storage much simpler. Creating a filesystem with enterprise functionalities like thin-provisioning, snapshots, volume management, and caching can be accomplished quickly and easily with just a few basic commands.

See also Getting Started with Stratis Encryption.

Posted on — Leave a comment

Getting started with Stratis encryption

Stratis is described on its official website as an “easy to use local storage management for Linux.” See this short video for a quick demonstration of the basics. The video was recorded on a Red Hat Enterprise Linux 8 system. The concepts shown in the video also apply to Stratis in Fedora.

Stratis version 2.1 introduces support for encryption. Continue reading to learn how to get started with encryption in Stratis.

Prerequisites

Encryption requires Stratis version 2.1 or greater. The examples in this post use a pre-release of Fedora 33. Stratis 2.1 will be available in the final release of Fedora 33.

You’ll also need at least one available block device to create an encrypted pool. The examples shown below were done on a KVM virtual machine with a 5 GB virtual disk drive (/dev/vdb).

Create a key in the kernel keyring

The Linux kernel keyring is used to store the encryption key. For more information on the kernel keyring, refer to the keyrings manual page (man keyrings).  

Use the stratis key set command to set up the key within the kernel keyring.  You must specify where the key should be read from. To read the key from standard input, use the –capture-key option. To retrieve the key from a file, use the –keyfile-path <file> option. The last parameter is a key description. It will be used later when you create the encrypted Stratis pool.

For example, to create a key with the description pool1key, and to read the key from standard input, you would enter:

# stratis key set --capture-key pool1key
Enter desired key data followed by the return key:

The command prompts us to type the key data / passphrase, and the key is then created within the kernel keyring.  

To verify that the key was created, run stratis key list:

# stratis key list
Key Description
pool1key

This verifies that the pool1key was created. Note that these keys are not persistent. If the host is rebooted, the key will need to be provided again before the encrypted Stratis pool can be accessed (this process is covered later).

If you have multiple encrypted pools, they can have a separate keys, or they can share the same key.

The keys can also be viewed using the following keyctl commands:

# keyctl get_persistent @s
318044983
# keyctl show
Session Keyring
 701701270 --alswrv      0     0  keyring: _ses
 649111286 --alswrv      0 65534   \_ keyring: _uid.0
 318044983 ---lswrv      0 65534   \_ keyring: _persistent.0
1051260141 --alswrv      0     0       \_ user: stratis-1-key-pool1key

Create the encrypted Stratis pool

Now that a key has been created for Stratis, the next step is to create the encrypted Stratis pool. Encrypting a pool can only be done at pool creation. It isn’t currently possible to encrypt an existing pool.

Use the stratis pool create command to create a pool. Add –key-desc and the key description that you provided in the previous step (pool1key). This will signal to Stratis that the pool should be encrypted using the provided key. The below example creates the Stratis pool on /dev/vdb, and names it pool1. Be sure to specify an empty/available device on your system.

# stratis pool create --key-desc pool1key pool1 /dev/vdb

You can verify that the pool has been created with the stratis pool list command:

# stratis pool list 
Name                     Total Physical   Properties
pool1   4.98 GiB / 37.63 MiB / 4.95 GiB      ~Ca, Cr

In the sample output shown above, ~Ca indicates that caching is disabled (the tilde negates the property). Cr indicates that encryption is enabled.  Note that caching and encryption are mutually exclusive. Both features cannot be simultaneously enabled.

Next, create a filesystem. The below example, demonstrates creating a filesystem named filesystem1, mounting it at the /filesystem1 mountpoint, and creating a test file in the new filesystem:

# stratis filesystem create pool1 filesystem1
# mkdir /filesystem1
# mount /stratis/pool1/filesystem1 /filesystem1
# cd /filesystem1
# echo "this is a test file" > testfile

Access the encrypted pool after a reboot

When you reboot you’ll notice that Stratis no longer shows your encrypted pool or its block device:

# stratis pool list
Name   Total Physical   Properties
# stratis blockdev list
Pool Name   Device Node   Physical Size   Tier

To access the encrypted pool, first re-create the key with the same key description and key data / passphrase that you used previously:

# stratis key set --capture-key pool1key
Enter desired key data followed by the return key:

Next, run the stratis pool unlock command, and verify that you can now see the pool and its block device:

# stratis pool unlock
# stratis pool list
Name                      Total Physical   Properties
pool1   4.98 GiB / 583.65 MiB / 4.41 GiB      ~Ca, Cr
# stratis blockdev list
Pool Name   Device Node   Physical Size   Tier
pool1       /dev/dm-2          4.98 GiB   Data

Next, mount the filesystem and verify that you can access the test file you created previously:

# mount /stratis/pool1/filesystem1 /filesystem1/
# cat /filesystem1/testfile 
this is a test file

Use a systemd unit file to automatically unlock a Stratis pool at boot

It is possible to automatically unlock your Stratis pool at boot without manual intervention. However, a file containing the key must be available. Storing the key in a file might be a security concern in some environments.

The systemd unit file shown below provides a simple method to unlock a Stratis pool at boot and mount the filesystem. Feedback on a better/alternative methods is welcome. You can provide suggestions in the comment section at the end of this article.

Start by creating your key file with the following command. Be sure to substitute passphrase with the same key data / passphrase you entered previously.

# echo -n passphrase > /root/pool1key

Make sure that the file is only readable by root:

# chmod 400 /root/pool1key
# chown root:root /root/pool1key

Create a systemd unit file at /etc/systemd/system/stratis-filesystem1.service with the following content:

[Unit]
Description = stratis mount pool1 filesystem1 file system
After = stratisd.service [Service]
ExecStartPre=sleep 2
ExecStartPre=stratis key set --keyfile-path /root/pool1key pool1key
ExecStartPre=stratis pool unlock
ExecStartPre=sleep 3
ExecStart=mount /stratis/pool1/filesystem1 /filesystem1
RemainAfterExit=yes [Install]
WantedBy = multi-user.target

Next, enable the service so that it will run at boot:

# systemctl enable stratis-filesystem1.service

Now reboot and verify that the Stratis pool has been automatically unlocked and that its filesystem is mounted.

Summary and conclusion

In today’s environment, encryption is a must for many people and organizations. This post demonstrated how to enable encryption in Stratis 2.1.