
Posted on — Leave a comment

Installing Fedora 45 on Stratis storage

The Anaconda installer in Fedora 45 will introduce a new option for storage configuration: Stratis, a modern solution for local storage management.

Stratis isn’t a completely new technology, it uses existing tools and technologies like device mapper, LUKS, and XFS and integrates them into an easy to use package. The idea is to provide modern storage features while hiding the often complex logic behind them. Adding support to the installer brings these features even closer to Fedora users.

There are only two basic structures or layers you need to know when working with Stratis: pools and filesystems. Pools represent an abstract layer on top of existing block devices (disks, partitions, RAID arrays etc.). A pool can consist of one or more devices (for systems with multiple disks, for example). Features like encryption or over-provisioning are also configured on the pool level. Multiple filesystems can be created on the pool. These are devices that will serve as your root or home volumes. Some additional features supported by Stratis include snapshots, caching, and for encrypted pools, multiple unlocking methods like TPM or Clevis/Tang. Caching and encryption without a passphrase are not currently supported by Anaconda, but these can be easily enabled after the installation.

Management of Stratis devices can be done using the stratis command. For more information, check our older, but still valid, article Getting started with Stratis or the Stratis project how-to.

Installation using Web UI

The new web-based user interface for the Anaconda installer currently doesn’t allow selecting which type of storage technology will be used for the automated and guided partitioning options. The storage layout you will get depends on the Fedora variant you choose to install. But if you want to use Stratis, you still have an option in the graphical installation. Any storage layout can be created manually using the Cockpit storage module, which is integrated into the installer. To enter it, simply select the If none of the options above apply… option on the Installation Destination step.
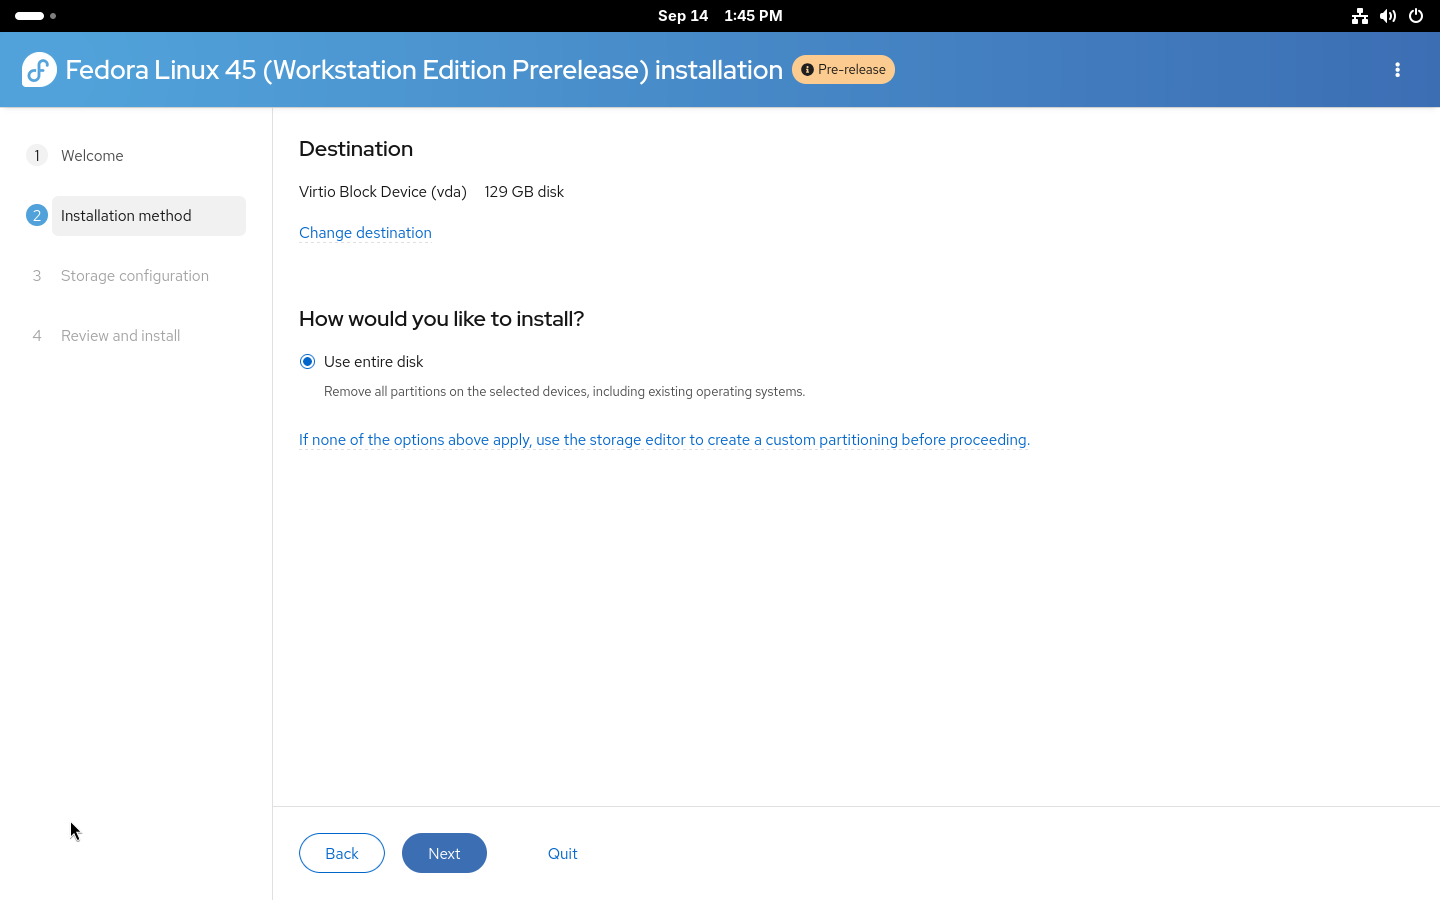
Installation method page in the Anaconda installer

The Cockpit storage module supports a wide variety of storage configurations and Stratis is one of the supported technologies. Do not forget that with manual partitioning, you need to create all required partitions so first create partitions required for booting (/boot and /boot/efi or biosboot, based on your system configuration). After that, simply create a new Stratis pool from the menu.
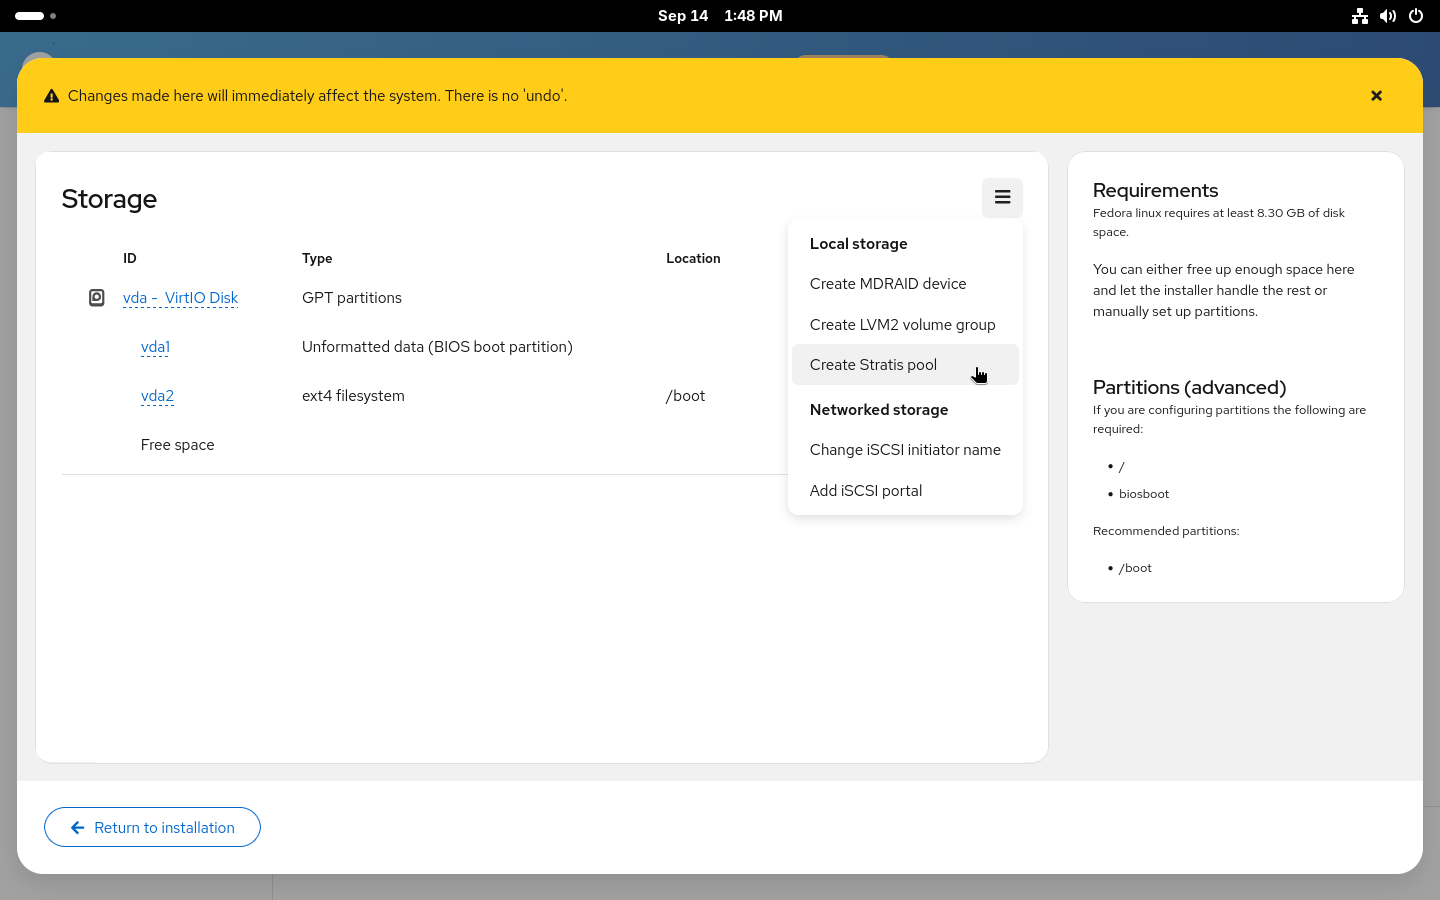
Local storage menu in the manual partitioning editor

Creating stratis pool

After selecting a name for the pool and the disk (or disks) it will be placed on, you can decide whether to enable encryption and over-provisioning for the pool. Over-provisioning allows allocation of more space for the filesystems created on the pool. Similarly to how LVM thin provisioning and Btrfs work. With over-provisioning enabled, there is no need to worry about running out of space in root with still plenty of free space in /home. It also allows greater flexibility when using snapshots. On the other hand, you actually need to be aware that you don’t really have terabytes of space and you need to make sure you won’t actually run out of space on your disk. Both encryption and over-provisioning can also be enabled or disabled after the installation.
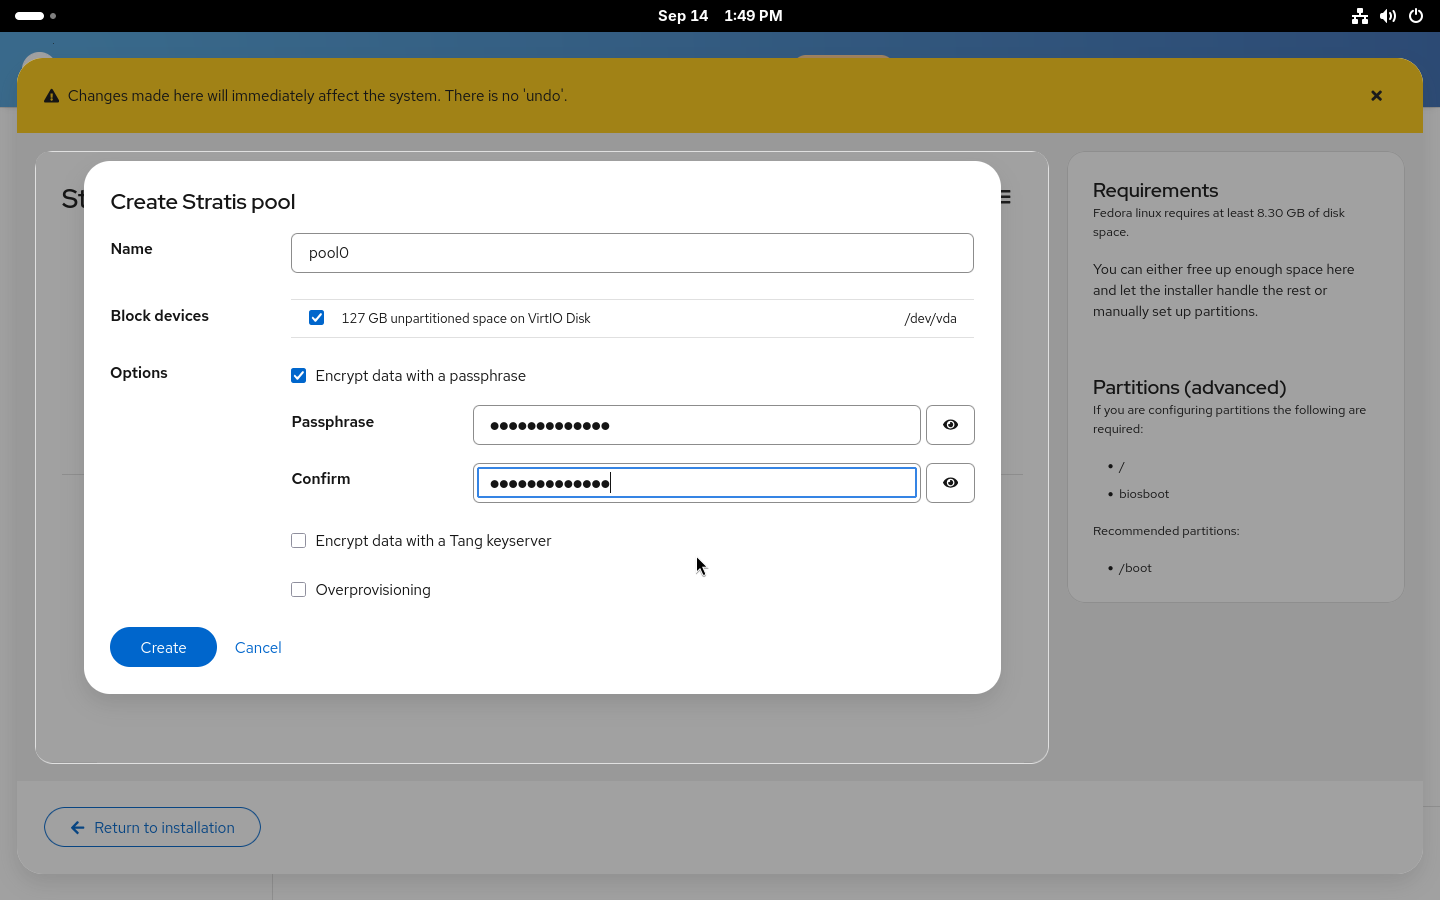
Creating Stratis pool in the manual partitioning

Creating stratis filesystems

With the new pool created, you now need to add some filesystems to it. You’ll most likely want the standard two separate filesystems for your / and /home. But you can also create a separate filesystem for your /var, for example.
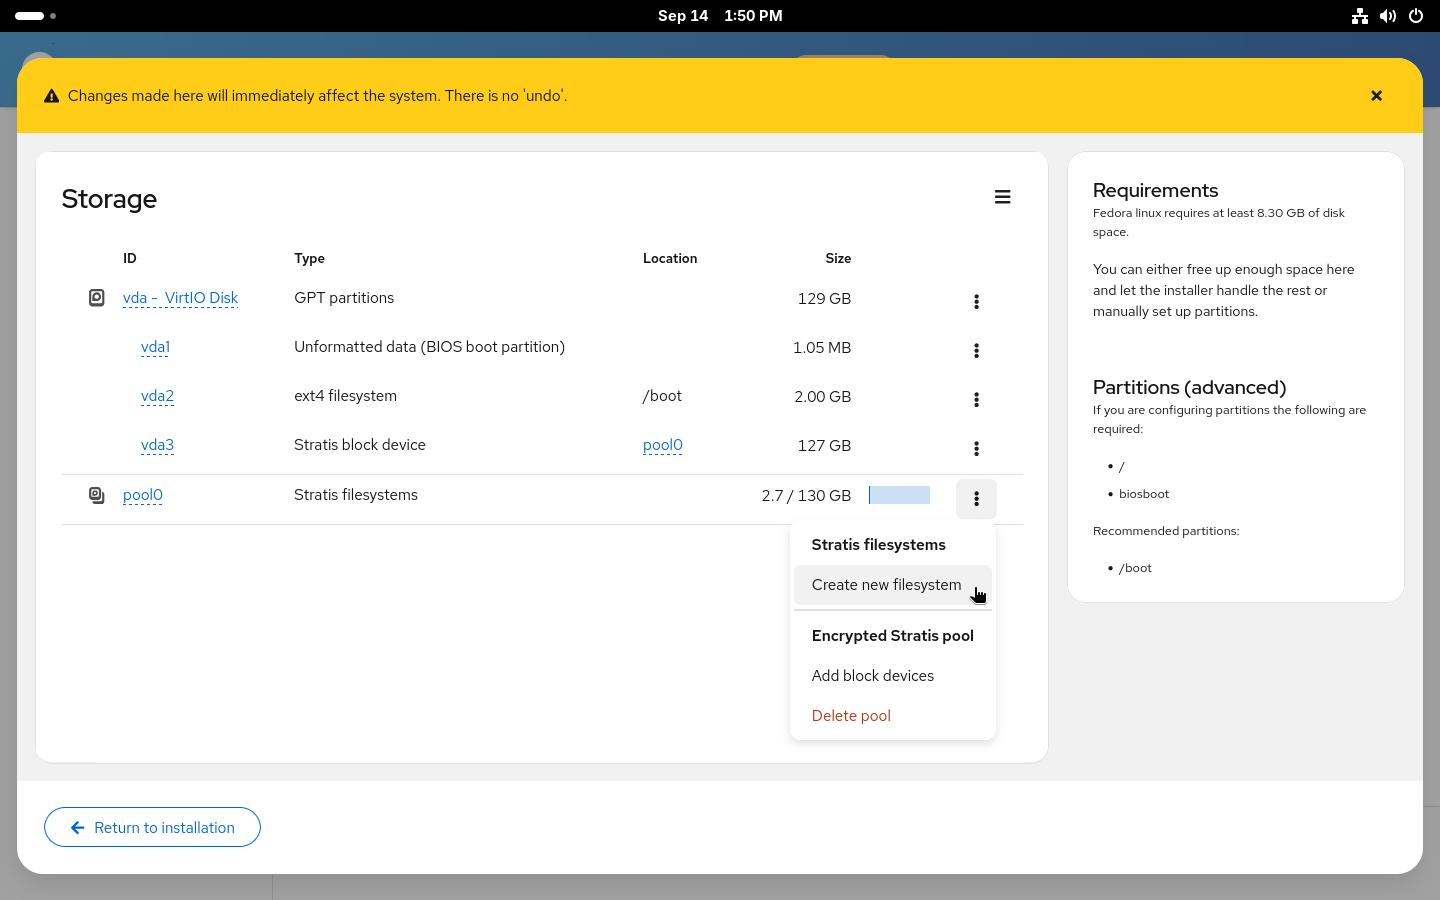
If you enable over-provisioning on your pool, you can also decide to not specify sizes for the filesystems and use the 1 TiB default size with over-provisioning or set a size limit for the filesystem to prevent it from automatically growing if you ever run out of space.
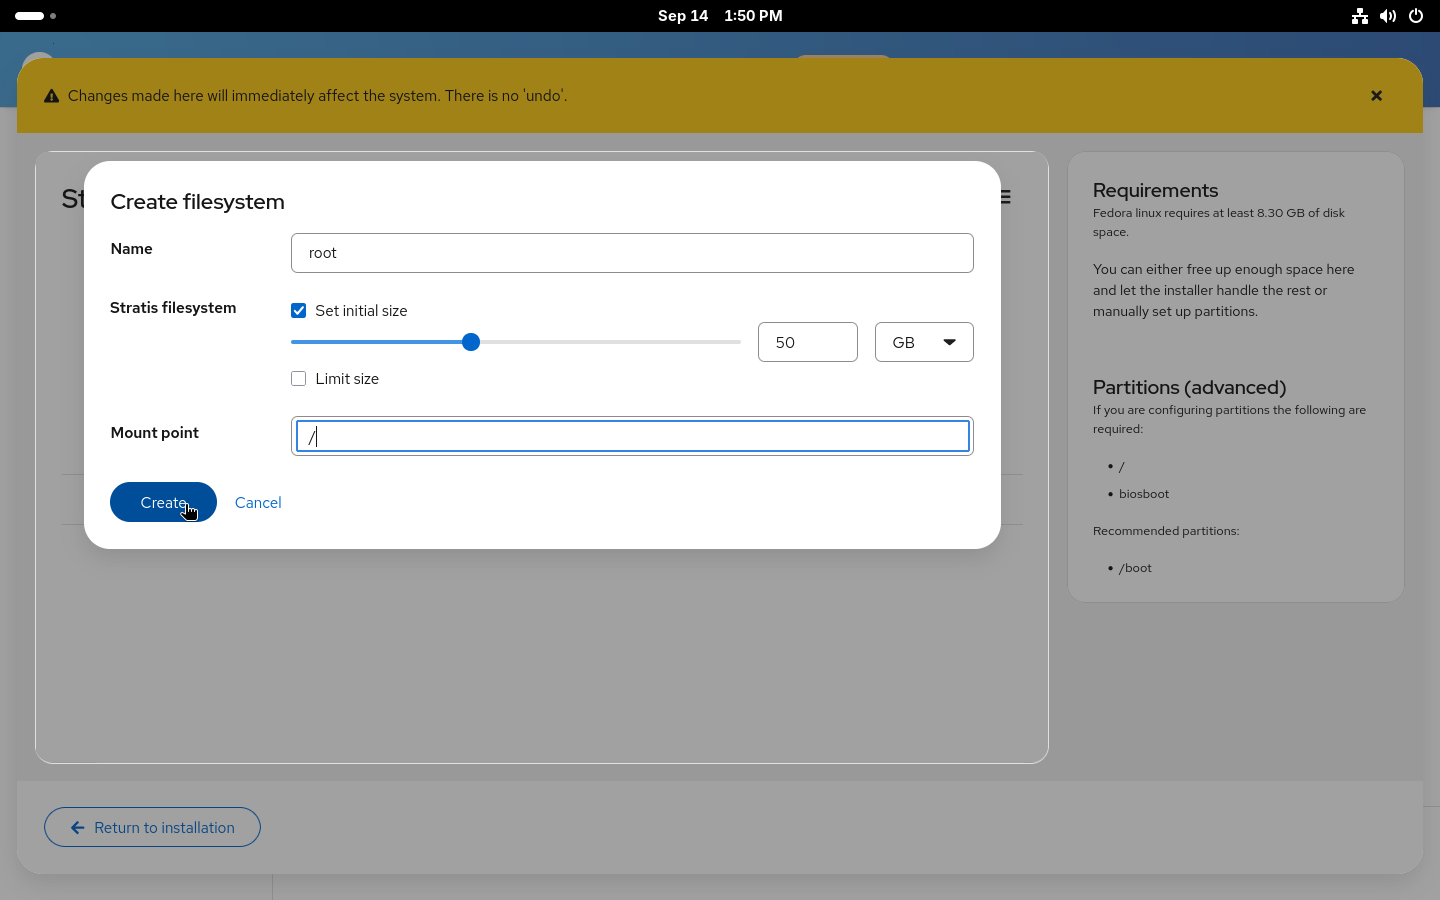
Creating Stratis filesystem in the manual partitioning

Using the configured layout

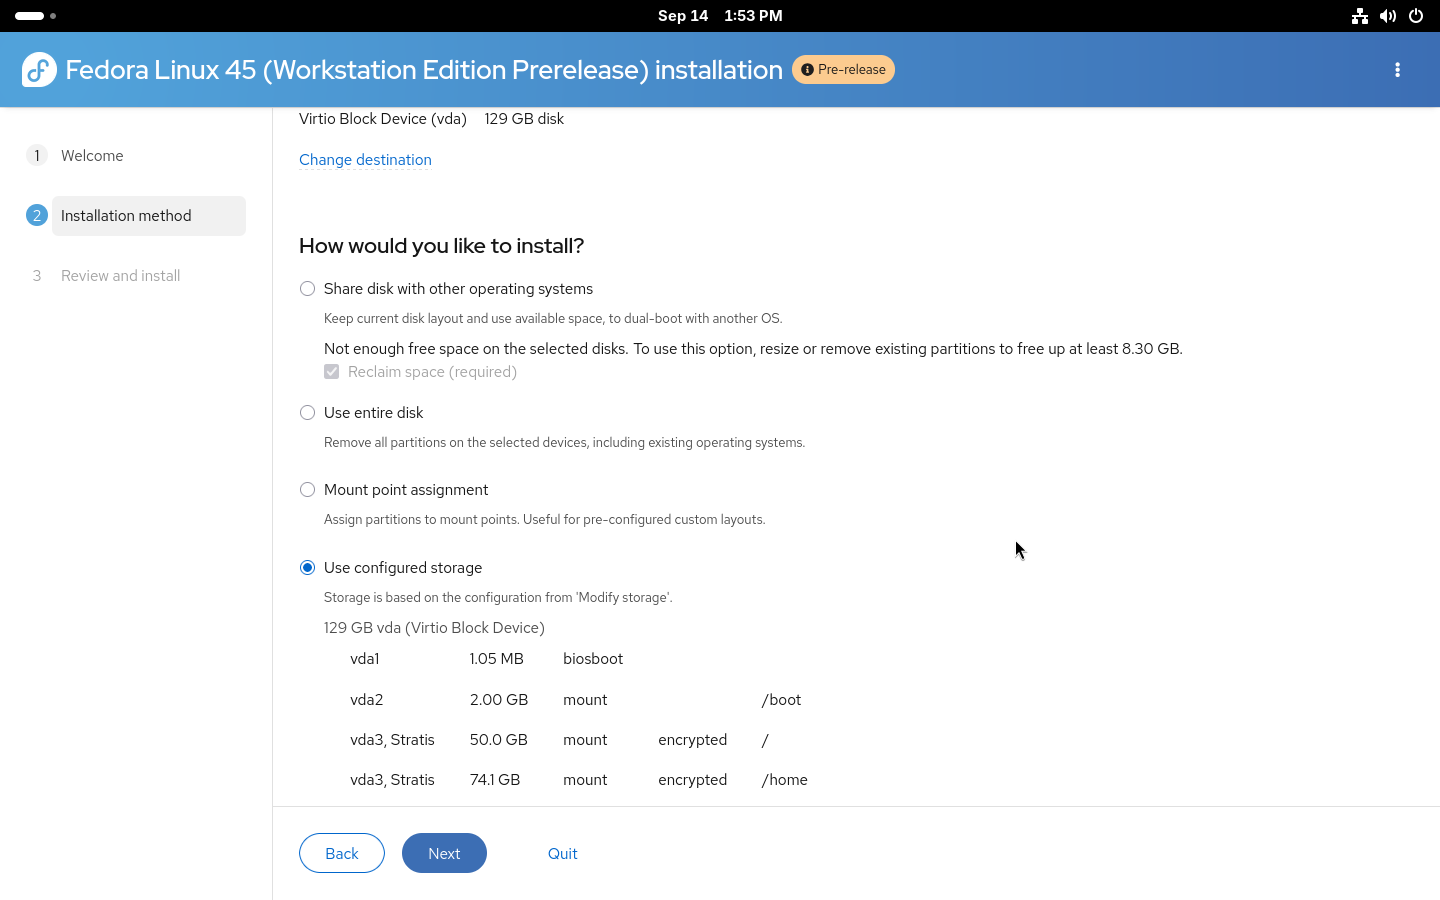
With all the filesystems created, you can Return to installation. Anaconda will check the created devices to make sure all requirements are met and return you to the Installation destination page where a new Use configured storage option will be preselected with the devices that were just created.
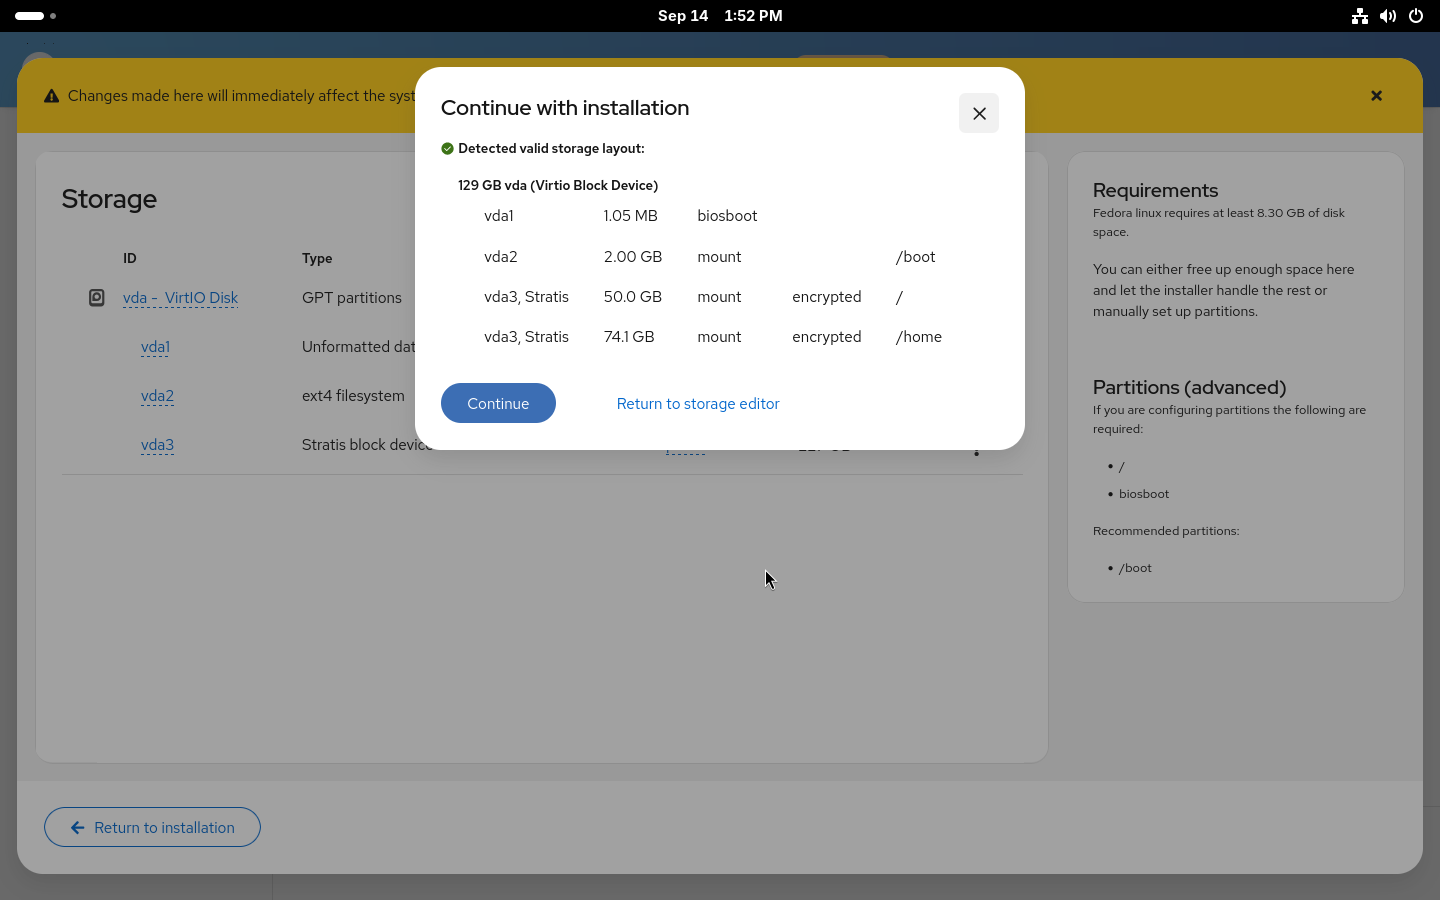
Confirmation dialog with validated storage layout in the manual partitioning
Using configured storage in the Anaconda installer

That is the storage part of the installation done. You can double-check on the Review and install page that everything is correctly set and start the installation.
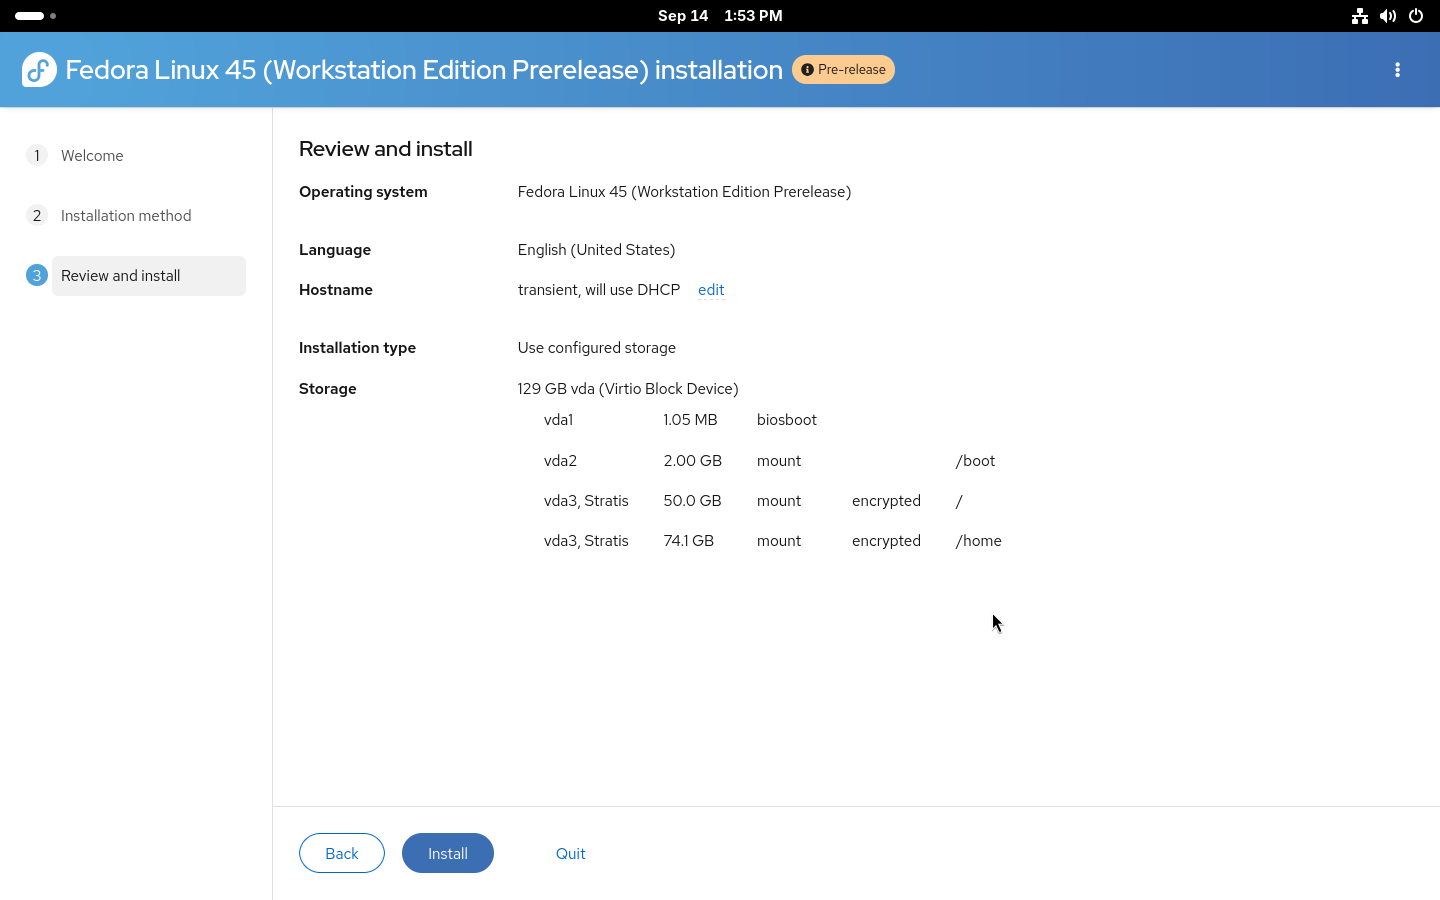
Summary of the installer configuration before starting the installation

Installation using kickstart

For advanced users who wish to use automated installations, full kickstart support for Stratis is also available. Both automatic and manual partitioning are available via kickstart.

Automatic partitioning is simple: the existing autopart command can be used with –type=stratis to create the default Stratis storage layout fully automatically. A storage section in kickstart, for setting up an encrypted Stratis layout, could look like this:

zerombr
clearpart --all --initlabel
autopart --type=stratis --encrypted --passphrase="passphrase"

Manual partitioning requires building the entire storage layout manually from bottom up. Two new Stratis kickstart commands were added: stratispool for creating and managing Stratis pools and stratisfs for creating and managing Stratis filesystems. Usage of these commands and most of the options are similar to how kickstart partitioning works with LVM. An example of a more advanced Stratis layout can be found below.

reqpart
part /boot --fstype=ext4 --size=500
part stratis.01 --size=1 --grow --ondisk=vda
part stratis.02 --size=1 --grow --ondisk=vdb
stratispool fedora stratis.01 stratis.02
stratisfs / --name=root --poolname=fedora --size=5000 --grow
stratisfs /home --name=home --poolname=fedora --size=1 --grow

Here we are creating a pool called fedora on top of two disks, vda and vdb, with two filesystems. One called root for / and a second called home for /home. The –grow tells the installer to use all available free space when creating the devices. For more details about the commands see the kickstart documentation.

Conlusion

The newly introduced Stratis support in Anaconda offers an easy way to take advantage of the modern storage features offered by Stratis. With the Web UI support available through Cockpit storage, you can now easily use Stratis on your system. We plan to simplify the process even more in future releases and enable even more advanced Stratis features. 

If you run into any issues or have feedback, both the Anaconda and Stratis teams would love to hear from you.

Posted on — Leave a comment

Add storage to your Fedora system with LVM

Sometimes there is a need to add another disk to your system. This is where Logical Volume Management (LVM) comes in handy. The cool thing about LVM is that it’s fairly flexible. There are several ways to add a disk. This article describes one way to do it.

Heads up!

This article does not cover the process of physically installing a new disk drive into your system. Consult your system and disk documentation on how to do that properly.

Important: Always make sure you have backups of important data. The steps described in this article will destroy data if it already exists on the new disk.

Good to know

This article doesn’t cover every LVM feature deeply; the focus is on adding a disk. But basically, LVM has volume groups, made up of one or more partitions and/or disks. You add the partitions or disks as physical volumes. A volume group can be broken down into many logical volumes. Logical volumes can be used as any other storage for filesystems, ramdisks, etc. More information can be found here.

Think of the physical volumes as forming a pool of storage (a volume group) from which you then carve out logical volumes for your system to use directly.

Preparation

Make sure you can see the disk you want to add. Use lsblk prior to adding the disk to see what storage is already available or in use.

$ lsblk
NAME MAJ:MIN RM SIZE RO TYPE MOUNTPOINT
zram0 251:0 0 989M 0 disk [SWAP]
vda 252:0 0 20G 0 disk
├─vda1 252:1 0 1G 0 part /boot
└─vda2 252:2 0 19G 0 part
└─fedora_fedora-root 253:0 0 19G 0 lvm /

This article uses a virtual machine with virtual storage. Therefore the device names start with vda for the first disk, vdb for the second, and so on. The name of your device may be different. Many systems will see physical disks as sda for the first disk, sdb for the second, and so on.

Once the new disk has been connected and your system is back up and running, use lsblk again to see the new block device.

$ lsblk
NAME MAJ:MIN RM SIZE RO TYPE MOUNTPOINT
zram0 251:0 0 989M 0 disk [SWAP]
vda 252:0 0 20G 0 disk
├─vda1 252:1 0 1G 0 part /boot
└─vda2 252:2 0 19G 0 part
└─fedora_fedora-root 253:0 0 19G 0 lvm /
vdb 252:16 0 10G 0 disk

There is now a new device named vdb. The location for the device is /dev/vdb.

$ ls -l /dev/vdb
brw-rw----. 1 root disk 252, 16 Nov 24 12:56 /dev/vdb

We can see the disk, but we cannot use it with LVM yet. If you run blkid you should not see it listed. For this and following commands, you’ll need to ensure your system is configured so you can use sudo:

$ sudo blkid
/dev/vda1: UUID="4847cb4d-6666-47e3-9e3b-12d83b2d2448" BLOCK_SIZE="4096" TYPE="ext4" PARTUUID="830679b8-01"
/dev/vda2: UUID="k5eWpP-6MXw-foh5-Vbgg-JMZ1-VEf9-ARaGNd" TYPE="LVM2_member" PARTUUID="830679b8-02"
/dev/mapper/fedora_fedora-root: UUID="f8ab802f-8c5f-4766-af33-90e78573f3cc" BLOCK_SIZE="4096" TYPE="ext4"
/dev/zram0: UUID="fc6d7a48-2bd5-4066-9bcf-f062b61f6a60" TYPE="swap"

Add the disk to LVM

Initialize the disk using pvcreate. You need to pass the full path to the device. In this example it is /dev/vdb; on your system it may be /dev/sdb or another device name.

$ sudo pvcreate /dev/vdb
Physical volume "/dev/vdb" successfully created.

You should see the disk has been initialized as an LVM2_member when you run blkid:

$ sudo blkid
/dev/vda1: UUID="4847cb4d-6666-47e3-9e3b-12d83b2d2448" BLOCK_SIZE="4096" TYPE="ext4" PARTUUID="830679b8-01"
/dev/vda2: UUID="k5eWpP-6MXw-foh5-Vbgg-JMZ1-VEf9-ARaGNd" TYPE="LVM2_member" PARTUUID="830679b8-02"
/dev/mapper/fedora_fedora-root: UUID="f8ab802f-8c5f-4766-af33-90e78573f3cc" BLOCK_SIZE="4096" TYPE="ext4"
/dev/zram0: UUID="fc6d7a48-2bd5-4066-9bcf-f062b61f6a60" TYPE="swap"
/dev/vdb: UUID="4uUUuI-lMQY-WyS5-lo0W-lqjW-Qvqw-RqeroE" TYPE="LVM2_member"

You can list all physical volumes currently available using pvs:

$ sudo pvs
PV VG Fmt Attr PSize PFree
/dev/vda2 fedora_fedora lvm2 a-- <19.00g 0
/dev/vdb lvm2 --- 10.00g 10.00g

/dev/vdb is listed as a PV (phsyical volume), but it isn’t assigned to a VG (Volume Group) yet.

Add the pysical volume to a volume group

You can find a list of available volume groups using vgs:

$ sudo vgs
VG #PV #LV #SN Attr VSize VFree
fedora_fedora 1 1 0 wz--n- 19.00g 0

In this example, there is only one volume group available. Next, add the physical volume to fedora_fedora:

$ sudo vgextend fedora_fedora /dev/vdb
Volume group "fedora_fedora" successfully extended

You should now see the physical volume is added to the volume group:

$ sudo pvs PV VG Fmt Attr PSize PFree
/dev/vda2 fedora_fedora lvm2 a– <19.00g 0
/dev/vdb fedora_fedora lvm2 a– <10.00g <10.00g

Look at the volume groups:

$ sudo vgs
VG #PV #LV #SN Attr VSize VFree
fedora_fedora 2 1 0 wz–n- 28.99g <10.00g

You can get a detailed list of the specific volume group and physical volumes as well:

$ sudo vgdisplay fedora_fedora
--- Volume group ---
VG Name fedora_fedora
System ID
Format lvm2
Metadata Areas 2
Metadata Sequence No 3
VG Access read/write
VG Status resizable
MAX LV 0
Cur LV 1
Open LV 1
Max PV 0
Cur PV 2
Act PV 2
VG Size 28.99 GiB
PE Size 4.00 MiB
Total PE 7422
Alloc PE / Size 4863 / 19.00 GiB
Free PE / Size 2559 / 10.00 GiB
VG UUID C5dL2s-dirA-SQ15-TfQU-T3yt-l83E-oI6pkp

Look at the PV:

$ sudo pvdisplay /dev/vdb --- Physical volume --- PV Name /dev/vdb VG Name fedora_fedora PV Size 10.00 GiB / not usable 4.00 MiB Allocatable yes PE Size 4.00 MiB Total PE 2559 Free PE 2559 Allocated PE 0 PV UUID 4uUUuI-lMQY-WyS5-lo0W-lqjW-Qvqw-RqeroE 

Now that we have added the disk, we can allocate space to logical volumes (LVs):

$ sudo lvs
LV VG Attr LSize Pool Origin Data% Meta% Move Log Cpy%Sync Convert
root fedora_fedora -wi-ao---- 19.00g

Look at the logical volumes. Here’s a detailed look at the root LV:

$ sudo lvdisplay fedora_fedora/root
--- Logical volume ---
LV Path /dev/fedora_fedora/root
LV Name root
VG Name fedora_fedora
LV UUID yqc9cw-AvOw-G1Ni-bCT3-3HAa-qnw3-qUSHGM
LV Write Access read/write
LV Creation host, time fedora, 2020-11-24 11:44:36 -0500
LV Status available
LV Size 19.00 GiB
Current LE 4863
Segments 1
Allocation inherit
Read ahead sectors auto
- currently set to 256
Block device 253:0

Look at the size of the root filesystem and compare it to the logical volume size.

$ df -h /
Filesystem Size Used Avail Use% Mounted on
/dev/mapper/fedora_fedora-root 19G 1.4G 17G 8% /

The logical volume and the filesystem both agree the size is 19G. Let’s add 5G to the root logical volume:

$ sudo lvresize -L +5G fedora_fedora/root
Size of logical volume fedora_fedora/root changed from 19.00 GiB (4863 extents) to 24.00 GiB (6143 extents).
Logical volume fedora_fedora/root successfully resized.

We now have 24G available to the logical volume. Look at the / filesystem.

$ df -h /
Filesystem Size Used Avail Use% Mounted on
/dev/mapper/fedora_fedora-root 19G 1.4G 17G 8% /

We are still showing only 19G free. This is because the logical volume is not the same as the filesytem. To use the new space added to the logical volume, resize the filesystem.

$ sudo resize2fs /dev/fedora_fedora/root
resize2fs 1.45.6 (20-Mar-2020)
Filesystem at /dev/fedora_fedora/root is mounted on /; on-line resizing required
old_desc_blocks = 3, new_desc_blocks = 3
The filesystem on /dev/fedora_fedora/root is now 6290432 (4k) blocks long.

Look at the size of the filesystem.

$ df -h /
Filesystem Size Used Avail Use% Mounted on
/dev/mapper/fedora_fedora-root 24G 1.4G 21G 7% /

As you can see, the root file system (/) has taken all of the space available on the logical volume and no reboot was needed.

You have now initialized a disk as a physical volume, and extended the volume group with the new physical volume. After that you increased the size of the logical volume, and resized the filesystem to use the new space from the logical volume.

Posted on — Leave a comment

Connect your Google Drive to Fedora Workstation

There are plenty of cloud services available where you can store important documents. Google Drive is undoubtedly one of the most popular. It offers a matching set of applications like Docs, Sheets, and Slides to create content. But you can also store arbitrary content in your Google Drive. This article shows you how to connect it to your Fedora Workstation.

Adding an account

Fedora Workstation lets you add an account either after installation during first startup, or at any time afterward. To add your account during first startup, follow the prompts. Among them is a choice of accounts you can add:

Online account listing

Select Google and a login prompt appears for you to login, so use your Google account information.

Online account login dialog

Be aware this information is only transmitted to Google, not to the GNOME project. The next screen asks you to grant access, which is required so your system’s desktop can interact with Google. Scroll down to review the access requests, and choose Allow to proceed.

You can expect to receive notifications on mobile devices and Gmail that a new device — your system — accessed your Google account. This is normal and expected.

Online account access request dialog

If you didn’t do this at first startup, or you need to re-add your account, open the Settings tool, and select Online Accounts to add the account. The Settings tool is available through the dropdown at right side of the Top Bar (the “gear” icon), or by opening the Overview and typing settings. Then proceed as described above.

Using the Files app with Google Drive

Open the Files app (formerly known as nautilus). Locations the Files app can access appear on the left side. Locate your Google account in the list.

When you select this account, the Files app shows the contents of your Google drive. Some files can be opened using your Fedora Workstation local apps, such as sound files or LibreOffice-compatible files (including Microsoft Office docs). Other files, such as Google app files like Docs, Sheets, and Slides, open using your web browser and the corresponding app.

Remember that if the file is large, it will take some time to receive over the network so you can open it.

You can also copy and paste files in your Google Drive storage from or to other storage connected to your Fedora Workstation. You can also use the built in functions to rename files, create folders, and organize them.

Be aware that the Files app does not refresh contents in real time. If you add or remove files from other Google connected devices like your mobile phone or tablet, you may need to hit Ctrl+R to refresh the Files app view.


Photo by Beatriz Pérez Moya on Unsplash.

Posted on — Leave a comment

Make free encrypted backups to the cloud on Fedora

Most free cloud storage is limited to 5GB or less. Even Google Drive is limited to 15GB. While not heavily advertised, IBM offers free accounts with a whopping 25GB of cloud storage for free. This is not a limited time offer, and you don’t have to provide a credit card. It’s absolutely free! Better yet, since it’s S3 compatible, most of the S3 tools available for backups should work fine.

This article will show you how to use restic for encrypted backups onto this free storage. Please also refer to this previous Magazine article about installing and configuring restic. Let’s get started!

Creating your free IBM account and storage

Head over to the IBM cloud services site and follow the steps to sign up for a free account here: https://cloud.ibm.com/registration. You’ll need to verify your account from the email confirmation that IBM sends to you.

Then log in to your account to bring up your dashboard, at https://cloud.ibm.com/.

Click on the Create resource button.

Click on Storage and then Object Storage.

Next click on the Create Bucket button.

This brings up the Configure your resource section.

Next, click on the Create button to use the default settings.

Under Predefined buckets click on the Standard box:

A unique bucket name is automatically created, but it’s suggested that you change this.

In this example, the bucket name is changed to freecloudstorage.

Click on the Next button after choosing a bucket name:

Continue to click on the Next button until you get the the Summary page:

Scroll down to the Endpoints section.

The information in the Public section is the location of your bucket. This is what you need to specify in restic when you create your backups. In this example, the location is s3.us-south.cloud-object-storage.appdomain.cloud.

Making your credentials

The last thing that you need to do is create an access ID and secret key. To start, click on Service credentials.

Click on the New credential button.

Choose a name for your credential, make sure you check the Include HMAC Credential box and then click on the Add button. In this example I’m using the name resticbackup.

Click on View credentials.

The access_key_id and secret_access_key is what you are looking for. (For obvious reasons, the author’s details here are obscured.)

You will need to export these by calling them with the export alias in the shell, or putting them into a backup script.

Preparing a new repository

Restic refers to your backup as a repository, and can make backups to any bucket on your IBM cloud account. First, setup the following environment variables using your access_key_id and secret_access_key that you retrieved from your IBM cloud bucket. These can also be set in any backup script you may create.

$ export AWS_ACCESS_KEY_ID=<MY_ACCESS_KEY>
$ export AWS_SECRET_ACCESS_KEY=<MY_SECRET_ACCESS_KEY>

Even though you are using IBM Cloud and not AWS, as previously mentioned, IBM Cloud storage is S3 compatible, and restic uses its interal AWS commands for any S3 compatible storage. So these AWS keys really refer to the keys from your IBM bucket.

Create the repository by initializing it. A prompt appears for you to type a password for the repository. Do not lose this password because your data is irrecoverable without it!

restic -r s3:http://PUBLIC_ENDPOINT_LOCATION/BUCKET init

The PUBLIC_ENDPOINT_LOCATION was specified in the Endpoint section of your Bucket summary.

For example:

$ restic -r s3:http://s3.us-south.cloud-object-storage.appdomain.cloud/freecloudstorage init

Creating backups

Now it’s time to backup some data. Backups are called snapshots. Run the following command and enter the repository password when prompted.

restic -r s3:http://PUBLIC_ENDPOINT_LOCATION/BUCKET backup files_to_backup

For example:

$ restic -r s3:http://s3.us-south.cloud-object-storage.appdomain.cloud/freecloudstorage backup Documents/
Enter password for repository: repository 106a2eb4 opened successfully, password is correct Files: 51 new, 0 changed, 0 unmodified Dirs: 0 new, 0 changed, 0 unmodified Added to the repo: 11.451 MiB processed 51 files, 11.451 MiB in 0:06 snapshot 611e9577 saved

Restoring from backups

Now that you’ve backed up some files, it’s time to make sure you know how to restore them. To get a list of all of your backup snapshots, use this command:

restic -r s3:http://PUBLIC_ENDPOINT_LOCATION/BUCKET snapshots

For example:

$ restic -r s3:http://s3.us-south.cloud-object-storage.appdomain.cloud/freecloudstorage snapshots
Enter password for repository: ID Date Host Tags Directory ------------------------------------------------------------------- 106a2eb4 2020-01-15 15:20:42 client /home/curt/Documents

To restore an entire snapshot, run a command like this:

restic -r s3:http://s3.us-south.cloud-object-storage.appdomain.cloud/freecloudstorage restore snapshotID --target restoreDirectory

For example:

$ restic -r s3:http://s3.us-south.cloud-object-storage.appdomain.cloud/freecloudstorage restore 106a2eb4 --target ~
Enter password for repository: repository 106a2eb4 opened successfully, password is correct
restoring <Snapshot 106a2eb4 of [/home/curt/Documents]

If the directory still exists on your system, be sure to specify a different location for the restoreDirectory. For example:

restic -r s3:http://s3.us-south.cloud-object-storage.appdomain.cloud/freecloudstorage restore 106a2eb4 --target /tmp

To restore an individual file, run a command like this:

restic -r s3:http://PUBLIC_ENDPOINT_LOCATION/BUCKET restore snapshotID --target restoreDirectory --include filename

For example:

$ restic -r s3:http://s3.us-south.cloud-object-storage.appdomain.cloud/freecloudstorage restore 106a2eb4 --target /tmp --include file1.txt Enter password for repository: restoring <Snapshot 106a2eb4 of [/home/curt/Documents] at 2020-01-16 15:20:42.833131988 -0400 EDT by curt@client> to /tmp

Photo by Alex Machado on Unsplash.

[EDITORS NOTE: The Fedora Project is sponsored by Red Hat, which is owned by IBM.]

[EDITORS NOTE: Updated at 1647 UTC on 24 February 2020 to correct a broken link.]