Posted on — Leave a comment

Installing Fedora 45 on Stratis storage

The Anaconda installer in Fedora 45 will introduce a new option for storage configuration: Stratis, a modern solution for local storage management.

Stratis isn’t a completely new technology, it uses existing tools and technologies like device mapper, LUKS, and XFS and integrates them into an easy to use package. The idea is to provide modern storage features while hiding the often complex logic behind them. Adding support to the installer brings these features even closer to Fedora users.

There are only two basic structures or layers you need to know when working with Stratis: pools and filesystems. Pools represent an abstract layer on top of existing block devices (disks, partitions, RAID arrays etc.). A pool can consist of one or more devices (for systems with multiple disks, for example). Features like encryption or over-provisioning are also configured on the pool level. Multiple filesystems can be created on the pool. These are devices that will serve as your root or home volumes. Some additional features supported by Stratis include snapshots, caching, and for encrypted pools, multiple unlocking methods like TPM or Clevis/Tang. Caching and encryption without a passphrase are not currently supported by Anaconda, but these can be easily enabled after the installation.

Management of Stratis devices can be done using the stratis command. For more information, check our older, but still valid, article Getting started with Stratis or the Stratis project how-to.

Installation using Web UI

The new web-based user interface for the Anaconda installer currently doesn’t allow selecting which type of storage technology will be used for the automated and guided partitioning options. The storage layout you will get depends on the Fedora variant you choose to install. But if you want to use Stratis, you still have an option in the graphical installation. Any storage layout can be created manually using the Cockpit storage module, which is integrated into the installer. To enter it, simply select the If none of the options above apply… option on the Installation Destination step.
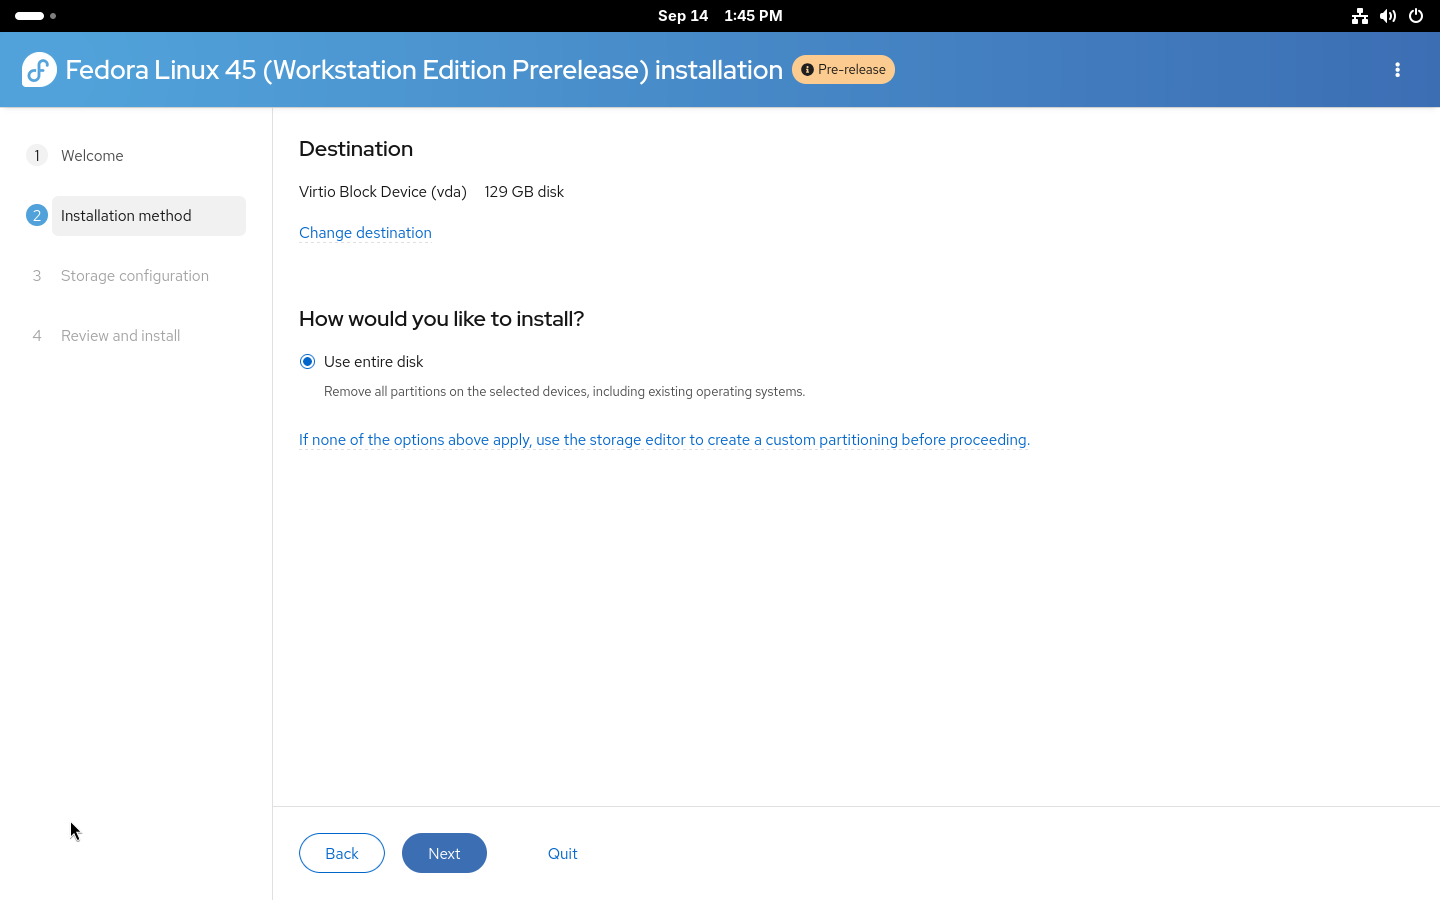
Installation method page in the Anaconda installer

The Cockpit storage module supports a wide variety of storage configurations and Stratis is one of the supported technologies. Do not forget that with manual partitioning, you need to create all required partitions so first create partitions required for booting (/boot and /boot/efi or biosboot, based on your system configuration). After that, simply create a new Stratis pool from the menu.
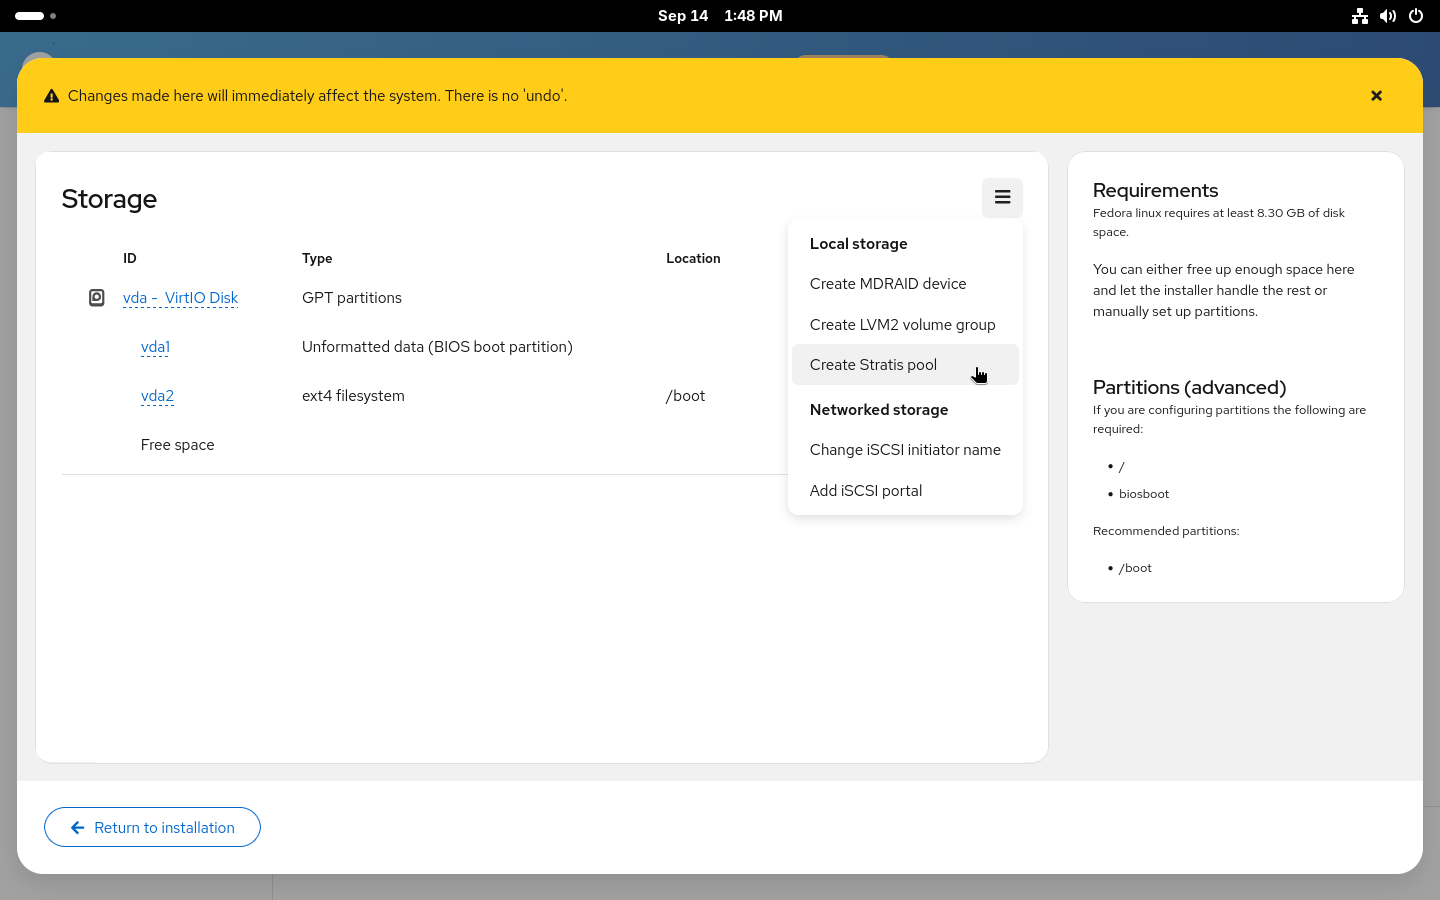
Local storage menu in the manual partitioning editor

Creating stratis pool

After selecting a name for the pool and the disk (or disks) it will be placed on, you can decide whether to enable encryption and over-provisioning for the pool. Over-provisioning allows allocation of more space for the filesystems created on the pool. Similarly to how LVM thin provisioning and Btrfs work. With over-provisioning enabled, there is no need to worry about running out of space in root with still plenty of free space in /home. It also allows greater flexibility when using snapshots. On the other hand, you actually need to be aware that you don’t really have terabytes of space and you need to make sure you won’t actually run out of space on your disk. Both encryption and over-provisioning can also be enabled or disabled after the installation.
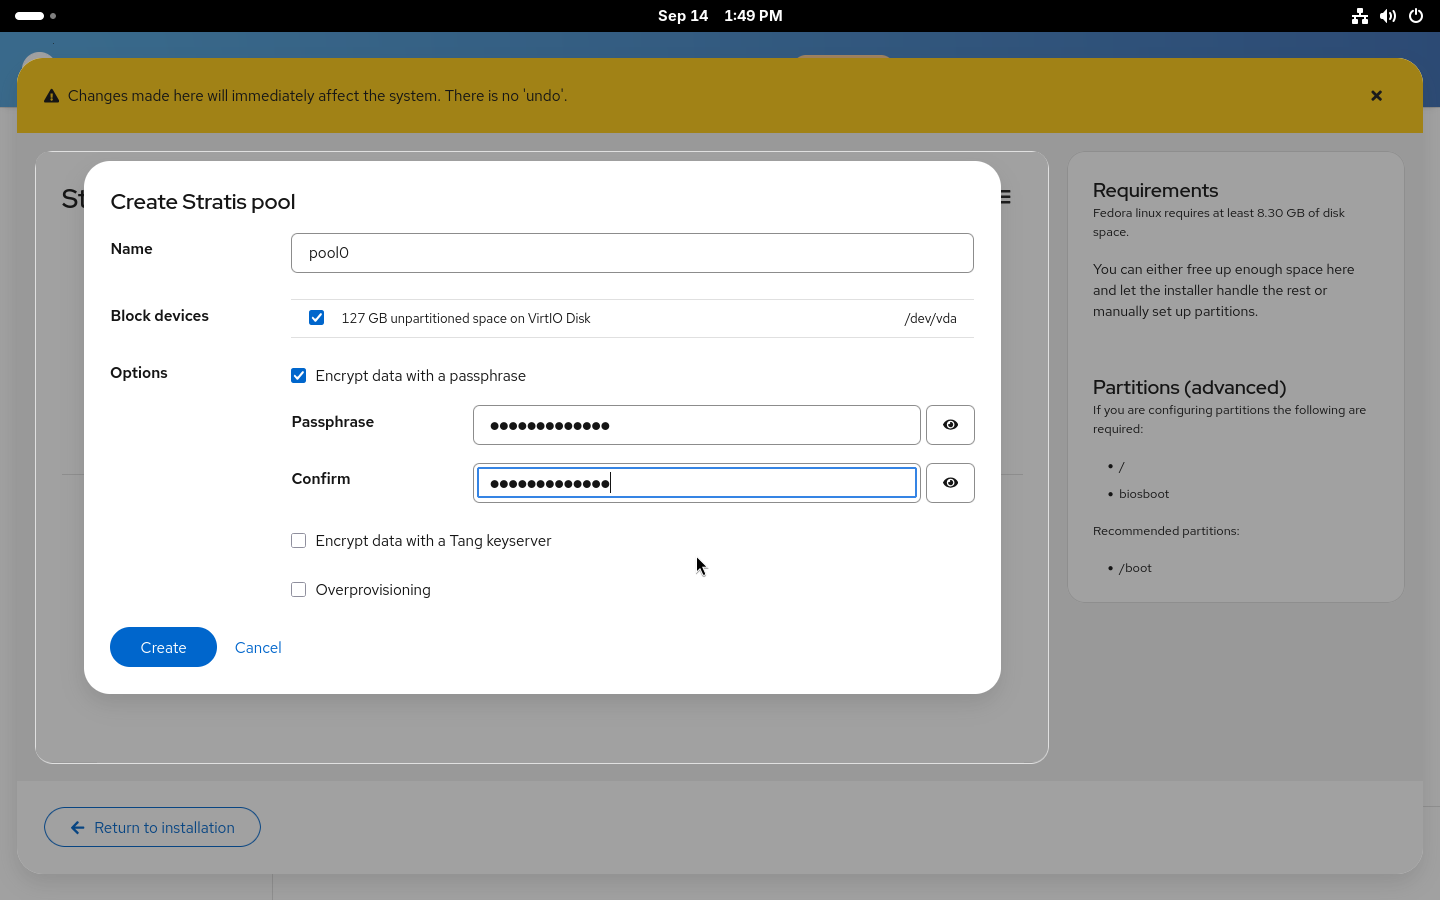
Creating Stratis pool in the manual partitioning

Creating stratis filesystems

With the new pool created, you now need to add some filesystems to it. You’ll most likely want the standard two separate filesystems for your / and /home. But you can also create a separate filesystem for your /var, for example.
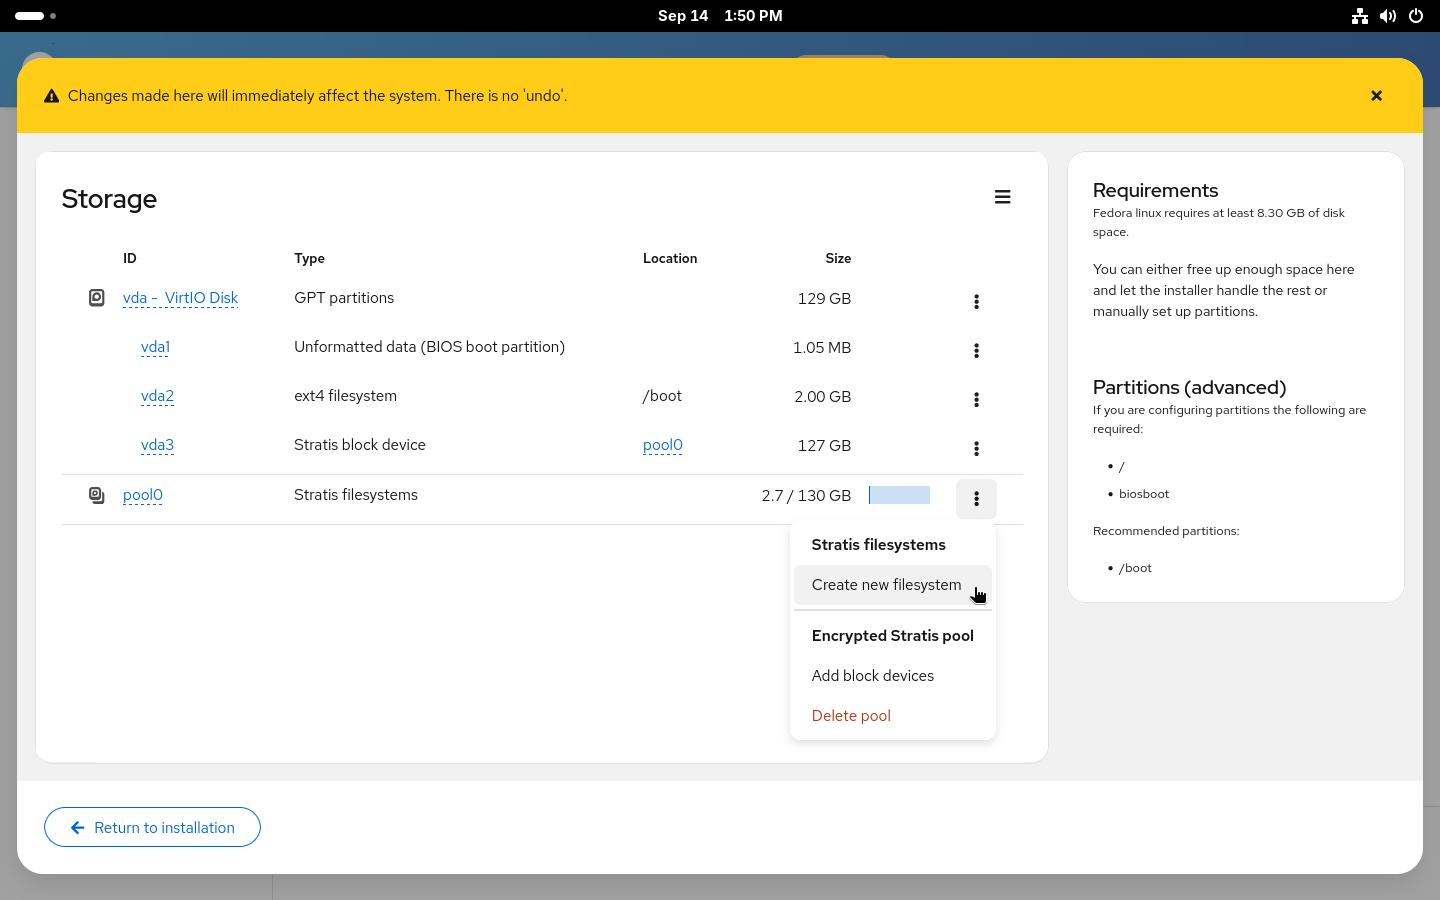
If you enable over-provisioning on your pool, you can also decide to not specify sizes for the filesystems and use the 1 TiB default size with over-provisioning or set a size limit for the filesystem to prevent it from automatically growing if you ever run out of space.
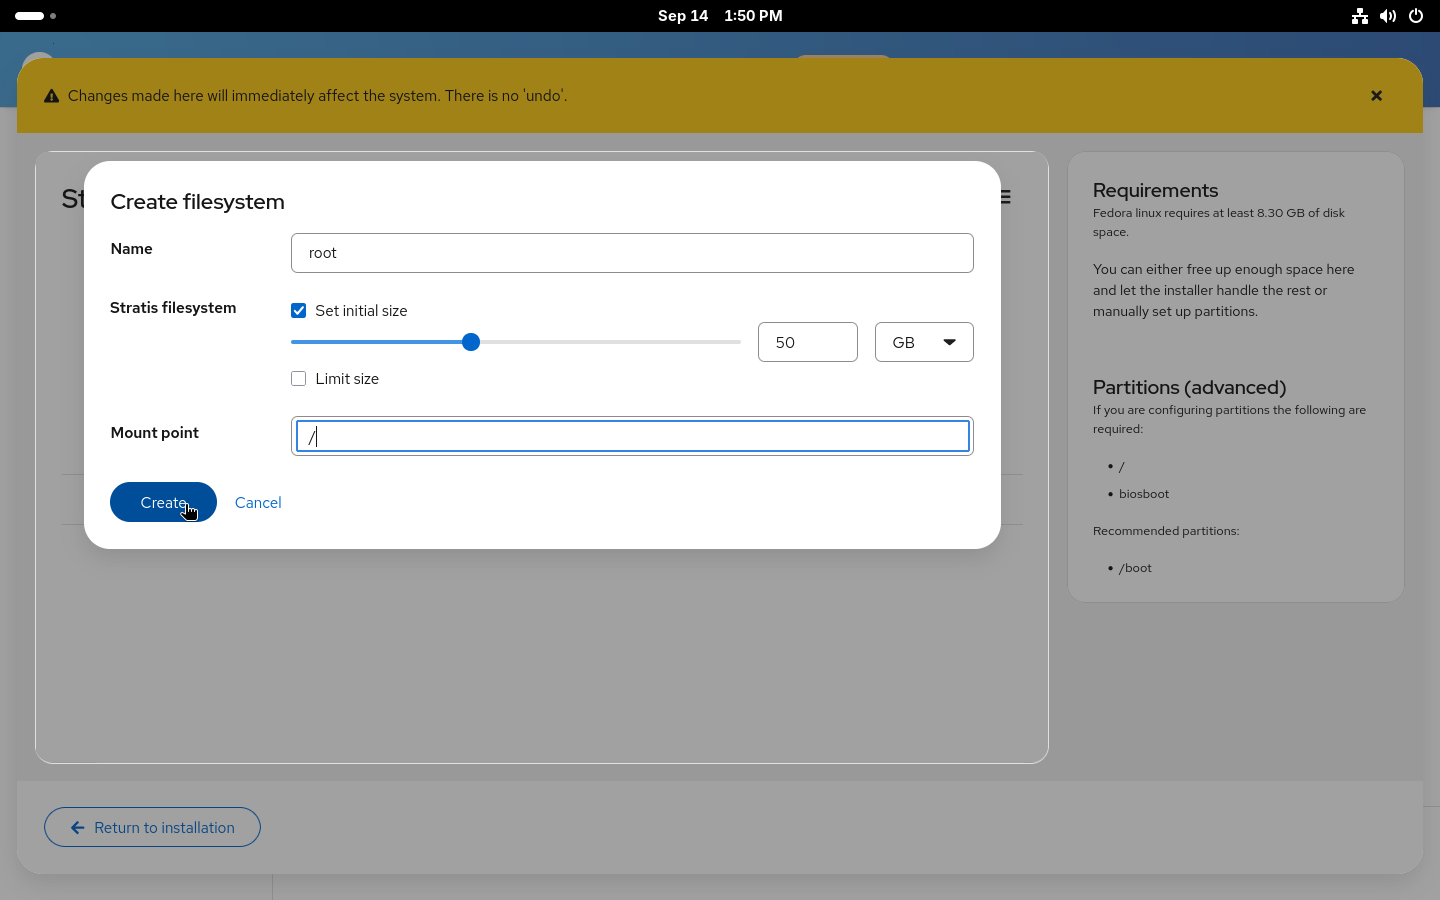
Creating Stratis filesystem in the manual partitioning

Using the configured layout

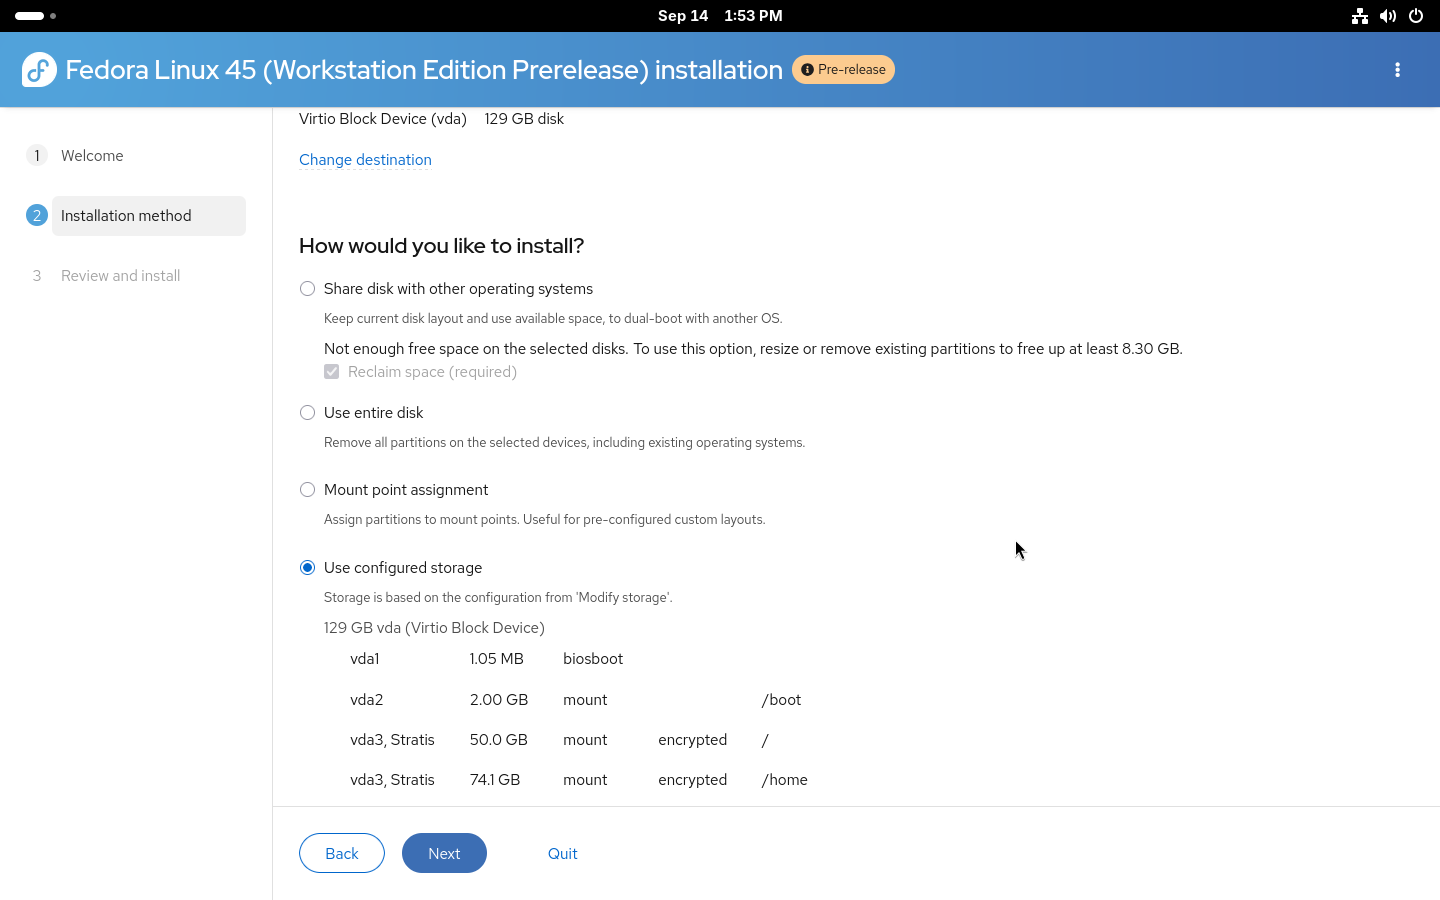
With all the filesystems created, you can Return to installation. Anaconda will check the created devices to make sure all requirements are met and return you to the Installation destination page where a new Use configured storage option will be preselected with the devices that were just created.
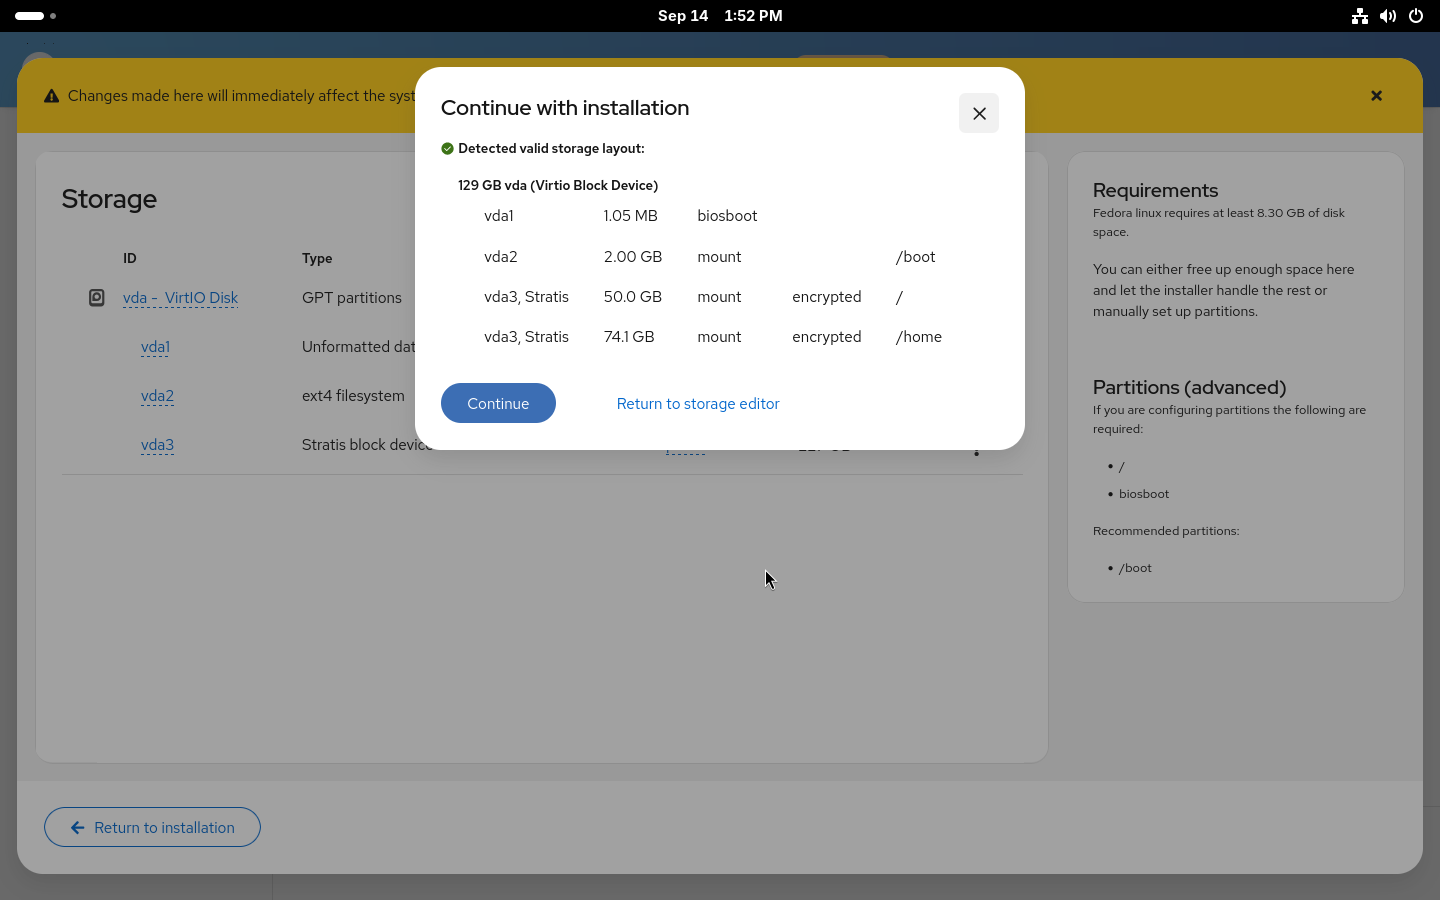
Confirmation dialog with validated storage layout in the manual partitioning
Using configured storage in the Anaconda installer

That is the storage part of the installation done. You can double-check on the Review and install page that everything is correctly set and start the installation.
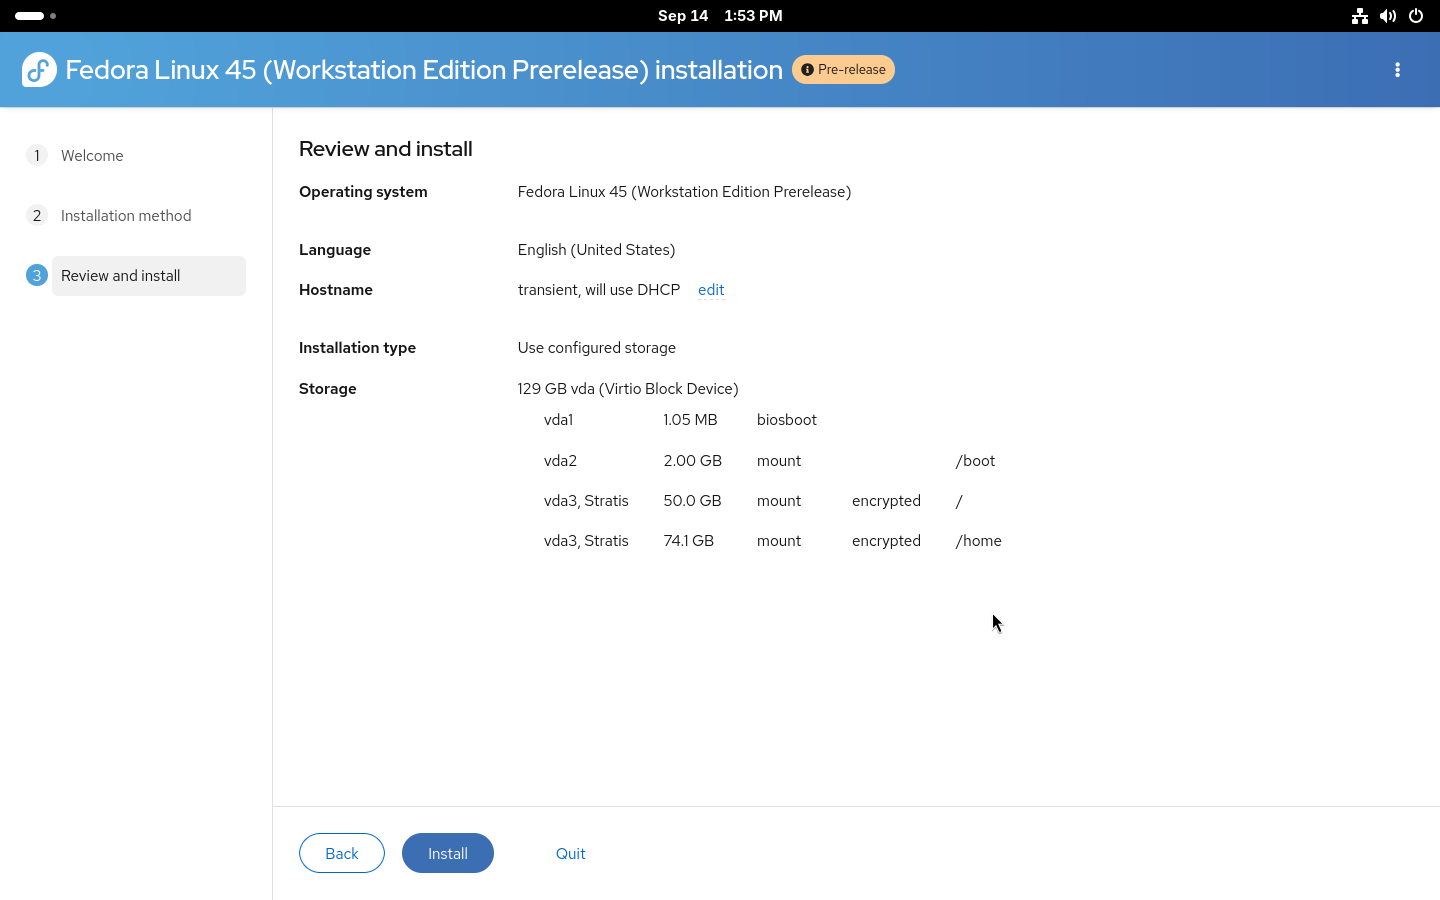
Summary of the installer configuration before starting the installation

Installation using kickstart

For advanced users who wish to use automated installations, full kickstart support for Stratis is also available. Both automatic and manual partitioning are available via kickstart.

Automatic partitioning is simple: the existing autopart command can be used with –type=stratis to create the default Stratis storage layout fully automatically. A storage section in kickstart, for setting up an encrypted Stratis layout, could look like this:

zerombr
clearpart --all --initlabel
autopart --type=stratis --encrypted --passphrase="passphrase"

Manual partitioning requires building the entire storage layout manually from bottom up. Two new Stratis kickstart commands were added: stratispool for creating and managing Stratis pools and stratisfs for creating and managing Stratis filesystems. Usage of these commands and most of the options are similar to how kickstart partitioning works with LVM. An example of a more advanced Stratis layout can be found below.

reqpart
part /boot --fstype=ext4 --size=500
part stratis.01 --size=1 --grow --ondisk=vda
part stratis.02 --size=1 --grow --ondisk=vdb
stratispool fedora stratis.01 stratis.02
stratisfs / --name=root --poolname=fedora --size=5000 --grow
stratisfs /home --name=home --poolname=fedora --size=1 --grow

Here we are creating a pool called fedora on top of two disks, vda and vdb, with two filesystems. One called root for / and a second called home for /home. The –grow tells the installer to use all available free space when creating the devices. For more details about the commands see the kickstart documentation.

Conlusion

The newly introduced Stratis support in Anaconda offers an easy way to take advantage of the modern storage features offered by Stratis. With the Web UI support available through Cockpit storage, you can now easily use Stratis on your system. We plan to simplify the process even more in future releases and enable even more advanced Stratis features. 

If you run into any issues or have feedback, both the Anaconda and Stratis teams would love to hear from you.

Posted on — Leave a comment

Anaconda Web UI storage feedback requested!

As you might know, the Anaconda Web UI preview image has a simple “erase everything” partitioning right now because partitioning is a pretty big and problematic topic. On one hand, Linux guru people want to control everything; on the other hand, we also need to support beginner users. We are also constrained by the capabilities of the existing backend and storage tooling and consistency with the rest of Anaconda. Anaconda team is looking for your storage feedback to help us with design of the Web UI!

In general, partitioning is one of the most complex, problematic, and controversial parts of what Anaconda is doing. Because of that and the great feedback from the last blog, we decided to ask you for feedback again to know where we should focus. We’re looking for feedback from everyone. More answers are better here. We’d like to get input if you’re using Fedora, RHEL, Debian, OpenSUSE, Windows, or Linux, even if it’s just for a week. All these inputs are valuable!

Please help us shape one of the most complex parts of the Anaconda installer!

With just a few minutes of your time filling out the questionnaire, you can help us decide which path we’d like to choose for partitioning.

Questionnaire link: https://redhatdg.co1.qualtrics.com/jfe/form/SV_87bPLycfp1ueko6 

Posted on — Leave a comment

Anaconda Web UI preview image now public!

We are excited to announce the first public preview image of the new Anaconda web interface!  Our vision is to reimagine and modernize our installer’s user experience (see our blog post “Anaconda is getting a new suit”). We are doing this by redesigning the user experience on all fronts to make it more easy and approachable for everyone to use.

Today, we would like to introduce our plans for the public preview release, as our new project has already reached a point where core code functionality is already developed and the new interface can be used for real installations. 

So, we’re giving you something to play with! 🙂

Installation progress of the preview image

Why public preview image?

By giving you a working ISO as soon as we can, you have the opportunity to help us to define this new UI. This task allows us to rethink what we have and find new ways to overcome the challenges of the UI instead of re-creating what we had already. Please take this opportunity and reach us with your feedback to help us to create the best OS installer ever!

Please let us know what you require from Anaconda. What features are important to you and why are these important? That will allow us to prioritize our focus on development and design. See below for how to contact us.

How to get public preview image?

Download the Anaconda preview image here. 

Thanks a lot to the Image Builder team for providing us with a way to build ISO with the Fedora 37 Workstation GA content. We are planning to provide additional images with an updated installer to give you the newest features and fixes with the link above. There are no updates to the installation payload (installed system data) yet. We will announce important updates of the ISO image by sending mail to anaconda-devel@lists.fedoraproject.org with CC to devel@lists.fedoraproject.org. Please subscribe to either of these to get information about the news. This way we will be able to iterate on your feedback.

What you will get with the preview ISO

The ISO will allow you to install the system and let you get a taste of the new UI, so you can provide us early feedback. However, it is pretty early in the development cycle. We advise you to not use this ISO to install critical infrastructure or machines where you have important data.

Let’s go to the more interesting part of what you can do with the ISO:

  • Choose installation language
  • Select your disks
  • Automatically partition the disks. BEWARE! This will erase everything on the selected disks.
  • Automatically install Fedora 37 GA Workstation system
  • Basic review screen of your selections
  • Installation progress screen
  • Built-in help (on Installation destination screen only)

Known issues:

  • In the bootloader menu you’ll see “Install Fedora 38”, it’s expected because the installation environment is from Rawhide. However, the content installed will be Fedora 37 GA, so don’t worry.
  • Virtual Box on Mac might have resolution issues. We are working on resolving this issue.
  • Aspect ratio and window handling. We know we need to solve this better, feedback is welcome.

How to provide feedback?

Your feedback is critical to have a project which you and we can be proud of, so please share it with us. To give us feedback:

Please take your time to play with the UI and tell us what you think. What works great, what is not working and what you would like to have. Ideally, follow future updates and tell us if the situation is better or worse. 

We are really counting on your feedback and we are thankful to have you all supporting us in this journey!

Posted on — Leave a comment

Anaconda improvements in Fedora 28

Fedora 28 was released last month, and the major update brought with it a raft of new features for the Fedora Installer (Anaconda).  Like Fedora, Anaconda is a dynamic software project with new features and updates every release. Some changes are user visible, while others happen under the hood — making Anaconda more robust and prepared for future improvements.

User & Root configuration on Fedora Workstation

When installing Fedora Workstation from the Live media, the user and root configuration screens are no longer in the installer. Setting up users is now only done in the Initial Setup screens after installation.

The progress hub on a Fedora 28 Workstation live installation.

The progress hub on a Fedora 28 Workstation live installation.

The back story is that the Fedora Workstation working group aimed to reduce the number of screens users see during installation.  Primarily, this included screens that let a user set option twice: both Anaconda and the Gnome Initial Setup tool upon first boot. The working group considered various options, such as Anaconda reporting which screens have been visited by the user and then hiding them in Gnome Initial Setup. In the end they opted for just always skipping the user and root configuration screens in Anaconda and just configuring a user with sudo rights in Gnome Initial Setup.

Because of this the respective screen (user creation) shows up just once (in Gnome Initial Setup), making the installation experience more consistent.

It’s also worth noting that this change only affects the Fedora Workstation live image. All other images, including the Fedora Workstation netinst image and other live images, are unaffected.

Anaconda on DBus

Last year we announced the commencement of our next major initiative — modularizing Anaconda. The main idea is to split the code into several modules that will communicate over DBus. This will provide better stability, extensibility and testability of Anaconda.

Fedora 28 is the first release where Anaconda operates via DBus. At startup, Anaconda starts its private message bus and ten simple modules. For now, the modules just hold data that are provided by a kickstart file and modified by the UI. The UI uses the data to drive installation. This means that you can use DBus to monitor current settings, but you should use the UI to change them.

You can easily explore the current Anaconda DBus API with the live version of Fedora Workstation 28. Just keep in mind that the API is still unstable, so it might change in the future.

To do so, boot the live image and install the D-Feet application:

sudo dnf install d-feet

Start the installer and get an address of the Anaconda message bus:

cat /var/run/anaconda/bus.address

Start D-Feet, choose the option ‘Connect to other Bus’ and copy the first part of the Anaconda bus address to the text field (see the picture below). Click on the ‘Connect’ button. The application will open a new tab and show you a list of available DBus services. Now you can view the interfaces, methods, signals and properties of Anaconda DBus modules and interact with them.

Connecting to the Anaconda DBUS session.

Connecting to the Anaconda DBUS session.

The Anaconda DBUS API as visible in D-Feet.

The Anaconda DBUS API as visible in D-Feet.

Blivet 3.0 and Pykickstart 3.0

Fedora 28 provides version 3 of blivet and Pykickstart, and Anaconda uses the updated versions too.  While this is not really visible from end user perspective, changes like this are important to assure a robust and maintainable future for the Anaconda installer.

The main change in Pykickstart 3 is the switch from the deprecated optparse module to argparse for kickstart parsing. This not only brings all the features argparse has, it was also one of the prerequisites for having automatically generated kickstart documentation on Read the Docs.

Blivet 3 is less radical  update, but includes significant API improvements and cleanups. Some installer-related code still sitting in Blivet was finally moved to Anaconda.

Migrating from authconfig to authselect

The authconfig tool is deprecated and replaced with authselect in Fedora 28, so Anaconda deprecated the kickstart command authconfig and introduced a new command: authselect. You can still use the authconfig command, but Anaconda will install and run the authselect-compat tool instead.

Enabled hibernation

Previously, Hibernation didn’t work after installation because of a missing kernel option, so it had to be set up manually. Starting with Fedora 28, Anaconda adds the kernel option ‘resume’ with a path to the largest available swap device by default on x86 architectures.

Reducing Initial Setup dependencies

The Initial Setup tool is basically a lightweight launcher for arbitrary configuration screens from Anaconda. And while Anaconda often runs from a dedicated installation image, Initial Setup always runs directly on the installed system. This also means all the dependencies of Initial Setup will end up on users system, and unless they are uninstalled, they will take up space more or less forever.

The situation is even more dire on ARM, where users generally just dd a Fedora image to memory card or internal storage on the ARM board and Initial Setup basically acts as the installer, customizing the otherwise identical image for the given user. In this case Initial Setup dependencies directly dictate how small the Fedora image can be.

In Fedora 28, the new anaconda-install-env-deps metapackage  depends on all installation-time-only dependencies. The anaconda-install-env-deps package is always installed on installation images (netinst, live), but is not an Initial Setup dependency and should thus prevent all the unnecessary packages from being pulled in to the installed system. There is also a nice side effect of finally consolidating all the install-time-only dependencies in the Anaconda spec file.