Posted on Leave a comment

BTRFS boot failure and easy GUI methods for system recovery

A few short how-to’s with screenshots, showing easy ways to boot up off a USB live ISO and return back to previous points in time with BTRFS.

Many Linux distributions now default to BTRFS as the standard installation filesystem. Fedora Linux is no exception to that.

2022/23 saw a lot of articles extolling its virtues of easy rollback, stability and so forth. All complete with paragraphs of command line instructions.

Times have changed, the BTRFS infrastructure has matured, and there are now easy to use GUI tools at our fingertips.

No special tools or skills

You may use any standard Fedora Linux ISO image and USB stick.

This article is for people new to Fedora Linux and for those who are familiar with ext4 and Timeshift.

Easy to follow instructions

My experience with Linux goes back quite a long way.

There used to be a time when the Fedora Linux help links often routed to Red Hat Enterprise. This generally targeted the needs of network managers and other system professionals.

Thankfully, for ordinary users the situation has now improved. The Fedora Magazine is one of those reasons.

In the last few years I have been using Fedora Linux as test-bed virtual machines and I have been using Fedora Kinoite on a secondary laptop.

As a daily driver, the thing that most recently stopped me switching to Fedora Linux was not being able to find easy to follow instructions on snapshot recovery during system boot failure.

This article lists the solutions that I finally pieced together.

How to start
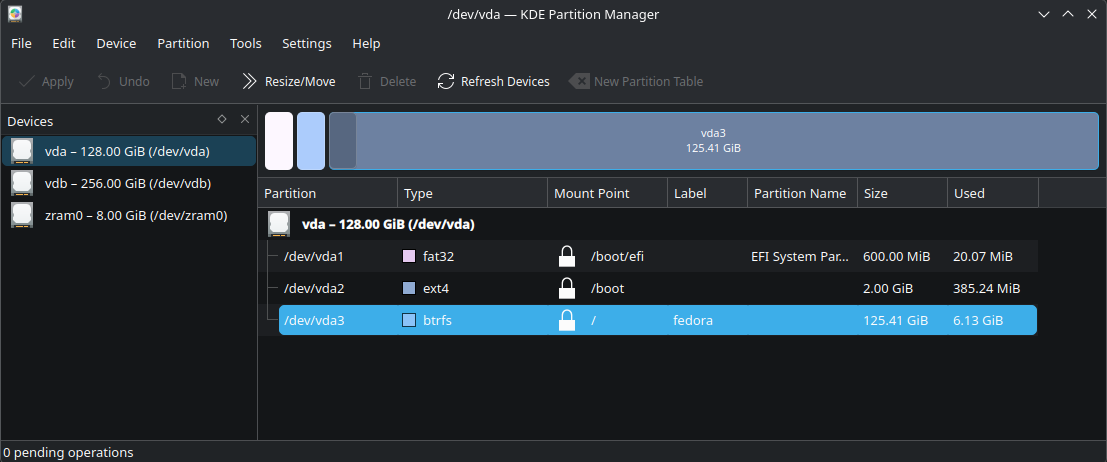
how to use a partition manager to discover what file system that you are using

First, make sure that you do actually have your OS running with BTRFS.

This is now normally the case but if you have had your installation for a few years, or someone else installed it for you, it is wise to check.

On Fedora Workstation, with Gnome, try disks or gparted. These two will also install readily on KDE and many users actually prefer them to the KDE partion manager.

Many people welcomed the 2025 decision by the Fedora steering committee to promote KDE to parity status with (Gnome) Workstation. This guide covers both official versions.

If you don’t have Fedora Linux yet, there are also a few notes on general setup as well.

Getting help from the assistant

You may have seen btrfs-assistant mentioned in forum discussions. If you don’t already have this program installed, then now is the time to look at doing it.
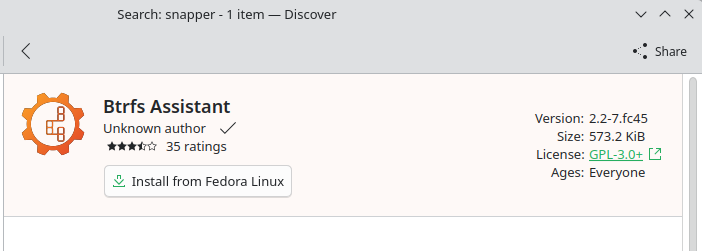
ways to install btrfs-assistant using Fedora

The package only takes a tiny amount of space and also installs snapper. About 4MB in total. Either Gnome Software or KDE Discover are fine. Or you can use dnf on the the command line.

Up and running:
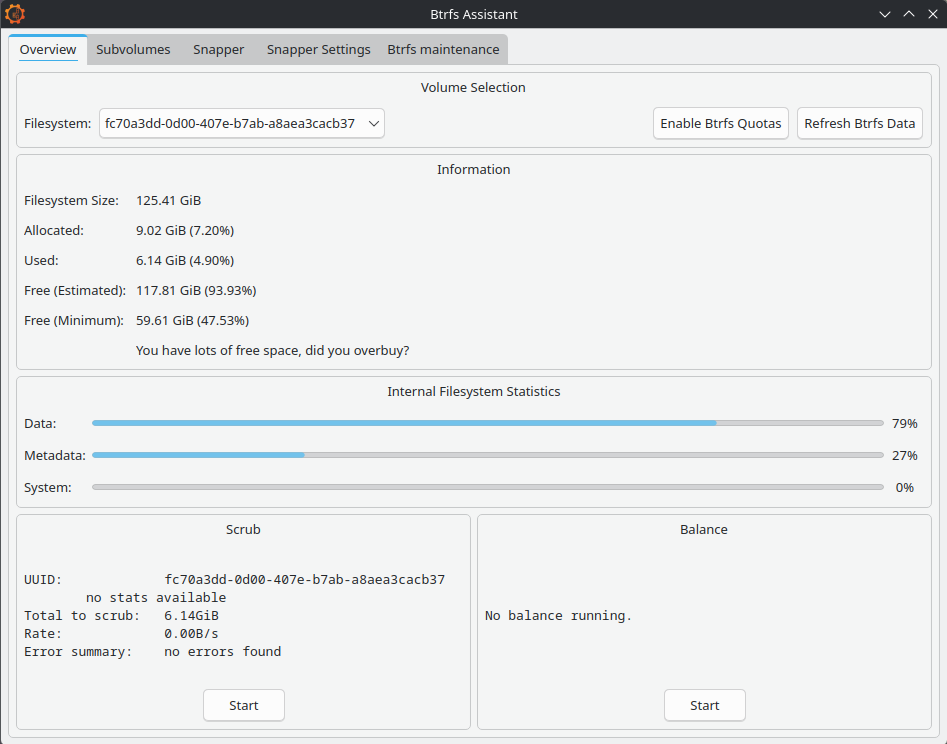
The btrfs-assistant user interface showing the range of system maintenance options

Sub-Volumes

Registration of existing sub-volumes is automatic:
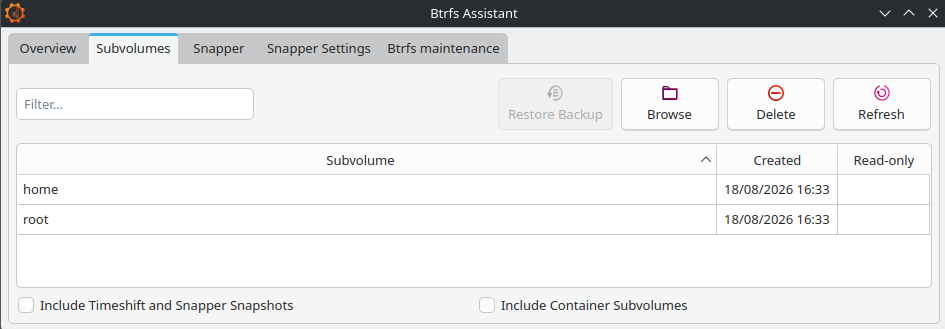
graphical viewing of btrfs sub-volumes using btrfs-assistant

By default, Fedora creates two sub-volume sections on standard installation. We can only see them in the file manager when we boot via a USB live ISO, otherwise we see the volume contents only.

Partition managers such as gparted may show the partition as complete but the file system won’t work unless we have set up the logical sub-volume overlay inside of it.

If you are using Gnome Workstation you may probably see an additional sub-volume ‘/root/var/lib/machines‘ which, unless you are working with container built machines, will be empty. It’s just there to exclude temporary files from any snapshot processes and can be ignored too.

Alternative layouts

Anaconda is the in-house installer and I have been quite impressed with its recent incarnations.

The default installation route is decidedly the easier option at present.

However, for users wanting to add extra sub-volumes, the best method may be right at the start when you are offered the Storage Editor option. If using pre Fedora Linux 45, you can also find it at the top right corner of the interface.

Fedora Linux will happily install alongside your current setup if you want to try things out.

I have found that the best method is to use gparted to prepare a section of non-allocated disk space to offer the installer to work with, rather than offering it a ready made partition.

Post-install adjustments

Creating new sub-volumes requires the command line. This is for advanced users only.

In theory, Blivet-gui claims to be able to do this task but I am yet to be convinced. Btrfs-assistant leaves this bit well alone, which is what we are going to do.

Backups

There isn’t much that we can do with the actual sub-volumes, as they stand. The Copy On Write (CoW) mechanism is there and working. That’s about it.

But backups are always good to have, so make sure that you have got one before you start setting things up for real. We’ll have a look at this in detail later on.

There are btrfs command line methods for sub-volumes using send and receive but the concepts can get quite complex.

Making standard partition backups are much easier using dd or Gnome Disks, just as if we were using ext4, and they are equally effective for basic needs.

Snapshots

These are what really sets BTRFS rollback into a totally different league compared to using Timeshift.

To get this working we are going to use Snapper:
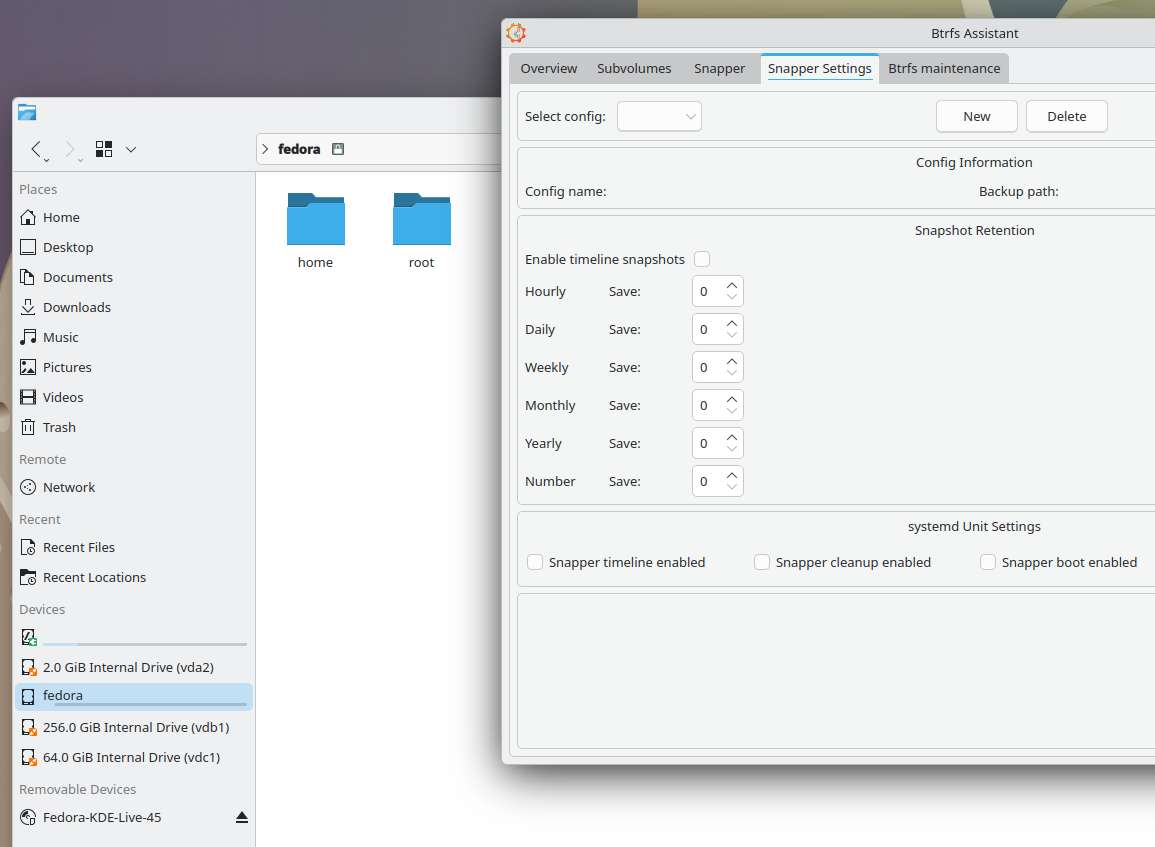
using live boot to view btrfs sub-volumes and snapper configs to setup automated snapshots

You may find mention on forums about using Timeshift on Fedora Linux BTRFS with Ubuntu style @ sub-volumes. This now no longer works unless you are using something like Linux Mint. It was never probably a good idea to start with but it does illustrate the extents to which people have gone to, and just to get some kind of easy GUI recovery setup going.

We need to set up Snapper before things go wrong.

If you have arrived at this article through a web search and are in difficulties, unless you have previously setup snapshots, you are going to be restricted to using the command line.

Command line btrfs is actually the foundation program used to create and manage the overlay sections. Snapper helps us work with the btrfs snapshots.

Several command line articles are available: https://fedoramagazine.org/?s=btrfs

Snapper configs

The place to start is at the Snapper Settings tab. Click ‘new’ and fill in the details, one for ‘root’ and one for ‘home’:
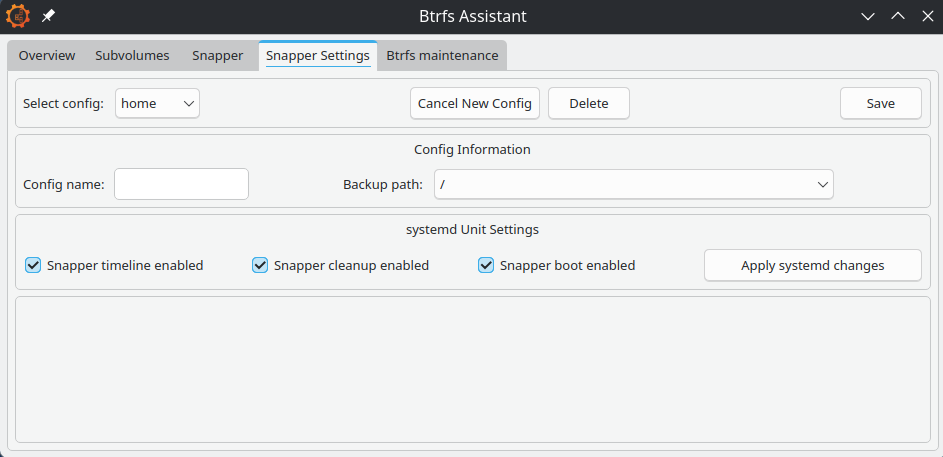
Setting up BTRFS Snapper configs

The backup and target paths must both be on the same partition. Otherwise, the docs say that you can place sub-volumes anywhere. BTRFS uses hidden sub-volumes, so placing ‘root’ at ‘/’ and ‘home’ at ‘/home’ is as good a place as any, probably.

In our setup, root means everything except the home folder. And the home folder will neatly hold the home snapshots.

Snapper will place its config files at ‘/etc/snapper’ if you need to find them.

Enable timeline, cleanup and boot. Click the save button.

Numbers

The first config save will set up the config file. We now have to set the numbers.
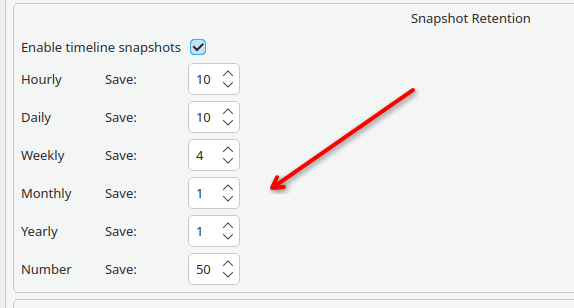
snapper retention numbers need adjusting

I don’t know if is intentional for Snapper to default to saving 10 whole years of snaps and nothing weekly. Perhaps it’s something to do with openSUSE and and their long term server support program?

For everyday use, these figures need changing. And the root volume needs to be treated differently from the home one.

I am currently evaluating the above set for root, with 15, 10, 5, 3, 1, 50 for home. Although, I am wondering if these these figures could be a bit too high …

The number defines how many snapshots the timeline cleanup algorithm should keep, counting from the youngest.

When done, save again, then apply systemd changes.

Hoarding Junk

Make sure that you don’t get carried away. Snapshots are very easy to take. We’ve all probably seen stories of people filling their houses with 20 years of old newspapers.

One or two snapshots of old kernels and firmware updates might get us out of problems but we don’t really need to keep Gigabytes of these for months on end. Conversely, it could be invaluable to find some small but important documents that got accidentally deleted a few months back without us realizing.

The dangers of system bloat could well be one of the reasons that Fedora Linux doesn’t have snapper already installed.

Creating the snapshots

This is normally fully automated and happens in micro-seconds. A very different scale to ext4 and Timeshift where we are frequently talking of minutes.

Manual snaps are great as well. Maybe just before doing something that could go wrong is a good idea.

If you set up the Snapper boot config option, an instant snapshot will be taken at every boot time, so any errant updates can be very easy to reverse too.

Different copy on write file systems can have both subtle or major differences but the basic b-tree principles tend to remain. If you want a deep dive into the theory, there’s lots out there.

The BTRFS system is continually working on records of what is happening, so data processing requirements are very small. In simple terms we can look at this as making tag at a point in time on a type of continuous and interconnected meta-data event log. When we roll back, we return to the tag and restart the recording on a new branch.

Browsing

Select the Snapper tab and then the sub-tab for Browse/Restore:
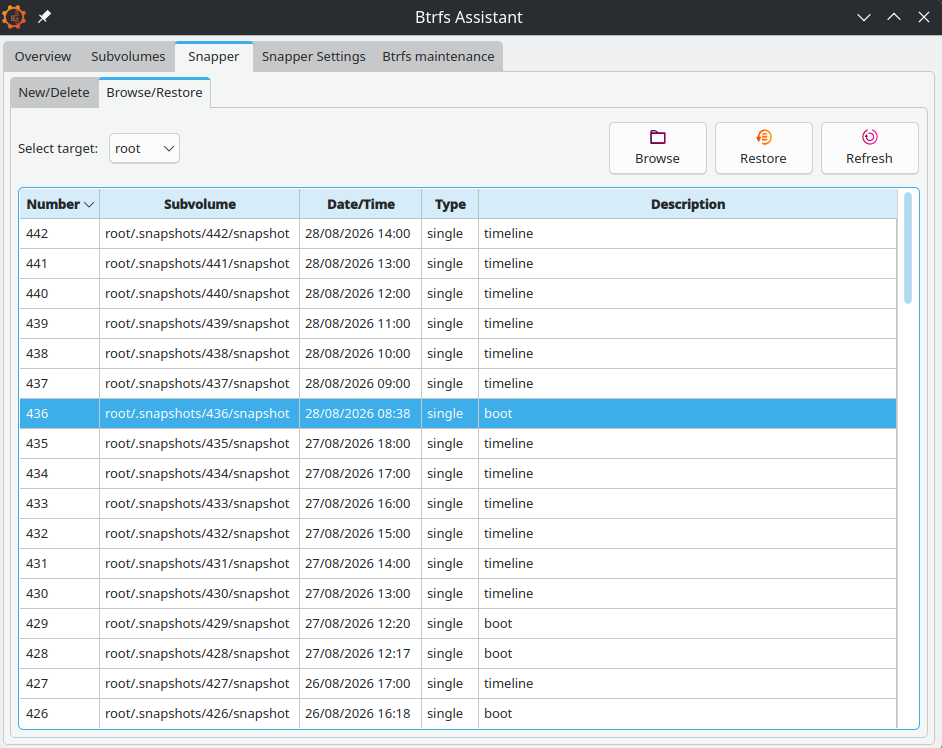
browse and restore with btrfs-assistant

Find the snapshot that you think you need and click on Browse to see what’s in there. The Browse function also lets you restore individual files rather than whole snaps. Keep an eye on the target drop down which will change when you switch tabs.

Deleting

BTRFS is night and day faster than the qcow2 systems used on virtual machines. The same for Timeshift. Only a couple of seconds are needed, even for very old snapshots.

Maintenance

On this tab, scrub is probably the only important one. The docs say this should run at least monthly. If you have done a lot of snapshot rewinding then a manual scrub is a good idea.

Balance is for balancing RAID devices and you only really need defrag if you are running on a mechanical hard drive. An SSD will have its own optimising system built in but you could run defrag manually every year or two if you want.
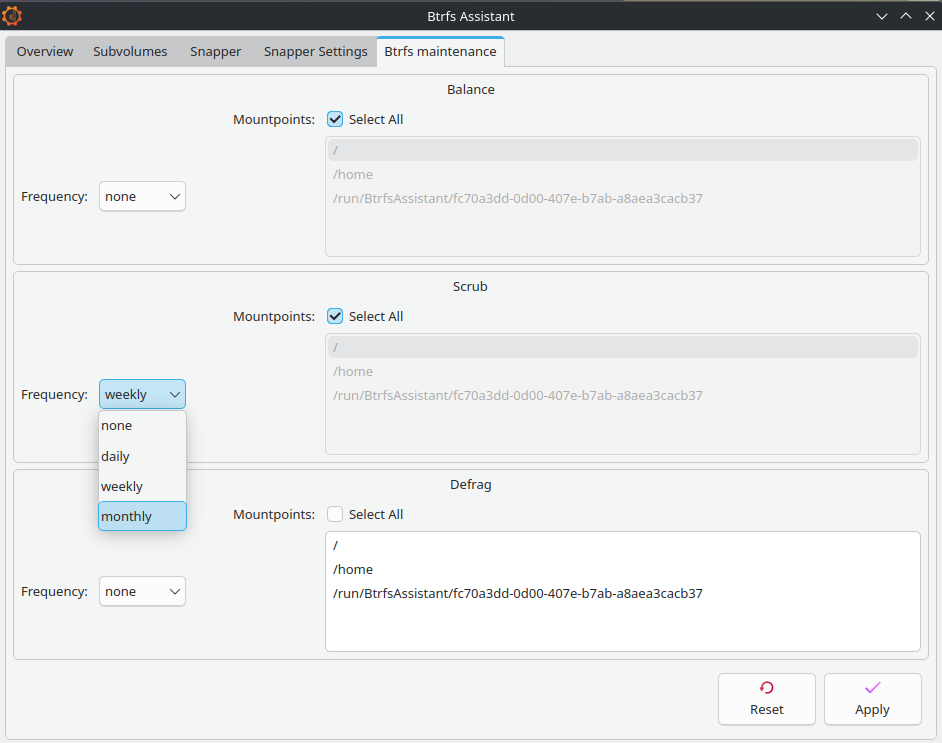
selecting btrfs maintenance schedules

Live booting

There are some operations that we simply can’t do on an operating system when it’s in use. Instead, we need to use Fedora Media Writer or Gnome Disks to put a downloaded Live ISO onto a USB stick and run things from there. For Disks, right click on the ISO and select open-with Disk Image Writer.

Many of you will be very familiar with this process. But not everybody is aware that many live ISO’s will also allow you to install small amounts of software onto them. This little trick will in fact go on to form a keystone to how we do our system failure recovery.

Downloaded ISO images from https://fedoraproject.org

If preferred, try the Manjaro KDE ISO from https://manjaro.org/products/download/x86 which will also have most of the needed software already there.

Restarts

The next stage is to get your computer to boot with the USB; you will need to have either already set your UEFI/BIOS to allow a trigger key during initial starting, usually delete, or you will need to go to the OS settings and request a UEFI restart there:
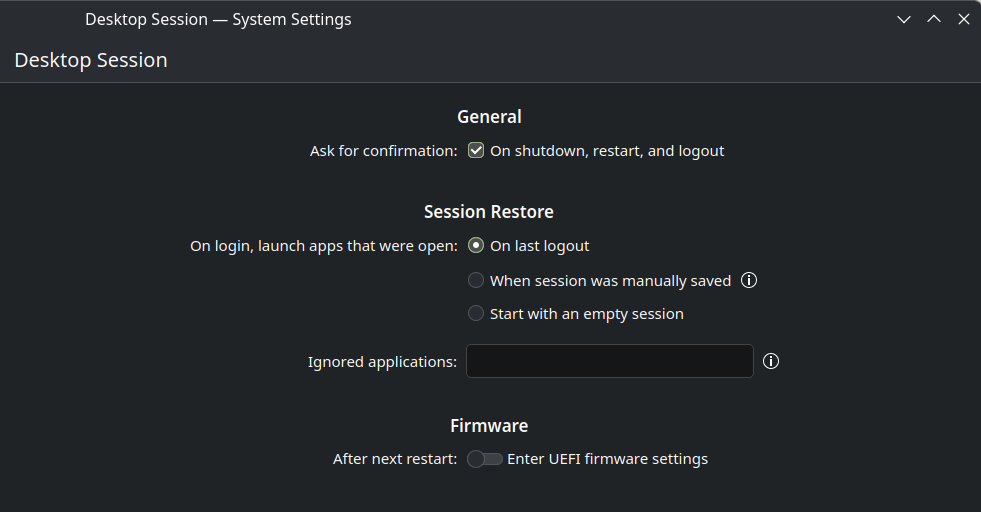
how to reboot into the uefi/bios from your operating system

Staying safe

It’s basic standard good practice to have a recent full backup when doing anything to your system.

Once you have booted the live ISO, if you don’t have a backup, then make sure that you do.

Using Disk‘s GUI interface allows the making of partition images to be fairly straight forward. Gnome Workstation ISO’s will already have Disks ready for you to use. If you are using KDE, set it up using KDE Discover. Otherwise use dnf. The installation is just a few MB.
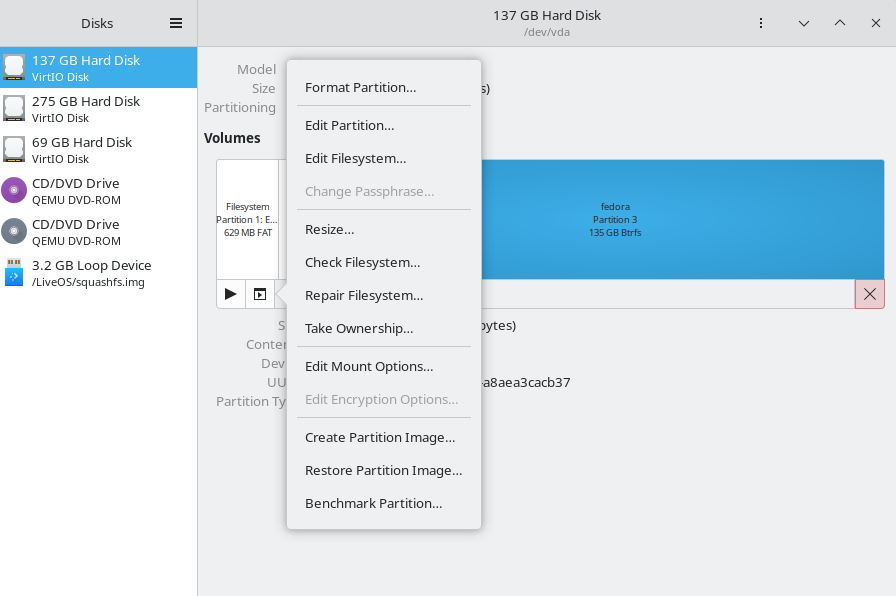
Gnome Disks interface and how to make a partition backup image

Select the partition, standard click the options button and choose ‘create partition image’.

Backup the boot partitions too. BTRFS makes no copies of these.

The usual cautions if you are thinking of using dd and have never used it before. You need to always pay attention to your input ‘if=’ and your output ‘of=’ or it changes from being a useful disk duplicator into it’s other guise of disk destroyer ….

Also, place your backups on to something reliable. A good quality USB hard-drive is generally viewed as a good choice. They are more resistant to time fading than SSD’s even if they are slower. If you have not heard of ‘bit rot’ there are lots of articles on the web. SSD’s will lose data if they are not regularly powered up.

Partition sizes

You may want to consider partition size adjustment at this point. But do the initial backup first, if you can.

Keeping the size of the OS partition reduced down will make backing up much easier. And you are still going to need further full backups, even with Copy On Write running things.

For more experienced users, there are methods to compress partition backups using dd. Also creating a ‘/dev/zero‘ temp file will help compress even more. You can save lots of space but the .img files have to be fully decompressed in order to mount them, which is a slight down side.

Virtual machines

Problems with computer speed and with excess data can occur when having a two concurrent CoW systems running together. A kind of snowball effect from the host system continually backing up copies of the other backups.

According to the Qemu docs, when keeping virtual machines on a BTRFS partition it is recommend to use the ‘nocow‘ option to avoid performance issues.

For those of you using Gnome Boxes, which comes pre-installed on Workstation, any adjustment of the config files and VM locations is not needed.

Boxes likes to keep its virtual machines out of view in a hidden home folder called ‘.local/share/gnome-boxes/images’ and it tends to work best when left that way. All the image files will already have had CoW disabled.

I can’t say that I have noticed any significant problems when I have carried out short tests. However, the issue is there nevertheless and a general look on the web will yield some quite lively discussion on the matter.

Advanced users may wish to consider running their VMs on a separate ext4 partition as another option.

The nocow +C flag can be easily checked by using lsattr against the image file, if required.

Swap files

Fedora Linux now uses the faster and more modern zram system which compresses the RAM data instead of swapping it to storage.

BTRFS snapshotting will not work if traditional swap files are present in the sub-volume.

If you are running short of RAM, your first option should be adjusting the zram allocation ratios. If you still find that you need a swap file, you will need to create a separate sub-volume to contain it.

Recovery

Having arrived at this point, you should now find this section to be fairly intuitive.

However, do remember to pay attention to root/home continuity. Remember that home will still contain hidden system and config files that are used by programs installed in the root section.
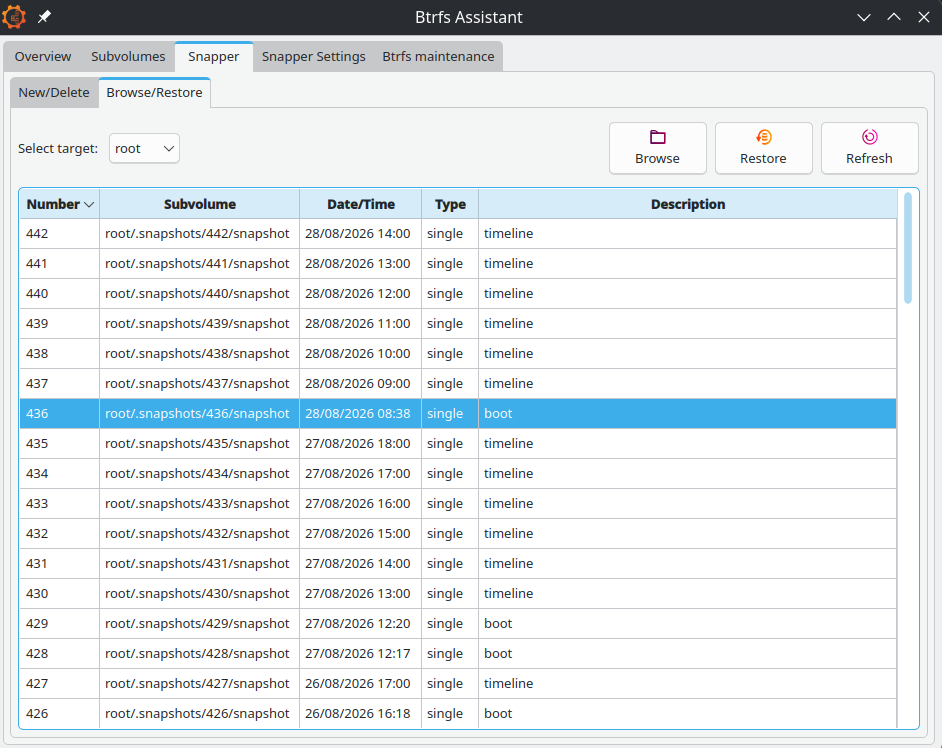
btrfs-assistant restore proceedure

For small problems, where the system still boots, load btrfs-assistant on standard load and roll back to a previous good point.

Importantly, for USB running, start the file manager and mount the partition that you need to fix before installing or running btrfs-assistant or it will fail to work.

In both cases you will be advised to reboot for the request to take effect. The whole process is fairly quick and compared to Timeshift, pretty much instant.

Choosing the right tools

System failure happens to the best of us, given enough time to press enough buttons or to adjust one configuration file too many. But sometimes the failures are caused from upstream, from an unnoticed upstream bug perhaps.

If you are still able to boot into your system, Fedora Linux already features a very quick package reversal system as built-in standard. Sometimes we don’t need to use snapshots at all.

There is a GUI program to run this called dnfdragora:
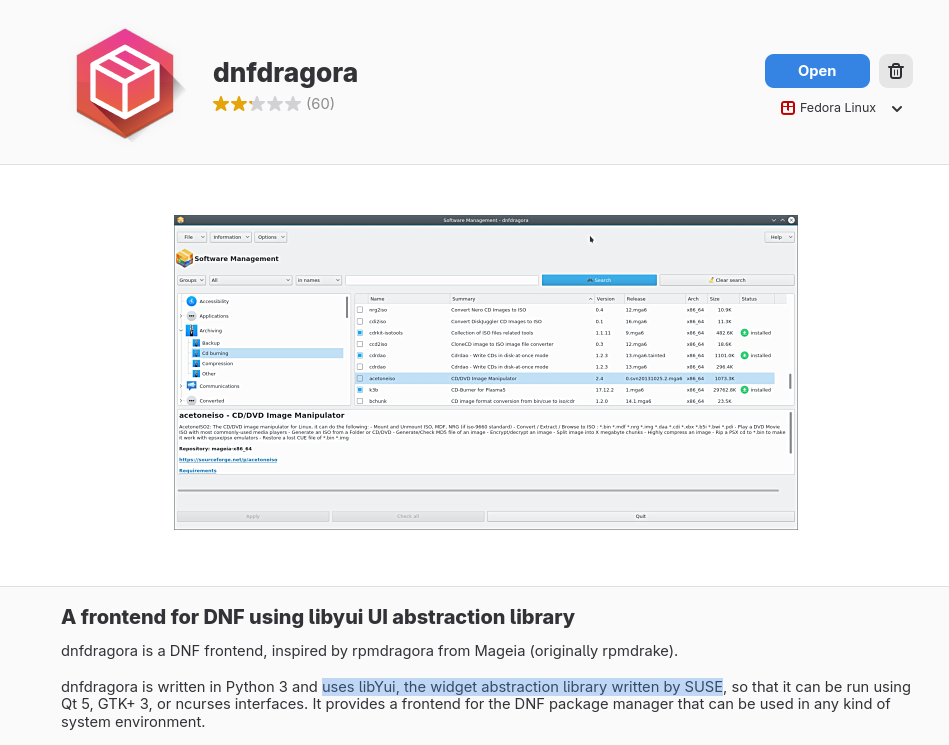
installation of dndragora

For the sake of completeness, this does need mentioning. However, I would probably argue that in this case the command line is quicker and more intuitive:
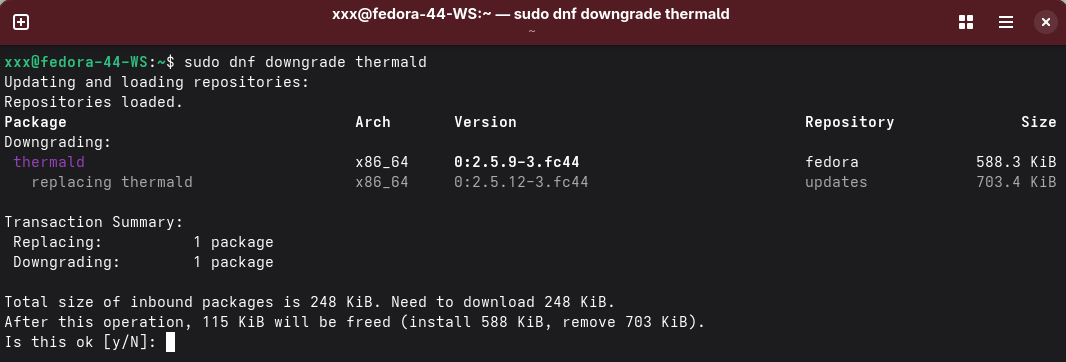
Downgrades work on a simple temporary basis only, so there is no need to re-instate anything at a later stage. When the next batch of updates are available, hopefully with a fix, the package and its associated files become automatically re-upgraded.

Conclusion

This article hopefully updates us to the start of H2 2026.

Should Red Hat support Fedora Linux putting their support behind btrfs-assistant and should we have snapper and snapshots already setup on new installations?

I think the answer to that is yes, and that this is probably going to be happening. But for exactly how and when, we will have to wait to see.

Further improvements will always be in the pipeline.

Posted on Leave a comment

Make use of Btrfs snapshots to upgrade Fedora Linux with easy fallback

Back in 2018, a previous article demonstrated how to use LVM to clone the root filesystem before upgrading Fedora Linux so as to have a fallback in the unlikely event that something goes wrong. Today, the default Fedora Workstation install uses Btrfs. Now you can use a Btrfs snapshot to make creating a bootable fallback much easier. Note that converting or migrating a system to Btrfs from another filesystem is outside the scope of this article.

Check that root filesystem is Btrfs

This example uses a Pinebook aarch64 laptop. Before proceeding, first make sure that Btrfs is being used for the root (system) filesystem. Not every spin or image uses Btrfs by default.

$ df -T
Filesystem Type 1K-blocks Used Available Use% Mounted on
devtmpfs devtmpfs 4096 0 4096 0% /dev
tmpfs tmpfs 998992 0 998992 0% /dev/shm
tmpfs tmpfs 399600 6360 393240 2% /run
/dev/mmcblk2p3 btrfs 56929280 39796116 15058348 73% /
tmpfs tmpfs 998996 24 998972 1% /tmp
tmpfs tmpfs 5242880 0 5242880 0% /var/lib/mock
/dev/mmcblk2p3 btrfs 56929280 39796116 15058348 73% /f34
/dev/mmcblk2p3 btrfs 56929280 39796116 15058348 73% /home
/dev/mmcblk2p2 ext4 996780 551888 376080 60% /boot
/dev/mmcblk2p1 vfat 194348 31648 162700 17% /boot/efi
tmpfs tmpfs 199796 100 199696 1% /run/user/1000
tmpfs tmpfs 199796 84 199712 1% /run/user/0

List the existing Btrfs subvolumes

The above example output shows that the file system mounted on “root” (“/”) is type Btrfs. Notice that three mountpoints show the same backing device and the same Used and Available blocks. This is because they are parts (subvolumes) mounted from a single Btrfs filesystem. The /f34 subvolume is my bootable snapshot from last year.

A default Fedora Btrfs install creates one Btrfs filesystem with two subvolumes — root and home — mounted on / and /home respectively. Let’s see what other subvolumes I’ve added:

$ sudo btrfs subvol list /
ID 272 gen 110428 top level 5 path root
ID 273 gen 110426 top level 5 path home
ID 300 gen 109923 top level 5 path f34
ID 301 gen 95852 top level 5 path home.22Jul26
ID 302 gen 95854 top level 5 path f36.22Jul26

There is an f34 subvol from the last system-upgrade and two readonly snapshots of home and f36. The easiest way to add and delete snapshots is to mount the Btrfs root. I will update the system and create a new snapshot of the current f36 root subvolume. If you have renamed your root subvolume, then you presumably know enough to adjust the following example accordingly for your system.

Create the Btrfs fallback snapshot

$ sudo dnf update --refresh
... lots of stuff updated (reboot if kernel updated)
$ sudo mkdir -p /mnt/root
$ sudo mount /dev/mmcblk2p3 /mnt/root
$ cd /mnt/root
$ ls
f34 f36.22Jul26 home home.22Jul26 root
$ sudo btrfs subvol snapshot root f36
Create a snapshot of 'root' in './f36'

Because Btrfs snapshots are filesystem based, it is not necessary to “sync” before the snapshot, as I recommended for LVM. To boot from the new subvol as a fallback, you will need to edit /mnt/root/f36/etc/fstab with your favorite editor. If you are a beginner, nano is a dirt simple text editor with minimal features. Here are some lines from my fstab file:

LABEL=PINE / btrfs subvol=root,compress=zstd:1 1 1
UUID=e31667fb-5b6f-48d9-aa90-f2fd6aa5f005 /boot ext4 defaults 1 2
UUID=75DB-5832 /boot/efi vfat umask=0077,shortname=winnt 0 2
LABEL=PINE /home btrfs subvol=home,compress=zstd:1 1 1
LABEL=SWAP swap swap	discard=once	0 0

Change subvol=root to subvol=f36. This change is to the file in the snapshot, not your production fstab. You can compare them with diff /etc/fstab /mnt/root/f36/etc/fstab. In my case, I also deleted my f34 snapshot from last year with sudo btrfs subvol delete f34.

Test the Btrfs fallback snapshot

Now you are ready to test the fallback. You could use grubby or edit an entry in /boot/loader/entries to change subvol=root to subvol=f36. But in the interest of safety for beginners, I will have you edit the GRUB entry at boot time instead. Checkout this article on GRUB for tips on getting to the GRUB menu. Once you are there, press the e key to edit the default kernel entry. Don’t worry — your changes are in volatile memory only. If you mess up, reboot to start over. Just like with fstab, find subvol=root and change it to subvol=f36. Press F10 or Ctrl+X to boot your modified entry. With these changes, the system should boot into your new snapshot. Look at /etc/fstab to make sure you are booting from the right subvol, or enter mount | grep subvol to see what subvolume is mounted on “/”.

Do the Fedora Linux system upgrade

If your fallback is working, reboot back to your normal root filesystem (and confirm as above). Then proceed with the standard system-upgrade outlined on the wiki page. TIP: Before running dnf system-upgrade reboot, make another snapshot of root. Call it something like root.dl. That way, you don’t have to download five gigabytes of packages again should you discover that there wasn’t enough free space. The snapshot will not take up any additional space because all but the downloaded packages are shared with root and f36. About that sharing of disk blocks …

dnf system-upgrade gets confused about free space as reported by Btrfs because the f36 files in the root subvolume use the same disk locations as the same files in the f36 subvolume. So removing them from the root subvolume during the upgrade process doesn’t actually free up any space. If you run out of space, and you reboot — the graphical user interface (GUI) won’t start. Use Ctrl+Alt+F2 to login on a text console and practice your command line interface skills. Figuring out what to remove to free up space or how to expand the root filesystem is beyond the scope of this article (mine is often on an LVM volume and can be expanded). Having more than 50% free for the upgrade is a safe bet.

Recovery

Should something go wrong, you can reboot and edit the GRUB entry to boot the fallback. If you are a beginner, you’ll want some hand holding if you do end up needing to change the GRUB entry on disk (so you don’t have to edit at each boot). It is straight forward to delete or rename the broken root subvol. Snapshot the f36 subvol (or the root.dl snapshot) to try the system-upgrade process again. Here is an example of starting over after booting into the fallback system on subvol f36:

$ mount | grep subvol
$ sudo mount /dev/mmcblk2p3 /mnt/root
$ cd /mnt/root
$ sudo mv root root.failed
$ sudo btrfs subvol snapshot f36 root
Create a snapshot of 'f36' in './root' Don't forget to edit /mnt/root/root/etc/fstab to change the subvol mounted on "/" to "root".

As it turns out, the new kernel-6.2.11 for f38 did not boot on my Pinebook after the system-upgrade! (Don’t worry, ARM is an alternative CPU architecture for Fedora Linux — this is very unlikely to happen to you on a mainstream device.) I was indeed able to boot back to f36 by editing the GRUB entry for kernel-6.2.10 at boot time as described above. I am now using f38 again — but with kernel-6.2.10 from f36.

Update: kernel-6.2.12 is out and it works on the Pinebook.

Expiration

As you update the f38 system, it will eventually want to delete the last f36 kernel from /boot. That is normally not a problem, as by that time you have settled into f38, and the f36 snapshot is just an archive. If you want to keep your fork (f36 snapshot) bootable indefinitely, you should preserve a working f36 kernel under /boot. The simplest way to do so is to set installonly_limit=0 in /etc/dnf/dnf.conf and manually remove old kernels. It is simple and safe (but annoying).

Outline of a more complex solution (not for beginners): Run find /boot -name "*fc36*" to list all the kernel and GRUB files for your f36 subvolume snapshot that are under /boot (which is not in the snapshot). Copy them to a backup location (I would mount the f36 subvolume and copy to a backup directory there). While booted from f38, for each f36 kernel version, use dnf to remove that specific kernel version (for example, dnf remove kernel-core-5.19.11-200.fc36). Do not remove the f38 kernels! Now restore the f36 kernels you saved to /boot. The f38 system doesn’t know about f36 kernels anymore, and it will not remove them from /boot.

The problem with that method is the danger of accidentally removing the running f38 kernel. If anyone has a better method, let me know in the comments.

Future directions

Those comfortable with modifying GRUB entries might consider creating a snapshot subvolume named f38, modifying the current GRUB entry to boot into that, rebooting, and running the system-upgrade in that subvolume. Then always name the subvol for the root filesystem after the Fedora Linux release it contains. I did not do that for this article for two reasons.

  1. Naming the current active subvolume root matches the Fedora Linux default.
  2. Sticking with root for the current subvol does not require any permanent changes outside of the normal system-upgrade procedure.

As this article has demonstrated, readonly snapsnots are useful as local restore points in case things go wrong when making significant system changes (such as a system release upgrade). These snapshots can also be sent to a remote backup using Btrfs’ send subcommand. (And if the remote backup device already contains previous backups, Btrfs can do an incremental send that only transmits changed files to save time and space.) If you intend to archive these snapshots long term, the key to not getting confused about which ones are which and what order to restore them is to use a consistent naming convention. See the article on Btrfs snapshots for backup for more information about using Btrfs’ send command to create backups.

Posted on Leave a comment

Working with Btrfs – Compression

This article will explore transparent filesystem compression in Btrfs and how it can help with saving storage space. This is part of a series that takes a closer look at Btrfs, the default filesystem for Fedora Workstation, and Fedora Silverblue since Fedora Linux 33.

In case you missed it, here’s the previous article from this series: https://fedoramagazine.org/working-with-btrfs-snapshots

Introduction

Most of us have probably experienced running out of storage space already. Maybe you want to download a large file from the internet, or you need to quickly copy over some pictures from your phone, and the operation suddenly fails. While storage space is steadily becoming cheaper, an increasing number of devices are either manufactured with a fixed amount of storage or are difficult to extend by end-users.

But what can you do when storage space is scarce? Maybe you will resort to cloud storage, or you find some means of external storage to carry around with you.

In this article I’ll investigate another solution to this problem: transparent filesystem compression, a feature built into Btrfs. Ideally, this will solve your storage problems while requiring hardly any modification to your system at all! Let’s see how.

Transparent compression explained

First, let’s investigate what transparent compression means. You can compress files with compression algorithms such as gzip, xz, or bzip2. This is usually an explicit operation: You take a compression utility and let it operate on your file. While this provides space savings, depending on the file content, it has a major drawback: When you want to access the file to read or modify it, you have to decompress it first.

This is not only a tedious process, but also temporarily defeats the space savings you had achieved previously. Moreover, you end up (de)compressing parts of the file that you didn’t intend to touch in the first place. Clearly there is something better than that!

Transparent compression on the other hand takes place at the filesystem level. Here, compressed files still look like regular uncompressed files to the user. However, they are stored with compression applied on disk. This works because the filesystem selectively decompresses only the parts of a file that you access and makes sure to compress them again as it writes changes to disk.

The compression here is transparent in that it isn’t noticeable to the user, except possibly for a small increase in CPU load during file access. Hence, you can apply this to existing systems without performing hardware modifications or resorting to cloud storage.

Comparing compression algorithms

Btrfs offers multiple compression algorithms to choose from. For technical reasons it cannot use arbitrary compression programs. It currently supports:

  • zstd
  • lzo
  • zlib

The good news is that, due to how transparent compression works, you don’t have to install these programs for Btrfs to use them. In the following paragraphs, you will see how to run a simple benchmark to compare the individual compression algorithms. In order to perform the benchmark, however, you must install the necessary executables. There’s no need to keep them installed afterwards, so you’ll use a podman container to make sure you don’t leave any traces in your system.

Because typing the same commands over and over is a tedious task, I have prepared a ready-to-run bash script that is hosted on Gitlab (https://gitlab.com/hartang/btrfs-compression-test). This will run a single compression and decompression with each of the above-mentioned algorithms at varying compression levels.

First, download the script:

$ curl -LO https://gitlab.com/hartang/btrfs-compression-test/-/raw/main/btrfs_compression_test.sh

Next, spin up a Fedora Linux container that mounts your current working directory so you can exchange files with the host and run the script in there:

$ podman run --rm -it --security-opt label=disable -v "$PWD:$PWD" \ -w "$PWD" registry.fedoraproject.org/fedora:37

Finally run the script with:

$ chmod +x ./btrfs_compression_test.sh
$ ./btrfs_compression_test.sh

The output on my machine looks like this:

[INFO] Using file 'glibc-2.36.tar' as compression target
[INFO] Target file 'glibc-2.36.tar' not found, downloading now...
################################################################### 100.0%
[ OK ] Download successful!
[INFO] Copying 'glibc-2.36.tar' to '/tmp/tmp.vNBWYg1Vol/' for benchmark...
[INFO] Installing required utilities
[INFO] Testing compression for 'zlib' Level | Time (compress) | Compression Ratio | Time (decompress)
-------+-----------------+-------------------+------------------- 1 | 0.322 s | 18.324 % | 0.659 s 2 | 0.342 s | 17.738 % | 0.635 s 3 | 0.473 s | 17.181 % | 0.647 s 4 | 0.505 s | 16.101 % | 0.607 s 5 | 0.640 s | 15.270 % | 0.590 s 6 | 0.958 s | 14.858 % | 0.577 s 7 | 1.198 s | 14.716 % | 0.561 s 8 | 2.577 s | 14.619 % | 0.571 s 9 | 3.114 s | 14.605 % | 0.570 s [INFO] Testing compression for 'zstd' Level | Time (compress) | Compression Ratio | Time (decompress)
-------+-----------------+-------------------+------------------- 1 | 0.492 s | 14.831 % | 0.313 s 2 | 0.607 s | 14.008 % | 0.341 s 3 | 0.709 s | 13.195 % | 0.318 s 4 | 0.683 s | 13.108 % | 0.306 s 5 | 1.300 s | 11.825 % | 0.292 s 6 | 1.824 s | 11.298 % | 0.286 s 7 | 2.215 s | 11.052 % | 0.284 s 8 | 2.834 s | 10.619 % | 0.294 s 9 | 3.079 s | 10.408 % | 0.272 s 10 | 4.355 s | 10.254 % | 0.282 s 11 | 6.161 s | 10.167 % | 0.283 s 12 | 6.670 s | 10.165 % | 0.304 s 13 | 12.471 s | 10.183 % | 0.279 s 14 | 15.619 s | 10.075 % | 0.267 s 15 | 21.387 s | 9.989 % | 0.270 s [INFO] Testing compression for 'lzo' Level | Time (compress) | Compression Ratio | Time (decompress)
-------+-----------------+-------------------+------------------- 1 | 0.447 s | 25.677 % | 0.438 s 2 | 0.448 s | 25.582 % | 0.438 s 3 | 0.444 s | 25.582 % | 0.441 s 4 | 0.444 s | 25.582 % | 0.444 s 5 | 0.445 s | 25.582 % | 0.453 s 6 | 0.438 s | 25.582 % | 0.444 s 7 | 8.990 s | 18.666 % | 0.410 s 8 | 34.233 s | 18.463 % | 0.405 s 9 | 41.328 s | 18.450 % | 0.426 s [INFO] Cleaning up...
[ OK ] Benchmark complete!

It is important to note a few things before making decisions based on the numbers from the script:

  • Not all files compress equally well. Modern multimedia formats such as images or movies compress their contents already and don’t compress well beyond that.
  • The script performs each compression and decompression exactly once. Running it repeatedly on the same input file will generate slightly different outputs. Hence, the times should be understood as estimates, rather than an exact measurement.

Given the numbers in my output, I decided to use the zstd compression algorithm with compression level 3 on my systems. Depending on your needs, you may want to choose higher compression levels (for example, if your storage devices are comparatively slow). To get an estimate of the achievable read/write speeds, you can divide the source archives size (about 260 MB) by the (de)compression times.

The compression test works on the GNU libc 2.36 source code by default. If you want to see the results for a custom file, you can give the script a file path as the first argument. Keep in mind that the file must be accessible from inside the container.

Feel free to read the script code and modify it to your liking if you want to test a few other things or perform a more detailed benchmark!

Configuring compression in Btrfs

Transparent filesystem compression in Btrfs is configurable in a number of ways:

  • As mount option when mounting the filesystem (applies to all subvolumes of the same Btrfs filesystem)
  • With Btrfs file properties
  • During btrfs filesystem defrag (not permanent, not shown here)
  • With the chattr file attribute interface (not shown here)

I’ll only take a look at the first two of these.

Enabling compression at mount-time

There is a Btrfs mount option that enables file compression:

$ sudo mount -o compress=<ALGORITHM>:<LEVEL> ...

For example, to mount a filesystem and compress it with the zstd algorithm on level 3, you would write:

$ sudo mount -o compress=zstd:3 ...

Setting the compression level is optional. It is important to note that the compress mount option applies to the whole Btrfs filesystem and all of its subvolumes. Additionally, it is the only currently supported way of specifying the compression level to use.

In order to apply compression to the root filesystem, it must be specified in /etc/fstab. The Fedora Linux Installer, for example, enables zstd compression on level 1 by default, which looks like this in /etc/fstab:

$ cat /etc/fstab
[ ... ]
UUID=47b03671-39f1-43a7-b0a7-db733bfb47ff / btrfs subvol=root,compress=zstd:1,[ ... ] 0 0

Enabling compression per-file

Another way of specifying compressions is via Btrfs filesystem properties. To read the compression setting for any file, folder or subvolume, use the following command:

$ btrfs property get <PATH> compression

Likewise, you can configure compression like this:

$ sudo btrfs property set <PATH> compression <VALUE>

For example, to enable zlib compression for all files under /etc:

$ sudo btrfs property set /etc compression zlib

You can get a list of supported values with man btrfs-property. Keep in mind that this interface doesn’t allow specifying the compression level. In addition, if a compression property is set, it overrides other compression configured at mount time.

Compressing existing files

At this point, if you apply compression to your existing filesystem and check the space usage with df or similar commands, you will notice that nothing has changed. That is because Btrfs, by itself, doesn’t “recompress” all your existing files. Compression will only take place when writing new data to disk. There are a few ways to perform an explicit recompression:

  1. Wait and do nothing: As files are modified and written back to disk, Btrfs compresses the newly written file contents as configured. At some point, if we wait long enough, an increasing part of our files are rewritten and, hence, compressed.
  2. Move files to a different filesystem and back again: Depending on which files you want to apply compression to, this can become a rather tedious operation.
  3. Perform a Btrfs defragmetation

The last option is probably the most convenient, but it comes with a caveat on Btrfs filesystems that already contain snapshots: it will break shared extent between snapshots. In other words, all the shared content between two snapshots, or a snapshot and its’ parent subvolume, will be present multiple times after a defrag operation.

Hence, if you already have a lot of snapshots on your filesystem, you shouldn’t run a defragmentation on the whole filesystem. This isn’t necessary either, since with Btrfs you can defragment specific directories or even single files, if you wish to do so.

You can use the following command to perform a defragmentation:

$ sudo btrfs filesystem defragment -r /path/to/defragment

For example, you can defragment your home directory like this:

$ sudo btrfs filesystem defragment -r "$HOME"

In case of doubt it’s a good idea to start with defragmenting individual large files and continuing with increasingly large directories while monitoring free space on the file system.

Measuring filesystem compression

At some point, you may wonder just how much space you have saved thanks to file system compression. But how do you tell? First, to tell if a Btrfs filesystem is mounted with compression applied, you can use the following command:

$ findmnt -vno OPTIONS /path/to/mountpoint | grep compress

If you get a result, the filesystem at the given mount point is using compression! Next, the command compsize can tell you how much space your files need:

$ sudo compsize -x /path/to/examine

On my home directory, the result looks like this:

$ sudo compsize -x "$HOME"
Processed 942853 files, 550658 regular extents (799985 refs), 462779 inline.
Type Perc Disk Usage Uncompressed Referenced
TOTAL 81% 74G 91G 111G
none 100% 67G 67G 77G
zstd 28% 6.6G 23G 33G

The individual lines tell you the “Type” of compression applied to files. The “TOTAL” is the sum of all the lines below it. The columns, on the other hand, tell you how much space our files need:

  • “Disk Usage” is the actual amount of storage allocated on the hard drive,
  • “Uncompressed” is the amount of storage the files would need without compression applied,
  • “Referenced” is the total size of all uncompressed files added up.

“Referenced” can differ from the numbers in “Uncompressed” if, for example, one has deduplicated files previously, or if there are snapshots that share extents. In the example above, you can see that 91 GB worth of uncompressed files occupy only 74 GB of storage on my disk! Depending on the type of files stored in a directory and the compression level applied, these numbers can vary significantly.

Additional notes about file compression

Btrfs uses a heuristic algorithm to detect compressed files. This is done because compressed files usually do not compress well, so there is no point in wasting CPU cycles in attempting further compression. To this end, Btrfs measures the compression ratio when compressing data before writing it to disk. If the first portions of a file compress poorly, the file is marked as incompressible and no further compression takes place.

If, for some reason, you want Btrfs to compress all data it writes, you can mount a Btrfs filesystem with the compress-force option, like this:

$ sudo mount -o compress-force=zstd:3 ...

When configured like this, Btrfs will compress all data it writes to disk with the zstd algorithm at compression level 3.

An important thing to note is that a Btrfs filesystem with a lot of data and compression enabled may take a few seconds longer to mount than without compression applied. This has technical reasons and is normal behavior which doesn’t influence filesystem operation.

Conclusion

This article detailed transparent filesystem compression in Btrfs. It is a built-in, comparatively cheap, way to get some extra storage space out of existing hardware without needing modifications.

The next articles in this series will deal with:

  • Qgroups – Limiting your filesystem size
  • RAID – Replace your mdadm configuration

If there are other topics related to Btrfs that you want to know more about, have a look at the Btrfs Wiki [1] and Docs [2]. Don’t forget to check out the first three articles of this series, if you haven’t already! If you feel that there is something missing from this article series, let me know in the comments below. See you in the next article!

Sources

[1]: https://btrfs.wiki.kernel.org/index.php/Main_Page
[2]: https://btrfs.readthedocs.io/en/latest/Introduction.html

Posted on Leave a comment

Choose between Btrfs and LVM-ext4

Fedora 33 introduced a new default filesystem in desktop variants, Btrfs. After years of Fedora using ext4 on top of Logical Volume Manager (LVM) volumes, this is a big shift. Changing the default file system requires compelling reasons. While Btrfs is an exciting next-generation file system, ext4 on LVM is well established and stable. This guide aims to explore the high-level features of each and make it easier to choose between Btrfs and LVM-ext4.

In summary

The simplest advice is to stick with the defaults. A fresh Fedora 33 install defaults to Btrfs and upgrading a previous Fedora release continues to use whatever was initially installed, typically LVM-ext4. For an existing Fedora user, the cleanest way to get Btrfs is with a fresh install. However, a fresh install is much more disruptive than a simple upgrade. Unless there is a specific need, this disruption could be unnecessary. The Fedora development team carefully considered both defaults, so be confident with either choice.

What about all the other file systems?

There are a large number of file systems for Linux systems. The number explodes after adding in combinations of volume managers, encryption methods, and storage mechanisms . So why focus on Btrfs and LVM-ext4? For the Fedora audience these two setups are likely to be the most common. Ext4 on top of LVM became the default disk layout in Fedora 11, and ext3 on top of LVM came before that.

Now that Btrfs is the default for Fedora 33, the vast majority of existing users will be looking at whether they should stay where they are or make the jump forward. Faced with a fresh Fedora 33 install, experienced Linux users may wonder whether to use this new file system or fall back to what they are familiar with. So out of the wide field of possible storage options, many Fedora users will wonder how to choose between Btrfs and LVM-ext4.

Commonalities

Despite core differences between the two setups, Btrfs and LVM-ext4 actually have a lot in common. Both are mature and well-tested storage technologies. LVM has been in continuous use since the early days of Fedora Core and ext4 became the default in 2009 with Fedora 11. Btrfs merged into the mainline Linux kernel in 2009 and Facebook uses it widely. SUSE Linux Enterprise 12 made it the default in 2014. So there is plenty of production run time there as well.

Both systems do a great job preventing file system corruption due to unexpected power outages, even though the way they accomplish it is different. Supported configurations include single drive setups as well as spanning multiple devices, and both are capable of creating nearly instant snapshots. A variety of tools exist to help manage either system, both with the command line and graphical interfaces. Either solution works equally well on home desktops and on high-end servers.

Advantages of LVM-ext4

Show the relationship of LVM-ext4 filesystem to hard-drive partitions and mounted directories.
Structure of ext4 on LVM

The ext4 file system focuses on high-performance and scalability, without a lot of extra frills. It is effective at preventing fragmentation over extended periods of time and provides nice tools for when it does happen. Ext4 is rock solid because it built on the previous ext3 file system, bringing with it all the years of in-system testing and bug fixes.

Most of the advanced capabilities in the LVM-ext4 setup come from LVM itself. LVM sits “below” the file system, which means it supports any file system. Logical volumes (LV) are generic block devices so virtual machines can use them directly. This flexibility allows each logical volume to use the right file system, with the right options, for a variety of situations. This layered approach also honors the Unix philosophy of small tools working together.

The volume group (VG) abstraction from the hardware allows LVM to create flexible logical volumes. Each LV pulls from the same storage pool but has its own configuration. Resizing volumes is a lot easier than resizing physical partitions as there are no limitation of ordered placement of the data. LVM physical volumes (PV) can be any number of partitions and can even move between devices while the system is running.

LVM supports read-only and read-write snapshots, which make it easy to create consistent backups from active systems. Each snapshot has a defined size, and a change to the source or snapshot volume use space from there. Alternately, logical volumes can also be part of a thinly provisioned pool. This allows snapshots to automatically use data from a pool instead of consuming fixed sized chunks defined at volume creation.

Multiple devices with LVM

LVM really shines when there are multiple devices. It has native support for most RAID levels and each logical volume can have a different RAID level. LVM will automatically choose appropriate physical devices for the RAID configuration or the user can specify it directly. Basic RAID support includes data striping for performance (RAID0) and mirroring for redundancy (RAID1). Logical volumes can also use advanced setups like RAID5, RAID6, and RAID10. LVM RAID support is mature because under the hood LVM uses the same device-mapper (dm) and multiple-device (md) kernel support used by mdadm.

Logical volumes can also be cached volumes for systems with both fast and slow drives. A classic example is a combination of SSD and spinning-disk drives. Cached volumes use faster drives for more frequently accessed data (or as a write cache), and the slower drive for bulk data.

The large number of stable features in LVM and the reliable performance of ext4 are a testament to how long they have been in use. Of course, with more features comes complexity. It can be challenging to find the right options for the right feature when configuring LVM. For single drive desktop systems, features of LVM like RAID and cache volumes don’t apply. However, logical volumes are more flexible than physical partitions and snapshots are useful. For normal desktop use, the complexity of LVM can also be a barrier to recovering from issues a typical user might encounter.

Advantages of Btrfs

Show the relationship of Btrfs filesystem to hard-drive partitions and mounted directories.
Btrfs Structure

Lessons learned from previous generations guided the features built into Btrfs. Unlike ext4, it can directly span multiple devices, so it brings along features typically found only in volume managers. It also has features that are unique in the Linux file system space (ZFS has a similar feature set, but don’t expect it in the Linux kernel).

Key Btrfs features

Perhaps the most important feature is the checksumming of all data. Checksumming, along with copy-on-write, provides the key method of ensuring file system integrity after unexpected power loss. More uniquely, checksumming can detect errors in the data itself. Silent data corruption, sometimes referred to as bitrot, is more common that most people realize. Without active validation, corruption can end up propagating to all available backups. This leaves the user with no valid copies. By transparently checksumming all data, Btrfs is able to immediately detect any such corruption. Enabling the right dup or raid option allows the file system to transparently fix the corruption as well.

Copy-on-write (COW) is also a fundamental feature of Btrfs, as it is critical in providing file system integrity and instant subvolume snapshots. Snapshots automatically share underlying data when created from common subvolumes. Additionally, after-the-fact deduplication uses the same technology to eliminate identical data blocks. Individual files can use COW features by calling cp with the reflink option. Reflink copies are especially useful for copying large files, such as virtual machine images, that tend to have mostly identical data over time.

Btrfs supports spanning multiple devices with no volume manager required. Multiple device support unlocks data mirroring for redundancy and striping for performance. There is also experimental support for more advanced RAID levels, such as RAID5 and RAID6. Unlike standard RAID setups, the Btrfs raid1 option actually allows an odd number of devices. For example, it can use 3 devices, even if they are are different sizes.

All RAID and dup options are specified at the file system level. As a consequence, individual subvolumes cannot use different options. Note that using the RAID1 option with multiple devices means that all data in the volume is available even if one device fails and the checksum feature maintains the integrity of the data itself. That is beyond what current typical RAID setups can provide.

Additional features

Btrfs also enables quick and easy remote backups. Subvolume snapshots can be sent to a remote system for storage. By leveraging the inherent COW meta-data in the file system, these transfers are efficient by only sending incremental changes from previously sent snapshots. User applications such as snapper make it easy to manage these snapshots.

Additionally, a Btrfs volume can have transparent compression and chattr +c will mark individual files or directories for compression. Not only does compression reduce the space consumed by data, but it helps extend the life of SSDs by reducing the volume of write operations. Compression certainly introduces additional CPU overhead, but a lot of options are available to dial in the right trade-offs.

The integration of file system and volume manager functions by Btrfs means that overall maintenance is simpler than LVM-ext4. Certainly this integration comes with less flexibility, but for most desktop, and even server, setups it is more than sufficient.

Btrfs on LVM

Btrfs can convert an ext3/ext4 file system in place. In-place conversion means no data to copy out and then back in. The data blocks themselves are not even modified. As a result, one option for an existing LVM-ext4 systems is to leave LVM in place and simply convert ext4 over to Btrfs. While doable and supported, there are reasons why this isn’t the best option.

Some of the appeal of Btrfs is the easier management that comes with a file system integrated with a volume manager. By running on top of LVM, there is still some other volume manager in play for any system maintenance. Also, LVM setups typically have multiple fixed sized logical volumes with independent file systems. While Btrfs supports multiple volumes in a given computer, many of the nice features expect a single volume with multiple subvolumes. The user is still stuck manually managing fixed sized LVM volumes if each one has an independent Btrfs volume. Though, the ability to shrink mounted Btrfs filesystems does make working with fixed sized volumes less painful. With online shrink there is no need to boot a live image.

The physical locations of logical volumes must be carefully considered when using the multiple device support of Btrfs. To Btrfs, each LV is a separate physical device and if that is not actually the case, then certain data availability features might make the wrong decision. For example, using raid1 for data typically provides protection if a single drive fails. If the actual logical volumes are on the same physical device, then there is no redundancy.

If there is a strong need for some particular LVM feature, such as raw block devices or cached logical volumes, then running Btrfs on top of LVM makes sense. In this configuration, Btrfs still provides most of its advantages such as checksumming and easy sending of incremental snapshots. While LVM has some operational overhead when used, it is no more so with Btrfs than with any other file system.

Wrap up

When trying to choose between Btrfs and LVM-ext4 there is no single right answer. Each user has unique requirements, and the same user may have different systems with different needs. Take a look at the feature set of each configuration, and decide if there is something compelling about one over the other. If not, there is nothing wrong with sticking with the defaults. There are excellent reasons to choose either setup.

Posted on Leave a comment

Recover your files from Btrfs snapshots

As you have seen in a previous article, Btrfs snapshots are a convenient and fast way to make backups. Please note that these articles do not suggest that you avoid backup software or well-tested backup plans. Their goals are to show a great feature of this file system, snapshots, and to inspire curiosity and invite you to explore, experiment and deepen the subject. Read on for more about how to recover your files from Btrfs snapshots.

A subvolume for your project

Let’s assume that you want to save the documents related to a project inside the directory $HOME/Documents/myproject.

As you have seen, a Btrfs subvolume, as well as a snapshot, looks like a normal directory. Why not use a Btrfs subvolume for your project, in order to take advantage of snapshots? To create the subvolume, use this command:

btrfs subvolume create $HOME/Documents/myproject

You can create an hidden directory where to arrange your snapshots:

mkdir $HOME/.snapshots

As you can see, in this case there’s no need to use sudo. However, sudo is still needed to list the subvolumes, and to use the send and receive commands.

Now you can start writing your documents. Each day (or each hour, or even minute) you can take a snapshot just before you start to work:

btrfs subvolume snapshot -r $HOME/Documents/myproject $HOME/.snapshots/myproject-day1

For better security and consistency, and if you need to send the snapshot to an external drive as shown in the previous article, remember that the snapshot must be read only, using the -r flag.

Note that in this case, a snapshot of the /home subvolume will not snapshot the $HOME/Documents/myproject subvolume.

How to recover a file or a directory

In this example let’s assume a classic error: you deleted a file by mistake. You can recover it from the most recent snapshot, or recover an older version of the file from an older snapshot. Do you remember that a snapshot appears like a regular directory? You can simply use the cp command to restore the deleted file:

cp $HOME/.snapshots/myproject-day1/filename.odt $HOME/Documents/myproject

Or restore an entire directory:

cp -r $HOME/.snapshots/myproject-day1/directory $HOME/Documents/myproject

What if you delete the entire $HOME/Documents/myproject directory (actually, the subvolume)? You can recreate the subvolume as seen before, and again, you can simply use the cp command to restore the entire content from the snapshot:

btrfs subvolume create $HOME/Documents/myproject
cp -rT $HOME/.snapshots/myproject-day1 $HOME/Documents/myproject

Or you could restore the subvolume by using the btrfs snapshot command (yes, a snapshot of a snapshot):

btrfs subvolume snapshot $HOME/.snapshots/myproject-day1 $HOME/Documents/myproject

How to recover btrfs snapshots from an external drive

You can use the cp command even if the snapshot resides on an external drive. For instance:

cp /run/media/user/mydisk/bk/myproject-day1/filename.odt $HOME/Documents/myproject

You can restore an entire snapshot as well. In this case, since you will use the send and receive commands, you must use sudo. In addition, consider that the restored subvolume will be created as read only. Therefore you need to also set the read only property to false:

sudo btrfs send /run/media/user/mydisk/bk/myproject-day1 | sudo btrfs receive $HOME/Documents/
mv Documents/myproject-day1 Documents/myproject
btrfs property set Documents/myproject ro false

Here’s an extra explanation. The command btrfs subvolume snapshot will create an exact copy of a subvolume in the same device. The destination has to reside in the same btrfs device. You can’t use another device as the destination of the snapshot. In that case you need to take a snapshot and use the send and receive commands.

For more information, refer to some of the online documentation:

man btrfs-subvolume
man btrfs-send
man btrfs-receive
Posted on Leave a comment

Incremental backups with Btrfs snapshots

Snapshots are an interesting feature of Btrfs. A snapshot is a copy of a subvolume. Taking a snapshot is immediate. However, taking a snapshot is not like performing a rsync or a cp, and a snapshot doesn’t occupy space as soon as it is created.

Editors note: From the BTRFS Wiki – A snapshot is simply a subvolume that shares its data (and metadata) with some other subvolume, using Btrfs’s COW capabilities.

Occupied space will increase alongside the data changes in the original subvolume or in the snapshot itself, if it is writeable. Added/modified files, and deleted files in the subvolume still reside in the snapshots. This is a convenient way to perform backups.

Using snapshots for backups

A snapshot resides on the same disk where the subvolume is located. You can browse it like a regular directory and recover a copy of a file as it was when the snapshot was performed. By the way, a snapshot on the same disk of the snapshotted subvolume is not an ideal backup strategy: if the hard disk broke, snapshots will be lost as well. An interesting feature of snapshots is the ability to send them to another location. The snapshot can be sent to an external hard drive or to a remote system via SSH (the destination filesystems need to be formatted as Btrfs as well). To do this, the commands btrfs send and btrfs receive are used.

Taking a snapshot

In order to use the send and the receive commands, it is important to create the snapshot as read-only, and snapshots are writeable by default.

The following command will take a snapshot of the /home subvolume. Note the -r flag for readonly.

sudo btrfs subvolume snapshot -r /home /.snapshots/home-day1

Instead of day1, the snapshot name can be the current date, like home-$(date +%Y%m%d). Snapshots look like regular subdirectories. You can place them wherever you like. The directory /.snapshots could be a good choice to keep them neat and to avoid confusion.

Editors note: Snapshots will not take recursive snapshots of themselves. If you create a snapshot of a subvolume, every subvolume or snapshot that the subvolume contains is mapped to an empty directory of the same name inside the snapshot.

Backup using btrfs send

In this example the destination Btrfs volume in the USB drive is mounted as /run/media/user/mydisk/bk . The command to send the snapshot to the destination is:

sudo btrfs send /.snapshots/home-day1 | sudo btrfs receive /run/media/user/mydisk/bk

This is called initial bootstrapping, and it corresponds to a full backup. This task will take some time, depending on the size of the /home directory. Obviously, subsequent incremental sends will take a shorter time.

Incremental backup

Another useful feature of snapshots is the ability to perform the send task in an incremental way. Let’s take another snapshot.

sudo btrfs subvolume snapshot -r /home /.snapshots/home-day2

In order to perform the send task incrementally, you need to specify the previous snapshot as a base and this snapshot has to exist in the source and in the destination. Please note the -p option.

sudo btrfs send -p /.snapshot/home-day1 /.snapshot/home-day2 | sudo btrfs receive /run/media/user/mydisk/bk

And again (the day after):

sudo btrfs subvolume snapshot -r /home /.snapshots/home-day3
sudo btrfs send -p /.snapshot/home-day2 /.snapshot/home-day3 | sudo btrfs receive /run/media/user/mydisk/bk

Cleanup

Once the operation is complete, you can keep the snapshot. But if you perform these operations on a daily basis, you could end up with a lot of them. This could lead to confusion and potentially a lot of used space on your disks. So it is a good advice to delete some snapshots if you think you don’t need them anymore.

Keep in mind that in order to perform an incremental send you need at least the last snapshot. This snapshot must be present in the source and in the destination.

sudo btrfs subvolume delete /.snapshot/home-day1
sudo btrfs subvolume delete /.snapshot/home-day2
sudo btrfs subvolume delete /run/media/user/mydisk/bk/home-day1
sudo btrfs subvolume delete /run/media/user/mydisk/bk/home-day2

Note: the day 3 snapshot was preserved in the source and in the destination. In this way, tomorrow (day 4), you can perform a new incremental btrfs send.

As some final advice, if the USB drive has a bunch of space, you could consider maintaining multiple snapshots in the destination, while in the source disk you would keep only the last one.