Question: Say you have an expression you want to execute using the eval() function. How to store the result of the expression in a Python variable my_result?
Before I show you the solution, let’s quickly recap the eval() function:
Recap Python eval()
Python eval(s) parses the string argument s into a Python expression, runs it, and returns the result of the expression.
Without further ado, let’s learn how you can store the result of the eval() function in a Python variable:
Method 1: Simple Assignment
The most straightforward way to store the result of an eval() expression in a Python variable is to assign the whole return value to the variable. For example, the expression my_result = eval('2+2') stores the result 4 in the variable my_result.
Here’s a minimal example:
my_result = eval('2+2')
print(my_result)
# 4
This simple approach may not always work, for example, if you have a print() statement in the expression.
Read on to learn how to fix this issue next and learn something new!
Method 2: Redirect Standard Output
This method assumes you have a print() statement within the expression passed into the eval() function such as shown in the following three examples:
eval('print(2+2)')
eval('print([1, 2, 3, 4] + [5, 6])')
eval('print(2+2*0)')
To get the output and store it in a variable my_result, you need to temporarily redirect the standard output to the variable.
The following code shows you how to accomplish exactly this:
# Step 1: Import libraries StringIO and sys
from io import StringIO
import sys # Step 2: Keep stdout in temporary variable
tmp = sys.stdout # Step 3: Capture standard output using a StringIO object
my_result = StringIO() # Step 4: Assign Standard Output Stream to StringIO object
sys.stdout = my_result # Step 5: Print to the standard output
expression = 'print(2+2)' # any eval() expression here
eval(expression) # Step 6: Clean up by redirecting stdout to Python shell
sys.stdout = tmp # Step 7: Get and print the string from stdout
print('VARIABLE:', my_result.getvalue())
# hello world
If you need some assistance understanding this whole idea of redirecting the standard output, have a look at our in-depth guide on the Finxter blog.
Note that this approach even works if you don’t have a print() statement in the original eval() expression because you can always artificially add the print() statement around the original expression like so:
Even if it’s a bit clunky, after applying this short trick, you can redirect the standard output and store the result of anyeval() expression in a variable.
Method 3: Use exec()
Using only Python’s eval() function, you cannot define variables inside the expression to be evaluated. However, you can define a variable inside the exec() function that will then be added to the global namespace. Thus, you can access the defined variable in your code after termination of the exec() expression!
Here’s how that works in a minimal example:
exec('my_result = 40 + 2')
print(my_result)
# 42
Variable my_result is only defined in the string expression passed into exec(), but you can use it in the code like it was part of the original source code.
Recap exec() vs eval()
Python’s exec() function takes a Python program, as a string or executable object, and runs it. The eval() function evaluates an expression and returns the result of this expression. There are two main differences:
exec() can execute all Python source code, whereas eval() can only evaluate expressions.
exec() always returns None, whereas eval() returns the result of the evaluated expression.
exec() can import modules, whereas eval() cannot.
You can learn more about the exec() function here:
Coders get paid six figures and more because they can solve problems more effectively using machine intelligence and automation.
To become more successful in coding, solve more real problems for real people. That’s how you polish the skills you really need in practice. After all, what’s the use of learning theory that nobody ever needs?
You build high-value coding skills by working on practical coding projects!
Do you want to stop learning with toy projects and focus on practical code projects that earn you money and solve real problems for people?
If your answer is YES!, consider becoming a Python freelance developer! It’s the best way of approaching the task of improving your Python skills—even if you are a complete beginner.
If you just want to learn about the freelancing opportunity, feel free to watch my free webinar “How to Build Your High-Income Skill Python” and learn how I grew my coding business online and how you can, too—from the comfort of your own home.
Question: How to redirect the standard output in Python and store it as a string in a variable?
This article will guide you through seven easy steps to solve this problem. As an overview, here’s the code in eight lines that stores the standard output in a variable my_result:
from io import StringIO
import sys
tmp = sys.stdout
my_result = StringIO()
sys.stdout = my_result
print('hello world') # output stored in my_result
sys.stdout = tmp
print(result.getvalue())
Let’s go over those steps one by one—we’ll examine the full code for copy&paste at the end of this article, so read on!
Step 1: Import libraries StringIO and sys
Import the two libraries StringIO and sys to access the standard output and store the string input-output stream.
from io import StringIO import sys
Both modules are part of the standard library, so there is no need to install them with pip!
Step 2: Keep stdout in temporary variable
We’ll overwrite the standard output to catch everything written to it. In order to reset your code to the normal state, we need to capture the original standard output stream by introducing a temporary variable.
tmp = sys.stdout
Step 3: Capture standard output using a StringIO object
Create a variable and assign a StringIO object to the variable to capture the standard output stream.
my_result = StringIO()
Now, this object can store everything printed to the standard output. But we have to connect it first to the stdout!
Step 4: Assign Standard Output Stream to StringIO object
Assign the StringIO object created in the previous step to the standard output that is captured with sys.stdout.
sys.stdout = my_result
Step 5: Print to the standard output
From this point onwards, anything that is printed using the print() statement by any function you call in your Python script is written in the StringIO object referred to by variable my_result.
The following exemplifies the print('hello world') statement but you can do anything here:
print('hello world')
Note: No output appears on the screen anymore because the standard output is now redirected to the variable.
Step 6: Clean up by redirecting stdout to Python shell
Are you ready with capturing the output in the variable? Clean up by redirecting the standard output stream from the variable to the screen again.
sys.stdout = tmp
Step 7: Get and print the string from stdout
At this point, your string from the standard output is stored in the StringIO object in the my_result variable. You can access it using the StringIO.getvalue() method.
print(result.getvalue())
Full Code
Here’s the full code snippet for ease of copy&paste:
Challenge: Get the size of the above image with PIL or any other Python library.
Method 1: Using img.size
Approach: To get the size of the image: ➢ open it up by calling the PIL function Image.open('image file path'). ➢ Then use the PIL property image.size on the opened image. This returns a tuple containing the width and height of the image in pixels. ➢ Unpack the tuple in two different variables to store the width and height individually.
Instead of using the img.size property, you can use the img.width and img.height properties to store/display the height and width of the image separately.
Here’s the code that demonstrates how you can use the width and height properties of the PIL library.
TRIVIA: PIL(Python Imaging Library) is a Python library that is used for image processing. It supports numerous image formats which include “jpeg”, “png”, “ppm”, “tiff”, “bmp”, “gif”, etc. It is an extremely useful library that provides a plethora of image editing capabilities like getting the size of an image, cropping an image, etc. The Image module of the PIL library is used to represent the PIL images.
To install the PIL, execute the following command in your terminal: pip install pillow
Method 2: Get Image Size Using Open-CV
Approach: To get the size of an image using OpenCV: ➢ Load the image from the specified path by calling OpenCV function imread('file_path'). ➢ Use the .shape property on this image. This returns a tuple consisting of the height, width in pixels, and the number of channels of the image. ➢ Unpack these values individually in three different variables and display the output accordingly.
pygame 2.1.2 (SDL 2.0.18, Python 3.9.10)
Hello from the pygame community. https://www.pygame.org/contribute.html
width: 640
height: 426
TRIVIA: pygame is a Python wrapper for the SDL library (Simple DirectMedia Layer). SDL allows cross-platform access to the system’s underlying multimedia hardware components, such as video, sound, keyboard, mouse, and joystick. Since both SDL and pygame facilitate us with a cross-platform nature, we can write game programs and create rich multimedia Python programs for almost every platform that is supported by them.
To install pygame, use the following pip command on your terminal: pip install pygame
▣ How to Get Image Size in Bytes?
Previously, we found out the size of the image, that is, the image dimensions (width and height). However, you may also need to find out the file size in bytes to decide how to use the image file. Hence, let us dive into the methods that will help us to find the image size in bytes.
Approach: Call the os.stat() method on the image file and then use the st_size property upon this image to get its size in bytes.
Code:
import os
print(os.stat('image.jpg').st_size) # 48297
◩ Using os.path.getsize
Approach:os.path.getsize() is a method of the os module that is used to get the size of a specified path. Pass the image path to this function to get the size of the image file in bytes.
Code:
import os
print(os.path.getsize('image.jpg')) # 48297
◩ Using PIL
Approach: Call the PIL function Image.open() to open the image and then use the len() method to find its length after reading the image.
Code:
from PIL import Image
img = Image.open('image.jpg')
print("File Size In Bytes:- "+str(len(img.fp.read())))
Bonus: Get the Size of an Image by Loading Image from an URL
The following code demonstrates how you can load an image from an URL and then get its size.
Code:
import requests
from PIL import Image
from io import BytesIO
header = {'User-Agent': 'Mozilla/5.0 (X11; CrOS x86_64 14588.98.0) AppleWebKit/537.36 (KHTML, like Gecko) ' 'Chrome/101.0.4951.59 Safari/537.36'}
res = requests.get("https://blog.finxter.com/wp-content/uploads/2022/05/sample_img.png", headers=header)
# create image from binary content
img = Image.open(BytesIO(res.content))
width, height = img.size
print(f'width:{width}, height:{height}')
Output:
width:867, height:489
Conclusion
We successfully unearthed the answer to numerous questions, including how to use different libraries to find the image size – dimensions as well as the size in bytes. I hope this tutorial helped you. Please subscribe and stay tuned for more interesting tutorials.
One of the most sought-after skills on Fiverr and Upwork is web scraping. Make no mistake: extracting data programmatically from websites is a critical life skill in today’s world that’s shaped by the web and remote work.
So, do you want to master the art of web scraping using Python’s BeautifulSoup?
If the answer is yes – this course will take you from beginner to expert in Web Scraping.
You can change your text to bold, italic, and underlined in Python. Not only can you play around with the style of your code but also change its color with the help of specific packages and modules in Python.
Interesting! Isn’t it?
There are different ways of doing this. By the end of this tutorial, you will be equipped with all the instruments to play around with the style of your code.
Problem Formulation: Given a string. How to print the string as underlined text in Python?
Method 1: Enclosing String in ANSI Escape Sequence ‘\x1B[3m’ and ‘\x1B[0m’
The most straightforward way to print underlined text in Python is to enclose a given string text in the special ANSI escape sequence like so: print("\x1B[4m" + text + "\x1B[0m").
Here’s a minimal example:
# Print Underlined Text
text = "abc"
underlined_text = "\x1B[4m" + text + "\x1B[0m"
print(underlined_text)
print(text)
You can try this yourself in our interactive Jupyter notebook:
Note that this escape sequence will not work in all editors and IDEs. For example, I made it work in Jupyter Notebooks but not in my IDLE shell.
Let’s dive into some further explanations to see why this works next.
Some terminals support the capacity to pass in unique escape sequences to modify the tone, color, and appearance of the content being printed.
These escape sequences are called ANSI escape sequences that got named after the ANSI standard that indicates their use.
Thus, you can utilize the built-in ANSI escape sequence to make the content or a specific text bold, underlined, italic, and even colored. To print the underlined text in Python using the ANSI escape sequence, we use: '\x1B[4m' + text + '\x1B[0m'.
'\x1B[4m' makes it underlined
'\x1B[1m' makes it bold
'\x1B[1;4m' makes it bold and underlined
'\x1B[0m' is the closing tag
So, you can chain together multiple text formatting specifiers by separating them with a semicolon. This is shown in the following example where the text is made bold and underlined:
Method 2: Make Text Bold and Underlined with Escape Sequence
Example 1: Escape-Sequence to print bold and underlined text for WindowsUsers
You may have to call the os.system() module if you are using a Windows OS to make the ANSI escape sequence work properly.
import os
os.system("color")
To make text bold and underlined, you can enclose the text in the escape sequence '\033[1;4m' and '\033[0m'.
'\x1B[1m' makes it bold
'\x1B[4m' makes it underlined
'\x1B[1;4m' makes it bold and underlined
'\x1B[0m' is the closing tag
# Print Bold and Underlined Text
print('\033[1;4m' + 'This text is bold and underlined' + '\033[0m')
Output:
NOTE: The code '\033[0m' is used to end the bold and underlined text format. If you forget to add the ANSI code sequence to enclose the specific line of code, the following statements will also be printed in underlined format because you didn’t close the formatted special text.
Method 3: Using The simple_color Package
This is one of the easiest methods to print underlined text in Python. The simple_colors package includes many colors like blue, black, green, magenta, red, yellow, and cyan.
You can also format your text in various styles like bold, dim, italic, bright, underlined, reverse and blink that are included in the package.
Since the simple_color package isn’t a part of Python’s standard library; you need to install it before utilizing it. To install the simple_color package, copy the following code on your terminal:
pip install simple-colors
or,
python -m pip install simple-colors
After you have successfully installed the module, you can follow the syntax given in the example below to customize/style your code.
Example: The following example demonstrates how you can add color, format, and make the text bold or even underline it using the simple_colors module.
from simple_colors import * # normal and colored text
print('Normal:', blue('Welcome Finxters!')) # print underlined and colored text
print('underlined: ', green('Welcome Finxter!', 'underlined')) # print italic and underlined and colored text
print('Italic and Underlined: ', red('Welcome Finxter!', ['italic', 'underlined']))
Output:
Amazing!
Method 4: Using termcolor Module
In Python, termcolor is a module utilized for the ANSII color formatting.
The module comes with various properties for various terminals and certain text formatting properties. It also includes various text colors like blue, red, and green and text highlights like on-magenta, on-cyan, and on-white.
Hence, we will use the boldproperty from the text attributes.
Note:termcolor module isn’t a part of Python’s standard library. Thus, you need to install it before utilizing it. To install the termcolor module copy the following code on your terminal:
pip install termcolor
After installing the module, let’s visualize how you can use it to print the text in bold format.
Example:
from termcolor import colored # Underlined Text
text = colored('Hello and Welcome to FINXTER!', attrs=['underline']) print(text) # Underlined + Blue Text
text2 = colored('This text will be printed in underlined and blue color', 'blue', attrs=['underline'])
print(text2)
Output:
Method 5: Create an HTML Object
Prompt_toolkit includes a print_formatted_text() function that is compatible (as much as possible) with the built-in print() function. It also supports colors and formatting.
HTML can be utilized to demonstrate that a string contains HTML based formatting. Thus, the HTML object recognizes the essential tags for bold, italic and underline: <b>, <i> and <u>.
from prompt_toolkit import print_formatted_text, HTML print_formatted_text(HTML('<b>This text is bold</b>'))
print_formatted_text(HTML('<i>This text is italic</i>'))
print_formatted_text(HTML('<u>This text is underlined</u>'))
Output:
Conclusion
We have finally conquered the art of printing bold texts in Python. Not only did we learn how to print bold texts, but we also learned how to style the code using colors and other formatting styles like underline and italics. I hope this article helped you.
Recursion in programming is a problem-solving concept.
In recursion, a function finds the solution by calling itself once or many times. This function call can be explicit or implicit.
Info: Recursion, according to (Tang 2013), is when a function or algorithm calls itself one or more times. These calls occur until the program meets a specified condition. When met, processing of repeated calls from the last one called to the first happens.
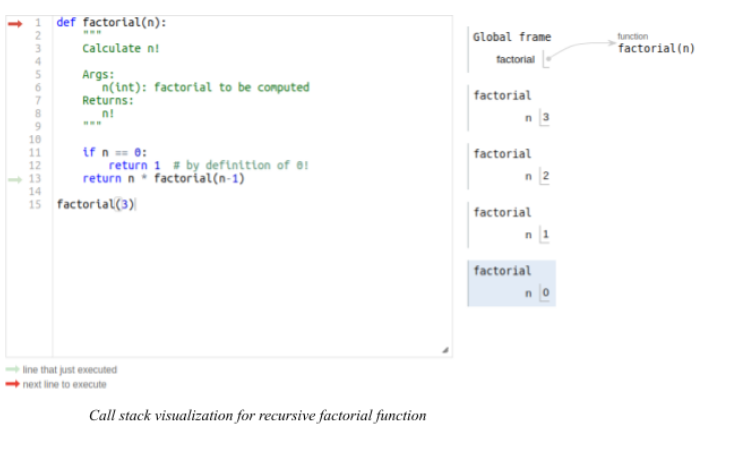
def factorial(n): """ Calculate n! Args: n(int): factorial to be computed Returns: n! """ if n == 0: return 1 return n * factorial(n-1) print(factorial(3))
# 6
In the highlighted line in the above snippet the factorial function calls itself. This function calls itself again and again.
This continues until the condition on line 10 is fulfilled.
Then, the previous function calls are evaluated up to the initial call. The condition n == 0 is a base case.
Info: A base case is very important in a recursive function since it defines the end of the recursive calls. If there exists a faulty base case or a non-existent one in a recursive function, the function calls would go on indefinitely, akin to an infinite while loop.
Recursion utilizes stacks in function calls. Hence, indefinite function calls lead to a C (programming language) stack overflow. This stack overflow, in turn, crashes Python. A size limit introduced to the python interpreter stack prevents potential stack overflow.
Or you just have a look at the screenshots taken from my execution flow:
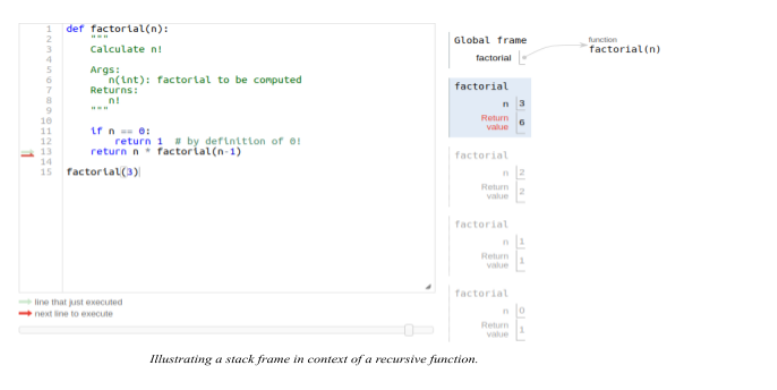
A stack frame from a recursive call is a data structure. It contains the variable of a function call parameters at the specific function call. It holds the state of the recursive function at an instance, with specific arguments.
As highlighted below, the return value of each successive call changes according to the argument passed into the recursive call.
When the argument is 0 the return value is 1. When the argument is 1 the return value is 1, and so on until the initial argument of 3, which has a return value of 6.
Types of Recursions
There are mainly two types of recursion. These types are direct and indirect recursion.
For direct recursion, the recursive call is explicitly declared (see code snippet below).
def direct_recursion(n): if n == 0: return 0 return direct_recursion(n-1)
direct_recursion(4)
Yet, in indirect recursion, the recursive function calls another function which in turn calls it.
For example, we define a new function named indirect_recursion(n). indirect_recursion(n) calls a function called other_function(3). Inside other_function(n) we call indirect_recursion(n) again.
This is a case of indirect recursion.
def indirect_recursion(n): if n == 0: return 0 return n - other_function(n-1) def other_function(n): if n > 0: n -= 2 return indirect_recursion(n) indirect_recursion(3)
Besides the above, there are other types of recursion.
There is also tail recursion and head recursion.
Head recursion, refers to when the recursive call is at the beginning of a function.
Tail as the name suggests refers to the scenario where the recursive call is the last line of the function.
In the direct recursion snippet above, the last line in the function is a sole recursive call.
This is an example of a tail-recursive function. Hence, tail recursion is a particular example of a direct recursion type.
Note, in our recursive factorial function, the last line contains the recursive call. But, it does not qualify to be tail-recursive. This is because the very last operation in that function is multiplication.
Tail call optimization
A tail call is not unique to recursive functions.
It refers to the last action that is finally performed by a function or a procedure.
As explained above, if the final action is recursive then the tail call can is a tail-recursion.
Some programming languages like scheme put in place tail call optimization. Tail call optimization ensures constant stack space usage. In (“Tail Call” 2022), tail call optimization, the call stack receives no more stack frames.
Since most of the current function state is no longer needed, hence replaced by the stack frame of the tail call.
As highlighted in the image illustration of a stack frame in the context of a recursive function. Instead of each call generating a new stack frame. This is achieved by modifying the current frame to align with the current argument. This is a powerful technique that allows for the conservation of memory.
Hence, preventing stack overflow in cases of tail recursion functions. As highlighted in this answer (Cronin 2008). The amount of space required for a recursive factorial function is constant for any value argument.
Tail Call Optimization in Python
By design, python, unlike languages like scheme, does not support tail call optimization.
This is true for all tail calls, including tail-recursive calls. The main reason for this is python’s emphasis on having complete debug information. This debug information relies on stack traces.
We lose debug info in discarded stacks by implementing tail call optimization. This renders stack trace useless.
Currently, Python, by default, allows for 1000 recursion calls. After exceeding these calls, Python raises a RecursionError: maximum recursion depth exceeded.
How to Get the Current Recursion Limit in Your System in Python?
The code listing below shows how to find out the current recursion limit in your system.
import sys
print(sys.getrecursionlimit())
The default is usually 1000 but it depends on the set-up one is running.
In my current set-up using Anaconda, the recursion limit is 3000.
Recursion limit refers to the number of function calls python allows when recursing.
How to Set the Recursion Limit in Python?
It is possible to change the recursion limit. By adding the following code we get rid of RecursionError if the solution lies within the set limit.
sys.setrecursionlimit(3500)
It is important to note that increasing the recursion limit does not change the C-stack size.
Hence, even with increasing the limit stack overflow might still occur since the limit is a safety measure to prevent stack overflow.
The better option might be refactoring the solution. For example, using an iterative solution using loops, and other built-in Python sequences.
References
Cronin, Kyle. 2008. “Answer to ‘What Is Tail Call Optimization?’” Stack Overflow. https://stackoverflow.com/a/310980.
“Sys — System-Specific Parameters and Functions — Python 3.10.4 Documentation.” n.d. Accessed April 26, 2022. https://docs.python.org/3/library/sys.html#sys.setrecursionlimit.
“Tail Call.” 2022. In Wikipedia. https://en.wikipedia.org/w/index.php?title=Tail_call&oldid=1082917459.
Tang, Daisy. 2013. “CS240: Data Structures & Algorithms I.” March 2013. https://www.cpp.edu/~ftang/courses/CS240/lectures/recursion.htm.
Generate PDF from HTML in a browser is one of the most wanted utilities. There are many hosted solutions generating PDF online from the posted source.
When using online tools the required features are not available with one tool. The users have to compromise some of their needs when depending on the online tools.
But, developers like us need not compromise. We can create a custom utility to generate PDF from HTML on our own.
Quick solution
There is a quick solution to generate PDF from an HTML page. The browser’s print wizard has the “Save as PDF” option along with the preview panel.
This JavaScript triggers the browser’s print action. Then, it supplies a particular portion of the HTM to print.
<div class="outer-content"> <div id="pdf-content"> <h2>PDF Page Title</h2> <hr> <p> How to generate a pdf from the <i>UI content</i> is easy. </p> <p> This describes how to <strong>generate pdf from HTML</strong> using programming. </p> </div> <hr> <button id="btn-generate">Generate PDF</button>
</div>
I am sure this is not enough to claim that the PDF generation is implemented 🙂
For creating a full-fledged solution to generate PDF from HTML we have to go for using libraries.
There are popular libraries available in the market to build a PDF generation tool for an application.
In this tutorial, we will see some of the top libraries that support PDF generation. For each library, we will see how-to steps for the integration and development.
Libraries available to Generate PDF from HTML
This section listed the libraries used to generate PDF from HTML in this article. It interlinks the appropriate example code below to land you in the right place.
The HTML to pdf and jspdf sections have more than one example. It is to know how to generate PDF from HTML containing complex nodes or containers. Example: HTML tables, image galleries and etc.
1. HTML to PDF
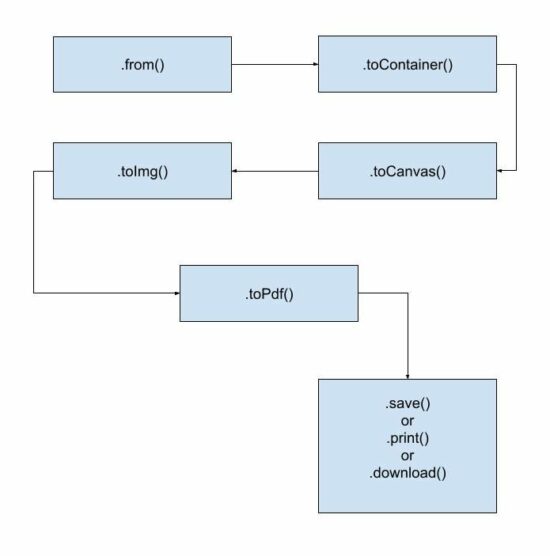
The HTML to pdf library method is a way to generate PDF from HTML. It is a two-step process to get a simple PDF output.
First, get the CDN URL of this library from an authentic source. Then, follow these two steps to get an output PDF file.
Instantiate html to pdf library class.
Map HTML content to generate and save PDF.
The basic life cycle to generate PDF from HTML using this library is shown in the below flow chart.
Example 1: Generate PDF from HTML containing only text.
<!DOCTYPE html>
<html lang="en">
<head>
<title>Generate PDF from HTML using html to pdf library</title>
<!-- CDN URL - html2pdf library -->
<script src="https://cdnjs.cloudflare.com/ajax/libs/html2pdf.js/0.10.1/html2pdf.bundle.min.js"></script>
</head> <body> <?php require_once __DIR__ . '/template.html'; ?> <script> var buttonElement = document.querySelector("#btn-generate"); buttonElement.addEventListener('click', function() { var pdfContent = document.querySelector("#pdf-content"); html2pdf().from(pdfContent).save(); }); </script>
</body>
</html>
Example 2: Supply library options to override defaults
Unlike the above example, it sends an array of options to generate PDF from HTML. It overrides the default file name, margin, orientation and more defaults as specified.
var pdfContent = document.querySelector("#pdf-content");
var optionArray = { margin: 10, filename: 'output.pdf', jsPDF: { unit: 'in', format: 'letter', orientation: 'portrait' }
}; // html to pdf generation with the reference of PDF worker object
html2pdf().set(optionArray).from(pdfContent).save();
In old monolithic method, the html2pdf() accepts the HTML reference and options. To generate PDF from HTML DOM object reference and JSON options are supplied like,
html2pdf(pdfContent, optionArray);
2. jsPDF
To generate PDF from HTML some libraries need document definition of the markup. The jsPDF is popularly known for its feature of getting the HTML input in any format.
For example, it is capable of accepting HTML in the following formats.
HTML markup.
HTML file input data.
HTML element object with the reference of selectors.
Example 1: Equivalent alternative solution to generate PDF from HTML
This example creates a basic usage reference of jsPDF to generate PDF from HTML template. It includes an external template source in the UI container.
The JavaScript maps an event handler to the “Generate PDF” button found in the HTML template.
On clicking the button, the script initiates jsPDF with the appropriate PDF specification. It uses .html() handling of the jsPDF library tp generate PDF from HTML object supplied as an argument.
This hander defines a callback function that executes the HTML to PDF conversion. It saves or opens the generated PDF document in the callback.
<!DOCTYPE html>
<html>
<head>
<title>jsPDF Example</title>
<script src="https://cdnjs.cloudflare.com/ajax/libs/jquery/3.3.1/jquery.min.js"></script>
<script src="https://cdnjs.cloudflare.com/ajax/libs/jspdf/2.5.1/jspdf.umd.min.js"></script>
<script src="https://cdnjs.cloudflare.com/ajax/libs/html2canvas/1.4.1/html2canvas.min.js"></script>
</head>
<body> <?php require_once __DIR__ . '/template.html'; ?> <script> var buttonElement = document.querySelector("#btn-generate"); buttonElement.addEventListener('click', function() { const { jsPDF } = window.jspdf; var doc = new jsPDF("p", "pt", 'a4'); var pdfContent = document.querySelector("#pdf-content"); // Generate PDF from HTML using right id-selector doc.html(pdfContent, { callback: function(doc) { doc.save("download.pdf"); }, x: 10, y: 19 }); }); </script>
</body>
</html>
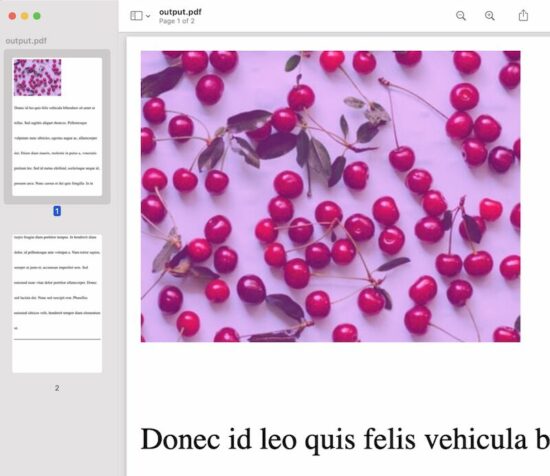
Example 2: Generate multipage PDF from HTML page
The jsPDF library is one of the best libraries used to generate PDF from HTML on the client-side. We have seen more examples in previous articles.
This example is for generating a multipage document from lengthy HTML to PDF format.
It uses the jsPDF’s page handlers like addPage, setPage, insertPage and more.
It calculates the PDF page content height and width and split the HTML source content. It creates chunks of page content from the HTML markup.
It calculates the total pages to paginate split chunks of HTML to PDF multi-page document. The addPage() generates a page instance to render the page content chunk into it.
<!doctype html>
<HTML>
<HEAD>
<TITLE>Generate multi-page PDF from HTML - jsPDF</TITLE>
<script src="https://code.jquery.com/jquery-2.1.3.js"></script>
<script src="https://cdnjs.cloudflare.com/ajax/libs/jspdf/1.3.3/jspdf.min.js"></script>
<script src="https://cdnjs.cloudflare.com/ajax/libs/html2canvas/1.4.1/html2canvas.min.js"></script>
<style>
.description { font-size: 2em; line-height: 4;
}
</style>
</HEAD>
<BODY> <div class="outer-content"> <div id="pdf-content"> <img src="cherry.jpeg" /> <p class="description">Donec id leo quis felis vehicula bibendum sit amet ut tellus. Sed sagittis aliquet rhoncus. Pellentesque vulputate nunc ultricies, egestas augue ac, ullamcorper dui. Etiam diam mauris, molestie in purus a, venenatis pretium leo. Sed id metus eleifend, scelerisque neque id, posuere arcu. Nunc cursus et dui quis fringilla. In in turpis feugiat diam porttitor tempus. In hendrerit diam dolor, id pellentesque ante volutpat a. Nam tortor sapien, semper ut justo et, accumsan imperdiet sem. Sed euismod nunc vitae dolor porttitor ullamcorper. Donec sed lacinia dui. Nunc sed suscipit erat. Phasellus euismod ultrices velit, hendrerit tempor diam elementum ut.</p> <hr> </div> <button id="btn-generate">Generate PDF</button> </div> </BODY>
<script>
$(document).ready(function(){ $("#btn-generate").click(function(){ var htmlWidth = $("#pdf-content").width(); var htmlHeight = $("#pdf-content").height(); var pdfWidth = htmlWidth + (15 * 2); var pdfHeight = (pdfWidth * 1.5) + (15 * 2); var doc = new jsPDF('p', 'pt', [pdfWidth, pdfHeight]); var pageCount = Math.ceil(htmlHeight / pdfHeight) - 1; html2canvas($("#pdf-content")[0], { allowTaint: true }).then(function(canvas) { canvas.getContext('2d'); var image = canvas.toDataURL("image/png", 1.0); doc.addImage(image, 'PNG', 15, 15, htmlWidth, htmlHeight); for (var i = 1; i <= pageCount; i++) { doc.addPage(pdfWidth, pdfHeight); doc.addImage(image, 'PNG', 15, -(pdfHeight * i)+15, htmlWidth, htmlHeight); } doc.save("output.pdf"); }); });
});
</script>
</HTML>
3. wkHTMLtoPDF
It is a command-line tool to generate PDFs from HTML. Find the latest suitable release. Then, install this library before running the command in the terminal.
It requires supplying a sanitized HTML source to create a PDF output.
After installation, add the library path to the system classpath. Then, run the following command.
wkhtmltopdf sanitised_html_source_path output.pdf
The best practice is to read the remote page content and sanitize the HTML. Then write the sanitized content into a local HTML to pass it to the PDF generation command. The PHP cURL post will be best to read the remote content compared to the file_get_contents().
It provides a C library to get used to it via programming.
If you want to execute the command via a program, the PHP exec() function may help.
There is a third-party interface to generate PDF from HTML using the wkHTMLtoPDF. Visit the Github page to install the PHP library used to content HTML to PDF.
This code shows the command to install this library into your vendor directory.
composer require mikehaertl/phpwkhtmltopdf
This simple usage example may initiate to start with this PHP library to generate PDF from HTML.
<?php
use mikehaertl\wkhtmlto\Pdf; $pdf = new Pdf('html-source-file.html'); if (!$pdf->saveAs('output.pdf')) { $error = $pdf->getError(); // return error to the request handler
}
4. pdfmake
The pdfmake library has both client-side and server-side integrations. Both methods generate PDF from HTML by accessing the element content from JavaScript.
Installation
This example uses pdfmake CDN URL to import dependencies. The documentation has alternate methods of installing and integrating the library.
For example, it gives npm commands to download node_modules with required dependencies.
Client-side integration
This example uses the pdfmake’s client-side method to generate PDF from HTML objects.
It accesses HTML element content from JavaScript and prepares the document definition object.
The document definition can supply the following types of content.
The HTML contains a heading, text, and image content. The docDefinition object is built with the content of these HTML elements.
Images will be supplied as encoded binary data. In this example, the JavaScript getDataUrl()converts the image into a binary data URL.
Then the pdfmake.createPDF() handler code generate PDF from HTML. The below code opens the HTML to PDF output in the browser screen. The pdfmake library also allows to print, and download the PDF document.
Thus, we have seen various methods to generate PDF from HTML source code or files. I hope the usage examples of the libraries may give choices to enable PDF generation.
Share your thoughts about the PDF generation concept we have seen. Also, share your comments on the example codes to generate PDF from HTML.
Before we learn about the money, let’s get this question out of the way:
What Does a Security Engineer Do?
A security engineer is a “white-hat hacker”, i.e., an IT professional who analyzes computer systems and computer networks to ensure they are running securely. This involves proactive analysis and understanding of possible security threats and attack vectors and designing the system to minimize the exposure to these threats.
Security Engineer Skills and Qualifications
Security Engineers should have at least a bachelor’s degree in computer science or a related field.
You need to understand networking, computer security systems, databases, HTTP, and web protocols, as well as an intimate understanding of distributed systems.
In particular, here are some crucial qualifications that are relevant as a Security Engineer:
Bachelor of Science in Computer Science or a related field
5+ years of work experience as a System Security Engineer or a related position
3+ years of work experience in development, operation, and maintenance of real-world security systems
Knowledge of operating systems
Knowledge of distributed systems
Knowledge of databases and database security
Knowledge of computer networks, networking technologies, network security
Knowledge of network monitoring solutions
Knowledge of anti-virus filters, content filtering, firewalls, authentication systems, and intrusion detection systems
Knowledge of security protocols, cryptographic algorithms, and principles
Critical thinking
Ability to solve complex problems
Annual Income Security Engineer (US)
Question: How much does a Security Engineer in the US make per year?
Figure: Average Income of a Security Engineer in the US by Source. [1]
The average annual income of a Security Engineer in the United States is between $75,732 and $144,874, with an average of $108,851 and a statistical median of $105,928 per year.
This data is based on our meta-study of ten (10) salary aggregators sources such as Glassdoor, ZipRecruiter, and PayScale.
If you decide to go the route as a freelance Security Engineer, you can expect to make between $30 and $150 per hour on Upwork (source). Assuming an annual workload of 2000 hours, you can expect to make between $60,000 and $300,000 per year.
Note: Do you want to create your own thriving coding business online? Feel free to check out our freelance developer course — the world’s #1 best-selling freelance developer course that specifically shows you how to succeed on Upwork and Fiverr!
But don’t wait too long to acquire practical experience!
Even if you have little skills, it’s best to get started as a freelance developer and learn as you work on real projects for clients — earning income as you learn and gaining motivation through real-world feedback.
Tip: An excellent start to turbo-charge your freelancing career (earning more in less time) is our Finxter Freelancer Course. The goal of the course is to pay for itself!
Related Video
You can find more job descriptions for coders, programmers, and computer scientists in our detailed overview guide:
The following statistic shows the self-reported income from 9,649 US-based professional developers (source).
The average annual income of professional developers in the US is between $70,000 and $177,500 for various programming languages.
Question: What is your current total compensation (salary, bonuses, and perks, before taxes and deductions)? Please enter a whole number in the box below, without any punctuation. If you are paid hourly, please estimate an equivalent weekly, monthly, or yearly salary. (source)
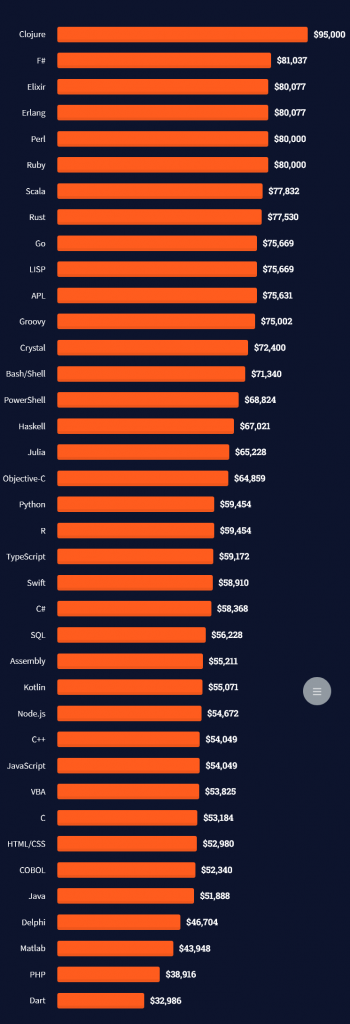
The following statistic compares the self-reported income from 46,693 professional programmers as conducted by StackOverflow.
The average annual income of professional developers worldwide (US and non-US) is between $33,000 and $95,000 for various programming languages.
Here’s a screenshot of a more detailed overview of each programming language considered in the report:
Here’s what different database professionals earn:
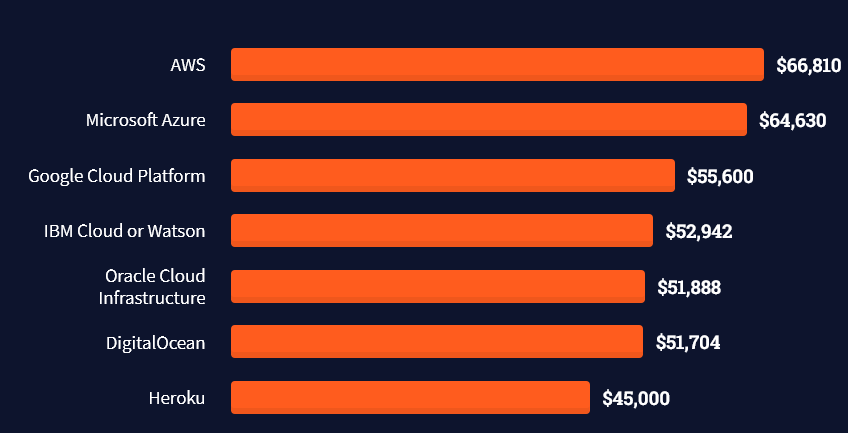
Here’s an overview of different cloud solutions experts:
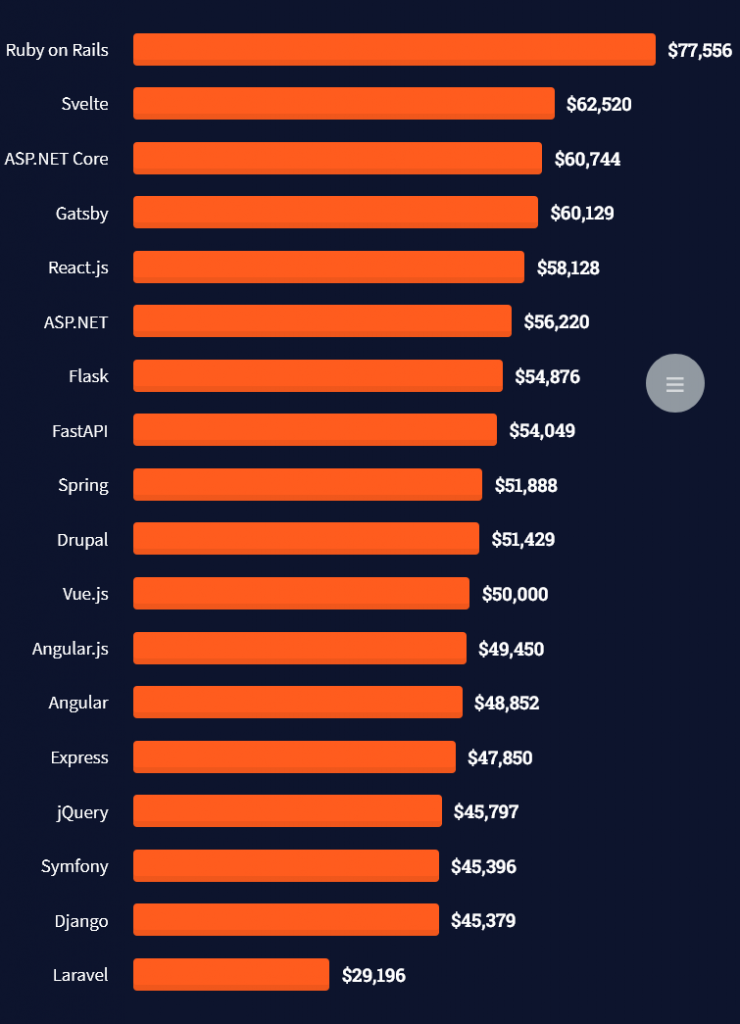
Here’s what professionals in web frameworks earn:
There are many other interesting frameworks—that pay well!
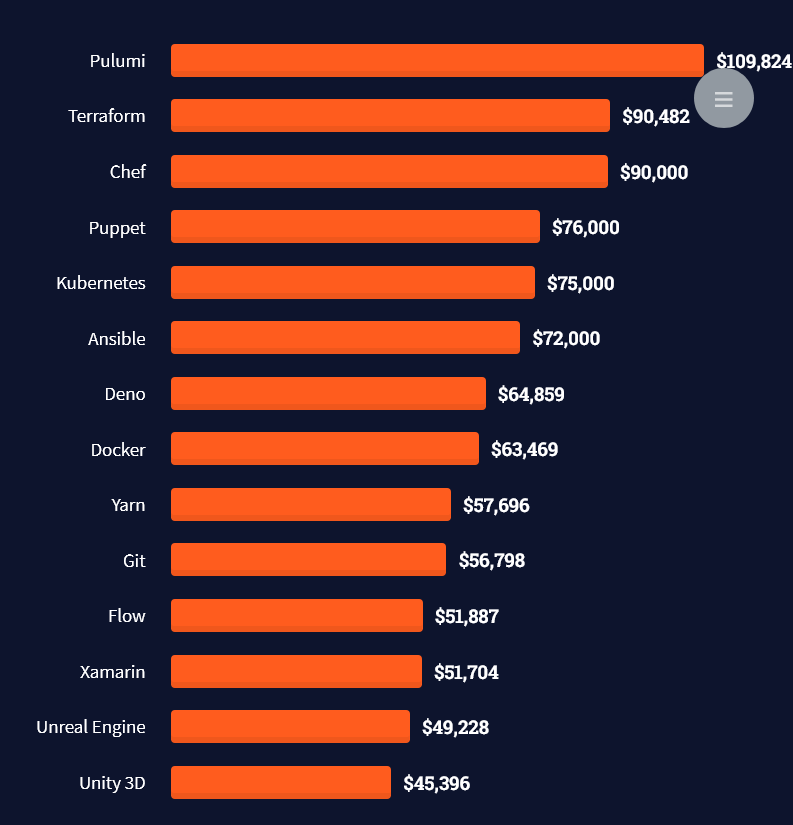
Look at those tools:
Okay, but what do you need to do to get there? What are the skill requirements and qualifications to make you become a professional developer in the area you desire?
Let’s find out next!
General Qualifications of Professionals
StackOverflow performs an annual survey asking professionals, coders, developers, researchers, and engineers various questions about their background and job satisfaction on their website.
Interestingly, when aggregating the data of the developers’ educational background, a good three quarters have an academic background.
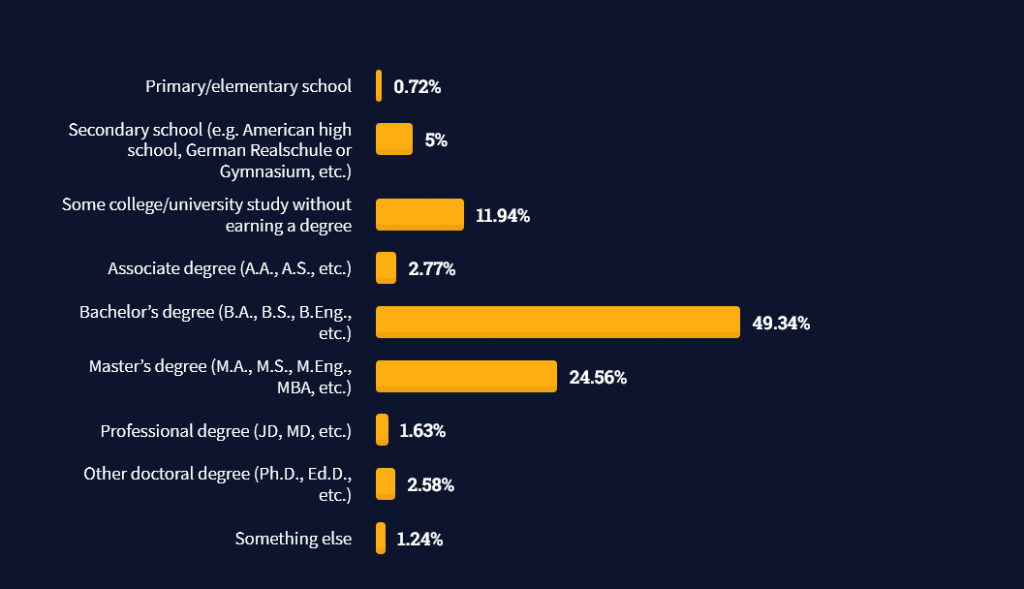
Here’s the question asked by StackOverflow (source):
Which of the following best describes the highest level of formal education that you’ve completed?
However, if you don’t have a formal degree, don’t fear! Many of the respondents with degrees don’t have a degree in their field—so it may not be of much value for their coding careers anyways.
Also, about one out of four don’t have a formal degree and still succeeds in their field! You certainly don’t need a degree if you’re committed to your own success!
Freelancing vs Employment Status
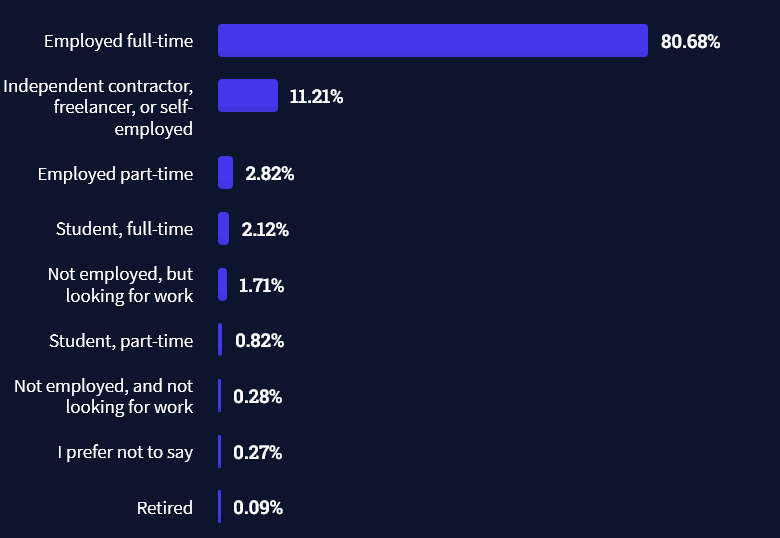
The percentage of freelance developers increases steadily. The fraction of freelance developers has already reached 11.21%!
This indicates that more and more work will be done in a more flexible work environment—and fewer and fewer companies and clients want to hire inflexible talent.
Here are the stats from the StackOverflow developer survey (source):
Do you want to become a professional freelance developer and earn some money on the side or as your primary source of income?
Resource: Check out our freelance developer course—it’s the best freelance developer course in the world with the highest student success rate in the industry!
Other Programming Languages Used by Professional Developers
The StackOverflow developer survey collected 58000 responses about the following question (source):
Which programming, scripting, and markup languages have you done extensive development work in over the past year, and which do you want to work in over the next year?
These are the languages you want to focus on when starting out as a coder:
And don’t worry—if you feel stuck or struggle with a nasty bug. We all go through it. Here’s what SO survey respondents and professional developers do when they’re stuck:
What do you do when you get stuck on a problem? Select all that apply. (source)
Related Tutorials
To get started with some of the fundamentals and industry concepts, feel free to check out these articles:
Coders get paid six figures and more because they can solve problems more effectively using machine intelligence and automation.
To become more successful in coding, solve more real problems for real people. That’s how you polish the skills you really need in practice. After all, what’s the use of learning theory that nobody ever needs?
You build high-value coding skills by working on practical coding projects!
Do you want to stop learning with toy projects and focus on practical code projects that earn you money and solve real problems for people?
If your answer is YES!, consider becoming a Python freelance developer! It’s the best way of approaching the task of improving your Python skills—even if you are a complete beginner.
If you just want to learn about the freelancing opportunity, feel free to watch my free webinar “How to Build Your High-Income Skill Python” and learn how I grew my coding business online and how you can, too—from the comfort of your own home.
Caesar Cipher is a simple encryption and obfuscation method. It’s a straightforward substitution cipher that replaces each plain text character with the obfuscated character obtained by shifting the plain text character a fixed number of positions in the alphabet.
What is Cryptography?
Before we introduce our first cryptographic algorithm, Caesar’s cipher, let’s first introduce cryptography as a scientific and industrial discipline.
Definition: Cryptography is the study of secure communications techniques that allow only the sender and recipient of a message to view its contents. The term is derived from the Greek word kryptos, which means hidden.
Definition: Cryptography provides for secure communication in the presence of malicious third-parties – known as adversaries. Encryption uses an algorithm and a key to transform an input (i.e., plaintext) into an encrypted output (i.e., ciphertext).
By this point, we begin to notice certain similarities or keywords.
(1) The first thing to notice is that both definitions emphasized secure communication, i.e. a communication whose content is unavailable to anyone other than the sender and receiver(s) of the message. The content is at the center of communication, as it is being carried in the form of a message.
(2) The second thing to notice is that we have the first party, i.e., the sender of the message; a second party (or more than one), i.e., the recipient(s) of the message; and possibly a third party, i.e., any unintended/uninvited recipient of the message, also known as an adversary.
An adversary is generally considered an unintended recipient of the message who might misuse the content of the message with any malicious intent.
(3) The third thing to notice from the definitions are mentions of a key, an algorithm, a plaintext message, and a ciphertext message.
A key is a changeable component, usually a number or a sequence of symbols that drive the encryption algorithm.
An encryption algorithm is represented as a series of computational steps which transform an input content (e.g., non-binary text or other binary content), by applying a key, to a secure ciphertext message.
The ciphered content is practically unreadable and, as such, suitable for transfer over an insecure information system to its intended recipient. The intended recipient holds a key that enables him to apply a reverse algorithm and decipher the ciphertext message back to the original, plaintext message.
It is assumed that a third party doesn’t hold the key and is unable to retrieve the plaintext message content in any other way, so the message is available only to the intended recipient and therefore secure.
From a practical point of view, absolute security may not be achieved as there are attack methods that might enable a third party to break the ciphered message and retrieve the original content, but their existence depends on the strength of a specific algorithm, which we will discuss at a later point.
What is Caesar’s Cipher?
Caesar’s cipher is a simple cryptographic algorithm that uses substitution, i.e., systematic replacement of each symbol from the original, plaintext message with another, predetermined symbol.
According to popular belief, it is said it was used by the Roman emperor Julius Caesar in his private correspondence.
Due to the algorithm’s simplicity, Caesar’s cipher in the modern era is not used as a standalone method of encryption but still finds its place as a component in more complex cryptographic systems, such as the ROT13 system or Vigenere cipher.
Besides that, it is a nice and simple algorithm to start our journey into cryptography.
How Does Caesar’s Cipher Work?
Caesar’s cipher algorithm construction begins by defining a set of unique symbols, which we will refer to as the alphabet.
Note: if an alphabet is also defined by order of its symbols, which is not a common case with Caesar’s cipher, it is said that the cipher algorithm uses monoalphabetic substitution.
For example, alphabets a1 = {A, B, C} and a2 = {A, C, B} are treated as different alphabets because the algorithm would produce different outputs for each of them.
We’ll take a closer look at the effect of symbol ordering a bit later.
Besides the alphabet in Caesar’s cipher, we will also introduce a key, i.e., a number that represents an offset in the symbol substitution.
This might sound a bit complicated, but it’s very straightforward: it just means how many symbols in the alphabet we have to skip before reaching the corresponding output symbol.
It is always helpful to take a look at an example: with an alphabet defined as al = {X, R, G, A, F, T, I} and a key k = 5, a plaintext pt = “GRAFITTIX” would be encrypted to ciphertext ct = “XIRGFAAFT”.
For symbols closer to the end of the alphabet than the length of a key, we would just continue counting from the beginning of the alphabet.
Such example is a symbol “F” that reaches the end of the alphabet after three skips: “F”, “T”, “I”, and continues symbol skipping for two more symbols from the start of the alphabet: “X”, “R”, and finally lands on the symbol “G”.
We will see how to simplify the skipping process by a calculation in our source code.
Once we have defined and shared the key with our second parties (the recipients), we can start exchanging secret messages.
In the era of Julius Caesar, literacy was not widespread, and ciphertexts were not so easily deciphered.
However, now in the modern era, Caesar’s cipher is no longer considered strong enough. Therefore, we will take a slight detour and have a look at the cipher with a monoalphabetic ordering.
Python Caesar Cipher
Here we’ll take a look at our source code and see how the magic happens. The comments are here to help in understanding particular ideas and choices in each of the algorithm steps.
def caesars_cipher(message, key=3, operation='encrypt'): # Performs an operation, either 'encrypt' or 'decrypt'. if operation.lower() not in ('encrypt', 'decrypt'): return message # Constructs our alphabet of symbols. alphabet = 'ABCDEFGHIJKLMNOPQRSTUVWXYZabcdefghijklmnopqrstuvwxyz1234567890 !?.' # Sets the encryption/decryption key. key = key % len(alphabet) # Initializes the store for encrypted/decrypted message. translated = '' # Processes each symbol in the message according to the operation and the alphabet. for symbol in message: # Just some housekeeping - the object initialization. shifted_index = -1 # Note: Only symbols in the 'alphabet' can be processed. if symbol in alphabet: symbol_index = alphabet.find(symbol) # Performs the actual operation. if operation == 'encrypt': shifted_index = symbol_index + key elif operation == 'decrypt': shifted_index = symbol_index - key # Handles possible overstepping. if shifted_index >= len(alphabet): shifted_index = shifted_index - len(alphabet) elif shifted_index < 0: shifted_index = shifted_index + len(alphabet) translated = translated + alphabet[shifted_index] else: # Leaves the symbol untouched if it's outside the alphabet: translated = translated + symbol return translated original_message = 'Finxter rules!'
caesars_key = 55 print(f'Original message = {original_message}')
ciphertext = caesars_cipher('Finxter rules!', caesars_key, 'encrypt')
print(f'Ciphertext = {ciphertext}')
plaintext = caesars_cipher(ciphertext, caesars_key, 'decrypt')
print(f'Plaintext = {plaintext}')
The Backstage Math
If we consider an alphabet of aN symbols, the number of ordered alphabets is aN! (! is a factorial operation) and there is aN! possible ciphertexts of the same plaintext.
Here we have to notice that having a key with a monoalphabetic substitution would have no effect. This is because it is always possible to generate an alphabet with an ordering that would exactly match Caesar’s cipher with a key.
In other words, each Caesar’s cipher with a specific key can be generalized by exactly one monoalphabetic substitution.
If we take the regular English alphabet of 26 symbols, the number of possible alphabets with unique orderings would amount to 26! ≈ 4 * 1026 possible ciphertexts (that’s 4 with 26 zeroes!).
Note: If you’re wondering why is this number so large, just consider the following: there are 26 letters in the English alphabet, hence 26 possibilities in picking the first letter. In the next round, for each of these possibilities, there are 25 possibilities in picking the second letter (since the first letter has already been picked). Going all the way, that’s 26 (first pick) * 25 (second pick) * 24 (third pick) * … * 1 (26th – last pick) = 26! ≈ 4 * 1026.
Now we can see that monoalphabetic substitution represents a superset of Caesar’s cipher, and since Caesar’s cipher uses an alphabet with typical alphabetical ordering, it drastically reduces the number of possible ciphertexts to only aN-1, which is, in our case, only 25.
With that in mind, Caesar’s ciphertext can easily be attacked by several approaches, such as a brute-force attack or frequency analysis.
Conclusion
We learned about Caesar’s Cipher, a simple encryption and decryption algorithm, in this article.
First, we made a gentle intro to cryptography.
Second, we encountered some of the fundamental terms in cryptography.
Third, we got acquainted with Caesar’s Cipher.
Fourth, we explained how Caesar’s Cipher works.
Fifth, we took a glance at the source code.
Sixth, we sneaked in the backstage and saw some traces of math behind the algorithm.
Learn More: ROT13 in Python
ROT13 is a simple encryption method. It shifts each character of the clear text string 13 positions forward in the alphabet.
This Python one-liner does ROT13 encryption for you:
cleartxt = "berlin"
abc = "abcdefghijklmnopqrstuvwxyz"
secret = "".join([abc[(abc.find(c)+13)%26] for c in cleartxt])
print(secret)
# oreyva
Add the following code to the top of each code snippet. This snippet will allow the code in this article to run error-free.
import re
from collections import Counter
Method 1: Use Regex and Dictionary Comprehension
This example uses Regex and Dictionary Comprehension as a one-liner to tally the number of specified vowels in a string. The results return in a Dictionary format.
saying = 'Saskatchewan! Where you can watch your dog run away for 3 days.'
vcount = {x: len(re.findall(f"{x}", saying.lower())) for x in 'aeiou'}
print(vcount)
The results save to vcount and are output to the terminal.
Output
{'a': 8, 'e': 3, 'i': 0, 'o': 4, 'u': 3}
Method 2: Use List Comprehension and count()
This example uses List Comprehension to tally the number of specified vowels in a string. The results return in a List format.
saying = 'Saskatchewan! Where you can watch your dog run away for 3 days.'
vcount = [saying.lower().count(x) for x in 'aeiou']
print(vcount)
This code declares the string saying. Then, List Comprehension converts the string to lowercase and searches for and tallies each specified vowel.
The results save to variable vcount and are output to the terminal.
Output
[8, 3, 0, 4, 3]
Note: This output displays the totals but not their associated vowel.
Method 3: Use Counter() and count.update()
This example calls the Collections library and uses Counter() to count the number of specified vowels in a string.
saying = 'Saskatchewan! Where you can watch your dog run away for 3 days.'
count = Counter() for i in saying: if i in 'aeiou': count.update(i.lower()) print(dict(count))
This code declares the string saying and initiates the Counter() object, count.
A for loop instantiates and traverses through each character converting to lowercase, searching for and tallies each specified vowel.
The results save to count and are output to the terminal.
If this code was output to the terminal using print(count), the output would be as follows:
Output using print(count)
Counter({'a': 8, 'o': 4, 'e': 3, 'u': 3})
Placing count inside dict() removes the word Counter and surrounding braces ().
Output using print(dict(count))
{'a': 8, 'e': 3, 'i': 0, 'o': 4, 'u': 3}
Note: This method produces the same output as Method 1 but with four (4) additional lines of code.
Method 4: Use For and count()
This example uses a for loop and string.count() to tally the number of specified vowels in a string. The results return as a string.
saying = 'Saskatchewan! Where you can watch your dog run away for 3 days.'
tmp = ''
for i in 'aeiou': tmp += i + ':' + str(saying.count(i)) + ' '
print(tmp)
This code declares the string saying and initiates a variable tmp.
A for loop instantiates and traverses through each character, searching for and tallying each specified vowel. The results convert to a string, save to tmp, and are output to the terminal.
Output
a:8 e:3 i:0 o:4 u:3
Method 5: Use map() and count()
This example uses map() and count() to tally the number of specified vowels in a string.
saying = 'Saskatchewan! Where you can watch your dog run away for 3 days.'
print(*map(saying.lower().count, 'aeiou'))
This code declares the string, saying converts the string to lowercase, and tallies the specified vowel. The results are output to the terminal.
Output
8 3 0 4 3
Summary
In this case, lower() was not required as you could see no vowels were in uppercase. However, you may not always know what a string will contain. In this case, best to convert to either lowercase or uppercase.
These five (5) methods of counting vowels in a string should give you enough information to select the best one for your coding requirements.
Before we learn about the money, let’s get this question out of the way:
What Does an Android App Developer Do?
An Android app developer is a programmer who focuses on software creation for mobile devices such as smartphones or wearables using the Android operating system.
Feel free to check out our other articles on the Finxter blog that concern app development.
For your motivation, I’ve compiled some interesting stats and facts about mobile app development:
The revenue of the mobile app market worldwide is mobile app revenue in 2022 is $437 billion USD. (Statista)
The number of Android mobile app developers in the world is 5.9 million. (EvansData)
The number of iOS mobile app developers in the world is 2.8 million. (EvansData)
The average revenue per mobile app developer worldwide is $50,229 USD/year. (Finxter)
The average annual income of a mobile app developer in the US is $101,000 USD. (Finxter)
The average annual income of a mobile app developer in India is ₹5,17,819. (Glassdoor)
So, are you motivated? Great, let’s have a look on the skills you need next!
What Skills Do Android App Developers Need?
As an Android app developer, your skill set varies depending on the concrete set of applications you’re working on. However, these skills will proof useful no matter what, and most successful Android app developers have these seven skills:
General programming skills (e.g., Java, C++, Python)
Of course, these are only the top seven most important skills from my point of view.
Android App Developer vs Desktop Developer
What’s the difference between an Android app developer and a desktop developer?
An Android app developer creates mobile applications for the Android operating system that runs on smartphones and wearables.
A desktop developer creates applications for desktop-based operating systems like macOS, Windows, and Linux.
Unlike desktop developers, Android app developers tend to focus more on utilizing native sensors such as NFC and GPS for location-based applications, as well as more natural human-computer interaction means such as speech and touch.
Both may use the same programming languages, such as Java, and similar IDEs, such as Eclipse.
Of course, there’s a two-way exchange of ideas and technologies because more and more desktop developers integrate ubiquitous computing technologies in their applications. And app developers use traditional “desktop” means of user interfaces such as virtual keyboards.
Now that you know about what Android development is let’s have a look at what it earns next!
Annual Income
How much does an Android App Developer make per year?
Figure: Average Income of an Android App Developer in the US by Source. [1]
The average annual income of an Android App Developer in the United States is between $85,000 and $126,577 with an average of $106,923 and a statistical median of $107,343 per year.
This data is based on our meta-study of nine (9) salary aggregators sources such as Glassdoor, ZipRecruiter, and PayScale.
If you decide to go the route as a freelance Mobile App Developer, you can expect to make between $30 and $60 per hour on Upwork (source). Assuming an annual workload of 2000 hours, you can expect to make between $60,000 and $120,000 per year.
Note: Do you want to create your own thriving coding business online? Feel free to check out our freelance developer course — the world’s #1 best-selling freelance developer course that specifically shows you how to succeed on Upwork and Fiverr!
But is there enough demand? Let’s have a look at Google trends to find out how interest evolves over time (source):
Looks like the interest is declining over time. But don’t let this fool you—this makes an excellent opportunity for you as a freelance developer because people are searching for “Android app developers for Hire” like never before:
While the interest in Android app development stays constant, the demand for Android app developers is growing. This means that the gap in the market place increases and you can expect hourly rates to increase in the years to come!
If demand for a scarce resource outstrips the supply growth, prices rise. Your prices. Your income.
You can see that many freelancers now start creating apps for clients rather than creating apps for themselves—it’s just the more attractive market opportunity:
Learning Path, Skills, and Education Requirements
Do you want to become a Mobile App Developer? Here’s a step-by-step learning path I’d propose to get started with Mobile App :
But don’t wait too long to acquire practical experience!
Even if you have little skills, it’s best to get started as a freelance developer and learn as you work on real projects for clients — earning income as you learn and gaining motivation through real-world feedback.
Tip: An excellent start to turbo-charge your freelancing career (earning more in less time) is our Finxter Freelancer Course. The goal of the course is to pay for itself!
Related Video
You can find more job descriptions for coders, programmers, and computer scientists in our detailed overview guide:
The following statistic shows the self-reported income from 9,649 US-based professional developers (source).
The average annual income of professional developers in the US is between $70,000 and $177,500 for various programming languages.
Question: What is your current total compensation (salary, bonuses, and perks, before taxes and deductions)? Please enter a whole number in the box below, without any punctuation. If you are paid hourly, please estimate an equivalent weekly, monthly, or yearly salary. (source)
The following statistic compares the self-reported income from 46,693 professional programmers as conducted by StackOverflow.
The average annual income of professional developers worldwide (US and non-US) is between $33,000 and $95,000 for various programming languages.
Here’s a screenshot of a more detailed overview of each programming language considered in the report:
Here’s what different database professionals earn:
Here’s an overview of different cloud solutions experts:
Here’s what professionals in web frameworks earn:
There are many other interesting frameworks—that pay well!
Look at those tools:
Okay, but what do you need to do to get there? What are the skill requirements and qualifications to make you become a professional developer in the area you desire?
Let’s find out next!
General Qualifications of Professionals
StackOverflow performs an annual survey asking professionals, coders, developers, researchers, and engineers various questions about their background and job satisfaction on their website.
Interestingly, when aggregating the data of the developers’ educational background, a good three quarters have an academic background.
Here’s the question asked by StackOverflow (source):
Which of the following best describes the highest level of formal education that you’ve completed?
However, if you don’t have a formal degree, don’t fear! Many of the respondents with degrees don’t have a degree in their field—so it may not be of much value for their coding careers anyways.
Also, about one out of four don’t have a formal degree and still succeeds in their field! You certainly don’t need a degree if you’re committed to your own success!
Freelancing vs Employment Status
The percentage of freelance developers increases steadily. The fraction of freelance developers has already reached 11.21%!
This indicates that more and more work will be done in a more flexible work environment—and fewer and fewer companies and clients want to hire inflexible talent.
Here are the stats from the StackOverflow developer survey (source):
Do you want to become a professional freelance developer and earn some money on the side or as your primary source of income?
Resource: Check out our freelance developer course—it’s the best freelance developer course in the world with the highest student success rate in the industry!
Other Programming Languages Used by Professional Developers
The StackOverflow developer survey collected 58000 responses about the following question (source):
Which programming, scripting, and markup languages have you done extensive development work in over the past year, and which do you want to work in over the next year?
These are the languages you want to focus on when starting out as a coder:
And don’t worry—if you feel stuck or struggle with a nasty bug. We all go through it. Here’s what SO survey respondents and professional developers do when they’re stuck:
What do you do when you get stuck on a problem? Select all that apply. (source)
Related Tutorials
To get started with some of the fundamentals and industry concepts, feel free to check out these articles:
Coders get paid six figures and more because they can solve problems more effectively using machine intelligence and automation.
To become more successful in coding, solve more real problems for real people. That’s how you polish the skills you really need in practice. After all, what’s the use of learning theory that nobody ever needs?
You build high-value coding skills by working on practical coding projects!
Do you want to stop learning with toy projects and focus on practical code projects that earn you money and solve real problems for people?
If your answer is YES!, consider becoming a Python freelance developer! It’s the best way of approaching the task of improving your Python skills—even if you are a complete beginner.
If you just want to learn about the freelancing opportunity, feel free to watch my free webinar “How to Build Your High-Income Skill Python” and learn how I grew my coding business online and how you can, too—from the comfort of your own home.

 Question: Say you have an expression you want to execute using the
  Related Article: 7 Easy Steps to Redirect Your Standard Output to a Variable (Python)
 If your answer is YES!, consider becoming a Python freelance developer! It’s the best way of approaching the task of improving your Python skills—even if you are a complete beginner.
 Note: No output appears on the screen anymore because the standard output is now redirected to the variable.
 Try it yourself:

 Challenge: Get the size of the above image with PIL or any other Python library.
 TRIVIA: PIL(Python Imaging Library) is a Python library that is used for image processing. It supports numerous image formats which include “
 Note: Use the following command to install OpenCV:
  Bonus: Get the Size of an Image by Loading Image from an URL
 Problem Formulation: Given a string. How to print the string as


 Note: Do you want to create your own thriving coding business online? Feel free to check out our


 A Finxter Favorite!


