Summary: The most straightforward way to overwrite the previous print to stdout is to set the carriage return ('\r') character within the print statement as print(string, end = "\r"). This returns the next stdout line to the beginning of the line without proceeding to the next line.
Problem Formulation
Problem Definition: How will you overwrite the previous print/output to stdout in Python?
Example: Let’s say you have the following snippet, which prints the output as shown below:
import time for i in range(10): if i % 2 == 0: print(i, end="\r") time.sleep(2)
Output:
Challenge: What we want to do is instead of printing each output in a newline, we want to replace the previous output value and overwrite it with the new output value on the same line, as shown below.
Expected Output
Method 1: Using Carriage Return (‘\r’) Character
Approach: The simplest solution to the given problem is to use the carriage return (‘\r‘) character within your print statement to return the stdout to the start of the same print line without advancing to the next line. This leads to the next print statement overwriting the previous print statement.
Note: Read here to learn more about the carriage return escape character.
Code:
import time for i in range(10): if i % 2 == 0: print(i, end="\r") time.sleep(2)
Output:
That’s easy! Isn’t it? Unfortunately, this approach is not completely foolproof. Let’s see what happens when we execute the following snippet:
import time li = ['start', 'Processing result']
for i in range(len(li)): print(li[i], end='\r') time.sleep(2)
print('Terminate')
Output:
print('Terminate') is unable to completely wipe out the previous output. Hence, the final output is erroneous.
Since we are executing each output generated by a print statement on top of the previous output, it is not possible to display an output properly on the same line if the following output has a shorter length than the output before.
FIX: To fix the above problem, instead of simply overwriting the output, we must clear the previous output before displaying the next output. This can be done with the help of the following ANSI sequence: “\x1b[2K“.
Code:
import time li = ['start', 'Processing result']
for i in range(len(li)): print(li[i], end='\r') time.sleep(2)
print(end='\x1b[2K') # ANSI sequence to clear the line where the cursor is located
print('Terminate')
Output:
Method 2: Clear Line and Print Using ANSI Escape Sequence
Approach: The idea here is to use an extra print statement instead of altering the end parameter of the print statement that is used to display the output. The extra print statement is used to move the cursor back to the previous line where the output was printed and then clear it out with the help of ANSI escape sequences.
Explanation:
Print a line that ends with a new line initially.
Just before printing the next output on the new line, perform a couple of operations with the help of ANSI escape sequences:
Move the cursor up, i.e., to the previous output line using the escape sequence: ‘\033[1A‘.
Clear the line using the escape sequence: ‘\x1b[2K‘
Print the next output.
Code:
import time UP = '\033[1A'
CLEAR = '\x1b[2K'
for i in range(10): if i % 2 == 0: print(i) time.sleep(2) print(UP, end=CLEAR)
Output:
Discussion: Though this code might look a little more complex than the previous approach, it comes with a major advantage of the neatness of output. You don’t have to worry about the length of the previous output. Also, the cursor does not visually hinder the output being displayed.
Here’s a handy guide to escape sequences with respect to cursor movements:
ESCAPE SEQUENCE
CURSOR MOVEMENT
\033[<L>;<C>H
Positions the cursor. Puts the cursor at line L and column C.
\033[<N>A
Move the cursor up by N lines.
\033[<N>B
Move the cursor down by N lines.
\033[<N>C
Move the cursor forward by N columns.
\033[<N>D
Move the cursor backward by N columns.
\033[2J
Clear the screen, move to (0,0)
\033[K
Erase the end of line.
Method 3: Using “\b” Character
Another way to overwrite the previous output line is to use the backspace character(“\b“) and write to the standard output.
Code:
import time
import sys for i in range(10): if i % 2 == 0: sys.stdout.write(str(i)) time.sleep(1) sys.stdout.write('\b') sys.stdout.flush()
Output:
Caution: Ensure that you properly flush the buffer as done in the above snippet. Otherwise, you might see that only the last result is displayed at the end of the script.
Bonus Read Ahead
What is Carriage Return (\r) in Python?
Simply put, carriage return is an escape character just like \n. Carriage return is denoted as \r and it is basically used to shift the cursor to the beginning of a line or string instead of allowing it to move on to the next line.
Whenever you use the carriage return escape character ‘\r’, the content that comes after the \r will appear on top of your line and will keep replacing the characters of the previous string one by one until it occupies all the contents left after the \r in that string.
Example:
li = ['One', 'Two', 'Three']
for i in range(len(li)): print(li[i], end='\r') # OUTPUT-->Three
Conclusion
To sum things up, the easiest way to overwrite the previous print is to use the carriage return \r character within your print statement using the end parameter. To ensure that the previous output is completely erased before printing the new output, you can use the \x1b[2K ANSI escape sequence.
I hope this tutorial helped you. Here’s another interesting read that you may find useful: Python Print One Line List
One of the most sought-after skills on Fiverr and Upwork is web scraping. Make no mistake: extracting data programmatically from websites is a critical life skill in today’s world that’s shaped by the web and remote work.
So, do you want to master the art of web scraping using Python’s BeautifulSoup?
If the answer is yes – this course will take you from beginner to expert in Web Scraping.
Tableau is a visual data analytics platform focused on the business analytics use case that helps you use data to solve problems. It is great to visualize data (e.g., using dashboards) and perform complex data analytics tasks with relatively simple-to-use operations.
I recommend you watch the following 10-minute video at 1.5x speed to get a first intuition of the platform quickly:
Here’s a screenshot of the video that shows the data analysis process relevant for Tableau:
And here’s a screenshot of all the subproducts of the Tableau platform—all of them may be a potential specialization for a Tableau Developer:
So, Tableau helps you accomplish all five steps of business process and business intelligence:
Storing transactions
Analyse data
Data preparation
Data analysis
Sharing insights
Making decisions
Monitoring outcomes and results
What is a Tableau Developer?
A Tableau Developer analyzes data, develops software, and creates data visualizations using Tableau to make businesses more efficient and effective.
Tableau developers routinely generate Tableau dashboards, business intelligence (BI) reports, and data visualizations to improve decision making in a data-driven organization.
Now that you know about what it is, let’s have a look at what it earns next!
Annual Income of Tableau Developer (US)
Question: How much does a Tableau Developer in the US make per year?
Figure: Average Income of a Tableau Developer in the US by Source. [1]
The expected annual income of a Tableau Developer in the United States is between $71,807 and $114,559, with an average annual income of $93,564 and a median income of $93,460 per year.
This data is based on our meta-study of 8 salary aggregators sources such as Glassdoor, ZipRecruiter, and PayScale.
If you decide to go the route as a freelance Tableau Developer, you can expect to make between $40 and $80 per hour on Upwork (source). Assuming an annual workload of 2000 hours, you can expect to make between $80,000 and $160,000 per year.
Note: Do you want to create your own thriving coding business online? Feel free to check out our freelance developer course — the world’s #1 best-selling freelance developer course that specifically shows you how to succeed on Upwork and Fiverr!
But don’t wait too long to acquire practical experience!
Even if you have little skills, it’s best to get started as a freelance developer and learn as you work on real projects for clients — earning income as you learn and gaining motivation through real-world feedback.
Tip: An excellent start to turbo-charge your freelancing career (earning more in less time) is our Finxter Freelancer Course. The goal of the course is to pay for itself!
Related Video
You can find more job descriptions for coders, programmers, and computer scientists in our detailed overview guide:
The following statistic shows the self-reported income from 9,649 US-based professional developers (source).
The average annual income of professional developers in the US is between $70,000 and $177,500 for various programming languages.
Question: What is your current total compensation (salary, bonuses, and perks, before taxes and deductions)? Please enter a whole number in the box below, without any punctuation. If you are paid hourly, please estimate an equivalent weekly, monthly, or yearly salary. (source)
The following statistic compares the self-reported income from 46,693 professional programmers as conducted by StackOverflow.
The average annual income of professional developers worldwide (US and non-US) is between $33,000 and $95,000 for various programming languages.
Here’s a screenshot of a more detailed overview of each programming language considered in the report:
Here’s what different database professionals earn:
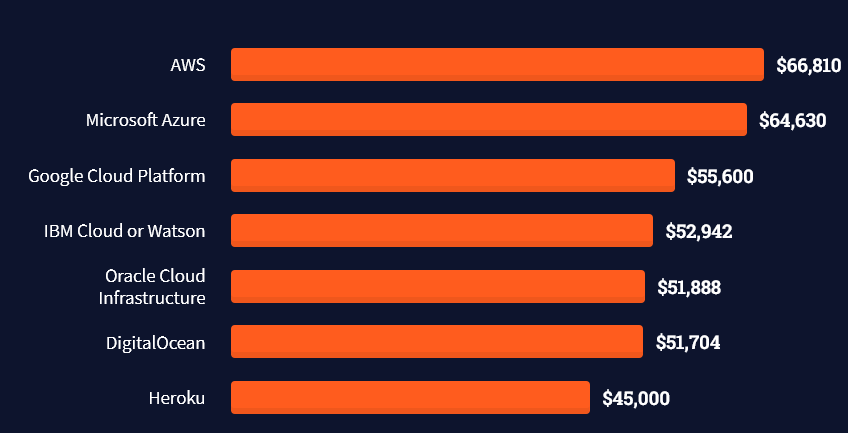
Here’s an overview of different cloud solutions experts:
Here’s what professionals in web frameworks earn:
There are many other interesting frameworks—that pay well!
Look at those tools:
Okay, but what do you need to do to get there? What are the skill requirements and qualifications to make you become a professional developer in the area you desire?
Let’s find out next!
General Qualifications of Professionals
StackOverflow performs an annual survey asking professionals, coders, developers, researchers, and engineers various questions about their background and job satisfaction on their website.
Interestingly, when aggregating the data of the developers’ educational background, a good three quarters have an academic background.
Here’s the question asked by StackOverflow (source):
Which of the following best describes the highest level of formal education that you’ve completed?
However, if you don’t have a formal degree, don’t fear! Many of the respondents with degrees don’t have a degree in their field—so it may not be of much value for their coding careers anyways.
Also, about one out of four don’t have a formal degree and still succeeds in their field! You certainly don’t need a degree if you’re committed to your own success!
Freelancing vs Employment Status
The percentage of freelance developers increases steadily. The fraction of freelance developers has already reached 11.21%!
This indicates that more and more work will be done in a more flexible work environment—and fewer and fewer companies and clients want to hire inflexible talent.
Here are the stats from the StackOverflow developer survey (source):
Do you want to become a professional freelance developer and earn some money on the side or as your primary source of income?
Resource: Check out our freelance developer course—it’s the best freelance developer course in the world with the highest student success rate in the industry!
Other Programming Languages Used by Professional Developers
The StackOverflow developer survey collected 58000 responses about the following question (source):
Which programming, scripting, and markup languages have you done extensive development work in over the past year, and which do you want to work in over the next year?
These are the languages you want to focus on when starting out as a coder:
And don’t worry—if you feel stuck or struggle with a nasty bug. We all go through it. Here’s what SO survey respondents and professional developers do when they’re stuck:
What do you do when you get stuck on a problem? Select all that apply. (source)
Related Tutorials
To get started with some of the fundamentals and industry concepts, feel free to check out these articles:
Coders get paid six figures and more because they can solve problems more effectively using machine intelligence and automation.
To become more successful in coding, solve more real problems for real people. That’s how you polish the skills you really need in practice. After all, what’s the use of learning theory that nobody ever needs?
You build high-value coding skills by working on practical coding projects!
Do you want to stop learning with toy projects and focus on practical code projects that earn you money and solve real problems for people?
If your answer is YES!, consider becoming a Python freelance developer! It’s the best way of approaching the task of improving your Python skills—even if you are a complete beginner.
If you just want to learn about the freelancing opportunity, feel free to watch my free webinar “How to Build Your High-Income Skill Python” and learn how I grew my coding business online and how you can, too—from the comfort of your own home.
Say, you want to find a regex pattern in a given string. You know the pattern exists in the string. You use the re.match(pattern, string) function to find the match object where the pattern matches in the string.
Problem: The Python regular expression pattern is not found in the string. The pattern doesn’t match anything, and, thus, the match object is None. How to fix this?
Here’s an example in which you’re searching for the pattern 'h[a-z]+' which should match the substring 'hello'.
But it doesn’t match!
import re my_string = 'hello world'
pattern = re.compile('h[a-z]+') match = re.match(pattern, my_string) if match: print('found!')
else: print('not found!')
Output:
not found!
Where is the bug? And how to fix it, so that the pattern matches the substring 'hello'?
Learn More: Improve your regex superpower by studying character classes used in the example pattern 'h[a-z]+' by visiting this tutorial on the Finxter blog.
Solution: Use re.search() instead of re.match()
A common reason why your Python regular expression pattern is not matching in a given string is that you mistakenly used re.match(pattern, string) instead of re.search(pattern, string) or re.findall(pattern, string). The former attempts to match the pattern at the beginning of the string, whereas the latter two functions attempt to match anywhere in the string.
Here’s a quick recap of the three regex functions:
re.match(pattern, string) returns a match object if the pattern matches at the beginning of the string. The match object contains useful information such as the matching groups and the matching positions.
re.findall(pattern, string) scans string from left to right, searching for all non-overlapping matches of the pattern. It returns a list of strings in the matching order when scanning the string from left to right.
Thus, the following code uses re.search() to fix our problem:
import re my_string = 'hello world'
pattern = re.compile('h[a-z]+') match = re.search(pattern, my_string) if match: print('found!')
else: print('not found!')
Output:
found!
Finally, the pattern 'h[a-z]+' does match the string 'hello world'.
Note that you can also use the re.findall() function if you’re interested in just the string matches of your pattern (without match object). We’ll explain all of this — re.match(), re.search(), re.findall(), and match objects — in a moment but first, let’s have a look at the same example with re.findall():
import re my_string = 'hello world'
pattern = re.compile('h[a-z]+') match = re.findall(pattern, my_string) print(match)
# ['hello'] if match: print('found!')
else: print('not found!')
Output:
['hello']
found!
Understanding re.match()
The re.match(pattern, string) method returns a match object if the pattern matches at the beginning of the string. The match object contains useful information such as the matching groups and the matching positions. An optional argument flags allows you to customize the regex engine, for example to ignore capitalization.
Specification:
re.match(pattern, string, flags=0)
The re.match() method has up to three arguments.
pattern: the regular expression pattern that you want to match.
string: the string which you want to search for the pattern.
The re.match() method returns a match object. You may ask (and rightly so):
Learn More: Understanding re.match() on the Finxter blog.
What’s a Match Object?
If a regular expression matches a part of your string, there’s a lot of useful information that comes with it: what’s the exact position of the match? Which regex groups were matched—and where?
The match object is a simple wrapper for this information. Some regex methods of the re package in Python—such as search()—automatically create a match object upon the first pattern match.
At this point, you don’t need to explore the match object in detail. Just know that we can access the start and end positions of the match in the string by calling the methods m.start() and m.end() on the match object m:
In the first line, you create a match object m by using the re.search() method. The pattern 'h...o' matches in the string 'hello world' at start position 0.
You use the start and end position to access the substring that matches the pattern (using the popular Python technique of slicing).
Now that you understood the purpose of the match object, let’s have a look at the alternative to the re.match() function next!
Understanding re.search()
The re.search(pattern, string) method matches the first occurrence of the pattern in the string and returns a match object.
Specification:
re.search(pattern, string, flags=0)
The re.search() method has up to three arguments.
pattern: the regular expression pattern that you want to match.
string: the string which you want to search for the pattern.
The re.search() method returns a match object. You may ask (and rightly so):
Learn More: Understanding re.search() on the Finxter blog.
Understanding re.findall()
The re.findall(pattern, string) method scans string from left to right, searching for all non-overlapping matches of the pattern. It returns a list of strings in the matching order when scanning the string from left to right.
Specification:
re.findall(pattern, string, flags=0)
The re.findall() method has up to three arguments.
pattern: the regular expression pattern that you want to match.
string: the string which you want to search for the pattern.
Google engineers are regular expression masters. The Google search engine is a massive text-processing engine that extracts value from trillions of webpages.
Facebook engineers are regular expression masters. Social networks like Facebook, WhatsApp, and Instagram connect humans via text messages.
Amazon engineers are regular expression masters. Ecommerce giants ship products based on textual product descriptions. Regular expressions rule the game when text processing meets computer science.
Now, this was a lot of theory! Let’s get some practice.
In my Python freelancer bootcamp, I’ll train you on how to create yourself a new success skill as a Python freelancer with the potential of earning six figures online.
The next recession is coming for sure, and you want to be able to create your own economy so that you can take care of your loved ones.
In this article, you’ll learn how to print the contents of a List without surrounding brackets in Python.
To make it more fun, we have the following running scenario:
You are a student and need to memorize the first 10 elements in the Periodic Table. This data is currently saved in a List format. However, you would prefer it to display without brackets to remove any distractions.
Question: How would we write Python code to print a List without brackets?
We can accomplish this task by one of the following options:
This method uses join() to access each element of the List passed. Then print() lets join() know which separator to concatenate (append) to each element. The result is a String.
This code declares a List of the first 10 element names of the Periodic Table and saves them to periodic_els.
Next, join() passes periodic_els as an argument and accesses each element, adding the appropriate separator character(s) as indicated in the print statement (' / ').
Finally, the output is sent to the terminal as a String data type.
Output
H / He / Li / Be / B / C / N / O / F / Ne
If we modified the print statement to have a comma (',') as a separator, the output would be as follows:
If periodic_els contained integers instead of strings, it would need to be converted to a String data type first. Then, join() and map() are used to output the contents without brackets.
This code declares a List of the first 10 elements in the Periodic Table and saves them to periodic_els.
Next, periodic_els is converted to a String, and the iterable map() object is accessed. Then, each element is evaluated, and a separator character (‘, ‘) is placed between each element and concatenated.
Finally, the output is sent to the terminal as a String data type.
Output
1, 2, 3, 4, 5, 6, 7, 8, 9,10
Bonus: Strip quote characters from Method 3
This section expands on Method 3, where the resultant output contained quote characters (') surrounding each element. This can easily be removed by running the following code.
A contact form is an important component of an eCommerce site. It is for letting the customers connect to the sellers. It allows customers to enquire and send their queries on the order and engage with the seller.
The WordPress WooCommerce plugin helps to create your online shop in a few minutes. It is very easy to create a contact form in the WordPress eCommerce shop.
There are plugins available in the market to customize the WooCommerce contact form. All of them give a shortcode or an option to embed forms into a page.
This article shows some of the available plugins to integrate a WooCommerce contact form. It also describes how to configure these plugins to render the form in the shop pages.
Reasons for having a contact form in a WooCommerce store
A WooCommerce contact form is essential for the following reasons.
To let customers raise queries, and support tickets.
To allow discussion about purchases.
To encourage customers to add feedback and comments for improving sales.
To enquire about products and orders.
List of Woocommerce contact form plugins
These are the list of WordPress plugins used to create a WooCommerce contact form. Most of them have the free version and are simple to integrate.
Contact form plugin
Number of installations
Last updated
WPForms
5+ million
2 weeks ago
Contact Form 7 (CF7)
5+ million
3 month ago
Ninja Forms
1+ million
2 months ago
Formidable Pro
300000+
2 days ago
Simple Basic Contact Form
10000+
2 months ago
Contact Form by BestWebSoft
80000+
2 months ago
Gravity Forms 20000
20000+
2 weeks ago
Install and activate the WooCommerce plugin to turn a WordPress site into an online shop.
Then, integrate any one of the above plugins to render a WooCommerce contact form on the shop.
In the upcoming sections, we will see the usage mechanism of the free plugins among the above list.
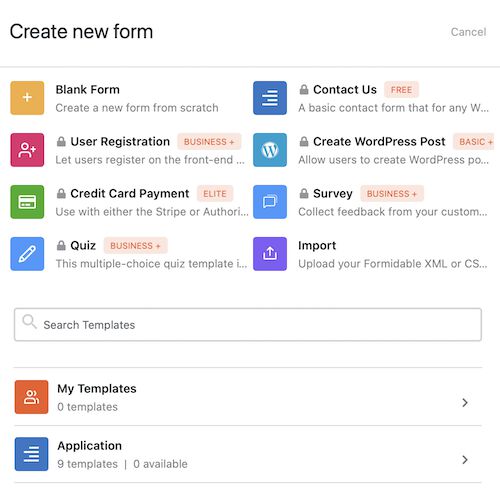
It covers all possible form fields to be rendered onto a form template. It has these selectable options above the rich-text editor of the form edit window.
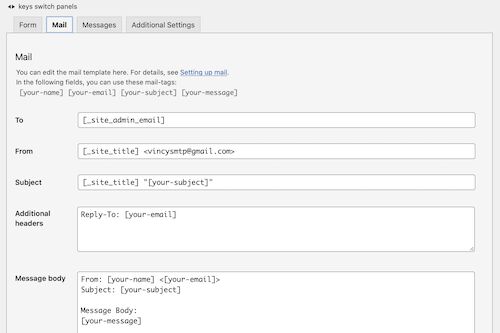
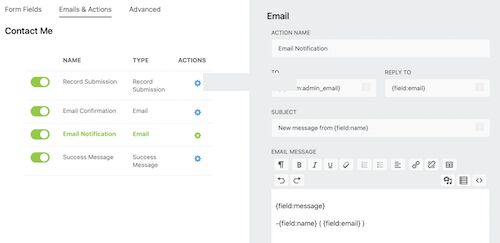
Step 2: Customize the email template
Then, it allows for designing an email template. In this, it has the option to build the email header and the body with the subject and other details.
Step 3: Configuring the acknowledgment message
The acknowledgment messages guide the end-users. It helps to complete submitting the WooCommerce contact form easily. It is for the following purposes.
To respond with a success or failure message.
To show a help text on entering wrong formatted data into the form.
To alert users to enter all mandatory fields.
To alert users to accept conditions or select form content if any.
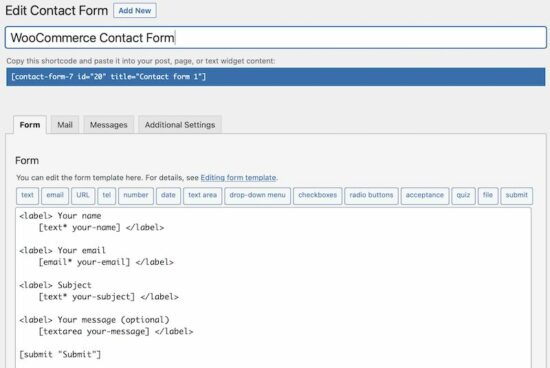
After successful configurations, save the form template. Then, copy the shortcode for rendering this WooCommerce contact form in the front end.
The shortcode is displayed below the contact form title in the editor window. Put this shortcode in the right template where the contact form is expected to be displayed.
Enabling Honey pot integrations to safeguard the form from bots and malicious users.
Enabling/disabling spam checking with respect to the on-submit token uniqueness using JavaScript.
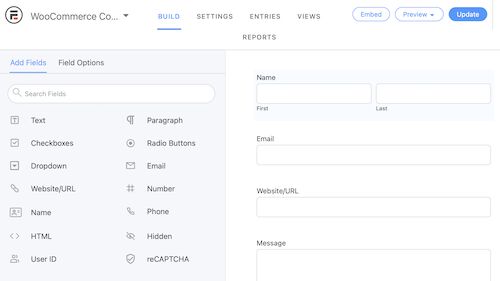
After building the WooCommerce contact form, click update to save the changes.
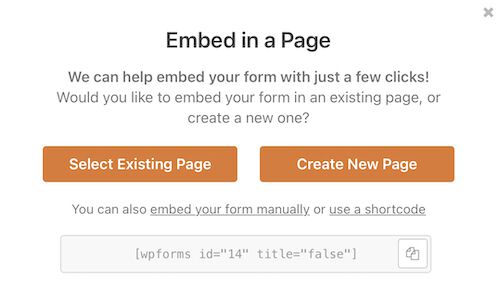
It is also having the “Embed” option to put the form into a WordPress page. The above image shows the “Embed”, “Preview” and “Update” options in the top right corner.
How to use the Simple Basic Contact Form plugin on a WooCommerce page?
The “Simple Basic Contact Form” is too simple to integrate as it is named. Unlike all the above plugins, it has a single-page setting to configure.
Though it doesn’t have a form builder, it provides a long scrollable list of configurations. These are more than enough to set up a useful WooCommerce contact form.
It includes place holder to include additional contents additional with the form fields. Those are,
Form description above and below the fields.
Help text above the submit button to guide the customers.
Markup of the success or failure responses.
Custom CSS to let the WooCommerce contact form be in the theme of the shop.
Enable captcha or question challenge.
Include stop words.
This settings page contains all minimal form fields required for a contact form. These are like Name, Email, Label, Text and more.
After configuring, add the shortcode [simple_contact_form] into a shop page template. It will render the corresponding form UI to allow customers to convey their doubts about the order placed.
Conclusion
With the use of any one of the above plugins, creating a WooCommerce contact form must be easy. It will enable your shop to let your customer enquire about the placed orders and product customization.
These choices help to choose one among them based on the need of your WooCommerce site.
These plugins have a volume of placeholders to configure. Sometimes, there will be a simple form expected to allow customers to enquire.
If you want a sleek solution instead of these complex configurations, then a custom code is best. Let us see how to create a WooCommerce contact form plugin in the next article.
Data cleaning describes the process of turning messy data into clean datasets that can be used for research and data science purposes. For example, tidy data will be in a wide format: every column contains a variable, and every row contains one case. Also, data cleaning means getting rid of corrupt data with very little utility.
Most data in the real world is messy and unstructured or semi-structured. Working in data science, most of your time will be spent on cleaning and structuring data.
In research, data from surveys or experiments is mostly already structured into Excel or CSV tables.
In companies, data can be stored in databases, Excel files, or distributed all over the company. This data can be in emails, documents, folders, images, and note apps.
This study shows, that most companies are having problems handling unstructured or semi-structured data, and almost half of them don’t even know where their data is located.
Unstructured data includes videos, images, and text or speech messages. Unstructured data from the web is mainly acquired by web scraping.
Semi-structured data is data found in documents, emails, social media posts, and if acquired from the web, it can be in HTML, JSON, or any other web format.
Is Web Scraping Legal?
Important: Even though web scraping is possible does not mean it is always legal!
If the data is publicly available and not copyrighted, it is mostly safe to scrape. But also pay attention to data privacy laws and do not scrape personal data.
Scraping data from social media websites, for example, is mostly illegal, as it is not publicly available without logging in and contains personal data.
There are also many services to get data via an API. To be safe, refer to this guide about what is legal when web scraping:
The goal of data cleaning and cleaning unstructured or semi-structured data is to create tidy data with which you can work. Tidy data will be in a wide format: every column contains a variable, and every row contains one case.
To demonstrate both perspectives, this article is divided into two parts:
First, we will scrape, load, and wrangle some semi-structured data from the web.
Second, we will clean this data. This second step is also valid for structured data as it is about finding missing, outliers and duplicates.
I recommend doing an exploratory data analysis before or during cleaning data to get a good feeling of the data you have. You can easily combine exploring and cleaning.
import pandas as pd # pandas for data wrangling, cleaning, and analysis
import requests # for http requests
from bs4 import BeautifulSoup # html reading
The wiki page that holds the table we are looking for can be found here:
We pass this URL into requests. The table in the HTML page is within <table class> , and the tables in wiki pages are called wiki tables. We can check this by looking at the HTML page in our browser or the HTML text file later to confirm we pulled the right table.
With requests.get(url).text, we pull the HTML from the page.
BeautifulSoup will pull the data table from the HTML file and save us time. We will pass the url_response from our request into the html.parser. With soup.find() we can tell it to look exactly for the wikitable. The output also tells us the name of the table.
I will drop the columns of the metropolitan area and the urban area because I am just interested in the population of the actual city. This can be done in several ways.
The heading looks clean. Now we explore the dataset to find information to clean.
With df.info() and df.describe() we get a quick overview of the data we scraped.
cities.info()
Output:
cities.describe()
Output:
It is immediately clear that the city_density/km2 is not a float even though it is supposed to be numerical.
Inspecting the data frame, you might have already noticed that the columns contain numbers following numbers in brackets, like [12]. This turns this data into an object, so we will have to get rid of this.
However, this would not work if some of our data points do not have the brackets at the end or more than that. So we’ll use the slicing method str.partition() to cut the brackets from our numbers.
First, we make sure our object type is a string that we can work string operations on. Then we apply the str.partition() method and advise the function to cut off at the first bracket [.
The commas in the variable will prevent us from converting the string into a float, so we’ll remove the comma with str.replace() before turning the string to a float with s.astype('float') and assigning it back to our data frame.
The variable now shows up when we look at df.describe() and we’ll want the results rounded for better readability:
cities.describe().round(1)
Output:
Cleaning Structured Data in Python
Following the cleaning of the scraped data we can now use it like a structured data frame with data we collected or downloaded.
This also can be cleaned of missing data, outliers and duplicates but does not always need data wrangling. However, with a data frame with many strings the cleaning process also often involves a lot of string manipulation.
Important note:
If you want to apply machine learning algorithms to your data, do split your dataset before feature engineering and data transformation as this can create data leakage!
There didn’t seem to be duplicates in our df, as the size remained the same.
When dealing with missing values, we must decide how to handle them based on our data.
We can either
Drop missing values
Replace or impute the values
Leave missing values in the dataset
Transform the information that they’re missing into a new variable
First, we inspect our missing data. The function df.isnull() is a boolean function, that tells us for the whole data frame if data is missing or not.
We can sum it up to determine, how many values are missing in each column.
cities.isnull().sum()
Output:
We can drop rows with missing values completely.
This will cause us to lose useful information in other columns. But as the first row is completely empty anyway, we can drop this one.
The df.dropna() function has useful features that help us pick what missing data we want to remove. So, I just want to remove the one row, or all of them if there are more, with all missing values.
cities = cities.dropna(how='all')
This will look like this:
What is left are the missing values for 8 cities for population, area and density. We will replace those.
Of course, you can look up the data on Wikipedia and reinsert them. For the sake of the exercise and because most of the time it is not possible to look up missing data, we will not do this.
The dataset now contains the data of the 73 biggest cities in the world, using the average of these to impute the missing values in the other 8 is the only and closest guess we have. This does not create much more information but keeps us from losing other information from these 8 cities.
The alternative option would be to drop those 8 cities completely.
So, we’ll replace the missing values in the area column with the average area size of all the other cities. First, we create the mean of the city area sizes, then we fill the missing values in the column with this value.
Pandas has the right function for this: df.fillna()
We can check back our missing values and the description of our dataset.
cities.isnull().sum()
cities.describe().round(1)
There is still one value missing in our city definition. Let’s have a look at these categories.
cities['city_definition'].value_counts()
Output:
As we don’t know if the missing city is a municipality or a capital, we could just replace the missing value with the generic description of “city”, as we know they all are cities.
If you’d want to calculate the differences between these categories, it would be useful to categorize and merge these single entries into bigger categories.
For now, we will just replace the missing value with “city”, as I am more interested in the size of the cities than the category.
Info: For many statistical operations, missing values will be dropped by default and don’t create a problem. For machine learning algorithms missing values must be removed before modelling.
We can also create dummy variables (information is missing/ not missing) as the fact that the data is missing might be useful information. This way, the fact that they’re missing can be included in the data analysis process.
Visualization
Now we visualize our data and check for outliers with a seaborn scatterplot.
import seaborn as sns
sns.scatterplot(data=cities, x="city_population", y="city_area_km2", size="city_population")
Output:
The city in the right top corner is clearly an outlier, but not one we would want to remove or equalize as it is not a measurement error. It is just the biggest city (or metropolitan area) in the world!
Let’s find out which one it is with df.sort_values(), using ascending=False to sort the city population from high to low.
In this article, you’ll learn how to check a List for Duplicates in Python.
To make it more fun, we have the following running scenario:
The Finxter Academy has given you an extensive list of usernames. Somewhere along the line, duplicate entries were added. They need you to check if their Listcontains duplicates. For testing purposes, a small sampling of this List is used.
Question: How would we write Python code to check a List for duplicate elements?
We can accomplish this task by one of the following options:
Method 1: Use set() and List to return a Duplicate-FreeList
Method 2: Use set(), For loop and List to return a List of Duplicates found.
Method 3: Use a For loop to return Duplicates and Counts
Method 4: Use any() to check for Duplicates and return a Boolean
Method 1: Use set() and List to return a Duplicate-Free List
This method uses set()which removes any duplicate values (set(users)) to produce a Duplicate-Freeset(). This set is then converted to a List (list(set(users))).
This code declares a small sampling of Finxter usernames and saves them to users.
Next, set() is called and users is passed as an argument to the same. Then, the new set is converted to a List and saved to dup_free.
If dup_free was output to the terminal before converting to a List, the result would be a set(), which is not subscriptable. Meaning the elements are inaccessible in this format.
Note: An empty set will result if no argument is passed.
Method 2: Use set(), For loop, and List to return a List of Duplicates Found
This method uses set(), and a For loop to check for and return any Duplicates found (set(x for x in users if ((x in tmp) or tmp.add(x)))) to dups. The set() is then converted to a List (print(list(dups))).
Here’s an example:
users = ['AmyP', 'ollie3', 'shoeguy', 'kyliek', 'ollie3', 'stewieboy', 'csealker', 'shoeguy', 'cdriver', 'kyliek'] tmp = set()
dups = set(x for x in users if (x in tmp or tmp.add(x)))
print(list(dups))
This code declares a small sampling of Finxter usernames and saves them to users.
Next, a new empty set, tmp is declared. A For loop is then instantiated to check each element in users for duplicates. If a duplicate is found, it is appended to tmp. The results save to dups as a set().
Output
In this example, the set() was converted to a List and displays a List of Duplicates values found in the original List, users.
['kyliek', 'ollie3', 'shoeguy']
Method 3: Use a For loop to return Duplicates and Counts
This method uses a For loop to navigate through and check each element of users while keeping track of all usernames and the number of times they appear. A Dictionary of Duplicates, including the Usernames and Counts returns.
Here’s an example:
count = {}
dup_count = {}
for i in users: if i not in count: count[i] = 1 else: count[i] += 1 dup_count[i] = count[i]
print(dup_count)
This code declares two (2) empty sets, count and dup_count respectively.
A For loop is instantiated to loop through each element of users and does the following:
If the element i is not in count, then the count element (count[i]=1) is set to one (1).
If element i is found in count, it falls to else where one (1) is added to count (count[i]+=1) and then added to dup_count (dup_count[i]=count[i])
This code repeats until the end of users has been reached.
At this point, a Dictionary containing the Duplicates, and the number of times they appear displays.
Output
{'ollie3': 2, 'shoeguy': 2, 'kyliek': 2}
Method 4: Use Any to Check for Duplicate Values
This example uses any(), and passes the iterableusers to iterate and locate Duplicates. If found, True returns. Otherwise, False returns. Best used on small Lists.
users = ['AmyP', 'ollie3', 'shoeguy', 'kyliek', 'ollie3', 'stewieboy', 'csealker', 'shoeguy', 'cdriver', 'kyliek'] dups = any(users.count(x) > 1 for x in users)
print(dups)
This code declares a small sampling of Finxter usernames and saves them to users.
Next, any() is called and loops through each element of users checking to see if the element is a duplicate. If found, True is assigned. Otherwise, Falseis assigned. The result saves to dups and the output displays as follows:
Output
True
Method 5: Use List Comprehension to return a List of all Duplicates
This method uses List Comprehension to loop through users, checking for duplicates. If found, the Duplicates are appended to dups.
Here’s an example:
users = ['AmyP', 'ollie3', 'shoeguy', 'kyliek', 'ollie3', 'stewieboy', 'csealker', 'shoeguy', 'cdriver', 'kyliek'] dups = [x for x in users if users.count(x) >= 2]
print(dups)
This code declares a small sampling of Finxter usernames and saves them to users.
Next, List Comprehension extracts and displays duplicate usernames and save them to a List. The duplicate values are output to the terminal
Before we learn about the money, let’s get this question out of the way:
What is a Database Engineer?
A database engineer is responsible for providing the data infrastructure of a company or organization. This involves designing, creating, installing, configuring, debugging, optimizing, securing, and managing databases. Database engineers can either work as employees or as freelancers remotely or onsite.
What Does a Database Engineer Do?
As already indicated, a database engineer is responsible for providing the data infrastructure of a company or organization.
In particular, a database engineer has many responsibilities, such as the following 15 most popular activities performed by a database engineer today:
Creating a new database system.
Finding a database system tailored to the needs of an organization.
Designing the data models.
Accessing the data with scripting languages including SQL-like syntax.
Installing an existing database software system onsite.
Configuring a database system.
Optimizing a database management system for performance, speed, or reliability.
Consulting management regarding data management issues.
Keeping databases secure and providing proper access control to users.
Monitoring and managing an existing database system to keep it running smoothly.
Debugging potential bugs, errors, and security issues detected at runtime.
Testing and deploying a database system on a public cloud infrastructure such as AWS.
Handling distribution issues in the case of a distributed database management system.
Ensuring budget adherence when running on a public cloud and estimating costs for private database solutions.
Communicating and negotiating with salespeople (e.g., from Oracle).
These are only some of the most common activities frequently handled by database engineers.
Database Engineer vs Data Engineer
A database engineer is responsible for providing the data infrastructure of a company or organization. This involves designing, creating, installing, configuring, debugging, optimizing, securing, and managing databases. Database engineers can either work as employees or as freelancers remotely or onsite.
A data engineer prepares data to be used in data analytics and operations, essentially providing automated or semi-automated ways for data collection and creating pipelines that connect various data sources to database management systems such as the ones managed by a database engineer.
A data engineer focuses on filling data into a database system whereas a database engineer is focused on providing the database system in the first place. There are intersection points between data engineers and database engineers at the interface between data sources and data management.
Database Engineer vs Database Administrator
Database administrators perform a similar role to database engineers in that they are responsible for setting up, installing, configuring, securing, and managing a database management system.
The focus is more on the technical maintenance of existing systems than the theoretical development of new solutions.
But the lines between those two job descriptions are blurry and often overlap significantly.
Annual Income of Database Engineer (US)
How much does a Database Engineer make per year?
Question: How much does a Database Engineer in the US make per year?
Figure: Average Income of a Database Engineer in the US by Source. [1]
The average annual income of a Database Engineer in the United States is between $72,536 and $135,000, with an average of $103,652 and a statistical median of $106,589 per year.
This data is based on our meta-study of ten (10) salary aggregators sources such as Glassdoor, ZipRecruiter, and PayScale.
If you decide to go the route as a freelance Database Developer, you can expect to make between $30 and $130 per hour on Upwork (source). Assuming an annual workload of 2000 hours, you can expect to make between $60,000 and $260,000 per year.
Note: Do you want to create your own thriving coding business online? Feel free to check out our freelance developer course — the world’s #1 best-selling freelance developer course that specifically shows you how to succeed on Upwork and Fiverr!
But don’t wait too long to acquire practical experience!
Even if you have little skills, it’s best to get started as a freelance developer and learn as you work on real projects for clients — earning income as you learn and gaining motivation through real-world feedback.
Tip: An excellent start to turbo-charge your freelancing career (earning more in less time) is our Finxter Freelancer Course. The goal of the course is to pay for itself!
Related Video
You can find more job descriptions for coders, programmers, and computer scientists in our detailed overview guide:
The following statistic shows the self-reported income from 9,649 US-based professional developers (source).
The average annual income of professional developers in the US is between $70,000 and $177,500 for various programming languages.
Question: What is your current total compensation (salary, bonuses, and perks, before taxes and deductions)? Please enter a whole number in the box below, without any punctuation. If you are paid hourly, please estimate an equivalent weekly, monthly, or yearly salary. (source)
The following statistic compares the self-reported income from 46,693 professional programmers as conducted by StackOverflow.
The average annual income of professional developers worldwide (US and non-US) is between $33,000 and $95,000 for various programming languages.
Here’s a screenshot of a more detailed overview of each programming language considered in the report:
Here’s what different database professionals earn:
Here’s an overview of different cloud solutions experts:
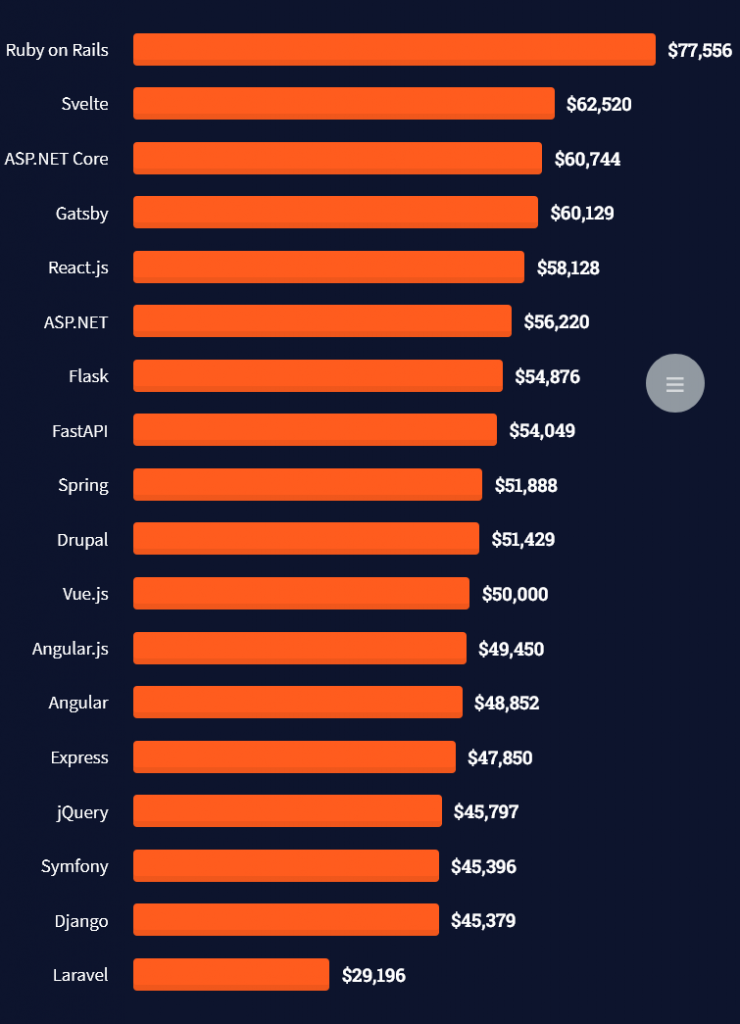
Here’s what professionals in web frameworks earn:
There are many other interesting frameworks—that pay well!
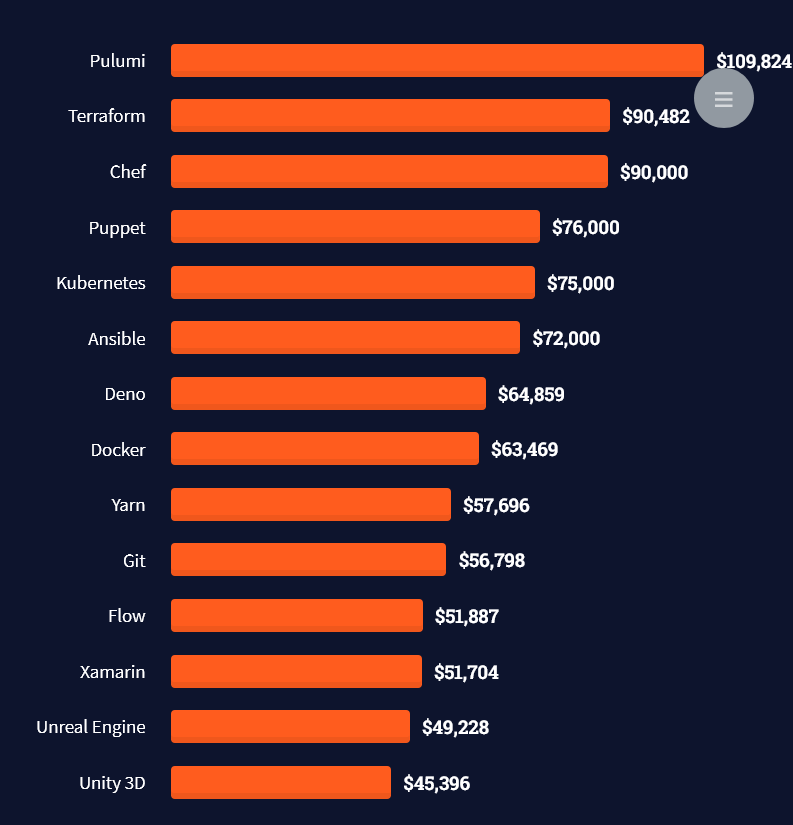
Look at those tools:
Okay, but what do you need to do to get there? What are the skill requirements and qualifications to make you become a professional developer in the area you desire?
Let’s find out next!
General Qualifications of Professionals
StackOverflow performs an annual survey asking professionals, coders, developers, researchers, and engineers various questions about their background and job satisfaction on their website.
Interestingly, when aggregating the data of the developers’ educational background, a good three quarters have an academic background.
Here’s the question asked by StackOverflow (source):
Which of the following best describes the highest level of formal education that you’ve completed?
However, if you don’t have a formal degree, don’t fear! Many of the respondents with degrees don’t have a degree in their field—so it may not be of much value for their coding careers anyways.
Also, about one out of four don’t have a formal degree and still succeeds in their field! You certainly don’t need a degree if you’re committed to your own success!
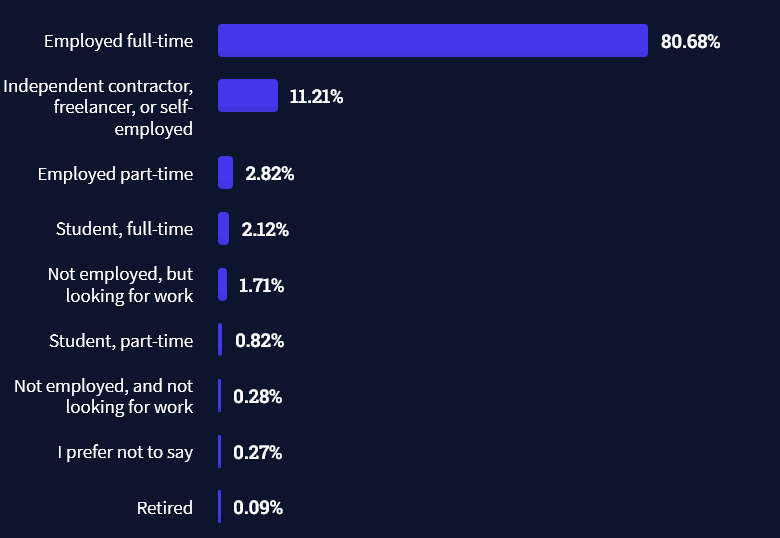
Freelancing vs Employment Status
The percentage of freelance developers increases steadily. The fraction of freelance developers has already reached 11.21%!
This indicates that more and more work will be done in a more flexible work environment—and fewer and fewer companies and clients want to hire inflexible talent.
Here are the stats from the StackOverflow developer survey (source):
Do you want to become a professional freelance developer and earn some money on the side or as your primary source of income?
Resource: Check out our freelance developer course—it’s the best freelance developer course in the world with the highest student success rate in the industry!
Other Programming Languages Used by Professional Developers
The StackOverflow developer survey collected 58000 responses about the following question (source):
Which programming, scripting, and markup languages have you done extensive development work in over the past year, and which do you want to work in over the next year?
These are the languages you want to focus on when starting out as a coder:
And don’t worry—if you feel stuck or struggle with a nasty bug. We all go through it. Here’s what SO survey respondents and professional developers do when they’re stuck:
What do you do when you get stuck on a problem? Select all that apply. (source)
Related Tutorials
To get started with some of the fundamentals and industry concepts, feel free to check out these articles:
Coders get paid six figures and more because they can solve problems more effectively using machine intelligence and automation.
To become more successful in coding, solve more real problems for real people. That’s how you polish the skills you really need in practice. After all, what’s the use of learning theory that nobody ever needs?
You build high-value coding skills by working on practical coding projects!
Do you want to stop learning with toy projects and focus on practical code projects that earn you money and solve real problems for people?
If your answer is YES!, consider becoming a Python freelance developer! It’s the best way of approaching the task of improving your Python skills—even if you are a complete beginner.
If you just want to learn about the freelancing opportunity, feel free to watch my free webinar “How to Build Your High-Income Skill Python” and learn how I grew my coding business online and how you can, too—from the comfort of your own home.
Question: Say you have an expression you want to execute using the exec() function. How to store the result of the expression in a Python variable my_result?
Before I show you the solution, let’s quickly recap the exec() function:
Recap Python exec()
Python’s exec() function executes the Python code you pass as a string or executable object argument.
This is called dynamic execution because, in contrast to normal static Python code, you can generate code and execute it at runtime.
This way, you can run programmatically-created Python code.
Without further ado, let’s learn how you can store the result of the exec() function in a Python variable:
Method 1: Define Variable in String Representation of Code
You can define a variable inside the exec() function that will then be added to the global namespace. Thus, you can access the defined variable in your code after the termination of the exec() expression!
Here’s how that works in a minimal example:
exec('my_result = 40 + 2')
print(my_result)
# 42
Variable my_result is only defined in the string expression passed into exec(). You can use it in the code like it was part of the original source code.
Method 2: How to Replace Value of a Variable in exec()
To replace a variable defined outside the exec() function call, you can simply do so using an f-string and pass the new value as the right-hand side of the assignment operator within the string representation of the code to be executed.
Here’s a minimal example where we overwrite the old_variable with the new string 'hello finxter' by using the expression:
Method 3: How to Replace Global Variable in exec()?
If you use the previous approach to replace a global variable defined outside the exec() expression that is called in a local context, the assignment operator will work on a local alias variable.
The global variable to be replaced will remain the same!
This can be seen in the following code example, where the global old_variable is not replaced with the new string 'hello finxter' because of the local scope of the function f that creates its own namespace with its own old_variable that overshadows the global old_variable.
old_variable = 'hello world'
new_string = 'hello finxter' def f(): # Replace old_old variable with new string 'hello finxter' exec(f'old_variable = "{new_string}"') f() print(old_variable)
# hello world
To overwrite a global variable within the exec() function, use the global keyword, followed by an empty space, the name of the global variable, a semicolon; to close the statement, and the expression to overwrite the global variable like so: exec(f'global old_variable; old_variable = "{new_string}"')
Let’s redirect the standard output and print directly to the variable!
This method assumes you have a print() statement within the expression passed into the exec() function such as shown in the following three examples:
exec('print(2+2)')
exec('print([1, 2, 3, 4] + [5, 6])')
exec('print(2+2*0)')
To get the output and store it in a variable my_result, you need to temporarily redirect the standard output to the variable.
The following code shows you how to accomplish exactly this:
# Step 1: Import libraries StringIO and sys
from io import StringIO
import sys # Step 2: Keep stdout in temporary variable
tmp = sys.stdout # Step 3: Capture standard output using a StringIO object
my_result = StringIO() # Step 4: Assign Standard Output Stream to StringIO object
sys.stdout = my_result # Step 5: Print to the standard output
expression = 'print(2+2)' # any exec() expression here
exec(expression) # Step 6: Clean up by redirecting stdout to Python shell
sys.stdout = tmp # Step 7: Get and print the string from stdout
print('VARIABLE:', my_result.getvalue())
# VARIABLE: 4
If you need some assistance understanding this whole idea of redirecting the standard output, have a look at our in-depth guide on the Finxter blog.
Note that this approach even works if you don’t have a print() statement in the original exec() expression because you can always artificially add the print() statement around the original expression like so:
Even if it’s a bit clunky, after applying this short trick, you can redirect the standard output and store the result of anyexec() expression in a variable.
Coders get paid six figures and more because they can solve problems more effectively using machine intelligence and automation.
To become more successful in coding, solve more real problems for real people. That’s how you polish the skills you really need in practice. After all, what’s the use of learning theory that nobody ever needs?
You build high-value coding skills by working on practical coding projects!
Do you want to stop learning with toy projects and focus on practical code projects that earn you money and solve real problems for people?
If your answer is YES!, consider becoming a Python freelance developer! It’s the best way of approaching the task of improving your Python skills—even if you are a complete beginner.
If you just want to learn about the freelancing opportunity, feel free to watch my free webinar “How to Build Your High-Income Skill Python” and learn how I grew my coding business online and how you can, too—from the comfort of your own home.
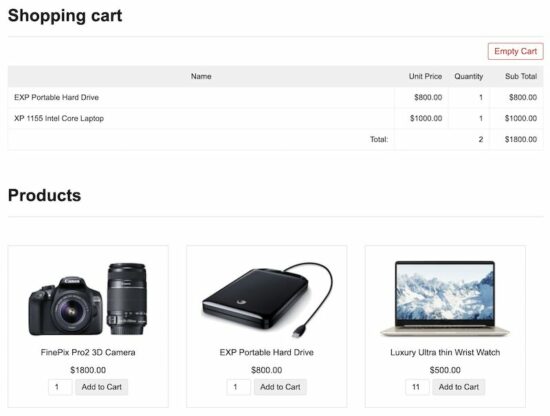
Do you want a shopping cart built entirely in JavaScript? With session / storage everything! With no PHP or server-side code, then read on and rock on.
Earlier I have written a lot of PHP shopping cart code using server-side sessions. Now let us see a similar concept on the client-side to build a JavaScript shopping cart.
The Window.sessionStorage is the right solution to create a session-based shopping cart. It is free from PHP or other server-side code, unlike previous eCommerce examples.
What is sessionStorage?
The sessionStorage is one of the standard JavaScript concepts of WebStorage API. It is a client-side session object that tends to set, get and clear data with respect to it. This object’s persistence is based on the browser’s session availability.
How to build a JavaScript shopping cart using sessionStorage?
The JavaScript shopping cart implementation is possible with sessionStorage like as below. The below table shows the mapping of sessionStorage capability with shopping cart features.
setItem() – Add to cart from the shopping gallery by referring to the purchased product id. It also is used to edit a cart item by replacing the value array.
getItem() – Read and display the cart items by iterating the sessionStorage object array.
removeItem() – Remove a single item from the cart by specifying the item index.
clear() – Empty the cart by unsetting the sessionStorage instance.
Shopping cart – checkout – payment
This section shows the execution flow of the JavaScript shopping cart code. It covers “add to cart” to check out and to the payment step.
Step 1: On “add to cart” action the sessionStorage object builds the purchased item array.
Step 2: Then, it gets the buyer’s payment details on a checkout form.
Step 3: Can renders payment options like PayPal with the request parameter array. This array contains purchased items and the buyer’s payment details.
Step 4: An alternate to step 3, that is, an email checkout. This suits the shopping cart not dealing with instant payment on the flow.
In this tutorial, we will see steps 1 and 2 of a JavaScript shopping cart. You can integrate with the payment options coded with different articles. Example: Integrate PayPal checkout into the eCommerce website.
JavaScript shopping cart example
This example provides bare minimal features of a Javascript shopping cart. It supports performing the “add to cart” and “clear cart” functionalities via JavaScript.
This code also builds and supplies product gallery HTML from JavaScript.
The productItem contains the product JSON data. It contains a row of product data with name, price and photo path.
The showProductGallery method iterates this productItem JSON and builds the product gallery HTML.
In this gallery, each product tile contains the option “add to cart”. It moves the selected product to the cart session by clicking the “Add to cart” button.
The JavaScript code uses for each loop to iterate theproductItem JSON.
“Add to cart” action to move a product into the cart table
This “add to cart” JavaScript handler is a core functionality of the example. This code initiates the JavaScript sessionStorage object.
On clicking the “Add to cart” button on the product tile, this function is invoked.
It reads the product details from the product grid where the clicked “Add to cart” is placed. For example, it gets the product name, quantity and other details.
Using these details, this code prepares the JSON instance of the cart item row. Then, it appends the newly added items to the existing cart sessionStorage object.
function addToCart(element) { var productParent = $(element).closest('div.product-item'); var price = $(productParent).find('.price span').text(); var productName = $(productParent).find('.productname').text(); var quantity = $(productParent).find('.product-quantity').val(); var cartItem = { productName: productName, price: price, quantity: quantity }; var cartItemJSON = JSON.stringify(cartItem); var cartArray = new Array(); // If javascript shopping cart session is not empty if (sessionStorage.getItem('shopping-cart')) { cartArray = JSON.parse(sessionStorage.getItem('shopping-cart')); } cartArray.push(cartItemJSON); var cartJSON = JSON.stringify(cartArray); sessionStorage.setItem('shopping-cart', cartJSON); showCartTable();
}
Empty the cart by clearing the session
This JavaScript shopping cart code contains an option to empty the cart table.
It explicitly clears the sessionStorage instance created to have the cart items.
The showCartTable function is called for updating the cart table UI and the total count.
function emptyCart() { if (sessionStorage.getItem('shopping-cart')) { // Clear JavaScript sessionStorage by index sessionStorage.removeItem('shopping-cart'); showCartTable(); }
}
Load cart row, item count, the total amount from sessionStorage object
This code displays the logic of showCartTable() to rebuild cart HTML and update UI.
It initiates variables to hold the following data. These are used in the JavaScript shopping cart code.
Cart table HTML.
A total number of items added to the cart.
A total amount of the purchased cart items.
It checks cart sessionStorage and iterates the array if exists. During the iteration, it builds the cart table HTML and computes the total count and price.
The cart sessionStorage data is pushed to the UI via this JavaScript function. It reflects the latest cart state to the end-users.
Persistent JavaScript shopping cart with localStorage instance
The WebStorage API’s sessionStorage will be expired when the browser is closed. This API provides one more storage object which is localStorage.
The localStorage object is similar to sessionStorage. The only difference is that the localStorage keeps data until explicit action.
So, this concept helps to have a persistent cart. That is to retain the customers’ cart items even if they closed the browser.
The source code uses sessionStorage for this JavaScript shopping cart code. Include the following file instead of cart.js if you want to use the localStorage object.
cart-local-storage.js
$(document).ready(function() { var productItem = [{ productName: "FinePix Pro2 3D Camera", price: "1800.00", photo: "camera.jpg" }, { productName: "EXP Portable Hard Drive", price: "800.00", photo: "external-hard-drive.jpg" }, { productName: "Luxury Ultra thin Wrist Watch", price: "500.00", photo: "laptop.jpg" }, { productName: "XP 1155 Intel Core Laptop", price: "1000.00", photo: "watch.jpg" }]; showProductGallery(productItem); showCartTable();
}); function addToCart(element) { var productParent = $(element).closest('div.product-item'); var price = $(productParent).find('.price span').text(); var productName = $(productParent).find('.productname').text(); var quantity = $(productParent).find('.product-quantity').val(); var cartItem = { productName: productName, price: price, quantity: quantity }; var cartItemJSON = JSON.stringify(cartItem); var cartArray = new Array(); // If javascript shopping cart session is not empty if (localStorage.getItem('shopping-cart')) { cartArray = JSON.parse(localStorage.getItem('shopping-cart')); } cartArray.push(cartItemJSON); var cartJSON = JSON.stringify(cartArray); localStorage.setItem('shopping-cart', cartJSON); showCartTable();
} function emptyCart() { if (localStorage.getItem('shopping-cart')) { // Clear JavaScript localStorage by index localStorage.removeItem('shopping-cart'); showCartTable(); }
} function removeCartItem(index) { if (localStorage.getItem('shopping-cart')) { var shoppingCart = JSON.parse(localStorage.getItem('shopping-cart')); localStorage.removeItem(shoppingCart[index]); showCartTable(); }
} function showCartTable() { var cartRowHTML = ""; var itemCount = 0; var grandTotal = 0; var price = 0; var quantity = 0; var subTotal = 0; if (localStorage.getItem('shopping-cart')) { var shoppingCart = JSON.parse(localStorage.getItem('shopping-cart')); itemCount = shoppingCart.length; //Iterate javascript shopping cart array shoppingCart.forEach(function(item) { var cartItem = JSON.parse(item); price = parseFloat(cartItem.price); quantity = parseInt(cartItem.quantity); subTotal = price * quantity cartRowHTML += "<tr>" + "<td>" + cartItem.productName + "</td>" + "<td class='text-right'>$" + price.toFixed(2) + "</td>" + "<td class='text-right'>" + quantity + "</td>" + "<td class='text-right'>$" + subTotal.toFixed(2) + "</td>" + "</tr>"; grandTotal += subTotal; }); } $('#cartTableBody').html(cartRowHTML); $('#itemCount').text(itemCount); $('#totalAmount').text("$" + grandTotal.toFixed(2));
} function showProductGallery(product) { //Iterate javascript shopping cart array var productHTML = ""; product.forEach(function(item) { productHTML += '<div class="product-item">'+ '<img src="product-images/' + item.photo + '">'+ '<div class="productname">' + item.productName + '</div>'+ '<div class="price">$<span>' + item.price + '</span></div>'+ '<div class="cart-action">'+ '<input type="text" class="product-quantity" name="quantity" value="1" size="2" />'+ '<input type="submit" value="Add to Cart" class="add-to-cart" onClick="addToCart(this)" />'+ '</div>'+ '</div>'; "<tr>"; }); $('#product-item-container').html(productHTML);
}
Security caution
Until the “add to cart” step, the client-side handling is fine. When proceeding with checkout, it is preferable to use server-side middleware.
It is for safety purposes to handle security loopholes. It will do the sanitization, validation of data authenticity and more verification process.
Conclusion
So, we have created a JavaScript shopping cart code using the sessionStorage object. And also, we saw one more option to add the cart item persistency with the localStorage object.
The client-side shopping cart implementation is not a complete solution. But, it has the advantages of minimalism. It will suit the thin static cart available online.
It is suitable for the shops having client-side integrations connected with hosted services. Download


 Note: Read here to learn more about the carriage return escape character.


 Question: How much does a Tableau Developer in the US make per year?
 Note: This is the most comprehensive salary meta-study of tableau developer income in the world, to the best of my knowledge!
 Note: Do you want to create your own thriving coding business online? Feel free to check out our

 Tip: An excellent start to turbo-charge your freelancing career (earning more in less time) is our
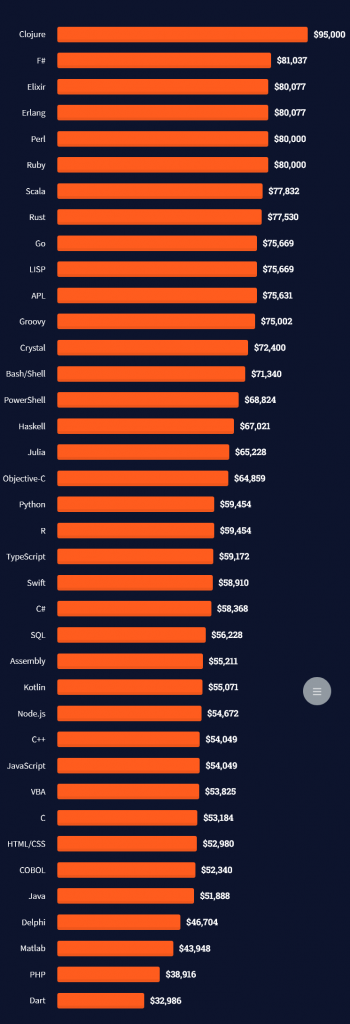


 Related Tutorial:


 Important: Even though web scraping is possible does not mean it is always legal!


 Related Article: