Uploading files to Google Drive programmatically can be done by the Google API. It uses OAuth to authenticate requests and authorize access.
This tutorial describes uploading files to Google Drive using PHP. It gives a simple PHP script to easily understand the Google API and upload files.
It also uses a database to save the uploaded file details with the Google Drive reference.
It handles errors that can occur for the following reasons during the upload process.
- When the file binary is empty on the PHP script.
- When the user fails to submit the form and proceeds to upload without form data.
- When the Google OAuth request is failed to get the access token.
- When the cURL request to the Google API is failed to return the status code 200.
On successful upload without any of the above uncertainties, this code shows the Google Drive link to see the uploaded file preview.
The below figure shows the file upload form with the success and failure responses.

How to create API credentials to access Google Drive
Login to your Google account and go to the developer console. Then follow the below steps to create API credentials to access Google Drive to upload a file.
- Create a new project or select an existing project from the Google console header.
- Click the Library menu and enable Google Drive API. Use the filter to shortlist this API.
- Choose the OAuth consent screen menu to create the app. Fill up the following to register the app.
- App name
- support email
- authorized domain
- developer contact detail (email).
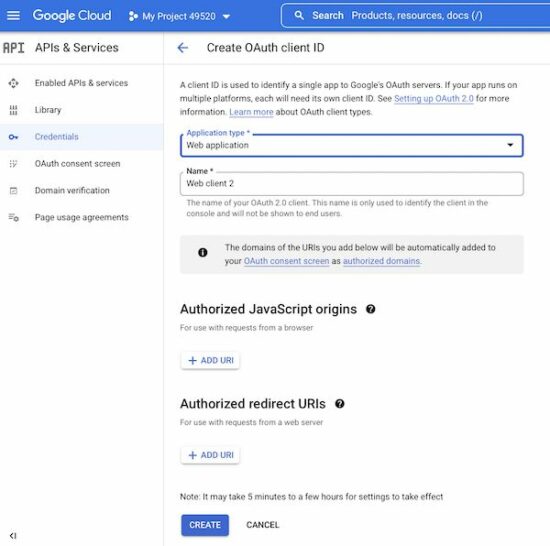
- Select Credentials->Create Credentials, then select OAuth client ID. Then, enter the following details.
- Choose Application type as Web Application.
- Add authorized JavaScript origin.
- Add authorized redirect URI.
After completing these steps, the console will display the Google web client id and the secret key. These credentials are used for the authentication process to get access to Google Drive.
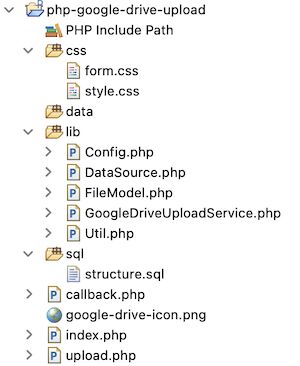
Example application files structure
Let us see the PHP example code created for this article to upload a file to Google Drive. The following figure shows the file structure of this example.
Application config file
This PHP file contains the constants used in this example. The API credentials and the endpoints are stored as PHP constants with this file.
The endpoint URI configured in this file is to hit the Google Drive API for the following purpose.
- To set scope during OAuth redirect.
- To get the access token after authentication with the API credentials
GOOGLE_WEB_CLIENT_IDandGOOGLE_WEB_CLIENT_SECRET. - To upload file to Drive
- To add metadata to the uploaded file
The AUTHORIZED_REDIRECT_URI is to set the callback. The API will call this URI with the access code to proceed with file upload after authentication.
lib/Config.php
<?php class Config
{ const GOOGLE_WEB_CLIENT_ID = 'add client id'; const GOOGLE_WEB_CLIENT_SECRET = 'add client secret'; const GOOGLE_ACCESS_SCOPE = 'https://www.googleapis.com/auth/drive'; const AUTHORIZED_REDIRECT_URI = 'https://domain-name/php-google-drive-upload/callback.php'; const GOOGLE_OAUTH2_TOKEN_URI = 'https://oauth2.googleapis.com/token'; const GOOGLE_DRIVE_FILE_UPLOAD_URI = 'https://www.googleapis.com/upload/drive/v3/files'; const GOOGLE_DRIVE_FILE_META_URI = 'https://www.googleapis.com/drive/v3/files/';
} ?>
Landing form with file upload option
This is a simple HTML form that calls the PHP endpoint upload.php on submitting. The file data is posted to this PHP file to upload to a local directory and to Google Drive.
I have just managed field validation by using HTML5 required attribute. You can also add exclusive JavaScript validation for this file upload form.
We have already seen code for doing server-side file validation in PHP.
index.php
<?php
session_start(); ?>
<html>
<head>
<title>How to upload file to Google drive</title>
<link rel="stylesheet" type="text/css" href="css/style.css" />
<link rel="stylesheet" type="text/css" href="css/form.css" />
<style>
input.btn-submit { background: #ffc72c url("google-drive-icon.png") no-repeat center left 45px; text-align: right; padding-right: 45px;
}
</style>
</head>
<body> <div class="phppot-container tile-container"> <form method="post" action="upload.php" class="form" enctype="multipart/form-data">
<?php if(!empty($_SESSION['responseMessage'])){ ?> <div id="phppot-message" class="<?php echo $_SESSION['responseMessage']['messageType']; ?>"> <?php echo $_SESSION['responseMessage']['message']; ?> </div>
<?php $_SESSION['responseMessage'] = "";
}
?>
<h2 class="text-center">Upload file to drive</h2> <div> <div class="row"> <label class="inline-block">Select file to upload</label> <input type="file" name="file" class="full-width" required> </div> <div class="row"> <input type="submit" name="submit" value="Upload to Drive" class="btn-submit full-width"> </div> </div> </form> </div>
</body>
</html>
PHP code upload file to a directory, save to database and redirect to Google
This HTML form action endpoint performs file upload to a directory. It saves the file path to the database and redirects to the Google OAuth URI.
This URI sets the scope, app client id and redirect path (callback.php) to get the access code from the Google Drive API endpoint.
In case of error occurrence, it calls application utils to acknowledge and guide users properly.
upload.php
<?php
session_start();
require_once __DIR__ . '/lib/Util.php';
$util = new Util(); if (! empty($_POST['submit'])) { require_once __DIR__ . '/lib/Config.php'; require_once __DIR__ . '/lib/FileModel.php'; $fileModel = new FileModel(); if (! empty($_FILES["file"]["name"])) { $fileName = basename($_FILES["file"]["name"]); $targetFilePath = "data/" . $fileName; if (move_uploaded_file($_FILES["file"]["tmp_name"], $targetFilePath)) { $fileInsertId = $fileModel->insertFile($fileName); if ($fileInsertId) { $_SESSION['fileInsertId'] = $fileInsertId; $googleOAuthURI = 'https://accounts.google.com/o/oauth2/auth?scope=' . urlencode(Config::GOOGLE_ACCESS_SCOPE) . '&redirect_uri=' . Config::AUTHORIZED_REDIRECT_URI . '&response_type=code&client_id=' . Config::GOOGLE_WEB_CLIENT_ID . '&access_type=online'; header("Location: $googleOAuthURI"); exit(); } else { $util->redirect("error", 'Failed to insert into the database.'); } } else { $util->redirect("error", 'Failed to upload file.'); } } else { $util->redirect("error", 'Choose file to upload.'); }
} else { $util->redirect("error", 'Failed to find the form data.');
}
?>
Callback action to get access token and proceed file upload to Google Drive
This page is called by Google API after performing the OAuth request. The API sends a code parameter while calling this redirect URL.
It calls the getAccessToken() a function defined in the service class. It passes API credentials to get the access token.
When the token is received, this file builds the file content and file meta to be uploaded to Google Drive via cURL request.
The uploadFileToGoogleDrive() accepts access token and the file information to set the cURL options. It returns the file id of the uploaded file to Google Drive.
Then, the addFileMeta() PHP function accepts the array of file metadata. It returns the Google Drive file meta data received as a cURL response.
This metadata id is used in the success response to allow users to view the uploaded file in Google Drive.
callback.php
<?php
session_start();
require_once __DIR__ . '/lib/Util.php';
$util = new Util();
if (isset($_GET['code'])) { require_once __DIR__ . '/lib/Config.php'; require_once __DIR__ . '/lib/GoogleDriveUploadService.php'; $googleDriveUploadService = new GoogleDriveUploadService(); $googleResponse = $googleDriveUploadService->getAccessToken(Config::GOOGLE_WEB_CLIENT_ID, Config::AUTHORIZED_REDIRECT_URI, Config::GOOGLE_WEB_CLIENT_SECRET, $_GET['code']); $accessToken = $googleResponse['access_token']; if (! empty($accessToken)) { require_once __DIR__ . '/lib/FileModel.php'; $fileModel = new FileModel(); $fileId = $_SESSION['fileInsertId']; if (! empty($fileId)) { $fileResult = $fileModel->getFileRecordById($fileId); if (! empty($fileResult)) { $fileName = $fileResult[0]['file_base_name']; $filePath = 'data/' . $fileName; $fileContent = file_get_contents($filePath); $fileSize = filesize($filePath); $filetype = mime_content_type($filePath); try { // Move file to Google Drive via cURL $googleDriveFileId = $googleDriveUploadService->uploadFileToGoogleDrive($accessToken, $fileContent, $filetype, $fileSize); if ($googleDriveFileId) { $fileMeta = array( 'name' => basename($fileName) ); // Add file metadata via Google Drive API $googleDriveMeta = $googleDriveUploadService->addFileMeta($accessToken, $googleDriveFileId, $fileMeta); if ($googleDriveMeta) { $fileModel->updateFile($googleDriveFileId, $fileId); $_SESSION['fileInsertId'] = ''; $driveLink = '<a href="https://drive.google.com/open?id=' . $googleDriveMeta['id'] . '" target="_blank"><b>Open in Google Drive</b></a>.'; $util->redirect("success", 'File uploaded. ' . $driveLink); } } } catch (Exception $e) { $util->redirect("error", $e->getMessage()); } } else { $util->redirect("error", 'Failed to get the file content.'); } } else { $util->redirect("error", 'File id not found.'); } } else { $util->redirect("error", 'Something went wrong. Access forbidden.'); }
}
?>
PHP service class to prepare requests and hit Google Drive API via cURL
The service class contains functions that build the PHP cURL request to hit the Google Drive API.
All the cURL requests use POST methods to submit parameters to the API endpoints.
It gets the response code and the data in the specified format. In case of a cURL error or getting a response code other than 200, it throws exceptions.
On getting the status code 200, it receives the Google Drive file reference and metadata JSON response appropriately.
lib/GoogleDriveUploadService.php
<?php
require_once __DIR__ . '/Config.php'; class GoogleDriveUploadService
{ public function getAccessToken($clientId, $authorizedRedirectURI, $clientSecret, $code) { $curlPost = 'client_id=' . $clientId . '&redirect_uri=' . $authorizedRedirectURI . '&client_secret=' . $clientSecret . '&code=' . $code . '&grant_type=authorization_code'; $curl = curl_init(); curl_setopt($curl, CURLOPT_URL, Config::GOOGLE_OAUTH2_TOKEN_URI); curl_setopt($curl, CURLOPT_RETURNTRANSFER, 1); curl_setopt($curl, CURLOPT_POST, 1); curl_setopt($curl, CURLOPT_SSL_VERIFYPEER, FALSE); curl_setopt($curl, CURLOPT_POSTFIELDS, $curlPost); $curlResponse = json_decode(curl_exec($curl), true); $responseCode = curl_getinfo($curl, CURLINFO_HTTP_CODE); if ($responseCode != 200) { $errorMessage = 'Problem in getting access token'; if (curl_errno($curl)) { $errorMessage = curl_error($curl); } throw new Exception('Error: ' . $responseCode . ': ' . $errorMessage); } return $curlResponse; } public function uploadFileToGoogleDrive($accessToken, $fileContent, $filetype, $fileSize) { $curl = curl_init(); curl_setopt($curl, CURLOPT_SSL_VERIFYPEER, false); curl_setopt($curl, CURLOPT_SSL_VERIFYHOST, false); curl_setopt($curl, CURLOPT_URL, Config::GOOGLE_DRIVE_FILE_UPLOAD_URI . '?uploadType=media'); curl_setopt($curl, CURLOPT_BINARYTRANSFER, 1); curl_setopt($curl, CURLOPT_POST, 1); curl_setopt($curl, CURLOPT_POSTFIELDS, $fileContent); curl_setopt($curl, CURLOPT_RETURNTRANSFER, true); curl_setopt($curl, CURLOPT_HTTPHEADER, array( 'Content-Type: ' . $filetype, 'Content-Length: ' . $fileSize, 'Authorization: Bearer ' . $accessToken )); $curlResponse = json_decode(curl_exec($curl), true); $responseCode = curl_getinfo($curl, CURLINFO_HTTP_CODE); if ($responseCode != 200) { $errorMessage = 'Failed to upload file to drive'; if (curl_errno($curl)) { $errorMessage = curl_error($curl); } throw new Exception('Error ' . $responseCode . ': ' . $errorMessage); } curl_close($curl); return $curlResponse['id']; } public function addFileMeta($accessToken, $googleDriveFileId, $fileMeta) { $curl = curl_init(); curl_setopt($curl, CURLOPT_URL, Config::GOOGLE_DRIVE_FILE_META_URI . $googleDriveFileId); curl_setopt($curl, CURLOPT_RETURNTRANSFER, 1); curl_setopt($curl, CURLOPT_POST, 1); curl_setopt($curl, CURLOPT_SSL_VERIFYPEER, false); curl_setopt($curl, CURLOPT_SSL_VERIFYHOST, false); curl_setopt($curl, CURLOPT_HTTPHEADER, array( 'Content-Type: application/json', 'Authorization: Bearer ' . $accessToken )); curl_setopt($curl, CURLOPT_CUSTOMREQUEST, 'PATCH'); curl_setopt($curl, CURLOPT_POSTFIELDS, json_encode($fileMeta)); $curlResponse = json_decode(curl_exec($curl), true); $responseCode = curl_getinfo($curl, CURLINFO_HTTP_CODE); if ($responseCode != 200) { $errorMessage = 'Failed to add file metadata'; if (curl_errno($curl)) { $errorMessage = curl_error($curl); } throw new Exception('Error ' . $responseCode . ': ' . $errorMessage); } curl_close($curl); return $curlResponse; }
}
?>
PHP model class to build queries and parameters to insert, read and update file data log
This PHP model class defines functions to keep track of the database log for the uploaded file.
In the callback, it writes the Google Drive file id with the reference of the last inserted id in the session.
lib/FileModel.php
<?php
require_once __DIR__ . '/DataSource.php'; class FileModel extends DataSource
{ function insertFile($fileBaseName) { $query = "INSERT INTO google_drive_upload_response_log (file_base_name, create_at) VALUES (?, NOW())"; $paramType = 's'; $paramValue = array( $fileBaseName ); $insertId = $this->insert($query, $paramType, $paramValue); return $insertId; } function getFileRecordById($fileId) { $query = "SELECT * FROM google_drive_upload_response_log WHERE id = ?"; $paramType = 'i'; $paramValue = array( $fileId ); $result = $this->select($query, $paramType, $paramValue); return $result; } function updateFile($googleFileId, $fileId) { $query = "UPDATE google_drive_upload_response_log SET google_file_id=? WHERE id=?"; $paramType = 'si'; $paramValue = array( $googleFileId, $fileId ); $this->update($query, $paramType, $paramValue); }
}
?>
This file is a simple PHP Util class having only a redirect function as of now.
We can enhance this function by adding more utils. For example, it can have JSON encode decode to convert the cURL response into an array.
lib/Util.php
<?php class Util
{ function redirect($type, $message) { $_SESSION['responseMessage'] = array( 'messageType' => $type, 'message' => $message ); header("Location: index.php"); exit(); }
}
?>
Installation steps
Before running this example to upload a file to Google Drive, do the following steps. It will let the development environment be ready with the required configurations and resources.
- Configure database details with lib/DataSource.php. The source code includes this file.
- Configure Google API keys with lib/Config.php. Also, provide the domain and subfolder for setting the callback with AUTHORIZED_REDIRECT_URI.
- Import the below SQL script into your target database.
sql/structure.sql
--
-- Table structure for table `google_drive_upload_response_log`
-- CREATE TABLE `google_drive_upload_response_log` ( `id` int NOT NULL, `google_file_id` varchar(255) CHARACTER SET utf8 COLLATE utf8_general_ci DEFAULT NULL, `file_base_name` varchar(255) CHARACTER SET utf8 COLLATE utf8_general_ci DEFAULT NULL, `create_at` datetime NOT NULL DEFAULT CURRENT_TIMESTAMP ON UPDATE CURRENT_TIMESTAMP
) ENGINE=InnoDB DEFAULT CHARSET=utf8mb4 COLLATE=utf8mb4_0900_ai_ci; --
-- Indexes for dumped tables
-- --
-- Indexes for table `google_drive_upload_response_log`
--
ALTER TABLE `google_drive_upload_response_log` ADD PRIMARY KEY (`id`); --
-- AUTO_INCREMENT for dumped tables
-- --
-- AUTO_INCREMENT for table `google_drive_upload_response_log`
--
ALTER TABLE `google_drive_upload_response_log` MODIFY `id` int NOT NULL AUTO_INCREMENT;
 Question: How would we write code to convert an Epoch Date to a Date Time representation?
 Note: Universal Time (UTC) is the primary standard 24-hour time clock by which the World regulates clocks and time.


 Related Tutorial:


 Finxter Favorite: My preference is Method 4 (Vanilla Python) because it’s simplest to use, efficient, and most robust for different input types (numerical or textual) and doesn’t require external dependencies and data wrangling.