Challenge: Given an integer d representing the number of digits. How to create a random number with d digits in Python?
Here are three examples:
my_random(2) generates 12
my_random(3) generates 389
my_random(10) generates 8943496710
I’ll discuss three interesting methods to accomplish this easily in Python—my personal favorite is Method 2!
Shortest Solution with randint()
Let’s start with an easy hand-coded observation:
The easiest way to create a random number with two digits is to use random‘s randint(10, 99), with three digits is randint(100,999), and with four digits is randint(1000,9999).
Here’s the same example in Python code:
from random import randint # Create random number with two digits (d=2):
print(randint(10, 99)) # Create random number with three digits (d=3):
print(randint(100, 999)) # Create random number with three digits (d=3):
print(randint(1000, 9999))
This solution can be generalized by using the one-liner random.randint(int('1'+'0'*(d-1)), int('9'*d)) that generates the start and end values on the fly, based on the number of digits d.
I used simple string arithmetic to define the start and end index of the random range:
int('1'+'0'*(d-1)) creates the start index such as 100 for d=3.
int('9'*d)) creates the end index that’s included in randint() such as 999 for d=3.
Here’s the basic Python example:
import random def my_random(d): ''' Generates a random number with d digits ''' return random.randint(int('1'+'0'*(d-1)), int('9'*d)) for i in range(1, 10): print(my_random(i)) '''
Output:
8
82
296
5909
90957
227691
1348638
61368798
160959002 '''
Cleanest Solution with randrange()
The cleanest solution is based on the randrange() function from the random module that takes the start and end index as input and generates a random number in between.
Unlike randint(), the end index is excluded in randrange(), so we have an easier way to construct our range for the d-digit random number problem: random.randrange(10**(d-1), 10**d).
Here’s an example:
import random def my_random(d): ''' Generates a random number with d digits ''' return random.randrange(10**(d-1), 10**d) for i in range(1, 10): print(my_random(i)) '''
Output:
7
64
872
2440
39255
979369
6897920
83589118
707920991 '''
An Iterative Solution Aggregating Outputs of Single-Digit Random Function Calls
You can also use a one-liner to repeatedly execute the random.randint() function for each digit. To combine the digits, you convert each digit to a string, pass them into the string.join() function to get one string with d characters, and convert this string back to an integer:
int(''.join(str(random.randint(0,9)) for _ in range(d)))
Here’s this exact approach in a Python code snippet:
import random def my_random(d): ''' Generates a random number with d digits ''' return int(''.join(str(random.randint(0,9)) for _ in range(d))) for i in range(1, 10): print(my_random(i)) '''
Output:
6
92
135
156
95865
409722
349673
31144072
439469934 '''
Summary
Thanks for reading through the whole article—I hope you got some value out of it.
Here’s again a summary of how to best generate a random number with d digits in Python:
random.randint(int('1'+'0'*(d-1)), int('9'*d))
random.randrange(10**(d-1), 10**d)
int(''.join(str(random.randint(0,9)) for _ in range(d)))
Personally, I like Method 2 the most because it’s short, concise, and very efficient!
In this tutorial, we’ll have a quick look at each of them and give you a link to a more detailed resource so you can set up your Solidity compiler as quickly and efficiently as possible.
Video: For your convenience, I embedded the video tutorial provided by our Solidity expert Matija so you don’t even need to leave this page.
Without further ado, let’s get started!
Method 1: Install Solidity Compiler via npm
As you watch the video or go through this tutorial, feel free to download the following slides as well — for your convenience:
Before we go into details about the Docker installation of solc, let’s first get introduced to what Docker is.
Docker is an open platform for developing, shipping, and running applications… Docker provides the ability to package and run an application in a loosely isolated environment called a container… Containers are lightweight and contain everything needed to run the application, so you do not need to rely on what is currently installed on the host.
There are some parts of the description I’ve deliberately left out (separated by the symbol …) because they’re not essential to our understanding of the technology.
Method 3: Install Solidity Compiler via Source Code Compilation
This is a very complex way to install the Solidity compiler and I wouldn’t recommend it for most people. Due to the complexity, I’ll only give a quick overview of the associated article (tutorial).
Feel free to dive into it after scanning through these three contributions:
First, we listed and explained the software prerequisites needed for compiling a Solidity compiler. In some cases, we reached a complete explanation, and in others, we just gave a brief introductory explanation and announced an entire topic, such as in the case of the Satisfiability Modulo Theorem, SMT.
Second, we installed the prerequisites by following the first part of a step-by-step tutorial. All the examples have been checked and validated at the time of writing the article, so I expect that we’ll be able to follow them without issues. We also concluded that a compilation process can in some cases take a substantial amount of time; it took almost 40 minutes to compile the z3 SMT solver on my machine.
Third, we compiled a Solidity compiler following a step-by-step tutorial. I explained for each command example to broaden our learning process even outside of the strict scope of Solidity, to Linux (as far as we needed to go). Finally, when the compilation ended, we confirmed that our home-compiled Solidity compiler works at least as charming as the ones we’ve simply downloaded or installed in a precompiled state.
Method 4: Install Solidity Compiler via Static Binary and Linux Packages
You’ll just download the compiler’s static binary, or in short, binary, and simply run it, without any additional prerequisites or preparations required.
First, downloading the file solc-static-linux and giving it an executable privilege:
$ cd ~ && wget https://github.com/ethereum/solidity/releases/download/v0.8.16/solc-static-linux
$ chmod +x ~/solc-static-linux
Second, running solc:
$ ~/solc-static-linux 1_Storage.sol -o output – abi – bin
Compiler run successful. Artifact(s) can be found in directory "output".
When checking our solidity_src directory, we’ll discover a new directory output, created by the Solidity compiler, containing both .abi and .bin files.
Solidity is the programming language of the future.
It gives you the rare and sought-after superpower to program against the “Internet Computer”, i.e., against decentralized Blockchains such as Ethereum, Binance Smart Chain, Ethereum Classic, Tron, and Avalanche – to mention just a few Blockchain infrastructures that support Solidity.
In particular, Solidity allows you to create smart contracts, i.e., pieces of code that automatically execute on specific conditions in a completely decentralized environment. For example, smart contracts empower you to create your own decentralized autonomous organizations (DAOs) that run on Blockchains without being subject to centralized control.
NFTs, DeFi, DAOs, and Blockchain-based games are all based on smart contracts.
This course is a simple, low-friction introduction to creating your first smart contract using the Remix IDE on the Ethereum testnet – without fluff, significant upfront costs to purchase ETH, or unnecessary complexity.
Also, you’ll learn how to solve a variant of this challenge.
Bonus challenge: Find only the length of the shortest list in the list of lists.
Here are some examples:
[[1], [2, 3], [4, 5, 6]]1
[[1, [2, 3], 4], [5, 6], [7]]1
[[[1], [2], [3]], [4, 5, [6]], [7, 8, 9, 10]]3
So without further ado, let’s get started!
Method 1: min(lst, key=len)
Use Python’s built-in min() function with a key argument to find the shortest list in a list of lists. Call min(lst, key=len) to return the shortest list in lst using the built-inlen() function to associate the weight of each list, so that the shortest inner list will be the minimum.
A beautiful one-liner solution, isn’t it? Let’s have a look at a slight variant to check the length of the shortest list instead.
Method 2: len(min(lst, key=len))
To get the length of the shortest list in a nested list, use the len(min(lst, key=len)) function. First, you determine the shortest inner list using the min() function with the key argument set to the len() function. Second, you pass this shortest list into the len() function itself to determine the minimum.
A Pythonic way to check the length of the shortest list is to combine a generator expression or list comprehension with the min() function without key. For instance, min(len(x) for x in lst) first turns all inner list into length integer numbers and passes this iterable into the min() function to get the result.
Here’s this approach on the same examples as before:
A not so Pythonic but still fine approach is to iterate over all lists in a for loop, check their length using the len() function, and compare it against the currently shortest list stored in a separate variable. After the termination of the loop, the variable contains the shortest list.
Here’s a simple example:
def get_shortest_list(lst): shortest = lst[0] if lst else None for x in lst: if len(x) < len(shortest): shortest = x return shortest print(get_shortest_list([[1], [2, 3], [4, 5, 6]]))
# [1] print(get_shortest_list([[1, [2, 3], 4], [5, 6], [7]]))
# [7] print(get_shortest_list([[[1], [2], [3]], [4, 5, [6]], [7, 8, 9, 10]]))
# [[1], [2], [3]] print(get_shortest_list([]))
# None
So many lines of code! At least does the approach also work when passing in an empty list due to the ternary operator used in the first line.
lst[0] if lst else None
If you need a refresher on the ternary operator, you should check out our blog tutorial.
Note: If you need the length of the shortest list, you could simply replace the last line of the function with return len(shortest) , and you’re done!
Summary
You have learned about four ways to find the shortest list and its length from a Python list of lists (nested list):
Method 1: min(lst, key=len)
Method 2: len(min(lst, key=len))
Method 3: min(len(x) for x in lst)
Method 4: Naive For Loop
I hope you found the tutorial helpful, if you did, feel free to consider joining our community of likeminded coders—we do have lots of free training material!
This article will show you how to delete a line from a file in Python.
To make it more interesting, we have the following running scenario:
Rivers Clothing has a flat text file, rivers_emps.txt containing employee data. What happens if an employee leaves? They would like you to write code to resolve this issue.
Contents of rivers_emps.txt
100:Jane Smith
101:Daniel Williams
102:Steve Markham
103:Howie Manson
104:Wendy Wilson
105:Anne McEvans
106:Bev Doyle
107:Hal Holden
108:Mich Matthews
109:Paul Paulson
Question: How would we write code to remove this line?
We can accomplish this task by one of the following options:
This example uses List Comprehension to remove a specific line from a flat text file.
orig_lines = [line.strip() for line in open('rivers_emps.txt')]
new_lines = [l for l in orig_lines if not l.startswith('102')] with open('rivers_01.txt', 'w') as fp: print(*new_lines, sep='\n', file=fp)
The above code uses List Comprehension to read in the contents of a flat text file to a List, orig_lines. If output to the terminal, the following displays.
Then, List Comprehension is used again to append each element to a new List only if the element does not start with 102. If output to the terminal, the following displays.
As you can see, the element starting with 102 has been removed.
Next, a new file, rivers_01.txt, is opened in write (w) mode and the List created above is written to the file with a newline (\n) character appended to each line. The contents of the file are shown below.
100:Jane Smith
101:Daniel Williams
103:Howie Manson
104:Wendy Wilson
105:Anne McEvans
106:Bev Doyle
107:Hal Holden
108:Mich Matthews
109:Paul Paulson
orig_lines = [line.strip() for line in open('rivers_emps.txt')]
new_lines = orig_lines[0:2] + orig_lines[3:] with open('rivers_02.txt', 'w') as fp: fp.write('\n'.join(new_lines))
The above code uses List Comprehension to read in the contents of a flat text file to a List, orig_lines. If output to the terminal, the following displays.
Then Slicing is used to extract all elements, except element two (2). The results save to new_lines. If output to the terminal, the following displays.
100:Jane Smith
101:Daniel Williams
103:Howie Manson
104:Wendy Wilson
105:Anne McEvans
106:Bev Doyle
107:Hal Holden
108:Mich Matthews
109:Paul Paulson
As you can see, element two (2) has been removed.
Next, a new file, rivers_02.txt, is opened in write (w) mode and the List created above is written to the file with a newline (\n) character appended to each line. The contents of the file are shown below.
100:Jane Smith
101:Daniel Williams
103:Howie Manson
104:Wendy Wilson
105:Anne McEvans
106:Bev Doyle
107:Hal Holden
108:Mich Matthews
109:Paul Paulson
Before moving forward, please ensure that the NumPy library is installed to ensure this code runs error-free.
import numpy as np orig_lines = [line.strip() for line in open('rivers_emps.txt')]
new_lines = orig_lines[0:2] + orig_lines[3:] np.savetxt('rivers_03.txt', new_lines, delimiter='\n', fmt='%s')
The following line uses List Comprehension to read the contents of a flat text file to the List, orig_lines. If output to the terminal, the following displays.
Then Slicing is applied to extract all elements, except element two (2). The results save to new_lines. If output to the terminal, the following displays.
100:Jane Smith
101:Daniel Williams
103:Howie Manson
104:Wendy Wilson
105:Anne McEvans
106:Bev Doyle
107:Hal Holden
108:Mich Matthews
109:Paul Paulson
As you can see, element two (2) has been removed.
The last code line calls np.savetxt() and passes it three (3) arguments:
100:Jane Smith
101:Daniel Williams
103:Howie Manson
104:Wendy Wilson
105:Anne McEvans
106:Bev Doyle
107:Hal Holden
108:Mich Matthews
109:Paul Paulson
Method 4: Use pop()
This example uses the pop() function to remove a specific line from a flat text file.
import numpy as np orig_lines = [line.strip() for line in open('rivers_emps.txt')]
orig_lines.pop(2)
np.savetxt('rivers_04.txt', orig_lines, delimiter='\n', fmt='%s')
The following line uses List Comprehension to read in the contents of a flat text file to the List, orig_lines. If output to the terminal, the following displays.
Then, the pop() method is called and passed one (1) argument, the element’s index to remove.
In this case, it is the second element.
If this List was output to the terminal, the following would display.
100:Jane Smith
101:Daniel Williams
103:Howie Manson
104:Wendy Wilson
105:Anne McEvans
106:Bev Doyle
107:Hal Holden
108:Mich Matthews
109:Paul Paulson
As shown in Method 3, the results save to a flat text file. In this case, rivers_04.txt. The contents are the same as in the previous examples.
Note: The pop() function removes the appropriate index and returns the contents to capture if necessary.
Method 5: Use remove()
This example uses the remove()function to remove a specific line from a flat text file.
import numpy as np orig_lines = [line.strip() for line in open('rivers_emps.txt')]
orig_lines.remove('102:Steve Markham')
np.savetxt('rivers_05.txt', orig_lines, delimiter='\n', fmt='%s')
This code works exactly like the code in Method 4. However, instead of passing a location of the element to remove, this function requires the contents of the entire line you to remove.
Then, the remove() function is called and passed one (1) argument, the index to remove. In this case, it is the second element. If this List was output to the terminal, the following would display.
100:Jane Smith
101:Daniel Williams
103:Howie Manson
104:Wendy Wilson
105:Anne McEvans
106:Bev Doyle
107:Hal Holden
108:Mich Matthews
109:Paul Paulson
As shown in the previous examples, the results save to a flat text file. In this case, rivers_05.txt.
Bonus: Remove row(s) from a DataFrame
CSV files are also known as flat-text files. This code shows you how to easily remove single or multiple rows from a CSV file
Finxter Challenge Find 2 Additional Ways to Remove Lines
Summary
This article has provided five (5) ways to delete a line from a file to select the best fit for your coding requirements.
Good Luck & Happy Coding!
Programmer Humor – Blockchain
“Blockchains are like grappling hooks, in that it’s extremely cool when you encounter a problem for which they’re the right solution, but it happens way too rarely in real life.”source – xkcd
Export data to an excel file is mainly used for taking a backup. When taking database backup, excel format is a convenient one to read and manage easily. For some applications exporting data is important to take a backup or an offline copy of the server database.
This article shows how to export data to excel using PHP. There are many ways to implement this functionality. We have already seen an example of data export from MySQL.
This article uses the PHPSpreadSheet library for implementing PHP excel export.
It is a popular library that supports reading, and writing excel files. It will smoothen the excel import-export operations through its built-in functions.
The complete example in this article will let create your own export tool or your application.
About this Example
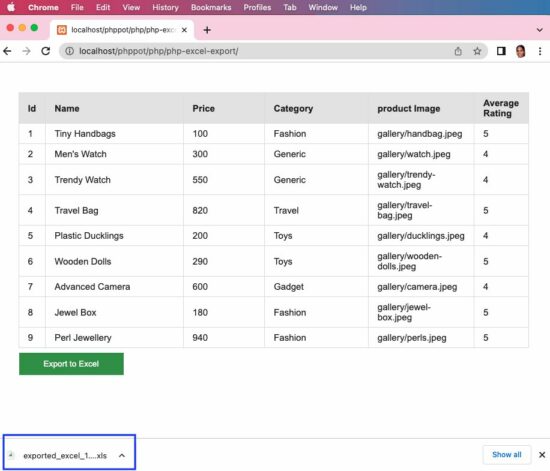
It will show a minimal interface with the list of database records and an “Export to Excel” button. By clicking this button, it will call the custom ExportService created for this example.
This service instantiates the PHPSpreadsheet library class and sets the column header and values. Then it creates a writer object by setting the PHPSpreadsheet instance to output the data to excel.
Follow the below steps to let this example run in your environment.
Create and set up the database with data exported to excel.
Download the code at the end of this article and configure the database.
Add PHPSpreadSheet library and other dependencies into the application.
1) Create and set up the database with data exported to excel
Create a database named “db_excel_export” and import the below SQL script into it.
structure.sql
--
-- Table structure for table `tbl_products`
-- CREATE TABLE `tbl_products` ( `id` int(8) NOT NULL, `name` varchar(255) NOT NULL, `price` double(10,2) NOT NULL, `category` varchar(255) NOT NULL, `product_image` text NOT NULL, `average_rating` float(3,1) NOT NULL
); --
-- Dumping data for table `tbl_products`
-- INSERT INTO `tbl_products` (`id`, `name`, `price`, `category`, `product_image`, `average_rating`) VALUES
(1, 'Tiny Handbags', 100.00, 'Fashion', 'gallery/handbag.jpeg', 5.0),
(2, 'Men\'s Watch', 300.00, 'Generic', 'gallery/watch.jpeg', 4.0),
(3, 'Trendy Watch', 550.00, 'Generic', 'gallery/trendy-watch.jpeg', 4.0),
(4, 'Travel Bag', 820.00, 'Travel', 'gallery/travel-bag.jpeg', 5.0),
(5, 'Plastic Ducklings', 200.00, 'Toys', 'gallery/ducklings.jpeg', 4.0),
(6, 'Wooden Dolls', 290.00, 'Toys', 'gallery/wooden-dolls.jpeg', 5.0),
(7, 'Advanced Camera', 600.00, 'Gadget', 'gallery/camera.jpeg', 4.0),
(8, 'Jewel Box', 180.00, 'Fashion', 'gallery/jewel-box.jpeg', 5.0),
(9, 'Perl Jewellery', 940.00, 'Fashion', 'gallery/perls.jpeg', 5.0); --
-- Indexes for dumped tables
-- --
-- Indexes for table `tbl_products`
--
ALTER TABLE `tbl_products` ADD PRIMARY KEY (`id`); --
-- AUTO_INCREMENT for dumped tables
-- --
-- AUTO_INCREMENT for table `tbl_products`
--
ALTER TABLE `tbl_products` MODIFY `id` int(8) NOT NULL AUTO_INCREMENT, AUTO_INCREMENT=10;
2) Download the code and configure the database
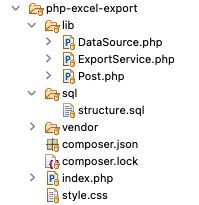
The source code contains the following files. This section explains the database configuration.
Once you download the excel export code from this page, you can find DataSource.php file in the lib folder. Open it and configure the database details in it as below.
PHP model calls prepare queries to fetch data to export
This is a PHP model class that is called to read data from the database. The data array will be sent to the export service to build the excel sheet object.
The getColumnName() reads the database table column name array. This array will supply data to form the first row in excel to create a column header.
The getAllPost() reads the data rows that will be iterated and set the data cells with the values.
lib/Post.php
<?php
class Post
{ private $ds; public function __construct() { require_once __DIR__ . '/DataSource.php'; $this->ds = new DataSource(); } public function getAllPost() { $query = "select * from tbl_products"; $result = $this->ds->select($query); return $result; } public function getColumnName() { $query = "select * from INFORMATION_SCHEMA.COLUMNS where TABLE_NAME=N'tbl_products'"; $result = $this->ds->select($query); return $result; }
}
?>
PHP excel export service
This service helps to export data to the excel sheet. The resultant file will be downloaded to the browser by setting the PHP header() properties.
The $postResult has the row data and the $columnResult has the column data.
This example instantiates the PHPSpreadSheet library class and sets the column header and values. Then it creates a writer object by setting the spreadsheet instance to output the data to excel.
Also, you’ll learn how to solve a variant of this challenge.
Bonus challenge: Find only the length of the longest list in the list of lists.
Here are some examples:
[[1], [2, 3], [4, 5, 6]]3
[[1, [2, 3], 4], [5, 6], [7]]3
[[[1], [2], [3]], [4, 5, [6]], [7, 8, 9, 10]]4
So without further ado, let’s get started!
Method 1: max(lst, key=len)
Use Python’s built-in max() function with a key argument to find the longest list in a list of lists. Call max(lst, key=len) to return the longest list in lst using the built-inlen() function to associate the weight of each list, so that the longest inner list will be the maximum.
A beautiful one-liner solution, isn’t it? Let’s have a look at a slight variant to check the length of the longest list instead.
Method 2: len(max(lst, key=len))
To get the length of the longest list in a nested list, use the len(max(lst, key=len)) function. First, you determine the longest inner list using the max() function with the key argument set to the len() function. Second, you pass this longest list into the len() function itself to determine the maximum.
A Pythonic way to check the length of the longest list is to combine a generator expression or list comprehension with the max() function without key. For instance, max(len(x) for x in lst) first turns all inner list into length integer numbers and passes this iterable into the max() function to get the result.
Here’s this approach on the same examples as before:
A not so Pythonic but still fine approach is to iterate over all lists in a for loop, check their length using the len() function, and compare it against the currently longest list stored in a separate variable. After the termination of the loop, the variable contains the longest list.
Note: If you need the length of the longest list, you could simply replace the last line of the function with return len(longest) , and you’re done!
Summary
You have learned about four ways to find the longest list and its length from a Python list of lists (nested list):
Method 1: max(lst, key=len)
Method 2: len(max(lst, key=len))
Method 3: max(len(x) for x in lst)
Method 4: Naive For Loop
I hope you found the tutorial helpful, if you did, feel free to consider joining our community of likeminded coders—we do have lots of free training material!
In the previous articles, we looked at some of the representative examples of smart contracts representing possible real-world scenarios.
Our main focus was on capturing the essence of each case, without particular attention given to the general structure, i.e. layout of the respective source files.
However, in this mini-series starting with this article, we will focus particularly on the source file layout.
The articles will continue with our tradition of going hand in hand with the official Solidity documentation, with the particular topic of our current interest available here.
Info: As we’ve reached such a nice, round number of articles on Solidity, I have a small foreword for my faithful audience.
For those of us who missed or skipped previous articles, the intent behind the content is to supplement and clarify the original documentation and even present it in a style that I find to be more appropriate to us as the audience.
Given that we come from various backgrounds, some less and some more technical, it is my permanent goal to soften the material and make it as close as possible to each reader. Sometimes, completely unannounced and unprovoked, I’ll even try and sprinkle some humor onto the content.
Will I succeed in making it funny and engaging? That’s whole another story
SPDX License Identifier
Smart contracts are somewhat a mystery to unfamiliar folks, and a mystery usually implies a certain amount of distrust. Even so, the more sensitive the subject is, the greater the amount of distrust. The best way to turn distrust into trust is to make the content in question open and available.
When we’re talking about smart contracts, the openness of a smart contract means the availability of its source code. However, making the source code available frequently triggers legal problems regarding copyright.
To alleviate these problems, the Solidity compiler instigates the use of SPDX license identifiers.
Info: SPDX stands for the Software Package Data Exchange, which is “An open standard for communicating software bill of material information, including components, licenses, copyrights, and security references. SPDX reduces redundant work by providing a common format for companies and communities to share important data, thereby streamlining and improving compliance.“
Yes, I agree, it’s a lengthy sentence, but the main takeaway ideas are a communication standard, an instrument of compliance, and a data exchange format:
SPDX is a standard used for communicating the information about the software contents;
SPDX reduces redundant work and improves compliance;
SPDX provides a common format for data sharing between companies and communities;
An SPDX license identifier should be included at the beginning of the source file, e.g.
// SPDX-License-Identifier: GPL-3.0-or-later
Although SPDX license identifiers are machine-readable, the compiler does not check if the license part of the comment is in the list of licenses allowed by SPDX.
Instead, the compiler will just include the string in the bytecode metadata.
We will touch on the subject of contract metadata in future articles, but until then, let’s just remember that there is a thing called metadata.
Info: Metadata can be loosely defined as “data/information about data”, meaning it provides more information or description of certain data.
We don’t have to specify a license or if the case is that the source code is closed-source (opposite of open-source), the recommendation is that we use a special value UNLICENSED.
The UNLICENSED value implies that usage is not allowed, i.e. there is not a corresponding item in SPDX license list; it differs from the value UNLICENSE which grants all rights to everyone.
If we as developers supply the UNLICENSE comment, we are still tied by the obligation related to licensing, i.e. we have to mention a specific license header or the original copyright holder in the source files.
Although the compiler recognizes the comment placed at any location in the source file, the recommendation, and good practice is to put it at the top of the file.
Pragmas
We’ve mentioned the pragma keyword somewhere in the first few articles, but now we’ll use the opportunity to say a few more words about it.
Pragma keyword is the element of the Solidity programming language that enables specific Solidity compiler (remember solc) features or validations, i.e. checks.
As the pragma keyword scope is its source file, we’d have to add the pragma to all our files to enable it in our whole project.
Note: A pragma from an imported file does not apply to the importer file, i.e. the file that imports the imported file.
Version Pragma
We always use a version pragma for limiting the source file(s) compilation to a specific range of compiler versions.
The intention behind this step is the prevention of incompatible changes introduced with future versions of compilers.
According to the Solidity authors, occurrences of incompatible changes are reduced to an absolute minimum, meaning that in all other cases i.e. cases of compatible changes, the changes in Solidity language semantics visibly coincide with the changes in language syntax.
To stay on the safe side, the recommendation is to study the changelog at least for releases that carry breaking changes, marked x.0.0 (major releases) or 0.x.0 (minor releases).
Info: semantic is relating to meaning in language or logic.
As in every our example so far, we’re using the version pragma as:
Note: pragma solidity ^0.x.y; allows changes that do not modify the left-most non-zero digit in the [major, minor, patch] tuple (docs).
The following line instructs the compilation process to use a compiler with the lowest version of 0.5.2 and with the highest version not exceeding 0.6.0 (this condition is incorporated by a ^ symbol):
pragma solidity ^0.5.2;
By recalling the article about semantic versioning, we’ll remember that no breaking changes are introduced until a minor version of 0.6.0 (in this specific case), therefore we can be sure that our code will compile just as we expect it to.
Also, by using the line above, we didn’t lock on the specific version, so the last part of the version label, i.e. the patch number can increase, leaving enough space for the compiler bug fixes.
Besides this most common way of expressing the allowed versions of the compiler, even more, complex rules are available by using the syntax available here.
Note: version pragma just instructs the compiler to self-check if it is compliant with the version required by the source file. In case of a mismatch, the compiler will throw an (in)appropriate error. I mean, who ever saw an appropriate error, anyways?
Conclusion
With this introductory article to the topic of the layout of a Solidity source file, we covered a few very light concepts, including SPDX license identifier, reintroduced the pragma keyword, and retouched the version pragma.
In the next article, we will continue with the next two pragmas and other, very interesting topics.
In the SPDX License Identifier section, we were asking around inconspicuously about the SPDX. We wanted to find out what it is, how and when it is used, and how it can make our developing life easier.
In the Pragmas section, we proudly reminded ourselves of the knowledge from long ago, why do we have to slam a pragma at the beginning of each source file?
If at least they looked nice… Starting our coding masterpieces with a dangling comment seemed like a skewed joke (like most of mine do) – until we learned why
If you are looking for a client-side solution to detect a mobile device, your search stops here :-). There are properties to detect this on the client side by using JavaScript.
Two methods of detecting if a current device is a mobile device are listed below.
By using JavaScript window.matchMedia() method.
By using navigator.userAgent property.
Both are using JavaScript basic methods to create the mobile device detector code.
1) By using JavaScript window.matchMedia() method
This method is the best one compared to the one using JavaScript navigator.userAgent. Because the userAgent is a setting that can be configured by the end users. They can change it!
matchmedia.html
Quick example
function isMobileDevice() { return window .matchMedia("only screen and (max-width: 760px)").matches;
}
if (isMobileDevice()) { document.write("<b>Detected device is a mobile.</b>");
} else { document .write("<b>Detected device is not a mobile.</b>");
}
The matchMedia() JavaScript custom method is used to do this mobile device detection.
It accepts a media query string and returns an object. This object will contain the current device’s media property and its relevancy.
Then, this object is used to find the match between the current device’s media property with the media query passed.
This program sends the media query containing a max-width of a mobile device that is expected to have.
If the current device’s media screen properties are matched with this argument, then this JavaScript function returns a boolean true.
This screenshot is taken from my computer that prints the result of the above quick example.
Media match with CSS
It can also be done by CSS instead of JavaScript. Follow the below steps to implement this using CSS.
Keep two possible messages in the HTML markup with style=’display:none’.
Write CSS media query section with @media screen and (max-width: 600px).
Show and hide the appropriate UI notification element according to the screen width.
<!DOCTYPE html>
<html>
<head>
<title>How to Detect Mobile Device using JavaScript</title>
<meta name="viewport" content="width=device-width, initial-scale=1">
<style>
.mobile { display: none;
} .not-mobile { display: block;
} @media only screen and (max-width: 600px) { .mobile { display: block; } .not-mobile { display: none; }
}
</style>
</head>
<body> <b class="mobile">Detected device is a mobile.</b> <b class="not-mobile">Detected device is not a mobile.</b>
</body>
</html>
2) By using a navigator.userAgent property
The alternate method is for checking the current userAgent to detect if it is a mobile device.
The isMobileDevice() function in the below example does the test with a regex pattern. The regex contains the most possible values of a mobile device’s userAgent.
The script compares the current device’s userAgent property with the pattern. If a match is found, then this function returns true to print the appropriate result.
navigator.html
<!DOCTYPE html>
<html>
<head>
<title>How to Detect Mobile Device using JavaScript</title>
</head>
<body> <h1>How to Detect Mobile Device using JavaScript</h1> <p>Note: Browser users can change value of "userAgent" via UA spoofing. So be aware of that and do not use this feature to provide a critical function of your website.</p> <script> function isMobileDevice() { return /Android|webOS|iPhone|iPad|iPod|BlackBerry|IEMobile|Opera Mini/i .test(navigator.userAgent); /* for a more detailed test /(android|bb\d+|meego).+mobile|avantgo|bada\/|blackberry|blazer|compal|elaine|fennec|hiptop|iemobile|ip(hone|od)|ipad|iris|kindle|Android|Silk|lge |maemo|midp|mmp|netfront|opera m(ob|in)i|palm( os)?|phone|p(ixi|re)\/|plucker|pocket|psp|series(4|6)0|symbian|treo|up\.(browser|link)|vodafone|wap|windows (ce|phone)|xda|xiino/i .test(navigator.userAgent) || /1207|6310|6590|3gso|4thp|50[1-6]i|770s|802s|a wa|abac|ac(er|oo|s\-)|ai(ko|rn)|al(av|ca|co)|amoi|an(ex|ny|yw)|aptu|ar(ch|go)|as(te|us)|attw|au(di|\-m|r |s )|avan|be(ck|ll|nq)|bi(lb|rd)|bl(ac|az)|br(e|v)w|bumb|bw\-(n|u)|c55\/|capi|ccwa|cdm\-|cell|chtm|cldc|cmd\-|co(mp|nd)|craw|da(it|ll|ng)|dbte|dc\-s|devi|dica|dmob|do(c|p)o|ds(12|\-d)|el(49|ai)|em(l2|ul)|er(ic|k0)|esl8|ez([4-7]0|os|wa|ze)|fetc|fly(\-|_)|g1 u|g560|gene|gf\-5|g\-mo|go(\.w|od)|gr(ad|un)|haie|hcit|hd\-(m|p|t)|hei\-|hi(pt|ta)|hp( i|ip)|hs\-c|ht(c(\-| |_|a|g|p|s|t)|tp)|hu(aw|tc)|i\-(20|go|ma)|i230|iac( |\-|\/)|ibro|idea|ig01|ikom|im1k|inno|ipaq|iris|ja(t|v)a|jbro|jemu|jigs|kddi|keji|kgt( |\/)|klon|kpt |kwc\-|kyo(c|k)|le(no|xi)|lg( g|\/(k|l|u)|50|54|\-[a-w])|libw|lynx|m1\-w|m3ga|m50\/|ma(te|ui|xo)|mc(01|21|ca)|m\-cr|me(rc|ri)|mi(o8|oa|ts)|mmef|mo(01|02|bi|de|do|t(\-| |o|v)|zz)|mt(50|p1|v )|mwbp|mywa|n10[0-2]|n20[2-3]|n30(0|2)|n50(0|2|5)|n7(0(0|1)|10)|ne((c|m)\-|on|tf|wf|wg|wt)|nok(6|i)|nzph|o2im|op(ti|wv)|oran|owg1|p800|pan(a|d|t)|pdxg|pg(13|\-([1-8]|c))|phil|pire|pl(ay|uc)|pn\-2|po(ck|rt|se)|prox|psio|pt\-g|qa\-a|qc(07|12|21|32|60|\-[2-7]|i\-)|qtek|r380|r600|raks|rim9|ro(ve|zo)|s55\/|sa(ge|ma|mm|ms|ny|va)|sc(01|h\-|oo|p\-)|sdk\/|se(c(\-|0|1)|47|mc|nd|ri)|sgh\-|shar|sie(\-|m)|sk\-0|sl(45|id)|sm(al|ar|b3|it|t5)|so(ft|ny)|sp(01|h\-|v\-|v )|sy(01|mb)|t2(18|50)|t6(00|10|18)|ta(gt|lk)|tcl\-|tdg\-|tel(i|m)|tim\-|t\-mo|to(pl|sh)|ts(70|m\-|m3|m5)|tx\-9|up(\.b|g1|si)|utst|v400|v750|veri|vi(rg|te)|vk(40|5[0-3]|\-v)|vm40|voda|vulc|vx(52|53|60|61|70|80|81|83|85|98)|w3c(\-| )|webc|whit|wi(g |nc|nw)|wmlb|wonu|x700|yas\-|your|zeto|zte\-/i .test(navigator.userAgent.substr(0, 4)) */ } if (isMobileDevice()) { document.write("<b>Detected device is a mobile.</b>"); } else { document .write("<b>Detected device is not a mobile.</b>"); } </script>
</body>
</html>
Note: Browser users can change the value of “userAgent” via UA spoofing. So be aware of that and do not use this feature to provide a critical function of your website.
We are going to see three different ways of capturing screenshots of a webpage using JavaScript. These three methods give solutions to take screenshots with and without using libraries.
Using html2canvas JavaScript library.
Using plain HTML5 with JavaScript.
Using WebRTC’s getDisplayMedia method.
1) Using the html2canvas JavaScript library
This method uses the popular JS library html2canvas to capture a screenshot from a webpage.
This script implements the below steps to capture a screenshot from the page HTML.
It initializes the html2canvas library class and supplies the body HTML to it.
It sets the target to append the output screenshot to the HTML body.
Generates canvas element and appends to the HTML.
It gets the image source data URL from the canvas object.
Push the source URL to the PHP via AJAX to save the screenshot to the server.
capture-screenshot/index.html
Quick example
<!DOCTYPE html>
<html>
<head>
<title>How to Capture Screenshot of Page using JavaScript</title>
<link rel='stylesheet' href='form.css' type='text/css' />
</head>
<body> <div class="phppot-container"> <h1>How to Capture Screenshot of Page using JavaScript</h1> <p> <button id="capture-screenshot">Capture Screenshot</button> </p> </div> <script src="https://ajax.googleapis.com/ajax/libs/jquery/3.2.1/jquery.min.js"></script> <script type="text/javascript" src="https://html2canvas.hertzen.com/dist/html2canvas.min.js"></script> <script type="text/javascript"> $('#capture-screenshot').click(function() { const screenshotTarget = document.body; html2canvas(screenshotTarget).then(canvas => { // to image as png use below line // const base64image = canvas.toDataURL("image/png"); // show the image in window use below line // window.location.href = base64image; // screenshot appended to the body as canvas document.body.appendChild(canvas); dataURL = canvas.toDataURL(); // to print the screenshot in console use below line // console.log(dataURL); // following line is optional and it is to save the screenshot // on the server side. It initiates an ajax call pushScreenshotToServer(dataURL); }); }); function pushScreenshotToServer(dataURL) { $.ajax({ url: "push-screenshot.php", type: "POST", data: { image: dataURL }, dataType: "html", success: function() { console.log('Screenshot pushed to server.'); } }); } </script>
</body>
</html>
This PHP script reads the screenshot binaries posted via AJAX. It prepares the screenshot properties in a JSON format.
capture-screenshot/push-screenshot.php
<?php
if (isset($_POST['image'])) { // should have read and write permission to the disk to write the JSON file $screenshotJson = fopen("screenshot.json", "a") or die("Unable to open screenshot.json file."); $existingContent = file_get_contents('screenshot.json'); $contentArray = json_decode($existingContent, true); $screenshotImage = array( 'imageURL' => $_POST['image'] ); $contentArray[] = $screenshotImage; $fullData = json_encode($contentArray); file_put_contents('screenshot.json', $fullData); fclose($screenshotJson);
}
?>
This will output a “screenshot.json” file with the image data URL and store it in the application. Video Demo
2) Using plain HTML5 with JavaScript
This JavaScript code includes two functions. One is to generate an image object URL and the other is to take screenshots by preparing the blob object from the page.
It prepares a blob object URL representing the output screenshot image captured from the page. It takes screenshots by clicking the “Capture Screenshot” button in the UI.
It controls the style properties and scroll coordinates of the node pushed to the screenshot object. This is to stop users have the mouse controls on the BLOB object.
This code will show the captured screenshot on a new page. The new page will have the generated blob URL as blob:http://localhost/0212cfc1-02ab-417c-b92f-9a7fe613808c
This method uses the JavaScript MediaServices class to capture the screenshot from the page content.
This example uses the getDisplayMedia() of this class to return the media stream of the current page content.
Note: It needs to grant permission to get the whole or part of the page content on the display.
It prepares an image source to draw into the canvas with the reference of its context. After writing the media stream object into the context, this script converts the canvas into a data URL.
This data URL is used to see the page screenshot captured on a new page.
After reading the media stream object to a screenshot element object, it should be closed. The JS MediaStreamTrack.stop() is used to close the track if it is not needed.
<!DOCTYPE html>
<html>
<head>
<title>How to Capture Sceenshot of Page using JavaScript</title>
<link rel='stylesheet' href='form.css' type='text/css' />
</head>
<body> <div class="phppot-container"> <p>This uses the WebRTC standard to take screenshot. WebRTC is popular and has support in all major modern browsers. It is used for audio, video communication.</p> <p>getDisplayMedia() is part of WebRTC and is used for screen sharing. Video is rendered and then page screenshot is captured from the video.</p> <p> <p> <button id="capture-screenshot" onclick="captureScreenshot();">Capture Screenshot</button> </p> </div> <script> const captureScreenshot = async () => { const canvas = document.createElement("canvas"); const context = canvas.getContext("2d"); const screenshot = document.createElement("screenshot"); try { const captureStream = await navigator.mediaDevices.getDisplayMedia(); screenshot.srcObject = captureStream; context.drawImage(screenshot, 0, 0, window.width, window.height); const frame = canvas.toDataURL("image/png"); captureStream.getTracks().forEach(track => track.stop()); window.location.href = frame; } catch (err) { console.error("Error: " + err); } }; </script>
</body>
</html>
Problem Formulation: Given a Python set. How to convert it to a tuple? And how to convert the tuple back to a set?
There are three main ways:
Method 1: To convert a Python set to a tuple, use the tuple(my_set) function.
Method 2: To convert a Python tuple to a set, use the set(my_tuple) function.
Method 3: To convert a Python tuple of mutable elements to a set, use the expression set(tuple(x) for x in my_tuple) to avoid a TypeError.
I’ll also give you a bonus method 4 that shows you what to do to retain the ordering information when converting a tuple to a set—so keep reading!
Method 1: Convert Set to Tuple with tuple()
To convert a set to a tuple, pass the set into the tuple() function. This is a built-in Python function, so you don’t need to import or install any library to use it. The return value is a new tuple from the values in the set.
Here’s an example where you convert the set {1, 2, 3} to a tuple (1, 2, 3):
By the way, here’s an explainer video on this function:
Method 2: Convert Tuple to Set with set()
To convert a tuple to a set, pass the tuple into the set() function. This is a built-in Python function, so you don’t need to import or install any library. The return value is a new set from the values in the tuple.
Here’s an example where you convert the tuple (1, 2, 3) to a set {1, 2, 3}:
Problem: However, the conversion process from a tuple to set doesn’t always work because if you try to convert a tuple of mutable values, Python will raise the TypeError: unhashable type!
Read on to learn more about this problem—and how to resolve it easily:
Method 3: Convert Tuple to Set with Set Comprehension
A Python set is an unordered collection of unique immutable elements. Each element must define explicitly or implicitly the __hash__() dunder method, i.e., must be hashable.
If you attempt to convert a tuple of mutable elements (e.g., lists) to a set, Python will raise an error such as the TypeError: unhashable type: 'list':
In this case, you can use set comprehension to convert each inner tuple element to an immutable type. For example, the expression set(tuple(x) for x in my_tuple) converts each inner list to a tuple. The result is a set of immutable tuples.
Here’s the solution to this problem in a minimal code example:
my_tuple = ([1, 2], [3, 4], [5, 6])
my_set = set(tuple(x) for x in my_tuple)
print(my_set)
# {(1, 2), (3, 4), (5, 6)}
The final “bonus” section introduces another elegant way to retain the ordering information in a set:
Bonus Method 4: Enumerate Elements
Sometimes, you want to associate each set or tuple element with a specific numerical “index” value, i.e., a unique integer identifier. The enumerate() method to the rescue!
Use tuple(enumerate(my_set)) to convert a set to an enumerated tuple.
Use set(enumerate(my_tuple)) to convert a tuple to an enumerated set.
The result is the respective container data structure with (identifier, value) tuples:
Especially in the case where you convert a tuple to a set, this makes a lot of sense because you can retain the information on the ordering of elements that would be otherwise lost after converting to a set.
Thanks for reading the whole article, my friend! You can join us here (we have cheat sheets too):

 Challenge: Given an integer
  Video: For your convenience, I embedded the video tutorial provided by our Solidity expert


 Docker is an open platform for developing, shipping, and running applications… Docker provides the ability to package and run an application in a loosely isolated environment called a container… Containers are lightweight and contain everything needed to run the application, so you do not need to rely on what is currently installed on the host.
 This is a very complex way to install the Solidity compiler and I wouldn’t recommend it for most people. Due to the complexity, I’ll only give a quick overview of the associated article (tutorial).

 Programming Challenge: Given a
  Let’s have a look at a slight variant to check the length of the shortest list instead.
 At least does the approach also work when passing in an empty list due to the ternary operator used in the first line.
 Note: If you need the length of the shortest list, you could simply replace the last line of the function with


 Finxter Challenge


 Info:
Info: