Summary: Use "given string".split() to split the given string by whitespace and store each word as an individual item in a list.
Minimal Example:print("Welcome Finxter".split())
# OUTPUT: [‘Welcome’, ‘Finxter’]
Problem Formulation
Problem: Given a string, How will you split the string into a list of words using whitespace as a separator/delimiter?
Let’s understand the problem with the help of a few examples:
| Example 1: Input: text = “Welcome to the world of Python” Explanation: Split the string into a list of words using a space ” ” as the delimiter to separate the words from the given string. Output: [‘Welcome’, ‘to’, ‘the’, ‘world’, ‘of’, ‘Python’] Example 2: Example 3: |
So, we have two situations at hand. One, that has a single whitespace used as a delimiter and another that has multiple whitespace characters as delimiters in the same string. Let’s dive into the numerous ways of solving this problem.
Method 1: Using split()
split() is a built-in method in Python which splits the string at a given separator and returns a split list of substrings. Here’s a minimal example that demonstrates how the split function works – finxterx42'.split('x') will split the string with the character ‘x’ as the delimiter and return the following list as an output: ['fin', 'ter', '42']. The default separator, i.e., when no value is passed to the split function is considered as any whitespace character, i.e., it will take into account any whitespace such as ‘\n’, ” “, ‘\t’, etc.
Read more about the split() method in this blog tutorial: Python String split().
Approach: Thus to split a string based on a given whitespace delimiter, you can simply pass the specific whitespace character as a separator/delimiter to the split('whitespace_character') function.
Code:
# Example 1:
text = "Welcome to the world of Python"
print(text.split(' '))
# OUTPUT: ['Welcome', 'to', 'the', 'world', 'of', 'Python'] # Example 2:
text = """Item 1
Item 2
Item 3"""
print(text.split('\n'))
# OUTPUT: ['Item_1', 'Item_2', 'Item_3'] # Example 3: text = "This is just a\trandom text:\nNew Line"
print(text.split()) # OUTPUT: ['This', 'is', 'just', 'a', 'random', 'text:', 'New', 'Line']
Note that to separate the words in the third example we did specify any separator within the split() function. This is because when you don’t specify the separator, then Python will automatically consider that any whitespace character that occurs within the given string is a separator.
Method 2: Using regex
Another extremely handy way of separating a string with whitespace characters as separators is to use the regex library.
Approach 1: Import the regex library and use its split method as re.split('\s+', text) where ‘\s+’ returns a match whenever the string contains one or more whitespace characters. Therefore, whenever any whitespace character is encountered, the string will be separated at that point.
Code:
import re
# Example 1:
text = "Welcome to the world of Python"
print(re.split('\s+', text))
# OUTPUT: ['Welcome', 'to', 'the', 'world', 'of', 'Python'] # Example 2:
text = """Item_1
Item_2
Item_3"""
print(re.split('\s+', text))
# OUTPUT: ['Item_1', 'Item_2', 'Item_3'] # Example 3:
text = "This is just a\trandom text:\nNew Line"
print(re.split('\s+', text))
# OUTPUT: ['This', 'is', 'just', 'a', 'random', 'text:', 'New', 'Line']
Related Tutorial: Python Regex Split
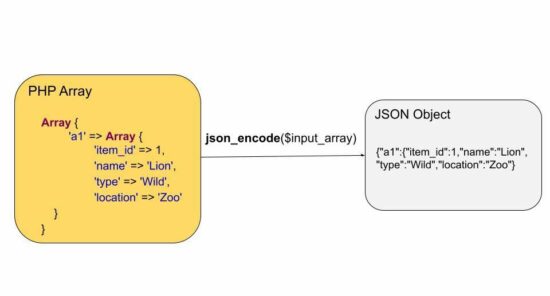
Approach 2: Another way of using the regex library to solve this question is to use the findall() method of the regex library. Import the regex library and use re.findall(r'\S+', text) where the expression returns all the characters/words in a list that do not contain any whitespace character. This essentially means that whenever Python finds and segregates a string that has no whitespace in it. As soon as a whitespace character is found it considers that as a breakpoint, therefore the next word that has a continuous sequence of characters without the presence of any whitespace character is taken into account.
Here’s a graphical representation of the above explanaton:

Code:
import re
# Example 1:
text = "Welcome to the world of Python"
print(re.findall(r'\S+', text))
# OUTPUT: ['Welcome', 'to', 'the', 'world', 'of', 'Python'] # Example 2:
text = """Item_1
Item_2
Item_3"""
print(re.findall(r'\S+', text))
# OUTPUT: ['Item_1', 'Item_2', 'Item_3'] # Example 3:
text = "This is just a random text:\n New Line"
print(re.findall(r'\S+', text))
# OUTPUT: ['This', 'is', 'just', 'a', 'random', 'text:', 'New', 'Line']
Related Tutorial: Python re.findall() – Everything You Need to Know
Do you want to master the regex superpower? Check out my new book The Smartest Way to Learn Regular Expressions in Python with the innovative 3-step approach for active learning: (1) study a book chapter, (2) solve a code puzzle, and (3) watch an educational chapter video.
Conclusion
We have successfully solved the given problem using different approaches. I hope you enjoyed this article and it helps you in your Python coding journey. Please subscribe and stay tuned for more interesting articles!
Related Reads:
⦿ How To Split A String And Keep The Separators?
⦿ How To Cut A String In Python?
⦿ Python | Split String into Characters
Python Regex Course
Google engineers are regular expression masters. The Google search engine is a massive text-processing engine that extracts value from trillions of webpages.
Facebook engineers are regular expression masters. Social networks like Facebook, WhatsApp, and Instagram connect humans via text messages.
Amazon engineers are regular expression masters. Ecommerce giants ship products based on textual product descriptions. Regular expressions rule the game when text processing meets computer science.
If you want to become a regular expression master too, check out the most comprehensive Python regex course on the planet:


 With this article, we’ll discover a new and fascinating world of bytes and strings, as well as ways to manipulate them, allocate memory arrays, and use array literals.
 Note: A rule of thumb says that
 Recommended Tutorial:
  Prev Tutorial
 Syllabus
 Next Tutorial
 Programming Challenge: Given a Pandas DataFrame or a Pandas Series object. How to convert them to a NumPy array?

 Attention: There is also the


 Rule: Only if you want to exit a loop inside a function and this would also exit the whole function, you can use both keywords. In that case, I’d recommend using the keyword

 Related Tutorial:
  ):
):