Posted on Leave a comment

Python | Split String Empty Separator

Rate this post

Summary: You can split a string using an empty separator using –
(i) list constructor
(ii) map+lambda
(iii) regex
(iv) list comprehension

Minimal Example:

text = '12345' # Using list()
print(list(text)) # Using map+lambda
print(list(map(lambda c: c, text))) # Using list comprehension
print([x for x in text]) # Using regex
import re
# Approach 1
print([x for x in re.split('', text) if x != ''])
# Approach 2
print(re.findall('.', text))

Problem Formulation

📜Problem: How to split a string using an empty string as a separator?

Example: Consider the following snippet –

a = 'abcd'
print(a.split(''))

Output:

Traceback (most recent call last): File "C:\Users\SHUBHAM SAYON\PycharmProjects\Finxter\Blogs\Finxter.py", line 2, in <module> a.split('')
ValueError: empty separator

Expected Output:

['a', 'b', 'c', 'd']

So, this essentially means that when you try to split a string by using an empty string as the separator, you will get a ValueError. Thus, your task is to find out how to eliminate this error and split the string in a way such that each character of the string is separately stored as an item in a list.


Now that we have a clear picture of the problem let us dive into the solutions to solve the problem.

Method 1: Use list()

Approach: Use the list() constructor and pass the given string as an argument within it as the input, which will split the string into separate characters.

Note: list() creates a new list object that contains items obtained by iterating over the input iterable. Since a string is an iterable formed by combining a group of characters, hence, iterating over it using the list constructor yields a single character at each iteration which represents individual items in the newly formed list.

Code:

a = 'abcd'
print(list(a)) # ['a', 'b', 'c', 'd']

🌎Related Read: Python list() — A Simple Guide with Video

Method 2: Use map() and lambda

Approach: Use the map() to execute a certain lambda function on the given string. All you need to do is to create a lambda function that simply returns the character passed to it as the input to the map object. That’s it! However, the map method will return a map object, so you must convert it to a list using the list() function.

Code:

a = 'abcd'
print(list(map(lambda c: c, a))) # ['a', 'b', 'c', 'd']

Method 3: Use a list comprehension

Approach: Use a list comprehension that returns a new list containing each character of the given string as individual items.

Code:

a = 'abcd'
print([x for x in a])
# ['a', 'b', 'c', 'd']

🌎Related Read: List Comprehension in Python — A Helpful Illustrated Guide

Method 4: Using regex

The re.findall(pattern, string) method scans string from left to right, searching for all non-overlapping matches of the pattern. It returns a list of strings in the matching order when scanning the string from left to right.

🌎Related Read: Python re.findall() – Everything You Need to Know

Approach: Use the regular expression re.findall('.',a) that finds all characters in the given string ‘a‘ and stires them in a list as individual items.

Code:

import re
a = 'abcd'
print(re.findall('.',a)) # ['a', 'b', 'c', 'd']

Alternatively, you can also use the split method of the regex library in a list comprehension which returns each character of the string and eliminates empty strings.

Code:

import re
a = 'abcd'
print([x for x in re.split('',a) if x!='']) # ['a', 'b', 'c', 'd']

🌎Related Read: Python Regex Split

Do you want to master the regex superpower? Check out my new book The Smartest Way to Learn Regular Expressions in Python with the innovative 3-step approach for active learning: (1) study a book chapter, (2) solve a code puzzle, and (3) watch an educational chapter video.

Conclusion

Hurrah! We have successfully solved the given problem using as many as four (five, to be honest) different ways. I hope this article helped you and answered your queries. Please subscribe and stay tuned for more interesting articles and solutions in the future.

Happy coding! 🙂


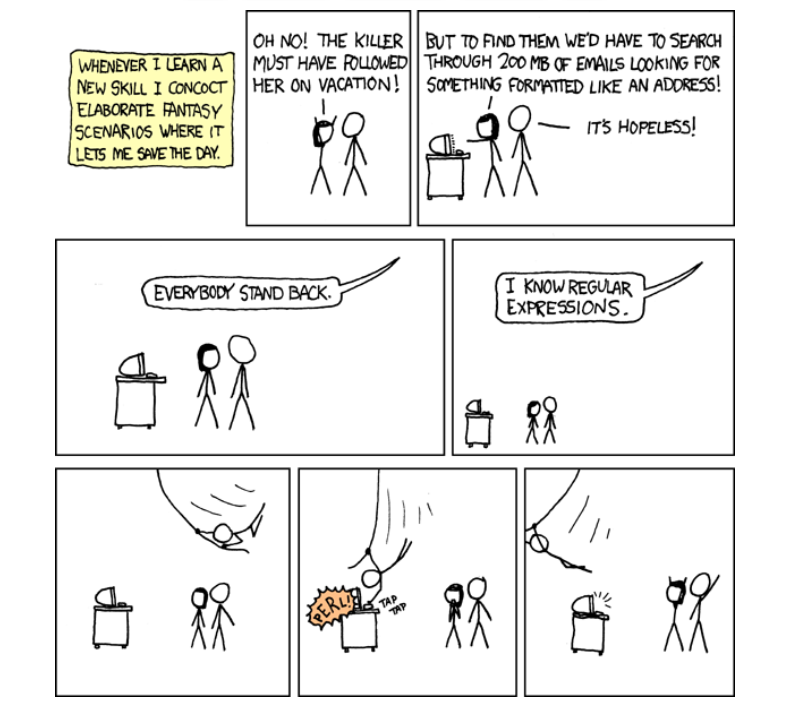
Regex Humor

Wait, forgot to escape a space. Wheeeeee[taptaptap]eeeeee. (source)
Posted on Leave a comment

TensorFlow ModuleNotFoundError: No Module Named ‘utils’

5/5 – (1 vote)

Problem Formulation

Say, you try to import label_map_util from the utils module when running TensorFlow’s object_detection API. You get the following error message:

>>> from utils import label_map_util
Traceback (most recent call last): File "<pyshell#3>", line 1, in <module> from utils import label_map_util
ModuleNotFoundError: No module named 'utils'

💬 Question: How to fix the ModuleNotFoundError: No module named 'utils'?

Solution Idea 1: Fix the Import Statement

The most common source of the error is that you use the expression from utils import <something> but Python doesn’t find the utils module. You can fix this by replacing the import statement with the corrected from object_detection.utils import <something>.

For example, do not use these import statements:

from utils import label_map_util
from utils import visualization_utils as vis_util

Instead, use these import statements:

from object_detection.utils import label_map_util
from object_detection.utils import visualization_utils as vis_util

Everything remains the same except the bolded text.

This, of course, assumes that Python can resolve the object_detection API. You can follow the installation recommendations here, or if you already have TensorFlow installed, check out the Object Detection API installation tips here.

Solution Idea 2: Modify System Path

Another idea to solve this issue is to append the path of the TensorFlow Object Detection API folder to the system paths so your script can find it easily.

To do this, import the sys library and run sys.path.append(my_path) on the path to the object_detection folder that may reside in /home/.../tensorflow/models/research/object_detection, depending on your environment.

import sys
sys.path.append('path/to/object/detection/folder')

Solution Idea 3: Dirty Copy and Paste

I don’t recommend using this approach but I still want to share it with you for comprehensibility. Try copying the utils folder from models/research/object_detection in the same directory as the Python file requiring utils.

Solution Idea 4: Import Module from Another Folder (Utils)

This is a better variant of the previous approach: use our in-depth guide to figure out a way to import the utils module correctly, even though it may reside on another path. This should usually do the trick.

🌎 Recommended Tutorial: How to Import a Module from Another Path

Resources: You can find more about this issue here, here, and here. Among other sources, these were also the ones that inspired the solutions provided in this tutorial.

Thanks for reading this—feel free to learn more about the benefits of a TensorFlow developer (we need to keep you motivated so you persist through the painful debugging process you’re currently in). 😉

🌎 Recommended Tutorial: TensorFlow Developer – Income and Opportunity

Posted on Leave a comment

Python | Split String and Count Results

Rate this post

✨Summary: Split the string using split and then use len to count the results.

Minimal Example

print("Result Count: ", len('one,two,three'.split(',')))
# Result Count: 3

Problem Formulation

📜Problem: Given a string. How will you split the string and find the number of split strings? Can you store the split strings into different variables?

Example

# Given String
text = '366NX-BQ62X-PQT9G-GPX4H-VT7TX'
# Expected Output:
Number of split strings: 5
key_1 = 366NX
key_2 = BQ62X
key_3 = PQT9G
key_4 = GPX4H
key_5 = VT7TX

In the above problem, the delimiter used to split the string is “-“. After splitting five substrings can be extracted. Therefore, you need five variables to store the five substrings. Can you solve it?


Solution

Splitting the string and counting the number of results is a cakewalk. All you have to do is split the string using the split() function and then use the len method upon the resultant list returned by the split method to get the number of split strings present.

Code:

text = '366NX-BQ62X-PQT9G-GPX4H-VT7TX'
# splitting the string using - as separator
res = text.split('-')
# length of split string list
x = len(res)
print("Number of split strings: ", x)

Approach 1

  • The idea here is to find the length of the results and then use this length to create another list containing all the variable names as items within it. This can be done with a simple for loop.
  • Now, you have two lists. One that stores the split strings and another that stores the variable names that will store the split strings.
  • So, you can create a dictionary out of the two lists such that the keys in this dictionary will be the items of the list containing the variable names and the values in this dictionary will be the items of the list containing the split strings. Read: How to Convert Two Lists Into A Dictionary

Code:

text = '366NX-BQ62X-PQT9G-GPX4H-VT7TX'
# splitting the string using - as separator
res = text.split('-')
# length of split string list
x = len(res) # Naming and storing variables and values
name = []
for i in range(1, x+1): name.append('key_'+str(i)) d = dict(zip(name, res))
for key, value in d.items(): print(key, "=", value)

Approach 2

Almost all modules have a special attribute known as __dict__ which is a dictionary containing the module’s symbol table. It is essentially a dictionary or a mapping object used to store an object’s (writable) attributes.

So, you can create a class and then go ahead create an instance of this class which can be used to set different attributes. Once you split the given string and also create the list containing the variable names (as done in the previous solution), you can go ahead and zip the two lists and use the setattr() method to assign the variable and their values which will serve as the attributes of the previously created class object. Once, you have set the attributes (i.e. the variable names and their values) and attached them to the object, you can access them using the built-in __dict__ as object_name.__dict__

Code:

text = '366NX-BQ62X-PQT9G-GPX4H-VT7TX'
# splitting the string using - as separator
res = text.split('-')
# length of split string list
x = len(res)
print("Number of split strings: ", x) # variable creation and value assignment
name = []
for i in range(1, x + 1): name.append('key_' + str(i)) class Record(): pass r = Record() for name, value in zip(name, res): setattr(r, name, value)
print(r.__dict__) for key, value in r.__dict__.items(): print(key, "=", value)

Approach 3

Caution: This solution is not recommended unless this is the only option left. I have mentioned this just because it solves the purpose. However, it is certainly not the best way to approach the given problem.

Code:

text = '366NX-BQ62X-PQT9G-GPX4H-VT7TX'
# splitting the string using - as separator
res = text.split('-')
# length of split string list
x = len(res)
print("Number of split strings: ", x)
name = []
for i in range(1, x + 1): name.append('key_' + str(i)) for idx, value in enumerate(res): globals()["key_" + str(idx + 1)] = value
print(globals())
x = 0
for i in reversed(globals()): print(i, "=", globals()[i]) x = x+1 if x == 5: break

Explanation: globals() function returns a dictionary containing all the variables in the global scope with the variable names as the key and the value assigned to the variable will be the value in the dictionary. You can reference this dictionary and add new variables by string name (globals()['a'] = 'b' sets variable a equal to "b"), however this is generally a terrible thing to do.

Since global returns a dictionary containing all the variables in the global scope, a workaround to get only the variables we assigned is to extract the last “N” key-value pairs from this dictionary where “N” is the length of the split string list.

Conclusion

I hope the solutions mentioned in this tutorial have helped you. Please stay tuned and subscribe for more interesting reads and solutions in the future. Happy coding!


Posted on Leave a comment

Easiest Way to Convert List of Hex Strings to List of Integers

5/5 – (1 vote)

💬 Question: Given a Python list of hexadecimal strings such as ['ff', 'ef', '0f', '0a', '93']. How to convert it to a list of integers in Python such as [255, 239, 15, 10, 147]?

Easiest Answer

The easiest way to convert a list of hex strings to a list of integers in Python is the list comprehension statement [int(x, 16) for x in my_list] that applies the built-in function int() to convert each hex string to an integer using the hexadecimal base 16, and repeats this for each hex string x in the original list.

Here’s a minimal example:

my_list = ['ff', 'ef', '0f', '0a', '93']
my_ints = [int(x, 16) for x in my_list] print(my_ints)
# [255, 239, 15, 10, 147]

The list comprehension statement applies the expression int(x, 16) to each element x in the list my_list and puts the result of this expression in the newly-created list.

The int(x, 16) expression converts a hex string to an integer using the hexadecimal base argument 16. A semantically identical way to write this would be int(x, base=16).

In fact, there are many more ways to convert a hex string to an integer—each of them could be used in the expression part of the list comprehension statement.

However, I’ll show you one completely different approach to solving this problem without listing each and every combination of possible solutions. 👇

For Loop with List Append

You can create an empty list and add one hex integer at a time in the loop body after converting it from the hex string x using the eval('0x' + x) function call. This first creates a hexadecimal string with '0x' prefix using string concatenation and then lets Python evaluate the string as if it was real code and not a string.

Here’s an example:

my_list = ['ff', 'ef', '0f', '0a', '93'] my_ints = []
for x in my_list: my_ints.append(eval('0x' + x)) print(my_ints)
# [255, 239, 15, 10, 147]

You use the fact that Python automatically converts a hex value of the form 0xff to an integer 255:

>>> 0xff
255
>>> 0xfe
254
>>> 0x0f
15

You may want to check out my in-depth guide on this important function for our solution:

🌍 Recommended Tutorial: Python eval()

Posted on Leave a comment

Bash Port Scanning (SSH) as a Python Script [TryHackMe]

5/5 – (1 vote)
YouTube Video

Background

I’ve been working on the Alice in Wonderland series of free hacking CTF (Capture the Flag) challenges on TryHackMe.

🚩 Recommended Tutorial: Capture the Flag – Alice in Wonderland – TryHackMe Walkthrough

While working on the second box in the series, Looking Glass, I stumbled upon a bash script written by Tay1or, another user on TryHackMe.

The opening challenge involves finding the correct port which hides an encrypted poem, Jabberwocky by Lewis Caroll.

Using a script here is a more efficient solution because it is quite time-consuming to manually attempt connecting to different ssh ports over and over until the correct port can be found.

The box also resets the mystery port after each login, so unless you solve the box on your first attempt, the script will come in handy multiple times.

Bash Script

Here is Tay1or’s bash script with a few slight modifications in bold to make it run on my machine:

#!/usr/bin/bash low=9000
high=13000 while true
do mid=$(echo "($high+$low)/2" | bc) echo -n "Low: $low, High: $high, Trying port: $mid – " msg=$(ssh -o "HostKeyAlgorithms=+ssh-rsa" -p $mid $targetIP | tr -d '\r') echo "$msg" if [[ "$msg" == "Lower" ]] then low=$mid elif [[ "$msg" == "Higher" ]] then high=$mid fi
done

I’m still new to bash scripting, but because I already understand the context of the problem being faced, I can more or less guess what the script is doing.

At the top, under the shebang line, it first sets low and high values for the ports to be searched. Then we see a while true loop.

The first command in the loop calculates the midpoint between the low and the high port values in the given range.

The echo command prints the low/high/and midpoint port that is currently being tested.

Then we have if/elif commands to respond appropriately to the output of the $msg to set the mid to either the lower or higher range variables. By resetting the range after each attempted connection, the search will take a minimal amount of time by eliminating the largest number of ports possible on each attempt.

When the output msg is neither “Higher” or “Lower” it will end the loop because we will have hit our secret encrypted message on the correct port.

Conversion into a Python script

I started wondering how it might be possible to translate the bash script to a Python script and decided to try my hand at converting the functionality of the code.

I’m more comfortable scripting in Python, and I think it will probably come in handy later in future challenges to be able to quickly write up a script during CTF challenges to save time. 

The inputs of the code are the targetIP and high and low values of the target SSH port range.

Outputs are the response from the targetIP on each attempted connection until the secret port is found. Once the secret port is found, the program will reiterate that you have found the port.

I posted the final version of the python script here on GitHub. For your convenience, I’ll include it here too:

#!/usr/bin/env python3
# These sites were used as references: https://stackabuse.com/executing-shell-commands-wi>
# https://stackoverflow.com/questions/4760215/running-shell-command-and-capturing-the-> #set up initial conditions for the target port search
import subprocess
low_port=9000
high_port=13790
targetIP = "10.10.252.52"
print(targetIP)
#initialize loop_key variable:
loop_key="higher" while loop_key=="Higher" or "Lower": print('low = ' + str(low_port) + ', high = ' + str(high_port))
#a good place to use floor division to cut off the extra digit mid_port=(high_port+low_port)//2 print('Trying port ' + str(mid_port)) #attempt to connect to the mid port result = subprocess.run(['ssh', 'root@' + str(targetIP), '-oHostKeyAlgorithms=+ssh-rsa', '-p', str(mid_port)], stdout=subprocess.PIPE) # prep the decoded output variable msg = result.stdout decoded_msg = msg.decode('utf-8') # print result of attempted ssh connection print(decoded_msg) if "Higher" in decoded_msg: #print("yes I see the words Higher") high_port=mid_port print(high_port) loop_key="Higher" elif "Lower" in decoded_msg: low_port=mid_port print(low_port) loop_key="Lower" else: print("You found the secret port - " + str(mid_port)) exit()
Posted on Leave a comment

phpMyAdmin – How to Create a Database?

by Vincy. Last modified on November 22nd, 2022.

PHPMyAdmin is one of the widely used database clients for PHP MySQL developers. It provides a simple user interface that can be easily adapted by beginners.

We can blindly say that PHPMyAdmin as the de-facto database client used by PHP developers for MySQL / MariaDB. It is hugely popular and that is because of its simplicity and ease of use.

It allows many database operations. Example,

  1. Creating databases and the corresponding tables.
  2. Adding and managing data.
  3. Altering the existing structure and attributes defined.
  4. Import, and export operations.

In this article, we will see how to create a MySQL database using PHPMyAdmin.

How to create a database?

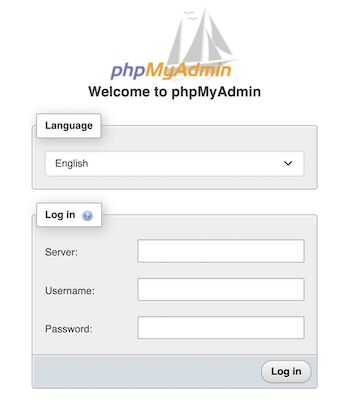
First login to the PHPMyAdmin client to go to the database control panel.

phpmyadmin login

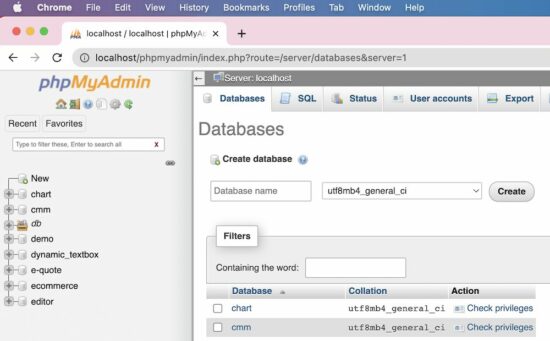
After login, it redirects to the PHPMyAdmin control panel which allows doing the following.

  1. To manage and manipulate MySQL database assets.
  2. To perform CRUD or other database-related operations.

phpmyadmin create database

If you want to see code to perform the MySQL database CRUD operations from a PHP application, the linked article has the source,

Ways to create a database using PHPMyAdmin

There are 4 ways to create a new MySQL database using the PHPMyAdmin client interface.

  1. Via the left panel navigation.
  2. Via the header tab control navigation.
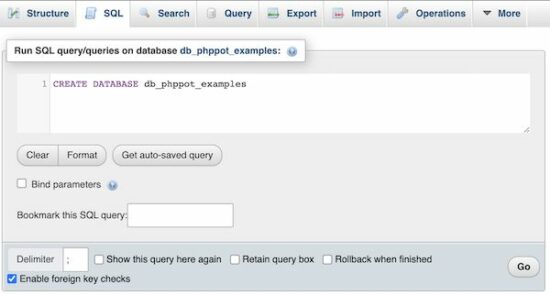
  3. By executing a CREATE statement via the SQL tab.
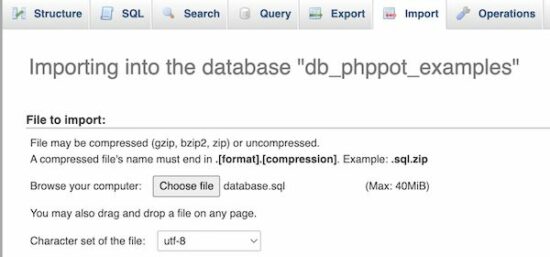
  4. By importing a CREATE statement SQL script via the Import tab.

1. Create database via left panel

In the PHPMyAdmin left panel, it contains a New link. It redirects to the page to create a new database.

2. Create database via header tab

The PHPMyAdmin UI shows tabs like Database, Import, Export and more. The Database tab redirects to show a list of existing databases with an option to create a new one.

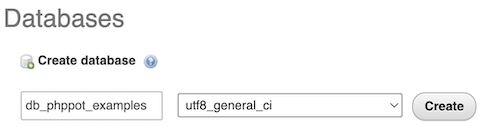
Both of these navigation controls will display the UI as shown in the figure.

database create form

The database create-form shows two fields.

  1. To type the name of the database to be created.
  2. To choose a collation that is encoding type.

In the above screenshot, the utf8_unicode_ci collation is selected.

The other two methods are for the one who has the SQL script for creating a new MySQL database.

Sometimes the database SQL will be provided. In that case, it is not required to use the interface to input the database name and the collation.

3. Create database via SQL tab, by running a CREATE SQL query

Choose the SQL tab from the PHPMyAdmin header. It will show a textarea to paste the CREATE database query.

Then, execute the entered query to see the created database among the existing list.

phpmyadmin sql tab

4. Create database via Import tab, by uploading a SQL script

If you have the database CREATE statement Choose the Import tab from the PHPMyAdmin header. Then browse the SQL script that contains the CREATE statement.

Then click the “Go” button to process the import. It will result in displaying a new database imported.

phpmyadmin import database

We have seen PHP code for importing Excel data into a database using a custom code.

After creating a MySQL database

After creating a MySQL database using PHPMyAdmin, the next job is to start adding the tables.

The PHPMyAdmin has the option to “Check privileges” to map roles and MySQL database operations.

But, this is a rarely used feature. If the database is associated with more than one user, then this feature will be used.

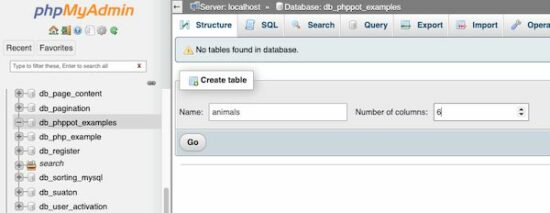
How to create tables in a database?

After creating a database, the PHPMyAdmin shows a form to a create table. That form show fields to enter the table name and the number of columns of the table.

create database table

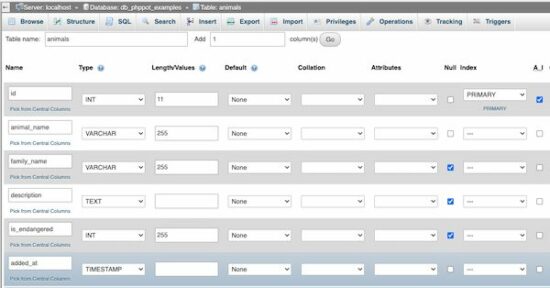
After specifying the table name and the “Number of columns”, the PHPMyAdmin panel will show inputs to add the table column specification.

See the following screen that is added with the column names with their corresponding types and more details.

create table column

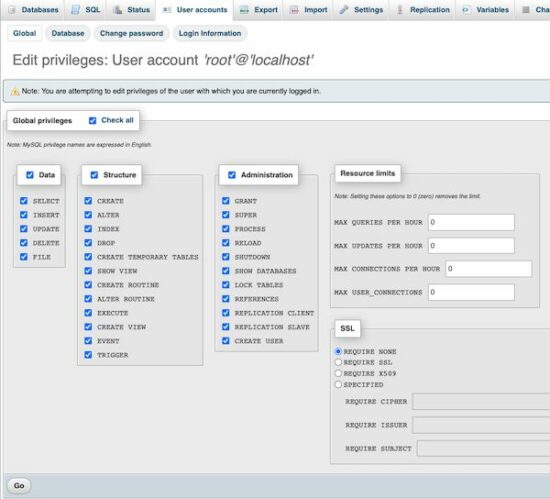
Add user accounts and set privileges

Select the “User accounts” tab to see the number of existing user accounts. The PHPMyAdmin also allows adding a new user via the interface.

The “Create user” page will have the option to select the user account details and set the permission to perform operations like,

  • CRUD operations on the Data.
  • CREATE, ALTER, DROP and more operations on the MySQL database Structure.
  • Access Administration tools.
  • Setting resource limits like making the number of simultaneous connections.

See the screenshot below to allow or deny access permissions of the user created for a MySQL database.

create and set privileges

↑ Back to Top

Posted on Leave a comment

phpMyAdmin – How to Create a Database?

by Vincy. Last modified on November 22nd, 2022.

PHPMyAdmin is one of the widely used database clients for PHP MySQL developers. It provides a simple user interface that can be easily adapted by beginners.

We can blindly say that PHPMyAdmin as the de-facto database client used by PHP developers for MySQL / MariaDB. It is hugely popular and that is because of its simplicity and ease of use.

It allows many database operations. Example,

  1. Creating databases and the corresponding tables.
  2. Adding and managing data.
  3. Altering the existing structure and attributes defined.
  4. Import, and export operations.

In this article, we will see how to create a MySQL database using PHPMyAdmin.

How to create a database?

First login to the PHPMyAdmin client to go to the database control panel.

phpmyadmin login

After login, it redirects to the PHPMyAdmin control panel which allows doing the following.

  1. To manage and manipulate MySQL database assets.
  2. To perform CRUD or other database-related operations.

phpmyadmin create database

If you want to see code to perform the MySQL database CRUD operations from a PHP application, the linked article has the source,

Ways to create a database using PHPMyAdmin

There are 4 ways to create a new MySQL database using the PHPMyAdmin client interface.

  1. Via the left panel navigation.
  2. Via the header tab control navigation.
  3. By executing a CREATE statement via the SQL tab.
  4. By importing a CREATE statement SQL script via the Import tab.

1. Create database via left panel

In the PHPMyAdmin left panel, it contains a New link. It redirects to the page to create a new database.

2. Create database via header tab

The PHPMyAdmin UI shows tabs like Database, Import, Export and more. The Database tab redirects to show a list of existing databases with an option to create a new one.

Both of these navigation controls will display the UI as shown in the figure.

database create form

The database create-form shows two fields.

  1. To type the name of the database to be created.
  2. To choose a collation that is encoding type.

In the above screenshot, the utf8_unicode_ci collation is selected.

The other two methods are for the one who has the SQL script for creating a new MySQL database.

Sometimes the database SQL will be provided. In that case, it is not required to use the interface to input the database name and the collation.

3. Create database via SQL tab, by running a CREATE SQL query

Choose the SQL tab from the PHPMyAdmin header. It will show a textarea to paste the CREATE database query.

Then, execute the entered query to see the created database among the existing list.

phpmyadmin sql tab

4. Create database via Import tab, by uploading a SQL script

If you have the database CREATE statement Choose the Import tab from the PHPMyAdmin header. Then browse the SQL script that contains the CREATE statement.

Then click the “Go” button to process the import. It will result in displaying a new database imported.

phpmyadmin import database

We have seen PHP code for importing Excel data into a database using a custom code.

After creating a MySQL database

After creating a MySQL database using PHPMyAdmin, the next job is to start adding the tables.

The PHPMyAdmin has the option to “Check privileges” to map roles and MySQL database operations.

But, this is a rarely used feature. If the database is associated with more than one user, then this feature will be used.

How to create tables in a database?

After creating a database, the PHPMyAdmin shows a form to a create table. That form show fields to enter the table name and the number of columns of the table.

create database table

After specifying the table name and the “Number of columns”, the PHPMyAdmin panel will show inputs to add the table column specification.

See the following screen that is added with the column names with their corresponding types and more details.

create table column

Add user accounts and set privileges

Select the “User accounts” tab to see the number of existing user accounts. The PHPMyAdmin also allows adding a new user via the interface.

The “Create user” page will have the option to select the user account details and set the permission to perform operations like,

  • CRUD operations on the Data.
  • CREATE, ALTER, DROP and more operations on the MySQL database Structure.
  • Access Administration tools.
  • Setting resource limits like making the number of simultaneous connections.

See the screenshot below to allow or deny access permissions of the user created for a MySQL database.

create and set privileges

↑ Back to Top

Posted on Leave a comment

(Fixed) ModuleNotFoundError: No Module Named ‘git’ | Python

5/5 – (1 vote)

Quick Fix: Python raises the ModuleNotFoundError: No module named 'git' when you haven’t installed GitPython explicitly with pip install GitPython or pip3 install GitPython (Python 3). Or you may have different Python versions on your computer, and GitPython is not installed for the particular version you’re using.

You’ll learn how to fix this error below after diving into the concrete problem first.

Problem Formulation

You’ve just learned about the awesome capabilities of the GitPython library, and you want to try it out, so you start your code with the following statement:

import git

or even something like:

from git import Repo

This is supposed to import the git library into your (virtual) environment. However, it only throws the following ModuleNotFoundError: No module named 'git':

>>> import git
Traceback (most recent call last): File "<pyshell#6>", line 1, in <module> import git
ModuleNotFoundError: No module named 'git'

Solution Idea 1: Install Library GitPython

The most likely reason is that Python doesn’t provide GitPython in its standard library. You need to install it first!

Before being able to import the GitPython module, you need to install it using Python’s package manager pip. Make sure pip is installed on your machine.

To fix this error, you can run the following command in your Windows shell:

$ pip install GitPython

This simple command installs GitPython in your virtual environment on Windows, Linux, and MacOS. Uppercase or lowercase library name doesn’t matter.

This assumes that your pip version is updated. If it isn’t, use the following two commands in your terminal, command line, or shell (there’s no harm in doing it anyways):

$ python -m pip install – upgrade pip
$ pip install GitPython

💡 Note: Don’t copy and paste the $ symbol. This is just to illustrate that you run it in your shell/terminal/command line.

Also, try the following variant if you run Python 3 on your computer:

pip3 install GitPython

Solution Idea 2: Fix the Path

The error might persist even after you have installed the GitPython library. This likely happens because pip is installed but doesn’t reside in the path you can use. Although pip may be installed on your system the script is unable to locate it. Therefore, it is unable to install the library using pip in the correct path.

To fix the problem with the path in Windows follow the steps given next.

Step 1: Open the folder where you installed Python by opening the command prompt and typing where python

Step 2: Once you have opened the Python folder, browse and open the Scripts folder and copy its location. Also verify that the folder contains the pip file.

Step 3: Now open the Scripts directory in the command prompt using the cd command and the location that you copied previously.

Step 4: Now install the library using pip install GitPython command. Here’s an analogous example:

After having followed the above steps, execute our script once again. And you should get the desired output.

Other Solution Ideas

  • The ModuleNotFoundError may appear due to relative imports. You can learn everything about relative imports and how to create your own module in this article.
  • You may have mixed up Python and pip versions on your machine. In this case, to install GitPython for Python 3, you may want to try python3 -m pip install GitPython or even pip3 install GitPython instead of pip install GitPython
  • If you face this issue server-side, you may want to try the command pip install – user GitPython
  • If you’re using Ubuntu, you may want to try this command: sudo apt install GitPython
  • You can also check out this article to learn more about possible problems that may lead to an error when importing a library.

Understanding the “import” Statement

import git

In Python, the import statement serves two main purposes:

  • Search the module by its name, load it, and initialize it.
  • Define a name in the local namespace within the scope of the import statement. This local name is then used to reference the accessed module throughout the code.

What’s the Difference Between ImportError and ModuleNotFoundError?

What’s the difference between ImportError and ModuleNotFoundError?

Python defines an error hierarchy, so some error classes inherit from other error classes. In our case, the ModuleNotFoundError is a subclass of the ImportError class.

You can see this in this screenshot from the docs:

You can also check this relationship using the issubclass() built-in function:

>>> issubclass(ModuleNotFoundError, ImportError)
True

Specifically, Python raises the ModuleNotFoundError if the module (e.g., git) cannot be found. If it can be found, there may be a problem loading the module or some specific files within the module. In those cases, Python would raise an ImportError.

If an import statement cannot import a module, it raises an ImportError. This may occur because of a faulty installation or an invalid path. In Python 3.6 or newer, this will usually raise a ModuleNotFoundError.

Related Videos

The following video shows you how to resolve the ImportError:

YouTube Video

The following video shows you how to import a function from another folder—doing it the wrong way often results in the ModuleNotFoundError:

YouTube Video

How to Fix “ModuleNotFoundError: No module named ‘git’” in PyCharm

If you create a new Python project in PyCharm and try to import the GitPython library, it’ll raise the following error message:

Traceback (most recent call last): File "C:/Users/.../main.py", line 1, in <module> import git
ModuleNotFoundError: No module named 'git' Process finished with exit code 1

The reason is that each PyCharm project, per default, creates a virtual environment in which you can install custom Python modules. But the virtual environment is initially empty—even if you’ve already installed GitPython on your computer!

Here’s a screenshot exemplifying this for the pandas library. It’ll look similar for GitPython.

The fix is simple: Use the PyCharm installation tooltips to install Pandas in your virtual environment—two clicks and you’re good to go!

First, right-click on the pandas text in your editor:

Second, click “Show Context Actions” in your context menu. In the new menu that arises, click “Install Pandas” and wait for PyCharm to finish the installation.

The code will run after your installation completes successfully.

As an alternative, you can also open the Terminal tool at the bottom and type:

$ pip install GitPython

If this doesn’t work, you may want to set the Python interpreter to another version using the following tutorial: https://www.jetbrains.com/help/pycharm/2016.1/configuring-python-interpreter-for-a-project.html

You can also manually install a new library such as GitPython in PyCharm using the following procedure:

  • Open File > Settings > Project from the PyCharm menu.
  • Select your current project.
  • Click the Python Interpreter tab within your project tab.
  • Click the small + symbol to add a new library to the project.
  • Now type in the library to be installed, in your example Pandas, and click Install Package.
  • Wait for the installation to terminate and close all popup windows.

Here’s an analogous example:

Here’s a full guide on how to install a library on PyCharm.

Posted on Leave a comment

Python Library Hijacking – A Simple Demonstration on NumPy

5/5 – (1 vote)

In this blog post, I’ll show you how recreated a Python library hijacking vulnerability on my home network.

The Wonderland box on TryHackMe was the inspiration for exploring this kind of vulnerability.

In my previous Wonderland walkthrough blog post, I highlighted an example of exploiting the ‘random’ module to switch users without knowing their password.

In this post, I’ll guide you through the setup and execution of the exploit. You can also watch the accompanying video tutorial here:

YouTube Video

What is Python Library Hijacking?

When a user has permission to run a file as another user it is possible to create a spoof file that Python will load instead of the originally intended module or library. The necessary conditions for Python library hijacking are:

  1. The user must have sudo permissions to run a Python file .py as another user
  2. The Python path must be set to look first in the folder where the spoof file is stored 

Setup

In order to re-create this vulnerability, I had to learn how to set up the above conditions for the exploit.

On my home network, I have a Raspberry Pi 3b running DietPi operating system. Originally I set this up to run Pi-hole to filter ads out from my home network.

In order to set up the permissions to run a file as another user I edited the sudoers file with visudo.

Visudo is a special editor specifically for editing the sudoers file. It only allows one user to edit the file at a time, and also checks user edits for correct syntax. I created a file called ‘checkmypermissions.py’ and granted sudo permissions to vulnerableuser to run it as user ben. 

To do this I used the command ‘sudo visudo’ to edit sudoers file, and then I added the second line for vulnerable user:

# User privilege specification
root ALL=(ALL:ALL) ALL
vulnerableuser ALL=(ben:1001) /usr/bin/python3 /home/vulnerableuser/checkmypermissions.py

The nice thing about visudo is that it checks your formatting to make sure that there are not any errors, and it will even suggest changes to help you format the permissions correctly.

This functionality helped me save time getting the correct spacing and punctuation on the new sudoers line.

Running the Exploit

Once the permissions were set up I ssh’d into vulnerableuser@<raspberry pi IP>. Running the ‘sudo -l’ command showed me the granular sudo permissions.

The line above (ben : 1001) /usr/bin/python3 /home/vulnerableuser/checkmypermissions.py shows that as vulnerableuser I can execute the checkmypermissions.py file as the user Ben.  

All that is left to do is to check the Python PATH to make sure that it checks first in the current directory, and then create a python file named numpy.py with code to spawn a shell. One way to check the Python PATH is:

Python

import sys
sys.path

In the example below, we can see that the python PATH is already set to search in the current working directory (''). 

Next we create the numpy.py file to spawn a shell.

nano numpy.py

import os
os.system("/bin/bash")

It is important to first set up execute permissions on the spoofed numpy.py file:

chmod +x numpy.py

Now we can carry out the python library hijack and spawn a shell as user ben without knowing their password by running the following command:

sudo -u ben /usr/bin/python3 /home/vulnerableuser/checkmypermissions.py  

Project Learnings

Learning #1

I learned that Visudo is a special editor within Linux to change the sudoers file /etc/sudoers.

It helps check formatting to avoid any errors or crashes from poorly written lines. The sudoers file allows the root user to granularize user permissions with the sudoers file on Linux.

Learning #2

Granting run as another user file permissions can expose a machine to library hijacking vulnerabilities.

Running sudo -l can help expose special user file permissions when enumerating for attack vectors to execute privilege escalation.

Learning #3

I found that it is helpful to compile a custom shortlist of Python and bash commands new to me for each project. I borrowed this strategy from my experience with language learning.

Over the years, I’ve improved my Mandarin by taking notes on new vocabulary words and grammar patterns. When working on a new topic area I would always create my own custom grammar and vocabulary lists for reference.

I’ve found that the simple act of focusing on recording a list helps to cement my learning and creates a nice reference for later use.

Posted on Leave a comment

ModuleNotFoundError: No module named ‘dotenv’

5/5 – (1 vote)

Quick Fix: Python raises the ModuleNotFoundError: No module named 'dotenv' when it cannot find the library dotenv. The most frequent source of this error is that you haven’t installed dotenv explicitly with pip install python-dotenv. Alternatively, you may have different Python versions on your computer, and dotenv is not installed for the particular version you’re using.

Other variants of the installation statement you should try if this doesn’t work are (in that order):

python -m pip install python-dotenv
python3 -m pip install python-dotenv
pip install python-dotenv
pip3 install python-dotenv
sudo pip3 install python-dotenv
pip install python-dotenv – user
py -m pip install python-dotenv

Also, you can try those on Anaconda and Jupyter Notebooks:

# Anaconda
conda install -c conda-forge python-dotenv # Jupyter Notebook
!pip install python-dotenv

Problem Formulation

You’ve just learned about the awesome capabilities of the dotenv library and you want to try it out, so you start your code with the following statement:

import dotenv

or from the official “Getting Started”:

from dotenv import load_dotenv load_dotenv() # take environment variables from .env.

This is supposed to import the dotenv library into your (virtual) environment. However, it only throws the following ImportError: No module named dotenv:

>>> import dotenv
Traceback (most recent call last): File "<pyshell#6>", line 1, in <module> import dotenv
ModuleNotFoundError: No module named 'dotenv'

Solution Idea 1: Install Library dotenv

The most likely reason is that Python doesn’t provide dotenv in its standard library. You need to install it first!

Before being able to import the dotenv module, you need to install it using Python’s package manager pip. Make sure pip is installed on your machine.

To fix this error, you can run the following command in your Windows shell:

$ pip install python-dotenv

This simple command installs dotenv in your virtual environment on Windows, Linux, and MacOS. It assumes that your pip version is updated. If it isn’t, use the following two commands in your terminal, command line, or shell (there’s no harm in doing it anyways):

$ python -m pip install – upgrade pip
$ pip install python-dotenv

💡 Note: Don’t copy and paste the $ symbol. This is just to illustrate that you run it in your shell/terminal/command line.

Solution Idea 2: Fix the Path

The error might persist even after you have installed the dotenv library. This likely happens because pip is installed but doesn’t reside in the path you can use. Although pip may be installed on your system the script is unable to locate it. Therefore, it is unable to install the library using pip in the correct path.

To fix the problem with the path in Windows follow the steps given next.

Step 1: Open the folder where you installed Python by opening the command prompt and typing where python

Step 2: Once you have opened the Python folder, browse and open the Scripts folder and copy its location. Also verify that the folder contains the pip file.

Step 3: Now open the Scripts directory in the command prompt using the cd command and the location that you copied previously.

Step 4: Now install the library using pip install python-dotenv command. Here’s an analogous example:

After having followed the above steps, execute our script once again. And you should get the desired output.

Other Solution Ideas

  • The ModuleNotFoundError may appear due to relative imports. You can learn everything about relative imports and how to create your own module in this article.
  • You may have mixed up Python and pip versions on your machine. In this case, to install dotenv for Python 3, you may want to try python3 -m pip install python-dotenv or even pip3 install python-dotenv instead of pip install python-dotenv
  • If you face this issue server-side, you may want to try the command pip install – user python-dotenv
  • If you’re using Ubuntu, you may want to try this command: sudo apt install python-dotenv
  • You can also check out this article to learn more about possible problems that may lead to an error when importing a library.

Understanding the “import” Statement

import dotenv

In Python, the import statement serves two main purposes:

  • Search the module by its name, load it, and initialize it.
  • Define a name in the local namespace within the scope of the import statement. This local name is then used to reference the accessed module throughout the code.

What’s the Difference Between ImportError and ModuleNotFoundError?

What’s the difference between ImportError and ModuleNotFoundError?

Python defines an error hierarchy, so some error classes inherit from other error classes. In our case, the ModuleNotFoundError is a subclass of the ImportError class.

You can see this in this screenshot from the docs:

You can also check this relationship using the issubclass() built-in function:

>>> issubclass(ModuleNotFoundError, ImportError)
True

Specifically, Python raises the ModuleNotFoundError if the module (e.g., dotenv) cannot be found. If it can be found, there may be a problem loading the module or some specific files within the module. In those cases, Python would raise an ImportError.

If an import statement cannot import a module, it raises an ImportError. This may occur because of a faulty installation or an invalid path. In Python 3.6 or newer, this will usually raise a ModuleNotFoundError.

Related Videos

The following video shows you how to resolve the ImportError:

YouTube Video

The following video shows you how to import a function from another folder—doing it the wrong way often results in the ModuleNotFoundError:

YouTube Video

How to Fix “ModuleNotFoundError: No module named ‘dotenv’” in PyCharm

If you create a new Python project in PyCharm and try to import the dotenv library, it’ll raise the following error message:

Traceback (most recent call last): File "C:/Users/.../main.py", line 1, in <module> import dotenv
ModuleNotFoundError: No module named 'dotenv' Process finished with exit code 1

The reason is that each PyCharm project, per default, creates a virtual environment in which you can install custom Python modules. But the virtual environment is initially empty—even if you’ve already installed dotenv on your computer!

Here’s a screenshot exemplifying this for the pandas library. It’ll look similar for dotenv.

The fix is simple: Use the PyCharm installation tooltips to install Pandas in your virtual environment—two clicks and you’re good to go!

First, right-click on the pandas text in your editor:

Second, click “Show Context Actions” in your context menu. In the new menu that arises, click “Install Pandas” and wait for PyCharm to finish the installation.

The code will run after your installation completes successfully.

As an alternative, you can also open the Terminal tool at the bottom and type:

$ pip install python-dotenv

If this doesn’t work, you may want to set the Python interpreter to another version using the following tutorial: https://www.jetbrains.com/help/pycharm/2016.1/configuring-python-interpreter-for-a-project.html

You can also manually install a new library such as dotenv in PyCharm using the following procedure:

  • Open File > Settings > Project from the PyCharm menu.
  • Select your current project.
  • Click the Python Interpreter tab within your project tab.
  • Click the small + symbol to add a new library to the project.
  • Now type in the library to be installed, in your example Pandas, and click Install Package.
  • Wait for the installation to terminate and close all popup windows.

Here’s an analogous example:

Here’s a full guide on how to install a library on PyCharm.