Ready, Steady, Go —-> Data Science by setting up Conda in your Computer
It has never been easier from the early python data tools invention than now, to set up an user environment in our own computer. Conda brings that easiness with it.
Conda as it defines itself is an “OS-agnostic, system-level binary package manager and ecosystem.”
The guiding principles of python are written by Tim Peters in PEP 20 — The Zen of Python. One of the aphorisms mentioned in it is, “There should be one– and preferably only one –obvious way to do it.” Conda is an effort towards it not only for Python but other languages like R, Ruby, etc.
If you wish to read more about conda, read an excellent blog post written by Travis Oliphant. He’s the creator of Numpy and Scipy.
The best way to install Conda package manager for python is through any one of the two distributions,
Anaconda
Miniconda
Choosing Between Anaconda and Miniconda
Miniconda is a small, bootstrap version of Anaconda that includes only conda, Python, the packages they depend on. If you’re ready to allocate more space (around 3 GB), Anaconda is the best option. Anaconda will install a wide range of packages that you might need to deal with the data. Otherwise, Miniconda will serve the purpose and you can install any package as required.
To get an up to date and stable version of the software, installing from the official documentation is the best way to do so. We’ll provide you the links to the docs. The steps mentioned in the docs are very easy to follow like a cakewalk. Also, by the time whenever any of the links are dead, We’ll update them.
We didn’t provide all the instructions directly here on this page because it’s very easy and clearly mentioned in the docs. The theme of this article is only to provide you with the necessary information to choose between Miniconda and Anaconda.
Do you want to enrich your Python script with powerful text-generation capabilities? You’re in the right place!
What does it do? I just discovered DeepAI’s API that automatically generates a body of text, given a sentence fragment or topic keyword.
How can it be used? You can use this as a basis to generate text automatically.
My opinion: The generated text makes sense (kind of) but you may need to further process it or guide it to generate longer meaningful content. The biggest opportunity, in my opinion, is to use it as a step in a more complex pipeline towards the automatic generation of valuable content. On its own, it wouldn’t generate too much meaning (apart from the entertainment value of reading machine-generated text).
Python Deep API Call
Ready? So, let’s have a look at the short Python script that asks the machine learning model to generate text for you—given a certain keyword such as ‘intelligence’, ‘Donald Trump’, or ‘Learn Python’.
You import Python’s standard library requests to issue web requests and access the DeepAI API that is hosted at the URL "https://api.deepai.org/api/text-generator".
Here’s the output the code snippet generated in my Python shell:
Automatically-Generated Text Example
Intelligence officials were able to confirm the existence of at least some Russian hacking operations, including the one apparent aimed at the White House.
The CIA brief, the statement said, “was made official by the Russian Government on the third assessment of a U.S. official that Russian Government officials had interfered in the 2016 presidential election. In my opinion, assertions that were made in the clear and unequivocal testimony of the public as well as in the public release on any of the Russian accounts were grossly improper, misleading, and should be seen to be completely absent from any official documents as well.”
It added: “In addition, the CIA’s assessment asserted the Russian Government’s claims were grossly misleading, misleading and misleading in their assertions. The CIA has concluded to date, including publicly, it has given credible facts to support the Russia’s claims, and there would be no justification for further claims, if such assertions are to be proven to be false.”
The CIA brief also claimed the CIA “should not” have “repeated, misleading details of Russian officials’ conduct.”
CIA spokeswoman Jane Harman told Fox News: “CIA Director John Brennan fully agrees that Director Brennan’s testimony confirms what we have heard from various intelligence agencies.
“He is clear that Director Brennan gave additional testimony to Congress on the subject, in the first instance in which he spoke frankly about the role of Russian intelligence.”
But Harman also said Brennan should have given “more proof” of “firm Russian intervention into the U.S. political environment” if such claims were to be believed about the same thing.
Brennan told me the U.S would “make public its best communications in Russia for all time.”
Brennan’s testimony was confirmed by CIA Director Gina Haspel.
Brennan’s public admission that the Clinton campaign was hacked “was, in fact, rejected by the CIA by the president,” the CIA brief said.
In a memo prepared to be published early Friday, CIA Director R. John Brennan outlined an intelligence assessment that a Russian national and political operative in the United States was responsible for leaking classified information to the Russian media and opposition leaders.
The CIA has denied the CIA’s assessment. But Brennan argued that the Russian “public claims are simply false assertions that are misleading, unconfirmed and improper.”
In the report, US intelligence provided more details to the National Security Council than a year ago, the first time in the United States that Russia was involved in the hack.
The CIA concluded that the Russian government hacked the DNC to help Trump and was trying to influence the 2016 election.
Russia has denied US attempts to influence the campaign. But President Obama, in a letter to US Secretary of State Rex Tillerson, said the US acted in “complete coordination with the Russian government” and “with Russian military officials, whom we have discussed with other countries.”
Russian election meddling and hacking of DNC were part of an international pattern of human rights violations in which countries have accused their governments of using disinformation to advance a political candidate and undermine a democratic election.
Dmitry Peskov, Russia’s president, said in December that the hacking was meant to interfere with the presidential election and may violate the election regulations.
“The cyberwar waged in this new Russia will not be stopped, the threats and security of the country will be the only legitimate measure,” he said, adding that the hackers “will have no chance to stop.”
The Russian state-sponsored cybercrime group F-Secure, which was based in Moscow, has claimed responsibility for a number of Russian cyber incidents that have been claimed by the United States, the Associated Press reports.
The Russian state-sponsored hacking groups include the computer firms Kaspersky Lab and DigiPG, both known for their malware and research programs, and the Moscow-based anti-virus firm Elemental.
The hacking groups have also said that as part of the election, they were targeting an array of Democratic political candidates.
The Russian military is responsible for the attack, according to Kremlin spokesman Dmitry Peskov.
Russia is often accused of using cyber hacks for its own interests. In December 2016, an Obama administration official stated that “every step is worth watching carefully” in the war in Afghanistan in 2014.
But Russia’s President Vladimir Putin, a Russian citizen and former head of the Communist Party, has denied that Russian state-backed separatists used hacking to support the presidential elections.
“I call on all government officials and political parties to avoid interference and the international community to take up arms for the political and economic purposes of Russia. We are not engaged, and should not be used,” Putin said in a speech in Moscow in February.
He said the Kremlin is not to blame for a country’s cyber crimes against the country during the presidential election.
Putin also said that “there is nothing new or wrong with the election result.”
Short Discussion
You can see that the generated text is quite detailed and looks professional. But is it correct? And does it contain plagiarism? To check these questions, I checked it with Grammarly. Here’s the result:
The text has high writing quality and is original!
But it’s obviously fake news—otherwise, Grammarly should have found the quotes of “CIA officials”. That’s why I think that the powerful text-generation ability should be used in a pipeline or system that ensures to create some real value-add—rather than using it as a stand-alone tool.
Try It Yourself (Interactive Shell)
Challenge
Challenge: Find ways to create real value using the Python API call in a more advanced code snippet and share it with the Finxter community. You can contact me by signing up on the Finxter Email Academy:
I’ll share the results of this poll in a follow-up blog article—so, stay tuned!
Quick Fix: Python throws the “ImportError: No module named pandas” when it cannot find the Pandas installation. The most frequent source of this error is that you haven’t installed Pandas explicitly with pip install pandas. Alternatively, you may have different Python versions on your computer and Pandas is not installed for the particular version you’re using. To fix it, run pip install pandas in your Linux/MacOS/Windows terminal.
Problem: You’ve just learned about the awesome capabilities of the Pandas library and you want to try it out, so you start with the following import statement you found on the web:
import pandas as pd
This is supposed to import the Pandas library into your (virtual) environment. However, it only throws the following import error: no module named pandas!
>>> import pandas as pd
ImportError: No module named pandas on line 1 in main.py
You can reproduce this error in the following interactive Python shell:
Why did this error occur?
The reason is that Python doesn’t provide Pandas in its standard library. You need to install Python first!
Before being able to import the Pandas module, you need to install it using Python’s package manager pip. You can run the following command in your Windows shell:
$ pip install pandas
Here’s the screenshot on my Windows machine:
This simple command installs Pandas in your virtual environment on Windows, Linux, and MacOS. It assumes that you know that your pip version is updated. If it isn’t, use the following two commands (there’s no harm in doing it anyways):
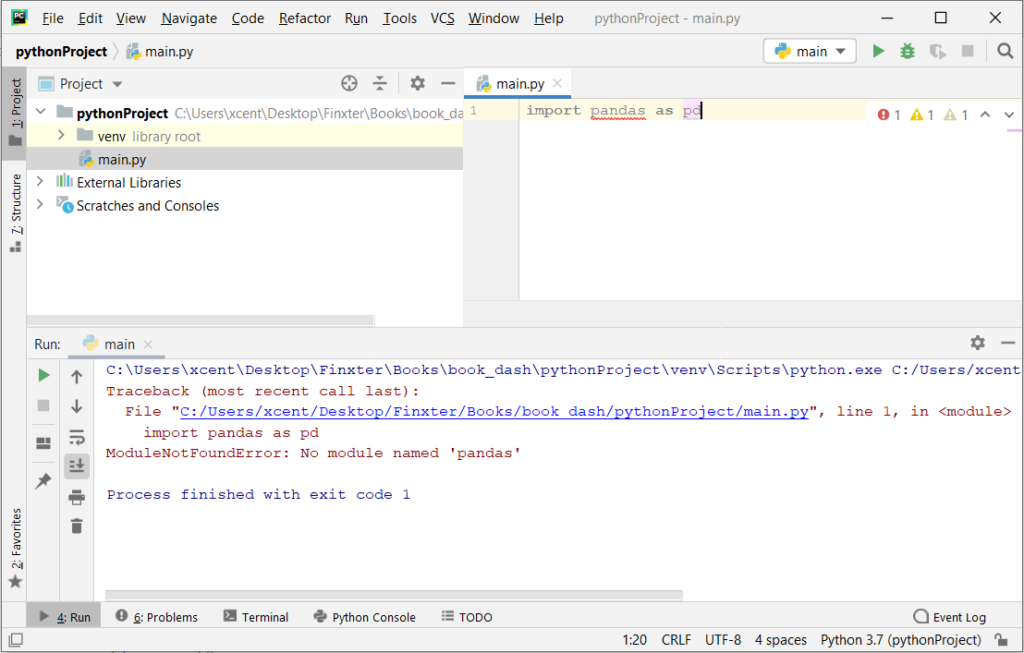
How to Fix “ImportError: No module named pandas” in PyCharm
If you create a new Python project in PyCharm and try to import the Pandas library, it’ll throw the following error:
Traceback (most recent call last): File "C:/Users/xcent/Desktop/Finxter/Books/book_dash/pythonProject/main.py", line 1, in <module> import pandas as pd
ModuleNotFoundError: No module named 'pandas' Process finished with exit code 1
The reason is that each PyCharm project, per default, creates a virtual environment in which you can install custom Python modules. But the virtual environment is initially empty—even if you’ve already installed Pandas on your computer!
Here’s a screenshot:
The fix is simple: Use the PyCharm installation tooltips to install Pandas in your virtual environment—two clicks and you’re good to go!
First, right-click on the pandas text in your editor:
Second, click “Show Context Actions” in your context menu. In the new menu that arises, click “Install Pandas” and wait for PyCharm to finish the installation.
The code will run after your installation completes successfully.
Rapid Answer: The following one-liner calculates the MD5 from the string 'hello world':
import hashlib as h;print(h.md5(b'hello world').hexdigest())
Background: MD5 message-digest is a vulnerable cryptographic algorithm to map a string to a 128-bit hash value. You can use it as a checksum on a given text to ensure that the message hasn’t been corrupted. However, you shouldn’t use it as a protection against malicious corruption due to its vulnerability. With modern hardware and algorithms, it’s easy to crack!
Problem: How to generate an MD5 sum from a string?
Example: Say, you have the following string text:
text = 'hello world'
And you want to convert it to the MD5 hash value:
5eb63bbbe01eeed093cb22bb8f5acdc3
We’ll discuss some methods to accomplish this next.
Method 1: hashlib.md5() — Multi-Liner
The hashlib library provides a function md5() that creates an object that can calculate the hash value of a given text for you via the method update():
# Method 1: hashlib.md5()
import hashlib m = hashlib.md5()
text = 'hello world'
m.update(text.encode('utf-8')) print(m.hexdigest())
# 5eb63bbbe01eeed093cb22bb8f5acdc3
Make sure to encode the string as a Unicode string with the string.encode('utf-8') method. Otherwise, Python will throw an error.
I also initialized the md5 object with the Unicode string directly rather than using the update() method. The one-liner now has minimum number of characters—I don’t think it can be made even more concise!
Python One-Liners Book
Python programmers will improve their computer science skills with these useful one-liners.
Python One-Linerswill teach you how to read and write “one-liners”: concise statements of useful functionality packed into a single line of code. You’ll learn how to systematically unpack and understand any line of Python code, and write eloquent, powerfully compressed Python like an expert.
The book’s five chapters cover tips and tricks, regular expressions, machine learning, core data science topics, and useful algorithms. Detailed explanations of one-liners introduce key computer science concepts and boost your coding and analytical skills. You’ll learn about advanced Python features such as list comprehension, slicing, lambda functions, regular expressions, map and reduce functions, and slice assignments. You’ll also learn how to:
• Leverage data structures to solve real-world problems, like using Boolean indexing to find cities with above-average pollution • Use NumPy basics such as array, shape, axis, type, broadcasting, advanced indexing, slicing, sorting, searching, aggregating, and statistics • Calculate basic statistics of multidimensional data arrays and the K-Means algorithms for unsupervised learning • Create more advanced regular expressions using grouping and named groups, negative lookaheads, escaped characters, whitespaces, character sets (and negative characters sets), and greedy/nongreedy operators • Understand a wide range of computer science topics, including anagrams, palindromes, supersets, permutations, factorials, prime numbers, Fibonacci numbers, obfuscation, searching, and algorithmic sorting
By the end of the book, you’ll know how to write Python at its most refined, and create concise, beautiful pieces of “Python art” in merely a single line.
Note that you can change the font-size to 15px, 17px, or even 20px—as you like! Also note that if you use another theme/style for your embedded code than bootstrap4, you need to set the CSS selector accordingly.
YouTube is an incredible resource for game developers, but sorting the gems out can be a challenge. Today we are going to highlight 6 excellent game development channels, especially if you are a Godot developer, as well as general game development guides, Blender, GameMaker and more.
AskGameDev is a collection of game developers that set out to answer your questions about game development. They cover many of aspects of gamedev that are often not covered, such as how to run a Kickstarter, how to get or deal with a publisher, as well as several game development themed compilations. AskGameDev also have a website available here.
GDQuest are home to dozens of Godot tutorials, in fact Nathan from GDQuest is a member of the Godot documentation team. In addition to Godot coverage, GDQuest has tutorials on all kinds of FOSS software such a Blender and Krita. The GDQuest website is available here.
HeartBeast started out as a GameMaker tutorial channel, of which there are dozens of high quality long form tutorial series. In more recent years, Heartbeast has been instead creating high quality multipart and stand-alone tutorials on Godot. HeartBeast also has a website available here.
BornCG has been making high quality Blender YouTube tutorials on his channel created in 2008! In more recent years BornCG has been increasingly covering the Godot game engine, as well as creating modern Blender tutorials as well.
DevDuck is the newest channel on this list, less than two year old and already over 100K subscribers, an impressive feat! DevDuck is a professional developer that is documenting his indie game development experience on the side. He started off with Unity but switched to Godot and of course did videos explaining why and how.
KidsCanCode have the project mission to get kids started in coding as young as possible, often through the process of creating games. Early on they did mostly Python and PyGame tutorials but then switched to Godot in recent years. They also run the Godot Recipes on their site, a collection of snippets on how to accomplish specific tasks in Godot and GDScript.
You can learn more about all the above channels in the video below.
Pandas is Excel on steroids—the powerful Python library allows you to analyze structured and tabular data with surprising efficiency and ease. Pandas is one of the reasons why master coders reach 100x the efficiency of average coders. In today’s article, you’ll learn how to work with missing data—in particular, how to handle NaN values in Pandas DataFrames.
You’ll learn about all the different reasons why NaNs appear in your DataFrames—and how to handle them. Let’s get started!
Checking Series for NaN Values
Problem: How to check a series for NaN values?
Have a look at the following code:
import pandas as pd
import numpy as np data = pd.Series([0, np.NaN, 2])
result = data.hasnans print(result)
# True
Series can contain NaN-values—an abbreviation for Not-A-Number—that describe undefined values.
To check if a Series contains one or more NaN value, use the attribute hasnans. The attribute returns True if there is at least one NaN value and False otherwise.
There’s a NaN value in the Series, so the output is True.
Filtering Series Generates NaN
Problem: When filtering a Series with where() and no element passes the filtering condition, what’s the result?
The method where() filters a Series by a condition. Only the elements that satisfy the condition remain in the resulting Series. And what happens if a value doesn’t satisfy the condition? Per default, all rows not satisfying the condition are filled with NaN-values.
This is why our Series contains NaN-values after filtering it with the method where().
Working with Multiple Series of Different Lengths
Problem: If you element-wise add two Series objects with a different number of elements—what happens with the remaining elements?
import pandas as pd s = pd.Series(range(0, 10))
t = pd.Series(range(0, 20))
result = (s + t)[1] print(result)
# 2
To add two Series element-wise, use the default addition operator +. The Series do not need to have the same size because once the first Series ends, the subsequent element-wise results are NaN values.
At index 1 in the resulting Series, you get the result of 1 + 1 = 2.
Create a DataFrame From a List of Dictionaries with Unequal Keys
Problem: How to create a DataFrame from a list of dictionaries if the dictionaries have unequal keys? A DataFrame expects the same columns to be available for each row!
import pandas as pd data = [{'Car':'Mercedes', 'Driver':'Hamilton, Lewis'}, {'Car':'Ferrari', 'Driver':'Schumacher, Michael'}, {'Car':'Lamborghini'}] df = pd.DataFrame(data, index=['Rank 2', 'Rank 1', 'Rank 3'])
df.sort_index(inplace=True)
result = df['Car'].iloc[0] print(result)
# Ferrari
You can create a DataFrame from a list of dictionaries. The dictionaries’ keys define the column labels, and the values define the columns’ entries. Not all dictionaries must contain the same keys. If a dictionary doesn’t contain a particular key, this will be interpreted as a NaN-value.
This code snippet uses string labels as index values to sort the DataFrame. After sorting the DataFrame, the row with index label Rank 1 is at location 0 in the DataFrame and the value in the column Car is Ferrari.
Sorting a DataFrame by Column with NaN Values
Problem: What happens if you sort a DataFrame by column if the column contains a NaN value?
import pandas as pd df = pd.read_csv("Cars.csv") # Dataframe "df"
# ----------
# make fuel aspiration body-style price engine-size
# 0 audi gas turbo sedan 30000 2.0
# 1 dodge gas std sedan 17000 1.8
# 2 mazda diesel std sedan 17000 NaN
# 3 porsche gas turbo convertible 120000 6.0
# 4 volvo diesel std sedan 25000 2.0
# ---------- selection = df.sort_values(by="engine-size")
result = selection.index.to_list()[0]
print(result)
# 1
In this code snippet, you sort the rows of the DataFrame by the values of the column engine-size.
The main point is that NaN values are always moved to the end in Pandas sorting. Thus, the first value is 1.8, which belongs to the row with index value 1.
Count Non-NaN Values
Problem: How to count the number of elements in a dataframe column that are not Nan?
import pandas as pd df = pd.read_csv("Cars.csv") # Dataframe "df"
# ----------
# make fuel aspiration body-style price engine-size
# 0 audi gas turbo sedan 30000 2.0
# 1 dodge gas std sedan 17000 1.8
# 2 mazda diesel std sedan 17000 NaN
# 3 porsche gas turbo convertible 120000 6.0
# 4 volvo diesel std sedan 25000 2.0
# ---------- df.count()[5]
print(result)
# 4
The method count() returns the number of non-NaN values for each column. The DataFrame df has five rows. The fifth column contains one NaN value. Therefore, the count of the fifth column is 4.
Drop NaN-Values
Problem: How to drop all rows that contain a NaN value in any of its columns—and how to restrict this to certain columns?
import pandas as pd df = pd.read_csv("Cars.csv") # Dataframe "df"
# ----------
# make fuel aspiration body-style price engine-size
# 0 audi gas turbo sedan 30000 2.0
# 1 dodge gas std sedan 17000 1.8
# 2 mazda diesel std sedan 17000 NaN
# 3 porsche gas turbo convertible 120000 6.0
# 4 volvo diesel std sedan 25000 2.0
# ---------- selection1 = df.dropna(subset=["price"])
selection2 = df.dropna()
print(len(selection1), len(selection2))
# 5 4
The DataFrame’s dropna() method drops all rows that contain a NaN value in any of its columns. But how to restrict the columns to be scanned for NaN values?
By passing a list of column labels to the optional parameter subset, you can define which columns you want to consider.
The call of dropna() without restriction, drops line 2 because of the NaN value in the column engine-size. When you restrict the columns only to price, no rows will be dropped, because no NaN value is present.
Drop Nan and Reset Index
Problem: What happens to indices after dropping certain rows?
import pandas as pd df = pd.read_csv("Cars.csv") # Dataframe "df"
# ----------
# make fuel aspiration body-style price engine-size
# 0 audi gas turbo sedan 30000 2.0
# 1 dodge gas std sedan 17000 1.8
# 2 mazda diesel std sedan 17000 NaN
# 3 porsche gas turbo convertible 120000 6.0
# 4 volvo diesel std sedan 25000 2.0
# ---------- df.drop([0, 1, 2], inplace=True)
df.reset_index(inplace=True)
result = df.index.to_list()
print(result)
# [0, 1]
The method drop() on a DataFrame deletes rows or columns by index. You can either pass a single value or a list of values.
By default the inplace parameter is set to False, so that modifications won’t affect the initial DataFrame object. Instead, the method returns a modified copy of the DataFrame. In the puzzle, you set inplace to True, so the deletions are performed directly on the DataFrame.
After deleting the first three rows, the first two index labels are 3 and 4. You can reset the default indexing by calling the method reset_index() on the DataFrame, so that the index starts at 0 again. As there are only two rows left in the DataFrame, the result is [0, 1].
Concatenation of Dissimilar DataFrames Filled With NaN
Problem: How to concatenate two DataFrames if they have different columns?
import pandas as pd df = pd.read_csv("Cars.csv")
df2 = pd.read_csv("Cars2.csv") # Dataframe "df"
# ----------
# make fuel aspiration body-style price engine-size
# 0 audi gas turbo sedan 30000 2.0
# 1 dodge gas std sedan 17000 1.8
# 2 mazda diesel std sedan 17000 NaN
# 3 porsche gas turbo convertible 120000 6.0
# 4 volvo diesel std sedan 25000 2.0
# ---------- # Additional Dataframe "df2"
# ----------
# make origin
# 0 skoda Czechia
# 1 toyota Japan
# 2 ford USA
# ---------- try: result = pd.concat([df, df2], axis=0, ignore_index=True) print("Y")
except Exception: print ("N") # Y
Even if DataFrames have different columns, you can concatenate them.
If DataFrame 1 has columns A and B and DataFrame 2 has columns C and D, the result of concatenating DataFrames 1 and 2 is a DataFrame with columns A, B, C, and D. Missing values in the rows are filled with NaN.
Outer Merge
Problem: When merging (=joining) two DataFrames—what happens if there are missing values?
import pandas as pd df = pd.read_csv("Cars.csv")
df2 = pd.read_csv("Cars2.csv") # Dataframe "df"
# ----------
# make fuel aspiration body-style price engine-size
# 0 audi gas turbo sedan 30000 2.0
# 1 dodge gas std sedan 17000 1.8
# 2 mazda diesel std sedan 17000 NaN
# 3 porsche gas turbo convertible 120000 6.0
# 4 volvo diesel std sedan 25000 2.0
# ---------- # Additional dataframe "df2"
# ----------
# make origin
# 0 skoda Czechia
# 1 mazda Japan
# 2 ford USA
# ---------- result = pd.merge(df, df2, how="outer", left_on="make", right_on="make")
print(len(result["fuel"]))
print(result["fuel"].count())
# 7
# 5
With Panda’s function merge() and the parameter how set to outer, you can perform an outer join.
The resulting DataFrame of an outer join contains all values from both input DataFrames; missing values are filled with NaN.
In addition, this puzzle shows how NaN values are counted by the len() function whereas the method count() does not include NaN values.
Replacing NaN
Problem: How to Replace all NaN values in a DataFrame with a given value?
import pandas as pd df = pd.read_csv("Cars.csv") # Dataframe "df"
# ----------
# make fuel aspiration body-style price engine-size
# 0 audi gas turbo sedan 30000 2.0
# 1 dodge gas std sedan 17000 1.8
# 2 mazda diesel std sedan 17000 NaN
# 3 porsche gas turbo convertible 120000 6.0
# 4 volvo diesel std sedan 25000 2.0
# ---------- df.fillna(2.0, inplace=True)
result = df["engine-size"].sum()
print(result)
# 13.8
The method fillna() replaces NaN values with a new value. Thus, the sum of all values in the column engine-size is 13.8.
Length vs. Count Difference — It’s NaN!
Problem: What’s the difference between the len() and the count() functions?
import pandas as pd df = pd.read_csv("Cars.csv")
df2 = pd.read_csv("Cars2.csv") # Dataframe "df"
# ----------
# make fuel aspiration body-style price engine-size
# 0 audi gas turbo sedan 30000 2.0
# 1 dodge gas std sedan 17000 1.8
# 2 mazda diesel std sedan 17000 NaN
# 3 porsche gas turbo convertible 120000 6.0
# 4 volvo diesel std sedan 25000 2.0
# ---------- # Additional dataframe "df2"
# ----------
# make origin
# 0 skoda Czechia
# 1 mazda Japan
# 2 ford USA
# ---------- result = pd.merge(df2, df, how="left", left_on="make", right_on="make")
print(len(result["fuel"]))
print(result["fuel"].count())
# 3
# 1
In a left join, the left DataFrame is the master, and all its values are included in the resulting DataFrame.
Therefore, the result DataFrame contains three rows, yet, since skoda and ford don’t appear in DataFrame df, only one the row for mazda contains value.
Again, we see the difference between using the function len() which also includes NaN values and the method count() which does not count NaN values.
Equals() vs. == When Comparing NaN
Problem:
import pandas as pd df = pd.read_csv("Cars.csv") # Dataframe "df"
# ----------
# make fuel aspiration body-style price engine-size
# 0 audi gas turbo sedan 30000 2.0
# 1 dodge gas std sedan 17000 1.8
# 2 mazda diesel std sedan 17000 NaN
# 3 porsche gas turbo convertible 120000 6.0
# 4 volvo diesel std sedan 25000 2.0
# ---------- df["engine-size_copy"] = df["engine-size"]
check1 = (df["engine-size_copy"] == df["engine-size"]).all()
check2 = df["engine-size_copy"].equals(df["engine-size"])
print(check1 == check2)
# False
This code snippet shows how to compare columns or entire DataFrames regarding the shape and the elements.
The comparison using the operator == returns False for our DataFrame because the comparing NaN-values with == always yields False.
On the other hand, df.equals() allows comparing two Series or DataFrames. In this case, NaN-values in the same location are considered to be equal.
The column headers do not need to have the same type, but the elements within the columns must be of the same dtype.
Since the result of check1 is False and the result of check2 yields True, the final output is False.
Where to Go From Here?
Enough theory, let’s get some practice!
To become successful in coding, you need to get out there and solve real problems for real people. That’s how you can become a six-figure earner easily. And that’s how you polish the skills you really need in practice. After all, what’s the use of learning theory that nobody ever needs?
Practice projects is how you sharpen your saw in coding!
Do you want to become a code master by focusing on practical code projects that actually earn you money and solve problems for people?
Then become a Python freelance developer! It’s the best way of approaching the task of improving your Python skills—even if you are a complete beginner.
Being a Python freelancer is a new way of living in the 21st century. It’s a path of personal growth, learning new skills, and earning money in the process. But in today’s digital economy, becoming a Python freelancer is – above everything else – a lifestyle choice. It can give you fulfillment, flexibility, and endless growth opportunities. Additionally, it offers you a unique way of connecting with other people, learning about their exciting projects, and finding friends and acquaintances on the way.
Disclaimer: Please don’t take this as legal advice but as tips & tricks from someone who’s been there and done that.
Freelance Developer Germany Pros and Cons
So what are the advantages of being a freelance coder? Let’s dive right into them.
Advantages of Being a Freelance Programmer in Germany
Flexibility: One big advantage of being a Python freelancer is that you are flexible in time and space. I live in a large German city (Stuttgart) where rent prices are increasing. However, since I am working full-time in the Python industry, being self-employed, and 100% digital, I have the freedom to move to the countryside. Outside large cities, housing is exceptionally cheap and living expenses are truly affordable. I am earning good money matched only by a few employees in my home town — while I am not forced to compete for housing to live close to my employers. A few cities demand very high prices in Germany while others allow you to get affordable and beautiful houses in the countryside. A clear advantage for freelance developers!
Independence: Do you hate working for your boss? Does your boss still value old-school values such as working 9-to-5? In Germany, a lot of bosses are that way. Being a freelancer injects a dose of true independence into your life. While you are not totally free (after all, you are still working for clients), you can theoretically get rid of any single client while not losing your profession. Firing your bad clients is even a smart thing to do because they demand more of your time, drain your energy, pay you badly (if at all), and don’t value your work in general. In contrast, good clients will treat you with respect, pay well and on time, come back, refer you to other clients, and make working with them a pleasant and productive experience. As an employee, you don’t have this freedom of firing your boss until you find a good one.
Tax advantages: As a freelancer, you start your own business. Please note that I’m not an accountant — and tax laws are different in different countries. But in Germany and many other developed nations, your small Python freelancing business usually comes with a lot of tax advantages. You can deduct many expenses from the taxes you pay, such as your Notebook, your car, your living expenses, working environment, eating outside with clients or partners, your smartphone, and so on. At the end of the year, many freelancers enjoy tax benefits worth tens of thousands of Euros. You can find a detailed tax guide here.
Business expertise: This advantage is maybe the most important one. As a freelancer, you gain a tremendous amount of experience in the business world. You learn to offer and sell your skills in the marketplace, you learn how to acquire clients and keep them happy, you learn how to solve problems, and you learn how to keep your books clean, invest, and manage your money. Being a freelancer gives you a lot of valuable business experiences. And even if you plan to start a more scalable business system, being a freelance developer is truly a great first step towards your goal. The business experience is a clear plus compared to other, more “nerdy” developers working only with code. The business skills will make you a more valuable person—even for established companies.
Paid learning: While you have to pay to learn at University—living is relatively expensive in Germany—being a freelance developer flips this situation upside down. You are getting paid for learning. As a bonus, the things you are learning are as practical as they can be. Instead of coding toy projects in University, you are coding (more or less) exciting projects with an impact on the real world. In Germany, the pay is relatively good due to the developed nature of the economy.
Save time in commute: Many Germans are stuck in commute for hours and hours every day. Being in commute is one of the major time killers in modern life. During a 10 year period, you’ll waste 2000-4000 hours — enough to become a master in a new topic of your choice, or writing more than ten full books and sell them on the marketplace. Commute time to work is one of the greatest inefficiencies of our society. And you, as a freelance developer, can completely eliminate it. This will make your life constantly easier, you have an unfair advantage compared to any other employee. You can spend the time on learning, recreation, or building more side businesses. You don’t even need a car (I don’t have one) which will save you hundreds of thousands of Euros throughout your lifetime (the average German employee spends 300,000 € on cars).
Family time: During the last 12 months being self-employed with Python, I watched my 1-year old son walking his first steps and speaking his first words. I was actually attending every single stage of his development and growth. While this often seems very normal to me, I guess that many fathers who work at big companies as employees may have missed their sons and daughters growing up. In my environment, most fathers do not have time to spend with their kids during their working days. But I have and I’m very grateful for this.
Competition: In Germany, there’s a seller’s market for freelance developers—demand is much higher than supply. This means that you can charge premium rates and work only on the gigs you want.
Are you already convinced that becoming a Python freelancer is the way to go for you? You are not alone. To help you with your quest, I have created the one and only Python freelancer course on the web which pushes you to Python freelancer level in a few months — starting out as a beginner coder. The course is designed to pay for itself because it will instantly increase your hourly rate on diverse freelancing platforms such as Upwork or Fiverr.
Disadvantages of Being a Freelance Programmer in Germany
Less stability: It’s hard to reach a stable income as a freelancer. In Germany, many people seek security above freedom. Also, if you want to buy your own home and need credit, banks usually have less trust in your ability to generate income than if you were employed.
Bad clients: You will get those bad clients for sure. However, in Germany this disadvantage is somehow mitigated as clients are mostly business owners that are able to pay their freelancing fees.
Legacy code: Germany has a lot of large and established industry players such as Bosch, Daimler, and other manufacturers. These older industries usually have older code bases as well. As a German freelance developer, you may need to handle more legacy code than as a freelancer in a newer economy such as, for example, India.
Solitude: If you are working as an employee at a company, you always have company, quite literally. In Germany, this culture is especially true—only a small percentage of your IT friends will work as self-employed freelance developers. Most coders work for big companies.
Freelance Developer Germany While Employed
If you’re an employee, you have the freedom to create your own side-hustle in Germany. However, there are some laws that ensure that people don’t work too much. Thus, you need to be careful not to work too many hours per week. In this resource, they recommend not to work more than 18 hours per week on your side business—if you still have a main job. In general, these are the points to consider when creating your own side-business as a freelance developer in Germany:
Side vs Main Income: Make sure to earn more in your main job than in your side business. This is required so that it still counts as a side-business and not your main income. In that case, your business would be considered your main income which would result in a loss of some benefits paid by your employer.
Inform Your Employer: You may need to inform your employer that you create your side business. This may be required by contract or even by law (for some type of jobs such as government employees).
Register Your Business: You need to register your business with the tax office and government. As in most other countries, you cannot just “go for it” but need to register your intent to create a business—even if it is on the side.
Social Insurance: If you’re creating a business on the side, you’re stilled insured by your employer (e.g., for pension funds and health insurance). That’s why you need to make sure not to work or earn too much for your side business. As soon as you cross this threshold and your “side” business becomes your primary income stream, you need to take care of insurance yourself and you’ll lose access to the benefits provided by the employer. (Well, if you reach this point, you essentially have a double income so you probably wouldn’t care financially.)
Tax: You need to make sure to pay all taxes (e.g., sales tax and income tax). However, suppose you don’t earn a lot with your side business. In that case, you’re probably eligible to apply for special tax treatment (“Kleinunternehmerregelung”) to free you from the need (partially) to pay sales taxes.
Freelance developers in Germany earn more than their employed colleagues. A recent article from a German magazine states that the average freelance developer earns 84€ per hour. If you work 8 hours per day for a client, you’d earn 640€ per day or 13440€ per month.
Note that this is the average rate of a freelance developer! Most people can significantly increase their income by honing their business and programming skills at the same time—and reach above-average hourly rates over time. If you reach expert status in a certain area, you can charge 100€ per hour which results in a monthly income of 16000€.
Becoming a freelance developer in Germany is, indeed, a profitable endeavor!
Make sure to save some 10% of your income for more calm times to ensure liquidity at all costs. Cash is the lifeblood of any business and the sensible business owner makes sure to always have enough cash on their bank account to pay for at least 6 months of expenses.
To learn how to reach above-average hourly rates, join my Python freelancer course—the world’s most comprehensive and in-depth freelance developer program!
There are two primary types of taxes for self-employed freelancers in Germany: sales tax and income tax.
Sales tax is between 16-18% of each transaction volume and if you sell your services to another business, you can usually deduct it again (ask your accountant)!
Income tax can easily reach 40% of your income if you reach the average earning levels of a German freelancer of a six-figure income.
However, if you’re just starting out and you’ve only a few or zero clients, you don’t have to pay either sales tax and income tax.
There are many ways to optimize your taxes and I recommend you check out our detailed tax guide (for hackers) to learn some smart ways to pay less tax and invest in your future success.
Freelance Developer German Language
My friend and freelancer Lukas is involved in freelancing for German clients. He’s a German guy so he swears on using a German gig description on freelancing platforms such as Fiverr. The big benefit is that, as a person being able to speak the German language, you can shield yourself from international competition and price wars. Many German clients only seek freelancers who can speak German with them because they’re uncomfortable in expressing their needs and gig specifications in a foreign language such as English. Being able to speak German well can make your freelancing business even more profitable and better protected against the competition!
Where to Go From Here?
Enough theory, let’s get some practice!
To become successful in coding, you need to get out there and solve real problems for real people. That’s how you can become a six-figure earner easily. And that’s how you polish the skills you really need in practice. After all, what’s the use of learning theory that nobody ever needs?
Practice projects is how you sharpen your saw in coding!
Do you want to become a code master by focusing on practical code projects that actually earn you money and solve problems for people?
Then become a Python freelance developer! It’s the best way of approaching the task of improving your Python skills—even if you are a complete beginner.
Every code or file within Pycharm is written inside a project. This means, everything in PyCharm is written with respect to a Project and the first thing that you need to create before you can write any code is a project. So, let’s see how we can create a project in PyCharm.
➮ After successfully installing PyCharm, the welcome screen comes up. Click Create New Project.
The Create New Project window opens up.
✶ In this window specify the location of the project where you want to save the files.
✶ Expand the Python Interpreter menu. Here, you can specify whether you want to create a new project interpreter or reuse an existing one. From the drop-down list, you can select one of the options: Virtualenv, Pipenv, or Conda. These are the tools that help us to keep dependencies required by different projects and are separated by creating isolated Python environments for each of them. You can also specify the location of the New environment and select a Base interpreter (for example Python2.x or Python3.x) from the options available. Then we have checkboxes to select Inherit global site-packages and Make available to all projects. Usually, it is a good idea to keep the defaults.
✶ Click Create on the bottom right corner of the dialog box to create the new project.
Note: You might be notified that: Projects can either be opened in a new window or you can replace the project in the existing window or be attached to the already opened projects. How would you like to open the project? Select the desired option.
You might also get a small Tip of the Day popup where PyCharm gives you one trick to learn at each startup. Feel free to close this popup.
Now, we are all set to start writing our first Python code in PyCharm.
Click on File.
Choose New.
Choose Python File and provide a name for the new file. In our case we name it add. Press enter on your keyboard and your new file will be ready and you can write your code in it.
Let us write a simple code that adds two numbers and prints the result of the addition as output.
How To Run The Python Code In PyCharm?
Once the code is written, it is time to run the code. There are three ways of running the Python code in PyCharm.
Method 1: Using Shortcuts
Use the shortcut Ctrl+Shift+R on Mac to run the code.
Use the shortcut Ctrl+Shift+F10 on Windows or Linux to run the code.
Method 2: Right click the code window and clickon Run ‘add’
Method 3: Choose ‘add’ and click on the little green arrow at the top right corner of the screen as shown in the diagram below.
How To Debug The Code Using Breakpoints?
While coding, you are bound to come across bugs especially if you are working with a tedious production code. PyCharm provides an effective way of debugging your code and allows you to debug your code line by line and identify exceptions or errors with ease. Let us have a look at the following example to visualize how to debug your code in PyCharm.
Example:
Output:
Note: This is a very basic example and has been just used for the purpose to guide you through the process of debugging in PyCharm. The example computes the average of two numbers but yields different results in the two print statements. A spoiler: we have not used the brackets properly which results in the wrong result in the first case. Now, we will have a look at how we can identify the same by debugging our Python code in PyCharm.
Debugging our code:
Step 1: Setting The Breakpoint
The first requirement to start debugging our code is to place a breakpoint by clicking on the blank space to the left of line number 1 ( this might vary according to your code and requirements). This is the point where the program will be suspended and the process of debugging can be started from here, one line at a time.
Step 2: Start Debugging
Once the breakpoint is set the next step is to start debugging using one of the following ways:
Using Shortcuts:Ctrl+Shift+D on Mac or Shift+Alt+F9 on Windows or Linux.
Right-click on the code and choose Debug ‘add’.
Choose ‘add’ and click on the icon on the top right corner of the menu bar.
Once you use any one of the above methods to start debugging your code, the Debug Window will open up at the bottom as shown in the figure below. Also, note that the current line is highlighted in blue.
Step 3: Debug line by line and identify the error (logical in our case). Press F8 on your keyboard to execute the current line and step over to the next line. To step into the function in the current line, press F7. As each statement is executed, the changes in the variables are automatically reflected in the Debugger window.
How To Test Code In PyCharm?
For any application or code to be operational, it must undergo unit test and PyCharm facilitates us with numerous testing frameworks for testing our code. The default test runner in Python is unittest, however, PyCharm also supports other testing frameworks such as pytest, nose, doctest, tox, and trial.
Let us create a file with the name currency.py and then test our file using unit testing.
Now, let us begin unit testing. Follow the steps given below:
Step 1:Create The Test File
To begin testing keep the currency.py file open and execute any one of the following steps:
Use Shortcut: Press Shift+Cmd+T on Mac or Ctrl+Shift+T on Windows or Linux.
Right-click on the class and select Go To ➠ Test. Make sure you right-click on the name of the class to avoid confusion!
Go to the main menu ➠ select Navigate ➠ Select Test
Step 2: Select Create New Test and that opens up the Create Test window. Keep the defaults and select all the methods and click on OK.
✶ PyCharm will automatically create a file with the name test_currency.py with the following tests within it.
Step 3: Create the Test Cases
Once our test file is created we need to import the currency class within it and define the test cases as follows:
Step 4:Run the Unit Test
Now, we need to run the test using one of the following methods:
Using Shortcut: Press Ctrl+R on Mac or Shift+F10 on Windows or Linux.
Right-click and choose Run ‘Unittests for test_currency.py’.
Click on the green arrow to the left of the test class name and choose Run ‘Unittests for test_currency.py’.
You will since that two tests are successful while one test fails. To be more specific unit test for test_euro() and test_yen() are successful while the test fails for test_pound().
Output:
That brings us to the end of this section and it is time for us to move on to a very important section of our tutorial where we will be discussing numerous tips and tricks to navigate PyCharm with the help of some interesting shortcuts. We will also discuss in brief about some of the tools like Django that we can integrate with PyCharm. So, without further delay lets dive into to next section.
Please click on the Next link/button given below to move on to the next phase of PyCharm journey!
The next disruption is about to happen in the freelancing space. Freelancing platforms such as Upwork and Fiverr grow double-digit per year.
But what if you’re living in the US? Is freelancing still a great opportunity for you—given the worldwide competition? How much can you earn in the US?
In this article, we’re going to answer these most common questions!
What’s the Hourly Rate of an US-Based Freelance Developer?
What’s the hourly rate of a freelance developer? If you’re like me, you want to peek into the potential of a given profession before you commit years of your life to any profession like freelance developing.
The average freelance developer in the US earns $56 per hour with conservative estimates ranging as low as $31 and aggressive estimates ranging as high as $82.
The following table compares the hourly rates of employed developers and freelance developers:
Job Description
Status
Hourly Rate
Web Developer
Employee
$31.62
Freelancer
$34.78
PHP Developer
Employee
$46.28
Freelance
$50.90
.Net Developer
Employee
$55.06
Freelance
$60.56
Python Developer
Employee
$56.90
Freelance
$62.59
About the Data. Our data is based on various online sources such as indeed.com, neuvoo.co.uk, and other portals where professionals can report their earnings. We state the sources below in the image captions.
We modified the expected earnings of a freelancer by increasing the average earnings of an employed professional by 10%. This is based on the findings of this study: the average freelancer earns about 10% more than his employed counterpart. We found that in practice, the difference is often much higher than that—freelancers earning much more than employees. One of the reasons may be that freelancers have more control of their earnings—an ambitious freelancer tends to earn a higher percentage more than an ambitious employee in the same profession. This is because there are no caps in freelance earnings.
If you want to earn your full-time income working in your part-time freelancing business, check out our course “Become a Python Freelance Developer”.
The average hourly rate of an employed web developer is $31.62 per hour in the US. The average hourly rate of a freelance web developer is $34.78 in the US.
The average hourly rate of an employed Python developer is $56.90 per hour in the US. The average hourly rate of a freelance Python developer is $62.59 in the US.
The average hourly rate of an employed PHP developer is $46.28 per hour in the US. The average hourly rate of a freelance PHP developer is $50.90 in the US.
The average hourly rate of an employed .Net developer is $55.06 per hour in the US. The average hourly rate of a freelance .Net developer is $60.56 in the US.
How Do You Compete with Cheap Labor Countries as an US-based Freelance Developer?
In the following video, I discuss little-known but very effective strategies to compete in a globalized economy as a US-based freelance developer.
How Many Freelance Software Developers Are There in the United States?
How many freelance developers are there in the US? There’s no official and precise answer. However, based on three credible sources—Upwork, Freelancer Union, McKinsey—I calculated an estimation stemming from each source.
Here are our estimations for the number of freelancers based on three independent data sources:
Upwork Data: 12,500,000 freelance developers in the IT sector.
Freelancer Union Data: 1,740,000 freelance developers in the IT sector.
McKinsey Data: 5,400,000 freelance developers in the IT sector.
The median of these three data points—Upwork, Freelancer Union, McKinsey—is 5,400,000 freelance developers working in an IT related field and the average is 6,560,000 freelance developers. Thus, the number of freelance developers is between 5 and 7 million.
A more in-depth explanation of these estimations is given in my detailed blog article.
To become successful in coding, you need to get out there and solve real problems for real people. That’s how you can become a six-figure earner easily. And that’s how you polish the skills you really need in practice. After all, what’s the use of learning theory that nobody ever needs?
Practice projects is how you sharpen your saw in coding!
Do you want to become a code master by focusing on practical code projects that actually earn you money and solve problems for people?
Then become a Python freelance developer! It’s the best way of approaching the task of improving your Python skills—even if you are a complete beginner.