Back in late January, we distributed a survey focusing on partitioning preferences for Anaconda Installer (OS Installer for RHEL, CentOS, and Fedora). We were able to get 1269 responses! Thank you to all who participated. The data we collected will help the Anaconda team continue to provide an installer that best suits the majority’s needs.
Given the high participation rate, we’re excited to share the main results and findings with you!
Who are our users?
First, we wanted to understand who the users are. The most common answers to demographic-style questions gave us the following results:
96% (of 1138 responses) are desktop/workstation Linux users
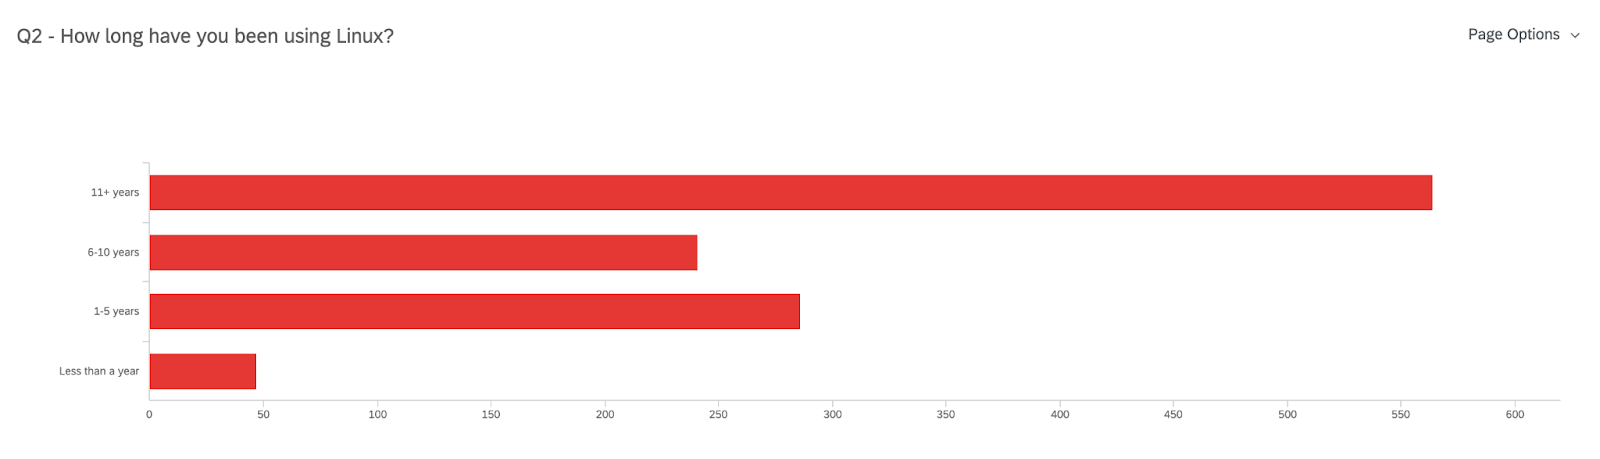
Have 11+ years of experience using Linux (50% of 1138 responses)
90% use Fedora (sometimes in combination with RHEL, CentOS, Ubuntu, or Debian)
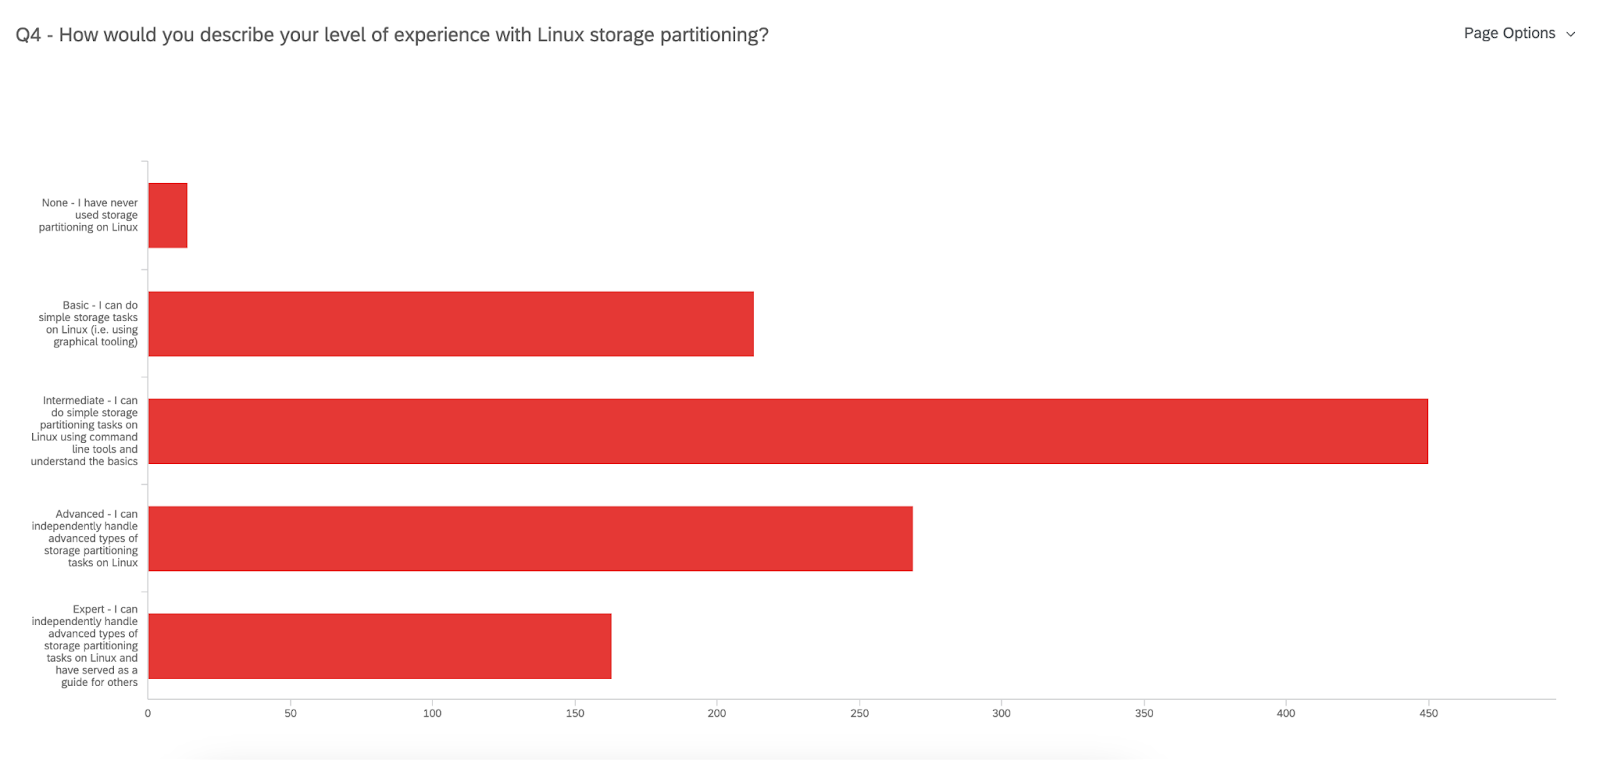
450 users identify as having an Intermediate level of expertise with Linux storage partitioning
n=1138
n=1109
These data points mean that most of you have been using Linux with Fedora (not exclusively) on a desktop/workstation for over a decade! That’s impressive! But when it comes to Linux storage partitioning there is still quite a bit to learn – and we are here to make that easier.
What storage and partitioning is used?
Storage
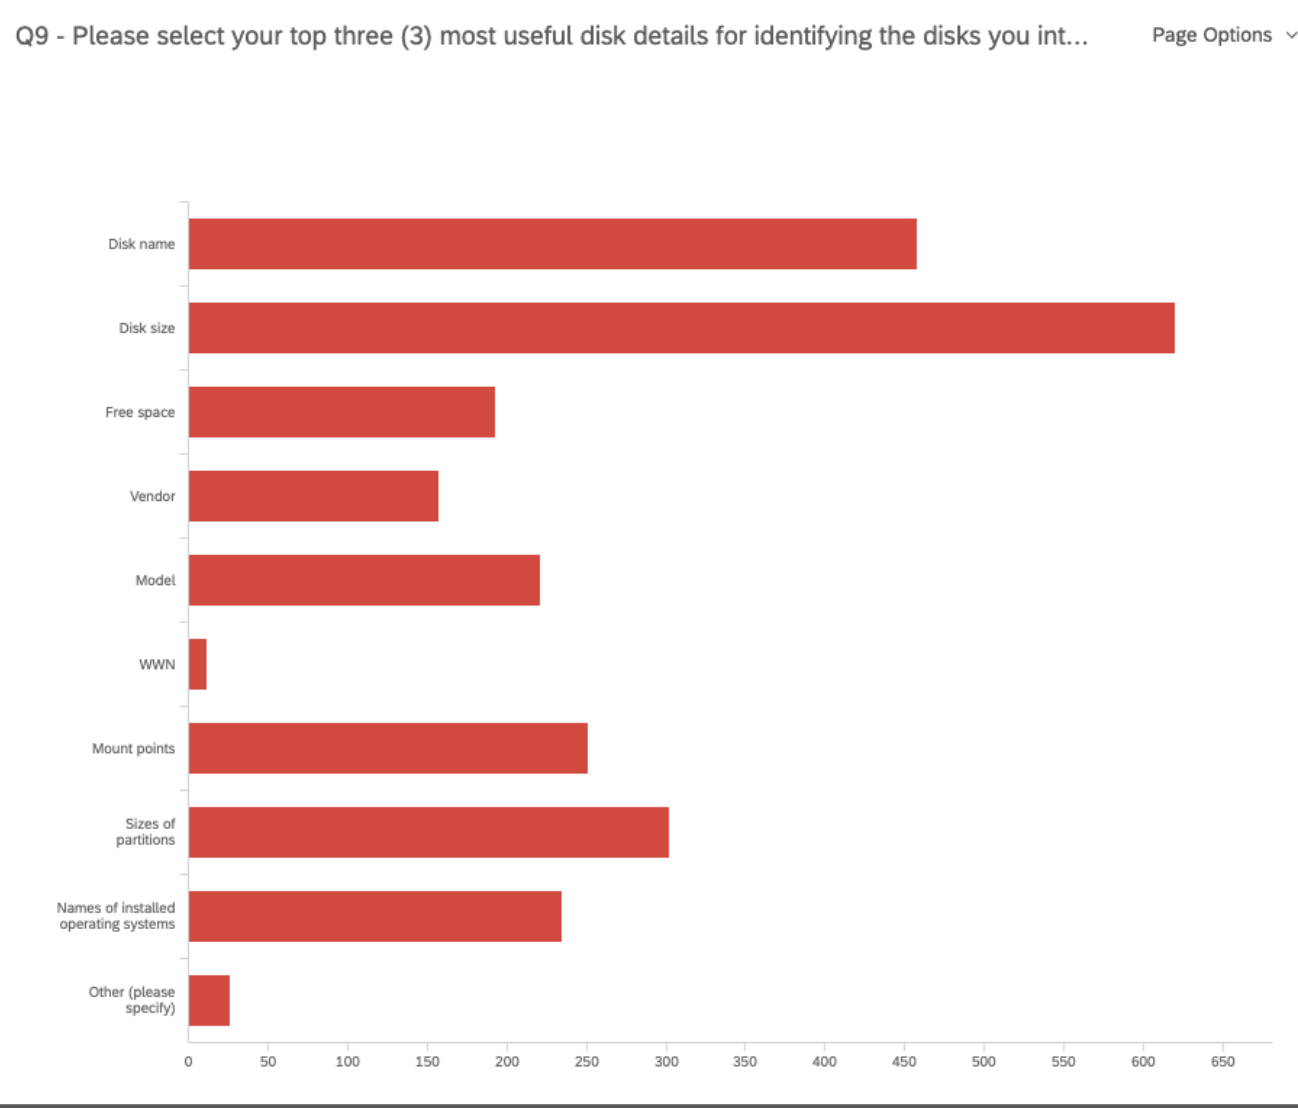
Once we got a better picture of who our participants were, we asked questions regarding your current storage and partitioning set up. For example, we uncovered that when it comes to identifying the disks you will use for your installation, most of you are mainly interested in the disk name, size, and the sizes of partitions. This helps the team decide which data is more helpful to present on the disk selection screen.
n=969
Partitioning
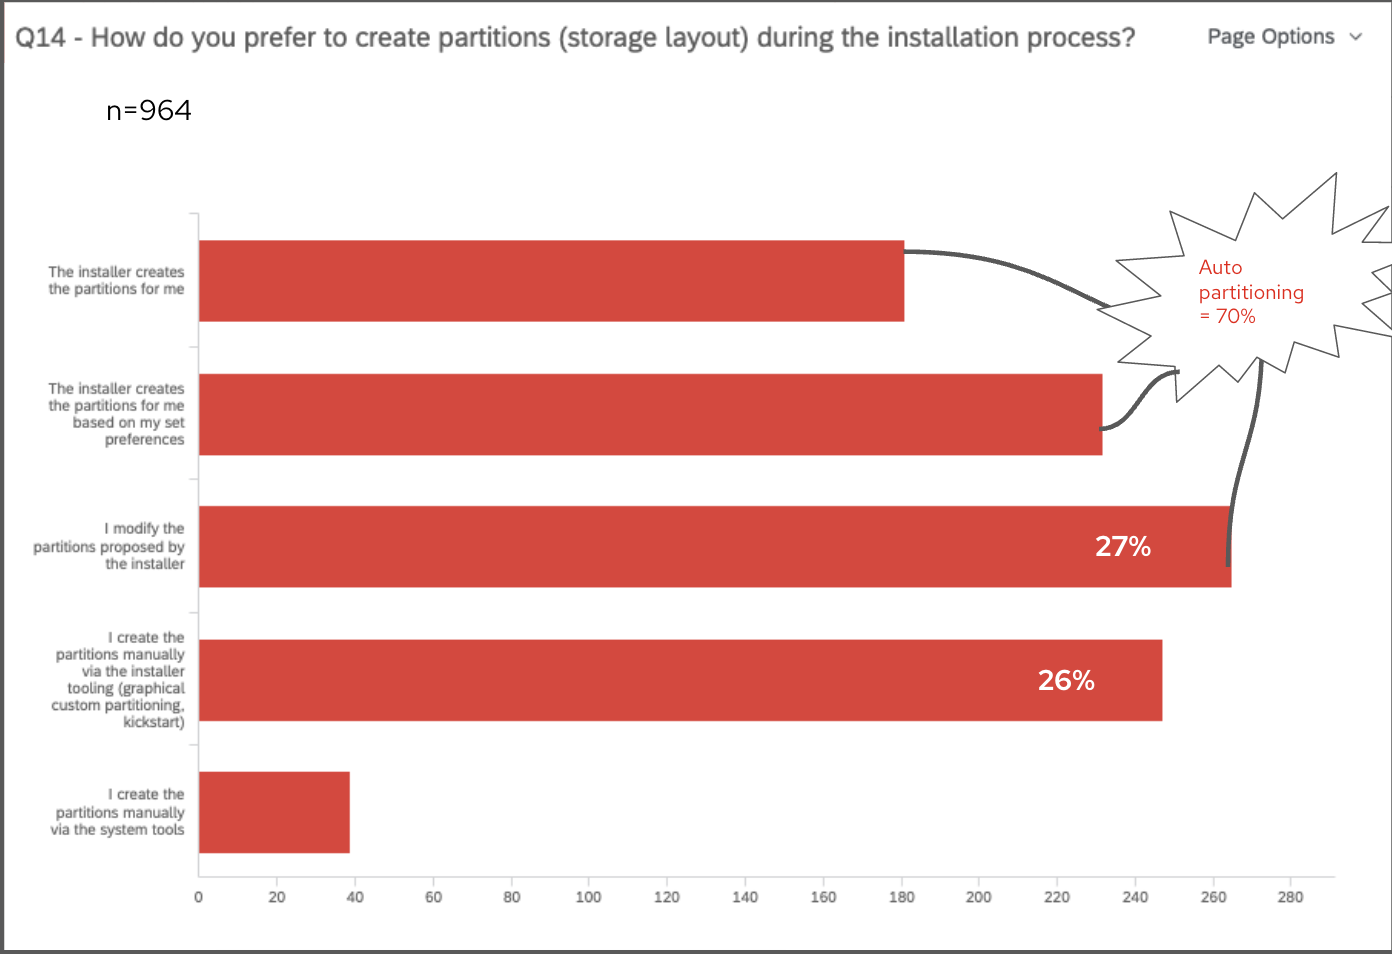
Then, we asked questions about your preferences and expectations regarding partitioning. From studies in the past, we kept seeing an almost even preference for auto-partitioning and custom partitioning because of the different needs they each fulfill. However, this survey clarified that there is a slightly stronger preference for auto-partitioning, but many of you made it clear that you need the Installer to allow some customizations to partitioning. The team is certainly keeping this in mind. In fact, we asked you “How do you prefer to create partitions (storage layout) during the installation process?” and most of the multiple-choice responses were split between “Installer creates the partitions for me”, “Installer creates partitions based on my set preferences”, or “I modify the partitions proposed by the installer”. These three options indicate some form of auto-partition, leading to the combined 70% of 964 responses preferring auto-partitioning.
Next steps for Anaconda
Finally, we wanted your input on what the next steps for Anaconda should be. The team has been considering a few different approaches, and most of you ranked the “Ability to select pre-defined partitioning configuration options with streamlined steps” as your #1 choice, closely followed by “Ability to customize details of partitioning”. This tells us that you are expecting a more guided experience for partitioning, especially given that most of you also feel there is a lot left to learn about Linux storage partitioning. Be on the lookout for what’s next with Anaconda!
Thanks to all who participated
Again, thank you to all who took the time to fill out the survey. You have provided the team with plenty of data to consider for the future of Anaconda Installer.
The Community Platform Engineering team is a Red Hat-sponsored team dedicated to the Fedora Project and CentOS Project that contributes to developing limited-scoped projects called initiatives, maintaining the community infrastructure, and helping manage releases of our offerings. As a remote-only team, the members were unable to get many opportunities to strategize the next big thing as a team and to bond with their fellow teammates beyond the scope of the designated work. Owing to the fact that the last team face-to-face meeting took place in Waterford City, Ireland in 2019, it became necessary for the team to meet up again when the travel restrictions started loosening up. After all, the popular saying “absence makes the heart grow fonder” applies to everyone — even to community members and teammates, right?
Barcelona, Spain was selected as the destination for the team face-to-face meeting and the duration was picked to be from 20th March 2023 to 23rd March 2023. As this was going to be one of the first times that people started embarking on travels again after a long spell of inactivity during COVID-19, the management made sure to begin the travel planning and event management well in advance to account for everyone in the team. This was no small feat to achieve considering the fact that the team had grown significantly since the last team face-to-face meeting; both in terms of member counts and scope diversity. The common accommodation point was chosen to be Hotel Abba Balmoral, Barcelona for the entire team, which is located at the very heart of the city and around a walking distance from the nearest Red Hat office.
Day 0
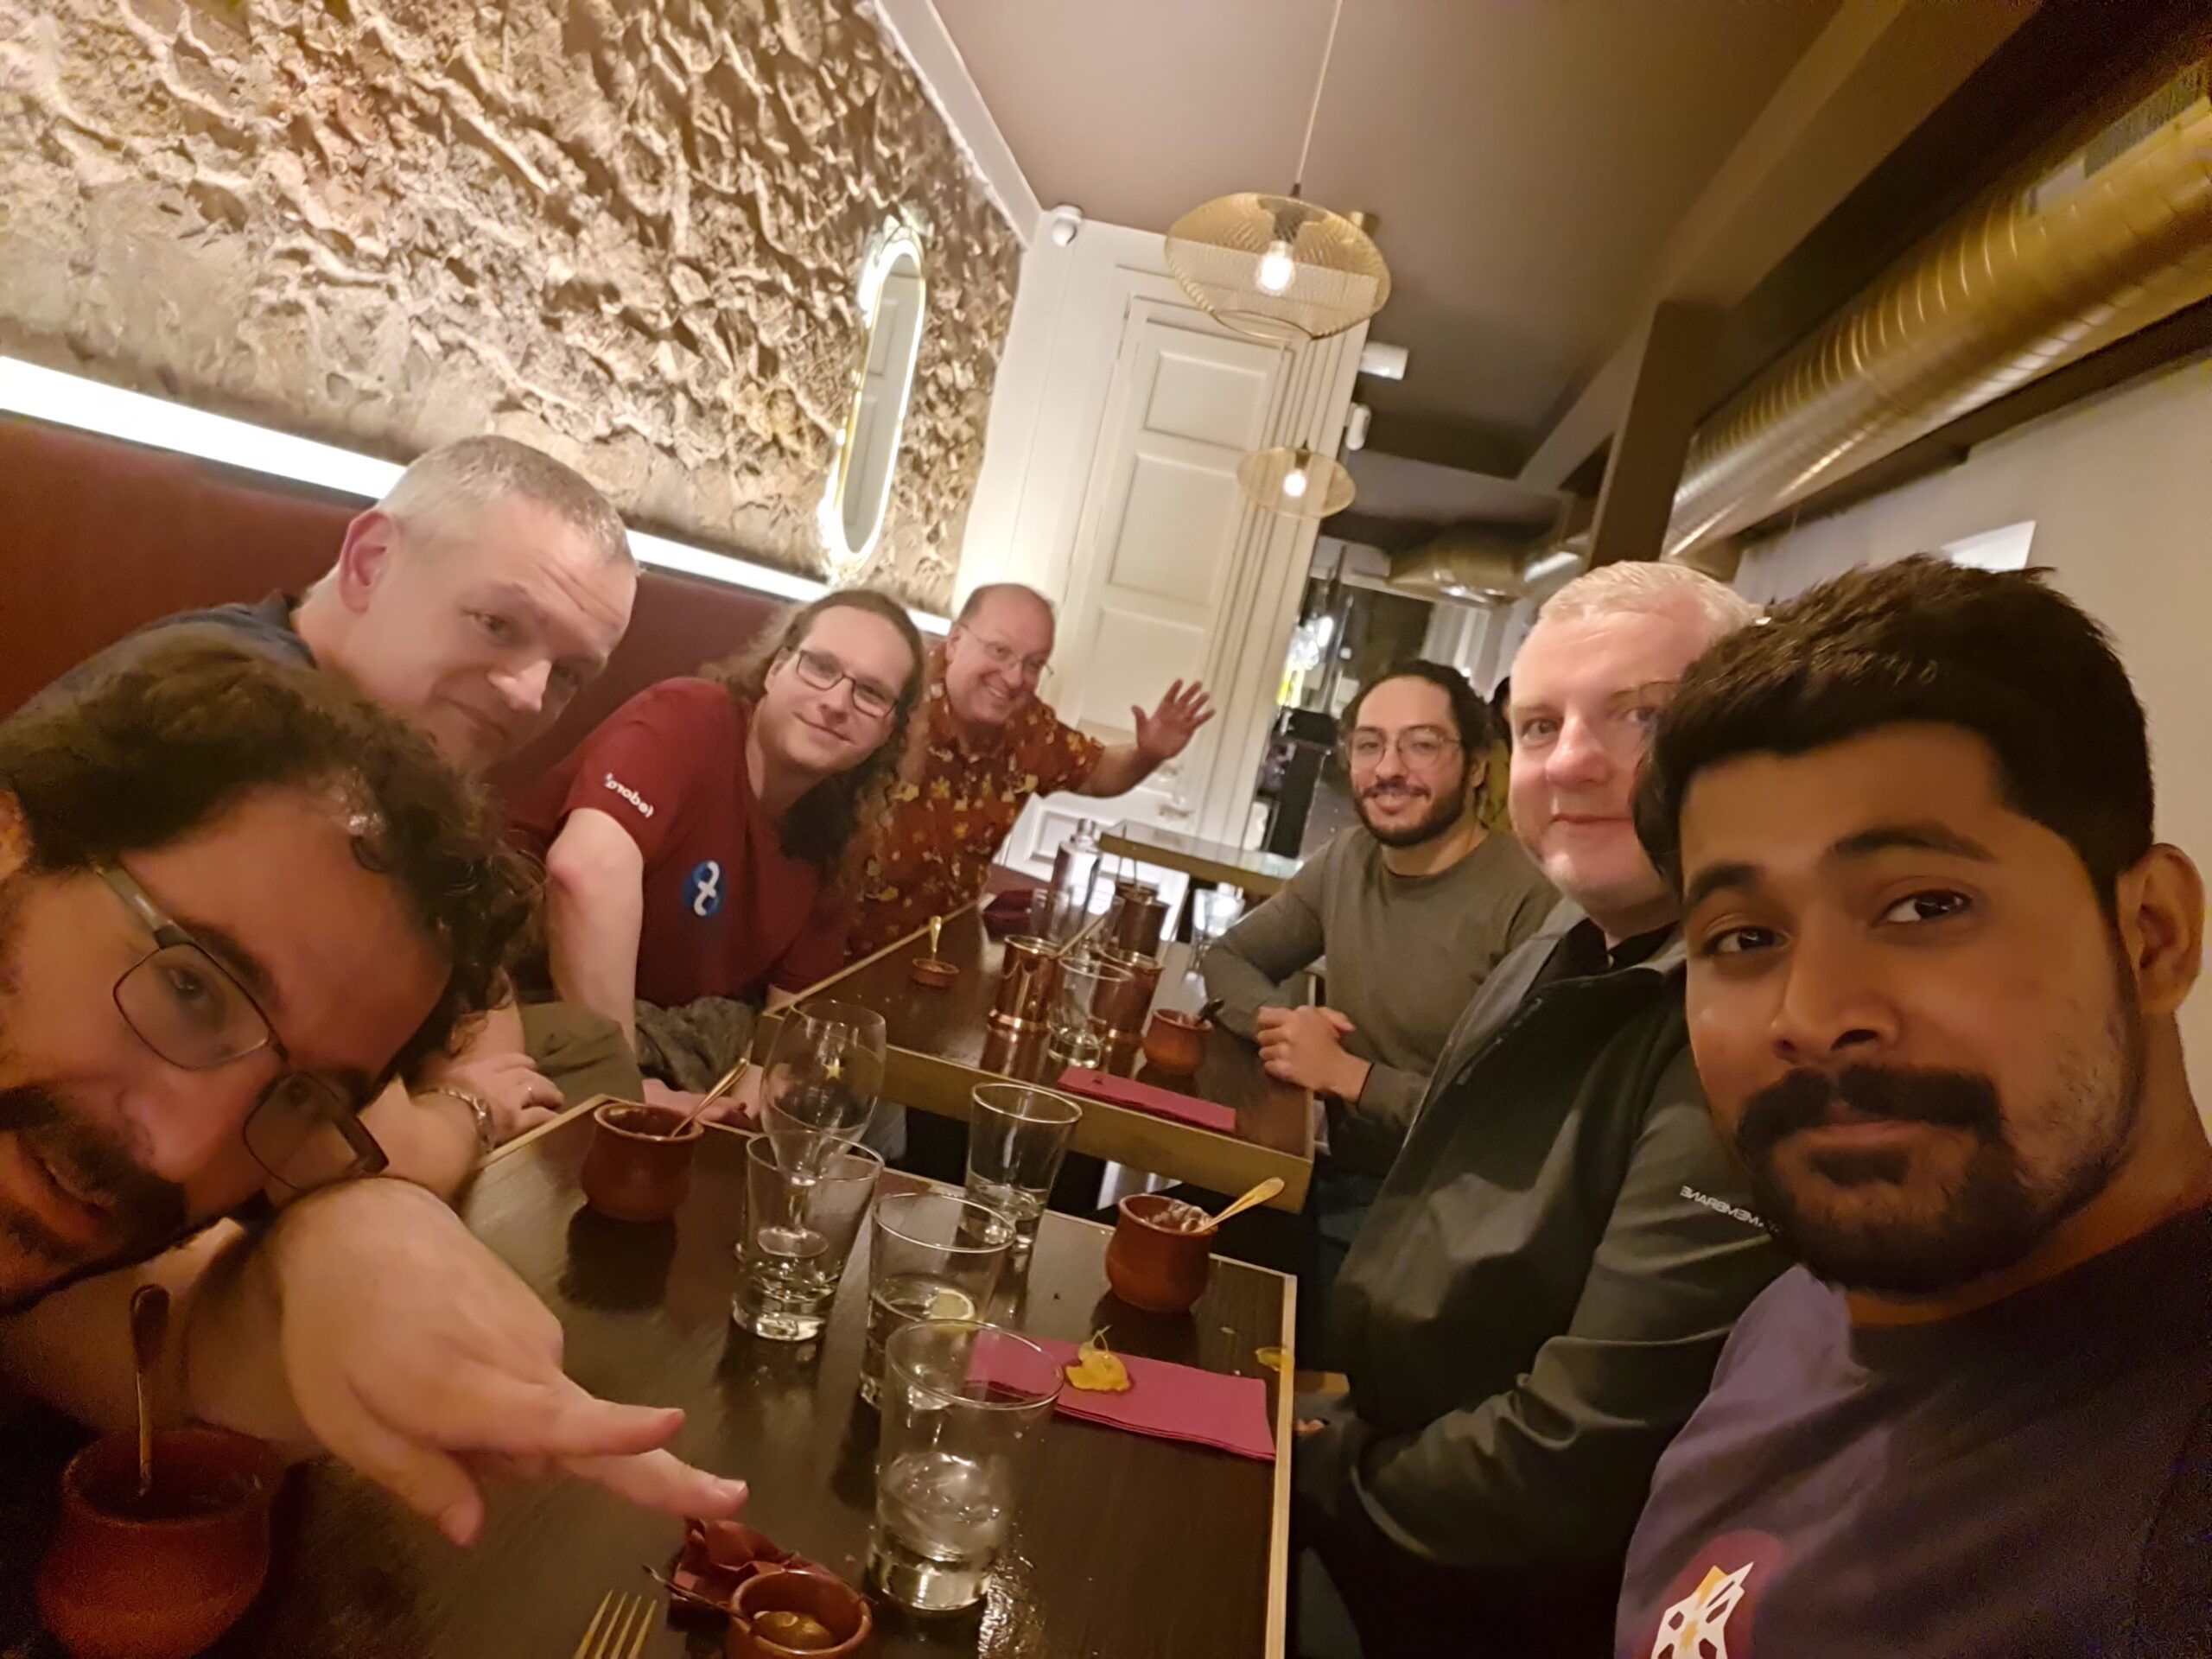
Whilst a few team members flew into Barcelona on Sunday, many flew in throughout the day and took a cab to the hotel on Monday. As nothing was planned on the agenda for the day, it was spent by the teammates mostly getting to know each other, snacking on regional delicacies, and resting after the long flights people had gone through to get here. It was surprising to see just how many team members were getting to meet each other for the first time here and could not before, either because they were new to the team or were working on greatly different things. Some members decided to recce the Red Hat office located close by to the hotel at Travessera de Garcia, Barcelona, and snacking joints while others decided to rest up during the afternoon before heading together to the planned dinner at 1930 in a local Indian restaurant.
With the evening finding its way into the day, the team united at the hotel lobby at 1900 and started heading over to the authentic Indian restaurant called Bar Bar, which was again a walking distance from the hotel. Being a cuisine that most of the teammates did not try previously, Akashdeep Dhar volunteered to guide folks through the menu – suggesting delicacies to try (or avoid) based on their preferences of flavor. For a team consisting of members hailing from across a variety of time zones and countries, having food and sharing anecdotes was indeed a magically unifying experience. After the dinner got over, some people stayed back to click pictures with the friends they made, some headed off for some more snacks in a nearby cafe and the remaining folks returned back to the hotel to get some much-needed respite.
Day 1
After the team had a joint breakfast from around 0700 to 0900, the members started heading off to the office in small groups to start off with the first (official) day of the event. Once all members settled down in a meeting room, the face-to-face meeting started off with the opening delivered by Stefan Mattejiet, following which a fun session was conducted to understand how well the members know each other by drawing each other’s faces. The next session was conducted by Akashdeep Dhar where he talked about the importance of mentorship within the team as well as in the community and organized an activity where the team, divided into multiple subteams, were asked to enact different scenarios of mentor-mentee interactions. Following that they dispersed into small groups and headed to their preferred places for lunch.
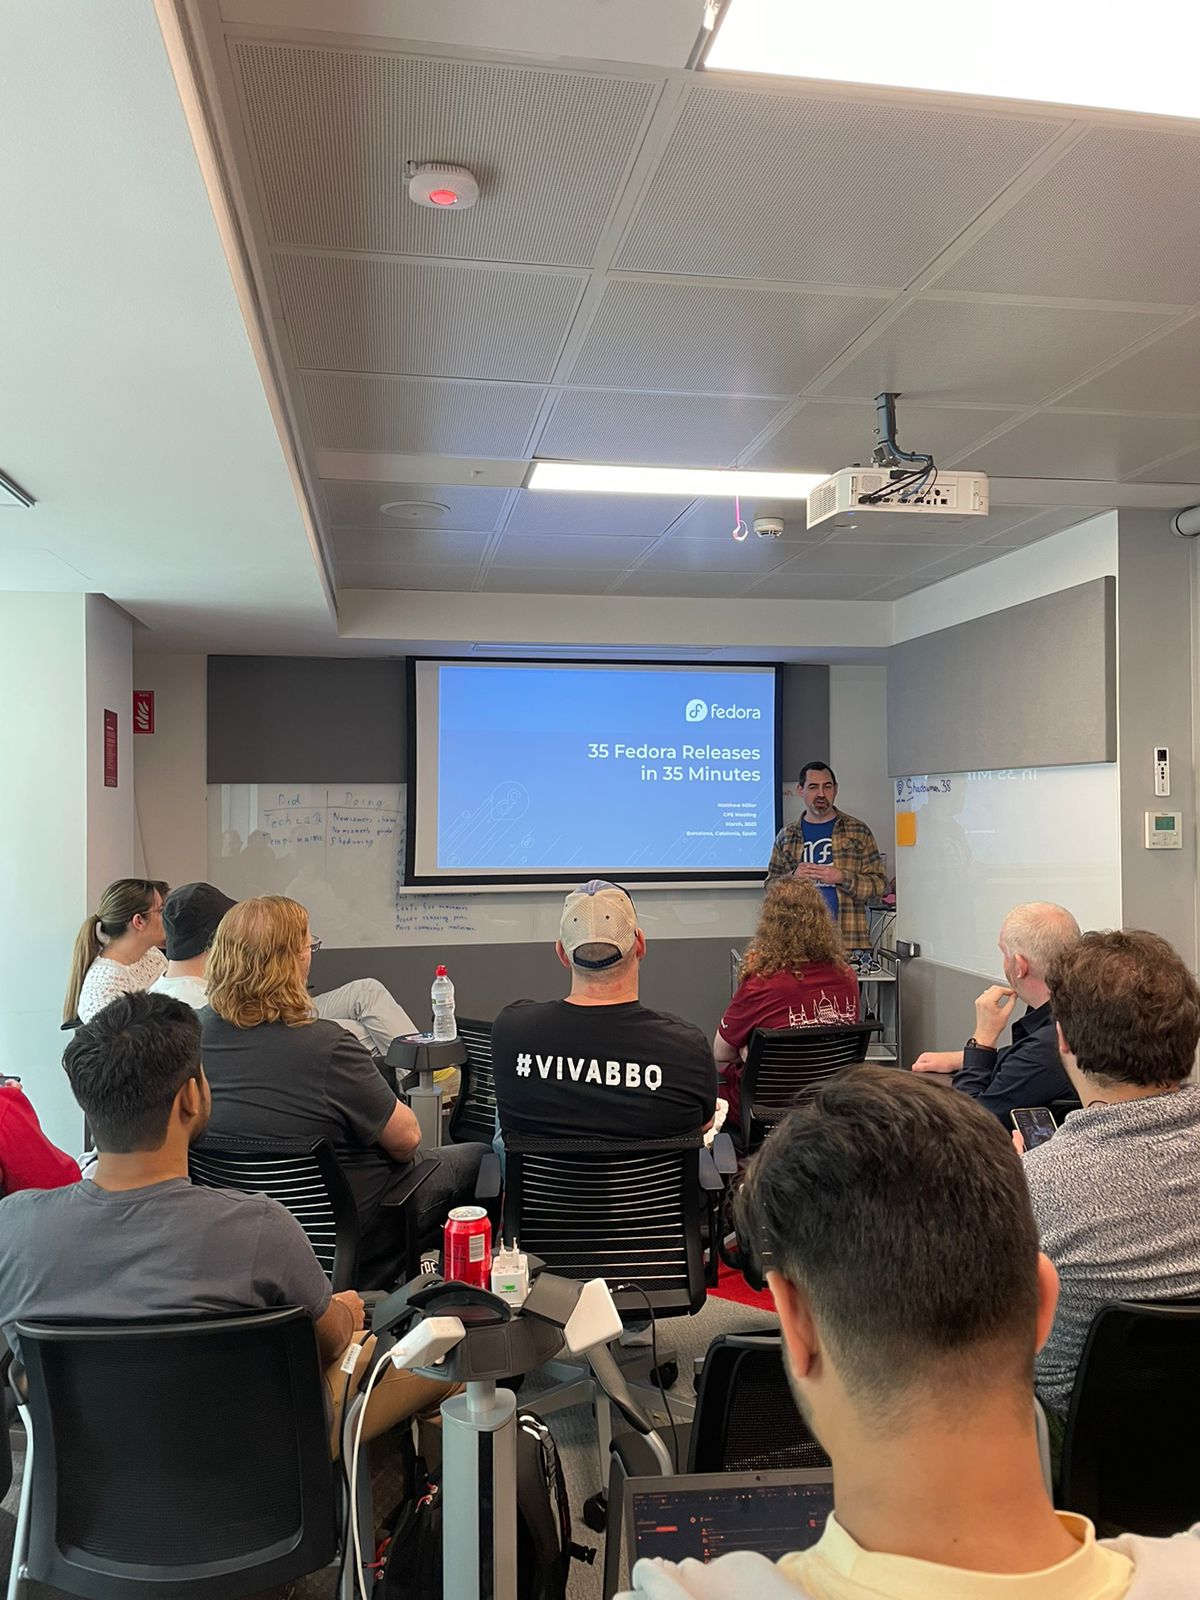
Once the team members were back in the office, Michal Konecny started off the next session about how knowledge can be effectively shared in the team, which proved to be really helpful. This was added to by the next session conducted jointly by Aoife Moloney, Kevin Fenzi, and Julia Bley, around understanding what the team skills are and what their interests lie in. The members were lining up their creative thoughts as sticky notes that were grouped under a certain focus topic. As we moved on to the later parts of the day, Troy Dawson organized a group story session where we came together to come up with fun stories and it was really surprising to see how creative people could get using just one or two words. Finally, Matthew Miller gave us a brief yet interesting run through the history of 35 Fedora Linux releases in around 35 minutes.
Matthew Miller giving a run-through of 35 releases of Fedora Linux in 35 minutes
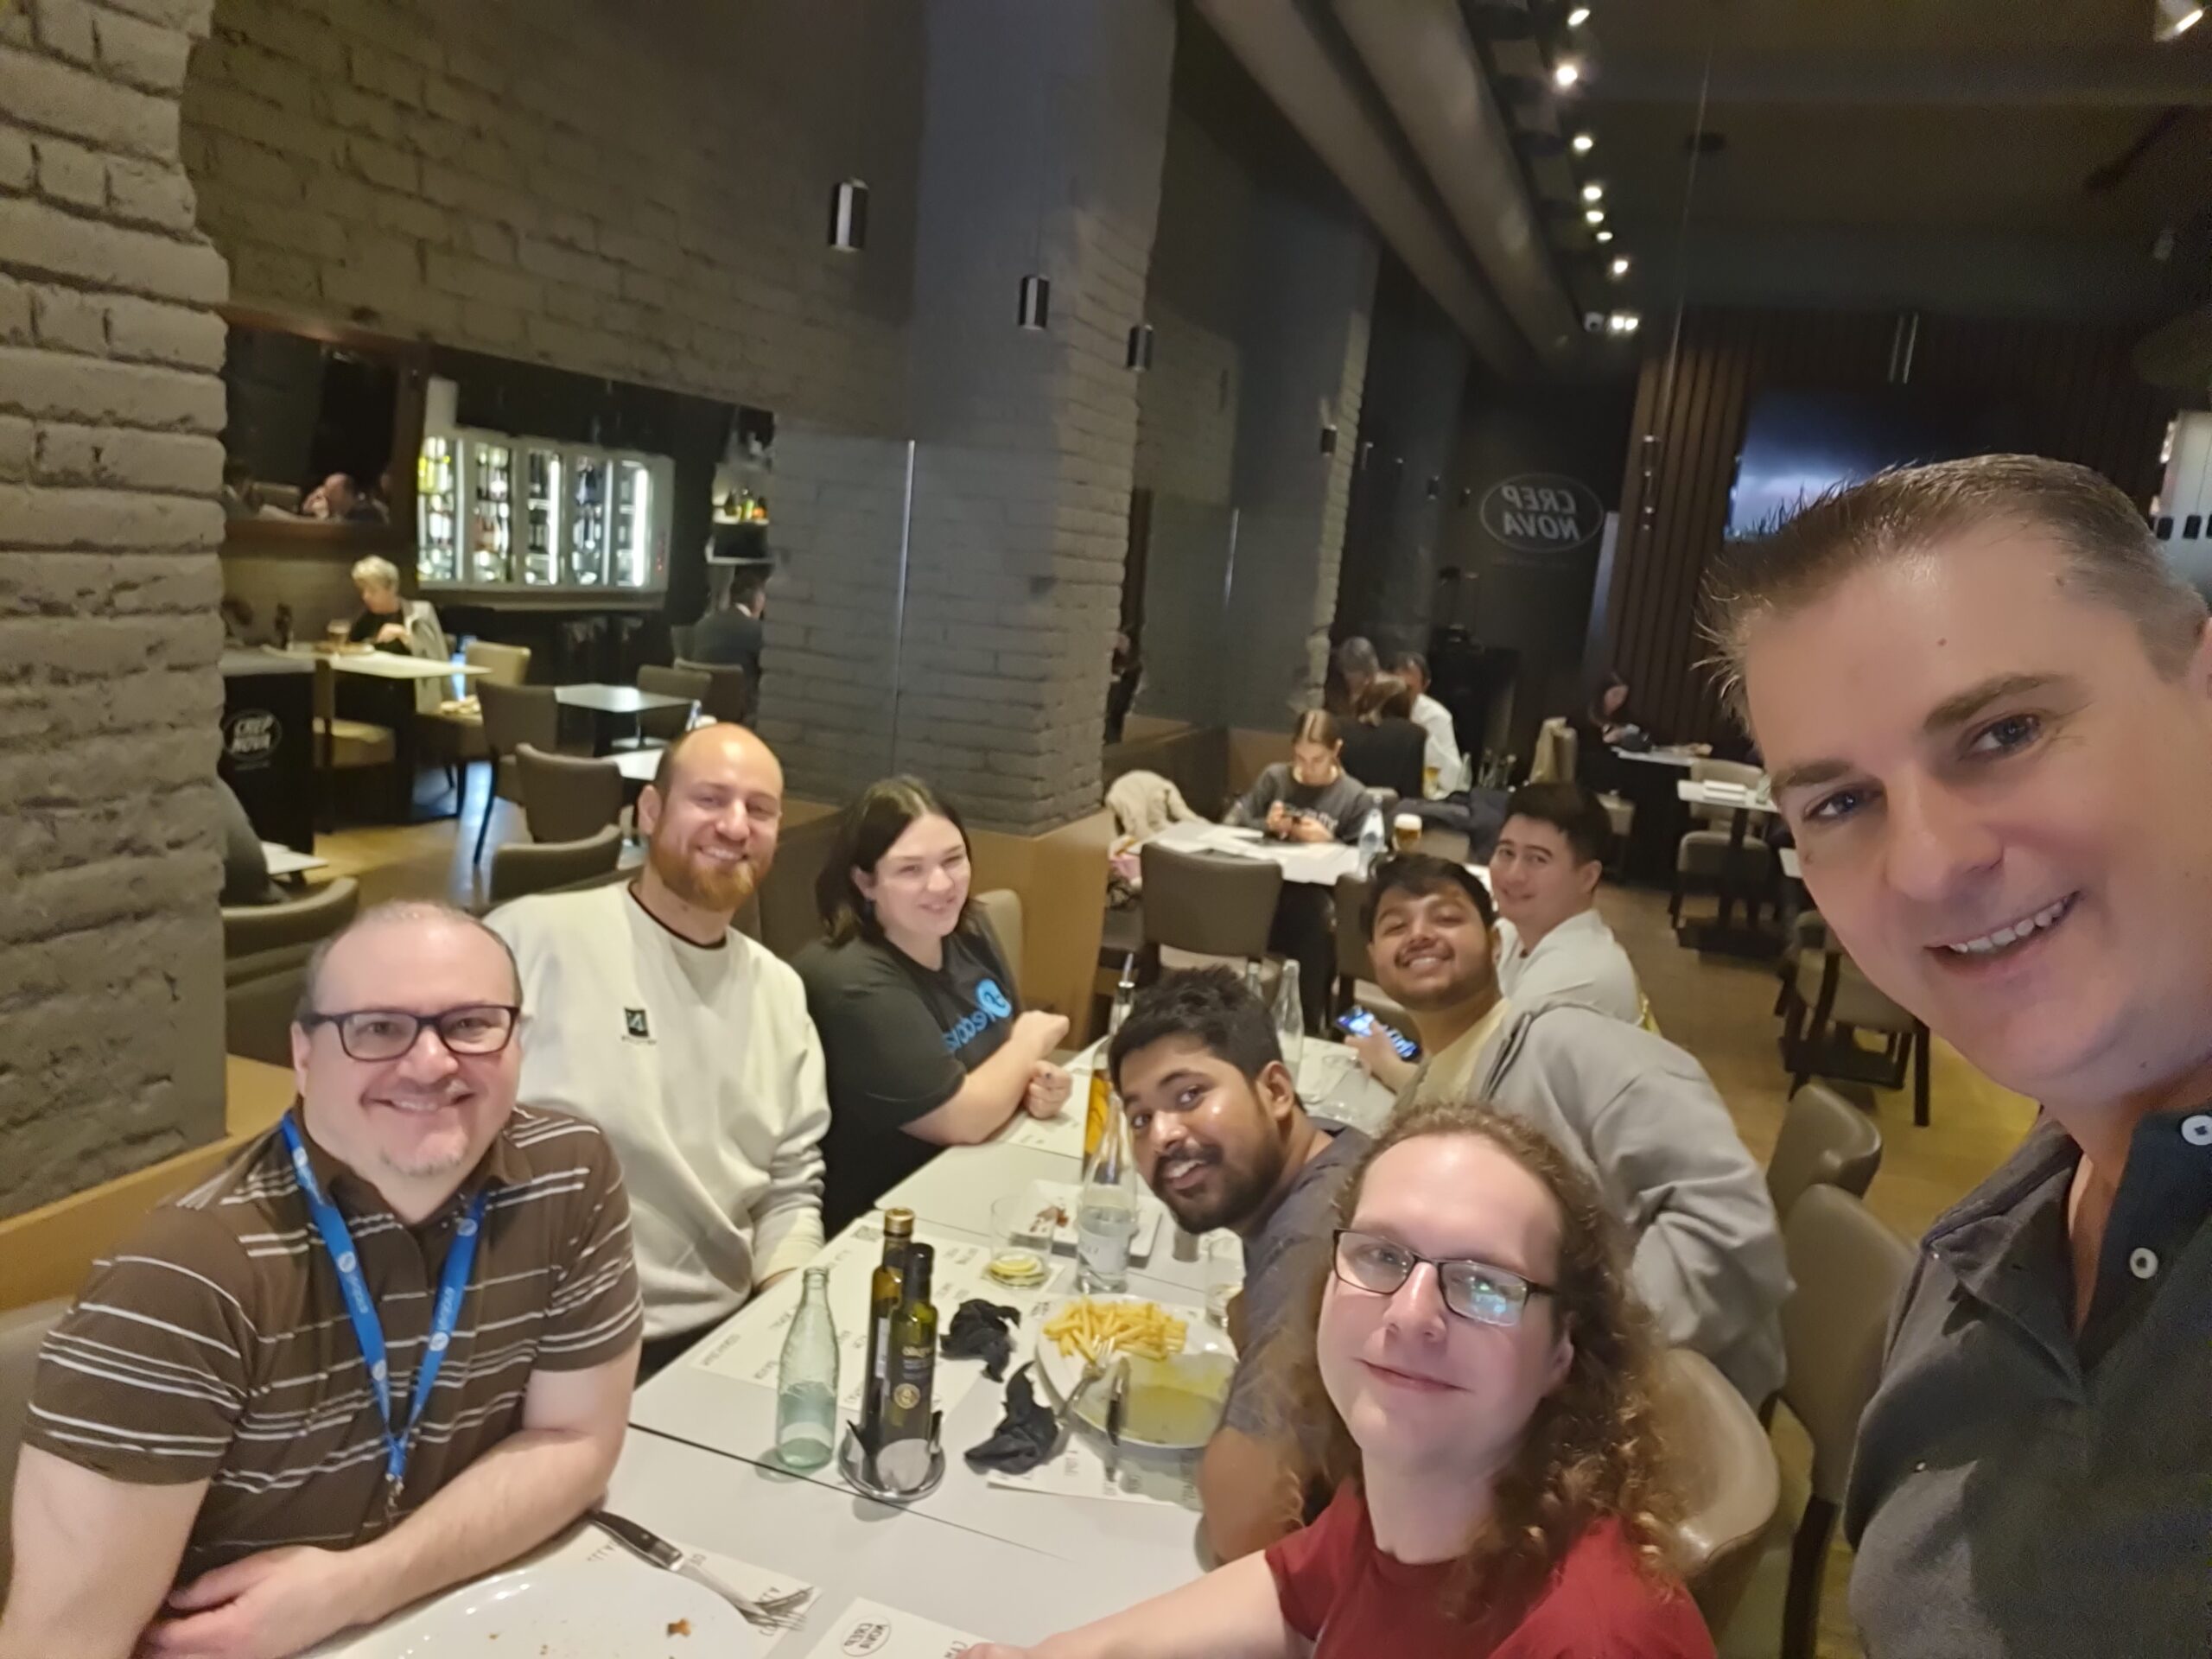
With the last talk having been completed, the team members headed back to the hotel for a brief respite before they reunited again for a touring walk at 1630. When the team got to Plaça de Catalunya, the members were divided into two groups and were provided with a couple of tour guides who took them through the famous historical structures of Barcelona. It was an enriching experience to get to know about the history that led to the creation of these fascinating architectural creations and the team members took plenty of photographs to retain the memories. The tour got over by around 1930 after which the team members went to a local restaurant, Taller de Tapas to enjoy regional Spanish cuisine. A wide variety of mouth-watering Tapas delicacies were served with drinks, culminating the first day of the meeting on a high note.
Red Hat is excited to announce significant changes to ELN kernel RPM NVR in the kernel-ark project. This change will be to limited to the kernel-ark ELN RPMs and does not impact Fedora. If you don’t use Fedora ELN builds you can likely stop reading as this change won’t affect you.
What is the kernel-ark project?
The kernel-ark project is an upstream kernel-based repository from which the Fedora kernel RPMs are built (contributions welcomed!). This project is also used by the Centos Stream and Red Hat Enterprise Linux (RHEL) maintainers to implement, test, and verify code that is destined to be used in Centos Stream and RHEL. In other words, the kernel-ark repository contains code that is enabled to build several different kernels which may contain unique code for different use cases. The kernel RPMs used for CentOS Stream and RHEL are commonly referred to as the ‘ELN’ (Enterprise Linux Next) RPMs.
Why are there ELN RPMs? Why can’t Centos Stream and Red Hat use Fedora RPMs?
While Fedora Linux is the source of a lot of code that lands in CentOS Stream and later RHEL, the kernel configuration used in each operating system is unique. Fedora Linux is configured to achieve its specific goals and targets. CentOS Stream and RHEL do the same but for a slightly different set of goals and targets.
The differences are significant enough that the Fedora Linux, Centos Stream, and RHEL kernel maintainers recognized the need for separate RPMs targeted for Fedora and those targeted for Centos Stream and RHEL. Examples of these differences are BTRFS is enabled in Fedora Linux but not in ELN and there are some specific devices that are disabled in ELN but are enabled in Fedora Linux.
Red Hat uses kernel-ark’s ELN RPMs to continuously test upstream changes with a Red Hat specific configuration. This enables Red Hat to monitor performance and resolve issues before they make it into a Red Hat Enterprise Linux (RHEL) release. In accordance with Red Hat’s long established ‘upstream first’ policy, all fixes and suggestions for improvements are sent back to the upstream kernel community. This benefits the entire Linux community with improvements due to issues resolved in ELN.
This structure also allows Red Hat to test and make changes without affecting the Fedora Linux kernel except in a positive or desired way, such as through bug fixes. Fedora Linux, CentOS Stream, and RHEL have the opportunity to accept or reject changes easily.
What ELN NVR changes are being made?
Before explaining the changes to the ELN kernel rpm NVR, it is important to understand what an NVR is. All RPMs have Name, Version, and Release (NVR) directives that describe the RPM package. In the case of the Fedora Linux kernel RPMs the Name is ‘kernel’ and the Version is the kernel’s uname (aka UTSNAME or the kernel version). The last field, the Release, contains additional upstream tagging information (release candidate tags), a monotonically increasing build number, and a distribution tag. The NVR is separate from the kernel’s uname and the uname is not generated from it. Instead, we have traditionally generated the NVR from the uname.
For example, for a recent Fedora Linux kernel build,
In the next few weeks, the Centos Stream and RHEL maintainers will introduce ELN RPMs that have new kernel Name, Version, and Release (NVR) directives that are unique to the ELN builds. This change has no impact on the kernel uname. The net result of the change is that the version number will have more meaning to CentOS Stream and RHEL builds, instead of being solely based on the kernel uname. For example, an ELN kernel may have NVR kernel-redhat-1.0.39.eln which packages a kernel with a kernel uname of 6.3.0-39.eln.
We have already decided that the new ‘Name’ directive for the ELN kernel NVR will be changed from ‘kernel’ to ‘kernel-redhat’. More information on the Version and Release directive changes will be released in the following months as they are finalized by the Centos Stream and RHEL kernel maintainers. You can follow these discussions on the Fedora Kernel Mailing List.
Why is the ELN NVR being changed?
The new ELN NVR will allow for better coordination of feature introduction, bug fixes, and CVE resolutions in future versions of Centos Stream and RHEL. More information on these improvements to the Centos Stream and RHEL ecosystems will be released in the upcoming months.
How is Fedora Linux impacted?
Fedora Linux is not impacted by these changes.
Since the inception of the kernel-ark project, the Fedora Linux, Centos Stream, and RHEL maintainers have been extraordinarily careful to ensure that Fedora Linux kernel builds are not impacted by ELN kernel builds (and vice-versa) in the kernel-ark project. The commitment to prevent cross-OS issues is strictly enforced by the maintainers. Due to the maintainers continued diligence, there is no impact to Fedora Linux.
Fedora Silverblue is an operating system for your desktop built on Fedora Linux. It’s excellent for daily use, development, and container-based workflows. It offers numerous advantages such as being able to roll back in case of any problems. If you want to update or rebase to Fedora Linux 38 on your Fedora Silverblue system (these instructions are similar for Fedora Kinoite), this article tells you how. It not only shows you what to do, but also how to revert things if something unforeseen happens.
Update your existing system
Prior to actually doing the rebase to Fedora Linux 38, you should apply any pending updates. Enter the following in the terminal:
$ rpm-ostree update
or install updates through GNOME Software and reboot.
Rebasing using GNOME Software
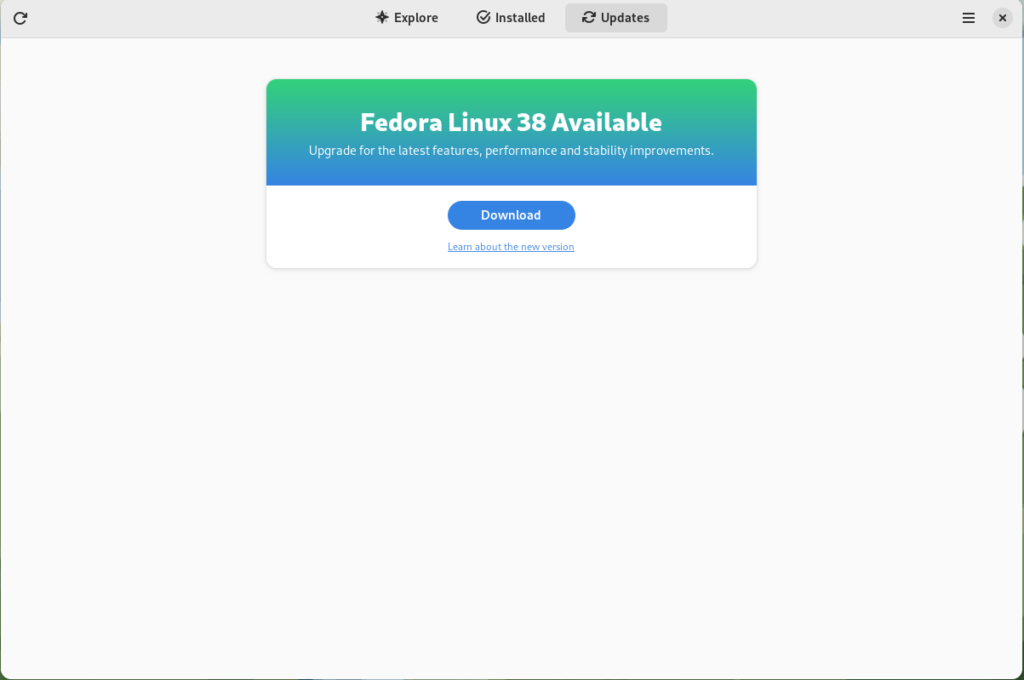
GNOME Software shows you that there is new version of Fedora Linux available on the Updates screen.
Fedora 38 update available
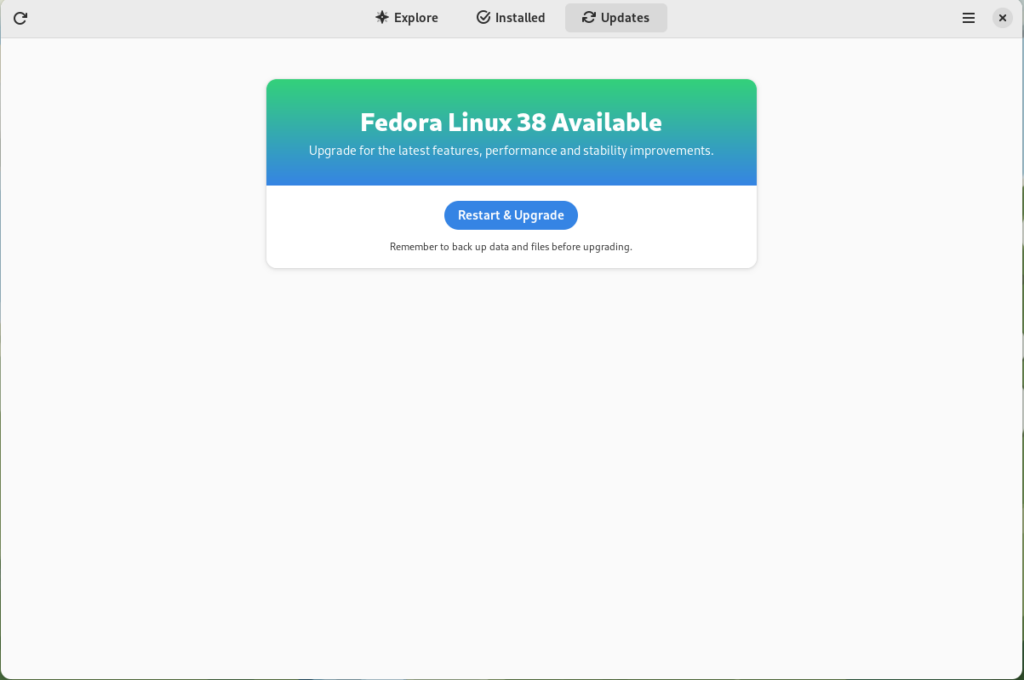
First thing you need to do is download the new image, so click on the Download button. This will take some time. When it’s done you will see that the update is ready to install.
Fedora 38 update ready to install
Click on the Restart & Upgrade button. This step will take only a few moments and the computer will be restarted when the update is completed. After the restart you will end up in new and shiny release of Fedora Linux 38. Easy, isn’t it?
Rebasing using terminal
If you prefer to do everything in a terminal, then this part of the guide is for you.
Rebasing to Fedora Linux 38 using the terminal is easy. First, check if the 38 branch is available:
$ ostree remote refs fedora
You should see the following in the output:
fedora:fedora/38/x86_64/silverblue
If you want to pin the current deployment (meaning that this deployment will stay as an option in GRUB until you remove it), you can do it by running:
# 0 is entry position in rpm-ostree status
$ sudo ostree admin pin 0
To remove the pinned deployment use the following command:
# 2 is entry position in rpm-ostree status
$ sudo ostree admin pin --unpin 2
Next, rebase your system to the Fedora Linux 38 branch.
$ rpm-ostree rebase fedora:fedora/38/x86_64/silverblue
Finally, the last thing to do is restart your computer and boot to Fedora Linux 38.
How to roll back
If anything bad happens—for instance, if you can’t boot to Fedora Linux 38 at all—it’s easy to go back. At boot time, pick the entry in the GRUB menu for the version prior to Fedora Linux 38 and your system will start in that previous version rather than Fedora Linux 38. If you don’t see the GRUB menu, try to press ESC during boot. To make the change to the previous version permanent, use the following command:
$ rpm-ostree rollback
That’s it. Now you know how to rebase Fedora Silverblue to Fedora Linux 38 and roll back. So why not do it today?
FAQ
Because there are similar questions in comments for each article about rebasing to newer version of Silverblue I will try to answer them in this section.
Question: Can I skip versions during rebase of Fedora? For example from Fedora 36 Silverblue to Fedora 38 Silverblue?
Answer: Although it could be sometimes possible to skip versions during rebase, it is not recommended. You should always update to one version above (37->38 for example) to avoid unnecessary errors.
Question: I have rpm-fusion layered and I got errors during rebase. How should I do the rebase?
Answer: If you have rpm-fusion layered on your Silverblue installation, you should do the following before rebase:
Fedora Workstation 38 is the latest version of the leading-edge Linux desktop OS, made by a worldwide community, including you! This article describes some of the user-facing changes in this new version of Fedora Workstation. Upgrade today from GNOME Software, or use dnf system-upgrade in a terminal emulator!
GNOME 44
Fedora Workstation 38 features the newest version of the GNOME desktop environment. GNOME 44 features subtle tweaks and revamps all throughout, most notably in the Quick Settings menu and the Settings app. More details about can be found in the GNOME 44 release notes.
File chooser
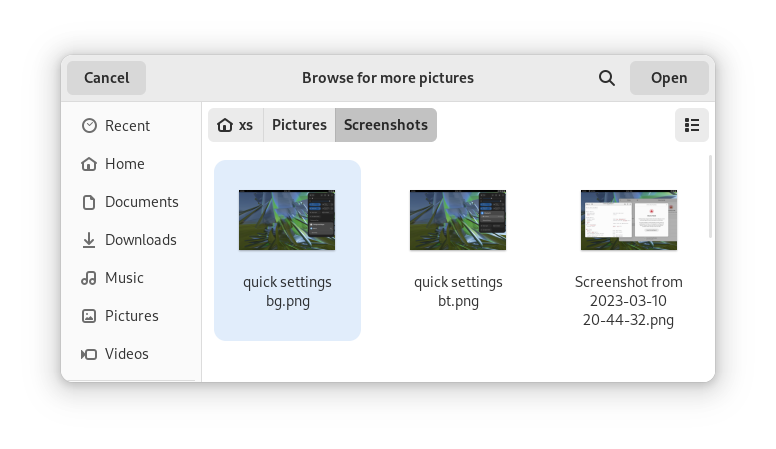
Most of the GNOME applications are built on GTK 4.10. This introduces a revamped file chooser with an icon view and image previews.
Icon view with image previews, new in GTK 4.10
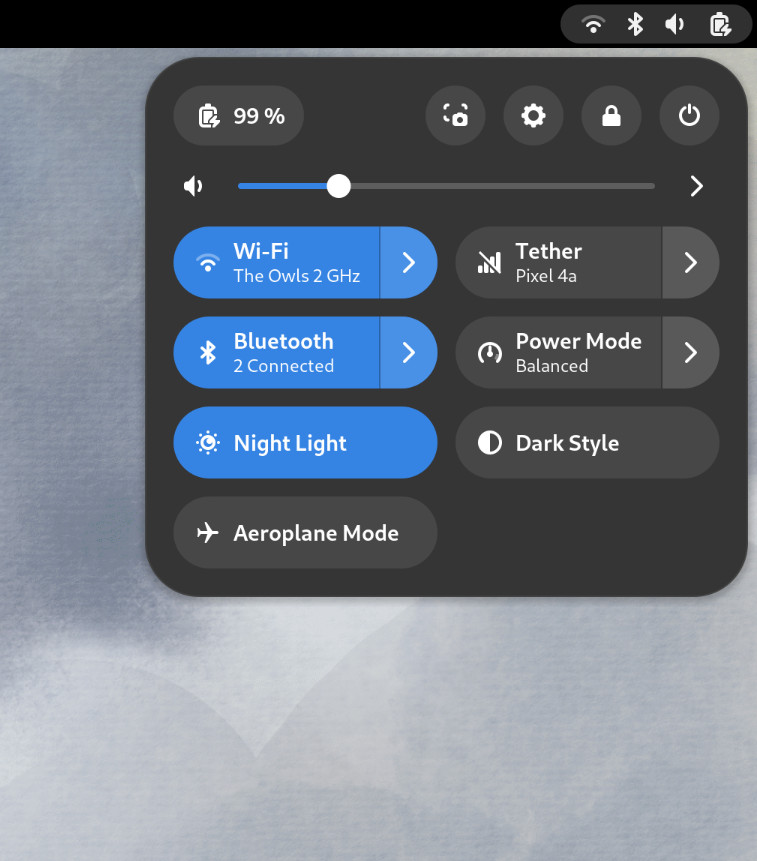
Quick Settings tweaks
For GNOME 44 There have been a number of improvements to the Quick Settings menu. The new version includes a new Bluetooth menu, which introduces the ability to quickly connect and disconnect known Bluetooth devices. Additional information is available in each quick settings button, thanks to new subtitles.
The Bluetooth menu can now be used to connect to known devices
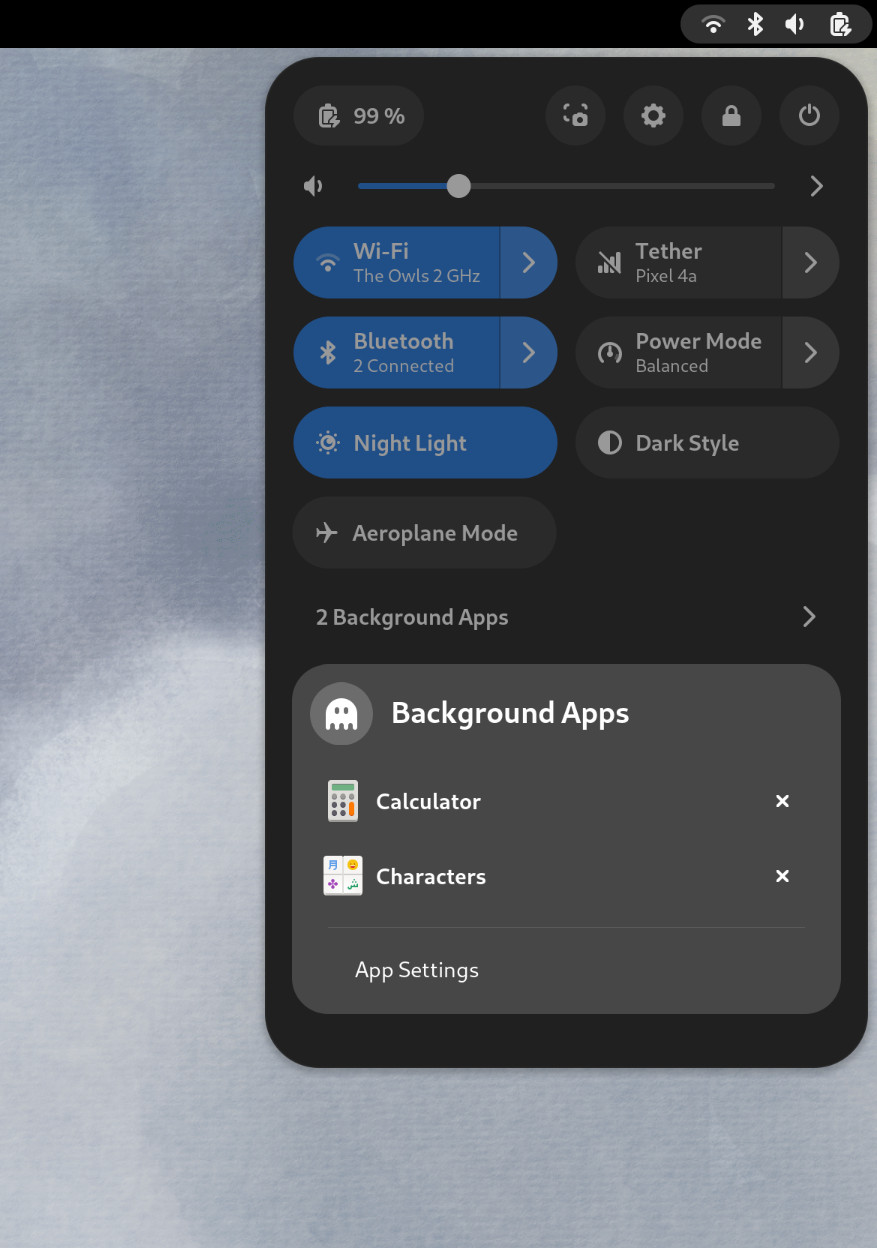
Also in the quick settings menu, a new background apps feature lists Flatpak apps which are running without a visible window.
Background Apps lets you see sandboxed apps running without a visible window and close them
Core applications
GNOME’s core applications have received significant improvements in the new version.
Settings has seen a round of updates, focused on improving the experience in each of the settings panels. Here are some notable changes:
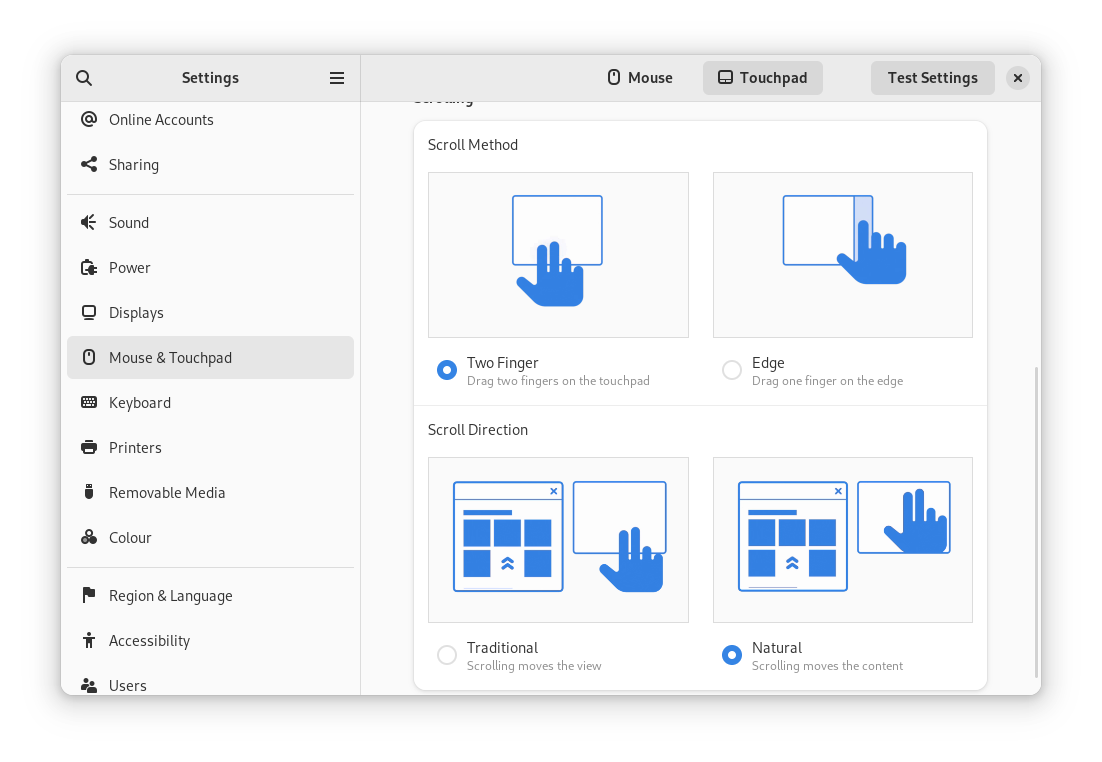
Major redesigns of Mouse & Touchpad and Accessibility significantly improves usability.
Updated Device Security now uses clearer language.
Redesigned sound now includes new windows for the volume mixer and alert sound.
You can now share your Wi-Fi credentials to another device through a QR code.
The revamped Mouse & Touchpad panel in Settings
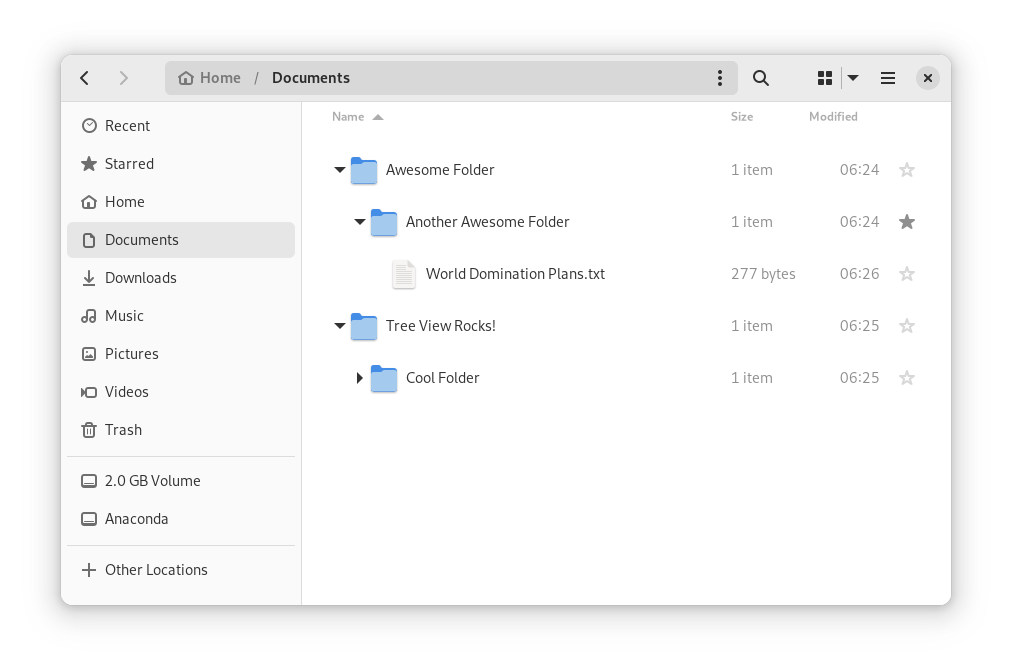
In Files, there is now an option to expand folders in the list view.
The tree view can be turned on in Files’ settings
GNOME Software now automatically checks for unused Flatpak runtimes and removes them, saving disk space. You can also choose to only allow open source apps in search results.
In Contacts, you can now share a contact through a QR code, making it super easy to share a contact from your desktop to your phone!
Third-party repositories
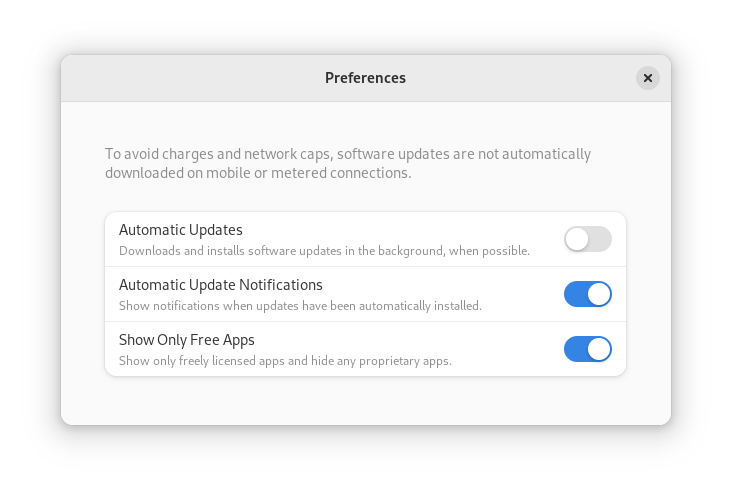
Fedora’s third-party repositories feature makes it easy to enable a selection of additional software repos. Previous versions included a filtered version of Flathub, which included a small number of apps. For Fedora 38, filtering of Flathub content no longer occurs. This means that the third party repos now provide full access to all of Flathub.
The third party repos must still be manually enabled, and individual repositories may be disabled from the GNOME Software settings. If you want to keep proprietary apps from showing up in your search results, you can also do that in GNOME Software’s preferences menu.
You are in control.
Under-the-hood changes throughout Fedora Linux 38
Fedora Linux 38 features many under the hood changes. Here are some notable ones:
The latest Linux kernel, version 6.2, brings extended hardware support, bug fixes and performance improvements.
The length of time that system services may block shutdown has been reduced. This means that, if a service delays your machine from powering off, it will be much less disruptive than in the past.
RPM now uses the Rust-written Sequoia OpenGPG parser for better security.
The Noto fonts are now the default for Khmer and Thai. The variable versions of the Noto CJK fonts are now used for Chinese, Japanese, and Korean. This reduces disk usage.
Profiling will be easier from Fedora 38, thanks to changes in its default build configuration. The expectation is that this will result in performance improvements in future versions.
Also check out…
Official spins for the Budgie desktop environment and Sway tiling Wayland compositor are now available!
Today I’m excited to share the results of the hard work of thousands of Fedora Project contributors: the Fedora Linux 38 release is here! With this release, we’re starting a new on-time streak. In fact, we’re ready a week early!
As always, you should make sure your system is fully up-to-date before upgrading from a previous release. Can’t wait to get started? Download while you read!
New website
Did you click the download link above? You may have noticed that the website looks different. This is the result of over a year of work by our Websites & Apps Team, in partnership with the Design and Infrastructure team, as well as the community at large. Right now, you’ll see pages for each of our five Editions, but this is only a start. The Spins and Labs websites will be updated in the future. Eventually, this will provide a foundation for bringing more of our websites together. I’m very excited about the visual refresh and the fact that this will make our websites more self-service for teams within Fedora — and very proud of the amazing community team that came together to create this.
New Spins
Fedora Linux 38 introduces several new Spins — variants that showcase different desktop environments. The popular Budgie Desktop environment, first packaged for Fedora in F37, now has its own Spin. The Fedora Budgie Spin aims to provide the premiere Budgie Desktop experience on top of Fedora Linux, the leading edge platform for developers and users alike.
For fans of tiling window managers, we now offer the Sway window manager in a Spin and in an rpm-ostree version we call “Sericea”. Sway uses the modern Wayland protocol and aims to be a drop-in replacement for the i3 window manager.
If you want to use Fedora Linux on your mobile device, F38 introduces a Phosh image. Phosh is a Wayland shell for mobile devices based on Gnome. This is an early effort from our Mobility SIG. If your device isn’t supported yet, we welcome your contributions!
Desktop improvements
Fedora Workstation focuses on the desktop experience. As usual, Fedora Workstation features the latest GNOME release. GNOME 44 includes a lot of great improvements, including a new lock screen, a “background apps” section on the quick menu, and improvements to accessibility settings. In addition, enabling third-party repositories now enables an unfiltered view of applications on Flathub.
With this release, we’ve shortened the default timeout when services shut down. This helps your system power off faster — important when you need to grab your laptop and go.
Of course, we produce more than just the Editions. Fedora Spins and Labs target a variety of audiences and use cases, including Fedora Comp Neuro, which provides tools for computational neuroscience, and desktop environments like Fedora LXQt, which provides a lightweight desktop environment. And, don’t forget our alternate architectures: ARM AArch64, Power, and S390x.
Sysadmin improvements
Microdnf — the lighter-weight version of the default package manager — is replaced by dnf5. dnf5 brings performance improvements, a smaller memory footprint, and a new daemon that can provide an alternative to PackageKit. You can start testing dnf5 now before it becomes the default in a future Fedora Linux release.
For mainframe admins, we increased the minimal architecture level for IBM Z hardware to z13. This enables you to benefit from the new features of that platform and get better CPU performance.
We always strive to bring new security features to users quickly. Packages are now built with stricter compiler flags that protect against buffer overflows. The rpm package manager uses a Sequoia-based OpenPGP parser instead of its own implementation.
Other updates
If you’re profiling applications, you’ll appreciate the framer pointers now built into official packages. This makes Fedora Linux a great platform for developers looking to improve Linux application performance.
Following our “First” foundation, we’ve updated key programming language and system library packages, including gcc 13, Golang 1.20, LLVM 16, Ruby 3.2, TeXLive2022, PHP 8.2, and many more.
We’re excited for you to try out the new release! Go to https://fedoraproject.org/ and download it now. Or if you’re already running Fedora Linux, follow the easy upgrade instructions. For more information on the new features in Fedora Linux 38, see the release notes.
In the unlikely event of a problem…
If you run into a problem, visit our Ask Fedora user support forum. This includes a category for common issues.
Thank you everyone
Thanks to the thousands of people who contributed to the Fedora Project in this release cycle. We love having you in the Fedora community. I hope to see you in Cork this August for the return of Flock to Fedora.
bcache is a simple and good way to have large disks (typically rotary and slow) exhibit performance quite similar to an SSD disk, using a small SSD disk or a small part of an SDD.
In general, bcache is a system for having devices composed of slow and large disks, with fast and small disks attached as a cache.
This article will discuss performance and some optimization tips as well as configuration of bcache.
The following terms are used in bcache to describe how it works and the parts of bcache:
backing device
slow and large disk (disk intended to actually hold the data)
cache device
fast and small disk (cache)
dirty cache
data present only in the cache device
writeback
writing to the cache device and later (much later) to the backing device
writeback rate
cache write speed in the backing device
A disk data cache has always existed, it is the free RAM in the operating system. When data is read from the disk it is copied to RAM. If the data is already in RAM, it is read from RAM rather than being read from disk again. When data is written to the disk, it is written to RAM and after a few moments written to the disk as well. The time data spends only in RAM is very short since RAM is volatile.
bcache is similar, only it has various modes of cache operation. The mode that is faster in writing data is writeback. It works the same as for RAM, only instead of RAM there is a SATA or NVME SSD device. The data may reside only in the cache for much longer, even forever, so it is a bit riskier (if you break the SSD, the data that resided only in the cache is lost, with a good chance that the whole filesystem becomes inaccessible).
Performance Comparison
It is very difficult to gather reliable data from any tests, either with real cases or with special programs. They always give extremely variable, different, unstable values. The various caches present and the type of filesystem (btrfs, journaled, etc.), make the values very variable. It is advisable to ignore small differences (say 5-10%).
The following performance data refers to the test below (random and multiple reads/writes), trying to always maintain the same conditions and repeating three times in immediate sequence.
$ sysbench fileio --file-total-size=2G --file-test-mode=rndrw --time=30 --max-requests=0 run
The tables below show the performance of the separate devices:
Performance of the backing device (RAID 1 with 1TB rotary disks)
Throughput:
read, MiB/s: 0.22
read, MiB/s: 0.23
read, MiB/s: 0.19
written, MiB/s: 0.15
written, MiB/s: 0.16
written, MiB/s 0.13
Latency (ms):
max: 174.92
max: 879.59
max: 1335.30
95th percentile: 87.56
95th percentile: 87.56
95th percentile: 89.16
RAID 1 with 1TB rotary disks
Performance of the cache device (SSD SATA 100GB)
Throughput:
read, MiB/s: 7.28
read, MiB/s: 7.21
read, MiB/s: 7.51
written, MiB/s: 4.86
written, MiB/s: 4.81
written, MiB/s 5.01
Latency (ms):
max: 126.55
max: 102.39
max: 107.95
95th percentile: 1.47
95th percentile: 1.47
95th percentile: 1.47
Cache device (SSD SATA 100GB)
The theoretical expectation that a bcache device will be as fast as the cache device is (physically) impossible to achieve. On average, bcache is significantly slower and only sometimes approaches the same performance as the cache device. Improved performance almost always requires various compromises.
Consider an example assuming there is a 1TB bcache device and a 100GB cache. When writing a 1TB file, the cache device is filled, then partially emptied to the backing device, and refilled again, until the file is fully written.
Because of this (and also because part of the cache also serves data when reading) there is a limit on the length of the file’s sequential data that are written to the cache. Once the limit is exceeded, the file data is written (or read) directly to the backing device, bypassing the cache.
bcache also limits the response delay of the disks, but disproportionately so, especially for SSD SATA, degrading the performance of the cache.
The dirty cache should be emptied to decrease the risk of data loss and to have cache available when it is needed. This should only be done when the devices exhibit little or no activity, otherwise the performance available for normal use collapses.
Unfortunately, the default settings are too low, and the writeback rate adjustment is crude. To improve the writeback rate adjustment it is necessary to write a program (I wrote a script for this).
The following commands provide the necessary optimizations (required at each startup) to get better performance from the bcache device.
CAUTION: Any operation performed can immediately destroy the data on the partitions and disks on which you are operating. Backup is advised.
In the following example /dev/md0 is the backing device and /dev/sda7 is the cache device.
WARNING: bcache device cannot be resized. NOTE: bcache refuses to use partitions or disks with a filesystem already present.
To delete an existing filesystem you can use:
# wipefs -a /dev/md0 # wipefs -a /dev/sda7
Create the backing device (and therefore the bcache device)
# bcache make -B /dev/md0
if necessary (device status is inactive)
# bcache register /dev/md0
Creating the cache device (and hooking the cache to the backing device)
# bcache make -C /dev/sda7
if necessary (device status is inactive)
# bcache register /dev/sda7
# bcache attach /dev/sda7 /dev/md0
# bcache set-cachemode /dev/md0 writeback
Check the status
# bcache show
The output from this command includes information similar to the following: (if the status of a device is inactive, it means that it must be registered)
Hopefully this article will provide some insight on the benefits of bcache if it suits your needs.
As always, nothing fits all cases and all people’s preferences. However, understanding (even roughly) how things work, and especially how they don’t work, as well as how to adapt them, makes the difference in having satisfactory results or not
Addendum
The following charts show the performance with a SSD NVME cache device rather than SSD SATA as shown above.
Performance of the cache device (SSD NVME 100GB)
Throughput:
read, MiB/s: 16.31
read, MiB/s: 16.17
read, MiB/s: 15.77
written, MiB/s: 10.87
written, MiB/s: 10.78
written, MiB/s 10.51
Latency (ms):
max: 17.50
max: 15.30
max: 46.61
95th percentile: 1.10
95th percentile: 1.10
95th percentile: 1.10
Cache device (SSD NVME 100GB)
Performance with optimizations
Throughput:
read, MiB/s: 7.96
read, MiB/s: 6.87
read, MiB/s: 7.73
written, MiB/s: 5.31
written, MiB/s: 4.58
written, MiB/s 5.15
Latency (ms):
max: 50.79
max: 84.40
max: 108.71
95th percentile: 2.00
95th percentile: 2.03
95th percentile: 2.00
Optimization (SSD NVME da 100GB)
Performance with the writeback rate adjustment script
Use the %autorelease and %autochangelog tags simplify package maintenance and make it easier to contribute packages to the Fedora Project. These rpmautospec tags cause no noticeable difference in the packages from the end user’s perspective. As of the Fedora Linux 38 release, package maintainers should use these new tags.
Information about package history
Every package in a distribution carries identifying information. For example, the latest version of Firefox is available as firefox-110.0-3.fc38.x86_64. This can be unpacked as:
a name (firefox),
a version (110.0),
a “release tag”, consisting of a packaging release version + a distribution marker + an architecture tag (3.fc38.x86_64).
In modern practice, the name and the version are supplied directly by the project upstream and unambiguously identify what was built. The release tag describes the downstream distro build (where, which distro, build count). This may sound natural, but in the past packagers would split parts of the upstream version into the release tag according to some rather complicated rules.
A package also contains useful information in its changelog.
Continuing with the Firefox example:
$ rpm -q --changelog firefox-110.0-3.fc38.x86_64 | head -n5
* Tue Feb 14 2023 Martin Stránský <stransky@redhat.com>- 110.0-3
- Updated to 110.0 build 3 * Mon Feb 13 2023 Martin Stránský <stransky@redhat.com>- 110.0-2
- Added fix for orca
The changelog is created by package maintainers. It describes changes to the package that are relevant to a user. New software versions, modified file paths, and important bugfixs are examples of things that would be mentioned in the changelog. Whitespace changes in packaging scripts and other cleanups are examples of things that would not be mentioned in the changelog. When things go well, users generally do not look at the changelog. However, the changelog is useful when a bug is found and people need to track down what changed, when, and why.
All this changelog information must be provided by the maintainer. When the maintainer builds a rpm package, they must provide this information in the appropriate fields of the package’s spec file.
For example, the firefox.spec might look like this:
Name: firefox
Version: 110.0
Release: 3%{dist}
...
%changelog
* Tue Feb 14 2023 Martin Stránský <stransky@redhat.com>- 110.0-3
- Updated to 110.0 build 3 * Mon Feb 13 2023 Martin Stránský <stransky@redhat.com>- 110.0-2
- Added fix for orca
...
This is the traditional way. Every time the maintainer makes a new build, they update the number in the Release field and add a corresponding entry in the %changelog section. For example, for the 110.0-3.fc38 build, Martin would have changed Release: 2%{dist} → Release: 3%{dist} and added the first paragraph under %changelog.
Packages in Fedora are maintained using git. This means that after making changes to the package, and adding some text to the changelog, the maintainer would also write a description of the changes in the git commit message. Often this is exactly the same text as the changelog. For example, for the 110.0-3.fc38 build, Martin wrote “Updated to latest 110.0 upstream build” in the git commit message. It should be noted that every commit in git also contains a name, the email address of the author, and a timestamp for the change. If this sounds a bit repetitive, that’s because it is. Thankfully, some of this can now be automated.
rpmautospec
The rpmautospec method takes advantage of the fact that the spec file is maintained in a git repository:
The purpose of the Release field is to identify the distro build number for a specific upstream Version. The Release field should be set to %autorelease and never changed again. The %autorelease macro provides a count of commits since the last commit that changed the Version field. This is nifty. Every time the packager changes the spec file, they have to make a commit to “save” the changes and do a build and the number in %autorelease will be incremented. When the Version is changed, the autorelease number is reset to 1.
The purpose of the git commit message is to summarize changes to the contents of the repository. The purpose of the %changelog section is to summarize changes to the package. The %autochangelog macro takes a git commit message, the author name, and the commit timestamp, and formats them in a way that is suitable for the %changelog section.
If Martin were to do another build, let’s say with a patch added, he would adjust the spec file adding a Patch line, and create a commit with:
$ git commit -a -m 'Add patch to fix rhbz#1000002'
The %autorelease field would be automatically increased by one, and the %autochangelog text would now start with:
* Thu Mar 23 2023 Martin Stránský <stransky@redhat.com>- 110.0-4
- Add patch to fix rhbz#1000002
What are the effects of the new workflow?
It is easiest to consider the effect for the users: no change. %autorelease and %autochangelog get replaced by “real” content before the package is built, and the binary package downloaded by users looks exactly the same.
For the packager, there is less busywork. The Release field is constant and the git commit text is reused for the changelog. I’ve glossed over the details here, but the git commit text can contain parts which are not included in the changelog text. It can even have commits that are completely elided from the changelog.
This automation also makes some mistakes less likely. For example:
The maintainer makes changes, but forgets to bump Release, and the build fails because a previous build with the same version-release already exists.
The maintainer makes changes, but forgets to describe them in %changelog, and users don’t know what changed.
The maintainer makes a changelog entry, but writes Tue instead of Thu, and rpm complains about an invalid date.
On the other hand, the packager has to be more disciplined. The text in the git commit message ends up visible to users. So it must be formatted accordingly. Every commit in git bumps the number in the release tag. The changelog is now formatted in the same specific style in all packages. Arguably, those are not huge limitations, but some adjustment of packager habits is required.
Using rpmautospec has a positive effect for external contributors. In Fedora, anyone who wants to contribute a change to the package is encouraged to open a pull request.
Unfortunately, for changes that touch the spec file, with traditional Release and %changelog, we have a conundrum. If the contributor does not update those in their commit, the maintainer has to do this before the build, and effectively the contribution is incomplete. If the contributor does update those in their commit, and the pull request is not merged immediately, it is likely that by the time it is merged the Release number will be out of date, the date in the %changelog will be in the past, and the spec file may even already have entries with later dates, and git will always show a merge conflict in the %changelog section.
With rpmautospec, all these problems go away. The release number is counted automatically. The date in the changelog is derived from the timestamp of when the patch was merged. And the changelog is generated from the stream of commits so there is no conflict to be had.
A specific variant of this contributor workflow occurs when the maintainer wants to copy (cherry-pick in git parlance) a commit to another branch. For example, because the important bugfix that was necessary in F38 also needs to be applied in F37, it is likely that, with rpmautospec, the commit can be applied without any changes to a different packaging branch.
Wrap-up
%autorelease and %autochangelog have been available for a while, but have now reached a level where they work nicely for common maintenance patterns and a great majority of packages; even if some some complicated corner cases are not yet supported. With Fedora 38, rpmautospec is now the recommended method. Hopefully, we will have happier maintainers and contributors with no negative changes noted by the users.
Fedora test days are events where anyone can help make certain that changes in Fedora work well in an upcoming release. Fedora community members often participate, and the public is welcome at these events. If you’ve never contributed to Fedora before, this is a perfect way to get started.
There are five upcoming test days in the next two weeks covering three topics:
Tues 28 March through Sunday 02 April, is to test the Fedora CoreOS.
Wed March 28th through March 31st , is to test the Upgrade
Monday April 03 through April 07 , is to test Fedora IoT .
Come and test with us to make Fedora 38 even better. Read more below on how to do it.
Fedora 38 CoreOS Test Week
The Fedora 38 CoreOS Test Week focuses on testing FCOS based on Fedora 38. The FCOS next stream is already rebased on Fedora 38 content, which will be coming soon to testing and stable. To prepare for the content being promoted to other streams the Fedora CoreOS and QA teams have organized test days on Tues, March 28, 2023 (results accepted through Sun , November 12). Refer to the wiki page for links to the test cases and materials you’ll need to participate. The FCOS and QA team will meet and communicate with the community sync on a Google Meet at the beginning of test week and async over multiple matrix/element channels. Read more about them in this announcement.
Upgrade test day
As we come closer to Fedora Linux 38 release dates, it’s time to test upgrades. This release has a lot of changes and it becomes essential that we test the graphical upgrade methods as well as the command line. As a part of these test days, we will test upgrading from a full updated, F36 and F37 to F38 for all architectures (x86_64, ARM, aarch64) and variants (WS, cloud, server, silverblue, IoT).
IoT test week
For this test week, the focus is all-around; test all the bits that come in a Fedora IoT release as well as validate different hardware. This includes:
Basic installation to different media
Installing in a VM
rpm-ostree upgrades, layering, rebasing
Basic container manipulation with Podman.
We welcome all different types of hardware, but have a specific list of target hardware for convenience.
How do test days work?
A test day is an event where anyone can help make certain that changes in Fedora work well in an upcoming release. Fedora community members often participate, and the public is welcome at these events. Test days are the perfect way to start contributing if you not in the past.
The only requirement to get started is the ability to download test materials (which include some large files) and then read and follow directions step by step.
Detailed information about all the test days are on the wiki page links provided above. If you are available on or around the days of the events, please do some testing and report your results.
This article describes one method of restarting PCI devices. It demonstrates restating a wireless device. But the concept should work on any device whose device driver has adequate hotplug support.[1]
Computers typically consist of several interconnected devices. Some devices can be physically disconnected and reconnected with ease (for example, most USB devices). Others might require a specific interaction with the operating system or specific software. And others will require a full reboot.
Built-in laptop wireless cards are PCI devices that could fail at runtime but might not be easy to physically disconnect and reconnect without a full reboot. In many cases these devices can be restarted through Linux’s sysfs interface without having to do a full reboot of the computer.
This article will specifically demo how to restart an Atheros wireless card which has locked up.
How to restart PCI devices
Depending on your particular desktop environment and hardware, it may be possible to switch the PCI card off and back on using a GUI or hardware switch or button. But if none of those options exist or work, the following CLI method of restarting the PCI card might prove useful.
To restart a wireless card you will need its PCI domain, bus, device and function address. Run the lspci command, as shown below, and search its output to find your wireless card’s PCI address.
In the above example, the PCI address of the Atheros card is 3d:00.0. If the address shown does not include a domain part (that is, the number at the start of the line contains only one colon character), then the computer has only one PCI domain and it is 0000.
The following commands, with the capital letters substituted with the device’s PCI address, can be used to restart a PCI device on a running system.[2]
In the above example, the placeholders DDDD, BB, DD, and F are for the PCI device domain, bus, device, and function respectively.
Substituting the values from the example output of the lspci command shown above gives the command that would need to be run to restart the Atheros wireless card on this example system.
Enable executable permissions with, for example, chmod +x restart-wireless-card.sh and run sudo ./restart-wireless-card.sh whenever you need to restart your PCI device.
Final notes
Not all PCI devices can be restarted using this method. But the real-life example demonstrated above does work to get the WiFi card running again without requiring a full reboot of the PC.