The Model Context Protocol (MCP) C# SDK has reached its v1.0 milestone, bringing full support for the
2025-11-25 version of the MCP Specification.
This release delivers a rich set of new capabilities — from improved authorization flows and richer metadata,
to powerful new patterns for tool calling, elicitation, and long-running request handling.
Here’s a tour of what’s new.
Enhanced authorization server discovery
In the previous spec, servers were required to provide a link to their Protected Resource Metadata (PRM) Document
in the resource_metadata parameter of the WWW-Authenticate header.
The 2025-11-25 spec broadens this, giving servers three ways to expose the PRM:
- Via a URL in the
resource_metadata parameter of the WWW-Authenticate header (as before)
- At a “well-known” URL derived from the server’s MCP endpoint path
(e.g. https://example.com/.well-known/oauth-protected-resource/public/mcp)
- At the root well-known URL (e.g.
https://example.com/.well-known/oauth-protected-resource)
Clients check these locations in order.
On the server side, the SDK’s AddMcp extension method on AuthenticationBuilder
makes it easy to configure the PRM Document:
.AddMcp(options =>
{ options.ResourceMetadata = new() { ResourceDocumentation = new Uri("https://docs.example.com/api/weather"), AuthorizationServers = { new Uri(inMemoryOAuthServerUrl) }, ScopesSupported = ["mcp:tools"], };
});
When configured this way, the SDK automatically hosts the PRM Document at the well-known location
and includes the link in the WWW-Authenticate header. On the client side, the SDK handles the
full discovery sequence automatically.
Icons for tools, resources, and prompts
The 2025-11-25 spec adds icon metadata to Tools, Resources, and Prompts. This information is included
in the response to tools/list, resources/list, and prompts/list requests.
Implementation metadata (describing a client or server) has also been extended with icons and a website URL.
The simplest way to add an icon for a tool is with the IconSource parameter on the McpServerToolAttribute:
[McpServerTool(Title = "This is a title", IconSource = "https://example.com/tool-icon.svg")]
public static string ToolWithIcon(
The McpServerResourceAttribute, McpServerResourceTemplateAttribute, and McpServerPromptAttribute
have also added an IconSource parameter.
For more advanced scenarios — multiple icons, MIME types, size hints, and theme preferences — you can
configure icons programmatically via McpServerToolCreateOptions.Icons:
.WithTools([ McpServerTool.Create( typeof(EchoTool).GetMethod(nameof(EchoTool.Echo))!, options: new McpServerToolCreateOptions { Icons = [ new Icon { Source = "https://raw.githubusercontent.com/microsoft/fluentui-emoji/main/assets/Loudspeaker/Flat/loudspeaker_flat.svg", MimeType = "image/svg+xml", Sizes = ["any"], Theme = "light" }, new Icon { Source = "https://raw.githubusercontent.com/microsoft/fluentui-emoji/main/assets/Loudspeaker/3D/loudspeaker_3d.png", MimeType = "image/png", Sizes = ["256x256"], Theme = "dark" } ] } )
])
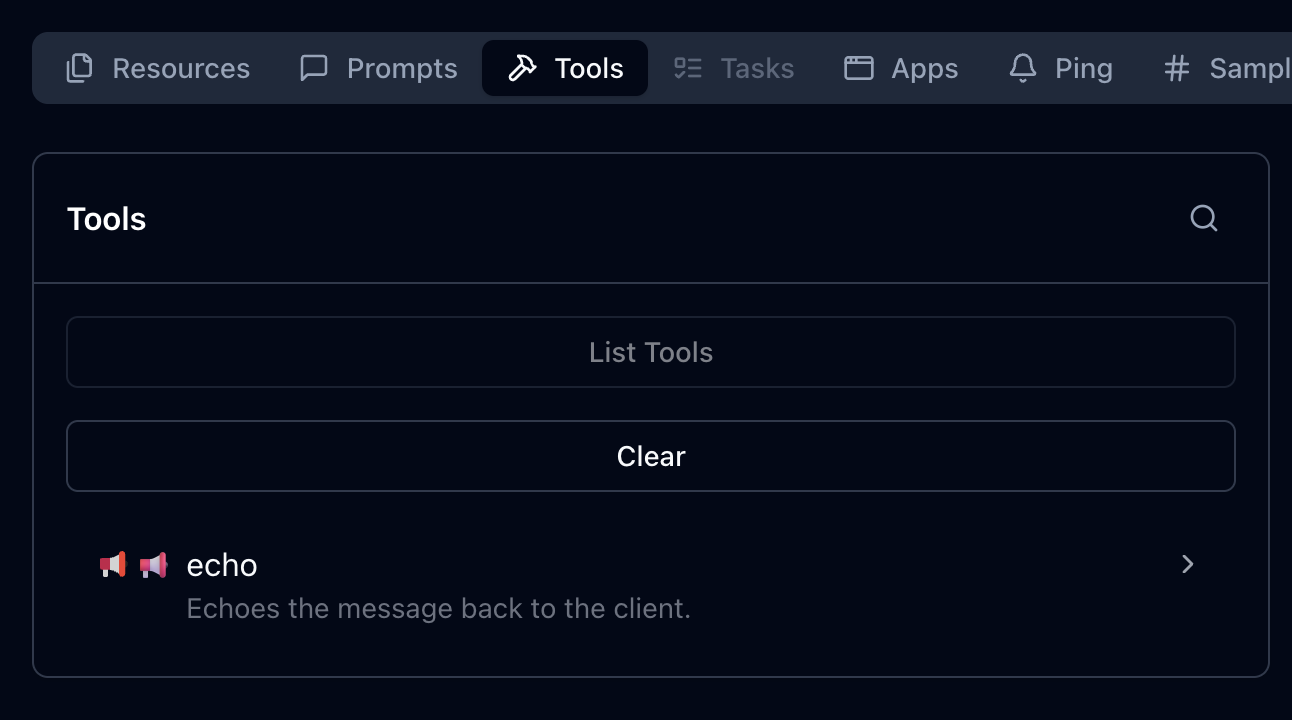
Here’s how these icons could be displayed, as illustrated in the MCP Inspector:
This placement works well after the code example showing how to configure multiple icons, providing a visual demonstration of how those icons appear in practice.
The Implementation class also has
Icons and
WebsiteUrl properties for server and client metadata:
.AddMcpServer(options =>
{ options.ServerInfo = new Implementation { Name = "Everything Server", Version = "1.0.0", Title = "MCP Everything Server", Description = "A comprehensive MCP server demonstrating all MCP features", WebsiteUrl = "https://github.com/modelcontextprotocol/csharp-sdk", Icons = [ new Icon { Source = "https://raw.githubusercontent.com/microsoft/fluentui-emoji/main/assets/Gear/Flat/gear_flat.svg", MimeType = "image/svg+xml", Sizes = ["any"], Theme = "light" } ] };
})
Incremental scope consent
The incremental scope consent feature brings the Principle of Least Privilege
to MCP authorization, allowing clients to request only the minimum access needed for each operation.
MCP uses OAuth 2.0 for authorization, where scopes define the level of access a client has.
Previously, clients might request all possible scopes up front because they couldn’t know which scopes
a specific operation would require. With incremental scope consent, clients start with minimal scopes
and request additional ones as needed.
The mechanism works through two flows:
-
Initial scopes: When a client makes an unauthenticated request, the server responds with
401 Unauthorized and a WWW-Authenticate header that now includes a scopes parameter listing
the scopes needed for the operation. Clients request authorization for only these scopes.
-
Additional scopes: When a client’s token lacks scopes for a particular operation, the server
responds with 403 Forbidden and a WWW-Authenticate header containing an error parameter
of insufficient_scope and a scopes parameter with the required scopes. The client then
obtains a new token with the expanded scopes and retries.
Client support for incremental scope consent
The MCP C# client SDK handles incremental scope consent automatically. When it receives a 401 or 403 with a scopes
parameter in the WWW-Authenticate header, it extracts the required scopes and initiates the
authorization flow — no additional client code needed.
Server support for incremental scope consent
Setting up incremental scope consent on the server involves:
-
Adding authentication services configured with the MCP authentication scheme:
builder.Services.AddAuthentication(options =>
{ options.DefaultAuthenticateScheme = McpAuthenticationDefaults.AuthenticationScheme; options.DefaultChallengeScheme = McpAuthenticationDefaults.AuthenticationScheme;
})
-
Enabling JWT bearer authentication with appropriate token validation:
.AddJwtBearer(options =>
{ options.TokenValidationParameters = new TokenValidationParameters { ValidateIssuer = true, ValidateAudience = true, ValidateLifetime = true, ValidateIssuerSigningKey = true, // Other validation settings as appropriate };
})
The following token validation settings are strongly recommended:
| Setting |
Value |
Description |
ValidateIssuer |
true |
Ensures the token was issued by a trusted authority |
ValidateAudience |
true |
Verifies the token is intended for this server |
ValidateLifetime |
true |
Checks that the token has not expired |
ValidateIssuerSigningKey |
true |
Confirms the token signature is valid |
-
Specifying authentication scheme metadata to guide clients on obtaining access tokens:
.AddMcp(options =>
{ options.ResourceMetadata = new() { ResourceDocumentation = new Uri("https://docs.example.com/api/weather"), AuthorizationServers = { new Uri(inMemoryOAuthServerUrl) }, ScopesSupported = ["mcp:tools"], };
});
-
Performing authorization checks in middleware.
Authorization checks should be implemented in ASP.NET Core middleware instead of inside the tool method itself. This is because the MCP HTTP handler may (and in practice does) flush response headers before invoking the tool. By the time the tool call method is invoked, it is too late to set the response status code or headers.
Unfortunately, the middleware may need to inspect the contents of the request to determine which scopes are required, which involves an extra deserialization for incoming requests. But help may be on the way in future versions of the MCP protocol that will avoid this overhead in most cases. Stay tuned…
In addition to inspecting the request, the middleware must also extract the scopes from the access token sent in the request. In the MCP C# SDK, the authentication handler extracts the scopes from the JWT and converts them to claims in the HttpContext.User property. The way these claims are represented depends on the token issuer and the JWT structure. For a token issuer that represents scopes as a space-separated string in the scope claim, you can determine the scopes passed in the request as follows:
var user = context.User;
var userScopes = user?.Claims .Where(c => c.Type == "scope" || c.Type == "scp") .SelectMany(c => c.Value.Split(' ')) .Distinct() .ToList();
With the scopes extracted from the request, the server can then check if the required scope(s) for the requested operation is included with userScopes.Contains(requiredScope).
If the required scopes are missing, respond with 403 Forbidden and a WWW-Authenticate header, including an error parameter indicating insufficient_scope and a scopes parameter indicating the scopes required.
The MCP Specification describes several strategies for choosing which scopes to include:
- Minimum approach: Only the newly-required scopes (plus any existing granted scopes that are still relevant)
- Recommended approach: Existing relevant scopes plus newly required scopes
- Extended approach: Existing scopes, newly required scopes, and related scopes that commonly work together
URL mode elicitation
URL mode elicitation enables secure out-of-band interactions between the server and end-user,
bypassing the MCP host/client entirely. This is particularly valuable for gathering sensitive data — like API keys,
third-party authorizations, and payment information — that would pose a security risk
if transmitted through the client.
Inspired by web security standards like OAuth, this mechanism lets the MCP client obtain user consent
and direct the user’s browser to a secure server-hosted URL where the sensitive interaction takes place.
The MCP host/client must present the elicitation request to the user — including the server’s identity
and the purpose of the request — and provide options to decline or cancel.
What the server does at the elicitation URL is outside the scope of MCP; it could present a form,
redirect to a third-party authorization service, or anything else.
Client support for URL mode elicitation
Clients indicate support by setting the Url property in Capabilities.Elicitation:
McpClientOptions options = new()
{ Capabilities = new ClientCapabilities { Elicitation = new ElicitationCapability { Url = new UrlElicitationCapability() } } // other client options
The client must also provide an ElicitationHandler.
Since there’s a single handler for both form mode and URL mode elicitation, the handler should begin by checking the
Mode property of the ElicitationRequest parameters
to determine which mode is being requested and handle it accordingly.
async ValueTask<ElicitResult> HandleElicitationAsync(ElicitRequestParams? requestParams, CancellationToken token)
{ if (requestParams is null || requestParams.Mode != "url" || requestParams.Url is null) { return new ElicitResult(); } // Success path for URL-mode elicitation omitted for brevity.
}
Server support for URL mode elicitation
The server must define an endpoint for the elicitation URL and handle the response.
Typically the response is submitted via POST to keep sensitive data out of URLs and logs.
If the URL serves a form, it should include anti-forgery tokens to prevent CSRF attacks —
ASP.NET Core provides built-in support for this.
One approach is to create a Razor Page:
public class ElicitationFormModel : PageModel
{ public string ElicitationId { get; set; } = string.Empty; public IActionResult OnGet(string id) { // Serves the elicitation URL when the user navigates to it } public async Task<IActionResult> OnPostAsync(string id, string name, string ssn, string secret) { // Handles the elicitation response when the user submits the form }
}
Note the id parameter on both methods — since an MCP server using Streamable HTTP Transport
is inherently multi-tenant, the server must associate each elicitation request and response
with the correct MCP session. The server must maintain state to track pending elicitation requests
and communicate responses back to the originating MCP request.
Tool calling support in sampling
This is one of the most powerful additions in the 2025-11-25 spec. Servers can now include tools
in their sampling requests, which the LLM may invoke to produce a response.
While providing tools to LLMs is a central feature of MCP, tools in sampling requests are fundamentally different
from standard MCP tools — despite sharing the same metadata structure. They don’t need to be implemented
as standard MCP tools, so the server must implement its own logic to handle tool invocations.
The flow is important to understand: when the LLM requests a tool invocation during sampling,
that’s the response to the sampling request. The server executes the tool, then issues a new
sampling request that includes both the tool call request and the tool call response. This continues
until the LLM produces a final response with no tool invocation requests.
sequenceDiagram participant Server participant Client Server->>Client: CreateMessage Request Note right of Client: messages: [original prompt]<br/>tools: [tool definitions] Client-->>Server: CreateMessage Response Note left of Server: stopReason: tool_calls<br/>toolCalls: [tool call 1, tool call 2] Note over Server: Server executes tools locally Server->>Client: CreateMessage Request Note right of Client: messages: [<br/> original prompt,<br/> tool call 1 request,<br/> tool call 1 response,<br/> tool call 2 request,<br/> tool call 2 response<br/>]<br/>tools: [tool definitions] Client-->>Server: CreateMessage Response Note left of Server: stopReason: end_turn<br/>content: [final response]
Client/host support for tool calling in sampling
Clients declare support for tool calling in sampling through their capabilities and must provide
a SamplingHandler:
var mcpClient = await McpClient.CreateAsync( new HttpClientTransport(new() { Endpoint = new Uri("http://localhost:6184"), Name = "SamplingWithTools MCP Server", }), clientOptions: new() { Capabilities = new ClientCapabilities { Sampling = new SamplingCapability { Tools = new SamplingToolsCapability {} } }, Handlers = new() { SamplingHandler = async (c, p, t) => { return await samplingHandler(c, p, t); }, } });
Implementing the SamplingHandler from scratch would be complex, but the Microsoft.Extensions.AI
package makes it straightforward. You can obtain an IChatClient from your LLM provider and use
CreateSamplingHandler to get a handler that translates between MCP and your LLM’s tool invocation format:
IChatClient chatClient = new OpenAIClient(new ApiKeyCredential(token), new OpenAIClientOptions { Endpoint = new Uri(baseUrl) }) .GetChatClient(modelId) .AsIChatClient(); var samplingHandler = chatClient.CreateSamplingHandler();
The sampling handler from IChatClient handles format translation but does not implement user consent
for tool invocations. You can wrap it in a custom handler to add consent logic.
Note that it will be important to cache user approvals to avoid prompting the user multiple times for the same tool invocation during a single sampling session.
Server support for tool calling in sampling
Servers can take advantage of the tool calling support in sampling if they are connected to a client/host that also supports this feature.
Servers can check whether the connected client supports tool calling in sampling:
if (_mcpServer?.ClientCapabilities?.Sampling?.Tools is not {})
{ return "Error: Client does not support sampling with tools.";
}
Tools for sampling can be described as simple Tool objects:
Tool rollDieTool = new Tool()
{ Name = "roll_die", Description = "Rolls a single six-sided die and returns the result (1-6)."
};
But the real power comes from using Microsoft.Extensions.AI on the server side too. The McpServer.AsSamplingChatClient()
method returns an IChatClient that supports sampling, and UseFunctionInvocation adds tool calling support:
IChatClient chatClient = ChatClientBuilderChatClientExtensions.AsBuilder(_mcpServer.AsSamplingChatClient()) .UseFunctionInvocation() .Build();
Define tools as AIFunction objects and pass them in ChatOptions:
AIFunction rollDieTool = AIFunctionFactory.Create( () => Random.Shared.Next(1, 7), name: "roll_die", description: "Rolls a single six-sided die and returns the result (1-6)."
); var chatOptions = new ChatOptions
{ Tools = [rollDieTool], ToolMode = ChatToolMode.Auto
}; var pointRollResponse = await chatClient.GetResponseAsync( "<Prompt that may use the roll_die tool>", chatOptions, cancellationToken
);
The IChatClient handles all the complexity: sending sampling requests with tools, processing
tool invocation requests, executing tools, and translating between MCP and LLM formats.
OAuth Client ID Metadata Documents
The 2025-11-25 spec introduces Client ID Metadata Documents (CIMDs) as an alternative
to Dynamic Client Registration (DCR) for establishing client identity with an authorization server.
CIMD is now the preferred method for client registration in MCP.
The idea is simple: the client specifies a URL as its client_id in authorization requests.
That URL resolves to a JSON document hosted by the client containing its metadata — identifiers,
redirect URIs, and other descriptive information. When an authorization server encounters this client_id,
it dereferences the URL and uses the metadata to understand and apply policy to the client.
In the C# SDK, clients specify a CIMD URL via ClientOAuthOptions:
const string ClientMetadataDocumentUrl = $"{ClientUrl}/client-metadata/cimd-client.json"; await using var transport = new HttpClientTransport(new()
{ Endpoint = new(McpServerUrl), OAuth = new ClientOAuthOptions() { RedirectUri = new Uri("http://localhost:1179/callback"), AuthorizationRedirectDelegate = HandleAuthorizationUrlAsync, ClientMetadataDocumentUri = new Uri(ClientMetadataDocumentUrl) },
}, HttpClient, LoggerFactory);
The CIMD URL must use HTTPS, have a non-empty path, and cannot contain dot segments or a fragment component.
The document itself must include at least client_id, client_name, and redirect_uris.
The SDK will attempt CIMD first, and fall back to DCR if the authorization server doesn’t support it
(provided DCR is enabled in the OAuth options).
Long-running requests over HTTP with polling
At the data layer, MCP is a message-based protocol with no inherent time limits.
But over HTTP, timeouts are a fact of life. The 2025-11-25 spec significantly improves the story
for long-running requests.
Previously, clients could disconnect and reconnect if the server provided an Event ID in SSE events,
but few servers implemented this — partly because it implied supporting stream resumption from any
event ID all the way back to the start. And servers couldn’t proactively disconnect; they had to
wait for clients to do so.
The new approach is cleaner. Servers that open an SSE stream for a request begin with an empty event
that includes an Event ID and optionally a Retry-After field. After sending this initial event,
servers can close the stream at any time, since the client can reconnect using the Event ID.
Server support for long-running requests
To enable this, the server provides an ISseEventStreamStore implementation. The SDK includes
DistributedCacheEventStreamStore, which works with any IDistributedCache:
// Add a MemoryDistributedCache to the service collection
builder.Services.AddDistributedMemoryCache();
// Add the MCP server with DistributedCacheEventStreamStore for SSE stream storage
builder.Services .AddMcpServer() .WithHttpTransport() .WithDistributedCacheEventStreamStore() .WithTools<RandomNumberTools>();
When a request handler wants to drop the SSE connection and let the client poll for the result,
it calls EnablePollingAsync on the McpRequestContext:
await context.EnablePollingAsync(retryInterval: TimeSpan.FromSeconds(retryIntervalInSeconds));
The McpRequestContext is available in handlers for MCP requests by simply adding it as a parameter to the handler method.
Implementation considerations
Event stream stores can be susceptible to unbounded memory growth, so consider these retention strategies:
Tasks (experimental)
Note: Tasks are an experimental feature in the 2025-11-25 MCP Specification. The API may change in future releases.
The 2025-11-25 version of the MCP Specification introduces tasks, a new primitive that provides durable state tracking
and deferred result retrieval for MCP requests. While stream resumability
handles transport-level concerns like reconnection and event replay, tasks operate at the data layer to ensure
that request results are durably stored and can be retrieved at any point within a server-defined retention window —
even if the original connection is long gone.
The key concept is that tasks augment existing requests rather than replacing them.
A client includes a task field in a request (e.g. tools/call) to signal that it wants durable result tracking.
Instead of the normal response, the server returns a CreateTaskResult containing task metadata — a unique task ID, the current status (working),
timestamps, a time-to-live (TTL), and optionally a suggested poll interval.
The client then uses tasks/get to poll for status, tasks/result to retrieve the stored result,
tasks/list to enumerate tasks, and tasks/cancel to cancel a running task.
This durability is valuable in several scenarios:
- Resilience to dropped results: If a result is lost due to a network failure, the client can retrieve it again by task ID
rather than re-executing the operation.
- Explicit status tracking: Clients can query the server to determine whether a request is still in progress, succeeded, or failed,
rather than relying on notifications or waiting indefinitely.
- Integration with workflow systems: MCP servers wrapping existing workflow APIs (e.g. CI/CD pipelines, batch processing, multi-step analysis)
can map their existing job tracking directly to the task primitive.
Tasks follow a defined lifecycle through these status values:
| Status |
Description |
working |
Task is actively being processed |
input_required |
Task is waiting for additional input (e.g., elicitation) |
completed |
Task finished successfully; results are available |
failed |
Task encountered an error |
cancelled |
Task was cancelled by the client |
The last three states (completed, failed, and cancelled) are terminal — once a task reaches one of these states, it cannot transition to any other state.
Task support is negotiated through explicit capability declarations during initialization.
Servers declare that they support task-augmented tools/call requests, while clients can declare support for
task-augmented sampling/createMessage and elicitation/create requests.
Server support for tasks
To enable task support on an MCP server, configure a task store when setting up the server.
The task store is responsible for managing task state — creating tasks, storing results, and handling cleanup.
var taskStore = new InMemoryMcpTaskStore(); builder.Services.AddMcpServer(options =>
{ options.TaskStore = taskStore;
})
.WithHttpTransport()
.WithTools<MyTools>(); // Alternatively, you can register an IMcpTaskStore globally with DI, but you only need to configure it one way.
//builder.Services.AddSingleton<IMcpTaskStore>(taskStore);
The InMemoryMcpTaskStore is a reference implementation suitable for development and single-server deployments.
For production multi-server scenarios, implement IMcpTaskStore
with a persistent backing store (database, Redis, etc.).
The InMemoryMcpTaskStore constructor accepts several optional parameters to control task retention, polling behavior,
and resource limits:
var taskStore = new InMemoryMcpTaskStore( defaultTtl: TimeSpan.FromHours(1), // Default task retention time maxTtl: TimeSpan.FromHours(24), // Maximum allowed TTL pollInterval: TimeSpan.FromSeconds(1), // Suggested client poll interval cleanupInterval: TimeSpan.FromMinutes(5), // Background cleanup frequency pageSize: 100, // Tasks per page for listing maxTasks: 1000, // Maximum total tasks allowed maxTasksPerSession: 100 // Maximum tasks per session
);
Tools automatically advertise task support when they return Task, ValueTask, Task<T>, or ValueTask<T> (i.e. async methods).
You can explicitly control task support on individual tools using the ToolTaskSupport enum:
Forbidden (default for sync methods): Tool cannot be called with task augmentationOptional (default for async methods): Tool can be called with or without task augmentationRequired: Tool must be called with task augmentation
Set TaskSupport on the McpServerTool attribute:
[McpServerTool(TaskSupport = ToolTaskSupport.Required)]
[Description("Processes a batch of data records. Always runs as a task.")]
public static async Task<string> ProcessData( [Description("Number of records to process")] int recordCount, CancellationToken cancellationToken)
{ await Task.Delay(TimeSpan.FromSeconds(8), cancellationToken); return $"Processed {recordCount} records successfully.";
}
Or set it via McpServerToolCreateOptions.Execution when registering tools explicitly:
builder.Services.AddMcpServer() .WithTools([ McpServerTool.Create( (int count, CancellationToken ct) => ProcessAsync(count, ct), new McpServerToolCreateOptions { Name = "requiredTaskTool", Execution = new ToolExecution { TaskSupport = ToolTaskSupport.Required } }) ]);
For more control over the task lifecycle, a tool can directly interact with
IMcpTaskStore and return an McpTask.
This bypasses automatic task wrapping and allows the tool to create a task, schedule background work, and return immediately.
Note: use a static method and accept IMcpTaskStore as a method parameter rather than via constructor injection
to avoid DI scope issues when the SDK executes the tool in a background context.
Client support for tasks
To execute a tool as a task, a client includes the Task property in the request parameters:
var result = await client.CallToolAsync( new CallToolRequestParams { Name = "processDataset", Arguments = new Dictionary<string, JsonElement> { ["recordCount"] = JsonSerializer.SerializeToElement(1000) }, Task = new McpTaskMetadata { TimeToLive = TimeSpan.FromHours(2) } }, cancellationToken); if (result.Task != null)
{ Console.WriteLine($"Task created: {result.Task.TaskId}"); Console.WriteLine($"Status: {result.Task.Status}");
}
The client can then poll for status updates and retrieve the final result:
// Poll until task reaches a terminal state
var completedTask = await client.PollTaskUntilCompleteAsync( taskId, cancellationToken: cancellationToken); switch (completedTask.Status)
{ case McpTaskStatus.Completed: // ... break; case McpTaskStatus.Failed: // ... break; case McpTaskStatus.Cancelled: // ... break;
{ var resultJson = await client.GetTaskResultAsync( taskId, cancellationToken: cancellationToken); var result = resultJson.Deserialize<CallToolResult>(McpJsonUtilities.DefaultOptions); foreach (var content in result?.Content ?? []) { if (content is TextContentBlock text) { Console.WriteLine(text.Text); } }
}
The SDK also provides methods to list all tasks (ListTasksAsync)
and cancel running tasks (CancelTaskAsync):
// List all tasks for the current session
var tasks = await client.ListTasksAsync(cancellationToken: cancellationToken); // Cancel a running task
var cancelledTask = await client.CancelTaskAsync(taskId, cancellationToken: cancellationToken);
Clients can optionally register a handler to receive status notifications as they arrive,
but should always use polling as the primary mechanism since notifications are optional:
var options = new McpClientOptions
{ Handlers = new McpClientHandlers { TaskStatusHandler = (task, cancellationToken) => { Console.WriteLine($"Task {task.TaskId} status changed to {task.Status}"); return ValueTask.CompletedTask; } }
};
Summary
The v1.0 release of the MCP C# SDK represents a major step forward for building MCP servers and clients in .NET.
Whether you’re implementing secure authorization flows, building rich tool experiences with sampling,
or handling long-running operations gracefully, the SDK has you covered.
Check out the full changelog
and the C# SDK repository to get started.
Demo projects for many of the features described here are available in the
mcp-whats-new demo repository.