Imagine that Fedora Workstation is your desk, and GNOME Shell extensions are small accessories you add to make it feel more personal. It’s like placing a pencil case on the right side, a lamp that helps you focus, or a small cabinet to keep your things from getting scattered. It’s the same desk—GNOME stays clean and minimal—but a few additions can make your routine more comfortable.
Extensions work on the GNOME interface: the top panel, the way you open applications, how notifications appear, and small details that usually stay hidden. These simple changes can be enough to make your Fedora Workstation feel different. With just one extension, you can make Fedora feel more “you.”
But like any accessories, choose only what truly helps—don’t install everything. Too many extensions can clutter your desktop or make things feel unstable. The goal isn’t to chase excitement, but to find a few small add-ons that better fit the way you work in Fedora Workstation.
Why use Extension Manager?
Once you see extensions as small “accessories” for GNOME, a question comes up fast: how do you install them without the hassle? This is where Extension Manager helps.
Instead of opening many browser tabs, you can do everything in one place. You can browse extensions. You can search for what you need. You can also read a short description before installing. As a result, the whole process feels calmer and more familiar.
More importantly, Extension Manager makes it easier to experiment safely. For example, you can try one extension to make the top panel more useful. If it doesn’t feel right, you can simply turn it off. Or you can uninstall it in seconds. That way, you stay in control.
Also, you’re not “modding” your whole system. You’re only adding small features. And if you change your mind, you can always go back to GNOME’s clean default look.
In short, Extension Manager is like a small drawer on your desk. It keeps your extensions in one spot. So they’re easy to find, easy to try, and easy to tidy up again.
Install Extension Manager
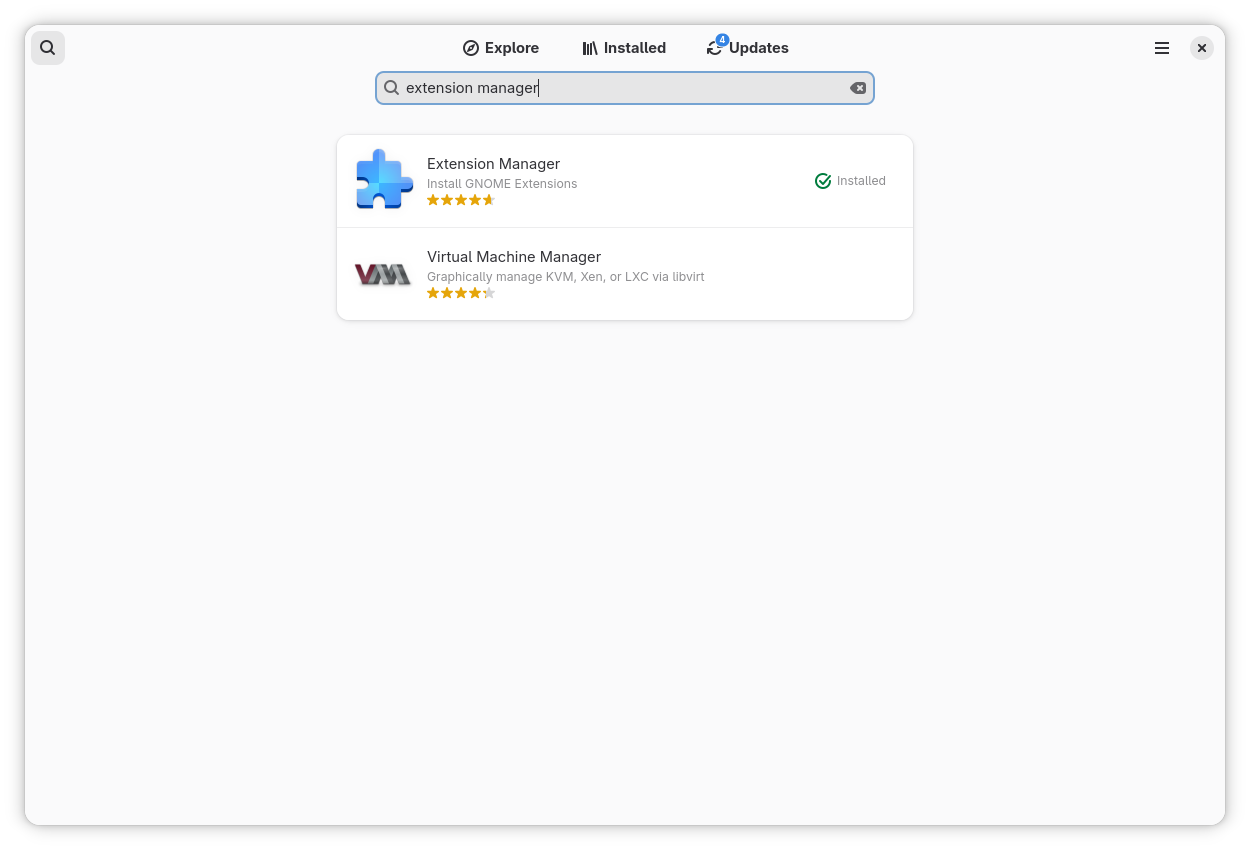
Let’s move to the easiest part: installing Extension Manager with just a few clicks. Open the Software app on Fedora Workstation, then search for Extension Manager using the search bar. Select the app and click Install. That’s it.
Once the installation is complete, open it from the app menu—look for Extension Manager. Now you’re ready to customize. Start slowly: try one extension first, then see if it fits your daily routine.
Find and Install an Extension
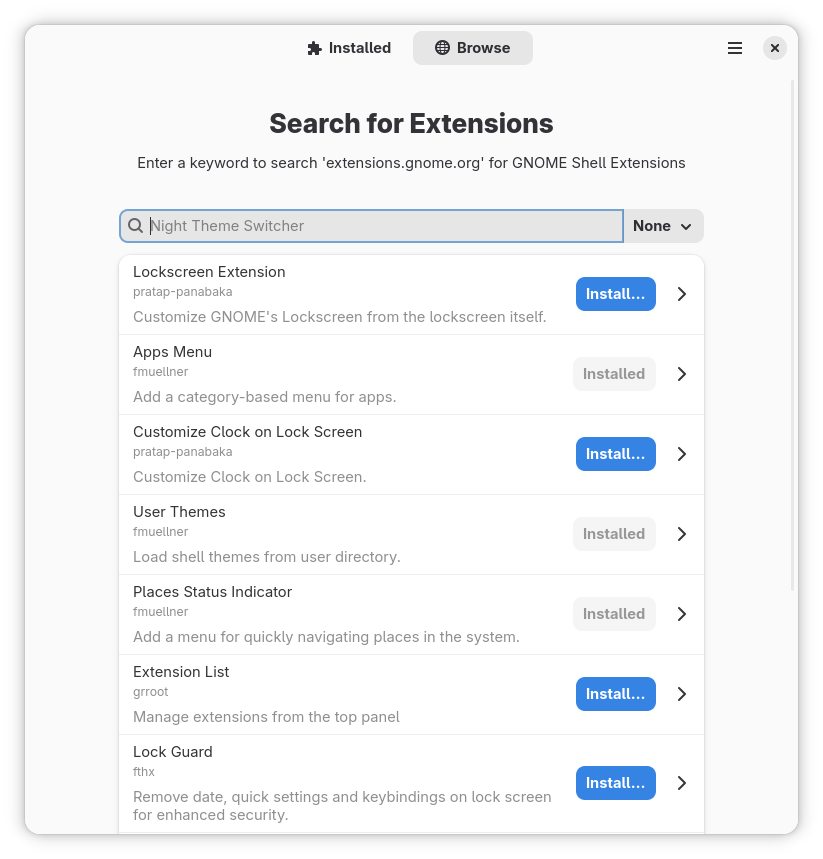
After you open Extension Manager, it can feel like opening an “accessories shop” for your Fedora Workstation. There are many options, from small tweaks to extensions that can change how you work.
Start with the search bar. Think about what you most often need in your day-to-day routine. For example, you might want quicker access to apps, tray icons for indicators, or a more informative top panel. When you find an extension that looks interesting, open its page for a moment. Read the short description, look at the screenshots, and then ask yourself whether it will really help your work flow.
If you’re sure, just click Install. In a few seconds, it will be installed, and you’ll notice the change right away. However, if it doesn’t feel right, don’t hesitate to uninstall it. At this stage, you’re simply trying things out—like picking the accessories that best fit your desk.
Enable/disable and adjust settings
After you install a few extensions, you don’t have to stick with all of them. Sometimes an extension is useful, but you don’t need it all the time. That’s the nice thing about Extension Manager: you can enable or disable extensions at any time, without any drama.
Think of it like accessories on your desk. Some days you need a desk lamp to help you focus. On other days, you want your desk to stay clean and simple. Extensions work the same way. You can turn one on when you need it, and turn it off when you’re done.
If an extension has options, you’ll usually see a Settings or Preferences button. From there, you can tweak small details to match your style—icon placement, button behaviour, panel appearance, and more. This is what makes extensions feel personal. You’re not just installing something and forgetting it; you’re shaping it around your workflow.
And if one day your Fedora starts to feel too crowded, don’t panic. Just open the list of installed extensions and disable the ones you don’t need. Take it slow. The best customization isn’t about how many extensions you have, but how well they fit your daily activities.
Keep it safe: a few practical tips
At this point, you might start thinking, “Wow, there are so many things I can change.” And that’s true. However, if you want Fedora Workstation to stay light and comfortable, there are a few simple habits worth keeping in mind.
First, install extensions the same way you choose tools: only when you truly need them. If you stop using an extension after a few days, it’s better to disable it or remove it. A comfortable desktop isn’t the most crowded one—it’s the one with fewer distractions.
Second, try extensions one by one. If you install many at once, it’s hard to tell which one causes a problem. On the other hand, if you take it slowly, you can quickly feel what fits and what doesn’t.
Finally, remember that GNOME keeps evolving. Sometimes after a major update, an extension may not be ready yet. If something feels odd after an update, the safest move is simple: open Extension Manager and disable the extension you suspect. Once things are back to normal, you can wait for an update or choose an alternative.
In the end, Extension Manager isn’t a ticket to customize without limits. It’s more like a clean toolbox. If you use it with care and focus on what you really need, customization can stay enjoyable—without losing the clean, stable feel of Fedora Workstation.
Wrapping up: share your favorite extensions
Now you know how to customize your Fedora Workstation with Extension Manager. You’ve learned how to install the app, try a few extensions, and adjust their settings. And here’s the fun part: everyone ends up with a different mix of extensions, because we all have different needs and work styles.
If you have a favorite extension, share it. Which one do you rely on most, and what do you use it for? Maybe it helps you stay focused during presentations. Or maybe it makes the top panel more informative, brings back tray icons, or simply speeds up your work flow. Tell us why you like it, so others can picture the benefit.
Who knows—your list might inspire someone else. And you might also discover a new extension that fits your daily routine even better.
FLAC, or Free Lossless Audio Codec, is a lossless audio compression format that preserves all the original audio data. This means that FLAC files can be decoded to an identical copy of the original audio file, without any loss in quality. However, lossless compression typically results in larger file sizes than lossy compression, which is why a method to convert FLAC to lossy formats is desirable. This is where TransFLAC can help.
FLAC is a popular format for archiving digital audio files, as well as for storing music collections on home computers. It is also becoming increasingly common for music streaming services to offer FLAC as an option for high-quality audio.
For portable devices, where storage space is limited, lossy audio formats such as MP3, AAC, and OGG Vorbis are often used. These formats can achieve much smaller file sizes than lossless formats, while still providing good sound quality.
In general, FLAC is a good choice for applications where lossless audio quality is important, such as archiving, mastering, and critical listening. Lossy formats are a good choice for applications where file size is more important, such as storing music on portable devices or streaming music over the internet.
TransFLAC: Convert FLAC to lossy formats
TransFLAC is a command-line application that converts FLAC audio files to a lossy format at a specified quality level. It can keep both the FLAC and lossy libraries synchronized, either partially or fully. TransFLAC also synchronizes album art stored in the directory structure, such as cover, albumart, and folder files. You can run TransFLAC interactively in a terminal window, or you can schedule it to run automatically using applications such as cron or systemd.
The following four parameters must be specified:
Input FLAC Directory: The directory to recursively search for FLAC audio files. The case of the directory name matters. TransFLAC will convert all FLAC audio files in the directory tree to the specified lossy codec format. The program will resolve any symlinks encountered and display the physical path.
Output Lossy Directory: The directory to store the lossy audio files. The case of the directory name matters. The program will resolve any symlinks encountered and display the physical path.
Lossy Codec: The codec used to convert the FLAC audio files. The case of the codec name does not matter. OPUS generally provides the best sound quality for a given file size or bitrate, and is the recommended codec. Valid values are: OPUS | OGG | AAC | MP3
Codec Quality: The quality preset used to encode the lossy audio files. The case of the quality name does not matter. OPUS STANDARD quality provides full bandwidth, stereo music, good audio quality approaching transparency, and is the recommended setting. Valid values are: LOW | MEDIUM | STANDARD | HIGH | PREMIUM
TransFLAC allows for customization of certain items in the configuration. The project wiki provides additional information.
Back in 2018, a previous article demonstrated how to use LVM to clone the root filesystem before upgrading Fedora Linux so as to have a fallback in the unlikely event that something goes wrong. Today, the default Fedora Workstation install uses Btrfs. Now you can use a Btrfs snapshot to make creating a bootable fallback much easier. Note that converting or migrating a system to Btrfs from another filesystem is outside the scope of this article.
Check that root filesystem is Btrfs
This example uses a Pinebook aarch64 laptop. Before proceeding, first make sure that Btrfs is being used for the root (system) filesystem. Not every spin or image uses Btrfs by default.
The above example output shows that the file system mounted on “root” (“/”) is type Btrfs. Notice that three mountpoints show the same backing device and the same Used and Available blocks. This is because they are parts (subvolumes) mounted from a single Btrfs filesystem. The /f34 subvolume is my bootable snapshot from last year.
A default Fedora Btrfs install creates one Btrfs filesystem with two subvolumes — root and home — mounted on / and /home respectively. Let’s see what other subvolumes I’ve added:
$ sudo btrfs subvol list /
ID 272 gen 110428 top level 5 path root
ID 273 gen 110426 top level 5 path home
ID 300 gen 109923 top level 5 path f34
ID 301 gen 95852 top level 5 path home.22Jul26
ID 302 gen 95854 top level 5 path f36.22Jul26
There is an f34 subvol from the last system-upgrade and two readonly snapshots of home and f36. The easiest way to add and delete snapshots is to mount the Btrfs root. I will update the system and create a new snapshot of the current f36 root subvolume. If you have renamed your root subvolume, then you presumably know enough to adjust the following example accordingly for your system.
Create the Btrfs fallback snapshot
$ sudo dnf update --refresh
... lots of stuff updated (reboot if kernel updated)
$ sudo mkdir -p /mnt/root
$ sudo mount /dev/mmcblk2p3 /mnt/root
$ cd /mnt/root
$ ls
f34 f36.22Jul26 home home.22Jul26 root
$ sudo btrfs subvol snapshot root f36
Create a snapshot of 'root' in './f36'
Because Btrfs snapshots are filesystem based, it is not necessary to “sync” before the snapshot, as I recommended for LVM. To boot from the new subvol as a fallback, you will need to edit /mnt/root/f36/etc/fstab with your favorite editor. If you are a beginner, nano is a dirt simple text editor with minimal features. Here are some lines from my fstab file:
Change subvol=root to subvol=f36. This change is to the file in the snapshot, not your production fstab. You can compare them with diff /etc/fstab /mnt/root/f36/etc/fstab. In my case, I also deleted my f34 snapshot from last year with sudo btrfs subvol delete f34.
Test the Btrfs fallback snapshot
Now you are ready to test the fallback. You could use grubby or edit an entry in /boot/loader/entries to change subvol=root to subvol=f36. But in the interest of safety for beginners, I will have you edit the GRUB entry at boot time instead. Checkout this article on GRUB for tips on getting to the GRUB menu. Once you are there, press the e key to edit the default kernel entry. Don’t worry — your changes are in volatile memory only. If you mess up, reboot to start over. Just like with fstab, find subvol=root and change it to subvol=f36. Press F10 or Ctrl+X to boot your modified entry. With these changes, the system should boot into your new snapshot. Look at /etc/fstab to make sure you are booting from the right subvol, or enter mount | grep subvol to see what subvolume is mounted on “/”.
Do the Fedora Linux system upgrade
If your fallback is working, reboot back to your normal root filesystem (and confirm as above). Then proceed with the standard system-upgrade outlined on the wiki page. TIP: Before running dnf system-upgrade reboot, make another snapshot of root. Call it something like root.dl. That way, you don’t have to download five gigabytes of packages again should you discover that there wasn’t enough free space. The snapshot will not take up any additional space because all but the downloaded packages are shared with root and f36. About that sharing of disk blocks …
dnf system-upgrade gets confused about free space as reported by Btrfs because the f36 files in the root subvolume use the same disk locations as the same files in the f36 subvolume. So removing them from the root subvolume during the upgrade process doesn’t actually free up any space. If you run out of space, and you reboot — the graphical user interface (GUI) won’t start. Use Ctrl+Alt+F2 to login on a text console and practice your command line interface skills. Figuring out what to remove to free up space or how to expand the root filesystem is beyond the scope of this article (mine is often on an LVM volume and can be expanded). Having more than 50% free for the upgrade is a safe bet.
Recovery
Should something go wrong, you can reboot and edit the GRUB entry to boot the fallback. If you are a beginner, you’ll want some hand holding if you do end up needing to change the GRUB entry on disk (so you don’t have to edit at each boot). It is straight forward to delete or rename the broken root subvol. Snapshot the f36 subvol (or the root.dl snapshot) to try the system-upgrade process again. Here is an example of starting over after booting into the fallback system on subvol f36:
$ mount | grep subvol
$ sudo mount /dev/mmcblk2p3 /mnt/root
$ cd /mnt/root
$ sudo mv root root.failed
$ sudo btrfs subvol snapshot f36 root
Create a snapshot of 'f36' in './root' Don't forget to edit /mnt/root/root/etc/fstab to change the subvol mounted on "/" to "root".
As it turns out, the new kernel-6.2.11 for f38 did not boot on my Pinebook after the system-upgrade! (Don’t worry, ARM is an alternative CPU architecture for Fedora Linux — this is very unlikely to happen to you on a mainstream device.) I was indeed able to boot back to f36 by editing the GRUB entry for kernel-6.2.10 at boot time as described above. I am now using f38 again — but with kernel-6.2.10 from f36.
Update: kernel-6.2.12 is out and it works on the Pinebook.
Expiration
As you update the f38 system, it will eventually want to delete the last f36 kernel from /boot. That is normally not a problem, as by that time you have settled into f38, and the f36 snapshot is just an archive. If you want to keep your fork (f36 snapshot) bootable indefinitely, you should preserve a working f36 kernel under /boot. The simplest way to do so is to set installonly_limit=0 in /etc/dnf/dnf.conf and manually remove old kernels. It is simple and safe (but annoying).
Outline of a more complex solution (not for beginners): Run find /boot -name "*fc36*" to list all the kernel and GRUB files for your f36 subvolume snapshot that are under /boot (which is not in the snapshot). Copy them to a backup location (I would mount the f36 subvolume and copy to a backup directory there). While booted from f38, for each f36 kernel version, use dnf to remove that specific kernel version (for example, dnf remove kernel-core-5.19.11-200.fc36). Do not remove the f38 kernels! Now restore the f36 kernels you saved to /boot. The f38 system doesn’t know about f36 kernels anymore, and it will not remove them from /boot.
The problem with that method is the danger of accidentally removing the running f38 kernel. If anyone has a better method, let me know in the comments.
Future directions
Those comfortable with modifying GRUB entries might consider creating a snapshot subvolume named f38, modifying the current GRUB entry to boot into that, rebooting, and running the system-upgrade in that subvolume. Then always name the subvol for the root filesystem after the Fedora Linux release it contains. I did not do that for this article for two reasons.
Naming the current active subvolume root matches the Fedora Linux default.
Sticking with root for the current subvol does not require any permanent changes outside of the normal system-upgrade procedure.
As this article has demonstrated, readonly snapsnots are useful as local restore points in case things go wrong when making significant system changes (such as a system release upgrade). These snapshots can also be sent to a remote backup using Btrfs’ send subcommand. (And if the remote backup device already contains previous backups, Btrfs can do an incremental send that only transmits changed files to save time and space.) If you intend to archive these snapshots long term, the key to not getting confused about which ones are which and what order to restore them is to use a consistent naming convention. See the article on Btrfs snapshots for backup for more information about using Btrfs’ send command to create backups.
A FIDO U2F security key is a small USB and/or NFC based device. It is a hardware security token with modules for many security related use-cases. There are several brands of FIDO compliant keys, including NitroKey, SoloKey v2, and YubiKey. FIDO, in contrast to proprietary protocols like Yubico OTP, is hardware token agnostic and the tools used are manufacturer independent.
This post introduces the FIDO protocol(s) and shows how to install and enable a FIDO U2F security key as an alternative authentication factor for logging into a terminal, GDM, or authenticating for sudo.
This post will not cover storing OpenPGP keys or X.509 certificates because those features are hardware dependent and not part of the FIDO U2F standard.
Keep a backup security key
As soon as you start working with security tokens you have to account for the potential to lock yourself out of accounts tied to these tokens. As hardware security tokens are unique and designed to be extremely hard to copy you cannot just make a backup of it like you can with software vaults like KeePass or AndOTP. Consequently, all registrations you make with your primary key you should immediately repeat with a second backup key that you will store in a secure location, maybe even a safe.
In practice this means you will need to register both hardware tokens with your Linux and web accounts, generate OpenSSH private keys twice, and upload both OpenSSH public keys to the servers and services you use (for example, GitHub).
Should you lose a key, you’ll want to use your second key to sign in on every service the keys are registered with, remove the lost key, and register a new one. This is especially true for password-less logins using a FIDO2 protocol.
FIDO2, U2F and the FIDO Alliance
FIDO2 is a collection of standards maintained by the FIDO Alliance. The FIDO Alliance hopes to eventually get rid of passwords altogether and instead provide procedures to authenticate users securely through multiple factors but without the need for passwords.
The standard consists of the World Wide Web Consortium’s (W3C) Web Authentication (WebAuthn) and the FIDO Alliance’s Client-to-Authenticator Protocol (CTAP). WebAuthn is a standard API to request and process public key challenges for authentication. With this, browsers send a challenge to a client which then produces a response with a private key that the challenger then verifies using a previously exchanged public key. How the challenge answer is produced is unknown to the service and it is controlled by the CTAP. The user might be prompted for several verification methods like biometrics, PIN, or presence check (or some combination of these methods). These checks are the same for authentication as they are when registering the key with the service.
A access PIN to protect any interaction with the hardware token is optional and it is unset by default. Most keys will self-invalidate after eight sequential failed attempts at entering the access PIN. The only way to recover an invalidated key and set a new PIN is to reset the key. However, when a key is reset, all its service registrations will be lost!
A FIDO2 key also supports the FIDO U2F protocol (now renamed CTAP1). This protocol is designed for second- or multi-factor (but not password-less) authentication. Linux’s PAM authentication system can also be configured to use the U2F protocol. Although FIDO U2F is not designed for password-less authentication, the U2F PAM module does allow password-less authentication.
Security implications
FIDO2 / U2F works by tying the security key to your user account. Most keys have a basic presence-check which is enabled / used by default. They typically perform a presence-check by lighting up and prompting you to touch the key. A FIDO2 PIN is optional and it will be unset by default. When the key is registered for signing in to your Linux account or for using sudo, it is sufficient to have the device and key physically present. A FIDO2 PIN is an important additional verification step to ensure that only you can use the key for authentication.
Wait! Now I have to keep track of an additional PIN? Isn’t this just a shorter password?
The concerned reader
A FIDO2 PIN is not a password. It is a short, easy-to-remember phrase. This is not a problem because:
You need physical access to the key and you need to know the PIN.
Failing to enter the PIN eight times will invalidate the key which makes it hard to brute-force.
On the contrary, you can now use a secure password stored in a password manager that you don’t need to remember.
Local system authentication uses Pluggable Authentication Modules (PAM). The PAM module for U2F devices (and hence authentication) is pam_u2f. Whether your key supports FIDO2 or FIDO U2F will depend on its firmware version and hardware model.
The setup is as follows:
Install the PAM module.
Register a key with your user account.
Use authselect to activate smart card support in PAM.
Authselect is a tool for configuring PAM with reproducible profiles. By using authselect’s profiles, manually altering configuration files under the /etc/pam.d directory can be avoided.
Dependencies
The required packages are available in the official repositories.
The FIDO2 standard defines an optional PIN for access protection. There is no PUK or other way to restore a lost or invalidated PIN so make sure you have a backup approach for authentication. If the PIN is invalidated through sequential entry of invalid PINs, the only way to recover is to reset the key. However, resetting your key removes all its credentials and disconnects it from all previously registered services.
The fido2-tools package contains a tool to set the FIDO2 PIN of your key: fido2-token. Get a list of currently connected FIDO2 devices with fido2-token -L and set a new pin with fido2-token -C </path/to/device>:
[…]$ fido2-token -L
/dev/hidraw1: vendor=0x1050, product=0x0407 (Yubico YubiKey OTP+FIDO+CCID)
[…]$ fido2-token -C /dev/hidraw1
Enter current PIN for /dev/hidraw1: Enter new PIN for /dev/hidraw1:
Register the security key with your local account(s)
Use the tool pamu2fcfg to retrieve a configuration line that goes into ~/.config/Yubico/u2f_keys. pam_u2f is a Yubico-provided, generic module for U2F keys, hence the Yubico specific default configuration path. Each configuration line in this file consists of a username and a key-specific credential / config part separated by colons. Be sure to only use one line per user.
fedora-user:owBYtPIH2yzjlSQaRrVcxB...Pg==,es256,+presence+pin[:another key for this user]
If the key is PIN protected you’ll be asked to enter the PIN for this operation. Use the following for the initial registration of your first key:
pam_u2f also supports the use of a central authentication file. In that case, be sure to use one line per user and to keep all the keys of a given user on the same line. If two lines reference the same username only the last one will be used! Have a look at the pam_u2f man page for all available options.
Configure PAM with authselect
authselect is a tool for controling your system’s PAM configuration. It introduces profiles as an additional layer of abstraction. One authselect profile can change several PAM configuration files. Profiles have parameters that control additional features and behaviors like enabling FIDO U2F security keys. A detailed tour of authselect is planned for a future article.
Display the currently active authselect profile. With the SSSD (System Security Service Daemon) profile selected and U2F support enabled, the output might resemble the following:
[…]$ authselect current
Profile ID: sssd
Enabled features:
- with-pam-u2f
Activate FIDO U2F support in PAM using authselect with the with-pam-u2f flag:
[…]$ sudo authselect select sssd with-pam-u2f
If you also want to use your fingerprint reader you have to enable both features:
This activates the sssd profile with pam_u2f and fingerprint reader support. For example, when using sudo on a terminal with the above authselect profile configuration, you’ll first be asked for a fingerprint and if that fails for the U2F key. GDM, however, will use the U2F key first.
Unlocking the GNOME keyring daemon
When using biometrics, a U2F key, or any other method that does not require a passphrase to sign in to GNOME, the Login keyring cannot be unlocked automatically. This is because, by default, the keyring passphrase is set to the same value as your login passphrase. Normally, PAM passes your login passphrase to the keyring daemon. Since you are not entering a passphrase when authenticating via methods such as biometrics or U2F keys, there is no passphrase for PAM to pass to the keyring daemon. There is no straight forward solution to this problem.
If you use LUKS encryption for your home partition and operate a single-user system, you could remove the passphrase from your keyring. This will leave your gnome keyring unencrypted at the file level. But it will still be encrypted at the block level by LUKS. LUKS encryption is equivalent to the default file-based keyring encryption on a single-user system since the keyring’s encryption is only designed to protect its contents from offline access. The keyring will be decrypted / unlocked after login either way and any runtime application or malware can potentially access the keyring’s contents after it is unlocked. Since LUKS is also an offline protection mechanism, it can be considered an equivalent alternative to the keyring’s normal file-based encryption.
LUKS encryption and the keyring’s normal file-based encryption are not equivalent if your system is used by multiple users. In the case of a multi-user system with the keyrings protected only by LUKS, any user with authorization to decrypt the disk and boot the system will be able to access any other user’s keyring on that same system.
Removing the GNOME Login keyring passphrase is straight forward. Just set a new empty password and the keyring will be unlocked and it will be stored unencrypted at the file level. The graphical utility seahorse (also called Passwords and Keys) can be used to set a blank password on your GNOME Login keyring.
Lookout and other use-cases
Upcoming articles will explore how to use FIDO2/U2F keys for unlocking LUKS-encrypted disks using the U2F Dracut plugin.
OpenSSH 8.2+ supports the use of ed25519-sk security keys. This topic has already been touched upon in the previous article titled “How to use a YubiKey with Fedora Linux“.
Note that FIDO2/U2F is an authentication standard. There are other use-cases for security tokens (primarily established by Yubico) like (T)OTP, PIV (for x509 key management) or OpenPGP which are not covered in general but on a hardware by hardware basis.
This article describes one method of restarting PCI devices. It demonstrates restating a wireless device. But the concept should work on any device whose device driver has adequate hotplug support.[1]
Computers typically consist of several interconnected devices. Some devices can be physically disconnected and reconnected with ease (for example, most USB devices). Others might require a specific interaction with the operating system or specific software. And others will require a full reboot.
Built-in laptop wireless cards are PCI devices that could fail at runtime but might not be easy to physically disconnect and reconnect without a full reboot. In many cases these devices can be restarted through Linux’s sysfs interface without having to do a full reboot of the computer.
This article will specifically demo how to restart an Atheros wireless card which has locked up.
How to restart PCI devices
Depending on your particular desktop environment and hardware, it may be possible to switch the PCI card off and back on using a GUI or hardware switch or button. But if none of those options exist or work, the following CLI method of restarting the PCI card might prove useful.
To restart a wireless card you will need its PCI domain, bus, device and function address. Run the lspci command, as shown below, and search its output to find your wireless card’s PCI address.
In the above example, the PCI address of the Atheros card is 3d:00.0. If the address shown does not include a domain part (that is, the number at the start of the line contains only one colon character), then the computer has only one PCI domain and it is 0000.
The following commands, with the capital letters substituted with the device’s PCI address, can be used to restart a PCI device on a running system.[2]
In the above example, the placeholders DDDD, BB, DD, and F are for the PCI device domain, bus, device, and function respectively.
Substituting the values from the example output of the lspci command shown above gives the command that would need to be run to restart the Atheros wireless card on this example system.
Enable executable permissions with, for example, chmod +x restart-wireless-card.sh and run sudo ./restart-wireless-card.sh whenever you need to restart your PCI device.
Final notes
Not all PCI devices can be restarted using this method. But the real-life example demonstrated above does work to get the WiFi card running again without requiring a full reboot of the PC.
This article explains how to configure Yubico’s YubiKey, a hardware security token, and Fedora Linux Workstation for typical use-cases such as logging into GDM, authentication for the sudo command, OpenSSH authentication and key management, or as a second-factor on the web.
Motivation
In times of sophisticated malware and always-and-everything-on(line), software based storage of credentials becomes at least unsettling. Hardware security tokens are a physical, cryptographically secured storage for secrets. Such a token and its secrets can not be copied by large malware attacks.
Applications and services that have to authenticate your access can use a physical token as a factor of ownership and identification. These tokens require extreme dedication, time and money to forge or maliciously acquire.
Nowadays hardware security tokens are quite versatile and can be used for a variety of interesting things. Use-cases are roughly divided into two categories: convenience and added security. Convenience covers anything from using the hardware token to unlock your LUKS encrypted disk to logging in to your Fedora Workstation with the press of a button. Added security on the other hand covers multi-factor authentication (MFA) scenarios as well as storing private credentials.
Always setup a backup key
As soon as you start working with security tokens you have to account for the potential to lock yourself out of accounts tied to these tokens. As hardware security tokens are unique and designed to be extremely hard to copy you can’t just make a backup of it as with software vaults like Keepass or AndOTP. All registrations you do with a primary key you should do with a second backup key which you store in a secure location like a safe or at least leave at home.
In practice you register both hardware tokens with your linux and web accounts, generate private keys on both keys, and configure their public keys at remote services.
Security considerations
Most features of the key can be used either with button press only or require entering an additional PIN. Keep in mind that without a PIN YubiKey authentication is only a button press away. This means that presence is required but is also enough. For example if configured to work as an alternative login factor it is enough to be in front of the machine with the key slotted to login.
YubiKey models and features
Yubico offers multiple models of the YubiKey with different connectors (USB A/C, NFC) and supported features. Depending on the model, the device can be used for a variety of things.
With OTP (One Time Password) you can:
Log into the system via terminal
Log into GDM
Use sudo
The OATH TOTP (Time-based One-Time Passwords) feature is an alternative to Google Authenticator (or andOTP). OATH (Open Authorization) is an organization that specifies two open authentication standards: TOTP and HOTP (HMAC- or Hash-based Message Authentication Code One-Time Password).
The PIV (Personal Identity Verification) module let’s you:
Store OpenSSL certificates and private keys
Store OpenSSH private keys
With FIDO U2F (Fast IDentity Alliance Universal 2nd Factor) you can use the key as second-factor in web browser authentication flows. The web page, or more specifically the browser, will ask you to insert the key and press the button on login if you configured the key as second-factor. This is an alternative to OTP that does not require you to lookup a 6-digit code in an Authenticator-App.
In the FIDO2 / WebAuthn module you can store ssh public keys or register your smart card as a password-less authentication method at supporting services, as opposed to it being “just” a second factor alongside a password. FIDO2 is a combined standard consisting of WebAuthn and CTAP2 (Client to Authenticator Protocol 2).
In general the YubiKey can act as either an alternative or second factor. The difference is that an alternative factor may make the input of another factor like a passphrase obsolete while a second factor is required in addition to, for example, a passphrase or a fingerprint.
Storage limitations
For some features, private keys and other secrets are stored on the YubiKey. Each feature has its own storage space and hence maximum number of credential slots:
OTP – Unlimited, as only one secret per key is required
FIDO U2F – Unlimited, as only one secret per key is required
FIDO2 – 25 credentials / identities
OATH – 32 credentials
PIV – 24 X.509 certificates and their respective private keys
OpenPGP – 3 keys; one for encryption, signing and authentication each
Prerequisites
First, install the management applications to configure the YubiKey. With these you can disable or reconfigure features, set PINs, PUKs, and other management passphrases.
For System Authentication install the yubico PAM module:
sudo dnf install -y pam_yubico
The OpenSSH agent and client support YubiKey without further changes.
For OATH you need the yubioath-desktop application and/or a mobile client:
sudo dnf install -y yubioath-desktop
Configuration of the YubiKey
A YubiKey comes pre-configured for Yubico OTP and uses public default PINs for all other modules which you are strongly advised to change. Use either the yubikey-manager CLI or yubikey-manager GUI application to configure the YubiKey.
Select the Applications button in the YubiKey Manager and a drop-down will appear to navigate to the single module configuration pages. Via the Interfaces button you open a page full of check-boxes where you can activate/deactivate single features on a per physical connector basis (e.g., USB C or NFC).
YubiKey Manager desktop application from the yubikey-manager-qt package.
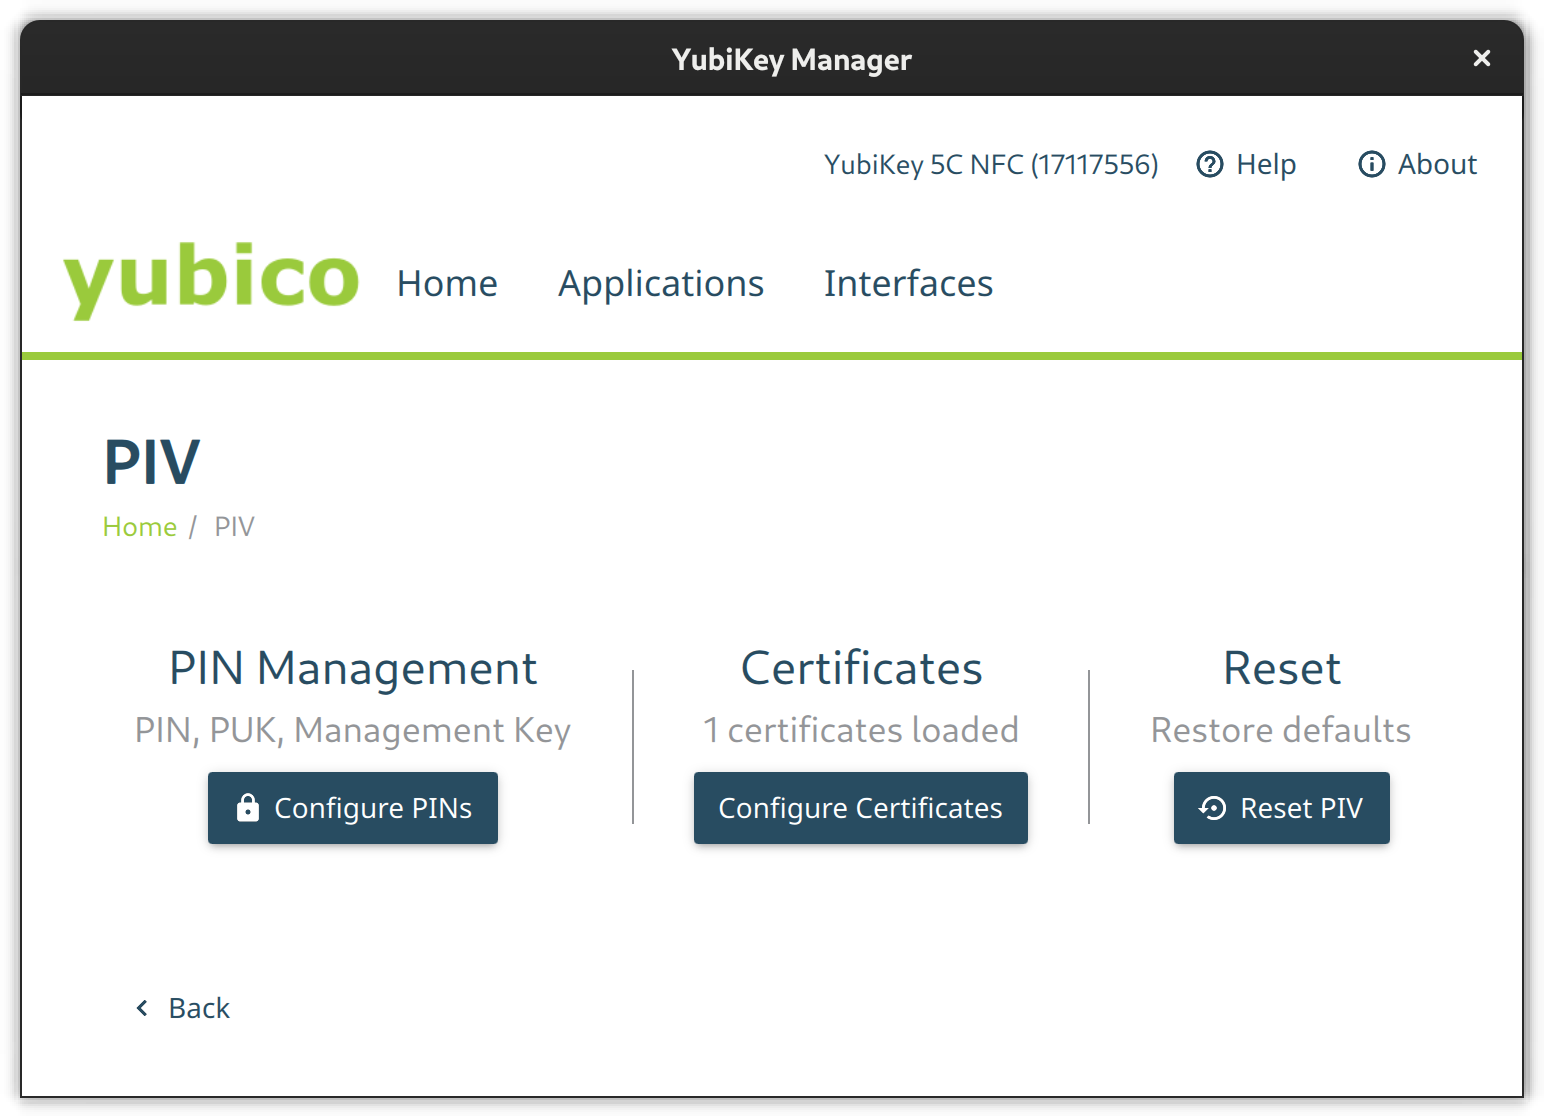
PIV
Go to the PIV configuration page and configure PIN and PUK. Their default values are 123456 and 12345678 respectively. Then set a new management key protected by your previously set pin.
The PIV configuration page from the YubiKey Manager GUI
Using the CLI tool change the default PIN like so:
$ ykman piv access change-pin
Enter the current PIN: 123456
Enter the new PIN: ********
Repeat for confirmation: ********
New PIN set.
Change the default PUK:
$ ykman piv access change-puk
Enter the current PUK: 12345678
Enter the new PUK: ********
Repeat for confirmation: ********
New PUK set.
Generate a new random management key, protect it with our previously set PIN, and replace the default key:
$ ykman piv access change-management-key --generate --protect
Enter the current management key [blank to use default key]:
Enter PIN: ********
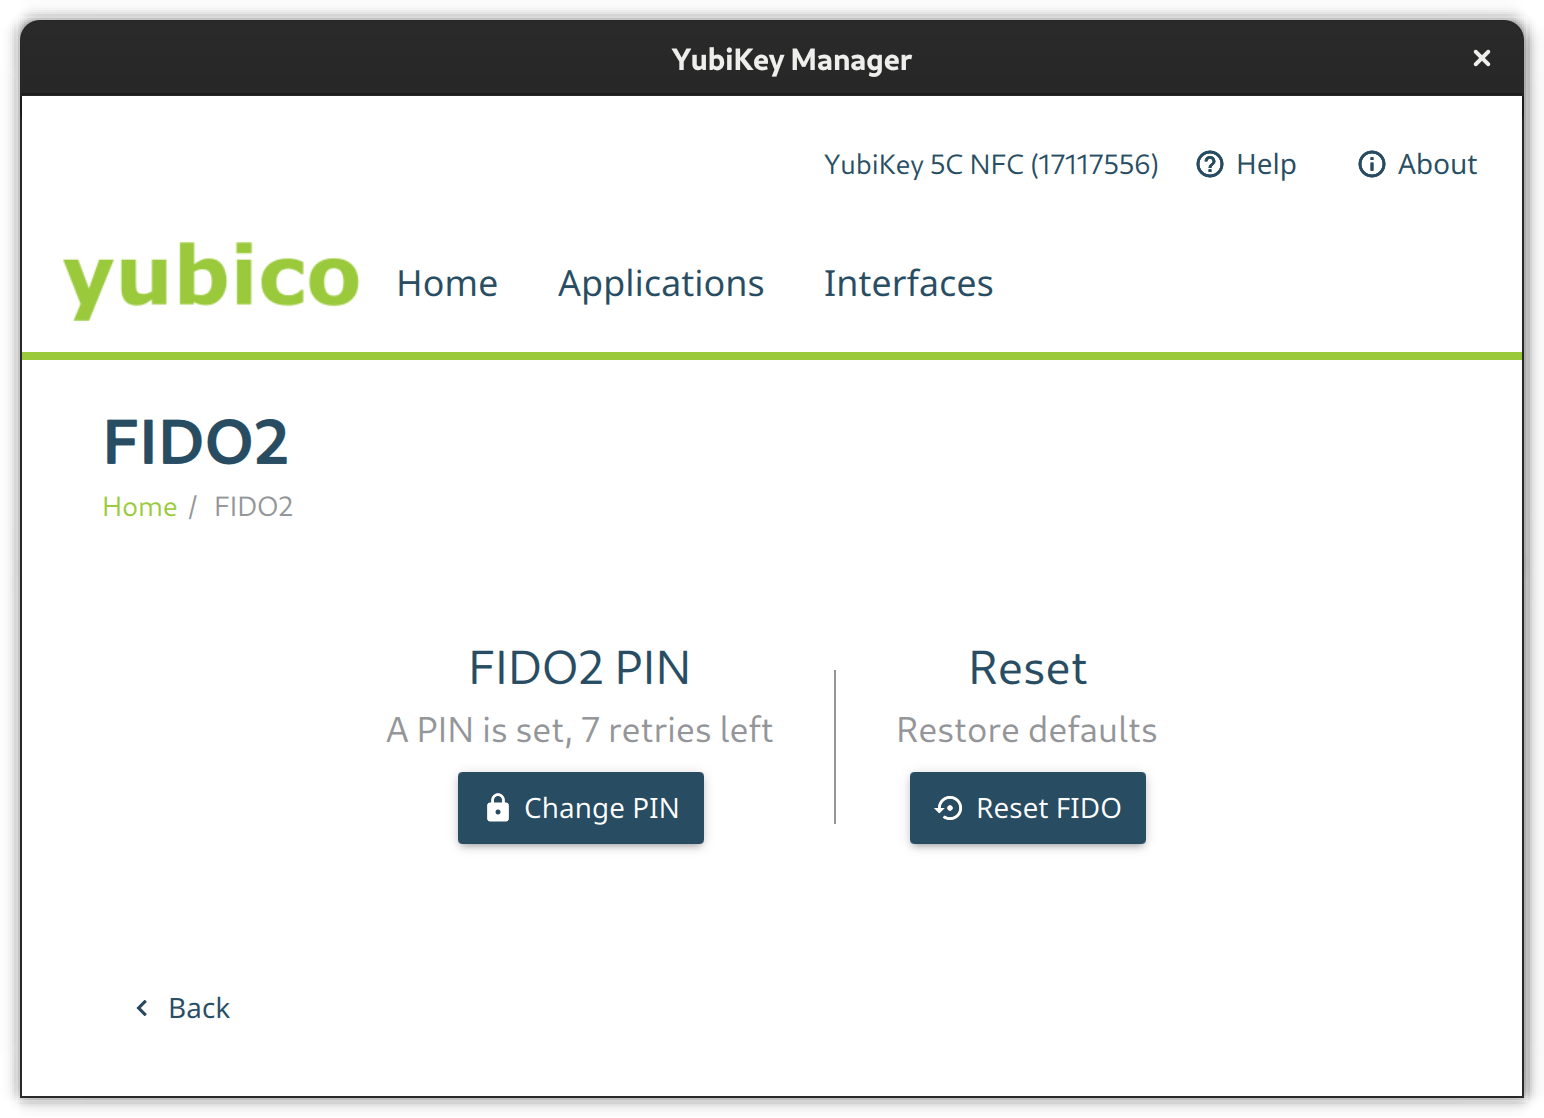
FIDO2
Go to the FIDO2 page and set a pin.
The FIDO2 configuration page from the Yubikey Manager GUI
Set the FIDO2 pin on a terminal like this:
$ ykman fido access change-pin
Enter the current PIN: 123456
Enter the new PIN: ********
Repeat for confirmation: ********
New PIN set.
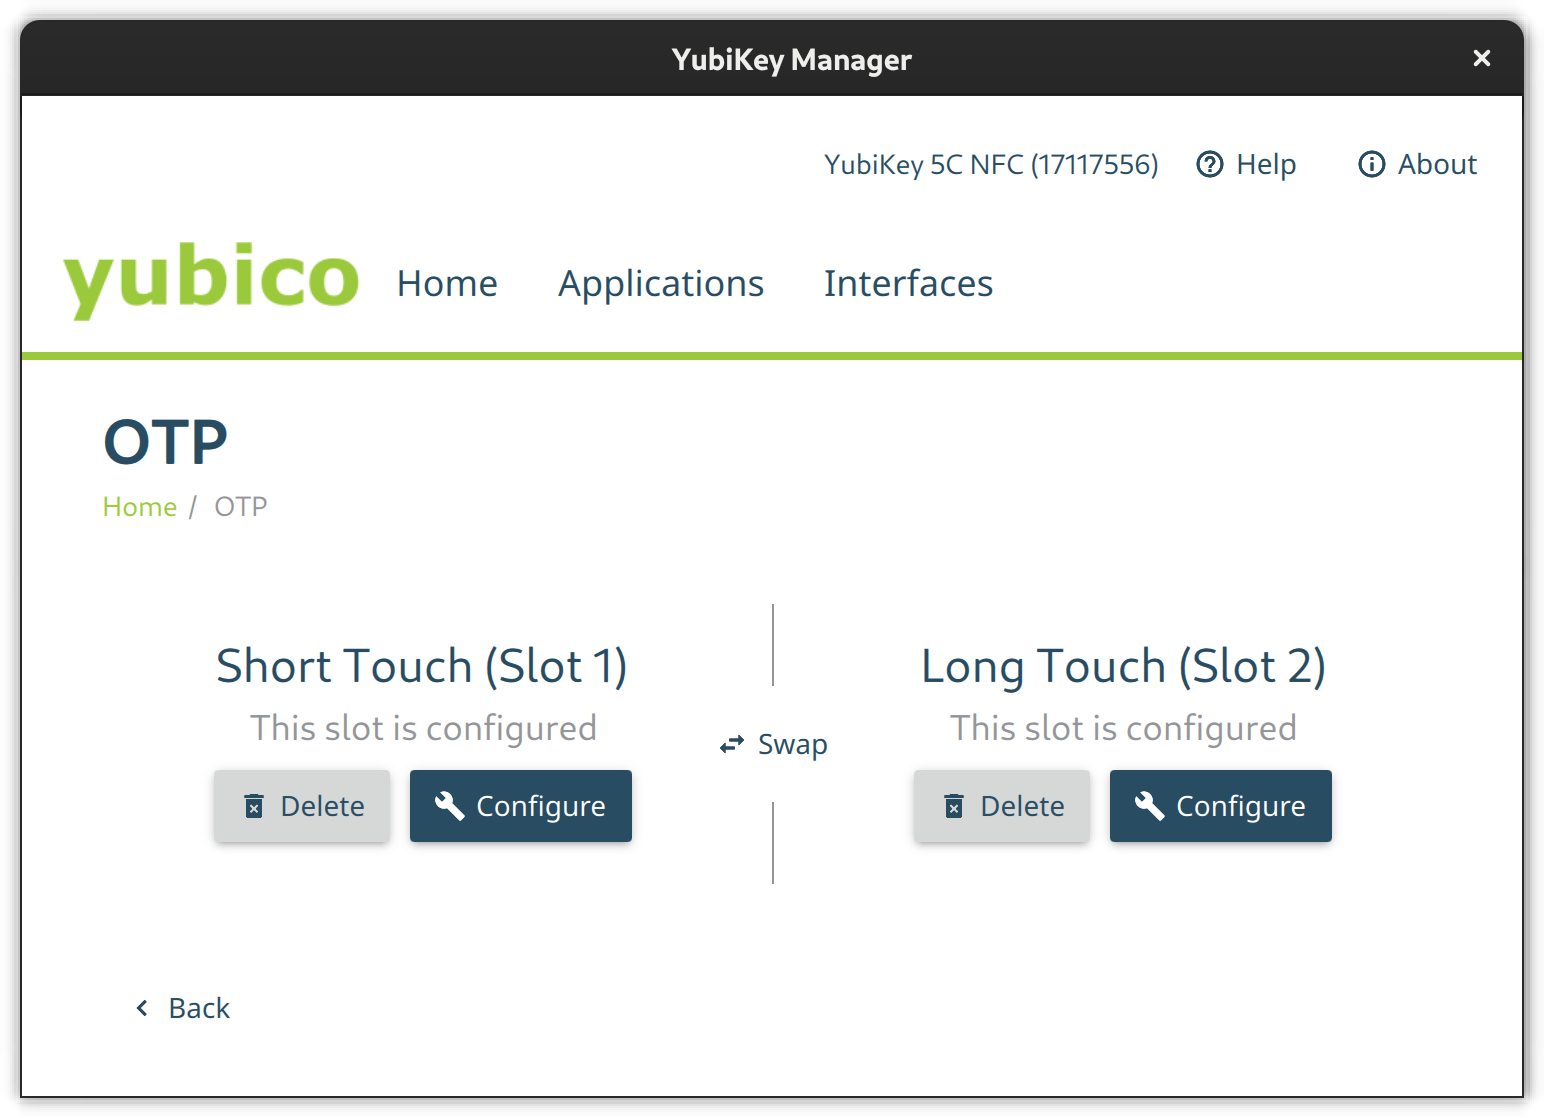
OTP
The OTP feature is configured out-of-the-box. There is nothing to do here except to configure Slot 2 if you like. Slot 1 is used for challenge-response by default. Slot 2, however, is empty at first. You can configure it to output a static key of your liking on a long touch of the YubiKey’s button (approximately 2.5 seconds).
The OTP configuration page from the Yubikey Manager GUI
If you like, set the second slot from a terminal via ykman otp static like this:
ykman otp static --keyboard-layout US 2 u25bohg87bmtj247ts725v5f
OATH
Use the OATH module to store TOTP codes. By default, this module does not have a passphrase. But you can assign one. Without a passphrase you can query all stored credentials and get TOTP codes without additional authentication.
The GUI does not have the means to change the passphrase so the CLI is required.
ykman oath access change
You can configure your device to remember the YubiKey so you only have to enter the passphrase once.
ykman oath access remember
In the same way, let your device forget the YubiKey OATH credential.
ykman oath access forget
Local (PAM) authentication via OTP
Add the YubiKey to local system authentication through PAM (Pluggable Authentication Modules). You can either do this using the default online or an alternative offline method. The online method uses the Yubico servers to validate the OTP tokens and thus requires an online connection while the offline method uses challenge-response.
Create base configuration files
Create two base configuration files using the pam_yubico module. One which instructs PAM to consider the YubiKey an alternative factor and one so PAM requires the key as an additional factor.
For the online YubiCloud method use the appropriate command shown here:
/etc/pam.d/yubikey-required
#%PAM-1.0
auth required pam_yubico.so id=[Your API Client ID] key=[Your API Client Key] /etc/pam.d/yubikey-sufficient
#%PAM-1.0
auth sufficient pam_yubico.so id=[Your API Client ID] key=[Your API Client Key]
You need to register your YubiKey at YubiCloud and obtain an API key. The module will work without an API key but then the client will not verify OpenSSL certificates and be susceptible to MitM (Man in the Middle) Attacks.
Note: This authentication method will not work if your device is offline or it cannot connect to the YubiCloud.
For offline challenge-response use the appropriate command shown here:
After the base configuration files are setup nothing has really changed — yet. It is advised that you now register your YubiKey(s) with the respective user accounts on your machines before changing the active PAM configuration of your systems.
If you use the online YubiCloud method you need the ID of your YubiKey. To find this just enter the key and retrieve an OTP code with a short press on the button and extract the first 12 characters – this is your key ID:
cccccbcgebif | bclbtjihhbfbduejkuhgvhkehnicrfdj
Next create a configuration file in ~/.yubico/authorized_yubikeys and add all authorized key IDs after your username separated by colons:
fedora-user:cccccbcgebif[:<another-key-id>]
If you go for the offline challenge-response method, you need at least one slot configured for challenge-response. Let’s assume Slot 1 is used in its default configuration with YubiCloud OTP for other things. So configure the 2nd slot for challenge-response:
ykman otp chalresp --generate --touch 2
Now register a connected YubiKey with your user account via challenge-response:
ykpamcfg -2
This creates a file in ~/.yubico/challenge-<key-serial> that contains a challenge response configuration for the key.
Choose PAM configuration
Now choose the PAM modules to consider the YubiKey and then include the respective configuration file, either before or after the system-auth import depending on whether sufficient or required is what you want:
/etc/pam.d/login – For console logins
/etc/pam.d/sudo – For sudo authentication
/etc/pam.d/gdm-password – For GNOME authentication
/etc/pam.d/ssh – SSH authentication against a local OpenSSH Server
For YubiKey as additional / required factor:
auth include system-auth
...
auth include yubikey-required
For YubiKey as alternative / sufficient factor:
auth include yubikey-sufficient
...
auth include system-auth
Note: If you add the YubiKey as a factor in sudo authentication, make certain to have a root shell open and test it thoroughly in another shell. Otherwise you could lose the ability to use sudo.
Lock the system on YubiKey removal
Wouldn’t it be cool to lock your Gnome session when removing the YubiKey? If that behavior fits your style just add a script which does just that and let udev trigger it.
Create an udev rule to catch the device detach event with a shell script. The model ID in this example might differ so please check your lsusb output to confirm it. Save the following udev rule into /etc/udev/rules.d/20-yubikey.rules:
Add the following script to the /usr/local/bin/lockscreen.sh file:
#!/bin/sh
#Author: https://gist.github.com/jhass/070207e9d22b314d9992 for bus in /run/user/*/bus; do uid=$(basename $(dirname $bus)) if [ $uid -ge 1000 ]; then user=$(id -un $uid) export DBUS_SESSION_BUS_ADDRESS=unix:path=$bus if su -c 'dbus-send --session --dest=org.freedesktop.DBus --type=method_call --print-reply /org/freedesktop/DBus org.freedesktop.DBus.ListNames' $user | grep org.gnome.ScreenSaver; then su -c 'dbus-send --session --type=method_call --dest=org.gnome.ScreenSaver /org/gnome/ScreenSaver org.gnome.ScreenSaver.Lock' $user fi fi done
Add execution permission to this script and reload udev:
$ sudo chmod +x /usr/local/bin/lockscreen.sh
$ sudo udevadm control -R
OpenSSH with PIV and FIDO2
Your YubiKey can store OpenSSH private keys in the PIV module, generate public keys from them, and require PIN and touch of the YubiKey button upon use.
Generate a private key (e.g. ED25519) with touch and pin requirement in the 9aslot:
$ ykman piv keys generate --algorithm ED25519 --pin-policy ONCE --touch-policy ALWAYS 9a public.pem
Enter PIN: ********
The slot 9A is for “PIV Authentication”.
Create a self-signed certificate for that key. The only use for the X.509 certificate is to satisfy PIV/PKCS #11 lib. It is needed to extract the public key from the smart card.
$ ykman piv certificates generate --subject "CN=OpenSSH" --hash-algorithm SHA384 9a pubkey.pem
Enter PIN: ********
Touch your YubiKey…
Use OpenSSH ssh-keygen to generate a public key you can later use in authorized_keys files on remote systems. The following generates such a key directly on the YubiKey in a FIDO2 slot, making it portable.
The resident option instructs ssh-keygen to store the key handle on the YubiKey, making it easier to use the key across multiple systems as ssh-add can load and use the ssh keys from the YubiKey directly. The application option assigns a designated name for the this specific private-public-key-pair and is useful if working with different ssh identities. The verify-required option is mandatory for resident keys and adds requirement to enter a pin on key usage.
If the key is generated with a touch requirement, only omit the verify-required option. If you don’t want to use FIDO2 slots, omit the resident and application options and make sure to backup generated public keys.
Caching OpenSSH connections
In the OpenSSH default configuration, every time you connect to a machine via ssh you’ll be prompted to touch your key. To let your OpenSSH client cache connections even after you close the session and thus no longer need to touch the key again, add the following option to your ~/.ssh/config:
Host * ControlMaster auto ControlPath ~/.ssh/S.%r@%h:%p ControlPersist 5m
Introspection
Get information on the PIV slot 9a:
$ ykman piv info
PIV version: 5.4.3
PIN tries remaining: 3/3
Management key algorithm: TDES
CHUID:	REDACTED
CCC: No data available.
Slot 9a: Algorithm:	RSA2048 Subject DN:	CN=SSH key Issuer DN:	CN=SSH key Serial: REDACTED Fingerprint: REDACTED Not before:	2022-01-01 20:00:00 Not after:	2023-01-01 20:00:00
List stored FIDO2 public keys with:
$ ykman fido credentials list
ssh:fedora 0000000000000000000000000000000000000000000000000000000000000000 openssh
Authenticating in the web
YubiKey Authenticator is a TOTP application for Desktop and Android and is similar to Google Authenticator and AndOTP. However, it uses the YubiKey as storage device. Either scan a QR code or enter the secret directly, choose a name and that’s it. Just keep in mind that the storage on a YubiKey is limited to 32 TOTP codes.
Since the TOTP codes are stored on the YubiKey they are portable and you may access them e.g. via USB C on desktop or via NFC on the android application.
Use the yubikey-manager to add a TOTP credential:
ykman oath accounts add fedora <TOTP secret>
Then retrieve a TOTP code with:
ykman oath accounts code fedora
WebAuthn and U2F as alternative
WebAuthn and U2F are modern alternatives to TOTP which just requests the presence of your key and a button press through your browser of preference. If previously registered at the web service in question, you can use it as a far more convenient factor than TOTP codes.
This feature is supported at least in Firefox but not in Gnome Web.
The difference between FIDO U2F and FIDO2 WebAuthn is that the latter stores an identity in the keys storage and thus the application or service can extract the user identity and authentication from the key without the need of an identity server.
Other use cases
There are more use cases not covered in this article which might be worth revisiting at some point. These Include but are not limited to:
OpenPGP to encrypt, sign or authenticate
x509 certificate management for Public Key Infrastructure
LUKS disk decryption
What other use-cases do you have in mind? Let us know in the comments.
This article demonstrates how to configure clevis and systemd-cryptenroll using a Trusted Platform Module 2 chip to automatically decrypt your LUKS-encrypted partitions at boot.
If you just want to get automatic decryption going you may skip directly to the Prerequisites section.
Motivation
Disk encryption protects your data (private keys and critical documents) through direct access of your hardware. Think of selling your notebook / smartphone or it being stolen by an opportunistic evil actor. Any data, even if “deleted”, is recoverable and hence may fall into the hands of an unknown third party.
Disk encryption does not protect your data from access on the running system. For example, disk encryption does not protect your data from access by malware running as your user or in kernel space. It’s already decrypted at that point.
Entering the passphrase to decrypt the disk at boot can become quite tedious. On modern systems a secure hardware chip called “TPM” (Trusted Platform Module) can store a secret and automatically decrypt your disk. This is an alternative factor, not a second factor. Keep that in mind. Done right, this is an alternative with a level of security similar to a passphrase.
Background
A TPM2 chip is a little hardware module inside your device which basically provides APIs for either WRITE-only or READ-only information. This way you might write a secret onto it, but you can never read it out later (but the TPM may use it later internally). Or you write info at one point that you only read out later. The TPM2 provides something called PCRs (Platform Configuration Registers). These registers take SHA1 or SHA256 hashes and contain measurements used to assert integrity of, for example, the UEFI configuration.
Enable or disable Secure Boot in the system’s UEFI. Among other things, Secure Boot computes hashes of every component in the boot chain (UEFI and its configuration, bootloader, etc.) and chains them together such that a change in one of those components changes the computed and stored hashes in all following PCRs. This way you can build up trust about the environment you are in. Having a measure of the trustworthiness of your environment is useful, for example, when decrypting your disk. The UEFI Secure Boot specification defines PCRs 0 – 7. Everything beyond that is free for the OS and applications to use.
A summary of what is measured into which PCRs according to the spec
PCR 0: the EFI Firmware info like its version
PCR 1: additional config and info related to the EFI Firmware
PCR 2: EFI drives from hardware components (like RAID controller)
PCR 3: additional config and info to drivers stored in 2
PCR 4: pre-OS diagnostics and the EFI OS Loader
PCR 5: config of the EFI OS Loader and GPT table
PCR 6: is reserved for host platform manufacturer variables and is not used by EFI
PCR 7: stores secure boot policy configuration
Some examples on what is measured into which PCR
Changes to the initramfs measure into PCRs 9 and 10. So if you regenerate the initramfs using dracut -f you have to rebind. This will happen on every update to the kernel.
Changes to the Grub configuration, like adding kernel arguments, kernels, etc. measure into PCRs 8, 9 and 10.
Storage devices measure into PCRs 8 and 10. However, Hubs and YubiKeys do not seem to measure in any PCR.
Additional operating systems measure into PCR 1. This occurs, for example, when attaching a USB stick before boot with a Fedora Linux live image.
Booting into a live image changes PCRs 1, 4, 5, 8, 9 and 10.
A tool called clevis generates a new decryption secret for the LUKS encrypted disk, stores it in the TPM2 chip and configures the TPM2 to only return the secret if the PCR state matches the one at configuration time. Clevis will attempt to retrieve the secret and automatically decrypt the disk at boot time only if the state is as expected.
Security implications
As you establish an alternative unlock method using only the on-board hardware of your platform, you have to trust your platform manufacturer to do their job right. This is a delicate topic. There is trust in a secure hardware and firmware design. Then there is trust that the UEFI, bootloader, kernel, initramfs, etc. are all unmodified. Combined you expect a trustworthy environment where it is OK to automatically decrypt the disk.
That being said you have to trust (or better, verify) that the manufacturer did not mess anything up in the overall platform design for this to be considered a fairly safe decryption alternative. There are a range of cases where things did not work out as planned. For example, when security researches showed that BitLocker on a Lenovo notebook would use unencrypted SPI communication with the TPM2 leaking the LUKS passphrase in plain text without even altering the system, or that BitLocker used the native encryption features of SSD drives that you can by-pass through factory reset.
These examples are all about BitLocker but it should make it clear that if the overall design is broken, then the secret is accessible and this alternative method less secure than a passphrase only present in your head (and somewhere safe like a password manager). On the other hand, keep in mind that in most cases elaborate research and attacks to access a drive’s data are not worth the effort for an opportunistic bad actor. Additionally, not having to enter a passphrase on every boot should help adoption of this technology as it is transparent but adds additional hurdles to unwanted access.
Prerequisites
First check that:
Secure Boot is enabled and working
A TPM2 chip is available
The clevis package is installed
Clevis is where the magic happens. It’s a tool you use in the running OS to bind the TPM2 as an alternative decryption method and use it inside the initramfs to read the decryption secret from the TPM2.
Check that secure boot is enabled. The output of dmesg should look like this:
$ dmesg | grep Secure
[ 0.000000] secureboot: Secure boot enabled
[ 0.000000] Kernel is locked down from EFI Secure Boot mode; see man kernel_lockdown.7
[ 0.005537] secureboot: Secure boot enabled
[ 1.582598] integrity: Loaded X.509 cert 'Fedora Secure Boot CA: fde32599c2d61db1bf5807335d7b20e4cd963b42'
[ 35.382910] Bluetooth: hci0: Secure boot is enabled
The reboot is important to get the correct PCRmeasurements based on the new initramfs image used for the next step.
Configure clevis
To bind the LUKS-encrypted partition with the TPM2 chip. Point clevis to your (root) LUKS partition and specify the PCRs it should use.
Enter your current LUKS passphrase when asked. The process uses this to generate a new independent secret that will tie your LUKS partition to the TPM2 for use as an alternative decryption method. So if it does not work you will still have the option to enter your decryption passphrase directly.
As mentioned previously, PCRs 1, 4 and 5 change when booting into another system such as a live disk. PCR 7 tracks the current UEFI Secure Boot policy and PCR 9 changes if the initramfs loaded via EFI changes.
Note: If you just want to protect the LUKS passphrase from live images but don’t care about more “elaborate” attacks such as altering the unsigned initramfs on the unencrypted boot partition, then you might omit PCR 9 and save yourself the trouble of rebinding on updates.
Automatically decrypt additional partitions
In case of secondary encrypted partitions use /etc/crypttab.
Use systemd-cryptenroll to register the disk for systemd to unlock:
The -s parameter specifies the slot of the alternative secret for this disk stored in the TPM. It should be 1 if you always unbind before binding again.
Regenerate binding, in case the PCRs have changed:
Disk decryption passphrase prompt shows at boot, but goes away after a while:
Add a sleep command to the systemd-ask-password-playmouth.service file using systemctl edit to avoid requests to the TPM before its kernel module is loaded:
[Service]
ExecStartPre=/bin/sleep 10
Add the following to the config file /etc/dracut.conf.d/systemd-ask-password-plymouth.conf:
This article will describe the process of creating a kiosk or information “station” using Fedora Silverblue.
What is a kiosk
If you’ve had the occasion to visit a museum, you might have used a touchscreen monitor with useful information and insights of the items on display. Or if you’ve attended a public library, you might have used a workstation with a browser or a software aimed to the consultation of the book’s catalog. Or even in public places like train stations or public squares, you might have spotted big screens or televisions where you can see advertisement videos, or interacted with them in order to obtain information and services. These devices are kiosks. They are locked down environments, generally running a full screen application.
Under the hood there is usually a small PC (maybe a fan-less device or a so called industrial PC, capable of staying powered on without issues for long periods of time) or perhaps a Raspberry Pi. Many times they are powered by Linux!
A 10″ Capacitive Touch Display showing the Fedora logo
Why Fedora Silverblue
Fedora Silverblue is a new generation of the desktop operating system. The main benefits of the system are atomic updates and immutability.
Atomic updates means that the update process will complete successfully and if not the operation will be abandoned and the system reverted to the previous state. This prevents situations where some packages are upgraded while others are not. This might occur, for example, due to a power loss in the middle of the update process, leading to an unstable or unbootable system.
In this context, immutability means part of the filesystem is read-only and the system files cannot be modified (at least not in the usual ways, read below). The term has been criticized by several parties: in fact, if you can update the system and install things, the system is actually mutable, so another term should be coined for these kinds of operating systems where there is a clearly defined distinction between the system, the applications and the changes made by the user. However this is not the topic of this article.
You can find more information about Fedora Silverblue in this article: What is Silverblue?
These features make the system more robust and secure. This is an important consideration since a kiosk is usually located in a remote place, accessible to the public (even if hidden inside some box or behind a TV), and difficult to reach in case of malfunctions.
If you have heard about Fedora IoT, you might think that it would be the perfect solution for this kind of operations. However, Fedora IoT, although sharing the same technologies as Fedora Silverblue (immutability, rpm-ostree, etc.), is not designed for and it doesn’t provide a graphical environment. Running headless is the expected use case for Fedora IoT.
GNOME Kiosk
GNOME Kiosk is a special GNOME session that “provides a desktop environment suitable for a fixed purpose, or single application deployments like wall displays and point-of-sale systems”. It provides a locked down GNOME session, without activities, dock, top bar, etc.
The required bits are available in the Fedora repository.
How to proceed
As a basic example, we will create a simple slideshow.
First of all let’s install Fedora Silverblue.
The first user created during initial setup becomes the administrator.
Go to Settings. Enable Sharing and enable Remote Login (that is SSH) in order to access the kiosk for remote management.
In Settings, go to Users and add a new user. Let’s call it “kiosk” and assign it a password.
Install GNOME Kiosk
Even though Fedora Silverblue is an immutable system, rpm-ostree still allows you to install packages from the DNF repositories. This is called layering. Read more on How I Customize Fedora Silverblue and Fedora Kinoite.
Open the terminal and issue the following command.
To activate the layered packages, you will have to reboot the system.
Automatic login
We have to set the system to automatically log in as the “kiosk” user.
After the reboot, log in as the administrator user. Then go to Settings, Users, select the “kiosk” user, and enable Automatic Login.
Then log out (don’t reboot yet).
For reference you can enable automatic login from the command line. To do so, edit the file /etc/gdm/custom.conf, and add the following two lines to the [daemon] section.
As a basic example, let’s create a slideshow of images. To do that we will use the GNOME image viewer (Eye of GNOME or eog). This is already installed on Fedora Silverblue as a Flatpak package. (Yes, you can run Flatpak applications from the command line.)
Put some images in the Pictures folder.
In the activities overview, you can find an application called Kiosk Script. Actually Gedit will open it and let you edit the script that will start when you select the Kiosk session at login. For reference, this script is named gnome-kiosk-script and it is located in the home directory under .local/bin.
Read the comments. Pay attention to the last line. If the program that you want to use in the kiosk session exits as soon as it is launched (or it runs in the background), you risk creating an infinite loop that will start a new window each second!
The slideshow script will look like this:
#!/bin/sh if [ ! "$(pidof eog)" ]
then flatpak run org.gnome.eog -s /home/kiosk/Pictures
fi sleep 1.0
exec "$0" "$@"
The above example script, will run eog in slideshow mode (indicated by the “-s” option) only if a process called eog isn’t already running. Make certain to take into account that the script can invoke itself in an infinite loop (it is instructed to do so by the last line). Note that if for some reason Eye of GNOME crashes, it will be launched again because of the “if” statement.
Save the script. And the full screen slideshow will start immediately! Don’t worry, you are not yet in the kiosk session. Press the super key and you can still use the dash and the applications overview.
Logout.
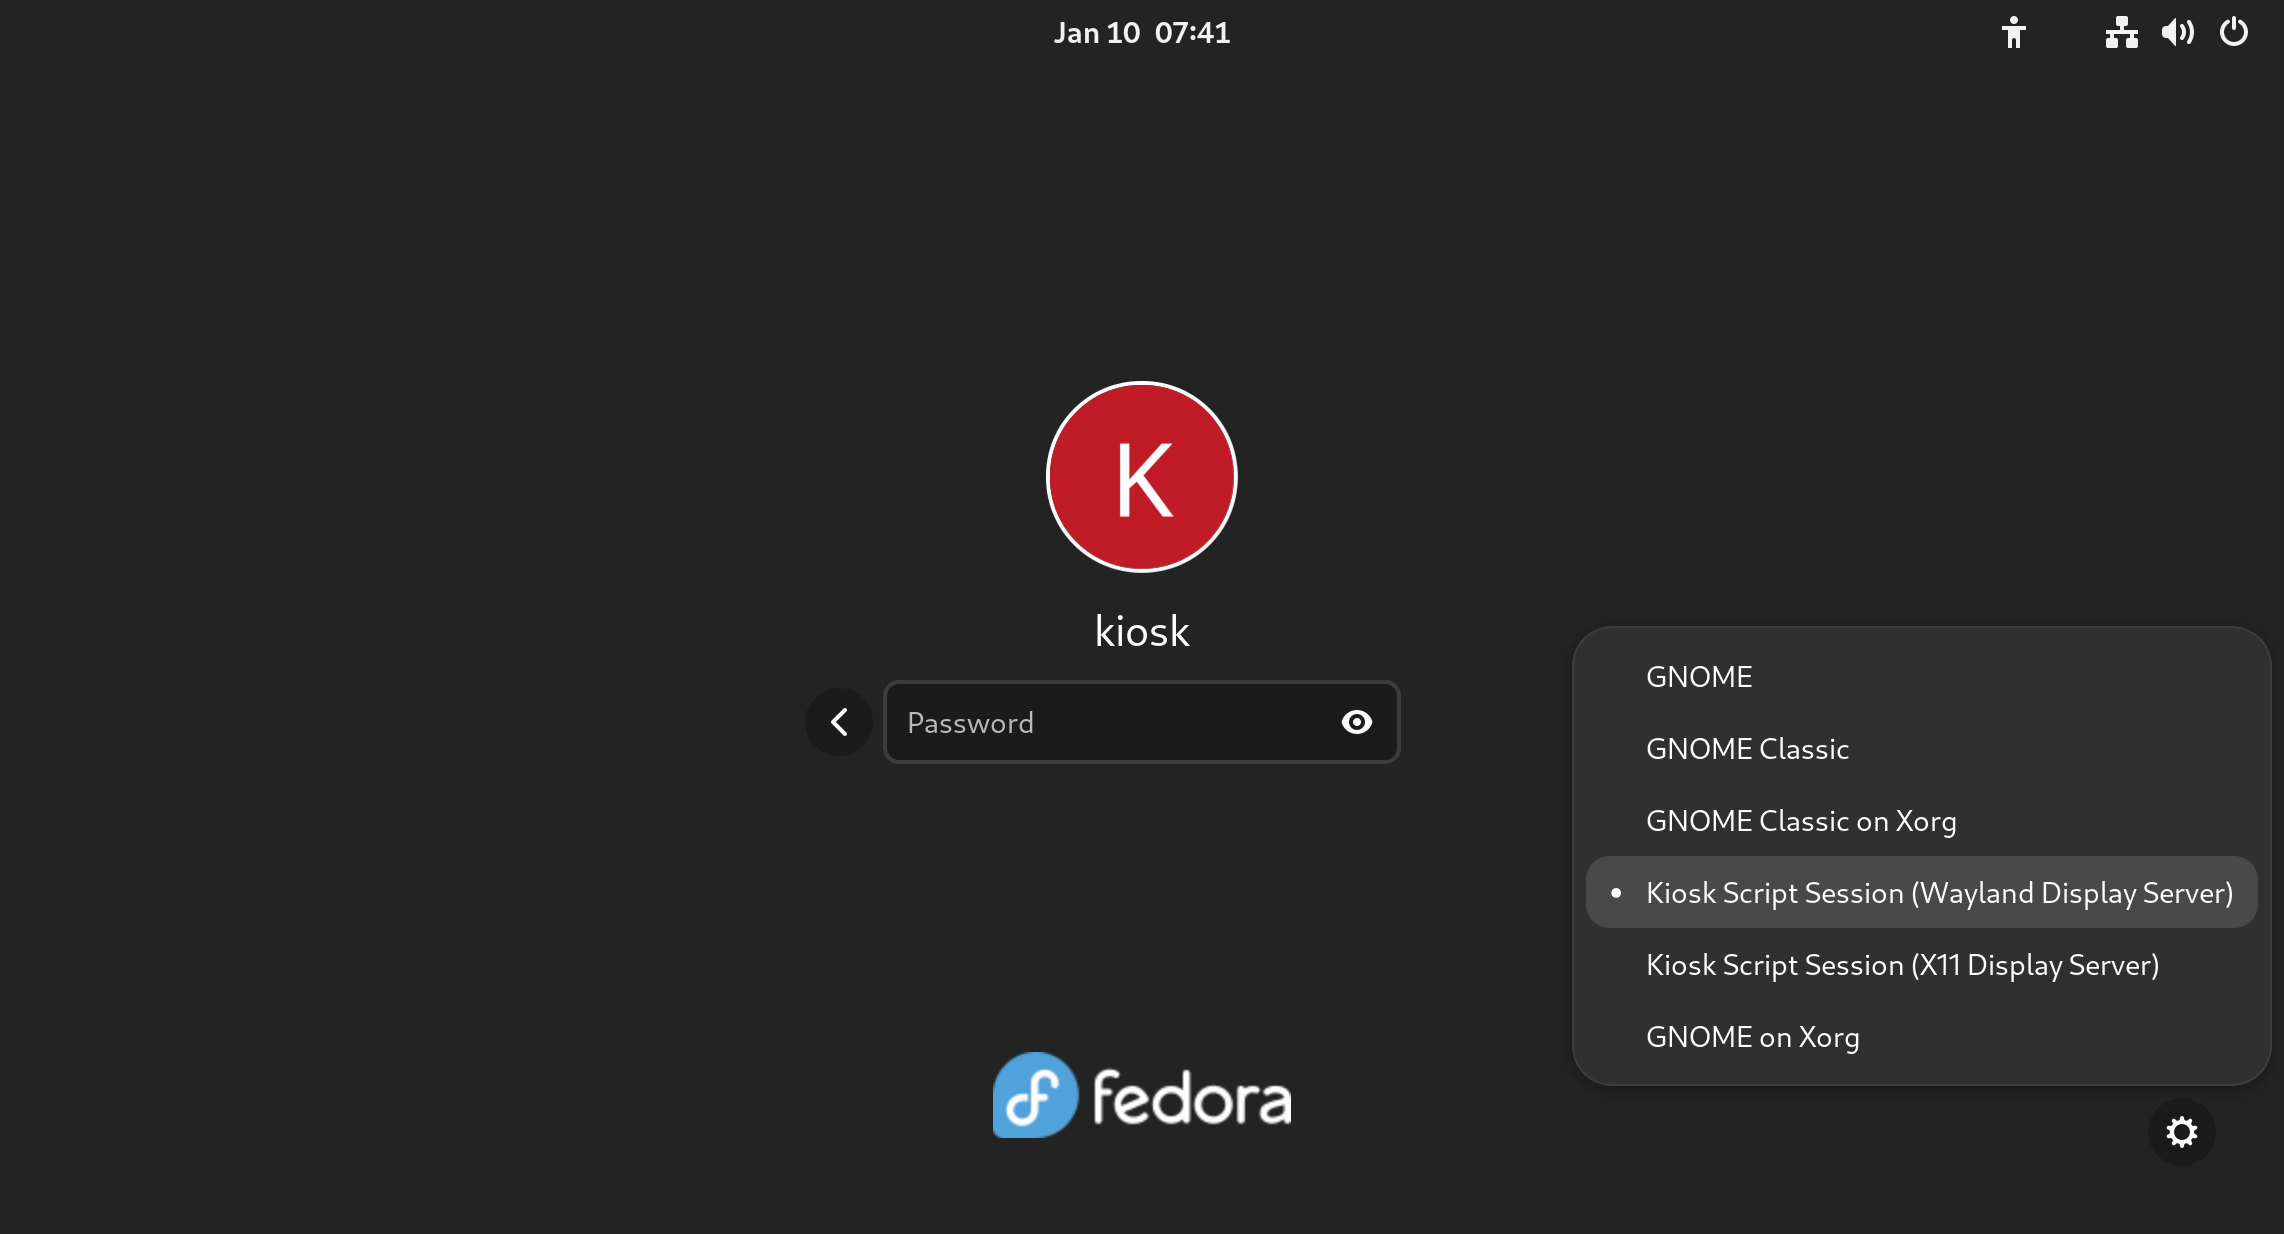
At the login screen click on the gear icon at the bottom right of the login page. Select “Kiosk Script Session (Wayland Display Server)”.
Insert the password and the full screen slideshow will start. You will be in the locked down GNOME session, so you can’t use any application or desktop functions. If needed, you can still switch to a TTY to gain the command line using a combination like CTRL+ALT+F3
For reference, the file containing the user’s default session is /var/lib/AccountsService/users/kiosk
Session=gnome-kiosk-script-wayland
The last step is to reboot the machine.
Other types of kiosk
Other ideas could be:
a full screen Firefox session (take a look at the gnome-kiosk-search-appliance RPM package)
a video loop
your own software specifically crafted for this purpose
any application
Further improvements
You might modify the script to show the slideshow only at certain times of the day.
To make the system more robust and secure, you might add a password to GRUB and to the BIOS. You might also disable the TTYs.
Other useful ideas might be to enable automatic updates, and especially to implement greenboot, a health check framework developed for Fedora IoT.
One of the nice things about using Linux is the wide choice of desktop environments. Fedora Linux official Worksation edition comes with GNOME as default desktop environment, but you can choose another desktop environment as default via Fedora Spins. This article will go into a little more detail about the Fedora Linux Spins. You can find an overview of all the Fedora Linux variants in my previous article Introduce the different Fedora Linux editions.
KDE Plasma Desktop
This Fedora Linux comes with KDE Plasma as the default desktop environment. KDE Plasma is an elegant desktop environment that is very easy to customize. Therefore, you can freely and easily change the appearance of your desktop as you wish. You can customize your favorite themes, install the widgets you want, change icons, change fonts, customize panels according to your preferences, and install various extensions from the community.
Fedora Linux KDE Plasma Desktop is installed with a variety of ready-to-use applications. You’re ready to go online with Firefox, Kontact, Telepathy, KTorrent, and KGet. LibreOffice, Okular, Dolphic, and Ark are ready to use for your office needs. Your multimedia needs will be met with several applications such as Elisa, Dragon Player, K3B, and GwenView.
This version is perfect for those who want a balance between ease of customizing appearance and performance. XFCE itself is made to be fast and light, but still has an attractive appearance. This desktop environment is becoming popular for those with older devices.
Fedora Linux XFCE is installed with various applications that suit your daily needs. These applications are Firefox, Pidgin, Gnumeric, AbiWord, Ristretto, Parole, etc. Fedora Linux XFCE also already has a System Settings menu to make it easier for you to configure your Fedora Linux.
This spin comes with a lightweight Qt desktop environment, and focuses on modern classic desktops without slowing down the system. This version of Fedora Linux includes applications based on the Qt5 toolkit and is Breeze themed. You will be ready to carry out various daily activities with built-in applications, such as QupZilla, QTerminal, FeatherPad, qpdfview, Dragon Player, etc.
Fedora Linux MATE Compiz Desktop is a combination of MATE and Compiz Fusion. MATE desktop allows this version of Fedora Linux to work optimally by prioritizing productivity and performance. At the same time Compiz Fusion provides a beautiful 3D look with Emerald and GTK + themes. This Fedora Linux is also equipped with various popular applications, such as Firefox, LibreOffice, Parole, FileZilla, etc.
Because of its user-friendly interface, Fedora Linux Cinnamon Desktop is perfect for those who may be new to the Linux operating system. You can easily understand how to use this version of Fedora Linux. This spin has built-in applications that are ready to use for your daily needs, such as Firefox, Pidgin, GNOME Terminal, LibreOffice, Thunderbird, Shotwell, etc. You can use Cinnamon Settings to configure your operating system.
Fedora Linux LXDE Desktop has a desktop environment that performs fast but is designed to keep resource usage low. This spin is designed for low-spec hardware, such as netbooks, mobile devices, and older computers. Fedora Linux LXDE has lightweight and popular applications, such as Midori, AbiWord, Osmo, Sylpheed, etc.
SoaS stands for Sugar on a Stick. Fedora Linux Sugar Desktop is a learning platform for children, so it has a very simple interface that is easy for children to understand. The word “stick” in this context refers to a thumb drive or memory “stick”. This means this OS has a compact size and can be completely installed on a thumb drive. Schoolchildren can carry their OS on a thumb drive, so they can use it easily at home, school, library, and elsewhere. Fedora Linux SoaS has a variety of interesting learning applications for children, such as Browse, Get Books, Read, Turtle Blocks, Pippy, Paint, Write, Labyrinth, Physic, and FotoToon.
The i3 Tiling WM spin of Fedora Linux is a bit different from the others. This Fedora Linux spin does not use a desktop environment, but only uses a window manager. The window manager used is i3, which is a very popular tiling window manager among Linux users. Fedora i3 Spin is intended for those who focus on interacting using a keyboard rather than pointing devices, such as a mouse or touchpad. This spin of Fedora Linux is equipped with various applications, such as Firefox, NM Applet, brightlight, azote, htop, mousepad, and Thunar.
Fedora Linux provides a large selection of desktop environments through Fedora Linux Spins. You can simply choose one of the Fedora Spins, and immediately enjoy Fedora Linux with the desktop environment of your choice along with its ready-to-use built-in applications. You can find complete information about Fedora Spins at https://spins.fedoraproject.org/.
We all have people around us, whom we hold dear. Some of them might even rely on you to keep them save. And since the world is constantly changing, that can be a challenge. No more is this apparent than with children, and Linux has long been lacking simple tools to help parents. But that is changing, and here we’ll talk about the new parental controls that Fedora Linux provides.
Users and permissions
First, it’s important to know that any Linux system has a lot of options for user, group, and permission management. Many of these advanced tools are aimed at professional users, though, and we won’t be talking about those here. In this article we’ll focus on home users.
Additionally, parental controls are not just useful for parents. You can use them when helping family members who are technically illiterate. Or perhaps you want to configure a basic workstation for simple administrative tasks. Either way, parental control can offer many security and reliability benefits.
Creating users
From the Settings panel, you can navigate to Users and from there you can select Add User… (after unlocking) to add a new user. You can give them a personal name, a username and their own icon. You can even decide if somebody else should also be an administrator.
Adding a user to your machine is as simple as going to settings, users, and clicking Add User…
You can also set a default password, or even allow a computer to automatically log in. You should help others understand digital security and the value of passwords, but for some people it might be better to just auto-login.
Admin rights
When you give somebody administrator rights, that user will have the same powers as you have on the system. They will be able to make any system change they prefer, and they can also add and remove users themselves.
Users who do not have admin rights, will not be able to make fundamental changes to the computer. They can still use all applications that are already on the system, and they can even download applications from the internet to their home folder. Still, they are ultimately blocked from doing anything that could damage the system.
Accessing the user-directories of others. Only administrator users will be able to do this.
Don’t forget that as an administrator, you can always reset a password. You can also enter another user’s home directory in case you have to. As with all ‘sudo’ rights, you should be careful and you should be considerate of other’s privacy.
Application control
Once one or multiple users are created, you can choose to tweak and control what applications somebody can use. This is done from within Settings > Users by selecting the new user then selecting Parental Controls and then Restrict Applications. Other options are available there, as well.
changing Parental Controls for a single user.
However, there is a big caveat
Parental controls come with a big caveat: If you want a simple home-user solution, you MUST use Flatpaks.
The problem is as follows. The existing Linux application landscape is quite complex, and it would be almost impossible to introduce a new user-friendly application-control system this late into its life cycle. Thus, the second best solution is to ensure that the next generation of packaging has such functionality from the start.
To use Flatpaks, you can use the Fedora’s repository, or the Flathub repository. If you want to know all the fine details about those projects, then don’t forget to read this recent comparison.
Compromise and limitations
No article would be complete without mentioning the inherit limitations of the parental controls. Besides all the obvious limits of computers not knowing right from wrong, there are also some technical limits to parental controls.
Parental Control’s limits
The security that Parental Controls provides will only work as long as Fedora Linux is running in working order. One could easily bypass all controls by flashing Fedora on a USB stick and starting from a clean, root-powered, installation image. At this point, human supervision is still superior to the machine’s rules.
Adding to that, there are the obvious issues of browsers, store fronts like Steam, and other on-line applications. You can’t block just parts of these applications. Minecraft is a great game for children, but it also allows direct communication with other people. Thus, you’ll have to constantly juggle permissions. Here too, it is better to focus on the human element instead of relying to much on the tools.
Finally, don’t forget about protecting the privacy and well-being of others online. Blocking bad actors with Ublock Origin and/or a DNS based blocker will also help a lot.
Legacy applications
As mentioned before, Fedora and Parental Controls only work with Flatpaks. Every application that is already on the system can be started by users who otherwise don’t have the permissions.
As a rule of thumb; If you want to share a computer with vulnerable family members, don’t install any software that’s inappropriate using the RPM Repositories. Instead, consider using a Flatpak.
Starting the system-wide installation of Firefox from the Terminal. The Flatpak version of Firefox though, will not start.
Summary
There is much that you can do to help those who are less experienced with computers. By simply giving these users their own account and using Flatpaks, you can make their lives a lot easier. Age restrictions can even offer additional benefits. But it’s not all perfect, and good communication and supervision will still be important.
The Parental Controls will improve over time. They have been given more priority in the past few years and there are additional plans. Time-tracking is, for example planned. As the migration to Flatpaks continues, you can expect that more software will respect age-restrictions in the future.
So, let’s start a small collaboration here. We’ve all been younger, so how did you escape your parents’ scrutiny? And for those who are taking care of others… how are you helping others? Let’s see what we can learn from each other.