Posted on Leave a comment

How to Convert Avro to CSV in Python?

4/5 – (1 vote)

💬 Question: How to convert an .avro file to a .csv file in Python?

Solution:

To convert an Avro file my_file.avro to a CSV file my_file.csv, create a CSV writer using the csv module and iterate over all rows using the iterator returned by fastavro.reader(). Then write each row to a file using the writerow() function.

Here’s an example:

from fastavro import reader
import csv with open('my_file.avro', 'rb') as file_object: csv_file = csv.writer(open("my_file.csv", "w+")) head = True for x in reader(file_object): if head: # write header header = emp.keys() csv_file.writerow(header) head = False # write normal row csv_file.writerow(emp.values())

Related: This code is a modified and improved version of this source.

💡 Avro is a data serialization framework for RPCs (remote procedure calls) that uses JSON and binary format to serialize data.

💡 CSV stands for comma-separated values, so you have a row-based file format where values are separated by commas, and the file is named using the suffix .csv.

Posted on Leave a comment

For Loop with Two Variables (for i j in python)

5/5 – (1 vote)

for i j in python

The Python expression for i, j in XXX allows you to iterate over an iterable XXX of pairs of values. For example, to iterate over a list of tuples, this expression captures both tuple values in the loop variables i and j at once in each iteration.

Here’s an example:

for i, j in [('Alice', 18), ('Bob', 22)]: print(i, 'is', j, 'years old')

Output:

Alice is 18 years old
Bob is 22 years old

Notice how the first loop iteration captures i='Alice' and j=18, whereas the second loop iteration captures i='Bob' and j=22.

for i j in enumerate python

The Python expression for i, j in enumerate(iterable) allows you to loop over an iterable using variable i as a counter (0, 1, 2, …) and variable j to capture the iterable elements.

Here’s an example where we assign the counter values i=0,1,2 to the three elements in lst:

lst = ['Alice', 'Bob', 'Carl']
for i, j in enumerate(lst): print(i, j)

Output:

0 Alice
1 Bob
2 Carl

Notice how the loop iteration capture:

  • i=0 and j='Alice',
  • i=1 and j='Bob', and
  • i=2 and j='Carl'.

🌍 Learn More: The enumerate() function in Python.

Python enumerate()

for i j in zip python

The Python expression for i, j in zip(iter_1, iter_2) allows you to align the values of two iterables iter_1 and iter_2 in an ordered manner and iterate over the pairs of elements. We capture the two elements at the same positions in variables i and j.

Here’s an example that zips together the two lists [1,2,3] and [9,8,7,6,5].

for i, j in zip([1,2,3], [9,8,7,6,5]): print(i, j)

Output:

1 9
2 8
3 7

🌍 Learn More: The zip() function in Python.

for i j in list python

The Python expression for i, j in list allows you to iterate over a given list of pairs of elements (list of tuples or list of lists). In each iteration, this expression captures both pairs of elements at once in the loop variables i and j.

Here’s an example:

for i, j in [(1,9), (2,8), (3,7)]: print(i, j)

Output:

1 9
2 8
3 7

for i j k python

The Python expression for i, j, k in iterable allows you to iterate over a given list of triplets of elements (list of tuples or list of lists). In each iteration, this expression captures all three elements at once in the loop variables i and j.

Here’s an example:

for i, j, k in [(1,2,3), (4,5,6), (7,8,9)]: print(i, j, k)

Output:

1 2 3
4 5 6
7 8 9

for i j in a b python

Given two lists a and b, you can iterate over both lists at once by using the expression for i,j in zip(a,b).

Given one list ['a', 'b'], you can use the expression for i,j in enumerate(['a', 'b']) to iterate over the pairs of (identifier, list element) tuples.

Summary

The Python for loop is a powerful method to iterate over multiple iterables at once, usually with the help of the zip() or enumerate() functions.

for i, j in zip(range(10), range(10)): # (0,0), (1,1), ..., (9,9)

If a list element is an iterable by itself, you can capture all iterable elements using a comma-separated list when defining the loop variables.

for i,j,k in [(1,2,3), (4,5,6)]: # Do Something
Posted on Leave a comment

Python RegEx – Match Whitespace But Not Newline

5/5 – (1 vote)

Problem Formulation

💬 Challenge: How to design a regular expression pattern that matches whitespace characters such as the empty space ' ' and the tabular character '\t', but not the newline character '\n'?

An example of this would be to replace all whitespaces (except newlines) between a space-delimited file with commas to obtain a CSV.

Method 1: Use Character Class

The character class pattern [ \t] matches one empty space ' ' or a tabular character '\t', but not a newline character. If you want to match an arbitrary number of empty spaces except for newlines, append the plus quantifier to the pattern like so: [ \t]+.

Here’s an example where you replace all separating whitespace (except newline) with a comma to receive a CSV formatted output:

import re txt = 'a \t b c\nd e f'
csv_txt = re.sub('[ \t]+', ',', txt)
print(csv_txt)

Output:

a,b,c
d,e,f

Why the space in the pattern [ \t]?

The reason there’s a space in the pattern is to match the empty space. The character class essentially is an OR relationship, i.e., one item within the character class is matched. For the given pattern, it matches either the empty space ' ' or the tabular character '\t'.

🌍 Learn More: Character Class (Character Set) — The Ultimate Guide for Python

Method 2: Match Individual Different Whitespace Characters

The previous method only matches the horizontal tab (U+0009) and breaking space (U+0020) characters. If you want more fine-grained control about which whitespace characters to match and which not, you can use the following baseline approach.

The following list of Unicode whitespace characters UNICODE_WHITESPACES contains all major whitespace variants you may want to check your string for. You can generate a character class using the string expression '[' + ''.join(UNICODE_WHITESPACES) + ']'.

Here’s a variant that finds all matches of whitespace characters in a given text:

import re UNICODE_WHITESPACES = [ "\u0009", # character tabulation "\u000a", # line feed "\u000b", # line tabulation "\u000c", # form feed "\u000d", # carriage return "\u0020", # space "\u0085", # next line "\u00a0", # no-break space "\u1680", # ogham space mark "\u2000", # en quad "\u2001", # em quad "\u2002", # en space "\u2003", # em space "\u2004", # three-per-em space "\u2005", # four-per-em space "\u2006", # six-per-em space "\u2007", # figure space "\u2008", # punctuation space "\u2009", # thin space "\u200A", # hair space "\u2028", # line separator "\u2029", # paragraph separator "\u202f", # narrow no-break space "\u205f", # medium mathematical space "\u3000", # ideographic space
] txt = ' \t\n\r'
pattern = '[' + ''.join(UNICODE_WHITESPACES) + ']'
matches = re.findall(pattern, txt)
print(matches)
# [' ', '\t', '\n', '\r']

Of course, you can restrict this to only contain whitespaces that are not newline-related.

Method 3: Match Individual Different Whitespaces Except Newlines

The following code snippet uses the UNICODE_WHITESPACES constant but comments out the newline whitespaces so that newline-related characters such as '\n' and '\r' are not matched anymore!

import re UNICODE_WHITESPACES = [ "\u0009", # character tabulation # "\u000a", # line feed "\u000b", # line tabulation "\u000c", # form feed # "\u000d", # carriage return "\u0020", # space # "\u0085", # next line "\u00a0", # no-break space "\u1680", # ogham space mark "\u2000", # en quad "\u2001", # em quad "\u2002", # en space "\u2003", # em space "\u2004", # three-per-em space "\u2005", # four-per-em space "\u2006", # six-per-em space "\u2007", # figure space "\u2008", # punctuation space "\u2009", # thin space "\u200A", # hair space # "\u2028", # line separator # "\u2029", # paragraph separator "\u202f", # narrow no-break space "\u205f", # medium mathematical space "\u3000", # ideographic space
] txt = ' \t\n\r'
pattern = '[' + ''.join(UNICODE_WHITESPACES) + ']'
matches = re.findall(pattern, txt)
print(matches)
# [' ', '\t']

Of course, you can comment out the individual whitespace Unicode characters you don’t want to match as required by your own application.

Posted on Leave a comment

How to Display a Progress Bar in Python

5/5 – (1 vote)
[😁😁😁😁😁😁😁😁😁😁😁😁😁😁😁😁😁😁😁😁] 100%

Problem Formulation and Solution Overview

In this article, you’ll learn how to configure and display a progress bar.

A progress bar is commonly used in Python or, for that matter, any other programming language to show the user an application’s progress. For example, an installation, a transferring of files, or any other commands.

The Finxter Academy recommends implementing this to visually display to the user what is happening behind the scenes.


💬 Question: How would we write code to display a progress bar?

We can accomplish this task by one of the following options:


Method 1: Use a For Loop

This method imports the time and sys libraries combined with a for loop to display a custom progress bar output on a single line.

from time import sleep
import sys for x in range(0,21): sys.stdout.write('\r') sys.stdout.write("[%-20s] %d%%" % ('😁'*x, 5*x)) sys.stdout.flush() sleep(0.75)

Above imports, the time library to call the sleep command and the sys library to write the contents to the terminal.

Next, a for loop is instantiated. This loop uses the range function to set the start position (0 by default) and the stop position (21-1). Inside this loop, the following occurs:

  • The first line uses a carriage return (\r) to start the code on a new line.
  • The following line determines how the progress bar appears by:
    • Left-aligning the emoji(s) inside the square brackets [%-20s].
    • Configuring the progress percentage %d%%" % (example 15%).
    • Determining the visual emoji progress ('😁'*x, 5*x).
  • Then sys.stdout.flush() writes everything in the buffer to the terminal.
  • The code pauses for the stated period (0.75).

The loop continues until 100% has been attained. Below is the end result.

[😁😁😁😁😁😁😁😁😁😁😁😁😁😁😁😁😁😁😁😁] 100%

💡Note: Any emoji or another symbol can be substituted for the above selection.


Method 2: Use apytl Library

This method imports the time and apytl libraries to generate a custom progress bar.

To run this code error-free, install the required library. Click here for installation instructions.

import time
import apytl total_iterations = 10 for index, value in enumerate(range(total_iterations)): apytl.Bar().drawbar(value, total_iterations, fill='*') time.sleep(0.75)

Above imports the time library to call the sleep command and the apytl library to display the progress bar.

Next, the total number of iterations to carry out is declared as 10 and saved to total_iterations.

To understand what is going on in the for loop, let’s write some test code to see what the values of index, value and total_iterations are doing:

total_iterations = 10 for index, value in enumerate(range(total_iterations)): print(index, value, total_iterations)

As you can see from the output, the index and value variables count from 0 (range default start position) to the stop position of 9 (10-1). Notice the value of total_iterations does not change.

0 0 10
1 1 10
2 2 10
3 3 10
4 4 10
5 5 10
6 6 10
7 7 10
8 8 10
9 9 10

Referring back to the code directly below the Method 2 heading, the next line is: apytl.Bar().drawbar(value, total_iterations, fill='*').

This function is passed three (3) arguments:

  • The variable value, which you can see from the above, increments by one (1) each iteration.
  • The variable total_iterations, which remains constant at 10.
  • The fill value. This example uses the asterisk (*) character. However, feel free to use an emoji or other symbol.
Progress |***********************************| 100.0% Complete

Method 3: Use alive-progress

The alive-progress library moves progress bars to the next level! With its many display options, it’s a must-a-try!

To run this code error-free, install the required library. Click here for installation instructions.

from alive_progress import alive_bar
from time import sleep for x in range(10): with alive_bar(x, bar='solid') as bar: for i in range(x): sleep(.001) bar()

Above imports the alive-progress library to use the progress bar and the time library to call the sleep command.

Next, a for loop is instantiated. This loop uses the range function to set the stop position at 9 (10-1). Inside this loop, the following occurs:

  • The alive_bar is called and passed the argument x and the bar type. For this example, solid was selected.
    • A new for loop is instantiated and loops through range passing x as an argument.
    • The code halts (sleep) for the stated period (.001).
    • The bar is output to the terminal each iteration.

The loop continues until 100% has been attained.

<■■■■■■■■■■■■■■■■■■■■■■■■■■■■■■■■> 0 in 0.0s (0.00/s)
<■■■■■■■■■■■■■■■■■■■■■■■■■■■■■■■■> 1/1 [100%] in 0.0s (333.28/s)
<■■■■■■■■■■■■■■■■■■■■■■■■■■■■■■■■> 2/2 [100%] in 0.0s (62.48/s)
<■■■■■■■■■■■■■■■■■■■■■■■■■■■■■■■■> 3/3 [100%] in 0.0s (63.96/s)
<■■■■■■■■■■■■■■■■■■■■■■■■■■■■■■■■> 4/4 [100%] in 0.1s (62.39/s)
<■■■■■■■■■■■■■■■■■■■■■■■■■■■■■■■■> 5/5 [100%] in 0.1s (63.32/s)
<■■■■■■■■■■■■■■■■■■■■■■■■■■■■■■■■> 6/6 [100%] in 0.1s (64.84/s)
<■■■■■■■■■■■■■■■■■■■■■■■■■■■■■■■■> 7/7 [100%] in 0.1s (63.79/s)
<■■■■■■■■■■■■■■■■■■■■■■■■■■■■■■■■> 8/8 [100%] in 0.1s (63.53/s)
<■■■■■■■■■■■■■■■■■■■■■■■■■■■■■■■■> 9/9 [100%] in 0.1s (64.09/s)

💡Note: To view a list of all available progress bars, click here.


Method 4: Use tqdm

A simple yet elegant progress bar, tqdm is a must-see!

To run this code error-free, install the required library. Click here for installation instructions.

from tqdm import tqdm
from time import sleep for i in tqdm(range(100)): sleep(0.02)

Above imports the tqdm library for the progress bar and the time library to call the sleep() command.

Next, a for loop is instantiated. This loop uses the tqdm library with the range function to set the stop position at 99 (100-1). Inside this loop, the following occurs:

The progress bar displays on one line. Each iteration increases the progress by a percentage.


Method 5: Use progress Library

This method uses the progress library to display a progress bar. This library has many fun options to select from.

To run this code error-free, install the required library. Click here for installation instructions.

from time import sleep
from progress.spinner import MoonSpinner with MoonSpinner('Processing…') as bar: for i in range(100): sleep(0.02) bar.next()

Above imports the time library to call the sleep command and the progress library to display a progress bar, specifically the MoonSpinner.

The following code displays the word Processing... at the terminal, and the MoonSpinner rotates, sleeps, and continues until the value of the range stop position (100-1) is attained.

Processing…◑

💡Note: Spend some time on this library page to test the different types of progress bars.


Summary

There is so much more to Python Progress Bars than was covered in this article. May we suggest you take time to delve into each method outlined above to determine the best one for your requirements.

Happy Coding!


Programming Humor – Python

“I wrote 20 short programs in Python yesterday. It was wonderful. Perl, I’m leaving you.”xkcd

Posted on Leave a comment

How to Convert a List of Objects to a CSV File in Python [5 Ways]

5/5 – (1 vote)

💬 Question: How to convert a list of custom objects to a csv file?

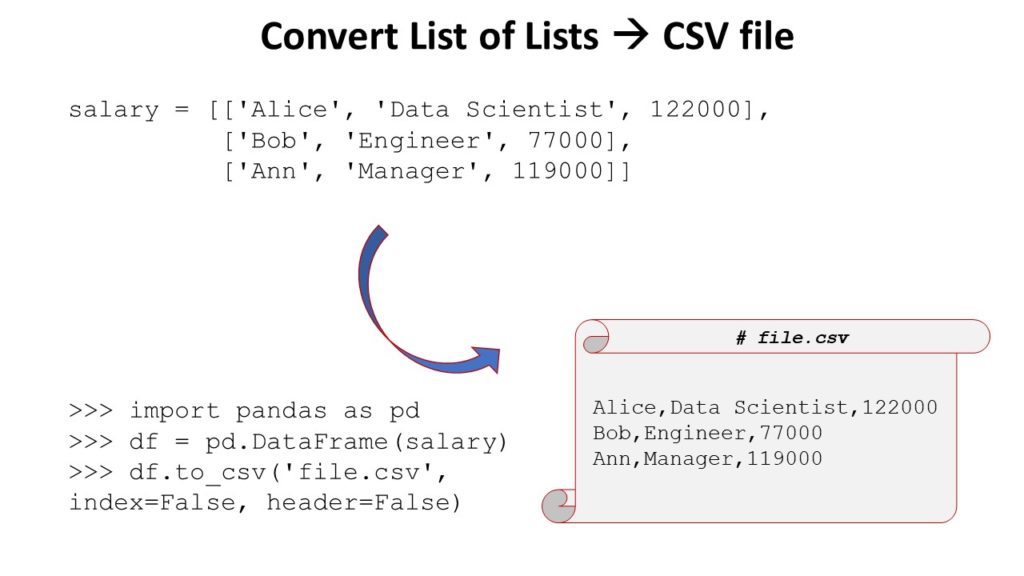
Example: Given is a list of custom objects of, say, type Employee that holds the name, job description, and income like so:

salary = [Employee('Alice', 'Data Scientist', 122000), Employee('Bob', 'Engineer', 77000), Employee('Ann', 'Manager', 119000)]

Your goal is to write the content of the list of objects into a comma-separated-values (CSV) file format.

Your output file should look like this:

# my_file.csv
Alice,Data Scientist,122000
Bob,Engineer,77000
Ann,Manager,119000

Solution: There are four simple ways to convert a list of lists to a CSV file in Python.

  1. CSV: Import the csv module in Python, create a csv writer object, and find a list lst of elements representing each object as a row, that is then written into the CSV using writer.writerow(lst).
  2. Pandas: Import the pandas library, convert each object to a list to obtain a list of lists, create a Pandas DataFrame out of the list of lists, and write the DataFrame to a file using the DataFrame method DataFrame.to_csv('file.csv').
  3. NumPy: Import the NumPy library, convert each object to a list to obtain a list of lists, create a NumPy array, and write the output to a CSV file using the numpy.savetxt('file.csv', array, delimiter=',') method.
  4. Python: Use a pure Python implementation that doesn’t require any library by using the Python file I/O functionality.

⭐ Finxter Favorite: My preference is Method 4 (Vanilla Python) because it’s simplest to use, efficient, and most robust for different input types (numerical or textual) and doesn’t require external dependencies and data wrangling.

Method 1: Python’s CSV Module

You can convert a list of lists to a CSV file in Python easily—by using the csv library. This is the most customizable of all four methods.

class Employee(object): def __init__(self, name, description, salary): self.name = name self.description = description self.salary = salary employees = [Employee('Alice', 'Data Scientist', 122000), Employee('Bob', 'Engineer', 77000), Employee('Ann', 'Manager', 119000)] # Method 1
import csv
with open('my_file.csv', 'w', newline='') as f: writer = csv.writer(f) for x in employees: writer.writerow([x.name, x.description, x.salary]) 

Output:

# my_file.csv
Alice,Data Scientist,122000
Bob,Engineer,77000
Ann,Manager,119000

In the code, you first open the file using Python’s standard open() command. Now, you can write content to the file object f.

Next, you pass this file object to the constructor of the CSV writer that implements some additional helper method—and effectively wraps the file object providing you with new CSV-specific functionality such as the writerow() method.

You now iterate over the objects and convert each object to a list.

The list representing one row is then passed in the writerow() method of the CSV writer. This takes care of converting the list of objects to a CSV format.

You can customize the CSV writer in its constructor (e.g., by modifying the delimiter from a comma ',' to a whitespace ' ' character). Have a look at the specification to learn about advanced modifications.

Method 2: Pandas DataFrame to_csv()

This method converts a list of objects to a CSV file in two steps:

List of Lists to CSV

You can convert a list of lists to a Pandas DataFrame that provides you with powerful capabilities such as the to_csv() method.

This is a super simple approach that avoids importing yet another library (I use Pandas in many Python projects anyways).

class Employee(object): def __init__(self, name, description, salary): self.name = name self.description = description self.salary = salary employees = [Employee('Alice', 'Data Scientist', 122000), Employee('Bob', 'Engineer', 77000), Employee('Ann', 'Manager', 119000)] # Method 2
import pandas as pd # Step 1: Convert list of objects to list of lists
lst = [[x.name, x.description, x.salary] for x in employees] # Step 2: Convert list of lists to CSV
df = pd.DataFrame(lst)
df.to_csv('my_file.csv', index=False, header=False) 

Output:

# my_file.csv
Alice,Data Scientist,122000
Bob,Engineer,77000
Ann,Manager,119000

Code Main Steps:

  1. lst = [[x.name, x.description, x.salary] for x in employees]
  2. df = pd.DataFrame(lst)
  3. df.to_csv('my_file.csv', index=False, header=False)

You convert a list of objects to a CSV file in three main steps.

  1. First, convert the list of objects to a list of lists by using list comprehension to iterate over each object and convert each object to an inner list using your custom expression.
  2. Second, create a Pandas DataFrame, Python’s default representation of tabular data.
  3. Third, the DataFrame is a very powerful data structure that allows you to perform various methods. One of those is the to_csv() method that allows you to write its contents into a CSV file.

You set the index and header arguments of the to_csv() method to False because Pandas, per default, adds integer row and column indices 0, 1, 2, ….

Think of them as the row and column indices in your Excel spreadsheet. You don’t want them to appear in the CSV file so you set the arguments to False.

If you want to customize the CSV output, you’ve got a lot of special arguments to play with. Check out this article for a comprehensive list of all arguments.

🌍 Related article: Pandas Cheat Sheets to Pin to Your Wall

Method 3: NumPy savetext()

NumPy is at the core of Python’s data science and machine learning functionality. Even Pandas uses NumPy arrays to implement critical functionality.

You can convert a list of objects to a CSV file by first converting it to a list of lists which is then converted to a NumPy array, and then using NumPy’s savetext() function by passing the NumPy array as an argument.

This method is best if you can represent the numerical data only—otherwise, it’ll lead to complicated data type conversions which are not recommended.

class Employee(object): def __init__(self, name, description, salary): self.name = name self.description = description self.salary = salary employees = [Employee('Alice', 'Data Scientist', 122000), Employee('Bob', 'Engineer', 77000), Employee('Ann', 'Manager', 119000)] # Method 3
import numpy as np # Convert list of objects to list of lists
lst = [[hash(x.name), hash(x.description), x.salary] for x in employees] # Convert list of lists to NumPy array
a = np.array(lst) # Convert array to CSV
np.savetxt('my_file.csv', a, delimiter=',') 

In the code, we use the hash() function to obtain a numerical value for the string attributes name and description of the Employee class.

Output:

# my_file.csv
-8.655249391637094400e+18,-4.821993523891147776e+18,1.220000000000000000e+05
7.826671284149683200e+18,-7.040934892515148800e+18,7.700000000000000000e+04
3.577554885237667328e+18,1.887669837421876992e+18,1.190000000000000000e+05

The output doesn’t look pretty: it stores the values as floats. But no worries, you can reformat the output using the format argument fmt of the savetxt() method (more here). However, I’d recommend you stick to method 2 (Pandas) to avoid unnecessary complexity in your code.

Method 4: Pure Python Without External Dependencies

If you don’t want to import any library and still convert a list of objects into a CSV file, you can use standard Python implementation as well: it’s not complicated but very efficient.

The idea is simple, iterate over the list of object and write a comma-separated representation of each object into the CSV file using a combination of the built-in open() function to create a file object and the file.write() method to write each row.

This method is best if you won’t or cannot use external dependencies.

class Employee(object): def __init__(self, name, description, salary): self.name = name self.description = description self.salary = salary employees = [Employee('Alice', 'Data Scientist', 122000), Employee('Bob', 'Engineer', 77000), Employee('Ann', 'Manager', 119000)] # Method 4
with open('my_file.csv', 'w') as f: for x in employees: f.write(f'{x.name},{x.description},{x.salary}\n') 

Output:

# my_file.csv
Alice,Data Scientist,122000,
Bob,Engineer,77000,
Ann,Manager,119000,

In the code, you first open the file object f. Then you iterate over each object and write a custom comma-separated string representation of this object to the file using the file.write() method.

We use Python’s f-string functionality to do that in a concise way. At the end of each row, you place the newline character '\n'.

Method 5 – Bonus: Python One-Liner

The previous method is a one-linerized variant of Method 4. If you’re part of the Finxter community, you know how I love one-liners. 😉

# Method 5
open('my_file.csv', 'w').writelines([f'{x.name},{x.description},{x.salary}\n' for x in employees])

Concise, isn’t it? The output is the same as before.

If you’re interested in the art of crafting beautiful one-liners, check out my book on the topic!

Python One-Liners Book: Master the Single Line First!

Python programmers will improve their computer science skills with these useful one-liners.

Python One-Liners

Python One-Liners will teach you how to read and write “one-liners”: concise statements of useful functionality packed into a single line of code. You’ll learn how to systematically unpack and understand any line of Python code, and write eloquent, powerfully compressed Python like an expert.

The book’s five chapters cover (1) tips and tricks, (2) regular expressions, (3) machine learning, (4) core data science topics, and (5) useful algorithms.

Detailed explanations of one-liners introduce key computer science concepts and boost your coding and analytical skills. You’ll learn about advanced Python features such as list comprehension, slicing, lambda functions, regular expressions, map and reduce functions, and slice assignments.

You’ll also learn how to:

  • Leverage data structures to solve real-world problems, like using Boolean indexing to find cities with above-average pollution
  • Use NumPy basics such as array, shape, axis, type, broadcasting, advanced indexing, slicing, sorting, searching, aggregating, and statistics
  • Calculate basic statistics of multidimensional data arrays and the K-Means algorithms for unsupervised learning
  • Create more advanced regular expressions using grouping and named groups, negative lookaheads, escaped characters, whitespaces, character sets (and negative characters sets), and greedy/nongreedy operators
  • Understand a wide range of computer science topics, including anagrams, palindromes, supersets, permutations, factorials, prime numbers, Fibonacci numbers, obfuscation, searching, and algorithmic sorting

By the end of the book, you’ll know how to write Python at its most refined, and create concise, beautiful pieces of “Python art” in merely a single line.

Get your Python One-Liners on Amazon!!

Posted on Leave a comment

Top 8 Profitable Python Packages to Learn in 2023

5/5 – (1 vote)

Are you interested in Python but you don’t know which Python library is most attractive from a career point of view?

Well, you should focus on the library you’re most excited about.

But if you’re generally open because you have multiple passions, it would be reasonable to also consider annual and hourly income.

These are the most profitable Python libraries, frameworks, modules, or packages:

Python Library (Dev) Annual Income (USD) Hourly Income (USD)
Python Developer $82,000 $55
Keras Developer $95,000 $63
Django Developer $117,000 $78
Flask Developer $103,000 $69
NumPy Developer $105,000 $70
Pandas Developer $87,000 $58
TensorFlow Developer $148,000 $99
PyTorch Developer $109,000 $73
Table: Annual and Hourly Income of a developer focusing on different Python libraries/frameworks/packages/modules.

What is the most profitable Python library?

The most profitable Python library is TensorFlow. TensorFlow developers make $148,000 per year on average (US) which roughly translates to $99 per hour assuming an annual workload of 1500 hours.

Let’s dive into each Python library from the table, one by one.

#0 – General Python Developer

A Python developer is a programmer who creates software in the Python programming language. Python developers are often involved in data science, web development, and machine learning applications.

💰 A Python developer earns $65,000 (entry-level), $82,000 (mid-level), or $114,000 (experienced) per year in the US according to Indeed. (source)

Do you want to become a Python Developer? Here’s a step-by-step learning path I’d propose to get started with Python:

You can find many courses on the Finxter Computer Science Academy (flatrate model).

🌍 Learn More: Read more about this specific Python library career path in our in-depth Finxter article.

#1 – Keras

Let’s have a look at the definition from the official Keras website:

“Keras is an API designed for human beings, not machines. Keras follows best practices for reducing cognitive load: it offers consistent & simple APIs, it minimizes the number of user actions required for common use cases, and it provides clear & actionable error messages. It also has extensive documentation and developer guides.”

A Keras Developer developer creates, edits, analyzes, debugs, and supervises the development of software written in the Keras deep learning framework. Keras developers create machine learning apps using deep learning.

💰 The average annual income of a Keras Developer in the United States is $95,000 per year, according to PayScale (source). Top earners make $156,000 and more in the US!

Do you want to become a Keras Developer? Here’s a step-by-step learning path I’d propose to get started with Keras:

🌍 Learn More: Read more about this specific Python library career path in our in-depth Finxter article.

#2 – Django

What is Django? Let’s have a look at the definition from the official website (highlights by me):

“Django is a high-level Python web framework that encourages rapid development and clean, pragmatic design. Built by experienced developers, it takes care of much of the hassle of web development, so you can focus on writing your app without needing to reinvent the wheel. It’s free and open source.”

A Django Developer developer creates, edits, analyzes, debugs, and supervises the development of software written in the Python programming language using the Django web development framework. You need to have good Python, HTML, and CSS skills.

💰 The average annual income of a Django Developer in the United States is between $101,000 (25th percentile) and $137,000 (75th percentile) with an average of $117,000 per year according to Ziprecruiter (source) and $90,000 per year according to PayScale (source). Top earners make $150,000 and more in the US!

Do you want to become a Django Developer? Here’s a step-by-step learning path I’d propose to get started with Django:

🌍 Learn More: Read more about this specific Python library career path in our in-depth Finxter article.

#3 – Flask

A Flask Developer developer creates, edits, analyzes, debugs, and supervises the development of software written in the Flask programming language. You should have a basic understanding of web technologies such as HTML, CSS, JavaScript, and of course Python.


Let’s have a look at the definition from the Flask wiki page (highlights by me):

“Flask is a micro web framework written in Python. It is classified as a microframework because it does not require particular tools or libraries.

It has no database abstraction layer, form validation, or any other components where pre-existing third-party libraries provide common functions.

However, Flask supports extensions that can add application features as if they were implemented in Flask itself. Extensions exist for object-relational mappers, form validation, upload handling, various open authentication technologies and several common framework related tools.”


💰 The average annual income of a Flask Developer in the United States is between $79,000 (25th percentile) and $123,000 (75th percentile) with an average of $103,000 per year according to Ziprecruiter (source). Top earners make $151,000 and more in the US!

Do you want to become a Flask Developer? Here’s a step-by-step learning path I’d propose to get started with Flask:

🌍 Learn More: Read more about this specific Python library career path in our in-depth Finxter article.

#4 – NumPy

Let’s have a look at the definition from the official NumPy website:

“Nearly every scientist working in Python draws on the power of NumPy. NumPy brings the computational power of languages like C and Fortran to Python, a language much easier to learn and use. With this power comes simplicity: a solution in NumPy is often clear and elegant.”

Here’s where NumPy is used in practice:

source

💰 The average annual income of a NumPy Developer in the United States is $105,000 per year according to PayScale (source). Top earners make $149,000 and more in the US!

Do you want to become a NumPy Developer? Here’s a step-by-step learning path I’d propose to get started with NumPy:

🌍 Learn More: Read more about this specific Python library career path in our in-depth Finxter article.

#5 – Pandas

What is pandas? Let’s have a look at the definition from the official Pandas website:

“pandas is a fast, powerful, flexible and easy to use open source data analysis and manipulation tool, built on top of the Python programming language.”

You may also want to check out our Pandas resources on the Finxter blog:

💰 The average annual income of a Pandas Developer in the United States is $87,000 per year according to Ziprecruiter (source). Top earners make $125,000 and more in the US!

Do you want to become a Pandas Developer? Here’s a step-by-step learning path I’d propose to get started with Pandas:

🌍 Learn More: Read more about this specific Python library career path in our in-depth Finxter article.

#6 – TensorFlow

A TensorFlow Developer creates, edits, analyzes, debugs, and supervises the development of code written with the TensorFlow library that is accessed mostly via the Python API. Because a TensorFlow developer is a deep learning engineer, they design and create machine learning models, train them, and improve them to reach high level of model accuracy and robustness.


Let’s have a look at the definition from the official TensorFlow website:

TensorFlow is “An end-to-end open source machine learning platform. The core open source library to help you develop and train ML models. TensorFlow makes it easy for beginners and experts to create machine learning models for desktop, mobile, web, and cloud. See the sections below to get started.”

💰 The average annual income of a TensorFlow Developer in the United States is between $104,000 (25th percentile) and $187,000 (75th percentile) with an average of $148,000 per year according to Ziprecruiter (source). Top earners make $197,000 and more in the US!

Do you want to become a TensorFlow Developer? Here’s a step-by-step learning path I’d propose to get started with TensorFlow:

🌍 Learn More: Read more about this specific Python library career path in our in-depth Finxter article.

#7 – PyTorch

A PyTorch Developer writes code using in Python’s PyTorch library to analyze data, create machine learning models, or runs deep learning algorithms on various hardware devices such as GPUs.

What Is PyTorch? Let’s have a look at the definition from the official PyTorch website:

“An open source machine learning framework that accelerates the path from research prototyping to production deployment. More specifically, PyTorch is an optimized tensor library for deep learning using GPUs and CPUs.”

💰 The average annual income of a PyTorch Developer in the United States is $109,000 per year according to PayScale (source). Top earners make $131,000 and more in the US!

Do you want to become a PyTorch Developer? Here’s a step-by-step learning path I’d propose to get started with PyTorch:

🌍 Learn More: Read more about this specific Python library career path in our in-depth Finxter article.

#Bonus – Plotly Dash


If you’re interested in learning more about how to create beautiful dashboard applications in Python, check out our new book Python Dash.

You’ve seen dashboards before; think election result visualizations you can update in real-time, or population maps you can filter by demographic.

With the Python Dash library, you’ll create analytic dashboards that present data in effective, usable, elegant ways in just a few lines of code.

Get the book on NoStarch or Amazon!


Summary

These are some of the most profitable Python libraries you could build your career on:

Posted on Leave a comment

Python Convert String to CSV File

5/5 – (1 vote)

Problem Formulation

Given a Python string:

my_string = '''a,b,c
1,2,3
9,8,7'''

💬 Question: How to convert the string to a CSV file in Python?

The desired output is the CSV file:

'my_file.csv':

a,b,c
1,2,3
9,8,7

Simple Vanilla Python Solution

To convert a multi-line string with comma-separated values to a CSV file in Python, simply write the string in a file (e.g., with the name 'my_file.csv') without further modification.

This works if the string is already in the correct CSV format with values separated by commas.

The following code uses the open() function and the file.write() functions to write the multi-line string to a file without modification.

my_string = '''a,b,c
1,2,3
9,8,7''' with open('my_file.csv', 'w') as out: out.write(my_string)

The result is a file 'my_file.csv' with the following contents:

a,b,c
1,2,3
9,8,7

Parsing and Modifying Text to CSV

The string may not be in the correct CSV format.

For example, you may want to convert any of the following strings to a CSV file—their format is not yet ready for writing it directly in a comma-separated file (CSV):

  1. Example 1: 'abc;123;987'
  2. Example 2: 'abc 123 987'
  3. Example 3: 'a=b=c 1=2=3 9=8=7'

To parse such a string and modify it before writing it in a file 'my_file.csv', you can use the string.replace() and string.split() methods to make sure that each value is separated by a comma and each row has its own line.

Let’s go over each of those examples to see how to parse the string effectively to bring it into the CSV format:

Example 1

# Example 1:
my_string = 'abc;123;987' with open('my_file.csv', 'w') as out: lines = [','.join(line) for line in my_string.split(';')] my_string = '\n'.join(lines) out.write(my_string)

I’ve higlighted the two code lines that convert the string to the CSV format.

  • The first highlighted line uses list comprehension to create a list of three lines, each interleaved with a comma.
  • The second highlighted line uses the string.join() function to bring those together to a CSV format that can be written into the output file.

The output file 'my_file.csv' contains the same CSV formatted text:

a,b,c
1,2,3
9,8,7

Example 2

The following example is the same as the previous code snippet, only that the empty spaces ' ' in the input string should be converted to new lines to obtain the final CSV:

# Example 2:
my_string = 'abc 123 987' with open('my_file.csv', 'w') as out: lines = [','.join(line) for line in my_string.split(' ')] my_string = '\n'.join(lines) out.write(my_string)

The output file 'my_file.csv' contains the same CSV formatted text:

a,b,c
1,2,3
9,8,7

Example 3

If the comma-separated values are not yet comma-separated (e.g., they may be semicolon-separated 'a;b;c'), you can use the string.replace() method to replace the symbols accordingly.

This is shown in the following example:

# Example 3:
my_string = 'a=b=c 1=2=3 9=8=7' with open('my_file.csv', 'w') as out: my_string = my_string.replace('=', ',').replace(' ', '\n') out.write(my_string)

Thanks for reading this article! I appreciate the time you took to learn Python with me.

If you’re interested in writing more concise code, feel free to check out my one-liner book here:

Python One-Liners Book: Master the Single Line First!

Python programmers will improve their computer science skills with these useful one-liners.

Python One-Liners

Python One-Liners will teach you how to read and write “one-liners”: concise statements of useful functionality packed into a single line of code. You’ll learn how to systematically unpack and understand any line of Python code, and write eloquent, powerfully compressed Python like an expert.

The book’s five chapters cover (1) tips and tricks, (2) regular expressions, (3) machine learning, (4) core data science topics, and (5) useful algorithms.

Detailed explanations of one-liners introduce key computer science concepts and boost your coding and analytical skills. You’ll learn about advanced Python features such as list comprehension, slicing, lambda functions, regular expressions, map and reduce functions, and slice assignments.

You’ll also learn how to:

  • Leverage data structures to solve real-world problems, like using Boolean indexing to find cities with above-average pollution
  • Use NumPy basics such as array, shape, axis, type, broadcasting, advanced indexing, slicing, sorting, searching, aggregating, and statistics
  • Calculate basic statistics of multidimensional data arrays and the K-Means algorithms for unsupervised learning
  • Create more advanced regular expressions using grouping and named groups, negative lookaheads, escaped characters, whitespaces, character sets (and negative characters sets), and greedy/nongreedy operators
  • Understand a wide range of computer science topics, including anagrams, palindromes, supersets, permutations, factorials, prime numbers, Fibonacci numbers, obfuscation, searching, and algorithmic sorting

By the end of the book, you’ll know how to write Python at its most refined, and create concise, beautiful pieces of “Python art” in merely a single line.

Get your Python One-Liners on Amazon!!

Posted on Leave a comment

The Ultimate Guide on Converting a CSV in Python

4/5 – (1 vote)

🐍 Abstract: In this article, we’ll quickly overview the best method, respectively, to convert a CSV file to JSON, Excel, dictionary, Parquet, list, list of lists, list of tuples, text file, DataFrame, XML, NumPy array, and list of dictionaries.

In this article, you’ve learned the best ways to perform the following conversions (click to read more):

How to Convert CSV to JSON in Python?

You can convert a CSV file to a JSON file by using the following five steps:

  1. Import the csv and json libraries
  2. Open the CSV as a file object in reading mode using the open(path_to_csv, 'r') function in a context manager (=with environment).
  3. Load the CSV content into Python using the csv.DictReader(fobj) and pass the file object just created.
  4. Iterate over each row and update a newly-created dictionary my_json using one of the column values as key: my_json[key] = row
  5. Store the my_json dictionary data in a JSON file using the json.dumps(my_json) function.
import csv
import json csv_file = 'my_file.csv'
json_file = 'my_file.json' my_json = {}
with open(csv_file, 'r') as fobj: reader = csv.DictReader(fobj) for row in reader: # Use one of the CSV column names as a key key = row['Name'] my_json[key] = row with open(json_file,'w') as fobj: fobj.write(json.dumps(my_json, indent=2))

Input CSV File:

Name,Job,Age,Income
Alice,Programmer,23,110000
Bob,Executive,34,90000
Carl,Sales,45,50000

Output JSON File:

{ "Alice": { "Name": "Alice", "Job": "Programmer", "Age": "23", "Income": "110000" }, "Bob": { "Name": "Bob", "Job": "Executive", "Age": "34", "Income": "90000" }, "Carl": { "Name": "Carl", "Job": "Sales", "Age": "45", "Income": "50000" }
}

There are many more details to it, so if this didn’t answer your question yet, go here:

🌍 Learn More: Feel free to learn more about this conversion goal in our full guide on the Finxter blog with multiple CSV conversion methods and step-by-step explanations.

How to Convert CSV to Excel (XLSX) in Python?

The most pythonic way to convert a .csv to an .xlsx (Excel) in Python is to use the Pandas library.

  1. Install the pandas library with pip install pandas
  2. Install the openpyxl library that is used internally by pandas with pip install openpyxl
  3. Import the pandas libray with import pandas as pd
  4. Read the CSV file into a DataFrame df by using the expression df = pd.read_csv('my_file.csv')
  5. Store the DataFrame in an Excel file by calling df.to_excel('my_file.xlsx', index=None, header=True)
import pandas as pd df = pd.read_csv('my_file.csv')
df.to_excel('my_file.xlsx', index=None, header=True)

Note that there are many ways to customize the to_excel() function in case

  • you don’t need a header line,
  • you want to fix the first line in the Excel file,
  • you want to format the cells as numbers instead of strings, or
  • you have an index column in the original CSV and want to consider it in the Excel file too.

🌍 Learn More: Feel free to learn more about this conversion goal in our full guide on the Finxter blog with multiple CSV conversion methods and step-by-step explanations.

How to Convert a CSV to a Dictionary in Python?

The best way to convert a CSV file to a Python dictionary is to create a CSV file object f using open("my_file.csv") and pass it in the csv.DictReader(f) method. The return value is an iterable of dictionaries, one per row in the CSV file, that maps the column header from the first row to the specific row value.

import csv csv_filename = 'my_file.csv' with open(csv_filename) as f: reader = csv.DictReader(f) for row in reader: print(row)

🌍 Learn More: Feel free to learn more about this conversion goal in our full guide on the Finxter blog with multiple CSV conversion methods and step-by-step explanations.

How to Convert a CSV to a Parquet Format in Python?

Here’s a step-by-step approach to reading a CSV and converting its contents to a Parquet file using the Pandas library:

  • Step 1: Run pip install pandas if the module is not already installed in your environment.
  • Step 2: Run pip install pyarrow to install pyarrow module
  • Step 3: Run pip install fastparquet to install the fastparquet module
  • Step 4: import pandas using import pandas as pd
  • Step 5: Read the CSV file into a DataFrame using df = pd.read_csv('my_file.csv').
  • Step 6: Write the Parquet file using df.to_parquet('my_file.parquet')

The code snippet to convert a CSV file to a Parquet file is quite simple (steps 4-6):

import pandas as pd
df = pd.read_csv('my_file.csv')
df.to_parquet('my_file.parquet')

🌍 Learn More: Feel free to learn more about this conversion goal in our full guide on the Finxter blog with multiple CSV conversion methods and step-by-step explanations.

How to Convert a CSV to a List in Python?

Here’s the code to convert that CSV file to a list of dictionaries, one dictionary per row by using the csv.DictReader(file) function:

import csv csv_filename = 'my_file.csv' with open(csv_filename) as f: reader = csv.DictReader(f) lst = list(*reader)

🌍 Learn More: Feel free to learn more about this conversion goal in our full guide on the Finxter blog with multiple CSV conversion methods and step-by-step explanations.

How to Convert a CSV to a List of Lists in Python?

To convert a CSV file 'my_file.csv' into a list of lists in Python, use the csv.reader(file_obj) method to create a CSV file reader. Then convert the resulting object to a list using the list() constructor.

import csv csv_filename = 'my_file.csv' with open(csv_filename) as f: reader = csv.reader(f) lst = list(reader)

Output:

print(lst)
# [['9', '8', '7'], ['6', '5', '4'], ['3', '2', '1']]

🌍 Learn More: Feel free to learn more about this conversion goal in our full guide on the Finxter blog with multiple CSV conversion methods and step-by-step explanations.

How to Convert a CSV to a List of Tuples in Python?

To convert a CSV file 'my_file.csv' into a list of tuples in Python, use csv.reader(file_obj) to create a CSV file reader that holds an iterable of lists, one per row. Now, use the list(tuple(line) for line in reader) expression with a generator expression to convert each inner list to a tuple.

Here’s a simple example that converts our CSV file to a list of tuples using this approach:

import csv csv_filename = 'my_file.csv' with open(csv_filename) as f: reader = csv.reader(f) lst = list(tuple(line) for line in reader)

Output:

print(lst)
# [('9', '8', '7'), ('6', '5', '4'), ('3', '2', '1')]

🌍 Learn More: Feel free to learn more about this conversion goal in our full guide on the Finxter blog with multiple CSV conversion methods and step-by-step explanations.

How to Convert a CSV to a Text File in Python?

If you want to keep the content (including the delimiter ',') in the CSV file unmodified, the conversion is simple: read the .csv file and write its content into a new .txt file using the open(), read(), and write() functions without importing any library.

In other words, perform the three steps to write a CSV to a TXT file unmodified:

  1. Open the CSV file in reading mode and the TXT file in writing mode.
  2. Read the CSV file and store it in a variable.
  3. Write the content into the TXT file.

Here’s the code snippet that solves our basic challenge:

# 1. Open the CSV file in reading mode and the TXT file in writing mode
with open('my_file.csv', 'r') as f_in, open('my_file.txt', 'w') as f_out: # 2. Read the CSV file and store in variable content = f_in.read() # 3. Write the content into the TXT file f_out.write(content)

🌍 Learn More: Feel free to learn more about this conversion goal in our full guide on the Finxter blog with multiple CSV conversion methods and step-by-step explanations.

How to Convert a CSV to a Pandas DataFrame in Python?

To import a given CSV file into a newly-created Pandas DataFrame, use the pd.read_csv('my_file.csv') function that returns a DataFrame created with the content in the CSV file 'my_file.csv'.

Here’s a quick and generic code snippet showcasing this approach:

import pandas as pd
df = pd.read_csv('my_file.csv')
print(df)

Output:

 Name Job Age Income
0 Alice Programmer 23 110000
1 Bob Executive 34 90000
2 Carl Sales 45 50000

🌍 Learn More: Feel free to learn more about this conversion goal in our full guide on the Finxter blog with multiple CSV conversion methods and step-by-step explanations.

How to Convert a CSV to an XML in Python?

You can convert a CSV to an XML using the following approach:

  • Read the whole CSV file into your Python script.
  • Store the first row as header data that is needed to name your custom XML tags (e.g., <Name>, <Job>, <Age>, and <Income> in our example).
  • Create a function convert_row() that converts each row separately to an XML representation of that row using basic string formatting.
  • Iterate over the data row-wise using csv.reader() and convert each CSV row to XML using your function convert_row().

Here’s the code:

# Convert CSV file to XML string
import csv filename = 'my_file.csv' def convert_row(headers, row): s = f'<row id="{row[0]}">\n' for header, item in zip(headers, row): s += f' <{header}>' + f'{item}' + f'</{header}>\n' return s + '</row>' with open(filename, 'r') as f: r = csv.reader(f) headers = next(r) xml = '<data>\n' for row in r: xml += convert_row(headers, row) + '\n' xml += '</data>' print(xml)

🌍 Learn More: Feel free to learn more about this conversion goal in our full guide on the Finxter blog with multiple CSV conversion methods and step-by-step explanations.

How to Convert a CSV to a NumPy Array in Python?

You can convert a CSV file to a NumPy array simply by calling np.loadtxt() with two arguments: the filename and the delimiter string. For example, the expression np.loadtxt('my_file.csv', delimiter=',') returns a NumPy array from the 'my_file.csv' with delimiter symbols ','.

Here’s an example:

import numpy as np array = np.loadtxt('my_file.csv', delimiter=',')
print(array)

Output:

[[9. 8. 7.] [6. 5. 4.] [3. 2. 1.]]

🌍 Learn More: Feel free to learn more about this conversion goal in our full guide on the Finxter blog with multiple CSV conversion methods and step-by-step explanations.

How to Convert a CSV to a List of Dictionaries?

Convert a CSV file to a list of Python dictionaries in three steps:

  1. Create a CSV file object f using open("my_file.csv") and pass it in the csv.DictReader(f) method.
  2. The return value is an iterable of dictionaries, one per row in the CSV file. Each dictionary maps the column header from the first row to the specific row value.
  3. As the last step, convert the iterable of dictionaries to a list using the Python built-in list() function.

Here’s the code to convert that CSV file to a list of dictionaries, one dictionary per row by using the csv.DictReader(file) function:

import csv csv_filename = 'my_file.csv' with open(csv_filename) as f: reader = csv.DictReader(f) lst = list(*reader)

🌍 Learn More: Feel free to learn more about this conversion goal in our full guide on the Finxter blog with multiple CSV conversion methods and step-by-step explanations.

Summary

You can find a more detailed article on each topic in the following table:

Goal Conversion Full Article
Python CSV to JSON https://blog.finxter.com/convert-csv-to-json-in-python/
Python CSV to Excel (.xlsx) https://blog.finxter.com/convert-csv-to-excel-xlsx-in-python/
Python CSV to Dictionary https://blog.finxter.com/convert-csv-to-dictionary-in-python/
Python CSV to Parquet https://blog.finxter.com/python-convert-csv-to-parquet/
Python CSV to List https://blog.finxter.com/python-convert-csv-to-list/
Python CSV to List of Lists https://blog.finxter.com/python-convert-csv-to-list-of-lists/
Python CSV to List of Tuples https://blog.finxter.com/convert-csv-to-list-of-tuples-in-python/
Python CSV to Text File (.txt) https://blog.finxter.com/python-convert-csv-to-text-file-csv-to-txt/
Python CSV to DataFrame (Pandas) https://blog.finxter.com/read-a-csv-file-to-a-pandas-dataframe/
Python CSV to XML File (.xml) https://blog.finxter.com/csv-to-xml-how-to-convert-in-python/
Python CSV to NumPy Array (ndarray) https://blog.finxter.com/how-to-convert-a-csv-to-numpy-array-in-python/
Python CSV to List of Dictionaries https://blog.finxter.com/python-convert-csv-to-list-of-dictionaries/

Feel free to check out the Finxter email academy to keep improving your coding skills. We have cheat sheets!

Programmer Humor

It’s hard to train deep learning algorithms when most of the positive feedback they get is sarcastic. — from xkcd
Posted on Leave a comment

[List] How to Check Package Version in Python

Rate this post

If you’re short on time, the simple solution is to run the following command in your shell/terminal/CMD/PowerShell to check the version of library xxx:

pip show xxx

But many more interesting ways to check package versions may be useful for you!


The following table refers to a list of articles to help you check the package/library/module version installed in your environment. You can use the STRG+F search hotkey to find the relevant package name you want to check the package version for.

Library URL
abc https://blog.finxter.com/how-to-check-abc-package-version-in-python/
aifc https://blog.finxter.com/how-to-check-aifc-package-version-in-python/
argparse https://blog.finxter.com/how-to-check-argparse-package-version-in-python/
array https://blog.finxter.com/how-to-check-array-package-version-in-python/
ast https://blog.finxter.com/how-to-check-ast-package-version-in-python/
asynchat https://blog.finxter.com/how-to-check-asynchat-package-version-in-python/
asyncio https://blog.finxter.com/how-to-check-asyncio-package-version-in-python/
asyncore https://blog.finxter.com/how-to-check-asyncore-package-version-in-python/
atexit https://blog.finxter.com/how-to-check-atexit-package-version-in-python/
audioop https://blog.finxter.com/how-to-check-audioop-package-version-in-python/
base64 https://blog.finxter.com/how-to-check-base64-package-version-in-python/
bdb https://blog.finxter.com/how-to-check-bdb-package-version-in-python/
binascii https://blog.finxter.com/how-to-check-binascii-package-version-in-python/
binhex https://blog.finxter.com/how-to-check-binhex-package-version-in-python/
bisect https://blog.finxter.com/how-to-check-bisect-package-version-in-python/
builtins https://blog.finxter.com/how-to-check-builtins-package-version-in-python/
bz2 https://blog.finxter.com/how-to-check-bz2-package-version-in-python/
calendar https://blog.finxter.com/how-to-check-calendar-package-version-in-python/
cgi https://blog.finxter.com/how-to-check-cgi-package-version-in-python/
cgitb https://blog.finxter.com/how-to-check-cgitb-package-version-in-python/
chunk https://blog.finxter.com/how-to-check-chunk-package-version-in-python/
cmath https://blog.finxter.com/how-to-check-cmath-package-version-in-python/
cmd https://blog.finxter.com/how-to-check-cmd-package-version-in-python/
code https://blog.finxter.com/how-to-check-code-package-version-in-python/
codecs https://blog.finxter.com/how-to-check-codecs-package-version-in-python/
codeop https://blog.finxter.com/how-to-check-codeop-package-version-in-python/
collections https://blog.finxter.com/how-to-check-collections-package-version-in-python/
colorsys https://blog.finxter.com/how-to-check-colorsys-package-version-in-python/
compileall https://blog.finxter.com/how-to-check-compileall-package-version-in-python/
concurrent https://blog.finxter.com/how-to-check-concurrent-package-version-in-python/
configparser https://blog.finxter.com/how-to-check-configparser-package-version-in-python/
contextlib https://blog.finxter.com/how-to-check-contextlib-package-version-in-python/
contextvars https://blog.finxter.com/how-to-check-contextvars-package-version-in-python/
copy https://blog.finxter.com/how-to-check-copy-package-version-in-python/
copyreg https://blog.finxter.com/how-to-check-copyreg-package-version-in-python/
cProfile https://blog.finxter.com/how-to-check-cProfile-package-version-in-python/
crypt https://blog.finxter.com/how-to-check-crypt-package-version-in-python/
csv https://blog.finxter.com/how-to-check-csv-package-version-in-python/
ctypes https://blog.finxter.com/how-to-check-ctypes-package-version-in-python/
curses https://blog.finxter.com/how-to-check-curses-package-version-in-python/
dataclasses https://blog.finxter.com/how-to-check-dataclasses-package-version-in-python/
datetime https://blog.finxter.com/how-to-check-datetime-package-version-in-python/
dbm https://blog.finxter.com/how-to-check-dbm-package-version-in-python/
decimal https://blog.finxter.com/how-to-check-decimal-package-version-in-python/
difflib https://blog.finxter.com/how-to-check-difflib-package-version-in-python/
dis https://blog.finxter.com/how-to-check-dis-package-version-in-python/
distutils https://blog.finxter.com/how-to-check-distutils-package-version-in-python/
doctest https://blog.finxter.com/how-to-check-doctest-package-version-in-python/
email https://blog.finxter.com/how-to-check-email-package-version-in-python/
encodings https://blog.finxter.com/how-to-check-encodings-package-version-in-python/
ensurepip https://blog.finxter.com/how-to-check-ensurepip-package-version-in-python/
enum https://blog.finxter.com/how-to-check-enum-package-version-in-python/
errno https://blog.finxter.com/how-to-check-errno-package-version-in-python/
faulthandler https://blog.finxter.com/how-to-check-faulthandler-package-version-in-python/
fcntl https://blog.finxter.com/how-to-check-fcntl-package-version-in-python/
filecmp https://blog.finxter.com/how-to-check-filecmp-package-version-in-python/
fileinput https://blog.finxter.com/how-to-check-fileinput-package-version-in-python/
fnmatch https://blog.finxter.com/how-to-check-fnmatch-package-version-in-python/
fractions https://blog.finxter.com/how-to-check-fractions-package-version-in-python/
ftplib https://blog.finxter.com/how-to-check-ftplib-package-version-in-python/
functools https://blog.finxter.com/how-to-check-functools-package-version-in-python/
gc https://blog.finxter.com/how-to-check-gc-package-version-in-python/
getopt https://blog.finxter.com/how-to-check-getopt-package-version-in-python/
getpass https://blog.finxter.com/how-to-check-getpass-package-version-in-python/
gettext https://blog.finxter.com/how-to-check-gettext-package-version-in-python/
glob https://blog.finxter.com/how-to-check-glob-package-version-in-python/
graphlib https://blog.finxter.com/how-to-check-graphlib-package-version-in-python/
grp https://blog.finxter.com/how-to-check-grp-package-version-in-python/
gzip https://blog.finxter.com/how-to-check-gzip-package-version-in-python/
hashlib https://blog.finxter.com/how-to-check-hashlib-package-version-in-python/
heapq https://blog.finxter.com/how-to-check-heapq-package-version-in-python/
hmac https://blog.finxter.com/how-to-check-hmac-package-version-in-python/
html https://blog.finxter.com/how-to-check-html-package-version-in-python/
http https://blog.finxter.com/how-to-check-http-package-version-in-python/
imaplib https://blog.finxter.com/how-to-check-imaplib-package-version-in-python/
imghdr https://blog.finxter.com/how-to-check-imghdr-package-version-in-python/
imp https://blog.finxter.com/how-to-check-imp-package-version-in-python/
importlib https://blog.finxter.com/how-to-check-importlib-package-version-in-python/
inspect https://blog.finxter.com/how-to-check-inspect-package-version-in-python/
io https://blog.finxter.com/how-to-check-io-package-version-in-python/
ipaddress https://blog.finxter.com/how-to-check-ipaddress-package-version-in-python/
itertools https://blog.finxter.com/how-to-check-itertools-package-version-in-python/
json https://blog.finxter.com/how-to-check-json-package-version-in-python/
keyword https://blog.finxter.com/how-to-check-keyword-package-version-in-python/
lib2to3 https://blog.finxter.com/how-to-check-lib2to3-package-version-in-python/
linecache https://blog.finxter.com/how-to-check-linecache-package-version-in-python/
locale https://blog.finxter.com/how-to-check-locale-package-version-in-python/
logging https://blog.finxter.com/how-to-check-logging-package-version-in-python/
lzma https://blog.finxter.com/how-to-check-lzma-package-version-in-python/
mailbox https://blog.finxter.com/how-to-check-mailbox-package-version-in-python/
mailcap https://blog.finxter.com/how-to-check-mailcap-package-version-in-python/
marshal https://blog.finxter.com/how-to-check-marshal-package-version-in-python/
math https://blog.finxter.com/how-to-check-math-package-version-in-python/
mimetypes https://blog.finxter.com/how-to-check-mimetypes-package-version-in-python/
mmap https://blog.finxter.com/how-to-check-mmap-package-version-in-python/
modulefinder https://blog.finxter.com/how-to-check-modulefinder-package-version-in-python/
msilib https://blog.finxter.com/how-to-check-msilib-package-version-in-python/
msvcrt https://blog.finxter.com/how-to-check-msvcrt-package-version-in-python/
multiprocessing https://blog.finxter.com/how-to-check-multiprocessing-package-version-in-python/
netrc https://blog.finxter.com/how-to-check-netrc-package-version-in-python/
nis https://blog.finxter.com/how-to-check-nis-package-version-in-python/
nntplib https://blog.finxter.com/how-to-check-nntplib-package-version-in-python/
numbers https://blog.finxter.com/how-to-check-numbers-package-version-in-python/
operator https://blog.finxter.com/how-to-check-operator-package-version-in-python/
optparse https://blog.finxter.com/how-to-check-optparse-package-version-in-python/
os https://blog.finxter.com/how-to-check-os-package-version-in-python/
ossaudiodev https://blog.finxter.com/how-to-check-ossaudiodev-package-version-in-python/
pathlib https://blog.finxter.com/how-to-check-pathlib-package-version-in-python/
pdb https://blog.finxter.com/how-to-check-pdb-package-version-in-python/
pickle https://blog.finxter.com/how-to-check-pickle-package-version-in-python/
pickletools https://blog.finxter.com/how-to-check-pickletools-package-version-in-python/
pipes https://blog.finxter.com/how-to-check-pipes-package-version-in-python/
pkgutil https://blog.finxter.com/how-to-check-pkgutil-package-version-in-python/
platform https://blog.finxter.com/how-to-check-platform-package-version-in-python/
plistlib https://blog.finxter.com/how-to-check-plistlib-package-version-in-python/
poplib https://blog.finxter.com/how-to-check-poplib-package-version-in-python/
posix https://blog.finxter.com/how-to-check-posix-package-version-in-python/
pprint https://blog.finxter.com/how-to-check-pprint-package-version-in-python/
profile https://blog.finxter.com/how-to-check-profile-package-version-in-python/
pstats https://blog.finxter.com/how-to-check-pstats-package-version-in-python/
pty https://blog.finxter.com/how-to-check-pty-package-version-in-python/
pwd https://blog.finxter.com/how-to-check-pwd-package-version-in-python/
py_compile https://blog.finxter.com/how-to-check-py_compile-package-version-in-python/
pyclbr https://blog.finxter.com/how-to-check-pyclbr-package-version-in-python/
pydoc https://blog.finxter.com/how-to-check-pydoc-package-version-in-python/
queue https://blog.finxter.com/how-to-check-queue-package-version-in-python/
quopri https://blog.finxter.com/how-to-check-quopri-package-version-in-python/
random https://blog.finxter.com/how-to-check-random-package-version-in-python/
re https://blog.finxter.com/how-to-check-re-package-version-in-python/
regex https://blog.finxter.com/how-to-check-regex-package-version-in-python/
matplotlib https://blog.finxter.com/how-to-check-matplotlib-package-version-in-python/
seaborn https://blog.finxter.com/how-to-check-seaborn-package-version-in-python/
readline https://blog.finxter.com/how-to-check-readline-package-version-in-python/
reprlib https://blog.finxter.com/how-to-check-reprlib-package-version-in-python/
resource https://blog.finxter.com/how-to-check-resource-package-version-in-python/
rlcompleter https://blog.finxter.com/how-to-check-rlcompleter-package-version-in-python/
runpy https://blog.finxter.com/how-to-check-runpy-package-version-in-python/
sched https://blog.finxter.com/how-to-check-sched-package-version-in-python/
secrets https://blog.finxter.com/how-to-check-secrets-package-version-in-python/
select https://blog.finxter.com/how-to-check-select-package-version-in-python/
selectors https://blog.finxter.com/how-to-check-selectors-package-version-in-python/
shelve https://blog.finxter.com/how-to-check-shelve-package-version-in-python/
shlex https://blog.finxter.com/how-to-check-shlex-package-version-in-python/
shutil https://blog.finxter.com/how-to-check-shutil-package-version-in-python/
signal https://blog.finxter.com/how-to-check-signal-package-version-in-python/
site https://blog.finxter.com/how-to-check-site-package-version-in-python/
smtpd https://blog.finxter.com/how-to-check-smtpd-package-version-in-python/
smtplib https://blog.finxter.com/how-to-check-smtplib-package-version-in-python/
sndhdr https://blog.finxter.com/how-to-check-sndhdr-package-version-in-python/
socket https://blog.finxter.com/how-to-check-socket-package-version-in-python/
socketserver https://blog.finxter.com/how-to-check-socketserver-package-version-in-python/
spwd https://blog.finxter.com/how-to-check-spwd-package-version-in-python/
sqlite3 https://blog.finxter.com/how-to-check-sqlite3-package-version-in-python/
ssl https://blog.finxter.com/how-to-check-ssl-package-version-in-python/
stat https://blog.finxter.com/how-to-check-stat-package-version-in-python/
statistics https://blog.finxter.com/how-to-check-statistics-package-version-in-python/
string https://blog.finxter.com/how-to-check-string-package-version-in-python/
stringprep https://blog.finxter.com/how-to-check-stringprep-package-version-in-python/
struct https://blog.finxter.com/how-to-check-struct-package-version-in-python/
subprocess https://blog.finxter.com/how-to-check-subprocess-package-version-in-python/
sunau https://blog.finxter.com/how-to-check-sunau-package-version-in-python/
symtable https://blog.finxter.com/how-to-check-symtable-package-version-in-python/
sys https://blog.finxter.com/how-to-check-sys-package-version-in-python/
sysconfig https://blog.finxter.com/how-to-check-sysconfig-package-version-in-python/
syslog https://blog.finxter.com/how-to-check-syslog-package-version-in-python/
tabnanny https://blog.finxter.com/how-to-check-tabnanny-package-version-in-python/
tarfile https://blog.finxter.com/how-to-check-tarfile-package-version-in-python/
telnetlib https://blog.finxter.com/how-to-check-telnetlib-package-version-in-python/
tempfile https://blog.finxter.com/how-to-check-tempfile-package-version-in-python/
termios https://blog.finxter.com/how-to-check-termios-package-version-in-python/
test https://blog.finxter.com/how-to-check-test-package-version-in-python/
textwrap https://blog.finxter.com/how-to-check-textwrap-package-version-in-python/
threading https://blog.finxter.com/how-to-check-threading-package-version-in-python/
time https://blog.finxter.com/how-to-check-time-package-version-in-python/
timeit https://blog.finxter.com/how-to-check-timeit-package-version-in-python/
tkinter https://blog.finxter.com/how-to-check-tkinter-package-version-in-python/
token https://blog.finxter.com/how-to-check-token-package-version-in-python/
tokenize https://blog.finxter.com/how-to-check-tokenize-package-version-in-python/
trace https://blog.finxter.com/how-to-check-trace-package-version-in-python/
traceback https://blog.finxter.com/how-to-check-traceback-package-version-in-python/
tracemalloc https://blog.finxter.com/how-to-check-tracemalloc-package-version-in-python/
tty https://blog.finxter.com/how-to-check-tty-package-version-in-python/
turtle https://blog.finxter.com/how-to-check-turtle-package-version-in-python/
turtledemo https://blog.finxter.com/how-to-check-turtledemo-package-version-in-python/
types https://blog.finxter.com/how-to-check-types-package-version-in-python/
typing https://blog.finxter.com/how-to-check-typing-package-version-in-python/
unicodedata https://blog.finxter.com/how-to-check-unicodedata-package-version-in-python/
unittest https://blog.finxter.com/how-to-check-unittest-package-version-in-python/
urllib https://blog.finxter.com/how-to-check-urllib-package-version-in-python/
uu https://blog.finxter.com/how-to-check-uu-package-version-in-python/
uuid https://blog.finxter.com/how-to-check-uuid-package-version-in-python/
venv https://blog.finxter.com/how-to-check-venv-package-version-in-python/
warnings https://blog.finxter.com/how-to-check-warnings-package-version-in-python/
wave https://blog.finxter.com/how-to-check-wave-package-version-in-python/
weakref https://blog.finxter.com/how-to-check-weakref-package-version-in-python/
webbrowser https://blog.finxter.com/how-to-check-webbrowser-package-version-in-python/
winreg https://blog.finxter.com/how-to-check-winreg-package-version-in-python/
winsound https://blog.finxter.com/how-to-check-winsound-package-version-in-python/
wsgiref https://blog.finxter.com/how-to-check-wsgiref-package-version-in-python/
xdrlib https://blog.finxter.com/how-to-check-xdrlib-package-version-in-python/
xml https://blog.finxter.com/how-to-check-xml-package-version-in-python/
xmlrpc https://blog.finxter.com/how-to-check-xmlrpc-package-version-in-python/
zipapp https://blog.finxter.com/how-to-check-zipapp-package-version-in-python/
zipfile https://blog.finxter.com/how-to-check-zipfile-package-version-in-python/
zipimport https://blog.finxter.com/how-to-check-zipimport-package-version-in-python/
zlib https://blog.finxter.com/how-to-check-zlib-package-version-in-python/
zoneinfo https://blog.finxter.com/how-to-check-zoneinfo-package-version-in-python/
boto3 https://blog.finxter.com/how-to-check-boto3-package-version-in-python/
botocore https://blog.finxter.com/how-to-check-botocore-package-version-in-python/
urllib3 https://blog.finxter.com/how-to-check-urllib3-package-version-in-python/
setuptools https://blog.finxter.com/how-to-check-setuptools-package-version-in-python/
requests https://blog.finxter.com/how-to-check-requests-package-version-in-python/
s3transfer https://blog.finxter.com/how-to-check-s3transfer-package-version-in-python/
six https://blog.finxter.com/how-to-check-six-package-version-in-python/
python-dateutil https://blog.finxter.com/how-to-check-python-dateutil-package-version-in-python/
certifi https://blog.finxter.com/how-to-check-certifi-package-version-in-python/
idna https://blog.finxter.com/how-to-check-idna-package-version-in-python/
pyyaml https://blog.finxter.com/how-to-check-pyyaml-package-version-in-python/
typing-extensions https://blog.finxter.com/how-to-check-typing-extensions-package-version-in-python/
charset-normalizer https://blog.finxter.com/how-to-check-charset-normalizer-package-version-in-python/
pip https://blog.finxter.com/how-to-check-pip-package-version-in-python/
numpy https://blog.finxter.com/how-to-check-numpy-package-version-in-python/
google-api-core https://blog.finxter.com/how-to-check-google-api-core-package-version-in-python/
wheel https://blog.finxter.com/how-to-check-wheel-package-version-in-python/
cryptography https://blog.finxter.com/how-to-check-cryptography-package-version-in-python/
pyparsing https://blog.finxter.com/how-to-check-pyparsing-package-version-in-python/
packaging https://blog.finxter.com/how-to-check-packaging-package-version-in-python/
jmespath https://blog.finxter.com/how-to-check-jmespath-package-version-in-python/
awscli https://blog.finxter.com/how-to-check-awscli-package-version-in-python/
rsa https://blog.finxter.com/how-to-check-rsa-package-version-in-python/
pyasn1 https://blog.finxter.com/how-to-check-pyasn1-package-version-in-python/
importlib-metadata https://blog.finxter.com/how-to-check-importlib-metadata-package-version-in-python/
zipp https://blog.finxter.com/how-to-check-zipp-package-version-in-python/
pyjwt https://blog.finxter.com/how-to-check-pyjwt-package-version-in-python/
colorama https://blog.finxter.com/how-to-check-colorama-package-version-in-python/
pytz https://blog.finxter.com/how-to-check-pytz-package-version-in-python/
click https://blog.finxter.com/how-to-check-click-package-version-in-python/
pandas https://blog.finxter.com/how-to-check-pandas-package-version-in-python/
protobuf https://blog.finxter.com/how-to-check-protobuf-package-version-in-python/
tensorflow https://blog.finxter.com/how-to-check-tensorflow-package-version-in-python/
attrs https://blog.finxter.com/how-to-check-attrs-package-version-in-python/
cffi https://blog.finxter.com/how-to-check-cffi-package-version-in-python/
oauthlib https://blog.finxter.com/how-to-check-oauthlib-package-version-in-python/
jinja2 https://blog.finxter.com/how-to-check-jinja2-package-version-in-python/
progress https://blog.finxter.com/how-to-check-progress-package-version-in-python/
requests-oauthlib https://blog.finxter.com/how-to-check-requests-oauthlib-package-version-in-python/
markupsafe https://blog.finxter.com/how-to-check-markupsafe-package-version-in-python/
pycparser https://blog.finxter.com/how-to-check-pycparser-package-version-in-python/
docutils https://blog.finxter.com/how-to-check-docutils-package-version-in-python/
google-auth https://blog.finxter.com/how-to-check-google-auth-package-version-in-python/
cachetools https://blog.finxter.com/how-to-check-cachetools-package-version-in-python/
pyasn1-modules https://blog.finxter.com/how-to-check-pyasn1-modules-package-version-in-python/
wrapt https://blog.finxter.com/how-to-check-wrapt-package-version-in-python/
googleapis-common-protos https://blog.finxter.com/how-to-check-googleapis-common-protos-package-version-in-python/
psutil https://blog.finxter.com/how-to-check-psutil-package-version-in-python/
isodate https://blog.finxter.com/how-to-check-isodate-package-version-in-python/
pyarrow https://blog.finxter.com/how-to-check-pyarrow-package-version-in-python/
sqlalchemy https://blog.finxter.com/how-to-check-sqlalchemy-package-version-in-python/
azure-core https://blog.finxter.com/how-to-check-azure-core-package-version-in-python/
lxml https://blog.finxter.com/how-to-check-lxml-package-version-in-python/
chardet https://blog.finxter.com/how-to-check-chardet-package-version-in-python/
tomli https://blog.finxter.com/how-to-check-tomli-package-version-in-python/
msrest https://blog.finxter.com/how-to-check-msrest-package-version-in-python/
async-timeout https://blog.finxter.com/how-to-check-async-timeout-package-version-in-python/
grpcio https://blog.finxter.com/how-to-check-grpcio-package-version-in-python/
decorator https://blog.finxter.com/how-to-check-decorator-package-version-in-python/
aiobotocore https://blog.finxter.com/how-to-check-aiobotocore-package-version-in-python/
werkzeug https://blog.finxter.com/how-to-check-werkzeug-package-version-in-python/
pillow https://blog.finxter.com/how-to-check-pillow-package-version-in-python/
aiohttp https://blog.finxter.com/how-to-check-aiohttp-package-version-in-python/
multidict https://blog.finxter.com/how-to-check-multidict-package-version-in-python/
beautifulsoup4 https://blog.finxter.com/how-to-check-beautifulsoup4-package-version-in-python/
soupsieve https://blog.finxter.com/how-to-check-soupsieve-package-version-in-python/
scipy https://blog.finxter.com/how-to-check-scipy-package-version-in-python/
yarl https://blog.finxter.com/how-to-check-yarl-package-version-in-python/
pygame https://blog.finxter.com/how-to-check-pygame-package-version-in-python/
google-cloud-storage https://blog.finxter.com/how-to-check-google-cloud-storage-package-version-in-python/
py https://blog.finxter.com/how-to-check-py-package-version-in-python/
fsspec https://blog.finxter.com/how-to-check-fsspec-package-version-in-python/
google-cloud-bigquery https://blog.finxter.com/how-to-check-google-cloud-bigquery-package-version-in-python/
importlib-resources https://blog.finxter.com/how-to-check-importlib-resources-package-version-in-python/
pytest https://blog.finxter.com/how-to-check-pytest-package-version-in-python/
pyqt https://blog.finxter.com/how-to-check-pyqt-package-version-in-python/
greenlet https://blog.finxter.com/how-to-check-greenlet-package-version-in-python/
azure-storage-blob https://blog.finxter.com/how-to-check-azure-storage-blob-package-version-in-python/
jsonschema https://blog.finxter.com/how-to-check-jsonschema-package-version-in-python/
pluggy https://blog.finxter.com/how-to-check-pluggy-package-version-in-python/
tqdm https://blog.finxter.com/how-to-check-tqdm-package-version-in-python/
pyopenssl https://blog.finxter.com/how-to-check-pyopenssl-package-version-in-python/
platformdirs https://blog.finxter.com/how-to-check-platformdirs-package-version-in-python/
s3fs https://blog.finxter.com/how-to-check-s3fs-package-version-in-python/
nltk https://blog.finxter.com/how-to-check-nltk-package-version-in-python/
tabulate https://blog.finxter.com/how-to-check-tabulate-package-version-in-python/
frozenlist https://blog.finxter.com/how-to-check-frozenlist-package-version-in-python/
aiosignal https://blog.finxter.com/how-to-check-aiosignal-package-version-in-python/
asn1crypto https://blog.finxter.com/how-to-check-asn1crypto-package-version-in-python/
pyrsistent https://blog.finxter.com/how-to-check-pyrsistent-package-version-in-python/
toml https://blog.finxter.com/how-to-check-toml-package-version-in-python/
filelock https://blog.finxter.com/how-to-check-filelock-package-version-in-python/
flask https://blog.finxter.com/how-to-check-flask-package-version-in-python/
dash https://blog.finxter.com/how-to-check-dash-package-version-in-python/
websocket-client https://blog.finxter.com/how-to-check-websocket-client-package-version-in-python/
google-cloud-core https://blog.finxter.com/how-to-check-google-cloud-core-package-version-in-python/
google-resumable-media https://blog.finxter.com/how-to-check-google-resumable-media-package-version-in-python/
future https://blog.finxter.com/how-to-check-future-package-version-in-python/
azure-common https://blog.finxter.com/how-to-check-azure-common-package-version-in-python/
scikit-learn https://blog.finxter.com/how-to-check-scikit-learn-package-version-in-python/
pygments https://blog.finxter.com/how-to-check-pygments-package-version-in-python/
itsdangerous https://blog.finxter.com/how-to-check-itsdangerous-package-version-in-python/
openpyxl https://blog.finxter.com/how-to-check-openpyxl-package-version-in-python/
et-xmlfile https://blog.finxter.com/how-to-check-et-xmlfile-package-version-in-python/
psycopg2-binary https://blog.finxter.com/how-to-check-psycopg2-binary-package-version-in-python/
iniconfig https://blog.finxter.com/how-to-check-iniconfig-package-version-in-python/
Posted on Leave a comment

Before After Image in Plotly Dash

5/5 – (1 vote)

💡 This article will show you how to use the BeforeAfter image component in your Plotly Dash project.


Dash book author Ann just created the following stunning web project visualizing before/after galaxy images from the James Webb Space Telescope in a simple and straightforward Dash app using the BeforeAfter component of the dash-extensions library.

pip install dash-extensions

Before we dive into the code, here’s a screenshot of the stunning interactive dashboard visualization created in the project:

Feel free to visit the live app showing different exciting images from the Hubble and Webb telescopes here:

🌎 Interactive Live App: https://dash-webb-compare.herokuapp.com/

It’s fun to play with it for 5-minutes—the pics from the Universe are stunning! 🐍


You can find the source code here:

💻 Full Source Code: https://github.com/AnnMarieW/webb-compare

The code to produce this easy app can be packed in only ~40 lines Python!

I highlighted the necessary code to create the BeforeAfter component from the dash-extensions package:

from dash import Dash, html
from dash_extensions import BeforeAfter
import dash_mantine_components as dmc app = Dash(__name__) header = html.Div( [ dmc.Title("James Webb Space Telescope", order=1), dmc.Text("First Images -- Before and After -- Hubble vs Webb"), dmc.Space(h="md"), ],
) def make_before_after(before, after): return html.Div( [ dmc.Space(h=40), dmc.Group( [dmc.Text("Hubble"), dmc.Text("Webb")], position="apart", style={"width": 1000}, ), BeforeAfter(before=before, after=after, height=800, width=1000), ], ) tabs = dmc.Tabs( [ dmc.Tab(make_before_after("/assets/webb_deep_field.jpg", "/assets/deep_field.jpg"), label="Galaxy Cluster SMACS 0723"), dmc.Tab(make_before_after("/assets/webb_stephans_quintet.jpg", "/assets/stephans_quintet.jpg"), label="Stephans Quintet"), dmc.Tab(make_before_after("assets/webb_carina.jpg", "/assets/carina.png"), label="Carina Nebula"), dmc.Tab(make_before_after("assets/webb_southern_nebula.jpg", "assets/southern_nebula.jpg"), label="Southern Ring Nebula"), ],
) app.layout = dmc.MantineProvider( dmc.Container([header, tabs]), theme={"colorScheme": "dark"}, withGlobalStyles=True
) if __name__ == "__main__": app.run()

It makes use of the BeforeAfter component and the dash_mantine_components from Plotly Dash.

Adam’s video greatly explains the Before After Image Slider — feel free to watch it and leave a like in the video for his effort educating the Dash community for free with outstanding content:

You can find a tutorial on how to install dash here.

You can find our full book on Python Dash here:

Book Python Dash


If you’re interested in learning more about how to create beautiful dashboard applications in Python, check out our new book Python Dash.

You’ve seen dashboards before; think election result visualizations you can update in real-time, or population maps you can filter by demographic.

With the Python Dash library, you’ll create analytic dashboards that present data in effective, usable, elegant ways in just a few lines of code.

Get the book on NoStarch or Amazon!