The numpy.polymulx function multiplies the polynomial c with a value x which is the independent variable.
Arguments
Type
Description
c
array_like or poly1d object
The input polynomials to be multiplied
The following table shows the return value of the function:
Type
Description
Return Value
ndarray or poly1d object
The polynomial resulting from the multiplication of the inputs. If either inputs is a poly1d object, then the output is also a poly1d object. Otherwise, it is a 1D array of polynomial coefficients from highest to lowest degree.
Let’s dive into some examples to show how the function is used in practice:
This function is inspired from this Github repository.
Any master coder has a “hands-on” mentality with a bias towards action. Try it yourself—play with the function in the following interactive code shell:
Exercise: Change the parameters of your polynomials and print them without the comparisons. Do you understand where they come from?
With the release of Visual Studio 2019 16.7 Preview 4, you can now try out our new experimental Razor editor for local development with MVC, Razor Pages, and Blazor. We’re excited for you to give it a try!
Enabling the new Razor editor
To enable the new experimental Razor editor in Visual Studio 2019 16.7 Preview 4 or later:
Go to Tools > Options > Environment > Preview Features and select the Enable experimental Razor editor option:
Select OK and restart Visual Studio
That’s it! You’re now setup to use the new Razor editor when working with Razor files locally (.cshtml and .razor).
What is Razor?
Razor is a templating language based on HTML and C# used to define dynamic rendering logic for .NET web apps based on MVC, Razor Pages, and Blazor. In MVC and Razor Pages apps you use Razor to define the rendering logic for your views and pages using .cshtml files. In Blazor, you use Razor to author reusable UI components in .razor files. Razor is a critical part of the experience for building web apps with .NET.
You can give Razor a try today by building your first web app with ASP.NET Core or Blazor.
Why a new Razor editor?
Part of the value of Razor is the rich tooling experience Visual Studio provides for editing Razor files. Visual Studio today provides IntelliSense, completions, and diagnostics for HTML, CSS, JavaScript, C#, and Razor specific syntax all within the same Razor file.
Visual Studio does some tricky gymnastics to enable editor support for all of these languages at the same time in Razor files. The Razor document is parsed to determine its constituent parts, and then each part is projected into a language specific buffer called a projection buffer. What you see in Visual Studio when editing a Razor document are a collection of little windows into each of these projection buffers to make up one whole document. Each language service then independently handles the editing experiences for each of these separate projection buffers.
The way Visual Studio handles this Razor code looks something like this:
This project buffer setup works well for Visual Studio and Visual Studio for Mac, but it’s problematic for remote editing scenarios, like Visual Studio LiveShare or Visual Studio Codespaces. It also can’t be used for editors that don’t have projection buffer support, like Visual Studio Code. The lack of a central orchestrator for the Razor editor also makes it difficult to enable new features without careful coordination between the various language service implementations (since they each control their own experience in projected scenarios).
A Razor Language Server
To enable broader support for Razor editing, we have been working for some time on a new Razor editor for ASP.NET Core projects based on a Razor Language Server. This new Razor Language Server implements editor features like auto completion, go to definition, etc. through the Language Server Protocol (LSP), which defines a standard way for an editor or IDE to enable these features. An IDE specific Razor extension then handles coordinating with the Razor Language Server and the other language servers for HTML & C#.
This new Razor Language Server is already being used to enable Razor support in Visual Studio Code as part of the C# extension. It will be the basis for the Razor editing support in Visual Studio Codespaces and Visual Studio LiveShare. And now it is available for local development in Visual Studio as a preview feature.
Currently our focus has been on making the new LSP based Razor editor have functional parity with the existing Visual Studio Razor editing experience (as noted below, there are still a few functional gaps to address). In future releases we expect to fill these functional gaps add significant new functionality, like bringing many more of the C# editing features to Razor, and enabling other new Razor specific productivity improvements.
Known issues
The new Razor editor is currently experimental and has some known limitations. The following Razor editor features have not yet been fully implemented and will be added in a future release:
JavaScript and CSS IntelliSense support
Colorization for C#, JavaScript, CSS, Blazor components, Tag Helpers, and tooltips
Formatting is limited to only C# code in @code and @functions blocks with no embedded HTML markup or Razor syntax
URL picker support in HTML
C# snippets (‘prop’, ‘ctor’, etc.)
Complex C# completions (for example, generating overrides)
Go-to-definition/implementation from C# to Razor
Renames in C# files do not propagate to Razor files
Matching identifier highlight support for HTML and curly braces
There are also some functional issues with the new Razor editor in 16.7 Preview 4 that will be addressed in a future release:
C# error squiggles may be misaligned
Unnecessary informational errors reported for unnecessary using directives in Razor files
Blazor components & Tag Helpers are currently colored like C# classes and don’t respect the Tag Helper colorization option
Give feedback
These are still the early days for the new LSP-based Razor editing experience in Visual Studio. We know that there’s still a lot of work to do before it can replace the existing Razor editing experience in Visual Studio. The new Razor tooling will remain optional and experimental in 16.7 and we don’t expect to make it the default Razor editor until it surpasses the functionality of the existing editor. But, we wanted to share our progress as early as possible to start getting your feedback on how well the new Razor editor works for you. To ensure we ship the best Razor editing experience possible, please give the new Razor tooling a try and let us know what you think. You can share your feedback with us by creating Razor Tooling issues on Github in the ASP.NET Core repo. We appreciate your feedback!
Summary: To use an elif branch in the ternary operator, use another ternary operator as the result of the else branch (nested ternary operator). The nested ternary operator x if c0 else y if c1 else z returns x if condition c0 is met, else if (elif) condition c1 is met, it returns y, else it returns z.
Problem: You may have seen the ternary operator x if c else y. Is there a similar ternary operator with an additional elif statement? In pseudocode, you want something like:
# Pseudocodex if c elif y0 else y1
In other words: What’s the best way of extending the ternary operator to what you may call a “quaternary” operator?
Background: The most basic ternary operator x if c else y consists of three operands x, c, and y. It is an expression with a return value. The ternary operator returns x if the Boolean expression c evaluates to True. Otherwise, if the expression c evaluates to False, the ternary operator returns the alternative y.
Example: Say, you want to write the following if-then-else condition in a single line of code:
>>> x = 42
>>> if x > 42:
>>> print("no")
>>> elif x == 42:
>>> print("yes")
>>> else:
>>> print("maybe")
yes
The elif branch wins: you print the output "yes" to the shell.
But how to do it in a single line of code? Just use the ternary operator with an elif statement won’t work (it’ll throw a syntax error):
Method: Nested Ternary Operator
The answer is simple: nest two ternary operators like so:
>>> print("no") if x > 42 else print("yes") if x == 42 else print("maybe")
yes
If the value x is larger than 42, we print “no” to the shell. Otherwise, we execute the remainder of the code (which is a ternary operator by itself). If the value x is equal to 42, we print “yes”, otherwise “maybe”.
So by nesting multiple ternary operators, we can greatly increase our Python one-liner power!
Try it yourself:
Exercise: Which method is more concise? Count the number of characters (or write a small script that does it for you ;))!
Python Ternary Multiple Elif
In the previous example, you’ve seen how a nested ternary operator semantically adds an elif branch. In theory, you can add an arbitrary number of elif branches by nesting more and more ternary operators:
# Method 1: If ... Elif ... Else
x = 42
if x > 42: y = 1
elif x == 42: y = 2
elif x == 12: y = 3
else: y = 4
print(y)
# 2 # Method 2: Nested Ternary Operator
y = 1 if x > 42 else 2 if x == 42 else 3 if x == 12 else 4
print(y)
# 2
However, readability suffers badly and you shouldn’t do anything of the sort. A simple mult-line if ... elif ... elif ... else statement is better!
Discussion
However, even if the nested ternary operator is more concise than an if-elif-else statement, it’s not recommended because of readability of your code. Most programmers don’t have any trouble understanding a simple if-elif-else statement. But a nested ternary operator is an advanced-level piece of Python code and especially beginners will struggle understanding it.
So, it’s great that you’ve expanded your One-Liner Superpower. But you should use it wisely!
Related Video: If-Then-Else in One Line of Python Code
Python One-Liners Book
Python programmers will improve their computer science skills with these useful one-liners.
Python One-Linerswill teach you how to read and write “one-liners”: concise statements of useful functionality packed into a single line of code. You’ll learn how to systematically unpack and understand any line of Python code, and write eloquent, powerfully compressed Python like an expert.
The book’s five chapters cover tips and tricks, regular expressions, machine learning, core data science topics, and useful algorithms. Detailed explanations of one-liners introduce key computer science concepts and boost your coding and analytical skills. You’ll learn about advanced Python features such as list comprehension, slicing, lambda functions, regular expressions, map and reduce functions, and slice assignments. You’ll also learn how to:
• Leverage data structures to solve real-world problems, like using Boolean indexing to find cities with above-average pollution • Use NumPy basics such as array, shape, axis, type, broadcasting, advanced indexing, slicing, sorting, searching, aggregating, and statistics • Calculate basic statistics of multidimensional data arrays and the K-Means algorithms for unsupervised learning • Create more advanced regular expressions using grouping and named groups, negative lookaheads, escaped characters, whitespaces, character sets (and negative characters sets), and greedy/nongreedy operators • Understand a wide range of computer science topics, including anagrams, palindromes, supersets, permutations, factorials, prime numbers, Fibonacci numbers, obfuscation, searching, and algorithmic sorting
By the end of the book, you’ll know how to write Python at its most refined, and create concise, beautiful pieces of “Python art” in merely a single line.
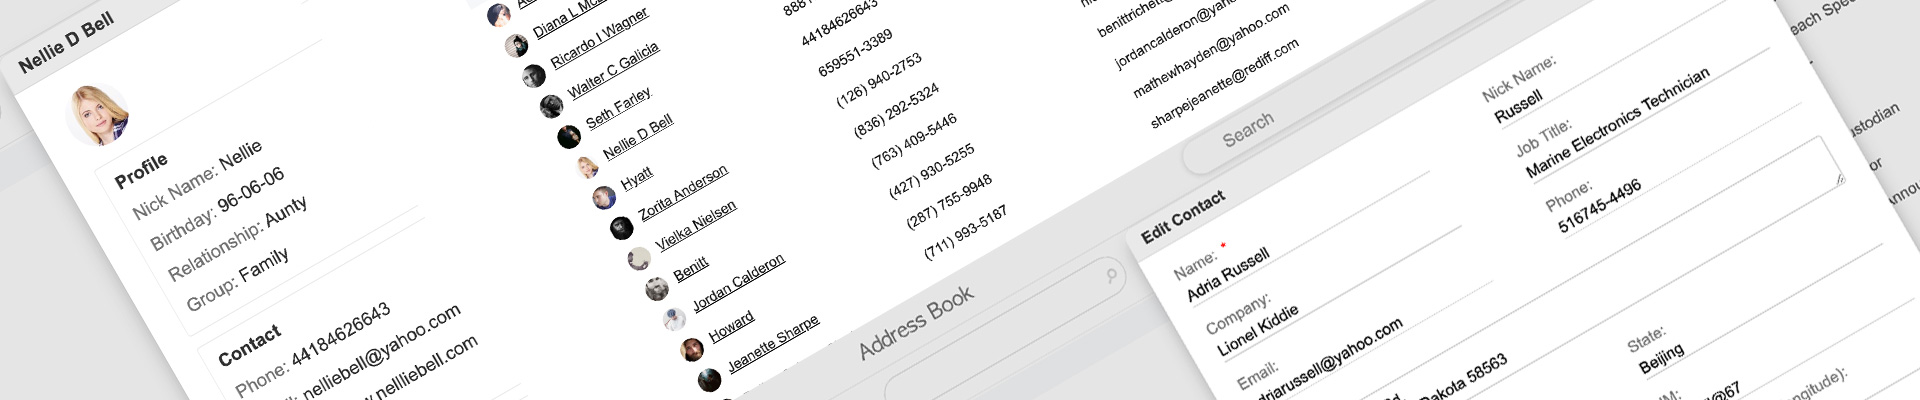
Built with security as the prime focus. Safe from SQL injection, CSRF attack, XSS attack and standard security measures in place.
Easy customization
Code is sleek, modular, separated in layers for easy understanding and customization. PSR standard compliant source code with optimum comments. Easy to understand, enhance and maintain.
VCF vCard support
Contacts can be exported as vCard files. It enables interoperability. As it can be imported with other contact management software.
Custom fields
Support for custom fields in the contacts. Everyone has different needs, the fields in the form may not be sufficient for you. But do not worry, there is support for custom fields. On the fly at runtime, users can add custom information. It can be searched too.
Import and export
Contacts form fields are carefully planned by considering standard address books. You can use the template and bulk import contacts to the address book. Also, you can export the contacts and use it in other contact management software.
What if you have a ternary operator that’s very long?
var = 'I want to learn Python' if 42**2<166 else 'I want to learn Go programming'
print(var)
# I want to learn Go programming
Problem: How to write the ternary operator in multiple lines?
Short Recap: Ternary Operator
Ternary Operator: The most basic ternary operator x if c else y consists of three operands x, c, and y. It is an expression with a return value. The ternary operator returns x if the Boolean expression c evaluates to True. Otherwise, if the expression c evaluates to False, the ternary operator returns the alternative y.
Syntax: The three operands are written as x if c else y which reads as “return x if c else return y“. Let’s write this more intuitively as:
<OnTrue> if <Condition> else <OnFalse>
Operand
Description
<OnTrue>
The return expression of the operator in case the condition evaluates to True
<Condition>
The condition that determines whether to return the <On True> or the <On False> branch.
<OnFalse>
The return expression of the operator in case the condition evaluates to False
var = 'I want to learn Python' if 42**2<166 else 'I want to learn Go programming'
print(var) var = ('I want to learn Python' if 42**2<166 else 'I want to learn Go programming')
print(var)
# I want to learn Go programming
This is the PEP8 standard way of breaking long lines—if you cannot do it in a more natural way (such as avoiding the ternary operator and using the if statement in this example).
Try it yourself:
Exercise: Write a nested ternary operator and break it into multiple lines!
Where to Go From Here?
Enough theory, let’s get some practice!
To become successful in coding, you need to get out there and solve real problems for real people. That’s how you can become a six-figure earner easily. And that’s how you polish the skills you really need in practice. After all, what’s the use of learning theory that nobody ever needs?
Practice projects is how you sharpen your saw in coding!
Do you want to become a code master by focusing on practical code projects that actually earn you money and solve problems for people?
Then become a Python freelance developer! It’s the best way of approaching the task of improving your Python skills—even if you are a complete beginner.
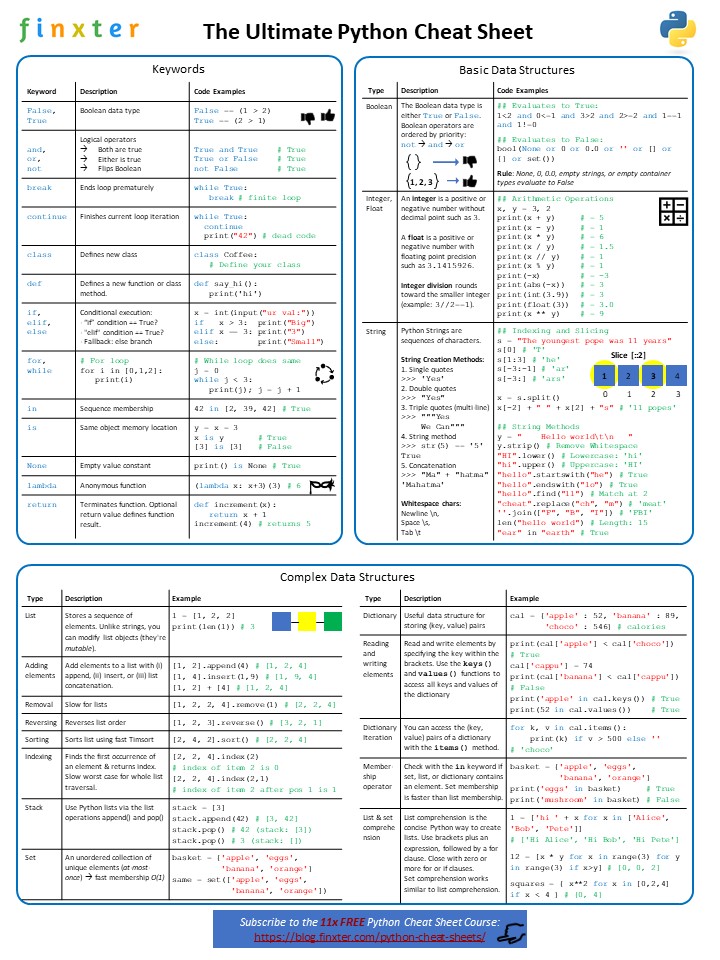
Do you want to learn Python but you’re overwhelmed and you don’t know where to start? Learn with Python cheat sheets! They compress the most important information in an easy-to-digest 1-page format.
Here’s the new Python cheat sheet I just created—my goal was to make it the world’s most concise Python cheat sheet!
You may know the ternary operator x if c else y in Python which reads as “return x if c else return y“. But you may not know that you can also write the ternary operator in a shorter form as (y, x)[c]. Let’s dive into this concise way of hacking your own ternary operator!
A shorthand form of the ternary operator is the following tuple syntax hack.
Syntax: You can use the tuple syntax (x, y)[c] consisting of a tuple (x, y) and a condition c enclosed in a square bracket. Here’s a more intuitive way to represent this tuple syntax.
(<OnFalse>, <OnTrue>)[<Condition>]
Operand
Description
<OnTrue>
The return expression of the operator in case the condition evaluates to True
<Condition>
The condition that determines whether to return the <On True> or the <On False> branch.
<OnFalse>
The return expression of the operator in case the condition evaluates to False
Tuple Syntax of the Ternary Operator
Exercise: Run the code and compare both ternary operators—the original and the tuple syntax hack.
In fact, the order of the <OnFalse> and <OnTrue> operands is just flipped when compared to the basic ternary operator. First, you have the branch that’s returned if the condition does NOT hold. Second, you run the branch that’s returned if the condition holds.
age = 17
print(('wtf', 'What?')[age<20]) 'What?'
The condition age<20 holds so the return value passed into the print() function is the <OnTrue> branch 'What?'. Don’t worry if this confuses you—you’re not alone. Let’s clarify why this tuple syntax works the way it does!
First, you create a tuple ('wtf', 'What?'). To access the first tuple value 'wtf', you’d use the standard indexing syntax('wtf', 'What?')[0]. To access the second tuple value 'What?', you’d use the standard indexing syntax ('wtf', 'What?')[1].
Second, you create a condition age<20. You use this condition as the indexing value. You end up with either ('wtf', 'What?')[False] or ('wtf', 'What?')[True]. As you may know, the Booleans False and True are represented through integers 0 and 1 in Python. Thus, you get ('wtf', 'What?')[0] and ('wtf', 'What?')[1], respectively.
In other words: if your condition evaluates to False, you access the first tuple value. If your condition evaluates to True, you access the second tuple value.
Where to Go From Here?
Enough theory, let’s get some practice!
To become successful in coding, you need to get out there and solve real problems for real people. That’s how you can become a six-figure earner easily. And that’s how you polish the skills you really need in practice. After all, what’s the use of learning theory that nobody ever needs?
Practice projects is how you sharpen your saw in coding!
Do you want to become a code master by focusing on practical code projects that actually earn you money and solve problems for people?
Then become a Python freelance developer! It’s the best way of approaching the task of improving your Python skills—even if you are a complete beginner.
Ternary (from Latin ternarius) is an adjective meaning “composed of three items”. (source) So, literally, the ternary operator in Python is composed of three operands.
Syntax: The three operands are written in an intuitive combination ... if ... else ....
<On True> if <Condition> else <On False>
Operand
Description
<On True>
The return expression of the operator in case the condition evaluates to True
<Condition>
The condition that determines whether to return the <On True> or the <On False> branch.
<On False>
The return expression of the operator in case the condition evaluates to False
Operands of the Ternary Operator
Let’s have a look at a minimum example in our interactive code shell:
Exercise: Run the code and input your age. What’s the output? Run the code again and try to change the output!
Let’s dive into the different variants of the Ternary operator in Python!
Python Ternary Examples
Let’s have a quick overview of a few examples on different methods to use the ternary operator:
age = 17 # Method 1: Basic Ternary
print('wtf' if age<20 else 'What?') 'wtf' # Method 2: Ternary Tuple
# (onFalse, onTrue) [condition]
print(('wtf', 'What?') [age<20]) 'What?' # Method 3: Ternary Dictionary
# Use Dictionary True/False values
print({True: 'wtf', False: 'What?'} [age<20]) 'wtf' # Method 4: Ternary Lambda
# Lambda function with 0 arguments
# Execute only one branch expression --> more efficient
print((lambda: 'wtf', lambda:'What?') [age<20]()) 'What?'
Some of them are pretty confusing, right? Stay with me for a moment because you’ll learn about each of those next!
Python Ternary Tuple
Python Ternary Dictionary
Python Ternary Lambda
Python Ternary Multiple Lines
Python Ternary Elif
Python Ternary Nested
Python Ternary Plot
Python Ternary Diagram
Python Ternary Evaluation Order
Python Ternary Try Except
Python Ternary Tree
Python Ternary in List Comprehension
Python Ternary Pep8 Pythonic
Python Ternary Can’t Assign to Conditional Expression
Python Ternary For Loop
Python Ternary Break
Python Ternary None
Python Ternary Multiple Conditions
Where to Go From Here?
Enough theory, let’s get some practice!
To become successful in coding, you need to get out there and solve real problems for real people. That’s how you can become a six-figure earner easily. And that’s how you polish the skills you really need in practice. After all, what’s the use of learning theory that nobody ever needs?
Practice projects is how you sharpen your saw in coding!
Do you want to become a code master by focusing on practical code projects that actually earn you money and solve problems for people?
Then become a Python freelance developer! It’s the best way of approaching the task of improving your Python skills—even if you are a complete beginner.
Python programmers will improve their computer science skills with these useful one-liners.
Python One-Linerswill teach you how to read and write “one-liners”: concise statements of useful functionality packed into a single line of code. You’ll learn how to systematically unpack and understand any line of Python code, and write eloquent, powerfully compressed Python like an expert.
The book’s five chapters cover tips and tricks, regular expressions, machine learning, core data science topics, and useful algorithms. Detailed explanations of one-liners introduce key computer science concepts and boost your coding and analytical skills. You’ll learn about advanced Python features such as list comprehension, slicing, lambda functions, regular expressions, map and reduce functions, and slice assignments. You’ll also learn how to:
• Leverage data structures to solve real-world problems, like using Boolean indexing to find cities with above-average pollution • Use NumPy basics such as array, shape, axis, type, broadcasting, advanced indexing, slicing, sorting, searching, aggregating, and statistics • Calculate basic statistics of multidimensional data arrays and the K-Means algorithms for unsupervised learning • Create more advanced regular expressions using grouping and named groups, negative lookaheads, escaped characters, whitespaces, character sets (and negative characters sets), and greedy/nongreedy operators • Understand a wide range of computer science topics, including anagrams, palindromes, supersets, permutations, factorials, prime numbers, Fibonacci numbers, obfuscation, searching, and algorithmic sorting
By the end of the book, you’ll know how to write Python at its most refined, and create concise, beautiful pieces of “Python art” in merely a single line.
In this one-liner tutorial, you’ll learn about the popular sorting algorithm Quicksort. Surprisingly, a single line of Python code is all you need to write the Quicksort algorithm!
Problem: Given a list of numerical values (integer or float). Sort the list in a single line of Python code using the popular Quicksort algorithm!
Example: You have list [4, 2, 1, 42, 3]. You want to sort the list in ascending order to obtain the new list [1, 2, 3, 4, 42].
Short answer: The following one-liner solution sorts the list recursively using the Quicksort algorithm:
q = lambda l: q([x for x in l[1:] if x <= l[0]]) + [l[0]] + q([x for x in l if x > l[0]]) if l else []
You can try it yourself using the following interactive code shell:
Now, let’s dive into some details!
A Conceptual Introduction
The following introduction is based on my new book “Python One-Liners”(Amazon Link) that teaches you the power of the single line of code (use it wisely)!
Introduction: Quicksort is not only a popular question in many code interviews – asked by Google, Facebook, and Amazon – but also a practical sorting algorithm that is fast, concise, and readable. Because of its beauty, you won’t find many introduction to algorithm classes which don’t discuss the Quicksort algorithm.
Overview: Quicksort sorts a list by recursively dividing the big problem (sorting the list) into smaller problems (sorting two smaller lists) and combining the solutions from the smaller problems in a way that it solves the big problem. In order to solve each smaller problem, the same strategy is used recursively: the smaller problems are divided into even smaller subproblems, solved separately, and combined. Because of this strategy, Quicksort belongs to the class of “Divide and Conquer” algorithms.
Algorithm: The main idea of Quicksort is to select a pivot element and then placing all elements that are larger or equal than the pivot element to the right and all elements that are smaller than the pivot element to the left. Now, you have divided the big problem of sorting the list into two smaller subproblems: sorting the right and the left partition of the list. What you do now is to repeat this procedure recursively until you obtain a list with zero elements. This list is already sorted, so the recursion terminates.
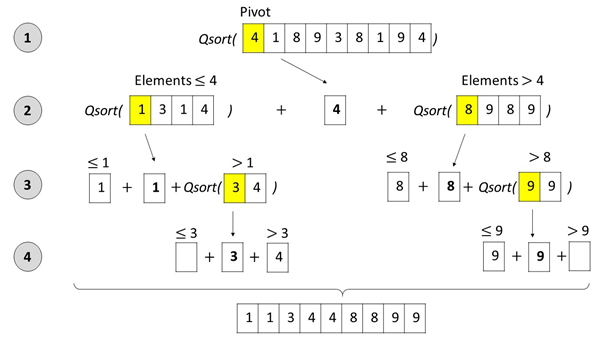
The following Figure shows the Quicksort algorithm in action:
Figure: The Quicksort algorithm selects a pivot element, splits up the list into (i) an unsorted sublist with all elements that are smaller or equal than the pivot, and (ii) an unsorted sublist with all elements that are larger than the pivot. Next, the Quicksort algorithm is called recursively on the two unsorted sublists to sort them. As soon as the sublists contain maximally one element, they are sorted by definition – the recursion ends. At every recursion level, the three sublists (left, pivot, right) are concatenated before the resulting list is handed to the higher recursion level.
This brings us to the following code:
Python One-Liner Quicksort [Code]
Create a function q which implements the Quicksort algorithm in a single line of Python code – and thus sorts any argument given as a list of integers.
## The Data
unsorted = [33, 2, 3, 45, 6, 54, 33] ## The One-Liner
q = lambda l: q([x for x in l[1:] if x <= l[0]]) + [l[0]] + q([x for x in l if x > l[0]]) if l else [] ## The Result
print(q(unsorted))
Listing: One-liner solution for the Quicksort algorithm using recursion.
What is the output of this code? Let’s see…
Explanation Quicksort One-Liner
We have already discussed the recursive Quicksort algorithm above. The one-liner resembles exactly the discussed algorithm. First, we create a new lambda function q which takes only one list argument l.
The lambda function has the following structure:
lambda l: q(left) + pivot + q(right) if l else []
The lambda function returns the empty list [] in the recursion base case (that is – the list to be sorted is empty and, therefore, trivially sorted).
In any other case, it selects the pivot element as the first element of list l, divides all elements into two sublists (left and right) based on whether they are smaller or larger than the pivot. To achieve this, we use simple list comprehension.
As the two sublists are not necessarily sorted, we recursively execute the Quicksort algorithm on them. Finally, we combine all three lists and return the sorted list. Therefore, the result is:
## The Result
print(q(unsorted))
# [2, 3, 6, 33, 33, 45, 54]
Related: For an interactive experience of what you’ve just learned, check out our Instagram post about the Quicksort algorithm:
To become successful in coding, you need to get out there and solve real problems for real people. That’s how you can become a six-figure earner easily. And that’s how you polish the skills you really need in practice. After all, what’s the use of learning theory that nobody ever needs?
Practice projects is how you sharpen your saw in coding!
Do you want to become a code master by focusing on practical code projects that actually earn you money and solve problems for people?
Then become a Python freelance developer! It’s the best way of approaching the task of improving your Python skills—even if you are a complete beginner.