Question: Given a Python list stored in a variable lst. How to remove the first and last elements from the list lst?
Example: The list ['Alice', 'Bob', 'Carl', 'Dave'] stored in variable lst becomes ['Bob', 'Carl'].
Method 1: Slicing List[1:-1]
To remove the first and last elements from a Python list, use the expression lst = lst[1:-1] that uses a Python feature called slicing with the syntax variable[start:stop] to iterate over a sequence starting from the start index (included) and ending in the element at stop index (excluded). If stop is a negative integer such as -i, Python takes the i-th right-most element.
To remove the first and last elements from a Python list, you can also use the slightly more complex expression lst = lst[1:len(lst)-1] that assigns the result of the slicing operation to the list and, thereby, overwrites the original longer list. We decrement the len() function result to obtain the index of the last element that is excluded from the slice.
To remove the first element of a Python list, you can use the list.pop(0) method. To remove the last element of a Python list, you can use the list.pop() method without argument. You can call both to remove the first and the last elements if the list has at least two elements.
Here’s a minimal example:
lst = ['Alice', 'Bob', 'Carl', 'Dave']
lst.pop() # remove last
lst.pop(0) # remove first
print(lst)
# ['Bob', 'Carl']
However, for a list with less than two elements, this will raise an IndexError: pop from empty list. A simple if check can make sure that the list has at least two elements—and otherwise simply override it with the empty list.
Here’s some background info in case you want to dive deeper into this approach:
The list.pop() method removes and returns the last element from an existing list. The list.pop(index) method with the optional argument index removes and returns the element at the position index.
This article will go over the top 21 most attractive developer jobs in the decade to come. Note that the purpose of this article is to look forward to the future rather than looking backward into the past. The future is inherently uncertain but we did everything we could (as you’ll see) to remain objective and use data to guide our predictions.
Here’s a quick tabular overview on the most relevant career paths and jobs you could pursue in the decade to come – if you’re a developer optimizing for the future rather than the past:
Okay, let’s dive into the meat—the most promising developer role for the upcoming decade(s)!
Blockchain Developer
A blockchain engineer operates, designs, develops, analyzes, implements, and supports a distributed blockchain network. Blockchain engineers manage specific business models dealing with blockchain technology.
The average annual income of a Blockchain engineer is between $105,180 and $108,560 according to Glassdoor (source):
But is there enough demand? Let’s have a look at Google trends to find out how interest evolves over time (source):
Do you want to become a Blockchain engineer? Here’s a learning path I’d propose in five steps to get started:
Data scientists use data to find quantifiable answers to questions that often need to be found as well!
For example, they not only find the answer to the question “How can company ABC make more money?” Instead, they may find that a better question to ask would be: “Who are the top 20% of the clients that bring 80% of the revenue, and what do they want in the first place?”
How much does a Data Scientist make per year?
Figure: Average Income of a Data Scientist in the US by Source. [1]
The average annual income of a Data Scientist in the United States is between $97,294 and $135,924 with an average of $116,505 and a median of $119,413 per year.
But is there enough demand? Let’s have a look at Google trends to find out how interest evolves over time (source):
Clearly, this is a long-term trend you can build your whole career on!
Do you want to become a Data Scientist? Here’s a step-by-step learning path I’d propose to get started with Data :
A Machine Learning Engineer creates, edits, analyzes, debugs, models, and supervises the development of machine learning models using programming languages such as Python or C++ and machine learning libraries such as Keras or TensorFlow.
How much does a Machine Learning Engineer make per year?
Figure: Average Machine Learning Engineer Income. [1]
The average annual income of a Machine Learning Engineer in the United States is between $112,000 and $157,000 with a median of $131,000 per year according to multiple data sources such as Indeed, Glassdoor, Salary.com, and Payscale.
Deep learning is a subset of machine learning using artificial neural network (ANN) models with more than three layers. ANNs are inspired by the behavior of the human brain to enable machines to learn — with the idea to connect neurons with each other via artificial “synapses” and learning is modeled as the collective weights and magnitude of the neural connections.
The average annual income of a Deep Learning Engineer in the United States is between $124,000 and $148,000 based on multiple sources such as Indeed, Ziprecruiter, and Salary.com.
A Deep Learning Engineer creates, edits, analyzes, debugs, and supervises the development of artificial neural networks (ANN) with multiple layers written in programming environments such as Python, TensorFlow, or Keras.
Do you want to become a Deep Learning Engineer? Here’s a step-by-step learning path I’d propose to get started with Deep Learning :
A computer science researcher and scientist identifies and answers open research questions in computer science. They apply scientific reasoning and research techniques to push the state-of-the-art forward in various fields such as machine learning, distributed systems, databases, algorithms, and data science.
Six of the most common activities of computer science researchers, based on my own experience:
reading research papers,
thinking about research questions and problems,
identifying research gaps and discussing them with their peers,
creating code and software systems for evaluation purposes,
writing research papers, and
presenting those scientific results at conferences and in journals.
The median annual income (=50th percentile) of a computer science researcher was $131,490 in May 2021. The bottom 10% (=10th percentile) of computer science researchers earned less than $74,210 and the top 10% (=90th percentile) earned more than $208,000.
A distributed system is a computer system spread across multiple computing devices connected via a communication network. Each participating device takes over part of the overall work performed by the system. By means of the collaboration of individual units, the system can provide services that each individual system component couldn’t provide on its own.
Some examples of distributed systems are:
Ethereumis a distributed system of Ethereum nodes connected via the Internet and a specific communication protocol.
Bitcoin is a distributed system of Bitcoin nodes connected via the Internet and a specific communication protocol as defined by the open-source Bitcoin protocol.
The World Wide Web is a distributed system of servers connected via IP to provide a coherent web experience via browsers and an HTML-like web experience.
A distributed systems engineer designs, implements, and debugs distributed systems for data storage, crypto & web3, or analytics. The idea is to design a distributed system that can provide a service to users that couldn’t be provided by a centralized system (e.g., providing a decentralized, censorship-free monetary network).
Figure: Average Income of a Distributed Systems Engineer in the US by Source. [1]
The average annual income of a Distributed Systems Engineer in the United States is between $97,000 and $169,656, with an average of $126,894 and a statistical median of $130,000 per year.
An AWS Developer creates, edits, analyzes, debugs, and supervises the development of software written for the AWS cloud services that support many programming languages such as Python or Java.
Learning AWS is one of the most important, most sought-after, and most profitable things you can do as a developer!
The average annual income of an AWS Developer in the United States is $122,799 per year according to ZipRecruiter. Another estimate is provided by Glassdoor that provides data supporting an annual income of AWS Developers of $115,000 per year.
An Android app developer is a programmer who focuses on software creation for mobile devices such as smartphones or wearables using the Android operating system.
As an Android app developer, your skill set varies depending on the concrete set of applications you’re working on. However, these skills will proof useful no matter what, and most successful Android app developers have these seven skills:
General programming skills (e.g., Java, C++, Python)
Figure: Average Income of an Android App Developer in the US by Source. [1]
The average annual income of an Android App Developer in the United States is between $85,000 and $126,577 with an average of $106,923 and a statistical median of $107,343 per year.
As a C++ developer, you create software in the programming language C++ which is among the most widely used programming languages. For example, Google, Amazon, Facebook all employ a large number of C++ developers.
The average annual income of a C++ Developer is between $45,000 and $140,000 according to PayScale with an average of $67,473 in the US based on 31 salary reports (source). But Indeed.com reports an even higher annual C++ developer income of $116,925 based on 480 salaries reported (source).
Do you want to become a C++ Developer? Here’s a step-by-step learning path I’d propose to get started with C++:
A full-stack web developer works both with back-end and front-end web technologies.
The back-end consists of the webserver infrastructure, databases, and code function integration to facilitate a smooth and secure serving of user requests.
The front-end focuses on the graphical user interface (GUI) of the website using HTML, CSS, and JavaScript with the goal of setting up the whole technology stack to enable users to view and interact with the website.
Full-stack developers have skills in all those fields so they often take crucial roles in overseeing the technical implementation of large web projects.
The average annual income of a Full-Stack Web Developer in the United States is between $79,584 and $108,984 with an average income of $98,454 and a median income of $99,274 per year according to our meta-study of 7 aggregated data sources such as Glassdoor and Indeed.
Figure: Average Income of a Full-Stack Developer in the US by Source. [1]
Let’s have a look at Google trends to find out how interest evolves over time (source):
A Solidity developer creates, edits, analyzes, and debugs code in the Solidity programming language used to develop smart contracts for modern Blockchain ecosystems such as Ethereum.
Do you want to become a Solidity Developer? Here’s a step-by-step learning path I’d propose to get started with Solidity:
A Python developer is a programmer who creates software in the Python programming language. Python developers are often involved in data science, web development, and machine learning applications.
A Python developer earns $65,000 (entry-level), $82,000 (mid-level), or $114,000 (experienced) per year in the US according to Indeed. (source)
Do you want to become a Python Developer? Here’s a step-by-step learning path I’d propose to get started with Python:
The average annual income of a Crypto Trading Bot Developer is similar to algorithmic traders of $104,422 (source). However, due to the novelty of the industry, there’s little official data. If you assume an hourly rate of $50 and an annual 2000 hours worked, the annual income of a crypto trading bot developer would be $100,000.
Let’s have a look at Google trends to find out how interest evolves over time (source):
Yes, this definitely is an interesting industry for programmers to make $50 per hour and more!
Trading bots are software programs that talk directly to financial exchanges. Crypto trading bots are programs that talk to crypto exchanges. A crypto bot developer develops those programs. Crypto trading bot developers tend to be very proficient in trading, financial algorithms, APIs, and web services.
Do you want to become a Crypto Trading Bot Developer? Here’s a learning path I’d propose in five steps to get started:
An Azure Developer creates, designs, edits, analyzes, debugs, deploys, and supervises the development of cloud applications written for the Azure cloud and development ecosystem.
The average annual income of an Azure Developer in the United States is $122,031 per year according to Talent.com. Entry-level Azure Developers start with $107,250 per year. Top earners make $127,000 and more in the US according to Glassdoor!
Let’s have a look at Google trends to find out how interest evolves over time (source):
Game Development is the art of creating games that involves multiple development stages such as game concept generation, game design, game development, game testing, game building, game deployment, and game release.
Game developers and video game developers create code for games in a variety of formats such as desktop-based games (Windows, macOS, Linux), consoles (PS2), web browsers (Chrome, Safari), crypto (Ethereum, Polygon/Optimism, Solana), and mobile phone (iOS, Android).
Figure: Average Income of a Game Developer in the US by Source. [1]
The average annual income of a Game Developer in the United States is between $64,053 and $115,846 with an average of $89,889 and a median of $92,061 per year.
A JavaScript developer creates dynamic web applications focusing mostly on the front-end logic—but recently some back-end JavaScript frameworks emerged as well. If you like web development and programming user interfaces, you’ll love the work as a JavaScript developer.
The average annual income of a JavaScript Developer is between $62,000 and $118,000 with an average of $84,000 per year according to Daxx.com and PayScale (source).
Do you want to become a JavaScript Developer? Here’s a step-by-step learning path I’d propose to get started with JavaScript and web development:
A quantitative developer (i.e., Quant) is a financial programmer focused on financial modeling and quantitative finance and trading.
Quants use their profound knowledge of
statistics and math,
finance,
data structures,
algorithms,
machine learning,
scientific computing,
data science,
chart technique, and
data visualization
to create models for financial prediction, backtesting, analysis, and implementation of trading and financial applications (e.g., for risk management).
Figure: Average Income of a Quant Developer in the US by Source. [1]
The expected annual income of a Quantitative Developer (Quant) in the United States is between $86,528 and $170,000 per year, with an average annual income of $127,375 per year and a median income of $136,321 per year.
A security engineer is a “white-hat hacker”, i.e., an IT professional who analyzes computer systems and computer networks to ensure they are running securely. This involves proactive analysis and understanding of possible security threats and attack vectors and designing the system to minimize the exposure to these threats.
Figure: Average Income of a Security Engineer in the US by Source. [1]
The average annual income of a Security Engineer in the United States is between $75,732 and $144,874, with an average of $108,851 and a statistical median of $105,928 per year.
A Test Automation Engineer is a software developer who creates automated software tests for existing or new applications. Testing is a crucial phase in the software development cycle to learn about bugs, usability, and security issues and fix them before deploying an application in the real world.
Figure: Average Income of a Test Automation Engineer in the US by Source. [1]
The expected annual income of a Test Automation Engineer in the United States is between $74,821 and $120,000 per year, with an average annual income of $95,285 per year and a median income of $93,657 per year.
A VHDL Developer developer creates, edits, analyzes, debugs, and supervises the development of software written in the VHDL programming language. VHDL is the other popular hardware description language. In fact, most professionals who know VHDL also know Verilog.
The annual income of a VHDL developer in the US can be as high as $169,500 and as low as $32,000 according to Ziprecruiter (source). Most VHDL developer make between $65,000 (25th percentile) and $135,000 (75th percentile) with top earners (90th percentile) making $157,500 annually across the United States.
A web developer is a programmer who specializes in the development of websites or applications viewed on web browsers, mobile devices, and large desktop screens that are transported over private or public networks such as the Internet.
A front-end web developer focuses on the graphical user interface (GUI) of the website using HTML, CSS, and JavaScript with the goal of setting up the whole technology stack to enable users to view and interact with the website.
The average annual income of a Front-end Web Developer in the United States is between $61,194 and $119,224 with an average income of $89,683 and a median income of $90,499 per year according to our meta-study of 8 aggregated data sources such as Glassdoor and Indeed.
The following graphic shows the individual data sources, as well as the average and median income level of a web developer in the US:
Figure: Average Income of a Front-End Web Developer in the US by Source. [1]
Feel free to join our free email academy to stay tuned and informed in many of those fields!
Programmer Humor – Blockchain
“Blockchains are like grappling hooks, in that it’s extremely cool when you encounter a problem for which they’re the right solution, but it happens way too rarely in real life.”source – xkcd
Where to Go From Here?
Enough theory. Let’s get some practice!
Coders get paid six figures and more because they can solve problems more effectively using machine intelligence and automation.
To become more successful in coding, solve more real problems for real people. That’s how you polish the skills you really need in practice. After all, what’s the use of learning theory that nobody ever needs?
You build high-value coding skills by working on practical coding projects!
Do you want to stop learning with toy projects and focus on practical code projects that earn you money and solve real problems for people?
If your answer is YES!, consider becoming a Python freelance developer! It’s the best way of approaching the task of improving your Python skills—even if you are a complete beginner.
If you just want to learn about the freelancing opportunity, feel free to watch my free webinar “How to Build Your High-Income Skill Python” and learn how I grew my coding business online and how you can, too—from the comfort of your own home.
In this article, I’ll show you how to check the version of a Python module (package, library).
These are the eight best ways to check the version of a Python module:
Method 1: pip show my_package
Method 2: pip list
Method 3: pip list | findstr my_package
Method 4: my_package.__version__
Method 5: importlib.metadata.version
Method 6: conda list
Method 7: pip freeze
Method 8: pip freeze | grep my_package
Let’s dive into some examples for each of those next!
Method 1: pip show
To check which version of a given Python library, say xyz, is installed, use pip show xyz or pip3 show xyz. For example, to check the version of your NumPy installation, run pip show numpy in your CMD/Powershell (Windows), or terminal (macOS/Linux/Ubuntu).
This will work if your pip installation is version 1.3 or higher—which is likely to hold in your case because pip 1.3 was released a decade ago in 2013!!
Here’s an example in my Windows Powershell for NumPy: I’ve highlighted the line that shows that my package version is 1.21.0:
PS C:\Users\xcent> pip show numpy
Name: numpy
Version: 1.21.0
Summary: NumPy is the fundamental package for array computing with Python.
Home-page: https://www.numpy.org
Author: Travis E. Oliphant et al.
Author-email: None
License: BSD
Location: c:\users\xcent\appdata\local\programs\python\python39\lib\site-packages
Requires:
Required-by: pandas, matplotlib
In some instances, this will not work—depending on your environment. In this case, try those commands before giving up:
python -m pip show numpy
python3 -m pip show numpy
py -m pip show numpy
pip3 show numpy
Of course, replace “numpy” with your particular package name.
Method 2: pip list
To check the versions of all installed packages, use pip list and locate the version of your particular package in the output list of package versions sorted alphabetically.
This will work if your pip installation is version 1.3 or higher.
Here’s an example in my Windows Powershell, I’ve highlighted the line that shows that my package version is 1.21.0:
In some instances, this will not work—depending on your environment. Then try those commands before giving up:
python -m pip list
python3 -m pip list
py -m pip list
pip3 list
Method 3: pip list + findstr on Windows
To check the versions of a single package on Windows, you can chain pip list with findstr xyz using the CMD or Powershell command: pip3 list | findstr numpy to locate the version of your particular package xyz in the output list of package versions automatically.
Here’s an example for numpy:
pip3 list | findstr numpy 1.21.0
Method 4: Library.__version__ Attribute
To check your package installation in your Python script, you can also use the xyz.__version__ attribute of the particular library xyz. Not all packages provide this attribute but as it is recommended by PEP, it’ll work for most libraries.
Here’s the code:
import numpy
print(numpy.__version__)
# 1.21.0
Here’s an excerpt from the PEP 8 docs mentioning the __version__ attribute.
“PEP 8 describes the use of a module attribute called __version__ for recording “Subversion, CVS, or RCS” version strings using keyword expansion. In the PEP author’s own email archives, the earliest example of the use of an __version__ module attribute by independent module developers dates back to 1995.”
Method 5: importlib.metadata.version
The importlib.metadata library provides a general way to check the package version in your Python script via importlib.metadata.version('xyz') for library xyz. This returns a string representation of the specific version. For example, importlib.metadata.version('numpy') returns 1.21.0 in my current environment.
If you have created your Python environment with Anaconda, you can use conda list to list all packages installed in your (virtual) environment. Optionally, you can add a regular expression using the syntax conda list regex to list only packages matching a certain pattern.
How to list all packages in the current environment?
conda list
How to list all packages installed into the environment 'xyz'?
conda list -n xyz
Regex: How to list all packages starting with 'py'?
conda list '^py'
Regex: How to list all packages starting with 'py' or 'code'?
conda list '^(py|code)'
Method 7: pip freeze
The pip freeze command without any option lists all installed Python packages in your environment in alphabetically order (ignoring UPPERCASE or lowercase). You can spot your specific package if it is installed in the environment.
pip freeze
Output from my local Windows environment with PowerShell (strange packages I know) ;):
To check the versions of a single package on Linux/Ubuntu/macOS, you can chain pip freeze with grep xyz using the CMD or Powershell command: pip freeze | grep xyz to programmatically locate the version of your particular package xyz in the output list of package versions.
To check which version of a given Python package is installed, use pip show my_package. For example, to check the version of your NumPy installation, run pip show numpy in your CMD/Powershell (Windows), or terminal (macOS/Linux/Ubuntu).
pip show my_package
Check Package Version Linux
How to check my package version in Linux?
To check which version of a given Python package is installed, use pip show my_package. For example, to check the version of your NumPy installation, run pip show numpy in your Linux terminal.
pip show my_package
Check Package Version Ubuntu
How to check my package version in Ubuntu?
To check which version of a given Python package is installed, use pip show my_package. For example, to check the version of your NumPy installation, run pip show numpy in your Ubuntu terminal/shall/bash.
pip show my_package
Check Package Version Windows
How to check package version on Windows?
To check which version of a given Python package is installed, use pip show my_package. For example, to check the version of your NumPy installation, run pip show numpy in your Windows CMD, command line, or PowerShell.
pip show my_package
Check Package Version Mac
How to check package version on macOS?
To check which version of a given Python package is installed, use pip show my_package. For example, to check the version of your NumPy installation, run pip show numpy in your macOS terminal.
pip show my_package
Check Package Version Jupyter Notebook
How to check package version in your Jupyter Notebook?
To check which version of a given Python package is installed, add the line !pip show my_package to your notebook cell where you want to check. Notice the exclamation mark prefix ! that allows you to run commands in your Python script cell. For example, to check the version of your NumPy installation, run !pip show numpy in your macOS terminal.
!pip show my_package
For example, this is a screenshot on how this looks for numpy in a Jupyter Notebook:
Check Package Version Terminal
How to check package version in my terminal?
To check which version of a given Python package is installed, use pip show my_package. For example, to check the version of your NumPy installation, run pip show numpy in your terminal.
pip show my_package
Check Package Version Conda/Anaconda
How to check package version in my conda installation?
Use conda list 'my_package' to list version information about the specific package installed in your (virtual) environment.
conda list 'my_package'
Check Package Version with PIP
How to check package version with pip?
You can use multiple commands to check the package version with PIP such as pip show my_package, pip list, pip freeze, and pip list.
pip show my_package
pip list
pip freeze
pip list
Check Package Version in VSCode or PyCharm
How to check package version in VSCode or PyCharm?
Integrated Development Environments (IDEs) such as VSCode or PyCharm provide a built-in terminal where you can run pip show my_package to check the current version of my_package in the specific environment you’re running the command in.
pip show my_package
pip list
pip freeze
You can type any of those commands in your IDE terminal like so:
Summary
In this article, you’ve learned those best ways to check a Python package version:
Method 1: pip show my_package
Method 2: pip list
Method 3: pip list | findstr my_package
Method 4: my_package.__version__
Method 5: importlib.metadata.version
Method 6: conda list
Method 7: pip freeze
Method 8: pip freeze | grep my_package
Thanks for giving us your valued attention — we’re grateful to have you here!
Programmer Humor
There are only 10 kinds of people in this world: those who know binary and those who don’t. ~~~
There are 10 types of people in the world. Those who understand trinary, those who don’t, and those who mistake it for binary.
This method uses List Comprehension to apply a mathematical operation to each element and return the result.
prime_nums = [2, 3, 5, 7, 11]
mult_result = [x * 2 for x in prime_nums]
print(mult_result)
Above declares the first (5) Prime Numbers and saves this List to prime_nums. Next, List Comprehension loops through each element and applies the multiplication operation to each. The output saves to mult_result and is output to the terminal.
[4, 6, 10, 14, 22]
Method 2: Use Pandas tolist()
This method requires an additional library to be imported, Pandas, to use the tolist() function.
Above, imports the Pandas Library. Click here if this requires installation. Then, the first (5) Prime Numbers are declared and saved to prime_nums.
Next, prime_nums is passed as an argument to the pd.Series() function and returns mult_result. The output of mult_result at this point is shown below.
0 2
1 3
2 5
3 7
4 11
dtype: int64
Now, we need to convert this output to a list (tolist()) and apply the multiplication operation to each element. The results save to mult_result and are output to the terminal.
[4, 6, 10, 14, 22]
Method 3: Use map and lambda Functions
This method wraps the map(), and lambda functions inside a Python List and calculates the results.
Above declares the first (5) Prime Numbers and saves them to prime_nums. The next line does the following:
The map() function is passed the lambda() function as an argument (map(lambda x: x*2, prime_nums)).
The lambda performs the multiplication operation to each element of prime_nums and saves it to map() as an object similar to below. <map object at 0x000001DC99CBBBB0>
Above, imports the NumPy Library. Click here if this requires installation. Then the first (5) Prime Numbers are declared and saved to prime_nums.
Next, prime_nums is passed as an argument to np.array() where the multiplication operation is applied to each element. Then, this is converted to a List, saved to the_result and output to the terminal.
[4, 6, 10, 14, 22]
Method 5: Use Slicing
This method uses Python’s infamous Slicing! No overhead, and a very pythonic way to resolve the issue.
prime_nums = [2, 3, 5, 7, 11]
prime_nums[:] = [x * 2 for x in prime_nums]
print(prime_nums)
Above declares the first (5) Prime Numbers and saves them to prime_nums.
Then slicing is applied and used in conjunction with List Comprehension to apply the multiplication operation to each element. The results save back to prime_nums and are output to the terminal.
[4, 6, 10, 14, 22]
A Finxter Favorite!
Summary
These methods of multiplying list elements by a number should give you enough information to select the best one for your coding requirements.
Good Luck & Happy Coding!
Programmer Humor
Programmer 1: We have a problem Programmer 2: Let’s use RegEx! Programmer 1: Now we have two problems
The TypeError: unhashable type: 'list' usually occurs when you try to use a list object as a set element or dictionary key and Python internally passes the unhashable list into the hash() function. But as lists are mutable objects, they do not have a fixed hash value. The easiest way to fix this error is to use a hashable tuple instead of a non-hashable list as a dictionary key or set element.
We’ll show how this is done in the remaining article. The last method is a unique way to still use lists in sets or dictionary keys that you likely won’t find anywhere else, so keep reading and learn something new!
Problem Formulation and Explanation
Question: How to fix the TypeError: unhashable type: 'list' in your Python script?
As you’ve seen in the previous two code snippets, the TypeError: unhashable type: 'list' usually occurs when you try to use a list object as a set element or dictionary key.
But let’s dive deeper to find the real reason for the error:
Minimal Reproducible Error Example: Lists are mutable objects so they do not have a fixed hash value. In fact, the error can be reproduced most easily when calling hash(lst) on a list object lst.
This is shown in the following minimal example that causes the error:
hash([1, 2, 3])
The output is the error message:
Traceback (most recent call last): File "C:\Users\xcent\Desktop\code.py", line 1, in <module> hash([1, 2, 3])
TypeError: unhashable type: 'list'
Because you cannot successfully pass a list into the hash() function, you cannot directly use lists as set elements or dictionary keys.
But let’s dive into some solutions to this problem!
Method 1: Use Tuple Instead of List as Dictionary Key
The easiest way to fix the TypeError: unhashable type: 'list' is to use a hashable tuple instead of a non-hashable list as a dictionary key. For example, whereas d[my_list] will raise the error, you can simply use d[tuple(my_list)] to fix the error.
The error may also occur when you try to use a list as a set element. Next, you’ll learn what to do in that case:
Method 2: Use Tuple Instead of List as Set Element
To fix the TypeError: unhashable type: 'list' when trying to use a list as a set element is to use a hashable tuple instead of a non-hashable list. For example, whereas set.add([1, 2]) will raise the error, you can simply use set.add((1, 2)) or set.add(tuple([1, 2])) to fix the error.
Here’s a minimal example:
my_set = set() # Error: my_set.add([1, 2]) # This is how to resolve the error:
my_set.add((1, 2))
# Or: my_set.add(tuple([1, 2])) print(my_set)
# {(1, 2)}
If you want to convert a list of lists to a set, you can check out my detailed tutorial on the Finxter blog:
Method 3: Use String Representation of List as Set Element or Dict Key
To fix the TypeError: unhashable type: 'list', you can also use a string representation of the list obtained with str(my_list) as a set element or dictionary key. Strings are hashable and immutable, so Python won’t raise the error when using this approach.
Here’s an example:
my_list = [1, 2, 3] # 1. Use str repr of list as dict key:
d = {}
d[str(my_list)] = 'hello Finxters' # 2. Use str repr of list as set element:
s = set()
s.add(str(my_list))
In both cases, we used the string representation of the list instead of the list itself. The string is immutable and hashable and it fixes the error.
But what if you really need a mutable set or dictionary key? Well, you shouldn’t but you can by using this approach:
Method 4: Create Hashable Wrapper List Class
You can still use a mutable list as a dictionary key, set element, or argument of the hash() function by defining a wrapper class, say HackedList, that overrides the __hash__()dunder method.
Python’s built-inhash(object) function takes one object as an argument and returns its hash value as an integer. You can view this hash value as a unique fingerprint of this object.
The Python __hash__() method implements the built-in hash() function.
Here’s the minimal code example that creates a wrapper class HackedList that overrides the __hash__() dunder method so you can use an instance of HackedList as a dictionary key, set element, or just as input to the hash() function:
my_list = [1, 2, 3] class HackedList: def __init__(self, lst): self.lst = lst def __hash__(self): return len(self.lst) my_hacked_list = HackedList(my_list) # 1. Pass hacked list into hash() function:
print(hash(my_hacked_list)) # Output: 3 # 2. Use hacked list as dictionary key:
d = dict()
d[my_hacked_list] = 'hello Finxters' # 3: Use hacked list as set element:
s = set()
s.add(my_hacked_list)
Here’s the content of the dictionary and set defined previously:
{<__main__.HackedList object at 0x0000016CFB0BDFA0>: 'hello Finxters'}
{<__main__.HackedList object at 0x0000016CFB0BDFA0>}
If you want to fix the ugly output, you can additionally define the __str__() and __repr__() magic methods like so:
my_list = [1, 2, 3] class HackedList: def __init__(self, lst): self.lst = lst def __hash__(self): return len(self.lst) def __str__(self): return str(self.lst) def __repr__(self): return str(self.lst) my_hacked_list = HackedList(my_list) # 1. Pass hacked list into hash() function:
print(hash(my_hacked_list)) # Output: 3 # 2. Use hacked list as dictionary key:
d = dict()
d[my_hacked_list] = 'hello Finxters' # 3: Use hacked list as set element:
s = set()
s.add(my_hacked_list) print(d)
print(s)
Beautiful output:
{[1, 2, 3]: 'hello Finxters'}
{[1, 2, 3]}
Summary
The five most Pythonic ways to convert a list of lists to a set in Python are:
Full Course: Check out the full beginner course on Forex trading on this Finxter page (5 video lessons).
As a Python beginner, or anything else new that we dive into, everything is fresh and exciting for a while and we have no problem staying motivated to do the work and move ahead.
It’s no wonder you can stay fired up when you are learning the most popular language, in a field that looks promising for years to come, and its innovations will shape the future. That’s exciting!
There’s a book that summarizes the next step in your journey, whether it be Python, Forex, business, freelancing, or anything else. It deals with what most people call, “being at the intermediate level.”
It’s called “The Dip”, by Seth Godin. Like most “self-help” type books, even though this one is only around 100 pages, it could have been done in 10 or 15. In this case though, the author gets an “A+” for the concept.
The idea that after the honeymoon, there will be a period of uncertain struggle on where to go next. Python has the mother of all dips.
To wrap up this beginner’s guide, I want to help you find your way through the dip and come out the other side a success. That “way” is in the title – “Practical Projects.”
Freelance and Get Some Work that Uses Your Python Skills
Doing a project for someone who doesn’t know how, or have the time to do it themselves, is a great way to put your Python skills to the test.
The great thing about freelancing your skills, is you never know what someone is going to need, and this can give you a great variety of projects.
PRO TIP: Don’t wait until you “feel” ready. You will never feel ready – what you need is confidence – by doing some real work, learning from your mistakes, and not making them again.
Getting started on a platform like Upwork is simple and you will know which projects you can handle, and which ones you can’t – besides, it’s good for you to take a couple that will push your skills and require you to learn how to complete them.
Here are a few more Ideas for some real-world projects:
Data Analysis Projects with Python and Its Libraries
We went through some simple examples of what you can do with data earlier in the series. Let’s break down a sample in detail:
Think about a subject that interests you, and where you can find data collections for that topic.
Do a search and find some downloadable files from their collections.
Pick a file that suits your project, download the CSV, (I hope you’re using Anaconda and Jupyter), clean it up and organize it, then see what types of patterns, if any, you can identify. I grabbed historical data on interest rates from the Fed’s website for my last analysis. There is so much information out there for free that we will never be able to cover a tiny percentage of it. So narrow it down to your specific needs.
Projects and Tests for Forex Trading and Python
Form a hypothesis – “Is there a correlation between the EUR/USD and WTI?” In light of recent global events, one would be safe in questioning crude oil’s affect on the entire world.
Do a comparison – Do you remember in a previous lesson when I demonstrated how to overlay one instrument with another on your charts? This is a simple way to look for correlation. Remember, correlation can be positive or negative.
Look to see if one or the other seems to “lead” its partner. This can be a great way to see into the future – so to speak.
If your theory looks promising, question if there is a way to quantify and automate the information using Python. This would also be a good time to start digging into machine learning. Use Python to streamline the process and set alerts.
This is a hypothetical situation I created as an example. Do not trade any theory from anyone without thoroughly testing it yourself.
Sources for Datasets
Governments collect data and make it available to the public on their websites. Records of everything from NFP to GDP, and weather events can be found with a little effort.
Central banks, the IMF, and the World Bank also issue reports and data on a variety of economic indicators and predictions created by their own experts.
Be wary of “advice” sites that are trying to sell you something – look for facts gleaned from statistics and research instead.
Get on Board with a Broker and Get a Robot
We have already discussed how to choose a broker, and did some analysis together on the subject. With the regulations in place these days, it’s really easy to find one that is legit. It will boil down to personal preference in the end. Make sure you feel comfortable with your choice, and that they have responsive customer service so you can communicate easily.
As a beginner, just like with Python, it’s important to start getting some experience while you’re learning to code your own bots. Using a ready-made bot on a demo account is the best way to get going and see if automated trading is right for you.
REMEMBER: Don’t make it all about the money just yet – the knowledge you’re getting in the process is the real value. If you have followed the steps in this series, you should already be on your way to safely making money with Python.
Bonus for Finishing the Beginner Series on Forex Bots and Python
For all of you who have stuck it out until the end of our beginner series, I’m going to give you some analysis that will demonstrate the many different ways to go about your trade planning – they’re endless, which is what makes Forex so interesting. No matter your style, you can find a system that fits.
In the accompanying video, I’m going to give some high-level tips and analysis on the EUR/USD pair that we have been using in the series, and explain what actually makes currency values change.
Check out the video, and it has been a pleasure sharing this information with you.
In this tutorial we will unearth the solutions to three commonly asked questions that users come across while dealing with huge sets of data.
Problem Formulation
Given: Consider the following csv file (Note: You need to use it as a Pandas DataFrame).
import pandas as pd df = pd.read_csv('countries.csv')
print(df)
 Country Capital Population Area
0 Germany Berlin 84,267,549 348,560
1 France Paris 65,534,239 547,557
2 Spain Madrid 46,787,468 498,800
3 Italy Rome 60,301,346 294,140
4 India Delhi 1,404,495,187 2,973,190
5 USA Washington 334,506,463 9,147,420
6 China Beijing 1,449,357,022 9,388,211
7 Poland Warsaw 37,771,789 306,230
8 Russia Moscow 146,047,418 16,376,870
9 England London 68,529,747 241,930
Here’s the list of the questions that we will be focusing upon in this article:
How to get the last N rows of a Pandas DataFrame?
How to get last N rows from last N columns of a Pandas DataFrame?
How to read last N rows of a large csv file in Pandas?
Without further delay, let us dive into the solutions to the first question and learn how to get the last N rows of a Pandas DataFrame.
Method 1: Using iloc
Approach: Use the iloc property as pandas.DataFrame.iloc[-n:].
The iloc property is used to get or set the values of specified indices. Select the last n rows using the square bracket notation syntax [-n:] with the iloc property. Here, -n represents the index of the last n rows of the given pandas DataFrame.
 Country Capital Population Area
5 USA Washington 334,506,463 9,147,420
6 China Beijing 1,449,357,022 9,388,211
7 Poland Warsaw 37,771,789 306,230
8 Russia Moscow 146,047,418 16,376,870
9 England London 68,529,747 241,930
Method 2: Using tail()
Approach: Use the pandas.DataFrame.tail(n) to select the last n rows of the given DataFrame.
The tail(n) method returns n number of methods from the bottom end of the DataFrame. Here, n represents an integer that denotes the number of rows you want to fetch from the bottom end of the DataFrame.
 Country Capital Population Area
5 USA Washington 334,506,463 9,147,420
6 China Beijing 1,449,357,022 9,388,211
7 Poland Warsaw 37,771,789 306,230
8 Russia Moscow 146,047,418 16,376,870
9 England London 68,529,747 241,930
Well, that brings us to the next question in line – “How to get the last N rows from last N columns of a Pandas DataFrame?”
Method 1: Integer Based Indexing
Approach: Call pandas.DataFrame.iloc[-n:, -m:] to display last n rows from the last m columns of the given DataFrame.
Code: In the following code snippet we will fetch the last 5 rows from the last 2 columns, i.e., Population and Area.
 Population Area
5 334,506,463 9,147,420
6 1,449,357,022 9,388,211
7 37,771,789 306,230
8 146,047,418 16,376,870
9 68,529,747 241,930
Method 2: Name Based Indexing
In case, you happen to know the names of the specific columns and you want to get the last N records from the DataFrame from those columns then you can follow a two step process.
Call the Pandas.DataFrame.loc(:, 'start_column_name':'end_column_name') selector. It allows you to use slicing on column names instead of integer identifiers which can be more comfortable.
.loc is for label based indexing. Hence, the negative indices are not found and reindexed to NaN. Thus, to deal with this you have to use the tail() method to extract the last N records from the selected columns.
Code: The following code snippet shows how you can use the column names and fetch the corresponding values from the last 5 rows of the given Dataframe.
 Population Area
5 334,506,463 9,147,420
6 1,449,357,022 9,388,211
7 37,771,789 306,230
8 146,047,418 16,376,870
9 68,529,747 241,930
Last but not least, let us solve the third and final problem of today’s tutorial – “How to read last N rows of a large csv file in Pandas?”
Unfortunately, read_csv() does not facilitate us with any parameter that allows you to directly read the last N lines from a file. This can be a troublesome issue to handle when you are dealing with large datasets.
Thus, a workaround to this problem is to first find out the total number of lines/records in the file. Then use the skiprows parameter to directly jump to the row/line from which you want to select the records.
Code: In the following code snippet we will fetch the first 5 rows from the csv file into our DataFrame.
import pandas as pd def num_of_lines(fname): with open(fname) as f: for i, _ in enumerate(f): pass return i + 1 num_lines = num_of_lines("countries.csv")
n = 5
df = pd.read_csv("countries.csv", skiprows=range(1, num_lines - n))
print(df)
Output:
 Country Capital Population Area
0 USA Washington 334,506,463 9,147,420
1 China Beijing 1,449,357,022 9,388,211
2 Poland Warsaw 37,771,789 306,230
3 Russia Moscow 146,047,418 16,376,870
4 England London 68,529,747 241,930
Conclusion
Phew! We have successfully solved all the problems that were presented to us in this tutorial. I hope this tutorial helped you to sharpen your coding skills. Please stay tuned and subscribe for more interesting coding problems.
If you want to boost your Pandas skills, consider checking out my puzzle-based learning book Coffee Break Pandas (Amazon Link).
It contains 74 hand-crafted Pandas puzzles including explanations. By solving each puzzle, you’ll get a score representing your skill level in Pandas. Can you become a Pandas Grandmaster?
Coffee Break Pandas offers a fun-based approach to data science mastery—and a truly gamified learning experience.
How to convert .blf from a CAN bus to .csv in Python?
What is BLF? The Binary Logging Format (BLF) is a proprietary CAN log format from the automative company Vector Informatik GmbH.
What is CAN? The Controller Area Network (CAN bus) is a message-based protocol standard for microcontrollers in vehicles to communicate without a host computer.
Method 1: Using BLF Reader and CSV Writer
To convert the BLF file 'my_file.blf' to the CSV file 'my_file.csv', you can first iterate over the bus messages using can.BLFReader('my_file.csv') and add the data to a list of lists. Then, you can use the csv.writer() approach to write the list of lists to a CSV file.
Here’s an example that improves upon this SO thread:
import can
import csv log = [] for msg in list(can.BLFReader("my_file.blf")): msg = str(msg) row = [msg[18:26], msg[38:40], msg[40:42], msg[46], msg[62], msg[67:90]] log.append(row) with open("my_file.csv", "w", newline='') as f: writer = csv.writer(f, delimiter=',', quotechar='\"', quoting=csv.QUOTE_ALL) writer.writerows(log)
A more sophisticated version of this code is provided in this Github repository. Here’s a screenshot of the code — notice the more advanced processing of a single message compared to our solution:
The candas library provides utility functions to work with .blf files and the CAN bus. Among other things, it helps you with the conversion from BLF to CSV as outlined here.
This is the provided example:
import candas as cd db = cd.load_dbc("dbc_folder") # This is the BLF file 'my_file.blf':
log = cd.from_file("my_file") # This prints a signal from the messages in the BLF:
print(log["AVGcellTemperature"])
Method 3: Using Custom Solution from python-can Library
You can use your tailor-made solutions by combining the Readers and Writers provided in the python-can library.
It provides multiple utility functions such as:
Listener
BufferedReader
RedirectReader
Logger
Printer
CSVWriter
SqliteWriter
ASC
Log
BLF
Chances are you’ll find what you’re looking for when going over those functions!
Related Video
Still not satisfied? I found the following relevant video when searching for a solution to this problem. I think you’ll find some nice tricks in the video!
You can convert a CSV file to a NumPy array simply by calling np.loadtxt() with two arguments: the filename and the delimiter string. For example, the expression np.loadtxt('my_file.csv', delimiter=',') returns a NumPy array from the 'my_file.csv' with delimiter symbols ','.
Here’s an example:
import numpy as np array = np.loadtxt('my_file.csv', delimiter=',')
print(array)
Output:
[[9. 8. 7.] [6. 5. 4.] [3. 2. 1.]]
Method 2: np.loadtxt() with Header
np.loadtxt() + header
You can convert a CSV file with first-line header to a NumPy array by calling np.loadtxt() with three arguments: the filename, skiprows=1 to skip the first line (header), and the delimiter string. For example, the expression np.loadtxt('my_file.csv', skiprows=1, delimiter=',') returns a NumPy array from the 'my_file.csv' with delimiter symbols ',' while skipping the first line.
Figure: Skip the first header line in the CSV using the skiprows argument of the np.loadtxt() function.
Here’s an example:
import numpy as np array = np.loadtxt('my_file.csv', skiprows=1, delimiter=',')
print(array)
Output:
[[9. 8. 7.] [6. 5. 4.] [3. 2. 1.]]
Method 3: CSV Reader
CSV Reader
To convert a CSV file 'my_file.csv' into a list of lists in Python, use the csv.reader(file_obj) method to create a CSV file reader. Then convert the resulting object to a list using the list() constructor. As a final step, you can convert the nested list to a NumPy array by using the np.array(list) constructor.
Here’s an example:
import numpy as np
import csv csv_filename = 'my_file.csv' with open(csv_filename) as f: reader = csv.reader(f) lst = list(reader) print(lst)
You can convert a CSV file to a NumPy array simply by calling np.genfromtxt() with two arguments: the filename and the delimiter string. For example, the expression np.genfromtxt('my_file.csv', delimiter=',') returns a NumPy array from the 'my_file.csv' with delimiter symbol ','.
Here’s an example:
import numpy as np array = np.loadtxt('my_file.csv', delimiter=',')
print(array)
Output:
[[9. 8. 7.] [6. 5. 4.] [3. 2. 1.]]
Method 5: Pandas read_csv() and df.to_numpy()
read_csv() and df.to_numpy()
A quick and efficient way to read a CSV to a NumPy array is to combine Pandas’ pd.read_csv() function to read a given CSV file to a DataFrame with the df.to_numpy() function to convert the Pandas DataFrame to a NumPy array.
The Python psycopg2 library is among the top 100 Python libraries, with more than 15,749,750 downloads. This article will show you everything you need to get this installed in your Python environment.
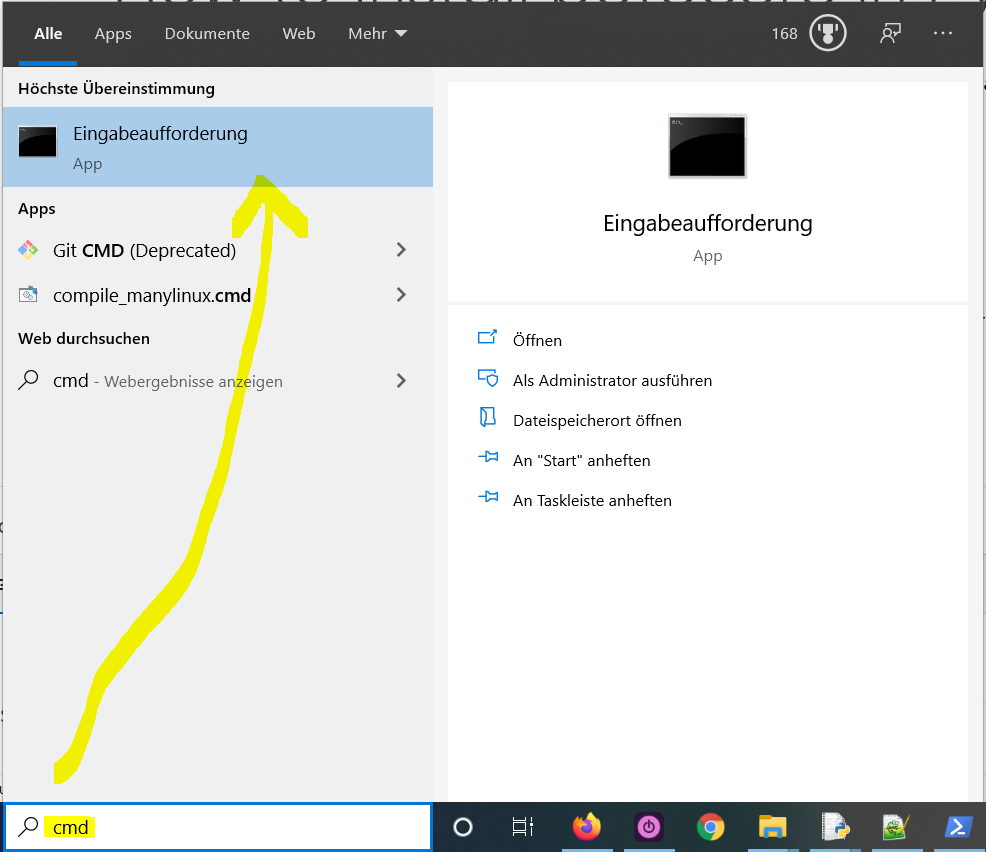
Type "cmd" in the search bar and hit Enter to open the command line.
Type “pip install psycopg2” (without quotes) in the command line and hit Enter again. This installs psycopg2 for your default Python installation.
The previous command may not work if you have both Python versions 2 and 3 on your computer. In this case, try "pip3 install psycopg2" or “python -m pip install psycopg2“.
Wait for the installation to terminate successfully. It is now installed on your Windows machine.
Here’s how to open the command line on a (German) Windows machine:
First, try the following command to install psycopg2 on your system:
pip install psycopg2
Second, if this leads to an error message, try this command to install psycopg2 on your system:
pip3 install psycopg2
Third, if both do not work, use the following long-form command:
python -m pip install psycopg2
The difference between pip and pip3 is that pip3 is an updated version of pip for Python version 3. Depending on what’s first in the PATH variable, pip will refer to your Python 2 or Python 3 installation—and you cannot know which without checking the environment variables. To resolve this uncertainty, you can use pip3, which will always refer to your default Python 3 installation.
How to Install psycopg2 on Linux?
You can install psycopg2 on Linux in four steps:
Open your Linux terminal or shell
Type “pip install psycopg2” (without quotes), hit Enter.
If it doesn’t work, try "pip3 install psycopg2" or “python -m pip install psycopg2“.
Wait for the installation to terminate successfully.
The package is now installed on your Linux operating system.
How to Install psycopg2 on macOS?
Similarly, you can install psycopg2 on macOS in four steps:
Open your macOS terminal.
Type “pip install psycopg2” without quotes and hit Enter.
If it doesn’t work, try "pip3 install psycopg2" or “python -m pip install psycopg2“.
Wait for the installation to terminate successfully.
The package is now installed on your macOS.
How to Install psycopg2 in PyCharm?
Given a PyCharm project. How to install the psycopg2 library in your project within a virtual environment or globally? Here’s a solution that always works:
Open File > Settings > Project from the PyCharm menu.
Select your current project.
Click the Python Interpreter tab within your project tab.
Click the small + symbol to add a new library to the project.
Now type in the library to be installed, in your example "psycopg2" without quotes, and click Install Package.
Wait for the installation to terminate and close all pop-ups.
Here’s the general package installation process as a short animated video—it works analogously for psycopg2 if you type in “psycopg2” in the search field instead:
Make sure to select only “psycopg2” because there may be other packages that are not required but also contain the same term (false positives):
How to Install psycopg2 in a Jupyter Notebook?
To install any package in a Jupyter notebook, you can prefix the !pip install my_package statement with the exclamation mark "!". This works for the psycopg2 library too:
!pip install my_package
This automatically installs the psycopg2 library when the cell is first executed.
How to Resolve ModuleNotFoundError: No module named ‘psycopg2’?
Say you try to import the psycopg2 package into your Python script without installing it first:
import psycopg2
# ... ModuleNotFoundError: No module named 'psycopg2'
Because you haven’t installed the package, Python raises a ModuleNotFoundError: No module named 'psycopg2'.
To fix the error, install the psycopg2 library using “pip install psycopg2” or “pip3 install psycopg2” in your operating system’s shell or terminal first.
See above for the different ways to install psycopg2 in your environment.
Improve Your Python Skills
If you want to keep improving your Python skills and learn about new and exciting technologies such as Blockchain development, machine learning, and data science, check out the Finxter free email academy with cheat sheets, regular tutorials, and programming puzzles.

 Question: Given a Python list stored in a variable
  Learn More: An Introduction to Python Slicing
 The
The 


 If your answer is YES!, consider becoming a


 A Finxter Favorite!
 Minimal Reproducible Error Example: Lists are