A not-so-fictious problem: Say, you’ve created a web application that runs on a dedicated Linux server in the cloud. Thousands of users visit your web app and suddenly … it crashes. Your users start complaining, and you lose revenue. More importantly, you bleed credibility by the hour. Your server is down, so what do you do?
First, don’t panic.
Let’s analyze your server logs!
This article shows you how to convert your log file to a CSV file in Python, that you can use for further processing (e.g., in Pandas or Excel).
Problem Formulation by Example
Given a file my_file.log like this one I pulled from a real IBM server log example:
03/22 08:51:01 INFO :.main: *************** RSVP Agent started ***************
03/22 08:51:01 INFO :...locate_configFile: Specified configuration file: /u/user10/rsvpd1.conf
03/22 08:51:01 INFO :.main: Using log level 511
03/22 08:51:01 INFO :..settcpimage: Get TCP images rc - EDC8112I Operation not supported on socket.
03/22 08:51:01 INFO :..settcpimage: Associate with TCP/IP image name = TCPCS
How to convert this log file to a CSV file of the following standard comma-separated values format:
03/22,08:51:01,INFO,:.main: *************** RSVP Agent started ***************
03/22,08:51:01,INFO,:...locate_configFile: Specified configuration file: /u/user10/rsvpd1.conf
03/22,08:51:01,INFO,:.main: Using log level 511
03/22,08:51:01,INFO,:..settcpimage: Get TCP images rc - EDC8112I Operation not supported on socket.
03/22,08:51:01,INFO,:..settcpimage: Associate with TCP/IP image name = TCPCS
Or, here’s how that would look if you opened it with Excel:
Prettier, isn’t it? Unlike the first representation (log file), this CSV representation is easier to read for (most) human beings.
Convert Server Log to CSV with Pandas
You can convert a .log file to a CSV file in Python in four simple steps: (1) Install the Pandas library, (2) import the Pandas library, (3) read the log file as DataFrame, and (4) write the DataFrame to the CSV file.
Note: The regular expressionsep='\s\s+' specifies more than one single whitespace as a separator between two CSV values. If you have a different separator string, you can define it here.
You specify the engine='python' to tell Pandas that we want the Python regular expression engine to process the separator regular expression.
The result of the code is the following CSV file:
You can use this CSV file as input for, say, an Excel sheet or Google Spreadsheet for further processing and analysis.
This is what your log file looks converted to a CSV and imported to Excel:
In this article, we will introduce one of the core elements describing the mathematics of neural networks: tensors.
Although typically, you won’t work directly with tensors (usually they operate under the hood), it is important to understand what’s going on behind the scenes. In addition, you may often wish to examine tensors so that you can look directly at the data, or look at the arrays of weights and biases, so it’s important to be able to work with tensors.
Theoretically, we could use pure Python to implement neural networks.
We could use Python lists to represent data in the network;
We could use other lists representing weights and biases in the network; and
We could use nested for loops to perform the operations of multiplying the inputs by the connection weights.
There are a few issues with this, however: Python, especially the list data type, performs rather slowly. Also, the code would not be very readable with nested for loops.
Instead, the libraries that implement neural networks in software packages such as PyTorch use tensors, and they run much more quickly than pure Python. Also, as you will see, tensors allow much more readable descriptions of networks and their data.
Tensors
Tensors are essentially arrays of values. Since neural networks are essentially arrays of neurons, tensors are a natural fit for describing them. They can be used for describing the data, describing the network connection weights, and other things.
A one-dimensional tensor is known as a vector. Here is an example:
Vectors can also be written horizontally. Here’s the same vector written horizontally:
Switching a vector from vertical to horizontal, or vice versa, is called transposing, and is sometimes needed depending on the math specifics. We will not go into detail on this in this article (see here for more).
Vectors are typically used to represent data in the network. For example, each individual element in a vector can represent the input value for each individual input neuron in the network.
2D Tensor Matrix
A two-dimensional tensor is known as a matrix. Here’s an example:
For a fully connected network, where each neuron in one layer connects to every neuron in the next layer, a matrix is typically used to represent all the connection weights. If there are m neurons connected to n neurons you would need an n x m matrix to describe all the connection weights.
Here’s an example of two neurons connected to three neurons. Here is the network, with connection weights included:
And here is the connection weights matrix:
Why We Use Tensors
Before we finish introducing tensors, let’s use what we’ve seen so far to see why they’re so important to use when modeling neural networks.
Let’s introduce a two-element vector of data and run it through the network we just showed.
Info: Recall neurons add together their weighted inputs, then run the result through an activation function.
In this example, we are ignoring the activation function to keep things simple for the demonstration.
Here is our data vector:
Here’s a diagram depicting the operation:
Let’s calculate the operation (the neuron computations) by hand:
The final result is a 3 element vector:
If you have learned about matrices in grade school and remember doing matrix multiplication, you may note that what we just calculated is identical to matrix multiplication:
Note: Recall matrix multiplication involves multiplying first matrix rows by second matrix columns element-wise, then adding elements together.
This is why tensors are so important for neural networks: tensor math precisely describes neural network operation.
As an added benefit, the equation above showing matrix multiplication is so much more a succinct description than nested for loops would be.
If we introduce the nomenclature of bold lower case for a vector and bold upper case for a matrix, then the operation of vector data running through a neural network weight matrix is described by this very compact equation:
We will see later that matrix multiplication within PyTorch is a similarly compact code equation.
Higher Dimensional Tensors
A three-dimensional (3D) tensor is known simply as a tensor. As you can see, the term tensor generically refers to any dimensional array of numbers. It’s just one-dimensional and two-dimensional tensors that have the unique names “vector” and “matrix” respectively.
You might not think that there is a need for three-dimensional and larger tensors, but that’s not quite true.
A grayscale image is clearly a two-dimensional tensor, in other words, a matrix. But a color image is actually three two-dimensional arrays, one each for red, green, and blue color channels. So a color image is essentially a three-dimensional tensor.
In addition, typically we process data in mini-batches. So if we’re processing a mini-batch of color images we have the three-dimensional aspect already noted, plus one more dimension of the list of images in the mini-batch. So a mini-batch of color images can be represented by a four-dimensional tensor.
Tensors in Neural Network Libraries
One Python library that is well suited to working with arrays is NumPy. In fact, NumPy is used by some users for implementing neural networks. One example is the scikit-learn machine learning library which works with NumPy.
However, the PyTorch implementation of tensors is more powerful than NumPy arrays. PyTorch tensors are designed with neural networks in mind. PyTorch tensors have these advantages:
PyTorch tensors include gradient calculations integrated into them.
PyTorch tensors also support GPU calculations, substantially speeding up neural network calculations.
However, if you are used to working with NumPy, you should feel fairly at home with PyTorch tensors. Though the commands to create PyTorch tensors are slightly different, they will feel fairly familiar. For the rest of this article, we will focus exclusively on PyTorch tensors.
Tensors in PyTorch: Creating Them, and Doing Math
OK, let’s finally do some coding!
First, make sure that you have PyTorch available, either by installing on your system or by accessing it through online Jupyter notebook servers.
Reference: See PyTorch’s website for instructions on how to install it on your own system.
See this Finxter article for a review of available online Jupyter notebook services:
For this article, we will use the online Jupyter notebook service provided by Google called Colab. PyTorch is already installed in Colab; we simply have to import it as a module to use it:
import torch
There are a number of ways of creating tensors in PyTorch.
Typically you would be creating tensors by importing data from data sets available through PyTorch, or by converting your own data into tensors.
For now, since we simply want to demonstrate the use of tensors we will use basic commands to create very simple tensors.
You can create a tensor from a list:
t_list = torch.tensor([[1,2], [3,4]])
t_list
Output:
tensor([[1, 2], [3, 4]])
Note that when we evaluate the tensor variable, the output is labeled to indicate it as a tensor. This means that it is a PyTorch tensor object, so an object within PyTorch that performs just like math tensors, plus has various features provided by PyTorch (such as supporting gradient calculations, and supporting GPU processing).
You can create tensors filled with zeros, filled with ones, or filled with random numbers:
An important attribute to be familiar with to understand the shape of a tensor is the appropriately named shape attribute:
t_rand.shape
# Output: torch.Size([3, 2, 4])
This shows you that tensor “t_rand” is a three-dimensional tensor composed of three elements of two rows by four columns.
Note: The dimensions of a tensor is referred to as its rank. A one-dimensional tensor, or vector, is a rank-1 tensor; a two-dimensional tensor, or matrix, is a rank-2 tensor; a three-dimensional tensor is a rank-3 tensor, and so on.
Let’s do some math with tensors – let’s add two tensors together:
Note the tensors are added together element-wise. Now here it is in PyTorch:
Let’s add a scalar, that is, an independent number (or a rank-0 tensor!) to a tensor:
t_add3 = t_first + 3
t_add3
Output:
tensor([[4, 5], [6, 7]])
Note that the scalar is added to each element of the tensor. The same applies when multiplying a scalar by a tensor:
t_times3 = t_first * 3
t_times3
Output:
tensor([[ 3, 6], [ 9, 12]])
The same kind of thing applies to raising a tensor to a power, that is the power operation is applied element-wise:
t_squared = t_first ** 2
t_squared
Output:
tensor([[ 1, 4], [ 9, 16]])
Recall that after summing weighted inputs, the neuron processes the result through an activation function. Note that the same performance applies here as well: when a vector is processed through an activation function, the operation is applied to the vector element-wise.
Earlier, we pointed out that matrix multiplication is an important part of neural network calculations.
There are two ways to do this in PyTorch: you can use the matmul function:
Or you can use the matrix multiplication symbol “@“:
t_matmul2 = t_first @ t_second
t_matmul2
Output:
tensor([[19, 22], [43, 50]])
Recall previously, we showed running an input signal through a neural network, where a vector of input signals was multiplied by a matrix of connection weights.
Here is that in PyTorch:
x = torch.tensor([[7],[8]])
x
Output:
tensor([[7], [8]])
W = torch.tensor([[1,4], [2,5], [3,6]])
W
Output:
tensor([[1, 4], [2, 5], [3, 6]])
y = W @ x
y
Output:
tensor([[39], [54], [69]])
Note how compact and readable that is instead of doing nested for loops.
Other math can be done with tensors as well, but we have covered most situations that are relevant to neural networks. If you find you need to do additional math with your tensors, check PyTorch documentation or do a web search.
Indexing and Slicing Tensors
Slicing allows you to examine subsets of your data and better understand how the dataset is constructed. You may find you will use this a lot.
Indexing Slicing PyTorch vs NumPy vs Python Lists
Indexing and slicing tensors work the same way it does with NumPy arrays. Note that the syntax is different from Python lists. With Python lists, a separate pair of brackets are used for each level of nested lists. Instead, with Pytorch one pair of brackets contains all dimensions, separated by commas.
Let’s find the item in tensor “t_rand” that is 2nd element, first row, third column. First here is “t_rand” again:
Important Slicing Tip: In the above, we use the standard Python convention that a blank before a “:” means “start from the beginning”, and a blank after a “:” means “go all the way to the end”. So a “:” alone means “include everything from beginning to end”.
A likely use for slicing would be to look at a full array (i.e. a matrix) within a set of arrays, i.e. one image out of a set of images.
Let’s pretend our “t_rand” tensor is a list of images. We may wish to sample just a few “images” to get an idea of what they are like.
Let’s examine the first “image” in our tensor (“list of images”):
Using small tensors to demonstrate indexing can be instructive, but let’s see it in action for real. Let’s examine some real datasets with real images.
Real Example
We won’t describe the following in detail, except to note that we are importing various libraries that allow us to download and work with a dataset. The last line creates a function that converts tensors into PIL images:
import torch
from torch.utils.data import Dataset
from torchvision import datasets
from torchvision.transforms import ToTensor
import matplotlib.pyplot as plt import torchvision.transforms as T conv_to_PIL = T.ToPILImage()
The following downloads the Caltech 101 dataset, which is a collection of over 8000 images in 101 categories:
The above code shows the dataset contains 8677 items. Looking at the first item of the set we can see they are tuples of 2 items each. Here are the kinds of items in the tuples:
type(caltech101_data[0][0])
# torch.Tensor type(caltech101_data[0][1])
# int
The two items in the tuple are the image as a tensor, and an integer code corresponding to the image’s category.
Colab has a convenient function display() which will display images. First, we use the conversion function we created earlier to convert our tensors to a PIL image, then we display the images.
The previous article was focused on an installation via npm, and in this article, we’ll go through the installation and use of the Solidity compiler via Docker.
Our goal is to get more familiar with the possibilities of this approach, as well as to get introduced to the technology that “runs the show”. This knowledge and experience will enable us to recognize the reasons behind choosing any of the approaches in the future, depending on the real-world needs of our projects.
What is Docker?
Before we go into details about the Docker installation of solc, let’s first get introduced to what Docker is.
Docker is an open platform for developing, shipping, and running applications… Docker provides the ability to package and run an application in a loosely isolated environment called a container… Containers are lightweight and contain everything needed to run the application, so you do not need to rely on what is currently installed on the host.
There are some parts of the description I’ve deliberately left out (separated by the symbol …) because they’re not essential to our understanding of the technology.
Now, let’s dissect the Docker description: the keywords of our interest are platform,isolated environment, and container. Let’s quickly dive into each of those next
Platform
A platform is a software framework that supports a specific function or a goal.
The goal Docker supports is enabling a piece of software (application, service, etc.) to correctly run, regardless of the target environment.
For us, this means running the Solidity compiler, i.e. feeding it with the input source code and producing the output bytecode in the form of .abi and .bin files.
Isolated Environment
By mentioning an isolated environment, we remember the concept of virtualization learned about earlier, meaning that Docker enables our software to run as intended by providing it with the resources in form of software libraries, network access, remote services, and other dependencies.
Container
Docker ensures the resources are provided without additional intervention by arranging them in a package called a container. Containers begin their lifecycle as images that we most commonly download and run.
We can also create a Docker image, but that’s another story.
Running an image creates a live instance of it, a container. Before it can be used, a Docker image has to be prepared, meaning that someone should install and configure all the required resources needed for the software to run.
Preparation of a Docker image falls in the domain of DevOps, i.e. Development and Operations:
“DevOps engineers manage the operations of software development, implementing engineering tools and knowledge of the software development process to streamline software updates and creation.”
Now that we have introduced Docker in general, we are continuing with the installation of the Solidity compiler via Docker.
First, we have to check if Docker is present on our system by simultaneously checking the Docker version:
$ docker version
bash: /usr/bin/docker: No such file or directory
As our check shows, we have to install Docker on our system before we can use it. The installation process via the Ubuntu repository is made of several steps (https://docs.docker.com/engine/install/ubuntu/):
Step 1: Update the apt package index
$ sudo apt update
…
Reading package lists... Done
Building dependency tree Reading state information... Done
All packages are up to date.
Step 2: Install packages
Installation of additional packages; we need these packages to enable the installation process accessing the repository over the secure HTTPS connection (note the backslash symbol \ for the multiline command):
$ sudo apt install \
ca-certificates \
curl gnupg lsb-release
...
The following additional packages will be installed: gnupg-l10n gnupg-utils gpg-wks-server
Suggested packages: parcimonie xloadimage
The following NEW packages will be installed: ca-certificates curl gnupg gnupg-l10n gnupg-utils gpg-wks-server lsb-release
...
Do you want to continue? [Y/n] y
...
Info: “GPG, or GNU Privacy Guard, is a public key cryptography implementation. This allows for the secure transmission of information between parties and can be used to verify that the origin of a message is genuine.”
Setting up the repository by writing to docker.list file.
The echo command evaluates the text inside the $( ), populates it with the command outputs (in parentheses), and sends it via stdin to system utility sudo tee with root privileges, which in turn overwrites the docker.list file and omits the output by redirecting it to /dev/null:
Info: Repositories added by mistake can be removed from Ubuntu 20.04 by selectively deleting them in /etc/apt/sources.list.d/ directory.
Step 5: Update apt package index
Updating the apt package index (once again):
$ sudo apt update
...
Reading package lists... Done
Building dependency tree Reading state information... Done
All packages are up to date.
Step 6: Install Docker
Installing Docker (the latest stable version) and its components:
$ sudo apt-get install docker-ce docker-ce-cli containerd.io docker-compose-plugin
Reading package lists... Done
Building dependency tree Reading state information... Done
The following additional packages will be installed: docker-ce-rootless-extras docker-scan-plugin pigz slirp4netns
Suggested packages: aufs-tools cgroupfs-mount | cgroup-lite
The following NEW packages will be installed: containerd.io docker-ce docker-ce-cli docker-ce-rootless-extras docker-compose-plugin docker-scan-plugin pigz slirp4netns
0 upgraded, 8 newly installed, 0 to remove and 0 not upgraded.
Need to get 108 MB of archives.
After this operation, 449 MB of additional disk space will be used.
Do you want to continue? [Y/n] y
...
Let’s check the Docker version once again:
$ docker version
Client: Docker Engine - Community Version: 20.10.17 API version: 1.41 Go version: go1.17.11 Git commit: 100c701 Built: Mon Jun 6 23:02:57 2022 OS/Arch: linux/amd64 Context: default Experimental: true Server: Docker Engine - Community Engine: Version: 20.10.17 API version: 1.41 (minimum version 1.12) Go version: go1.17.11 Git commit: a89b842 Built: Mon Jun 6 23:01:03 2022 OS/Arch: linux/amd64 Experimental: false containerd: Version: 1.6.7 GitCommit: 0197261a30bf81f1ee8e6a4dd2dea0ef95d67ccb runc: Version: 1.1.3 GitCommit: v1.1.3-0-g6724737 docker-init: Version: 0.19.0 GitCommit: de40ad0
Now that we’re sure that our Docker installation went through and the Docker Engine version we have is 20.20.17 (at the time of writing this article). The next step is getting the Docker image with the Solidity compiler.
Docker images are identified by their release organization, image name (shorter, images), and tag, i.e. label that makes them unique. In general, we can download a Docker image by referencing it with its organization/image:tag marker.
We will download a Docker image of the Solidity compiler by specifying its marker as ethereum/solc:stable for a stable version, and ethereum/solc:nightly for the bleeding edge, potentially unstable version.
We can also specify a distinct version of the Solidity compiler by setting a tag to a specific version, e.g. ethereum/solc:0.5.4.
We will do three things with one Docker command: we’ll download the image, instantiate (run) a container from the image and print the container usage (flag – help):
docker run ethereum/solc:stable – help
Sure enough, we’d like to compile our Solidity files, so we’ll make three preparations (First, Second, Third):
First: Create a local directory containing our Solidity source code (I’ll use 1_Storage.sol from the Remix contracts folder by creating an empty file and pasting the content into it):
$ mkdir ~/solidity_src/ && cd ~/solidity_src/
$ touch 1_Storage.sol
Second: You can write your own contract for testing purposes or just open the 1_Storage.sol with your favorite text editor and paste the contents from 1_Storage.sol example in Remix.
Third: Run a Docker container (we already have the image so the download procedure will be skipped); command flag -v mounts our local ~/solidity_src directory to the container’s path /sources, path ethereum/solc:stable selects the Docker image to run a container, command flag -o sets the output location for the compiled files, --abi and --bin activate the generation of both .abi and .bin files, and the path /sources/1_Storage.sol selects the source file for compilation:
$ docker run -v ~/solidity_src:/sources ethereum/solc:stable -o /sources/output – abi – bin /sources/1_Storage.sol
Compiler run successful. Artifact(s) can be found in directory "/sources/output".
When checking our solidity_src directory, we’ll discover a new directory output, created by the Solidity compiler, containing both .abi and .bin files.
Docker also enables us to use the standard JSON interface, and it is a recommended approach when using the compiler with a toolchain. This interface doesn’t require mounted directories if the JSON input is self-contained, in other words, all the code is already contained in the source files and there are no references to external, imported files:
docker run ethereum/solc:stable – standard-json < input.json > output.json
Since we haven’t done any examples using the JSON interface, we’ll suspend this approach until a later time.
Conclusion
This article introduced us to a Solidity-supporting technology called Docker.
Of course, our main focus is on an ecosystem consisting of Solidity, Ethereum, blockchain technology, etc., but I recognized an opportunity of making a detour and walking us through the process of setting up and using the Solidity compiler via the Docker platform. Therefore, although initially unplanned, we’re also gaining some DevOps skills.
In the first and only chapter (yeah, I’m a bit surprised as well) we’ve set the mining charges by getting to know what Docker is. Then we blew a big piece of rock away by discovering how to install Docker on Ubuntu Linux (and by extension, some other operating systems). I believe this article will prove useful and provide multiple tips and tricks in terms of setting your development environment for Solidity on Ubuntu Linux. Besides that and personally speaking, it was always useful to gain secondary knowledge whenever I learned a specific topic, and I’m sure you’ll have the same experience.
Solidity is the programming language of the future.
It gives you the rare and sought-after superpower to program against the “Internet Computer”, i.e., against decentralized Blockchains such as Ethereum, Binance Smart Chain, Ethereum Classic, Tron, and Avalanche – to mention just a few Blockchain infrastructures that support Solidity.
In particular, Solidity allows you to create smart contracts, i.e., pieces of code that automatically execute on specific conditions in a completely decentralized environment. For example, smart contracts empower you to create your own decentralized autonomous organizations (DAOs) that run on Blockchains without being subject to centralized control.
NFTs, DeFi, DAOs, and Blockchain-based games are all based on smart contracts.
This course is a simple, low-friction introduction to creating your first smart contract using the Remix IDE on the Ethereum testnet – without fluff, significant upfront costs to purchase ETH, or unnecessary complexity.
You can unpack all list elements into the print() function to print all values individually, separated by an empty space per default (that you can override using the sep argument). For example, the expression print(*my_list) prints the elements in my_list, empty space separated, without the enclosing square brackets and without the separating commas!
Note: If you want a different separating character, you can set the sep argument of the print() function. For example, print(*my_list, sep='|') will use the vertical bar '|' as a separating character.
You can learn about the ins and outs of the built-in print() function in the following video:
To master the basics of unpacking, feel free to check out this video on the asterisk operator:
Method 2: String Replace Method
A simple way to print a list without commas and square brackets is to first convert the list to a string using the built-in str() function. Then modify the resulting string representation of the list by using the string.replace() method until you get the desired result.
Here’s an example:
my_list = [1, 2, 3] # Convert List to String
s = str(my_list)
print(s)
# [1, 2, 3] # Replace Separating Commas and Square Brackets
s = s.replace(', ', '\n').replace('[', '').replace(']', '') # Print List Without Commas and Brackets
print(s)
The result is a string without commas and without brackets:
1
2
3
Method 3: String Join With Generator Expression
You can print a list without brackets and without commas. Use the string.join() method on any separator string such as ' ' or '\t'. Pass a generator expression to convert each list element to a string using the str() built-in function. For example, the expression print(' '.join(str(x) for x in my_list)) prints my_list to the shell without enclosing brackets and commas.
my_list = [1, 2, 3]
print(' '.join(str(x) for x in my_list))
# Output: 1 2 3
You can modify the separator string on which you join to customize the appearance of the list:
my_list = [1, 2, 3]
print('xxx'.join(str(x) for x in my_list))
# Output: 1xxx2xxx3
The str(object) built-in function converts a given object to its string representation.
Generator expressions or list comprehensions are concise one-liner ways to create a new iterable based by reusing elements from another iterable.
You can dive deeper into generators in the following video:
Where to Go From Here?
Enough theory. Let’s get some practice!
Coders get paid six figures and more because they can solve problems more effectively using machine intelligence and automation.
To become more successful in coding, solve more real problems for real people. That’s how you polish the skills you really need in practice. After all, what’s the use of learning theory that nobody ever needs?
You build high-value coding skills by working on practical coding projects!
Do you want to stop learning with toy projects and focus on practical code projects that earn you money and solve real problems for people?
If your answer is YES!, consider becoming a Python freelance developer! It’s the best way of approaching the task of improving your Python skills—even if you are a complete beginner.
If you just want to learn about the freelancing opportunity, feel free to watch my free webinar “How to Build Your High-Income Skill Python” and learn how I grew my coding business online and how you can, too—from the comfort of your own home.
In JavaScript, there are many options to removing duplicates. We shall see them one by one with examples below.
This example provides all those options from easy to complex solutions to achieve this. You can save this into your application’s common client-side assets to use in your projects.
1) Remove duplicates using JavaScript Set
This quick example uses the JavaScript Set class. This class constructs a unique elements array.
If you pass an input array with duplicate elements, the Set removes the duplicate and returns an array of unique elements.
Quick example
// best and simple solution
// when creating a JavaScript Set, it implicitly removes duplicates
const arrayElements = ['a', 'b', 'c', 'a', 'b', 'd'];
console.log(arrayElements);
let uniqueElements = [...new Set(arrayElements)];
// result array after remove is [ 'a', 'b', 'c', 'd' ]
console.log(uniqueElements);
Output
[ 'a', 'b', 'c', 'd' ]
2) Fastest method to remove duplicates from an array
This is the fastest method to remove duplicates from an array.
The removeDuplicates() custom function runs a loop on the input array.
It defines an array seen[] to mark that the element is found already.
It checks if it is already set in the seen[] array during the iteration. If not, it will be added to the resultant unique array.
<html>
<body> <h1>Remove Duplicates from Array JavaScript - fastest method</h1> <script> function removeDuplicates(arrayElements) { var seen = {}; var resultArray = []; var length = arrayElements.length; var j = 0; for (var i = 0; i < length; i++) { var element = arrayElements[i]; if (seen[element] !== 1) { seen[element] = 1; resultArray[j++] = element; } } return resultArray; } const arrayElements = ['a', 'b', 'c', 'a', 'b', 'd']; console.log(arrayElements); uniqueElements = removeDuplicates(arrayElements); // result array after remove is [ 'a', 'b', 'c', 'd' ] console.log(uniqueElements); </script>
</body>
</html>
3) Remove duplicates from an array using filter()
The JavaScript filter is used with an arrow function to narrow down the array output. It filters the array of elements based on their uniqueness.
The filter condition uses JavaScript indexOf() method to compare. The indexOf() always returns the first index of the element. It is regardless of its multiple occurrences in an array.
This filter condition compares the first index with the current index of the original array. If the condition is matched then the arrow function returns the element to the output array. Refer this for filtering an array in PHP of elements to get rid of duplicates.
<html>
<body> <h1>Remove Duplicates from Array JavaScript using filter()</h1> <script> const arrayElements = ['a', 'b', 'c', 'a', 'b', 'd']; console.log(arrayElements); let uniqueElements = arrayElements.filter((element, index) => { return arrayElements.indexOf(element) === index; }); // result array after remove is [ 'a', 'b', 'c', 'd' ] console.log(uniqueElements); </script>
</body>
</html>
4) Remove Duplicates from Array using JavaScript Hashtables
In this method, the JavaScript hashtable mapping is created based on the data type of the input array element. It defines a JavaScript primitive data type object mapping array.
It applies the filter to do the following steps.
It gets the array element’s data type.
If the element is the type one among the primitive array defined, then it applies the filter condition.
Condition checks if the hashtable has an entry as same as the current element’s property. If a match is found, then it returns the current element.
If the array element is not a primitive data type, then the filter will be based on the JavaScript objects’ linear search.
<html>
<body> <h1>Remove Duplicates from Array JavaScript using Hashtables</h1> <script> // uses hash lookups for JavaScrip primitives and linear search for objects function removeDuplicates(arrayElements) { var primitives = { "boolean": {}, "number": {}, "string": {} }, objects = []; return arrayElements .filter(function(element) { var type = typeof element; if (type in primitives) return primitives[type] .hasOwnProperty(element) ? false : (primitives[type][element] = true); else return objects.indexOf(element) >= 0 ? false : objects.push(element); }); } const arrayElements = ['a', 'b', 'c', 'a', 'b', 'd']; console.log(arrayElements); uniqueElements = removeDuplicates(arrayElements); // result array after remove is [ 'a', 'b', 'c', 'd' ] console.log(uniqueElements); </script>
</body>
</html>
5) Remove Duplicates from Array using includes() and push()
This method uses JavaScript forEach() to iterate the input array. It defines an empty array to store the unique elements uniqueElements[].
In each iteration, it checks if the uniqueElements[]array already has the element. It uses JavaScript includes() to do this check.
Once the includes() function returns false, then it will push the current element in to the uniqueElements[].
<html>
<body> <h1>Remove Duplicates from Array JavaScript using includes() and push()</h1> <script> const arrayElements = ['a', 'b', 'c', 'a', 'b', 'd']; console.log(arrayElements); let uniqueElements = []; arrayElements.forEach((element) => { if (!uniqueElements.includes(element)) { uniqueElements.push(element); } }); // result array after remove is [ 'a', 'b', 'c', 'd' ] console.log(uniqueElements); </script>
</body>
</html>
6) Remove Duplicates from Array using reduce()
Like the JavaScript filter() function, the reduce() function also applies conditions to narrow down the input array.
This function has the current element and the previous result returned by the callback of the reduce().
Each callback action pushes the unique element into an array. This array is used in the next callback to apply includes() and push() to remove the duplicates.
<html>
<body> <h1>Remove Duplicates from Array JavaScript using reduce()</h1> <script> const arrayElements = ['a', 'b', 'c', 'a', 'b', 'd']; console.log(arrayElements); let uniqueElements = arrayElements.reduce(function(pass, current) { if (!pass.includes(current)) pass.push(current); return pass; }, []); // result array after remove is [ 'a', 'b', 'c', 'd' ] console.log(uniqueElements); </script>
</body>
</html>
7) Remove Duplicates from Array using JavaScript Sort
It sorts the input array and removes the duplicates by successive elements comparison.
After sorting, the filter functions condition checks if the current and the previous element are not the same. Then, filters the unique array out of duplicates.
<html>
<body> <h1>Remove Duplicates from Array JavaScript using Sort</h1> <script> // sort the JavaScript array, and then // remove each element that's equal to the preceding one function removeDuplicates(arrayElements) { return arrayElements.sort().filter( function(element, index, ary) { return !index || element != ary[index - 1]; }); } const arrayElements = ['a', 'b', 'c', 'a', 'b', 'd']; console.log(arrayElements); uniqueElements = removeDuplicates(arrayElements); // result array after remove is [ 'a', 'b', 'c', 'd' ] console.log(uniqueElements); </script>
</body>
</html>
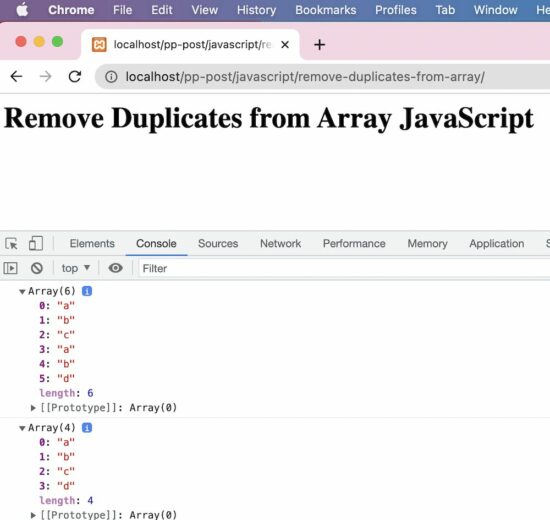
Output:
Array(6) 0: "a" 1: "b" 2: "c" 3: "a" 4: "b" 5: "d" length: 6
Array(4) 0: "a" 1: "b" 2: "c" 3: "d" length: 4
Use the tuple concatenation operation * with a tuple with one element (42,) as a right operand and the number of repetitions of this element as a left operand. For example, the expression (42,) * n creates the tuple (42, 42, 42, 42, 42) for n=5.
Let’s play with an interactive code shell before you’ll dive into the detailed solution!
Exercise: Initialize the tuple with n=20 placeholder elements -1 and run the code.
Problem Formulation
Next, you’ll learn about the more formal problem and dive into the step-by-step solution.
Problem: Given an integer n. How to initialize a tuple with n placeholder elements (e.g., 42)?
Use the tuple concatenation operation * with a tuple with one element (42,) as right operand and the number of repetitions of this element as left operand. For example, the expression (42,) * n creates the tuple (42, 42, 42, 42, 42) for n=5.
n = 5
t = (42,) * n
print(t)
# (42, 42, 42, 42, 42)
Note that you cannot change the values of a tuple, once created, because unlike lists tuples are immutable. For example, trying to overwrite the third tuple value will yield a TypeError: 'tuple' object does not support item assignment.
>>> x = (42,) * 5
>>> x[0] = 'Alice'
Traceback (most recent call last): File "<pyshell#6>", line 1, in <module> x[0] = 'Alice'
TypeError: 'tuple' object does not support item assignment
Example 2 – N-Ary Tuple Concatenation
You can also use a generalization of the unary tuple concatenation — I call it n-ary tuple concatenation — to create a tuple of size n. For example, given a tuple t of size 3, you can create a tuple of size 9 by multiplying it with the integer 3 like so: t * 3.
This approach is simple: First, create a list of size n. Second, pass that list into the tuple() function to create a tuple of size n.
n = 100 # 1. Create list of size n
lst = [42] * n # 2. Change value in (mutable) list
lst[2] = 'Alice' # 3. Create tuple from list AFTER modification
t = tuple(lst) # 4. Print tuple
print(t)
# (42, 42, 'Alice', 42, 42, ...)
Example 4 – Generator Expression (List Comprehension)
You can pass a generator expression into Python’s built-in tuple() function to dynamically create a tuple of elements, given another iterable. For example, the expression tuple(i**2 for i in range(10)) creates a tuple with ten square numbers.
Here’s the code snippet for copy&paste:
x = tuple(i**2 for i in range(10))
print(x)
# (0, 1, 4, 9, 16, 25, 36, 49, 64, 81)
In case you need some background on this terrific Python feature, check out my article on List Comprehension and my best-selling Python textbook on writing super condensed and concise Python code:
Python One-Liners Book: Master the Single Line First!
Python programmers will improve their computer science skills with these useful one-liners.
Python One-Linerswill teach you how to read and write “one-liners”: concise statements of useful functionality packed into a single line of code. You’ll learn how to systematically unpack and understand any line of Python code, and write eloquent, powerfully compressed Python like an expert.
The book’s five chapters cover (1) tips and tricks, (2) regular expressions, (3) machine learning, (4) core data science topics, and (5) useful algorithms.
Detailed explanations of one-liners introduce key computer science concepts and boost your coding and analytical skills. You’ll learn about advanced Python features such as list comprehension, slicing, lambda functions, regular expressions, map and reduce functions, and slice assignments.
You’ll also learn how to:
Leverage data structures to solve real-world problems, like using Boolean indexing to find cities with above-average pollution
Use NumPy basics such as array, shape, axis, type, broadcasting, advanced indexing, slicing, sorting, searching, aggregating, and statistics
Calculate basic statistics of multidimensional data arrays and the K-Means algorithms for unsupervised learning
Create more advanced regular expressions using grouping and named groups, negative lookaheads, escaped characters, whitespaces, character sets (and negative characters sets), and greedy/nongreedy operators
Understand a wide range of computer science topics, including anagrams, palindromes, supersets, permutations, factorials, prime numbers, Fibonacci numbers, obfuscation, searching, and algorithmic sorting
By the end of the book, you’ll know how to write Python at its most refined, and create concise, beautiful pieces of “Python art” in merely a single line.
Email validation in PHP can be done in different ways. In general, a website will have client-side validation.
I prefer both client and server-side validation. It is applicable not only for emails but also to all inputs received from the end users. It will make the website more robust.
Validating email or other user inputs is a basic precautionary step before processing.
In this article, we will see how to validate email on the server-side. PHP provides various alternates to validate email with its built-in constants and functions. Some of them are listed below.
Ways to validate email in PHP
Using FILTER_VALIDATE_EMAIL.
Using pattern matching with regular expression.
By validating the domain name from the email address.
The following quick example uses PHP filter FILTER_VALIDATE_EMAIL. It is the best method of validating email in PHP.
Quick example
<?php
$email = 'test@example.com';
isValidEmail($email); // using FILTER_VALIDATE_EMAIL - this is the best option to use in PHP
function isValidEmail($email)
{ return filter_var($email, FILTER_VALIDATE_EMAIL) !== false;
}
?>
Let us see other methods to validate email using PHP script.
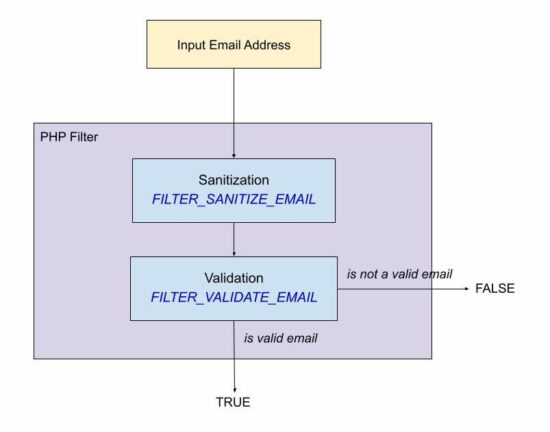
Using FILTER_SANITIZE_EMAIL for input sanitization
The FILTER_SANITIZE_EMAIL is used to clean the email data submitted by the user.
In this example, the $email is hard coded with an example email address. You can supply email input from the form data posted to PHP using GET or POST methods.
It adds a prior step to sanitize the email data before validating its format. For validating the format of the sanitized email data, it uses FILTER_VALIDATE_EMAIL.
filter-sanitize-email.php
<?php
// this script explains the difference between FILTER_SANITIZE_EMAIL and FILTER_VALIDATE_EMAIL // validation is to test if an email is in valid email format and FILTER_VALIDATE_EMAIL should be used.
// sanitization is to clean an user input before using it in the program and FILTER_SANITIZE_EMAIL should be used.
$email = "test@example.com";
$cleanEmail = filter_var($email, FILTER_SANITIZE_EMAIL); // after sanitization use the email and check for valid email or not
if (filter_var($cleanEmail, FILTER_VALIDATE_EMAIL)) { // the email is valid and use it
}
?>
Using pattern matching with regular expression
If you are expecting a regex pattern to validate the email format, this example code will help.
This code has a regex pattern in a variable and is used to validate email with PHP preg_match().
In PHP, the preg_match() is for pattern matching with a given subject that is an email address here.
This code has the validateWithRegex() function to process the PHP email validation. It applies converts the input email string to lower case and trims before applying preg_match().
Then, it returns a boolean true if the match is found for the email regex pattern.
email-regex.php
<?php
validateWithRegex($email); // Using regular expression (regex). If for some reason you want to validate email via a regex use this
// function. The best way to validate is via FILTER_VALIDATE_EMAIL only.
function validateWithRegex($email)
{ $email = trim(strtolower($email)); // the regex I have used is from PHP version 8.1.7 which is used in php_filter_validate_email // reference: https://github.com/php/php-src/blob/PHP-8.1.7/ext/filter/logical_filters.c#L682 $emailRegex = '/^(?!(?:(?:\\x22?\\x5C[\\x00-\\x7E]\\x22?)|(?:\\x22?[^\\x5C\\x22]\\x22?)){255,})(?!(?:(?:\\x22?\\x5C[\\x00-\\x7E]\\x22?)|(?:\\x22?[^\\x5C\\x22]\\x22?)){65,}@)(?:(?:[\\x21\\x23-\\x27\\x2A\\x2B\\x2D\\x2F-\\x39\\x3D\\x3F\\x5E-\\x7E\\pL\\pN]+)|(?:\\x22(?:[\\x01-\\x08\\x0B\\x0C\\x0E-\\x1F\\x21\\x23-\\x5B\\x5D-\\x7F\\pL\\pN]|(?:\\x5C[\\x00-\\x7F]))*\\x22))(?:\\.(?:(?:[\\x21\\x23-\\x27\\x2A\\x2B\\x2D\\x2F-\\x39\\x3D\\x3F\\x5E-\\x7E\\pL\\pN]+)|(?:\\x22(?:[\\x01-\\x08\\x0B\\x0C\\x0E-\\x1F\\x21\\x23-\\x5B\\x5D-\\x7F\\pL\\pN]|(?:\\x5C[\\x00-\\x7F]))*\\x22)))*@(?:(?:(?!.*[^.]{64,})(?:(?:(?:xn--)?[a-z0-9]+(?:-+[a-z0-9]+)*\\.){1,126}){1,}(?:(?:[a-z][a-z0-9]*)|(?:(?:xn--)[a-z0-9]+))(?:-+[a-z0-9]+)*)|(?:\\[(?:(?:IPv6:(?:(?:[a-f0-9]{1,4}(?::[a-f0-9]{1,4}){7})|(?:(?!(?:.*[a-f0-9][:\\]]){7,})(?:[a-f0-9]{1,4}(?::[a-f0-9]{1,4}){0,5})?::(?:[a-f0-9]{1,4}(?::[a-f0-9]{1,4}){0,5})?)))|(?:(?:IPv6:(?:(?:[a-f0-9]{1,4}(?::[a-f0-9]{1,4}){5}:)|(?:(?!(?:.*[a-f0-9]:){5,})(?:[a-f0-9]{1,4}(?::[a-f0-9]{1,4}){0,3})?::(?:[a-f0-9]{1,4}(?::[a-f0-9]{1,4}){0,3}:)?)))?(?:(?:25[0-5])|(?:2[0-4][0-9])|(?:1[0-9]{2})|(?:[1-9]?[0-9]))(?:\\.(?:(?:25[0-5])|(?:2[0-4][0-9])|(?:1[0-9]{2})|(?:[1-9]?[0-9]))){3}))\\]))$/iDu'; if (preg_match($emailRegex, $email) === 1) { return true; } else { return false; }
}
?>
By validating the domain name from the email string
This method is a very simple one for validating email. It validates email by ensuring its host DNS validness.
It uses the PHP checkdnsrr() function to validate DNS by a hostname or the site IP address.
This function returns a boolean true if the host has any DNS records found. And thereby, the email in that host can be considered in a valid format.
It follows the below list of steps.
It extracts the domain name from the email.
It extracts the username prefixed before the @ symbol.
It ensures that the username and domain name are not empty.
It checks if the DNS details are not empty about the host extracted from the input email.
domain-validate-email.php
<?php // simplest custom email validation using email's domain validation
function validateEmail($email)
{ $isEmailValid = FALSE; if (! empty($email)) { $domain = ltrim(stristr($email, '@'), '@') . '.'; $user = stristr($email, '@', TRUE); // validate email's domain using DNS if (! empty($user) && ! empty($domain) && checkdnsrr($domain)) { $isEmailValid = TRUE; } } return $isEmailValid;
}
?>
In this article, you’ll learn how to print a string and an integer together in Python.
To make it more fun, we have the following running scenario:
The Finxter Academy has decided to send its users an encouraging message using their First Name (a String) and Problems Solved (an Integer). They have provided you with five (5) fictitious users to work with and to select the most appropriate option.
This example uses the print() function to output a String and an Integer.
print('Steve', 39915)
This function offers the ability to accept various Data Types and output the results, separated by commas (,) to the terminal.
Although not the most aesthetically pleasing output, it gets the job done. The print() function at its most simplistic level!
Steve 39915
Method 2: Use the print() function and str() method
This example uses the print() function and the str() method to format and output a sentence containing a String and an Integer.
print('Steve has solved ' + str(39915) + ' puzzles!')
To successfully output the contents of the print() function, the Integer must first be converted to a String. This can be done by calling the str() method and passing, in this case, 39915 as an argument.
Steve has solved 39915 puzzles!
Method 3: Use f-string with print() function
This example uses the f-string inside the print() function. This method uses curly brackets ({}) to accept and display the data.
first_name = 'Steve'
solved = 39915
print(f'{first_name} has solved {solved} puzzles to date!')
Above, two (2) variables are declared: first_name and solved.
The print() function is called and passed these two (2) variables, each inside curly braces ({}). This indicates that Python should expect two (2) variables of unknown Data Types. The print() function executes and sends this output to the terminal.
Steve has solved 39915 puzzles!
What if you need to print out all Finxter users? This example assumes the data is saved to separate Lists and output using a For loop.
f_name = ['Steve', 'Amy', 'Peter', 'Marcus', 'Alice']
f_solved = [39915, 31001, 29675, 24150, 23580] for i in range(len(f_name)): print(f'{f_name[i]} has solved {f_solved[i]} puzzles to date!')
Steve has solved 39915 puzzles to date! Amy has solved 31001 puzzles to date! Peter has solved 29675 puzzles to date! Marcus has solved 24150 puzzles to date! Alice has solved 23580 puzzles to date!
Method 4: Use %d, %s and %f Operator
This examples uses the %d (decimal value), the %s (string value), and %f (float value) inside the print() function to output the fictitious Finxter user’s data.
f_name = ['Steve', 'Amy', 'Peter', 'Marcus', 'Alice']
f_solved = [39915, 31001, 29675, 24150, 23580]
f_avg = [99.315, 82.678, 79.563, 75.899, 71.233] i = 0
while i < len(f_name): print("%s solved %d puzzles with an average of %3.2f." % (f_name[i], f_solved[i], f_avg[i])) i += 1
Above, three (3) Lists are declared. Each List carries different information for each user (f_name, f_solved, f_avg).
The following line instantiates a while loop and a counter (i) which increments upon each iteration. This loop iterates until the final element in f_name is reached.
Inside the loop, the %s (accepts strings) is replaced with the value of f_name[i]. Then, %d (accepts integers) is replaced with the value of f_solved[i]. Finally, the %3.2f (for floats) value of is replaced with f_avg[i] having two (2) decimal places. The output displays below.
Steve solved 39915 puzzles with an average of 99.31. Amy solved 31001 puzzles with an average of 82.68. Peter solved 29675 puzzles with an average of 79.56. Marcus solved 24150 puzzles with an average of 75.90. Alice solved 23580 puzzles with an average of 71.23.
Note: In the %3.2f annotation, the value of three (3) indicates the width, and 2 indicates the number of decimal places. Try different widths!
Method 5: Use identification numbers
This example uses field identification numbers, such as 0, 1, 2, etc., inside the print() function to identify the fields to display and in what order.
f_name = ['Steve', 'Amy', 'Peter', 'Marcus', 'Alice']
f_solved = [39915, 31001, 29675, 24150, 23580] for i in range(len(f_name)): print('{0} solved {1} puzzles!'.format(f_name[i], (format(f_solved[i], ',d'))))
Above, two (2) Lists are declared. Each List carries different information for each Finxter user (f_name, f_solved).
Then, using a For loop, the code runs through the above Lists. The numbers wrapped inside curly braces ({0}, {1}) indicate holding places for the expected data. This data appears inside the format() function ((format(f_solved[i], ',d')))) and are output to the terminal.
Steve solved 39,915 puzzles! Amy solved 31,001 puzzles! Peter solved 29,675 puzzles! Marcus solved 24,150 puzzles! Alice solved 23,580 puzzles!
Note: The data in f_solved is formatted to display a thousand comma (',d').
Method 6: Use f-string and a conditional
This example uses an f-string and a conditional to display the results based on a condition inside the print() function.
f_name = ['Steve', 'Amy', 'Peter', 'Marcus', 'Alice']
f_solved = [39915, 31001, 29675, 24150, 23580]
print(f'Has Alice solved more puzzles than Amy? {True if f_solved[4] > f_solved[1] else False}')
Above, two (2) Lists are declared. Each List carries different information for each Finxter user (f_name, f_solved).
Inside the print() function, the code inside the curly braces ({}) checks to see if the number of puzzles Alice has solved is greater than the number of puzzles Amy has solved. True or False returns based on the outcome and is output along with the String to the terminal.
Has Alice solved more puzzles than Amy? False
Bonus: Putting it Together!
This article used several ways to format a String and an Integer. However, let’s put this together to generate a custom email body!
The first step is to install the Pandas library. Click here for installation instructions.
import pandas as pd finxters = pd.read_csv('finxter_top5.csv') for _, row in finxters.iterrows(): user_email = row[3] e_body = f""" Hello {row[0]} {row[1]},\n The Finxter Academy wants to congratulate you on solving {row[2]:,d} puzzles. For achieving this, our Team is sending you a free copy of our latest book! Thank you for joining us. The Finxter Academy """ print(e_body.strip())
This code reads in a fictitious finxter_top5.csv file.
First_Name
Last_Name
Solved
Email
0
Steve
Hamilton
39915
steveh@acme.org
1
Amy
Pullister
31001
amy.p@bminc.de
2
Peter
Dunn
29675
pdunn@tsce.ca
3
Marcus
Williams
24150
marwil@harpoprod.com
4
Alice
Miller
23580
amiller@harvest.com
Next, a For loop is instantiated to iterate through each row of the DataFrame finxters.
Note: The underscore (_) character in the for loop indicates that the value is unimportant and not used, but needed.
For each loop, the user’s email address is retrieved from the row position (row[3]). This email address saves to user_email.
Next, the custom email body is formatted using the f-string and passed the user’s First Name and Last Name in the salutation ({row[0]} {row[1]}). Then, the solved variable is formatted to display commas (,) indicating thousands ({row[2]:,d}). The results are saved to e_body and, for this example, are output to the terminal.
For this example, the first record displays.
Hello Steve Hamilton, The Finxter Academy wants to congratulate you on solving 39,915 puzzles. For achieving this, our Team is sending you a free copy of our latest book. Thank you for joining us. The Finxter Academy
A Finxter Challenge! Combine the knowledge you learned here to create a custom emailer. Click here for a tutorial to get you started!
Summary
These six (6) methods of printing Strings and Integers should give you enough information to select the best one for your coding requirements.
This article is for learning how to use JavaScript localStorage to put a string or object into it. This is for storing data in the client browser and use it when the need arises.
Data storage is a critical part of programming. These are the scenarios the localStorage used for adding persistency on the client-side.
To store the session and the unique identity of a guest user to manage the state of his selection.
To store shopping cart selected items on the client-side.
To store language preferences to display content on a multilingual site.
To store user preferences to display data, time and timezone as selected on the client.
Let us see a quick example of using the JavaScript localStorage to store an object. It prepares a JSON object of an array of data and put it into the localStorage.
Quick example
var animalObject = { 'Lion': 'Wild', 'Dog': 'Domestic'
}; // flatten the animal object as a string
animalString = JSON.stringify(animalObject); //store the string into local storage
localStorage.setItem('animals', animalString);
Quick example output
Log this localStorage object into the developer’s browser console to display the following output.
Object from local storage: {Lion: 'Wild', Dog: 'Domestic'}
It contains a handle to access the local storage space of the browser origin.
Properties
Web Storage API
Web Storage API provides two concepts to store the objects having data in a key: value format.
window.localStorage
window.sessionStorage
Both use different Storage instances and control the actions separately.
This storage object is similar to the JavaScript localStorage. But, it has an expiration time.
It is valid only on the current browser session. When closing and reloading the browser, then the sessionStorage object is elapsed.
The expiration time is the main difference between these two storage concepts.
How to set and get items in JavaScript localStorage?
This example is for learning a basic usage of the JavaScript localStorage object. It performs the following actions on the localStorage about a String item.
To set an item as a key-value pair.
To get the value of an item by key.
To remove an item by key.
To clear the entire localStorage.
To get the key by item index position.
This localStorage class contains functions used to perform the above actions. This program uses these functions with appropriate parameters.
basics.html
<html>
<head>
<title>JavaScript localStorage Example and how to store a JavaScript object</title>
</head>
<body> <script> // set item in localstorage window.localStorage.setItem('king', 'Lion'); console.log("Local Storage Key-Value = " + JSON.stringify(window.localStorage) + "\n"); // get item from JavaScript localStorage window.localStorage.getItem('king'); console.log("Local Storage Value = " + window.localStorage.getItem('king') + "\n"); // to get name of key using index var indexPosition = parseInt(window.localStorage.length) -1; var KeyName = window.localStorage.key(indexPosition); console.log("Local Storage Key = " + KeyName + "\n"); // remove item from JavaScript localStorage window.localStorage.removeItem('king'); // to clear all items from localStorage window.localStorage.clear(); </script>
</body>
</html>
Output
The above program displays the following output. It is for printing the localStorage data, it’s key and value based on the appropriate function calls.
Local Storage Key-Value = {"king":"Lion"} Local Storage Value = Lion Local Storage Key = king
Store JavaScript object in HTML5 browser localStorage
This example is to store an object in the JavaScript localStorage. It proceeds with the following steps to achieve this.
It builds a JSON object to have a property array.
It converts the object into a string using JSON stringify.
Then put the JSON string into the localStorage.
Like the above basic example, it calls the getItem() by object key to get the property mapping.
The retrieved string output from the localStorage is converted back to an object. The example outputs the converted object to the browser console.
index.html
<html>
<head>
<title>JavaScript localStorage Example and how to store a JavaScript object</title>
</head>
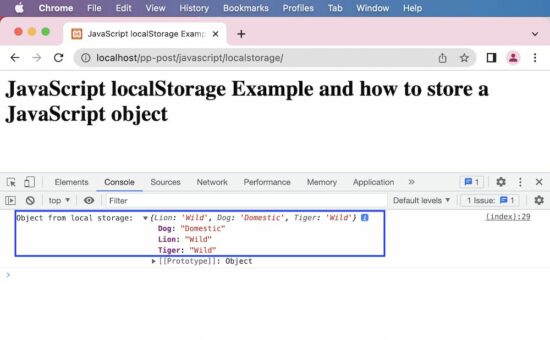
<body> <h1>JavaScript localStorage Example and how to store a JavaScript object</h1> <script> // Example: Store JavaScript object in HTML5 browser localStorage var animalObject = { 'Lion' : 'Wild', 'Dog' : 'Domestic', 'Tiger' : 'Wild' }; // flatten the object as a string animalString = JSON.stringify(animalObject); //store the string into local storage localStorage.setItem('animals', animalString); //retrieve the string from local storage var retrievedString = localStorage.getItem('animals'); // parse the string back to an object convertedObject = JSON.parse(retrievedString); console.log('Object from local storage: ', convertedObject); </script>
</body>
</html>
Output
Object from local storage: {Lion: 'Wild', Dog: 'Domestic', Tiger: 'Wild'}
We learned how to use JavaScript localStorage to set a String or an Object and use it later when needed.
This article will answer some basic questions on Ethereum Classic. Its main purpose is to give you a quick overview of the project. I’m not affiliated in any way with Ethereum Classic, so I try to be as unbiased as I can.
What is Ethereum Classic?
Ethereum Classic is an open-source proof-of-work blockchain and distributed computing platform that allows the execution of smart contracts and decentralized applications (dApps) on a public Ethereum Virtual Machine (EVM).
What is the Difference Between Ethereum Classic and Ethereum?
Ethereum is a hard fork of Ethereum Classic. These are two different Blockchain projects with different developers, features, philosophies, and dApp ecosystems.
The less popular Ethereum Classic contains the original, unmodified history of the Ethereum Blockchain, whereas the more well-known Ethereum Blockchain emerged as a hard fork that redistributed the “stolen” tokens after the DAO hack in 2016.
Most influential developers and institutions, as well as Ethereum’s founder Vitalik Buterin supported the new Ethereum blockchain and explicitly recommended miners to NOT support the Ethereum Classic Blockchain.
The main differences between the two are as follows:
Ethereum Classic is much smaller than Ethereum in regards to almost all metrics such as market cap, transaction volume, number of validators, total locked value, and number of dApps that run on top of the Blockchain.
Ethereum Classic‘s philosophy is “Code is Law”, i.e., even if there is a smart contract hack, the state of the Blockchain is never reverted. This is in contrast to Ethereum’s philosophy of “rapid change” and regular hard forks if the “Layer 0”, i.e., the people running the Blockchain agree to the changes. You could think of it as “Consensus through PoW” vs “Consensus through People”.
Ethereum Classic has an upper maximum supply of 210,700,000 ETC tokens, whereas Ethereum (ETH) has no max supply.
Ethereum Classic runs a proof of work (PoW) consensus algorithm, whereas Ethereum runs a proof of stake (PoS) consensus algorithm.
The DAO was a decentralized autonomous organization (DAO) launched in 2016 on the Ethereum blockchain. After collecting almost 15% of all ETH through a token sale, The DAO was hacked due to a vulnerability in the smart contract.
Ethereum is the Blockchain that emerged when reversing the state of the chain to before the hack, i.e., rewriting history. Code is Not Law.
Ethereum Classic is the Blockchain that emerged from just leaving the hack unchanged, i.e., not rewriting history. Code is Law.
A great video on the DAO hack in 2016 is given here:
Are There Any dApps on Ethereum Classic?
The Ethereum Classic Blockchain is Turing Complete, i.e., you can run arbitrary smart contract code on it. Thus, Ethereum Classic supports decentralized apps (dApps) that issue their own tokens and NFTs.
While there are many dApps on Ethereum Classic, the dApp ecosystem is by orders of magnitude smaller than the Ethereum dApp ecosystem due to the lack of broad developer support.
Statistics: For example, DappRadar lists 3425 Ethereum dApps but not a single dApp for Ethereum Classic. On the Ethereum Classic web page itself, there are only 34 dApps listed. Now, that’s two orders of magnitude fewer dApps for Ethereum Classic when compared to Ethereum!
Figure: That’s about it regarding dApps on Ethereum Classic at the point of this writing.
How to Create a dApp for Ethereum Classic?
Programming Smart Contracts on Ethereum Classic is identical to how it is done on ETH, as ETC maintains compatibility with the Ethereum EVM. Any contract written for Ethereum can be deployed to ETC.
To create a dapp for Ethereum Classic you must program one in a smart contract programming language. Then, you must compile that dapp and install it on the blockchain from a funded account.
So, you can create a decentralized application on Ethereum Classic using Solidity or any other programming language that is able to be compiled against the EVM.
Does Ethereum Classic Have a Future?
Ethereum Classic has much less developer activity than many other Blockchain projects such as Ethereum or Solana. Given the strong developer network effects of bigger Blockchains, i.e., developers are more likely to go to the “meaningful” Blockchain projects which make them even more meaningful, many people are led to believe that Ethereum Classic doesn’t have a rosy future.
I agree with the network effects argument. However, when diving into the project, I discovered some interesting arguments that speak for Ethereum Classic:
Proof of work smart contract blockchain
Open system
Permissionless
Bitcoin philosophy
Hedge against ETH failure
Let’s dive into each of them one by one.
Proof of work smart contract blockchain
First, Ethereum Classic will be the largest proof of work smart contract Blockchain after the “Merge”, i.e., Ethereum’s move to a proof of stake consensus algorithm. This gives Ethereum Classic a unique and robust positioning in the market for decades to come.
Open system design
Second, Ethereum Classic is an open system, whereas Ethereum is a closed system (like all PoS Blockchains). This may make Ethereum Classic more robust against corruption and capturing of the Blockchain. For example, you could argue that Ethereum is already captured by the current token holders. Ethereum Classic is an open PoW system, so the current majority of computing power doesn’t control Ethereum Classic forever. One could always add more mining devices from outside the system.
Permissionless
Third, Ethereum Classic is permissionless, whereas Ethereum is permissioned. You cannot contribute to the consensus algorithm of the Ethereum network without buying a stake from an insider, i.e., asking them for permission. If the majority of token holders are not willing to sell ETH to you, you can never start a “revolution”, i.e., taking over control from the centralized controlling entity or entities. Once a PoS chain is captured by centralized entities, it is very hard to take it over to decentralize it again. However, this is possible in a PoW system.
Bitcoin philosophy
Fourth, Ethereum Classic’s design philosophy is much closer to Bitcoin’s. Code is Law. Few changes. Decentralization over scalability. Maximum token supply and sound money properties. Proof of work security. Thus, even though the project is much smaller than Ethereum and Ethereum Classic has been subject to 51% attacks in the past, it has proven to be extremely robust organism, like Bitcoin, and many people subscribing to the Bitcoin philosophy may also subscribe to the ETC philosophy.
Hedge against ETH failure
Fifth, Ethereum Classic will be used as a “hedge” against the failure of Ethereum in the decades to come. While I believe in the philosophy of Ethereum, it is not at all guaranteed that they will make it against the powerful centralization forces (and I don’t like the fact that it’s a closed, i.e., fragile, system). To hedge against those potentially low-probability failure cases of Ethereum, one could buy some Ethereum Classic tokens (no financial advise).
Solidity is the programming language of the future.
It gives you the rare and sought-after superpower to program against the “Internet Computer”, i.e., against decentralized Blockchains such as Ethereum, Binance Smart Chain, Ethereum Classic, Tron, and Avalanche – to mention just a few Blockchain infrastructures that support Solidity.
In particular, Solidity allows you to create smart contracts, i.e., pieces of code that automatically execute on specific conditions in a completely decentralized environment. For example, smart contracts empower you to create your own decentralized autonomous organizations (DAOs) that run on Blockchains without being subject to centralized control.
NFTs, DeFi, DAOs, and Blockchain-based games are all based on smart contracts.
This course is a simple, low-friction introduction to creating your first smart contract using the Remix IDE on the Ethereum testnet – without fluff, significant upfront costs to purchase ETH, or unnecessary complexity.


 Note: The regular expression

 Related Tutorial: Python Pandas DataFrame

 Note: This article assumes you are familiar with how neural networks work. To review those basics, see the article


 If your answer is YES!, consider becoming a


 Question: How would we write code to print a String and an Integer?


 A Finxter Challenge!


 Statistics: For example,


