Posted on Leave a comment

How I Designed an AI Blog Writing Tool with Streamlit

5/5 – (1 vote)

Barely four months since OpenAI unleashed ChatGPT, a human-behavior-mimicking chatbot that took the community by storm, they recently announced its successor, GPT-4. This development will continue to disrupt the global market and, unfortunately, take the jobs of millions of people.

While it’s a welcome development for ChatGPT users looking to explore the capabilities of AI in their respective fields of human endeavor, the bad news is that ChatGPT-4 is not for free. However, we are yet to see if it could be freely available following Microsoft’s announcement that its recently introduced Bing AI is operating on GPT-4.

Hence, if you are unwilling to commit to a $20 monthly subscription, or you feel ChatGPT-3 is working flawlessly for you, you may be better off with ChatGPT-3. What is more, ChatGPT-4 is no different than its previous GPT model if it’s about taking information from your question and giving you an answer it deems perfect.

The only difference is that it is more accurate and creative, plus the special graphic features that will turn your text into pictures and videos.

The Purpose of This Tutorial

You will benefit from this tutorial if you have not yet learned how to implement the ChatGPT model using Streamlit.

As a Python developer, you have undoubtedly learned to implement ChatGPT in your Python script and have it running in your terminal. So this tutorial will be nothing new to you except for a few things.

Overall, the purpose of this tutorial is threefold:

  • To improve your Python skills.
  • To demonstrate how to implement the ChatGPT model using Streamlit.
  • To show you how to use the model to write unique blog articles.

🚀 Try this app in live demo here.

Creating a Streamlit Dashboard

Writing a blog article involves a series of steps. First, you have to brainstorm topic ideas based on a selected niche and choose the one you prefer. Then, you outline the sections. In each section, you generate content corresponding to the sections and the topic.

We will try using ChatGPT to automate these tasks. Note that this article is created with ChatGPT-3 in mind. Of course, the principle can be applied to the GPT-4 model.

I usually start with a main() function that will run as soon as we open the app. But in this tutorial, something came before the function.

import openai
import streamlit as st API_KEY = st.sidebar.text_input('Enter your API key')
openai.api_key = API_KEY

We made provision for our users to use their API key given that we now have a new model with a paid plan.

Not everyone will let others use their paid plan for free. If you have no problem with that, then you are free to include your key in the script. Now comes the main() function.

def main(): st.sidebar.header('AI Blog Writing Tool') st.sidebar.info('An AI tool that can generate blog content') st.sidebar.info('Start with the first option\n before you proceed to the next.') op = st.sidebar.selectbox('Steps', ['topics', 'section', 'content']) if op == 'topics': topics() elif op == 'section': section() else: content()

Everything is self-explanatory. Each step you select will take you to the function that will be executed.

So, let’s imagine we are writing a blog article with Python programming being the selected niche. We narrow down the niche to data science.

Let’s see if the model can generate blog topics for us. To do so we selected the topic option, triggering a callback function.

def topics(): st.header('AI Blog Writing Tool') st.info('To generate blog topic, please follow the pattern given below:') prompt = st.text_area('Write your words', height=50, value='Generate blog topic on data science with Python') if st.button('Send'): st.text(BlogTopics(prompt))

The prompt is the question we will feed to the model. It will be sent to the BlogTopics() function. What we feed to the model will help it know what to give as an answer. In the st.text_area() I gave a sample you can use based on your selected niche.

def BlogTopics(prompt): response = openai.Completion.create( engine="davinci-instruct-beta-v3", prompt=prompt, temperature=0.7, max_tokens=100, top_p=1, frequency_penalty=0, presence_penalty=0 ) return response.choices[0].text

.We have to import the openai module to enable this function to run.

🧑‍💻 Recommended: How to Install OpenAI in Python?

Notice the model that was used. In one Django application, I used the text-davinci-003 model. But in this one, we are using the davinci-instruct-beta-v3 model. It’s proven to be an ideal one for generating unique blog content.

The max_tokens is the number of characters we want the model to generate. Blog topics shouldn’t be more than that. For a detailed explanation of the arguments, check this article.

Let’s now run the app on Streamlit to see the results.

Wow! Can you see 9 blog topic ideas the ChatGPT model has generated for us? That’s interesting. So, let’s select number 2, How to use Pandas for data analysis. This is now our topic.

The next step is sections. When selected, it calls the callback function.

def section(): st.header('AI Blog Writing Tool') st.info('To generate blog section, please follow the pattern given below:') prompt = st.text_area('Write your words', height=50, value='Write blog sections\n\nBlog topic: ') if st.button('Send'): st.text(BlogSections(prompt))

Notice what I suggested in the st.text_area() function. You can follow the same pattern. As usual, another function gets executed when the button is pressed.

def BlogSections(prompt): response = openai.Completion.create( engine="davinci-instruct-beta-v3", prompt=prompt, temperature=0.6, max_tokens=100, top_p=1, frequency_penalty=0, presence_penalty=0 ) return response.choices[0].text

This is similar to the BlogTopics() function. So let’s run it and see the results.

Please note that the results might be different from yours. At times, you may have to run it several times to get what you want. I did that and got ‘Introduction’ as the first section.

Based on the sections, you select one and feed it to the model. Here is the function called when the last step of the main() function is selected.

def content(): st.header('AI Blog Writing Tool') st.info('To generate blog content, please follow the pattern given below:') prompt = st.text_area('Write your words', height=50, value="Expand the blog section in a professional tone \n\nBlog Topic:\n\nSection:") if st.button('Send'): st.text(BlogContent(prompt))

And here is the BlogContent() function. The only difference is the max_tokens.

def BlogContent(prompt): response = openai.Completion.create( engine="davinci-instruct-beta-v3", prompt=prompt, temperature=0.7, max_tokens=400, top_p=1, frequency_penalty=0, presence_penalty=0 ) return response.choices[0].text

Can you see a 400 max_tokens of text have been generated based on the introductory section? The key lies in the prompt you feed to the model. Do the same to all your sections and before long, you will have a unique blog article professionally written by ChatGPT.

Don’t forget to copy each of the text generated.

Conclusion

We have taken advantage of advancements in technology, the latest being the invention of ChatGPT, an AI model that mimics human behavior, to write a unique blog article.

You now have at your disposal an AI writing tool you can use for all your blog articles. Check my GitHub page for the full code. The app is already running on Streamlit Cloud. Make sure you check it out. Enjoy your day.
Posted on Leave a comment

Convert PHP CSV to JSON

by Vincy. Last modified on March 17th, 2023.

JSON format is a widely used format while working with API development. Most of the existing API responses are in JSON format.

Converting CSV content into a JSON format is simple in PHP. In this article, we will see different methods of achieving this conversion.

Quick example

<?php $csvFileContent= file_get_contents("animals.csv");
// Converts the CSV file content into line array $csvLineArray = explode("\n", $csvFileContent);
// Forms row results in an array format
$result = array_map("str_getcsv", $csvLineArray);
$jsonObject = json_encode($result);
print_r($jsonObject);
?>

The above quick example in PHP converts the CSV file content into JSON with few lines of code.

  1. First, it reads the .csv file content using the PHP file_get_contents() function.
  2. It explodes the CSV row by the new line (\n) escape sequence.
  3. Then, it iterates the line array and reads the line data of the CSV row.
  4. Finally, the resultant CSV row array is converted to JSON using the json_encode() function.

In step 3, the iteration happens with a single line of code. This line maps the array to call  PHP str_getcsv to parse and convert the CSV lines into an array.

When we saw the methods of reading a CSV file, we created an example using str_getcsv function.

The below input file is saved and used for this PHP example.

Input CSV

Id,Name,Type,Role
1,Lion,Wild,"Lazy Boss"
2,Tiger,Wild,CEO
3,Jaguar,Wild,Developer

Output JSON

This PHP quick example displays the below JSON output on the browser.

[["Id","Name","Type","Role"],["1","Lion","Wild","Lazy Boss"],["2","Tiger","Wild","CEO"],["3","Jaguar","Wild","Developer"]]

In the following sections, we will see two more examples of converting CSV files into JSON.

  1. Method 2: Convert CSV (containing header) into a JSON (associating the column=>value pair)
  2. Method 3: Upload a CSV file and convert it into JSON

upload and convert csv to json

Method 2: Convert CSV (containing header) into a JSON (associating the column=>value pair)

This example uses a CSV string as its input instead of a file.

It creates the header column array by getting the first row of the CSV file.

Then, the code iterates the CSV rows from the second row onwards. On each iteration, it associates the header column and the iterated data column.

This loop prepares an associative array containing the CSV data.

In the final step, the json_encode() function converts the associative array and writes it into an output JSON file.

<?php
$csvString = "Id,Name,Type,Role
1,Lion,Wild,Boss
2,Tiger,Wild,CEO
3,Jaguar,Wild,Developer"; $lineContent = array_map("str_getcsv", explode("\n", $csvString)); $headers = $lineContent[0];
$jsonArray = array();
$rowCount = count($lineContent);
for ($i=1;$i<$rowCount;$i++) { foreach ($lineContent[$i] as $key => $column) { $jsonArray[$i][$headers[$key]] = $column; }
} header('Content-type: application/json; charset=UTF-8');
$fp = fopen('animals.json', 'w');
fwrite($fp, json_encode($jsonArray, JSON_PRETTY_PRINT));
fclose($fp);
?>

Output – The animal.json file

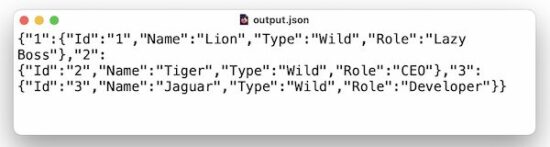
This is the output written to the animal.json file via this PHP program.

{ "1": { "Id": "1", "Name": "Lion", "Type": "Wild", "Role": "Boss" }, "2": { "Id": "2", "Name": "Tiger", "Type": "Wild", "Role": "CEO" }, "3": { "Id": "3", "Name": "Jaguar", "Type": "Wild", "Role": "Developer" }
}

Method 3: Upload a CSV file and convert it into JSON

Instead of using a fixed CSV input assigned to a program, this code allows users to choose the CSV file.

This code shows an HTML form with a file input to upload the input CSV file.

Once uploaded, the PHP script will read the CSV file content, prepare the array, and form the JSON output.

In a previous tutorial, we have seen how to convert a CSV into a PHP array.

upload-and-convert-csv-to-json.php

<?php
if (isset($_POST["convert"])) { if ($_FILES['csv_file_input']['name']) { if ($_FILES['csv_file_input']["type"] == 'text/csv') { $jsonOutput = array(); $csvFileContent = file_get_contents($_FILES['csv_file_input']['tmp_name']); $result = array_map("str_getcsv", explode("\n", $csvFileContent)); $header = $result[0]; $recordCount = count($result); for ($i = 1; $i < $recordCount; $i++) { // Associates the data with the string index in the header array $data = array_combine($header, $result[$i]); $jsonOutput[$i] = $data; } header('Content-disposition: attachment; filename=output.json'); header('Content-type: application/json'); echo json_encode($jsonOutput); exit(); } else { $error = 'Invalid CSV uploaded'; } } else { $error = 'Invalid CSV uploaded'; }
}
?>
<!DOCTYPE html>
<html> <head> <title>Convert CSV to JSON</title> <style> body { font-family: arial; } input[type="file"] { padding: 5px 10px; margin: 30px 0px; border: #666 1px solid; border-radius: 3px; } input[type="submit"] { padding: 8px 20px; border: #232323 1px solid; border-radius: 3px; background: #232323; color: #FFF; } .validation-message { color: #e20900; } </style>
</head>
<body> <form name="frmUpload" method="post" enctype="multipart/form-data"> <input type="file" name="csv_file_input" accept=".csv" /> <input type="submit" name="convert" value="Convert"> <?php if (!empty($error)) { ?> <span class="validation-message"><?php echo $error; ?></span> <?php } ?> </form>
</body>
</html>

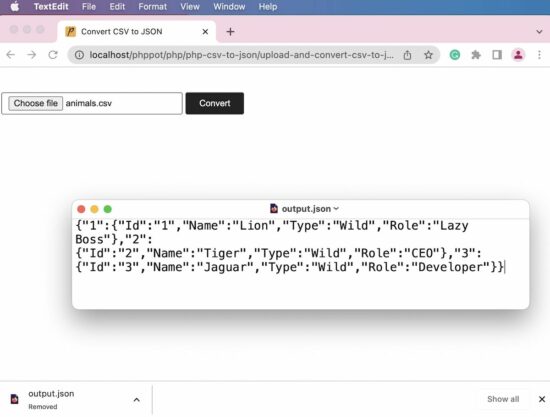
Output:

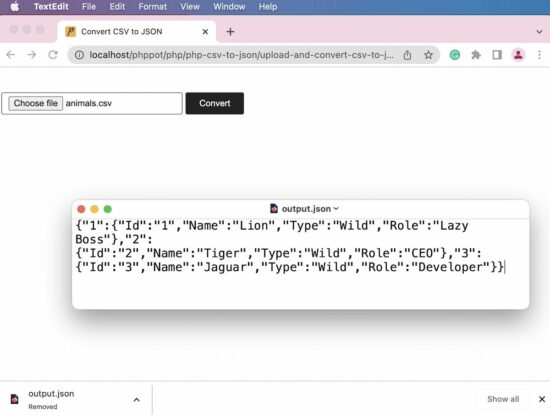
This program writes the output JSON into a file and downloads it automatically to the browser.

Note: Both methods 2 and 3 require CSV input with a header column row to get good results.
output json file
Download

↑ Back to Top

Posted on Leave a comment

phpMyAdmin – How to Connect a Remote Database?

by Vincy. Last modified on March 16th, 2023.

Do you want to connect a remote server from the phpMyAdmin installed on a local or test server? This article gives the steps needed to achieve it.

There are many database clients, most of which support connecting a database server. But, working with phpMyAdmin to connect to a remote database server is heavenly easier than with other clients.

We have seen many tutorials for phpMyAdmin to create a database and perform the operations around it.

Configure remote server details in the phpMyAdmin application config file

A configuration file config.inc.php is there for the phpMyAdmin application. Open that file and add the below settings into it.

This setting is to add the remote database details, host, username, and password. The database port is optional if it is the default.

Before setting the database details, it increments the existing config array index. We can add as many configurations as following the current batch of settings.

$i++;
$cfg['Servers'][$i]['host'] = 'DATABASE_HOST:PORT';//set the database hostname.
$cfg['Servers'][$i]['user'] = 'DATABASE_USER';// set the remote database user
$cfg['Servers'][$i]['password'] = 'DATABASE_PASSWORD';// database password
$cfg['Servers'][$i]['auth_type'] = 'config';

After adding these details, the phpMyAdmin application lists the configured database hostnames.

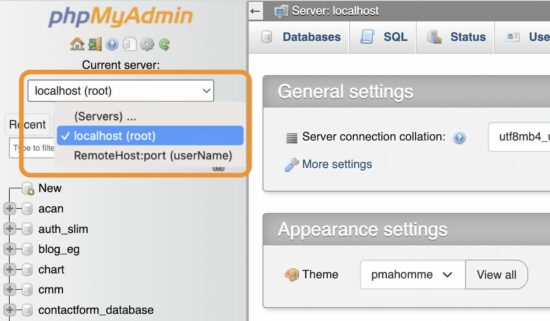
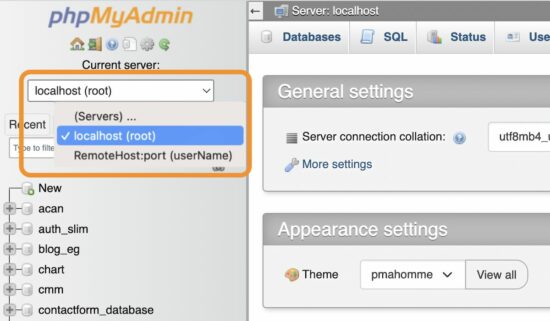
The list is a dropdown of selectable database hosts that appears above the left navigation menu.

The below figure shows the dropdown options of the current localhost and the RemoteHost server.

It allows navigation between these two database servers to manage their assets.

Note: The RemoteHost:port is a test configuration data. Replace it with the remote database IP and port to be connected.

phpmyadmin remote database

These guidelines assume that you have the PHP and MySQL environment with the phpMyAdmin application installed.

If you newly create the environment or install the phpMyAdmin, ensure the required privileges and security measures. We have seen steps to install phpMyAdmin on a windows machine via the WAMP package installer.

Security measures needed for the machine connecting the remote database

(1) Use a Linux environment

Before connecting the remote database via phpMyAdmin, we must be confident about the security.

Linux-based machines are safe for proceeding with the remote connection.

If you are using a Windows machine, there are settings to enable WSL to let it be secure while working with the remote database servers.

(2) Let login configuration empty

When setup the remote database server configuration, let the username and password empty.

Set only the remote database server IP address to show in the phpMyAdmin web interface.

Choosing the remote server to connect will redirect to the phpMyAdmin login panel to enter the details.

Directly access the remote phpMyAdmin web application URL

If you know the URL of the phpMyAdmin web application installed on the remote server, we can visit and land on its login page.

The login page prompts the MySQL database host, username, and password. Entering and submitting these details allows access to the remote database.

Thus, we have seen the possible ways of connecting the remote database server using the phpMyAdmin application.

↑ Back to Top

Posted on Leave a comment

1 Billion Coders – Prompting Is The New Programming

5/5 – (1 vote)

Introduction

🧑‍💻 Prompting and GPT-4
💡 Main argument: Prompting is programming for the masses


The recent release of GPT-4 has taken the tech world by storm, providing powerful AI-driven solutions that transform how we work and interact with technology.

💡 Recommended: GPT-4 is Out! A New Language Model on Steroids

One such groundbreaking innovation is “Prompting”, a term that refers to AI-assisted code completion and generation. As more people become familiar with this concept, it’s becoming increasingly evident that Prompting is not just a novel feature, but a game-changing revolution in programming.

In this article, we will explore the idea that Prompting is, in fact, programming for the masses.

By examining the evolution of programming technologies over the years and the impact of Prompting on the programming landscape, we will demonstrate how this new paradigm democratizes programming and opens up new opportunities for people from all walks of life.

So, without further ado, let’s dive into the world of Prompting and discover how it reshapes the future of programming.

Evolution of Programming Technologies

🧬 Evolution of programming technologies, from punch cards to AI-assisted prompting
🚀 Each abstraction layer 10x’d the number of programmers and broadened the spectrum of activities considered programming


To fully understand the significance of Prompting and its role as programming for the masses, it’s essential to take a step back and examine the evolution of programming technologies over the years.

I’ll give you a completely personal view on the history of programming language evolution going from manipulating “0”s and “1”s towards natural language programming:

  • [1940s-1950s] Punch Cards
  • [1950s-1970s] Assembly Languages
  • [1970s-1990s] Low-level C
  • [1980s-2000s] Higher-level C++, Java
  • [1990s-2020s] Intuitive Python
  • [2000s-2020s] Smart IDEs + Code Generation
  • [2010s-2020s] Machine Learning Frameworks
  • [2020s+] Prompting and AI-driven Code Assistance

Since the early days of computing, several key milestones have been in developing programming languages and tools.

Each new abstraction layer has made programming more accessible, enabling more people to participate in the field and broadening the range of activities that can be considered programming.

Here’s my rough estimate of the number of programmers in each “age”:

Skill Approximate Number of People
Punch Cards 10,000
Assembly 100,000
C Programming 1,000,000
C++ or Java 10,000,000
Python 100,000,000
Automatically Generate Code 200,000,000
Prompting (GPT-based coding) 2,000,000,000

The journey began in the 1940s and 1960s with punch cards, which allowed programmers to encode instructions for early computers. Assembler languages soon followed, providing mnemonic codes that represented machine instructions, making programming more human-readable.

The 1970s and 1980s saw the introduction of low-level C, which allowed for greater abstraction and more flexibility in programming. Higher-level languages like C++ and Java emerged in the 1980s and 2000s, further simplifying the programming process and opening up new possibilities for software development.

With its intuitive and beginner-friendly syntax, Python came into the picture in the 2000s and 2010s, making programming even more accessible to a wider audience.

The introduction of smart IDEs and code generation tools in the 2010s and 2020s further streamlined the programming process, allowing developers to work more efficiently and effectively.

With the advent of Prompting in the 2020s, we’re witnessing the next major leap in the evolution of programming technologies. By leveraging AI-driven code completion and generation, Prompting is breaking down barriers and enabling even non-programmers to participate in creating and customizing software applications.

This new layer of abstraction is set to change the programming landscape profoundly, expanding the reach of programming like never before.

The total addressable market (TAM) of programming is not in the millions, tens of millions, or even hundreds of millions. Prompting has paved the road for the billions!

Comparing Prompting to Googling

🔍 Prompting vs Googling as essential skills in the tech world
🤯 Prompting goes beyond just being a skill to learn, but a paradigm shift in programming


As Prompting gains traction, many in the tech industry are drawing parallels between it and Googling, the now-ubiquitous skill of searching for information online.

Indeed, both skills have become increasingly important in our digital age, and learning to use them effectively can greatly enhance one’s ability to solve problems, access knowledge, and innovate. However, likening Prompting to Googling does not fully capture the transformative power of this new technology.

While Googling is an essential skill that enables users to find answers to questions and access a wealth of information at their fingertips, Prompting represents a more profound shift in the programming world.

Rather than merely being another skill to learn, Prompting is a paradigm shift that transforms how we approach programming. It effectively democratizes the process, allowing individuals with little or no programming experience to create, modify, and deploy software applications.

Everybody with an idea can now spin up an app easily and effectively. More importantly, everybody can create an app unique to their needs.

In essence, Prompting does for programming what Googling does for information retrieval. It simplifies and streamlines the process, making it more accessible and intuitive for a broader audience. This, in turn, fosters innovation and creativity, as more people can engage in programming and contribute their ideas to the world of technology.

By breaking down barriers and empowering individuals from all walks of life, Prompting is redefining the nature of programming and expanding its reach to encompass a greater range of activities and participants.

The Impact of Prompting on the Programming Landscape

🏛 Democratization of programming and the expansion of the total addressable market (TAM) for programmers
🪶 Prompting lowers the barrier to entry for programming, allowing more people to participate and innovate


As Prompting continues to revolutionize the way we approach programming, its impact on the programming landscape is becoming increasingly evident.

One of the most significant changes brought about by Prompting is the democratization of programming, which has led to an expansion of the total addressable market (TAM) for programmers. With the introduction of this new layer of abstraction, a wider range of individuals can now participate in programming, regardless of their background or prior experience.

Prompting lowers the barrier to entry for programming by simplifying complex tasks and providing AI-driven code completion and generation.

For example, the following gives me a Python script to calculate the ROI of investing in broad index funds:

This enables even non-programmers to create software applications with relative ease, allowing them to bring their ideas to life without being limited by a lack of technical expertise. As a result, we can expect to see a surge of new innovations, as more people gain the ability to contribute their unique perspectives and skills to the world of technology.

But this is not all – instead of writing a Python program that does it, you can simply ask ChatGPT to do it!

🧑‍💻 Prompt: Give me a table of investment results when investing $10,000 for 40 years at a 9% annual ROI!

So not only has traditional programming become easier and more accessible, it is often not needed because ChatGPT can do the actual work.

🚀 Recommended: ChatGPT at the Heart – Building a Movie Recommendation Python Web App in 2023

The rise of Prompting also has implications for education and workforce development. As programming becomes more accessible to the masses, the demand for coding education will likely increase, with more people seeking to learn programming skills to stay competitive in the job market.

This could lead to a shift in the way programming is taught, with a greater emphasis on using AI-driven tools like Prompting, alongside traditional programming languages and techniques.

Furthermore, the growing prevalence of Prompting may also change the way companies hire and develop talent. With programming becoming more accessible, companies may place less emphasis on formal coding education and experience, instead focusing on an individual’s ability to leverage AI-assisted tools like Prompting to solve problems and innovate.

This could lead to a more diverse and inclusive tech industry, as individuals from various backgrounds can contribute their talents and ideas.

The Future of Prompting and its Implications

🪴 Future developments and improvements in Prompting technology
🤑 Potential impact on education, job markets, and the tech industry


As Prompting technology continues to evolve and improve, we can expect its impact on the programming landscape to become even more profound.

Future developments in AI-driven code completion and generation tools may lead to even greater levels of abstraction, further simplifying the programming process and enabling more people to engage with technology in new and exciting ways.

One potential growth area is integrating Prompting tools with other technologies, such as

  • augmented and virtual reality,
  • IoT devices,
  • spreadsheets,
  • games, and
  • voice assistants.

This could give rise to new forms of interaction and collaboration, enabling people to create and modify software applications in more intuitive and immersive ways.

💡 With Microsoft’s ChatGPT Bing integration, we already see how massive billion-dollar industries such as search engines now have “ChatGPT at the heart”.

Another possibility is the development of more advanced and specialized Prompting tools tailored to specific industries or use cases.

This could lead to greater customization and personalization in software development, as individuals can leverage AI-driven tools to create bespoke applications that cater to their unique needs and preferences.

You can now start a massive business from your garage, leveraging infinite artificial intelligence to create insane value.

As Prompting becomes increasingly prevalent, it may also drive changes in how programming languages and frameworks are designed. Language creators may focus on developing more AI-friendly languages, allowing seamless integration with Prompting tools and enabling developers to work more efficiently and effectively.

Ultimately, the rise of Prompting holds the potential to reshape the entire tech industry, from education and workforce development to how we design and interact with technology. By democratizing programming and making it accessible to a wider audience, Prompting is ushering in a new era of innovation and creativity, empowering individuals from all walks of life to contribute their ideas and talents to the world of technology.

Getting Started with Prompting

🧑‍💻 7 Effective Prompting Tricks for ChatGPT
📈 Explore Prompting and leverage it to enhance their coding skills and productivity


As the programming world continues to evolve, individuals interested in technology must keep up with the latest advancements and learn how to harness the power of AI-driven tools like Prompting.

To help you get started, we’d like to introduce a comprehensive blog tutorial that can guide you through the process:

💡 Recommended: 7 Effective Prompting Tricks for ChatGPT

For your convenience, I summarized the article using simple prompting:

By learning to leverage the power of AI-assisted code completion and generation, you’ll be well on your way to enhancing your coding skills and boosting your productivity.

I encourage you to explore the world of Prompting and experiment with how it can help you create, modify, and deploy software applications. As you familiarize yourself with this cutting-edge technology, you’ll be well-equipped to stay ahead of the curve 📈 and make your mark in the rapidly evolving programming landscape. 🧑‍💻

Conclusion

As you’ve explored throughout this article, Prompting represents a fundamental paradigm shift in the programming landscape, ushering in a new era of programming for the masses.

By leveraging AI-driven code completion and generation tools, Prompting is democratizing programming, making it more accessible and intuitive for a wider range of individuals.

You’ve learned how the evolution of programming technologies has paved the way for this paradigm shift, with each new layer of abstraction increasing the number of programmers and broadening the scope of what can be considered programming. The rise of Prompting is set to further expand the reach of programming, empowering more people to engage with technology and contribute their unique ideas and talents.

As you embark on your journey into the world of Prompting, remember that this technology holds the potential to reshape not only the way you work but also the entire tech industry. By embracing the change and learning to harness the power of AI-driven tools like Prompting, you’ll be well-positioned to thrive in this new era of programming for the masses.

Action! So, go forth, explore the potential of Prompting, and become part of the next revolution in programming. The future is bright, and the possibilities are endless! 🧑‍🚀

Definitely download the prompting cheat sheet I created here:

💡 Recommended: Free ChatGPT Prompting Cheat Sheet (PDF)

Posted on Leave a comment

7 Effective Prompting Tricks for ChatGPT

5/5 – (1 vote)

ChatGPT is a powerful AI conversation model that can assist you in generating various types of text content. But to get the best results, you need to give clear and specific prompts.

Here are 7 prompting strategies that can help you get the most out of ChatGPT:

Trick #1 – Define ChatGPT’s Role

ChatGPT can play different roles, such as a tour guide, philosopher, or translator. To get the desired result, give ChatGPT a prompt that specifies the role it needs to play.

Example: 👇

"I want you to act as a tour guide. I’ll write you my location, and you’ll suggest a place for me to visit near my location."

I also created a fun way to role-play a mastermind group with your personal heroes. You can check it out in this article — I promise it’ll be worth your time:

🤯 Recommended: What Would Jesus Say? Creating a ChatGPT Mastermind with Jesus, Gandhi, Musk, and Gates

Trick #2 -Define Target Group and Communication Channel

To avoid tedious rewriting, give ChatGPT as much information as possible about the target group and the communication channel. Tell the AI how to address the reader and for which channel the text is intended.

Example: 👇

"I need a script for a TikTok about the opportunities and risks of ChatGPT. Use short sentences. Address the audience directly. Use gender-neutral language."

Trick #3 -Chained Prompting

Break up complex tasks into several intermediate steps, hoping the AI will generate a more concrete, customized, and better result.

Example: 👇

"Write an article about ChatGPT. First give me the outline, which consists of a headline, a teaser, and several subheadings. ... (possibly wait for generated output) ... Now write five key messages for each subheading. Add five keywords to the key messages for each subheading."

I think this is one of the best hacks of prompt engineering. Trial. Error. Iteration. You’ll often get your desired output quickly and efficiently and get better at it in no time!

Trick #4 -Create Content Variations

Prepare the same content for different channels such as LinkedIn, Twitter, or Facebook. The text should be adapted to the tone and formatting of the target channel.

Example: 👇

"Formulate the generated text as a LinkedIn post. Keep in mind that the maximum length is 3000 characters. Structure the main points of the text into a bulleted list. Start with an exciting teaser sentence and end with a call to action for more engagement."

Trick #5 -Format Output

ChatGPT replies in plain text by default, but it can handle formatting in the Markdown markup language, such as headings, bold or italic text, ordered or unordered lists, and even tables.

Example: 👇

"I need a blog post about ChatGPT. Write a headline, a teaser, a subtitle, and a paragraph. Format everything in Markdown."

Trick #6 -Generate Prompt Instructions

Instruct ChatGPT to take on a specific role and ask itself the questions it needs to answer in the next prompts.

Example: 👇

"You are a robot for creating prompts. You need to gather information about the user’s goals, examples of preferred output, and any other relevant contextual information. The prompt should contain all the necessary information provided to you. Ask the user more questions until you are sure you can create an optimal prompt."

Trick #7 -Extract Structured From Unstructured Data

Extract structured data from unstructured data by specifying a desired output format (e.g., CSV) with one example output. This can help you in data preprocessing.

Example: 👇

Extract house pricing data from the following text. Text: """
A 100 square meter house I recently visited in Florida costs $1 million dollars. I was surprised as my own 90 square meter house in Florida costs only $100 thousands USD. Compare this to the house of my friend ($500000 USD for 110 square meter). """ Desired output format: """
House 1 | $1,000,000 | 100 sqm """

Conclusion

ChatGPT is a versatile, mind-blowing tool that can assist you in generating various types of text content. However, you need to give clear and specific prompts to get the best results.

These 7 prompting strategies can help you get the most out of ChatGPT and produce high-quality content.

🚀 Recommended: Free ChatGPT Prompting Cheat Sheet (PDF)

Posted on Leave a comment

GPT-4 is Out! A New Language Model on Steroids

5/5 – (3 votes)

Hold onto your hats, folks! OpenAI has just introduced GPT-4, a colossal leap forward in deep learning.

This large multimodal model is more than just a text-based smarty-pants; it can process both images and text, producing text outputs that are nothing short of impressive.

⚔ Showdown: At the end of this article, I’ll let both GPT-3.5 and GPT-4 write a short story. You’ll be mind-blown by the difference!

But how does it stack up against its predecessor, GPT-3.5?

In this beginner-friendly blog post, we’ll break down the key differences, explain why GPT-4 is such a big deal, and give you some mind-blowing statistics to showcase its extraordinary capabilities.

✅ Recommended: Read the full paper here.

GPT-4: The Superstar Student

Picture this: GPT-4 just took a simulated bar exam and scored in the top 10% of test-takers! To put that in perspective, GPT-3.5’s score was around the bottom 10%.

That’s a massive improvement, and it’s all thanks to OpenAI’s tireless efforts to fine-tune GPT-4 over six months using lessons from adversarial testing and ChatGPT. The result? Improved factuality, steerability, and adherence to guardrails.

Supercomputer Stack

The brainpower behind GPT-4 isn’t all software – there’s some serious hardware at play too.

Over the past two years, OpenAI rebuilt its entire deep learning stack, partnering with Azure to create a supercomputer specifically designed for their workload.

GPT-3.5 was like a test run — an impressive one nonetheless — allowing the team to work out the kinks and refine their approach.

And boy, did they succeed!

GPT-4’s training was stable and predictable, making it the first large model with performance that could be accurately forecasted ahead of time.

Text Input Capability: Now Available for Everyone!

GPT-4’s text input capabilities have been released via ChatGPT and the API (with a waitlist), so everyone can enjoy its remarkable advancements.

OpenAI is also working on its image input capability, collaborating with a single partner to prepare it for wider availability.

Plus, they’re open-sourcing OpenAI Evals, a framework for evaluating AI model performance, so you can help guide future improvements.

GPT-4 vs. GPT-3.5: The Showdown

When it comes to casual conversation, the differences between GPT-3.5 and GPT-4 might seem subtle. But the magic happens when the task complexity increases.

GPT-4 is more reliable, creative, and capable of handling nuanced instructions than GPT-3.5.

OpenAI tested both models on various benchmarks, including simulated exams designed for humans. GPT-4’s performance was nothing short of astonishing.

Above 50% is super-human average performance! 🚀

Beyond English: Multilingual Mastery

GPT-4 doesn’t just excel in English; it shines in other languages too.

OpenAI tested GPT-4 using the MMLU benchmark, a suite of 14,000 multiple-choice problems across 57 subjects, translated into various languages.

In 24 of 26 languages tested, GPT-4 outperformed GPT-3.5 and other large language models—even in low-resource languages like Latvian, Welsh, and Swahili!

A Handy Helper in the Office

GPT-4 isn’t just flexing its muscles in the lab; it’s making a real-world impact too.

OpenAI has been using GPT-4 internally for support, sales, content moderation, programming, and even evaluating AI outputs. It’s a versatile and powerful tool that’s ready to revolutionize the way we work.

GPT-4 is significantly better than previous versions in a wide variety of general-purpose skills:

Visual Inputs: A Sneak Peek into the Future

But wait, there’s more! 🤯

GPT-4 can also handle visual inputs, allowing users to prompt the model with both text and images. This means it can generate text outputs based on a variety of image types, like documents with text and photographs, diagrams, or screenshots.

GPT-4’s capabilities in this domain are similar to its text-only prowess and can be enhanced with test-time techniques developed for text-only language models, such as few-shot and chain-of-thought prompting.

Keep in mind that image inputs are still in the research preview stage and not yet publicly available.

Conclusion

In a nutshell, GPT-4 is the AI game-changer we’ve all been waiting for.

With human-level performance on various professional and academic benchmarks, impressive multilingual capabilities, and the ability to process both text and image inputs, it’s easy to see why GPT-4 is making waves in the AI community.

As OpenAI continues to refine and expand GPT-4’s capabilities, we can expect even more groundbreaking advancements in the near future. So, stay tuned, AI has never been more exciting!

🚀 Recommended: ChatGPT at the Heart – Building a Movie Recommendation Python Web App in 2023

Interesting Facts and Stats GPT-4

  1. GPT-4 is a multimodal model, capable of processing both text and image inputs.
  2. It has shown human-level performance on various professional and academic benchmarks.
  3. On a simulated bar exam, GPT-4 scored in the top 10% of test-takers, while GPT-3.5 scored in the bottom 10%.
  4. OpenAI spent six months fine-tuning GPT-4 using lessons from adversarial testing and ChatGPT.
  5. GPT-4 was tested on the MMLU benchmark, a suite of 14,000 multiple-choice problems across 57 subjects.
  6. In 24 of the 26 languages tested on the MMLU benchmark, GPT-4 outperformed GPT-3.5 and other large language models.
  7. OpenAI used GPT-4 internally for various tasks, including support, sales, content moderation, and programming.
  8. GPT-4 can generate text outputs from inputs consisting of interspersed text and images.
  9. The development of GPT-4 involved rebuilding OpenAI’s entire deep learning stack and co-designing a supercomputer with Azure.
  10. GPT-4 considerably outperforms existing large language models and most state-of-the-art models on traditional benchmarks designed for machine learning models.

Appendix: GPT-3.5 vs GPT-4 Short Story

To showcase the new capabilities of GPT-4, I let both write a short story with the following prompt:

Write a funny soccer story for kids that teaches the kid that persistence is key for success in the style of Rowling.

Here’s the output of GPT-3.5:

Once upon a time, in a small village in England, there was a young boy named Harry who loved playing soccer more than anything in the world. He dreamed of one day playing for the famous Manchester United team, but he wasn't very good at it. Harry would spend hours every day practicing his soccer skills, but no matter how much he tried, he just couldn't seem to improve. His kicks were weak, his passes were sloppy, and he always seemed to trip over his own feet. One day, Harry heard that the Manchester United team was holding tryouts in his town. He knew that he wasn't good enough to make the team, but he decided to give it a try anyway. He put on his favorite soccer jersey, laced up his cleats, and headed to the field. When he arrived, he saw hundreds of other kids just like him, all vying for a chance to play for Manchester United. Harry watched as the other kids showed off their skills, dribbling the ball with ease, making perfect passes, and scoring goal after goal. Harry knew that he couldn't compete with those kids, but he refused to give up. He stepped up to the ball, took a deep breath, and kicked it with all his might. The ball flew into the air, wobbling and spinning wildly, and Harry watched in horror as it sailed straight into the goalpost and bounced back toward him. But Harry didn't give up. He chased after the ball, ignoring the snickers and jeers of the other kids, and kicked it again. And again. And again. Each time, the ball sailed in a different direction, bouncing off the other kids, the goalposts, and even the referee's head. But Harry didn't care. He was having the time of his life, and he refused to let anyone else bring him down. He kicked the ball with all his might, laughing and shouting and cheering himself on. And then, something amazing happened. The Manchester United coach, who had been watching the tryouts from the sidelines, walked up to Harry and tapped him on the shoulder. "Son," the coach said, "I've never seen anyone as persistent as you. You may not be the best soccer player on this field, but you have heart. And that's something that can't be taught." And with that, the coach offered Harry a spot on the Manchester United team. Harry couldn't believe his ears. He had made it! He had achieved his dream! From that day on, Harry worked harder than ever before, practicing every day and pushing himself to be the best he could be. And in the end, his persistence paid off. He became one of the greatest soccer players in the world, known not just for his skill, but for his determination and his unwavering spirit. So remember, kids: persistence is key. If you want to achieve your dreams, you can't give up. You have to keep pushing, keep trying, and keep kicking that soccer ball with all your might. Who knows? Maybe one day, you'll be the next Harry of the soccer world!

And here’s the impressive output of GPT-4, notice the unique use of words and creative ideas and turns in the storyline! 👇

Once upon a time in the magical land of Fussballia, there lived a young and spirited soccer player named Jorrick Kickalot. Jorrick was no ordinary soccer player. He had an extraordinary talent of kicking soccer balls with the precision of a master archer. However, his small size made it difficult for him to make the local team, the Fussballia Falcons. Jorrick's best friend, a tiny but wise owl named Hootius Whistlebeak, would always accompany him to the games. One day, Hootius spotted a secret sign in the sky. It was an invitation to the legendary Flying Cleat Cup, a mysterious soccer tournament that only appeared once every 100 years. "Jorrick, this is your chance to prove yourself!" said Hootius excitedly, flapping his wings in anticipation. Together, they embarked on a long and treacherous journey to the secret location of the Flying Cleat Cup. They encountered peculiar creatures, such as the Zigzag Zephyrs, who could change the direction of the wind with a flick of their tails, and the elusive Balliphants, giant soccer balls with elephant trunks. Finally, they reached the hidden stadium, where they found teams of all shapes, sizes, and magical abilities. Jorrick felt nervous and unsure, but he remembered Hootius' words: "Persistence is the key to success!" The tournament began with a grand fanfare. In the first match, Jorrick and his makeshift team of magical creatures faced off against the towering Stomposaurs, a team of dinosaur-like creatures with powerful legs. Despite their intimidating size, Jorrick and his teammates worked together, and he managed to score the winning goal with a perfectly placed kick. In the next round, they faced the clever Whizbang Wizards, a team of magical beings who could make the ball disappear and reappear in the most unexpected places. Jorrick, however, was not to be outwitted. With Hootius' help, he kept a sharp eye on the ball and successfully led his team to another victory. The final match was against the reigning champions, the Enchanted Elves, known for their unmatched speed and agility. Jorrick was exhausted and felt the weight of the pressure on his shoulders. His legs were heavy, and his heart pounded in his chest. As the match began, the Enchanted Elves darted around the field, scoring goal after goal. It seemed like all hope was lost. But then, Hootius flew down to Jorrick and whispered, "Remember, persistence is the key to success!" With renewed determination, Jorrick summoned every ounce of strength he had left. He dodged, weaved, and kicked with all his might. Miraculously, he scored an equalizer in the final minutes of the game, sending it into extra time. In the final moments, Jorrick took a deep breath and prepared for a corner kick. He spotted Hootius in the stands, who gave him a reassuring nod. Jorrick took a step back, and with a powerful swing of his leg, sent the ball soaring through the air. The ball curved around the defenders, flew past the goalie, and nestled perfectly into the corner of the net. The stadium erupted in cheers as Jorrick's team celebrated their unexpected victory. They had won the Flying Cleat Cup, and Jorrick had proven that size did not matter when it came to playing soccer. Jorrick and Hootius returned home to Fussballia, where they were greeted as heroes. And from that day on, Jorrick Kickalot became a legend, not only for his incredible skills but also for his unwavering persistence. Young soccer players from all over the land would come to watch Jorrick play and learn from him. They admired not just his talent, but also his determination and grit. Jorrick always took the time to share his wisdom with the aspiring athletes, reminding them of the important lesson he had learned: "Persistence is the key to success!" As for Hootius Whistlebeak, he became the official mascot of the Fussballia Falcons, always encouraging the players to never give up, no matter the odds. Years later, the story of Jorrick Kickalot and his magical adventure at the Flying Cleat Cup became a beloved tale in Fussballia. Parents would tell their children the story of the young soccer player who, against all odds, achieved greatness through his sheer persistence and determination. And so, the legacy of Jorrick Kickalot lived on, inspiring generations of young soccer players to believe in themselves and never give up, no matter how tough the challenges they faced. They knew that if they could persist like Jorrick, they too could achieve their dreams and become the best soccer players they could be.
Posted on Leave a comment

How I Built an OpenAI-Powered Web Assistant with Django

5/5 – (1 vote)

Django is a backend web framework that makes it easy to build web pages quickly using Python. There is no better way to learn Django than by building projects. In this tutorial, I will show you how I built an Artificial Intelligence-powered web assistant using Django.

Set Up

To get started, we will create a directory where every file will live in. In the directory, we will create and activate a virtual environment. Then we will install the required Python libraries for the project. I am using an Ubuntu terminal, so a basic knowledge of the command line will be an added advantage going forward.

mkdir project && cd project
python3 -m venv .venv
source .venv/bin/activate

In the project directory, we create and activate a virtual environment using the source command. You can also replace the source command with a dot .. Let’s now install the modules we will be using.

pip install django tzdata openai

Creating Django Project

Once the installation is complete, run the following command in your Ubuntu terminal to create a Django project.

django-admin startproject webassistant .

This creates a folder with the name webassistant.

  • The . tells Django to create the project in the current directory.
  • The manage.py file is used to execute several Django commands.
  • The settings.py in the webassistant folder is the project’s settings. In it, we will register the Django apps we are about to create.
  • The urls.py is where we will let Django know what it should display to the user.

We now check to ensure that the installation went successfully. In your terminal run the following command:

python3 manage.py runserver

Once you have seen the above image, congrats! You have successfully installed Django. You can use control C to close the server.

Creating Django Apps

Back to your terminal, run the following command to create a Django app.

python3 manage.py startapp assistant

Use the ls command to see what’s inside the assistant folder.

ls assistant
__init__.py admin.py apps.py migrations models.py tests.py views.py

The __init__.py file found in both the webassistant and assistant folders enables the folders to be imported as a Python package. The views.py is where we code what we want the browser to be displayed to the user. These files are what concern our project. To know more about other files, check the documentation.

Next, we go to the settings.py file, in INSTALLED_APPS section to register the name of the app we just created. Use the nano command.

nano webassistant/settings.py

...
INSTALLED_APPS = [ 'django.contrib.admin', 'django.contrib.auth', 'django.contrib.contenttypes', 'django.contrib.sessions', 'django.contrib.messages', 'django.contrib.staticfiles', # custom app 'assistant',
]

We also open the project’s urls.py file to register the app-level URLs.

from django.contrib import admin
from django.urls import path, include urlpatterns = [ path('admin/', admin.site.urls), path('', include('assistant.urls')),
]

The path() function is used to map the URL to the appropriate view. The include() function adds the URL of the app to the project-level urls.py. The empty quote means the home URL, that is, what we see when we run the local server.

If you have read Django tutorials including this one, you are gradually becoming familiar with the process. That’s how it is done in every Django application.

Getting the API Key

We need an API key to enable the OpenAI model to perform web assistant tasks for us. To get the API key, we first have to create an account on the official website of OpenAI. Once you have completed the signup process, go to the OpenAI API reference where you will be directed to a page to generate your API key.

⭐ Recommended: OpenAI API – or How I Made My Python Code Intelligent

Make sure you keep the API key safe. Create a file in your app-level folder and call it key.py.

API_KEY = 'YOUR SECRET API KEY'

Just replace the text in quotes with your own generated API key.

Integrating the OpenAI Model

To integrate the API with our Django application, create a file called engine.py in the app’s folder and input the following python script.

# engine.py from .key import API_KEY
import openai openai.api_key = API_KEY def model(request): prompt = request.POST.get('prompt') response = openai.Completion.create( engine='text-davinci-003', temperature=0.5 prompt=prompt, max_tokens=1000, ) text = response.choices[0].text chats = {'prompt': prompt, 'response': text } return chats

We import the API key and the openai module. We use the openai.api_key to load the API key. Then, in the function, we requested to get the prompt, which is the question asked by the user. We then return the response generated by the model in form of a dictionary.

The temperature affects the randomness of the output, and it’s between 0 and 1. The AI model employed to generate predictions is the text_davinci_003. The max_tokens specifies the maximum number of tokens or pieces of words that can be generated by the model.

To learn more about the parameters, perhaps this article can be of help. We will now import the function in our views.py file.

from django.shortcuts import render, redirect
from .engine import model def home(request): try: if request.method == 'POST': context = model(request) return render(request, 'home.html', context) else: return render(request, 'home.html') except: return redirect('error') def error_handler(request): return render(request, 'error.html')

Two functions indicate two separate HTML files. In the first function, we use a try statement to check the block of code for errors. If no errors were found, the code under the try statement will execute. But if there were errors, the code under the except statement will be executed.

🐍 Recommended: Python Try/Except Error Handling

The if statement checks if the request method is POST, if so, it will generate a response from the OpenAI model. But if otherwise, the else statement will be run in which no response will be generated.

The render() function renders or displays a response in the HTML files which we are yet to create. Notice that in the else statement, the render() function just renders the same homepage without the context because the request method was not POST. The redirect() function is used to redirect a user to another webpage.

Let’s now write a URL in the urls.py file to display our contents.

assistant/urls.py from django.urls import path
from .import views urlpatterns = [ path('', views.home, name='home'), path('error', views.error_handler, name='error_handler'),
]

The name argument is kind of an alias for the URL. So instead of writing long URLs, we can just reference them with the name given. Mostly used in HTML files.

Templates

We now want to render our templates. Create a folder named templates in the current directory. This is where we will keep our HTML files. Having created the folder, go to settings.py and let Django know that a templates folder is created.

In the settings.py file, scroll down to the ‘TEMPLATES’ section and add the following to DIRS.

…
TEMPLATES = [ { … 'DIRS': [os.path.join(BASE_DIR, 'templates')], … }
]

Be sure to import the os module. Then, create a file in the templates folder with the name base.html

<!DOCTYPE html>
<html lang="en">
<head> <meta charset="UTF-8"> <meta http-equiv="X-UA-Compatible" content="IE=edge"> <meta name="viewport" content="width=device-width, initial-scale=1.0"> <title>Web Assistant | {% block title %} {% endblock %}</title> <link href="https://cdn.jsdelivr.net/npm/bootstrap@5.3.0-alpha1/dist/css/bootstrap.min.css" rel="stylesheet">
</head>
<body> {% block content %} {% endblock %}
</body>
</html>

That’s our HTML boilerplate with bootstrap added to it for styling our web pages. Next is the home.html, the homepage that will inherit everything in the base.html template.

{% extends 'base.html' %}
{% block title %} Home {% endblock %}
{% block content %}
<div class="row justify-content-center my-4"> <div class="col-md-7 mt-4"> <div class="card"> <h1 class="card-header text-center">A.I WEB ASSISTANT</h1> <div class="card-body"> <pre>Hello, how can I help you?</pre> <form action="." method="POST"> <!-- this secures the form from malicious attacks during submission --> {% csrf_token %} <input class="form-control mb-2" required type="text" autofocus="autofocus" name="prompt" value="{{ prompt }}" id=""> <button class="btn btn-success fw-bold" type="submit"> GENERATE </button> </form> <hr> <pre> {{ response }} </pre> </div> </div> </div> </div>
</div>
{% endblock %}

Finally, the error.html will be displayed when an error occurs. It also inherits everything in the base.html.

{% extends 'base.html' %}
{% block title %} 404 {% endblock %}
{% block content %}
<div class="row justify-content-center my-4"> <div class="col-md-7 mt-4"> <h1>Page Not Found</h1> <p>Make sure you are connected to the internet or your query is correct</p> <a href="{% url 'home' %}" class="btn btn-secondary">Home</a> </div>
</div>
{% endblock %}

Certain things in these HTML files demand an explanation. Those strange syntaxes that begin with curly braces are Django templating language. When used with a block statement, it must end with an endblock statement. In base.html, we inserted the empty block statement in the title tag.

This makes it possible to override the home and error HTML files with a different word. But you can see the ‘Web Assistant’ remains the same in all files inheriting base.html.

The csrf_token is for security reasons. It’s compulsory. If you don’t add it, Django will throw an error. The prompt variable comes from the view.py file which in turn is imported from the engine.py file. The same applies to the response. Remember, we sent them here using the render() function.

The {% url 'home' %} syntax is Django’s way of displaying internal URLs. Go back to the app-level urls.py, you will see where we defined the name and this makes it possible to use it in HTML files.

Conclusion

Congrats on creating an AI-powered web assistant using Django. If you enjoy the tutorial, feel free to share it with others. Have a nice day.

⭐ Recommended: How I Created an URL Shortener App Using Django

Posted on Leave a comment

Python to .exe – How to Make a Python Script Executable?

5/5 – (1 vote)

I have a confession to make. I use Windows for coding Python.

This means that I often need to run my practical coding projects as Windows .exe files, especially if I work with non-technical clients that don’t know how to run a Python file.

In this tutorial, I’ll share my learnings on making a Python file executable and converting them to an .exe so that they can be run by double-click.

PyInstaller

To make a Python script executable as a .exe file on Windows, use a tool like pyinstaller. PyInstaller runs on Windows 8 and newer.

⭐ Pyinstaller is a popular package that bundles a Python application and its dependencies into a single package, including an .exe file that can be run on Windows without requiring a Python installation.

Here are the general steps to create an executable file from your Python script using Pyinstaller:

  1. Install Pyinstaller by opening a command prompt and running the command: pip install pyinstaller or pip3 install pyinstaller depending on your Python version.
  2. Navigate to the directory where your Python script is located in the command prompt using cd (command line) or ls (PowerShell).
  3. Run the command: pyinstaller --onefile your_script_name.py. This command creates a single executable file of your Python script with all its dependencies included.
  4. After the command completes, you can find the executable file in a subdirectory called dist.
  5. You can now distribute the executable file to users, who can run it on their Windows machines by double-clicking the .exe file.

What Does the –onefile Option Mean?

The --onefile file specifier is an option for Pyinstaller that tells it to package your Python script and all its dependencies into a single executable file.

By default, Pyinstaller will create a directory called dist that contains your script and a set of related files that it needs to run. However, using the --onefile option, Pyinstaller will generate a single .exe file, which is more convenient for the distribution and deployment of the application.

1-Paragraph Summary

To convert a Python file my_script.py to an executable my_script.exe using Pyinstaller, install Pyinstaller using pip install pyinstaller, navigate to the script directory in the command prompt, run pyinstaller --onefile my_script.py, then locate the executable file in the dist folder.

If you want to keep improving your coding skills, check out our free Python cheat sheets!

Posted on Leave a comment

PIP Install Django – A Helpful Illustrated Guide

5/5 – (1 vote)

As a Python developer, I love using Django for web development. Its built-in features and clear code structure make building scalable and robust web applications fast and efficient. In fact, I used Django to build my own web app for Python testing and training.

Here’s how you can install Django:

pip install django

Alternatively, you may use any of the following commands to install django, depending on your concrete environment. One is likely to work!

💡 If you have only one version of Python installed:
pip install django 💡 If you have Python 3 (and, possibly, other versions) installed:
pip3 install django 💡 If you don't have PIP or it doesn't work
python -m pip install django
python3 -m pip install django 💡 If you have Linux and you need to fix permissions (any one):
sudo pip3 install django
pip3 install django --user 💡 If you have Linux with apt
sudo apt install django 💡 If you have Windows and you have set up the py alias
py -m pip install django 💡 If you have Anaconda
conda install -c anaconda django 💡 If you have Jupyter Notebook
!pip install django
!pip3 install django

Let’s dive into the installation guides for the different operating systems and environments!

How to Install Django on Windows?

To install the updated Django framework on your Windows machine, run the following code in your command line or Powershell:

  • python3 -m pip install --upgrade pip
  • python3 -m pip install --upgrade django

Here’s the code for copy&pasting:

python3 -m pip install --upgrade pip
python3 -m pip install --upgrade django

I really think not enough coders have a solid understanding of PowerShell. If this is you, feel free to check out the following tutorials on the Finxter blog.

Related Articles:

How to Install Django on Mac?

Open Terminal (Applications/Terminal) and run:

  • xcode-select -install (You will be prompted to install the Xcode Command Line Tools)
  • sudo easy_install pip
  • sudo pip install django
  • pip install django

As an alternative, you can also run the following two commands to update pip and install the Django library:

python3 -m pip install --upgrade pip
python3 -m pip install --upgrade django

These you have already seen before, haven’t you?

Related Article:

How to Install Django on Linux?

To upgrade pip and install the Django library, you can use the following two commands, one after the other.

  • python3 -m pip install --upgrade pip
  • python3 -m pip install --upgrade django

Here’s the code for copy&pasting:

python3 -m pip install --upgrade pip
python3 -m pip install --upgrade django

How to Install Django on Ubuntu?

Upgrade pip and install the Django library using the following two commands, one after the other:

  • python3 -m pip install --upgrade pip
  • python3 -m pip install --upgrade django

Here’s the code for copy&pasting:

python3 -m pip install --upgrade pip
python3 -m pip install --upgrade django

How to Install Django in PyCharm?

The simplest way to install Django in PyCharm is to open the terminal tab and run the pip install django command.

This is shown in the following code:

pip install django

Here’s a screenshot of the two steps:

  1. Open Terminal tab in Pycharm
  2. Run pip install django in the terminal to install Django in a virtual environment.

As an alternative, you can also search for Django in the package manager.

However, this is usually an inferior way to install packages because it involves more steps.

How to Install Django in Anaconda?

You can install the Django package with Conda using the command conda install -c anaconda django in your shell or terminal.

Like so:

 conda install -c anaconda django 

This assumes you’ve already installed conda on your computer. If you haven’t check out the installation steps on the official page.

How to Install Django in VSCode?

You can install Django in VSCode by using the same command pip install django in your Visual Studio Code shell or terminal.

pip install django

If this doesn’t work — it may raise a No module named 'django' error — chances are that you’ve installed it for the wrong Python version on your system.

To check which version your VS Code environment uses, run these two commands in your Python program to check the version that executes it:

import sys
print(sys.executable)

The output will be the path to the Python installation that runs the code in VS Code.

Now, you can use this path to install Django, particularly for that Python version:

/path/to/vscode/python -m pip install django

Wait until the installation is complete and run your code using django again. It should work now!

🚀 Recommended: Django Developer — Income and Opportunity

More Finxter Tutorials

Learning is a continuous process and you’d be wise to never stop learning and improving throughout your life. 👑

What to learn? Your subconsciousness often knows better than your conscious mind what skills you need to reach the next level of success.

I recommend you read at least one tutorial per day (only 5 minutes per tutorial is enough) to make sure you never stop learning!

💡 If you want to make sure you don’t forget your habit, feel free to join our free email academy for weekly fresh tutorials and learning reminders in your INBOX.

Also, skim the following list of tutorials and open 3 interesting ones in a new browser tab to start your new — or continue with your existing — learning habit today! 🚀

Python Basics:

Python Dependency Management:

Python Debugging:

Fun Stuff:

Thanks for learning with Finxter!

Programmer Humor

❓ Question: How did the programmer die in the shower? ☠

Answer: They read the shampoo bottle instructions:
Lather. Rinse. Repeat.