Posted on Leave a comment

JetBrains Mono–A Font For Programmers

JetBrains, the makers of programmer tools such as IntelliJ, WebStorm, CLion and Rider, as well as the programming language Kotlin have been working on a font specifically designed for code.  JetBrains Mono is an open source font family consisting of 8 fonts specifically designed with reading and writing code in mind.

Details from the JetBrains blog:

For the most part of our day we, as developers, look at the code. And it is no wonder that we are always on the lookout for the best font to make looking at the text on the screen easier on our eyes. However, the logic in many popular fonts does not always take into account the difference between reading through code and reading a book. Our eyes move along code in a very different way, often having to move vertically as often as they do horizontally, which is opposed to reading a book where they slide along the text always in the same direction.

Therefore, while working on JetBrains Mono we focused, among other things, on the issues that can cause eye fatigue during long sessions of working with code. We have considered things like the size and shape of letters; the amount of space between them, a balance naturally engineered in monospace fonts; unnecessary details and unclear distinctions between symbols, such as I’s and l’s for example; and programming ligatures when developing our font.

Today, we proudly present JetBrains Mono – a new open-source typeface specifically made for developers. Check out what makes JetBrains Mono unique in the big family of monospaced fonts and try it in your favorite code editor. Have a look at JetBrains Mono, your eyes will thank you for it.

More details about Mono are available here.  It is the default font on all 2020 JetBrains IDEs and is available as an option in version 2019.3 and beyond of all JetBrain products.  If you use another IDE you can download the zip here.  Learn more about JetBrains Mono, including how to install and configure in Visual Studio Code in the video below.

[youtube https://www.youtube.com/watch?v=AyCZ0dVlz4A&w=853&h=480]

Programming GameDev News


<!–

–>

Posted on Leave a comment

Announcing Experimental Mobile Blazor Bindings

Eilon Lipton

Eilon

Today I’m excited to announce a new experimental project to enable native mobile app development with Blazor: Experimental Mobile Blazor Bindings. These bindings enable developers to build native mobile apps using C# and .NET for iOS and Android using familiar web programming patterns. This means you can use the Blazor programming model and Razor syntax to define UI components and behaviors of an application. The UI components that are included are based on Xamarin.Forms native UI controls, which results in beautiful native mobile apps.

Here is a sample Counter component, which may look familiar to Blazor developers, that increments a value on each button press:

<StackLayout> <Label FontSize="30" Text="@("You pressed " + count + " times")" /> <Button Text="+1" OnClick="@HandleClick" />
</StackLayout> @code { int count; void HandleClick() { count++; }
}

Notice that the Blazor model is present with code sitting side by side the user interface markup that leverages Razor syntax with mobile specific components. This will feel very natural for any web developer that has ever used Razor syntax in the past. Now with the Experimental Mobile Blazor Bindings you can leverage your existing web skills and knowledge to build native iOS and Android apps powered by .NET.

Here is the code above running in the Android Emulator:

Clicking increment button in Android emulator

Get started with Mobile Blazor Bindings

To get started, all you need is the .NET Core 3.0 or 3.1 SDK, Visual Studio or Visual Studio for Mac, and the ASP.NET and web development and Mobile development with .NET (Xamarin.Forms) workloads installed.

Install the templates by running this command from a command/shell window:

dotnet new -i Microsoft.MobileBlazorBindings.Templates::0.1.173-beta

And then create your first project by running this command:

dotnet new mobileblazorbindings -o MyApp

Open the solution (SLN file) in Visual Studio and mark either the Android or iOS project as the StartUp Project, which should look like this:

VS solution with shared UI, Android, and iOS projects

Now run your first Mobile Blazor Bindings app in a local emulator or on an attached mobile device! Don’t have one set up yet for development? No worries, the Xamarin documentation has all the details for you here:

For documentation and walkthroughs, check out the Mobile Blazor Bindings documentation.

Why Mobile Blazor Bindings now?

Many developers delight in using XAML and Xamarin.Forms to craft beautiful native mobile apps. We have heard from a set of developers that come from a web programming background that having web specific patterns to build mobile applications would be ideal for them. The goal of these bindings is to see if developers would like to have the option of writing markup and doing data binding for native mobile applications using the Blazor-style programming model with Razor syntax and features. Would you love to see this option in the box for future versions of Visual Studio?

Learn more

To learn more about Experimental Mobile Blazor Bindings, please check out these resources:

Give feedback

Please send us your feedback via issues in our GitHub repo and by completing a short survey about your experience and expectations.

We hope you try out this new framework and let us know your thoughts!

Eilon Lipton

Posted on Leave a comment

Python Regex Fullmatch

Why have regular expressions survived seven decades of technological disruption? Because coders who understand regular expressions have a massive advantage when working with textual data. They can write in a single line of code what takes others dozens!

This article is all about the re.fullmatch(pattern, string) method of Python’s re library. There are three similar methods to help you use regular expressions:

  • The findall(pattern, string) method returns a list of string matches. Check out our blog tutorial.
  • The search(pattern, string) method returns a match object of the first match. Check out our blog tutorial.
  • The match(pattern, string) method returns a match object if the regex matches at the beginning of the string. Check out our blog tutorial.

So how does the re.fullmatch() method work? Let’s study the specification.

How Does re.fullmatch() Work in Python?

The re.fullmatch(pattern, string) method returns a match object if the pattern matches the whole string.

Specification:

re.fullmatch(pattern, string, flags=0)

The re.fullmatch() method has up to three arguments.

  • pattern: the regular expression pattern that you want to match.
  • string: the string which you want to search for the pattern.
  • flags (optional argument): a more advanced modifier that allows you to customize the behavior of the function. Want to know how to use those flags? Check out this detailed article on the Finxter blog.

We’ll explore them in more detail later.

Return Value:

The re.fullmatch() method returns a match object. You may ask (and rightly so):

What’s a Match Object?

If a regular expression matches a part of your string, there’s a lot of useful information that comes with it: what’s the exact position of the match? Which regex groups were matched—and where?

The match object is a simple wrapper for this information. Some regex methods of the re package in Python—such as fullmatch()—automatically create a match object upon the first pattern match.

At this point, you don’t need to explore the match object in detail. Just know that we can access the start and end positions of the match in the string by calling the methods m.start() and m.end() on the match object m:

>>> m = re.fullmatch('h...o', 'hello')
>>> m.start()
0
>>> m.end()
5

In the first line, you create a match object m by using the re.fullmatch() method. The pattern ‘h…o’ matches in the string ‘hello’ at start position 0 and end position 5. But note that as the fullmatch() method always attempts to match the whole string, the m.start() method will always return zero.

Now, you know the purpose of the match object in Python. Let’s check out a few examples of re.fullmatch()!

A Guided Example for re.fullmatch()

First, you import the re module and create the text string to be searched for the regex patterns:

>>> import re
>>> text = '''
Call me Ishmael. Some years ago--never mind how long precisely
--having little or no money in my purse, and nothing particular
to interest me on shore, I thought I would sail about a little
and see the watery part of the world. '''

Let’s say you want to match the full text with this regular expression:

>>> re.fullmatch('Call(.|\n)*', text)
>>> 

The first argument is the pattern to be found: 'Call(.|\n)*'. The second argument is the text to be analyzed. You stored the multi-line string in the variable text—so you take this as the second argument. The third argument flags of the fullmatch() method is optional and we skip it in the code.

There’s no output! This means that the re.fullmatch() method did not return a match object. Why? Because at the beginning of the string, there’s no match for the ‘Call’ part of the regex. The regex starts with an empty line!

So how can we fix this? Simple, by matching a new line character ‘\n’ at the beginning of the string.

>>> re.fullmatch('\nCall(.|\n)*', text)
<re.Match object; span=(0, 229), match='\nCall me Ishmael. Some years ago--never mind how>

The regex (.|\n)* matches an arbitrary number of characters (new line characters or not) after the prefix ‘\nCall’. This matches the whole text so the result is a match object. Note that there are 229 matching positions so the string included in resulting match object is only the prefix of the whole matching string. This fact is often overlooked by beginner coders.

What’s the Difference Between re.fullmatch() and re.match()?

The methods re.fullmatch() and re.match(pattern, string) both return a match object. Both attempt to match at the beginning of the string. The only difference is that re.fullmatch() also attempts to match the end of the string as well: it wants to match the whole string!

You can see this difference in the following code:

>>> text = 'More with less'
>>> re.match('More', text)
<re.Match object; span=(0, 4), match='More'>
>>> re.fullmatch('More', text)
>>> 

The re.match(‘More’, text) method matches the string ‘More’ at the beginning of the string ‘More with less’. But the re.fullmatch(‘More’, text) method does not match the whole text. Therefore, it returns the None object—nothing is printed to your shell!

What’s the Difference Between re.fullmatch() and re.findall()?

There are two differences between the re.fullmatch(pattern, string) and re.findall(pattern, string) methods:

  • re.fullmatch(pattern, string) returns a match object while re.findall(pattern, string) returns a list of matching strings.
  • re.fullmatch(pattern, string) can only match the whole string, while re.findall(pattern, string) can return multiple matches in the string.

Both can be seen in the following example:

>>> text = 'the 42th truth is 42'
>>> re.fullmatch('.*?42', text)
<re.Match object; span=(0, 20), match='the 42th truth is 42'>
>>> re.findall('.*?42', text)
['the 42', 'th truth is 42']

Note that the regex .*? matches an arbitrary number of characters but it attempts to consume as few characters as possible. This is called “non-greedy” match (the *? operator). The fullmatch() method only returns a match object that matches the whole string. The findall() method returns a list of all occurrences. As the match is non-greedy, it finds two such matches.

What’s the Difference Between re.fullmatch() and re.search()?

The methods re.fullmatch() and re.search(pattern, string) both return a match object. However, re.fullmatch() attempts to match the whole string while re.search() matches anywhere in the string.

You can see this difference in the following code:

>>> text = 'Finxter is fun!'
>>> re.search('Finxter', text)
<re.Match object; span=(0, 7), match='Finxter'>
>>> re.fullmatch('Finxter', text)
>>> 

The re.search() method retrieves the match of the ‘Finxter’ substring as a match object. But the re.fullmatch() method has no return value because the substring ‘Finxter’ does not match the whole string ‘Finxter is fun!’.

How to Use the Optional Flag Argument?

As you’ve seen in the specification, the fullmatch() method comes with an optional third ‘flag’ argument:

re.fullmatch(pattern, string, flags=0)

What’s the purpose of the flags argument?

Flags allow you to control the regular expression engine. Because regular expressions are so powerful, they are a useful way of switching on and off certain features (for example, whether to ignore capitalization when matching your regex).

Syntax Meaning
re.ASCII If you don’t use this flag, the special Python regex symbols w, W, b, B, d, D, s and S will match Unicode characters. If you use this flag, those special symbols will match only ASCII characters — as the name suggests.
re.A Same as re.ASCII
re.DEBUG If you use this flag, Python will print some useful information to the shell that helps you debugging your regex.
re.IGNORECASE If you use this flag, the regex engine will perform case-insensitive matching. So if you’re searching for [A-Z], it will also match [a-z].
re.I Same as re.IGNORECASE
re.LOCALE Don’t use this flag — ever. It’s depreciated—the idea was to perform case-insensitive matching depending on your current locale. But it isn’t reliable.
re.L Same as re.LOCALE
re.MULTILINE This flag switches on the following feature: the start-of-the-string regex ‘^’ matches at the beginning of each line (rather than only at the beginning of the string). The same holds for the end-of-the-string regex ‘$’ that now matches also at the end of each line in a multi-line string.
re.M Same as re.MULTILINE
re.DOTALL Without using this flag, the dot regex ‘.’ matches all characters except the newline character ‘n’. Switch on this flag to really match all characters including the newline character.
re.S Same as re.DOTALL
re.VERBOSE To improve the readability of complicated regular expressions, you may want to allow comments and (multi-line) formatting of the regex itself. This is possible with this flag: all whitespace characters and lines that start with the character ‘#’ are ignored in the regex.
re.X Same as re.VERBOSE

Here’s how you’d use it in a practical example:

>>> text = 'Python is great!'
>>> re.search('PYTHON', text, flags=re.IGNORECASE)
<re.Match object; span=(0, 6), match='Python'>

Although your regex ‘PYTHON’ is all-caps, we ignore the capitalization by using the flag re.IGNORECASE.

Where to Go From Here?

This article has introduced the re.fullmatch(pattern, string) method that attempts to match the whole string—and returns a match object if it succeeds or None if it doesn’t.

Learning Python is hard. But if you cheat, it isn’t as hard as it has to be:

Download 8 Free Python Cheat Sheets now!

Posted on Leave a comment

Python Regex Match

Why have regular expressions survived seven decades of technological disruption? Because coders who understand regular expressions have a massive advantage when working with textual data. They can write in a single line of code what takes others dozens!

This article is all about the match() method of Python’s re library. There are two similar methods to help you use regular expressions:

  • The easy-to-use but less powerful findall() method returns a list of string matches. Check out our blog tutorial.
  • The search() method returns a match object of the first match. Check out our blog tutorial.

So how does the re.match() method work? Let’s study the specification.

How Does re.match() Work in Python?

The re.match(pattern, string) method matches the pattern at the beginning of the string and returns a match object.

Specification:

re.match(pattern, string, flags=0)

The re.match() method has up to three arguments.

  • pattern: the regular expression pattern that you want to match.
  • string: the string which you want to search for the pattern.
  • flags (optional argument): a more advanced modifier that allows you to customize the behavior of the function. Want to know how to use those flags? Check out this detailed article on the Finxter blog.

We’ll explore them in more detail later.

Return Value:

The re.match() method returns a match object. You may ask (and rightly so):

What’s a Match Object?

If a regular expression matches a part of your string, there’s a lot of useful information that comes with it: what’s the exact position of the match? Which regex groups were matched—and where?

The match object is a simple wrapper for this information. Some regex methods of the re package in Python—such as match()—automatically create a match object upon the first pattern match.

At this point, you don’t need to explore the match object in detail. Just know that we can access the start and end positions of the match in the string by calling the methods m.start() and m.end() on the match object m:

>>> m = re.match('h...o', 'hello world')
>>> m.start()
0
>>> m.end()
5
>>> 'hello world'[m.start():m.end()] 'hello'

In the first line, you create a match object m by using the re.match() method. The pattern ‘h…o’ matches in the string ‘hello world’ at start position 0. You use the start and end position to access the substring that matches the pattern (using the popular Python technique of slicing). But note that as the match() method always attempts to match only at the beginning of the string, the m.start() method will always return zero.

Now, you know the purpose of the match() object in Python. Let’s check out a few examples of re.match()!

A Guided Example for re.match()

First, you import the re module and create the text string to be searched for the regex patterns:

>>> import re
>>> text = ''' Ha! let me see her: out, alas! he's cold: Her blood is settled, and her joints are stiff; Life and these lips have long been separated: Death lies on her like an untimely frost Upon the sweetest flower of all the field. '''

Let’s say you want to search the text for the string ‘her’:

>>> re.match('lips', text)
>>>

The first argument is the pattern to be found: the string ‘lips’. The second argument is the text to be analyzed. You stored the multi-line string in the variable text—so you take this as the second argument. The third argument flags of the match() method is optional.

There’s no output! This means that the re.match() method did not return a match object. Why? Because at the beginning of the string, there’s no match for the regex pattern ‘lips’.

So how can we fix this? Simple, by matching all the characters that preced the string ‘lips’ in the text:

>>> re.match('(.|\n)*lips', text)
<re.Match object; span=(0, 122), match="\n Ha! let me see her: out, alas! he's cold:\n>

The regex (.|\n)*lips matches all prefixes (an arbitrary number of characters including new lines) followed by the string ‘lips’. This results in a new match object that matches a huge substring from position 0 to position 122. Note that the match object doesn’t print the whole substring to the shell. If you access the matched substring, you’ll get the following result:

>>> m = re.match('(.|\n)*lips', text)
>>> text[m.start():m.end()] "\n Ha! let me see her: out, alas! he's cold:\n Her blood is settled, and her joints are stiff;\n Life and these lips"

Interestingly, you can also achieve the same thing by specifying the third flag argument as follows:

>>> m = re.match('.*lips', text, flags=re.DOTALL)
>>> text[m.start():m.end()] "\n Ha! let me see her: out, alas! he's cold:\n Her blood is settled, and her joints are stiff;\n Life and these lips"

The re.DOTALL flag ensures that the dot operator . matches all characters including the new line character.

What’s the Difference Between re.match() and re.findall()?

There are two differences between the re.match(pattern, string) and re.findall(pattern, string) methods:

  • re.match(pattern, string) returns a match object while re.findall(pattern, string) returns a list of matching strings.
  • re.match(pattern, string) returns only the first match in the string—and only at the beginning—while re.findall(pattern, string) returns all matches in the string.

Both can be seen in the following example:

>>> text = 'Python is superior to Python'
>>> re.match('Py...n', text)
<re.Match object; span=(0, 6), match='Python'>
>>> re.findall('Py...n', text)
['Python', 'Python']

The string ‘Python is superior to Python’ contains two occurrences of ‘Python’. The match() method only returns a match object of the first occurrence. The findall() method returns a list of all occurrences.

What’s the Difference Between re.match() and re.search()?

The methods re.search(pattern, string) and re.match(pattern, string) both return a match object of the first match. However, re.match() attempts to match at the beginning of the string while re.search() matches anywhere in the string.

You can see this difference in the following code:

>>> text = 'Slim Shady is my name'
>>> re.search('Shady', text)
<re.Match object; span=(5, 10), match='Shady'>
>>> re.match('Shady', text)
>>>

The re.search() method retrieves the match of the ‘Shady’ substring as a match object. But if you use the re.match() method, there is no match and no return value because the substring ‘Shady’ does not occur at the beginning of the string ‘Slim Shady is my name’.

How to Use the Optional Flag Argument?

As you’ve seen in the specification, the match() method comes with an optional third ‘flag’ argument:

re.match(pattern, string, flags=0)

What’s the purpose of the flags argument?

Flags allow you to control the regular expression engine. Because regular expressions are so powerful, they are a useful way of switching on and off certain features (for example, whether to ignore capitalization when matching your regex).

Syntax Meaning
re.ASCII If you don’t use this flag, the special Python regex symbols w, W, b, B, d, D, s and S will match Unicode characters. If you use this flag, those special symbols will match only ASCII characters — as the name suggests.
re.A Same as re.ASCII
re.DEBUG If you use this flag, Python will print some useful information to the shell that helps you debugging your regex.
re.IGNORECASE If you use this flag, the regex engine will perform case-insensitive matching. So if you’re searching for [A-Z], it will also match [a-z].
re.I Same as re.IGNORECASE
re.LOCALE Don’t use this flag — ever. It’s depreciated—the idea was to perform case-insensitive matching depending on your current locale. But it isn’t reliable.
re.L Same as re.LOCALE
re.MULTILINE This flag switches on the following feature: the start-of-the-string regex ‘^’ matches at the beginning of each line (rather than only at the beginning of the string). The same holds for the end-of-the-string regex ‘$’ that now matches also at the end of each line in a multi-line string.
re.M Same as re.MULTILINE
re.DOTALL Without using this flag, the dot regex ‘.’ matches all characters except the newline character ‘n’. Switch on this flag to really match all characters including the newline character.
re.S Same as re.DOTALL
re.VERBOSE To improve the readability of complicated regular expressions, you may want to allow comments and (multi-line) formatting of the regex itself. This is possible with this flag: all whitespace characters and lines that start with the character ‘#’ are ignored in the regex.
re.X Same as re.VERBOSE

Here’s how you’d use it in a practical example:

>>> text = 'Python is great!'
>>> re.search('PYTHON', text, flags=re.IGNORECASE)
<re.Match object; span=(0, 6), match='Python'>

Although your regex ‘PYTHON’ is all-caps, we ignore the capitalization by using the flag re.IGNORECASE.

Where to Go From Here?

This article has introduced the re.match(pattern, string) method that attempts to match the first occurrence of the regex pattern at the beginning of a given string—and returns a match object.

Python soars in popularity. There are two types of people: those who understand coding and those who don’t. The latter will have larger and larger difficulties participating in the era of massive adoption and penetration of digital content. Do you want to increase your Python skills daily without investing a lot of time?

Then join my “Coffee Break Python” email list of tens of thousands of ambitious coders!

Posted on Leave a comment

Building ArmorPaint From Source

ArmorPaint is an open source competitor to Substance Painter, from the creator of the Armory game engine (tutorial series available here).  It is available for just 16 Euro in binary form, but can also be built from source code.  This guide walks you step by step through the process of building ArmorPaint from source.

There are a few requirements before you can build.  Download and install the following programs if not already installed:

First step, we clone the repository.  Make sure to add the –recursive flag(that’s two ‘-‘ by the way).

Open a command prompt, cd to the directory where you want to install ArmorPaint’s source code and run the command:

git clone –recursive https://github.com/armory3d/armorpaint.git

Depending on your internet speed this could take a minute to several minutes while all of the files are downloaded. 

In Explorer, go the installation directory, then navigate to armorpaint\Kromx\V8\Libraries\win32\release and using 7zip extract v8_monolith.7z to the same directory as the .7z file.

Next in the command prompt run the following commands

(Assuming you are reusing the same CMD that you did the git clone from)

cd armorpaint

node Kromx/make –g direct3d11

cd Kromx

node Kinc/make –g direct3d11

explorer .

If you receive any errors above, the most likely cause is node not being installed.  The final command will now open a Windows Explorer window in the Kromx subdirectory.  Open the build directory and load the file Krom.sln.

image

This will open the project in Visual Studio.  If you haven’t run VS yet,you may have to do some initial installation steps.  Worst case scenario run through the initial install, close and double click Krom.sln again.

First make sure that you are building for x64 and Release mode at the top:

image

In the Solution Explorer, select Krom then hit ALT + ENTER or right click and select Properties.

Then select Debugging, in Command Arguments enter ..\..\build.krom then click Apply.

image

You are now ready to build ArmorPaint.  Select Ctrl + SHIFT + B or select Build->Build Solution.

image

Assuming no errors, are exe should be built.  Now go to the folder armorpaint\Kromx\build\x64\Release and copy the file Krom.exe, then copy to armorpaint\build\krom.  You can now run Krom.exe and you’re good to go. 

image

Step by step instructions are available in the video below.

[youtube https://www.youtube.com/watch?v=y6h2KOP47ZY&w=853&h=480]

Art Programming


<!–

–>

Posted on Leave a comment

Python Regex Search

When I first learned about regular expressions, I didn’t appreciate their power. But there’s a reason regular expressions have survived seven decades of technological disruption: coders who understand regular expressions have a massive advantage when working with textual data. They can write in a single line of code what takes others dozens!

This article is all about the search() method of Python’s re library. To learn about the easy-to-use but less powerful findall() method that returns a list of string matches, check out our article about the similar findall() method.

So how does the re.search() method work? Let’s study the specification.

How Does re.search() Work in Python?

The re.search(pattern, string) method matches the first occurrence of the pattern in the string and returns a match object.

Specification:

re.search(pattern, string, flags=0)

The re.search() method has up to three arguments.

  • pattern: the regular expression pattern that you want to match.
  • string: the string which you want to search for the pattern.
  • flags (optional argument): a more advanced modifier that allows you to customize the behavior of the function. Want to know how to use those flags? Check out this detailed article on the Finxter blog.

We’ll explore them in more detail later.

Return Value:

The re.search() method returns a match object. You may ask (and rightly so):

What’s a Match Object?

If a regular expression matches a part of your string, there’s a lot of useful information that comes with it: what’s the exact position of the match? Which regex groups were matched—and where?

The match object is a simple wrapper for this information. Some regex methods of the re package in Python—such as search()—automatically create a match object upon the first pattern match.

At this point, you don’t need to explore the match object in detail. Just know that we can access the start and end positions of the match in the string by calling the methods m.start() and m.end() on the match object m:

>>> m = re.search('h...o', 'hello world')
>>> m.start()
0
>>> m.end()
5
>>> 'hello world'[m.start():m.end()] 'hello'

In the first line, you create a match object m by using the re.search() method. The pattern ‘h…o’ matches in the string ‘hello world’ at start position 0. You use the start and end position to access the substring that matches the pattern (using the popular Python technique of slicing).

Now, you know the purpose of the match() object in Python. Let’s check out a few examples of re.search()!

A Guided Example for re.search()

First, you import the re module and create the text string to be searched for the regex patterns:

>>> import re
>>> text = ''' Ha! let me see her: out, alas! he's cold: Her blood is settled, and her joints are stiff; Life and these lips have long been separated: Death lies on her like an untimely frost Upon the sweetest flower of all the field. '''

Let’s say you want to search the text for the string ‘her’:

>>> re.search('her', text)
<re.Match object; span=(20, 23), match='her'>

The first argument is the pattern to be found. In our case, it’s the string ‘her’. The second argument is the text to be analyzed. You stored the multi-line string in the variable text—so you take this as the second argument. You don’t need to define the optional third argument flags of the search() method because you’re fine with the default behavior in this case.

Look at the output: it’s a match object! The match object gives the span of the match—that is the start and stop indices of the match. We can also directly access those boundaries by using the start() and stop() methods of the match object:

>>> m = re.search('her', text)
>>> m.start()
20
>>> m.end()
23

The problem is that the search() method only retrieves the first occurrence of the pattern in the string. If you want to find all matches in the string, you may want to use the findall() method of the re library.

What’s the Difference Between re.search() and re.findall()?

There are two differences between the re.search(pattern, string) and re.findall(pattern, string) methods:

  • re.search(pattern, string) returns a match object while re.findall(pattern, string) returns a list of matching strings.
  • re.search(pattern, string) returns only the first match in the string while re.findall(pattern, string) returns all matches in the string.

Both can be seen in the following example:

>>> text = 'Python is superior to Python'
>>> re.search('Py...n', text)
<re.Match object; span=(0, 6), match='Python'>
>>> re.findall('Py...n', text)
['Python', 'Python']

The string ‘Python is superior to Python’ contains two occurrences of ‘Python’. The search() method only returns a match object of the first occurrence. The findall() method returns a list of all occurrences.

What’s the Difference Between re.search() and re.match()?

The methods re.search(pattern, string) and re.match(pattern, string) both return a match object of the first match. However, re.match() attempts to match at the beginning of the string while re.search() matches anywhere in the string.

You can see this difference in the following code:

>>> text = 'Slim Shady is my name'
>>> re.search('Shady', text)
<re.Match object; span=(5, 10), match='Shady'>
>>> re.match('Shady', text)
>>>

The re.search() method retrieves the match of the ‘Shady’ substring as a match object. But if you use the re.match() method, there is no match and no return value because the substring ‘Shady’ does not occur at the beginning of the string ‘Slim Shady is my name’.

How to Use the Optional Flag Argument?

As you’ve seen in the specification, the search() method comes with an optional third ‘flag’ argument:

re.search(pattern, string, flags=0)

What’s the purpose of the flags argument?

Flags allow you to control the regular expression engine. Because regular expressions are so powerful, they are a useful way of switching on and off certain features (for example, whether to ignore capitalization when matching your regex).

Syntax Meaning
re.ASCII If you don’t use this flag, the special Python regex symbols \w, \W, \b, \B, \d, \D, \s and \S will match Unicode characters. If you use this flag, those special symbols will match only ASCII characters — as the name suggests.
re.A Same as re.ASCII
re.DEBUG If you use this flag, Python will print some useful information to the shell that helps you debugging your regex.
re.IGNORECASE If you use this flag, the regex engine will perform case-insensitive matching. So if you’re searching for [A-Z], it will also match [a-z].
re.I Same as re.IGNORECASE
re.LOCALE Don’t use this flag — ever. It’s depreciated—the idea was to perform case-insensitive matching depending on your current locale. But it isn’t reliable.
re.L Same as re.LOCALE
re.MULTILINE This flag switches on the following feature: the start-of-the-string regex ‘^’ matches at the beginning of each line (rather than only at the beginning of the string). The same holds for the end-of-the-string regex ‘$’ that now matches also at the end of each line in a multi-line string.
re.M Same as re.MULTILINE
re.DOTALL Without using this flag, the dot regex ‘.’ matches all characters except the newline character ‘\n’. Switch on this flag to really match all characters including the newline character.
re.S Same as re.DOTALL
re.VERBOSE To improve the readability of complicated regular expressions, you may want to allow comments and (multi-line) formatting of the regex itself. This is possible with this flag: all whitespace characters and lines that start with the character ‘#’ are ignored in the regex.
re.X Same as re.VERBOSE

Here’s how you’d use it in a practical example:

>>> text = 'Python is great!'
>>> re.search('PYTHON', text, flags=re.IGNORECASE)
<re.Match object; span=(0, 6), match='Python'>

Although your regex ‘PYTHON’ is all-caps, we ignore the capitalization by using the flag re.IGNORECASE.

Where to Go From Here?

This article has introduced the re.search(pattern, string) method that attempts to match the first occurrence of the regex pattern in a given string—and returns a match object.

Python soars in popularity. There are two types of people: those who understand coding and those who don’t. The latter will have larger and larger difficulties participating in the era of massive adoption and penetration of digital content. Do you want to increase your Python skills daily without investing a lot of time?

Then join my “Coffee Break Python” email list of tens of thousands of ambitious coders!

Posted on Leave a comment

Contact Form with Custom Image Captcha Validation like Google reCaptcha

Last modified on January 9th, 2020 by Vincy.

A contact form on a website is a medium to the users to contact the site admin or maintainer. It acts as a medium of communication. For many a websites, it is a critical factor in getting a sale.

The Captcha in a form is a mechanism to prevent bots or malicious users from submitting the form. It protects the site from security abuses.

There are components available in the market to render captcha in a form. Google reCAPTCHA is a popular and unbeatable service to make your form captcha-enabled.

  1. Different websites use different types of captcha.
  2. Displaying random alpha-numeric characters.
  3. Requesting to solve puzzles, Google reCAPTCHA-like image captcha.

I created an example code for a contact form in PHP with the reCAPTCHA-like image captcha mechanism.

Contact Form In Php With Captcha

What is inside?

  1. Existing contact form component
  2. About this example
  3. File structure
  4. HTML code to show contact form with image captcha
  5. PHP code to validate image captcha and send contact mail
  6. Contact form captcha image database script
  7. Contact form output with custom image captcha

Ready-made contact form components are existing huge in number around the web. If you want to get one among them, then we need to be sure about the security and robustness of the code.

I have created a secure spam-free contact form script, Iris. I coded this component to easily integrate and configure with your application. If you are looking for a contact form that controls spam without using a captcha, then you will like it.

This also component includes Google reCAPTCHA. You can enable or disable this feature on a need basis. In similar ways, it comes with loads of features that is configurable in minutes.

About this example

This example code has the Name, Email, Subject and Message fields. These are some basic fields that we have seen with other PHP contact form example earlier.

Added to these fields, I have added an image captcha section in this code. This section will show five random images and ask to choose one. The random images are from the database.

I used jQuery script to validate the form field data before posting it to the PHP.

In PHP, it validates the captcha image clicked by the user. Based on the server-side captcha validation, the PHP will respond to the user.
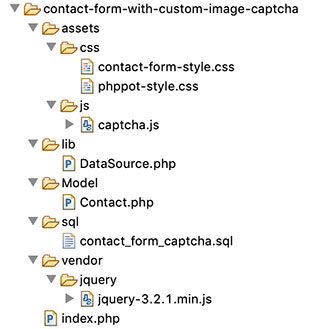
File structure

The PHP contact form with an image captcha example includes less number of files.

The file structure is in the below screenshot. You can see that it has a systematic code with a conventional structure.

Contact Form with Image Captcha File Structure

This code snippet shows the HTML part of the index.php, the landing page. 

This contact form contains some basic fields with custom captcha in PHP.

The captcha section shows the SVG image markup from the database. It displays five random images and requests the user to select one.

The HTML form has the specification of a jQuery validation handler. The form-submit event will invoke this handler to process the form validation.

This HTML includes the response containers to display notifications to the user. These notifications acknowledge the user about the captcha validation or other responses.

index.php (contact form HTML)

<html> <head> <title>Contact Us Form</title> <link rel="stylesheet" type="text/css" href="assets/css/contact-form-style.css" /> <link rel="stylesheet" type="text/css" href="assets/css/phppot-style.css" /> <script src="vendor/jquery/jquery-3.2.1.min.js"></script> </head> <body> <div class="phppot-container"> <h1>PHP contact form with captcha images</h1> <form name="frmContact" id="captcha-cnt-frm" class="phppot-form" frmContact"" method="post" action="" enctype="multipart/form-data" onsubmit="return validateContactForm()"> <div class="phppot-row"> <div class="label"> Name <span id="userName-info" class="validation-message"></span> </div> <input type="text" class="phppot-input" name="userName" id="userName" value="<?php if(!empty($_POST['userName'])&& $type == 'error'){ echo $_POST['userName'];}?>" /> </div> <div class="phppot-row"> <div class="label"> Email <span id="userEmail-info" class="validation-message"></span> </div> <input type="text" class="phppot-input" name="userEmail" id="userEmail" value="<?php if(!empty($_POST['userEmail'])&& $type == 'error'){ echo $_POST['userEmail'];}?>" /> </div> <div class="phppot-row"> <div class="label"> Subject <span id="subject-info" class="validation-message"></span> </div> <input type="text" class="phppot-input" name="subject" id="subject" value="<?php if(!empty($_POST['subject'])&& $type == 'error'){ echo $_POST['subject'];}?>" /> </div> <div class="phppot-row"> <div class="label"> Message <span id="userMessage-info" class="validation-message"></span> </div> <textarea name="content" id="content" class="phppot-input" cols="60" rows="6"><?php if(!empty($_POST['content'])&& $type == 'error'){ echo $_POST['content'];}?></textarea> </div> <?php if (! empty($result)) { ?> <div class="phppot-row"> <div class="captcha-container <?php if(!empty($border)){ echo $border;} ?>"> <p> Select the <span class="text-color"><?php echo $result[0]['name'];?> </span><span id="captcha-info" class="validation-message"></span> </p> <input type="hidden" name="captcha_code" value="<?php echo $result[0]['name'];?>"> <?php shuffle($captchaOutput); if (! empty($captchaOutput)) { foreach ($captchaOutput as $value) { ?> <div class="svg-padding"> <div class="svg"><?php echo $value['captcha_icon'];?> <input type="hidden" class="icons" value="<?php echo $value['name'];?>"> </div> </div> <?php }}?> </div> </div> <?php }?> <div class="phppot-row"> <input type="submit" name="send" class="send-button" value="Send" /> </div> <input type="hidden" name="captcha_chosen" id="captcha-chosen" value=""> </form> <?php if(!empty($message)) { ?> <div id="phppot-message" class="<?php echo $type; ?>"><?php if(isset($message)){ ?> <?php echo $message; }}?> </div> </div> <script src="assets/js/captcha.js"></script> </body> </html> 

jQuery script to validate contact form and highlight captcha selection

This section shows the jQuery script for validation and captcha selection.

The validateContactForm() function is handling the form validation. All the contact form fields are mandatory. This function is making sure about the non-empty state of the form fields.

On selecting one of the lists of captcha images, the script puts the selected value in a form field. Also, it highlights the selected by adding CSS via script.

If the user selects no captcha, then the validation will return false.

assets/js/captcha.js

function validateContactForm() { var valid = true; $("#userName").removeClass("error-field"); $("#userEmail").removeClass("error-field"); $("#subject").removeClass("error-field"); $("#content").removeClass("error-field"); $("#userName-info").html("").hide(); $("#userEmail-info").html("").hide(); $("#subject-info").html("").hide(); $("#content-info").html("").hide(); $(".validation-message").html(""); $(".phppot-input").css('border', '#e0dfdf 1px solid'); $(".captcha-container").css('border', '#e0dfdf 1px solid'); var userName = $("#userName").val(); var userEmail = $("#userEmail").val(); var subject = $("#subject").val(); var content = $("#content").val(); var captcha = $("#captcha-chosen").val(); if (userName.trim() == "") { $("#userName-info").html("required.").css("color", "#ee0000").show(); $("#userName").css('border', '#e66262 1px solid'); $("#userName").addClass("error-field"); valid = false; } if (userEmail.trim() == "") { $("#userEmail-info").html("required.").css("color", "#ee0000").show(); $("#userEmail").css('border', '#e66262 1px solid'); $("#userEmail").addClass("error-field"); valid = false; } if (!userEmail.match(/^([\w-\.]+@([\w-]+\.)+[\w-]{2,4})?$/)) { $("#userEmail-info").html("invalid email address.").css("color", "#ee0000").show(); $("#userEmail").css('border', '#e66262 1px solid'); $("#userEmail").addClass("error-field"); valid = false; } if (subject == "") { $("#subject-info").html("required.").css("color", "#ee0000").show(); $("#subject").css('border', '#e66262 1px solid'); $("#subject").addClass("error-field"); valid = false; } if (content == "") { $("#userMessage-info").html("required.").css("color", "#ee0000").show(); $("#content").css('border', '#e66262 1px solid'); $("#content").addClass("error-field"); valid = false; } if (captcha == "") { $("#captcha-info").html("required."); $(".captcha-container").css('border', '#e66262 1px solid'); valid = false; } if (valid == false) { $('.error-field').first().focus(); valid = false; } return valid; } $(".svg-padding").on('click', function() { $(".svg").removeClass('captcha-selected'); $(this).find(".svg").addClass('captcha-selected'); var icons = $(this).find(".icons").val(); $("#captcha-chosen").val(icons); }); 

CSS created for contact form example

These are the exclusive styles created to present the contact form. Mostly, it contains styles for the captcha section.

I used a generic CSS template for designing other common form components. You can find this CSS in the downloadable.

assets/css/contact-form-style.css

.svg-padding { display: inline-block; } .svg { cursor: pointer; padding: 5px 5px 5px 5px; border-radius: 3px; margin: 0px 5px 0px 5px; border: 1px solid #FFF; } .text-color { font-weight: bold; } .captcha-container { background: #fff; padding: 15px; border: 1px solid #9a9a9a; width: 270px; border-radius: 3px; padding-top: 0px; } .error-field { border: 1px solid #d96557; } .send-button { cursor: pointer; background: #3cb73c; border: #36a536 1px solid; color: #FFF; font-size: 1em; width: 100px; } .captcha-selected { color: #1cb87b; background-color: #e3e3e3; border: #d7d7d7 1px solid; } .border-error-color { border: 1px solid #e66262; } 

On loading the contact form, the PHP code reads the random captcha images from the database. In PHP, it picks one image from the random results as the captcha code.

The HTML form contains a hidden field to have this code.

When the user selects an image and posts it to the PHP, it will validate the selected captcha.

The user-selected captcha is matched with the pre-loaded code, then the PHP code will return true. Then, it will process the contact email sending script.

index.php (Captcha Validation and Mail sending)

<?php namespace Phppot; require_once ("Model/Contact.php"); $contact = new Contact(); if (! empty($_POST['send'])) { if ($_POST['captcha_code'] == $_POST['captcha_chosen']) { $contact->sendContactMail($_POST); $message = "Hi, we have received your message. Thank you."; $type = "success"; } else { $message = "Invalid captcha. Please select the correct image."; $type = "error"; $border = "border-error-color"; } } $result = $contact->getRecord(); $termId = $result[0]['id']; $captchaResult = $contact->getCaptchaIcons($termId); $randomCaptchaResult = $contact->getRandomCaptchaId($termId); $captchaOutput = array_merge($captchaResult, $randomCaptchaResult); ?> 

In this PHP model class, it has the functions to read random captcha images from the database.

The getRecord() method reads a single random record to load captcha code on the page load.

The sendContactMail() function send the contact mail. I used PHP mail() function for this example. If you want to use SMTP for sending the email, you can see the example in the linked article.

Model/Contact.php

<?php namespace Phppot; use Phppot\DataSource; class Contact { private $ds; function __construct() { require_once __DIR__ . './../lib/DataSource.php'; $this->ds = new DataSource(); } function getRecord() { $query = "SELECT * FROM tbl_term ORDER BY RAND() LIMIT 1"; $result = $this->ds->select($query); return $result; } function getCaptchaIcons($id) { $query = "SELECT tbl_captcha_images.*, tbl_term.name FROM tbl_captcha_images JOIN tbl_term ON tbl_captcha_images.term_id = tbl_term.id WHERE term_id != " . $id . " ORDER BY RAND() LIMIT 4"; $captchaResult = $this->ds->select($query); return $captchaResult; } function getRandomCaptchaId($id) { $query = "SELECT tbl_captcha_images.*, tbl_term.name FROM tbl_captcha_images JOIN tbl_term ON tbl_captcha_images.term_id = tbl_term.id WHERE term_id = " . $id . " ORDER BY RAND() LIMIT 1"; $captcha = $this->ds->select($query); return $captcha; } function sendContactMail($postValues) { $name = $postValues["userName"]; $email = $postValues["userEmail"]; $subject = $postValues["subject"]; $content = $postValues["content"]; $toEmail = "SITE_ADMIN_EMAIL"; // Put in place the recipient email $mailHeaders = "From: " . $name . "<" . $email . ">\r\n"; mail($toEmail, $subject, $content, $mailHeaders); } } 

lib/Datasource.php

<?php namespace Phppot; /** * Generic datasource class for handling DB operations. * Uses MySqli and PreparedStatements. * * @version 2.3 */ class DataSource { // PHP 7.1.0 visibility modifiers are allowed for class constants. // when using above 7.1.0, declare the below constants as private const HOST = 'localhost'; const USERNAME = 'root'; const PASSWORD = ''; const DATABASENAME = 'contact_form_captcha'; private $conn; /** * PHP implicitly takes care of cleanup for default connection types. * So no need to worry about closing the connection. * * Singletons not required in PHP as there is no * concept of shared memory. * Every object lives only for a request. * * Keeping things simple and that works! */ function __construct() { $this->conn = $this->getConnection(); } /** * If connection object is needed use this method and get access to it. * Otherwise, use the below methods for insert / update / etc. * * @return \mysqli */ public function getConnection() { $conn = new \mysqli(self::HOST, self::USERNAME, self::PASSWORD, self::DATABASENAME); if (mysqli_connect_errno()) { trigger_error("Problem with connecting to database."); } $conn->set_charset("utf8"); return $conn; } /** * To get database results * * @param string $query * @param string $paramType * @param array $paramArray * @return array */ public function select($query, $paramType = "", $paramArray = array()) { $stmt = $this->conn->prepare($query); if (! empty($paramType) && ! empty($paramArray)) { $this->bindQueryParams($stmt, $paramType, $paramArray); } $stmt->execute(); $result = $stmt->get_result(); if ($result->num_rows > 0) { while ($row = $result->fetch_assoc()) { $resultset[] = $row; } } if (! empty($resultset)) { return $resultset; } } } 

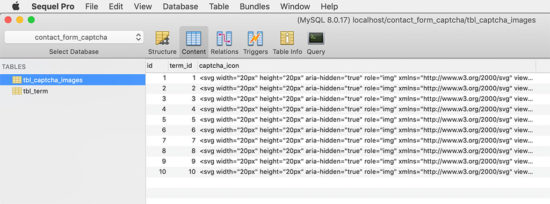
This SQL script includes the structure and data of the tables used to display custom captcha. The tbl_captcha_images table contains the SVG markup of the captcha images.

I have used another table tbl_term to hold the captcha term and title. The captcha term is for stating the user what to select. The captcha title is a slug to add it with a title attribute.

sql/contact_form_captcha.sql

-- -- Database: `contact_form_captcha` -- -- -------------------------------------------------------- -- -- Table structure for table `tbl_captcha_images` -- CREATE TABLE `tbl_captcha_images` ( `id` int(11) NOT NULL, `term_id` int(11) NOT NULL, `captcha_icon` text NOT NULL ) ENGINE=InnoDB DEFAULT CHARSET=latin1; -- -- Dumping data for table `tbl_captcha_images` -- INSERT INTO `tbl_captcha_images` (`id`, `term_id`, `captcha_icon`) VALUES (1, 1, '<svg width=\"25px\" height=\"25px\" aria-hidden=\"true\" role=\"img\" xmlns=\"http://www.w3.org/2000/svg\" viewBox=\"0 0 640 512\"><path fill=\"currentColor\" d=\"M192 384h192c53 0 96-43 96-96h32c70.6 0 128-57.4 128-128S582.6 32 512 32H120c-13.3 0-24 10.7-24 24v232c0 53 43 96 96 96zM512 96c35.3 0 64 28.7 64 64s-28.7 64-64 64h-32V96h32zm47.7 384H48.3c-47.6 0-61-64-36-64h583.3c25 0 11.8 64-35.9 64z\"></path></svg>'), (2, 2, '<svg width=\"25px\" height=\"25px\" aria-hidden=\"true\" role=\"img\" xmlns=\"http://www.w3.org/2000/svg\" viewBox=\"0 0 576 512\"><path fill=\"currentColor\" d=\"M259.3 17.8L194 150.2 47.9 171.5c-26.2 3.8-36.7 36.1-17.7 54.6l105.7 103-25 145.5c-4.5 26.3 23.2 46 46.4 33.7L288 439.6l130.7 68.7c23.2 12.2 50.9-7.4 46.4-33.7l-25-145.5 105.7-103c19-18.5 8.5-50.8-17.7-54.6L382 150.2 316.7 17.8c-11.7-23.6-45.6-23.9-57.4 0z\"></path></svg>'), (3, 3, '<svg width=\"25px\" height=\"25px\" aria-hidden=\"true\" role=\"img\" xmlns=\"http://www.w3.org/2000/svg\" viewBox=\"0 0 384 512\"><path fill=\"currentColor\" d=\"M377.33 375.429L293.906 288H328c21.017 0 31.872-25.207 17.448-40.479L262.79 160H296c20.878 0 31.851-24.969 17.587-40.331l-104-112.003c-9.485-10.214-25.676-10.229-35.174 0l-104 112.003C56.206 134.969 67.037 160 88 160h33.21l-82.659 87.521C24.121 262.801 34.993 288 56 288h34.094L6.665 375.429C-7.869 390.655 2.925 416 24.025 416H144c0 32.781-11.188 49.26-33.995 67.506C98.225 492.93 104.914 512 120 512h144c15.086 0 21.776-19.069 9.995-28.494-19.768-15.814-33.992-31.665-33.995-67.496V416h119.97c21.05 0 31.929-25.309 17.36-40.571z\"></path></svg>'), (4, 4, '<svg width=\"25px\" height=\"25px\" aria-hidden=\"true\" role=\"img\" xmlns=\"http://www.w3.org/2000/svg\" viewBox=\"0 0 640 512\"><path fill=\"currentColor\" d=\"M624 352h-16V243.9c0-12.7-5.1-24.9-14.1-33.9L494 110.1c-9-9-21.2-14.1-33.9-14.1H416V48c0-26.5-21.5-48-48-48H48C21.5 0 0 21.5 0 48v320c0 26.5 21.5 48 48 48h16c0 53 43 96 96 96s96-43 96-96h128c0 53 43 96 96 96s96-43 96-96h48c8.8 0 16-7.2 16-16v-32c0-8.8-7.2-16-16-16zM160 464c-26.5 0-48-21.5-48-48s21.5-48 48-48 48 21.5 48 48-21.5 48-48 48zm320 0c-26.5 0-48-21.5-48-48s21.5-48 48-48 48 21.5 48 48-21.5 48-48 48zm80-208H416V144h44.1l99.9 99.9V256z\"></path></svg>'), (5, 5, '<svg width=\"25px\" height=\"25px\" aria-hidden=\"true\" role=\"img\" xmlns=\"http://www.w3.org/2000/svg\" viewBox=\"0 0 512 512\"><path fill=\"currentColor\" d=\"M512 176.001C512 273.203 433.202 352 336 352c-11.22 0-22.19-1.062-32.827-3.069l-24.012 27.014A23.999 23.999 0 0 1 261.223 384H224v40c0 13.255-10.745 24-24 24h-40v40c0 13.255-10.745 24-24 24H24c-13.255 0-24-10.745-24-24v-78.059c0-6.365 2.529-12.47 7.029-16.971l161.802-161.802C163.108 213.814 160 195.271 160 176 160 78.798 238.797.001 335.999 0 433.488-.001 512 78.511 512 176.001zM336 128c0 26.51 21.49 48 48 48s48-21.49 48-48-21.49-48-48-48-48 21.49-48 48z\"></path></svg>'), (6, 6, '<svg width=\"25px\" height=\"25px\" aria-hidden=\"true\" role=\"img\" xmlns=\"http://www.w3.org/2000/svg\" viewBox=\"0 0 512 512\"><path fill=\"currentColor\" d=\"M499.991 168h-54.815l-7.854-20.944c-9.192-24.513-25.425-45.351-46.942-60.263S343.651 64 317.472 64H194.528c-26.18 0-51.391 7.882-72.908 22.793-21.518 14.912-37.75 35.75-46.942 60.263L66.824 168H12.009c-8.191 0-13.974 8.024-11.384 15.795l8 24A12 12 0 0 0 20.009 216h28.815l-.052.14C29.222 227.093 16 247.997 16 272v48c0 16.225 6.049 31.029 16 42.309V424c0 13.255 10.745 24 24 24h48c13.255 0 24-10.745 24-24v-40h256v40c0 13.255 10.745 24 24 24h48c13.255 0 24-10.745 24-24v-61.691c9.951-11.281 16-26.085 16-42.309v-48c0-24.003-13.222-44.907-32.772-55.86l-.052-.14h28.815a12 12 0 0 0 11.384-8.205l8-24c2.59-7.771-3.193-15.795-11.384-15.795zm-365.388 1.528C143.918 144.689 168 128 194.528 128h122.944c26.528 0 50.61 16.689 59.925 41.528L391.824 208H120.176l14.427-38.472zM88 328c-17.673 0-32-14.327-32-32 0-17.673 14.327-32 32-32s48 30.327 48 48-30.327 16-48 16zm336 0c-17.673 0-48 1.673-48-16 0-17.673 30.327-48 48-48s32 14.327 32 32c0 17.673-14.327 32-32 32z\"></path></svg>'), (7, 7, '<svg width=\"25px\" height=\"25px\" aria-hidden=\"true\" role=\"img\" xmlns=\"http://www.w3.org/2000/svg\" viewBox=\"0 0 576 512\"><path fill=\"currentColor\" d=\"M414.9 24C361.8 24 312 65.7 288 89.3 264 65.7 214.2 24 161.1 24 70.3 24 16 76.9 16 165.5c0 72.6 66.8 133.3 69.2 135.4l187 180.8c8.8 8.5 22.8 8.5 31.6 0l186.7-180.2c2.7-2.7 69.5-63.5 69.5-136C560 76.9 505.7 24 414.9 24z\"></path></svg>'), (8, 8, '<svg width=\"25px\" height=\"25px\" aria-hidden=\"true\" role=\"img\" xmlns=\"http://www.w3.org/2000/svg\" viewBox=\"0 0 576 512\"><path fill=\"currentColor\" d=\"M488 312.7V456c0 13.3-10.7 24-24 24H348c-6.6 0-12-5.4-12-12V356c0-6.6-5.4-12-12-12h-72c-6.6 0-12 5.4-12 12v112c0 6.6-5.4 12-12 12H112c-13.3 0-24-10.7-24-24V312.7c0-3.6 1.6-7 4.4-9.3l188-154.8c4.4-3.6 10.8-3.6 15.3 0l188 154.8c2.7 2.3 4.3 5.7 4.3 9.3zm83.6-60.9L488 182.9V44.4c0-6.6-5.4-12-12-12h-56c-6.6 0-12 5.4-12 12V117l-89.5-73.7c-17.7-14.6-43.3-14.6-61 0L4.4 251.8c-5.1 4.2-5.8 11.8-1.6 16.9l25.5 31c4.2 5.1 11.8 5.8 16.9 1.6l235.2-193.7c4.4-3.6 10.8-3.6 15.3 0l235.2 193.7c5.1 4.2 12.7 3.5 16.9-1.6l25.5-31c4.2-5.2 3.4-12.7-1.7-16.9z\"></path></svg>'), (9, 9, '<svg width=\"25px\" height=\"25px\" aria-hidden=\"true\" role=\"img\" xmlns=\"http://www.w3.org/2000/svg\" viewBox=\"0 0 512 512\"><path fill=\"currentColor\" d=\"M349.565 98.783C295.978 98.783 251.721 64 184.348 64c-24.955 0-47.309 4.384-68.045 12.013a55.947 55.947 0 0 0 3.586-23.562C118.117 24.015 94.806 1.206 66.338.048 34.345-1.254 8 24.296 8 56c0 19.026 9.497 35.825 24 45.945V488c0 13.255 10.745 24 24 24h16c13.255 0 24-10.745 24-24v-94.4c28.311-12.064 63.582-22.122 114.435-22.122 53.588 0 97.844 34.783 165.217 34.783 48.169 0 86.667-16.294 122.505-40.858C506.84 359.452 512 349.571 512 339.045v-243.1c0-23.393-24.269-38.87-45.485-29.016-34.338 15.948-76.454 31.854-116.95 31.854z\"></path></svg>'), (10, 10, '<svg width=\"25px\" height=\"25px\" aria-hidden=\"true\" role=\"img\" xmlns=\"http://www.w3.org/2000/svg\" viewBox=\"0 0 576 512\"><path fill=\"currentColor\" d=\"M472 200H360.211L256.013 5.711A12 12 0 0 0 245.793 0h-57.787c-7.85 0-13.586 7.413-11.616 15.011L209.624 200H99.766l-34.904-58.174A12 12 0 0 0 54.572 136H12.004c-7.572 0-13.252 6.928-11.767 14.353l21.129 105.648L.237 361.646c-1.485 7.426 4.195 14.354 11.768 14.353l42.568-.002c4.215 0 8.121-2.212 10.289-5.826L99.766 312h109.858L176.39 496.989c-1.97 7.599 3.766 15.011 11.616 15.011h57.787a12 12 0 0 0 10.22-5.711L360.212 312H472c57.438 0 104-25.072 104-56s-46.562-56-104-56z\"></path></svg>'); -- -------------------------------------------------------- -- -- Table structure for table `tbl_term` -- CREATE TABLE `tbl_term` ( `id` int(11) NOT NULL, `name` varchar(255) NOT NULL, `slug` varchar(255) NOT NULL ) ENGINE=InnoDB DEFAULT CHARSET=latin1; -- -- Dumping data for table `tbl_term` -- INSERT INTO `tbl_term` (`id`, `name`, `slug`) VALUES (1, 'cup', 'cup-1'), (2, 'star', 'star-2'), (3, 'tree', 'tree-3'), (4, 'truck', 'truck-4'), (5, 'key', 'key-5'), (6, 'car', 'car-6'), (7, 'heart', 'heart-7'), (8, 'house', 'house-8'), (9, 'flag', 'flag-9'), (10, 'plane', 'plane-10'); -- -- Indexes for dumped tables -- -- -- Indexes for table `tbl_captcha_images` -- ALTER TABLE `tbl_captcha_images` ADD PRIMARY KEY (`id`); -- -- Indexes for table `tbl_term` -- ALTER TABLE `tbl_term` ADD PRIMARY KEY (`id`); -- -- AUTO_INCREMENT for dumped tables -- -- -- AUTO_INCREMENT for table `tbl_captcha_images` -- ALTER TABLE `tbl_captcha_images` MODIFY `id` int(11) NOT NULL AUTO_INCREMENT, AUTO_INCREMENT=11; -- -- AUTO_INCREMENT for table `tbl_term` -- ALTER TABLE `tbl_term` MODIFY `id` int(11) NOT NULL AUTO_INCREMENT, AUTO_INCREMENT=11; COMMIT; 

Contact Form Captcha Image Database

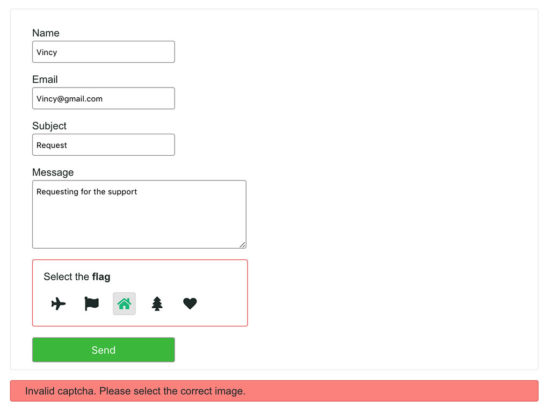
This screenshot shows the output of this PHP contact form example. It displays the custom image captcha in the form.

It focuses on the captcha section because of the form submitted with invalid captcha.

Contact Form in PHP with Image Captcha

Download

↑ Back to Top

Posted on Leave a comment

Python Regex Flags

In many functions, you see a third argument flags. What are they and how do they work?

Flags allow you to control the regular expression engine. Because regular expressions are so powerful, they are a useful way of switching on and off certain features (e.g. whether to ignore capitalization when matching your regex).

For example, here’s how the third argument flags is used in the re.findall() method:

re.findall(pattern, string, flags=0)

So the flags argument seems to be an integer argument with the default value of 0. To control the default regex behavior, you simply use one of the predefined integer values. You can access these predefined values via the re library:

Syntax Meaning
re.ASCII If you don’t use this flag, the special Python regex symbols \w, \W, \b, \B, \d, \D, \s and \S will match Unicode characters. If you use this flag, those special symbols will match only ASCII characters — as the name suggests.
re.A Same as re.ASCII
re.DEBUG If you use this flag, Python will print some useful information to the shell that helps you debugging your regex.
re.IGNORECASE If you use this flag, the regex engine will perform case-insensitive matching. So if you’re searching for [A-Z], it will also match [a-z].
re.I Same as re.IGNORECASE
re.LOCALE Don’t use this flag — ever. It’s depreciated—the idea was to perform case-insensitive matching depending on your current locale. But it isn’t reliable.
re.L Same as re.LOCALE
re.MULTILINE This flag switches on the following feature: the start-of-the-string regex ‘^’ matches at the beginning of each line (rather than only at the beginning of the string). The same holds for the end-of-the-string regex ‘$’ that now matches also at the end of each line in a multi-line string.
re.M Same as re.MULTILINE
re.DOTALL Without using this flag, the dot regex ‘.’ matches all characters except the newline character ‘\n’. Switch on this flag to really match all characters including the newline character.
re.S Same as re.DOTALL
re.VERBOSE To improve the readability of complicated regular expressions, you may want to allow comments and (multi-line) formatting of the regex itself. This is possible with this flag: all whitespace characters and lines that start with the character ‘#’ are ignored in the regex.
re.X Same as re.VERBOSE

How to Use These Flags?

Simply include the flag as the optional flag argument as follows:

import re text = ''' Ha! let me see her: out, alas! he's cold: Her blood is settled, and her joints are stiff; Life and these lips have long been separated: Death lies on her like an untimely frost Upon the sweetest flower of all the field. ''' print(re.findall('HER', text, flags=re.IGNORECASE))
# ['her', 'Her', 'her', 'her']

As you see, the re.IGNORECASE flag ensures that all occurrences of the string ‘her’ are matched—no matter their capitalization.

How to Use Multiple Flags?

Yes, simply add them together (sum them up) as follows:

import re text = ''' Ha! let me see her: out, alas! he's cold: Her blood is settled, and her joints are stiff; Life and these lips have long been separated: Death lies on her like an untimely frost Upon the sweetest flower of all the field. ''' print(re.findall(' HER # Ignored', text, flags=re.IGNORECASE + re.VERBOSE))
# ['her', 'Her', 'her', 'her']

You use both flags re.IGNORECASE (all occurrences of lower- or uppercase string variants of ‘her’ are matched) and re.VERBOSE (ignore comments and whitespaces in the regex). You sum them together re.IGNORECASE + re.VERBOSE to indicate that you want to take both.

Posted on Leave a comment

Python re.findall() – Everything You Need to Know

When I first learned about regular expressions, I didn’t really appreciate their power. But there’s a reason regular expressions have survived seven decades of technological disruption: coders who understand regular expressions have a massive advantage when working with textual data. They can write in a single line of code what takes others dozens!

This article is all about the findall() method of Python’s re library. The findall() method is the most basic way of using regular expressions in Python: If you want to master them, start here!

So how does the re.findall() method work? Let’s study the specification.

How Does the findall() Method Work in Python?

The re.findall(pattern, string) method finds all occurrences of the pattern in the string and returns a list of all matching substrings.

Specification:

re.findall(pattern, string, flags=0)

The re.findall() method has up to three arguments.

  • pattern: the regular expression pattern that you want to match.
  • string: the string which you want to search for the pattern.
  • flags (optional argument): a more advanced modifier that allows you to customize the behavior of the function. Want to know how to use those flags? Check out this detailed article on the Finxter blog.

We will have a look at each of them in more detail.

Return Value:

The re.findall() method returns a list of strings. Each string element is a matching substring of the string argument.

Let’s check out a few examples!

Examples re.findall()

First, you import the re module and create the text string to be searched for the regex patterns:

import re text = ''' Ha! let me see her: out, alas! he's cold: Her blood is settled, and her joints are stiff; Life and these lips have long been separated: Death lies on her like an untimely frost Upon the sweetest flower of all the field. '''

Let’s say, you want to search the text for the string ‘her’:

>>> re.findall('her', text)
['her', 'her', 'her']

The first argument is the pattern you look for. In our case, it’s the string ‘her’. The second argument is the text to be analyzed. You stored the multi-line string in the variable text—so you take this as the second argument. You don’t need to define the optional third argument flags of the findall() method because you’re fine with the default behavior in this case.

Also note that the findall() function returns a list of all matching substrings. In this case, this may not be too useful because we only searched for an exact string. But if we search for more complicated patterns, this may actually be very useful:

>>> re.findall('\\bf\w+\\b', text)
['frost', 'flower', 'field']

The regex ‘\\bf\w+\\b’ matches all words that start with the character ‘f’.

You may ask: why to enclose the regex with a leading and trailing ‘\\b’? This is the word boundary character that matches the empty string at the beginning or at the end of a word. You can define a word as a sequence of characters that are not whitespace characters or other delimiters such as ‘.:,?!’.

In the previous example, you need to escape the boundary character ‘\b’ again because in a Python string, the default meaning of the character sequence ‘\b’ is the backslash character.

Where to Go From Here?

This article has introduced the re.findall(pattern, string) method that attempts to match all occurrences of the regex pattern in a given string—and returns a list of all matches as strings.

Python is growing rapidly and the world is more and more divided into two classes: those who understand coding and those who don’t. The latter will have larger and larger difficulties participating in the era of massive adoption and penetration of digital content. Do you want to increase your Python skills on a daily basis without investing a lot of time?

Then join my “Coffee Break Python” email list of tens of thousands of ambitious coders!

Posted on Leave a comment

User Registration in PHP with Login: Form with MySQL and Code Download

Last modified on January 3rd, 2020 by Vincy.

Are you looking for code to create user registration in PHP? A lightweight form with MySQL database backend. Read on!

There are lots of PHP components for user registration available on the Internet. But these contain heavy stuff and lots of dependencies.

An appropriate code should be lightweight, secure, feature-packed and customizable. I am going to explain how to code this user registration in PHP with a login.

With this code, you can customize or put any add-ons as per your need and enhance it.

User Registration in PHP with Login Form

What is inside?

  1. Example code for user registration in PHP
  2. Create user registration and login form
  3. Registration and login form validation
  4. Process user registration in PHP
  5. PHP login authentication code
  6. User dashboard
  7. MySQL database script
  8. Screenshot of user registration and login form

Example code for user registration in PHP

In this example, I have created user registration in PHP with the login script. In a previous article, we have seen how to create a login script with PHP session.

On a landing page, it shows a login form with a signup link. The registered user can enter their login details with the login form. Once done, he can get into the dashboard after authentication.

If the user does not have an account, then he can click the signup option to create a new account.

The user registration form requests username, email, password from the user. On submission, PHP code allows registration if the email does not already exist.

This example code has client-side validation for validating the entered user details. And also, it includes contains the server-side uniqueness test. The user email is the base to check uniqueness before adding the users to the MySQL database.

This linked article includes a basic example of implementing user registration in PHP and MySQL.

File structure

User Registration File Structure

Create user registration and login form

I have created three HTML view login form, registration form and the dashboard for this code.

Below HMTL code is for displaying the login form to the user. In this form, it has two inputs to allow the user to enter their username and password.

Without these details, a validation code will not allow the login to proceed. The login form tag’s on-click attribute is with loginValidation(). This function contains the login form validation script.

On submitting this login form, the PHP code will validate the user. If the users clear the authentication, then it will redirect him to the dashboard.

If the user attempts to log in with the wrong data, then the code will display a login error message in the login form. If you want to limit the failed login attempts, the linked article has an example of that.

See also login form with forgot password and remember me.

login-form.php

<div class="sign-up-container"> <div class="login-signup"> <a href="user-registration-form.php">Sign up</a> </div> <div class="signup-align"> <form name="login" action="" method="post" onsubmit="return loginValidation()"> <div class="signup-heading">Login</div> <?php if(!empty($loginResult)){?> <div class="error-msg"><?php echo $loginResult;?></div> <?php }?> <div class="row"> <div class="inline-block"> <div class="form-label"> Username<span class="required error" id="username-info"></span> </div> <input class="input-box-330" type="text" name="username" id="username"> </div> </div> <div class="row"> <div class="inline-block"> <div class="form-label"> Password<span class="required error" id="signup-password-info"></span> </div> <input class="input-box-330" type="password" name="signup-password" id="signup-password"> </div> </div> <div class="row"> <input class="sign-up-btn" type="submit" name="login-btn" id="login-btn" value="Login"> </div> </form> </div> </div> 

This is a user registration form getting minimal user data from the user. All form fields are mandatory.

It will pass-through a JavaScript validation before processing the user registration in PHP.

On submitting the registration form fields, it will invoke the signupValidation() JavaScript method. In this method, it validates with the non-empty check, email format, and the password match.

After validation, the PHP registration will take place with the posted form data. 

user-registration-form.php

<HTML> <HEAD> <TITLE>Registration</TITLE> <link href="./assets/css/phppot-style.css" type="text/css" rel="stylesheet" /> <link href="./assets/css/user-registration.css" type="text/css" rel="stylesheet" /> </HEAD> <BODY> <div class="phppot-container"> <div class="sign-up-container"> <div class="login-signup"> <a href="login-form.php">Login</a> </div> <div class=""> <form name="sign-up" action="" method="post" onsubmit="return signupValidation()"> <div class="signup-heading">Registration</div> <?php if(!empty($registrationResponse["status"])) { ?> <?php if($registrationResponse["status"] == "error") { ?> <div class="server-response error-msg"><?php echo $registrationResponse["message"]; ?></div> <?php } else if($registrationResponse["status"] == "success") { ?> <div class="server-response success-msg"><?php echo $registrationResponse["message"]; ?></div> <?php } ?> <?php } ?> <div class="error-msg" id="error-msg"></div> <div class="row"> <div class="inline-block"> <div class="form-label"> Username<span class="required error" id="username-info"></span> </div> <input class="input-box-330" type="text" name="username" id="username"> </div> </div> <div class="row"> <div class="inline-block"> <div class="form-label"> Email<span class="required error" id="email-info"></span> </div> <input class="input-box-330" type="email" name="email" id="email"> </div> </div> <div class="row"> <div class="inline-block"> <div class="form-label"> Password<span class="required error" id="signup-password-info"></span> </div> <input class="input-box-330" type="password" name="signup-password" id="signup-password"> </div> </div> <div class="row"> <div class="inline-block"> <div class="form-label"> Confirm Password<span class="required error" id="confirm-password-info"></span> </div> <input class="input-box-330" type="password" name="confirm-password" id="confirm-password"> </div> </div> <div class="row"> <input class="sign-up-btn" type="submit" name="signup-btn" id="signup-btn" value="Sign up"> </div> </form> </div> </div> </div> </BODY> </HTML> 

Landing page loads login registration forms

index.php

<?php use Phppot\Member; session_start(); ?> <HTML> <HEAD> <TITLE>user-registration</TITLE> <link href="./assets/css/phppot-style.css" type="text/css" rel="stylesheet" /> <link href="./assets/css/user-registration.css" type="text/css" rel="stylesheet" /> <script src="./vendor/jquery/jquery-3.3.1.js" type="text/javascript"></script> </HEAD> <BODY> <div class="phppot-container"> <?php require_once "login-form.php";?> </div> </BODY> </HTML> 

And the below CSS is for presenting this example of user registration in PHP.

user-registration.css

.sign-up-container { border: 1px solid; border-color: #9a9a9a; background: #fff; border-radius: 4px; padding: 10px; width: 350px; margin: 50px auto; } .page-header { float: right; } .login-signup { margin: 10px; text-decoration: none; float: right; } .login-signup a { text-decoration: none; color: #000; font-weight: 700; } .signup-heading { font-size: 2em; font-weight: bold; padding-top: 60px; text-align: center; } .inline-block { display: inline-block; } .row { margin: 15px 0px; text-align: center; } .form-label { margin-bottom: 5px; text-align: left; } input.input-box-330 { width: 250px; } .sign-up-container .error { color: #ee0000; padding: 0px; background: none; border: #ee0000; } .sign-up-container .error-field { border: 1px solid #d96557; } .sign-up-container .error:before { content: '*'; padding: 0 3px; color: #D8000C; } .error-msg { padding-top: 10px; color: #D8000C; text-align: center; } .success-msg { padding-top: 10px; color: #23a600; text-align: center; } input.sign-up-btn { background-color: #ffb932; border-color: #ffc87a #e2a348 #da9d0a; text-align: center; cursor: pointer; color: #000; width: 250px } .signup-align { margin: 0 auto; } .page-content { font-weight: bold; padding-top: 60px; text-align: center; } 

Registration and login form validation

In this section, we are going to see the code created in JavaScript for form validation.

There are two methods for validating the form fields before sending the data to the PHP code.

On invalid data submission, the code will return a boolean false. It forces the user to enter the required fields by highlighting them.

login-form.php (JavaScript)

function loginValidation() { var valid = true; $("#username").removeClass("error-field"); $("#password").removeClass("error-field"); var UserName = $("#username").val(); var Password = $('#signup-password').val(); $("#username-info").html("").hide(); $("#email-info").html("").hide(); if (UserName.trim() == "") { $("#username-info").html("required.").css("color", "#ee0000").show(); $("#username").addClass("error-field"); valid = false; } if (Password.trim() == "") { $("#signup-password-info").html("required.").css("color", "#ee0000").show(); $("#signup-password").addClass("error-field"); valid = false; } if (valid == false) { $('.error-field').first().focus(); valid = false; } return valid; } 

user-registration-form.php (JavaScript)

function signupValidation() { var valid = true; $("#username").removeClass("error-field"); $("#email").removeClass("error-field"); $("#password").removeClass("error-field"); $("#confirm-password").removeClass("error-field"); var UserName = $("#username").val(); var email = $("#email").val(); var Password = $('#signup-password').val(); var ConfirmPassword = $('#confirm-password').val(); var emailRegex = /^[a-zA-Z0-9.!#$%&'*+/=?^_`{|}~-]+@[a-zA-Z0-9](?:[a-zA-Z0-9-]{0,61}[a-zA-Z0-9])?(?:\.[a-zA-Z0-9](?:[a-zA-Z0-9-]{0,61}[a-zA-Z0-9])?)*$/; $("#username-info").html("").hide(); $("#email-info").html("").hide(); if (UserName.trim() == "") { $("#username-info").html("required.").css("color", "#ee0000").show(); $("#username").addClass("error-field"); valid = false; } if (email == "") { $("#email-info").html("required").css("color", "#ee0000").show(); $("#email").addClass("error-field"); valid = false; } else if (email.trim() == "") { $("#email-info").html("Invalid email address.").css("color", "#ee0000").show(); $("#email").addClass("error-field"); valid = false; } else if (!emailRegex.test(email)) { $("#email-info").html("Invalid email address.").css("color", "#ee0000") .show(); $("#email").addClass("error-field"); valid = false; } if (Password.trim() == "") { $("#signup-password-info").html("required.").css("color", "#ee0000").show(); $("#signup-password").addClass("error-field"); valid = false; } if (ConfirmPassword.trim() == "") { $("#confirm-password-info").html("required.").css("color", "#ee0000").show(); $("#confirm-password").addClass("error-field"); valid = false; } if(Password != ConfirmPassword){ $("#error-msg").html("Both passwords must be same.").show(); valid=false; } if (valid == false) { $('.error-field').first().focus(); valid = false; } return valid; } 

Process user registration in PHP

After submitting the form details, it processes user registration in the PHP code.

This code uses default form submit to post data to the PHP. If you want the user registration code with AJAX, then we have to prevent the default submit with a script.

I have added this code at the beginning of the user-registration-form.php. It checks if the user submitted the form. Then, it invokes the registerMember() method defined in the Member model.

login-form.php (PHP code)

<?php use Phppot\Member; if (! empty($_POST["signup-btn"])) { require_once './Model/Member.php'; $member = new Member(); $registrationResponse = $member->registerMember(); } ?> 

I have shown the Member model class code below. It contains all the functions related to this user registration and login example.

In the registerMember() function, it checks if the posted email already exists. If so, it truncates the registration flow and returns the error. Otherwise, it creates the Insert query to add the member record into the MySQL database.

The loginMember() function checks if there is any match for the entered login details. If the match found, it clears the authentication and allows the user to access the dashboard.

Model/Member.php

<?php namespace Phppot; class Member { private $ds; function __construct() { require_once __DIR__ . './../lib/DataSource.php'; $this->ds = new DataSource(); } public function isMemberExists($email) { $query = 'SELECT * FROM tbl_member where email = ?'; $paramType = 's'; $paramValue = array( $email ); $insertRecord = $this->ds->select($query, $paramType, $paramValue); $count = 0; if (is_array($insertRecord)) { $count = count($insertRecord); } return $count; } public function registerMember() { $result = $this->isMemberExists($_POST["email"]); if ($result < 1) { if (! empty($_POST["signup-password"])) { $hashedPassword = password_hash($_POST["signup-password"], PASSWORD_DEFAULT); } $query = 'INSERT INTO tbl_member (username, password, email) VALUES (?, ?, ?)'; $paramType = 'sss'; $paramValue = array( $_POST["username"], $hashedPassword, $_POST["email"] ); $memberId = $this->ds->insert($query, $paramType, $paramValue); if(!empty($memberId)) { $response = array("status" => "success", "message" => "You have registered successfully."); } } else if ($result == 1) { $response = array("status" => "error", "message" => "Email already exists."); } return $response; } public function getMember($username) { $query = 'SELECT * FROM tbl_member where username = ?'; $paramType = 's'; $paramValue = array( $username ); $loginUser = $this->ds->select($query, $paramType, $paramValue); return $loginUser; } public function loginMember() { $loginUserResult = $this->getMember($_POST["username"]); if (! empty($_POST["signup-password"])) { $password = $_POST["signup-password"]; } $hashedPassword = $loginUserResult[0]["password"]; $loginPassword = 0; if (password_verify($password, $hashedPassword)) { $loginPassword = 1; } if ($loginPassword == 1) { $_SESSION["username"] = $loginUserResult[0]["username"]; $url = "./home.php"; header("Location: $url"); } else if ($loginPassword == 0) { $loginStatus = "Invalid username or password."; return $loginStatus; } } } 

PHP login authentication code

Below PHP code is for invoking the authentication function after login. It is in the login-form.php file above the HTML code.

user-registration-form.php (PHP Code)

<?php if (! empty($_POST["login-btn"])) { require_once './Model/Member.php'; $member = new Member(); $loginResult = $member->loginMember(); } ?> 

User dashboard

This is the user dashboard HTML code. It shows a welcome message with the logged-in member name. It also has an option to logout from the current session.

home.php

<?php session_start(); $username = $_SESSION["username"]; ?> <HTML> <HEAD> <TITLE>Welcome</TITLE> <link href="./assets/css/phppot-style.css" type="text/css" rel="stylesheet" /> <link href="./assets/css/user-registration.css" type="text/css" rel="stylesheet" /> </HEAD> <BODY> <div class="phppot-container"> <div class="page-header"> <span class="login-signup"><a href="login-form.php">Logout</a></span> </div> <div class="page-content">Welcome <?php echo $username;?></div> </div> </BODY> </HTML> 

DataSource.php

<?php /** * Copyright (C) 2019 Phppot * * Distributed under MIT license with an exception that, * you don’t have to include the full MIT License in your code. * In essense, you can use it on commercial software, modify and distribute free. * Though not mandatory, you are requested to attribute this URL in your code or website. */ namespace Phppot; /** * Generic datasource class for handling DB operations. * Uses MySqli and PreparedStatements. * * @version 2.5 - recordCount function added */ class DataSource { // PHP 7.1.0 visibility modifiers are allowed for class constants. // when using above 7.1.0, declare the below constants as private const HOST = 'localhost'; const USERNAME = 'root'; const PASSWORD = 'test'; const DATABASENAME = 'user-registration'; private $conn; /** * PHP implicitly takes care of cleanup for default connection types. * So no need to worry about closing the connection. * * Singletons not required in PHP as there is no * concept of shared memory. * Every object lives only for a request. * * Keeping things simple and that works! */ function __construct() { $this->conn = $this->getConnection(); } /** * If connection object is needed use this method and get access to it. * Otherwise, use the below methods for insert / update / etc. * * @return \mysqli */ public function getConnection() { $conn = new \mysqli(self::HOST, self::USERNAME, self::PASSWORD, self::DATABASENAME); if (mysqli_connect_errno()) { trigger_error("Problem with connecting to database."); } $conn->set_charset("utf8"); return $conn; } /** * To get database results * * @param string $query * @param string $paramType * @param array $paramArray * @return array */ public function select($query, $paramType = "", $paramArray = array()) { $stmt = $this->conn->prepare($query); if (! empty($paramType) && ! empty($paramArray)) { $this->bindQueryParams($stmt, $paramType, $paramArray); } $stmt->execute(); $result = $stmt->get_result(); if ($result->num_rows > 0) { while ($row = $result->fetch_assoc()) { $resultset[] = $row; } } if (! empty($resultset)) { return $resultset; } } /** * To insert * * @param string $query * @param string $paramType * @param array $paramArray * @return int */ public function insert($query, $paramType, $paramArray) { $stmt = $this->conn->prepare($query); $this->bindQueryParams($stmt, $paramType, $paramArray); $stmt->execute(); $insertId = $stmt->insert_id; return $insertId; } /** * To execute query * * @param string $query * @param string $paramType * @param array $paramArray */ public function execute($query, $paramType = "", $paramArray = array()) { $stmt = $this->conn->prepare($query); if (! empty($paramType) && ! empty($paramArray)) { $this->bindQueryParams($stmt, $paramType, $paramArray); } $stmt->execute(); } /** * 1. * Prepares parameter binding * 2. Bind prameters to the sql statement * * @param string $stmt * @param string $paramType * @param array $paramArray */ public function bindQueryParams($stmt, $paramType, $paramArray = array()) { $paramValueReference[] = & $paramType; for ($i = 0; $i < count($paramArray); $i ++) { $paramValueReference[] = & $paramArray[$i]; } call_user_func_array(array( $stmt, 'bind_param' ), $paramValueReference); } /** * To get database results * * @param string $query * @param string $paramType * @param array $paramArray * @return array */ public function getRecordCount($query, $paramType = "", $paramArray = array()) { $stmt = $this->conn->prepare($query); if (! empty($paramType) && ! empty($paramArray)) { $this->bindQueryParams($stmt, $paramType, $paramArray); } $stmt->execute(); $stmt->store_result(); $recordCount = $stmt->num_rows; return $recordCount; } } 

MySQL database script

Below SQL script shows the MySQL database table’s create statement. It also has the specification for the key and indexes.

User registration MySQL schema

Import this script into your PHP development root to execute this example.

sql/user-registration.sql

-- -- Database: `user-registration` -- -- -------------------------------------------------------- -- -- Table structure for table `tbl_member` -- CREATE TABLE `tbl_member` ( `id` int(11) NOT NULL, `username` varchar(255) NOT NULL, `password` varchar(200) NOT NULL, `email` varchar(255) NOT NULL, `create_at` timestamp NOT NULL DEFAULT CURRENT_TIMESTAMP ON UPDATE CURRENT_TIMESTAMP ) ENGINE=InnoDB DEFAULT CHARSET=latin1; -- -- Indexes for dumped tables -- -- -- Indexes for table `tbl_member` -- ALTER TABLE `tbl_member` ADD PRIMARY KEY (`id`); -- -- AUTO_INCREMENT for dumped tables -- -- -- AUTO_INCREMENT for table `tbl_member` -- ALTER TABLE `tbl_member` MODIFY `id` int(11) NOT NULL AUTO_INCREMENT; 

Screenshot of user registration and login form

Login form with validation response:

User Login Form Output

User registration form server-side validation response:

Screenshot User Registration in-php PHP

Download

↑ Back to Top