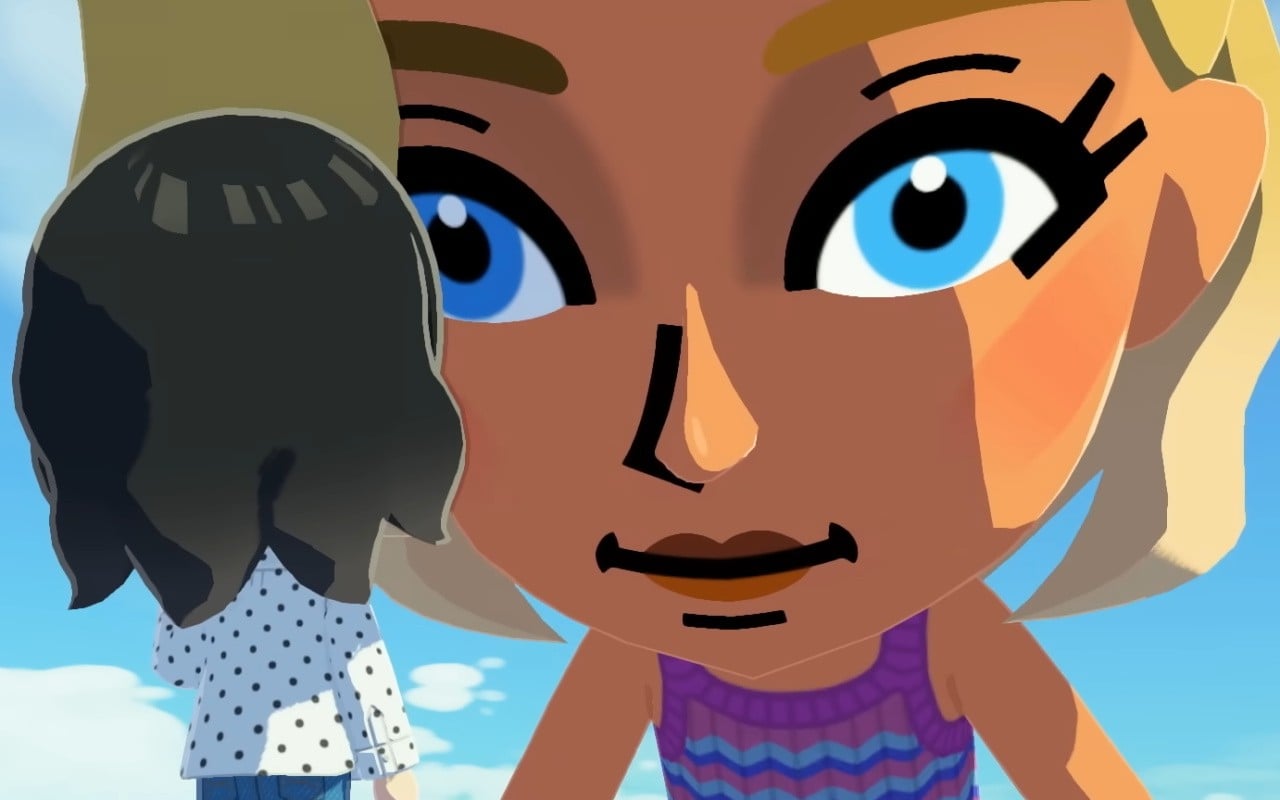
Although Nintendo’s focus is slowly shifting from the Switch, it’s still got some first-party titles planned for the original hybrid system. One of these games happens to be Tomodachi Life: Living the Dream, and it’s out next month.
Ahead of this launch, we’ve now got an official ESRB rating. Unsurprisingly, it’s been rated ‘E’ for “Everyone” (the same as the 3DS release) and contains “comic mischief” and “mild fantasy violence”. Apart from this, there’s also a rating summary, which gives us a little more insight into what to expect from this new experience.
Apart from the ability to create and customise Mii, and construct shops and landmarks, you’ll also be able to participate in minigames and turn-based combat against. This particular mention of fighting slimes mixed with “fantasy” themes already has some fans convinced an RPG-style experience (drawing on Tomodachi Quest, Miitopia, or at least something similar) is returning. There’s some toilet humour in there, too.
“Tomodachi Life: Living the Dream is rated E for Everyone by the ESRB with Comic Mischief and Mild Fantasy Violence. This is a simulation game in which players create, customize, and help Mii characters live and thrive on an island. Players can construct shops and landmarks, build relationships with other Miis, and complete various minigames. Minimal acts of cartoony violence are occasionally seen: fight clouds of character fighting; turn-based combat against a slime enemy. The game includes brief instances of bathroom humor: Miis emitting flatulence, accompanied by a cloud effect; a character near a toilet stating, “Ugh! I forgot to think before I sniff.”
So, now that we’ve got this rating it seems Tomodachi Life: Living the Dream really is on track for its 16th April 2026. If you want to find out more about what else is in this new entry, check out our guide here on Nintendo Life detailing new features such as Mii and island customisation as well as the Palette House.
Will you be getting this game when it arrives on the Switch next month? Let us know in the comments.
Adobe has issued a statement agreeing to pay a hefty fine after years of customers complaining about a lack of transparency in its billing agreements — but it still doesn’t think it did anything wrong.
Adobe has announced that it has finalized a settlement agreement with the U.S. Department of Justice. It officially marks the end of the more than two-year long saga surrounding its much maligned cancellation practices.
Of the $150 million Adobe has agreed to pay, $75 million will go directly to affected customers in the form of complimentary services. The remaining $75 will go directly to the Department of Justice to settle the lawsuit.
While Adobe agreed to pay the fee, it hasn’t admitted any wrongdoing. In fact, the company says, “While we disagree with the government’s claims and deny any wrongdoing, we are pleased to resolve this matter.”
To be clear, Adobe isn’t fixing the abhorrent cancellation fees – it’s just now required to be significantly more transparent about them.
To understand why this shook out the way it did, you’ll need to understand how Adobe handles subscriptions. And, if you’ve never seen this before, I apologize ahead of time for how confusing it is.
Starving artists need not subscribe
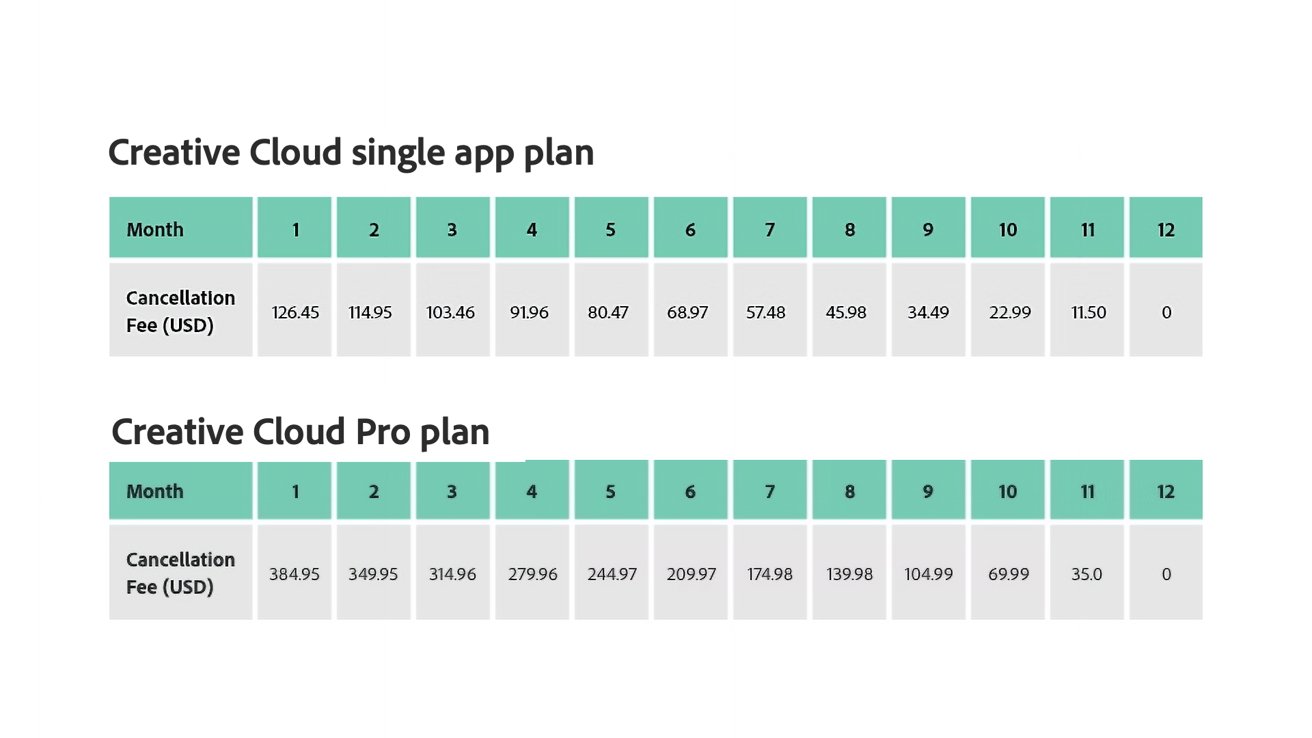
When a user subscribes to something Adobe offers, they’re given three options to pay: monthly; annual, paid monthly; or annual, paid upfront. Here’s what each of those options means.
None of the subscriptions, by the way, are terribly cheap. If you’re an independent artist who needs Adobe products, that can account for a large portion of your monthly overhead.
Monthly subscription: The most expensive option, Adobe’s monthly subscriptions are often twice the cost of the other subscription options. However, if a user needs to cancel the subscription, Adobe does not charge a fee.
Annual subscription, paid monthly: Typically half the price of the standard monthly subscription, Adobe allows users to subscribe at the yearly price while still paying monthly. The downside is that Adobe will charge 50% of the remaining contract if canceled.
Annual subscription, paid upfront: Users may also choose to pay upfront for a full year of service. While this has advantages, such as preventing surprise billing, Adobe warns users that there are absolutely no refunds on this plan after the first 14 days.
Image credit: Adobe
The outcry came when Adobe hid its cancellation terms and conditions in the fine print. This meant that anyone who suddenly couldn’t justify — or afford — paying $69.99 per month for the all apps plan could be hit with up to a $384.95 cancellation fee if they cancelled between day 15 and day 30 of the first month.
Even if a user cancelled in the seventh month, they’d still be forced to pay nearly $175. Which, again, for many individual users isn’t just inconvenient — they might not be able to afford it at all.
So, the high cancellation fees remain, but Adobe at least now discloses them a bit more clearly.
Interestingly enough, if you poke around the Adobe site, you’ll find that this cancellation fee varies from location to location. South Korean users only pay 10 percent of the annual commitment as a cancellation fee.
Adobe subscribers in Brazil only pay 20% if they choose to terminate the contract early.
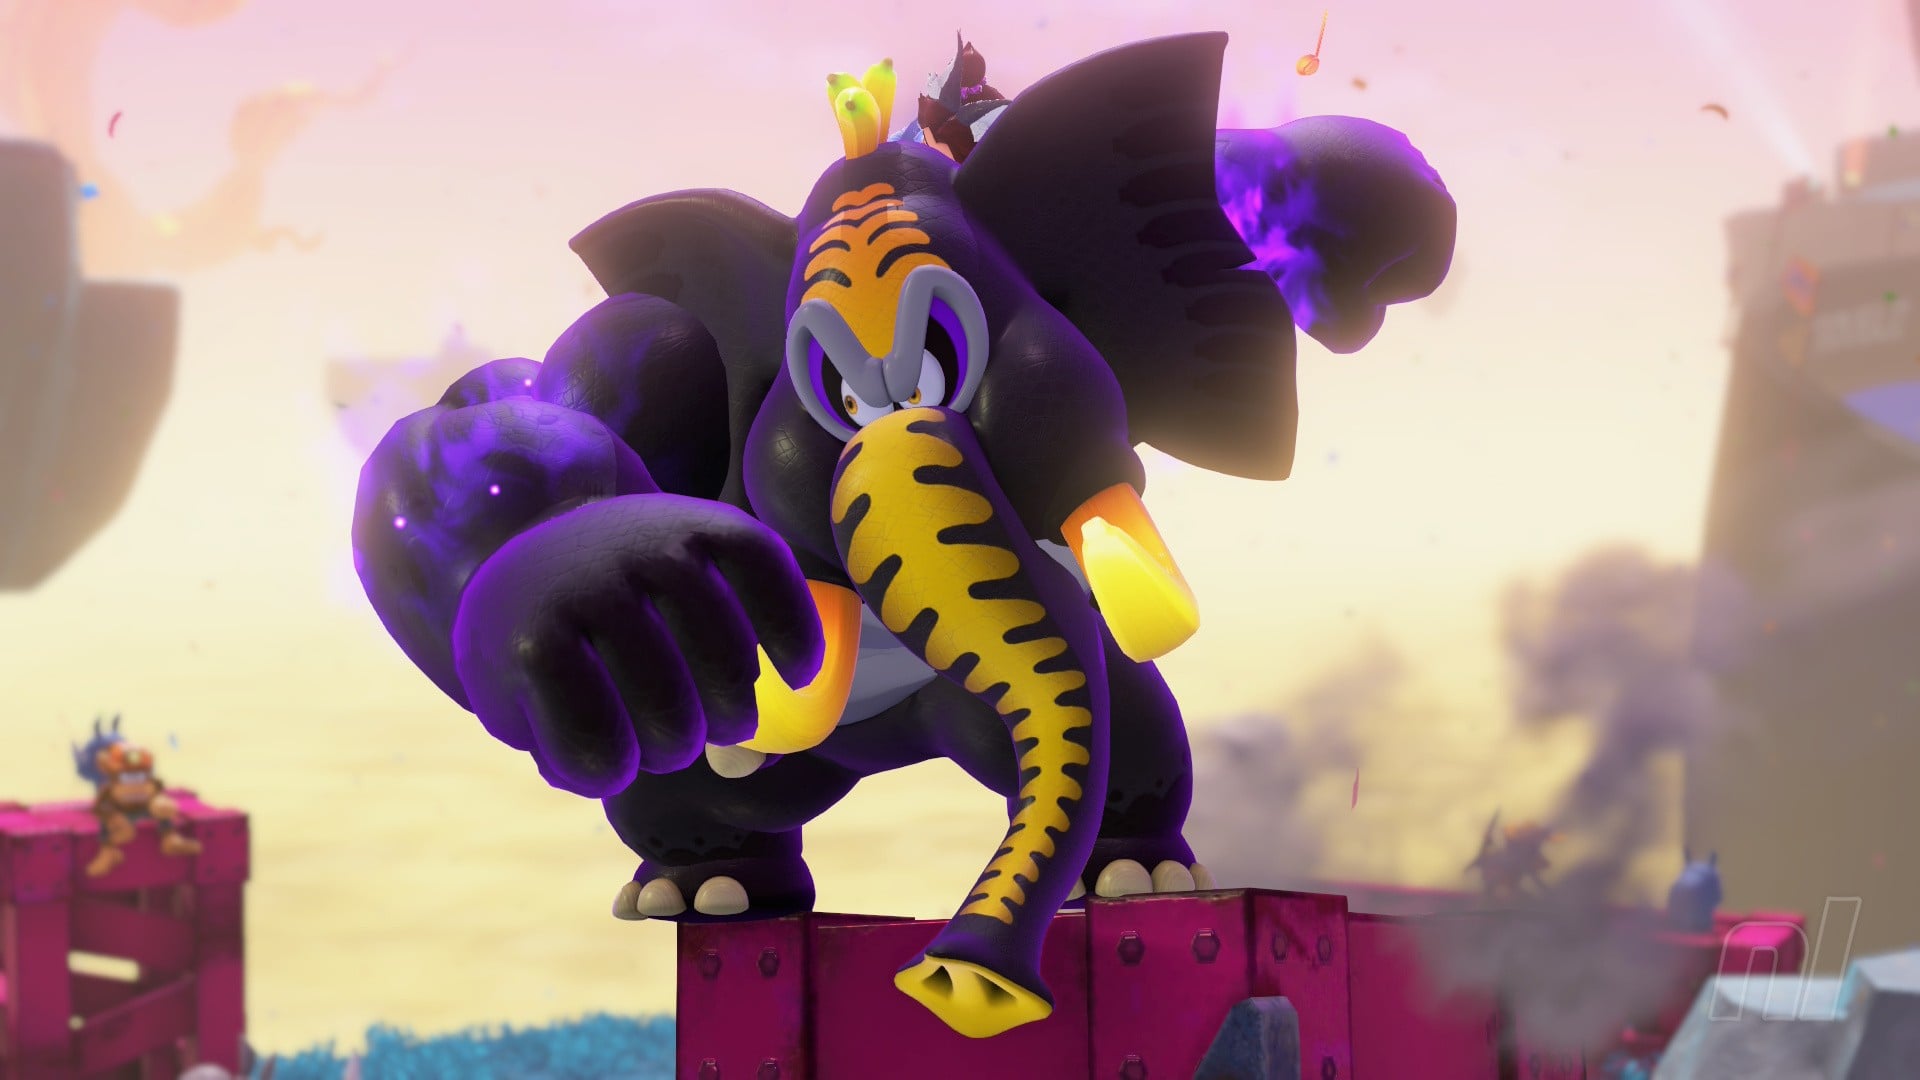
We all had a great time with Donkey Kong Bananza last year, didn’t we? The 3D platformer marked a great return for Nintendo’s great ape, and the developers haven’t been shy about the work that went into it — we got a three-part Ask the Developer interview on it shortly after launch, let’s not forget — but that doesn’t mean that the Odyssey team doesn’t still have a story or two to tell.
In a new interview with Game Informer, producer Kenta Motokura and programmer Tatsuya Kurihara did just that. While the pair reiterated tales about the game’s Switch 1 origins and its fancy voxel tech, they also confessed that the destructive power of one Bananza transformation in particular is perhaps a little bit overpowered.
“I think we can agree the most destructive transformation is the Elephant Bananza, and honestly speaking, it probably went too far,” Kurihara told GI, “But at the same time, it’s fun, it feels good. And that’s what matters most.”
That balance between overpowered and fun to play sums the Elephant Bananza up nicely, we’d say. As anyone who has sampled its inhaling powers will know, this transformation is a complete game-changer when it comes to destruction — something particularly important in the post-credits game — and arguably makes digging up chunks of rock a little too easy as a consequence.
That said, it is undeniably fun (and has a banging theme tune to boot). “Our goal is to make playful destruction possible within the game,” Motokura added, explaining that this is why DK has his transformation tools in his arsenal at all times, compared to something like a traditional Mario format, “where you have to encounter or have in your possession items to be able to transform.”
And as for the elephant in the room, yes, the Bananza devs also noticed the animal’s back-to-back appearances in Wonder and Bananza, though it was apparently “a complete coincidence”. Motokura was never too worried about any gameplay overlap after seeing that the transformations were being used for very different purposes across both titles. “However, if they were vacuuming out blocks in Super Mario Bros. Wonder, I would have been a little bit worried,” he added.
Overpowered or not, we couldn’t deny how gosh-darn great DK and his Bananza transformations felt to play. “Whether it’s smashing through the scenery with a Bananza Transformation or carefully planning a route to a hidden Banandium Gem,” we said in our review, “you’ll have trouble finding more originality and, crucially, more enjoyment from a platformer in recent years.”
What’s your favourite Bananza transformation? Do you also think the Elephant is a bit OP in the destruction department? Let us know in the comments.
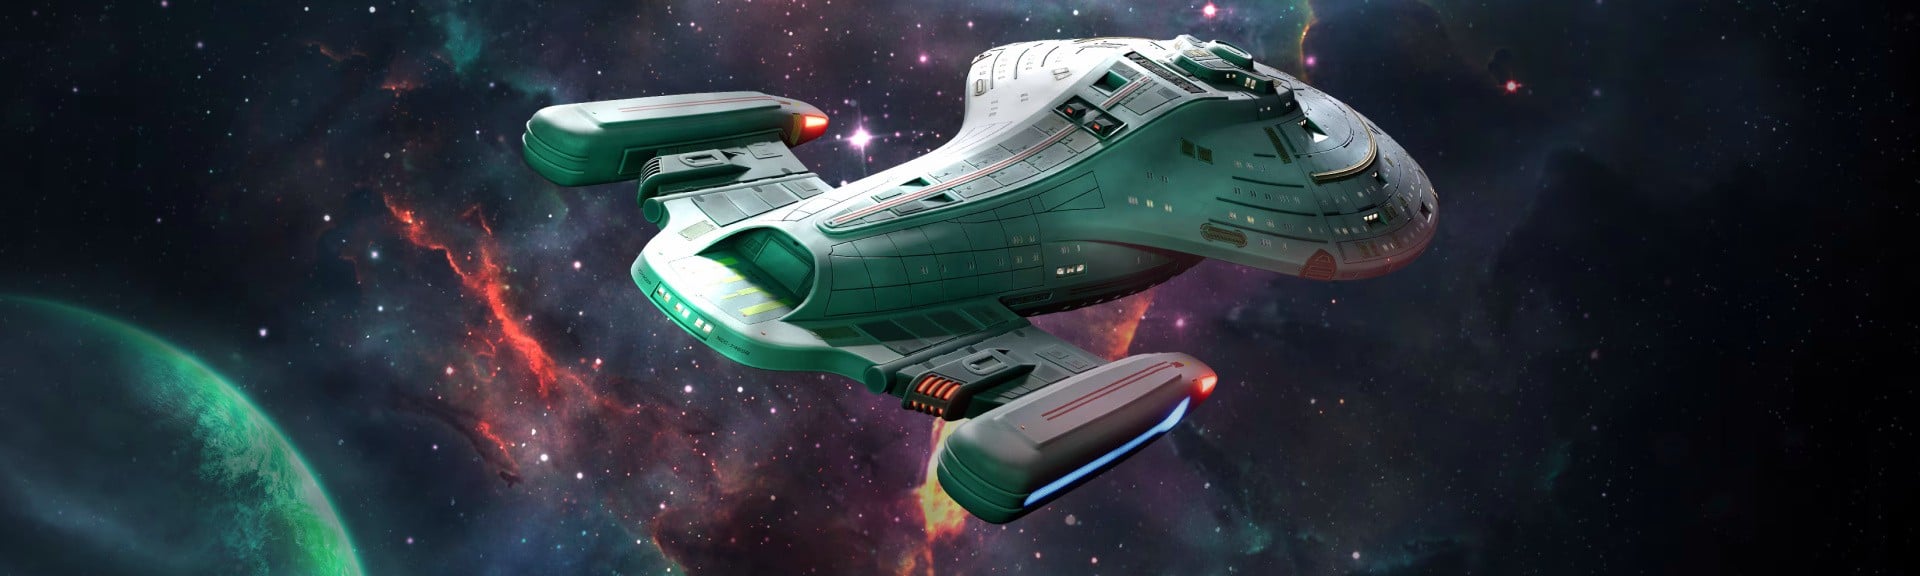
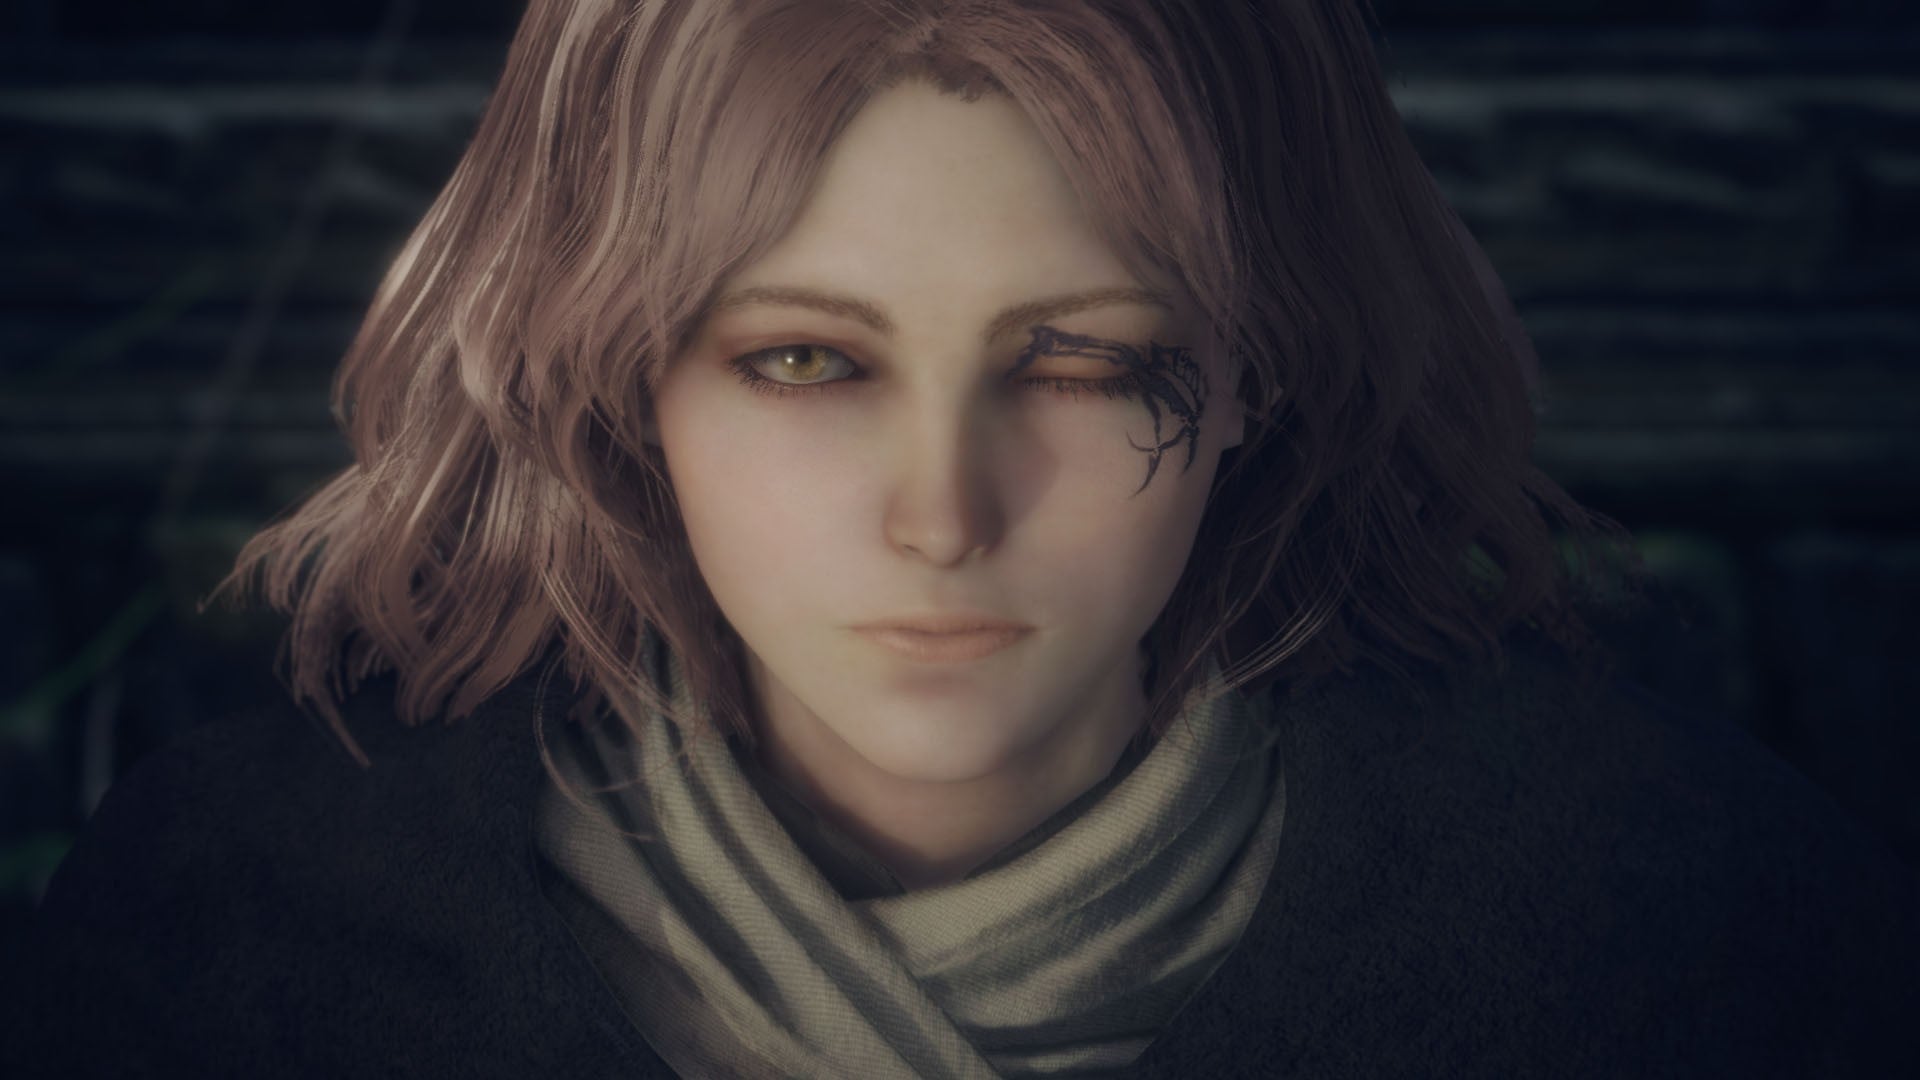
Following a handful of Star Trek games on Switch over the last few years, a couple of which have been rather good, Switch 2 now has its own entry in the Trek library courtesy of German devs GameXcite, and this is probably the best one yet – IF (big if) you’ve got the stones for a long, arduous journey.
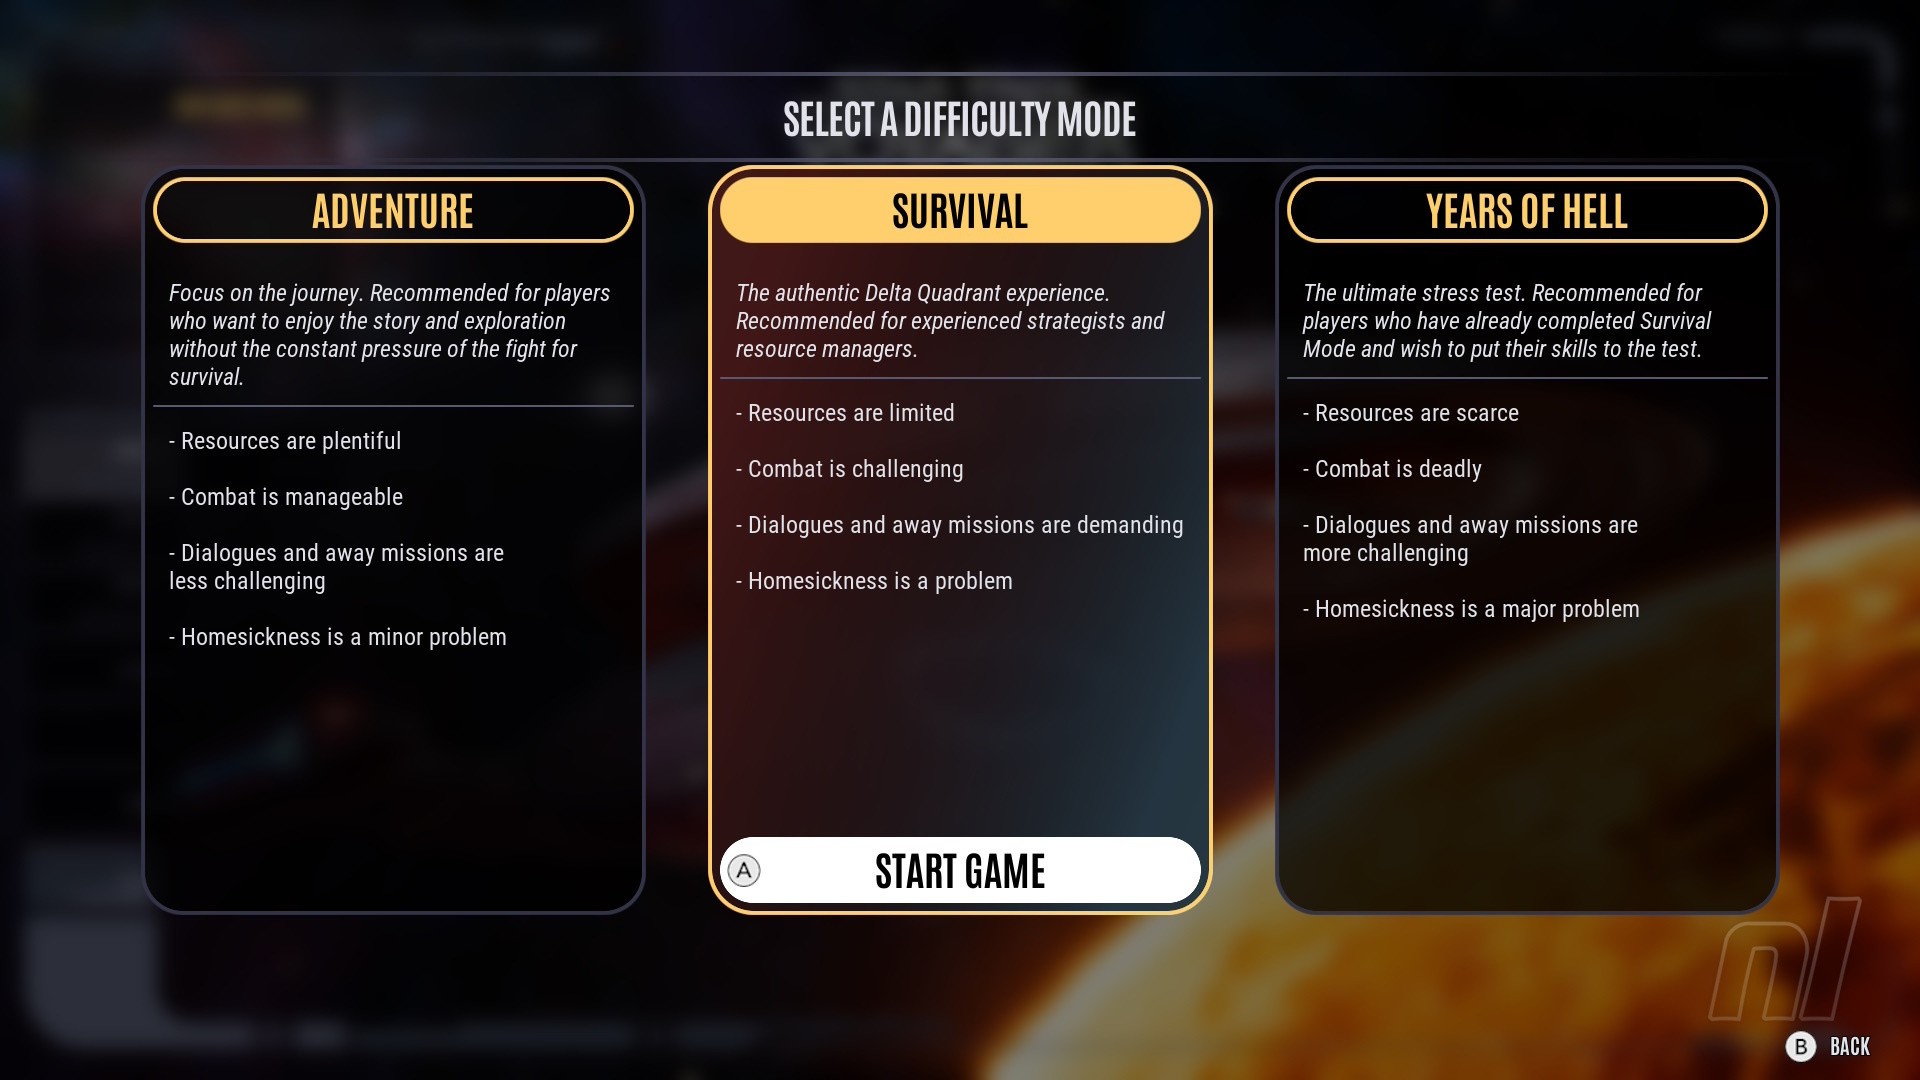
It’s worth emphasising up front that Star Trek: Voyager – Across The Unknown is punishing. If you want to explore strange new worlds stress-free, best warp on by; expect compromises, tough decisions, and permanent losses if you’re to get Janeway and co. back to the Alpha Quadrant. Even on the lowest difficulty, you will have to restart a sector or two.
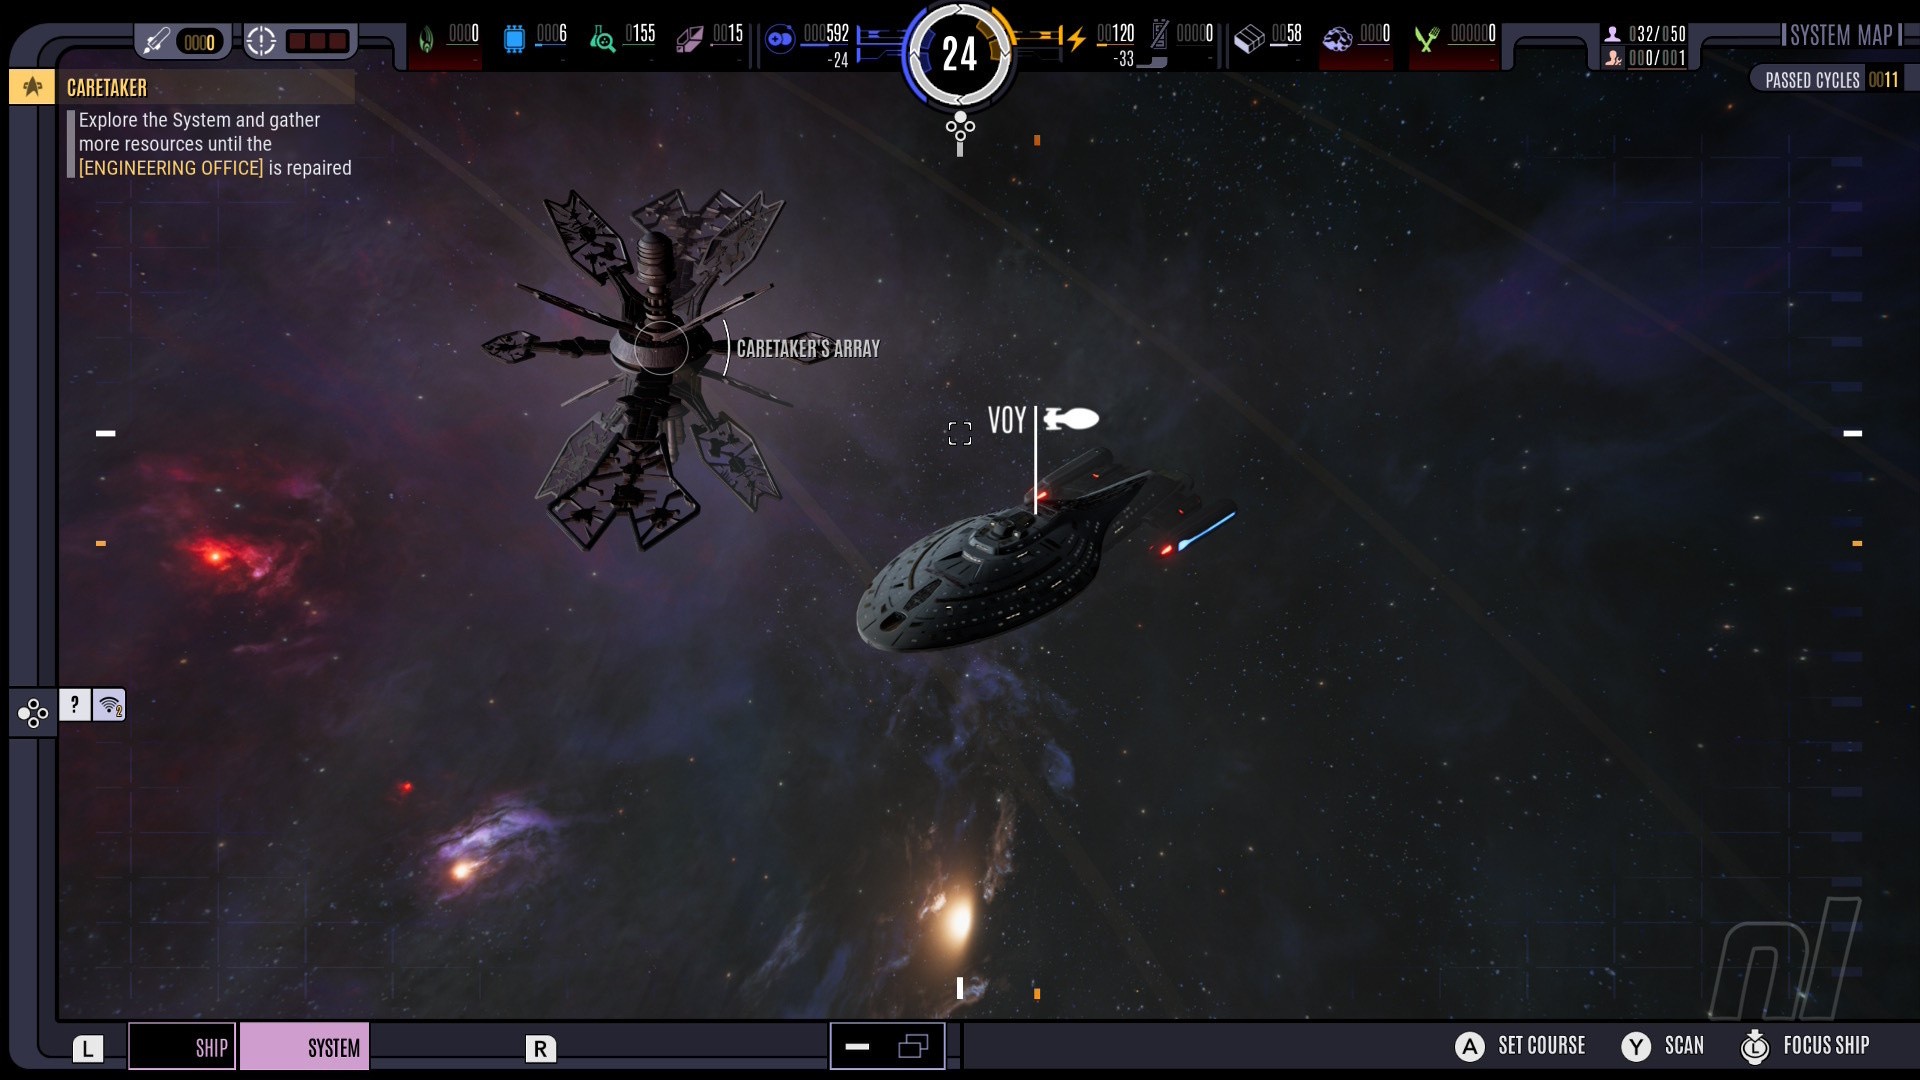
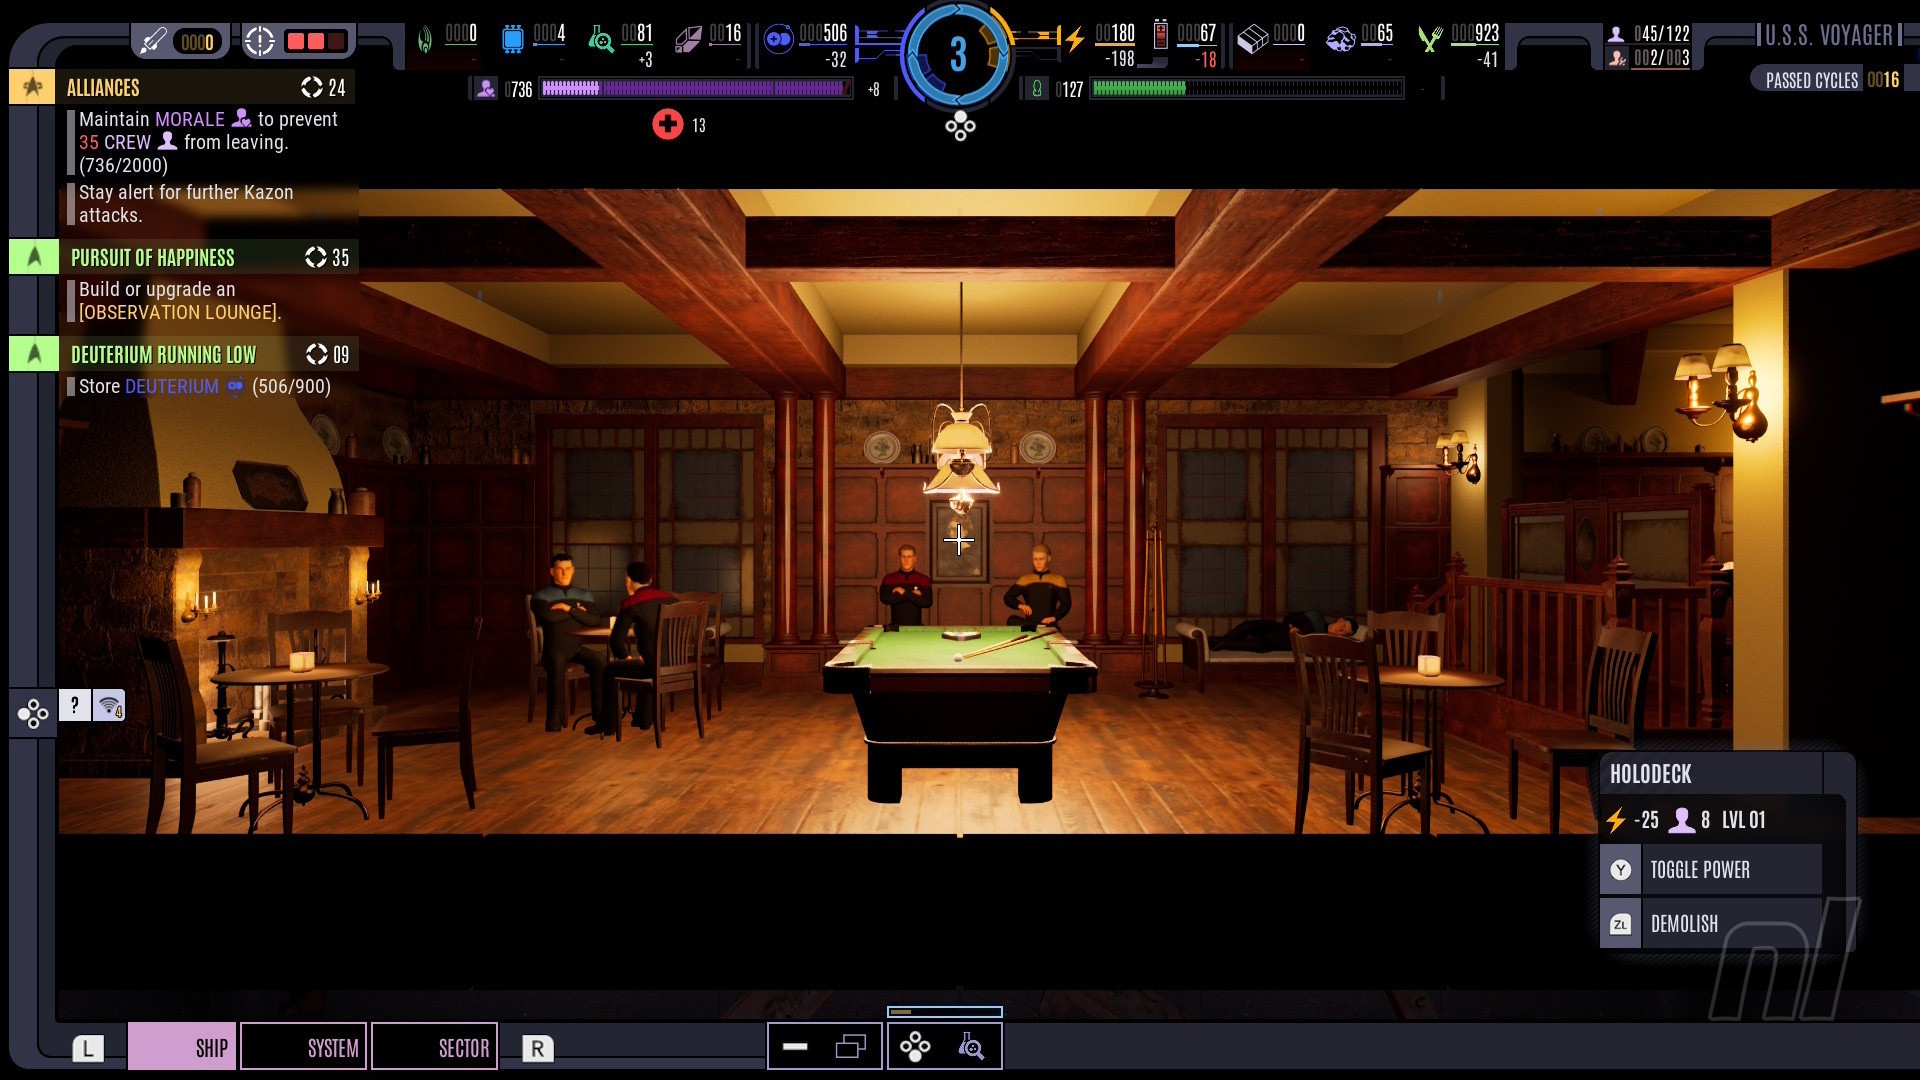
Survival strategy and resource management dovetail nicely with Voyager’s plight, though: a Starfleet ship yanked across the galaxy, systems destroyed, crew in disarray, making their way homeward, repairing, researching, improvising as they go. You travel through 12 sectors, each with a handful of systems containing planets and points of interest to scan and warp between, collecting Deuterium (warp drive and system fuel), Duranium and Tritanium (for construction and crafting), food (for…well, you get the idea), and other resources as you meet aliens and try to cut a potential 70-year trek down by hook or by crook.
Captured on Nintendo Switch 2 (Docked)
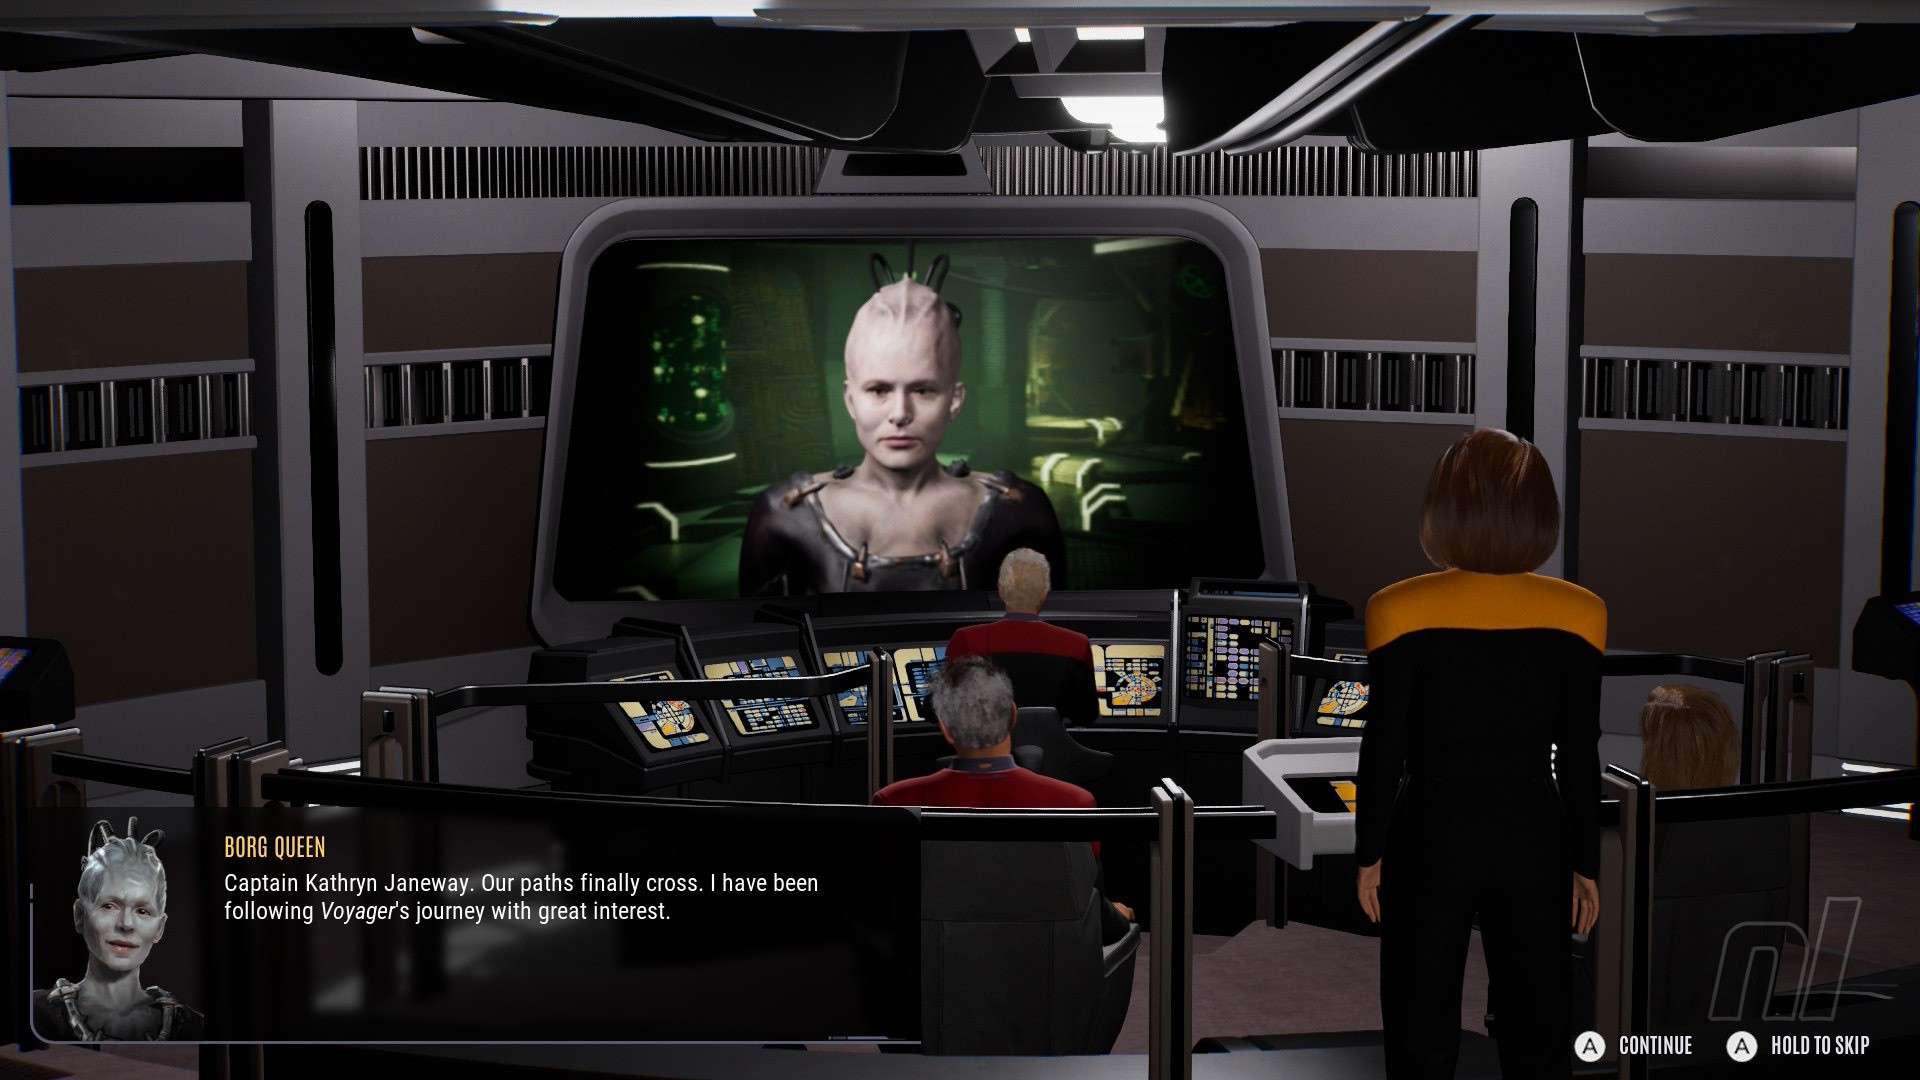
There are lingering Borg, Kazon, Vidiians, and assorted Delta Quadrant baddies to battle, ne’er-do-wells arriving at the perfect time to knock you down when you’re just about on your feet. The devs do a decent job with pacing and balancing, ratcheting up the tension with nebulas that prevent you from scanning POIs, ambushes at trading posts, and a plunging Morale stat exacerbated by food and facility shortages.
Gameplay-wise, Across the Unknown blends FTL-style ship and numbers management with a Fallout Shelter-style side-on view of Voyager’s decks. Senior officers and assorted ‘Heroes’ can be assigned to specific rooms, and you level them up on Away Missions. B’Elanna’s engineering nous cuts crafting time down in the Workshop, for instance, and she’s a dab hand with the warp core, naturally.
Once Life Support is restored on each deck, you clear debris to build new rooms dedicated to Engineering, Crew, Science, Combat, or (later) Borg-related operations. There’s a tech tree for each, with nodes unlocked via Science Points and Lab research tied to cycles. The whole game runs on cycles, with every action tied to a specific number, and you’ll need to ensure your crew isn’t idling when they could be doing something productive like repairing the hull. The more rooms you have, the more energy they draw, so in a wider sense, upgrading your warp core and improving efficiency is the name of the survival game.
Captured on Nintendo Switch 2 (Docked)
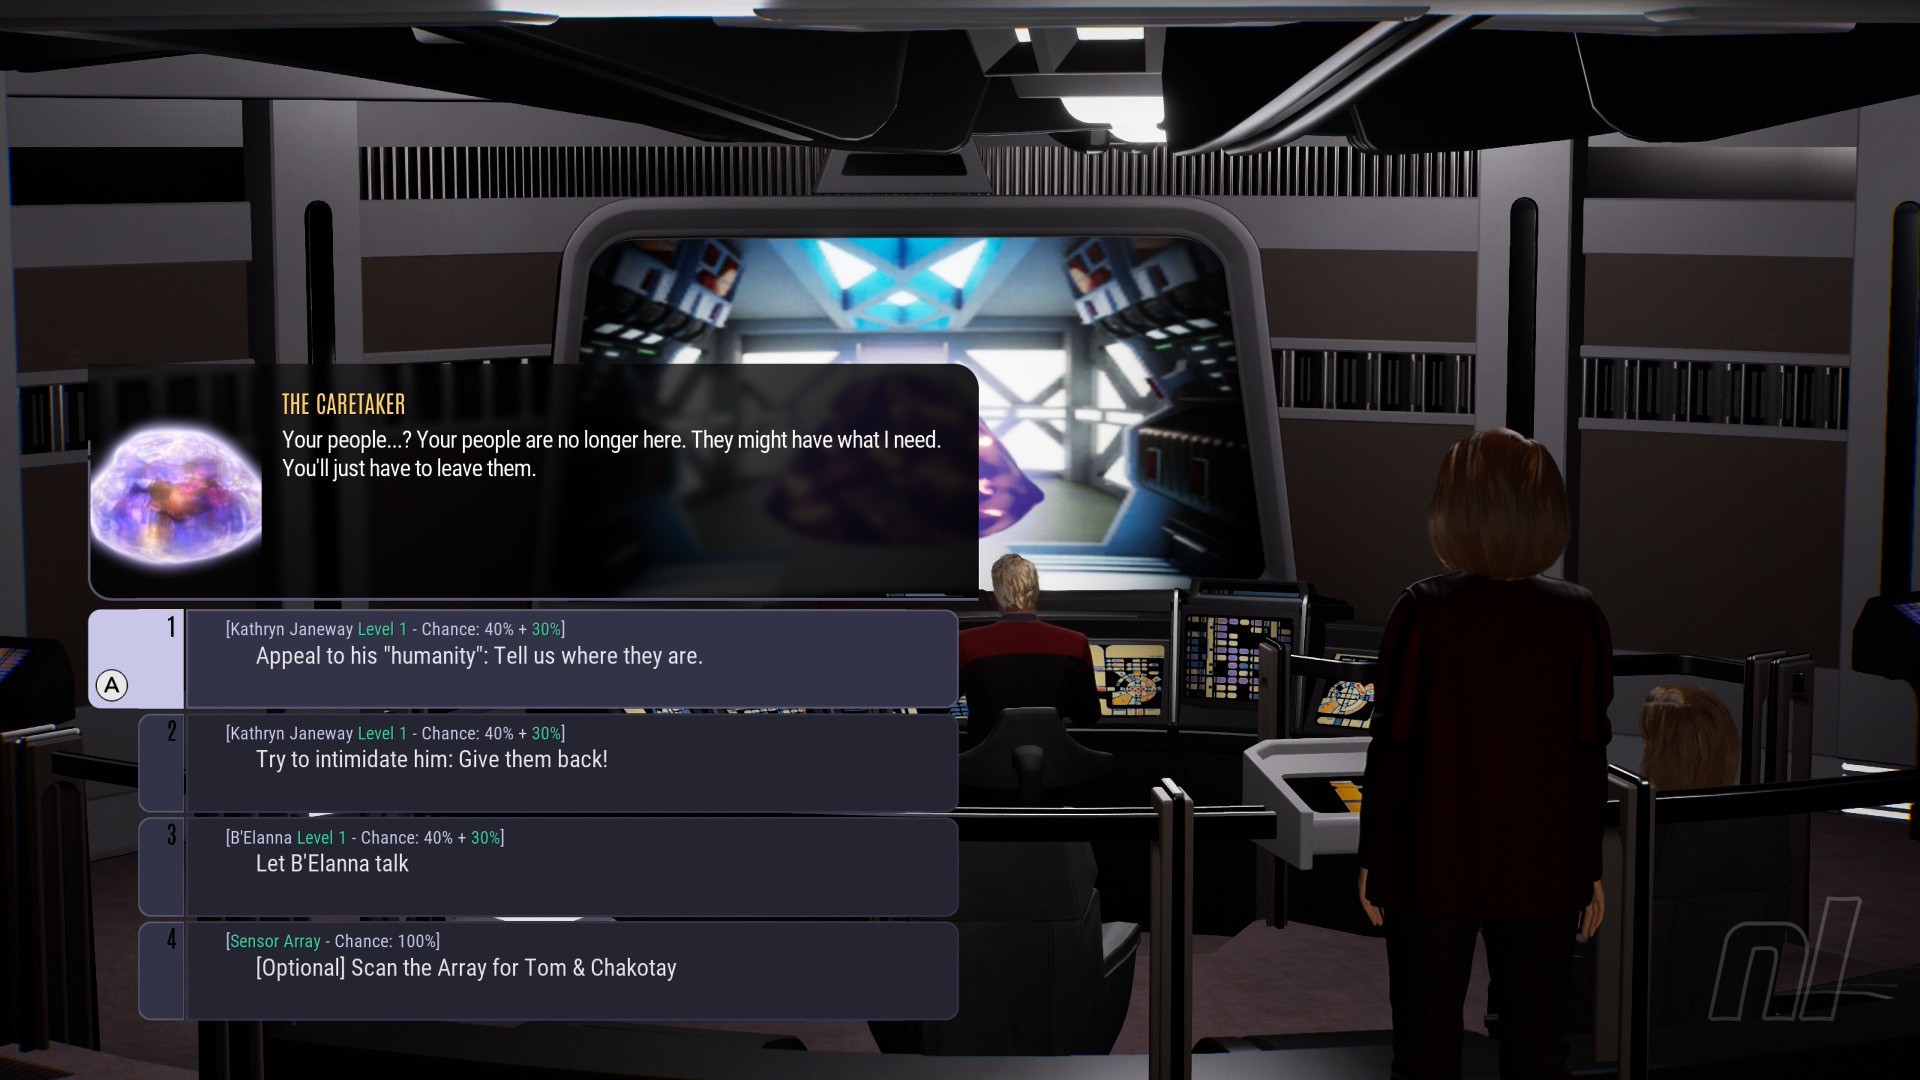
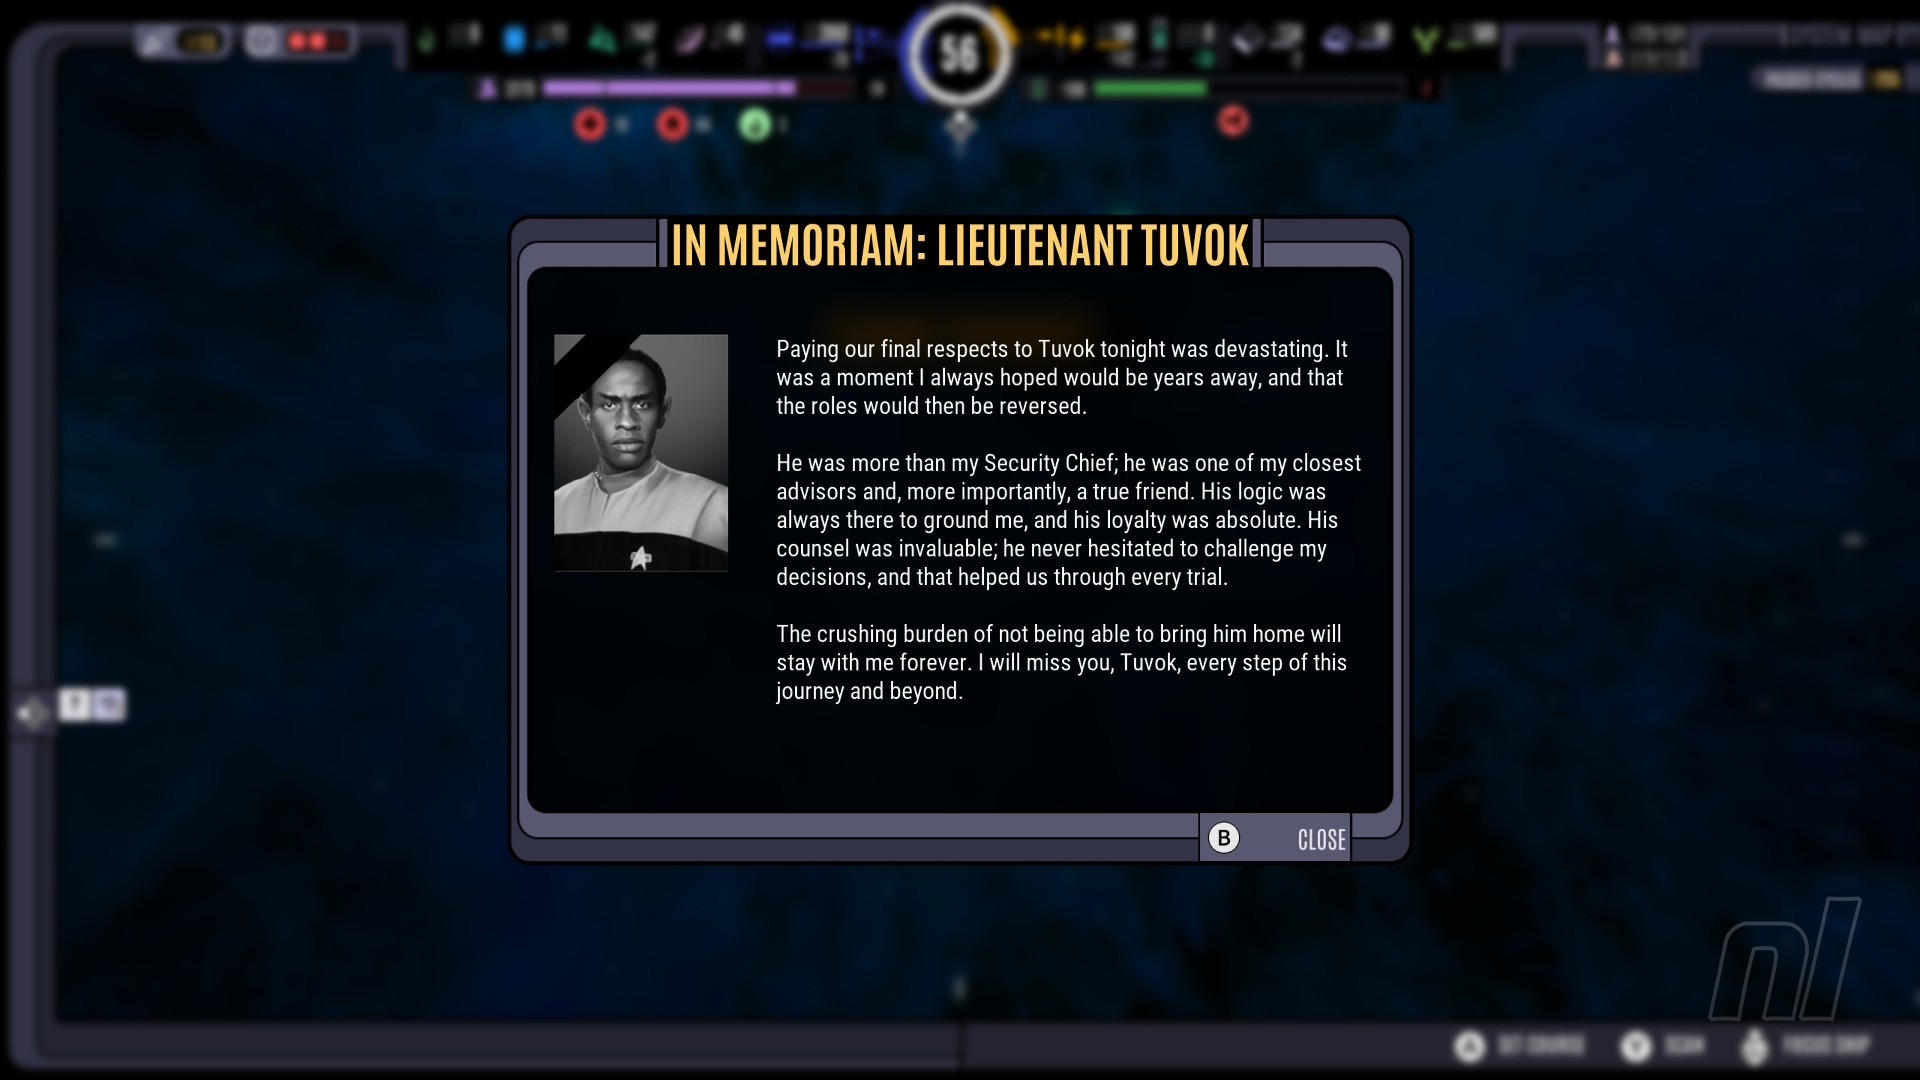
Story-wise, the framework follows the show’s seven seasons closely, although specific scenarios can diverge from their canon conclusions depending on your choices. Some events may never happen if you don’t meet the criteria or make a detour. When arriving at a certain M-class planet, Tuvok was busy on another assignment and not part of my active crew. So, Neelix beamed down alone, returned to the ship without incident, and we went on our merry way, the Tuvix mission ‘complete’ without any ethical debates whatsoever. Later on, I lost my Vulcan security chief (my most levelled-up away teamer) in a black hole fighting the Hirogen. You win some, you lose some — or lots — in this game.
I played on the default ‘Survival’ difficulty (‘Adventure’ is easier, ‘Years of Hell’ harder), but you’re locked in once you start one of the three available profiles. Death was frequent, although a fairly generous autosave stops things getting too grindy. You can autosave yourself into an impossible spot, though, in which case you can restart an entire sector.
And you will have to restart. A morale crisis in Sector 8 proved particularly tricky as I juggled the crew’s restlessness with the need to stock up on essentials; I had to prioritise defence over diversion.
Captured on Nintendo Switch 2 (Docked)
Another time, having prevailed in an epic confrontation with the Borg, I was left with a damaged deflector dish and a hull stat so low I could barely move. I managed to limp across the system, juggling repair teams between the hull and a dozen damaged rooms, my structural integrity stat creeping up +1 per cycle until I could finally reengage the deflector and make it to a Deuterium deposit without blowing up. Restocked, I spent a couple of dozen cycles putting out fires before gingerly pressing on.
Combat presents its own challenges, including positioning the ship via orders that dictate Voyager’s movements and target. Aft shields down, Captain! Click on the radial option and Tom Paris will turn the ship, moving the vulnerable stern out of enemy range. Strategically targeting your opponent’s individual systems is key, and you can also hire allied ships to assist with skirmishes.
Up to three Hero officers bring specific skills with cooldowns, too, with system power balanced via a bar arrangement on the bottom left. Oh, and once you’ve crafted them, you’ll have a complement of precious photon torpedoes to fire manually with ‘ZL’. It’s satisfying to pop them off, but you’ll need to wait until enemy shields are down for maximum effectiveness.
Captured on Nintendo Switch 2 (Docked)
Ship-to-ship battles are enjoyable once you’ve worked it all out. The tutorial is fairly comprehensive, although it wasn’t until two-thirds through the game that I discovered, through sheer desperation at my predicament (hull disintegrating, torpedoes depleted, my phaser-firing Mr. Tuvok lost in the void), that fleeing or even surrender can be a viable option. I assumed I would lose my entire crew or something comparably calamitous, but many opponents are scavengers and often satisfied with some Deuterium. Surrender isn’t heroic, but needs must. Then again, it’s not an option with the Borg.
Your Number One problem is always having the materials and cycles necessary to complete tasks before the next disaster strikes, or your crew get shirty. It’s well-balanced, but brutal; one unlucky roll and all the spinning plates come crashing down as miserable, homesick crewmembers pile up in sickbay. I spent a good 10 hours learning the systems with a furrowed brow and getting knocked on my aft repeatedly, watching arrows roving back and forth over coloured meters, praying to the RNG gods that today isn’t a good day to die. Which is as it should be.
Captured on Nintendo Switch 2 (Handheld/Undocked)
Across the Unknown is an impressive effort overall, then, although it could do with some polish. Early doors, Tom Paris was away on the Caretaker’s array but also somehow sitting at the conn on my bridge. One of my multiple Sector 10 restarts was down to a black-screen bug obscuring my ship, randomly indicating that nearby planets were 2.4 million cycles away, and hard-crashing the console a couple of times. Reloading the same autosave didn’t help; a sector reset was my only recourse.
Elsewhere, UI elements are fairly small onscreen, especially when you’re learning to parse the icons and numbers, but having more screen space to survey systems — stellar and starship alike — was ultimately more useful. Text was readable on a Switch 2 screen, but your mileage (and eyesight) may vary, and some UI scaling options would have been appreciated. Pleasingly, Deuteranope, Protanope, and Tritanope colour blind accessibility options are present.
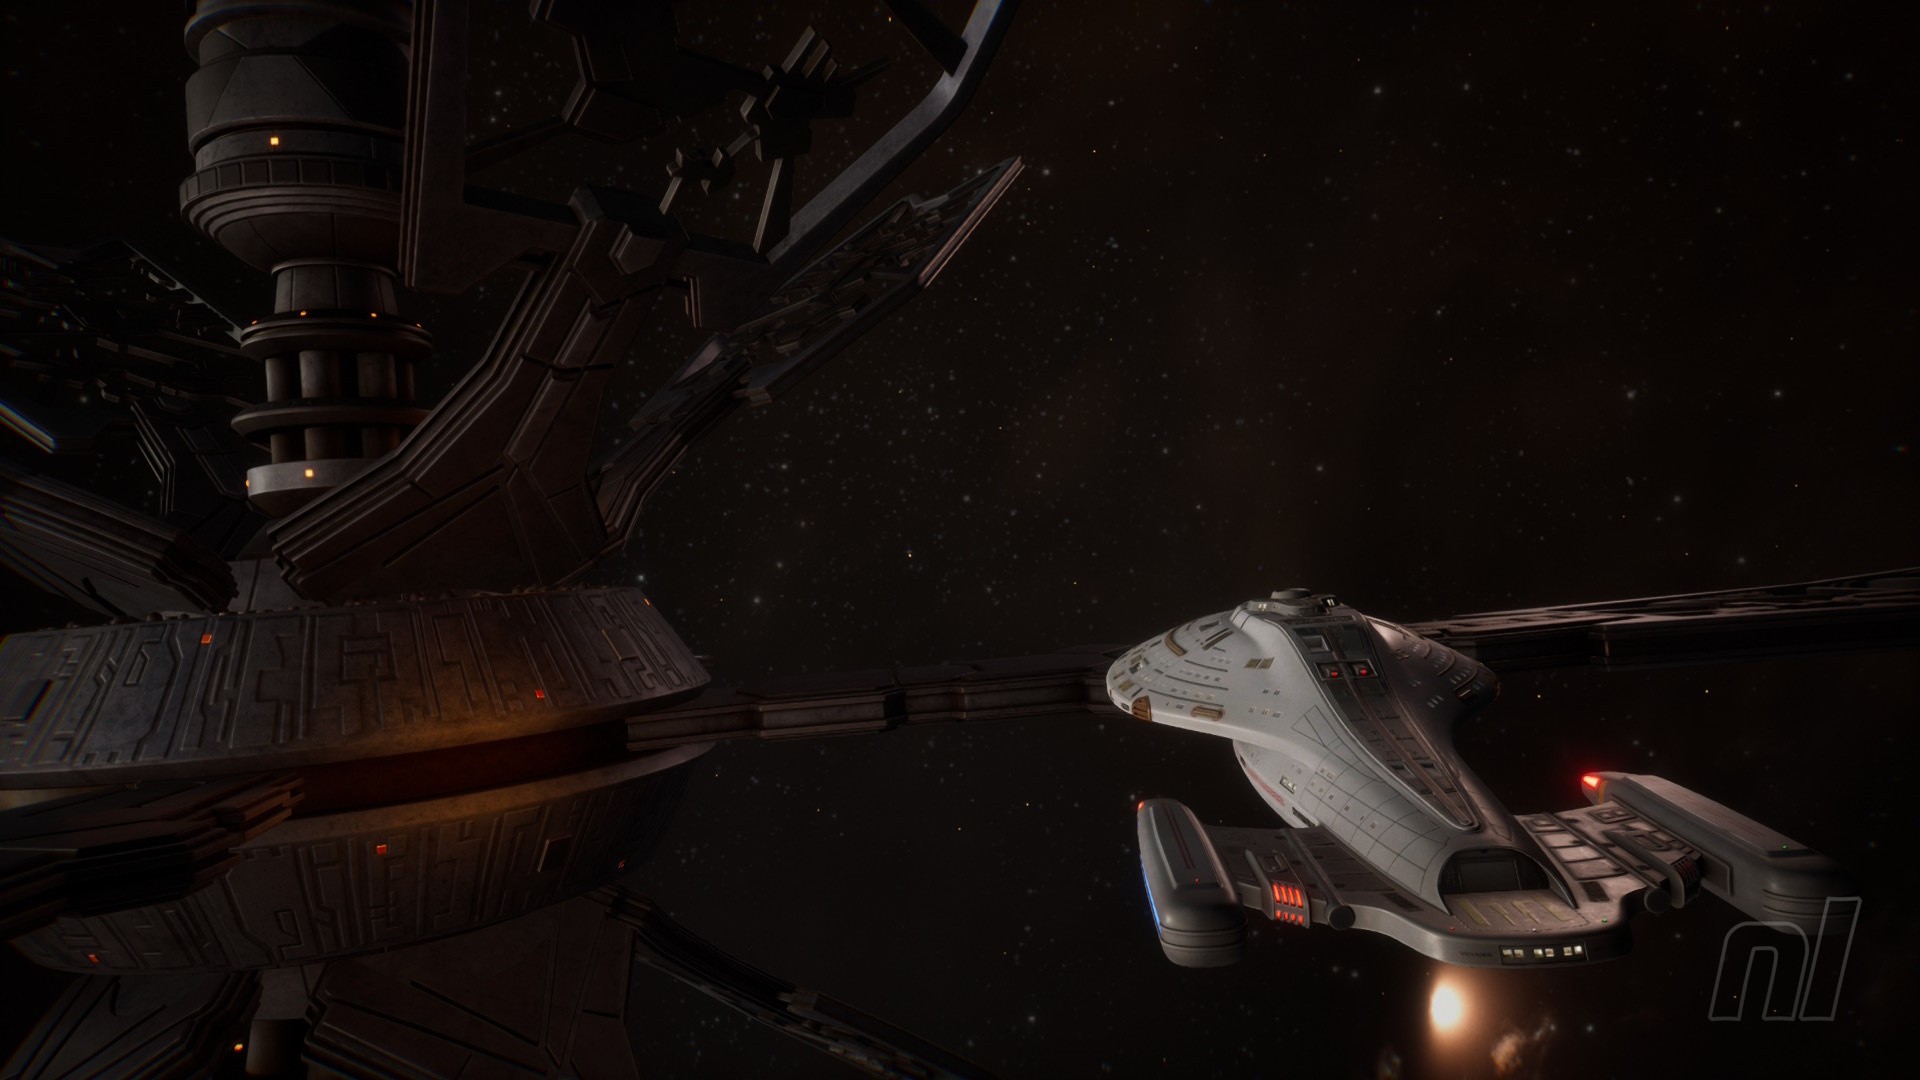
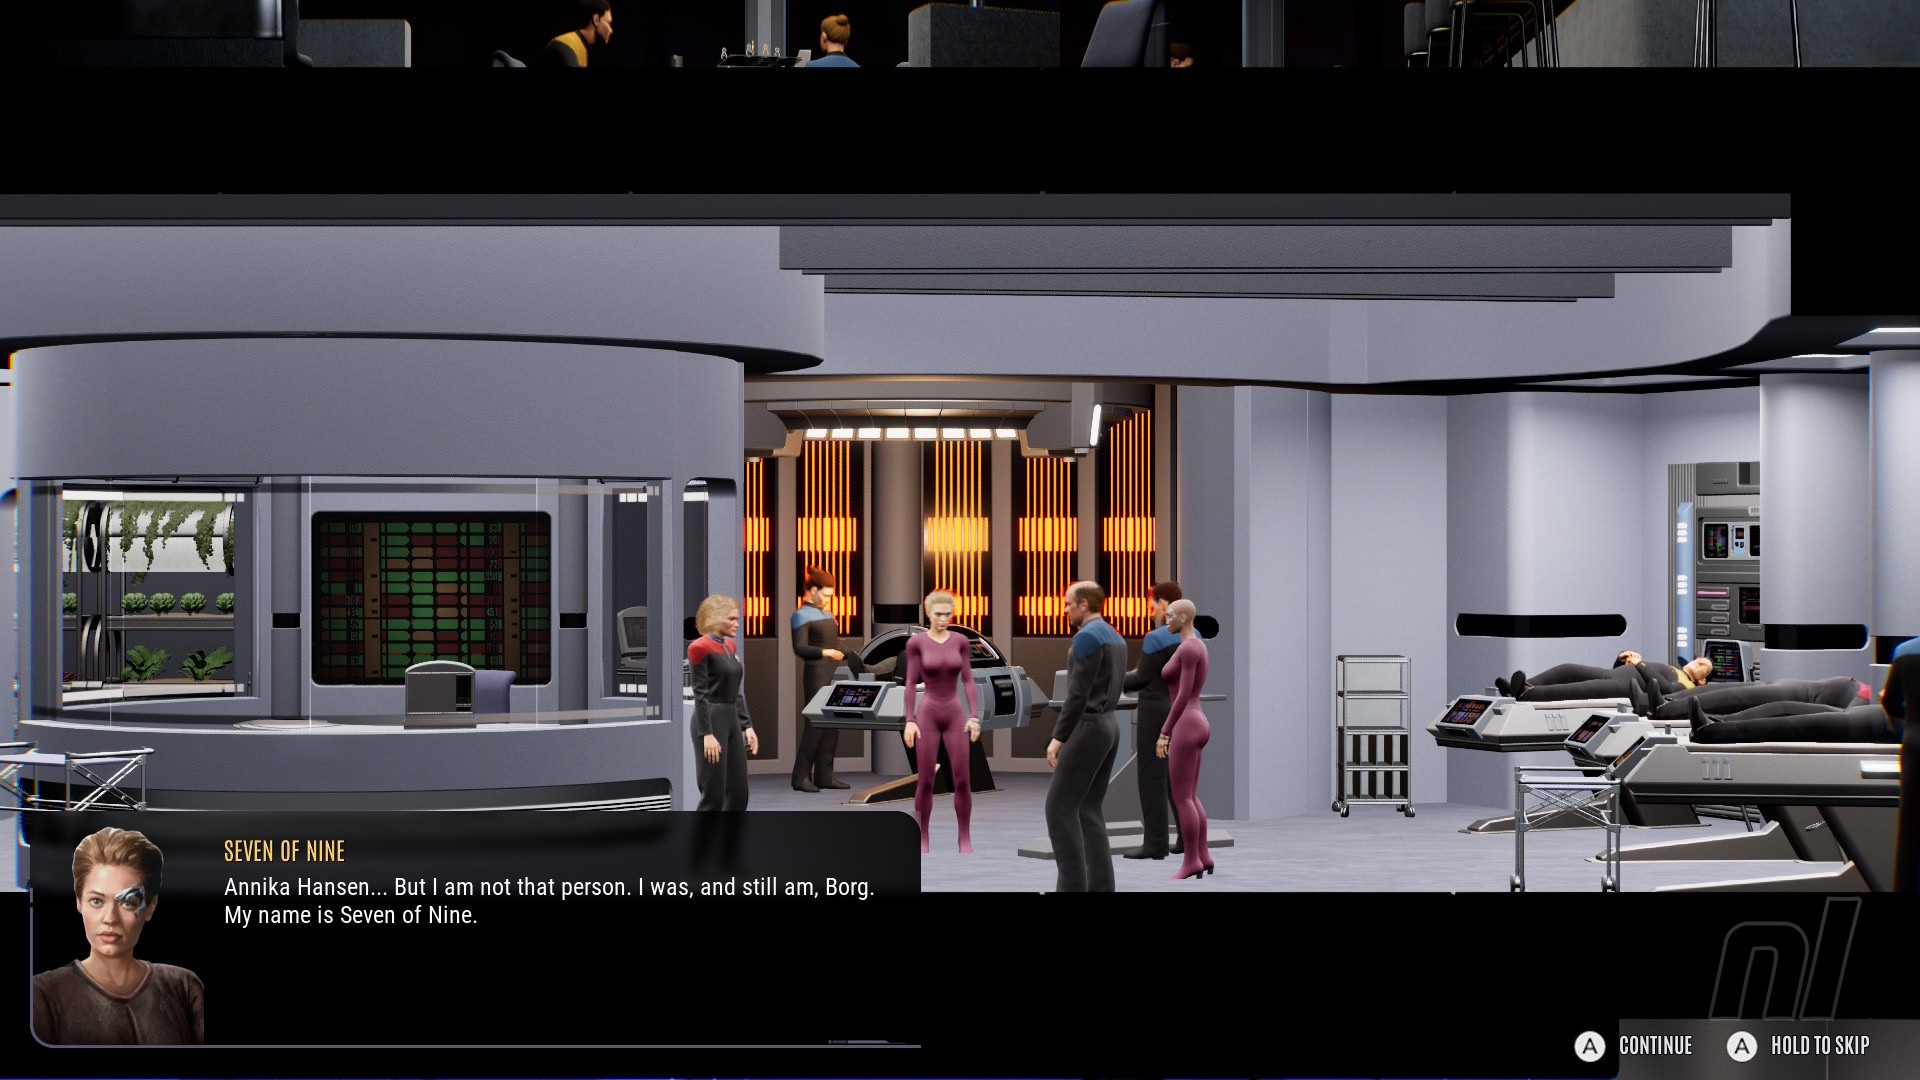
Visually, the LCARS stylings capture the show’s graphical style well, and Voyager herself looks lovely. Likewise, the systems and interstellar phenomena she passes are rendered nicely, with attractive lighting and details. The green wisps ignited in the ship’s wake as you pass through nebulae (à la the show’s intro) are a great touch. Character models are very simple, but do the job.
Captured on Nintendo Switch 2 (Handheld/Undocked)
Performance-wise, scanning my centralised cursor across later sectors got a little juddery, especially in handheld, but this isn’t the sort of game that requires silky smooth frame rates. Other platforms will handle it better, but it functioned just fine on Switch 2 and this was a great ‘plane game’. The lack of Mouse Mode is surprising when it seems such a natural fit. In practice, however, I probably wouldn’t have used it. Touchscreen functionality, also missing, might have been more useful, but that wasn’t a dealbreaker, either.
Speaking of dealbreakers, if you played the demo and missed Jerry Goldsmith’s rousing theme, don’t worry – it’s present and correct on the main menu and between sectors. Audio logs from Tim Russ (Tuvok) and Robert Duncan McNeill (Tom Paris) give some great flavour, too, and the sound effects in general are spot-on. Overall, making good on the premise, the devs make great use of available resources.
By the time I’d made it home (after 16 years), I had over 20 hours on the in-game clock, although my Switch profile says “30 hours or more”. It’s a slow-burn game with some frustrations along the way, but I did come away satisfied. Tellingly, with dozens of other games to be playing, I want to dive right back in, knowing there were things I missed, knowing I could do a far better job with a do-over.
Captured on Nintendo Switch 2 (Handheld/Undocked)
Part of the pleasure was down to it functioning almost as a rewatch. I wonder if the narrative threads here would be enough to engage anybody who hasn’t watched Voyager, though. Half the fun was being reminded of plot points and characters, roleplaying as Janeway, and stepping — or being pushed — off the canon path into uncharted territory. Recognising characters and deceptions was a thrill that will be lost on non-fans. Same old story for a Trek game, perhaps.
Publisher Vertigo Games and developer Exkee have announced a full remake of the FMV cult classic The 7th Guest, heading to the Switch later this year.
Curiously, there’s seemingly no Switch 2 version of the game at the time of writing, so we’re keen to see how this one runs on the Switch. It’s an intriguing proposition, mind you, with FMV sequences re-recorded using volumetric video, letting you view scenes in full 3D. The remake looks to be based on a recent VR version of the game, which our pals over at Push Square reviewed a couple of years back.
Otherwise, much like the original, you’ll be exploring a eerie mansion stuffed with puzzles and secrets to uncover. Released in 1993 by Virgin Interactive Entertainment, The 7th Guest went on to sell over 2 million copies and received a 25th anniversary remaster for the Switch in 2023.
Here’s a look at the key features:
– Cinematic Storytelling Through Volumetric Video: Step inside the story. Using newly recorded volumetric video, live-action performances are captured in full 3D, placing players directly inside Henry Stauf’s mansion. Real actors appear within the world itself, making every encounter feel immediate and unsettling.
– Unique Mind-Bending Puzzle Gameplay: The iconic haunted mansion comes alive with high-end visuals and carefully redesigned puzzles. Every puzzle is woven into the story and rooted in the mansion’s lore, with recognizable elements that pay homage to the original.
– Dynamic Environments: The haunted mansion shifts and transforms through clever visual effects and optical illusions. Investigate every creepy nook and cranny, unlock new rooms, and uncover hidden secrets as the horrors within begin to close in.
There’s no word on a specific release date for The 7th Guest just yet, but we’re definitely eager to see more. Hopefully, we’ll get confirmation of a Switch 2 version ahead of its release too, but we’ll be sure to let you know as soon as we hear more.
Are you looking forward to The 7th Guest remake on the Switch? Did you play the original? Let us know your thoughts with a comment down below.
Writing a real-time audio plugin on Linux often conjures up images of a complex environment: C++, toolchains, CMake, CLAP / VST3 / LV2 SDK, ABI…
However, there is a much simpler approach : JSFX
This article offers a practical introduction to JSFX and YSFX on Fedora Linux: we’ll write some small examples, add a graphical VU meter, and then see how to use it as an CLAP / VST3 plugin in a native Linux workflow.
JSFX (JesuSonic Effects – created by REAPER [7]) allows you to write audio plugins in just a few lines, without compilation, with instant reloading and live editing.
Long associated with REAPER, they are now natively usable on Linux, thanks to YSFX [3], available on Fedora Linux in CLAP and VST3 formats via the Audinux repository ([4], [5]).
This means it’s possible to write a functional audio effect in ten lines, then immediately load it into Carla [8], Ardour [9], or any other compatible host, all within a PipeWire / JACK [11] environment.
A citation from [1] (check the [1] link for images):
In 2004, before we started developing REAPER, we created software designed for creating and modifying FX live, primarily for use with guitar processing.
The plan was that it could run on a minimal Linux distribution on dedicated hardware, for stage use. We built a couple of prototypes.
These hand-built prototypes used mini-ITX mainboards with either Via or Intel P-M CPUs, cheap consumer USB audio devices, and Atmel AVR microcontrollers via RS-232 for the footboard controls.
The cost for the parts used was around $600 each.
In the end, however, we concluded that we preferred to be in the software business, not the hardware business, and our research into adding multi-track capabilities in JSFX led us to develop REAPER. Since then, REAPER has integrated much of JSFX’s functionality, and improved on it.
So, as you can see, this technology is not that new. But the Linux support via YSFX [3] is rather new (Nov 2021, started by Jean-Pierre Cimalando).
A new programming language, but for what ? What would one would use JSFX for ?
This language is dedicated to audio and with it, you can write audio effects like an amplifier, a chorus, a delay, a compressor, or you can write synthesizers.
JSFX is good for rapid prototyping and, once everything is in place, you can then rewrite your project into a more efficient language like C, C++, or Rust.
JSFX for developers
Developing an audio plugin on Linux often involves a substantial technical environment. This complexity can be a hindrance when trying out an idea quickly.
JSFX (JesuSonic Effects) offers a different approach: writing audio effects in just a few lines of interpreted code, without compilation and with instant reloading.
Thanks to YSFX, available on Fedora Linux in CLAP and VST3 formats, these scripts can be used as true plugins within the Linux audio ecosystem.
This article will explore how to write a minimal amplifier in JSFX, add a graphical VU meter, and then load it into Carla as a CLAP / VST3 plugin.
The goal is simple: to demonstrate that it is possible to prototype real-time audio processing on Fedora Linux in just a few minutes.
No compilation environment is required: a text editor is all you need.
YSFX plugin
On Fedora Linux, YSFX comes in 3 flavours :
a standalone executable ;
a VST3 plugin ;
a CLAP plugin.
YSFX is available in the Audinux [5] repository. So, first, install the Audinux repository:
Here is a screenshot of YSFX as a VST3 plugin loaded in Carla Rack [8]:
You can :
Load a file ;
Load a recent file ;
Reload a file modified via the Edit menu ;
Zoom / Unzoom via the 1.0 button ;
Load presets ;
Switch between the Graphics and Sliders view.
Here is a screenshot of the Edit window:
The Variables column displays all the variables defined by the loaded file.
Examples
We will use the JSFX documentation available at [4].
JSFX code is always divided into section.
@init : The code in the @init section gets executed on effect load, on samplerate changes, and on start of playback.
@slider : The code in the @slider section gets executed following an @init, or when a parameter (slider) changes
@block : The code in the @block section is executed before processing each sample block. Typically a block is the length as defined by the audio hardware, or anywhere from 128-2048 samples.
@sample : The code in the @sample section is executed for every PCM (Pulse Code Modulation) audio sample.
@serialize : The code in the @serialize section is executed when the plug-in needs to load or save some extended state.
@gfx [width] [height] : The @gfx section gets executed around 30 times a second when the plug-ins GUI is open.
A simple amplifier
In this example, we will use a slider value to amplify the audio input.
desc:Simple Amplifier
slider1:1<0,4,0.01>Gain @init
gain = slider1; @slider
gain = slider1; @sample
spl0 *= gain;
spl1 *= gain;
slider1, @init, @slider, @sample, spl0, spl1 are JSFX keywords [1].
Description:
slider1: create a user control (from 0 to 4 here);
@init: section executed during loading;
@slider: section executed when we move the slide;
@sample: section executed for each audio sample;
spl0 and spl1: left and right channels.
In this example, we just multiply the input signal by a gain.
Here is a view of the result :
An amplifier with a gain in dB
This example will create a slider that will produce a gain in dB.
desc:Simple Amplifier (dB)
slider1:0<-60,24,0.1>Gain (dB) @init
gain = 10^(slider1/20); @slider
gain = 10^(slider1/20); @sample
spl0 *= gain;
spl1 *= gain;
Only the way we compute the gain changes.
Here is a view of the result :
An amplifier with an anti-clipping protection
This example adds protection against clipping and uses a JSFX function for that.
desc:Simple Amplifier with Soft Clip
slider1:0<-60,24,0.1>Gain (dB) @init
gain = 10^(slider1/20); @slider
gain = 10^(slider1/20);
function softclip(x) ( x / (1 + abs(x));
); @sample
spl0 = softclip(spl0 * gain);
spl1 = softclip(spl1 * gain);
Here is a view of the result :
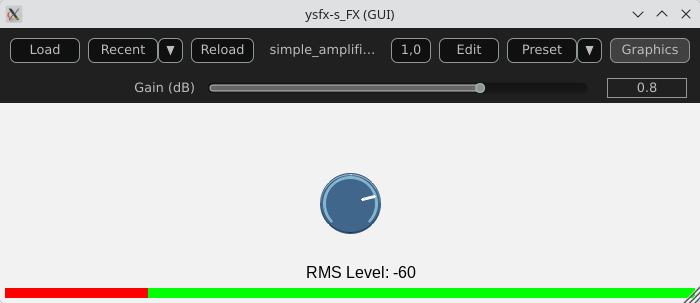
An amplifier with a VU meter
This example is the same as the one above, we just add a printed value of the gain.
desc:Simple Amplifier with VU Meter
slider1:0<-60,24,0.1>Gain (dB) @init
rms = 0;
coeff = 0.999; // RMS smoothing
gain = 10^(slider1/20); @slider
gain = 10^(slider1/20); @sample
// Apply the gain
spl0 *= gain;
spl1 *= gain;
// Compute RMS (mean value of the 2 channels)
mono = 0.5*(spl0 + spl1);
rms = sqrt((coeff * rms * rms) + ((1 - coeff) * mono * mono)); @gfx 300 200 // UI part
gfx_r = 0.1; gfx_g = 0.1; gfx_b = 0.1;
gfx_rect(0, 0, gfx_w, gfx_h); // Convert to dB
rms_db = 20*log(rms)/log(10);
rms_db < -60 ? rms_db = -60; // Normalisation for the display
meter = (rms_db + 60) / 60;
meter > 1 ? meter = 1; // Green color
gfx_r = 0;
gfx_g = 1;
gfx_b = 0; // Horizontal bar
gfx_rect(10, gfx_h/2 - 10, meter*(gfx_w-20), 20); // Text
gfx_r = gfx_g = gfx_b = 1;
gfx_x = 10;
gfx_y = gfx_h/2 + 20;
gfx_printf("Level: %.1f dB", rms_db);
The global structure of the code:
Apply the gain
Compute a smoothed RMS value
Convert to dB
Display a horizontal bar
Display a numerical value
Here is a view of the result :
An amplifier using the UI lib from jsfx-ui-lib
In this example, we will use a JSFX UI library to produce a better representation of the amplifier’s elements.
Import and setup: The UI library is imported and then allocated memory (ui_setup) using @init;
UI controls: control_dial creates a thematic potentiometer with a label, integrated into the library;
Integrated VU meter: A small graph is drawn with ui_graph, normalizing the RMS value between 0 and 1;
UI structure: ui_start(“main”) prepares the interface for each frame. ui_push_height / ui_pop organize the vertical space.
Here is a view of the result :
A simple synthesizer
Now, produce some sound and use MIDI for that.
The core of this example will be the ADSR envelope generator ([10]).
desc:Simple MIDI Synth (Mono Sine)
// Parameters
slider1:0.01<0.001,2,0.001>Attack (s)
slider2:0.2<0.001,2,0.001>Decay (s)
slider3:0.8<0,1,0.01>Sustain
slider4:0.5<0.001,3,0.001>Release (s)
slider5:0.5<0,1,0.01>Volume @init
phase = 0;
note_on = 0;
env = 0;
state = 0; // 0=idle,1=attack,2=decay,3=sustain,4=release @slider
// Compute the increment / decrement for each states
attack_inc = 1/(slider1*srate);
decay_dec = (1-slider3)/(slider2*srate);
release_dec = slider3/(slider4*srate); @block
while ( midirecv(offset, msg1, msg23) ? ( status = msg1 & 240; note = msg23 & 127; vel = (msg23/256)|0; // Note On status == 144 && vel > 0 ? ( freq = 440 * 2^((note-69)/12); phase_inc = 2*$pi*freq/srate; note_on = 1; state = 1; ); // Note Off (status == 128) || (status == 144 && vel == 0) ? ( state = 4; ); );
); @sample
// ADSR Envelope [10]
state == 1 ? ( // Attack env += attack_inc; env >= 1 ? ( env = 1; state = 2; );
); state == 2 ? ( // Decay env -= decay_dec; env <= slider3 ? ( env = slider3; state = 3; );
); state == 3 ? ( // Sustain env = slider3;
); state == 4 ? ( // Release env -= release_dec; env <= 0 ? ( env = 0; state = 0; );
); // Sine oscillator
sample = sin(phase) * env * slider5;
phase += phase_inc;
phase > 2*$pi ? phase -= 2*$pi; // Stereo output
spl0 = sample;
spl1 = sample;
Global structure of the example:
Receives MIDI via @block;
Converts MIDI note to frequency (A440 standard);
Generates a sine wave;
Applies an ADSR envelope;
Outputs in stereo.
Here is a view of the result :
Comparison with CLAP / VST3
JSFX + YSFX
Advantages of JSFX:
No compilation required;
Instant reloading;
Fast learning curve;
Ideal for DSP prototyping;
Portable between systems via YSFX.
Limitations:
Less performant than native C++ for heavy processing;
Less suitable for “industrial” distribution;
Simpler API, therefore less low-level control.
CLAP / VST3 in C/C++
Advantages:
Maximum performance;
Fine-grained control over the architecture;
Deep integration with the Linux audio ecosystem;
Standardized distribution.
Limitations:
Requires a complete toolchain;
ABI management/compilation;
Longer development cycle.
Conclusion
A functional audio effect can be written in just a few lines, adding a simple graphical interface, and then loaded this script as an CLAP / VST3 plugin on Fedora Linux. This requires no compilation, no complex SDK, no cumbersome toolchain.
JSFX scripts don’t replace native C++ development when it comes to producing optimized, widely distributable plugins. However, they offer an exceptional environment for experimentation, learning signal processing, and rapid prototyping.
Thanks to YSFX, JSFX scripts now integrate seamlessly into the Linux audio ecosystem, alongside Carla, Ardour, and a PipeWire-based audio system.
For developers and curious musicians alike, JSFX provides a simple and immediate entry point into creating real-time audio effects on Fedora Linux.
Available plugins
ysfx-chokehold
A free collection of JS (JesuSonic) plugins for Reaper.
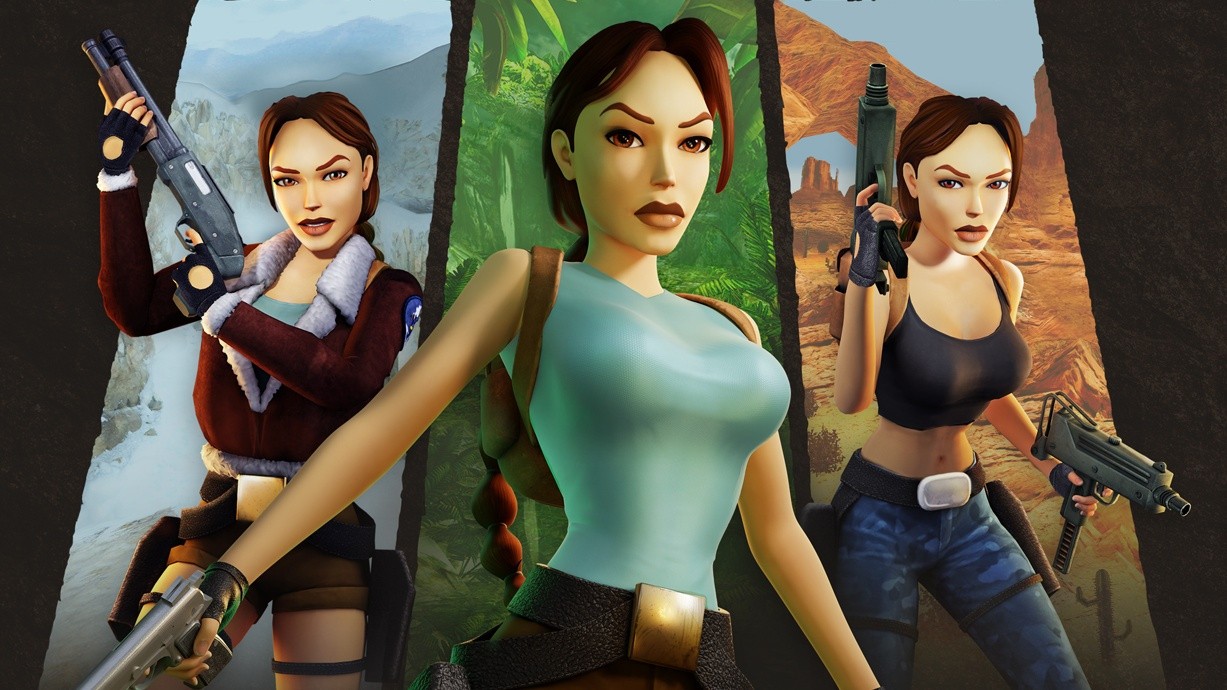
If you’re a fan of the video game icon Lara Croft and happen to own a Switch 2, we’ve got some good news! Her collection Tomb Raider I-III Remastered is now available on the Switch 2.
According to the press release, this version includes 1440p at 60fps docked and 1080p at 120fps in handheld mode. The good news is this upgrade will also be available to existing owners of the Switch version “at no extra charge in a free update “coming soon”. According to a response from Aspyr on social media, the upgrade will begin rolling out on 18th March 2026 (aka next week).
If you do want to play right now, the Switch 2 version is also available as a standalone purchase, and is currently half-price in select locations, reducing it from the regular price of $29.99 / £25.26 to $14.99 / £12.63. Other Tomb Raider titles are also currently on sale on the eShop.
To top it off, Aspyr and Crystal Dynamics have also released a new Challenge Mode content update for Tomb Raider I-III Remastered, which is a free patch for all versions of the game that adds a new mode with level difficulty customisation as well as new outfits. It’s all timed in with the 30th anniversary of Tomb Raider this year.
Will you be revisiting this game on the Switch 2? Do you plan on checking the new Challenge Mode update? Tell us in the comments.
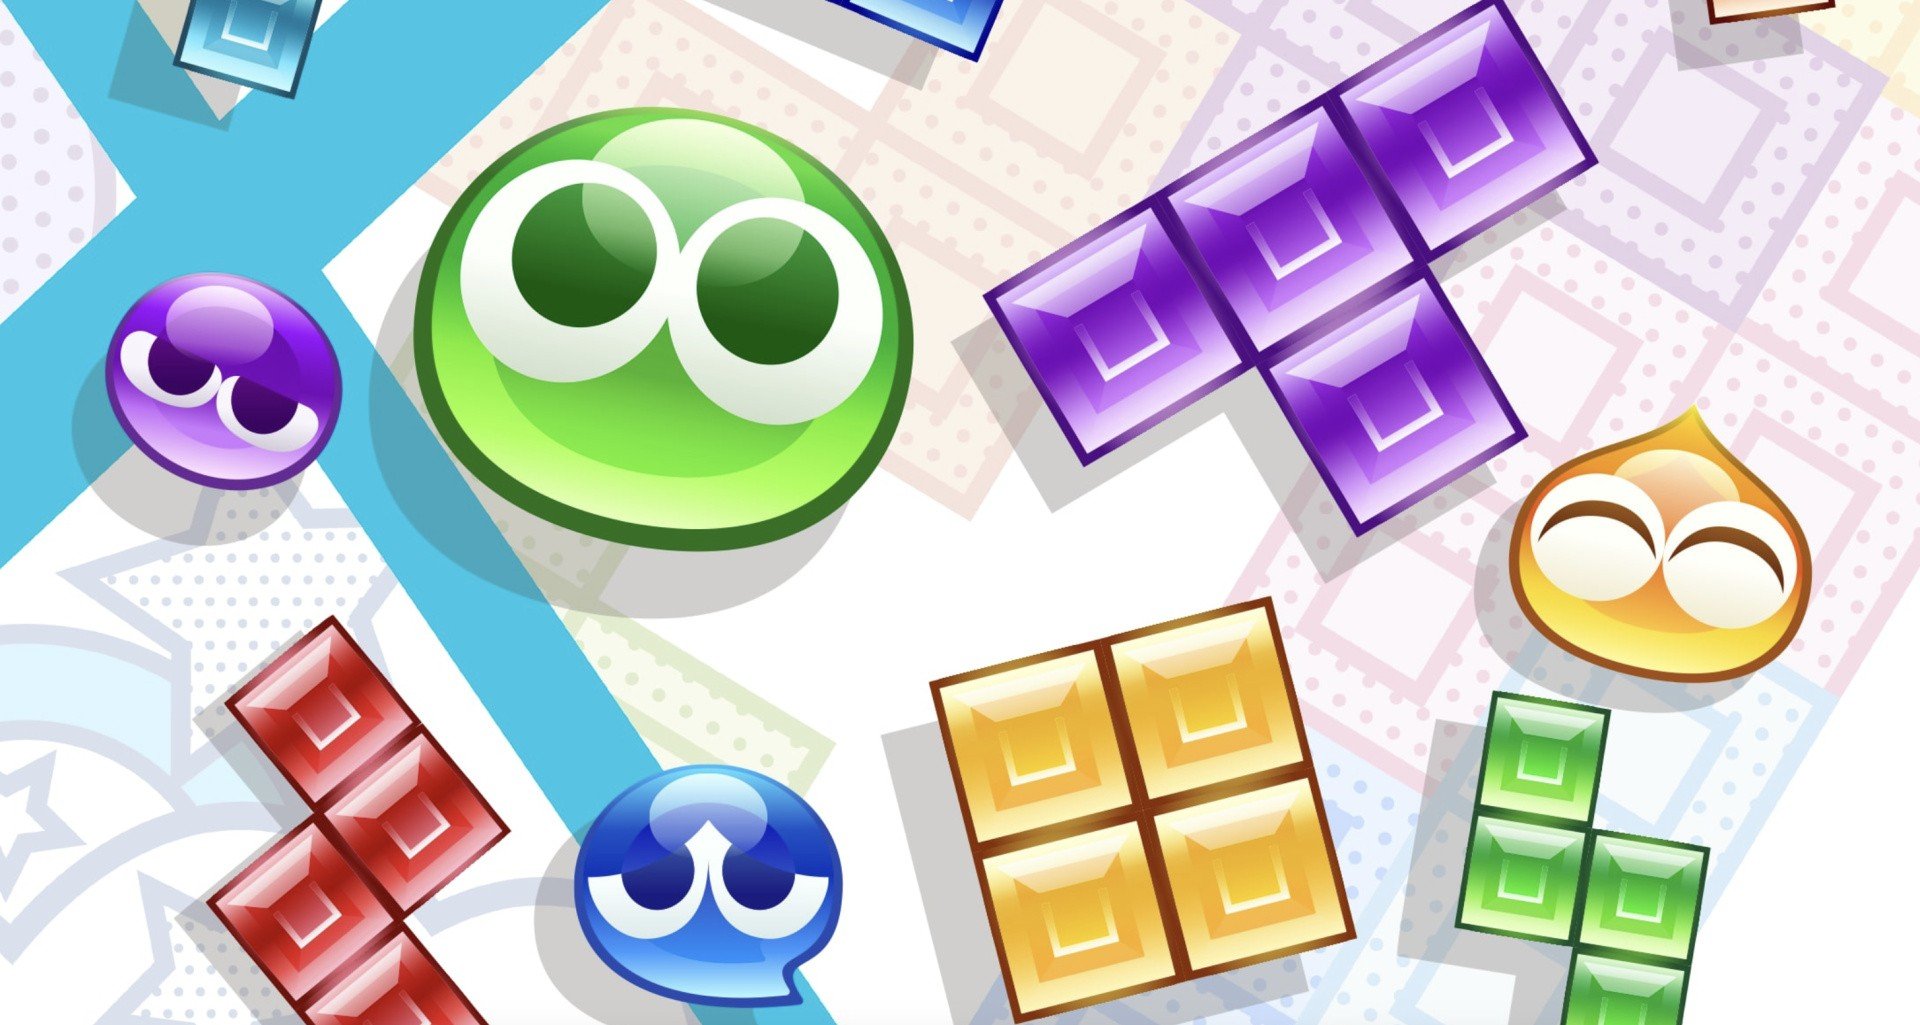
Update #3 []: Sega has released its first 2026 update for the Switch 2 launch title Puyo Puyo Tetris 2S, and Doubles Mode is now ready for local and online multiplayer. Version 1.0.5 also resolves various bugs.
As usual, replays from earlier versions can’t be viewed after this update has been performed. Here are the full patch notes via Sega’s social media page:
Puyo Puyo Tetris 2S Update – 13th March 2026
Update drops today!
Patch ver. 1.0.5 has landed in Puyo Puyo™ Tetris® 2S!
What’s new?
• Puyo Tetris Doubles mode is now ready for action in local AND online multiplayer!
• Various bugs have been squished
Heads up! Replays from earlier versions won’t be viewable after updating.
If you haven’t played this title yet, be sure to check out our review. Unfortunately, there’s no upgrade path for this one, so you’ll either have to fork out the full price, wait for a sale, or you can stick with the existing Puyo Puyo Tetris 2 game on the Switch.
You can see all of the past updates for Puyo Puyo Tetris 2 in our existing stories below.
Update #2 []:
Sega has announced another update for the Switch 2 launch title Puyo Puyo Tetris 2S. This patch will address some matchmaking issues online and resolves some bugs. Here’s the full rundown about Version 1.0.4:
Update #1 []:
Sega has already shown plenty of love for the Switch 2 with games like Sonic and Yakuza, and its support for the launch title Puyo Puyo Tetris 2S also continues. While the game was already in a respectable state on release, the company has continued to roll out some small updates for it.
Following the USB camera fix in the previous update, which you can see in the original story below, Version 1.0.3 has now officially gone live. It apparently deals with more bugs, with the official details mentioning how “various fixes” have been applied. Sega also mentions how replay data from earlier iterations of the game will no longer be playable in this version.
Once again, if you haven’t already played this game on the Switch 2, be sure to check out our review. It got six out of ten stars. It’s a “pretty darn decent” experience, even if the Switch 2 additions are admittedly minimal at best.
Original Story: One of the many Sega games released alongside the Switch 2 at launch was Puyo Puyo Tetris 2S.
Although it arguably didn’t offer much for returning players, there was a new camera feature allowing you to superimpose your face during gameplay. It seems there were some display issues with “certain” USB cameras, but this now been resolved in the latest update.
Along with this fix are some other updates, resolving various issues. Here’s the full rundown:
Puyo Puyo Tetris 2S – Ver. 1.0.2 (27th June 2025)
Fixes video display problems that could affect certain USB cameras.
Fixes matchmaking issues that could occur with promotion battles.
Other minor fixes.
And in case you missed it, yes – you can use regular USB cameras with your Switch 2 to enjoy certain features in select titles. The game also includes Joy-Con 2 mouse support.
As for our thoughts on Puyo Puyo Tetris 2S, we gave it six out of ten. While it’s a “pretty darn decent game” the Switch 2 additions are minimal at best, and there’s no upgrade path like certain other third-party releases.
Have you tried out this game on the Switch 2 yet? Or are you sticking with the Switch release? Let us know in the comments.
Elden Ring: Tarnished Edition is on its way to the Switch 2 at some point this year, and ahead of its arrival, we’ve got a new round of previews from GDC. These latest impressions are based on a 15-minute demo of a newly optimised build of the game.
Overall, this latest previews seem mostly positive and there is a lot of focus on the game’s performance. FromSoftware’s title will apparently run at around 30fps on Nintendo’s new hybrid hardware on both the handheld and docked modes. RPG Site says the resolution is “either hitting or very visibly close to a native 1080p” in handheld.
So, here are the latest round of impressions:
Polygon: “While the Switch 2 version most certainly won’t be hitting 60 FPS, it doesn’t seem too far behind handhelds like the Steam Deck anymore. At a glance, I’d wager that it was running in the 30 to 40 FPS range, depending on how demanding the scene was. I was able to take down an easy, early game boss without disruptive stutters..The performance is far from perfect, mind you. The biggest dip in frame rate I saw wasn’t in a boss fight, but when it started raining while riding Torrent through the world. That’s what makes me a little hesitant to say that FromSoftware has totally cracked the Switch 2 code.”
RPG Site: “Our session was quite short, but to make the most of it, I bumrushed from the tutorial to the Margit boss fight in order to get the best representation of the game’s performance across the open world, while deliberately stretching things to the limits with active NPCs and constant loading. Even once it started raining, the game hit the 30FPS target consistently, and resolution similarly remained much the same… We also got to check out the game in docked mode, using the new lighter knight-type class added to this version of Elden Ring. The demo we played looked to emphasize quality over performance, settling in with a 30FPS framerate at a high resolution.”
GameSpot: “After several months of performance adjustment, the game has re-emerged at GDC 2026, and so far, it looks to be in a much better shape. One telling sign here is that Bandai Namco has enough confidence to allow Switch 2 handheld gameplay to be recorded, albeit from an over-the-shoulder perspective. The demo can also be experienced in docked mode, and overall, it looks like the game has been well-optimized. Even with several graphical concessions, Limgrave still looks great, and it looks like the frame rate hovers around the 30-40 FPS range.”
This new optimised build for Switch 2 is sounding promising, and it seems to be a step up from the previews based on the Gamescom 2025 demo. Now, we just need a release date, or at least a window!
FromSoftware’s new game The Duskbloods is also planned for a 2026 release, so be on the lookout for that.
Are you planning to check out Elden Ring for the Switch 2 when it’s released? Let us know in the comments.
The relaxing life sim Pokémon Pokopia has got off to a tremendous start, with The Pokémon Company yesterday reporting the game’s sales had already surpassed 2.2 million units globally in just four days.
With the launch patch out of the way, the development team has now announced the next update will be arriving soon. Based on a rough machine translation from Pokopia’s Japanese website, the main takeaway here is that this next update will address multiple issues, including progression bugs. The team also has some improvements planned to deal with certain other issues.
Here are the details, and we’ll provide an update if English patch notes are shared.
Thank you for always enjoying the Nintendo Switch 2 software Pokémon Pokopia. We plan to address the following issues.
Confirmed Bugs
– In the request “Let’s Build a Home!” in “Dry and Dust-Covered Town,” Squirtle moves onto a tree and becomes unapproachable, preventing progress on the request.
– In the request “Let’s Find the Pokémon Center!” in Cloudy Seaside Town, if you break the cracked bridge blocks before Munchlax crosses the bridge, it becomes difficult to progress the request.
– In the request “Let’s Find the Pokémon Center!” in the Cloudy Seaside Town, performing specific steps prevents the event where Munchlax repairs the bridge from occurring, making it impossible to progress the request.
– In “Rocky Mountain Town,” performing specific actions prevents the event where you encounter Rotom from occurring.
– The request “Clean Up the Road!” in “Rocky Mountain Town” becomes difficult to progress under certain conditions.
– The type listed for “Ittomaru” (Spinarak) in the Pokédex is incorrect.
Planned Improvements
We plan to implement improvements for the following issues.
– In the “Dry Dry Town” request “Break Rocks with Rock Smash!”, if another block is placed on the cracked block near “Shrimpy” instead, the progression path becomes unclear.
– In the “Gloomy Seaside Town” request “Take the Scientists There!”, placing a different block where the cracked block near “Snorlax” should be makes the progression unclear.
Future Plans
An update to fix the above issues is scheduled for release soon. Even if you are already experiencing this issue, applying this update will resolve it. We will continue investigating other issues beyond those mentioned above.
So, if you are encountering certain problems in Pokémon Pokopia, as you can see, bug fixes and improvements are on the way.
If you haven’t already got Pokémon Pokopia and want to know more about this new spin-off, take a look at our review. We called it the “freshest Pokémon experience in a long time”.
How has your experience been with Pokémon Pokopia so far? Have you encountered any problems or progression issues? Let us know in the comments.