Welcome, Guest
You have to register before you can post on our site.

Username
  

Password


Search Forums

(Advanced Search)

Forum Statistics
» Members: 20,946
» Latest member: blackopsdlc
» Forum threads: 22,011
» Forum posts: 22,978

Full Statistics

Online Users
There are currently 1792 online users.
» 0 Member(s) | 1788 Guest(s)
Applebot, Bing, Facebook, Google

Latest Threads
When does Godzilla releas...
Forum: PC Discussion
Last Post: xSicKxBot

» Replies: 0
» Views: 1
[WoW Retail News] Ula'tek...
Forum: World of Warcraft
Last Post: xSicKxBot

» Replies: 0
» Views: 3
[DevBlog MS] Microsoft is...
Forum: C#, Visual Basic, & .Net Frameworks
Last Post: xSicKxBot

» Replies: 0
» Views: 13
[WoW Retail News] BlizzCo...
Forum: World of Warcraft
Last Post: xSicKxBot

» Replies: 0
» Views: 14
What is Celestial Codex i...
Forum: PC Discussion
Last Post: xSicKxBot

» Replies: 0
» Views: 14
[Ubuntu News] Fine tune y...
Forum: Linux, FreeBSD, and Unix types
Last Post: xSicKxBot

» Replies: 0
» Views: 12
[WoW Retail News] Xal'ata...
Forum: World of Warcraft
Last Post: xSicKxBot

» Replies: 0
» Views: 31
[Ubuntu News] Scaling And...
Forum: Linux, FreeBSD, and Unix types
Last Post: xSicKxBot

» Replies: 0
» Views: 22
[WoW Retail News] Comment...
Forum: World of Warcraft
Last Post: xSicKxBot

» Replies: 0
» Views: 24
How to unlock Maya Aguina...
Forum: PC Discussion
Last Post: xSicKxBot

» Replies: 0
» Views: 31

 
  [Tut] How to Get Started With Python Dash on PyCharm [Absolute Beginners]
Posted by: xSicKxBot - 03-23-2022, 11:50 AM - Forum: Python - No Replies

How to Get Started With Python Dash on PyCharm [Absolute Beginners]

This is a chapter draft for our upcoming book “Python Dash” with NoStarch—to appear in 2021. Stay tuned!

Why an IDE


Using an integrated development environment (IDE) has the potential to significantly accelerate your programming productivity. Many programmers do not unlock their full potential until they finally decide to switch from a simple code editor to an IDE—and mastering the advanced functionality provided by the IDE. Some advantages of IDEs over simple text editors are code highlighting, tooltips, syntax checker, code linters that check for style issues, version control to safeguard the history of programming edits, debugging with the help of breakpoints, visual aids such as flowcharts and block diagrams, performance optimization tools and profilers—just to name a few.

PyCharm for Dash Apps


In this book about dashboard applications, we recommend that you also take your time to switch to an IDE, if you haven’t already. In particular, we recommend that you use the PyCharm IDE to follow along with the provided code examples. Apart from the benefits of using IDEs, you’ll also develop web applications that can quickly grow by adding more and more features. As your Python dashboard applications grow, so will your need to aggregate all source code at a single spot and in a single development environment. Increasing complexity quickly demands the use of an IDE.

In the following, we’ll describe how to download and install PyCharm, and create your first simple dashboard application that you can view in your browser. After you’ve completed those steps, you’re well-prepared to duplicate the increasingly advanced applications in the upcoming chapters.

Download PyCharm


First, let’s start with downloading the latest PyCharm version. We assume you have a Windows PC, but the steps are very similar on a macOS and Linux computer. As soon as you’ve launched the PyCharm application, the similarity of usage increases even more across the different operating systems.

You can download the PyCharm app from the official website.


Click the download button of the free community version and wait for the download to complete.

Install PyCharm on Your Computer


Now, run the executable installer and follow the steps of the installation application. A sensible approach is to accept the default settings suggested by the PyCharm installer.

Congratulations, you’ve installed PyCharm on your system!

Open PyCharm


Now type “PyCharm” into the search bar of your operating system and run the IDE!

Create a New Dash Project in PyCharm


After choosing “New Project”, you should see a window similar to this one:


This user interface asks you to provide a project name, a virtual environment, and a Python interpreter. We call our project firstDashProject, use a virtual environment with the standard Python installation, and don’t create a main.py welcome script:


Create the project and you should see your first PyCharm dashboard project!


Create Your Dash File app.py in Your PyCharm Project


Let’s create a new file app.py in your project and copy&paste the code from the official documentation into your app.py file:

# -*- coding: utf-8 -*- # Run this app with `python app.py` and
# visit http://127.0.0.1:8050/ in your web browser. import dash
import dash_core_components as dcc
import dash_html_components as html
import plotly.express as px
import pandas as pd external_stylesheets = ['https://codepen.io/chriddyp/pen/bWLwgP.css'] app = dash.Dash(__name__, external_stylesheets=external_stylesheets) # assume you have a "long-form" data frame
# see https://plotly.com/python/px-arguments/ for more options
df = pd.DataFrame({ "Fruit": ["Apples", "Oranges", "Bananas", "Apples", "Oranges", "Bananas"], "Amount": [4, 1, 2, 2, 4, 5], "City": ["SF", "SF", "SF", "Montreal", "Montreal", "Montreal"]
}) fig = px.bar(df, x="Fruit", y="Amount", color="City", barmode="group") app.layout = html.Div(children=[ html.H1(children='Hello Dash'), html.Div(children=''' Dash: A web application framework for Python. '''), dcc.Graph( id='example-graph', figure=fig )
]) if __name__ == '__main__': app.run_server(debug=True)

You can get the code from the official Dash tutorial: https://dash.plotly.com/layout

Your PyCharm dashboard project should now look like this:


Debug Your Dash App Using PyCharm’s Tooltips


Now, let’s try to run our project by using the top menu and select Run > app.py. Unfortunately, it doesn’t already work—PyCharm doesn’t recognize dash!


You can easily fix this by hovering over the red underlined “dash” library import in your app and choosing the “install package dash” option.


This is one great advantage of an IDE is that installing dependencies in your Python projects is as simple as accepting the tooltips provided by your intelligent development environment.

Install Dash in Your Virtual Environment


Installing the dash library will take a few moments. Note that the library will be installed only in a virtual environment which means that it’ll install it not on your global operating system but only on a project level. For a different project, you may have to install dash again. While this may sound tedious, it’s actually the most Pythonic way because it keeps dependency management simple and decentralized. There won’t be any version issues because your first project needs version 1 and your second project needs version 2 of a given library. Instead, each project installs exactly the version it needs.

Install Pandas in Your Virtual Environment


PyCharm will tell you when it is done with installing the dash library in the virtual environment. Now repeat the same procedure for all red-underlined libraries in the project. If you used the code given above, you’ll have to install the pandas library (see Chapter 3) as well in your local environment. A few moments later, the pandas installation will also successfully complete. The red underlined error messages in your code will disappear and you’re ready to restart the project again by clicking “Run”.

Exploring Your First Dash App in Your Browser


On my machine, the output after running the app.py file in PyCharm is:

C:\Users\xcent\Desktop\Python\firstDashProject\venv\Scripts\python.exe C:/Users/xcent/Desktop/Python/firstDashProject/app.py
Dash is running on http://127.0.0.1:8050/ * Serving Flask app "app" (lazy loading) * Environment: production WARNING: This is a development server. Do not use it in a production deployment. Use a production WSGI server instead. * Debug mode: on

Note the highlighted line (in bold). You can now copy the URL http://127.0.0.1:8050/ and paste it into your browser—the dashboard app runs on a local server that is hosted on your machine with IP address 127.0.0.1 and port 8050.  

When you visit this URL in your browser, you should see your first Dash application!


Congratulations, you’re now well-prepared to run all dashboard apps in this book—and beyond it as well—using similar steps. For further reading on PyCharm, feel free to check out our multi-site blog tutorial on https://academy.finxter.com/course/introduction-to-pycharm/

The post How to Get Started With Python Dash on PyCharm [Absolute Beginners] first appeared on Finxter.


https://www.sickgaming.net/blog/2021/01/...beginners/

Print this item

  [Oracle Blog] JDK 10.0.2, 8u181, 7u191, and 6u201 Released!
Posted by: xSicKxBot - 03-23-2022, 11:50 AM - Forum: Java Language, JVM, and the JRE - No Replies

JDK 10.0.2, 8u181, 7u191, and 6u201 Released!

JDK 10.0.2, 8u181, 7u191, and 6u201 releases are now available. You can download the latest JDK releases from the Java SE Downloads page. NOTE: There are several items of interest in this CPU release that you should be aware of: There are no further planned update releases for JDK 9. Users of JDK 9 ...

https://blogs.oracle.com/java/post/jdk-1...1-released

Print this item

  [Tut] Guide to Setup Raspberry Pi with LCD Display using I2C Backpack
Posted by: xSicKxBot - 03-23-2022, 11:50 AM - Forum: PHP Development - No Replies

Guide to Setup Raspberry Pi with LCD Display using I2C Backpack

Last modified on November 8th, 2020.

Internet of things (IoT) is fascinating. I am predominantly a web applications person. But sensors, LED display, chips, soldering and the collage of software with these “things” is exciting.

The credit card sized Raspberry Pi computer gives all the opportunity to experiment and explore IoT. I wrote getting started with IoT using Raspberry Pi and PHP a while back. Now I thought of extending that and write about my hobby projects that I do with Raspberry Pi.

I have been using Raspberry Pi to,

  • Notify for new emails integrating GMail API.
  • Show the number of unread emails.
  • Monitor website uptime and notify if it’s up or down.
  • Show traffic user count to my website integrating Google Analytics.
  • Notify if there is a sale in my online shop.

Raspberry Pi is my hobby and I thought of sharing with you about these tiny projects. This will be a multi article series. Let us start with how to connect a I2C LCD display with the Raspberry Pi.

Then I will write about all the above items one by one.

I2C LCD display module


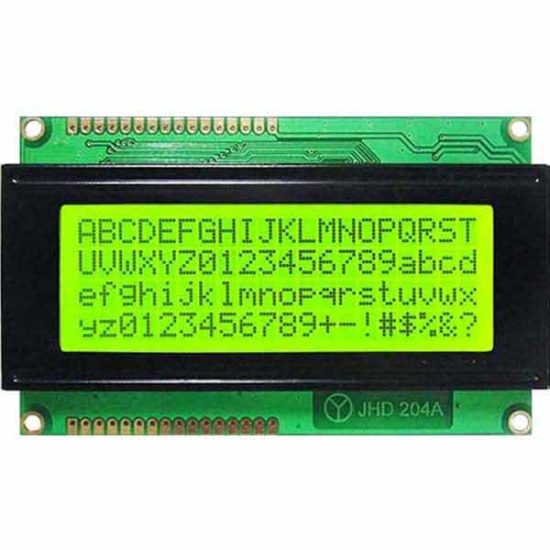
Widely popular are 16×2(LCD1602) and 20×4 (LCD2004) LCD displays. The below image shows a 20×4 LCD display module.

20x4 LCD Display Module

Three main reasons to choose this type of LCD display for IoT projects using Raspberry Pi or Arduino.

  1. Economical to purchase. You can buy a 16×2 LCD module for just $1 USD.
  2. It requires 5v to run and so we can hook it to Raspberry Pi and no dedicated power source required.
  3. Consumes low current. You can keep it on 24×7 with backlight on without burning your purse.

Why I2C backpack?


These LCD modules have parallel interface. That will not be convenient to connect multiple pins to the chip and use them in parallel mode.

I2C is a serial bus developed by Philips. So we can use I2C communication and just use 4 wires to communicate. To do this we need to use an I2C adapter and solder it to the display.

I2C uses two bidirectional lines, called SDA (Serial Data Line) and SCL (Serial Clock Line) with 5V standard power supply requirement a ground pin. So just 4 pins to deal with.

When you buy the LCD module, you can purchase LCD, I2C adapter separately and solder it. If soldering is not your thing, then it is better to buy the LCD module that comes with the I2C adapter backpack with it.

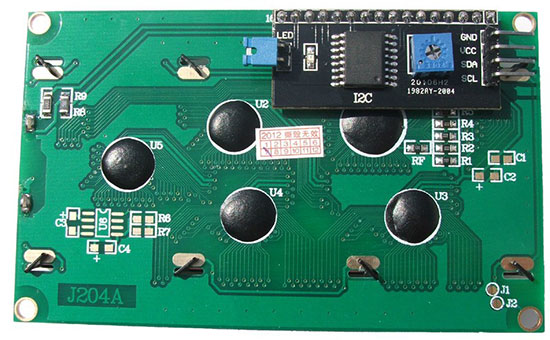
2004LCD with I2C Adapter

The above image is backside of a 2004 LCD module. The black thing is the I2C adapter. You can see the four pins GND, VCC, SDA and SCL. That’s where the you will be connecting the Raspberry Pi.

The square blue thing with plus mark is used for adjusting the brightness of the display. The blue jumper is used to switch on or off the backlight.

Switching off the backlight may not be necessary. If you switch off, the characters will be barely visible. You can keep it on 24×7, it will not eat up power as it is a low power consumption device.

Logic converter


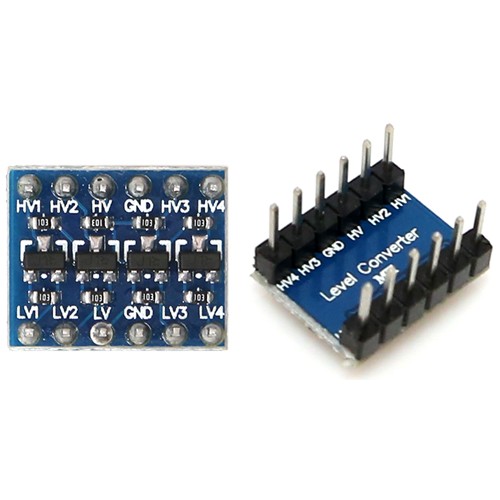
Raspberry Pi GPIO pins are natively of 3.3V. So we should not pull 5v from Raspberry Pi. The I2C LCD module works on 5V power and to make these compatible, we need to shift up the 3.3V GPIO to 5V. To do that, we can use a logic level converter.

Reference: https://www.raspberrypi.org/documentation/faqs/#pi-power-gpioout

Logic Level Converter

This is an important point and this is where a lot of beginners fail out. You may find some conflicting information in the Internet pages.

You might see RPIs connected directly to a 5V devices, but they may not be pulling power from RPI instead supplying externally. Only for data / instruction RPI might be used. So watch out, you might end up frying the LCD module or the RPI itself.

Required hardware list


  • Raspberry Pi (I have used Zero W and you can use any model you have).
  • LCD display with I2C adapter backpack (I have used 20×4, you can use as per your choice).
  • 3.3V to 5V bi-directional logic level converter
  • Breadboard
  • Jumper wires

Pre-requisite


  • Micro SD card with Raspbian OS
  • 5.1V power supply (Official power adapter recommended)
  • Memory card reader

Why official power adapter?


Why am I recommending the official power adapter! There is a reason to it. The cheap mobile adapters though guarantee a voltage, they do not provide a steady voltage. That may not be required in charging a cellphone device but not in the case of Raspberry Pi. That is the main reason, a USB keyboard or mouse attached does not get detected. They may not get sufficient power. Either go for an official power adapter or use the best branded one you know.

Headless


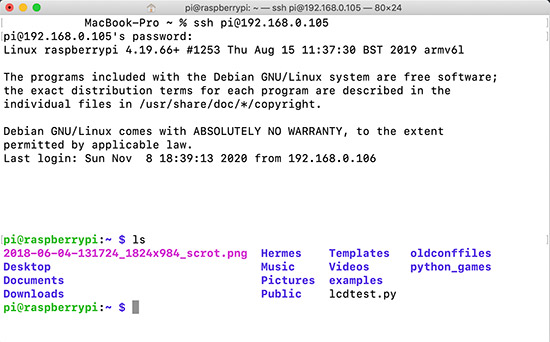
I have a headless setup. I am doing SSH from my MAC terminal and use VIM as editor. VNC viewer may occasionally help but doing the complete programming / debugging may not be comfortable. If you do not prefer SSH way, then you will need a monitor to plug-in to Raspberry Pi.

Headless Raspberry Pi

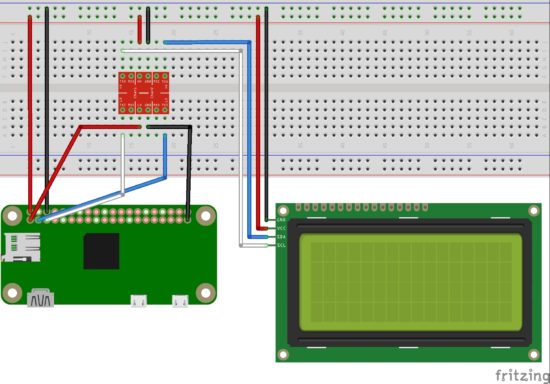
Raspberry Pi LCD I2C Circuit diagram


I have used a breadboard, logic level converter, 20×4 LCD display module with I2C backpack and Raspberry Pi Zero W in the circuit diagram.

Raspberry Pi LCD2004 I2C Circuit

3.3V GPIO of Raspberry Pi is converted using a logic level converter to 5V to be compatible for the LCD display.

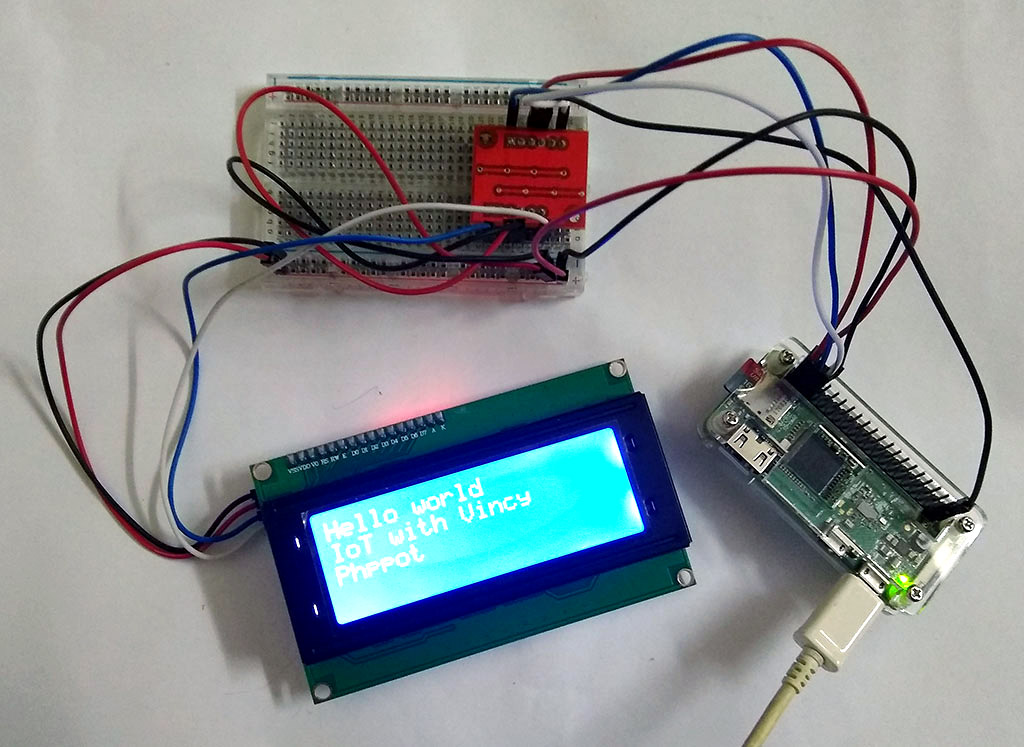
Raspberry Pi setup with LCD display module using I2C backpack


Raspberry Pi with I2C LCD Setup

Programming


As you know my language of choice to build website is PHP. But for IoT with Raspberry Pi, let us use Python. Reason being availability of packages and that will save ton of effort. Low level interactions via serial or parallel interface is easier via Python.

I2C


We need the below two tools for working with I2C. So install it by running the following command in the RPI terminal.

sudo apt-get install python-smbus i2c-tools

Enable I2C


sudo raspi-config

The above command opens the Raspberry Pi configuration in the terminal. Under ‘Interfacing Options’, activate I2C.

sudo vi /etc/modules

Add the following two lines at the end of the file and save it.

i2c-bcm2708
i2c-dev

Then restart Raspberry Pi.

sudo reboot

Test I2C


To check if the I2C is properly connected and detected.

sudo i2cdetect -y 1

This will return a matrix with ’27’ highlighted, that means you I2C is detected and it is the address.

Install PIP


curl https://bootstrap.pypa.io/get-pip.py -o get-pip.py
python3 get-pip.py

LCD Library


We need a library to interact with the LCD module. There are many Python libraries available. I prefer RPLCD.

sudo pip install RPLCD

This will install the RPLCD library.

Raspberry Pi LCD Hello World Python program


LCDHelloWorld.py

Following code imports the RPLCD library. Then initializes the LCD instance. Then print the “Hello World” string followed by new line. Then another two statements. Then a sleep for 5 seconds and switch off the LCD backlight. Finally, clear the LCD screen.

# Import LCD library
from RPLCD import i2c # Import sleep library
from time import sleep # constants to initialise the LCD
lcdmode = 'i2c'
cols = 20
rows = 4
charmap = 'A00'
i2c_expander = 'PCF8574' # Generally 27 is the address;Find yours using: i2cdetect -y 1 address = 0x27 port = 1 # 0 on an older Raspberry Pi # Initialise the LCD
lcd = i2c.CharLCD(i2c_expander, address, port=port, charmap=charmap, cols=cols, rows=rows) # Write a string on first line and move to next line
lcd.write_string('Hello world')
lcd.crlf()
lcd.write_string('IoT with Vincy')
lcd.crlf()
lcd.write_string('Phppot')
sleep(5)
# Switch off backlight
lcd.backlight_enabled = False # Clear the LCD screen
lcd.close(clear=True)

My next article in this series will be on how to integrate the GMail API and notify for new mails.

↑ Back to Top


https://www.sickgaming.net/blog/2020/11/...-backpack/

Print this item

  (Indie Deal) FREE Last Dream, 2K Sale, Core Keeper & Quantum Break
Posted by: xSicKxBot - 03-23-2022, 11:50 AM - Forum: Deals or Specials - No Replies

FREE Last Dream, 2K Sale, Core Keeper & Quantum Break

Last Dream FREEbie
[freebies.indiegala.com]
NEW FREEbie: Last Dream incorporates the best features of classic RPGs: replayability & complete immersion into a vast world, rich with detail
https://www.youtube.com/watch?v=-bsTaudFzNc
2K Sale, up to 95% OFF
[www.indiegala.com]
(Final weekend) Any purchase made on IndieGala (be it store deals or bundles) will be rewarding you instantly and handsomely, directly into your IndieGala account, with 5% of your final purchase (in the form of GalaCredit).
https://www.youtube.com/watch?v=r36nBuRGzVk
Stay Inside, Stay Safe and Enjoy Good Games.
Check out IndieGala on Twitter, YouTube & Facebook[www.facebook.com]


https://steamcommunity.com/groups/indieg...3537199178

Print this item

  (Free Game Key) Brothers - A Tale of Two Sons - Free Epic Game
Posted by: xSicKxBot - 03-23-2022, 11:50 AM - Forum: Deals or Specials - No Replies

Brothers - A Tale of Two Sons - Free Epic Game

Visit the store page and add the game to your account:

Brothers - A Tale of Two Sons[store.epicgames.com]

The game is free to keep until Feb 24th 2022 - 16:00 UTC.

Next week's freebie:
Cris Tales

We are welcoming everyone to join our discord[discord.gg]. We are more active there on finding giveaways, small or large, and there are daily raffles you can participate.

?GrabFreeGames.com ?Twitter ?Steam Curator ?Facebook[fb.me]?Discord[discord.gg]
❤️Support us: ✔️HumbleBundle Partner[www.humblebundle.com] Epic Tag: GrabFreeGames


https://steamcommunity.com/groups/GrabFr...1588580559

Print this item

  PC - Guild Wars 2: End of Dragons
Posted by: xSicKxBot - 03-23-2022, 11:50 AM - Forum: New Game Releases - No Replies

Guild Wars 2: End of Dragons


Guild Wars 2: End of Dragons is the third expansion for the award-winning and critically acclaimed MMORPG Guild Wars 2. The dragon cycle that has sustained and blighted Tyria for ages is collapsing. Mortal hearts and choices will define this moment in history—and echo in the future forever.

Publisher: NCSOFT

Release Date: Feb 28, 2022


https://www.metacritic.com/game/pc/guild...of-dragons

Print this item

  Quarkus: Modernize “helloworld” JBoss EAP quickstart, Part 1
Posted by: xSicKxBot - 03-22-2022, 05:39 PM - Forum: Java Language, JVM, and the JRE - No Replies

Quarkus: Modernize “helloworld” JBoss EAP quickstart, Part 1

Quarkus is, in its own words, “Supersonic subatomic Java” and a “Kubernetes native Java stack tailored for GraalVM & OpenJDK HotSpot, crafted from the best of breed Java libraries and standards.” For the purpose of illustrating how to modernize an existing Java application to Quarkus, I will use the Red Hat JBoss Enterprise Application Platform (JBoss EAP) quickstarts helloworld quickstart as sample of a Java application builds using technologies (CDI and Servlet 3) supported in Quarkus.

It’s important to note that both Quarkus and JBoss EAP rely on providing developers with tools based—as much as possible—on standards. If your application is not already running on JBoss EAP, there’s no problem. You can migrate it from your current application server to JBoss EAP using the Red Hat Application Migration Toolkit. After that, the final and working modernized version of the code is available in the https://github.com/mrizzi/jboss-eap-quickstarts/tree/quarkus repository inside the helloworld module.

This article is based on the guides Quarkus provides, mainly Creating Your First Application and Building a Native Executable.

Get the code


To start, clone the JBoss EAP quickstarts repository locally, running:

$ git clone https://github.com/jboss-developer/jboss...starts.git Cloning into 'jboss-eap-quickstarts'... remote: Enumerating objects: 148133, done. remote: Total 148133 (delta 0), reused 0 (delta 0), pack-reused 148133 Receiving objects: 100% (148133/148133), 59.90 MiB | 7.62 MiB/s, done. Resolving deltas: 100% (66476/66476), done. $ cd jboss-eap-quickstarts/helloworld/

Try plain, vanilla helloworld


The name of the quickstart is a strong clue about what this application does, but let’s follow a scientific approach in modernizing this code, so first things first: Try the application as it is.

Deploy helloworld


  1. Open a terminal and navigate to the root of the JBoss EAP directory EAP_HOME (which you can download).
  2. Start the JBoss EAP server with the default profile by typing the following command:
$ EAP_HOME/bin/standalone.sh 

Note: For Windows, use the EAP_HOME\bin\standalone.bat script.

After a few seconds, the log should look like:

[org.jboss.as] (Controller Boot Thread) WFLYSRV0025: JBoss EAP 7.2.0.GA (WildFly Core 6.0.11.Final-redhat-00001) started in 3315ms - Started 306 of 527 services (321 services are lazy, passive or on-demand)
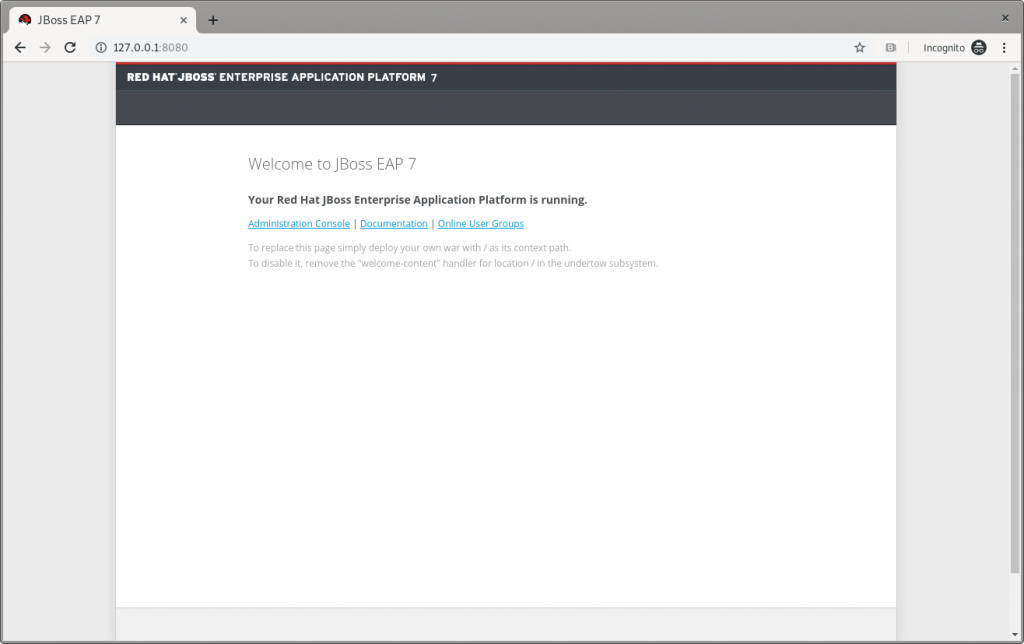
  1. Open http://127.0.0.1:8080 in a browser, and a page like Figure 1 should appear:
The JBoss EAP home page.

Figure 1: The JBoss EAP home page.

  1. Following instructions from Build and Deploy the Quickstart, deploy the helloworld quickstart and execute (from the project root directory) the command:
$ mvn clean install wildfly:deploy 

This command should end successfully with a log like this:

[INFO] ------------------------------------------------------------------------ [INFO] BUILD SUCCESS [INFO] ------------------------------------------------------------------------ [INFO] Total time: 8.224 s 

The helloworld application has now been deployed for the first time in JBoss EAP in about eight seconds.

Test helloworld


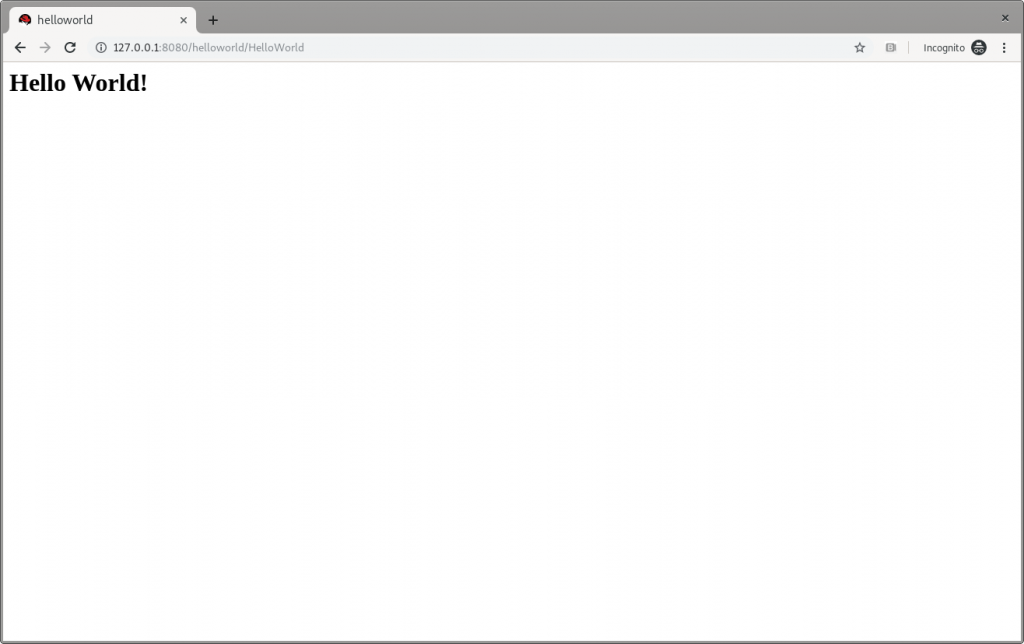
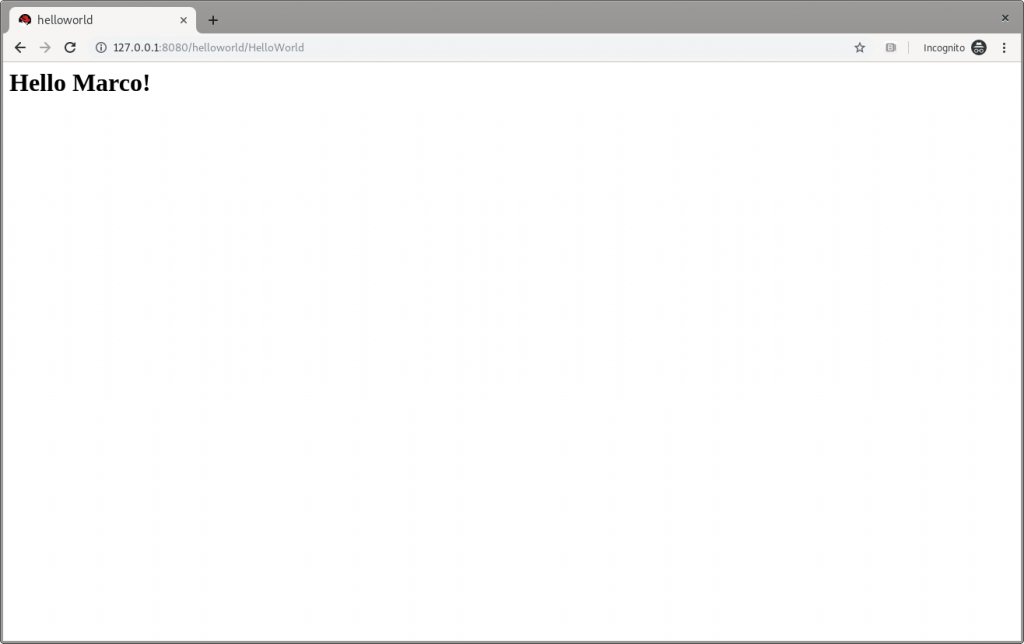
Following the Access the Application guide, open http://127.0.0.1:8080/helloworld in the browser and see the application page, as shown in Figure 2:

JBoss EAP's Hello World.

Figure 2: JBoss EAP’s Hello World.

Make changes


Change the createHelloMessage(String name) input parameter from World to Marco (my ego is cheap):

writer.println("<h1>" + helloService.createHelloMessage("Marco") + "</h1>");

Execute again the command:

$ mvn clean install wildfly:deploy 

and then refresh the web page in the browser to check the message displayed changes, as shown in Figure 3:

JBoss EAP's Hello Marco.

Figure 3: JBoss EAP’s Hello Marco.

Undeploy helloworld and shut down


If you want to undeploy (optional) the application before shutting down JBoss EAP, run the following command:

$ mvn clean install wildfly:undeploy 

To shut down the JBoss EAP instance, enter Ctrl+C in the terminal where it’s running.

Let’s modernize helloworld


Now we can leave the original helloworld behind and update it.

Create a new branch


Create a new working branch once the quickstart project finishes executing:

$ git checkout -b quarkus 7.2.0.GA 

Change the pom.xml file


The time has come to start changing the application. starting from the pom.xml file. From the helloworld folder, run the following command to let Quarkus add XML blocks:

$ mvn io.quarkus:quarkus-maven-plugin:0.23.2:create 

This article uses the 0.23.2 version. To know which is the latest version is, please refer to https://github.com/quarkusio/quarkus/releases/latest/, since the Quarkus release cycles are short.

This command changed the pom.xml, file adding:

  • The property <quarkus.version> to define the Quarkus version to be used.
  • The <dependencyManagement> block to import the Quarkus bill of materials (BOM). In this way, there’s no need to add the version to each Quarkus dependency.
  • The quarkus-maven-plugin plugin responsible for packaging the application, and also providing the development mode.
  • The native profile to create application native executables.

Further changes required to pom.xml, to be done manually:

  1. Move the <groupId> tag outside of the <parent> block, and above the <artifactId> tag. Because we remove the <parent> block in the next step, the <groupId> must be preserved.
  2. Remove the <parent> block: The application doesn’t need the JBoss parent pom anymore to run with Quarkus.
  3. Add the <version> tag (below the <artifactId> tag) with the value you prefer.
  4. Remove the <packaging> tag: The application won’t be a WAR anymore, but a plain JAR.
  5. Change the following dependencies:
    1. Replace the javax.enterprise:cdi-api dependency with io.quarkus:quarkus-arc, removing <scope>provided</scope> because—as stated in the documentation—this Quarkus extension provides the CDI dependency injection.
    2. Replace the org.jboss.spec.javax.servlet:jboss-servlet-api_4.0_spec dependency with io.quarkus:quarkus-undertow, removing the <scope>provided</scope>, because—again as stated in the documentation—this is the Quarkus extension that provides support for servlets.
    3. Remove the org.jboss.spec.javax.annotation:jboss-annotations-api_1.3_spec dependency because it’s coming with the previously changed dependencies.

The pom.xml file’s fully changed version is available at https://github.com/mrizzi/jboss-eap-quickstarts/blob/quarkus/helloworld/pom.xml.

Note that the above mvn io.quarkus:quarkus-maven-plugin:0.23.2:create command, besides the changes to the pom.xml file, added components to the project. The added file and folders are:

  • The files mvnw and mvnw.cmd, and .mvn folder: The Maven Wrapper allows you to run Maven projects with a specific version of Maven without requiring that you install that specific Maven version.
  • The docker folder (in src/main/): This folder contains example Dockerfile files for both native and jvm modes (together with a .dockerignore file).
  • The resources folder (in src/main/): This folder contains an empty application.properties file and the sample Quarkus landing page index.html (more in the section “Run the modernized helloworld“).

Run helloworld


To test the application, use quarkus:dev, which runs Quarkus in development mode (more details on Development Mode here).

Note: We expect this step to fail as changes are still required to the application, as detailed in this section.

Now run the command to check if and how it works:

$ ./mvnw compile quarkus:dev [INFO] Scanning for projects... [INFO] [INFO] ----------------< org.jboss.eap.quickstarts:helloworld >---------------- [INFO] Building Quickstart: helloworld quarkus [INFO] --------------------------------[ war ]--------------------------------- [INFO] [INFO] --- maven-resources-plugin:2.6:resources (default-resources) @ helloworld --- [INFO] Using 'UTF-8' encoding to copy filtered resources. [INFO] Copying 2 resources [INFO] [INFO] --- maven-compiler-plugin:3.1:compile (default-compile) @ helloworld --- [INFO] Nothing to compile - all classes are up to date [INFO] [INFO] --- quarkus-maven-plugin:0.23.2:dev (default-cli) @ helloworld --- Listening for transport dt_socket at address: 5005 INFO [io.qua.dep.QuarkusAugmentor] Beginning quarkus augmentation INFO [org.jbo.threads] JBoss Threads version 3.0.0.Final ERROR [io.qua.dev.DevModeMain] Failed to start quarkus: java.lang.RuntimeException: io.quarkus.builder.BuildException: Build failure: Build failed due to errors [error]: Build step io.quarkus.arc.deployment.ArcProcessor#validate threw an exception: javax.enterprise.inject.spi.DeploymentException: javax.enterprise.inject.UnsatisfiedResolutionException: Unsatisfied dependency for type org.jboss.as.quickstarts.helloworld.HelloService and qualifiers [@Default] - java member: org.jboss.as.quickstarts.helloworld.HelloWorldServlet#helloService - declared on CLASS bean [types=[javax.servlet.ServletConfig, java.io.Serializable, org.jboss.as.quickstarts.helloworld.HelloWorldServlet, javax.servlet.GenericServlet, javax.servlet.Servlet, java.lang.Object, javax.servlet.http.HttpServlet], qualifiers=[@Default, @Any], target=org.jboss.as.quickstarts.helloworld.HelloWorldServlet] at io.quarkus.arc.processor.BeanDeployment.processErrors(BeanDeployment.java:841) at io.quarkus.arc.processor.BeanDeployment.init(BeanDeployment.java:214) at io.quarkus.arc.processor.BeanProcessor.initialize(BeanProcessor.java:106) at io.quarkus.arc.deployment.ArcProcessor.validate(ArcProcessor.java:249) at sun.reflect.NativeMethodAccessorImpl.invoke0(Native Method) at sun.reflect.NativeMethodAccessorImpl.invoke(NativeMethodAccessorImpl.java:62) at sun.reflect.DelegatingMethodAccessorImpl.invoke(DelegatingMethodAccessorImpl.java:43) at java.lang.reflect.Method.invoke(Method.java:498) at io.quarkus.deployment.ExtensionLoader$1.execute(ExtensionLoader.java:780) at io.quarkus.builder.BuildContext.run(BuildContext.java:415) at org.jboss.threads.ContextClassLoaderSavingRunnable.run(ContextClassLoaderSavingRunnable.java:35) at org.jboss.threads.EnhancedQueueExecutor.safeRun(EnhancedQueueExecutor.java:2011) at org.jboss.threads.EnhancedQueueExecutor$ThreadBody.doRunTask(EnhancedQueueExecutor.java:1535) at org.jboss.threads.EnhancedQueueExecutor$ThreadBody.run(EnhancedQueueExecutor.java:1426) at java.lang.Thread.run(Thread.java:748) at org.jboss.threads.JBossThread.run(JBossThread.java:479) Caused by: javax.enterprise.inject.UnsatisfiedResolutionException: Unsatisfied dependency for type org.jboss.as.quickstarts.helloworld.HelloService and qualifiers [@Default] - java member: org.jboss.as.quickstarts.helloworld.HelloWorldServlet#helloService - declared on CLASS bean [types=[javax.servlet.ServletConfig, java.io.Serializable, org.jboss.as.quickstarts.helloworld.HelloWorldServlet, javax.servlet.GenericServlet, javax.servlet.Servlet, java.lang.Object, javax.servlet.http.HttpServlet], qualifiers=[@Default, @Any], target=org.jboss.as.quickstarts.helloworld.HelloWorldServlet] at io.quarkus.arc.processor.Beans.resolveInjectionPoint(Beans.java:428) at io.quarkus.arc.processor.BeanInfo.init(BeanInfo.java:371) at io.quarkus.arc.processor.BeanDeployment.init(BeanDeployment.java:206) ... 14 more 

It failed. Why? What happened?

The UnsatisfiedResolutionException exception refers to the HelloService class, which is a member of the HelloWorldServlet class (java member: org.jboss.as.quickstarts.helloworld.HelloWorldServlet#helloService). The problem is that HelloWorldServlet needs an injected instance of HelloService, but it can not be found (even if the two classes are in the very same package).

It’s time to return to Quarkus guides to leverage the documentation and understand how @Inject—and hence Contexts and Dependency Injection (CDI)—works in Quarkus, thanks to the Contexts and Dependency Injection guide. In the Bean Discovery paragraph, it says, “Bean classes that don’t have a bean defining annotation are not discovered.”

Looking at the HelloService class, it’s clear there’s no bean defining annotation, and one has to be added to have Quarkus to discover the bean. So, because it’s a stateless object, it’s safe to add the @ApplicationScoped annotation:

@ApplicationScoped public class HelloService { 

Note: The IDE should prompt you to add the required package shown here (add it manually if need be):

import javax.enterprise.context.ApplicationScoped; 

If you’re in doubt about which scope to apply when the original bean has no scope defined, please refer to the JSR 365: Contexts and Dependency Injection for Java 2.0—Default scope documentation.

Now, try again to run the application, executing again the ./mvnw compile quarkus:dev command:

$ ./mvnw compile quarkus:dev [INFO] Scanning for projects... [INFO] [INFO] ----------------< org.jboss.eap.quickstarts:helloworld >---------------- [INFO] Building Quickstart: helloworld quarkus [INFO] --------------------------------[ war ]--------------------------------- [INFO] [INFO] --- maven-resources-plugin:2.6:resources (default-resources) @ helloworld --- [INFO] Using 'UTF-8' encoding to copy filtered resources. [INFO] Copying 2 resources [INFO] [INFO] --- maven-compiler-plugin:3.1:compile (default-compile) @ helloworld --- [INFO] Changes detected - recompiling the module! [INFO] Compiling 2 source files to /home/mrizzi/git/forked/jboss-eap-quickstarts/helloworld/target/classes [INFO] [INFO] --- quarkus-maven-plugin:0.23.2:dev (default-cli) @ helloworld --- Listening for transport dt_socket at address: 5005 INFO [io.qua.dep.QuarkusAugmentor] (main) Beginning quarkus augmentation INFO [io.qua.dep.QuarkusAugmentor] (main) Quarkus augmentation completed in 576ms INFO [io.quarkus] (main) Quarkus 0.23.2 started in 1.083s. Listening on: http://0.0.0.0:8080 INFO [io.quarkus] (main) Profile dev activated. Live Coding activated. INFO [io.quarkus] (main) Installed features: [cdi] 

This time the application runs successfully.

Run the modernized helloworld


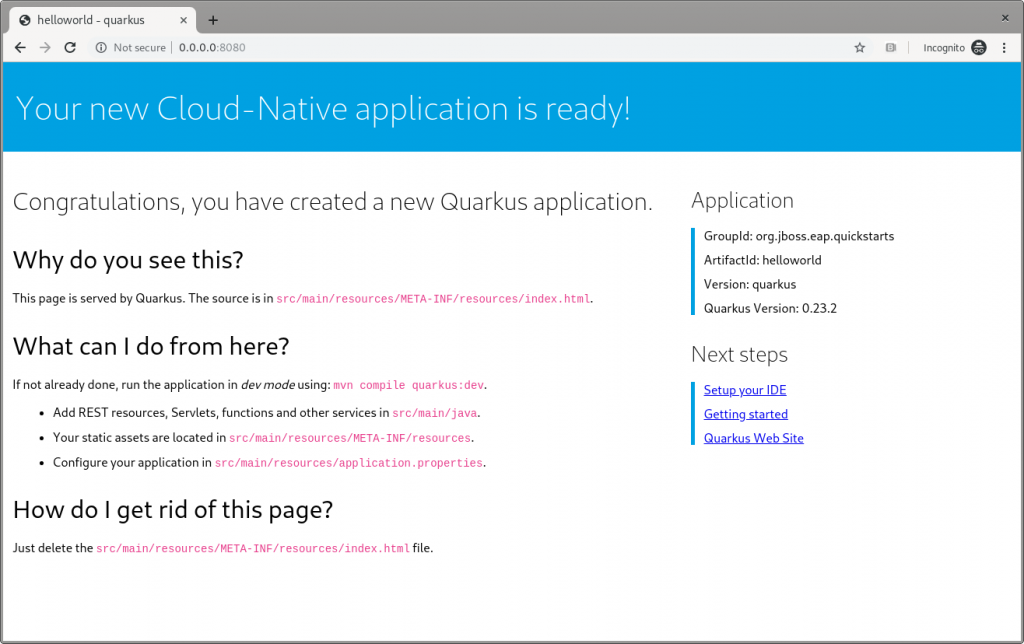
As the terminal log suggests, open a browser to http://0.0.0.0:8080(the default Quarkus landing page), and the page shown in Figure 4 appears:

The Quarkus dev landing page.

Figure 4: The Quarkus dev landing page.

This application has the following context’s definition in the WebServlet annotation:

@WebServlet("/HelloWorld") public class HelloWorldServlet extends HttpServlet { 

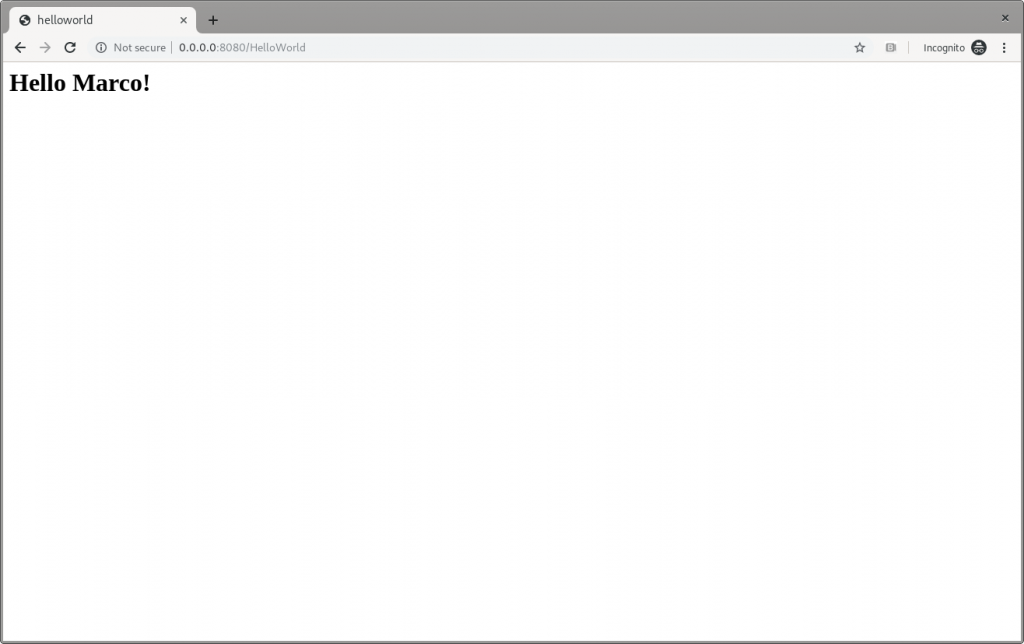
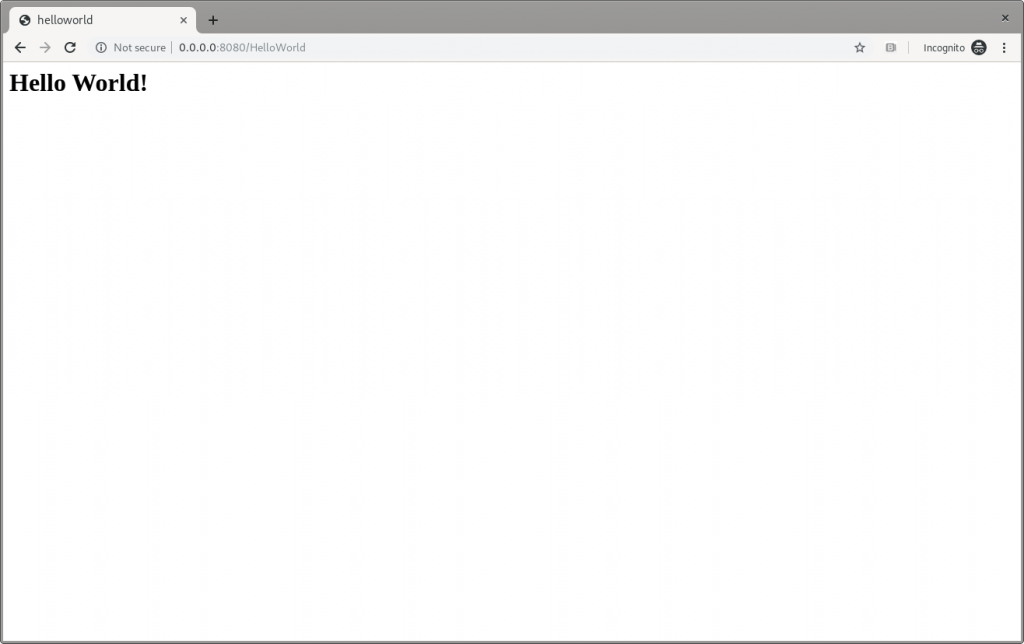
Hence, you can browse to http://0.0.0.0:8080/HelloWorldto reach the page shown in Figure 5:

The Quarkus dev Hello World page.

Figure 5: The Quarkus dev Hello World page.

It works!

Make changes


Please, pay attention to the fact that the ./mvnw compile quarkus:dev command is still running, and we’re not going to stop it. Now, try to apply the same—very trivial—change to the code and see how Quarkus improves the developer experience:

writer.println("<h1>" + helloService.createHelloMessage("Marco") + "</h1>");

Save the file, and then refresh the web page to check that Hello Marco appears, as shown in Figure 6:

The Quarkus dev Hello Marco page.

Figure 6: The Quarkus dev Hello Marco page.

Take time to check the terminal output:

INFO [io.qua.dev] (vert.x-worker-thread-3) Changed source files detected, recompiling [/home/mrizzi/git/forked/jboss-eap-quickstarts/helloworld/src/main/java/org/jboss/as/quickstarts/helloworld/HelloWorldServlet.java] INFO [io.quarkus] (vert.x-worker-thread-3) Quarkus stopped in 0.003s INFO [io.qua.dep.QuarkusAugmentor] (vert.x-worker-thread-3) Beginning quarkus augmentation INFO [io.qua.dep.QuarkusAugmentor] (vert.x-worker-thread-3) Quarkus augmentation completed in 232ms INFO [io.quarkus] (vert.x-worker-thread-3) Quarkus 0.23.2 started in 0.257s. Listening on: http://0.0.0.0:8080 INFO [io.quarkus] (vert.x-worker-thread-3) Profile dev activated. Live Coding activated. INFO [io.quarkus] (vert.x-worker-thread-3) Installed features: [cdi] INFO [io.qua.dev] (vert.x-worker-thread-3) Hot replace total time: 0.371s 

Refreshing the page triggered the source code change detection and the Quarkus automagic “stop-and-start.” All of this executed in just 0.371 seconds (that’s part of the Quarkus “Supersonic Subatomic Java” experience).

Build the helloworld packaged JAR


Now that the code works as expected, it can be packaged using the command:

$ ./mvnw clean package

This command creates two JARs in the /target folder. The first is helloworld-<version>.jar, which is the standard artifact built from the Maven command with the project’s classes and resources. The second is helloworld-<version>-runner.jar, which is an executable JAR.

Please pay attention to the fact that this is not an uber-jar, because all of the dependencies are copied into the /target/lib folder (and not bundled within the JAR). Hence, to run this JAR in another location or host, both the JAR file and the libraries in the /lib folder have to be copied, considering that the Class-Path entry of the MANIFEST.MF file in the JAR explicitly lists the JARs from the lib folder.

To create an uber-jar application, please refer to the Uber-Jar Creation Quarkus guide.

Run the helloworld packaged JAR


Now, the packaged JAR can be executed using the standard java command:

$ java -jar ./target/helloworld-<version>-runner.jar INFO [io.quarkus] (main) Quarkus 0.23.2 started in 0.673s. Listening on: http://0.0.0.0:8080 INFO [io.quarkus] (main) Profile prod activated. INFO [io.quarkus] (main) Installed features: [cdi] 

As done above, open the http://0.0.0.0:8080 URL in a browser, and test that everything works.

Build the helloworld quickstart-native executable


So far so good. The helloworld quickstart ran as a standalone Java application using Quarkus dependencies, but more can be achieved by adding a further step to the modernization path: Build a native executable.

Install GraalVM


First of all, the tools for creating the native executable have to be installed:

  1. Download GraalVM 19.2.0.1 from https://github.com/oracle/graal/releases/tag/vm-19.2.0.1.
  2. Untar the file using the command:

$ tar xvzf graalvm-ce-linux-amd64-19.2.0.1.tar.gz

  1. Go to the untar folder.
  2. Execute the following to download and add the native image component:

$ ./bin/gu install native-image

  1. Set the GRAALVM_HOME environment variable to the folder created in step two, for example:

$ export GRAALVM_HOME={untar-folder}/graalvm-ce-19.2.0.1)

More details and install instructions for other operating systems are available in Building a Native Executable—Prerequisites Quarkus guide.

Build the helloworld native executable


As stated in the Building a Native Executable—Producing a native executable Quarkus guide, “Let’s now produce a native executable for our application. It improves the startup time of the application and produces a minimal disk footprint. The executable would have everything to run the application including the ‘JVM’ (shrunk to be just enough to run the application), and the application.”

To create the native executable, the Maven native profile has to be enabled by executing:

$ ./mvnw package -Pnative

The build took me about 1:10 minutes and the result is the helloworld-<version>-runner file in the /target folder.

Run the helloworld native executable


The /target/helloworld-<version>-runner file created in the previous step. It’s executable, so running it is easy:

$ ./target/helloworld-<version>-runner INFO [io.quarkus] (main) Quarkus 0.23.2 started in 0.006s. Listening on: http://0.0.0.0:8080 INFO [io.quarkus] (main) Profile prod activated. INFO [io.quarkus] (main) Installed features: [cdi] 

As done before, open the http://0.0.0.0:8080 URL in a browser and test that everything is working.

Next steps


I believe that this modernization, even of a basic application, is the right way to approach a brownfield application using technologies available in Quarkus. This way, you can start facing the issues and tackling them to understand and learn how to solve them.

In part two of this series, I’ll look at how to capture memory consumption data in order to evaluate performance improvements, which is a fundamental part of the modernization process.

Share

The post Quarkus: Modernize “helloworld” JBoss EAP quickstart, Part 1 appeared first on Red Hat Developer.


https://www.sickgaming.net/blog/2019/11/...rt-part-1/

Print this item

  [Tut] 7 Ways to Make Money as a Coder – Without a Job
Posted by: xSicKxBot - 03-22-2022, 05:39 PM - Forum: Python - No Replies

7 Ways to Make Money as a Coder – Without a Job


https://www.sickgaming.net/blog/2021/01/...out-a-job/

Print this item

  [Oracle Blog] AMC 2.11 is Released!
Posted by: xSicKxBot - 03-22-2022, 05:39 PM - Forum: Java Language, JVM, and the JRE - No Replies

AMC 2.11 is Released!

The Advanced Management Console (AMC) 2.11 release is now available. AMC is a commercial product available as part of Oracle Java Standard Edition (SE) Advanced and Oracle Java SE Suite. AMC helps you manage the use of different Java versions and Java applications in your enterprise. This release of...

https://blogs.oracle.com/java/post/amc-211-is-released

Print this item

  [Tut] Stripe One Time Payment with Prebuilt Hosted Checkout in PHP
Posted by: xSicKxBot - 03-22-2022, 05:39 PM - Forum: PHP Development - No Replies

Stripe One Time Payment with Prebuilt Hosted Checkout in PHP

Last modified on October 6th, 2020.

Stripe provides payment processing to support eCommerce software and mobile APPs. The key features by Stripe are,

  • fast and interactive checkout experience.
  • secure, smooth payment flow.
  • scope to uplift the conversion rate and business growth.

Stripe is the most popular payment gateway solution supporting card payments along with PayPal. Its complete documentation helps developers to do an effortless integration.

Stripe provides different types of payment services to accept payments. It supports accepting one-time payment, recurring payment, in-person payment and more.

There are two ways to set up the Stripe one-time payment option in a eCommerce website.

  1. Use the secure prebuilt hosted checkout page.
  2. Create a custom payment flow.

Let us take the first method to integrate Stripe’s one-time payment. The example code redirects customers to the Stripe hosted checkout page. It’s a pre-built page that allows customers to enter payment details.

Stripe hosted checkout option piggybacks on the Stripe trust factor. If your website is lesser-known, if you are not popular, then it is best to choose this option. Because the end users may feel uncomfortable to enter their card details on your page.

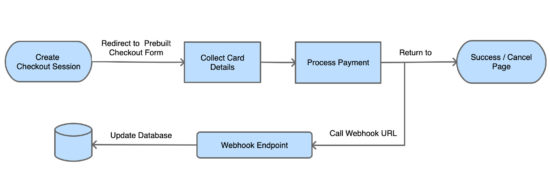
This diagram depicts the Stripe payment flow, redirect and response handling.
Stripe Hosted Checkout Block Diagram

In this example, it uses the latest checkout version to set up a one-time payment. If you want to create Stripe subscription payment, then the linked article has an example for it.

What is inside?


  1. About Stripe Checkout
  2. Steps to set up Stripe one-time payment flow
  3. About this example
  4. Generate and configure Stripe API keys
  5. Create webhook and map events
  6. Required libraries to access Stripe API
  7. Create client-server-side code to initiate checkout
  8. Capture and process webhook response
  9. Evaluate integration with test data
  10. Stripe one-time payment example output

About Stripe Checkout


Latest Stripe Checkout provides a frictionless smooth checkout experience. The below list shows some features of the latest Stripe checkout version.

  • Strong Customer Authentication (SCA).
  • Checkout interface fluidity over various devices’ viewport.
  • Multilingual support.
  • Configurable options to enable billing address collection, email receipts, and Button customizations

If you are using the legacy version,  it’s so simple to migrate to the latest Stripe Checkout version. The upgraded version supports advanced features like 3D secure, mobile payments and more.

Steps to setup Stripe one-time payment flow


The below steps are the least needs to set up a Stripe one-time payment online.

  1. Register with Stripe and generate API keys.
  2. Configure API keys with the application.
  3. Install and load the required libraries to access API.
  4. Create client and server-side code to make payments.
  5. Create endpoints to receive payment response and log into a database.
  6. Create a UI template to acknowledge customers.

We will see the above steps in this article with example code and screenshots.

About Stripe payment integration example


Stripe API allows applications to access and use its online payment services. It provides Stripe.js a JavaScript library to initiate the payment session flow.

This example code imports the Stripe libraries to access the API functions. It sets the endpoint to build the request and receive the response.

The client and server-side code redirect customers to the Stripe hosted checkout page. In the callback handlers, it processes the payment response sent by the API.

This example uses a database to store payment entries. It uses MySQLi with prepared statements to execute queries.

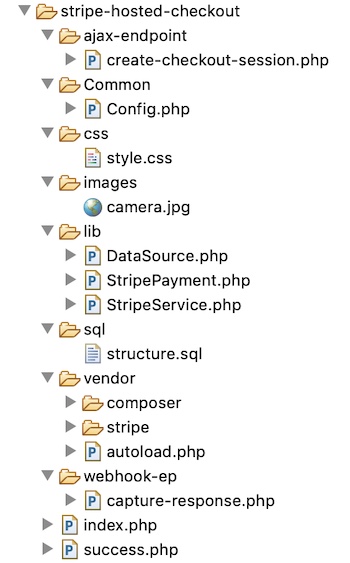
This image shows the simple file architecture of this example.
Stripe Hosted Checkout File Structure

Get and configure Stripe API keys


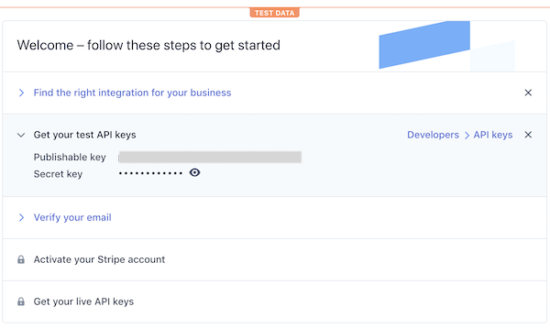
Register and log in with Stripe to get the API keys. Stripe dashboard will show two keys publishable_key and secret_key.

These keys are the reference to validate the request during the authentication process.

Note: Once finish testing in a sandbox mode, Stripe requires to activate the account to get the live API keys.
Get Stripe API Keys

This code shows the constants created to configure the API keys for this example.

<?php
namespace Phppot; class Config
{ const ROOT_PATH = "https://your-domain/stripe-hosted"; /* Stripe API test keys */ const STRIPE_PUBLISHIABLE_KEY = ""; const STRIPE_SECRET_KEY = ""; /* PRODUCT CONFIGURATIONS BEGINS */ const PRODUCT_NAME = 'A6900 MirrorLess Camera'; const PRODUCT_IMAGE = Config::ROOT_PATH . '/images/camera.jpg'; const PRODUCT_PRICE = '289.61'; const CURRENCY = 'USD'; const PRODUCT_TYPE = 'good';
}

Create webhook and map events


Creating a webhook is a conventional way to get the payment notifications sent by the API. All payment gateway providers give the option to create webhook for callback.

In PayPal payment gateway integration article, we have seen the types of notification mechanisms supported by PayPal.

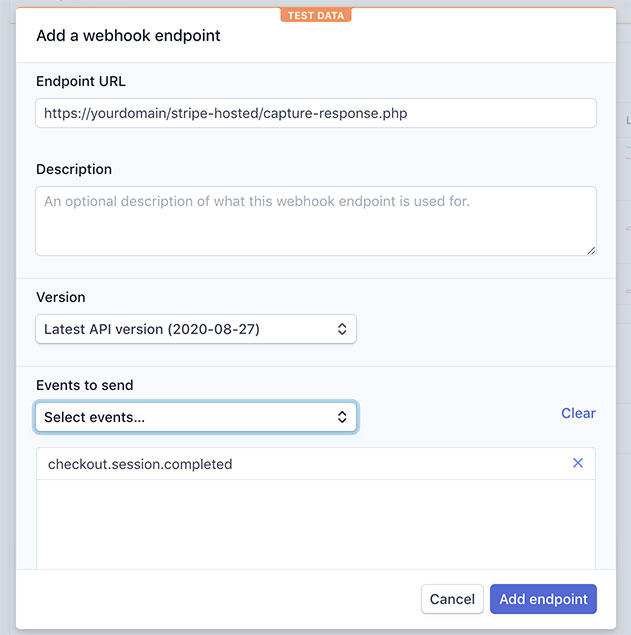
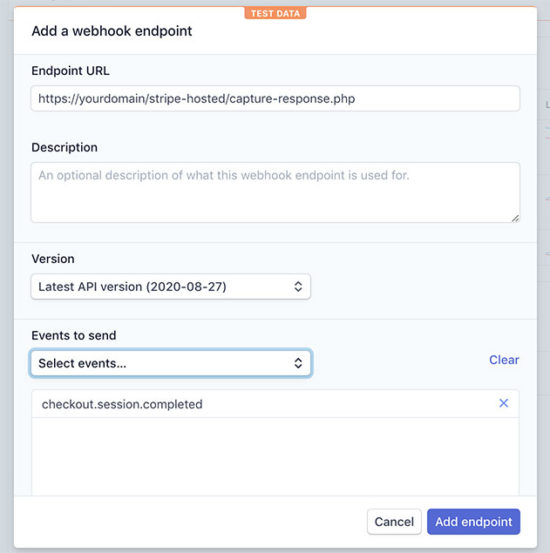
The code has the webhook endpoint registered with Stripe. It handles the API responses based on the event that occurred.

The below image shows the screenshot of the add-endpoint dialog. It populates the URL and the mapped events in the form fields.

Navigate via Developers->Webhooks and click the Add endpoint button to see the dialog.
Add Stripe Webhook Endpoint

Required libraries to access Stripe API


First, download and install the stripe-php library. This will help to send flawless payment initiation request to the Stripe API.

This command helps to install this library via Composer. It is also available to download from GitHub.

composer require stripe/stripe-php

Load Stripe.js JavaScript library into the page which has the checkout button. Load this file by using https://js.stripe.com/v3/ instead of having it in local.

<script src="https://js.stripe.com/v3/"></script>

Create client-server code to process checkout


This section includes the steps needed to create the client-server code for setting up the Stripe one-time payment.

  1. Add checkout button and load Stripe.js
  2. Create a JavaScript event handler to initiate checkout session
  3. Create PHP endpoint to post create-checkout-session request
  4. Redirect customers to the Stripe hosted checkout page
  5. Get checkout session-id from the response.

HTML page with Stripe checkout button


This page has HTML code to add the Stripe checkout button. It loads the Stripe.js library.

This page loads a JavaScript that initiates the checkout session and redirects the user to the prebuilt Stripe hosted checkout.

The Stripe hosted checkout form handles the card validation effectively. We have created a custom car validator for Authorize.net payment integration code. Hosted checkout is more secure than handling card details by custom handlers.

index.php

<?php
namespace Phppot;
?>
<html>
<title>Stripe Prebuilt Hosted Checkout</title>
<head>
<link href="css/style.css" type="text/css" rel="stylesheet" />
<script src="https://js.stripe.com/v3/"></script>
</head>
<body> <div class="phppot-container"> <h1>Stripe Prebuilt Hosted Checkout</h1> <div id="payment-box"> <img src="images/camera.jpg" /> <h4 class="txt-title">A6900 MirrorLess Camera</h4> <div class="txt-price">$289.61</div> <button id="checkout-button">Checkout</button> </div> </div> <script> var stripe = Stripe('<?php echo Config::STRIPE_PUBLISHIABLE_KEY; ?>'); var checkoutButton = document.getElementById('checkout-button'); checkoutButton.addEventListener('click', function() { fetch('create-checkout-session.php', { method: 'POST', }) .then(function(response) { return response.json(); }) .then(function(session) { return stripe.redirectToCheckout({ sessionId: session.id }); }) .then(function(result) { if (result.error) { alert(result.error.message); } }) .catch(function(error) { console.error('Error:', error); }); }); </script>
</body>
</html>

JavaScript event handler initiates checkout session


In the previous section, it loads a JavaScript to do the following.

  1. Instantiate Stripe Javascript library object with the reference of the Stripe Publishable key.
  2. Map the checkout button’s click event to initiate a create-checkout-session.
  3. Redirect customers to the Stripe hosted checkout page with the checkout session id.

It calls the PHP endpoint builds the API request params to start a checkout session.

Then it receives the checkout-session-id as returned by the PHP endpoint. The redirectToCheckout() method sends customers to the prebuilt checkout to complete the payment.

PHP endpoint processing create-checkout-session request


When clicking the checkout button, the JavaScript executes an AJAX request. It fetches the PHP endpoint processing the create-checkout-session request.

The below code shows how to create the Stripe checkout-session via API. The API request is with the required query parameters. It includes the product detail, unit amount, payment method and more.

Then the API will return the session object after processing this request. This endpoint parses the response and grab the session-id and return it.

ajax-endpoint/create-checkout-session.php

<?php
namespace Phppot; use Phppot\StripeService;
use Phppot\StripePayment; $orderReferenceId = rand(100000, 999999); require_once __DIR__ . "/../lib/StripeService.php";
require_once __DIR__ .'/../Common/Config.php'; require_once __DIR__ . '/../lib/StripePayment.php';
$stripePayment = new StripePayment(); $stripeService = new StripeService(); $currency = Config::CURRENCY; $orderId = $stripePayment->insertOrder(Config::PRODUCT_PRICE, $currency, $orderReferenceId, "Payment in-progress");
$unitAmount = Config::PRODUCT_PRICE * 100;
$session = $stripeService->createCheckoutSession($unitAmount, $orderId);
echo json_encode($session);

The StripeService is a PHP class created to build API requests and process responses.

The createCheckoutSession() function builds the param array for the create-checkout-session request.

This service also handles the webhook responses sent by the API. The API sends the response on the occurrences of the events mapped with the webhook endpoint URL.

lib/StripeService.php

<?php
namespace Phppot; require_once __DIR__ . '/../Common/Config.php'; class StripeService
{ function __construct() { require_once __DIR__ . "/../vendor/autoload.php"; // Set your secret key. Remember to set your live key in production! \Stripe\Stripe::setApiKey(Config::STRIPE_SECRET_KEY); } public function createCheckoutSession($unitAmount, $clientReferenceId) { $checkout_session = \Stripe\Checkout\Session::create([ 'payment_method_types' => ['card'], 'line_items' => [[ 'price_data' => [ 'currency' => Config::CURRENCY, 'unit_amount' => $unitAmount, 'product_data' => [ 'name' => Config::PRODUCT_NAME, 'images' => [Config::PRODUCT_IMAGE], ], ], 'quantity' => 1, ]], 'mode' => 'payment', 'client_reference_id' => $clientReferenceId, 'success_url' => Config::ROOT_PATH . '/success.php?session_id={CHECKOUT_SESSION_ID}', 'cancel_url' => Config::ROOT_PATH . '/index.php?status=cancel', ]); return $checkout_session; } public function captureResponse() { $payload = @file_get_contents('php://input'); $event = json_decode($payload); require_once __DIR__ . "/../lib/StripePayment.php"; $stripePayment = new StripePayment(); switch($event->type) { case "customer.created": $param["stripe_customer_id"] = $event->data->object->id; $param["email"] = $event->data->object->email; $param["customer_created_datetime"] = date("Y,m,d H:i:s", $event->data->object->created); $param["stripe_response"] = json_encode($event->data->object); $stripePayment->insertCustomer($param); break; case "checkout.session.completed": $param["order_id"] = $event->data->object->client_reference_id; $param["customer_id"] = $event->data->object->customer; $param["payment_intent_id"] = $event->data->object->payment_intent; $param["stripe_checkout_response"] = json_encode($event->data->object); $stripePayment->updateOrder($param); break; case "payment_intent.created": $param["payment_intent_id"] = $event->data->object->id; $param["payment_create_at"] = date("Y-m-d H:i:s", $event->data->object->created); $param["payment_status"] = $event->data->object->status; $param["stripe_payment_response"] = json_encode($event->data->object); $stripePayment->insertPayment($param); break; case "payment_intent.succeeded": $param["payment_intent_id"] = $event->data->object->id; $param["billing_name"] = $event->data->object->charges->data[0]->billing_details->name; $param["billing_email"] = $event->data->object->charges->data[0]->billing_details->email; $param["payment_last_updated"] = date("Y-m-d H:i:s", $event->data->object->charges->data[0]->created); $param["payment_status"] = $event->data->object->charges->data[0]->status; $param["stripe_payment_response"] = json_encode($event->data->object); $stripePayment->updatePayment($param); break; case "payment_intent.canceled": $param["payment_intent_id"] = $event->data->object->id; $param["billing_name"] = $event->data->object->charges->data[0]->billing_details->name; $param["billing_email"] = $event->data->object->charges->data[0]->billing_details->email; $param["payment_last_updated"] = date("Y-m-d H:i:s", $event->data->object->charges->data[0]->created); $param["payment_status"] = $event->data->object->charges->data[0]->status; $param["stripe_payment_response"] = json_encode($event->data->object); $stripePayment->updatePayment($param); break; case "payment_intent.payment_failed": $param["payment_intent_id"] = $event->data->object->id; $param["billing_name"] = $event->data->object->charges->data[0]->billing_details->name; $param["billing_email"] = $event->data->object->charges->data[0]->billing_details->email; $param["payment_last_updated"] = date("Y-m-d H:i:s", $event->data->object->charges->data[0]->created); $param["payment_status"] = $event->data->object->charges->data[0]->status; $param["stripe_payment_response"] = json_encode($event->data->object); $stripePayment->updatePayment($param); break; } http_response_code(200); }
}

Capture and process response


The capture-response.php file calls the StripeService class to handle the webhook response.

The registered webhook endpoint has the mapping for the events. The figure shows the mapped events and the webhook URL below.
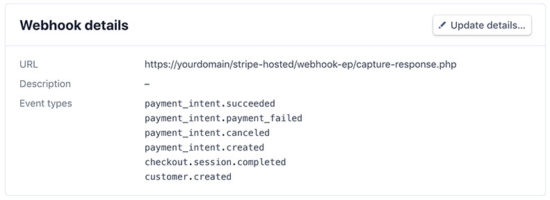
Stripe Developers Webhook Detail

The captureResponse() function handles the API response based on the events that occurred.

On each event, it updates the customer, order database tables. It creates the payment response log to put entries into the tbl_stripe_response table.

webhook-ep/capture-response.php

<?php
namespace Phppot; use Phppot\StriService; require_once __DIR__ . "/../lib/StripeService.php"; $stripeService = new StripeService(); $stripeService->captureResponse(); ?>

It invokes the StripeService function captureResponse(). It calls StripePayment to store Orders, Customers and Payment data into the database.

The StripePayment class it uses DataSource to connect the database and access it.

lib/StripePayment.php

<?php
namespace Phppot; use Phppot\DataSource; class StripePayment
{ private $ds; function __construct() { require_once __DIR__ . "/../lib/DataSource.php"; $this->ds = new DataSource(); } public function insertOrder($unitAmount, $currency, $orderReferenceId, $orderStatus) { $orderAt = date("Y-m-d H:i:s"); $insertQuery = "INSERT INTO tbl_order(order_reference_id, amount, currency, order_at, order_status) VALUES (?, ?, ?, ?, ?) "; $paramValue = array( $orderReferenceId, $unitAmount, $currency, $orderAt, $orderStatus ); $paramType = "sisss"; $insertId = $this->ds->insert($insertQuery, $paramType, $paramValue); return $insertId; } public function updateOrder($param) { $paymentDetails = $this->getPaymentByIntent($param["payment_intent_id"]); if (! empty($paymentDetails)) { if($paymentDetails[0]["payment_status"] == "succeeded") { $paymentStatus = "Paid"; } else if($paymentDetails[0]["payment_status"] == "requires_source") { $paymentStatus = "Payment in-progress"; } $query = "UPDATE tbl_order SET stripe_customer_id = ?, stripe_payment_intent_id = ?, stripe_checkout_response = ?, order_status = ? WHERE id = ?"; $paramValue = array( $param["customer_id"], $param["payment_intent_id"], $param["stripe_checkout_response"], $paymentStatus, $param["order_id"] ); $paramType = "ssssi"; $this->ds->execute($query, $paramType, $paramValue); } } public function insertCustomer($customer) { $insertQuery = "INSERT INTO tbl_customer(stripe_customer_id, email, customer_created_datetime, stripe_response) VALUES (?, ?, ?, ?) "; $paramValue = array( $customer["stripe_customer_id"], $customer["email"], $customer["customer_created_datetime"], $customer["stripe_response"] ); $paramType = "ssss"; $this->ds->insert($insertQuery, $paramType, $paramValue); } public function insertPayment($param) { $insertQuery = "INSERT INTO tbl_payment(stripe_payment_intent_id, payment_create_at, payment_status, stripe_payment_response) VALUES (?, ?, ?, ?) "; $paramValue = array( $param["payment_intent_id"], $param["payment_create_at"], $param["payment_status"], $param["stripe_payment_response"] ); $paramType = "ssss"; $this->ds->insert($insertQuery, $paramType, $paramValue); } public function updatePayment($param) { $query = "UPDATE tbl_payment SET billing_name = ?, billing_email = ?, payment_last_updated = ?, payment_status = ?, stripe_payment_response = ? WHERE stripe_payment_intent_id = ?"; $paramValue = array( $param["billing_name"], $param["billing_email"], $param["payment_last_updated"], $param["payment_status"], $param["stripe_payment_response"], $param["payment_intent_id"] ); $paramType = "ssssss"; $this->ds->execute($query, $paramType, $paramValue); } public function getPaymentByIntent($paymentIntent) { $query = "SELECT * FROM tbl_payment WHERE stripe_payment_intent_id = ?"; $paramValue = array( $paymentIntent ); $paramType = "s"; $result = $this->ds->select($query, $paramType, $paramValue); return $result; }
}
?>

Showing success page after payment


As sent with the create-checkout-session request, Stripe invokes the success page URL after payment.

The below code has the payment success message to acknowledge customers.

success.php

<?php
namespace Phppot; require_once __DIR__ . '/Common/Config.php';
?>
<html>
<head>
<title>Payment Response</title>
<link href="./css/style.css" type="text/css" rel="stylesheet" />
</head>
<body> <div class="phppot-container"> <h1>Thank you for shopping with us.</h1> <p>You have purchased "<?php echo Config::PRODUCT_NAME; ?>" successfully.</p> <p>You have been notified about the payment status of your purchase shortly.</p> </div>
</body>
</html>

Database script


Import the following SQL script to execute this example in your environment. It has the SQL to create tables created for this example and to build a relationship between them.

sql/structure.sql

--
-- Table structure for table `tbl_customer`
-- CREATE TABLE `tbl_customer` ( `id` int(11) NOT NULL, `stripe_customer_id` varchar(255) NOT NULL, `email` varchar(50) NOT NULL, `customer_created_datetime` timestamp NOT NULL DEFAULT CURRENT_TIMESTAMP ON UPDATE CURRENT_TIMESTAMP, `stripe_response` text NOT NULL, `create_at` timestamp NOT NULL DEFAULT CURRENT_TIMESTAMP ON UPDATE CURRENT_TIMESTAMP
) ENGINE=InnoDB DEFAULT CHARSET=latin1; -- -------------------------------------------------------- --
-- Table structure for table `tbl_order`
-- CREATE TABLE `tbl_order` ( `id` int(11) NOT NULL, `order_reference_id` varchar(255) NOT NULL, `stripe_customer_id` varchar(255) DEFAULT NULL, `stripe_payment_intent_id` varchar(255) DEFAULT NULL, `amount` decimal(10,2) NOT NULL, `currency` varchar(10) NOT NULL, `order_at` timestamp NOT NULL DEFAULT CURRENT_TIMESTAMP ON UPDATE CURRENT_TIMESTAMP, `order_status` varchar(25) NOT NULL, `stripe_checkout_response` text NOT NULL, `create_at` timestamp NOT NULL DEFAULT CURRENT_TIMESTAMP ON UPDATE CURRENT_TIMESTAMP
) ENGINE=InnoDB DEFAULT CHARSET=latin1; -- -------------------------------------------------------- --
-- Table structure for table `tbl_payment`
-- CREATE TABLE `tbl_payment` ( `id` int(11) NOT NULL, `stripe_payment_intent_id` varchar(255) NOT NULL, `payment_create_at` timestamp NULL DEFAULT NULL, `payment_last_updated` timestamp NULL DEFAULT '0000-00-00 00:00:00', `billing_name` varchar(255) NOT NULL, `billing_email` varchar(255) NOT NULL, `payment_status` varchar(255) NOT NULL, `stripe_payment_response` text NOT NULL, `create_at` timestamp NOT NULL DEFAULT CURRENT_TIMESTAMP ON UPDATE CURRENT_TIMESTAMP
) ENGINE=InnoDB DEFAULT CHARSET=latin1; --
-- Indexes for dumped tables
-- --
-- Indexes for table `tbl_customer`
--
ALTER TABLE `tbl_customer` ADD PRIMARY KEY (`id`), ADD UNIQUE KEY `stripe_customer_id` (`stripe_customer_id`); --
-- Indexes for table `tbl_order`
--
ALTER TABLE `tbl_order` ADD PRIMARY KEY (`id`), ADD KEY `stripe_payment_intent_id` (`stripe_payment_intent_id`), ADD KEY `stripe_customer_id` (`stripe_customer_id`); --
-- Indexes for table `tbl_payment`
--
ALTER TABLE `tbl_payment` ADD PRIMARY KEY (`id`), ADD UNIQUE KEY `stripe_payment_intent_id` (`stripe_payment_intent_id`); --
-- AUTO_INCREMENT for dumped tables
-- --
-- AUTO_INCREMENT for table `tbl_customer`
--
ALTER TABLE `tbl_customer` MODIFY `id` int(11) NOT NULL AUTO_INCREMENT; --
-- AUTO_INCREMENT for table `tbl_order`
--
ALTER TABLE `tbl_order` MODIFY `id` int(11) NOT NULL AUTO_INCREMENT; --
-- AUTO_INCREMENT for table `tbl_payment`
--
ALTER TABLE `tbl_payment` MODIFY `id` int(11) NOT NULL AUTO_INCREMENT; --
-- Constraints for dumped tables
-- --
-- Constraints for table `tbl_order`
--
ALTER TABLE `tbl_order` ADD CONSTRAINT `tbl_order_ibfk_1` FOREIGN KEY (`stripe_payment_intent_id`) REFERENCES `tbl_payment` (`stripe_payment_intent_id`), ADD CONSTRAINT `tbl_order_ibfk_2` FOREIGN KEY (`stripe_customer_id`) REFERENCES `tbl_customer` (`stripe_customer_id`);
COMMIT;

Evaluate integration with test data


After integrating Stripe one-time payment, evaluate the integration with test card details.

The following test card details help to try a successful payment flow.

Card Number 4242424242424242
Expiry Month/Year Any future date
CVV Three-digit number

Stripe provides more test card details to receive more types of responses.

Stripe one-time payment example output


This example displays a product tile with the Stripe Checkout button as shown below.

Stripe Payment Landing Page

On clicking the Checkout button, it redirects customers to the prebuilt Stripe hosted checkout page.
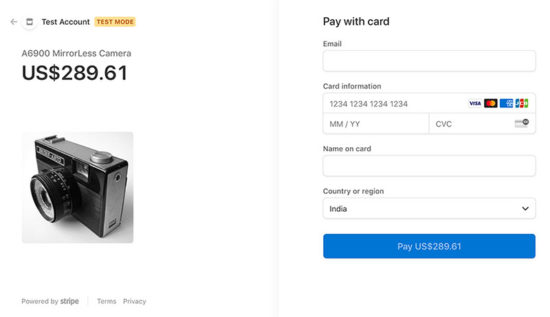
Stripe Hosted Checkout Page

After processing the payment, Stripe will redirect customers to the success page URL.
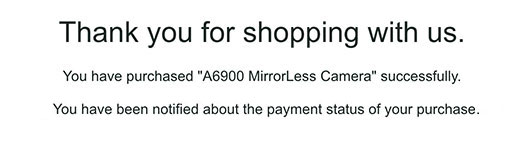
Payment Success Page

Conclusion


We have seen how to integrate the stripe hosted checkout in PHP with an example. Hope it is simple and easy to follow.

It helps to have a quick glance with the bullet points pre-requisites, implementation steps. It pinpoints the todo items in short.

The downloadable source code has the required vendor files. It is not needed to download libraries and SDK from anywhere.

With database intervention, the code is ready to integrate with a full-fledged application.

With the latest Stripe checkout version, it provides payment services with SCA and more advanced features.

Download

↑ Back to Top


https://www.sickgaming.net/blog/2020/10/...ut-in-php/

Print this item