Open Liberty Java runtime now available to Red Hat Runtimes subscribers
Open Liberty is a lightweight, production-ready Java runtime for containerizing and deploying microservices to the cloud, and is now available as part of a Red Hat Runtimes subscription. If you are a Red Hat Runtimes subscriber, you can write your Eclipse MicroProfile and Jakarta EE apps on Open Liberty and then run them in containers on Red Hat OpenShift, with commercial support from Red Hat and IBM.
Develop cloud-native Java microservices
Open Liberty is designed to provide a smooth developer experience with a one-second startup time, a low memory footprint, and our new dev mode:
Open Liberty provides a full implementation of MicroProfile 3 and Jakarta EE 8. MicroProfile is a collaborative project between multiple vendors (including Red Hat and IBM) and the Java community that aims to optimize enterprise Java for writing microservices. With a four-week release schedule, Liberty usually has the latest MicroProfile release available soon after the spec is published.
Also, Open Liberty is supported in common developer tools, including VS Code, Eclipse, Maven, and Gradle. Server configuration (e.g., adding or removing a capability, or “feature,” to your app) is through an XML file. Open Liberty’s zero migration policy means that you can focus on what’s important (writing your app!) and not have to worry about APIs changing under you.
Deploy in containers to any cloud
When you’re ready to deploy your app, you can just containerize it and deploy it to OpenShift. The zero migration principle means that new versions of Open Liberty features will not break your app, and you can control which version of the feature your app uses.
Monitoring live microservices is enabled by MicroProfile Metrics, Health, and OpenTracing, which add observability to your apps. The emitted metrics from your apps and from the Open Liberty runtime can be consolidated using Prometheus and presented in Grafana.
Learn with the Open Liberty developer guides
Our Open Liberty developer guides are available with runnable code and explanations to help you learn how to write microservices with MicroProfile and Jakarta EE, and then to deploy them to Red Hat OpenShift.
Python’s built-in divmod(a, b) function takes two integer or float numbers a and b as input arguments and returns a tuple (a // b, a % b). The first tuple value is the result of the integer divisiona//b. The second tuple is the result of the remainder, also called modulo operationa % b. In case of float inputs, divmod() still returns the division without remainder by rounding down to the next round number.
Usage
Learn by example! Here are some examples of how to use the divmod()built-in function with integer arguments:
Syntax:

divmod(a, b) -> returns a tuple of two numbers. The first is the result of the division without remainder a/b. The second is the remainder (modulo) a%b.
Arguments
integer
The dividend of the division operation.
integer
The divisor of the division operation.
Return Value
tuple
Returns a tuple of two numbers. The first is the result of the division without remainder. The second is the remainder (modulo).
Exercise: Guess the output before running the code.
But before we move on, I’m excited to present you my brand-new Python book Python One-Liners (Amazon Link).
If you like one-liners, you’ll LOVE the book. It’ll teach you everything there is to know about a single line of Python code. But it’s also an introduction to computer science, data science, machine learning, and algorithms. The universe in a single line of Python!
The book is released in 2020 with the world-class programming book publisher NoStarch Press (San Francisco).
You can generally use the divmod(a, b) function with two integers, one integer and one float, or two floats.
Two integers. Say you call divmod(a, b) with two integers a and b. In this case, the exact mathematical definition of the return value is (a // b, a % b).
a = 5

b = 2

print((a // b, a % b))

print(divmod(a, b))

# OUTPUT:

# (2, 1)

# (2, 1)
One integer and one float. Say you call divmod(a, b) with an integer a and a float b. In this case, the exact mathematical definition of the return value is the return value of converting the integer to a float and calling divmod(a, float(b)).
a = 5.0

b = 2

print((a // b, a % b))

print(divmod(a, b))

# OUTPUT:

# (2.0, 1.0)

# (2.0, 1.0)
Two floats. Say you call divmod(a, b) with two floats a and b. In this case, the exact mathematical definition of the return value is (float(math.floor(a / b)), a % b).
import math a = 5.0

b = 2.0

print((float(math.floor(a / b)), a % b))

print(divmod(a, b))

# OUTPUT:

# (2.0, 1.0)

# (2.0, 1.0)
Note that because of the imprecision of floating point arithmetic, the result may have a small floating point error in one of the lower decimal positions. You can read more about the floating point trap on the Finxter blog.
Can you use the divmod() method on negative numbers for the dividend or the divisor?
You can use divmod(a, b) for negative input arguments a, b, or both. In any case, if both arguments are integers, Python performs integer division a // b to obtain the first element and modulo division a % b to obtain the second element of the returned tuple. Both operations allow negative inputs a or b. The returned tuple (x, y) is calculated so that x * b + y = a.
Python divmod() Performance — Is It Faster Than Integer Division // and Modulo % Operators?
There are two semantically identical ways to create a tuple where the first element is the result of the integer division and the second is the result of the modulo operation:
Use the divmod(a, b) function.
Use the (a // b, a % b) explicit operation with Python built-in operators.
Next, we measure the performance of calculating the elapsed runtime in milliseconds when performing 10 million computations for relatively small integers. Let’s start with divmod():
import time

import random # Small Operands

operands = zip([random.randint(1, 100) for i in range(10**7)], [random.randint(1, 100) for i in range(10**7)]) start = time.time() for i, j in operands: divmod(i, j) stop = time.time()

print('divmod() elapsed time: ', (stop-start), 'milliseconds')

# divmod() elapsed time: 1.7654337882995605 milliseconds
Compare this to integer division and modulo:
import time

import random # Small Operands

operands = zip([random.randint(1, 100) for i in range(10**7)], [random.randint(1, 100) for i in range(10**7)]) start = time.time() for i, j in operands: (i // j, i % j) stop = time.time()

print('(i // j, i % j) elapsed time: ', (stop-start), 'milliseconds')

# (i // j, i % j) elapsed time: 1.9048900604248047 milliseconds
The result of this performance benchmark is that divmod() requires 1.76 milliseconds and the explicit way of using integer division and modulo requires 1.90 milliseconds for 10,000,000 operations. Thus, divmod() is 8% faster. The reason is that the explicit way performs many duplicate operations to calculate the result of the integer division and the modulo operation which internally uses integer division again. This effect becomes even more pronounced if you use larger integers.
Python divmod() Implementation
For integer input arguments, here’s a semantically equivalent divmod() implementation:
The second tuple is the result of the remainder, also called modulo operationa % b.
In case of float inputs, divmod() still returns the division without remainder by rounding down to the next round number.
I hope you enjoyed the article! To improve your Python education, you may want to join the popular free Finxter Email Academy:
Do you want to boost your Python skills in a fun and easy-to-consume way? Consider the following resources and become a master coder!
Where to Go From Here?
Enough theory, let’s get some practice!
To become successful in coding, you need to get out there and solve real problems for real people. That’s how you can become a six-figure earner easily. And that’s how you polish the skills you really need in practice. After all, what’s the use of learning theory that nobody ever needs?
Practice projects is how you sharpen your saw in coding!
Do you want to become a code master by focusing on practical code projects that actually earn you money and solve problems for people?
Then become a Python freelance developer! It’s the best way of approaching the task of improving your Python skills—even if you are a complete beginner.
It’s been a great start to the year for the Java Champion program having added new members from all over the world, New Zealand, Japan, Turkey, Europe, Canada and the USA. This group of talented individuals continue to push the language and platform forward, contributing to JSRs, working on open sou...
Login with Twitter using OAuth1.0a Protocol via API in PHP
Last modified on December 27th, 2020.
Almost all Internet giants (in good sense) like Google, Facebook, Twitter and LinkedIn support OAuth login. They provide API with detailed documentation to help developers integrate OAuth authentication.
There are many client libraries available to implement Twitter OAuth login. But we will do with just plain core PHP. Yes, actually it is sufficient, lightweight and better.
Application with the OAuth login feature has many advantages.
Simplifies the login process.
Reduces friction by minimising user’s effort with a single click.
Saves developers’ effort from building a custom login.
In its community API gallery, Twitter lists many PHP libraries. These libraries contain handlers to read-write API data in a secure manner. An authentication step ensures access security on each API request.
Twitter uses various authentication methods. Those are, OAuth 1.0a, OAuth 2.0 Bearer token, Basic authentication. I used OAuth 1.0a authentication to validate login with Twitter API requests.
During the login flow, Twitter prompts to enter user credentials to login. Then, it will ask to authorize the App for the first time.
“Login with Twitter” flow is very similar to the 3-legged OAuth flow used to get the access token. With the reference of this token, API will return user data as per the request URL. This example will read user name, photo and more details after successful authentication.
In this article, we will see how to integrate “Login with Twitter” by completing each of the below steps.
How to get and configure the API keys.
How to perform the 3-step authentication flow.
Create requests and handle responses during the authentication flow.
Store the authenticated user data into the Database.
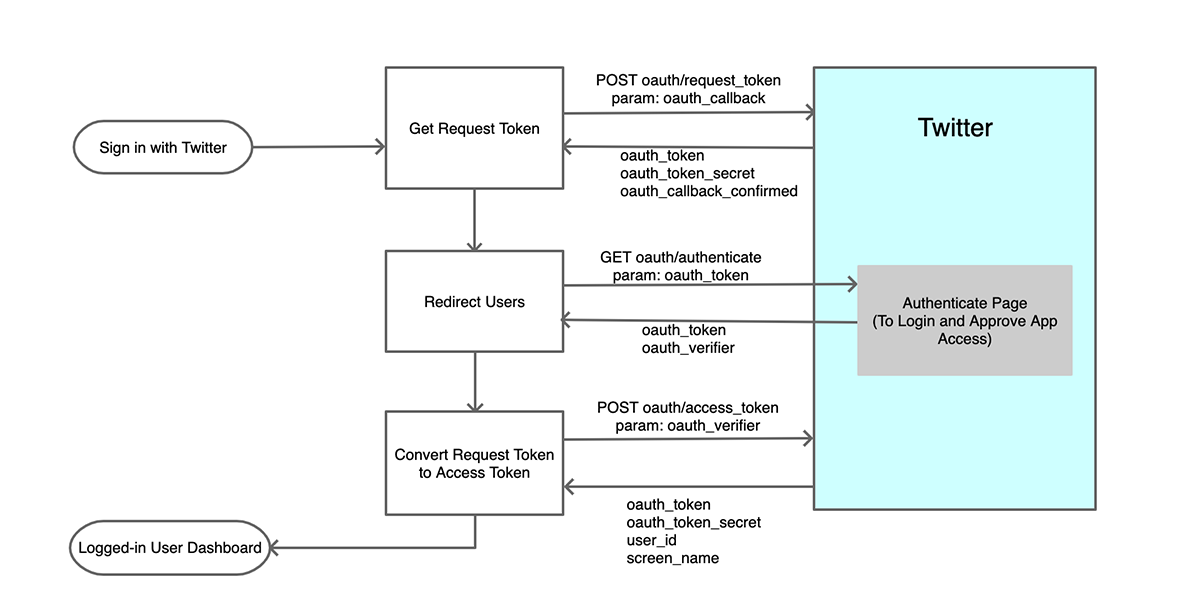
The Twitter login authentication flow includes three steps.
Get a Request token and a secret-key.
Redirect to Twitter to login and approve access rights to the Twitter app.
Get an Access token and the secret-key to access the user account via API.
During the OAuth login process, each request has to be signed with an OAuth signature. In this example, it has a service class to prepare signed requests.
The following diagram shows the “Login with Twitter” flow. It indicates the steps, request parameters and API response data.
Click to see a larger image.
How to integrate Twitter OAuth login?
Twitter gives a Login with Twitter or Sign in with Twitter button control to put into an application. It makes users sign in to the application with a couple of clicks.
After obtaining the Twitter API keys and token secret, configure them with the PHP application. The next section will show the config file created for this example.
Then, create the request-response handlers to communicate with the Twitter API. It will proceed step by step process to obtain tokens to process the next request.
Instead of using custom handlers, we can use built-in Twitter client libraries.
With the access_token, API will allow access to hit the endpoints. But, it depends on the App permissions set in the developer console.
On getting the response data from the API, the application login flow comes to end. With this step, it will change the logged-in status of the application users in the UI.
Generating Twitter API keys
The process of generating Twitter API keys is straight-forward. Once we have seen the steps to get keys for Google OAuth login integration.
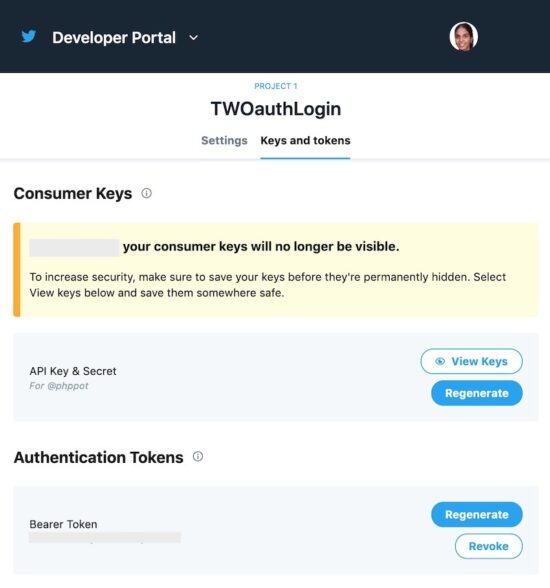
Login to the Twitter developer portal and follow the below steps.
Login to Twitter and go to its developer console.
Create a Twitter developer App. (project-specific app or standalone app).
Go to app settings to edit permissions and authentication settings.
Go to the “keys and tokens” tab to copy the consumer key and the secret key.
Save the keys in a secured place and configure them into the application.
Twitter allows creating two types of developer App. A project-specific app or a standalone app. The project-specific app can use v2 endpoints. The standalone apps can only access the v1 endpoints.
Twitter API keys will no longer keep the API keys and tokens permanently. This is for security purposes. But it allows regenerating the keys and tokens.
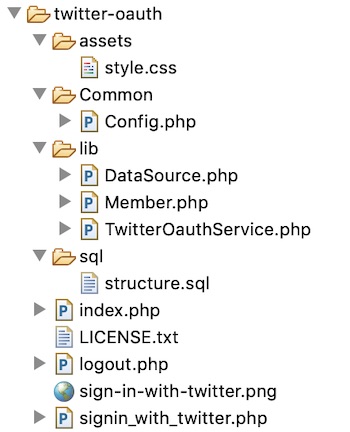
Configure the Twitter App consumer_key and secret_key in Config.php file. This application config defines the application constants. It includes the root path, database config and Twitter consumer and secrete key.
There are various ways to implement Twitter OAuth login in a PHP application. Generally, people use built-in client-side libraries to implement this. Twitter also recommends one or more PHP libraries in its community API gallery.
This example shows a simple code for “Login with Twitter” integration. It uses no external libraries to achieve this.
It has a custom class that prepares the API request and handle responses. It creates OAuth signatures to send valid signed requests to the API.
A landing page will show the “Sign in with Twitter” button to trigger the OAuth login process. On clicking, it invokes the PHP service to proceed with the three steps sign-in flow.
As a result, it gets the Twitter user data on successful authentication. The resultant page will change the logged-in state and display the user data.
If you refuse to approve the app access or login, Twitter will redirect back to the application. This redirect URL is set with the param list of the API request.
This example uses the Database to keep the user details read from the API response. Thus, it records the application’s users logged-in via Twitter OAuth login.
Twitter OAuth PHP service
This PHP service class request Twitter API for the access key and token. It follows the three steps to obtain the access token.
The following three methods perform the three steps.
Step 1: getRequestToken() – sends the oauth_callback with the authentication header. It requests request_token and the secrete key from the Twitter API.
Step 2: getOAuthVerifier() – redirects the user to the Twitter authentication page. It let users sign in and approve the App to access the account. It passes the OAuth request token received in step1 with the URL. After authentication, Twitter will invoke the oauth_callback with the oauth_verifier in the querystring.
Step 3: getAccessToken() – requests the access_token and secrete key from the API. The params are the request_token, request_token_secret, oauth_verifier get from Step 1, 2.
Twitter requires each of the API requests has to be signed. This PHP service class has a function to generate the signature by the use of API request parameters.
Initiate login flow with “Sign in with Twitter” control
The landing page of this example will show a “Sign in with Twitter” button. On clicking this button, it invokes functions to proceed with the 3-step login flow.
The following code shows the index.php file script. It checks if any user logged-in already. If so, it displays the user dashboard. Otherwise, it shows the “Sign in with Twitter” button.
It invokes the TwitterOAuthService to initiate the login flow. This initiation will happen when the user tries to log in.
After completing the 3-steps, the TwitterOauthService will return the user access token. Then it invokes GET oauth/verify_credentials endpoint to read the user daya.
It will return the logged-in user data as a JSON response. The application callback endpoint receives this data.
Then, the code will save the data into the database and put the logged-in user id into the session. Based on the existence of this user session the landing page will show the user dashboard.
The below section shows the tbl_member database table script. Import this script before executing this example.
sql/structure.sql
--

-- Database: `oauth_login`

-- -- -------------------------------------------------------- --

-- Table structure for table `tbl_member`

-- CREATE TABLE `tbl_member` ( `id` int(11) NOT NULL, `oauth_id` varchar(255) NOT NULL, `oauth_provider` varchar(255) NOT NULL, `full_name` varchar(255) NOT NULL, `screen_name` varchar(255) NOT NULL, `photo_url` varchar(255) NOT NULL, `create_at` timestamp NOT NULL DEFAULT CURRENT_TIMESTAMP ON UPDATE CURRENT_TIMESTAMP

) ENGINE=InnoDB DEFAULT CHARSET=latin1; --

-- Indexes for dumped tables

-- --

-- Indexes for table `tbl_member`

--

ALTER TABLE `tbl_member` ADD PRIMARY KEY (`id`); --

-- AUTO_INCREMENT for dumped tables

-- --

-- AUTO_INCREMENT for table `tbl_member`

--

ALTER TABLE `tbl_member` MODIFY `id` int(11) NOT NULL AUTO_INCREMENT;
Login with Twitter example output
After completing the application config, the home page will display the “Sign in with Twitter” button as below.
Before login, the home page will display the “Sign in with Twitter” button as below. I used the login button downloaded from the official Twitter documentation.
The game is free to keep until Mar 3rd 2022 - 16:00 UTC.
Next week's freebie: Black Widow: Recharged Centipede: Recharged
We are welcoming everyone to join our discord[discord.gg]. We are more active there on finding giveaways, small or large, and there are daily raffles you can participate.
[www.indiegala.com] [www.indiegala.com] [www.indiegala.com] Save up to 80% OFF, on the final cashback day! Any purchase made on IndieGala (be it store deals or bundles) will be rewarding you instantly and handsomely, directly into your IndieGala account, with 5% of your final purchase (in the form of GalaCredit).
ELEX II is the sequel to ELEX, the vintage open-world role-playing experience from the award-winning creators of the Gothic and Risen series, Piranha Bytes. ELEX II returns to the post-apocalyptic Science Fantasy world of Magalan with massive environments that can be explored with unrivaled freedom via jetpack, you will be able to move through the epic story any way you want.
Several years after Jax defeated the Hybrid, a new threat arrives from the sky, unleashing the dangerous powers of dark Elex and endangering all life on the planet. In order to defend the peace on Magalan and the safety of his own family, Jax has to go on a mission to convince the factions to unite against the invaders.
Dive into a huge, hand-crafted, completely unique world with multiple factions and diverse environments set in a post-apocalyptic science fantasy universe.
Ubuntu tends to drop a new version of their April release shortly after a new version of Node.js drops. Every other year, this Ubuntu release is a long-term support release, which has a longer shelf life in terms of support and maintenance compared to their interim releases.
True to form of Debian and Debian-based distros striving for stability, Ubuntu doesn’t include the latest and greatest version of Node.js with their LTS releases. In fact, depending on the year, you get the current LTS version of Node.js or something even older.
With Ubuntu 20.04 LTS, your on Node.js 10.x-14.x, which at this point, is quite behind as Node.js 16.x is available and 10.x has left maintenance mode. Node.js 16.x won’t become the LTS release until later this year, but it’s still considered stable and will inevitably become the LTS release, so there’s no reason not to upgrade!
To get started, I always like to make sure my Ubuntu installation is fully up to date:
Code:
sudo apt update
sudo apt upgrade
Don’t forget to reboot if you had any updates to the Linux Kernel.
With things all up to date, let’s make sure we have curl installed, as we’ll be using that to download the installation script from NodeSource (which provides binary packages for Ubuntu, Debian and a bunch of their derivatives):
Code:
sudo apt install -y curl
Obviously if you know you already have curl installed, you don’t need to run this. Once we have curl in the mix, we can download and run the setup script:
That script will run, gets thing added to your apt sources, and will even run another apt update to make sure you’re ready to go. Once that’s done running, you will need to install or upgrade the current version of Node.js you have installed:
Code:
sudo apt install -y nodejs
At this point, you should be all set. Just to be certain, you can run node to figure out what version you’re currently running:
Code:
$ node --version
v16.1.0
A little note, because it never fails that somebody brings up that you could nvm to accomplish this. While you certainly COULD use nvm, and that may be your preferred method, it’s not mine, for a number of reasons.
First,
nvm needed to be sourced in your shell profile, which can slow your prompt down when creating new sessions. I’ve been able to speed things up by lazy loading it, but that wasn’t my biggest issue with using nvm.
My biggest concern with using nvm on a server is that it creates an additional way to install / update packages. By using this method, you add Node.js into your system’s existing package manager, apt and you can easily upgrade nodejs along with your other system packages.
This makes it the clear choice for me, as it’s one less thing for me to have to think about when maintaining a server.
Quick note:
NPM is installed with Node.js 16.x, so don't have to install separately like previous versions.
From all the compression methods available, Zip is probably one of the most popular ones.
Released in 1989 by Philip Katz, Zip is widely used by system administrators in order to reduce the size of bulky files and directories on your system.
Nowadays, Zip is available on all operating systems on the market : whether it is Windows, Linux or MacOS.
With zip, you can easily transfer files between operating systems and save space on your disks.
In this tutorial, we are going to see how you can easily zip folders and directories on Linux using the zip command.
Zip Folder using zip
The easiest way to zip a folder on Linux is to use the “zip” command with the “-r” option and specify the file of your archive as well as the folders to be added to your zip file.
You can also specify multiple folders if you want to have multiple directories compressed in your zip file.
$ zip -r ...
For example, let’s say that you want to archive a folder named “Documents” in a zip file named “temp.zip”.
In order to achieve that, you would run the following command
$ zip -r temp.zip Documents
In order to check if your zip file was created, you can run the “ls” command and look for your archive file.
$ ls -l | grep .zip
Alternatively, if you are not sure where you stored your zip files before, you can search for files using the find command
$ find / -name *.zip 2> /dev/null
Zip Folder using find
Another great way of creating a zip file for your folders is to use the “find” command on Linux. You have to link it to the “exec” option in order to execute the “zip” command that creates an archive.
If you want to zip folders in the current working directory, you would run the following command
$ find . -maxdepth 1 -type d -exec zip archive.zip {} +
Using this technique is quite useful : you can choose to archive folders recursively or to have only a certain level of folders zipped in your archive.
Zip Folder using Desktop Interface
If you are using GNOME or KDE, there’s also an option for you to zip your folders easily.
Compress Folders using KDE Dolphin
If you are using the KDE Graphical Interface, you will be able to navigate your folders using the Dolphin File Manager.
In order to open Dolphin, click on your the “Application Launcher” button at the bottom left of your screen and type “Dolphin“.
Click on the “Dolphin – File Manager” option.
Now that Dolphin is open, select the folders to be zipped by holding the “Control” key and left-clicking on the folders to be compressed together.
select folders on dolphin linux
Now that folders are selected, right-click wherever you want and select the “Compress” option.
When hovering your mouse cursor over the “Compress” option and select the “Here (as ZIP)” option in the menu.
If you want to zip folders in another location, you will have to select the “Compress to” option, specify the location and the compression mode (as ZIP).
create zip for folders using dolphin on linux
After a quick time, depending on the size of your archive, your zip should be created with all the folders you have selected in it.
zip created for folders on linux
Congratulations, you successfully created a zip for your folders on Linux!
Compress Folders on GNOME
If you are using GNOME, on Debian 10 or on CentOS 8 for example, you will also be able to compress your files directly from the user interface.
Select the “Applications” menu at the top left corner of your Desktop, and search for “Files“
Files file manager on GNOME
Select the “Files” option : your file explorer should start automatically.
Now that you are in your file explorer, select multiple folders by holding the “Control” key and left-clicking on all the folders to be zipped.
When you are done, right-click and select the “Compress” option.
compressing folders using GNOME
Now that the “Compress” option is selected, a popup window should appear asking for the filename of your zip as well as the extension to be used.
naming your archive on GNOME
When you are done, simply click the “Create” option for your zip file to be created.
zip file created on GNOME File manager
That’s it!
Your folders should now be zipped in an archive file : you can start sending the archive or extracting the files that are contained in it.
Zipping Directories using Bash
In some cases, you may not have a graphical interface directly installed on your server.
As a consequence, you may want to zip folders directly from the command-line, using the Bash programming language.
If you are not sure about Bash, here’s a Bash beginners guide and another one for more advanced Bash scripting.
In order to zip folders using Bash, use the “for” loop and iterate over the directories of the current working directory
$ for file in $(ls -d */); do zip archive.zip $file; done
zip folder using bash
Using bash, you can actually get specific when it comes to the folders to be zipped.
For example, if you want to zip folders beginning with the letter D, you can write the following command
$ for file in $(ls -d */ | grep D); do zip archive.zip $file; done
Congratulations, you successfully created a zip for your folders in the current working directory!
New features in Red Hat CodeReady Studio 12.13.0.GA and JBoss Tools 4.13.0.Final for
JBoss Tools 4.13.0 and Red Hat CodeReady Studio 12.13 for Eclipse 2019-09 are here and waiting for you. In this article, I’ll cover the highlights of the new releases and show how to get started.
JBoss Tools or Bring-Your-Own-Eclipse (BYOE) CodeReady Studio requires a bit more.
This release requires at least Eclipse 4.13 (2019-09), but we recommend using the latest Eclipse 4.13 2019-09 JEE Bundle because then you get most of the dependencies pre-installed.
Once you have installed Eclipse, you can either find us on the Eclipse Marketplace under “JBoss Tools” or “Red Hat CodeReady Studio.”
For JBoss Tools, you can also use our update site directly:
Our main focus for this release was improvements for container-based development and bug fixing. Eclipse 2019-06 itself has a lot of new cool stuff, but I’ll highlight just a few updates in both Eclipse 2019-06 and JBoss Tools plugins that I think are worth mentioning.
Red Hat OpenShift
OpenShift Container Platform 4.2 support
With the new OpenShift Container Platform (OCP) 4.2 now available (see the announcement), even if this is a major shift compared to OCP 3, Red Hat CodeReady Studio and JBoss Tools are compatible with this major release in a transparent way. Just define your connection to your OCP 4.2 based cluster as you did before for an OCP 3 cluster, and use the tooling!
CodeReady Containers 1.0 Server Adapter
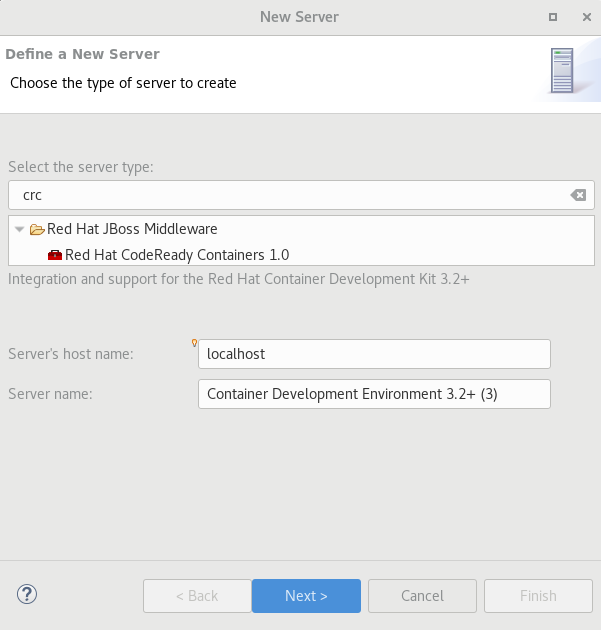
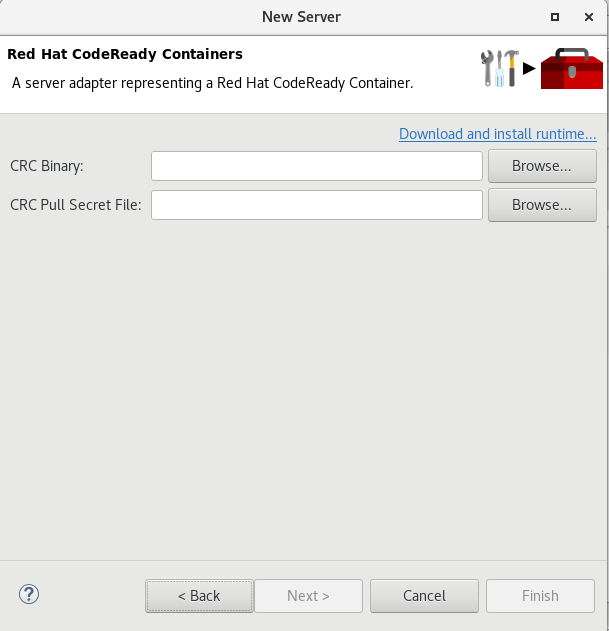
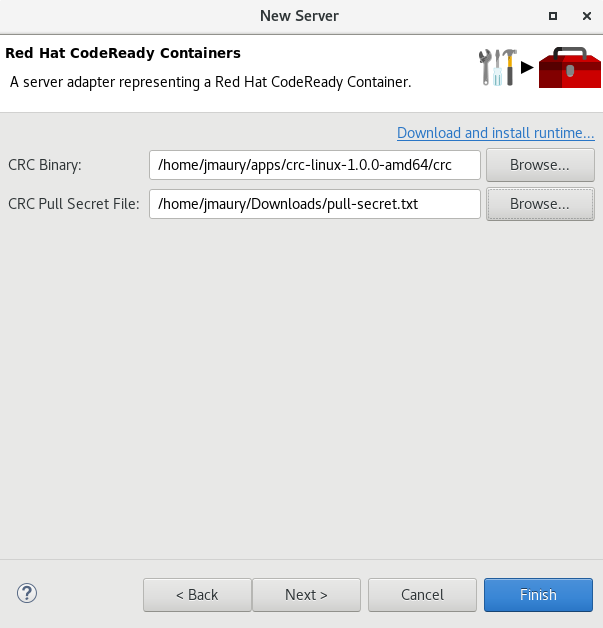
A new server adapter has been added to support the next generation of CodeReady Containers 1.0. Although the server adapter itself has limited functionality, it is able to start and stop the CodeReady Containers virtual machine via its crc binary. Simply hit Ctrl+3 (Cmd+3 on OSX) and type new server, which will bring up a command to set up a new server.
Enter crc in the filter textbox.
You should see the Red Hat CodeReady Containers 1.0 server adapter.
Select Red Hat CodeReady Containers 1.0 and click Next.
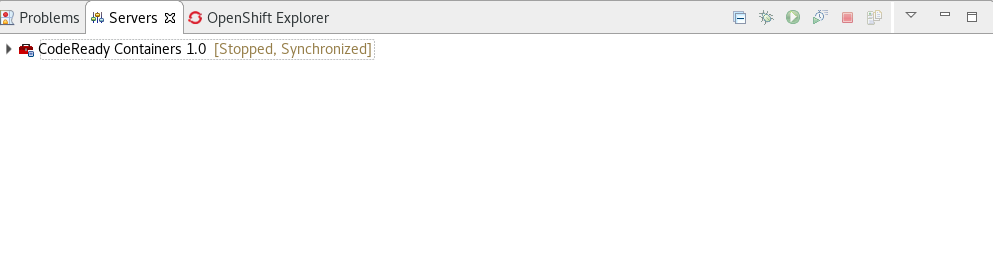
Once you’re finished, a new CodeReady Containers server adapter will then be created and visible in the Servers view.
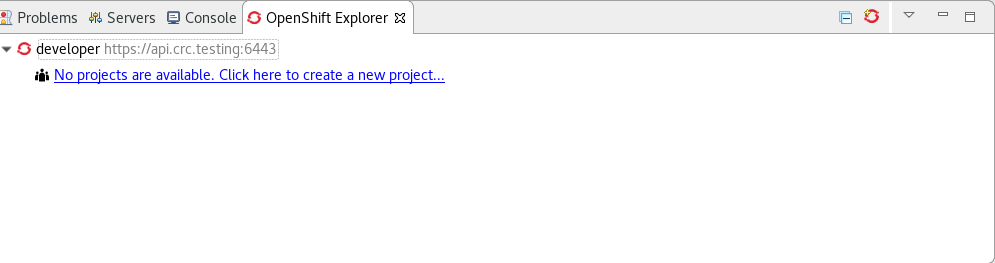
Once the server is started, a new OpenShift connection should appear in the OpenShift Explorer view, allowing the user to quickly create a new Openshift application and begin developing their AwesomeApp in a highly replicatable environment.
Server tools
Wildfly 18 Server Adapter
A server adapter has been added to work with Wildfly 18. It adds support for Java EE 8 and Jakarta EE 8.
EAP 7.3 Beta Server Adapter
A server adapter has been added to work with EAP 7.3 Beta.
Hibernate Tools
Hibernate Runtime Provider Updates
A number of additions and updates have been performed on the available Hibernate runtime providers.
The Hibernate 5.4 runtime provider now incorporates Hibernate Core version 5.4.7.Final and Hibernate Tools version 5.4.7.Final.
The Hibernate 5.3 runtime provider now incorporates Hibernate Core version 5.3.13.Final and Hibernate Tools version 5.3.13.Final.
Platform
Views, Dialogs and Toolbar
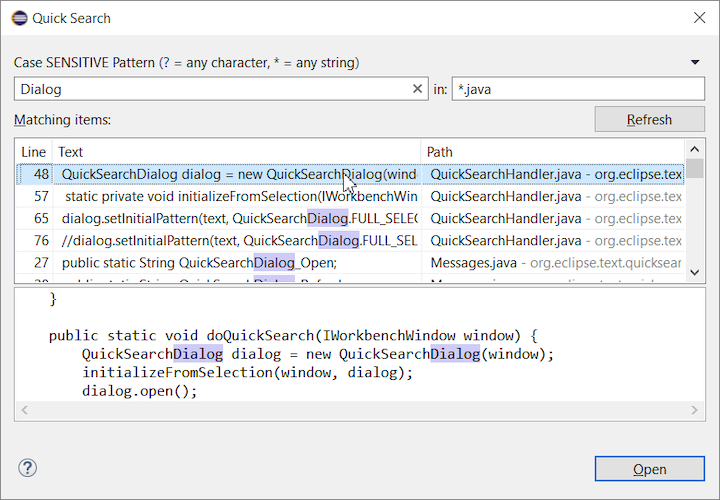
Quick Search
The new Quick Search dialog provides a convenient, simple and fast way to run a textual search across your workspace and jump to matches in your code. The dialog provides a quick overview showing matching lines of text at a glance. It updates as quickly as you can type and allows for quick navigation using only the keyboard. A typical workflow starts by pressing the keyboard shortcut Ctrl+Alt+Shift+L (or Cmd+Alt+Shift+L on Mac). Typing a few letters updates the search result as you type. Use Up-Down arrow keys to select a match, then hit Enter to open it in an editor.
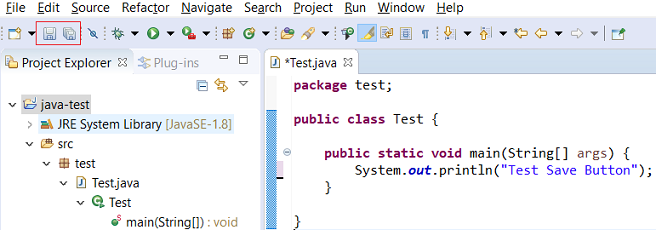
Save editor when Project Explorer has focus
You can now save the active editor even when the Project Explorer has focus. In cases where an extension contributes Saveables to the Project Explorer, the extension is honored and the save action on the Project Explorer will save the provided saveable item instead of the active editor.
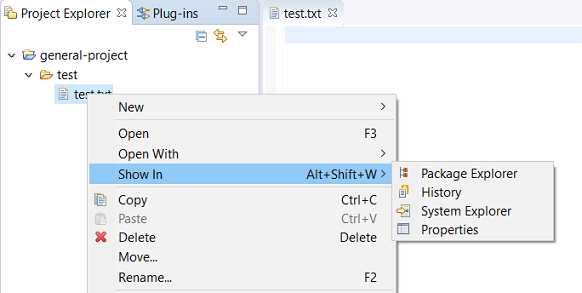
“Show In” context menu available for normal resources
The Show In context menu is now available for an element inside a resource project on the Project Explorer.
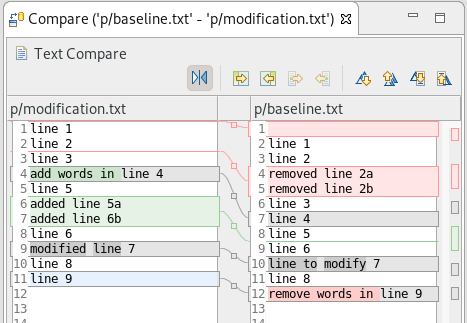
Show colors for additions and deletions in Compare viewer
In simple cases such as a two-way comparison or a three-way comparison with no merges and conflicts, the Compare viewer now shows different colors, depending on whether text has been added, removed, or modified. The default colors are green, red, and black, respectively.
The colors can be customized through usual theme customization approaches, including using related entries in the Colors and Fonts preference page.
Editor status line shows more selection details
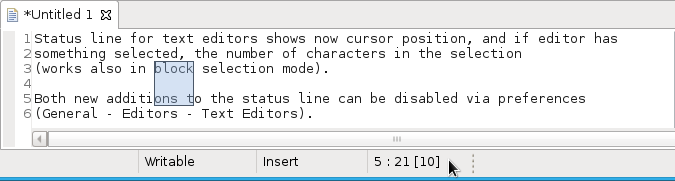
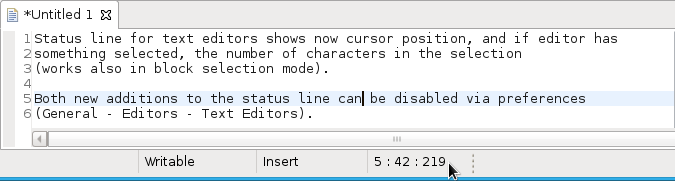
The status line for Text Editors now shows the cursor position, and when the editor has something selected, it shows the number of characters in the selection as well. This also works in the block selection mode.
These two new additions to the status line can be disabled via the General > Editors > Text Editors preference page.
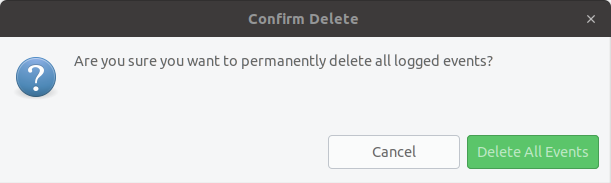
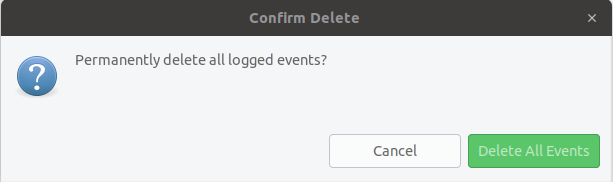
Shorter dialog text
Several dialog texts have been shortened. This allows you to capture important information faster.
Previously:
Now:
Close project via middle-click
In the Project Explorer, you can now close a project using middle-click.
Debug
Improved usability of Environment tab in Launch Configurations
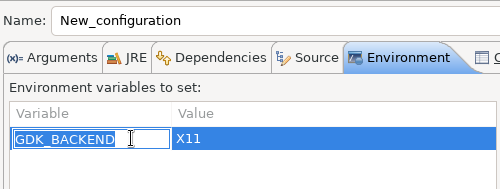
In the Environment tab of the Launch Configuration dialog, you can now double-click on an environment variable name or value and start editing it directly from the table.
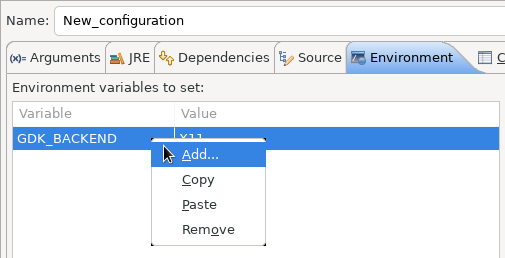
Right-clicking on the environment variable table now opens a context menu, allowing for quick addition, removal, copying, and pasting of environment variables.
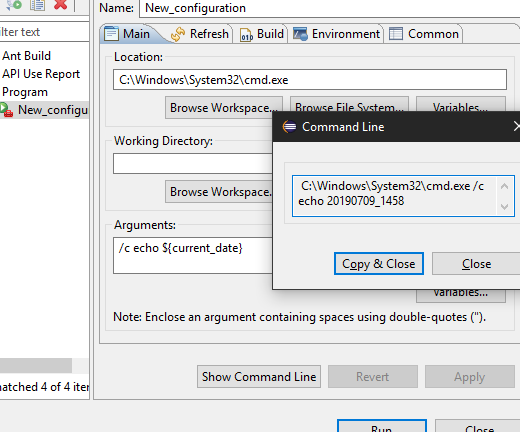
Show Command Line for external program launch
The External Tools Configuration dialog for launching an external program now supports the Show Command Line button.
Preferences
Close editors automatically when reaching 99 open editors
The preference to close editors automatically is now enabled by default. It will be triggered when you have opened 99 files. If you continue to open editors, old editors will be closed to protect you from performance problems. You can modify this setting in the Preferences dialog via the General > Editors > Close editors automatically preference.
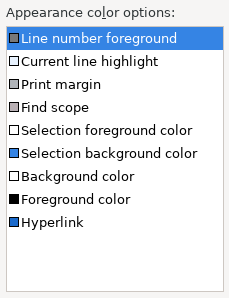
In-table color previews for Text Editor appearance color options
You can now see all the colors currently being used in Text Editors from the Appearance color options table, located in the Preferences > General > Editors > Text Editor page.
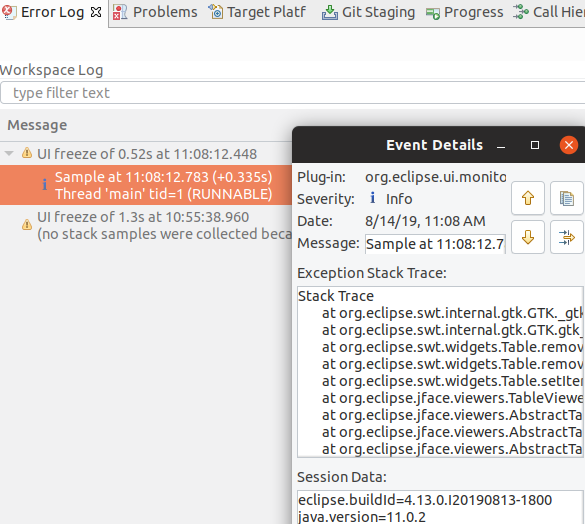
Automatic detection of UI freezes in the Eclipse SDK
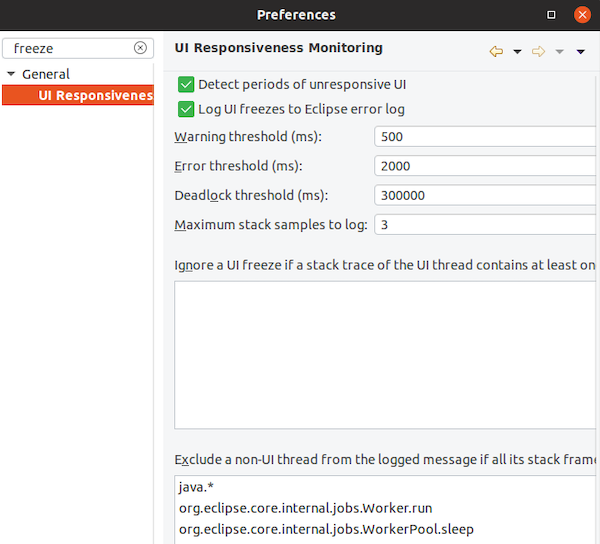
The Eclipse SDK has been configured to show stack traces for UI freezes in the Error Log view by default for new workspaces. You can use this information to identify and report slow parts of the Eclipse IDE.
You can disable the monitoring or tweak its settings via the options in the General > UI Responsiveness Monitoring preference page as shown below.
Themes and Styling
Start automatically in dark theme based on OS theme
On Linux and Mac, Eclipse can now start automatically in dark theme when the OS theme is dark. This works by default, that is on a new workspace or when the user has not explicitly set or changed the theme in Eclipse.
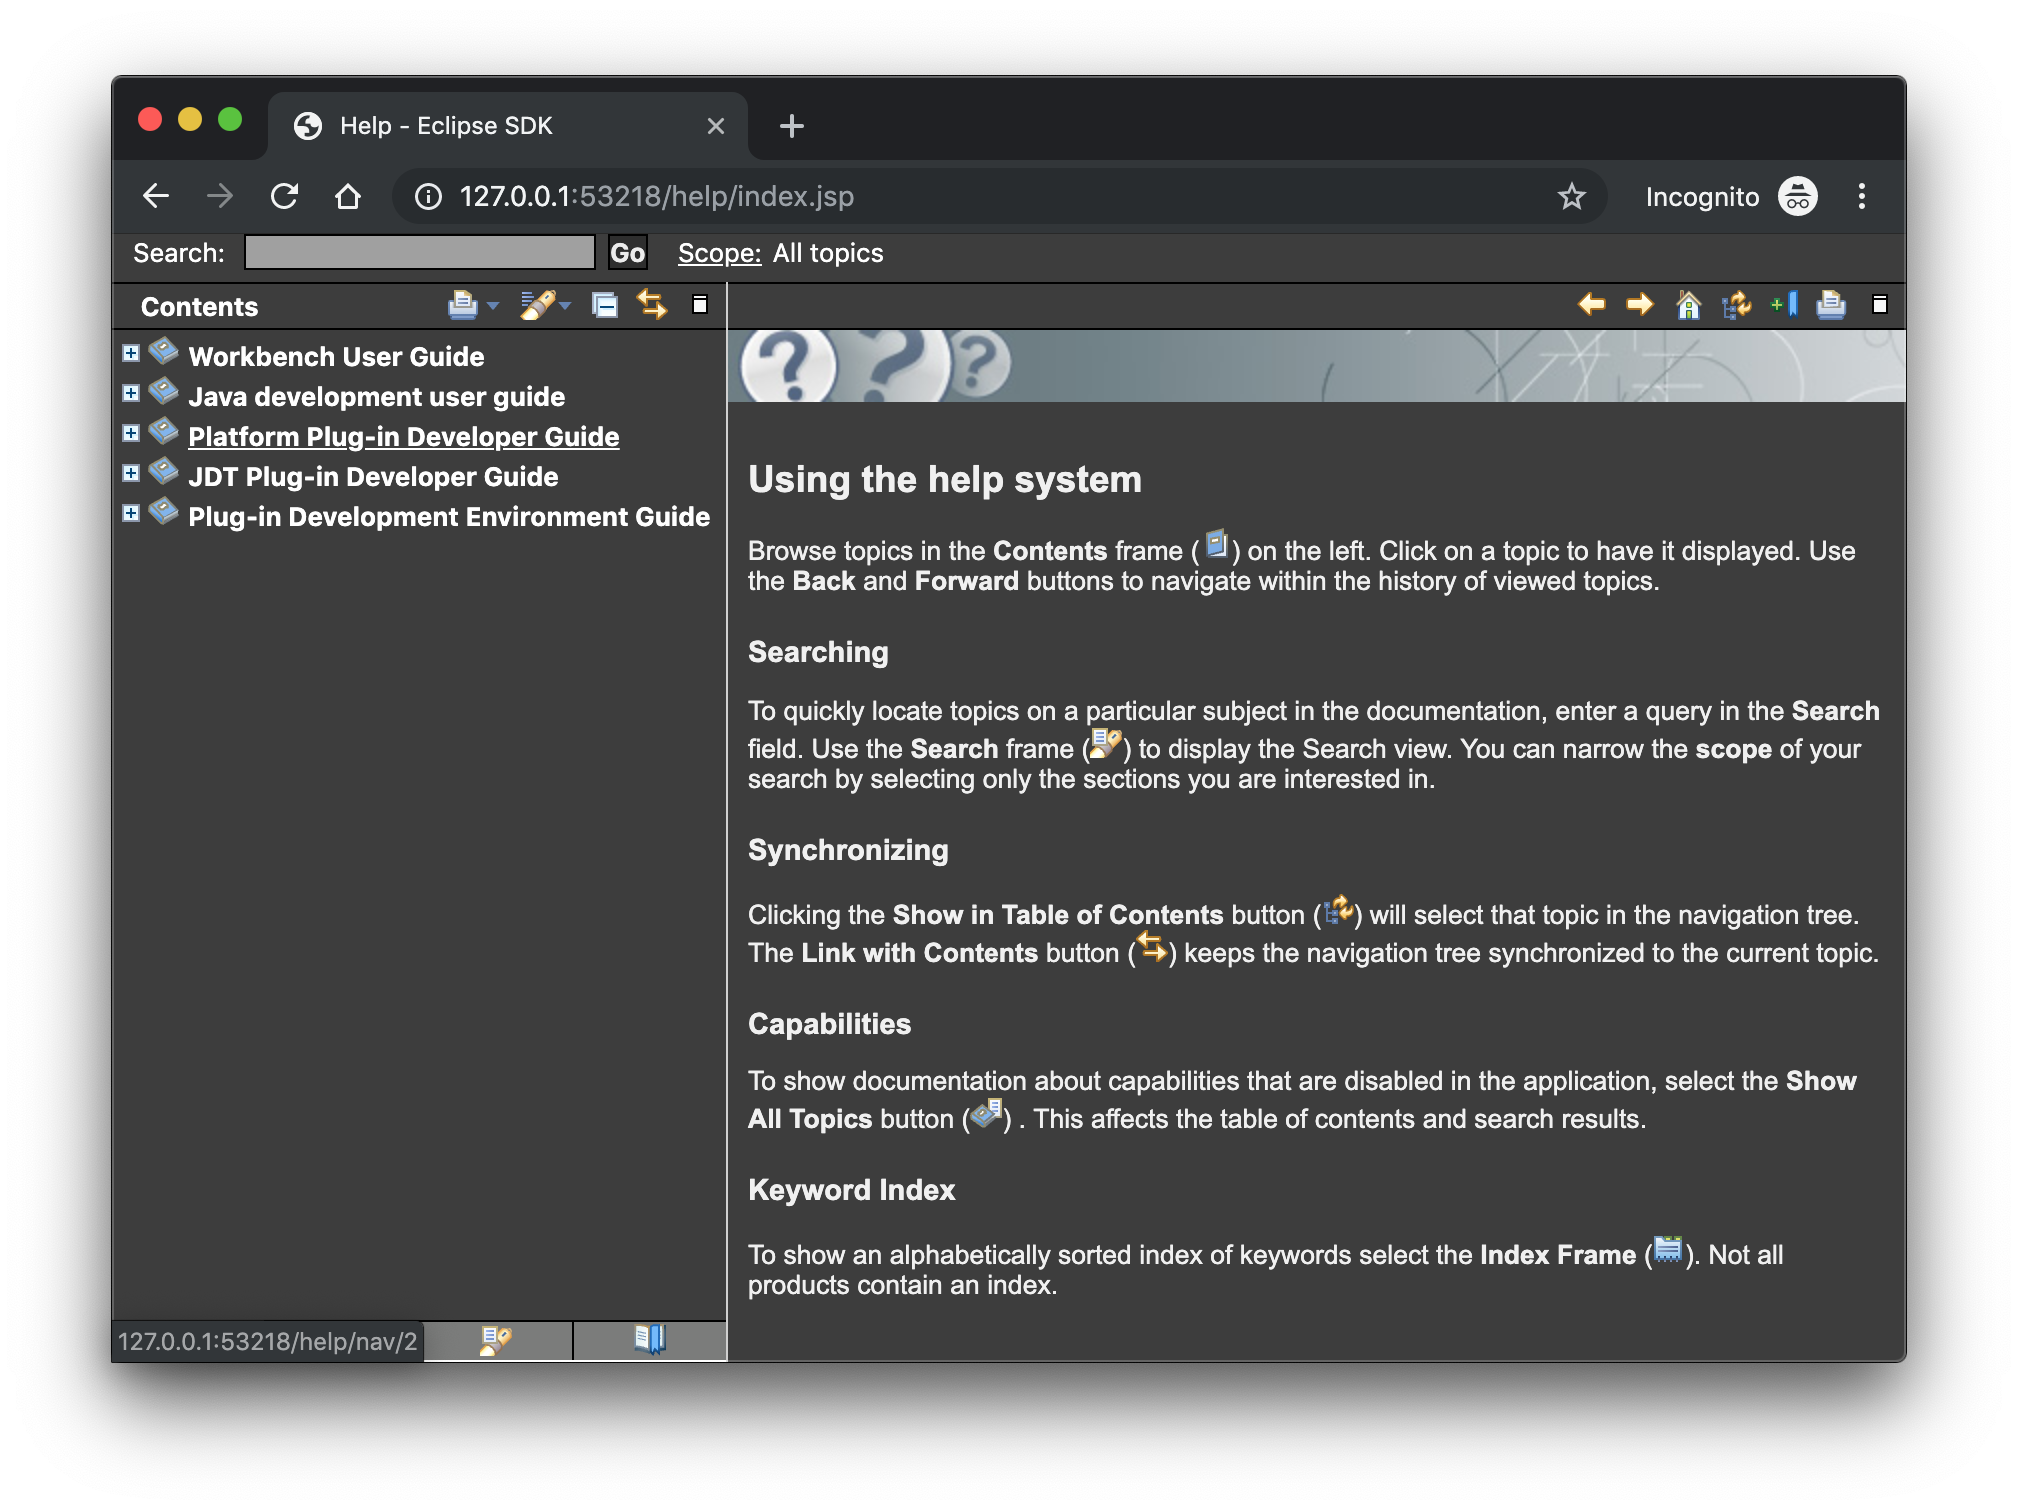
Display of Help content respects OS theme
More and more operating systems provide a system-wide dark theme. Eclipse now respects this system-wide theme setting when the Eclipse help content is displayed in an external browser. A prerequisite for this is a browser that supports the prefers-color-scheme CSS media query.
As of the time of writing, the following browser versions support it:
Firefox version 67
Chrome version 76
Safari version 12.1
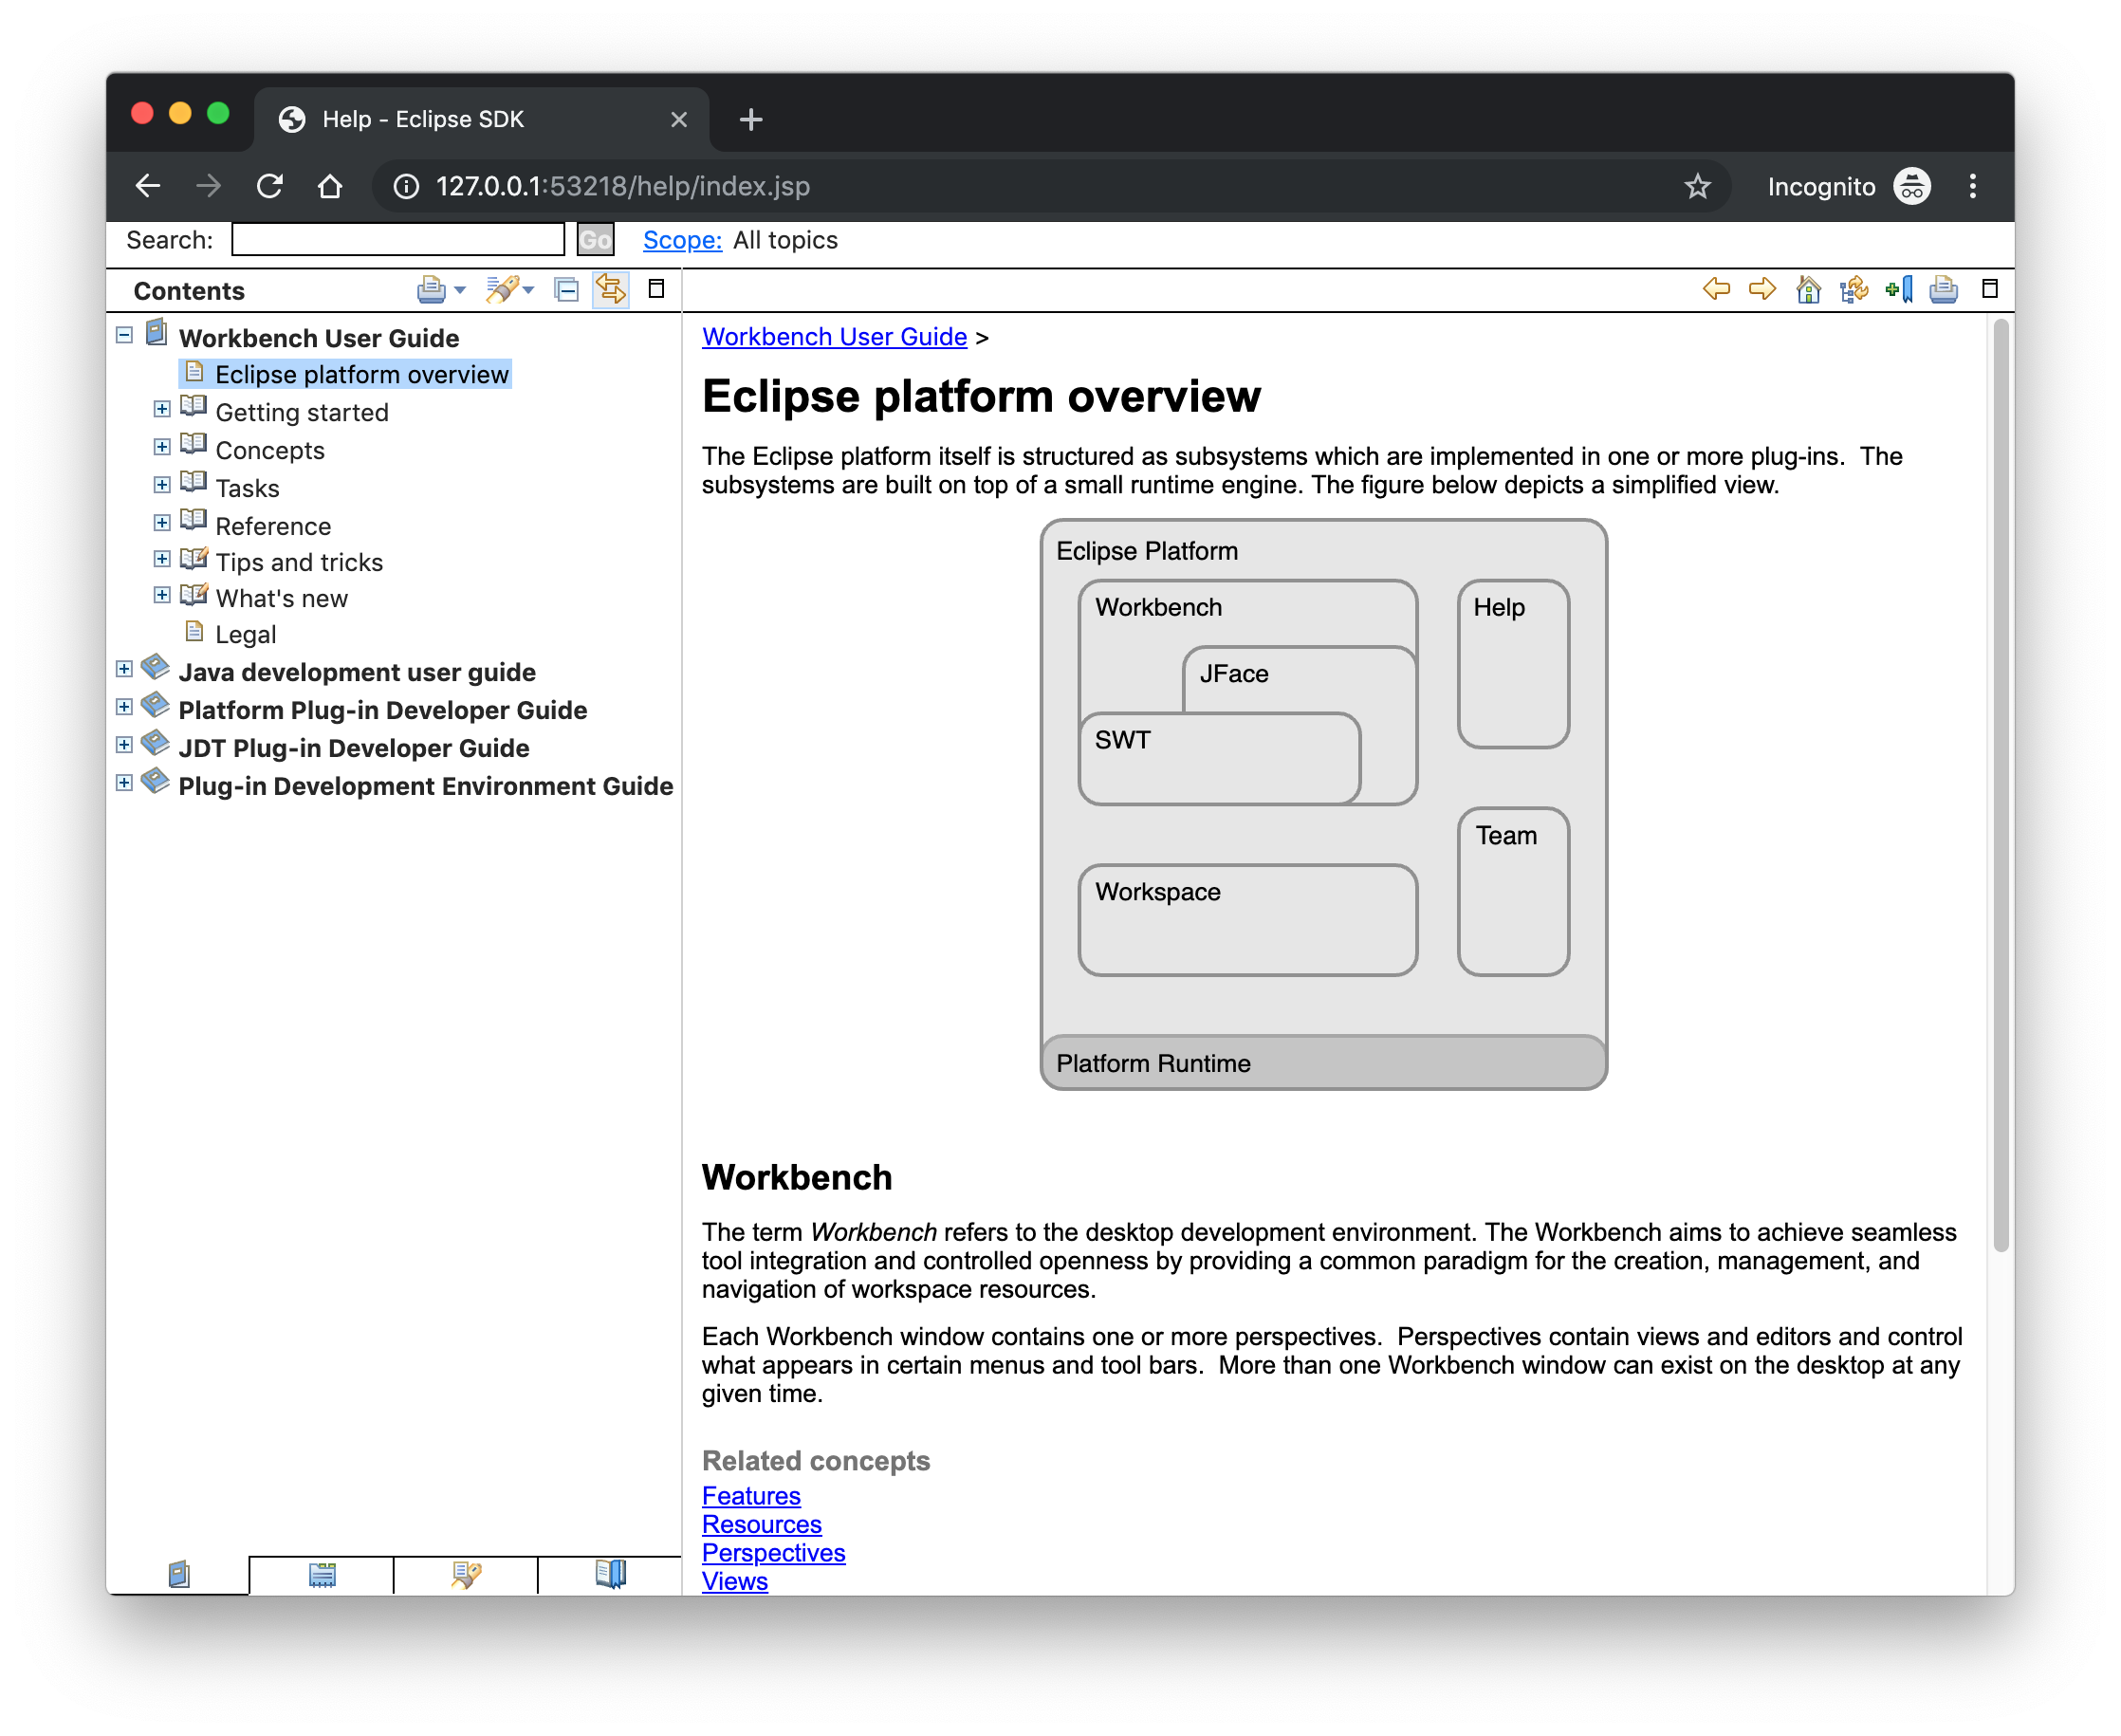
Help content uses high-resolution icons.
The Help System, as well as the help content of the Eclipse Platform, the Java Development Tooling, and the Plug-in Development Environment, now uses high-resolution icons. They are now crisp on high-resolution displays and also look much better in the dark theme.
Improved dark theme on Windows
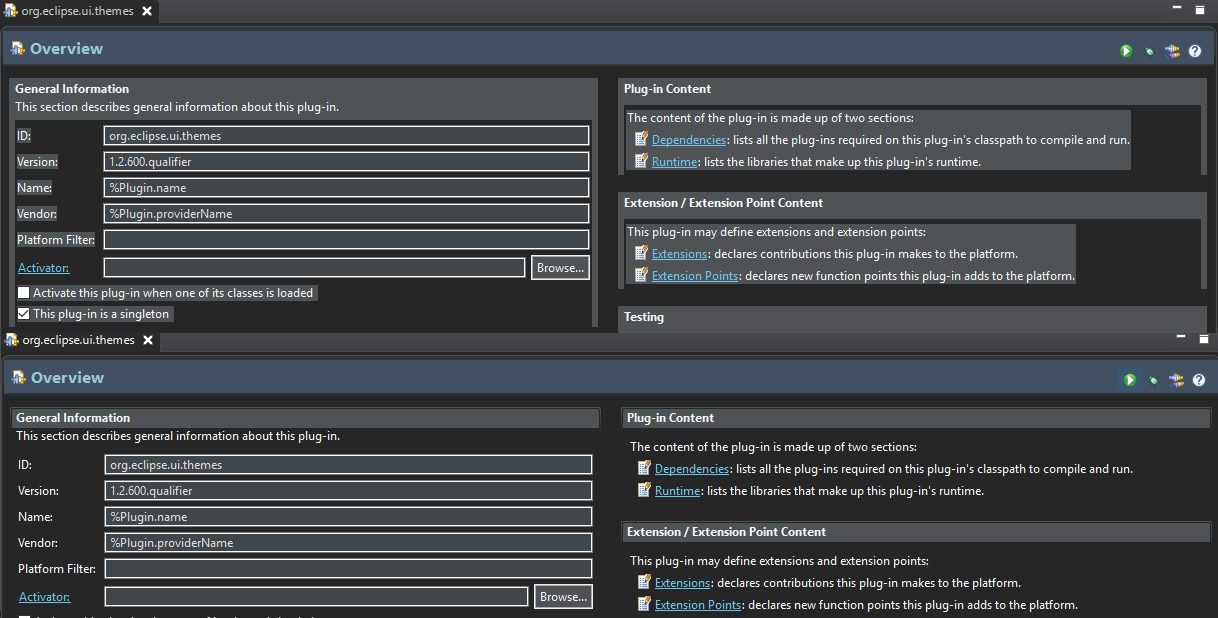
Labels, Sections, Checkboxes, Radio Buttons, FormTexts, and Sashes on forms now use the correct background color in the dark mode on windows.
General Updates
Interactive performance
Interactive performance has been further improved in this release and several UI freezes have been fixed.
Show key bindings when command is invoked
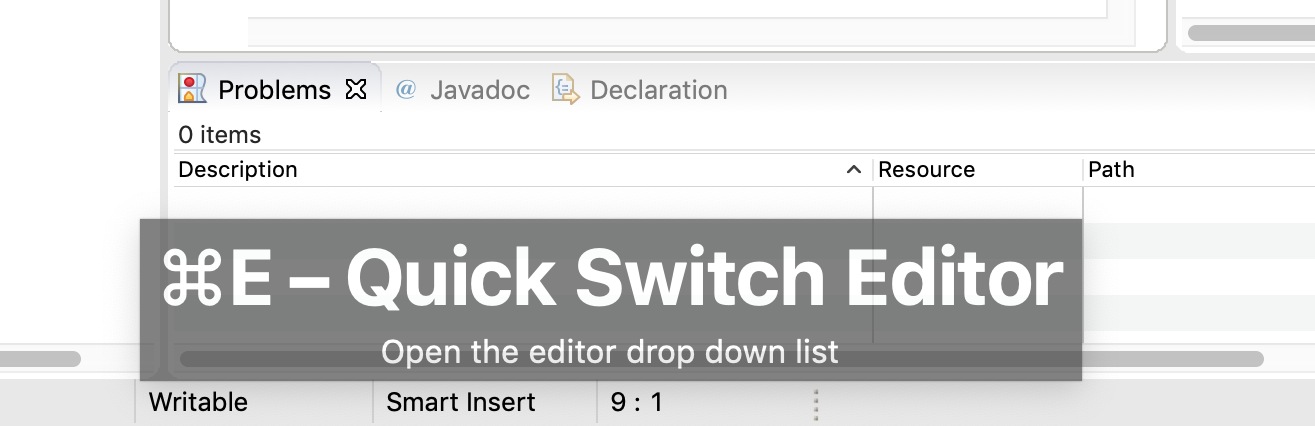
For presentations, screencasts, and learning purposes, it is very helpful to show the corresponding key binding when a command is invoked. When the command is invoked (via a key binding or menu interaction) the key binding, the command’s name and description are shown on the screen.
You can activate this in the Preferences dialog via the Show key binding when command is invoked checkbox on the General > Keys preference page. To toggle this setting quickly, you can use the Toggle Whether to Show Key Binding command (e.g., via the quick access).
Java Developement Tools (JDT)
Java 13 Support
Java 13 is out, and Eclipse JDT supports Java 13 for 4.13 via Marketplace.
The release notably includes the following Java 13 features:
JEP 354: Switch Expressions (Preview).
JEP 355: Text Blocks (Preview).
Please note that these are preview language features; hence, the enable preview option should be on. For an informal introduction of the support, please refer to Java 13 Examples wiki.
Java Views and Dialogs
Synchronize standard and error output in console
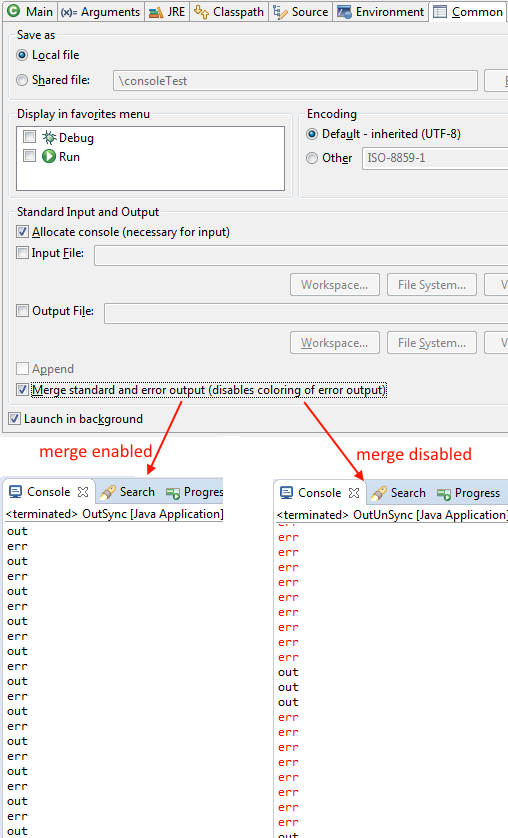
The Eclipse Console view currently can not ensure that mixed standard and error output is shown in the same order as it is produced by the running process. For Java applications, the launch configuration Common tab now provides an option to merge standard and error output. This ensures that standard and error output is shown in the same order it was produced but also disables the individual coloring of error output.
Java Editor
Convert to enhanced ‘for’ loop using Collections
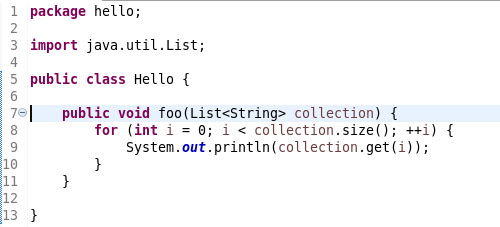
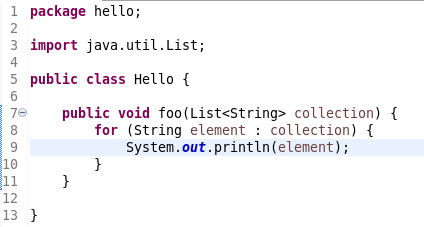
The Java quickfix/cleanup Convert to enhanced ‘for’ loop is now offered on for loops that are iterating through Collections. The loop must reference the size method as part of the condition and if accessing elements in the body, must use the get method. All other Collection methods other than isEmpty invalidate the quickfix being offered.
Initialize ‘final’ fields
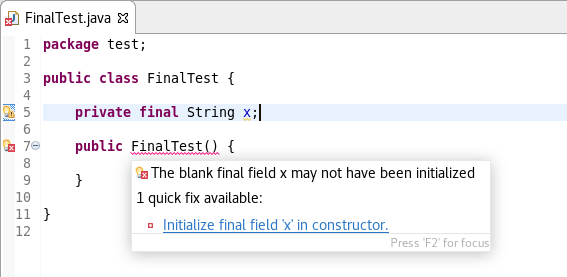
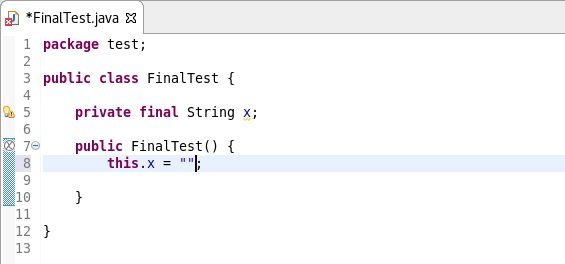
A Java quickfix is now offered to initialize an uninitialized final field in the class constructor. The fix will initialize a String to the empty string, a numeric base type to 0, and, for class fields, it initializes them using their default constructor if available or null if no default constructor exists.
Autoboxing and Unboxing
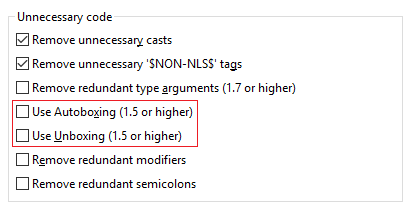
Use Autoboxing and Unboxing when possible. These features are enabled only for Java 5 and higher.
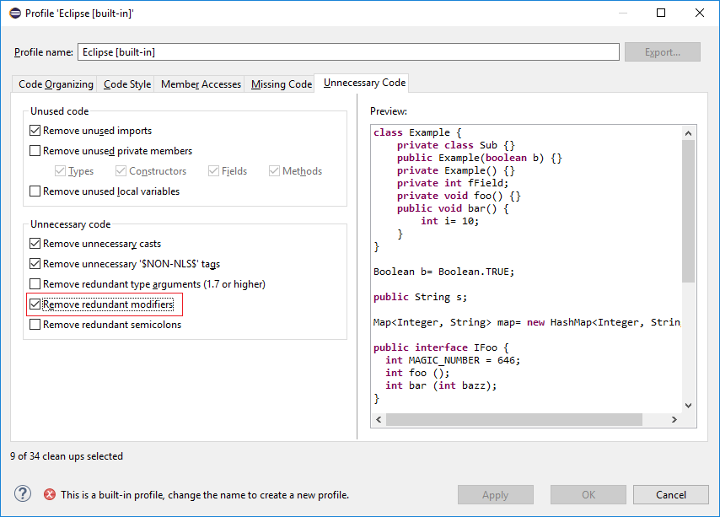
Improved redundant modifier removal
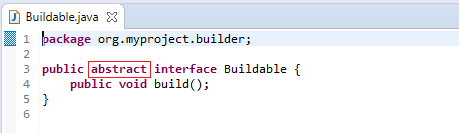
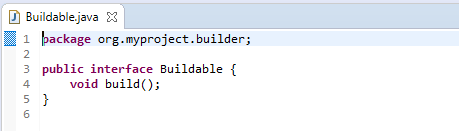
The Remove redundant modifier now also removes useless abstract modifier on the interfaces.
For the given code:
You get this:
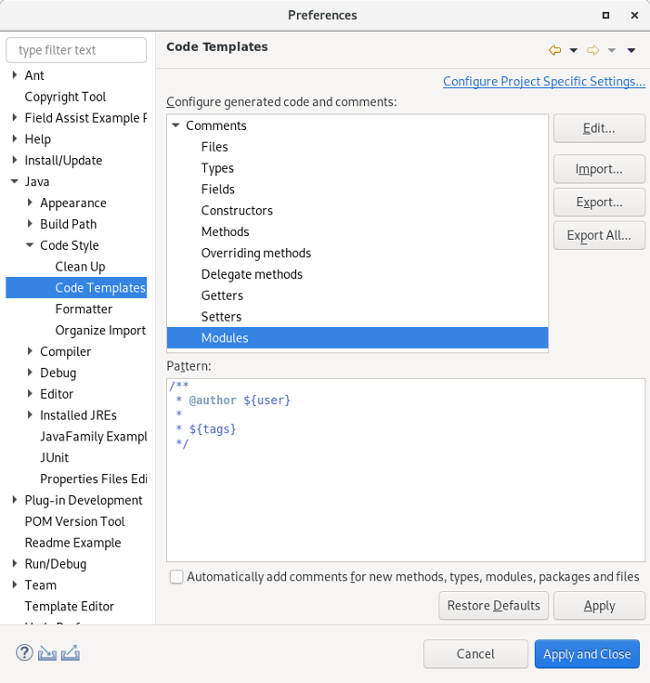
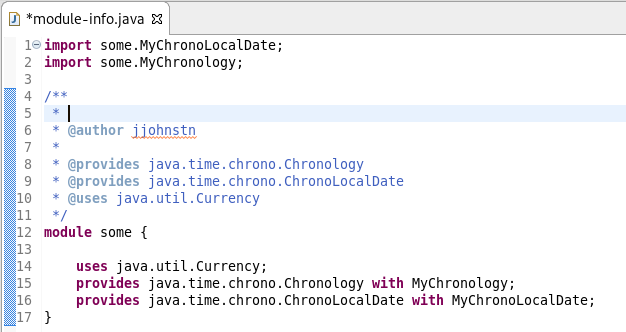
Javadoc comment generation for module
Adding a Javadoc comment to a Java module (module-info.java) will result in automatic annotations being added per the new module comment preferences.
The $(tags) directive will add @uses and @provides tags for all uses and provides module statements.
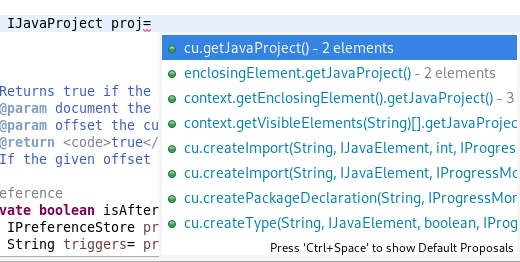
Chain Completion Code Assist
Code assist for “Chain Template Proposals” will be available. These will traverse reachable local variables, fields, and methods, to produce a chain whose return type is compatible with the expected type in a particular context.
The preference to enable the feature can be found in the Advanced sub-menu of the Content Assist menu group (Preferences > Java > Editor > Content Assist > Advanced).
Java Formatter
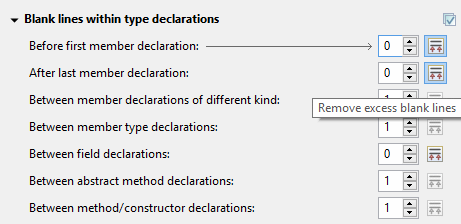
Remove excess blank lines
All the settings in the Blank lines section can now be configured to remove excess blank lines, effectively taking precedence over the Number of empty lines to preserve setting. Each setting has its own button to turn the feature on, right next to its number control. The button is enabled only if the selected number of lines is smaller than the Number of empty lines to preserve; otherwise, any excess lines are removed anyway.
Changes in blank lines settings
There’s quite a lot of changes in the Blank lines section of the formatter profile.
Some of the existing subsections and settings are now phrased differently to better express their function:
The Blank lines within class declarations subsection is now Blank lines within type declaration.
Before first declaration is now Before first member declaration.
Before declarations of the same kind is now Between member declarations of different kind.
Before member class declarations is now Between member type declarations.
Before field declarations is now Between field declarations.
Before method declarations is now Between method/constructor declarations.
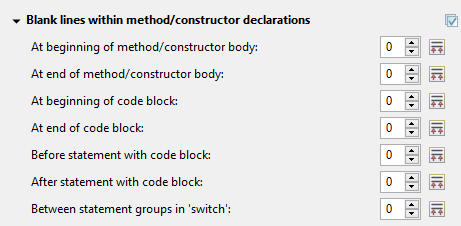
More importantly, a few new settings have been added to support more places where the number of empty lines can be controlled:
After last member declaration in a type (to complement previously existing Before first member declaration setting).
Between abstract method declarations in a type (these cases were previously handled by Between method/constructor declarations).
At end of method/constructor body (to complement previously existing At beginning of method/constructor body setting).
At beginning of code block and At end of code block.
Before statement with code block and After statement with code block.
Between statement groups in ‘switch.’
Most of the new settings have been put in a new subsection Blank lines within method/constructor declarations.
JUnit
JUnit 5.5.1
JUnit 5.5.1 is here and Eclipse JDT has been updated to use this version.
Debug
Enhanced support for –patch-module during launch
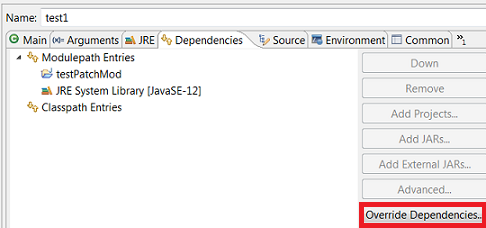
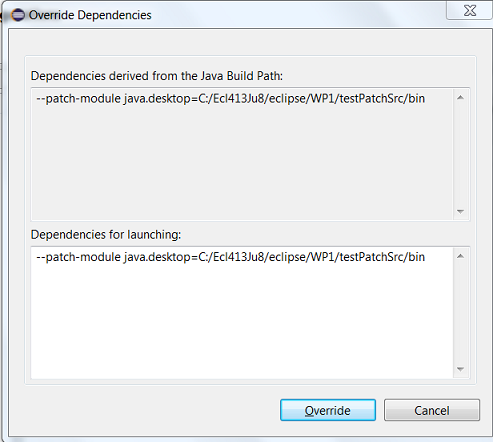
The Java Launch Configuration now supports patching of different modules by different sources during the launch. This can be verified in the Override Dependencies… dialog in the Dependencies tab in a Java Launch Configuration.
Java Build
Full build on JDT core preferences change
Manually changing the settings file .settings/org.eclipse.jdt.core.prefs of a project will result in a full project build, if the workspace auto-build is on. For example, pulling different settings from a git repository or generating the settings with a tool will now trigger a build. Note that this includes timestamp changes, even if actual settings file contents were not changed.
For the 4.13 release, it is possible to disable this new behavior with the VM property: -Dorg.eclipse.disableAutoBuildOnSettingsChange=true. It is planned to remove this VM property in a future release.
And more…
You can find more noteworthy updates in on this page.
What is next?
Having JBoss Tools 4.13.0 and Red Hat CodeReady Studio 12.13 out we are already working on the next release for Eclipse 2019-12.