Welcome, Guest
You have to register before you can post on our site.

Username
  

Password


Search Forums

(Advanced Search)

Forum Statistics
» Members: 20,946
» Latest member: blackopsdlc
» Forum threads: 22,012
» Forum posts: 22,979

Full Statistics

Online Users
There are currently 3042 online users.
» 0 Member(s) | 3037 Guest(s)
Applebot, Baidu, Bing, Facebook, Google

Latest Threads
When does Godzilla releas...
Forum: PC Discussion
Last Post: xSicKxBot

» Replies: 0
» Views: 4
[WoW Retail News] Ula'tek...
Forum: World of Warcraft
Last Post: xSicKxBot

» Replies: 0
» Views: 8
[DevBlog MS] Microsoft is...
Forum: C#, Visual Basic, & .Net Frameworks
Last Post: xSicKxBot

» Replies: 0
» Views: 15
[WoW Retail News] BlizzCo...
Forum: World of Warcraft
Last Post: xSicKxBot

» Replies: 0
» Views: 16
What is Celestial Codex i...
Forum: PC Discussion
Last Post: xSicKxBot

» Replies: 0
» Views: 17
[Ubuntu News] Fine tune y...
Forum: Linux, FreeBSD, and Unix types
Last Post: xSicKxBot

» Replies: 0
» Views: 14
[WoW Retail News] Xal'ata...
Forum: World of Warcraft
Last Post: xSicKxBot

» Replies: 0
» Views: 33
[Ubuntu News] Scaling And...
Forum: Linux, FreeBSD, and Unix types
Last Post: xSicKxBot

» Replies: 0
» Views: 23
[WoW Retail News] Comment...
Forum: World of Warcraft
Last Post: xSicKxBot

» Replies: 0
» Views: 25
How to unlock Maya Aguina...
Forum: PC Discussion
Last Post: xSicKxBot

» Replies: 0
» Views: 31

 
  [Tut] 7 Ways to Make Money as a Coder – Without a Job
Posted by: xSicKxBot - 03-22-2022, 05:39 PM - Forum: Python - No Replies

7 Ways to Make Money as a Coder – Without a Job


https://www.sickgaming.net/blog/2021/01/...out-a-job/

Print this item

  [Tut] Stripe One Time Payment with Prebuilt Hosted Checkout in PHP
Posted by: xSicKxBot - 03-22-2022, 05:39 PM - Forum: PHP Development - No Replies

Stripe One Time Payment with Prebuilt Hosted Checkout in PHP

Last modified on October 6th, 2020.

Stripe provides payment processing to support eCommerce software and mobile APPs. The key features by Stripe are,

  • fast and interactive checkout experience.
  • secure, smooth payment flow.
  • scope to uplift the conversion rate and business growth.

Stripe is the most popular payment gateway solution supporting card payments along with PayPal. Its complete documentation helps developers to do an effortless integration.

Stripe provides different types of payment services to accept payments. It supports accepting one-time payment, recurring payment, in-person payment and more.

There are two ways to set up the Stripe one-time payment option in a eCommerce website.

  1. Use the secure prebuilt hosted checkout page.
  2. Create a custom payment flow.

Let us take the first method to integrate Stripe’s one-time payment. The example code redirects customers to the Stripe hosted checkout page. It’s a pre-built page that allows customers to enter payment details.

Stripe hosted checkout option piggybacks on the Stripe trust factor. If your website is lesser-known, if you are not popular, then it is best to choose this option. Because the end users may feel uncomfortable to enter their card details on your page.

This diagram depicts the Stripe payment flow, redirect and response handling.
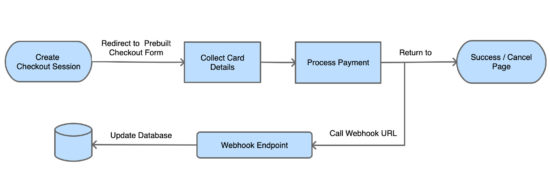
Stripe Hosted Checkout Block Diagram

In this example, it uses the latest checkout version to set up a one-time payment. If you want to create Stripe subscription payment, then the linked article has an example for it.

What is inside?


  1. About Stripe Checkout
  2. Steps to set up Stripe one-time payment flow
  3. About this example
  4. Generate and configure Stripe API keys
  5. Create webhook and map events
  6. Required libraries to access Stripe API
  7. Create client-server-side code to initiate checkout
  8. Capture and process webhook response
  9. Evaluate integration with test data
  10. Stripe one-time payment example output

About Stripe Checkout


Latest Stripe Checkout provides a frictionless smooth checkout experience. The below list shows some features of the latest Stripe checkout version.

  • Strong Customer Authentication (SCA).
  • Checkout interface fluidity over various devices’ viewport.
  • Multilingual support.
  • Configurable options to enable billing address collection, email receipts, and Button customizations

If you are using the legacy version,  it’s so simple to migrate to the latest Stripe Checkout version. The upgraded version supports advanced features like 3D secure, mobile payments and more.

Steps to setup Stripe one-time payment flow


The below steps are the least needs to set up a Stripe one-time payment online.

  1. Register with Stripe and generate API keys.
  2. Configure API keys with the application.
  3. Install and load the required libraries to access API.
  4. Create client and server-side code to make payments.
  5. Create endpoints to receive payment response and log into a database.
  6. Create a UI template to acknowledge customers.

We will see the above steps in this article with example code and screenshots.

About Stripe payment integration example


Stripe API allows applications to access and use its online payment services. It provides Stripe.js a JavaScript library to initiate the payment session flow.

This example code imports the Stripe libraries to access the API functions. It sets the endpoint to build the request and receive the response.

The client and server-side code redirect customers to the Stripe hosted checkout page. In the callback handlers, it processes the payment response sent by the API.

This example uses a database to store payment entries. It uses MySQLi with prepared statements to execute queries.

This image shows the simple file architecture of this example.
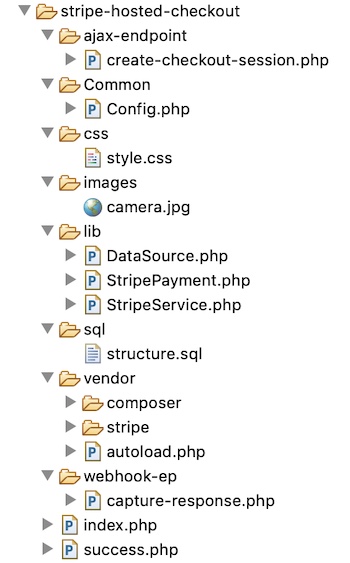
Stripe Hosted Checkout File Structure

Get and configure Stripe API keys


Register and log in with Stripe to get the API keys. Stripe dashboard will show two keys publishable_key and secret_key.

These keys are the reference to validate the request during the authentication process.

Note: Once finish testing in a sandbox mode, Stripe requires to activate the account to get the live API keys.
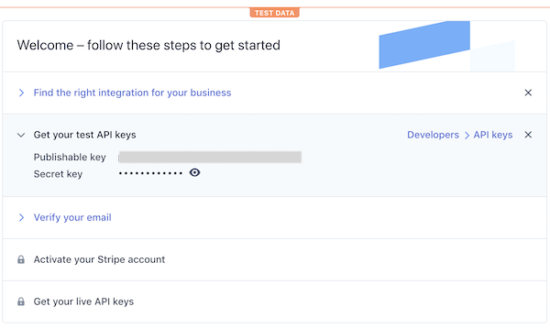
Get Stripe API Keys

This code shows the constants created to configure the API keys for this example.

<?php
namespace Phppot; class Config
{ const ROOT_PATH = "https://your-domain/stripe-hosted"; /* Stripe API test keys */ const STRIPE_PUBLISHIABLE_KEY = ""; const STRIPE_SECRET_KEY = ""; /* PRODUCT CONFIGURATIONS BEGINS */ const PRODUCT_NAME = 'A6900 MirrorLess Camera'; const PRODUCT_IMAGE = Config::ROOT_PATH . '/images/camera.jpg'; const PRODUCT_PRICE = '289.61'; const CURRENCY = 'USD'; const PRODUCT_TYPE = 'good';
}

Create webhook and map events


Creating a webhook is a conventional way to get the payment notifications sent by the API. All payment gateway providers give the option to create webhook for callback.

In PayPal payment gateway integration article, we have seen the types of notification mechanisms supported by PayPal.

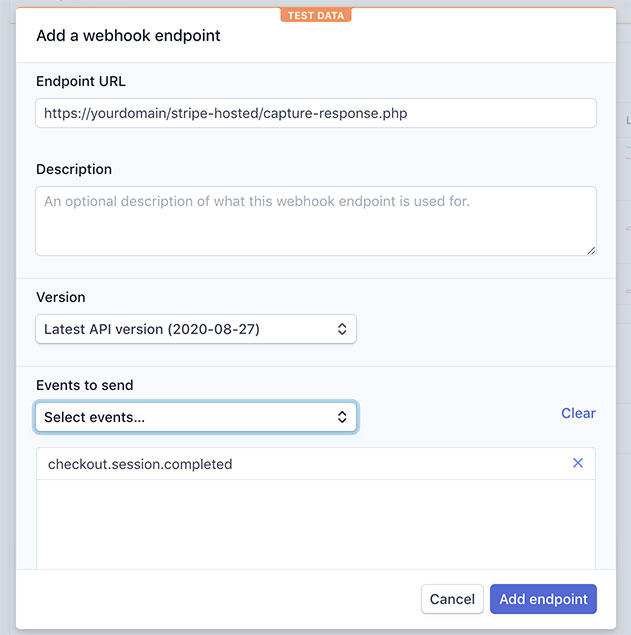
The code has the webhook endpoint registered with Stripe. It handles the API responses based on the event that occurred.

The below image shows the screenshot of the add-endpoint dialog. It populates the URL and the mapped events in the form fields.

Navigate via Developers->Webhooks and click the Add endpoint button to see the dialog.
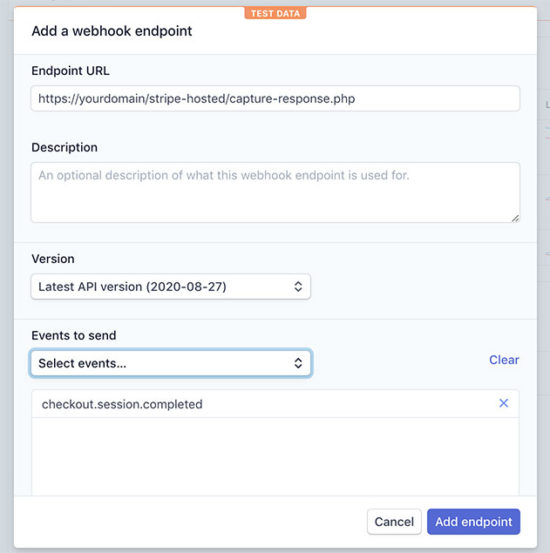
Add Stripe Webhook Endpoint

Required libraries to access Stripe API


First, download and install the stripe-php library. This will help to send flawless payment initiation request to the Stripe API.

This command helps to install this library via Composer. It is also available to download from GitHub.

composer require stripe/stripe-php

Load Stripe.js JavaScript library into the page which has the checkout button. Load this file by using https://js.stripe.com/v3/ instead of having it in local.

<script src="https://js.stripe.com/v3/"></script>

Create client-server code to process checkout


This section includes the steps needed to create the client-server code for setting up the Stripe one-time payment.

  1. Add checkout button and load Stripe.js
  2. Create a JavaScript event handler to initiate checkout session
  3. Create PHP endpoint to post create-checkout-session request
  4. Redirect customers to the Stripe hosted checkout page
  5. Get checkout session-id from the response.

HTML page with Stripe checkout button


This page has HTML code to add the Stripe checkout button. It loads the Stripe.js library.

This page loads a JavaScript that initiates the checkout session and redirects the user to the prebuilt Stripe hosted checkout.

The Stripe hosted checkout form handles the card validation effectively. We have created a custom car validator for Authorize.net payment integration code. Hosted checkout is more secure than handling card details by custom handlers.

index.php

<?php
namespace Phppot;
?>
<html>
<title>Stripe Prebuilt Hosted Checkout</title>
<head>
<link href="css/style.css" type="text/css" rel="stylesheet" />
<script src="https://js.stripe.com/v3/"></script>
</head>
<body> <div class="phppot-container"> <h1>Stripe Prebuilt Hosted Checkout</h1> <div id="payment-box"> <img src="images/camera.jpg" /> <h4 class="txt-title">A6900 MirrorLess Camera</h4> <div class="txt-price">$289.61</div> <button id="checkout-button">Checkout</button> </div> </div> <script> var stripe = Stripe('<?php echo Config::STRIPE_PUBLISHIABLE_KEY; ?>'); var checkoutButton = document.getElementById('checkout-button'); checkoutButton.addEventListener('click', function() { fetch('create-checkout-session.php', { method: 'POST', }) .then(function(response) { return response.json(); }) .then(function(session) { return stripe.redirectToCheckout({ sessionId: session.id }); }) .then(function(result) { if (result.error) { alert(result.error.message); } }) .catch(function(error) { console.error('Error:', error); }); }); </script>
</body>
</html>

JavaScript event handler initiates checkout session


In the previous section, it loads a JavaScript to do the following.

  1. Instantiate Stripe Javascript library object with the reference of the Stripe Publishable key.
  2. Map the checkout button’s click event to initiate a create-checkout-session.
  3. Redirect customers to the Stripe hosted checkout page with the checkout session id.

It calls the PHP endpoint builds the API request params to start a checkout session.

Then it receives the checkout-session-id as returned by the PHP endpoint. The redirectToCheckout() method sends customers to the prebuilt checkout to complete the payment.

PHP endpoint processing create-checkout-session request


When clicking the checkout button, the JavaScript executes an AJAX request. It fetches the PHP endpoint processing the create-checkout-session request.

The below code shows how to create the Stripe checkout-session via API. The API request is with the required query parameters. It includes the product detail, unit amount, payment method and more.

Then the API will return the session object after processing this request. This endpoint parses the response and grab the session-id and return it.

ajax-endpoint/create-checkout-session.php

<?php
namespace Phppot; use Phppot\StripeService;
use Phppot\StripePayment; $orderReferenceId = rand(100000, 999999); require_once __DIR__ . "/../lib/StripeService.php";
require_once __DIR__ .'/../Common/Config.php'; require_once __DIR__ . '/../lib/StripePayment.php';
$stripePayment = new StripePayment(); $stripeService = new StripeService(); $currency = Config::CURRENCY; $orderId = $stripePayment->insertOrder(Config::PRODUCT_PRICE, $currency, $orderReferenceId, "Payment in-progress");
$unitAmount = Config::PRODUCT_PRICE * 100;
$session = $stripeService->createCheckoutSession($unitAmount, $orderId);
echo json_encode($session);

The StripeService is a PHP class created to build API requests and process responses.

The createCheckoutSession() function builds the param array for the create-checkout-session request.

This service also handles the webhook responses sent by the API. The API sends the response on the occurrences of the events mapped with the webhook endpoint URL.

lib/StripeService.php

<?php
namespace Phppot; require_once __DIR__ . '/../Common/Config.php'; class StripeService
{ function __construct() { require_once __DIR__ . "/../vendor/autoload.php"; // Set your secret key. Remember to set your live key in production! \Stripe\Stripe::setApiKey(Config::STRIPE_SECRET_KEY); } public function createCheckoutSession($unitAmount, $clientReferenceId) { $checkout_session = \Stripe\Checkout\Session::create([ 'payment_method_types' => ['card'], 'line_items' => [[ 'price_data' => [ 'currency' => Config::CURRENCY, 'unit_amount' => $unitAmount, 'product_data' => [ 'name' => Config::PRODUCT_NAME, 'images' => [Config::PRODUCT_IMAGE], ], ], 'quantity' => 1, ]], 'mode' => 'payment', 'client_reference_id' => $clientReferenceId, 'success_url' => Config::ROOT_PATH . '/success.php?session_id={CHECKOUT_SESSION_ID}', 'cancel_url' => Config::ROOT_PATH . '/index.php?status=cancel', ]); return $checkout_session; } public function captureResponse() { $payload = @file_get_contents('php://input'); $event = json_decode($payload); require_once __DIR__ . "/../lib/StripePayment.php"; $stripePayment = new StripePayment(); switch($event->type) { case "customer.created": $param["stripe_customer_id"] = $event->data->object->id; $param["email"] = $event->data->object->email; $param["customer_created_datetime"] = date("Y,m,d H:i:s", $event->data->object->created); $param["stripe_response"] = json_encode($event->data->object); $stripePayment->insertCustomer($param); break; case "checkout.session.completed": $param["order_id"] = $event->data->object->client_reference_id; $param["customer_id"] = $event->data->object->customer; $param["payment_intent_id"] = $event->data->object->payment_intent; $param["stripe_checkout_response"] = json_encode($event->data->object); $stripePayment->updateOrder($param); break; case "payment_intent.created": $param["payment_intent_id"] = $event->data->object->id; $param["payment_create_at"] = date("Y-m-d H:i:s", $event->data->object->created); $param["payment_status"] = $event->data->object->status; $param["stripe_payment_response"] = json_encode($event->data->object); $stripePayment->insertPayment($param); break; case "payment_intent.succeeded": $param["payment_intent_id"] = $event->data->object->id; $param["billing_name"] = $event->data->object->charges->data[0]->billing_details->name; $param["billing_email"] = $event->data->object->charges->data[0]->billing_details->email; $param["payment_last_updated"] = date("Y-m-d H:i:s", $event->data->object->charges->data[0]->created); $param["payment_status"] = $event->data->object->charges->data[0]->status; $param["stripe_payment_response"] = json_encode($event->data->object); $stripePayment->updatePayment($param); break; case "payment_intent.canceled": $param["payment_intent_id"] = $event->data->object->id; $param["billing_name"] = $event->data->object->charges->data[0]->billing_details->name; $param["billing_email"] = $event->data->object->charges->data[0]->billing_details->email; $param["payment_last_updated"] = date("Y-m-d H:i:s", $event->data->object->charges->data[0]->created); $param["payment_status"] = $event->data->object->charges->data[0]->status; $param["stripe_payment_response"] = json_encode($event->data->object); $stripePayment->updatePayment($param); break; case "payment_intent.payment_failed": $param["payment_intent_id"] = $event->data->object->id; $param["billing_name"] = $event->data->object->charges->data[0]->billing_details->name; $param["billing_email"] = $event->data->object->charges->data[0]->billing_details->email; $param["payment_last_updated"] = date("Y-m-d H:i:s", $event->data->object->charges->data[0]->created); $param["payment_status"] = $event->data->object->charges->data[0]->status; $param["stripe_payment_response"] = json_encode($event->data->object); $stripePayment->updatePayment($param); break; } http_response_code(200); }
}

Capture and process response


The capture-response.php file calls the StripeService class to handle the webhook response.

The registered webhook endpoint has the mapping for the events. The figure shows the mapped events and the webhook URL below.
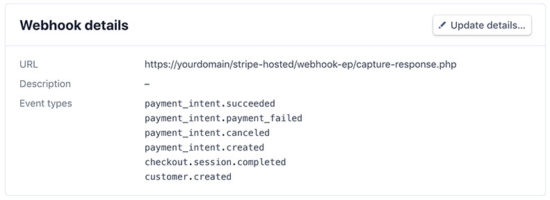
Stripe Developers Webhook Detail

The captureResponse() function handles the API response based on the events that occurred.

On each event, it updates the customer, order database tables. It creates the payment response log to put entries into the tbl_stripe_response table.

webhook-ep/capture-response.php

<?php
namespace Phppot; use Phppot\StriService; require_once __DIR__ . "/../lib/StripeService.php"; $stripeService = new StripeService(); $stripeService->captureResponse(); ?>

It invokes the StripeService function captureResponse(). It calls StripePayment to store Orders, Customers and Payment data into the database.

The StripePayment class it uses DataSource to connect the database and access it.

lib/StripePayment.php

<?php
namespace Phppot; use Phppot\DataSource; class StripePayment
{ private $ds; function __construct() { require_once __DIR__ . "/../lib/DataSource.php"; $this->ds = new DataSource(); } public function insertOrder($unitAmount, $currency, $orderReferenceId, $orderStatus) { $orderAt = date("Y-m-d H:i:s"); $insertQuery = "INSERT INTO tbl_order(order_reference_id, amount, currency, order_at, order_status) VALUES (?, ?, ?, ?, ?) "; $paramValue = array( $orderReferenceId, $unitAmount, $currency, $orderAt, $orderStatus ); $paramType = "sisss"; $insertId = $this->ds->insert($insertQuery, $paramType, $paramValue); return $insertId; } public function updateOrder($param) { $paymentDetails = $this->getPaymentByIntent($param["payment_intent_id"]); if (! empty($paymentDetails)) { if($paymentDetails[0]["payment_status"] == "succeeded") { $paymentStatus = "Paid"; } else if($paymentDetails[0]["payment_status"] == "requires_source") { $paymentStatus = "Payment in-progress"; } $query = "UPDATE tbl_order SET stripe_customer_id = ?, stripe_payment_intent_id = ?, stripe_checkout_response = ?, order_status = ? WHERE id = ?"; $paramValue = array( $param["customer_id"], $param["payment_intent_id"], $param["stripe_checkout_response"], $paymentStatus, $param["order_id"] ); $paramType = "ssssi"; $this->ds->execute($query, $paramType, $paramValue); } } public function insertCustomer($customer) { $insertQuery = "INSERT INTO tbl_customer(stripe_customer_id, email, customer_created_datetime, stripe_response) VALUES (?, ?, ?, ?) "; $paramValue = array( $customer["stripe_customer_id"], $customer["email"], $customer["customer_created_datetime"], $customer["stripe_response"] ); $paramType = "ssss"; $this->ds->insert($insertQuery, $paramType, $paramValue); } public function insertPayment($param) { $insertQuery = "INSERT INTO tbl_payment(stripe_payment_intent_id, payment_create_at, payment_status, stripe_payment_response) VALUES (?, ?, ?, ?) "; $paramValue = array( $param["payment_intent_id"], $param["payment_create_at"], $param["payment_status"], $param["stripe_payment_response"] ); $paramType = "ssss"; $this->ds->insert($insertQuery, $paramType, $paramValue); } public function updatePayment($param) { $query = "UPDATE tbl_payment SET billing_name = ?, billing_email = ?, payment_last_updated = ?, payment_status = ?, stripe_payment_response = ? WHERE stripe_payment_intent_id = ?"; $paramValue = array( $param["billing_name"], $param["billing_email"], $param["payment_last_updated"], $param["payment_status"], $param["stripe_payment_response"], $param["payment_intent_id"] ); $paramType = "ssssss"; $this->ds->execute($query, $paramType, $paramValue); } public function getPaymentByIntent($paymentIntent) { $query = "SELECT * FROM tbl_payment WHERE stripe_payment_intent_id = ?"; $paramValue = array( $paymentIntent ); $paramType = "s"; $result = $this->ds->select($query, $paramType, $paramValue); return $result; }
}
?>

Showing success page after payment


As sent with the create-checkout-session request, Stripe invokes the success page URL after payment.

The below code has the payment success message to acknowledge customers.

success.php

<?php
namespace Phppot; require_once __DIR__ . '/Common/Config.php';
?>
<html>
<head>
<title>Payment Response</title>
<link href="./css/style.css" type="text/css" rel="stylesheet" />
</head>
<body> <div class="phppot-container"> <h1>Thank you for shopping with us.</h1> <p>You have purchased "<?php echo Config::PRODUCT_NAME; ?>" successfully.</p> <p>You have been notified about the payment status of your purchase shortly.</p> </div>
</body>
</html>

Database script


Import the following SQL script to execute this example in your environment. It has the SQL to create tables created for this example and to build a relationship between them.

sql/structure.sql

--
-- Table structure for table `tbl_customer`
-- CREATE TABLE `tbl_customer` ( `id` int(11) NOT NULL, `stripe_customer_id` varchar(255) NOT NULL, `email` varchar(50) NOT NULL, `customer_created_datetime` timestamp NOT NULL DEFAULT CURRENT_TIMESTAMP ON UPDATE CURRENT_TIMESTAMP, `stripe_response` text NOT NULL, `create_at` timestamp NOT NULL DEFAULT CURRENT_TIMESTAMP ON UPDATE CURRENT_TIMESTAMP
) ENGINE=InnoDB DEFAULT CHARSET=latin1; -- -------------------------------------------------------- --
-- Table structure for table `tbl_order`
-- CREATE TABLE `tbl_order` ( `id` int(11) NOT NULL, `order_reference_id` varchar(255) NOT NULL, `stripe_customer_id` varchar(255) DEFAULT NULL, `stripe_payment_intent_id` varchar(255) DEFAULT NULL, `amount` decimal(10,2) NOT NULL, `currency` varchar(10) NOT NULL, `order_at` timestamp NOT NULL DEFAULT CURRENT_TIMESTAMP ON UPDATE CURRENT_TIMESTAMP, `order_status` varchar(25) NOT NULL, `stripe_checkout_response` text NOT NULL, `create_at` timestamp NOT NULL DEFAULT CURRENT_TIMESTAMP ON UPDATE CURRENT_TIMESTAMP
) ENGINE=InnoDB DEFAULT CHARSET=latin1; -- -------------------------------------------------------- --
-- Table structure for table `tbl_payment`
-- CREATE TABLE `tbl_payment` ( `id` int(11) NOT NULL, `stripe_payment_intent_id` varchar(255) NOT NULL, `payment_create_at` timestamp NULL DEFAULT NULL, `payment_last_updated` timestamp NULL DEFAULT '0000-00-00 00:00:00', `billing_name` varchar(255) NOT NULL, `billing_email` varchar(255) NOT NULL, `payment_status` varchar(255) NOT NULL, `stripe_payment_response` text NOT NULL, `create_at` timestamp NOT NULL DEFAULT CURRENT_TIMESTAMP ON UPDATE CURRENT_TIMESTAMP
) ENGINE=InnoDB DEFAULT CHARSET=latin1; --
-- Indexes for dumped tables
-- --
-- Indexes for table `tbl_customer`
--
ALTER TABLE `tbl_customer` ADD PRIMARY KEY (`id`), ADD UNIQUE KEY `stripe_customer_id` (`stripe_customer_id`); --
-- Indexes for table `tbl_order`
--
ALTER TABLE `tbl_order` ADD PRIMARY KEY (`id`), ADD KEY `stripe_payment_intent_id` (`stripe_payment_intent_id`), ADD KEY `stripe_customer_id` (`stripe_customer_id`); --
-- Indexes for table `tbl_payment`
--
ALTER TABLE `tbl_payment` ADD PRIMARY KEY (`id`), ADD UNIQUE KEY `stripe_payment_intent_id` (`stripe_payment_intent_id`); --
-- AUTO_INCREMENT for dumped tables
-- --
-- AUTO_INCREMENT for table `tbl_customer`
--
ALTER TABLE `tbl_customer` MODIFY `id` int(11) NOT NULL AUTO_INCREMENT; --
-- AUTO_INCREMENT for table `tbl_order`
--
ALTER TABLE `tbl_order` MODIFY `id` int(11) NOT NULL AUTO_INCREMENT; --
-- AUTO_INCREMENT for table `tbl_payment`
--
ALTER TABLE `tbl_payment` MODIFY `id` int(11) NOT NULL AUTO_INCREMENT; --
-- Constraints for dumped tables
-- --
-- Constraints for table `tbl_order`
--
ALTER TABLE `tbl_order` ADD CONSTRAINT `tbl_order_ibfk_1` FOREIGN KEY (`stripe_payment_intent_id`) REFERENCES `tbl_payment` (`stripe_payment_intent_id`), ADD CONSTRAINT `tbl_order_ibfk_2` FOREIGN KEY (`stripe_customer_id`) REFERENCES `tbl_customer` (`stripe_customer_id`);
COMMIT;

Evaluate integration with test data


After integrating Stripe one-time payment, evaluate the integration with test card details.

The following test card details help to try a successful payment flow.

Card Number 4242424242424242
Expiry Month/Year Any future date
CVV Three-digit number

Stripe provides more test card details to receive more types of responses.

Stripe one-time payment example output


This example displays a product tile with the Stripe Checkout button as shown below.

Stripe Payment Landing Page

On clicking the Checkout button, it redirects customers to the prebuilt Stripe hosted checkout page.
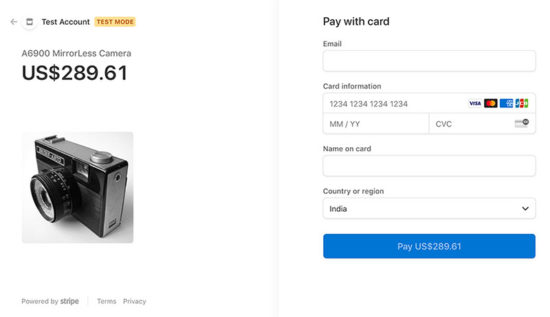
Stripe Hosted Checkout Page

After processing the payment, Stripe will redirect customers to the success page URL.
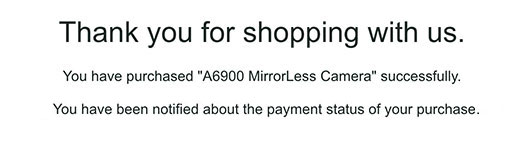
Payment Success Page

Conclusion


We have seen how to integrate the stripe hosted checkout in PHP with an example. Hope it is simple and easy to follow.

It helps to have a quick glance with the bullet points pre-requisites, implementation steps. It pinpoints the todo items in short.

The downloadable source code has the required vendor files. It is not needed to download libraries and SDK from anywhere.

With database intervention, the code is ready to integrate with a full-fledged application.

With the latest Stripe checkout version, it provides payment services with SCA and more advanced features.

Download

↑ Back to Top


https://www.sickgaming.net/blog/2020/10/...ut-in-php/

Print this item

  (Indie Deal) ?Fantastic Tales Bundle, Transport Giveaways, Ziggurat & Maximum Sales
Posted by: xSicKxBot - 03-22-2022, 05:39 PM - Forum: Deals or Specials - No Replies

?Fantastic Tales Bundle, Transport Giveaways, Ziggurat & Maximum Sales

Transportation Giveaways
[www.indiegala.com]

https://youtu.be/OwuTYwuKUEw
Fantastic Tales Bundle | 8 eBooks | 94% OFF
[www.indiegala.com]
Get ready for a fantastic journey in the realm of fiction, fantasy and sci-fi with an eBook collection bringing Ancestors, Retropunk, Hope: All Alone, Alpha Gods: Omnibus & DGM Sleaze Castle: The Director's Cut.

Ziggurat & Maximum Games Sales, up to 92% OFF
[www.indiegala.com]
[www.indiegala.com]

https://www.youtube.com/watch?v=lxMD4lRupDk

Stay Inside, Stay Safe and Enjoy Good Games.
Check out IndieGala on Twitter, YouTube & Facebook[www.facebook.com]


https://steamcommunity.com/groups/indieg...3532924310

Print this item

  (Free Game Key) Dear Esther: Landmark Edition - Free Steam Game
Posted by: xSicKxBot - 03-22-2022, 05:39 PM - Forum: Deals or Specials - No Replies

Dear Esther: Landmark Edition - Free Steam Game

Visit the store page and add the game to your steam account:

Dear Esther: Landmark Edition

The game is free to keep for 3 days until 16th February

We are welcoming everyone to join our discord[discord.gg]. We are more active there on finding giveaways, small or large, and there are daily raffles you can participate.

?GrabFreeGames.com ?Twitter ?Steam Curator ?Facebook[fb.me]?Discord[discord.gg]
❤️Support us: ✔️HumbleBundle Partner[www.humblebundle.com] Epic Tag: GrabFreeGames


https://steamcommunity.com/groups/GrabFr...7788713192

Print this item

  PC - Atelier Sophie 2: The Alchemist of the Mysterious Dream
Posted by: xSicKxBot - 03-22-2022, 05:39 PM - Forum: New Game Releases - No Replies

Atelier Sophie 2: The Alchemist of the Mysterious Dream


A mysterious story of a mysterious dream...
One of the stories experienced throughout the Alchemist Sophie’s many adventures, as she continued her travels after leaving her hometown of Kirchen Bell.
This is Sophie’s adventure as she searches for her friend Plachta in the dream world Erde Wiege, where they become separated, and shows the bonds she forms with the people she meets and passing of hearts.

■Evolved turn-based battles & seamless transitions!
In the 6 member party turn-based battles, the 3 members in the front and 3 in the back form 2 teams cooperating “multi-linked turn battles”, and transitions from exploration to battles without loading times in “seamless battles”, the entire game can be enjoyed at a great pace.

■2 types of panels for everyone to enjoy synthesis!
This game uses panel synthesis, the synthesis system of the Mysterious series, where materials are placed in the panel slots to create new items in this puzzle-like feature. By placing the certain materials in the slots, various effects can be produced.
There are 2 types of panels in this game that players can select from : a regular panel and a restricted panel that has a higher synthesis difficulty level.
The board of the restricted panel is fairly complex, but when materials are placed just right, items with high effects can be synthesized, which can't be generated from the regular panel.

Publisher: Koei Tecmo Games

Release Date: Feb 25, 2022


https://www.metacritic.com/game/pc/ateli...ious-dream

Print this item

  Managing JBoss EAP/Wildfly using Jcliff
Posted by: xSicKxBot - 03-21-2022, 11:16 AM - Forum: Java Language, JVM, and the JRE - No Replies

Managing JBoss EAP/Wildfly using Jcliff

Systems management can be a difficult task. Not only does one need to determine what the end state should be but, more importantly, how to ensure systems attain and remain at this state. Doing so in an automated fashion is just as critical, because there may be a large number of target instances. In regard to enterprise Java middleware application servers, these instances are typically configured using a set of XML based files. Although these files may be manually configured, most application servers have a command-line based tool or set of tools that abstracts the end user from having to worry about the underlying configuration. WebSphere Liberty includes a variety of tools to manage these resources, whereas JBoss contains the jboss-cli tool.

Although each tool accomplishes its utilitarian use case as it allows for proper server management, it does fail to adhere to one of the principles of automation and configuration management: idempotence. Ensuring the desired state does not equate to executing the same action with every iteration. Additional intelligence must be introduced. Along with idempotence, another core principle of configuration management is that values be expressed declaratively and stored in a version control system.

Jcliff is a Java-based utility that is built on top of the JBoss command-line interface and allows for the desired intent for the server configuration to be expressed declaratively, which in turn can be stored in a version control system. We’ll provide an overview of the Jcliff utility including inherent benefits, installation options, and several examples showcasing the use.

The problem space


Before beginning to work with Jcliff, one must be cognizant of the underlying JBoss architecture. The configuration of the JBoss server can be expressed using Dynamic Model Representation (DMR) notation. The following is an example of DMR:

{ "system-property" => { "foo" => "bar", "bah" => "gah" } } 

The DMR example above describes several Java system properties that will be stored within the JBoss configuration. These properties can be added using the JBoss CLI by executing the following command:

/system-property=foo:add(value=bar) /system-property=bah:add(value=gah) 

The challenge is that the same commands cannot be executed more than once. Otherwise, an error similar to the following is produced.

{ "outcome" => "failed", "failure-description" => "WFLYCTL0212: Duplicate resource [(\"system-property\" => \"foo\")]", "rolled-back" => true } 

Where Jcliff excels is that it includes the necessary intelligence to determine the current state of the JBoss configuration and then applying the appropriate configurations necessary. This is critical to adopting proper configuration management when working with JBoss.

Installing Jcliff


With a baseline understanding of Jcliff, let’s discuss the methods in which one can obtain the utility. First, Jcliff can be built from source from the project repository, given that it’s a freely open source project. Alternatively, Jcliff can be installed using popular software packaging tools in each of the primary operating system families.

Linux (rpm)


Jcliff can be consumed on a Linux package when capable of consuming an rpm using a package manager.

First, install the yum repository:

$ cat /etc/yum.repos.d/jcliff.repo [jcliff] baseurl = http://people.redhat.com/~rpelisse/jcliff.yum/ gpgcheck = 0 name = JCliff repository 

Once this repository has been added, JCliff can be installed by using Yum or Dnf:

Using yum:

$ sudo yum install jcliff 

Or using dnf:

$ sudo dnf install jcliff 

Manual installation


Jcliff can also be installed manually without the need to leverage a package manager. This is useful for those on Linux distributions that cannot consume rpm packages. Simply download and unpack the archive from the release artifact from the project repository.

$ curl -O \ https://github.com/bserdar/jcliff/releas...ist.tar.gz $ tar xzvf jcliff-2.12.1-dist.tar.gz 

Place the resulting Jcliff folder in the destination of your choosing. This location is known as JCLIFF_HOME. Add this environment variable and add it to the path as described below:

$ export JCLIFF_HOME=/path/to/jcliff-2.12.1/ $ export PATH=${JCLIFF_HOME}/bin:${PATH} 

At this point, you should be able to execute the jcliff command.

OSX


While users on OSX can take advantage of the manual installation option, those making use of the brew package manager can use this tool as well.

Execute the following commands to install Jcliff using Brew:

$ brew tap redhat-cop/redhat-cop $ brew install redhat-cop/redhat-cop/jcliff 

Windows


Fear not, Windows users; you can also make use of Jcliff without having to compile from source. Windows, in the same vein as OSX, does not have an official package manager, but Chocolatey has been given this role.

Execute the following command to install Jcliff using Chocolatey:

$ choco install jcliff 

Using Jcliff


With Jcliff properly installed on your machine, let’s walk through a simple example to demonstrate the use of the tool. As discussed previously, Jcliff makes use of files that describe the target configuration. At this point, you may have questions like: What is the format of these configurations, and where do I begin?

Let’s take a simple example and look into adding a new system property to the JBoss configuration. Launch an instance of JBoss and connect using the JBoss command-line interface:

$ /bin/jboss-cli.sh --connect [standalone@localhost:9990 /] ls /system-property [standalone@localhost:9990 /] 

Now, use Jcliff to update the configuration. First, we’ll need to create a Jcliff rule. The rule resembles DMR format and appears similar to the following:

$ cat jcliff-prop { "system-property" => { "jcliff.enabled" => "true", } } 

Then we can simply ask JCliff to run this script against our JBoss server:

$ jcliff jcliff-prop Jcliff version 2.12.4 2019-10-02 17:03:40:0008: /core-service=platform-mbean/type=runtime:read-attribute(name=system-properties) 2019-10-02 17:03:41:0974: /system-property=jcliff.enabled:add(value="true") 

Use the JBoss CLI to verify the changes have been applied.

$ “${JBOSS_HOME}/bin/jboss-cli.sh” --connect --command=/system-property=jcliff.enabled:read-resource { "outcome" => "success", "result" => {"value" => "true"} } 

To demonstrate how Jcliff handles repetitive executions, run the previous Jcliff command again. Inspect the output.

$ jcliff jcliff-prop Jcliff version 2.12.4 2019-10-02 17:05:34:0107: /core-service=platform-mbean/type=runtime:read-attribute(name=system-properties) 

Notice that only 1 command was executed against the JBoss server instead of two? This action was a result of assessing the current state within JBoss and determining that no action was necessary to reach the desired state. Mission accomplished.

Next steps


Although the preceding scenario was not overly complex, you should now have the knowledge necessary to understand the capabilities and functionality of the Jcliff utility as well as the benefits afforded through declarative configurations and automation. When building out enterprise-grade systems, however, Jcliff would not be executed manually. You would want to integrate the utility into a proper configuration management tool that employs many of the automation and configuration principles described earlier. Fortunately, Jcliff has been integrated into several popular configuration management tools.

In an upcoming article, we’ll provide an overview of the configuration management options available with Jcliff, along with examples that will allow you to quickly build out enterprise-grade confidence with Jcliff.

Share

The post Managing JBoss EAP/Wildfly using Jcliff appeared first on Red Hat Developer.


https://www.sickgaming.net/blog/2019/11/...ng-jcliff/

Print this item

  [Tut] Return Keyword in Python – A Simple Illustrated Guide
Posted by: xSicKxBot - 03-21-2022, 11:16 AM - Forum: Python - No Replies

Return Keyword in Python – A Simple Illustrated Guide

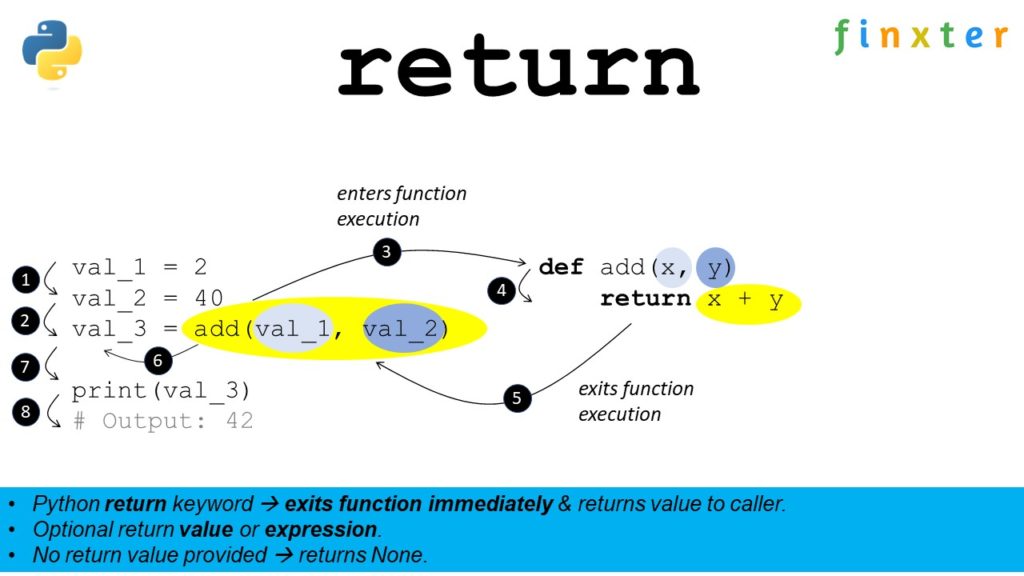
Python return keyword - visual example

Python’s return keyword commands the execution flow to exit a function immediately and return a value to the caller of the function. You can specify an optional return value—or even a return expression—after the return keyword. If you don’t provide a return value, Python will return the default value None to the caller.

Python Return Keyword Video


Return Keyword Followed by Return Value


Here’s an example of the return keyword in combination with a return value:

def f(): return 4 print(f())
# OUTPUT: 4

Within function f(), Python returns the result 4 to the caller. The print() function then prints the output to the shell.

Return Keyword Followed by Return Expression


Here’s an example of the return keyword in combination with a return expression:

def f(): return 2+2 print(f())
# OUTPUT: 4

Within function f(), Python evaluates the expression 2+2=4 and returns the result 4 to the caller. The print() function then prints the output to the shell.

Return Keyword Followed by No Value


Here’s an example of the return keyword without defining a return value:

def f(): return print(f())
# OUTPUT: None

Within function f(), Python returns the default value None to the caller. The print() function then prints the output to the shell.

Interactive Code Shell


Run the following code in your browser:

Exercise: Change the three return values to 42, 42, and ‘Alice’ in the interactive code shell!

The post Return Keyword in Python – A Simple Illustrated Guide first appeared on Finxter.


https://www.sickgaming.net/blog/2021/01/...ted-guide/

Print this item

  [Oracle Blog] A Quick Summary on the new Java SE Subscription
Posted by: xSicKxBot - 03-21-2022, 11:16 AM - Forum: Java Language, JVM, and the JRE - No Replies

A Quick Summary on the new Java SE Subscription

Earlier today, Oracle announced the introduction of the Oracle Java SE Subscription. Simply put, you can now buy access to Java SE updates – including support from Oracle just as you would buy Linux updates and support from any distro provider. Pricing is low and simple. We are working to make it po...

https://blogs.oracle.com/java/post/a-qui...bscription

Print this item

  [Tut] Bootstrap Contact Form with JavaScript Validation and PHP
Posted by: xSicKxBot - 03-21-2022, 11:16 AM - Forum: PHP Development - No Replies

Bootstrap Contact Form with JavaScript Validation and PHP

Last modified on September 7th, 2020.

Bootstrap is the most popular solution to design an optimum, intuitive, mobile-ready UI components. It is easy to integrate the Bootstrap library for the application interface.

Often, many of my readers ask for a Bootstrap contact form code. So I thought of creating a basic example for a Bootstrap enabled PHP contact form.

Bootstrap provides in-built features to take care of UI responsiveness, form validation, and more. I used its SVG icon library to display the contact form fields with suitable icons.

A Bootstrap contact form looks enriched. UI attracts people and enables them to use it with ease. Also, the developers’ effort is reduced by using the Bootstrap framework.

I have created a secure feature-packed responsive contact form – Iris. This is one of the best and sleek contact form component you can ever get.

What is inside?


  1. Contact form with vs without Bootstrap
  2. Majority of  the contact form fields
  3. About this example
  4. File Structure
  5. Slim UI layout with the Bootstrap contact from
  6. Contact form validation with plain JavaScript
  7. Processing contact form data in PHP code
  8. Bootstrap contact form UI output

A contact form collects a different type of user details like name, message and more. There are various popular templates for contact forms.

I have created various PHP contact form examples. And those form templates uses my own custom CSS.

Though it is straight forward to go with custom CSS, designing with Bootstrap gives irrefutable offer.

Bootstrap provides full-fledged styles to create various types of form layout. It includes more of element-specific, attribute-specific forms styles.

With a Bootstrap contact form, the responsiveness, the cross-browser compatibilities are an easy deal.

If you already use the Bootstrap framework, then also it would be natural not to choose the custom CSS UI option.

For a simple example to prepend icons to form inputs without Bootstrap needs a bunch of CSS and media queries. But, with Bootstrap it has input-group selector to achieve this.

In case if you want to render a thin, primitive contact form, then custom CSS is preferable.

Most of the contact forms have the name, email, subject, message fields. Some times it varies based on the applications’ purpose.

For example, site-admin may merge the user feedbacks and inquiries entry points. In such cases, the contact form may have a radio option group to choose between feedback and inquiry.

Sometimes, people may collect phone numbers with country code. Also, it may have checkbox options to receive GDPR consent as per the European legislation.

In a way, contact forms become complex in positioning fields, giving fluidity and more aspects.

Bootstrap supports a variety of layout options to create even a more complex form. Based on the complexity of the contact form layout, the Bootstrap is even dependable.

About this example


This example uses rebooted form styles with classes to create a Bootstrap contact form. It makes this form UI responsive and consistent in all browsers and viewports.

It includes a default contact form having vertically stacked form controls. Each form-control has a prepended icon suitable to the contact input. I downloaded the Bootstrap SVG icon library to have such icons.

The form validation with a plain JavaScript simplifies the effort of loading any external libraries.

In PHP, it handles the posted data for sending them via a contact email. Also, it stores the data into a database table if any. It is optional and can disable in code.

This code uses a simple PHP mail() function for sending the emails. In a previous example, I have added how to send email using Gmail SMTP. Replace the simple mail() function with the one using PhpMailer via Gmail SMTP.

File Structure


The contact form code is a small integrative component of an application. This example contains a very minimal code of having a Bootstrap contact form.

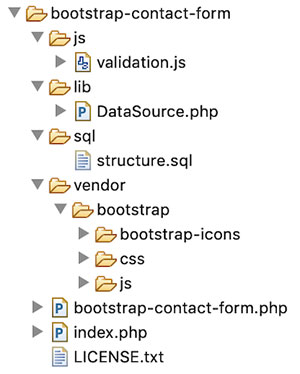
The vendor directory includes the Bootstrap CSS and icon library.

The bootstrap-contact-form.phpfile contains the contact form HTML template. The landing page renders the contact form by including this template.

Bootstrap Contact Form File Structure

This section shows the Bootstrap contact form HTML code. This HTML shows a default vertically stacked contact form fields.

The Bootstrap form grid styles and CSS provides options to display a horizontal form.

In the below HTML, each form element is in a form-group container. It groups the form element label, form controls, validation and help-text properly.

The Email field has a help text that displays a note spaced as text-muted.

The input-group specific styles help to display icon-prepended form controls. These icons are from the Bootstrap SVG icon library.

bootstrap-contact-form.php

<html>
<head>
<meta name="viewport" content="width=device-width, initial-scale=1, shrink-to-fit=no">
<title>Bootstrap Contact Form</title>
<link rel="stylesheet" href="./vendor/bootstrap/css/bootstrap.min.css">
</head>
<body class="bg-light"> <div class="container"> <div class="row py-4"> <div class="col"> <h2>Bootstrap Contact Form</h2> </div> </div> <form name="frmContact" id="frmContact" method="post" action="" enctype="multipart/form-data" novalidate> <div class="row"> <div class="form-group col-md-4"> <label>Name</label> <span id="userName-info" class="invalid-feedback"></span> <div class="input-group"> <div class="input-group-prepend"> <span class="input-group-text"><?php require __DIR__ . '/vendor/bootstrap/bootstrap-icons/person.svg';?></span> </div> <input type="text" class="form-control" name="userName" id="userName" required> </div> </div> </div> <div class="row"> <div class="form-group col-md-4"> <label>Email</label> <span id="userEmail-info" class="invalid-feedback"></span> <div class="input-group"> <div class="input-group-prepend"> <span class="input-group-text"><?php require __DIR__ . '/vendor/bootstrap/bootstrap-icons/envelope.svg';?></span> </div> <input type="email" name="userEmail" id="userEmail" class="form-control" required> </div> <small id="emailHelp" class="form-text text-muted">Your email will not be shared.</small> </div> </div> <div class="row"> <div class="form-group col-md-8"> <label>Subject</label> <span id="subject-info" class="invalid-feedback"></span> <div class="input-group"> <div class="input-group-prepend"> <span class="input-group-text"><?php require __DIR__ . '/vendor/bootstrap/bootstrap-icons/question.svg';?></span> </div> <input type="text" name="subject" id="subject" class="form-control" required> </div> </div> </div> <div class="row"> <div class="form-group col-md-8"> <label>Message</label> <span id="content-info" class=" invalid-feedback"></span> <div class="input-group"> <div class="input-group-prepend"> <span class="input-group-text"><?php require __DIR__ . '/vendor/bootstrap/bootstrap-icons/pencil.svg';?></span> </div> <textarea class="form-control" rows="5" name="message" id="message" required></textarea> </div> </div> </div> <div class="row"> <div class="col"> <input type="submit" name="send" class="btn btn-primary" value="Send Message" /> </div> </div>
<?php
if (! empty($displayMessage)) { ?> <div class="row"> <div class="col-md-8"> <div id="statusMessage" class="alert alert-success mt-3" role="alert"><?php echo $displayMessage; ?> </div> </div> </div>
<?php
}
?> </form> </div> <script type="text/javascript" src="./js/validation.js"></script>
</body>
</html>

The above HTML template imports the Bootstrap CSS from the vendor location.

After submitting the contact details, users will receive an acknowledgment message. The bootstrap success alert box displays a positive response on successful mail sending.

All the fields are mandatory in this Bootstrap contact form example.

The js/validation.js file has the validation script. On the window load event, this script sets the submit event listener to check the form validity.

Once it found invalid form fields, it will prevent the form to submit. Added to that it will add Bootstrap custom validation styles to highlight the invalid fields.

It adds the .was-validated class to the parent form element. It highlights the form fields with respect to the :valid and :invalid pseudo-classes.

Apart from the red-bordered invalid field highlighting, the script displays a text-based error message. The setValidationResponse() checks the form data and insert the error message into the target.

This custom function invokes markAsValid() and markAsInvalid() to show the error messages. These functions set the element’s display property and the innerText.

js/validation.js

(function() { 'use strict'; window.addEventListener('load', function() { var form = document.getElementById('frmContact'); form.addEventListener('submit', function(event) { if (form.checkValidity() === false) { event.preventDefault(); event.stopPropagation(); setValidationResponse(); } form.classList.add('was-validated'); }, false); }, false);
})(); function setValidationResponse() { var emailRegex = /^([a-zA-Z0-9_.+-])+\@(([a-zA-Z0-9-])+\.)+([a-zA-Z0-9]{2,4})+$/; var userName = document.getElementById("userName").value; var userEmail = document.getElementById("userEmail").value; var subject = document.getElementById("subject").value; var content = document.getElementById("message").value; if (userName == "") { markAsInvalid("userName", "required"); } else { markAsValid("userName"); } if (userEmail == "") { markAsInvalid("userEmail", "required"); } else if(!emailRegex.test(userEmail)) { markAsInvalid("userEmail", "invalid"); } else { markAsValid("userEmail"); } if (subject == "") { markAsInvalid("subject", "required"); } else { markAsValid("subject"); } if (content == "") { markAsInvalid("content", "required"); } else { markAsValid("content"); }
} function markAsValid(id) { document.getElementById(id+"-info").style.display = "none";
} function markAsInvalid(id, feedback) { document.getElementById(id+"-info").style.display = "inline"; document.getElementById(id+"-info").innerText = feedback;
}

This section is something common in all of my contact forms example. But, this is important for which we have started.

In this example, it has support to store the contact form data into a database. But, it is optional and configurable in the coding.

The PHP code has a variable $isDatabase which may have a boolean true to enable the database.

structure.sql

--
-- Database: `bootstrap_contact_form`
-- -- -------------------------------------------------------- --
-- Table structure for table `tbl_contact`
-- CREATE TABLE `tbl_contact` ( `id` int(11) NOT NULL, `user_name` varchar(255) NOT NULL, `user_email` varchar(255) NOT NULL, `subject` varchar(255) NOT NULL, `message` varchar(255) NOT NULL
) ENGINE=InnoDB DEFAULT CHARSET=latin1; --
-- Indexes for dumped tables
-- --
-- Indexes for table `tbl_contact`
--
ALTER TABLE `tbl_contact` ADD PRIMARY KEY (`id`); --
-- AUTO_INCREMENT for dumped tables
-- --
-- AUTO_INCREMENT for table `tbl_contact`
--
ALTER TABLE `tbl_contact` MODIFY `id` int(11) NOT NULL AUTO_INCREMENT, AUTO_INCREMENT=1;

The below code shows the backend logic created in PHP for handling the posted data. This code has the default PHP mail() function to send the contact details.

index.php

<?php
use Phppot\DataSource; if (! empty($_POST["send"])) { $name = $_POST["userName"]; $email = $_POST["userEmail"]; $subject = $_POST["subject"]; $message = $_POST["message"]; $isDatabase = false; if ($isDatabase) { require_once __DIR__ . "/lib/DataSource.php"; $ds = new DataSource(); $query = "INSERT INTO tbl_contact (user_name, user_email, subject, message) VALUES (?, ?, ?, ?)"; $paramType = "ssss"; $paramArray = array( $name, $email, $subject, $message ); $ds->insert($query, $paramType, $paramArray); } $toEmail = "phppot@example.com"; $mailHeaders = 'From: webmaster@example.com' . "\r\n" . 'Reply-To: ' . $name . '<' . $email . ">\r\n" . 'X-Mailer: PHP/' . phpversion(); $mailHeaders = "From: " . $name . "<" . $email . ">\r\n"; // if lines are larger than 70 chars, then should be wrapped $message = wordwrap($message, 70, "\r\n"); // your PHP setup should have configuration to send mail $isValidMail = mail($toEmail, $subject, $message, $mailHeaders); if ($isValidMail) { $displayMessage = "Message sent. Thank you."; }
}
require_once __DIR__ . "/bootstrap-contact-form.php";

After setting $isDatabase to true, configure the database details in this class to connect the database for the contact form action.

lib/DataSource.php

<?php
/** * Copyright © Phppot * * Distributed under 'The MIT License (MIT)' * In essense, you can do commercial use, modify, distribute and private use. * Though not mandatory, you are requested to attribute Phppot URL in your code or website. */
namespace Phppot; /** * Generic datasource class for handling DB operations. * Uses MySqli and PreparedStatements. * * @version 2.6 - recordCount function added */
class DataSource
{ const HOST = 'localhost'; const USERNAME = 'root'; const PASSWORD = 'test'; const DATABASENAME = 'bootstrap_contact_form'; private $conn; /** * PHP implicitly takes care of cleanup for default connection types. * So no need to worry about closing the connection. * * Singletons not required in PHP as there is no * concept of shared memory. * Every object lives only for a request. * * Keeping things simple and that works! */ function __construct() { $this->conn = $this->getConnection(); } /** * If connection object is needed use this method and get access to it. * Otherwise, use the below methods for insert / update / etc. * * @return \mysqli */ public function getConnection() { $conn = new \mysqli(self::HOST, self::USERNAME, self::PASSWORD, self::DATABASENAME); if (mysqli_connect_errno()) { trigger_error("Problem with connecting to database."); } $conn->set_charset("utf8"); return $conn; } /** * To get database results * * @param string $query * @param string $paramType * @param array $paramArray * @return array */ public function select($query, $paramType = "", $paramArray = array()) { $stmt = $this->conn->prepare($query); if (! empty($paramType) && ! empty($paramArray)) { $this->bindQueryParams($stmt, $paramType, $paramArray); } $stmt->execute(); $result = $stmt->get_result(); if ($result->num_rows > 0) { while ($row = $result->fetch_assoc()) { $resultset[] = $row; } } if (! empty($resultset)) { return $resultset; } } /** * To insert * * @param string $query * @param string $paramType * @param array $paramArray * @return int */ public function insert($query, $paramType, $paramArray) { $stmt = $this->conn->prepare($query); $this->bindQueryParams($stmt, $paramType, $paramArray); $stmt->execute(); $insertId = $stmt->insert_id; return $insertId; } /** * To execute query * * @param string $query * @param string $paramType * @param array $paramArray */ public function execute($query, $paramType = "", $paramArray = array()) { $stmt = $this->conn->prepare($query); if (! empty($paramType) && ! empty($paramArray)) { $this->bindQueryParams($stmt, $paramType, $paramArray); } $stmt->execute(); } /** * 1. * Prepares parameter binding * 2. Bind prameters to the sql statement * * @param string $stmt * @param string $paramType * @param array $paramArray */ public function bindQueryParams($stmt, $paramType, $paramArray = array()) { $paramValueReference[] = & $paramType; for ($i = 0; $i < count($paramArray); $i ++) { $paramValueReference[] = & $paramArray[$i]; } call_user_func_array(array( $stmt, 'bind_param' ), $paramValueReference); } /** * To get database results * * @param string $query * @param string $paramType * @param array $paramArray * @return array */ public function getRecordCount($query, $paramType = "", $paramArray = array()) { $stmt = $this->conn->prepare($query); if (! empty($paramType) && ! empty($paramArray)) { $this->bindQueryParams($stmt, $paramType, $paramArray); } $stmt->execute(); $stmt->store_result(); $recordCount = $stmt->num_rows; return $recordCount; }
}

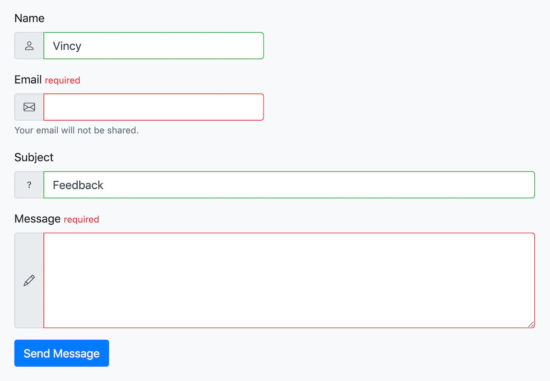
This screenshot shows the Bootstrap contact form example output. It displays the valid fields in green and the invalid fields in red.

This indication will notify the user on clicking the “Send Email” submit button.

Bootstrap Contact Form Output

On successful mail sending, a success response will send to the user as shown below.

Contact Form Success Response
Download

↑ Back to Top


https://www.sickgaming.net/blog/2020/08/...n-and-php/

Print this item

  (Indie Deal) Savage Destiny Bundle & THQ Deals are live
Posted by: xSicKxBot - 03-21-2022, 11:16 AM - Forum: Deals or Specials - No Replies

Savage Destiny Bundle & THQ Deals are live

Savage Destiny Bundle | 6 Steam Games | 92% OFF
[www.indiegala.com]
Meeting such splendid indies in the wild is extremely rare...but since it happened, it must be destiny! Witness the untamed potential of: Through The Fragmentation, ppL: The Animated Adventures, The GoD Unit, Sweet Collector & Do Animals Dream?

THQ Nordic Sale, up to 80% OFF
[www.indiegala.com]
Don't forget that any purchase made on IndieGala, be it store deals or bundles, will be rewarding you instantly and handsomely, directly into your IndieGala account, ready to be used!
Stay Inside, Stay Safe and Enjoy Good Games.
Check out IndieGala on Twitter, YouTube & Facebook[www.facebook.com]


https://steamcommunity.com/groups/indieg...9963940686

Print this item