The games are free to keep until August 25th 2022 - 15:00 UTC. Pssst, There is also a DLC for Rumbleverse free for this week: Rumbleverse™️ - Boom Boxer Content Pack[store.epicgames.com]
Next week's freebie: Ring of Pain
We are welcoming everyone to join our discord[discord.gg]. We are more active there on finding giveaways, small or large, and there are daily raffles you can participate.
Grease Is Coming Back To Theaters To Celebrate Olivia Newton-John
With Olivia Newton-John's passing, Hollywood and fans mourned a legend, and now Grease is returning to theaters in honor of her. AMC will be showing the film at a discounted rate, and part of the proceeds will go to breast cancer research, which Newton-John was diagnosed with back in 1992.
AMC CEO Adam Aron announced the news on his Twitter with the plan of the rerelease and what percentage goes to the research. "To honor the late Olivia Newton-John: many of our U.S. [theaters] this weekend will show her classic 1978 hit movie Grease, again on the big screen," Aron tweeted. "An inexpensive $5 admission price, and through our charity AMC Cares we will donate $1 per sold ticket to breast cancer research."
The fan reaction was mostly positive with people sharing screenshots of their ticket orders, and what Newton-John's performance and the movie meant to them.
In Tower of Fantasy, dwindling resources and a lack of energy have forced mankind to leave earth and migrate to Aida, a lush and habitable alien world. There, they observed the comet Mara and discovered an unknown but powerful energy called "Omnium" contained in it. They built the Omnium Tower to capture Mara, but due to the influence of Omnium radiation, a catastrophic disaster occurred on their new homeworld.
Posted by: xSicKxBot - 08-18-2022, 10:44 AM - Forum: Python
- No Replies
How to Append a New Row to a CSV File in Python?
Rate this post
Python Append Row to CSV
To append a row (=dictionary) to an existing CSV, open the file object in append mode using open('my_file.csv', 'a', newline=''). Then create a csv.DictWriter() to append a dict row using DictWriter.writerow(my_dict).
Given the following file 'my_file.csv':
You can append a row (dict) to the CSV file via this code snippet:
import csv # Create the dictionary (=row)

row = {'A':'Y1', 'B':'Y2', 'C':'Y3'} # Open the CSV file in "append" mode

with open('my_file.csv', 'a', newline='') as f: # Create a dictionary writer with the dict keys as column fieldnames writer = csv.DictWriter(f, fieldnames=row.keys()) # Append single row to CSV writer.writerow(row)
After running the code in the same folder as your original 'my_file.csv', you’ll see the following result:
Append Multiple Rows to CSV
Given the following CSV file:
To add multiple rows (i.e., dicts) to an old existing CSV file, iterate over the rows and write each row by calling csv.DictWriter.writerow(row) on the initially created DictWriter object.
Here’s an example (major changes highlighted):
import csv # Create the dictionary (=row)

rows = [{'A':'Z1', 'B':'Z2', 'C':'Z3'}, {'A':'ZZ1', 'B':'ZZ2', 'C':'ZZ3'}, {'A':'ZZZ1', 'B':'ZZZ2', 'C':'ZZZ3'}] # Open the CSV file in "append" mode

with open('my_file.csv', 'a', newline='') as f: # Create a dictionary writer with the dict keys as column fieldnames writer = csv.DictWriter(f, fieldnames=rows[0].keys()) # Append multiple rows to CSV for row in rows: writer.writerow(row)
The resulting CSV file has all three rows added to the first row:
Python Add Row to CSV Pandas
To add a row to an existing CSV using Pandas, you can set the write mode argument to append 'a' in the pandas DataFrame to_csv() method like so: df.to_csv('my_csv.csv', mode='a', header=False).
df.to_csv('my_csv.csv', mode='a', header=False)
For a full example, check out this code snippet:
import pandas as pd # Create the initial CSV data

rows = [{'A':'Z1', 'B':'Z2', 'C':'Z3'}, {'A':'ZZ1', 'B':'ZZ2', 'C':'ZZ3'}, {'A':'ZZZ1', 'B':'ZZZ2', 'C':'ZZZ3'}] # Create a DataFrame and write to CSV

df = pd.DataFrame(rows)

df.to_csv('my_file.csv', header=False, index=False) # Create another row and append row (as df) to existing CSV

row = [{'A':'X1', 'B':'X2', 'C':'X3'}]

df = pd.DataFrame(row)

df.to_csv('my_file.csv', mode='a', header=False, index=False)
The output file looks like this (new row highlighted):
Alternatively, you can open the file in append mode using normal open() function with the append 'a' argument and pass it into the pandas DataFrame to_csv() method.
Here’s an example snippet for copy&paste:
with open('my_csv.csv', 'a') as f: df.to_csv(f, header=False)
Localhost is the web developer’s favorite home. Local development environment is always convenient to develop and debug scripts.
Mailing via a script with in-built PHP function. This may not work almost always in a localhost. You need to have a sendmail program and appropriate configurations.
If the PHP mail() is not working on your localhost, there is an alternate solution to sending email. You can use a SMTP server and send email from localhost and it is the popular choice for sending emails for PHP programmers.
This example shows code to use PHPMailer to send email using SMTP from localhost.
PHP Mail sending script with SMTP
This program uses the PHPMailer library to connect SMTP to send emails. You can test this in your localhost server. You need access to a SMTP server.
Before running this code, configure the SMTP settings to set the following details.
Authentication directive and security protocol.
Configure SMTP credentials to authenticate and authorize mail sending script.
Add From, To and Reply-To addresses using the PHPMailer object.
Build email body and add subject before sending the email.
The above steps are mandatory with the PHPMailer mail sending code. Added to that, this mailing library supports many features. Some of them are,
Set the SMTP Debug = 4 in development mode to print the status details of the mail-sending script.
<?php

use PHPMailer\PHPMailer\PHPMailer;

use PHPMailer\PHPMailer\SMTP;

use PHPMailer\PHPMailer\Exception; require_once __DIR__ . '/vendor/phpmailer/src/Exception.php';

require_once __DIR__ . '/vendor/phpmailer/src/PHPMailer.php';

require_once __DIR__ . '/vendor/phpmailer/src/SMTP.php'; $mail = new PHPMailer(true); $mail->SMTPDebug = 0;

$mail->isSMTP();

$mail->Host = 'SET-SMTP-HOST';

$mail->SMTPAuth = true;

$mail->SMTPSecure = "ssl";

$mail->Port = 465; $mail->mailer = "smtp"; $mail->Username = 'SET-SMTP-USERNAME';

$mail->Password = 'SET-SMTP-PASSWORD'; // Sender and recipient address

$mail->SetFrom('SET-SENDER-EMAIL', 'SET-SENDER_NAME');

$mail->addAddress('ADD-RECIPIENT-EMAIL', 'ADD-RECIPIENT-NAME');

$mail->addReplyTo('ADD-REPLY-TO-EMAIL', 'ADD-REPLY-TO-NAME'); // Setting the subject and body

$mail->IsHTML(true);

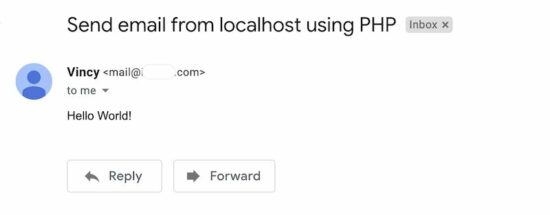
$mail->Subject = "Send email from localhost using PHP";

$mail->Body = 'Hello World!'; if ($mail->send()) { echo "Email is sent successfully.";

} else { echo "Error in sending an email. Mailer Error: {$mail->ErrorInfo}";

}

?>
Google and Microsoft disabled insecure authentication
Earlier, programmers conveniently used GMail’s SMTP server for sending emails via PHP. Now, less secure APPs configuration in Google is disabled. Google and Microsoft force authentication via OAuth 2 to send email.
There is ill-informed text going around in this topic. People say that we cannot send email via Google SMTP any more. That is not the case. They have changed the authentication method.
IMPORTANT: I have written an article to help you send email using xOAuth2 via PHP. You can use this and continue to send email using Google or other email service providers who force to use OAuth.
Alternate: Enabling PHP’s built-in mail()
If you do not have access to an email SMTP server.
If you are not able to use xOAuth2 and Google / Microsoft’s mailing service.
In the above situations, you may try to setup your own server in localhost. Yes! that is possible and it will work.
PHP has a built-in mail function to send emails without using any third-party libraries.
The mail() function is capable of simple mail sending requirements in PHP.
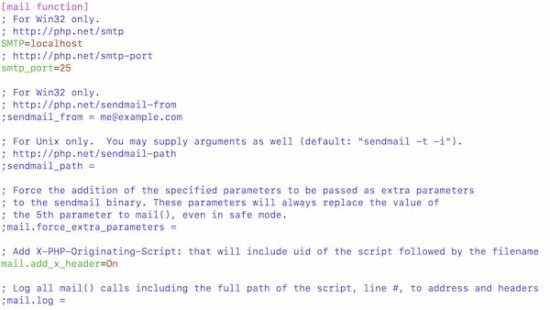
In localhost, it will not work without setting the php.ini configuration. Find the following section in your php.ini file and set the sendmail path and related configuration.
[www.indiegala.com] Something refreshing, something unusual, something unexpected. This indie game bundle has it all and more: All Walls Must Fall, Firelight Fantasy: Resistance, Niflhel's Fables: The Book of Gypsies, Adventures at the North Pole, Freddy Spaghetti & its sequel.
The GameCreators 2 Bundle | 98% OFF over $300-worth of content
[www.indiegala.com] Become a gamedev on your own & create your dream video game with the help of GameGuru, AppGameKit & a vast selection of steam game assets, software and dlcs. From Modern to Retro, from constructions to military/medical assets, a giant array of options & tools are available for you to choose from.
Posted by: xSicKxBot - 08-18-2022, 10:43 AM - Forum: Lounge
- No Replies
Thymesia: All Potion Recipes
Become the alchemist you've always been inside.
GameSpot may receive revenue from affiliate and advertising partnerships for sharing this content and from purchases through links.
Thymesia has a lot of unique mechanics we haven’t seen much in other soulslikes, and one of those is its intriguing potions system. Not only can you find and equip a variety of ingredients to add boons to your potions, but using specific ingredients together can result in recipes that grant additional helpful bonuses. Note, however, that some ingredients won’t be available until near the end of the game and may require you to revisit locations via sub quests. Also, you do not need to place the ingredients in order to achieve the desired recipe. We’ve compiled a full list of recipes below so that you can decide what works best for you.
Circulation Effect: Recover 5 health every second
Advertisement Ingredients: Fennel, Oregano, Clove
Refreshing Effect: Recover 3 energy every second Ingredients: Fennel, Oregano, Mint
Build the university of your dreams with Two Point Campus, the sim with a twist from the makers of Two Point Hospital. Build, hire staff and run an academic institution packed with wild courses. Rather than typical academic fare, students in Two Point County enjoy a range of wild and wonderful courses: from Knight School (hey, we all have to learn jousting at some point in our lives), to the salivatory Gastronomy, where your students will build mouth-watering concoctions like giant pizzas and enormous pies.
Get to know your students, explore their individual personalities, wants and needs. Keep them happy with clubs, societies, gigs. Surround them with friends, help them develop relationships, furnish them with pastoral care and ensure they have the right amount of joie de vivre to develop into incredible individuals who will do the legacy of your university proud.
Question: How to convert a dictionary to a CSV in Python?
In Python, convert a dictionary to a CSV file using the DictWriter() method from the csv module. The csv.DictWriter() method allows you to insert a dictionary-formatted row (keys=column names; values=row elements) into the CSV file using its DictWriter.writerow() method.
You create a Pandas DataFrame—which is Python’s default representation of tabular data. Think of it as an Excel spreadsheet within your code (with rows and columns).
The DataFrame is a very powerful data structure that allows you to perform various methods. One of those is the to_csv() method that allows you to write its contents into a CSV file.
You set the index argument of the to_csv() method to False because Pandas, per default, adds integer row and column indices 0, 1, 2, …. Again, think of them as the row and column indices in your Excel spreadsheet. You don’t want them to appear in the CSV file so you set the arguments to False.
You set the and header argument to True because you want the dict keys to be used as headers of the CSV.
If you want to customize the CSV output, you’ve got a lot of special arguments to play with. Check out this Finxter Tutorial for a comprehensive list of all arguments.
In Python, convert a dictionary to a CSV file using the DictWriter() method from the csv module. The csv.DictWriter() method allows you to insert data into the CSV file using its DictWriter.writerow() method.
The following example writes the dictionary to a CSV using the keys as column names and the values as row values.
import csv data = {'A':'X1', 'B':'X2', 'C':'X3'} with open('my_file.csv', 'w', newline='') as f: writer = csv.DictWriter(f, fieldnames=data.keys()) writer.writeheader() writer.writerow(data)
The resulting file 'my_file.csv' looks like this:
The csv library may not yet installed on your machine. To check if it is installed, follow these instructions. If it is not installed, fix it by running pip install csv in your shell or terminal.
Method 3: Dict to CSV String (in Memory)
To convert a list of dicts to a CSV string in memory, i.e., returning a CSV string instead of writing in a CSV file, use the pandas.DataFrame.to_csv() function without file path argument. The return value is a CSV string representation of the dictionary.
We pass index=False because we don’t want an index 0, 1, 2 in front of each row.
Method 4: Dict to CSV Append Line
To append a dictionary to an existing CSV, you can open the file object in append mode using open('my_file.csv', 'a', newline='') and using the csv.DictWriter() to append a dict row using DictWriter.writerow(my_dict).
Given the following file 'my_file.csv':
You can append a row (dict) to the CSV file via this code snippet:
import csv row = {'A':'Y1', 'B':'Y2', 'C':'Y3'} with open('my_file.csv', 'a', newline='') as f: writer = csv.DictWriter(f, fieldnames=row.keys()) writer.writerow(row)
After running the code in the same folder as your original 'my_file.csv', you’ll see the following result:
Method 5: Dict to CSV Columns
To write a Python dictionary in a CSV file as a column, i.e., a single (key, value) pair per row, use the following three steps:
Open the file in writing mode and using the newline='' argument to prevent blank lines.
Create a CSV writer object.
Iterate over the (key, value) pairs of the dictionary using the dict.items() method.
Write one (key, value) tuple at a time by passing it in the writer.writerow() method.
Here’s the code example:
import csv data = {'A':42, 'B':41, 'C':40} with open('my_file.csv', 'w', newline='') as f: writer = csv.writer(f) for row in data.items(): writer.writerow(row)
Your output CSV file (column dict) looks like this:
Method 6: Dict to CSV with Header
Convert a Python dictionary to a CSV file with header using the csv.DictWriter(fileobject, fieldnames) method to create a writer object used for writing the header via writer.writeheader() without argument. This writes the list of column names passed as fieldnames, e.g., the dictionary keys obtained via dict.keys().
To write the rows, you can then call the DictWriter.writerow() method.
The following example writes the dictionary to a CSV using the keys as column names and the values as row values.
import csv data = {'A':'X1', 'B':'X2', 'C':'X3'} with open('my_file.csv', 'w', newline='') as f: writer = csv.DictWriter(f, fieldnames=data.keys()) writer.writeheader() writer.writerow(data)
The resulting file 'my_file.csv' looks like this:
Where to Go From Here
If you haven’t found your solution, yet, you may want to check out my in-depth guide on how to write a list of dicts to a CSV:
If you don’t want to import any library and still convert a list of dicts into a CSV file, you can use standard Python implementation as well: it’s not complicated and very efficient.
This method is best if you won’t or cannot use external dependencies.
Open the file f in writing mode using the standard open() function.
Write the first dictionary’s keys in the file using the one-liner expression f.write(','.join(salary[0].keys())).
Iterate over the list of dicts and write the values in the CSV using the expression f.write(','.join(str(x) for x in row.values())).
Here’s the concrete code example:
salary = [{'Name':'Alice', 'Job':'Data Scientist', 'Salary':122000}, {'Name':'Bob', 'Job':'Engineer', 'Salary':77000}, {'Name':'Carl', 'Job':'Manager', 'Salary':119000}] # Method 3

with open('my_file.csv','w') as f: f.write(','.join(salary[0].keys())) f.write('n') for row in salary: f.write(','.join(str(x) for x in row.values())) f.write('n')
In the code, you first open the file object f. Then you iterate over each row and each element in the row and write the element to the file—one by one. After each element, you place the comma to generate the CSV file format. After each row, you place the newline character 'n'.
Note: to get rid of the trailing comma, you can check if the element x is the last element in the row within the loop body and skip writing the comma if it is.
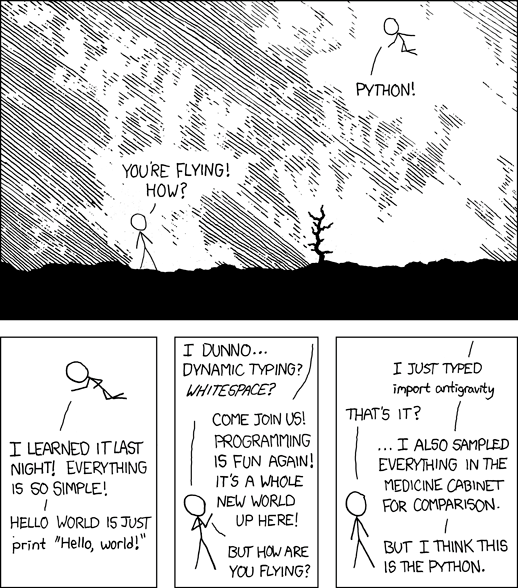
“I wrote 20 short programs in Python yesterday. It was wonderful. Perl, I’m leaving you.” — xkcd
Where to Go From Here?
Enough theory. Let’s get some practice!
Coders get paid six figures and more because they can solve problems more effectively using machine intelligence and automation.
To become more successful in coding, solve more real problems for real people. That’s how you polish the skills you really need in practice. After all, what’s the use of learning theory that nobody ever needs?
You build high-value coding skills by working on practical coding projects!
Do you want to stop learning with toy projects and focus on practical code projects that earn you money and solve real problems for people?
If your answer is YES!, consider becoming a Python freelance developer! It’s the best way of approaching the task of improving your Python skills—even if you are a complete beginner.
If you just want to learn about the freelancing opportunity, feel free to watch my free webinar “How to Build Your High-Income Skill Python” and learn how I grew my coding business online and how you can, too—from the comfort of your own home.
Google API client library for JavaScript-based API access.
Added to that, create the API app and get the credentials.
Enable the Google Drive API.
Get the API key and Web client id from the Google developer console.
Go to the Google developer console and click “Create Credentials” to set the API key and web client id. We have seen how to get the Google API keys from the developer console in previous articles.
Steps to upload files to Google Drive with JavaScript
These are the steps to implement uploading files from an application to Google Drive using JavaScript.
Authorize by proving the identity via Google sign-in API (GSI) library challenge.
Get the access token.
Prepare the upload request by specifying the Google drive directory target (optional).
The below code shows the landing page interface in HTML and the JavaScript asset created for uploading the files to Google Drive.
HTML code to display controls for requesting authorization and upload
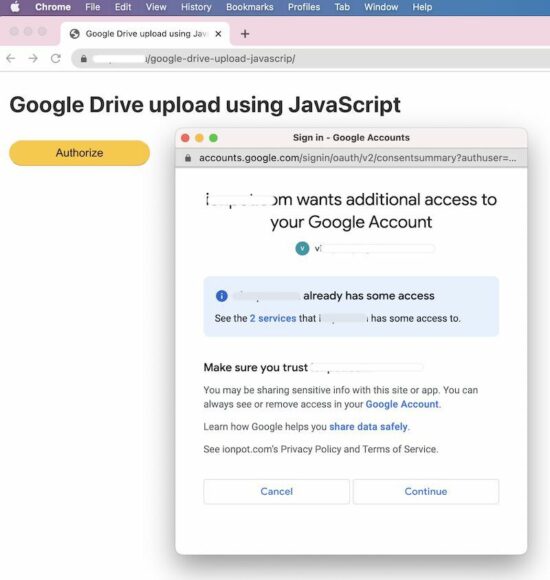
When landing on the home page, it displays an Authorize button in the UI. On clicking this button, it shows the Google sign-in overlay dialog to proceed with the authorization request.
In this step, the user must prove their identity to have access to upload to the Drive directory.
JavaScript to handle user authorization and file upload sequence
This JavaScript code initializes the gapi and gsi on a callback of loading these Google JavaScript libraries.
It also contains the handlers to trigger API requests for the following actions.
Google authorization with identity proof.
Upload files with the access token.
Refresh gapi upload action once authorized.
Signout.
This JavaScript code requires the authorization credentials to be configured. Set the CLIENT_ID and API_KEY in this script before running this example.
In this example, it sets the Google Drive folder id to upload the file via JavaScript. This configuration is optional. If no target is needed, remove the parameter from the file meta array.
js/gapi-upload.js
// TODO: Set the below credentials

const CLIENT_ID = 'SET-YOUR-CLIENT-ID';

const API_KEY = 'SET-YOUR-API-KEY'; // Discovery URL for APIs used by the quickstart

const DISCOVERY_DOC = 'https://www.googleapis.com/discovery/v1/apis/drive/v3/rest'; // Set API access scope before proceeding authorization request

const SCOPES = 'https://www.googleapis.com/auth/drive.file';

let tokenClient;

let gapiInited = false;

let gisInited = false; document.getElementById('authorize_button').style.visibility = 'hidden';

document.getElementById('signout_button').style.visibility = 'hidden'; /** * Callback after api.js is loaded. */

function gapiLoaded() { gapi.load('client', initializeGapiClient);

} /** * Callback after the API client is loaded. Loads the * discovery doc to initialize the API. */

async function initializeGapiClient() { await gapi.client.init({ apiKey: API_KEY, discoveryDocs: [DISCOVERY_DOC], }); gapiInited = true; maybeEnableButtons();

} /** * Callback after Google Identity Services are loaded. */

function gisLoaded() { tokenClient = google.accounts.oauth2.initTokenClient({ client_id: CLIENT_ID, scope: SCOPES, callback: '', // defined later }); gisInited = true; maybeEnableButtons();

} /** * Enables user interaction after all libraries are loaded. */

function maybeEnableButtons() { if (gapiInited && gisInited) { document.getElementById('authorize_button').style.visibility = 'visible'; }

} /** * Sign in the user upon button click. */

function handleAuthClick() { tokenClient.callback = async (resp) => { if (resp.error !== undefined) { throw (resp); } document.getElementById('signout_button').style.visibility = 'visible'; document.getElementById('authorize_button').value = 'Refresh'; await uploadFile(); }; if (gapi.client.getToken() === null) { // Prompt the user to select a Google Account and ask for consent to share their data // when establishing a new session. tokenClient.requestAccessToken({ prompt: 'consent' }); } else { // Skip display of account chooser and consent dialog for an existing session. tokenClient.requestAccessToken({ prompt: '' }); }

} /** * Sign out the user upon button click. */

function handleSignoutClick() { const token = gapi.client.getToken(); if (token !== null) { google.accounts.oauth2.revoke(token.access_token); gapi.client.setToken(''); document.getElementById('content').style.display = 'none'; document.getElementById('content').innerHTML = ''; document.getElementById('authorize_button').value = 'Authorize'; document.getElementById('signout_button').style.visibility = 'hidden'; }

} /** * Upload file to Google Drive. */

async function uploadFile() { var fileContent = 'Hello World'; // As a sample, upload a text file. var file = new Blob([fileContent], { type: 'text/plain' }); var metadata = { 'name': 'sample-file-via-js', // Filename at Google Drive 'mimeType': 'text/plain', // mimeType at Google Drive // TODO [Optional]: Set the below credentials // Note: remove this parameter, if no target is needed 'parents': ['SET-GOOGLE-DRIVE-FOLDER-ID'], // Folder ID at Google Drive which is optional }; var accessToken = gapi.auth.getToken().access_token; // Here gapi is used for retrieving the access token. var form = new FormData(); form.append('metadata', new Blob([JSON.stringify(metadata)], { type: 'application/json' })); form.append('file', file); var xhr = new XMLHttpRequest(); xhr.open('post', 'https://www.googleapis.com/upload/drive/v3/files?uploadType=multipart&fields=id'); xhr.setRequestHeader('Authorization', 'Bearer ' + accessToken); xhr.responseType = 'json'; xhr.onload = () => { document.getElementById('content').innerHTML = "File uploaded successfully. The Google Drive file id is <b>" + xhr.response.id + "</b>"; document.getElementById('content').style.display = 'block'; }; xhr.send(form);

}
Google Drive JavaScript Upload Response
Once authorized, the JavaScript calls the uploadFile() function to hit the Google Drive V3 API to post the file binary.
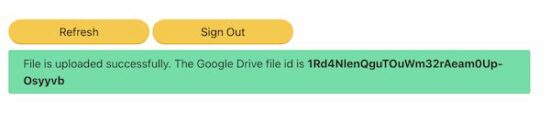
The below screenshot shows the uploaded Google Drive file id in the success message.
After sign-in, the landing page UI will display the signout option. It also shows a Refresh button to trigger upload action again in case of any issues on uploading.



 Learn More: If you want to learn about 7 Best Ways to Convert Dict to CSV in Python,


 Question: How to convert a


 If your answer is YES!, consider becoming a