Email validation in PHP can be done in different ways. In general, a website will have client-side validation.
I prefer both client and server-side validation. It is applicable not only for emails but also to all inputs received from the end users. It will make the website more robust.
Validating email or other user inputs is a basic precautionary step before processing.
In this article, we will see how to validate email on the server-side. PHP provides various alternates to validate email with its built-in constants and functions. Some of them are listed below.
Ways to validate email in PHP
Using FILTER_VALIDATE_EMAIL.
Using pattern matching with regular expression.
By validating the domain name from the email address.
The following quick example uses PHP filter FILTER_VALIDATE_EMAIL. It is the best method of validating email in PHP.
Quick example
<?php

$email = 'test@example.com';

isValidEmail($email); // using FILTER_VALIDATE_EMAIL - this is the best option to use in PHP

function isValidEmail($email)

{ return filter_var($email, FILTER_VALIDATE_EMAIL) !== false;

}

?>
Let us see other methods to validate email using PHP script.
Using FILTER_SANITIZE_EMAIL for input sanitization
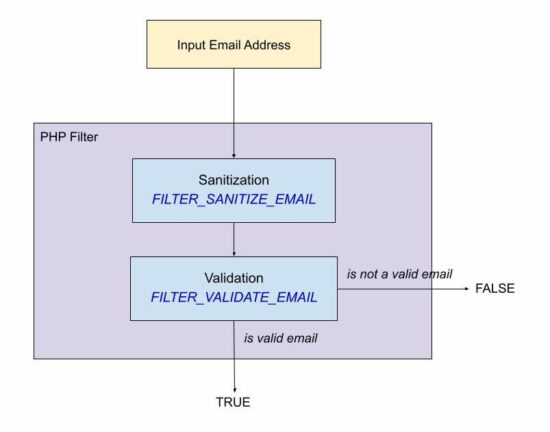
The FILTER_SANITIZE_EMAIL is used to clean the email data submitted by the user.
In this example, the $email is hard coded with an example email address. You can supply email input from the form data posted to PHP using GET or POST methods.
It adds a prior step to sanitize the email data before validating its format. For validating the format of the sanitized email data, it uses FILTER_VALIDATE_EMAIL.
filter-sanitize-email.php
<?php

// this script explains the difference between FILTER_SANITIZE_EMAIL and FILTER_VALIDATE_EMAIL // validation is to test if an email is in valid email format and FILTER_VALIDATE_EMAIL should be used.

// sanitization is to clean an user input before using it in the program and FILTER_SANITIZE_EMAIL should be used.

$email = "test@example.com";

$cleanEmail = filter_var($email, FILTER_SANITIZE_EMAIL); // after sanitization use the email and check for valid email or not

if (filter_var($cleanEmail, FILTER_VALIDATE_EMAIL)) { // the email is valid and use it

}

?>
Using pattern matching with regular expression
If you are expecting a regex pattern to validate the email format, this example code will help.
This code has a regex pattern in a variable and is used to validate email with PHP preg_match().
In PHP, the preg_match() is for pattern matching with a given subject that is an email address here.
This code has the validateWithRegex() function to process the PHP email validation. It applies converts the input email string to lower case and trims before applying preg_match().
Then, it returns a boolean true if the match is found for the email regex pattern.
email-regex.php
<?php

validateWithRegex($email); // Using regular expression (regex). If for some reason you want to validate email via a regex use this

// function. The best way to validate is via FILTER_VALIDATE_EMAIL only.

function validateWithRegex($email)

{ $email = trim(strtolower($email)); // the regex I have used is from PHP version 8.1.7 which is used in php_filter_validate_email // reference: https://github.com/php/php-src/blob/PHP-...ers.c#L682 $emailRegex = '/^(?!(?:(?:\\x22?\\x5C[\\x00-\\x7E]\\x22?)|(?:\\x22?[^\\x5C\\x22]\\x22?)){255,})(?!(?:(?:\\x22?\\x5C[\\x00-\\x7E]\\x22?)|(?:\\x22?[^\\x5C\\x22]\\x22?)){65,}@)(?:(?:[\\x21\\x23-\\x27\\x2A\\x2B\\x2D\\x2F-\\x39\\x3D\\x3F\\x5E-\\x7E\\pL\\pN]+)|(?:\\x22(?:[\\x01-\\x08\\x0B\\x0C\\x0E-\\x1F\\x21\\x23-\\x5B\\x5D-\\x7F\\pL\\pN]|(?:\\x5C[\\x00-\\x7F]))*\\x22))(?:\\.(?:(?:[\\x21\\x23-\\x27\\x2A\\x2B\\x2D\\x2F-\\x39\\x3D\\x3F\\x5E-\\x7E\\pL\\pN]+)|(?:\\x22(?:[\\x01-\\x08\\x0B\\x0C\\x0E-\\x1F\\x21\\x23-\\x5B\\x5D-\\x7F\\pL\\pN]|(?:\\x5C[\\x00-\\x7F]))*\\x22)))*@(?:(?:(?!.*[^.]{64,})(?:(?:(?:xn--)?[a-z0-9]+(?:-+[a-z0-9]+)*\\.){1,126}){1,}(?:(?:[a-z][a-z0-9]*)|(?:(?:xn--)[a-z0-9]+))(?:-+[a-z0-9]+)*)|(?:\\[(?:(?:IPv6:(?:(?:[a-f0-9]{1,4}(?::[a-f0-9]{1,4}){7})|(?:(?!(?:.*[a-f0-9][:\\]]){7,})(?:[a-f0-9]{1,4}(?::[a-f0-9]{1,4}){0,5})?::(?:[a-f0-9]{1,4}(?::[a-f0-9]{1,4}){0,5})?)))|(?:(?:IPv6:(?:(?:[a-f0-9]{1,4}(?::[a-f0-9]{1,4}){5}:)|(?:(?!(?:.*[a-f0-9]:){5,})(?:[a-f0-9]{1,4}(?::[a-f0-9]{1,4}){0,3})?::(?:[a-f0-9]{1,4}(?::[a-f0-9]{1,4}){0,3}:)?)))?(?:(?:25[0-5])|(?:2[0-4][0-9])|(?:1[0-9]{2})|(?:[1-9]?[0-9]))(?:\\.(?:(?:25[0-5])|(?:2[0-4][0-9])|(?:1[0-9]{2})|(?:[1-9]?[0-9]))){3}))\\]))$/iDu'; if (preg_match($emailRegex, $email) === 1) { return true; } else { return false; }

}

?>
By validating the domain name from the email string
This method is a very simple one for validating email. It validates email by ensuring its host DNS validness.
It uses the PHP checkdnsrr() function to validate DNS by a hostname or the site IP address.
This function returns a boolean true if the host has any DNS records found. And thereby, the email in that host can be considered in a valid format.
It follows the below list of steps.
It extracts the domain name from the email.
It extracts the username prefixed before the @ symbol.
It ensures that the username and domain name are not empty.
It checks if the DNS details are not empty about the host extracted from the input email.
domain-validate-email.php
<?php // simplest custom email validation using email's domain validation

function validateEmail($email)

{ $isEmailValid = FALSE; if (! empty($email)) { $domain = ltrim(stristr($email, '@'), '@') . '.'; $user = stristr($email, '@', TRUE); // validate email's domain using DNS if (! empty($user) && ! empty($domain) && checkdnsrr($domain)) { $isEmailValid = TRUE; } } return $isEmailValid;

}

?>
Leisure Suit Larry 6 - Shape Up Or Slip Out FREEbie
[freebies.indiegala.com] If you haven't grabbed it yet, this weekend is your last chance to claim it! Shape Up or Slip Out! is the fifth game in Al Lowe's Leisure Suit Larry series and again a classique point&click adventure.
Summer Scratchy Sale is ending soon
[www.indiegala.com] This BONUS opportunity is available for everyone and sadly it will be ending after this weekend, so make sure you stock up on your favorite deals before the Scratch Card opportunity containing a BONUS secret Steam game for every store purchase ends.
Developed by my Insomniac Games teammates in collaboration with Marvel, Marvel's Spider-Man Remastered introduces you to an experienced Peter Parker who's fighting big crime and iconic villains in Marvel's New York. At the same time, he's struggling to balance his chaotic personal life and career while the fate of Marvel's New York rests upon his shoulders.
Marvel's Spider-Man Remastered on PC will include the full main story and its continued narrative in Marvel's Spider-Man: The City That Never Sleeps DLC, which features three accompanying story chapters in Peter Parker's journey along with additional missions and challenges for players to discover.
Above declares a List of Rivers Clothing Employees. If we were searching for an Employee, such as Darcy, using this List, no results would return as Darcy and DarCY are not the same. Let’s fix this issue.
Info: A lambda function is a one-liner that, in this case, converts each List element in staff to lower case. Then, converts to a map() object and back to a List. The output saves to staff_lower and is output to the terminal.
['andy', 'maci', 'steve', 'darcy', 'harvey']
If a comparison was made now, it would find the correct Employee.
if ('Darcy'.lower() == staff_lower[3]): print('Match Found!')
Match Found!
Method 2: Use upper() and List Comprehension
This method uses upper() and a list comprehension to convert a List of Strings to upper case and search for an Employee.
brands = ['ChaNnel', 'CLINique', 'DIOR', 'Lancome', 'MurAD']

brands_upper = [x.upper() for x in brands]

print(brands_upper)
Above declares a List of the Top five (5) Beauty Brands in the world. If we were searching for a Company, such as Channel, using this List, no results would return as Channel and ChaNnel are not the same. Let’s fix this issue.
AList Comprehension is called and converts each element in brands to upper case. The results are saved to brands_upper and output to the terminal.
If a comparison was made now, it would find the correct Brand.
my_fav = 'Murad'

if (my_fav.upper() == brands_upper[4]): print(f'{my_fav} Found!')
Murad Found!
Method 3: Use title()
This method uses title() to convert each word in a String to upper case. Great use of this is to convert a Full Name to title case. This ensures both the First, Middle and Last Names are as expected.
full_name = 'jessica a. barker'.title()

print(full_name)
Above accepts a string, appends the title() method to the string, saves it to full_name and outputs to the terminal.
phrase = 'Nichts ist unmöglich für den Unwilligen!'

cfold = phrase.casefold()

print(cfold)
Above creates a quote in German and saves it to phrase. This ensures all characters are correctly converted to lower case, thus making a caseless match.
nichts ist unmöglich für den unwilligen!
What does this say?
Method 5: Use lower() and Dictionary Comprehension
employees = {'Sandy': 'Coder', 'Kevin': 'Network Specialist', 'Amy': 'Designer'}

result = {k: v.lower() for k, v in employees.items()}

print(result)
Above creates a Dictionary containing Rivers Employees Names and associated Job Title. This saves to employees.
Next, Dictionary Comprehension is used to loop through the values in the key:valueDictionary pairs and convert the values to lower case. The output saves to result and is output to the terminal.
In this Bonus section, a CSV file you are working with contains a column of Full Names. You want to ensure all data entered in this column is in title() case. This can be accomplished by running the following code.
Above imports the Pandas library. For installation instructions, click here.
Next, the finxter_users.csv file (contents shown above) is read and saved to the DataFrame users.
The highlighted line directly accesses all values in the users['Full_Name'] column and converts each entry to title() case. This saves back to users['Full_Name'] and is output to the terminal.
FID
Full_Name
0
30022145
Sally Jenkins
1
30022192
Joyce Hamilton
2
30022331
Allan Thompson
3
30022345
Harry Stiller
4
30022157
Ben Hawkins
Note: Don’t forget to save the DataFrame to keep the changes.
Summary
These six (6) methods of ignoring cases in Strings should give you enough information to select the best one for your coding requirements.
Programmer Humor
Question: Why do programmers always mix up Halloween and Christmas? Answer: Because Oct 31 equals Dec 25.
(If you didn’t get this, read our articles on the oct() and int() Python built-in functions!)
This giveaway is for GOG, its a platform for distributing games, similar to steam and others
- Go to the giveaway page - Login or make an account if you do not have one - Go to the GOG Homepage - https://www.gog.com/ - Scroll a bit down until you see the banner for the game STASIS - Its and above "Highest discount ever" - Wait for the button to appear on the right - Click on the "Yes, and claim the game" button - That's it
We are welcoming everyone to join our discord[discord.gg]. We are more active there on finding giveaways, small or large, and there are daily raffles you can participate.
[www.indiegala.com] Something refreshing, something unusual, something unexpected. This indie game bundle has it all and more: All Walls Must Fall, Firelight Fantasy: Resistance, Niflhel's Fables: The Book of Gypsies, Adventures at the North Pole, Freddy Spaghetti & its sequel.
The GameCreators 2 Bundle | 98% OFF over $300-worth of content
[www.indiegala.com] Become a gamedev on your own & create your dream video game with the help of GameGuru, AppGameKit & a vast selection of steam game assets, software and dlcs. From Modern to Retro, from constructions to military/medical assets, a giant array of options & tools are available for you to choose from.
Start your own cult in a land of false prophets, venturing out into diverse and mysterious regions to build a loyal community of woodland worshippers and spread your Word to become the one true cult. BUILD YOUR FLOCK. Collect and use resources to build new structures, perform dark rituals to appease the gods, and give sermons to reinforce the faith of your flock. DESTROY THE NON-BELIEVERS. Explore a sprawling, randomly generated world, fight off hordes of enemies and defeat rival cult leaders in order to absorb their power and assert your cult's dominance. SPREAD YOUR WORD. Train your flock and embark on a quest to explore and discover the secrets of five mysterious regions. Cleanse the non-believers, spread enlightenment and perform mystical rituals on the journey to become the mighty lamb god.
New State Mobile has been out for a little under a year, but in that short time, it has grabbed the attention of millions of players worldwide. A hardened battle royale with PUBG lineage, New State focuses wholly on shooting with guns blazing rather than secondary mechanics like fighting wild monsters to earn experience in Final Fantasy VII: The First Soldier, or building mechanics like in Fortnite.
This creates a battle royale with very little dawdling throughout the map, while facing numerous enemy players one after the other with little downtime in between. As with any other battle royale, you want to get first place. The prestige, the glory, and, well, getting out of Bronze placements through the ranking system is always a great initial goal to have.
This guide will go through tips, tricks, and tactics that will aid you in being rewarded with that esteemed first-place trophy out of 100 players.
Definition: The Keyhole Markup Language (KML) is a file format for displaying geographic data in Google Earth or other so-called “Earth Browsers”. Similarly to XML, KML uses a tag-based structure with nested elements and attributes.
How to Convert KML to CSV in Python?
You can convert a .kml to a .csv file in Python by using the BeautifulSoup and the csv libraries. You use the former to read the XML-structured KML file and the latter to write the CSV file row by row.
Here’s the code example inspired but modified from this GitHub repository. You can copy&paste it in the directory where your KML file resides and change the input and output filenames at the beginning to convert your own KML to a CSV in Python:
from bs4 import BeautifulSoup

import csv infile = 'my_file.kml'

outfile = 'my_file.csv' with open(infile, 'r') as f: s = BeautifulSoup(f, 'xml') with open(outfile, 'wb') as csvfile: writer = csv.writer(csvfile) for coords in s.find_all('coordinates'): # Take coordinate string from KML and break it up into [Lat,Lon,Lat,Lon...] to get CSV row space_splits = coords.string.split(" ") row = [] for split in space_splits[1:]: # Note: because of the space between <coordinates>" "-80.123, we slice [1:] comma_split = split.split(',') # lattitude row.append(comma_split[1]) # longitude row.append(comma_split[0]) writer.writerow(row)
Example Conversion
We use the following sample KML file as 'my_file.kml':
<?xml version="1.0" encoding="UTF-8"?>
<kml xmlns="http://www.opengis.net/kml/2.2"> <Document> <name>KML Samples</name> <open>1</open> <description>Unleash your creativity with the help of these examples!</description> <Style id="downArrowIcon"> <IconStyle> <Icon> <href>http://maps.google.com/mapfiles/kml/pal4/icon28.png</href> </Icon> </IconStyle> </Style> <Style id="globeIcon"> <IconStyle> <Icon> <href>http://maps.google.com/mapfiles/kml/pal3/icon19.png</href> </Icon> </IconStyle> <LineStyle> <width>2</width> </LineStyle> </Style> <Style id="transPurpleLineGreenPoly"> <LineStyle> <color>7fff00ff</color> <width>4</width> </LineStyle> <PolyStyle> <color>7f00ff00</color> </PolyStyle> </Style> <Style id="yellowLineGreenPoly"> <LineStyle> <color>7f00ffff</color> <width>4</width> </LineStyle> <PolyStyle> <color>7f00ff00</color> </PolyStyle> </Style> <Style id="thickBlackLine"> <LineStyle> <color>87000000</color> <width>10</width> </LineStyle> </Style> <Style id="redLineBluePoly"> <LineStyle> <color>ff0000ff</color> </LineStyle> <PolyStyle> <color>ffff0000</color> </PolyStyle> </Style> <Style id="blueLineRedPoly"> <LineStyle> <color>ffff0000</color> </LineStyle> <PolyStyle> <color>ff0000ff</color> </PolyStyle> </Style> <Style id="transRedPoly"> <LineStyle> <width>1.5</width> </LineStyle> <PolyStyle> <color>7d0000ff</color> </PolyStyle> </Style> <Style id="transBluePoly"> <LineStyle> <width>1.5</width> </LineStyle> <PolyStyle> <color>7dff0000</color> </PolyStyle> </Style> <Style id="transGreenPoly"> <LineStyle> <width>1.5</width> </LineStyle> <PolyStyle> <color>7d00ff00</color> </PolyStyle> </Style> <Style id="transYellowPoly"> <LineStyle> <width>1.5</width> </LineStyle> <PolyStyle> <color>7d00ffff</color> </PolyStyle> </Style> <Style id="noDrivingDirections"> <BalloonStyle> <text><![CDATA[ <b>$[name]</b> <br /><br /> $[description] ]]></text> </BalloonStyle> </Style> <Folder> <name>Placemarks</name> <description>These are just some of the different kinds of placemarks with which you can mark your favorite places</description> <LookAt> <longitude>-122.0839597145766</longitude> <latitude>37.42222904525232</latitude> <altitude>0</altitude> <heading>-148.4122922628044</heading> <tilt>40.5575073395506</tilt> <range>500.6566641072245</range> </LookAt> <Placemark> <name>Simple placemark</name> <description>Attached to the ground. Intelligently places itself at the height of the underlying terrain.</description> <Point> <coordinates>-122.0822035425683,37.42228990140251,0</coordinates> </Point> </Placemark> <Placemark> <name>Floating placemark</name> <visibility>0</visibility> <description>Floats a defined distance above the ground.</description> <LookAt> <longitude>-122.0839597145766</longitude> <latitude>37.42222904525232</latitude> <altitude>0</altitude> <heading>-148.4122922628044</heading> <tilt>40.5575073395506</tilt> <range>500.6566641072245</range> </LookAt> <styleUrl>#downArrowIcon</styleUrl> <Point> <altitudeMode>relativeToGround</altitudeMode> <coordinates>-122.084075,37.4220033612141,50</coordinates> </Point> </Placemark> <Placemark> <name>Extruded placemark</name> <visibility>0</visibility> <description>Tethered to the ground by a customizable "tail"</description> <LookAt> <longitude>-122.0845787421525</longitude> <latitude>37.42215078737763</latitude> <altitude>0</altitude> <heading>-148.4126684946234</heading> <tilt>40.55750733918048</tilt> <range>365.2646606980322</range> </LookAt> <styleUrl>#globeIcon</styleUrl> <Point> <extrude>1</extrude> <altitudeMode>relativeToGround</altitudeMode> <coordinates>-122.0857667006183,37.42156927867553,50</coordinates> </Point> </Placemark> </Folder> <Folder> <name>Styles and Markup</name> <visibility>0</visibility> <description>With KML it is easy to create rich, descriptive markup to annotate and enrich your placemarks</description> <LookAt> <longitude>-122.0845787422371</longitude> <latitude>37.42215078726837</latitude> <altitude>0</altitude> <heading>-148.4126777488172</heading> <tilt>40.55750733930874</tilt> <range>365.2646826292919</range> </LookAt> <styleUrl>#noDrivingDirections</styleUrl> <Document> <name>Highlighted Icon</name> <visibility>0</visibility> <description>Place your mouse over the icon to see it display the new icon</description> <LookAt> <longitude>-122.0856552124024</longitude> <latitude>37.4224281311035</latitude> <altitude>0</altitude> <heading>0</heading> <tilt>0</tilt> <range>265.8520424250024</range> </LookAt> <Style id="highlightPlacemark"> <IconStyle> <Icon> <href>http://maps.google.com/mapfiles/kml/paddle/red-stars.png</href> </Icon> </IconStyle> </Style> <Style id="normalPlacemark"> <IconStyle> <Icon> <href>http://maps.google.com/mapfiles/kml/paddle/wht-blank.png</href> </Icon> </IconStyle> </Style> <StyleMap id="exampleStyleMap"> <Pair> <key>normal</key> <styleUrl>#normalPlacemark</styleUrl> </Pair> <Pair> <key>highlight</key> <styleUrl>#highlightPlacemark</styleUrl> </Pair> </StyleMap> <Placemark> <name>Roll over this icon</name> <visibility>0</visibility> <styleUrl>#exampleStyleMap</styleUrl> <Point> <coordinates>-122.0856545755255,37.42243077405461,0</coordinates> </Point> </Placemark> </Document> <Placemark> <name>Descriptive HTML</name> <visibility>0</visibility> <description><![CDATA[Click on the blue link!<br><br>
Placemark descriptions can be enriched by using many standard HTML tags.<br>
For example:
<hr>
Styles:<br>
<i>Italics</i>, <b>Bold</b>, <u>Underlined</u>, <s>Strike Out</s>, subscript<sub>subscript</sub>, superscript<sup>superscript</sup>, <big>Big</big>, <small>Small</small>, <tt>Typewriter</tt>, <em>Emphasized</em>, <strong>Strong</strong>, <code>Code</code>
<hr>
Fonts:<br> <font color="red">red by name</font>, <font color="#408010">leaf green by hexadecimal RGB</font>
<br>
<font size=1>size 1</font>, <font size=2>size 2</font>, <font size=3>size 3</font>, <font size=4>size 4</font>, <font size=5>size 5</font>, <font size=6>size 6</font>, <font size=7>size 7</font>
<br>
<font face=times>Times</font>, <font face=verdana>Verdana</font>, <font face=arial>Arial</font><br>
<hr>
Links: <br>
<a href="http://earth.google.com/">Google Earth!</a>
<br> or: Check out our website at www.google.com
<hr>
Alignment:<br>
<p align=left>left</p>
<p align=center>center</p>
<p align=right>right</p>
<hr>
Ordered Lists:<br>
<ol><li>First</li><li>Second</li><li>Third</li></ol>
<ol type="a"><li>First</li><li>Second</li><li>Third</li></ol>
<ol type="A"><li>First</li><li>Second</li><li>Third</li></ol>
<hr>
Unordered Lists:<br>
<ul><li>A</li><li>B</li><li>C</li></ul>
<ul type="circle"><li>A</li><li>B</li><li>C</li></ul>
<ul type="square"><li>A</li><li>B</li><li>C</li></ul>
<hr>
Definitions:<br>
<dl>
<dt>Google:</dt><dd>The best thing since sliced bread</dd>
</dl>
<hr>
Centered:<br><center>
Time present and time past<br>
Are both perhaps present in time future,<br>
And time future contained in time past.<br>
If all time is eternally present<br>
All time is unredeemable.<br>
</center>
<hr>
Block Quote:
<br>
<blockquote>
We shall not cease from exploration<br>
And the end of all our exploring<br>
Will be to arrive where we started<br>
And know the place for the first time.<br>
<i> – T.S. Eliot</i>
</blockquote>
<br>
<hr>
Headings:<br>
<h1>Header 1</h1>
<h2>Header 2</h2>
<h3>Header 3</h3>
<h3>Header 4</h4>
<h3>Header 5</h5>
<hr>
Images:<br>
<i>Remote image</i><br>
<img src="//developers.google.com/kml/documentation/images/googleSample.png"><br>
<i>Scaled image</i><br>
<img src="//developers.google.com/kml/documentation/images/googleSample.png" width=100><br>
<hr>
Simple Tables:<br>
<table border="1" padding="1">
<tr><td>1</td><td>2</td><td>3</td><td>4</td><td>5</td></tr>
<tr><td>a</td><td>b</td><td>c</td><td>d</td><td>e</td></tr>
</table>
<br>
[Did you notice that double-clicking on the placemark doesn't cause the viewer to take you anywhere? This is because it is possible to directly author a "placeless placemark". If you look at the code for this example, you will see that it has neither a point coordinate nor a LookAt element.]]]></description> </Placemark> </Folder> <Folder> <name>Ground Overlays</name> <visibility>0</visibility> <description>Examples of ground overlays</description> <GroundOverlay> <name>Large-scale overlay on terrain</name> <visibility>0</visibility> <description>Overlay shows Mount Etna erupting on July 13th, 2001.</description> <LookAt> <longitude>15.02468937557116</longitude> <latitude>37.67395167941667</latitude> <altitude>0</altitude> <heading>-16.5581842842829</heading> <tilt>58.31228652890705</tilt> <range>30350.36838438907</range> </LookAt> <Icon> <href>http://developers.google.com/kml/documentation/images/etna.jpg</href> </Icon> <LatLonBox> <north>37.91904192681665</north> <south>37.46543388598137</south> <east>15.35832653742206</east> <west>14.60128369746704</west> <rotation>-0.1556640799496235</rotation> </LatLonBox> </GroundOverlay> </Folder> <Folder> <name>Screen Overlays</name> <visibility>0</visibility> <description>Screen overlays have to be authored directly in KML. These examples illustrate absolute and dynamic positioning in screen space.</description> <ScreenOverlay> <name>Simple crosshairs</name> <visibility>0</visibility> <description>This screen overlay uses fractional positioning to put the image in the exact center of the screen</description> <Icon> <href>http://developers.google.com/kml/documentation/images/crosshairs.png</href> </Icon> <overlayXY x="0.5" y="0.5" xunits="fraction" yunits="fraction"/> <screenXY x="0.5" y="0.5" xunits="fraction" yunits="fraction"/> <rotationXY x="0.5" y="0.5" xunits="fraction" yunits="fraction"/> <size x="0" y="0" xunits="pixels" yunits="pixels"/> </ScreenOverlay> <ScreenOverlay> <name>Absolute Positioning: Top left</name> <visibility>0</visibility> <Icon> <href>http://developers.google.com/kml/documentation/images/top_left.jpg</href> </Icon> <overlayXY x="0" y="1" xunits="fraction" yunits="fraction"/> <screenXY x="0" y="1" xunits="fraction" yunits="fraction"/> <rotationXY x="0" y="0" xunits="fraction" yunits="fraction"/> <size x="0" y="0" xunits="fraction" yunits="fraction"/> </ScreenOverlay> <ScreenOverlay> <name>Absolute Positioning: Top right</name> <visibility>0</visibility> <Icon> <href>http://developers.google.com/kml/documentation/images/top_right.jpg</href> </Icon> <overlayXY x="1" y="1" xunits="fraction" yunits="fraction"/> <screenXY x="1" y="1" xunits="fraction" yunits="fraction"/> <rotationXY x="0" y="0" xunits="fraction" yunits="fraction"/> <size x="0" y="0" xunits="fraction" yunits="fraction"/> </ScreenOverlay> <ScreenOverlay> <name>Absolute Positioning: Bottom left</name> <visibility>0</visibility> <Icon> <href>http://developers.google.com/kml/documentation/images/bottom_left.jpg</href> </Icon> <overlayXY x="0" y="-1" xunits="fraction" yunits="fraction"/> <screenXY x="0" y="0" xunits="fraction" yunits="fraction"/> <rotationXY x="0" y="0" xunits="fraction" yunits="fraction"/> <size x="0" y="0" xunits="fraction" yunits="fraction"/> </ScreenOverlay> <ScreenOverlay> <name>Absolute Positioning: Bottom right</name> <visibility>0</visibility> <Icon> <href>http://developers.google.com/kml/documentation/images/bottom_right.jpg</href> </Icon> <overlayXY x="1" y="-1" xunits="fraction" yunits="fraction"/> <screenXY x="1" y="0" xunits="fraction" yunits="fraction"/> <rotationXY x="0" y="0" xunits="fraction" yunits="fraction"/> <size x="0" y="0" xunits="fraction" yunits="fraction"/> </ScreenOverlay> <ScreenOverlay> <name>Dynamic Positioning: Top of screen</name> <visibility>0</visibility> <Icon> <href>http://developers.google.com/kml/documentation/images/dynamic_screenoverlay.jpg</href> </Icon> <overlayXY x="0" y="1" xunits="fraction" yunits="fraction"/> <screenXY x="0" y="1" xunits="fraction" yunits="fraction"/> <rotationXY x="0" y="0" xunits="fraction" yunits="fraction"/> <size x="1" y="0.2" xunits="fraction" yunits="fraction"/> </ScreenOverlay> <ScreenOverlay> <name>Dynamic Positioning: Right of screen</name> <visibility>0</visibility> <Icon> <href>http://developers.google.com/kml/documentation/images/dynamic_right.jpg</href> </Icon> <overlayXY x="1" y="1" xunits="fraction" yunits="fraction"/> <screenXY x="1" y="1" xunits="fraction" yunits="fraction"/> <rotationXY x="0" y="0" xunits="fraction" yunits="fraction"/> <size x="0" y="1" xunits="fraction" yunits="fraction"/> </ScreenOverlay> </Folder> <Folder> <name>Paths</name> <visibility>0</visibility> <description>Examples of paths. Note that the tessellate tag is by default set to 0. If you want to create tessellated lines, they must be authored (or edited) directly in KML.</description> <Placemark> <name>Tessellated</name> <visibility>0</visibility> <description><![CDATA[If the <tessellate> tag has a value of 1, the line will contour to the underlying terrain]]></description> <LookAt> <longitude>-112.0822680013139</longitude> <latitude>36.09825589333556</latitude> <altitude>0</altitude> <heading>103.8120432044965</heading> <tilt>62.04855796276328</tilt> <range>2889.145007690472</range> </LookAt> <LineString> <tessellate>1</tessellate> <coordinates> -112.0814237830345,36.10677870477137,0 -112.0870267752693,36.0905099328766,0 </coordinates> </LineString> </Placemark> <Placemark> <name>Untessellated</name> <visibility>0</visibility> <description><![CDATA[If the <tessellate> tag has a value of 0, the line follow a simple straight-line path from point to point]]></description> <LookAt> <longitude>-112.0822680013139</longitude> <latitude>36.09825589333556</latitude> <altitude>0</altitude> <heading>103.8120432044965</heading> <tilt>62.04855796276328</tilt> <range>2889.145007690472</range> </LookAt> <LineString> <tessellate>0</tessellate> <coordinates> -112.080622229595,36.10673460007995,0 -112.085242575315,36.09049598612422,0 </coordinates> </LineString> </Placemark> <Placemark> <name>Absolute</name> <visibility>0</visibility> <description>Transparent purple line</description> <LookAt> <longitude>-112.2719329043177</longitude> <latitude>36.08890633450894</latitude> <altitude>0</altitude> <heading>-106.8161545998597</heading> <tilt>44.60763714063257</tilt> <range>2569.386744398339</range> </LookAt> <styleUrl>#transPurpleLineGreenPoly</styleUrl> <LineString> <tessellate>1</tessellate> <altitudeMode>absolute</altitudeMode> <coordinates> -112.265654928602,36.09447672602546,2357 -112.2660384528238,36.09342608838671,2357 -112.2668139013453,36.09251058776881,2357 -112.2677826834445,36.09189827357996,2357 -112.2688557510952,36.0913137941187,2357 -112.2694810717219,36.0903677207521,2357 -112.2695268555611,36.08932171487285,2357 -112.2690144567276,36.08850916060472,2357 -112.2681528815339,36.08753813597956,2357 -112.2670588176031,36.08682685262568,2357 -112.2657374587321,36.08646312301303,2357 </coordinates> </LineString> </Placemark> <Placemark> <name>Absolute Extruded</name> <visibility>0</visibility> <description>Transparent green wall with yellow outlines</description> <LookAt> <longitude>-112.2643334742529</longitude> <latitude>36.08563154742419</latitude> <altitude>0</altitude> <heading>-125.7518698668815</heading> <tilt>44.61038665812578</tilt> <range>4451.842204068102</range> </LookAt> <styleUrl>#yellowLineGreenPoly</styleUrl> <LineString> <extrude>1</extrude> <tessellate>1</tessellate> <altitudeMode>absolute</altitudeMode> <coordinates> -112.2550785337791,36.07954952145647,2357 -112.2549277039738,36.08117083492122,2357 -112.2552505069063,36.08260761307279,2357 -112.2564540158376,36.08395660588506,2357 -112.2580238976449,36.08511401044813,2357 -112.2595218489022,36.08584355239394,2357 -112.2608216347552,36.08612634548589,2357 -112.262073428656,36.08626019085147,2357 -112.2633204928495,36.08621519860091,2357 -112.2644963846444,36.08627897945274,2357 -112.2656969554589,36.08649599090644,2357 </coordinates> </LineString> </Placemark> <Placemark> <name>Relative</name> <visibility>0</visibility> <description>Black line (10 pixels wide), height tracks terrain</description> <LookAt> <longitude>-112.2580438551384</longitude> <latitude>36.1072674824385</latitude> <altitude>0</altitude> <heading>4.947421249553717</heading> <tilt>44.61324882043339</tilt> <range>2927.61105910266</range> </LookAt> <styleUrl>#thickBlackLine</styleUrl> <LineString> <tessellate>1</tessellate> <altitudeMode>relativeToGround</altitudeMode> <coordinates> -112.2532845153347,36.09886943729116,645 -112.2540466121145,36.09919570465255,645 -112.254734666947,36.09984998366178,645 -112.255493345654,36.10051310621746,645 -112.2563157098468,36.10108441943419,645 -112.2568033076439,36.10159722088088,645 -112.257494011321,36.10204323542867,645 -112.2584106072308,36.10229131995655,645 -112.2596588987972,36.10240001286358,645 -112.2610581199487,36.10213176873407,645 -112.2626285262793,36.10157011437219,645 </coordinates> </LineString> </Placemark> <Placemark> <name>Relative Extruded</name> <visibility>0</visibility> <description>Opaque blue walls with red outline, height tracks terrain</description> <LookAt> <longitude>-112.2683594333433</longitude> <latitude>36.09884362144909</latitude> <altitude>0</altitude> <heading>-72.24271551768405</heading> <tilt>44.60855445139561</tilt> <range>2184.193522571467</range> </LookAt> <styleUrl>#redLineBluePoly</styleUrl> <LineString> <extrude>1</extrude> <tessellate>1</tessellate> <altitudeMode>relativeToGround</altitudeMode> <coordinates> -112.2656634181359,36.09445214722695,630 -112.2652238941097,36.09520916122063,630 -112.2645079986395,36.09580763864907,630 -112.2638827428817,36.09628572284063,630 -112.2635746835406,36.09679275951239,630 -112.2635711822407,36.09740038871899,630 -112.2640296531825,36.09804913435539,630 -112.264327720538,36.09880337400301,630 -112.2642436562271,36.09963644790288,630 -112.2639148687042,36.10055381117246,630 -112.2626894973474,36.10149062823369,630 </coordinates> </LineString> </Placemark> </Folder> <Folder> <name>Polygons</name> <visibility>0</visibility> <description>Examples of polygon shapes</description> <Folder> <name>Google Campus</name> <visibility>0</visibility> <description>A collection showing how easy it is to create 3-dimensional buildings</description> <LookAt> <longitude>-122.084120030116</longitude> <latitude>37.42174011925477</latitude> <altitude>0</altitude> <heading>-34.82469740081282</heading> <tilt>53.454348562403</tilt> <range>276.7870053764046</range> </LookAt> <Placemark> <name>Building 40</name> <visibility>0</visibility> <styleUrl>#transRedPoly</styleUrl> <Polygon> <extrude>1</extrude> <altitudeMode>relativeToGround</altitudeMode> <outerBoundaryIs> <LinearRing> <coordinates> -122.0848938459612,37.42257124044786,17 -122.0849580979198,37.42211922626856,17 -122.0847469573047,37.42207183952619,17 -122.0845725380962,37.42209006729676,17 -122.0845954886723,37.42215932700895,17 -122.0838521118269,37.42227278564371,17 -122.083792243335,37.42203539112084,17 -122.0835076656616,37.42209006957106,17 -122.0834709464152,37.42200987395161,17 -122.0831221085748,37.4221046494946,17 -122.0829247374572,37.42226503990386,17 -122.0829339169385,37.42231242843094,17 -122.0833837359737,37.42225046087618,17 -122.0833607854248,37.42234159228745,17 -122.0834204551642,37.42237075460644,17 -122.083659133885,37.42251292011001,17 -122.0839758438952,37.42265873093781,17 -122.0842374743331,37.42265143972521,17 -122.0845036949503,37.4226514386435,17 -122.0848020460801,37.42261133916315,17 -122.0847882750515,37.42256395055121,17 -122.0848938459612,37.42257124044786,17 </coordinates> </LinearRing> </outerBoundaryIs> </Polygon> </Placemark> <Placemark> <name>Building 41</name> <visibility>0</visibility> <styleUrl>#transBluePoly</styleUrl> <Polygon> <extrude>1</extrude> <altitudeMode>relativeToGround</altitudeMode> <outerBoundaryIs> <LinearRing> <coordinates> -122.0857412771483,37.42227033155257,17 -122.0858169768481,37.42231408832346,17 -122.085852582875,37.42230337469744,17 -122.0858799945639,37.42225686138789,17 -122.0858860101409,37.4222311076138,17 -122.0858069157288,37.42220250173855,17 -122.0858379542653,37.42214027058678,17 -122.0856732640519,37.42208690214408,17 -122.0856022926407,37.42214885429042,17 -122.0855902778436,37.422128290487,17 -122.0855841672237,37.42208171967246,17 -122.0854852065741,37.42210455874995,17 -122.0855067264352,37.42214267949824,17 -122.0854430712915,37.42212783846172,17 -122.0850990714904,37.42251282407603,17 -122.0856769818632,37.42281815323651,17 -122.0860162273783,37.42244918858722,17 -122.0857260327004,37.42229239604253,17 -122.0857412771483,37.42227033155257,17 </coordinates> </LinearRing> </outerBoundaryIs> </Polygon> </Placemark> <Placemark> <name>Building 42</name> <visibility>0</visibility> <styleUrl>#transGreenPoly</styleUrl> <Polygon> <extrude>1</extrude> <altitudeMode>relativeToGround</altitudeMode> <outerBoundaryIs> <LinearRing> <coordinates> -122.0857862287242,37.42136208886969,25 -122.0857312990603,37.42136935989481,25 -122.0857312992918,37.42140934910903,25 -122.0856077073679,37.42138390166565,25 -122.0855802426516,37.42137299550869,25 -122.0852186221971,37.42137299504316,25 -122.0852277765639,37.42161656508265,25 -122.0852598189347,37.42160565894403,25 -122.0852598185499,37.42168200156,25 -122.0852369311478,37.42170017860346,25 -122.0852643957828,37.42176197982575,25 -122.0853239032746,37.42176198013907,25 -122.0853559454324,37.421852864452,25 -122.0854108752463,37.42188921823734,25 -122.0854795379357,37.42189285337048,25 -122.0855436229819,37.42188921797546,25 -122.0856260178042,37.42186013499926,25 -122.085937287963,37.42186013453605,25 -122.0859428718666,37.42160898590042,25 -122.0859655469861,37.42157992759144,25 -122.0858640462341,37.42147115002957,25 -122.0858548911215,37.42140571326184,25 -122.0858091162768,37.4214057134039,25 -122.0857862287242,37.42136208886969,25 </coordinates> </LinearRing> </outerBoundaryIs> </Polygon> </Placemark> <Placemark> <name>Building 43</name> <visibility>0</visibility> <styleUrl>#transYellowPoly</styleUrl> <Polygon> <extrude>1</extrude> <altitudeMode>relativeToGround</altitudeMode> <outerBoundaryIs> <LinearRing> <coordinates> -122.0844371128284,37.42177253003091,19 -122.0845118855746,37.42191111542896,19 -122.0850470999805,37.42178755121535,19 -122.0850719913391,37.42143663023161,19 -122.084916406232,37.42137237822116,19 -122.0842193868167,37.42137237801626,19 -122.08421938659,37.42147617161496,19 -122.0838086419991,37.4214613409357,19 -122.0837899728564,37.42131306410796,19 -122.0832796534698,37.42129328840593,19 -122.0832609819207,37.42139213944298,19 -122.0829373621737,37.42137236399876,19 -122.0829062425667,37.42151569778871,19 -122.0828502269665,37.42176282576465,19 -122.0829435788635,37.42176776969635,19 -122.083217411188,37.42179248552686,19 -122.0835970430103,37.4217480074456,19 -122.0839455556771,37.42169364237603,19 -122.0840077894637,37.42176283815853,19 -122.084113587521,37.42174801104392,19 -122.0840762473784,37.42171341292375,19 -122.0841447047739,37.42167881534569,19 -122.084144704223,37.42181720660197,19 -122.0842503333074,37.4218170700446,19 -122.0844371128284,37.42177253003091,19 </coordinates> </LinearRing> </outerBoundaryIs> </Polygon> </Placemark> </Folder> <Folder> <name>Extruded Polygon</name> <description>A simple way to model a building</description> <Placemark> <name>The Pentagon</name> <LookAt> <longitude>-77.05580139178142</longitude> <latitude>38.870832443487</latitude> <heading>59.88865561738225</heading> <tilt>48.09646074797388</tilt> <range>742.0552506670548</range> </LookAt> <Polygon> <extrude>1</extrude> <altitudeMode>relativeToGround</altitudeMode> <outerBoundaryIs> <LinearRing> <coordinates> -77.05788457660967,38.87253259892824,100 -77.05465973756702,38.87291016281703,100 -77.05315536854791,38.87053267794386,100 -77.05552622493516,38.868757801256,100 -77.05844056290393,38.86996206506943,100 -77.05788457660967,38.87253259892824,100 </coordinates> </LinearRing> </outerBoundaryIs> <innerBoundaryIs> <LinearRing> <coordinates> -77.05668055019126,38.87154239798456,100 -77.05542625960818,38.87167890344077,100 -77.05485125901024,38.87076535397792,100 -77.05577677433152,38.87008686581446,100 -77.05691162017543,38.87054446963351,100 -77.05668055019126,38.87154239798456,100 </coordinates> </LinearRing> </innerBoundaryIs> </Polygon> </Placemark> </Folder> <Folder> <name>Absolute and Relative</name> <visibility>0</visibility> <description>Four structures whose roofs meet exactly. Turn on/off terrain to see the difference between relative and absolute positioning.</description> <LookAt> <longitude>-112.3348969157552</longitude> <latitude>36.14845533214919</latitude> <altitude>0</altitude> <heading>-86.91235037566909</heading> <tilt>49.30695423894192</tilt> <range>990.6761201087104</range> </LookAt> <Placemark> <name>Absolute</name> <visibility>0</visibility> <styleUrl>#transBluePoly</styleUrl> <Polygon> <tessellate>1</tessellate> <altitudeMode>absolute</altitudeMode> <outerBoundaryIs> <LinearRing> <coordinates> -112.3372510731295,36.14888505105317,1784 -112.3356128688403,36.14781540589019,1784 -112.3368169371048,36.14658677734382,1784 -112.3384408457543,36.14762778914076,1784 -112.3372510731295,36.14888505105317,1784 </coordinates> </LinearRing> </outerBoundaryIs> </Polygon> </Placemark> <Placemark> <name>Absolute Extruded</name> <visibility>0</visibility> <styleUrl>#transRedPoly</styleUrl> <Polygon> <extrude>1</extrude> <tessellate>1</tessellate> <altitudeMode>absolute</altitudeMode> <outerBoundaryIs> <LinearRing> <coordinates> -112.3396586818843,36.14637618647505,1784 -112.3380597654315,36.14531751871353,1784 -112.3368254237788,36.14659596244607,1784 -112.3384555043203,36.14762621763982,1784 -112.3396586818843,36.14637618647505,1784 </coordinates> </LinearRing> </outerBoundaryIs> </Polygon> </Placemark> <Placemark> <name>Relative</name> <visibility>0</visibility> <LookAt> <longitude>-112.3350152490417</longitude> <latitude>36.14943123077423</latitude> <altitude>0</altitude> <heading>-118.9214100848499</heading> <tilt>37.92486261093203</tilt> <range>345.5169113679813</range> </LookAt> <styleUrl>#transGreenPoly</styleUrl> <Polygon> <tessellate>1</tessellate> <altitudeMode>relativeToGround</altitudeMode> <outerBoundaryIs> <LinearRing> <coordinates> -112.3349463145932,36.14988705767721,100 -112.3354019540677,36.14941108398372,100 -112.3344428289146,36.14878490381308,100 -112.3331289492913,36.14780840132443,100 -112.3317019516947,36.14680755678357,100 -112.331131440106,36.1474173426228,100 -112.332616324338,36.14845453364654,100 -112.3339876620524,36.14926570522069,100 -112.3349463145932,36.14988705767721,100 </coordinates> </LinearRing> </outerBoundaryIs> </Polygon> </Placemark> <Placemark> <name>Relative Extruded</name> <visibility>0</visibility> <LookAt> <longitude>-112.3351587892382</longitude> <latitude>36.14979247129029</latitude> <altitude>0</altitude> <heading>-55.42811560891606</heading> <tilt>56.10280503739589</tilt> <range>401.0997279712519</range> </LookAt> <styleUrl>#transYellowPoly</styleUrl> <Polygon> <extrude>1</extrude> <tessellate>1</tessellate> <altitudeMode>relativeToGround</altitudeMode> <outerBoundaryIs> <LinearRing> <coordinates> -112.3348783983763,36.1514008468736,100 -112.3372535345629,36.14888517553886,100 -112.3356068927954,36.14781612679284,100 -112.3350034807972,36.14846469024177,100 -112.3358353861232,36.1489624162954,100 -112.3345888301373,36.15026229372507,100 -112.3337937856278,36.14978096026463,100 -112.3331798208424,36.1504472788618,100 -112.3348783983763,36.1514008468736,100 </coordinates> </LinearRing> </outerBoundaryIs> </Polygon> </Placemark> </Folder> </Folder> </Document>
</kml>
The following is the resulting CSV after running the above code snippet (new CSV file: 'my_file.csv'):
This article is for learning how to use JavaScript localStorage to put a string or object into it. This is for storing data in the client browser and use it when the need arises.
Data storage is a critical part of programming. These are the scenarios the localStorage used for adding persistency on the client-side.
To store the session and the unique identity of a guest user to manage the state of his selection.
To store shopping cart selected items on the client-side.
To store language preferences to display content on a multilingual site.
To store user preferences to display data, time and timezone as selected on the client.
Let us see a quick example of using the JavaScript localStorage to store an object. It prepares a JSON object of an array of data and put it into the localStorage.
Quick example
var animalObject = { 'Lion': 'Wild', 'Dog': 'Domestic'

}; // flatten the animal object as a string

animalString = JSON.stringify(animalObject); //store the string into local storage

localStorage.setItem('animals', animalString);
Quick example output
Log this localStorage object into the developer’s browser console to display the following output.
Object from local storage: {Lion: 'Wild', Dog: 'Domestic'}
It contains a handle to access the local storage space of the browser origin.
Properties
Web Storage API
Web Storage API provides two concepts to store the objects having data in a key: value format.
window.localStorage
window.sessionStorage
Both use different Storage instances and control the actions separately.
This storage object is similar to the JavaScript localStorage. But, it has an expiration time.
It is valid only on the current browser session. When closing and reloading the browser, then the sessionStorage object is elapsed.
The expiration time is the main difference between these two storage concepts.
How to set and get items in JavaScript localStorage?
This example is for learning a basic usage of the JavaScript localStorage object. It performs the following actions on the localStorage about a String item.
To set an item as a key-value pair.
To get the value of an item by key.
To remove an item by key.
To clear the entire localStorage.
To get the key by item index position.
This localStorage class contains functions used to perform the above actions. This program uses these functions with appropriate parameters.
basics.html
<html>

<head>

<title>JavaScript localStorage Example and how to store a JavaScript object</title>

</head>

<body> <script> // set item in localstorage window.localStorage.setItem('king', 'Lion'); console.log("Local Storage Key-Value = " + JSON.stringify(window.localStorage) + "\n"); // get item from JavaScript localStorage window.localStorage.getItem('king'); console.log("Local Storage Value = " + window.localStorage.getItem('king') + "\n"); // to get name of key using index var indexPosition = parseInt(window.localStorage.length) -1; var KeyName = window.localStorage.key(indexPosition); console.log("Local Storage Key = " + KeyName + "\n"); // remove item from JavaScript localStorage window.localStorage.removeItem('king'); // to clear all items from localStorage window.localStorage.clear(); </script>

</body>

</html>
Output
The above program displays the following output. It is for printing the localStorage data, it’s key and value based on the appropriate function calls.
Local Storage Key-Value = {"king":"Lion"} Local Storage Value = Lion Local Storage Key = king
Store JavaScript object in HTML5 browser localStorage
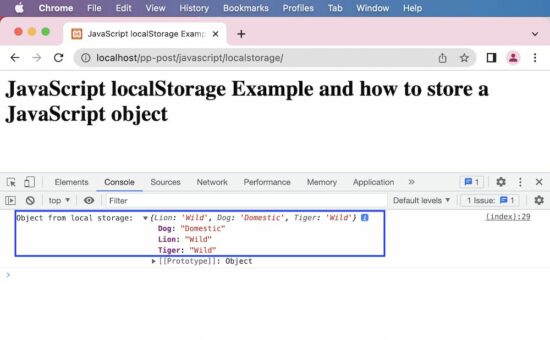
This example is to store an object in the JavaScript localStorage. It proceeds with the following steps to achieve this.
It builds a JSON object to have a property array.
It converts the object into a string using JSON stringify.
Then put the JSON string into the localStorage.
Like the above basic example, it calls the getItem() by object key to get the property mapping.
The retrieved string output from the localStorage is converted back to an object. The example outputs the converted object to the browser console.
index.html
<html>

<head>

<title>JavaScript localStorage Example and how to store a JavaScript object</title>

</head>

<body> <h1>JavaScript localStorage Example and how to store a JavaScript object</h1> <script> // Example: Store JavaScript object in HTML5 browser localStorage var animalObject = { 'Lion' : 'Wild', 'Dog' : 'Domestic', 'Tiger' : 'Wild' }; // flatten the object as a string animalString = JSON.stringify(animalObject); //store the string into local storage localStorage.setItem('animals', animalString); //retrieve the string from local storage var retrievedString = localStorage.getItem('animals'); // parse the string back to an object convertedObject = JSON.parse(retrievedString); console.log('Object from local storage: ', convertedObject); </script>

</body>

</html>
Output
Object from local storage: {Lion: 'Wild', Dog: 'Domestic', Tiger: 'Wild'}
We learned how to use JavaScript localStorage to set a String or an Object and use it later when needed.





 Question: How would we write code to compare Strings?
 Info: A


 Note: Don’t forget to save the DataFrame to keep the changes.
 Question: Why do programmers always mix up Halloween and Christmas?
 Answer: Because Oct 31 equals Dec 25.