Hard West 2 is a journey to the heart of darkness in the American West. Take control of a supernatural posse and catch the mysterious Ghost Train. Outsmart, outcheat and outgun your enemies in this turn-based tactics game set in a Wild West world where nothing is as it seems.
We’ll also look at slight variations of this problem. Let’s go!
Method 1: String Replace Single Tab
The most straightforward way to convert a tab-delimited (TSV) to a comma-separated (CSV) file in Python is to replace each tabular character '\t' with a comma ',' character using the string.replace() method. This works if two values are separated by exactly one tabular character.
Here’s an example input file 'my_file.tsv':
Here’s an example of some code to convert the tab-delimited file to the CSV file:
with open('my_file.tsv') as f: # Read space-delimited file and replace all empty spaces by commas data = f.read().replace('\t', ',') # Write the CSV data in the output file print(data, file=open('my_file.csv', 'w'))
Output file 'my_file.csv':
If you have any doubts, feel free to dive into our related tutorials:
To replace one '\t' or more tabs '\t\t\t' between two column values with a comma ',' and obtain a CSV, use the regular expressions operation re.sub('[\t]+', ',', data) on the space-separated data.
If you have any doubts, feel free to dive into our related tutorials:
Here’s an example input file 'my_file.tsv', notice the additional tabular characters that may separate two column values:
Here’s an example of some code to convert the TSV to the CSV file:
import re with open('my_file.txt') as infile: # Read space-delimited file and replace all empty spaces by commas data = re.sub('[ ]+', ',', infile.read()) # Write the CSV data in the output file print(data, file=open('my_file.csv', 'w'))
Output file 'my_file.csv':
Method 3: Pandas read_csv() and to_csv()
To convert a tab-delimited file to a CSV, first read the file into a Pandas DataFrame using pd.read_csv(filename, sep='\t+', header=None) and then write the DataFrame to a file using df.to_csv(outfilename, header=None).
Here’s an example input file 'my_file.tsv':
Here’s an example of some code to convert the tab-delimited file to the CSV file:
import pandas as pd # Read space-delimited file

df = pd.read_csv('my_file.tsv', sep='\t+', header=None) # Write DataFrame to file

df.to_csv('my_file.csv', header=None)
Output file 'my_file.csv':
You can also use the simpler sep='\t' if you are sure that only a single tabular character separates two column values.
If you have any doubts, feel free to dive into our related tutorials:
Posted by: xSicKxBot - 08-14-2022, 01:12 AM - Forum: Lounge
- No Replies
Elden Ring Modder Obtained Pre-Release Build And Streamed It
Streamer and video game modder Lance McDonald has somehow obtained a pre-release version of Elden Ring and recently streamed it on Twitch.
On a now deleted Tweet, McDonald claimed that the pre-release version has "HEAPS of unfinished stuff, different items, enemies, mechanics, character names, and full debug camera mode." The version comes from around two months before release, according to McDonald. While this version may contain some cut content, it is also clearly unfinished. McDonald noted on the stream that some weapons have incorrect movesets, and that some NPC questlines don't activate properly. McDonald is a prolific modder and content creator, probably best known for creating a 60fps patch for Bloodborne.
Though From Software has not commented on how Elden Ring has changed over development, several other hackers and modders have found abandoned mechanics or ideas by digging in the game's source test and network test build. For example, McDonald contributed to finding a cut dream capturing questline. YouTuber Zellie the Witch unearthed that Torrent used to have an attack. The discovery of this pre-release build might yet reveal more previously unknown secrets. Because there is such a dedicated community for From Software games, we can get a fascinatingly incomplete understanding of what the game was like during development and what it might have been in an alternate world.
Welcome to Murderer’s Island. Your companions: four dead-sexy Killers who, underneath their murderous exteriors, just want a little romance. Flirt your way into their hearts, uncovering dark twists along the way. Will you find true love, forge friendships… or get hacked to death?
Solution: There are four simple ways to convert a list of dicts to a CSV file in Python.
Pandas: Import the pandas library, create a Pandas DataFrame, and write the DataFrame to a file using the DataFrame method DataFrame.to_csv('my_file.csv').
CSV: Import the csvmodule in Python, create a CSV DictWriter object, and write the list of dicts to the file in using the writerows() method on the writer object.
Python: Use a pure Python implementation that doesn’t require any library by using the Python file I/O functionality.
Reduce Problem: You can first convert the list of dicts to a list of lists and then use our related tutorial’s methods to write the list of lists to the CSV.
My preference is Method 1 (Pandas) because it’s simplest to use, concise, and most robust for different input types (numerical or textual).
Method 1: Pandas DataFrame to_csv()
You can convert a list of lists to a Pandas DataFrame that provides you with powerful capabilities such as the to_csv() method. This is the easiest method and it allows you to avoid importing yet another library (I use Pandas in many Python projects anyways).
You create a Pandas DataFrame—which is Python’s default representation of tabular data. Think of it as an Excel spreadsheet within your code (with rows and columns).
The DataFrame is a very powerful data structure that allows you to perform various methods. One of those is the to_csv() method that allows you to write its contents into a CSV file.
You set the index argument of the to_csv() method to False because Pandas, per default, adds integer row and column indices 0, 1, 2, …. Again, think of them as the row and column indices in your Excel spreadsheet. You don’t want them to appear in the CSV file so you set the arguments to False.
You set the and header argument to True because you want the dict keys to be used as headers of the CSV.
If you want to customize the CSV output, you’ve got a lot of special arguments to play with. Check out this article for a comprehensive list of all arguments.
You can convert a list of dicts to a CSV file in Python easily—by using the csv library. This is the most customizable of all four methods.
Here are the six easy steps to convert a list of dicts to a CSV with header row:
Import the CSV library with import csv.
Open the CSV file using the expression open('my_file.csv', 'w', newline=''). You need the newline argument because otherwise, you may see blank lines between the rows in Windows.
Create a csv.DictWriter() object passing the file and the fieldnames argument.
Set the fieldnames argument to the first dictionary’s keys using the expression salary[0].keys().
You can customize the CSV writer in its constructor (e.g., by modifying the delimiter from a comma ',' to a whitespace ' ' character). Have a look at the specification to learn about advanced modifications.
Method 3: Pure Python Without External Dependencies
If you don’t want to import any library and still convert a list of dicts into a CSV file, you can use standard Python implementation as well: it’s not complicated and very efficient.
This method is best if you won’t or cannot use external dependencies.
Open the file f in writing mode using the standard open() function.
Write the first dictionary’s keys in the file using the one-liner expression f.write(','.join(salary[0].keys())).
Iterate over the list of dicts and write the values in the CSV using the expression f.write(','.join(str(x) for x in row.values())).
Here’s the concrete code example:
salary = [{'Name':'Alice', 'Job':'Data Scientist', 'Salary':122000}, {'Name':'Bob', 'Job':'Engineer', 'Salary':77000}, {'Name':'Carl', 'Job':'Manager', 'Salary':119000}] # Method 3

with open('my_file.csv','w') as f: f.write(','.join(salary[0].keys())) f.write('\n') for row in salary: f.write(','.join(str(x) for x in row.values())) f.write('\n')
In the code, you first open the file object f. Then you iterate over each row and each element in the row and write the element to the file—one by one. After each element, you place the comma to generate the CSV file format. After each row, you place the newline character '\n'.
Note: to get rid of the trailing comma, you can check if the element x is the last element in the row within the loop body and skip writing the comma if it is.
A simple approach to convert a list of dicts to a CSV file is to first convert the list of dicts to a list of lists and then use the approaches discussed in the following article (code block given).
salary = [['Alice', 'Data Scientist', 122000], ['Bob', 'Engineer', 77000], ['Ann', 'Manager', 119000]] # Method 1

import csv

with open('file.csv', 'w', newline='') as f: writer = csv.writer(f) writer.writerows(salary) # Method 2

import pandas as pd

df = pd.DataFrame(salary)

df.to_csv('file2.csv', index=False, header=False) # Method 3

a = [[1, 2, 3], [4, 5, 6], [7, 8, 9]] import numpy as np

a = np.array(a)

np.savetxt('file3.csv', a, delimiter=',') # Method 4

with open('file4.csv','w') as f: for row in salary: for x in row: f.write(str(x) + ',') f.write('\n')
Coders get paid six figures and more because they can solve problems more effectively using machine intelligence and automation.
To become more successful in coding, solve more real problems for real people. That’s how you polish the skills you really need in practice. After all, what’s the use of learning theory that nobody ever needs?
You build high-value coding skills by working on practical coding projects!
Do you want to stop learning with toy projects and focus on practical code projects that earn you money and solve real problems for people?
If your answer is YES!, consider becoming a Python freelance developer! It’s the best way of approaching the task of improving your Python skills—even if you are a complete beginner.
If you just want to learn about the freelancing opportunity, feel free to watch my free webinar “How to Build Your High-Income Skill Python” and learn how I grew my coding business online and how you can, too—from the comfort of your own home.
Night Light Bundle & Super Robot Wars 30 Ultimate Deal
Night Light Bundle | 6 Steam Games | 95% OFF
[www.indiegala.com] ?Drive, drift, drag, fast cars, fast life, from morning until night, but racing has no stop light, speed will keep you awake until sunrise, with racing video games like: Strange Night, iREC, CrashMetal Cyberpunk, Drift Horizon Online, Drive for Your Life & JetX VR
Super Robot Wars 30 Ultimate Edition Historical Deal
[www.indiegala.com] The Digital Ultimate Edition includes the Super Robot Wars 30 full game, Season Pass, Bonus Mission Pack, and Premium Sound & Data Pack. Includes 31 anime themes and soundtracks, 15 original songs, and 51 reference images
Cambridge academic Peter stumbles from the wreckage in search of help, fighting the cold. As his attempts to escape the ice grow more desperate, the lines between his past and present begin to blur.
A love story between colleagues Peter and Clara, set against the backdrop of the Cold War, South of the Circle is a narrative adventure game about memory, survival, and the consequences of not dealing with the past.
Posted by: xSicKxBot - 08-13-2022, 04:32 AM - Forum: Lounge
- No Replies
Select Google Users Can Now Play Cloud Games Right From Their Search Results
Google Stadia and other streaming game services are being promoted in a new way, as it looks like searching for certain games presents you with a new button that can boot it up and play instantly, though this isn't yet available for everyone.
As spotted by Bryant Chappel on Twitter, searching for games that are available on Stadia can now have a "Play" button that when pressed boots you straight into the game. Chappel used Control Ultimate Edition as an example of the feature, getting all the way to the title screen without much problem.
In follow-up tweets, Chappel also found that similar buttons could be found for Amazon Luna and Xbox Cloud Gaming. While the Play button for Stadia games brings you straight into the game, it should be noted that it looks like Luna and Xbox Cloud Gaming games first bring you to the game's page, before allowing you to actually play the it.
Posted by: xSicKxBot - 08-12-2022, 01:58 AM - Forum: Python
- No Replies
3 Simple Steps to Convert calendar.ics to CSV/Excel in Python
Rate this post
Step 1: Install csv-ical Module with PIP
Run the following command in your command line or PowerShell (Windows) or shell or terminal (macOS, Linux, Ubuntu) to install the csv-ical library:
pip install csv-ical
In some instances, you need to modify this command a bit to make it work. If you need more assistance installing the library, check out my detailed guide.
Create a new Python code file with the extension .py or a Jupyter Notebook with the file extension .ipynb. This creates a Python script or Jupyter Notebook that can run the code in Step 3 to conver the .ics.
Now, put the .ics file to be converted in the same folder as the newly-created Python script.
Use Jupyter Notebook to create a new .ipynb file
Step 3: Convert
This step consists of running the code doing these three things:
Create and initialize a Convert object
Read the .ics file
Create the CSV object and save it at the specified location
Here’s the full code:
from csv_ical import Convert # Create and initialize a Convert object

convert = Convert()

convert.CSV_FILE_LOCATION = 'my_file.csv'

convert.SAVE_LOCATION = 'my_file.ics' # Read the .ics file

convert.read_ical(convert.SAVE_LOCATION) # Create the CSV object and save it at the specified location

convert.make_csv()

convert.save_csv(convert.CSV_FILE_LOCATION)
Google reCaptcha V3 is the latest version provided with the highest security in comparison. Google contains different captcha services with reCaptcha V2. There are the (I am not a Robot) checkbox, invisible captcha and etc.
With the V3, Google guarantees zero friction while predicting the score for the website interactions. The score and the response report returned by the reCaptcha V3 is a very good security measure. It helps to take action accordingly to safeguard the website.
Like other Google reCaptcha concepts, the V3 also has more than one method to integrate the captcha challenge. Those are two as listed below.
Programmatic invocation of the challenge.
Automatic binding of the challenge with the form button.
This article explains to implement both methods by creating examples.
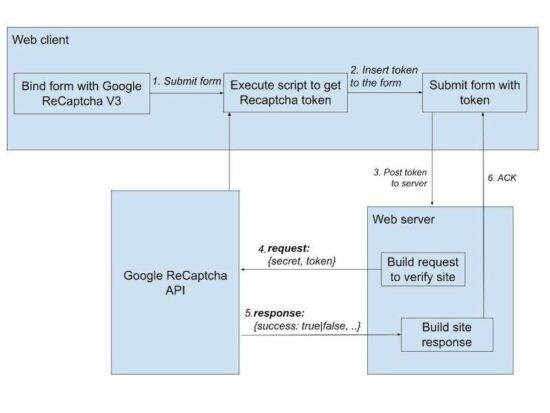
The below diagram will help to have a quick look at the Google reCaptcha V3 process flow. Continue reading to learn how to get the API keys and integrate reCaptcha for your website.
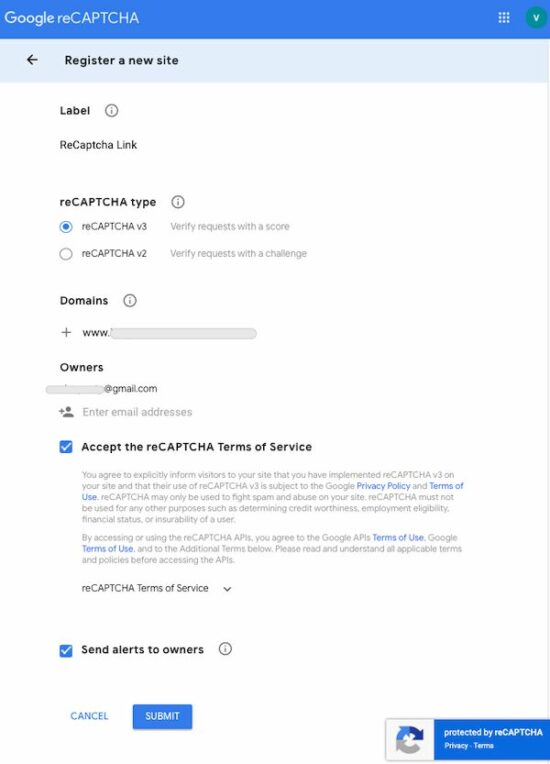
The below screenshot masked the data related to the domain and site owner details. Enter your site details in the place of the masked data.
Step2: Copy the reCaptcha site key and the secret key.
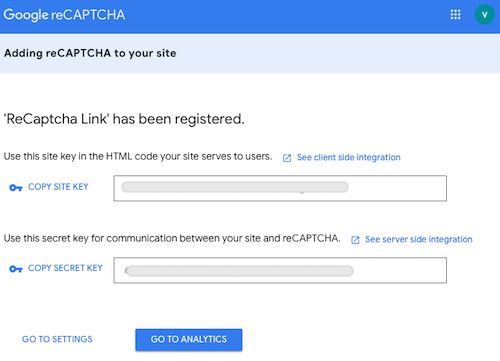
Once registration is done, the reCaptcha V3 keys are displayed below. Copy these details and configure them into the website code.
The site key is used to render the Google reCaptcha on the client side. And, the secret key is used for server-side verification.
The following example contains an application configuration file for this. Continue reading to know how to configure.
About this example
This example renders the reCaptcha script and element in the landing UI. It has the configuration to make the website reCaptcha ready with the API keys.
It gets the token from the Google reCaptcha API and appends it to the form. On submit, the server-side PHP script receives the token to send the siteverify request to the API.
It integrates the Google reCaptcha V3 programmatic challenge in the root. If you want to implement the “automatic binding” method, then it is in a separate folder.
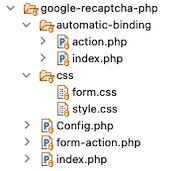
The below structure shows the reCaptcha example files order and location. It will be helpful to set up this code correctly in a development environment.
Application configuration file
It configures the Google reCaptcha V3 site and the secret keys used in the examples below.
The site key is used to render the Google recaptcha element on the client side. The secret key is used in the PHP files to build the site verification request parameters.
Method 1: Programatically invoking Google reCaptcha token via script
This method is used when the developer wants to have more programming control over the reCaptcha token.
During the explicit execution, it sets parameters to the request. These parameters can be returned with the Google reCaptcha V3 response. This will be helpful for additional verification.
HTML page renders form with reCaptcha JS
This landing page loads the JavaScript API while rendering the form UI. It uses the Google reCaptcha site key while loading the JavaScript.
// Execute Google reCaptcha v3 to get token function getToken(event) { event.preventDefault(); grecaptcha.ready(function() { grecaptcha.execute('<?php echo Config::GOOGLE_RECAPTCHA_SITE_KEY; ?>', { action: 'submit' }).then(function(token) { var button = document.createElement('input'); button.type = 'hidden'; button.name = 'recaptcha_token'; button.id = 'recaptcha_token'; button.value = token; var form = document.getElementById("frm"); form.appendChild(button); submitForm(); });; });

} // Submit reCaptcha token to the PHP

function submitForm() { const form = document.getElementById('frm'); const formData = new FormData(form); var xhttp = new XMLHttpRequest(); xhttp.open('POST', 'form-action.php', true); xhttp.send(formData); xhttp.onreadystatechange = function() { if (xhttp.readyState == 4 && xhttp.status == 200) { document.getElementById("ack-message").innerHTML = xhttp.responseText; document.getElementById('recaptcha_token').remove(); } }

}
Verify website interaction using Google reCaptcha V3 API
The form submits action calls this PHP script by sending the reCaptcha token. It builds the post parameters with the Google reCaptcha v3 secret key and token.
It returns the score about the interaction made on the website. This score will be between 0.0 (lower) and 1.1(higher) ranking. It helps to predict the necessary steps to make to protect the site.
Method 2: Automatic binding callback with the submit button
This is a basic and simple method of integrating Google reCaptcha V3 for a site. In this automatic binding of the reCaptcha challenge, it gets the token in the callback.
Site HTML to bind the reCaptcha challenge automatically
It loads the Google reCaptcha JavaScript API as we did in method 1.
The g-recaptcha field binds the callback, action, and reCaptcha site key with the HTML5 data attributes.
JavaScript callback to append token field to the form
This callback function is linked with the Google reCaptcha element, which is the send button of the form. So, on clicking the send button, it calls the onSubmit JavaScript function.
This callback has the reCaptcha token to be appended to the form data.
automatic-binding/index.php (JavaScript callback)
// JavaScript

function onSubmit(token) { var button = document.createElement('input'); button.type = 'hidden'; button.name = 'recaptcha_token'; button.value = token; var form = document.getElementById("frm"); form.appendChild(button); form.submit();

}
PHP action to predict Google reCaptcha score
In PHP, it verifies the site and checks the interaction score. It contains the same code as the form-action.php we used in method 1.
The difference is that the response is sent via session instead of printing it to AJAX callback.





 Related article:
 If your answer is YES!, consider becoming a