Problem Formulation: Given a Python set. How to convert it to a tuple? And how to convert the tuple back to a set?
There are three main ways:
Method 1: To convert a Python set to a tuple, use the tuple(my_set) function.
Method 2: To convert a Python tuple to a set, use the set(my_tuple) function.
Method 3: To convert a Python tuple of mutable elements to a set, use the expression set(tuple(x) for x in my_tuple) to avoid a TypeError.
I’ll also give you a bonus method 4 that shows you what to do to retain the ordering information when converting a tuple to a set—so keep reading!
Method 1: Convert Set to Tuple with tuple()
To convert a set to a tuple, pass the set into the tuple() function. This is a built-in Python function, so you don’t need to import or install any library to use it. The return value is a new tuple from the values in the set.
Here’s an example where you convert the set {1, 2, 3} to a tuple (1, 2, 3):
By the way, here’s an explainer video on this function:
Method 2: Convert Tuple to Set with set()
To convert a tuple to a set, pass the tuple into the set() function. This is a built-in Python function, so you don’t need to import or install any library. The return value is a new set from the values in the tuple.
Here’s an example where you convert the tuple (1, 2, 3) to a set {1, 2, 3}:
Problem: However, the conversion process from a tuple to set doesn’t always work because if you try to convert a tuple of mutable values, Python will raise the TypeError: unhashable type!
Read on to learn more about this problem—and how to resolve it easily:
Method 3: Convert Tuple to Set with Set Comprehension
A Python set is an unordered collection of unique immutable elements. Each element must define explicitly or implicitly the __hash__() dunder method, i.e., must be hashable.
If you attempt to convert a tuple of mutable elements (e.g., lists) to a set, Python will raise an error such as the TypeError: unhashable type: 'list':
In this case, you can use set comprehension to convert each inner tuple element to an immutable type. For example, the expression set(tuple(x) for x in my_tuple) converts each inner list to a tuple. The result is a set of immutable tuples.
Here’s the solution to this problem in a minimal code example:
my_tuple = ([1, 2], [3, 4], [5, 6])

my_set = set(tuple(x) for x in my_tuple)

print(my_set)

# {(1, 2), (3, 4), (5, 6)}
The final “bonus” section introduces another elegant way to retain the ordering information in a set:
Bonus Method 4: Enumerate Elements
Sometimes, you want to associate each set or tuple element with a specific numerical “index” value, i.e., a unique integer identifier. The enumerate() method to the rescue!
Use tuple(enumerate(my_set)) to convert a set to an enumerated tuple.
Use set(enumerate(my_tuple)) to convert a tuple to an enumerated set.
The result is the respective container data structure with (identifier, value) tuples:
Especially in the case where you convert a tuple to a set, this makes a lot of sense because you can retain the information on the ordering of elements that would be otherwise lost after converting to a set.
Thanks for reading the whole article, my friend! You can join us here (we have cheat sheets too):
If you are looking for a client-side solution to detect a mobile device, your search stops here :-). There are properties to detect this on the client side by using JavaScript.
Two methods of detecting if a current device is a mobile device are listed below.
By using JavaScript window.matchMedia() method.
By using navigator.userAgent property.
Both are using JavaScript basic methods to create the mobile device detector code.
1) By using JavaScript window.matchMedia() method
This method is the best one compared to the one using JavaScript navigator.userAgent. Because the userAgent is a setting that can be configured by the end users. They can change it!
matchmedia.html
Quick example
function isMobileDevice() { return window .matchMedia("only screen and (max-width: 760px)").matches;

}

if (isMobileDevice()) { document.write("<b>Detected device is a mobile.</b>");

} else { document .write("<b>Detected device is not a mobile.</b>");

}
The matchMedia() JavaScript custom method is used to do this mobile device detection.
It accepts a media query string and returns an object. This object will contain the current device’s media property and its relevancy.
Then, this object is used to find the match between the current device’s media property with the media query passed.
This program sends the media query containing a max-width of a mobile device that is expected to have.
If the current device’s media screen properties are matched with this argument, then this JavaScript function returns a boolean true.
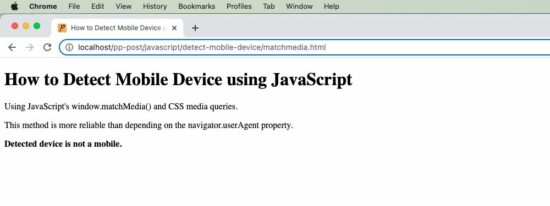
This screenshot is taken from my computer that prints the result of the above quick example.
Media match with CSS
It can also be done by CSS instead of JavaScript. Follow the below steps to implement this using CSS.
Keep two possible messages in the HTML markup with style=’display:none’.
Write CSS media query section with @media screen and (max-width: 600px).
Show and hide the appropriate UI notification element according to the screen width.
<!DOCTYPE html>

<html>

<head>

<title>How to Detect Mobile Device using JavaScript</title>

<meta name="viewport" content="width=device-width, initial-scale=1">

<style>

.mobile { display: none;

} .not-mobile { display: block;

} @media only screen and (max-width: 600px) { .mobile { display: block; } .not-mobile { display: none; }

}

</style>

</head>

<body> <b class="mobile">Detected device is a mobile.</b> <b class="not-mobile">Detected device is not a mobile.</b>

</body>

</html>
2) By using a navigator.userAgent property
The alternate method is for checking the current userAgent to detect if it is a mobile device.
The isMobileDevice() function in the below example does the test with a regex pattern. The regex contains the most possible values of a mobile device’s userAgent.
The script compares the current device’s userAgent property with the pattern. If a match is found, then this function returns true to print the appropriate result.
navigator.html
<!DOCTYPE html>

<html>

<head>

<title>How to Detect Mobile Device using JavaScript</title>

</head>

<body> <h1>How to Detect Mobile Device using JavaScript</h1> <p>Note: Browser users can change value of "userAgent" via UA spoofing. So be aware of that and do not use this feature to provide a critical function of your website.</p> <script> function isMobileDevice() { return /Android|webOS|iPhone|iPad|iPod|BlackBerry|IEMobile|Opera Mini/i .test(navigator.userAgent); /* for a more detailed test /(android|bb\d+|meego).+mobile|avantgo|bada\/|blackberry|blazer|compal|elaine|fennec|hiptop|iemobile|ip(hone|od)|ipad|iris|kindle|Android|Silk|lge |maemo|midp|mmp|netfront|opera m(ob|in)i|palm( os)?|phone|p(ixi|re)\/|plucker|pocket|psp|series(4|6)0|symbian|treo|up\.(browser|link)|vodafone|wap|windows (ce|phone)|xda|xiino/i .test(navigator.userAgent) || /1207|6310|6590|3gso|4thp|50[1-6]i|770s|802s|a wa|abac|ac(er|oo|s\-)|ai(ko|rn)|al(av|ca|co)|amoi|an(ex|ny|yw)|aptu|ar(ch|go)|as(te|us)|attw|au(di|\-m|r |s )|avan|be(ck|ll|nq)|bi(lb|rd)|bl(ac|az)|br(e|v)w|bumb|bw\-(n|u)|c55\/|capi|ccwa|cdm\-|cell|chtm|cldc|cmd\-|co(mp|nd)|craw|da(it|ll|ng)|dbte|dc\-s|devi|dica|dmob|do(c|p)o|ds(12|\-d)|el(49|ai)|em(l2|ul)|er(ic|k0)|esl8|ez([4-7]0|os|wa|ze)|fetc|fly(\-|_)|g1 u|g560|gene|gf\-5|g\-mo|go(\.w|od)|gr(ad|un)|haie|hcit|hd\-(m|p|t)|hei\-|hi(pt|ta)|hp( i|ip)|hs\-c|ht(c(\-| |_|a|g|p|s|t)|tp)|hu(aw|tc)|i\-(20|go|ma)|i230|iac( |\-|\/)|ibro|idea|ig01|ikom|im1k|inno|ipaq|iris|ja(t|v)a|jbro|jemu|jigs|kddi|keji|kgt( |\/)|klon|kpt |kwc\-|kyo(c|k)|le(no|xi)|lg( g|\/(k|l|u)|50|54|\-[a-w])|libw|lynx|m1\-w|m3ga|m50\/|ma(te|ui|xo)|mc(01|21|ca)|m\-cr|me(rc|ri)|mi(o8|oa|ts)|mmef|mo(01|02|bi|de|do|t(\-| |o|v)|zz)|mt(50|p1|v )|mwbp|mywa|n10[0-2]|n20[2-3]|n30(0|2)|n50(0|2|5)|n7(0(0|1)|10)|ne((c|m)\-|on|tf|wf|wg|wt)|nok(6|i)|nzph|o2im|op(ti|wv)|oran|owg1|p800|pan(a|d|t)|pdxg|pg(13|\-([1-8]|c))|phil|pire|pl(ay|uc)|pn\-2|po(ck|rt|se)|prox|psio|pt\-g|qa\-a|qc(07|12|21|32|60|\-[2-7]|i\-)|qtek|r380|r600|raks|rim9|ro(ve|zo)|s55\/|sa(ge|ma|mm|ms|ny|va)|sc(01|h\-|oo|p\-)|sdk\/|se(c(\-|0|1)|47|mc|nd|ri)|sgh\-|shar|sie(\-|m)|sk\-0|sl(45|id)|sm(al|ar|b3|it|t5)|so(ft|ny)|sp(01|h\-|v\-|v )|sy(01|mb)|t2(18|50)|t6(00|10|18)|ta(gt|lk)|tcl\-|tdg\-|tel(i|m)|tim\-|t\-mo|to(pl|sh)|ts(70|m\-|m3|m5)|tx\-9|up(\.b|g1|si)|utst|v400|v750|veri|vi(rg|te)|vk(40|5[0-3]|\-v)|vm40|voda|vulc|vx(52|53|60|61|70|80|81|83|85|98)|w3c(\-| )|webc|whit|wi(g |nc|nw)|wmlb|wonu|x700|yas\-|your|zeto|zte\-/i .test(navigator.userAgent.substr(0, 4)) */ } if (isMobileDevice()) { document.write("<b>Detected device is a mobile.</b>"); } else { document .write("<b>Detected device is not a mobile.</b>"); } </script>

</body>

</html>
Note: Browser users can change the value of “userAgent” via UA spoofing. So be aware of that and do not use this feature to provide a critical function of your website.
Jack Move is a unique blend of gritty cyberpunk story telling, turn based battles and beautiful modern pixel art. Take on the role of Noa, a vigilante hacker determined to rescue her kidnapped father and take down the overreaching Monomind corporation.
They whisper her name on the streets: Solares. A mysterious veteran of the Data Wars, Noa Solares keeps the fight against the Corporations alive as a vigilante hacker-for-hire, empowering the downtrodden and undermining those with power. When she receives an emergency message from her estranged father - the eccentric Dr. Abner Solares, whose wife's death spurred him to become the leading researcher of 'digital reanimation' - Noa is thrust into a world of murder, kidnapping, dark research, and the corporation that would steal it for their own ends: Monomind.
What starts as fight to save your father will become a fight for the future of mankind itself...
Twitch Is Changing Its Revenue Split For Its Biggest Streamers From 2023
Streaming platform Twitch has announced changes to its revenue system that will kick in starting next year, with this new update affecting some of its biggest streamers. The current Twitch model for revenue works on a 50/50 split between partnered streamers and the platform when dealing with paid subscriptions, while bigger streamers get a more generous 70/30 split.
This will change in June 2023, as streamers will get to keep 70% of the subscription revenue on the first $100,000 earned, and the share will then revert to a 50/50 split. The new threshold will have an impact on Twitch's top 10% of streamers, and one of the reasons for the policy change is due to an increased cost in video hosting according to a blog post from Twitch president Dan Clancy.
In our latest blog post, we tackle a topic that's been at the forefront of the community for some time - the rev split. We also provide a related update around monetization for a subset of Partners. Read here: https://t.co/zP6xcCtJAQpic.twitter.com/KAwOMDIkmm
"Delivering high definition, low latency, always available live video to nearly every corner of the world is expensive," Clancy wrote. "Using the published rates from Amazon Web Services' Interactive Video Service (IVS)--which is essentially Twitch video--live video costs for a 100 CCU streamer who streams 200 hours a month are more than $1000 per month. We don't typically talk about this because, frankly, you shouldn't have to think about it. We'd rather you focus on doing what you do best."
Posted by: xSicKxBot - 09-19-2022, 11:34 AM - Forum: Python
- No Replies
How to Find the Longest String in a NumPy Array?
5/5 – (1 vote)
Python Longest String in NumPy Array
To find the longest string in a given NumPy array, say arr, you can use the max(arr, key=len) function that determines the maximum by comparing the length of the array elements using the len() function as a key for comparison.
import numpy as np arr = np.array(['Alice', 'Bob', 'Carl'])

print(max(arr, key=len))

# Alice
You can find more about the powerful max() function in our detailed blog tutorial:
To find the length of the longest string in a NumPy array arr, use the max(arr, key=len) function to obtain the string with the maximum length and then pass this max string into the len() function to obtain the number of characters of the max string.
len(max(arr, key=len))
Here’s a more detailed code example of a simple 1D NumPy Array:
import numpy as np arr = np.array(['Alice', 'Bob', 'Carl']) # Print Longest String:

print(max(arr, key=len))

# Alice # Print Length of Longest String

print(len(max(arr, key=len)))

# 5
Get Longest String from NumPy Axis (2D, Column or Row)
To get the longest string from a certain NumPy array axis (e.g., row or column), first use simple NumPy slicing and indexing to get that axis (e.g., arr[0, :] to get the first row) and pass it into the max() function with the key argument set to the length function like so: max(arr[0, :], key=len).
Here’s an example to get the longest string of the first row of a 2D array:
import numpy as np arr = np.array([['Alice', 'Bob', 'Carl'], ['Ann', 'Zoe', 'Leonard']]) print(max(arr[0, :], key=len))

# Alice
Here’s an example to get the longest string of the third column of a 2D array:
print(max(arr[:, 2], key=len))

# Leonard
You get the idea.
If you want to get the longest string from the whole NumPy array, not only from a column or row or axis, first flatten it and then pass the flattened array into the max() function using the key=len argument.
Welcome to Meow Meow Furrington, capital city of cats, home of the world's biggest ball of yarn...and hotbed of crime. You are Cuddles Nutterbutter, feline private investigator and owner of two perfectly normal-sized paws, the doctor said so. After agreeing to take on a last-minute case for the Chief of Police, you and your plucky assistant find yourselves investigating a murder that risks upsetting the careful balance between the city's two most powerful crime families: the Montameeuws and the Catulets.
Cuddles will need to use every skill he's learned - as well as his definitely-not-smaller-than-average paws - to poke, lick and talk his way through to the heart of the mystery...before some very dangerous cats decide to take matters into their own paws. Which, to clarify, are absolutely regular-sized.
Stretch your legs, clean your whiskers, and dive into Nine Noir Lives. Enjoy a "point-and-lick" comedy-noir adventure, full of humour, crazy characters, and intriguing locations. Solve challenging puzzles and answer the immortal question: how many things need to be licked to solve a murder in this town?
Posted by: xSicKxBot - 09-19-2022, 11:34 AM - Forum: Lounge
- No Replies
How To Get Six Free Syndicate Packs In Apex Legends Mobile
Apex Legends Mobile recently held a surprise weekend event that rewarded players with three free Loba Bootlegger Packs, a special kind of Syndicate Pack that usually can only be obtained via purchase with Syndicate Coins, the game's premium currency. These packs gave players free cosmetics from the premium Bootlegger cosmetic collection.
This event proved so popular that two more have since been announced, but this time, the prize has been doubled--players who participate in the Bootlegger Bonanza and Star Spectacle events will receive a total of three Loba Bootlegger Packs and three Rhapsody Digital Star Packs. Keep reading for a closer look at both of these events, instructions on how to participate, and a list of all the prizes you can earn by taking part.
Schedule
The events each last for three days and take place on separate weekends:
Posted by: xSicKxBot - 09-18-2022, 10:23 AM - Forum: Python
- No Replies
Combine Images Using Numpy
Rate this post
Summary: You can combine images represented in the form of Numpy arrays using the concatenate function of the Numpy library as np.concatenate((numpydata_1, numpydata_2), axis=1). This combines the images horizontally. Use syntax: np.concatenate((numpydata_1, numpydata_2), axis=0) to combine the images vertically.
Problem Formulation
Consider you have two images represented as Numpy arrays of pixels. How will you combine the two images represented in the form of Numpy pixel arrays?
Combining two images that are in the form of Numpy arrays will create a new Numpy array having pixels that will represent a new combined image formed by either concatenating the two images horizontally or vertically. Let’s understand this with the help of an example:
Given: Let’s say we have two different images as given below (Both images have similar dimensions) –
img_1.JPG img_2.JPG
When you convert them to Numpy arrays this is how you can represent the two images:
So, are you up for the challenge? Well! If it looks daunting – don’t worry. This tutorial will guide you through the techniques to solve the programming challenge. So, without further delay let us dive into the solution.
Prerequisite: To understand how the solutions to follow work it is essential to understand – “How to concatenate two Numpy arrays in Python.”
NumPy’s concatenate() method joins a sequence of arrays along an existing axis. The first couple of comma-separated array arguments are joined. If you use the axis argument, you can specify along which axis the arrays should be joined. For example, np.concatenate(a, b, axis=0) joins arrays along the first axis and np.concatenate(a, b, axis=None) joins the flattened arrays.
To learn more about concatenating arrays in Python, here’s a wonderful tutorial that will guide you through numerous methods of doing so: How to Concatenate Two NumPy Arrays?
Combine Images “Horizontally” with Numpy
Approach: The concatenate() method of the Numpy library allows you combine matrices of different images along different axes. To combine the two image arrays horizontally, you must specify the axis=1.
Code: Please go through the comments mentioned in the script in order to understand how each line of code works.
from PIL import Image

import numpy as np

# Reading the given images img_1 = Image.open('img_1.JPG')

img_2 = Image.open('img_2.JPG')

# Converting the two images into Numpy Arrays

numpydata_1 = np.asarray(img_1)

numpydata_2 = np.asarray(img_2)

# Combining the two images horizontally

horizontal = np.concatenate((numpydata_1, numpydata_2), axis=1)

# Display the horizontally combined image as a Numpy Array

print(horizontal)

# converting the combined image in the Numpy Array form to an image format

data = Image.fromarray(horizontal)

# Saving the combined image

data.save('combined_pic.png')
Here’s how the horizontally combined image looks like when saved to a file:
Wonderful! Isn’t it?
Combine Images “Vertically” with Numpy
In the previous solution, we combined the images horizontally. In this soution you will learn how to combine two images represented in the form of Numpy arrays vertically.
Approach: The idea is quite similar to the previous solution with the only difference in the axis parameter of the concatenate() method. To combine the two image arrays vertically, you must specify the axis=0.
Code:
from PIL import Image

import numpy as np

# Reading the given images

img_1 = Image.open('img_1.JPG')

img_2 = Image.open('img_2.JPG')

# Converting the two images into Numpy Arrays

numpydata_1 = np.asarray(img_1)

numpydata_2 = np.asarray(img_2)

# Combining the two images horizontally

vertical = np.concatenate((numpydata_1, numpydata_2), axis=0)

# Display the vertically combined image as a Numpy Array

print(vertical)

# converting the combined image in the Numpy Array form to an image format

data = Image.fromarray(vertical)

# Saving the combined image

data.save('combined_pic.png')
Phew! That was some coding challenge! I hope you can now successfully combine images given as Numpy arrays in both dimensions – horizontally as well as vertically. With that we come to the end of this tutorial. Please subscribe and stay tuned for more interesting tutorials and solutions in the future.


 Problem Formulation: Given a Python set. How to convert it to a tuple? And how to convert the tuple back to a set?
 Here’s an example where you convert the set

 Problem: However, the conversion process from a tuple to set doesn’t always work because if you try to convert a tuple of mutable values, Python will raise the
  A Python set is an unordered collection of unique immutable elements. Each element must define explicitly or implicitly the