When Elise and her fiance decided to leave urban life and settle near the French coast, she could not imagine that she would end up completely alone.
Now, surrounded by strange phenomena in a dark, post-Cold War climate, Elise will have to investigate and unravel the mysteries surrounding the region of Saint-Exil, its ritualistic cult, and its lighthouse overlooking the coast.
Broken Pieces is an action-packed investigative and adventure video game set in France. The game puts you in the shoes of Elise, a woman in her thirties who finds herself in the village of Saint-Exil in an imaginary region reminiscent of Brittany. Following an unexplained paranormal phenomenon, Elise is stuck, completely alone and out of time.
Also, you’ll learn how to solve a variant of this challenge.
Bonus challenge: Find only the length of the longest list in the list of lists.
Here are some examples:
[[1], [2, 3], [4, 5, 6]]3
[[1, [2, 3], 4], [5, 6], [7]]3
[[[1], [2], [3]], [4, 5, [6]], [7, 8, 9, 10]]4
So without further ado, let’s get started!
Method 1: max(lst, key=len)
Use Python’s built-in max() function with a key argument to find the longest list in a list of lists. Call max(lst, key=len) to return the longest list in lst using the built-inlen() function to associate the weight of each list, so that the longest inner list will be the maximum.
A beautiful one-liner solution, isn’t it? Let’s have a look at a slight variant to check the length of the longest list instead.
Method 2: len(max(lst, key=len))
To get the length of the longest list in a nested list, use the len(max(lst, key=len)) function. First, you determine the longest inner list using the max() function with the key argument set to the len() function. Second, you pass this longest list into the len() function itself to determine the maximum.
A Pythonic way to check the length of the longest list is to combine a generator expression or list comprehension with the max() function without key. For instance, max(len(x) for x in lst) first turns all inner list into length integer numbers and passes this iterable into the max() function to get the result.
Here’s this approach on the same examples as before:
A not so Pythonic but still fine approach is to iterate over all lists in a for loop, check their length using the len() function, and compare it against the currently longest list stored in a separate variable. After the termination of the loop, the variable contains the longest list.
Note: If you need the length of the longest list, you could simply replace the last line of the function with return len(longest) , and you’re done!
Summary
You have learned about four ways to find the longest list and its length from a Python list of lists (nested list):
Method 1: max(lst, key=len)
Method 2: len(max(lst, key=len))
Method 3: max(len(x) for x in lst)
Method 4: Naive For Loop
I hope you found the tutorial helpful, if you did, feel free to consider joining our community of likeminded coders—we do have lots of free training material!
We are going to see three different ways of capturing screenshots of a webpage using JavaScript. These three methods give solutions to take screenshots with and without using libraries.
Using html2canvas JavaScript library.
Using plain HTML5 with JavaScript.
Using WebRTC’s getDisplayMedia method.
1) Using the html2canvas JavaScript library
This method uses the popular JS library html2canvas to capture a screenshot from a webpage.
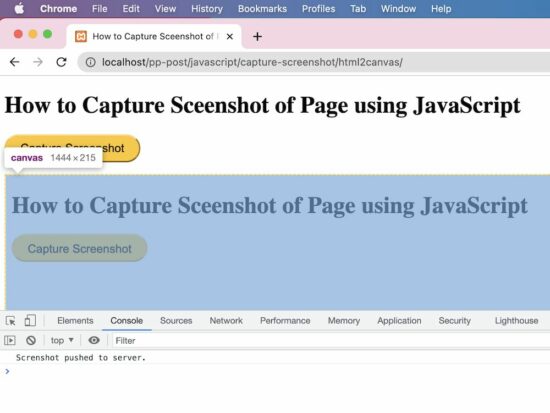
This script implements the below steps to capture a screenshot from the page HTML.
It initializes the html2canvas library class and supplies the body HTML to it.
It sets the target to append the output screenshot to the HTML body.
Generates canvas element and appends to the HTML.
It gets the image source data URL from the canvas object.
Push the source URL to the PHP via AJAX to save the screenshot to the server.
capture-screenshot/index.html
Quick example
<!DOCTYPE html>

<html>

<head>

<title>How to Capture Screenshot of Page using JavaScript</title>

<link rel='stylesheet' href='form.css' type='text/css' />

</head>

<body> <div class="phppot-container"> <h1>How to Capture Screenshot of Page using JavaScript</h1> <p> <button id="capture-screenshot">Capture Screenshot</button> </p> </div> <script src="https://ajax.googleapis.com/ajax/libs/jquery/3.2.1/jquery.min.js"></script> <script type="text/javascript" src="https://html2canvas.hertzen.com/dist/html2canvas.min.js"></script> <script type="text/javascript"> $('#capture-screenshot').click(function() { const screenshotTarget = document.body; html2canvas(screenshotTarget).then(canvas => { // to image as png use below line // const base64image = canvas.toDataURL("image/png"); // show the image in window use below line // window.location.href = base64image; // screenshot appended to the body as canvas document.body.appendChild(canvas); dataURL = canvas.toDataURL(); // to print the screenshot in console use below line // console.log(dataURL); // following line is optional and it is to save the screenshot // on the server side. It initiates an ajax call pushScreenshotToServer(dataURL); }); }); function pushScreenshotToServer(dataURL) { $.ajax({ url: "push-screenshot.php", type: "POST", data: { image: dataURL }, dataType: "html", success: function() { console.log('Screenshot pushed to server.'); } }); } </script>

</body>

</html>
This PHP script reads the screenshot binaries posted via AJAX. It prepares the screenshot properties in a JSON format.
capture-screenshot/push-screenshot.php
<?php

if (isset($_POST['image'])) { // should have read and write permission to the disk to write the JSON file $screenshotJson = fopen("screenshot.json", "a") or die("Unable to open screenshot.json file."); $existingContent = file_get_contents('screenshot.json'); $contentArray = json_decode($existingContent, true); $screenshotImage = array( 'imageURL' => $_POST['image'] ); $contentArray[] = $screenshotImage; $fullData = json_encode($contentArray); file_put_contents('screenshot.json', $fullData); fclose($screenshotJson);

}

?>
This will output a “screenshot.json” file with the image data URL and store it in the application. Video Demo
2) Using plain HTML5 with JavaScript
This JavaScript code includes two functions. One is to generate an image object URL and the other is to take screenshots by preparing the blob object from the page.
It prepares a blob object URL representing the output screenshot image captured from the page. It takes screenshots by clicking the “Capture Screenshot” button in the UI.
It controls the style properties and scroll coordinates of the node pushed to the screenshot object. This is to stop users have the mouse controls on the BLOB object.
This code will show the captured screenshot on a new page. The new page will have the generated blob URL as blob:http://localhost/0212cfc1-02ab-417c-b92f-9a7fe613808c
This method uses the JavaScript MediaServices class to capture the screenshot from the page content.
This example uses the getDisplayMedia() of this class to return the media stream of the current page content.
Note: It needs to grant permission to get the whole or part of the page content on the display.
It prepares an image source to draw into the canvas with the reference of its context. After writing the media stream object into the context, this script converts the canvas into a data URL.
This data URL is used to see the page screenshot captured on a new page.
After reading the media stream object to a screenshot element object, it should be closed. The JS MediaStreamTrack.stop() is used to close the track if it is not needed.
<!DOCTYPE html>
<html>
<head>
<title>How to Capture Sceenshot of Page using JavaScript</title>
<link rel='stylesheet' href='form.css' type='text/css' />
</head>
<body> <div class="phppot-container"> <p>This uses the WebRTC standard to take screenshot. WebRTC is popular and has support in all major modern browsers. It is used for audio, video communication.</p> <p>getDisplayMedia() is part of WebRTC and is used for screen sharing. Video is rendered and then page screenshot is captured from the video.</p> <p> <p> <button id="capture-screenshot" onclick="captureScreenshot();">Capture Screenshot</button> </p> </div> <script> const captureScreenshot = async () => { const canvas = document.createElement("canvas"); const context = canvas.getContext("2d"); const screenshot = document.createElement("screenshot"); try { const captureStream = await navigator.mediaDevices.getDisplayMedia(); screenshot.srcObject = captureStream; context.drawImage(screenshot, 0, 0, window.width, window.height); const frame = canvas.toDataURL("image/png"); captureStream.getTracks().forEach(track => track.stop()); window.location.href = frame; } catch (err) { console.error("Error: " + err); } }; </script>
</body>
</html>
Apex Legends' Throwing Knife Isn't Here To Stay, But More LTMs Are On The Way
Apex Legends developer Respawn Entertainment recently hosted two Reddit AMAs to answer questions from players regarding various aspects of the game. The first AMA took place on Tuesday, shortly after the launch of the Beast of Prey Collection Event, and featured lead game designer Robert West (/u/RoboB0b). West answered questions concerning the event's new Gun Run LTM and some of Apex's other limited-time modes. The second AMA was held yesterday, with the discussion focused on the game's weapons, legends, and overall meta. Weapons designer Eric Canavese (/u/RV-Eric) and lead legends designer Devan McGuire (/u/RV-Devan) teamed up to answer questions about game balance.
Both AMAs revealed some interesting facts about the game's development (and some hints at upcoming features). With so many questions and answers in both massive threads, it's easy to lose track of what's what, so we took a deep dive into both AMA sessions to uncover every interesting tidbit of information we could find. Keep reading for a summary of everything we learned from Respawn's Apex Legends AMA series.
AMA #1: Gun Run & LTMs
The first AMA was focused solely on questions pertaining to limited-time modes, including Gun Run.
Tonight you're on a surprise mission at the inimitable Club Low. This former coffin factory-turned-nightclub has, for years, been a beacon of nocturnal energy, a haven for wild-limbed dancing, mind-altering music and shady characters aplenty. It's also a place to prove your skills as an undercover agent.
An old colleague is trapped in the club, caught up in an intel-gathering mission with a notorious business captain. Your mission is to sneak into the club incognito and get him out before he blows his cover. Can you do it?
Solidity File Layout – SPDX License ID and Version Pragmas
5/5 – (1 vote)
In the previous articles, we looked at some of the representative examples of smart contracts representing possible real-world scenarios.
Our main focus was on capturing the essence of each case, without particular attention given to the general structure, i.e. layout of the respective source files.
However, in this mini-series starting with this article, we will focus particularly on the source file layout.
The articles will continue with our tradition of going hand in hand with the official Solidity documentation, with the particular topic of our current interest available here.
Info: As we’ve reached such a nice, round number of articles on Solidity, I have a small foreword for my faithful audience.
For those of us who missed or skipped previous articles, the intent behind the content is to supplement and clarify the original documentation and even present it in a style that I find to be more appropriate to us as the audience.
Given that we come from various backgrounds, some less and some more technical, it is my permanent goal to soften the material and make it as close as possible to each reader. Sometimes, completely unannounced and unprovoked, I’ll even try and sprinkle some humor onto the content.
Will I succeed in making it funny and engaging? That’s whole another story
SPDX License Identifier
Smart contracts are somewhat a mystery to unfamiliar folks, and a mystery usually implies a certain amount of distrust. Even so, the more sensitive the subject is, the greater the amount of distrust. The best way to turn distrust into trust is to make the content in question open and available.
When we’re talking about smart contracts, the openness of a smart contract means the availability of its source code. However, making the source code available frequently triggers legal problems regarding copyright.
To alleviate these problems, the Solidity compiler instigates the use of SPDX license identifiers.
Info: SPDX stands for the Software Package Data Exchange, which is “An open standard for communicating software bill of material information, including components, licenses, copyrights, and security references. SPDX reduces redundant work by providing a common format for companies and communities to share important data, thereby streamlining and improving compliance.“
Yes, I agree, it’s a lengthy sentence, but the main takeaway ideas are a communication standard, an instrument of compliance, and a data exchange format:
SPDX is a standard used for communicating the information about the software contents;
SPDX reduces redundant work and improves compliance;
SPDX provides a common format for data sharing between companies and communities;
An SPDX license identifier should be included at the beginning of the source file, e.g.
// SPDX-License-Identifier: GPL-3.0-or-later
Although SPDX license identifiers are machine-readable, the compiler does not check if the license part of the comment is in the list of licenses allowed by SPDX.
Instead, the compiler will just include the string in the bytecode metadata.
We will touch on the subject of contract metadata in future articles, but until then, let’s just remember that there is a thing called metadata.
Info: Metadata can be loosely defined as “data/information about data”, meaning it provides more information or description of certain data.
We don’t have to specify a license or if the case is that the source code is closed-source (opposite of open-source), the recommendation is that we use a special value UNLICENSED.
The UNLICENSED value implies that usage is not allowed, i.e. there is not a corresponding item in SPDX license list; it differs from the value UNLICENSE which grants all rights to everyone.
If we as developers supply the UNLICENSE comment, we are still tied by the obligation related to licensing, i.e. we have to mention a specific license header or the original copyright holder in the source files.
Although the compiler recognizes the comment placed at any location in the source file, the recommendation, and good practice is to put it at the top of the file.
Pragmas
We’ve mentioned the pragma keyword somewhere in the first few articles, but now we’ll use the opportunity to say a few more words about it.
Pragma keyword is the element of the Solidity programming language that enables specific Solidity compiler (remember solc) features or validations, i.e. checks.
As the pragma keyword scope is its source file, we’d have to add the pragma to all our files to enable it in our whole project.
Note: A pragma from an imported file does not apply to the importer file, i.e. the file that imports the imported file.
Version Pragma
We always use a version pragma for limiting the source file(s) compilation to a specific range of compiler versions.
The intention behind this step is the prevention of incompatible changes introduced with future versions of compilers.
According to the Solidity authors, occurrences of incompatible changes are reduced to an absolute minimum, meaning that in all other cases i.e. cases of compatible changes, the changes in Solidity language semantics visibly coincide with the changes in language syntax.
To stay on the safe side, the recommendation is to study the changelog at least for releases that carry breaking changes, marked x.0.0 (major releases) or 0.x.0 (minor releases).
Info: semantic is relating to meaning in language or logic.
As in every our example so far, we’re using the version pragma as:
Note: pragma solidity ^0.x.y; allows changes that do not modify the left-most non-zero digit in the [major, minor, patch] tuple (docs).
The following line instructs the compilation process to use a compiler with the lowest version of 0.5.2 and with the highest version not exceeding 0.6.0 (this condition is incorporated by a ^ symbol):
pragma solidity ^0.5.2;
By recalling the article about semantic versioning, we’ll remember that no breaking changes are introduced until a minor version of 0.6.0 (in this specific case), therefore we can be sure that our code will compile just as we expect it to.
Also, by using the line above, we didn’t lock on the specific version, so the last part of the version label, i.e. the patch number can increase, leaving enough space for the compiler bug fixes.
Besides this most common way of expressing the allowed versions of the compiler, even more, complex rules are available by using the syntax available here.
Note: version pragma just instructs the compiler to self-check if it is compliant with the version required by the source file. In case of a mismatch, the compiler will throw an (in)appropriate error. I mean, who ever saw an appropriate error, anyways?
Conclusion
With this introductory article to the topic of the layout of a Solidity source file, we covered a few very light concepts, including SPDX license identifier, reintroduced the pragma keyword, and retouched the version pragma.
In the next article, we will continue with the next two pragmas and other, very interesting topics.
In the SPDX License Identifier section, we were asking around inconspicuously about the SPDX. We wanted to find out what it is, how and when it is used, and how it can make our developing life easier.
In the Pragmas section, we proudly reminded ourselves of the knowledge from long ago, why do we have to slam a pragma at the beginning of each source file?
If at least they looked nice… Starting our coding masterpieces with a dangling comment seemed like a skewed joke (like most of mine do) – until we learned why
The games is free to keep until Thursday, September 29th, 2022 15:00 UTC.
Next week's freebies: - Runbow - The Drone Racing League Simulator
We are welcoming everyone to join our discord[discord.gg]. We are more active there on finding giveaways, small or large, and there are daily raffles you can participate.
Paris, 1789. The French Revolution has been suppressed with bloodshed by Louis XVI and his merciless mechanical army. Aegis, a mysterious automaton masterpiece, must confront the king's army alone to save history in this challenging action-RPG.



 Programming Challenge: Given a
 Let’s have a look at a slight variant to check the length of the longest list instead.
 At least does the approach also work when passing in an empty list due to the ternary operator used in the first line.
 Note: If you need the length of the longest list, you could simply replace the last line of the function with






 Info:
Info:  Note: A pragma from an imported file does not apply to the importer file, i.e. the file that imports the imported file.