What’s the runtime complexity of various list methods?
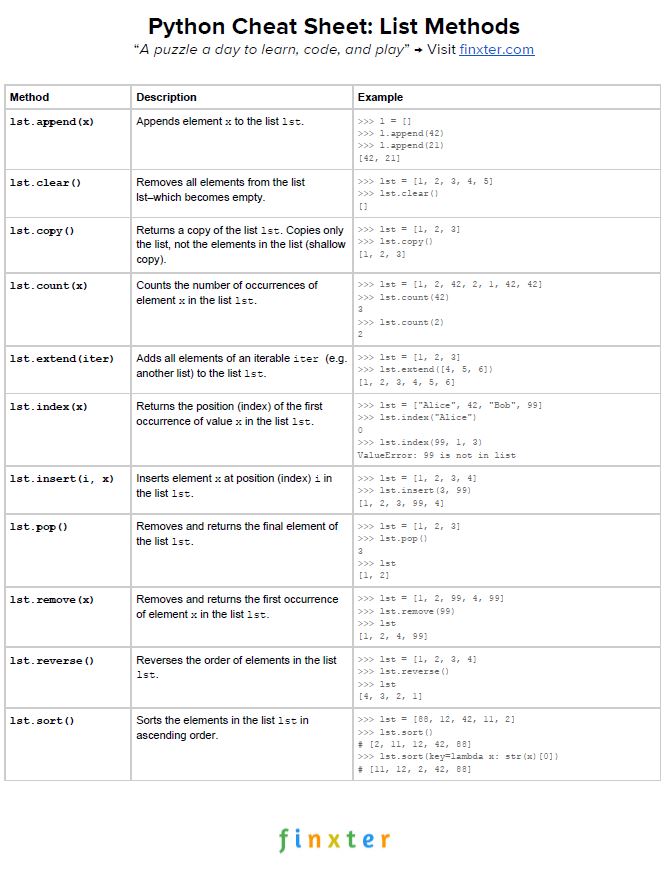
The following table summarizes the runtime complexity of all list methods.
Assume that the length of the data type is defined as n (that is—len(data_type)). You can now categorize the asymptotic complexity of the different complexity functions as follows:
Here’s your free PDF cheat sheet showing you all Python list methods on one simple page. Click the image to download the high-resolution PDF file, print it, and post it to your office wall:
To become successful in coding, you need to get out there and solve real problems for real people. That’s how you can become a six-figure earner easily. And that’s how you polish the skills you really need in practice. After all, what’s the use of learning theory that nobody ever needs?
Practice projects is how you sharpen your saw in coding!
Do you want to become a code master by focusing on practical code projects that actually earn you money and solve problems for people?
Then become a Python freelance developer! It’s the best way of approaching the task of improving your Python skills—even if you are a complete beginner.
In this tutorial, you’ll learn the runtime complexity of different Python operations.
Then, you’ll learn how to calculate the complexity of your own function by combining the complexity classes of its constituents. This is called “static analysis”
The tutorial is loosely based on (source) but it extends it significantly with more practical examples, interactive snippets, and explanatory material.
Introducing Big-O
Definition: The complexity of an operation (or an algorithm for that matter) is the number of resources that are needed to run it (source). Resources can be time (runtime complexity) or space (memory complexity).
So, how can you measure the complexity of an algorithm? In most cases, the complexity of an algorithm is not static. It varies with the size of the input to the algorithm or the operation.
For example, the list method list.sort() has one input argument: the list object to be sorted. The runtime complexity is not constant, it increases with increasing size of the list. If there are more elements to be sorted, the runtime of the algorithm increases.
Complexity Function
Given input size n, you can describe the complexity of your algorithm with a function of the input n → f(n) that defines the number of “resource units” (e.g., time, memory) needed to finish it (worst-case or average-case).
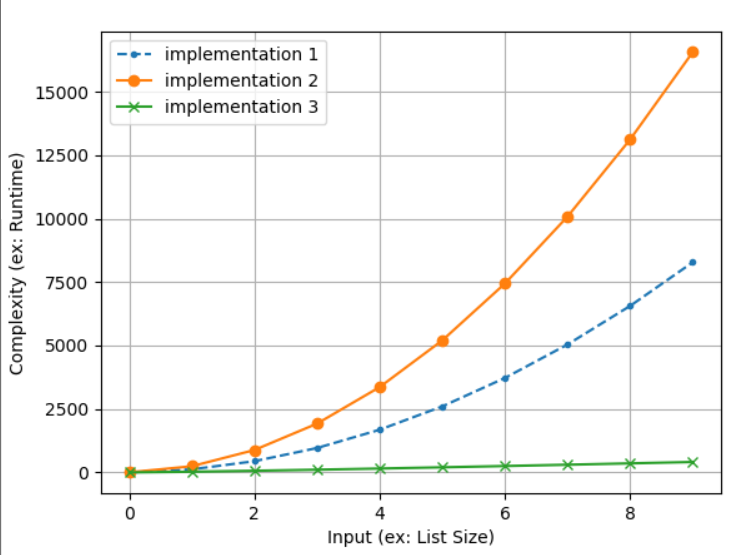
Say, you’ve got three implementations to sort a list: implementation_1, implementation_2, implementation_3.
The figure shows the three complexity functions. The x axis measures the input size (in our example, it would be the list size). The y axis measures the complexity with respect to this input.
implementation_1 has a quadratic complexity function f(n) = n².
implementation_2 has a quadratic complexity function f(n) = 2n².
implementation_3 has a logarithmic complexity function f(n) = n log(n).
You can see the code we used to generate this plot here:
import matplotlib.pyplot as plt
import math implementation_1 = [n**2 for n in range(1, 100, 10)]
implementation_2 = [2*n**2 for n in range(1, 100, 10)]
implementation_3 = [n*math.log(n) for n in range(1, 100, 10)] plt.plot(implementation_1, '--.', label='implementation 1')
plt.plot(implementation_2, '-o', label='implementation 2')
plt.plot(implementation_3, '-x', label='implementation 3') plt.legend()
plt.xlabel('Input (ex: List Size)')
plt.ylabel('Complexity (ex: Runtime)')
plt.grid()
plt.show()
Of course, it’s good to waste as little resources as possible so the logarithmic complexity function is superior to the quadratic complexity functions.
Big-O Notation
For large inputs, the runtime behavior will be dominated by the part of the complexity function that grows fastest. For example, a quadratic runtime complexity function f(n) = 1000n² + 100000n + 999 will be much better than a cubic runtime complexity function g(n) = 0.1n³.
Why? Because sooner or later the function g(n) will produce much higher values than f(n) as the input size n increases.
In fact, you can argue that the only important part of a complexity function is the part that grows fastest with increasing input size.
This is exactly what’s the Big-O notation is all about:
The Big O notation characterizes functions according to their growth rates: different functions with the same growth rate may be represented using the same O notation. (wiki)
Roughly speaking, you remove everything but the fastest-growing term from the complexity function. This allows you to quickly compare different algorithms against each other.
To show this, have a look at our two examples:
Complexity function f(n) = 1000n² + 100000n + 999 grows like O(n²).
Complexity function g(n) = 0.1n³ grows like O(n³).
By reducing the complexity function to its asymptotic growth, you can immediately see that the former is superior to the latter in terms of runtime complexity—without being distracted by all the constant factors in front of the constituents or the constituents with smaller asymptotic growth.
Examples Big-O of Complexity Functions
So, here are a few examples of complexity functions and their asymptotic growth in Big-O notation:
Complexity Function
Asymptotic Growth
f(n) = 10000
O(1)
f(n) = n + 1000000
O(n)
f(n) = 33n + log(n)
O(n log(n))
f(n) = 33n + 4n * log(n)
O(n log(n))
f(n) = n² + n
O(n²)
f(n) = 1000n² + 100000n + 999
O(n²)
f(n) = 0.000000001n³ + 4n² + 100000n + 999
O(n³)
f(n) = n * n³ + 33n
O(n³)
You can see that the asymptotic growth of a function (in Big-O notation) is dominated by the fastest-growing term in the function equation.
Python Complexity of Operations
Let’s explore the complexity of Python operations—classified by the data structure on which you perform those operations. A great coder will always use the data structure that suits their needs best.
In general, the list data structure supports more operations than the set data structure as it keeps information about the ordering of the elements—at the cost of higher computational complexity.
Python List Complexity
Assume that the length of the data type is defined as n (that is—n = len(data_type)). You can now categorize the asymptotic complexity of the different complexity functions as follows:
Tuples are similar as lists—with a few exceptions: you cannot modify a tuple because they are immutable.
Let’s consider another important data structure:
Python Set Complexity
Assume that the length of the data type is defined as n (that is—n = len(data_type)). If there are two sets in a single operation such as s1 == s2, the lengths are given by the variables n1 and n2. You can now categorize the asymptotic complexity of the different complexity functions as follows:
I highlighted the set operations that are more efficient than the corresponding list operations. The reason for those being O(1) rather than O(n) is that the list data structure also maintains the ordering of the elements—which incurs additional overhead.
Python Dictionary Complexity
Now, have a look at the time complexity of Python dictionary operations:
Most operations are O(1) because Python dictionaries share multiple properties of Python sets (such as fast membership operation).
Composing Complexity Classes
Now, you know the complexity of different operations. But how do you obtain the complexity of your algorithm?
The concept is simple: you break the big problem (knowing the complexity of the whole algorithm) into a series of smaller problems (knowing the complexity of individual operations).
Then, you recombine the individual operation’s complexities to obtain the solution to the big problem.
How? Let’s start with a small example: you first get a list from a dictionary of list values. Then you sort the list:
You see in Equation (1) what you could call the “chain rule of complexity analysis”: O(f(n)) + O(g(n)) = O(f(n) + g(n)).
You can see in Equation (3) that the Big-O notation focuses only on the largest growing term. In our case, O(n log n) grows faster than O(2n).
Here are two important examples of Big-O recombination:
O(f(n)) + O(f(n)) = O(f(n) + f(n)) = O(2f(n)) = O(f(n). In other words, Executing an operation a constant (fixed) number of times, doesn’t change the overall complexity of the algorithm.
O(f(n) + g(n)) = O(f(n)) if the complexity function f(n) grows faster than g(n). An example is O(n³ + 1000n³) = O(n³).
In programming, you can also have conditional execution:
if condition: f(n)
else: g(n)
You can recombine the complexity class of the overall code snippet as follows: O(max(f(n), g(n)). Roughly speaking, (if the condition can be true), the complexity of the conditional execution is the maximum of both blocks f(n) or g(n).
Example:
if lst: lst.sort()
else: lst = [1, 2, 3, 4]
The complexity is O(n log n) because it grows faster than O(n) — the complexity of the block in the else statement.
Another possibility is to repeatedly execute a certain function (e.g., in a for loop).
If you repeat function f(n)m times, the computational complexity is m * O(f(n)) = O(m f(n)). If m is a constant, the computational complexity simplifies to O(f(n)).
Where to Go From Here?
Enough theory, let’s get some practice!
To become successful in coding, you need to get out there and solve real problems for real people. That’s how you can become a six-figure earner easily. And that’s how you polish the skills you really need in practice. After all, what’s the use of learning theory that nobody ever needs?
Practice projects is how you sharpen your saw in coding!
Do you want to become a code master by focusing on practical code projects that actually earn you money and solve problems for people?
Then become a Python freelance developer! It’s the best way of approaching the task of improving your Python skills—even if you are a complete beginner.
A wildly popular operation you’ll find in any (non-trivial) code base is to concatenate lists—but there are multiple methods to accomplish this. Master coders will always choose the right method for the right problem.
This tutorial shows you the difference between three methods to concatenate lists:
Concatenate two lists with the + operator. For example, the expression [1, 2, 3] + [4, 5] results in a new list [1, 2, 3, 4, 5]. More here.
Concatenate two lists with the += operator. This operation is inplace which means that you don’t create a new list and the result of the expression lst += [4, 5] is to add the elements on the right to the existing list object lst. More here.
Concatenate two lists with the extend() method of Python lists. Like +=, this method modifies an existing list in place. So the result of lst.extend([4, 5]) adds the elements 4 and 5 to the list lst. More here.
To summarize: the difference between the + method and the += and extend() methods is that the former creates a new list and the latter modify an existing list object in-place.
You can quickly compare those three methods in the following interactive code shell:
Puzzle: Can you already figure out the outputs of this code snippet?
Fear not if you can’t! I’ll explain you each detailed example next.
Method 1: Add (+)
The standard way of adding two lists is to use the + operator like this:
While the + operator is the most readable one (especially for beginner coders), it’s not the best choice in most scenarios. The reason is that it creates a new list each time you call it. This can become very slow and I’ve seen many practical code snippets where the list data structure used with the + operator is the bottleneck of the whole algorithm.
In the above code snippet, you create two list objects in memory—even though your goal is probably just to update the existing list ['Alice', 'Bob', 'Ann'].
This can be nicely demonstrated in the code visualization tool:
Just keep clicking “Next” until the second list appears in memory.
Method 2: INPLACE Add (+=)
The += operator is not well understood by the Python community. Many of my students (join us for free) believe the add operation lst += [3, 4] is just short for lst = lst + [3, 4]. This is wrong and I’ll demonstrate it in the following example:
Again, you can visualize the memory objects with the following interactive tool (click “Next”):
The takeaway is that the += operation performs INPLACE add. It changes an existing list object rather than creating a new one. This makes it more efficient in the majority of cases. Only if you absolutely need to create a new list, you should use the + operator. In all other cases, you should use the += operator or the extend() method.
Speaking of which…
Method 3: Extend()
Like the previous method +=, the list.extend(iterable) method adds a number of elements to the end of a list. The method operators in-place so no new list object is created.
Click “Next” and explore how the memory allocation “unfolds” as the execution proceeds.
Speed Comparison Benchmark
Having understood the differences of the three methods + vs += vs extend(), you may ask: what’s the fastest?
To help you understand why it’s important to choose the best method, I’ve performed a detailed speed benchmark on my Intel i7 (8th Gen) Notebook (8GB RAM) concatenating lists with increasing sizes using the three methods described previously.
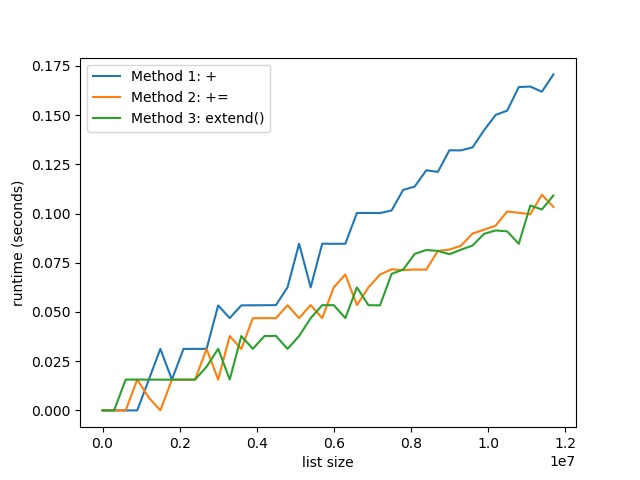
Here’s the result:
The plot shows that with increasing list size, the runtime difference between the + method (Method 1), and the += and extend() methods (Methods 2 and 3) becomes increasingly evident. The former creates a new list for each concatenation operation—and this slows it down.
Result: Thus, both INPLACE methods += and extend() are more than 30% faster than the + method for list concatenation.
You can reproduce the result with the following code snippet:
To become successful in coding, you need to get out there and solve real problems for real people. That’s how you can become a six-figure earner easily. And that’s how you polish the skills you really need in practice. After all, what’s the use of learning theory that nobody ever needs?
Practice projects is how you sharpen your saw in coding!
Do you want to become a code master by focusing on practical code projects that actually earn you money and solve problems for people?
Then become a Python freelance developer! It’s the best way of approaching the task of improving your Python skills—even if you are a complete beginner.
I’m thrilled to announce that Blazor WebAssembly is now officially released. This is a fully-featured and supported release of Blazor WebAssembly that is ready for production use. Full stack web development with .NET is now here!
Get started
Getting started with Blazor WebAssembly is easy: simply go to https://blazor.net and install the latest .NET Core SDK (3.1.300 or later), which includes everything you need to build and run Blazor WebAssembly apps.
You can then create and run your first Blazor WebAssembly app by running:
dotnet new blazorwasm -o BlazorApp1
cd BlazorApp1
dotnet run
Browse to https://localhost:5001 and voilà! You’ve just built and run your first Blazor WebAssembly app!
To maximize your Blazor productivity, be sure to install a supported version of Visual Studio for your platform of choice:
If you already have an existing Blazor WebAssembly project, you can upgrade it from the 3.2.0 Release Candidate to the official 3.2.0 release by doing the following:
Update all Microsoft.AspNetCore.Components.WebAssembly.* and System.Net.Http.Json package references to version 3.2.0.
That’s it, you’re all set!
What is Blazor WebAssembly?
In case this is your first time learning about Blazor, let me introduce you to what Blazor WebAssembly is all about.
Blazor is an open source and cross-platform web UI framework for building single-page apps using .NET and C# instead of JavaScript. Blazor is based on a powerful and flexible component model for building rich interactive web UI. You implement Blazor UI components using a combination of .NET code and Razor syntax: an elegant melding of HTML and C#. Blazor components can seamlessly handle UI events, bind to user input, and efficiently render UI updates.
Blazor components can then be hosted in different ways to create your web app. The first supported way is called Blazor Server. In a Blazor Server app, the components run on the server using .NET Core. All UI interactions and updates are handled using a real-time WebSocket connection with the browser. Blazor Server apps are fast to load and simple to implement. Support for Blazor Server is available with .NET Core 3.1 LTS.
Blazor WebAssembly is now the second supported way to host your Blazor components: client-side in the browser using a WebAssembly-based .NET runtime. Blazor WebAssembly includes a proper .NET runtime implemented in WebAssembly, a standardized bytecode for the web. This .NET runtime is downloaded with your Blazor WebAssembly app and enables running normal .NET code directly in the browser. No plugins or code transpilation are required. Blazor WebAssembly works with all modern web browsers, both desktop and mobile. Similar to JavaScript, Blazor WebAssembly apps run securely on the user’s device from within the browser’s security sandbox. These apps can be deployed as completely standalone static sites without any .NET server component at all, or they can be paired with ASP.NET Core to enable full stack web development with .NET, where code can be effortlessly shared with the client and server.
Fully-featured
Blazor WebAssembly comes packed with features to keep you productive on your next web app project:
Blazor in action
Blazor WebAssembly has everything you need to build fully-featured production web apps. To see all these Blazor WebAssembly features in action, checkout Steve Sanderson’s on-demand BUILD session (link should be live after 12pm PT): Modern Web UI with Blazor WebAssembly.
Ready-made components
Of course, any web app is going to need beautiful and feature rich components. A variety of Blazor UI components are available from our fantastic partners that work great in any Blazor app, including Blazor WebAssembly apps:
Open-source community
Blazor also has a thriving open-source community and ecosystem. Members of the community, (folks just like you!) have built lots of great component libraries, interop libraries, test frameworks, and more, and then made them freely available for you to use. Some great examples include:
Blazor WebAssembly 3.2.0 is a fully supported release under the .NET Core Support Policy. Since this is the first release of Blazor WebAssembly, it is a Current release, not an LTS release; it does not the inherit LTS status of .NET Core 3.1. This means that once Blazor WebAssembly ships with .NET 5 later this year, you will need to upgrade to .NET 5 to stay in support. We expect Blazor in .NET 5 to be a highly compatible release.
What’s next?
Now that we have shipped Blazor WebAssembly, we are shifting our attention to .NET 5. Work has already started on making Blazor WebAssembly available with .NET 5, which we expect to complete for preview next month.
We also have a number of Blazor features and improvements that we are investigating for the .NET 5 & 6 wave. You can see the list of core deliverables that we are considering in the Blazor Roadmap for .NET 5 issue on GitHub. Please note that we consider this list to be highly aspirational. While we hope to deliver all of the improvements listed, there are still many unknown and plans will certainly change as we go. We also expect that there will be plenty of smaller improvements that we will deliver as well.
We are also continuing to collaborate with our friends on the Xamarin team on experimental support for building native UI using Blazor through the Mobile Blazor Bindings project. This includes some early efforts to explore building hybrid UI for native apps, which we hope to share more about soon.
Thank you
We sincerely appreciate all the enthusiastic support we have received from the Blazor community as we’ve worked to make the release a reality. The number of Blazor articles, blog posts, docs, sample apps, libraries, books, videos, presentations, workshops, courses, meetups, feature suggestions, and feedback issues that have been contributed by the community to the Blazor ecosystem even while it was still in preview has been truly outstanding. To everyone who helped make this release possible, thank you! We couldn’t have done it without you.
Try Blazor today
We hope you enjoy this release of Blazor WebAssembly. Give Blazor a try today by going to https://blazor.net. We look forward to seeing what you create with it.
As always, if you have any questions of feedback about Blazor please let us know by filing an issue on GitHub.
That’s it! You should now be all set to use .NET 5 Preview 4.
What’s new?
Performance Improvements to HTTP/2
By adding support for HPack dynamic compression of HTTP/2 response headers in Kestrel, the 5.0.0-prevew4 release improves the performance of HTTP/2. For more information on how HPACK helps save bandwidth and help reduce latency, we recommend reading this excellent write-up by the team at CloudFlare.
Reduction in container image sizes
The canonical multi-stage Docker build for ASP.NET Core involves pulling both the SDK image and ASP.NET Core runtime image. By re-platting the SDK image upon the ASP.NET runtime image, we’re sharing layers between the two images. This dramatically reduces the size of the aggregate images that you pull. For more information about the size improvements and other container enhancements, check out the .NET 5 Preview 4 blog post
See the release notes for additional details and known issues.
Give feedback
We hope you enjoy this release of ASP.NET Core in .NET 5! We are eager to hear about your experiences with this latest .NET 5 release. Let us know what you think by filing issues on GitHub.
Want to boost your Python skills to the next level as an intermediate coder? Want to know how to overcome being stuck at average coding level? Do you enjoy solving puzzles?
We’re excited to release a new fresh, and tough Finxter book with 99 never-seen Python puzzles. It’s the hardest one in our Coffee Break Python series.
IF YOU CAN DO IT THERE, YOU CAN DO IT EVERYWHERE!
If you want to download a 50-page sample of the book for FREE, you’re on the right spot:
Title: Coffee Break Python – Mastery Workout
Subtitle: 99 Tricky Python Puzzles to Push You to Programming Mastery
YouTube is a great way of learning Python. But those channels top all others. In this article, you’ll find a list of the top YouTube Channels — in reverse order!
Channel Description: This channel is focused on creating tutorials and walkthroughs for software developers, programmers, and engineers. We cover topics for all different skill levels, so whether you are a beginner or have many years of experience, this channel will have something for you.
We’ve already released a wide variety of videos on topics that include: Python, Git, Development Environments, Terminal Commands, SQL, Programming Terms, JavaScript, Computer Science Fundamentals, and plenty of other tips and tricks which will help you in your career.
Channel Description: You can find awesome programming lessons here! Also, expect programming tips and tricks that will take your coding skills to the next level.
Channel Description: On this channel you’ll get new Python videos and screencasts every week. They’re bite-sized and to the point so you can fit them in with your day and pick up new Python skills on the side:
Channel Description: Socratica makes high-quality educational videos on math and science. The videos are …. different. Check them out to see what I mean!
Channel Description: Python Programming tutorials, going further than just the basics. Learn about machine learning, finance, data analysis, robotics, web development, game development and more.
These are the best Python channels on YouTube. Check them out, there’s an infinite number of YT videos that will make you a better coder — for free!
The Finxter Channel
You may also check out the Finxter channel which is a small Python Business related channel. If you want to improve your Python business skills, this channel is for you!
Want to create your own webserver in a single line of Python code? No problem, just use this command in your shell:
$ python -m http.server 8000
The terminal will tell you:
Serving HTTP on 0.0.0.0 port 8000
To shut down your webserver, kill the Python program with CTRL+c.
This works if you’ve Python 3 installed on your system. To check your version, use the command python --version in your shell.
You can run this command in your Windows Powershell, Win Command Line, MacOS Terminal, or Linux Bash Script.
You can see in the screenshot that the server runs on your local host listening on port 8000 (the standard HTTP port to serve web requests).
Note: The IP address is NOT 0.0.0.0—this is an often-confused mistake by many readers. Instead, your webserver listens at your “local” IP address 127.0.0.1 on port 8000. Thus, only web requests issued on your computer will arrive at this port. The webserver is NOT visible to the outside world.
Python 2: To run the same simple webserver on Python 2, you need to use another command using SimpleHTTPServerinstead of http:
$ python -m SimpleHTTPServer 8000
Serving HTTP on 0.0.0.0 port 8000 ...
If you want to start your webserver from within your Python script, no problem:
import http.server
import socketserver PORT = 8000 Handler = http.server.SimpleHTTPRequestHandler with socketserver.TCPServer(("", PORT), Handler) as httpd: print("serving at port", PORT) httpd.serve_forever()
You can execute this in our online Python browser (yes, you’re creating a local webserver in the browser—how cool is that)!
This code comes from the official Python documentation—feel free to read more if you’re interested in setting up the server (most of the code is relatively self-explanatory).
Where to Go From Here?
Enough theory, let’s get some practice!
To become successful in coding, you need to get out there and solve real problems for real people. That’s how you can become a six-figure earner easily. And that’s how you polish the skills you really need in practice. After all, what’s the use of learning theory that nobody ever needs?
Practice projects is how you sharpen your saw in coding!
Do you want to become a code master by focusing on practical code projects that actually earn you money and solve problems for people?
Then become a Python freelance developer! It’s the best way of approaching the task of improving your Python skills—even if you are a complete beginner.
Python’s Tilde ~n operator is the bitwise negation operator: it takes the number n as binary number and “flips” all bits 0 to 1 and 1 to 0 to obtain the complement binary number. For example, the tilde operation ~1 becomes 0 and ~0 becomes 1 and ~101 becomes 010.
Sometimes, you’ll see the tilde operator in a Pandas DataFrame for indexing. Here’s an example:
import pandas as pd # Create a DataFrame
df = pd.DataFrame([{'User': 'Alice', 'Age': 22}, {'User': 'Bob', 'Age': 24}])
print(df) ''' User Age
0 Alice 22
1 Bob 24 ''' # Use Tilde to access all lines where user doesn't contain 'A'
df = df[~df['User'].str.contains('A')]
print(df) ''' User Age
1 Bob 24 '''
To improve your practical understanding, feel free to run this code in your browser in our interactive Python shell:
The tilde operator negates the Boolean values in the DataFrame: True becomes False and False becomes True.
You can see this in action when printing the result of different operations:
This is the original DataFrame in the code:
print(df) ''' User Age
0 Alice 22
1 Bob 24 '''
Now apply the contains operation to find all user names that contain the character 'A'.
Now, we use this DataFrame to access only those rows with users that don’t contain the character 'A'.
df = df[~df['User'].str.contains('A')]
print(df) ''' User Age
1 Bob 24 '''
Where to Go From Here?
Enough theory, let’s get some practice!
To become successful in coding, you need to get out there and solve real problems for real people. That’s how you can become a six-figure earner easily. And that’s how you polish the skills you really need in practice. After all, what’s the use of learning theory that nobody ever needs?
Practice projects is how you sharpen your saw in coding!
Do you want to become a code master by focusing on practical code projects that actually earn you money and solve problems for people?
Then become a Python freelance developer! It’s the best way of approaching the task of improving your Python skills—even if you are a complete beginner.
To add an element to a given Python list, you can use either of the three following methods:
Use the list insert method list.insert(index, element).
Use slice assignmentlst[index:index] = [element] to overwrite the empty slice with a list of one element.
Use list concatenation with slicing lst[:2] + ['Alice'] + lst[2:] to create a new list object.
In the following, you’ll learn about all three methods in greater detail. But before that, feel free to test those yourself in our interactive Python shell (just click “Run” to see the output):
Method 1: insert(index, element)
The list.insert(i, element) method adds an element element to an existing list at position i. All elements j>i will be moved by one index position to the right.
Here’s an example with comments:
# Create the list
lst = [2, 4, 6, 8] # Insert string at index 2
lst.insert(2, 'Alice') # Print modified list object
print(lst)
# [2, 4, 'Alice', 6, 8]
Properties of insert()
Operates on existing list object
Simple
Fast
Check out the objects in memory while executing this code snippet (in comparison to the other methods discussed in this article):
Click “Next” to move on in the code and observe the memory objects creation.
If you use the + operator on two integers, you’ll get the sum of those integers. But if you use the + operator on two lists, you’ll get a new list that is the concatenation of those lists.
Here’s the same example, you’ve already seen in the previous sections:
# Create the list
lst = [2, 4, 6, 8] # Insert string at index 2
lst = lst[:2] + ['Alice'] + lst[2:] # Print modified list object
print(lst)
# [2, 4, 'Alice', 6, 8]
To become successful in coding, you need to get out there and solve real problems for real people. That’s how you can become a six-figure earner easily. And that’s how you polish the skills you really need in practice. After all, what’s the use of learning theory that nobody ever needs?
Practice projects is how you sharpen your saw in coding!
Do you want to become a code master by focusing on practical code projects that actually earn you money and solve problems for people?
Then become a Python freelance developer! It’s the best way of approaching the task of improving your Python skills—even if you are a complete beginner.