Believe it or not—how you answer this question in your day-to-day code reveals your true Python skill level to every master coder who reads your code.
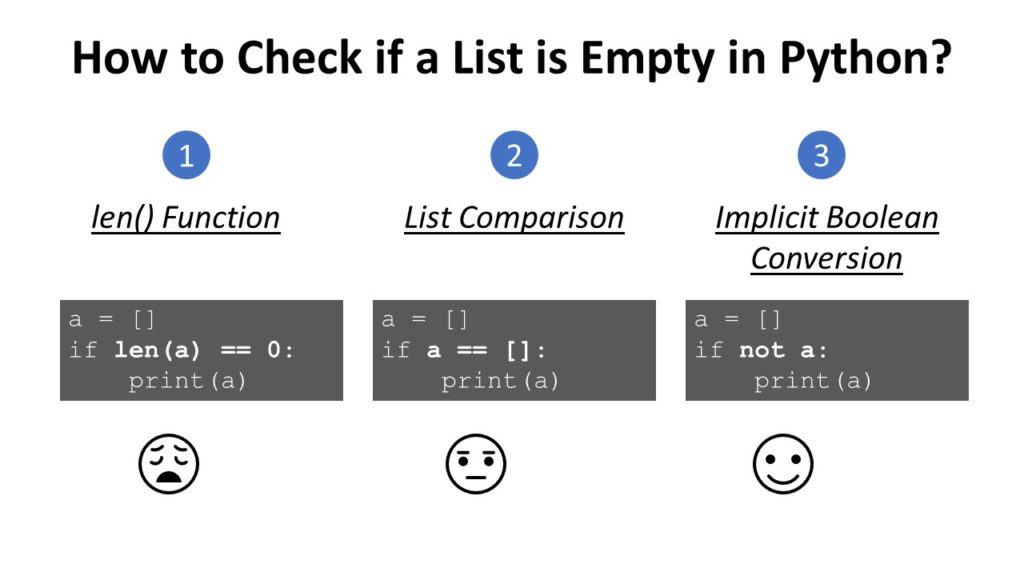
Beginner coders check if a list a is empty using crude statements like len(a)==0 or a==[]. While those solve the problem—they check if a list is empty—they are not what a master coder would do. Instead, the most Pythonic way to check if a list (or any other iterable for that matter) is empty is the expression not a.
You may call it implicit Booleanness (or, more formal, type flexibility): every object in Python can be implicityl converted into a truth value.
Here’s an example in our interactive Python shell—try it yourself!
Exercise: What’s the output of the code if you add one element to the list a?
Truth Value Testing and Type Flexibility
Python implicitly associates any object with a Boolean value. Here are some examples:
The integers 1, 2, and 3 are associated to the Boolean True.
The integer 0 is associated to the Boolean False.
The strings 'hello', '42', and '0' are associated to the Boolean True.
The empty string '' is associated to the Boolean False.
Roughly speaking, each time a Boolean value is expected, you can throw in a Python object instead. The Python object will then be converted to a Boolean value. This Boolean value will be used to decide whether to enter, say, a while loop or an if statement. This is called “type flexibility” and it’s one of Python’s core design choices.
Per default, all objects are considered True if they are semantically non-empty. Empty objects are usually associated to the Boolean False. More specifically, only if one of the two cases is met, will the result of an object be False: (i) the __len__() function returns 0, or (ii) the __bool__() function returns False. You can redefine those two methods for each object.
From the Python documentation, here are some common objects that are associated to the Boolean False:
Defined constants: None and False.
Zero of numerical types: 0, 0.0, 0j, Decimal(0), Fraction(0, 1)
Empty iterables: '', (), [], {}, set(), range(0)
Here are some examples:
if []: print('1') if (): print('2') if [()]: print('3')
# 3 if 0: print('4') if 0.00: print('5') if 0.001: print('6')
# 6 if set(): print('7') if [set()]: print('8')
# 8
Again, even if the iterable contains only a single element (that may evaluate to False like integer 0), the implicit Boolean conversion will return True because an empty element is an element nonetheless.
PEP8 Recommendation: How to Check if a List is Empty
As some readers argued with me about how to correctly check for an empty list in Python, here‘s the explicit excerpt from the PEP8 standard (Python’s set of rules about how to write readable code):
For sequences, (strings, lists, tuples), use the fact that empty sequences are false:
# Correct:
if not seq:
if seq:
# Wrong:
if len(seq):
if not len(seq):
Performance Evaluations
To see which of the three methods is fastest, I repeated each method 100 times using the timeit library on my notebook with Intel Core i7 (TM) CPU of 8th Generation, 8GB RAM—yes, I know—and NVIDIA Graphic Card (not that it mattered).
The third method is the most Pythonic one with type flexibility. We measure the elapsed time of 100 executions of each method. In particular, we’re interested in the average time and the variance of the elapsed time. Both should be minimal.
Our thesis is that the third, most Pythonic method is also the fastest because there’s no need to create a new empty list (like in method 2) or performing nested function calls like in method 1. Method 3 consists only of a single function call: converting the list into a Boolean value with the __bool__ or __len__ methods.
Here’s the result in terms of elapsed average runtime and variance of the runtimes:
Method 1: len(a) == 0
avg: 0.06273576400000003
var: 0.00022597495215430347 Method 2: a == []
avg: 0.034635367999999944
var: 8.290137682917488e-05 Method 3: not a
avg: 0.017685209000000004
var: 6.900910317342067e-05
You can see that the third method is not only 50% faster than method 2 and 75% faster than method 3, it also has very little variance. It’s clearly the best method in terms of runtime performance. Being also the shortest method, you can now see why the method is considered to be most “Pythonic”.
Where to Go From Here?
Enough theory, let’s get some practice!
To become successful in coding, you need to get out there and solve real problems for real people. That’s how you can become a six-figure earner easily. And that’s how you polish the skills you really need in practice. After all, what’s the use of learning theory that nobody ever needs?
Practice projects is how you sharpen your saw in coding!
Do you want to become a code master by focusing on practical code projects that actually earn you money and solve problems for people?
Then become a Python freelance developer! It’s the best way of approaching the task of improving your Python skills—even if you are a complete beginner.
In Python, there are always multiple ways to accomplish the same thing—but with subtle differences in the side effects. A great coder will always choose the most effective way for the problem at hand.
This tutorial shows you six different ways to add elements to a list in Python. In a nutshell, the different ways to add one or more elements to a list are:
append(): add a single element to an existing list.
extend(): add multiple elements to an existing list.
insert(): add an element at an arbitrary position in an existing list.
Try It Yourself: Before we dive into each of those methods, let’s try them yourself in our interactive Python shell!
Exercise: Use each method to add yet another integer element 42 to each list. Which method is the best one to add multiple elements?
Next, you’ll learn about each method in a video tutorial and short example code snippet. I’ve written in-depth articles for each method so feel free to follow the references given in each method.
Method 1: append()
The list.append(x) method—as the name suggests—appends element x to the end of the list. You can call this method on each list object in Python. Here’s the syntax:
The list.extend(iter) method adds all elements in the argument iterable iter to an existing list. You can call this method on each list object in Python. Here’s the syntax:
list.extend(iterable)
Argument
Description
iterable
All the elements of the iterable will be added to the end of the list—in the order of their occurrence.
The list.insert(i, element) method adds an element element to an existing list at position i. All elements j>i will be moved by one index position to the right. You can call this method on each list object in Python. Here’s the syntax:
list.insert(index, element)
Argument
Description
index
Integer value representing the position before you want to insert an element
Slice assignment is a little-used, beautiful Python feature to replace a slice with another sequence. Simply select the slice you want to replace on the left and the values to replace it on the right side of the equation. For example, the slice assignment list[2:4] = [42, 42] replaces the list elements with index 2 and 3 with the value 42.
If you use the + operator on two integers, you’ll get the sum of those integers. But if you use the + operator on two lists, you’ll get a new list that is the concatenation of those lists.
There are many applications of the asterisk operator. But one nice trick is to use it as an unpacking operator that “unpacks” the contents of a container data structure such as a list or a dictionary into another one.
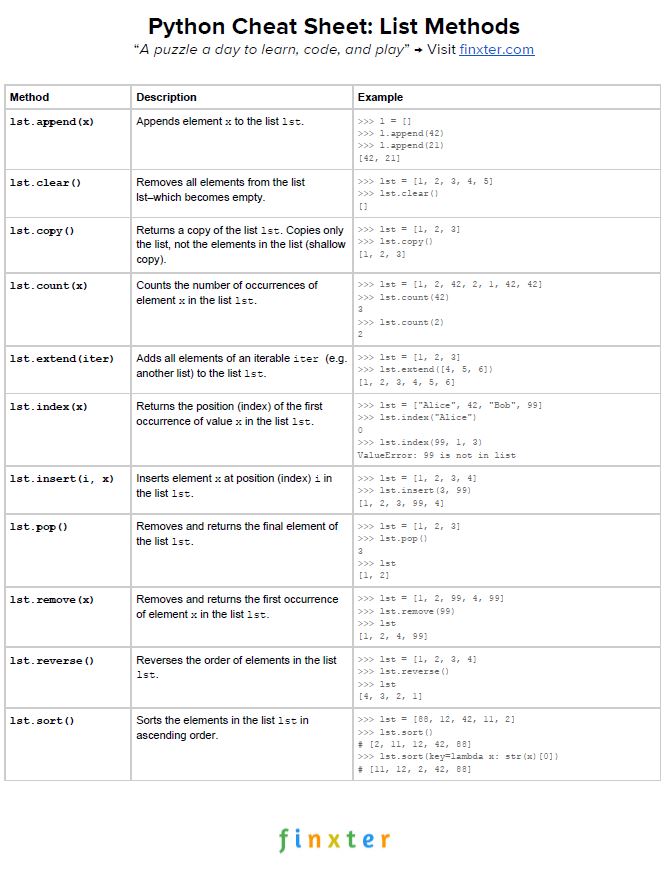
Here’s your freePDF cheat sheet showing you all Python list methods on one simple page. Click the image to download the high-resolution PDF file, print it, and post it to your office wall:
Let’s summarize the strengths and weaknesses of the different methods:
Use the append() method to add a single element to an existing list without creating a new list.
Use the extend() method to add multiple elements to an existing list without creating a new list.
Use the insert() method to add an element at an arbitrary position in the list—without creating a new list.
Use slice assignment to replace a slice of an existing list—without creating a new list.
Use list concatenation with + to add one or more elements to a list—if you want to create a new list.
Use the asterisk operator * to unpack multiple iterables into a new list—if you want to create a new list.
Where to Go From Here?
Enough theory, let’s get some practice!
To become successful in coding, you need to get out there and solve real problems for real people. That’s how you can become a six-figure earner easily. And that’s how you polish the skills you really need in practice. After all, what’s the use of learning theory that nobody ever needs?
Practice projects is how you sharpen your saw in coding!
Do you want to become a code master by focusing on practical code projects that actually earn you money and solve problems for people?
Then become a Python freelance developer! It’s the best way of approaching the task of improving your Python skills—even if you are a complete beginner.
In this article, we will completely ignore the coding technicalities and syntax for a change. We’ll focus on time and work management, which represents a significant portion of a skillset of well-rounded and successful companies and individuals.
Disclaimer: A clear distinction between project and product management might be blurred in some organizations, and could be a topic for another short blog. Therefore, without further ado, we shall be using “project management” terminology for this blog.
Software engineering consists of creative problem solving and innovation. Almost daily, coders and developers face new challenges or problems that they’ve never solved before.
Software engineering as a filed involves minimal routine and, therefore, a higher degree of uncertainty or variety not only towards HOW to solve a specific problem but often also about WHAT exactly needs to be solved.
To be successful, good time and work management are essential. Let’s begin with a few statements which we will expand on as we go along:
Time and work management is a skill. And, as with any other skill, you can learn it.
Even the world’s best coder is useless without good work or time management—regardless whether they’re working as a freelancer or an employee in a development team).
Management is a highly transferable skill: you can apply it in almost any field.
Overview
You can use and take advantage of several project management frameworks, approaches, and concrete techniques. Their advantages and disadvantages are a common topic for debate, which we’ll try and avoid addressing in this blog. The topic quickly becomes highly complex, and very rarely is there an ultimate right answer as to which approaches, techniques, or methods are the best. In reality, it depends on a wide variety of factors such as type of the project, spectrum of personalities of people involved, management skills, company policies, etc.
There are three ultimate truths to keep in mind:
Each method possesses certain elements that are suitable to adopt or use in a particular project.
No plan and no structure leads to anarchy.
If you have to apply any method because the framework you’ve chosen tells you so, you’re doing it wrong! Every management method you choose to implement should be at your service and help you optimize your workflow.
Many would argue that project management approaches are “brand-named common sense”: recently, names were put to processes that happened naturally.
In this sense, we mostly speak of three approaches:
Traditional or “waterfall” model,
Agile methodologies, and
Lean software development methods.
Related: You can read more about the most common methodologies in this article, which includes summaries and also links to external resources.
Traditional Waterfall Methodology
Waterfall is the most traditional approach and is mainly plan-driven, meaning that a substantial amount of time is spent on planning at first.
Once all requirements are well-defined, there comes a design phase. There, all requirements are translated into technical language, meaning how they would be implemented or accomplished.
This is followed by an implementation phase, where all functionalities are actually implemented according to what’s been outlined so far.
Once all is implemented, there is a verification and testing phase takes place where all functionalities are double-checked and verified.
Upon completion, the product is deployed, which is followed by a maintenance phase. This approach is very well established, repeatedly proving itself as the most useful in projects where the goal is apparent, and the team knows how to get there.
Agile Methodologies
A whole family of agile methodologies and frameworks are all designed around the same baseline, challenging the high rigidity (or lack of flexibility) of the waterfall model. Agile approaches are designed to accommodate changes that inevitably happen as we learn new things during development. Agile approaches allow for re-planning and strongly rely on people’s communication, transparency, commitment, common goals, and values over a fixed plan.
Agile methodologies mostly apply in projects where the degree of uncertainty and complexity are high.
To this category, we can attach projects that are on the high end of innovation, where we don’t know what they will become, what impact they will have, and we might need to re-direct or focus as we go along so we can match the audience’s expectations.
On the other hand, we have highly complex projects that are out of our scope of skills. We are attempting to develop something we’ve never done before, which makes our early planning highly inaccurate.
According to Google trends, the term “Scrum framework” has undergone an increasing interest over the past decade.
Scrum is a variant of an agile approach that puts the development team on its front page. It assumes that the most efficient way of working is having small, “self-officiating” and self-organizing teams (up to 9 people) with a few key roles. The development process relies on incremental work of short periods (“sprints”), where the goal of each period (sprint) is to come up with a concluded deliverable (“increment”) that maximizes the final product’s value.
Scrum is people-oriented and assumes small groups working together. It is purposefully defined in a lightweight way, and it highly relies on people’s character. The values that are promoted are values of commitment, courage, focus, openness, and respect. It is assumed that people in organizations that practice scrum framework would in time adopt those values and live by them: commit to a common goal, always do the right thing and maintain transparent and respectful relationships with their fellow team members. It is also assumed that a scrum team consists of people with all necessary relevant skills to complete the work.
Following this principle, the size of the scrum team is strictly limited to between 3 and 9 people. Fewer than three would increase the probability of lacking skills to complete the work, whereas having more than nine people makes the communication too complicated.
The main roles defined in a scrum team are:
The product owner is responsible for maximizing the product’s value under development, managing the product backlog, and ensuring the development team understands it. The product owner is NOT a part of the development team.
The Scrum master: facilitates the scrum principles among the scrum team by promoting the rules, values, and practices of Scrum. Scrum master is also a part of the development team.
The development team: professionals who deliver a potentially releasable increment at the end of each sprint (what those can be read in the next section)
No member of the Scrum team is superior on inferior to another in this core definition.
Scrum Events
Scrum frameworks have clearly defined events during work execution. All product features are kept and prioritized in a product backlog (managed by the product owner).
Activities are executed through sprints, a max. 4 weeks long periods during which an increment is designed, developed, tested, and delivered. In this case, the increment represents a small enough feature or development step that can be completed and declared as “done” in one sprint. Bigger chunks of work are sensibly broken down into smaller pieces.
Every sprint begins with a sprint planning session where a sprint backlog is created. The development team then performs daily scrum/stand-up where they plan the work for the next 24h. When the sprint comes to an end, and an increment is developed, the sprint review session is held. There, all stakeholders (also external ones) review what was done and together refine the product backlog. The development team on their own finally hold a sprint retrospective where the point of debate is to answer questions like “how can we function better as a team?” or “what would make our work more enjoyable?”. It’s more work-oriented rather than product-oriented.
How formal are these roles, and how much are they worth? According to Glassdoor, a Scrum product owner’s annual salary is between 90k and 120k USD, whereas the Scrum Master’s salary is between 90k and 100k USD (source).
Conclusion
Any organization you will be involved with will practice a different methodology. Mastering the skill of using the values, structures, or disciplines promoted in any of these frameworks is highly transferable. Values promoted in Scrum can be useful in any other environment, even in your private life.
There are much doubt and debate about whether scrum principles are too vague. It is being argued that they have to be so vastly modified to be implemented in a work environment among different organizations, that they are often largely decoupled from the “rulebook” of Scrum. Secondly, some organizations had trouble translating principles of scrum framework into reality, arguing that it took a very long time. It can be hard to make it work with the people who are not open to changes. Many people don’t want to alter their well-functioning ways of working just to fit the model.
In reality, scrum practice is as challenging to master as any other. Clearly, lack of understanding or competence in this field can adversely affect your business. To function properly, Scrum must be adopted corporate-wide.
All of these models put the messiness of reality into a model or framework of actions and relationships that might fit your business. It is up to you to decide whether to adopt them or not and to what extent. Adhering to the principles of one is the most useful step to make at a certain point. The ultimate goal is to tweak and tune your project management to make it the most compatible with your technical skills, marketing, and all other skills that complete you as a freelancer, business owner, or team member in general.
About the Author
Luka Banović is a full-time engineering project manager at IRNAS LTD in Slovenia (and also a Finxter). A line of experience in engineering project leading has taught him many perks of this job, and he is happy to share some ideas with the Finxter community.
If you’re like me, you try things first in your code and fix the bugs as they come. One frequent bug in Python is the IndexError: list index out of range. So, what does this error message mean?
The error “list index out of range” arises if you access invalid indices in your Python list. For example, if you try to access the list element with index 100 but your lists consist only of three elements, Python will throw an IndexError telling you that the list index is out of range.
Let’s have a look at an example where this error arises:
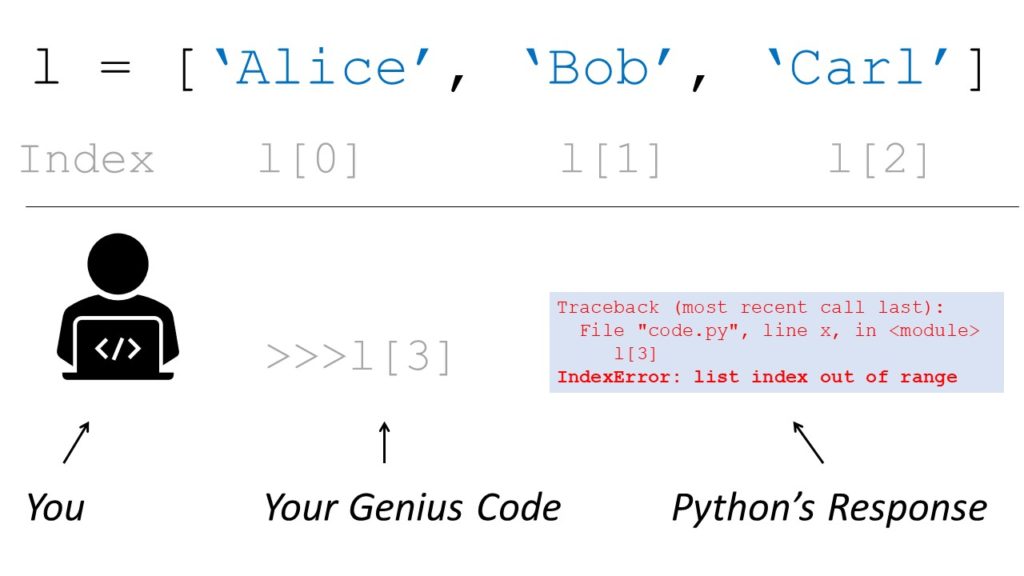
lst = ['Alice', 'Bob', 'Carl']
print(lst[3])
The element with index 3 doesn’t exist in the list with three elements. Why is that? The following graphic shows that the maximal index in your list is 2. The call lst[2] would retrieve the third list element 'Carl'. Did you try to access the third element with index 3? It’s a common mistake: The index of the third element is 2 because the index of the first list element is 0.
lst[0] –> Alice
lst[1] –> Bob
lst[2] –> Carl
lst[3] –> ??? Error ???
Try It Yourself: Before I tell you what to do about it, try to fix the code yourself in our interactive Python shell:
Exercise: Fix the code in the interactive code shell to get rid of the error message.
How to Fix the IndexError in a For Loop? [General Strategy]
So, how can you fix the code? Python tells you in which line and on which list the error occurs.
To pin down the exact problem, check the value of the index just before the error occurs. To achieve this, you can print the index that causes the error before you use it on the list. This way, you’ll have your wrong index in the shell right before the error message.
Here’s an example of wrong code that will cause the error to appear:
# WRONG CODE
lst = ['Alice', 'Bob', 'Ann', 'Carl'] for i in range(len(lst)+1): lst[i] # Traceback (most recent call last):
# File "C:\Users\xcent\Desktop\code.py", line 5, in <module>
# lst[i]
# IndexError: list index out of range
The error message tells you that the error appears in line 5. So, let’s insert a print statement before that line:
lst = ['Alice', 'Bob', 'Ann', 'Carl'] for i in range(len(lst)+1): print(i) lst[i]
The result of this code snippet is still an error. But there’s more:
0
1
2
3
4
Traceback (most recent call last): File "C:\Users\xcent\Desktop\code.py", line 6, in <module> lst[i]
IndexError: list index out of range
You can now see all indices used to retrieve an element. The final one is the index i=4 which points to the fifth element in the list (remember: Python starts indexing at index 0!). But the list has only four elements, so you need to reduce the number of indices you’re iterating over. The correct code is, therefore:
# CORRECT CODE
lst = ['Alice', 'Bob', 'Ann', 'Carl'] for i in range(len(lst)): lst[i]
Note that this is a minimal example and it doesn’t make a lot of sense. But the general debugging strategy remains even for advanced code projects:
Figure out the faulty index just before the error is thrown.
Eliminate the source of the faulty index.
IndexError When Modifying a List as You Iterate Over It
The IndexError also frequently occurs if you iterate over a list but you remove elements as you iterate over the list:
l=[1,2,3,0,0,1]
for i in range(0, len(l)): if l[i]==0: l.pop(i)
This code snippet is from a StackOverflow question. The source is simply that the list.pop() method removes the element with value 0. All subsequent elements now have a smaller index. But you iterate over all indices up to len(l)-1 = 6-1 = 5 and the index 5 does not exist in the list after removing elements in a previous iteration.
You can simply fix this with a short list comprehension statement that accomplishes the same thing:
l = [x for x in l if x]
Only non-zero elements are included in the list.
String IndexError: List Index Out of Range
The error can occur when accessing strings as well:
s = 'Python'
print(s[6])
To fix the error for strings, make sure that the index falls between the range 0 ... len(s)-1 (included):
s = 'Python'
print(s[5])
# n
Tuple IndexError: List Index Out of Range
In fact, the IndexError can occur for all ordered collections where you can use indexing to retrieve certain elements. Thus, it also occurs when accessing tuple indices that do not exist:
s = ('Alice', 'Bob')
print(s[2])
Again, start counting with index 0 to get rid of this:
s = ('Alice', 'Bob')
print(s[1])
# Bob
Note: The index of the last element in any sequence is len(sequence)-1.
Where to Go From Here?
Enough theory, let’s get some practice!
To become successful in coding, you need to get out there and solve real problems for real people. That’s how you can become a six-figure earner easily. And that’s how you polish the skills you really need in practice. After all, what’s the use of learning theory that nobody ever needs?
Practice projects is how you sharpen your saw in coding!
Do you want to become a code master by focusing on practical code projects that actually earn you money and solve problems for people?
Then become a Python freelance developer! It’s the best way of approaching the task of improving your Python skills—even if you are a complete beginner.
Python’s math module provides you with some of the most popular mathematical functions you may want to use. In this article, I’ll take you through the most common ones. You can also watch the following tutorial video in which I’ll guide you through the article:
The math module is part of the Python standard library, and it is always available with every Python installation. However, you must import it before you can start using the functions it contains.
import math
Now every function in the math library is accessible by calling math.function_name(). If you want to import specific functions, use the standard from math import function_name syntax.
Python Math Floor
The math.floor(x) function takes one argument x – either a float or int – and returns the largest integer less than or equal to x.
The largest numbers less than or equal to 3.9845794 and 9673.0001 are 3 and 9673, respectively. Since 12 is an integer, the result of math.floor(12) is 12 itself.
>>> math.floor(-10.5)
-11
The floor of -10.5 is -11. This can sometimes be confusing but remember that -11 < -10 < -9 < … < -1 < 0.
If you create custom a custom Python class, you can make them work with math.floor() by defining a __floor__() method.
Try It Yourself: Run the following interactive Python shell.
Exercise: Can you figure out the output before running it?
Python Math.Ceil
The math.ceil(x) function takes one argument x – either a float or int – and returns the smallest integer greater than or equal to x.
The smallest numbers greater than or equal to 3.9845794 and 9673.0001 are 4 and 9674, respectively. Since 12 is an integer, the result of math.ceil(12) is 12 itself.
>>> math.ceil(-10.5)
-10
The ceiling of -10.5 is -10. Your instinct that 10 < 10.5 is correct when 10 is a positive number. But the opposite is true for negative numbers, and so -10.5 < -10.
If you create custom a custom Python class, you can make them work with math.ceil() by defining a __ceil__() method.
Python Math Operators
The standard mathematical operators are not defined in the math module but rather in the syntax of Python itself.
To add two numbers together, use the + operator.
>>> 5 + 10
15
To subtract two numbers, use the - operator.
>>> 5 - 10
-5
To multiply two numbers together, use the * operator.
>>> 5 * 10
50
To divide two numbers, use the / operator.
>>> 5 / 10
0.5
Note that this always returns a float even if the result is a whole number.
>>> 10 / 5
2.0
Remember that if you take two random numbers and divide them, it is highly unlikely they will divide each other perfectly, so it is logical that all division with / returns a float.
To raise a number to a certain power, use the ** operator.
>>> 5 ** 10
9765625
This is ‘five to the power of ten‘ and you write it in the same order you would write this out by hand.
Then there are some other operators used less often in mathematics but are incredibly useful for computer science and coding: modulus and floor division.
The modulus operator returns the remainder left when one number is divided by another. You perform this calculation with the % operator in Python.
>>> 13 % 3
1
You should read the above line as ‘13 modulo 3‘, and the result is 1. This is because 3 goes into 13 four times (3 x 4 = 12) and the the total difference between 13 and 12 is: 13 – 12 = 1.
Another way to think of it is if you write 13/3 as a compound fraction, you get 4 + 1/3. Looking at the fraction left over – 1/3 – take the numerator (the top part) to get the final result: 1.
If you do many ‘modulo n’ calculations, the set of possible results ranges from 0 up to and including n-1. So for 3, the range of possible results is 0, 1, and 2.
Here are some more examples:
>>> 14 % 3
2
>>> 15 % 3
0
>>> 16 % 3
1
You can see that 15 % 3 is 0. This result is the case for all multiples of 3.
One incredibly useful way to use the modulo operator is in for loops if you want to do something every n-th iteration.
for i in range(10): if i % 4 == 0: print('Divisible by 4!!!') else: print('Not divisible by 4 :(')
Divisible by 4!!!
Not divisible by 4 :(
Not divisible by 4 :(
Not divisible by 4 :(
Divisible by 4!!!
Not divisible by 4 :(
Not divisible by 4 :(
Not divisible by 4 :(
Divisible by 4!!!
Not divisible by 4 :(
Here I used the modulo operator to print Divisible by 4!!! every time i was divisible by 4 – i.e., when i % 4 == 0 – and print Not divisible by 4 :( in all other cases.
The final built-in operator is related to modulo. It performs floor division and is written as //. As the name suggests, floor division is the same as normal division but always rounds the result down to the nearest whole number.
If you write 13/3 as a compound fraction, you get 4 + 1/3. Floor division returns the whole number part of this fraction, 4 in this case.
>>> 13 // 3
4
>>> 13 / 3 4.333333333333333
Here I calculated ‘thirteen floor three’, and this returns 4. The result of ‘thirteen divided by three’ is 4.3333, and if you round this down, you get 4.
Another way to think of it is if you write 13/3 as a compound fraction, you get 4 + 1/3. Floor division returns the whole number part of this fraction, 4 in this case.
Here are some more examples:
>>> 14 // 3
4
>>> 15 // 3
5
>>> 16 // 3
5
Note that all of the above examples are ints being floor divided by ints. In each case, Python returns an int. But if either of the numbers is a float, Python returns a float.
>>> 14.0 // 3
4.0
>>> 14 // 3.0
4.0
This result is different to normal division / which always returns a float.
You can perform floor division on any two numbers, but you may get surprising results if you add decimal places.
# No difference to normal
>>> 14.999 // 3
4.0
# Returns 3.0, not 4.0!
>>> 14 // 3.999
3.0
# Now we see why
>>> 14 / 3.999
3.500875218804701
When you run 14 // 3.999, the result is 3.0 because 14 / 3.999 is 3.508... and the floor of 3.508... is 3.
Floor division for negative numbers works in the same way.
>>> -14 / 3
-4.666666666666667
>>> -14 // 3
-5
Recall that floor division takes the lower number and that -5 < -4. Thus the result of floor division for negative numbers is not the same as adding a minus sign to the result of floor division for positive numbers.
Try It Yourself: Run the following interactive Python shell.
Exercise: Which line does not produce output integer 42?
Python Math Domain Error
You may encounter a special ValueError when working with Python’s math module.
ValueError: math domain error
Python raises this error when you try to do something that is not mathematically possible or mathematically defined.
import numpy as np
import matplotlib.pyplot as plt # Plotting y = log(x)
fig, ax = plt.subplots()
ax.set(xlim=(-5, 20), ylim=(-4, 4), title='log(x)', ylabel='y', xlabel='x')
x = np.linspace(-10, 20, num=1000)
y = np.log(x) plt.plot(x, y)
This is the graph of log(x). Don’t worry if you don’t understand the code, what’s more important is the following point. You can see that log(x) tends to negative infinity as x tends to 0. Thus, it is mathematically meaningless to calculate the log of a negative number. If you try to do so, Python raises a math domain error.
>>> math.log(-10)
Traceback (most recent call last): File "<stdin>", line 1, in <module>
ValueError: math domain error
Python Math Round
Rounding is more complicated than you might expect. Incorrectly rounding floats has lead to disastrous consequences. The Vancouver Stock Exchange used an overly simplified rounding algorithm when trading stocks. In less than two years, the algorithm resulted in the price of the stock exchange being half of what it should have been!
The round() function is not part of the math module but rather a built-in function you can access at all times.
It accepts two arguments:
round(number[, ndigits])
The number is an int or float, and ndigits is the rounding precision you want after the decimal point. The square brackets around ndigits signify that it is an optional argument. If you omit ndigits, Python rounds number to the closest integer.
# Closest integer
>>> round(10.237)
10
# One decimal place
>>> round(10.237, 1)
10.2
# Two decimal places
>>> round(10.237, 2)
10.24
Here you can see that round() works as you would expect.
First, I want to round 10.237 to an integer. So, let’s look at the first value after the decimal place and round down if it’s less than 5 and up if it’s greater than 5. The first value is 2, and so you round down to get 10. For the next example, round 10.237 to one decimal place. Look at the second decimal place – 3 – and so round it down to get 10.2. Finally, round 10.237 to two decimal places by looking at the third decimal place – 7 – and rounding up to get 10.24.
This algorithm works as expected; however, it is not that simple. Let’s look at rounding 1.5 and 2.5.
>>> round(1.5)
2
This rounds to 2, as expected.
>>> round(2.5)
2
But this also rounds to 2! What is going on?
The round() function applies a type of rounding called ’rounding half to even’. This means that, in the event of a tie, Python rounds to the closest even number.
The mathematical logic underpinning it is explained here, but in short, the reason Python does this is to preserve the mean of the numbers. If all the ties are rounded up (as we are taught in school), then if you round a collection of numbers, the mean of the rounded numbers will be larger than the mean of the actual collection.
Python assumes that about half will be odd for a random collection of numbers, and half will be even. In practice, this is true most of the time. However, there are more mathematically rigorous methods you can use in extreme circumstances.
Note that floating-point arithmetic has some inherent issues that cannot be resolved. Fortunately, this is built into all programming languages, mainly because computers represent floats as binary numbers. Some numbers that have finite floating-point representations – such as 0.1 – have infinite binary representations – 0.0001100110011… – and vice versa. Thus, the round() function is not perfect.
# Expected 2.68 but got 2.67
>>> round(2.675, 2)
2.67
From what I’ve said above, this example should return 2.68 as that is an even number. However, it returns 2.67. This result is not a bug and is a known property of the function. For the vast majority of cases, round() works as I described above, but you should know that it is not perfect. If you want something more precise, use the decimal module.
Python Math Pi
The math module includes some mathematical constants, one of which is π (pi).
>>> math.pi
3.141592653589793
It is the ratio of the circumference of a circle to its diameter and is 3.141592653589793 to 15 decimal places. If you are going to use this constant a lot, I recommend importing it separately to save you typing out math. every time you want to use it.
>>> from math import pi
>>> pi
3.141592653589793
Python Math Sqrt
To calculate the square root of a number, use the math.sqrt(n) function.
Note that this always returns a float. Even if you pass an int and Python can express the result as an int, it always returns a float. This functionality is similar to the division operator and makes logical sense; the vast majority of times you calculate a square root, it will not return an integer.
As of Python 3.8, there is also the function math.isqrt(n) which returns the integer square root for some integer n. This result you get is the same as applying math.sqrt(n) and then math.floor() to the result.
# Only works with Python 3.8
>>> math.isqrt(2)
1
>>> math.isqrt(16)
4
If you pass numbers that have precise square roots, you get a similar result to math.sqrt(), but the result is always an integer.
>>> math.isqrt(16.0)
Traceback (most recent call last): File "<stdin>", line 1, in <module>
TypeError: 'float' object cannot be interpreted as an integer
The function math.isqrt(n) is the same as math.floor(math.sqrt(n)) if n is an integer,
Python Math Abs
The abs() function is a built-in function that returns the absolute value of a number. The function accepts integers, floats, and complex numbers as input.
If you pass abs() an integer or float, n, it returns the non-negative value of n and preserves its type. In other words, if you pass an integer, abs() returns an integer, and if you pass a float, it returns a float.
# Int returns int
>>> abs(20)
20
# Float returns float
>>> abs(20.0)
20.0
>>> abs(-20.0)
20.0
The first example returns an int, the second returns a float, and the final example returns a float and demonstrates that abs() always returns a positive number.
Complex numbers are made up of two parts and can be written as a + bj where a and b are either ints or floats. The absolute value of a + bj is defined mathematically as math.sqrt(a**2 + b**2). Thus, the result is always positive and always a float (since taking the square root always returns a float).
Here you can see that abs() always returns a float and that the result of abs(a + bj) is the same as math.sqrt(a**2 + b**2).
Python Math Random
To generate random numbers, you must use the Python random module rather than the math module. That link takes you to an article I’ve written all about it.
Python Math Degrees
It is important that you can quickly switch between degrees and radians, especially if you work with trigonometric functions.
Let’s say you have an angle r which is in radians, and you want to convert it to degrees. Simply call math.degrees(r).
Let’s look at some common examples.
# You need to use pi a lot, so let's import it
>>> from math import pi
>>> math.degrees(pi)
180.0
>>> math.degrees(pi/4)
45.0
>>> math.degrees(2*pi)
360.0
First, I imported pi so that I could easily use it in all the functions. Then I calculated some common degree-to-radians conversions. Note that math.degrees() always returns a float. This result is expected as the vast majority of the time, the result of a conversion is not a whole number.
Note that, as is always the case with floating-point arithmetic, this function is not perfect.
>>> math.degrees(pi/3)
59.99999999999999
This should return 60.0. But note that since 0.999… recurring equals 1, it will not negatively impact your results.
Python Math Radians
Let’s say you have an angle d in degrees, and you want to convert it to radians. Simply call math.radians(d).
Let’s look at some common examples.
>>> from math import pi
>>> math.radians(180)
3.141592653589793
>>> math.radians(180) == pi
True
>>> math.radians(45)
0.7853981633974483
>>> math.radians(45) == pi/4
True
One downside with converting degrees to radians is that radians are much harder for humans to read. So, I added in the equality statements afterward to show you that 180 degrees, when converted to radians, is π and likewise for 45 degrees and π/4.
This function is especially crucial if you want to use any of the trigonometric functions as they assume you are passing an angle in radians.
Python Math Sin
To calculate the sine of some angle r, call math.sin(r). Note that the function assumes that r is in radians.
>>> math.sin(0)
0
# Assumes angle is in radians!
>>> math.sin(90)
0.8939966636005579
# Convert to radians
>>> math.sin(math.radians(90))
1.0
# Enter as radians
>>> math.sin(pi/2)
1.0
From high school math, we know that sin(90) = 1.0 if 90 is in degrees. But here I demonstrate that you do not get 1.0 if you input 90. Instead, input pi/2, and you get the expected result. Alternatively, you can use the math.radians() function to convert any angle in degrees to radians.
Let’s look at the result for math.sin(pi).
>>> math.sin(pi)
1.2246467991473532e-16
Again, from high school math, you expect the result to be 0.0, but, as is often the case with floating-point arithmetic, this is not the case. Although we know that the sine of 0 and π are the same value, unfortunately, it is not reflected in the output. This result is because π is an infinite decimal that cannot be represented fully in a computer. However, the number is so small that it should not make a massive difference to your calculations. But if you need it to equal 0, there are some methods you can try, but I will not discuss them in this article for brevity.
Finally, note that all the values returned are floats even if Python can represent them as integers.
Python Math Cos
To calculate the cosine of some angle r, call math.cos(r). Note that the function assumes that r is in radians.
>>> math.cos(0)
1.0
# Assumes angle is in radians
>>> math.cos(180)
-0.5984600690578581
# Convert to radians
>>> math.cos(math.radians(180))
-1.0
# Enter angle in radians
>>> math.cos(pi)
-1.0
From high school math, we know that cos(180) = -1.0 if 180 is in degrees. However, the trigonometric functions expect the angle to be in radians. So, you must either convert it to radians using the math.radians(180) function, or enter the actual radians value, which is pi in this case. Both methods give you the answer -1.0 as expected.
Let’s look at the result of math.cos(pi/2).
>>> math.cos(pi/2)
6.123233995736766e-17
The result of math.cos(pi/2) should be 0.0, but instead, it is a tiny number close to 0. This is because π is an infinite decimal that cannot be represented entirely in a computer. This functionality should be fine for most cases. If you must have it equal to 0, check out this Stack Overflow answer for alternative methods you can use.
Python Math Tan
To calculate the tangent of some angle r, call math.tan(r). Note that the function assumes that r is in radians.
The results for math.tan() are similar to those for math.sin() and math.cos(). You get the results you expect for 0.0, but once you start including pi, nothing is exactly what you expect. For example, tan(pi/4) is 1, but Python returns 0.999.... This may not look the same, but, mathematically, they are equal). The result of tan(pi/2) should be positive infinity, but Python returns a huge number instead. This result is nice as it lets you perform calculations with math.tan() without throwing loads of errors all the time.
Conclusion
There you have it; you now know how to use the most common functions in Python’s built-in math module!
You can take the floor or ceiling of any number using math.floor() and math.ceil(). You know all the essential operators, what types they return, and when. You’ve seen that Python raises a Math Domain Error if you try to do something mathematically impossible. And you can use some essential functions and constants for scientific computing such as math.pi, converting angles from degrees to radians and using the most common trigonometric functions – sin, cos, and tan.
There are some more functions I didn’t get the chance to cover in this article, such as the inverse and hyperbolic trigonometric functions. With your knowledge, you’ll easily understand and use them if you quickly read the docs.
Where To Go From Here?
Do you wish you could be a programmer full-time but don’t know how to start?
Check out the pure value-packed webinar where Chris – creator of Finxter.com – teaches you to become a Python freelancer in 60 days or your money back!
It doesn’t matter if you’re a Python novice or Python pro. If you are not making six figures/year with Python right now, you will learn something from this webinar.
These are proven, no-BS methods that get you results fast.
This webinar won’t be online forever. Click the link below before the seats fill up and learn how to become a Python freelancer, guaranteed.
It’s been a few months so it’s time for another update of Experimental Mobile Blazor Bindings! This release brings several bug fixes in the areas of CSS styling support, adding XML doc comments to common APIs, and several syntax improvements to common controls.
Here are the major changes in this release:
Update to latest native mobile component versions in Xamarin.Forms 4.5 and add doc comments #96, #110, #111
Because most of the components in Mobile Blazor Bindings are based on Xamarin.Forms native controls, the components have been updated to Xamarin.Forms 4.5. For example, properties such as Image.IsAnimationPlaying and Stepper.StepperPosition are now available. The doc comments that are seen in IntelliSense have also been imported so that you get useful help while coding:
Improve Label and Button syntax
Because one of the key motivators for building Mobile Blazor Bindings was to have patterns that were more familiar to web developers, the syntax for Label and Button components has been simplified and improved.
In previous versions setting the text for a Label’s Span’s Text or a Button’s Text had to be done via a property setter:
Speaking of Span.Text, a Label with complex formatting used to have many intermediate tags:
<Label FontSize="12"> <FormattedText> <FormattedString> <Spans> <Span Text="This text is large... " FontSize="50" /> <Span Text="and this is plain... " /> <Span Text="and this is green!" TextColor="Color.Green" /> </Spans> </FormattedString> </FormattedText>
</Label>
And starting with Preview 3, the intermediate tags have all been removed:
<Label FontSize="12"> <Span FontSize="50">This text is large... </Span> <Span>and this is plain... </Span> <Span TextColor="Color.Green">and this is green!</Span>
</Label>
CSS improvements
CSS is a great way to style your application while keeping it separate from the layout and behavior. Check out the CSS Styles topic for more information on how to use CSS in your Mobile Blazor Bindings apps.
There are three CSS-related improvements in this release:
The minimum version of Xamarin.Forms is now 4.5, which fixes most CSS issues, such as the ability to use almost all CSS selectors.
A small breaking change was made to use spaces as separators instead of commas when specifying multiple class names (this matches web behavior). See issue #100 for more information.
A bug fix was made to ensure CSS is loaded properly on iOS devices.
More information:
For more information please check out:
Thank you to community blog posts!
If you’d like to learn more, please check out these blog posts from community members:
Thank you!
What’s next? Let us know what you want!
We’re listening to your feedback, which has been both plentiful and helpful! We’re also fixing bugs and adding new features. And you may have seen last week’s announcement for .NET Multi-platform App UI (.NET MAUI). As an experiment, what we find with Mobile Blazor Bindings will feed directly into the Blazor aspects of .NET MAUI so please share with us your thoughts on using Blazor with .NET MAUI on this project’s repo or on .NET MAUI’s GitHub repo.
This project will continue to take shape in large part due to your feedback, so please let us know your thoughts at the GitHub repo.
P.S.: My apologies for the delay in this update. The realities of work-from-home (and stay-at-home parenting) meant that progress was extremely limited. I thank everyone for their patience, understanding, and support. You can always stay up-to-date by going to the GitHub repo and using the latest builds, or reach me on Twitter @original_ejl.
Do you want to convert a Python set to a list? Use the list(...) constructor and pass the set object as an argument. For example, to convert a set of strings friends into a list, use the code expression list(friends).
Here’s an example code snippet that converts the set to a list using the list(...) constructor:
# Create the set of strings
friends = {'Alice', 'Ann', 'Bob'} # Convert the set to a list
l = list(friends) # Print both
print(friends)
print(l) '''
{'Ann', 'Alice', 'Bob'}
['Alice', 'Ann', 'Bob'] '''
Try it in our interactive Python shell:
Exercise: Add more elements to the set. Does the list always have the same order as the set?
Python Set to List Order
A set is defined as an unordered collection of unique elements. The keyword is “unordered” here. Python does not guarantee any particular order of the elements in the resulting list. If you convert a set to a list, the elements can have an arbitrary order.
Python Set to List Keep Order
But what if you want to preserve the order when converting a set to a list (and, maybe, back)?
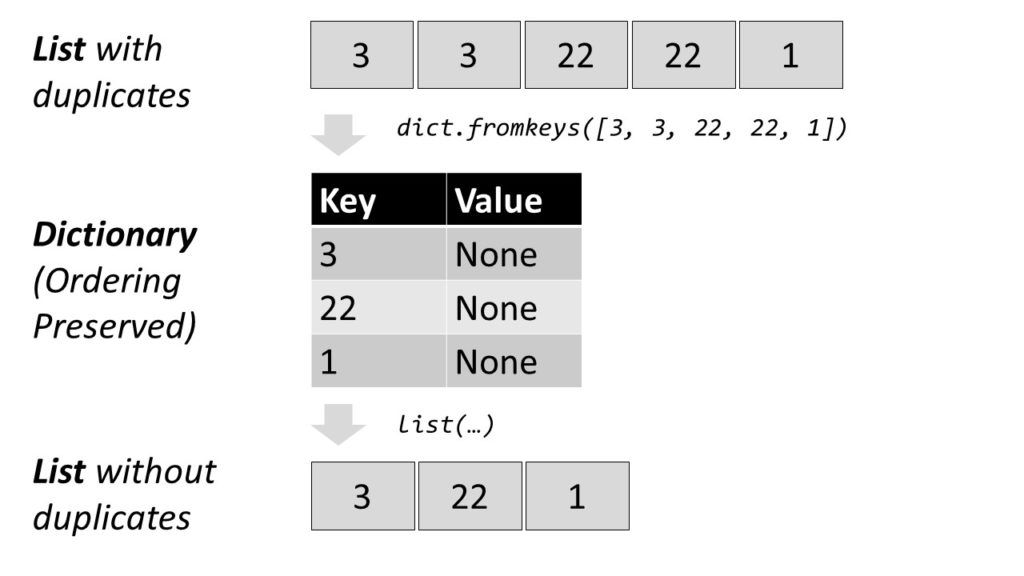
Create a dictionary from the elements in the list to remove all duplicates and convert the dictionary back to a list. This preserves the order of the original list elements.
Convert the list to a dictionary with dict.fromkeys(lst).
Convert the dictionary into a list with list(dict).
Each list element becomes a new key to the dictionary. For example, the list [1, 2, 3] becomes the dictionary {1:None, 2:None, 3:None}. All elements that occur multiple times will be assigned to the same key. Thus, the dictionary contains only unique keys—there cannot be multiple equal keys.
As dictionary values, you take dummy values (per default).
Then, you convert the dictionary back to a list, throwing away the dummy values.
Example: Convert set {0, 9, 8, 3} to the sorted list [0, 3, 8, 9].
Solution: Use the sorted(...) method that creates a new list from any iterable you pass as an argument.
Code: Let’s have a look at the source code that solves the problem!
s = {0, 9, 8, 3}
l = sorted(s)
print(l)
# [0, 3, 8, 9]
Exercise: Can you modify the code so that the elements are sorted in descending order?
Python Set to List Unpacking
An alternative method to convert a set to a list is unpacking with the asterisk operator *. You can simply unpack all elements in set s into an empty list by using the asterisk as a prefix within an empty list like this [*s]. It’s a fast and Pythonic way of converting a set to a list. And it has the advantage that you can also convert multiple sets into a single list like this: [*s1, *s2, ..., *sn].
Exercise: Play with the following code unpacking a fourth set into a new list l4.
Python Set to List Complexity
The time complexity of converting a set to a list is linear in the number of list elements. So, if the set has n elements, the asymptotic complexity is O(n). The reason is that you need to iterate over each element in the set which is O(n), and append this element to the list which is O(1). Together the complexity is O(n) * O(1) = O(n * 1) = O(n).
Here’s the pseudo-code implementation of the set to list conversion method:
def set_to_list(s): l = [] # Repeat n times --> O(n) for x in s: # Append element to list --> O(1) l.append(x) return s friends = {'Alice', 'Bob', 'Ann', 'Liz', 'Alice'}
l = set_to_list(friends)
print(l)
# {'Alice', 'Liz', 'Ann', 'Bob'}
Need help understanding this code snippet? Try visualizing it in your browser—just click “Next” to see what the code does in memory:
Python Add Set to List
Problem: Given a list l and a set s. Add all elements in s to list l.
Example: Given is list ['Alice', 'Bob', 'Ann'] and set {42, 21}. You want to get the resulting list ['Alice', 'Bob', 'Ann', 42, 21].
Solution: Use the list.extend(iterable) method to add all elements in the iterable to the list.
Code: The following code accomplishes this.
l = ['Alice', 'Bob', 'Ann']
s = {42, 21}
l.extend(s)
print(l)
# ['Alice', 'Bob', 'Ann', 42, 21]
Sometimes you can see the following seemingly strange behavior (e.g., here):
s = set([1, 2, 3])
l = list(s)
The output may give you the following cryptic error message:
TypeError: 'set' object is not callable
The reason is—in all likelihood—that you overwrote the name set in your namespace. This happens if you assign a value to a variable called ‘set’. Python will assume that set is a variable—and tells you that you cannot call variables.
Here’s code that will cause this issue:
set = {1, 2}
lst = [1, 2, 3]
s = set(lst) '''
Traceback (most recent call last): File "C:\Users\xcent\Desktop\code.py", line 3, in <module> s = set(lst)
TypeError: 'set' object is not callable '''
You can fix it by using another variable name so that the built-in function set() is not overshadowed:
s0 = {1, 2}
lst = [1, 2, 3]
s = set(lst)
Now, no such error is thrown because the set name correctly points to the Python built-in constructor function.
Where to Go From Here?
Enough theory, let’s get some practice!
To become successful in coding, you need to get out there and solve real problems for real people. That’s how you can become a six-figure earner easily. And that’s how you polish the skills you really need in practice. After all, what’s the use of learning theory that nobody ever needs?
Practice projects is how you sharpen your saw in coding!
Do you want to become a code master by focusing on practical code projects that actually earn you money and solve problems for people?
Then become a Python freelance developer! It’s the best way of approaching the task of improving your Python skills—even if you are a complete beginner.
Do you have a list but you want to convert it to a Python set? No problem! Use the set(...) constructor and pass the list object as an argument. For example, if you have a list of strings friends, you can convert it to a set using the call set(friends).
Exercise: Add another string 'Alice' to the list friends and see the resulting set. How many elements do the list and the set have?
Python List to Set Time Complexity
The time complexity of converting a list to a set is linear in the number of list elements. So, if the set has n elements, the asymptotic complexity is O(n). The reason is that you need to iterate over each element in the list which is O(n), and add this element to the set which is O(1). Together the complexity is O(n) * O(1) = O(n * 1) = O(n).
Here’s the pseudo-code implementation of the list to set conversion method:
def list_to_set(l): s = set() # Repeat n times --> O(n) for x in l: # Add element to set --> O(1) s.add(x) return s friends = ['Alice', 'Bob', 'Ann', 'Liz', 'Alice']
s = list_to_set(friends)
print(s)
# {'Ann', 'Alice', 'Bob', 'Liz'}
Need help understanding this code snippet? Try visualizing it in your browser—just click “Next” to see what the code does in memory:
Collection: A set is a collection of elements like a list or a tuple. The collection consists of either primitive elements (e.g. integers, floats, strings), or complex elements (e.g. objects, tuples). However, in a set all data elements must be hashable because it heavily relies on the hash function to implement the specification.
Unordered: Unlike lists, sets are unordered because there is no fixed order of the elements. In other words, regardless of the order you put stuff in the set, you can never be sure in which order the set stores these elements.
Unique: All elements in the set are unique. Each pair of values (x,y) in the set produces a different pair of hash values (hash(x)!=hash(y)). Hence, each pair of elements x and y in the set are different.
Thus, you can remove all duplicates from a list x by converting it into a set and back into a list using the command list(set(x)). However, the ordering information may be lost in the process (as a set is, by definition, unordered).
This way, the resulting list doesn’t have any duplicates—but it also has lost the order of elements: strings 'Liz' and 'Ann' switched their order after conversion. This may be different on your computer!
Python List to Set to List: list(set(x))
By converting a list x to a set and back to a list with the nested constructor expression list(set(x)), you achieve two things:
You remove all duplicates from the original list x.
You lose all ordering information. The resulting list may (or may not) have a complete new ordering of the remaining elements.
There’s no way out: the set data structure is more efficient than the list data structure only because it’s less powerful.
It’s like compressing an image: by removing information from the original image, the new image needs less resources on your computer at the cost of having a lower quality. If you convert the lossy-compressed image (or the set for that matter) back into the original data structure, it doesn’t look the same anymore.
This highlights an important trade-off in programming: always choose the right data structure for the particular problem at hand.
Python List to Set Preserve Order
But what if you want to preserve the order when converting a list to a set (and, maybe, back)? (You’d only do this to remove duplicates).
Efficient Method: A shorter and more concise way is to create a dictionary out of the elements in the list to remove all duplicates and convert the dictionary back to a list. This preserves the order of the original list elements.
Convert the list to a dictionary with dict.fromkeys(lst).
Convert the dictionary into a list with list(dict).
Each list element becomes a new key to the dictionary. For example, the list [1, 2, 3] becomes the dictionary {1:None, 2:None, 3:None}. All elements that occur multiple times will be assigned to the same key. Thus, the dictionary contains only unique keys—there cannot be multiple equal keys.
As dictionary values, you take dummy values (per default).
Then, you convert the dictionary back to a list, throwing away the dummy values.
The result is an error message unhashable type: 'list'.
'''
Traceback (most recent call last): File "C:\Users\xcent\Desktop\code.py", line 6, in <module> s = set(users)
TypeError: unhashable type: 'list' '''
Why are lists unhashable?
Because they are mutable: you can change a list by appending or removing elements. If you change the list data type, the hash value changes (it is calculated based on the content of the list). This directly violates the definition that a “hash value […] never changes during its lifetime” (see here).
Key takeaway: mutable data types are not hashable. Therefore, you cannot use them in sets.
So, how to solve it? Simply convert the inner lists into an immutable collection type such as a tuple:
Now, the result is a set of tuple elements. As tuples are immutable, the hash value will never change and you can create a set out of them.
Where to Go From Here?
Enough theory, let’s get some practice!
To become successful in coding, you need to get out there and solve real problems for real people. That’s how you can become a six-figure earner easily. And that’s how you polish the skills you really need in practice. After all, what’s the use of learning theory that nobody ever needs?
Practice projects is how you sharpen your saw in coding!
Do you want to become a code master by focusing on practical code projects that actually earn you money and solve problems for people?
Then become a Python freelance developer! It’s the best way of approaching the task of improving your Python skills—even if you are a complete beginner.
Problem: Given a dictionary and a filter condition. How to filter a dictionary by …
… key so that only those (key, value) pairs in the dictionary remain where the key satisfies the condition?
… value so that only those (key, value) pairs remain where the value satisfies the condition?
In this tutorial, you’ll learn four methods and how they compare against each other. It’s loosely based on this tutorial but extends it by many additional examples and code explanations.
If you’re too busy to read this tutorial, here’s the spoiler:
Method 4 — Dictionary comprehension {k:v for (k,v) in dict.items() if condition} is the most Pythonic and fastest way to filter a dictionary in Python.
However, by reading this short 8-minute tutorial, you’re going to learn a lot about the nuances of writing Pythonic code. So keep reading!
Method 1: Simple Iteration to Filter Dictionary
You should always start with the simplest method to solve a problem (see Occam’s razor) because premature optimization is the root of all evil!
So let’s have a look at the straightforward loop iteration method to filter a dictionary.
You want to keep those (key, value) pairs where key meets a certain condition (such as key%2 == 1).
newDict = dict() # Iterate over all (k,v) pairs in names
for key, value in names.items(): # Is condition satisfied? if key%2 == 1: newDict[key] = value
Only the (key, value) pairs where the key is an odd integer remain in the filtered dictionary newDict.
But what if you want to filter the dictionary by a condition on the values?
Filter Python Dictionary By Value (Simple Loop)
To filter by value, you only need to replace one line in the previous code snippet: instead of writing if key%2 == 1: ..., you use the value to determine whether to add a certain (key, value) pair: if len(value)<5: ....
newDict = dict() # Iterate over all (k,v) pairs in names
for key, value in names.items(): # Is condition satisfied? if len(value)<5: newDict[key] = value print(newDict)
# {2: 'Bob', 3: 'Carl', 4: 'Ann', 5: 'Liz'}
Only the dictionary (key, value) pairs remain in the filtered dictionary newDict where the length of the name string value is less than five characters.
Try It Yourself in Our Interactive Cod Shell (Click “run”):
Now, you know the basic method of filtering a dictionary in Python (by key and by value). But can we do better? What if you need to filter many dictionaries by many different filtering conditions? Do we have to rewrite the same code again and again?
The answer is no! Read on to learn about a more generic way to make filtering a dictionary as easy as calling a function passing the dictionary and the filter function.
Method 2: Generic Function to Filter Dictionary
How can you use different filtering functions on different dictionaries without writing the same code again and again? The answer is simple: create your own generic filtering function!
Your goal is to create a function filter_dict(dictionary, filter_func) that takes a dictionary to be filtered and a filter_func to determine for each (key, value) pair whether it should be included in the filtered dictionary.
def filter_dict(d, f): ''' Filters dictionary d by function f. ''' newDict = dict() # Iterate over all (k,v) pairs in names for key, value in d.items(): # Is condition satisfied? if f(key, value): newDict[key] = value return newDict
The function takes two arguments: the dictionary d to be filtered and the function f that decides if an element should be included in the new dictionary.
You create an empty dictionary newDict and decide for all elements of the original dictionary d whether they should be included. To accomplish this, you iterate over each original (key, value) pair and pass it to the function f: key, value --> Boolean. The function f returns a Boolean value. If it evaluates to True, the (key, value) pair is added to the new dictionary. Otherwise, it’s skipped. The return value is the newly created dictionary newDict.
Here’s how you can use the filtering function to filter by key:
Filter Python Dictionary By Key Using Generic Function
If you want to accomplish the same thing as above—filtering by key to include only odd keys—you simply use the following one-liner call:
That was easy! The lambda function you pass returns k%2 == 1 which is the Boolean filtering value associated to each original element in the dictionary names.
Similarly, if you want to filter by key to include only even key, you’d do the following:
The filter(function, iterable) function takes a function as input that takes one argument (an element of an iterable) and returns a Boolean value whether this element should pass the filter. All elements that pass the filter are returned as a new iterable object (a filter object).
You can use the lambda function statement to create the function right where you pass it as an argument. The syntax of the lambda function is lambda x: expression and it means that you use x as an input argument and you return expression as a result (that can or cannot use x to decide about the return value). For more information, see my detailed blog article about the lambda function.
Filter Python Dictionary By Key Using filter() + Lambda Functions
Here’s how you can filter a dictionary by key using only a single line of code (without defining your custom filter function as in method 2):
You may recognize the same filter lambda function lambda x: x[0]%2 == 1 that returns True if the key is an odd integer. Note that this lambda function takes only a single input as this is how the filter() function works (it requires that you pass a function object that takes one argument and maps it to a Boolean value).
You operate on the iterable names.items() that gives you all (key, value) pairs (an element of the iterable is a (key, value) tuple).
After filtering, you convert the filter object back to a dictionary using the dict(...) constructor function.
Filter Python Dictionary By Value Using filter() + Lambda Functions
You can use the same basic idea—filter() + lambda + dict()—to filter a dictionary by value. For example, if you want to filter out all (key, value) pairs where the value has less than five characters, use the following one-liner:
Dictionary comprehension allows you to transform one dictionary into another one—by modifying each (key, value) pair as you like.
Filter Python Dictionary By Key Using Dictionary Comprehension
The general framework for dictionary comprehension is { expression context }.
expression defines how you would like to change each (key, value) pair.
context defines the (key, value) pairs, you’d like to include in the new dictionary.
Here’s a practical example that filters all (key, value) pairs with odd keys:
print({k:v for (k,v) in names.items() if k%2 == 1})
# {1: 'Alice', 3: 'Carl', 5: 'Liz'}
And here’s an example that filters all (key, value) pairs with even keys:
print({k:v for (k,v) in names.items() if k%2 == 0})
# {2: 'Bob', 4: 'Ann'}
Let’s look at dictionary filtering by value! Is it any different?
Filter Python Dictionary By Value Using Dictionary Comprehension
No! It’s exactly the same:
print({k:v for (k,v) in names.items() if len(v)<5})
# {2: 'Bob', 3: 'Carl', 4: 'Ann', 5: 'Liz'}
This powerful framework is not only fast and easy to understand, it’s also concise and consistent. The filtering criteria is the last part of the expression so that you can quickly grasp how it’s filtered:
print({k:v for (k,v) in names.items() if v.startswith('A')})
# {1: 'Alice', 4: 'Ann'}
Try It Yourself in Our Interactive Cod Shell (Click “run”):
Here are all four methods from the tutorial to simplify copy&pasting:
names = {1: 'Alice', 2: 'Bob', 3: 'Carl', 4: 'Ann', 5: 'Liz'} ''' Method 1: Simple For Loop ''' # FILTER BY KEY
newDict = dict() # Iterate over all (k,v) pairs in names
for key, value in names.items(): # Is condition satisfied? if key%2 == 1: newDict[key] = value print(newDict)
# {1: 'Alice', 3: 'Carl', 5: 'Liz'} # FILTER BY VALUE
newDict = dict() # Iterate over all (k,v) pairs in names
for key, value in names.items(): # Is condition satisfied? if len(value)<5: newDict[key] = value print(newDict)
# {2: 'Bob', 3: 'Carl', 4: 'Ann', 5: 'Liz'} ''' Method 2: Custom Function ''' def filter_dict(d, f): ''' Filters dictionary d by function f. ''' newDict = dict() # Iterate over all (k,v) pairs in names for key, value in d.items(): # Is condition satisfied? if f(key, value): newDict[key] = value return newDict # FILTER BY KEY
print(filter_dict(names, lambda k,v: k%2 == 1))
print(filter_dict(names, lambda k,v: k%2 == 0)) # FILTER BY VALUE
print(filter_dict(names, lambda k,v: len(v)<5))
print(filter_dict(names, lambda k,v: v.startswith('A'))) ''' Method 3: filter() ''' # FILTER BY KEY
print(dict(filter(lambda x: x[0]%2 == 1, names.items())))
print(dict(filter(lambda x: x[0]%2 == 0, names.items()))) # FITER BY VALUE
print(dict(filter(lambda x: len(x[1])<5, names.items())))
print(dict(filter(lambda x: x[1].startswith('A'), names.items()))) ''' Method 4: Dict Comprehension ''' # FITER BY KEY
print({k:v for (k,v) in names.items() if k%2 == 1})
print({k:v for (k,v) in names.items() if k%2 == 0}) # FITER BY VALUE
print({k:v for (k,v) in names.items() if len(v)<5})
print({k:v for (k,v) in names.items() if v.startswith('A')})
But how do all of those methods compare in terms of algorithmic complexity and runtime? Let’s see…
Algorithmic Analysis
Before we benchmark those methods against each other, let’s quickly discuss computational complexity.
All four methods have linear runtime complexity in the number of elements in the original dictionary to be filtered—assuming that the filtering condition itself has constant runtime complexity (it’s independent of the number of elements in the dictionary).
Method
Complexity
Method 1: Loop
O(n)
Method 2: Custom
O(n)
Method 3: filter()
O(n)
Method 4: Dictionary Comprehension
O(n)
But this doesn’t mean that all methods are equally efficient. The dictionary comprehension is usually fastest for these types of filtering operations because it doesn’t use an intermediate function filter(). And it’s also easiest to understand. Therefore, you should use dictionary comprehension in your own code to filter a dictionary by key or by value!
Where to Go From Here?
Enough theory, let’s get some practice!
To become successful in coding, you need to get out there and solve real problems for real people. That’s how you can become a six-figure earner easily. And that’s how you polish the skills you really need in practice. After all, what’s the use of learning theory that nobody ever needs?
Practice projects is how you sharpen your saw in coding!
Do you want to become a code master by focusing on practical code projects that actually earn you money and solve problems for people?
Then become a Python freelance developer! It’s the best way of approaching the task of improving your Python skills—even if you are a complete beginner.
Project Tye is an experimental developer tool that makes developing, testing, and deploying microservices and distributed applications easier.
When building an app made up of multiple projects, you often want to run more than one at a time, such as a website that communicates with a backend API or several services all communicating with each other. Today, this can be difficult to setup and not as smooth as it could be, and it’s only the very first step in trying to get started with something like building out a distributed application. Once you have an inner-loop experience there is then a, sometimes steep, learning curve to get your distributed app onto a platform such as Kubernetes.
The project has two main goals:
Making development of microservices easier by:
Running many services with one command
Using dependencies in containers
Discovering addresses of other services using simple conventions
Automating deployment of .NET applications to Kubernetes by:
Automatically containerizing .NET applications
Generating Kubernetes manifests with minimal knowledge or configuration
Using a single configuration file
If you have an app that talks to a database, or an app that is made up of a couple of different processes that communicate with each other, then we think Tye will help ease some of the common pain points you’ve experienced.
Tye makes it very easy to run single applications. To demonstrate this:
1. Make a new folder called microservices and navigate to it:
mkdir microservices
cd microservices
2. Then create a frontend project:
dotnet new razor -n frontend
3. Now run this project using tye run:
tye run frontend
The above displays how Tye is building, running, and monitoring the frontend application.
One key feature from tye run is a dashboard to view the state of your application. Navigate to http://localhost:8000 to see the dashboard running.
The dashboard is the UI for Tye that displays a list of all of your services. The Bindings column has links to the listening URLs of the service. The Logs column allows you to view the streaming logs for the service.
Services written using ASP.NET Core will have their listening ports assigned randomly if not explicitly configured. This is useful to avoid common issues like port conflicts.
Running multiple services
Instead of just a single application, suppose we have a multi-application scenario where our frontend project now needs to communicate with a backend project. If you haven’t already, stop the existing tye run command using Ctrl + C.
1. Create a backend API that the frontend will call inside of the microservices/ folder.
dotnet new webapi -n backend
2. Then create a solution file and add both projects:
dotnet new sln
dotnet sln add frontend backend
You should now have a solution called microservices.sln that references the frontend and backend projects.
3. Run tye in the folder with the solution.
tye run
The dashboard should show both the frontend and backend services. You can navigate to both of them through either the dashboard of the url outputted by tye run.
The backend service in this example was created using the webapi project template and will return an HTTP 404 for its root URL.
Getting the frontend to communicate with the backend
Now that we have two applications running, let’s make them communicate.
To get both of these applications communicating with each other, Tye utilizes service discovery. In general terms, service discovery describes the process by which one service figures out the address of another service. Tye uses environment variables for specifying connection strings and URIs of services.
The simplest way to use Tye’s service discovery is through the Microsoft.Extensions.Configuration system – available by default in ASP.NET Core or .NET Core Worker projects. In addition to this, we provide the Microsoft.Tye.Extensions.Configuration package with some Tye-specific extensions layered on top of the configuration system.
If you want to learn more about Tye’s philosophy on service discovery and see detailed usage examples, check out this reference document.
1. If you haven’t already, stop the existing tye run command using Ctrl + C. Open the solution in your editor of choice.
2. Add a file WeatherForecast.cs to the frontend project.
using System; namespace frontend { public class WeatherForecast { public DateTime Date { get; set; } public int TemperatureC { get; set; } public int TemperatureF => 32 + (int)(TemperatureC / 0.5556); public string Summary { get; set; } } }
This will match the backend WeatherForecast.cs.
3. Add a file WeatherClient.cs to the frontend project with the following contents:
using System.Net.Http;
using System.Text.Json;
using System.Threading.Tasks; namespace frontend
{ public class WeatherClient { private readonly JsonSerializerOptions options = new JsonSerializerOptions() { PropertyNameCaseInsensitive = true, PropertyNamingPolicy = JsonNamingPolicy.CamelCase, }; private readonly HttpClient client; public WeatherClient(HttpClient client) { this.client = client; } public async Task<WeatherForecast[]> GetWeatherAsync() { var responseMessage = await this.client.GetAsync("/weatherforecast"); var stream = await responseMessage.Content.ReadAsStreamAsync(); return await JsonSerializer.DeserializeAsync<WeatherForecast[]>(stream, options); } }
}
4. Add a reference to the Microsoft.Tye.Extensions.Configuration package to the frontend project
5. Now register this client in frontend by adding the following to the existing ConfigureServices method to the existing Startup.cs file:
...
public void ConfigureServices(IServiceCollection services)
{ services.AddRazorPages(); /** Add the following to wire the client to the backend **/ services.AddHttpClient<WeatherClient>(client => { client.BaseAddress = Configuration.GetServiceUri("backend"); }); /** End added code **/
}
...
This will wire up the WeatherClient to use the correct URL for the backend service.
6. Add a Forecasts property to the Index page model under Pages\Index.cshtml.cs in the frontend project.
... public WeatherForecast[] Forecasts { get; set; }
...
7. Change the OnGet method to take the WeatherClient to call the backend service and store the result in the Forecasts property:
9. Run the project with tye run and the frontend service should be able to successfully call the backend service!
When you visit the frontend service you should see a table of weather data. This data was produced randomly in the backend service. The fact that you’re seeing it in a web UI in the frontend means that the services are able to communicate. Unfortunately, this doesn’t work out of the box on Linux right now due to how self-signed certificates are handled, please see the workaround here
Tye’s configuration schema
Tye has a optional configuration file (tye.yaml) to enable customizing settings. This file contains all of your projects and external dependencies. If you have an existing solution, Tye will automatically populate this with all of your current projects.
To initalize this file, you will need to run the following command in the microservices directory to generate a default tye.yaml file:
tye init
The contents of the tye.yaml should look like this:
The top level scope (like the name node) is where global settings are applied.
tye.yaml lists all of the application’s services under the services node. This is the place for per-service configuration.
To learn more about Tye’s yaml specifications and schema, you can check it out here in Tye’s repository on Github.
We provide a json-schema for tye.yaml and some editors support json-schema for completion and validation of yaml files. See json-schema for instructions.
Adding external dependencies (Redis)
Not only does Tye make it easy to run and deploy your applications to Kubernetes, it’s also fairly simple to add external dependencies to your applications as well. We will now add redis to the frontend and backend application to store data.
Tye can use Docker to run images that run as part of your application. Make sure that Docker is installed on your machine.
1. Change the WeatherForecastController.Get() method in the backend project to cache the weather information in redis using an IDistributedCache.
2. Add the following using‘s to the top of the file:
using Microsoft.Extensions.Caching.Distributed;
using System.Text.Json;
3. Update Get():
[HttpGet]
public async Task<string> Get([FromServices]IDistributedCache cache)
{ var weather = await cache.GetStringAsync("weather"); if (weather == null) { var rng = new Random(); var forecasts = Enumerable.Range(1, 5).Select(index => new WeatherForecast { Date = DateTime.Now.AddDays(index), TemperatureC = rng.Next(-20, 55), Summary = Summaries[rng.Next(Summaries.Length)] }) .ToArray(); weather = JsonSerializer.Serialize(forecasts); await cache.SetStringAsync("weather", weather, new DistributedCacheEntryOptions { AbsoluteExpirationRelativeToNow = TimeSpan.FromSeconds(5) }); } return weather;
}
This will store the weather data in Redis with an expiration time of 5 seconds.
4. Add a package reference to Microsoft.Extensions.Caching.StackExchangeRedis in the backend project:
cd backend/
dotnet add package Microsoft.Extensions.Caching.StackExchangeRedis
cd ..
5. Modify Startup.ConfigureServices in the backend project to add the redis IDistributedCache implementation.
We’ve added 2 services to the tye.yaml file. The redis service itself and a redis-cli service that we will use to watch the data being sent to and retrieved from redis.
The "${host}:${port}" format in the connectionString property will substitute the values of the host and port number to produce a connection string that can be used with StackExchange.Redis.
7. Run the tye command line in the solution root
Make sure your command-line is in the microservices/ directory. One of the previous steps had you change directories to edit a specific project.
tye run
Navigate to http://localhost:8000 to see the dashboard running. Now you will see both redis and the redis-cli running listed in the dashboard.
Navigate to the frontend application and verify that the data returned is the same after refreshing the page multiple times. New content will be loaded every 5 seconds, so if you wait that long and refresh again, you should see new data. You can also look at the redis-cli logs using the dashboard and see what data is being cached in redis.
The "${host}:${port}" format in the connectionString property will substitute the values of the host and port number to produce a connection string that can be used with StackExchange.Redis.
Deploying to Kubernetes
Tye makes the process of deploying your application to Kubernetes very simple with minimal knowlege or configuration required.
Tye will use your current credentials for pushing Docker images and accessing Kubernetes clusters. If you have configured kubectl with a context already, that’s what tye deploy is going to use!
Prior to deploying your application, make sure to have the following:
Docker installed based off on your operating system
A container registry. Docker by default will create a container registry on DockerHub. You could also use Azure Container Registry (ACR) or another container registry of your choice.
A Kubernetes Cluster. There are many different options here, including:
If you choose a container registry provided by a cloud provider (other than Dockerhub), you will likely have to take some steps to configure your kubernetes cluster to allow access. Follow the instructions provided by your cloud provider.
Deploying Redis
tye deploy will not deploy the redis configuration, so you need to deploy it first by running:
This will create a deployment and service for redis.
Tye deploy
You can deploy your application by running the follow command:
tye deploy --interactive
Enter the Container Registry (ex: example.azurecr.io for Azure or example for dockerhub):
You will be prompted to enter your container registry. This is needed to tag images, and to push them to a location accessible by kubernetes.
If you are using dockerhub, the registry name will be your dockerhub username. If you are using a standalone container registry (for instance from your cloud provider), the registry name will look like a hostname, eg: example.azurecr.io.
You’ll also be prompted for the connection string for redis.
Enter the following to use the instance that you just deployed:
redis:6379
tye deploy will create Kubernetes secret to store the connection string.
–interactive is needed here to create the secret. This is a one-time configuration step. In a CI/CD scenario you would not want to have to specify connection strings over and over, deployment would rely on the existing configuration in the cluster.
Tye uses Kubernetes secrets to store connection information about dependencies like redis that might live outside the cluster. Tye will automatically generate mappings between service names, binding names, and secret names.
tye deploy does many different things to deploy an application to Kubernetes. It will:
Create a docker image for each project in your application.
Push each docker image to your container registry.
Generate a Kubernetes Deployment and Service for each project.
Apply the generated Deployment and Service to your current Kubernetes context.
You should now see three pods running after deploying.
kubectl get pods NAME READY STATUS RESTARTS AGE
backend-ccfcd756f-xk2q9 1/1 Running 0 85m
frontend-84bbdf4f7d-6r5zp 1/1 Running 0 85m
redis-5f554bd8bd-rv26p 1/1 Running 0 98m
You can visit the frontend application, you will need to port-forward to access the frontend from outside the cluster.
kubectl port-forward svc/frontend 5000:80
Now navigate to http://localhost:5000 to view the frontend application working on Kubernetes.
Currently tye does not automatically enable TLS within the cluster, and so communication takes place over HTTP instead of HTTPS. This is typical way to deploy services in kubernetes – we may look to enable TLS as an option or by default in the future.
Adding a registry to tye.yaml
If you want to use tye deploy as part of a CI/CD system, it’s expected that you’ll have a tye.yaml file initialized. You will then need to add a container registry to tye.yaml. Based on what container registry you configured, add the following line in the tye.yaml file:
registry: <registry_name>
Now it’s possible to use tye deploy without --interactive since the registry is stored as part of configuration.
This step may not make much sense if you’re using tye.yaml to store a personal Dockerhub username. A more typical use case would storing the name of a private registry for use in a CI/CD system.
For a conceptual overview of how Tye behaves when using tye deploy for deployment, check out this document.
Undeploying your application
After deploying and playing around with the application, you may want to remove all resources associated from the Kubernetes cluster. You can remove resources by running:
tye undeploy
This will remove all deployed resources. If you’d like to see what resources would be deleted, you can run:
tye undeploy --what-if
If you want to experiment more with using Tye, we have a variety of different sample applications and tutorials that you can walk through, check them out down below:
We have been diligently working on adding new capabilities and integrations to continuously improve Tye. Here are some integrations below that we have recently released. There is also information provided on how to get started for each of these:
Ingress – to expose pods/services created to the public internet.
Redis – to store data, cache, or as a message broker.
Dapr – for integrating a Dapr application with Tye.
While we are excited about the promise Tye holds, it’s an experimental project and not a committed product. During this experimental phase we expect to engage deeply with anyone trying out Tye to hear feedback and suggestions. The point of doing experiments in the open is to help us explore the space as much as we can and use what we learn to determine what we should be building and shipping in the future.
Project Tye is currently commited as an experiment until .NET 5 ships. At which point we will be evaluating what we have and all that we’ve learnt to decide what we should do in the future.
Our goal is to ship every month, and some new capabilities that we are looking into for Tye include:
More deployment targets
Sidecar support
Connected development
Database migrations
We are excited by the potential Tye has to make developing distributed applications easier and we need your feedback to make sure it reaches that potential. We’d really love for you to try it out and tell us what you think, there is a link to a survey on the Tye dashboard that you can fill out or you can create issues and talk to us on GitHub. Either way we’d love to hear what you think.