Posted on Leave a comment

Python One Line Array

This article answers a number of questions how to accomplish different things with a Python array in one line. By studying these questions, you’ll become a better coder. So, let’s roll up your sleeves and get started! 🙂

Python One Line Print Array

If you just want to know the best way to print an array (list) in Python, here’s the short answer:

  • Pass a list as an input to the print() function in Python.
  • Use the asterisk operator * in front of the list to “unpack” the list into the print function.
  • Use the sep argument to define how to separate two list elements visually.

Here’s the code:

# Create the Python List
lst = [1, 2, 3, 4, 5] # Use three underscores as separator
print(*lst, sep='___')
# 1___2___3___4___5 # Use an arrow as separator
print(*lst, sep='-->')
# 1-->2-->3-->4-->5

Try It Yourself in Our Interactive Code Shell:

This is the best and most Pythonic way to print a Python array list. If you still want to learn about alternatives—and improve your Python skills in the process of doing so—read the following tutorial!

Related Article: Print a Python List Beautifully [Click & Run Code]

Python If Else One Line Array

The most basic ternary operator x if c else y returns expression x if the Boolean expression c evaluates to True. Otherwise, if the expression c evaluates to False, the ternary operator returns the alternative expression y.

Here’s a minimal example:

var = 21 if 3<2 else 42
# var == 42

While you read through the article to boost your one-liner power, you can listen to my detailed video explanation:

Related Article: If-Then-Else in One Line Python [Video + Interactive Code Shell]

Python One Line For Loop Array

How to Write a For Loop in a Single Line of Python Code?

There are two ways of writing a one-liner for loop:

  • Method 1: If the loop body consists of one statement, simply write this statement into the same line: for i in range(10): print(i). This prints the first 10 numbers to the shell (from 0 to 9).
  • Method 2: If the purpose of the loop is to create a list, use list comprehension instead: squares = [i**2 for i in range(10)]. The code squares the first ten numbers and stores them in the array list squares.

Let’s have a look at both variants in more detail in the following article:

Related article: Python One Line For Loop [A Simple Tutorial]

Python Iterate Array One Line

How to iterate over an array in a single line of code?

Say, you’ve given an array (list) lst and you want to iterate over all values and do something with them. You can accomplish this using list comprehension:

lst = [1, 2, 3]
squares = [i**2 for i in lst]
print(squares)
# [1, 4, 9]

You iterate over all values in the array lst and calculate their square numbers. The result is stored in a new array list squares.

You can even print all the squared array values in a single line by creating a dummy array of None values using the print() function in the expression part of the list comprehension statement:

[print(i**2) for i in lst] '''
1
4
9 '''

Related article: List Comprehension Full Introduction

Python Fill Array One Line

Do you want to fill or initialize an array with n values using only a single line of Python code?

To fill an array with an integer value, use the list multiplication feature:

array = [0] * 10
print(array)
# [0, 0, 0, 0, 0, 0, 0, 0, 0, 0]

This creates an array of ten elements filled with the value 0. You can also fill the array with other elements by replacing the 0 with the desired element—for example, [None] * 10 creates a list of ten None elements.

Python Initialize Array One Line

There are many ways of creating an array (list) in Python. Let’s get a quick overview in the following table:

Code Description
[] Square bracket: Initializes an empty list with zero elements. You can add elements later.
[x1, x2, x3, … ] List display: Initializes an empty list with elements x1, x2, x3, … For example, [1, 2, 3] creates a list with three integers 1, 2, and 3.
[expr1, expr2, ... ] List display with expressions: Initializes a list with the result of the expressions expr1, expr2, … For example, [1+1, 2-1] creates the list [2, 1].
[expr for var in iter] List comprehension: applies the expression expr to each element in an iterable.
list(iterable) List constructor that takes an iterable as input and returns a new list.
[x1, x2, ...] * n List multiplication creates a list of n concatenations of the list object. For example [1, 2] * 2 == [1, 2, 1, 2].

You can play with some examples in our interactive Python shell:

Exercise: Use list comprehension to create a list of square numbers.

Let’s dive into some more specific ways to create various forms of lists in Python.

Related Article: How to Create a Python List?

Python Filter Array One Line

How can you filter an array in Python using an arbitrary condition?

The most Pythonic way of filtering an array is the list comprehension statement [x for x in list if condition]. You can replace condition with any function of x you would like to use as a filtering criterion.

For example, if you want to filter all elements that are smaller than, say, 10, you’d use the list comprehension statement [x for x in list if x<10] to create a new list with all list elements that are smaller than 10.

Here are three examples of filtering a list:

  • Get elements smaller than eight: [x for x in lst if x<8].
  • Get even elements: [x for x in lst if x%2==0].
  • Get odd elements: [x for x in lst if x%2].
lst = [8, 2, 6, 4, 3, 1] # Filter all elements <8
small = [x for x in lst if x<8]
print(small) # Filter all even elements
even = [x for x in lst if x%2==0]
print(even) # Filter all odd elements
odd = [x for x in lst if x%2]
print(odd)

The output is:

# Elements <8
[2, 6, 4, 3, 1] # Even Elements
[8, 2, 6, 4] # Odd Elements
[3, 1]

This is the most efficient way of filtering an array and it’s also the most Pythonic one.

Related Article: How to Filter a List in Python?

Python One-Liners Book

Python programmers will improve their computer science skills with these useful one-liners.

Python One-Liners

Python One-Liners will teach you how to read and write “one-liners”: concise statements of useful functionality packed into a single line of code. You’ll learn how to systematically unpack and understand any line of Python code, and write eloquent, powerfully compressed Python like an expert.

The book’s five chapters cover tips and tricks, regular expressions, machine learning, core data science topics, and useful algorithms. Detailed explanations of one-liners introduce key computer science concepts and boost your coding and analytical skills. You’ll learn about advanced Python features such as list comprehension, slicing, lambda functions, regular expressions, map and reduce functions, and slice assignments. You’ll also learn how to:

•  Leverage data structures to solve real-world problems, like using Boolean indexing to find cities with above-average pollution
•  Use NumPy basics such as array, shape, axis, type, broadcasting, advanced indexing, slicing, sorting, searching, aggregating, and statistics
•  Calculate basic statistics of multidimensional data arrays and the K-Means algorithms for unsupervised learning
•  Create more advanced regular expressions using grouping and named groups, negative lookaheads, escaped characters, whitespaces, character sets (and negative characters sets), and greedy/nongreedy operators
•  Understand a wide range of computer science topics, including anagrams, palindromes, supersets, permutations, factorials, prime numbers, Fibonacci numbers, obfuscation, searching, and algorithmic sorting

By the end of the book, you’ll know how to write Python at its most refined, and create concise, beautiful pieces of “Python art” in merely a single line.

Get your Python One-Liners Now!!

Posted on Leave a comment

Top 20 Laws for Freelance Web Developers

Last modified on August 30th, 2020.

I got an email from a freelance developer friend. I have a list of associates with whom I collaborate (I get their help) when I am overloaded. The email had two inevitable questions,

  1. How do you ensure that you get the full payment?
  2. How did you create such a testimonial page? Is it fake?

My testimonials

First let me write a short note on my testimonials page. You can easily identify that all the testimonials listed are true.

  • Live link to client’s website.
  • Logo, company name, address, client’s name, designation.

All the above are public information and can be verified within minutes. There are more that twenty five testimonials listed and cannot be faked.

Project success

Okay let us get back to the two questions. With a decade of freelancing experience, I have come up with twenty laws for freelance web developers. If you follow that, a project will be a success. 

When I say “project success” it means, client is happy. Everything else is a derivative of that. You get full payment, a good testimonial, repeat order, possible new reference and all the good things will happen as a by product.
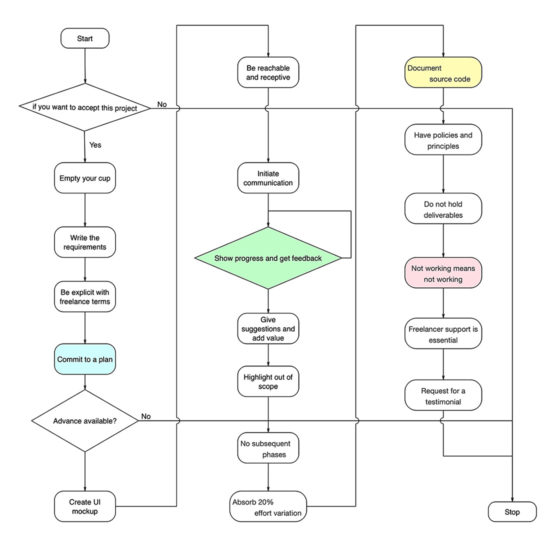
The Laws

  1. All projects are not doable
  2. Empty your cup
  3. Write the requirements
  4. Be explicit with freelance terms
  5. Commit to milestones, dates and a plan
  6. Never work without an advance payment
  7. Create UI mockups
  8. Be reachable and receptive
  9. Initiate communication
  10. Show the progress and get feedback
  11. Give suggestions and add value
  12. When it is out of scope, call it out
  13. Do not discuss subsequent phases in between
  14. Absorb up to 20% variation in effort
  15. Document the source code
  16. Do not be ad-hoc, have policies and principles
  17. Holding a deliverable is not a solution
  18. When client says ‘not working’, it’s not working!
  19. Freelancer’s support is essential
  20. Request for a testimonial

freelance web developer laws

1. All projects are not doable

Do not accept everything that comes your way. Play to your strength. You may have to spend time without projects, even then you should be ready to say no.

There are various reasons to not accept a project.

  • As a web developer we have numerous tech stack options, plugins, extensions. You may not have knowledge or experience with the tech stack the client wishes. A freelance project is not a platform for you to experiment and learn.
  • A client does not know what he needs.
  • You do not have the required domain expertise.
  • You do not know how to achieve what he asks for. 
  • You are already occupied. Trying to accept projects in parallel will not allow you to focus.
  • Do not accept if you have to work for free or under-billed. Always conduct yourself as a professional business.
  • When you do not have access to the actual person giving the order. You can be sub-contracted, but you should have access to the person who gives the requirements. When there are multiple middle men passing requirements to you, things will get lost in the transfer. Unless you directly talk to the person who drives the requirements, you will not get a good hang of it.

Unless you are able to estimate the work and arrive at a detailed work break down structure, do not accept it.

Sometimes a long-term client may bring a project on an alien territory to you. He may try to persuade you, because he is comfortable working with you. If you accept and fail, you will loose. Better explain him why you do not want to take the project and it will add to your respect. 

2. Empty your cup

Every project is a new beginning. As you keep on delivering project, there is a possibility to become complacent. That will lead you to underestimate a project. 

Start as if it is your first freelance web project. Learning is critical a freelance web developer. Most of the times, you will be sitting alone coding from your attic.

There is no team to discuss, share and learn. It is all dependent on your thought process. If you start fresh, you will be receptive (law no. 12). 

3. Write the requirements

Spend more time on requirements phase. As a freelance web developer you will not be billing the time spent on proposal process. Requirements analysis and elaboration is the most critical phase in a software development life cycle. Even critical than the design phase.

Unless you know what you are building where you will be headed. As a web developer, you will be dealing with intangible things. So it is important to get the detailed requirements upfront. 

If you are working based on fixed rate, then waterfall method of development is best suited. You need to fix every inch of the requirement before start.

If you are working based on time and material (hour based billing), then agile iterative development methodology is fine. It is suitable for projects, where the requirement has to evolve over a period as you build. 

In both the cases, write the requirements. Ask the client to write a document and email to you. You analyze and elaborate it. Write it as a document and circulate back for feedback. Iterate the process and arrive at a final document. have the conversation recorded via email as it will help you later to recollect. 

Telephonic conversations has to be converted to a document. At the end of the phase, there should be a requirements document as detailed as possible. 

4. Be explicit with freelance terms

Do not assume things. In particular when it comes to money, do not assume. There are numerous ways the freelance developer world works. 

Explain the terms is detail and get the acknowledgement. Do not shy away from it. Discuss the percentage breakup, schedule, milestone, billing rate, fixed or hourly etc and the mode of payment.

Understand the emphasize is on money. It will also help to plan his budget allocation and be prepared for payment. Never ask for ad-hoc payments. Stick to the agreed schedule and payment mode.

5. Commit to milestones, dates and a plan

Before the project is agreed, the plan should be in place. It should have detailed work break down structure with milestones. The plan should be approved.

You should initiate this process even if the client does not insists on a plan. You should voluntarily commit to it. If you do not do so, it will allow for micro management and ad-hoc reporting.

Client will be guessing the progress and will be on his toes. It will subject you to pressure. Working without a shared plan will never be an advantage for you.

6. Never work without an advance payment

This is not to be on the safer side. This is for a commitment. This is a business. The client has to get involved from day one. He needs to invest on it. You will be investing your time and building the product and for his part he needs to invest the money. It is mutual.

Beginner freelancers fear for everything. If I ask for advance and the client says no to the project, I will loose an opportunity. Working without a commitment is even worser. 

Next, how much to ask is the question. In the freelance web developer world, it is customary to ask for 50% advance payment for smaller (less than 1000 USD) projects. For projects larger than that, the payment can be in three or four parts. Can be even tied to milestones (law no. 5). But whatsoever, there should be an advance to start the project.

7. Create UI mockups

A freelance web developer will always have an urge to commit a project, take advance and jump coding immediately. All these needs to happen immediately. There will be fear of losing the order. But you have to resist that urge.

The more the time you spend on requirements, it will save you later. Remember money is not the only objective. You should retain him for a repeat order, you need to get a testimonial from him, you need to get order references from him.

If all these have to happen, then do not rush into the project. The success is more essential than getting the final payment. Success encompasses more things than the final payment. 

Client’s happiness directly relates to the success. A freelance web developer needs to step into his shoes. Should make all the effort to understand his objective. 

A web developer’s key tool to obtain that objective is UI mockup. You need to invest on a fancy tool, monthly subscription etc. My go to tool is the good old pen and paper, sometimes color pencils will add jazz. 

Just draw, write to create a rough sketch of how you envision the application. Take a snapshot and share with the client. Get his concurrence. Do not over work it. Remember you will be doing this in the proposal stage and the time spent is not billed. All you need to do is covey your idea of the understanding to the client. 

A freelance web developer’s success depends on the strong grip on the project. The first step towards that is the UI mockups. 

8. Be reachable and receptive

Establish a proper communication channel with the client. Along with the quote, share the ways using which the client can reach you. Give multiple possible channels,

  1. Email
  2. Project collaboration tools
  3. IM
  4. Telephone

A freelance web developer is like a juggler. If you loose balance at any point, the whole act will come down. For you to maintain the balance, the client should be comfortable.

Be easily reachable. Clearly convey the client that you prefer email as the communication mode. Attend to emails at least twice a day. Communication channel preference should be in the above order for comfortable execution.

IM and telephone should be the last choice in the list. It never helps. As a freelance web developer, I work with global clients. Imagine a client calling you at midnight and asking for a modification.

When the client writes, it will give clarity to his thoughts. So written communication should be encouraged. You should show that you are listening. In an email, never put any points under the carpet. Whether you agree or not, respond to everything. 

If you are not able to reply immediately, just acknowledge and get back with details later. Your immediate response says that you are receptive.

9. Initiate communication

Do not be casual and wait for client to talk to you. Every mail, ping, call should emanate from the freelance developer and not the client. This will give a comfort to the client. This will assure the client that you are taking care of the project and it is in trusted hands.

Initiating the conversation for a doubt from your side is usual. Every freelance developer does it. But the emphasise is on initiation to inform that the milestone is getting delayed, or you are not able to achieve a feature that you agreed. It might be a bad news, but have the courage to initiate communication. 

10. Show the progress and get feedback

As a freelance web developer you might follow multiple different models for development. In agile development methodology, it is imperative the way it works is by iteration and sprints. You show the progress, get feedback, iterate and keep developing.

A freelance developer has a mindset to get into a cocoon. Nature of the work style drives into it. You keep on developing yourself, there is no team, no one around you to ensure that you are on the right track. Here comes the client. Whatever model you choose, establish a schedule.

Do not be ad-hoc to show the progress. Before you write the first line of code, in fact at the proposal itself lay out a plan. What are all the dates you are going to show the progress should be transparently conveyed to the client. It will drive your progress. More than that, it will avoid rework.

Whenever you get feedback, give priority for the feedback. Not the regular planned tasks. Adjust the plan and covey the client. Always feedback goes first, it should not be accumulated.

11. Give suggestions and add value

A freelance web developer is an expert. The client does it for the first or second time. But you are doing it for the hundredth time. It should reflect in the work.

You are not a data entry operator, you are a developer. Lot more is expected from you. You should contribute in all aspects from design to implementation to training. 

The client will have a narrowed down objective. He just focuses on only one thing, just the UI. You know the engine better. What component to use, how to modularize, how to make things interact, there are numerous aspects. 

Sometimes enthusiastic clients take things outside the track and it might derail the stability of the software. That’s where you step-in. Say no, be steadfast and more important you have to explain and make the client understand. After all he is the one investing.

There might be some intricate things, as an experienced person only you will know. Explain it to the client, add value to his investment. Those will not go free and you will be rewarded.

12. When it is out of scope, call it out

As per law 10, you are supposed to get feedback in regular interval. This opens up other possibility, scope creep. Every feedback has to be organized into bullet points.

Feedbacks should be encouraged to be communicated in written form. If it comes in paragraphs break it down to points. That will reveal hidden gems. Client may not be doing it intentionally. He wants to get a product of his dream. 

So he will be thinking about only what he wants. A freelance developer is doing business. Profitability is important. By informing the client that this is out of scope you are also helping him. Scope creep, will take you down. If you go down, the project goes down and so the client.

Explain it, give reference from the requirements document. Do not say no! A scope creep is an opportunity for a freelance web developer. Do not take it negatively and jump on the client. Explain him politely and increase the scope of the project and so the bill.

13. Do not discuss subsequent phases in between

If an out of scope item is minor that can be informed to the client, reestimate the project, schedule and cost. Sometimes, the out scope item can be a module. If in proportion it is 50% of the current size or more than that, then it should be carved out as a separate phase.

Do not mix it with the current scope of work. Tell the client that you will definitely work on it. But will be taken as next phase. Let us document it and move forward with the current scope of items. Let us finish the planned work and then take this as a next project.

Re estimate and re scheduling can be done once or twice. If you keep on repeating it, then the client will get a feeling that things are dragged. It will feel like when this thing will end. So it is all in perception.

14. Absorb up to 20% variation in effort

If you are billing by hourly (time and material), then this is not an issue. To be safe on this, people advice to always go for hourly billing and avoid fixed rate. Not necessarily. 

If you are good in your territory, then fixed rate is fine. Client’s prefer that. If you are skilled enough to arrive at a good estimate, then why not? Go for fixed billing.

Freelance web development is a haunting story, most of the time. Despite you follow all these laws, expect unexpected turns. A freelance web developer has to swim in uncharted territories at times.

This may result in effort variation, remember plus or minus both. Sometimes you loose and sometimes you win. In any case, up to 20% variation is fine. 

In situations beyond that, explain the client. Attribute proper reasons, give reference and evidences. It is your responsibility as a freelance developer to convince. Web development keeps on changing. A freelance developer needs to keep up the pace. Otherwise you will be in this situation quite often.

15. Document the source code

Developer’s responsibility is to ensure that the project is a success. In the success durability is also a critical element. A freelance developer is not expected to launch and run away (see law 19). 

A web application should have a life of minimum five years. Without any maintenance project should run. But when there is a necessity, it should be doable easily. Either you or some other freelance developer might work on it in the future.

The comments you are going to add now will be of great help later. Freelance web development should not be seen as a one time job. If you do not add code comments, the same project may be freelanced to you later and the web application will come back and haunt you.

There are so many literature around the web explaining the goodness of source code comments.

16. Do not be ad-hoc, have policies and principles

As a freelance web developer, you need to draw your own rules. How do you arrive that? Is there any web developer template available? There is none. If you find something, do not follow it blindly.

Every freelance developer is a unique breed. Every web development project has unique challenges. You handle it in your own style. You have to arrive at your own rules. 

But you cannot live without rules. For example, let us take non disclosure agreement (NDA). There are numerous template NDA littered all over the web. As a freelance developer you will come across many. Over a period build document for your own. Incorporate the best and keep updating it. 

Hourly billing, fixed rate, what is your style. If fixed rate, do not keep it volatile. Which UI web component you will use? Which web responsive framework will you use? Right from money to tech stack, a freelance developer should have written everything. This is what you will follow, this what you will use.

What is your free support duration? These are all questions that are thrown at a freelance developer quite often. You should have readymade fixed answers for these. You should have freelance policy document. 

17. Holding a deliverable is not a solution

The rope is holding you back. Did you see the movie “The Dark Knight Rises”? The scene where the batman tries to get out of the well (prison pit). It neatly sums up what fear does to you.

You are not exchanging illegal things. Holding a deliverable makes the client feel untrusted. Business requires trust from both the sides. If you have followed all the laws till now, the client will be more than happy to pay you.

You need not hold the deliverable and ask for money. It feels like threatening. You are a web developer. If you are confident that you have done a good job, do not tie the deliverable to the payment. They should be independent of each other.

No client will burn the bridge. If you do a good job and you make the client feel it, then he will pay you. Sometimes even more than what you agreed for. I have got paid extra many times.

The client will need you in the future in two cases. He may require you for maintenance or enhancement for the application you have built. He may also require you for new projects. So he will not attempt to run away.

To get the full payment, to get a testimonial, or for any similar objective, do not hold the deliverable. Your fear will make things worse. Be good and focus on client’s objective, then you will get everything.

18. When client says ‘not working’, it’s not working!

You have delivered the project and the job is over. But, the client says it is not working. Never ever reply saying, “it is working for me!”. When he says, he means it.

If it is a web application, ask for access. First have intention to identify what is happening. Then think about how to help solve the issue.

How you respond to the call is important. Instead of saying working for me think about understanding the issue. Nobody cares about whether it works for you or in your environment. It needs to work in the production and work for the investor. Only then the developer job is complete. 

19. Freelancer’s support is essential

Freelancer should always provide a support period. The terms may vary, but you should always provide support.

The terms of support should be discussed and conveyed at the proposal stage itself. For example, a freelancer can give six months of free support. Then what comes under free needs to be described. 

Support is essential for the durability of the web application. For maintenance and enhancements will always be there. The client will bank on you as a first choice. You should be available for that.

Repeat work has higher priority than new job. Free support has higher priority than repeat work. That’s how it goes in the freelance world. That’s how you ensure project success.

20. Request for a testimonial

“The crying baby gets the milk”, you should ask for it and there is nothing wrong in it. There are two main purposes to ask for a testimonial.

  1. To use it in your showcase
  2. To ensure that whether you have done a good job.

A freelancer’s worth is determined by the testimonials he has. It is your pride. It is far better and more important than a portfolio.

The words in the testimonial will teach you your strengths and weaknesses. Sometimes the client will not give you one. Don’t pester. Instead ask for what help should be done to make the project success.

Go the extra mile and make it a success. Then ensure that you get a testimonial.

↑ Back to Top

Posted on Leave a comment

How To Display The Latest Python News On Your Webpage?

To display the latest Python news on your website, you can use the embed feature in your WordPress editor….

Problem: How To Display The Latest Python News On Your Webpage?

Example:

Given a dictionary:

d = {'a': 42, 'b': 21}

We want to obtain the sum of all values in the dictionary:

42+21=63

Method 1: Extract Values and Use sum() Functions

fjfjk

print(42)

fdskalfjlk

Method 2: Extract Values and Use sum() Functions

fjfjk

print(42)

fdskalfjlk

Method 3: Extract Values and Use sum() Functions

fjfjk

print(42)

fdskalfjlk

Method 4: Extract Values and Use sum() Functions

fjfjk

print(42)

fdskalfjlk

Conclusion / Summary

alksjdflkasj

Posted on Leave a comment

Pretty Print JSON [Python One-Liner]

Problem: Given a JSON object. How to pretty print it from the shell/terminal/command line using a Python one-liner?

Minimal Example: You have given the following JSON object:

{"Alice": "24", "Bob": "28"}

And you want to get the following print output:

{ "Alice": "24", "Bob": "28"
}

How to accomplish this using a Python one-liner?

Method 0: Python Program + json.dump

The default way to accomplish this in a Python script is to import the json library to solve the issue:

Exercise: Execute the script. What’s the output? Now change the number of indentation spaces to 2!

However, what if you want to run this from your operating system terminal as a one-liner command? Let’s dive into the four best ways!

Method 1: Terminal / Shell / Command Line with Echo + Pipe + json.tool

The echo command prints the JSON to the standard output. This is then piped as standard input to the json.tool program that pretty prints the JSON object to the standard output:

echo '{"Alice": "24", "Bob": "28"}' | python -m json.tool

The output is the prettier:

{ "Alice": "24", "Bob": "28"
}

The pipe operator | redirects the output to the standard input of the Python script.

Method 2: Use a File as Input with json.tool

An alternative is the simple:

python -m json.tool file.json

This method is best if you have stored your JSON object in the file.json file. If the file contains the same data, the output is the same, too:

{ "Alice": "24", "Bob": "28"
}

Method 3: Use Web Resource with json.tool

If your JSON file resides on a given URL https://example.com, you’ll best use the following one-liner:

curl https://example.com/ | python -m json.tool

Again, assuming the same JSON object residing on the server, the output is the same:

{ "Alice": "24", "Bob": "28"
}

Method 4: Use jq

This is the simplest way but it assumes that you have the jq program installed on your machine. You can download jq here and also read about the excellent quick-start resources here.

Let’s dive into the code you can run in your shell:

jq <<< '{ "foo": "lorem", "bar": "ipsum" }'
{ "bar": "ipsum", "foo": "lorem"
}

The <<< operator passes the string on the right to the standard input of the command on the left. You can learn more about this special pipe operator in this SO thread.

While this method is not a Python script, it still works beautifully when executed from a Linux or MacOS shell or the Windows Powershell / command line.

Python One-Liners Book

Python programmers will improve their computer science skills with these useful one-liners.

Python One-Liners

Python One-Liners will teach you how to read and write “one-liners”: concise statements of useful functionality packed into a single line of code. You’ll learn how to systematically unpack and understand any line of Python code, and write eloquent, powerfully compressed Python like an expert.

The book’s five chapters cover tips and tricks, regular expressions, machine learning, core data science topics, and useful algorithms. Detailed explanations of one-liners introduce key computer science concepts and boost your coding and analytical skills. You’ll learn about advanced Python features such as list comprehension, slicing, lambda functions, regular expressions, map and reduce functions, and slice assignments. You’ll also learn how to:

•  Leverage data structures to solve real-world problems, like using Boolean indexing to find cities with above-average pollution
•  Use NumPy basics such as array, shape, axis, type, broadcasting, advanced indexing, slicing, sorting, searching, aggregating, and statistics
•  Calculate basic statistics of multidimensional data arrays and the K-Means algorithms for unsupervised learning
•  Create more advanced regular expressions using grouping and named groups, negative lookaheads, escaped characters, whitespaces, character sets (and negative characters sets), and greedy/nongreedy operators
•  Understand a wide range of computer science topics, including anagrams, palindromes, supersets, permutations, factorials, prime numbers, Fibonacci numbers, obfuscation, searching, and algorithmic sorting

By the end of the book, you’ll know how to write Python at its most refined, and create concise, beautiful pieces of “Python art” in merely a single line.

Get your Python One-Liners Now!!

Posted on Leave a comment

ASP.NET Core updates in .NET 5 Preview 8

Daniel Roth

Daniel

.NET 5 Preview 8 is now available and is ready for evaluation. Here’s what’s new in this release:

  • Azure Active Directory authentication with Microsoft.Identity.Web
  • CSS isolation for Blazor components
  • Lazy loading in Blazor WebAssembly
  • Updated Blazor WebAssembly globalization support
  • New InputRadio Blazor component
  • Set UI focus in Blazor apps
  • Influencing the HTML head in Blazor apps
  • IAsyncDisposable for Blazor components
  • Control Blazor component instantiation
  • Protected browser storage
  • Model binding and validation with C# 9 record types
  • Improvements to DynamicRouteValueTransformer
  • Auto refresh with dotnet watch
  • Console Logger Formatter
  • JSON Console Logger

See the .NET 5 release notes for additional details and known issues.

Get started

To get started with ASP.NET Core in .NET 5 Preview 8 install the .NET 5 SDK.

You need to use Visual Studio 2019 16.8 Preview 2 or newer to use .NET 5 Preview 8. .NET 5 is also supported with the latest preview of Visual Studio for Mac. To use .NET 5 with Visual Studio Code, install the latest version of the C# extension.

Upgrade an existing project

To upgrade an existing ASP.NET Core app from .NET 5 Preview 7 to .NET 5 Preview 8:

  • Update all Microsoft.AspNetCore.* package references to 5.0.0-preview.8.*.
  • Update all Microsoft.Extensions.* package references to 5.0.0-preview.8.*.
  • Update System.Net.Http.Json package references to 5.0.0-preview.8.*.

That’s it! You should be all ready to go.

See also the full list of breaking changes in ASP.NET Core for .NET 5.

What’s new?

Azure Active Directory authentication with Microsoft.Identity.Web

The ASP.NET Core project templates now integrate with Microsoft.Identity.Web to handle authentication with Azure Activity Directory (Azure AD). The Microsoft.Identity.Web package provides a better experience for authentication through Azure AD as well as an easier way to access Azure resources on behalf of your users, including Microsoft Graph. Check out the Microsoft.Identity.Web sample that take you from a simple login through multi-tenancy, using Azure APIs, using Microsoft Graph, and protecting your own APIs. Microsoft.Identity.Web will be generally available alongside .NET 5.

CSS isolation for Blazor components

Blazor now supports defining CSS styles that are scoped to a given component. Component specific CSS styles make it easier to reason about the styles in your app and to avoid unintentional side effects from global styles. You define component specific styles in a .razor.css file the matches the name of the .razor file for the component.

For example, let’s say you have a component MyComponent.razor file that looks like this:

MyComponent.razor

<h1>My Component</h1> <ul class="cool-list"> <li>Item1</li> <li>Item2</li>
</ul>

You can then define a MyComponent.razor.css with the styles for MyComponent:

MyComponent.razor.css

h1 { font-family: 'Comic Sans MS'
} .cool-list li { color: red;
}

The styles in MyComponent.razor.css will only get applied to the rendered output of MyComponent; the h1 elements rendered by other components, for example, are not affected.

To write a selector in component specific styles that affects child components, use the ::deep combinator.

.parent ::deep .child { color: red;
}

By using the ::deep combinator, only the .parent class selector is scoped to the component; the .child class selector is not scoped, and will match content from child components.

Blazor achieves CSS isolation by rewriting the CSS selectors as part of the build so that they only match markup rendered by the component. Blazor then bundles together the rewritten CSS files and makes the bundle available to the app as a static web asset at the path _framework/scoped.styles.css.

While Blazor doesn’t natively support CSS preprocessors like Sass or Less, you can still use CSS preprocessors to generate component specific styles before they are rewritten as part of the building the project.

Lazy loading in Blazor WebAssembly

Lazy loading enables you to improve the load time of your Blazor WebAssembly app by deferring the download of specific app dependencies until they are required. Lazy loading may be helpful if your Blazor WebAssembly app has large dependencies that are only used for specific parts of the app.

To delay the loading of an assembly, you add it to the BlazorWebAssemblyLazyLoad item group in your project file:

Assemblies marked for lazy loading must be explicitly loaded by the app before they are used. To lazy load assemblies at runtime, use the LazyAssemblyLoader service:

@inject LazyAssemblyLoader LazyAssemblyLoader @code { var assemblies = await LazyAssemblyLoader.LoadAssembliesAsync(new string[] { "Lib1.dll" });
}

To lazy load assemblies for a specific page, use the OnNavigateAsync event on the Router component. The OnNavigateAsync event is fired on every page navigation and can be used to lazy load assemblies for a particular route. You can also lazily load the entire page for a route by passing any lazy loaded assemblies as additional assemblies to the Router.

The following examples demonstrates using the LazyAssemblyLoader service to lazy load a specific dependency (Lib1.dll) when the user navigates to /page1. The lazy loaded assembly is then added to the additional assemblies list passed to the Router component, so that it can discover any routable components in that assembly.

@using System.Reflection
@using Microsoft.AspNetCore.Components.Routing
@using Microsoft.AspNetCore.Components.WebAssembly.Services
@inject LazyAssemblyLoader LazyAssemblyLoader <Router AppAssembly="typeof(Program).Assembly" AdditionalAssemblies="lazyLoadedAssemblies" OnNavigateAsync="@OnNavigateAsync"> <Navigating> <div> <p>Loading the requested page...</p> </div> </Navigating> <Found Context="routeData"> <RouteView RouteData="@routeData" DefaultLayout="typeof(MainLayout)" /> </Found> <NotFound> <LayoutView Layout="typeof(MainLayout)"> <p>Sorry, there is nothing at this address.</p> </LayoutView> </NotFound>
</Router> @code { private List<Assembly> lazyLoadedAssemblies = new List<Assembly>(); private async Task OnNavigateAsync(NavigationContext args) { if (args.Path.EndsWith("/page1")) { var assemblies = await LazyAssemblyLoader.LoadAssembliesAsync(new string[] { "Lib1.dll" }); lazyLoadedAssemblies.AddRange(assemblies); } }
}

Updated Blazor WebAssembly globalization support

.NET 5 Preview 8 reintroduces globalization support for Blazor WebAssembly based on International Components for Unicode (ICU). Part of introducing the ICU data and logic is optimizing these payloads for download size. This work is not fully completed yet. We expect to reduce the size of the ICU data in future .NET 5 preview updates.

New InputRadio Blazor component

Blazor in .NET 5 now includes built-in InputRadio and InputRadioGroup components. These components simplify data binding to radio button groups with integrated validation alongside the other Blazor form input components.

Opinion about blazor:
<InputRadioGroup @bind-Value="survey.OpinionAboutBlazor"> @foreach (var opinion in opinions) { <div class="form-check"> <InputRadio class="form-check-input" id="@opinion.id" Value="@opinion.id" /> <label class="form-check-label" for="@opinion.id">@opinion.label</label> </div> }
</InputRadioGroup>

Set UI focus in Blazor apps

Blazor now has a FocusAsync convenience method on ElementReference for setting the UI focus on that element.

<button @onclick="() => textInput.FocusAsync()">Set focus</button>
<input @ref="textInput"/>

IAsyncDisposable support for Blazor components

Blazor components now support the IAsyncDisposable interface for the asynchronous release of allocated resources.

Control Blazor component instantiation

You can now control how Blazor components are instantiated by providing your own IComponentActivator service implementation.

Thank you Mladen Macanović for this Blazor feature contribution!

Influencing the HTML head in Blazor apps

Use the new Title, Link, and Meta components to programmatically set the title of a page and dynamically add link and meta tags to the HTML head in a Blazor app.

To use the new Title, Link, and Meta components:

  1. Add a package reference to the Microsoft.AspNetCore.Components.Web.Extensions package.
  2. Include a script reference to _content/Microsoft.AspNetCore.Components.Web.Extensions/headManager.js.
  3. Add a @using directive for Microsoft.AspNetCore.Components.Web.Extensions.Head.

The following example programmatically sets the page title to show the number of unread user notifications, and updates the page icon a as well:

@if (unreadNotificationsCount > 0)
{ var title = $"Notifications ({unreadNotificationsCount})"; <Title Value="title"></Title> <Link rel="icon" href="icon-unread.ico" />
}

Protected browser storage

In Blazor Server apps, you may want to persist app state in local or session storage so that the app can rehydrate it later if needed. When storing app state in the user’s browser, you also need to ensure that it hasn’t been tampered with.

Blazor in .NET 5 helps solve this problem by providing two new services: ProtectedLocalStorage and ProtectedSessionStorage. These services help you store state in local and session storage respectively, and they take care of protecting the stored data using the ASP.NET Core data protection APIs.

To use the new protected browser storage services:

  1. Add a package reference to Microsoft.AspNetCore.Components.Web.Extensions.
  2. Configure the services by calling services.AddProtectedBrowserStorage() from Startup.ConfigureServcies.
  3. Inject either ProtectedLocalStorage and ProtectedSessionStorage into your component implementation:

    @inject ProtectedLocalStorage ProtectedLocalStorage
    @inject ProtectedSessionStorage ProtectedSessionStorage
    
  4. Use the desired service to get, set, and delete state asynchronously:

    private async Task IncrementCount()
    {
    await ProtectedLocalStorage.SetAsync("count", ++currentCount);
    }
    

Model binding and validation with C# 9 record types

You can now use C# 9 record types with model binding in an MVC controller or a Razor Page. Record types are a great way to model data being transmitted over the wire.

For example, the PersonController below uses the Person record type with model binding and form validation:

“`C# public record Person([Required] string Name, [Range(0, 150)] int Age);

public class PersonController { public IActionResult Index() => View();

[HttpPost] public IActionResult Index(Person person) { // … } }

<br />*Person/Index.cshtml* ```razor
@model Person Name: <input asp-for="Model.Name" />
<span asp-validation-for="Model.Name" /> Age: <input asp-for="Model.Age" />
<span asp-validation-for="Model.Age" />

Improvements to DynamicRouteValueTransformer

ASP.NET Core in .NET Core 3.1 introduced DynamicRouteValueTransformer as a way to use use a custom endpoint to dynamically select an MVC controller action or a razor page. In .NET 5 Preview 8 you can now pass state to your DynamicRouteValueTransformer and filter the set of endpoints chosen.

Auto refresh with dotnet watch

In .NET 5, running dotnet watch on an ASP.NET Core project will now both launch the default browser and auto refresh the browser as you make changes to your code. This means you can open an ASP.NET Core project in your favorite text editor, run dotnet watch run once, and then focus on your code changes while the tooling handles rebuilding, restarting, and reloading your app. We expect to bring the auto refresh functionality to Visual Studio in the future as well.

Console Logger Formatter

We’ve made improvements to the console log provider in the Microsoft.Extensions.Logging library. Developers can now implement a custom ConsoleFormatter to exercise complete control over formatting and colorization of the console output. The formatter APIs allow for rich formatting by implementing a subset of the VT-100 (supported by most modern terminals) escape sequences. The console logger can parse out escape sequences on unsupported terminals allowing you to author a single formatter for all terminals.

JSON Console Logger

In addition to support for custom formatters, we’ve also added a built-in JSON formatter that emits structured JSON logs to the console. You can switch from the default simple logger to JSON, add to following snippet to your Program.cs:

public static IHostBuilder CreateHostBuilder(string[] args) => Host.CreateDefaultBuilder(args)
+ .ConfigureLogging(logging =>
+ {
+ logging.AddJsonConsole(options =>
+ {
+ options.JsonWriterOptions = new JsonWriterOptions() { Indented = true };
+ });
+ }) .ConfigureWebHostDefaults(webBuilder => { webBuilder.UseStartup<Startup>(); });

Once enabled, log messages emitted to the console are now JSON formatted.

{ "EventId": 0, "LogLevel": "Information", "Category": "Microsoft.Hosting.Lifetime", "Message": "Now listening on: https://localhost:5001", "State": { "Message": "Now listening on: https://localhost:5001", "address": "https://localhost:5001", "{OriginalFormat}": "Now listening on: {address}" }
}

Give feedback

We hope you enjoy this release of ASP.NET Core in .NET 5! We are eager to hear about your experiences with this latest .NET 5 release. Let us know what you think by filing issues on GitHub.

Thanks for trying out ASP.NET Core!

Posted on Leave a comment

How to Print Without Newline in Python—A Simple Illustrated Guide

Summary: To print without the newline character in Python 3, set the end argument in the print() function to the empty string or the single whitespace character. This ensures that there won’t be a newline in the standard output after each execution of print(). Alternatively, unpack the iterable into the print() function to avoid the use of multiple print() statements: print(*iter).

Print Without Newline Python (End Argument)

Let’s go over this problem and these two solutions step-by-step.

Problem: How to use the print() function without printing an implicit newline character to the Python shell?

Example: Say, you want to use the print() function within a for loop—but you don’t want to see multiple newlines between the printed output:

for i in range(1,5): print(i)

The default standard output is the following:

1
2
3
4

But you want to get the following output in a single line of Python code.

1 2 3 4

How to accomplish this in Python 3?

Solution: I’ll give you the quick solution in an interactive Python shell here:

By reading on, you’ll understand how this works and become a better coder in the process.

Let’s have a quick recap of the Python print() function!

Python Print Function – Quick Start Guide

There are two little-used arguments of the print function in Python.

  • The argument sep indicates the separator which is printed between the objects.
  • The argument end defines what comes at the end of each line.

Related Article: Python Print Function [And Its SECRET Separator & End Arguments]

Consider the following example:

a = 'hello'
b = 'world' print(a, b, sep=' Python ', end='!')

Try it yourself in our interactive code shell:

Exercise: Click “Run” to execute the shell and see the output. What has changed?

Solution 1: End Argument of Print Function

Having studied this short guide, you can now see how to solve the problem:

To print the output of the for loop to a single line, you need to define the end argument of the print function to be something different than the default newline character. In our example, we want to use the empty space after each string we pass into the print() function. Here’s how you accomplish this:

for i in range(1,5): print(i, end=' ')

The shell output concentrates on a single line:

1 2 3 4 

By defining the end argument, you can customize the output to your problem.

Solution 2: Unpacking

However, there’s an even more advanced solution that’s more concise and more Pythonic. It makes use of the unpacking feature in Python.

print(*range(1,5))
# 1 2 3 4

The asterisk prefix * before the range(1,5) unpacks all values in the range iterable into the print function. This way, it becomes similar to the function execution print(1, 2, 3, 4) with comma-separated arguments. You can use an arbitrary number of arguments in the print() function.

Per default, Python will print these arguments with an empty space in between. If you want to customize this separator string, you can use the sep argument as you’ve learned above.

How to Print a List?

Do you want to print a list to the shell? Just follow these simple steps:

  • Pass a list as an input to the print() function in Python.
  • Use the asterisk operator * in front of the list to “unpack” the list into the print function.
  • Use the sep argument to define how to separate two list elements visually.

Here’s the code:

# Create the Python List
lst = [1, 2, 3, 4, 5] # Use three underscores as separator
print(*lst, sep='___')
# 1___2___3___4___5 # Use an arrow as separator
print(*lst, sep='-->')
# 1-->2-->3-->4-->5

Try It Yourself in Our Interactive Code Shell:

This is the best and most Pythonic way to print a Python list. If you still want to learn about alternatives—and improve your Python skills in the process of doing so—read the following tutorial!

Related Article: Print a Python List Beautifully [Click & Run Code]

Where to Go From Here?

Enough theory, let’s get some practice!

To become successful in coding, you need to get out there and solve real problems for real people. That’s how you can become a six-figure earner easily. And that’s how you polish the skills you really need in practice. After all, what’s the use of learning theory that nobody ever needs?

Practice projects is how you sharpen your saw in coding!

Do you want to become a code master by focusing on practical code projects that actually earn you money and solve problems for people?

Then become a Python freelance developer! It’s the best way of approaching the task of improving your Python skills—even if you are a complete beginner.

Join my free webinar “How to Build Your High-Income Skill Python” and watch how I grew my coding business online and how you can, too—from the comfort of your own home.

Join the free webinar now!

Posted on Leave a comment

Python One Line And/Or

How do the Boolean and and or operators work in the context of Python one-liners?

You may know the standard use of the logical operators applied to Boolean values:

>>> True and False
False
>>> False or True
True

But there’s more to these operators that only experts in the art of writing concise Python one-liners know.

For instance, the following use of the or operator applied to non-Boolean values is little known:

>>> 'hello' or 42 'hello'
>>> [] or 42
42

Similarly, the following use of the and operator often causes confusion in readers of advanced Python one-liners:

>>> 'hello' and 42
42
>>> [] and 42
[]

How do the and and or operator work when applied to non-Boolean operands?

To understand what is going on, you need to look at the definitions of the Boolean operators:

Operator Description
a or b Returns b if the expression a evaluates to False using implicit Boolean conversion. If the expression a evaluates to True, the expression a is returned.
a and b Returns b if the expression a evaluates to True using implicit Boolean conversion. If the expression a evaluates to False, the expression a is returned.

Study these explanations thoroughly! The return value is of the same data type of the operands—they only return a Boolean value if the operands are already Boolean!

This optimization is called short-circuiting and it’s common practice in many programming languages. For example, it’s not necessary to evaluate the result of the second operand of an and operation if the first operand evaluates to False. The whole operation must evaluate to False in this case because the logical and only returns True if both operands are True.

Python goes one step further using the property of implicit Boolean conversion. Every object can be implicitly converted to a Boolean value. That’s why you see code like this:

l = []
if l: print('hi')
else: print('bye')
# bye

You pass a list into the if condition. Python then converts the list to a Boolean value to determine which branch to visit next. The empty list evaluates to False. All other lists evaluate to True, so the result is bye.

Together, short circuiting and implicit Boolean conversion allow the logical operators and and or to be applied to any two Python objects as operands. The return value always is one of the two operands using the short circuiting rules described in the table.

Try it yourself in our interactive code shell:

Exercise: Guess the output! Then check if you were right! Create your own crazy operands and evaluate them by executing the code in your browser.

Python One-Liners Book

Python programmers will improve their computer science skills with these useful one-liners.

Python One-Liners

Python One-Liners will teach you how to read and write “one-liners”: concise statements of useful functionality packed into a single line of code. You’ll learn how to systematically unpack and understand any line of Python code, and write eloquent, powerfully compressed Python like an expert.

The book’s five chapters cover tips and tricks, regular expressions, machine learning, core data science topics, and useful algorithms. Detailed explanations of one-liners introduce key computer science concepts and boost your coding and analytical skills. You’ll learn about advanced Python features such as list comprehension, slicing, lambda functions, regular expressions, map and reduce functions, and slice assignments. You’ll also learn how to:

•  Leverage data structures to solve real-world problems, like using Boolean indexing to find cities with above-average pollution
•  Use NumPy basics such as array, shape, axis, type, broadcasting, advanced indexing, slicing, sorting, searching, aggregating, and statistics
•  Calculate basic statistics of multidimensional data arrays and the K-Means algorithms for unsupervised learning
•  Create more advanced regular expressions using grouping and named groups, negative lookaheads, escaped characters, whitespaces, character sets (and negative characters sets), and greedy/nongreedy operators
•  Understand a wide range of computer science topics, including anagrams, palindromes, supersets, permutations, factorials, prime numbers, Fibonacci numbers, obfuscation, searching, and algorithmic sorting

By the end of the book, you’ll know how to write Python at its most refined, and create concise, beautiful pieces of “Python art” in merely a single line.

Get your Python One-Liners Now!!

Posted on Leave a comment

Python Small Integer Caching: == versus is

This interesting code snippet was brought to my attention by Finxter reader Albrecht.

a, b = 250, 250
for i in range(250, 260): if a is not b: break a += 1 b += 1
print(a)
# What's the output of this code snippet?

You’d guess that the for loop goes from i=250 to i=259, each time incrementing a and b. As Python creates one integer object to which both names refer, the command a is not b should always be False. Thus, the result is a=259, right?

WRONG!!! $%&&%$

Try it yourself in our interactive code shell:

Exercise: Run the code and check the result. Did you expect this?

The result is a=257.

The reason is an implementation detail of the CPython implementation called “Small Integer Caching” — the internal cache of integers in Python.

If you create an integer object that falls into the range of -5 to 256, Python will only return a reference to this object — which is already cached in memory.

“The current implementation keeps an array of integer objects for all integers between -5 and 256, when you create an int in that range you actually just get back a reference to the existing object.”

Python Docs

You can visualize the code execution in this interactive memory visualizer:

Exercise: Click next until you see the result. How many integers are in memory?

Let’s quickly examine the meaning of “is” in Python.

The is operator

The is operator checks if two variable names point to the same object in memory:

>>> a = "hello"
>>> b = "hello"
>>> a is b
True

Both variables a and b point to the string "hello". Python doesn’t store the same string twice but creates it only once in memory. This saves memory and makes Python faster and more efficient. And it’s not a problem because strings are immutable — so one variable cannot “overshadow” a string object of another variable.

Note that we can use the id() function to check an integer representation of the memory address:

>>> a = "hello"
>>> b = "hello"
>>> id(a)
1505840752992
>>> id(b)
1505840752992

They both point to the same location in memory! Therefore, the is operator returns True!

Small Integer Caching

Again, if you create an integer object that falls into the range of -5 to 256, Python will only return a reference to this object — which is already cached in memory. But if we create an integer object that does not fall into this range, Python may return a new integer object with the same value.

If we now check a is not b, Python will give us the correct result True.

In fact, this leads to the strange behavior of the C implementation of Python 3:

>>> a = 256
>>> b = 256
>>> a is b
True
>>> a = 257
>>> b = 257
>>> a is b
False

Therefore, you should always compare integers by using the == operator in Python. This ensures that Python performs a semantic comparison, and not a mere memory address comparison:

>>> a = 256
>>> b = 256
>>> a == b
True
>>> a = 257
>>> b = 257
>>> a == b
True

What can you learn from this? Implementation details matter!

Where to Go From Here?

Enough theory, let’s get some practice!

To become successful in coding, you need to get out there and solve real problems for real people. That’s how you can become a six-figure earner easily. And that’s how you polish the skills you really need in practice. After all, what’s the use of learning theory that nobody ever needs?

Practice projects is how you sharpen your saw in coding!

Do you want to become a code master by focusing on practical code projects that actually earn you money and solve problems for people?

Then become a Python freelance developer! It’s the best way of approaching the task of improving your Python skills—even if you are a complete beginner.

Join my free webinar “How to Build Your High-Income Skill Python” and watch how I grew my coding business online and how you can, too—from the comfort of your own home.

Join the free webinar now!

Posted on Leave a comment

How to Make Online Photo Editing Effects like Blur Image, Sepia, Vintage

Last modified on August 23rd, 2020.

Photo editing effects will turn graphical elements to be expressive. With suitable effects, you can use a simple image and convey an idea. For example, you can bring logo to the foreground by blurring the background image.

The effects like image blur, transparency, shadowing creates attractive visual effects. There are many different image effects available. In fact, hundreds of them are available.

Online photo editing tools use a variety of methods to apply the effects on a target image. For example, either a CSS filter property or a SVG filter primitive can create an image blur effect.

Most of the visual effects are achievable with HTML5 and CSS3 filter properties. We will see how to make photo editing effects to blur, apply sepia, and vintage effect on a target image.

I created a simple image editing tool to apply blur, sepia, and vintage effect on a target image. Following is a live preview of the tool.

I have added a jQuery slider to allow you fiddle with the image editing effects between a min-max range.

What is inside?

  1. Popular photo editing effects
  2. Uses of image editing effects
  3. About this example
  4. File structure
  5. Online photo editing UI to apply blur sepia effects
  6. Managing image editing effects with jQuery slider
  7. Blur image using CSS and SVG filter
  8. How to apply sepia effect on an image
  9. Applying various tones with vintage effects
  10. Editing tool output with image Blur Sepia and Vintage effects

Popular photo editing effects

You can use photo editing effects and manipulate images in an innovative way. They cause visual conversion on the UI graphics. You can add tones, brightness, shadow, themes, and lot more effects on a photo.

There is almost no limit to add effects on a photo. In a previous article, I gave an image-editing example with image transition effects.

Below is a sample list of visual effects achievable with simple CSS.

  • Grayscale
  • Blur
  • Brightness
  • Contrast
  • Opacity
  • Saturate
  • Sepia
  • Invert

Uses of image editing effects

The photo editing may seem like a fun and easy job. But, it’s not true. Rather, it’s a real challenge to show your potential to give the best results.

I used some of the effects on the output of the image editing example scripts like fade-in-out image background.

Many of the image editing effects are most frequently required by the user. They are,

  • Blur image – to highlight something important in the foreground.
  • opacity – to add transparency for the product labels displayed on the shop gallery images.
  • grayscale – to remove the color of an image.

With CSS filter property, these effects can give a combined result on a target UI element.

About this example

This example handles blur, sepia and vintage effect on an image element.

For applying the blur and sepia effects, there is a jQuery slider handle above the image target. It will allow you to change the intensity.

This code will preview four vintage tones in a row. On clicking the preview, the editor panel will apply the appropriate vintage effect.

There is an option to reset the applied image editing effects. Blur is the default effect the slider handler events apply.

File Structure

This screenshot shows the file structure of the image editing example code. It’s a pure CSS jQuery example that provides image editing features.

There are no third-party plugins used to achieve the editing effects on this example.

Image Editing File Structure

I have rendered a static image as a target for applying the blur and more effects. You may include an image upload option to render dynamic images.

Online photo editing UI to apply blur sepia vintage effects

This section shows the HTML of the online photo editing interface to allow image blur like effects.

The landing page has the complete HTML code for the image editing UI.

It shows the action buttons to choose the editing effects among blur, sepia and vintage.

index.php

<html>
<head>
<meta name="viewport" content="width=device-width, initial-scale=1">
<title>Image Effects Blur Sepia Vintage</title>
<link href="./assets/css/phppot-style.css" type="text/css" rel="stylesheet" />
<link href="./assets/css/style.css" type="text/css" rel="stylesheet" />
<link href="./vendor/jquery/ui/jquery-ui.min.css" type="text/css" rel="stylesheet" />
</head>
<body> <div class="phppot-container"> <div class="container"> <input type='button' value='Blur' class="btn action selected" /> <input type='button' id='btnSpin' value='Sepia' class="btn action" /> <input type='button' value='Vintage' class="btn" id="vintage" /><input type='button' value='Reset' class="btn" id="reset" /> <div id="vintage-slide"> <?php for ($i = 1; $i <= 4; $i ++) { ?> <img src="./image/slide/vintage-slide<?php echo $i; ?>.png" class="vintage-effect" id="vintage-effect<?php echo $i; ?>" data-slide="<?php echo $i; ?>" /> <?php } ?> </div> <div class="image-demo-box"> <div id="slider"> <div id="slider-handle" class="ui-slider-handle"></div> </div> <img src='./image/cherry-bloosm.jpg' id='image' /> <div class="overlay"></div> </div> </div> </div> <script src='./vendor/jquery/jquery-3.3.1.js' type='text/javascript'></script> <script src='./vendor/jquery/ui/jquery-ui.min.js' type='text/javascript'></script> <script src='./assets/js/image-edit.js'></script>
</body>
</html>

After selecting the action buttons, the slider control will supply the value of the selected editing effect.

The reset button helps revert back to the original state of the rendered image element.

Managing image editing effects with jQuery slider

This jQuery script initializes UI slider on document ready. It applies the selected effects on an image by clicking the blur, sepia, vintage buttons. On dragging the slider handle the value from the ui.value has the effect’s intensity.

On selecting each effect, the slider reset will happen to bring the handle to the min position.

The reset button will clear the applied photo effects on the image. It reverts the target image back to its original.

assets/js/image-edit.js

$(document).ready(function() { $("#slider").slider({ range : "min", min : 0, max : 100, slide : function(event, ui) { var val = ui.value; var action = $('.action.selected').val(); applyEffect(action, val); } }); $('.action').on('click', function() { resetSlider(); $('.btn').removeClass("selected"); $(this).addClass("selected"); }); $('#vintage').on('click', function() { $('.btn').removeClass("selected"); $(this).addClass("selected"); $("#slider").hide(); $("#vintage-slide").show(); vintage(1); }); $('.vintage-effect').on('click', function() { var val = $(this).data("slide") vintage(val); }); $('#reset').on('click', function() { resetSlider(); $('.btn').removeClass("selected"); $('.btn').first().addClass("selected"); }); });
function applyEffect(action, val) { if (action == 'Blur') { blur(val); } else if (action == 'Sepia') { sepia(val); }
}
function blur(val) { $("#image").css("filter", "blur(" + val + "px)");
}
function sepia(val) { $("#image").css("filter", "sepia(" + val + "%)");
}
function vintage(val) { $('.vintage-effect').removeClass("selected") $("#vintage-effect"+val).addClass("selected"); $(".overlay").show(); $(".overlay").css("background", "url('./image/vintage-bg"+val+".jpg')")
}
function resetSlider() { $("#slider").show(); $("#vintage-slide").hide(); $(".overlay").hide(); var options = $("#slider").slider('option'); $("#slider").slider("value", options.min); var action = $('.action.selected').val(); applyEffect(action, options.min);
}

Blur image using CSS and SVG filter

As shown in the above example, blur image action is possible with CSS filter function blur(). It accepts a value as its parameter to apply the blur filter on the target element.

The CSS in the below code will apply the blur effect on the image element of the HTML.

<style>
#image { margin: 50px auto; border: #f6f5f6 10px solid; width: 500px; filter: blur(10px);
}
</style>
<img src='./image/cherry-bloosm.jpg' id='image' />

This example has a slider’s drag event-based photo editing effects. So, the jQuery script manages the CSS filter property on dragging the slider handle.

Blur image with SVG filter and CSS url() function

In the below code, it shows yet another way to blur images HTML element. It uses CSS url() function to apply the blur effect.

The url() function accepts a path or a selector string to apply the filter via CSS.

This code has the svg with <fegaussianblur> filter primitive. The blur intensity will vary based on the stdDeviation attribute’s value.

<style>
#image{ filter:url('#blur');
}
</style>
<img src='./image/cherry-bloosm.jpg' id='image' />
<svg> <defs> <filter id="blur"> <feGaussianBlur in="SourceGraphic" stdDeviation="1,4" /> </filter> </defs>
</svg>

How to apply sepia effect on an image

Sepia is one of the photo editing effects used in this example to apply on a HTML image. It gives light reddish or brownish tones to monochromatic photos.

There is yet another CSS filter function sepia() to apply this effect on an image.

The CSS sepia() function may have a number or percentage as a parameter. All the below CSS styles are valid to create the sepia() effect.

filter:sepia(0);
filter:sepia(25%);
filter:sepia(0.3);
filter:sepia(1);

Applying various tones with vintage effects

The vintage effect on a photograph gives an ancient tone to the photo. It’s an art to giving a flimsy tone to the modern photo output.

In this example, I have used template films to create a vintage effect on an image. It uses four types of films as a background to add different tones to the image element.

There are plugins to convert photos with vintage effects. For getting a basic result, the combination of the basic photo editing effects may help.

Editing tool output with image Blur Sepia and Vintage effects

In the below screenshot, I have shown all the three photo effects in a single output window.

Blur Sepia Vintage Effect- Output

Conclusion

We have seen how to apply three of the popular photo effects blur, sepia and vintage on an image. Though there are more possible effects, this example code is a very good beginning to achieve all.

I hope, applying effects with jQuery slider is more comfortable than any other type of input. I prefer slider whenever required to collect input between ranges.

Applying a creative combinational photo editing effects will give impressive results. Not only beautification but also helps to convey your thoughts via graphical representation. Rock on!

Download

↑ Back to Top

Posted on Leave a comment

[Collection] URL Decoding Methods

URL encoding “is a method to encode information in a Uniform Resource Identifier (URI)”. It is also called Percent-encoding because percentage symbols are used to encode certain reserved characters:

! # $ % & ' ( ) * + , / : ; = ? @ [ ]
%21 %23 %24 %25 %26 %27 %28 %29 %2A %2B %2C %2F %3A %3B %3D %3F %40 %5B %5D

This article collects various ways to decode an URL encoded string. Let’s get started!

Python 2

$ alias urldecode='python -c "import sys, urllib as ul; \ print ul.unquote_plus(sys.argv[1])"' $ alias urlencode='python -c "import sys, urllib as ul; \ print ul.quote_plus(sys.argv[1])"'

Source

Here’s an example usage:

$ urldecode 'q+werty%3D%2F%3B'
q werty=/; $ urlencode 'q werty=/;'
q+werty%3D%2F%3B

Python 3

$ alias urldecode='python3 -c "import sys, urllib.parse as ul; \ print(ul.unquote_plus(sys.argv[1]))"' $ alias urlencode='python3 -c "import sys, urllib.parse as ul; \ print (ul.quote_plus(sys.argv[1]))"'

Here’s an example usage:

$ urldecode 'q+werty%3D%2F%3B'
q werty=/; $ urlencode 'q werty=/;'
q+werty%3D%2F%3B

Source

sed

$ sed 's@+@ @g;s@%@\\x@g' file | xargs -0 printf "%b"

Source

sed with echo -e

$ sed -e's/%\([0-9A-F][0-9A-F]\)/\\\\\x\1/g' file | xargs echo -e

Source

sed with alias

For convenience, you may want to use an alias:

$ alias urldecode='sed "s@+@ @g;s@%@\\\\x@g" | xargs -0 printf "%b"'

If you want to decode, you can now simply use:

$ echo "http%3A%2F%2Fwww" | urldecode
http://www

Source

Bash

input="http%3A%2F%2Fwww"
decoded=$(printf '%b' "${input//%/\\x}")

Source

To handle pluses (+) correctly, replace them with spaces using sed:

decoded=$(input=${input//+/ }; printf "${input//%/\\x}")

Bash + urlencode() + urldecode() Functions

urlencode() { # urlencode <string> local length="${#1}" for (( i = 0; i < length; i++ )); do local c="${1:i:1}" case $c in [a-zA-Z0-9.~_-]) printf "$c" ;; *) printf '%%%02X' "'$c" ;; esac done
} urldecode() { # urldecode <string> local url_encoded="${1//+/ }" printf '%b' "${url_encoded//%/\\x}"
}

Sources:

bash + xxd

urlencode() { local length="${#1}" for (( i = 0; i < length; i++ )); do local c="${1:i:1}" case $c in [a-zA-Z0-9.~_-]) printf "$c" ;; *) printf "$c" | xxd -p -c1 | while read x;do printf "%%%s" "$x";done esac
done
}

Sources:

PHP

$ echo oil+and+gas | php -r 'echo urldecode(fgets(STDIN));' // Or: php://stdin
oil and gas

Source

PHP Library

php -r 'echo urldecode("oil+and+gas");'

Source

Perl

decoded_url=$(perl -MURI::Escape -e 'print uri_unescape($ARGV[0])' "$encoded_url")

Source

Perl to Process File

perl -i -MURI::Escape -e 'print uri_unescape($ARGV[0])' file

Source

awk

awk -niord '{printf RT?$0chr("0x"substr(RT,2)):$0}' RS=%..

Sources:

Python 2 urllib.unquote

The urllib.unquote is a special function in Python’s built-in standard library urllib that does what you need:

decoded_url=$(python2 -c 'import sys, urllib; print urllib.unquote(sys.argv[1])' "$encoded_url")

You can also use it to modify a file:

python2 -c 'import sys, urllib; print urllib.unquote(sys.stdin.read())' <file >file.new &&
mv -f file.new file

Source: https://unix.stackexchange.com/questions/159253/decoding-url-encoding-percent-encoding

Python 3 urllib.parse.unquote

If you run Python 3 on your system (like most people would), use the alternative function urllib.parse.unquote. To check your version, visit this article.

decoded_url=$(python3 -c 'import sys, urllib.parse; print(urllib.parse.unquote(sys.argv[1]))' "$encoded_url")

Again, you can use the function to process a file as follows:

python3 -c 'import sys, urllib; print(urllib.parse.unquote(sys.stdin.read()))' <file >file.new &&
mv -f file.new file

Source: https://unix.stackexchange.com/questions/159253/decoding-url-encoding-percent-encoding

Perl URI::Escape

The URI::Escape solves the problem of URL decoding for Perl users.

decoded_url=$(perl -MURI::Escape -e 'print uri_unescape($ARGV[0])' "$encoded_url")

You can use the function to process a file as follows:

perl -i -MURI::Escape -e 'print uri_unescape($ARGV[0])' file

Source: https://unix.stackexchange.com/questions/159253/decoding-url-encoding-percent-encoding

Perl One-Liner Without Installing Modules

$ perl -pe 's/\%(\w\w)/chr hex $1/ge'

Here’s a usage example:

$ echo '%21%22' | perl -pe 's/\%(\w\w)/chr hex $1/ge'
!"

Source: https://unix.stackexchange.com/questions/159253/decoding-url-encoding-percent-encoding

Bash Regex

$ function urldecode() { : "${*//+/ }"; echo -e "${_//%/\\x}"; }

Now, you can use the function as a command like this:

$ urldecode https%3A%2F%2Fgoogle.com%2Fsearch%3Fq%3Durldecode%2Bbash
https://google.com/search?q=urldecode+bash

If you need to assign some variables, use this strategy:

$ x="http%3A%2F%2Fstackoverflow.com%2Fsearch%3Fq%3Durldecode%2Bbash"
$ y=$(urldecode "$x")
$ echo "$y"
http://stackoverflow.com/search?q=urldecode+bash

Source: https://stackoverflow.com/questions/6250698/how-to-decode-url-encoded-string-in-shell

GNU Awk

#!/usr/bin/awk -fn
@include "ord"
BEGIN { RS = "%.."
}
{ printf "%s", $0 if (RT != "") { printf "%s", chr("0x" substr(RT, 2)) }
}

Source: https://stackoverflow.com/questions/6250698/how-to-decode-url-encoded-string-in-shell

References