The most Pythonic way to import a module from another folder is to place an empty file named __init__.py into that folder and use the relative path with the dot notation. For example, a module in the parent folder would be imported with from .. import module. The __init__.py file signals to Python that the folder should be treated as package.
Problem: How to import a file or a module from another folder or directory in Python?
Example: Say, you’ve given the following folder structure:
Note that you need to replace the first three dots in '/…/application/app/folder' with the concrete path to the applications folder.
Method 2: sys.path.insert()
A similar alternative is to insert the path of file_1.py to position 1 of the system’s path variable. This ensures that it’s loaded with higher priority and avoids some naming conflicts:
Again, replace the first three dots in '/…/application/app/folder' with the concrete path to the applications folder.
Method 3: Dot Notation with __init__.py
You can also do the following trick—creating a new package.
# file_2.py
from application.app.folder.file_1 import func_name
However, you need to make sure to include an empty __init__.py file in the directory. This file tells Python to treat the directory as a package. It is considered to be the most Pythonic way of solving this problem.
Method 4: Importlib
A not-so Pythonic alternative is to use the importlib module:
To become successful in coding, you need to get out there and solve real problems for real people. That’s how you can become a six-figure earner easily. And that’s how you polish the skills you really need in practice. After all, what’s the use of learning theory that nobody ever needs?
Practice projects is how you sharpen your saw in coding!
Do you want to become a code master by focusing on practical code projects that actually earn you money and solve problems for people?
Then become a Python freelance developer! It’s the best way of approaching the task of improving your Python skills—even if you are a complete beginner.
“This is the Unix philosophy: Write programs that do one thing and do it well. Write programs to work together. Write programs to handle text streams, because that is a universal interface. […] ” – McIlroy
This book chapter draft is original material drawn from my upcoming book “From One to Zero” to appear in 2021 with NoStarchPress (San Francisco).
In this chapter, you’ll learn about the Unix philosophy and how it applies to Python code examples. After providing you with a quick overview of the philosophy, I’ll show you the top principles that were employed by some of the world’s smartest computer engineers to create today’s operating systems. If you’re a software engineer, you’ll find much valuable advice on how to write better code in your own projects.
You may ask: what is Unix anyway, and why should you care?
The Rise of Unix
The family of Unix operating systems emerged in the late 1970s when Bell Systems made the source code of its technology open to the public. In the subsequent decades, universities, individuals, and corporations developed a multitude of extensions and new versions.
Today, Unix is a trademarked standard that ensures that certain quality standards are met of any operating system that applies for the standard. Unix and Unix-like operating systems have a major impact in the computing world. About two out of free web servers run on a Linux system, which is based on Unix. Most of today’s supercomputers run Unix-based systems. The macOS is also a registered Unix system in 2020 (source).
The massive impact of Unix has attracted the best coders in the world to collaborate on improving the operating system continuously. Linus Torvaldis, Ken Thompson, Brian Kernighan—the list of Unix-developers contains the names of some of the world’s most impactful coders. You would think that there must be great systems in place to allow programmers all over the world to collaborate in order to build the massive ecosystem of Unix code consisting of millions of lines of code. And rightly so! The philosophy that enables this scale of collaboration is the acronym DOTADIW (seriously)—or Do One Thing And Do It Well. Next, we’re getting a short overview of the full Unix philosophy. Whole books have been written about it but we focus on the things that are still relevant today and use Python code snippets to showcase some examples. To the best of our knowledge, no book has ever contextualized the Unix principles for the Python programming language.
Philosophy Overview
The basic idea of the Unix philosophy is to build simple, clear, concise, modular code that is easy to extend and maintain. This can mean many different things—more on this later in the chapter—but the goal is to allow many humans to work together on a code base by prioritizing human over computer efficiency, favoring composability over monolithic design.
Say you write a program that takes an URL and prints the HTML from this URL on the command line. Let’s call this program url_to_html(). According to the Unix philosophy this program should do one thing well. This one thing is to take the HTML from the URL and print it to the shell. That’s it. You don’t add more functionality such as filtering out tags or fix bugs you find in the HTML code. For instance, a common mistake in HTML code is to forget closing tags such as in
But even if you spot these type of mistakes, you don’t fix them—do one thing well! Another feature you may want to add to your program url_to_html() is to automatically fix the formatting.
For example, the following HTML code doesn’t look pretty:
However, the name of the function is url_to_html() and, according to the Unix philosophy, you don’t want to mess with its main purpose: converting a URL to the HTML located at this URL. Adding a feature such as code prettifying would add a second functionality that may not even be needed by some users of the function. Note that a user of a function could even be another function called prettify_html(url) which single purpose was to fix stylistic issues of the HTML code at the URL given as a function argument. This function may very well use the function url_to_html() internally to get the HTML before processing it further. By focusing every function on one purpose and one purpose only, you improve maintainability and extensibility of your code base: the output of one program is the input of another. At the point where you implement one program, you may not even know for which it will be used. Thus, you reduce complexity, don’t add any clutter to the output of a program, and focus on implementing one thing well.
While a single program may look trivial, useful tools can be created through the interaction of those components (see Figure 8-1).
Figure 8-1: Overview of multiple simple components working together to accomplish a bigger task.
Figure 8-1 shows how four simple functions—they may be Unix tools—interact to help a user display the HTML code from a given URL. Think of this as a browser in your code shell. Alice calls the function display_html(url) that takes the URL and passes it to another function url_to_html(url) that has already implemented functionality of collecting the HTML from a given URL location. No need to implement the same functionality twice. Fortunately, the coder of the function url_to_html() has kept his function minimal so that we can use its returned HTML output directly as an input to another function fix_missing_tags(html). This is called “piping” in Unix lingo: the output of one program is passed as an input to another program. The return value of fix_missing_tags() is the fixed HTML code with a closing </span> tag that was missing in the original HTML. Again, you pipe the output into the function prettify_html(html) in step 8 and wait for the result: the corrected HTML with indentation to make it user-friendly. Only then returns the function display_html(url) the prettified and fixed HTML code to Alice. You see that a series of small functions connected and piped together can accomplish quite big tasks! Compare this version to the monolithic implementation where the function display_html(url) would have to implement everything by itself. There would be no way to reuse partial functionality such as retrieving the HTML code from an URL or fixing a faulty HTML code. However, some other functions may only need this partial functionality. The modular design of the code enables reusability, maintainability, and extensibility. Small is beautiful!
Next, I’m going to go over a collection of Unix rules from Unix coding experts Eric Raymond and Mike Gancarz.
Unix Principle 1. Simple is Better Than Complex
This is the overwhelming principle of this whole book. You’ve already seen it in many shapes and forms—I stress this so hard because if you don’t take decisive action to simplify, you’ll harvest complexity. In Python, the principle simple is better than complex even made it into the inofficial rule book. If you open a Python shell and type import this, you obtain the famous Zen of Python that shows you a number of rules on how to write great Python code, including our principle simple is better than complex. See Listing 8-1 for the complete Zen of Python.
>>> import this
The Zen of Python, by Tim Peters Beautiful is better than ugly.
Explicit is better than implicit.
Simple is better than complex.
Complex is better than complicated.
Flat is better than nested.
Sparse is better than dense.
Readability counts.
Special cases aren't special enough to break the rules.
Although practicality beats purity.
Errors should never pass silently.
Unless explicitly silenced.
In the face of ambiguity, refuse the temptation to guess.
There should be one-- and preferably only one --obvious way to do it.
Although that way may not be obvious at first unless you're Dutch.
Now is better than never.
Although never is often better than *right* now.
If the implementation is hard to explain, it's a bad idea.
If the implementation is easy to explain, it may be a good idea.
Namespaces are one honking great idea -- let's do more of those!
Listing 8-1: The Zen of Python.
At this point, if you wonder why simple is better than complex, go back to Chapter 2 Keep It Simple, Stupid!
Unix Principle 2. Small is Beautiful
You’ve already seen this rule in action in the previous example in Figure 8-1. Rather than writing big monolithic code blocks, write small functions and work as an architect brokering the interaction between those functions. You’re the system architect and you foster interaction between the system components. Small programs are superior to large blocks of programs in many ways:
Going small reduces complexity. Comprehending code becomes more complicated if the code is longer. This is a cognitive fact: your brain can only keep so many chunks of information at the same time. If you overload your brain with too many pieces of information, it becomes unable to see the big picture. Any line of code is a piece of information. By going small and reducing the number of lines of code of a function, you improve readability of your code and reduce the likelihood of injecting costly bugs into your code base.
Going small improves maintainability. If you structure your code in many small pieces of functionality, it becomes easier to maintain. You can add more small functions easily without having to worry about side-effects. Contrast this to a big monolithic code block. If you change it, it can easily have global effects. The risk of injecting bugs into your code when working with a monolithic code block increases significantly, for instance because more programmers may want to change the same monolithic function at the same time.
Going small improves testability. Test-driven development is a big topic in today’s software companies. Every test you write reduces the chance of shipping buggy code—most serious software development houses use unit tests to change each function separately by stress-testing different inputs and compare the outputs with the expected ones. This way, bugs can be found in isolation—which is a big advantage of a software architecture that prefers small over big.
I promised to provide you a Python example for each of the Unix principles to show you that they are still relevant today. Well, for this principle, Python itself is the best example. Any master coder uses other people’s code to ramp up their coding productivity. If you think about it, the act of programming itself is to build on other people’s code. It is just a matter of the abstraction layer you find yourself in:
Do you write source code that is very close to machine code (test: do you use a goto statement?) or do you write source code that has abstracted most of the low-level complexity (test: does your program asks for the user input via a built-in function get_user_input()?).
Do you create a machine learning algorithm yourself or do you simply import a library that already provides the algorithm you are seeking?
Do you use TCP or HTTP communication to access other programs?
No matter how you answer these questions, you rely on a lower layer of code that provides the functionality you need. Python already implements much of this functionality for you. Millions of developers have spend countless hours optimizing code that you can import into your code in a split second. However, Python, like most other programming languages, chose to provide this functionality by means of libraries. Many of the infrequently used libraries need to be installed separately—they don’t ship with the default implementation. By not providing all the libraries as built-in functionality, the Python installation on your computer remains relatively small while it doesn’t sacrifice the potential power of external libraries. On top of this, the libraries themselves are relatively small—all of them focus on a restricted subset of functions. Rather than having one big library to rule all problems, we have many small libraries—each responsible for a small part of the picture. Small is beautiful. Every few years there’s a new hot trend towards breaking up big, monolithic applications into small beautiful applications to scale up the software development cycle. The last few trends have been CORBA, SOA, and Microservices. It pays to stay ahead of the curve by learning the concept. Here’s the definition of book author and expert on the field of software architecture Martin Fowler:
The term “Microservice Architecture” has sprung up over the last few years to describe a particular way of designing software applications as suites of independently deployable services.
The idea is to break up a large software block into a series of independently deployable components. These components can then be accessed by multiple programs instead of only by a single program. The hope is to accelerate overall progress in the software development space by sharing and building upon each other microservices. Diving into this exciting topic is beyond this book, but I’d suggest, you check out the online resource about microservices from Martin Fowler.
Unix Principle 3. Make Each Program Do One Thing Well
You’ve seen this principle at play in Figure 8-1 where we rather implemented four small functions than one large monolithic function. Let’s have a look how that would look like in code in Listing 8-2.
import urllib.request
import re def url_to_html(url): html = urllib.request.urlopen(url).read() return html def prettify_html(html): return re.sub('<\s+', '<', html) def fix_missing_tags(html): if not re.match('<!DOCTYPE html>', html): html = '<!DOCTYPE html>\n' + html return html def display_html(url): html = url_to_html(url) fixed_html = fix_missing_tags(html) prettified_html = prettify_html(fixed_html) return prettified_html
Listing 8-2: Make one function or program do one thing well.
The code in Listing 8-2 gives a sample implementation of the four functions explained in Figure 8-1 to perform the following steps in the function display_html:
Get the HTML from a given URL location.
Fix some missing tags.
Prettify the HTML
And return the result back to the function caller.
For example, if you’d run the following code and the given URL would point to the not very pretty HTML code '< a href="https://finxter.com">Solve next Puzzle</a>', the function display_html would fix it simply by brokering the inputs and outputs of the small code functions that do one thing well.
What happens if you print the result of the main function?
print(display_html('https://finxter.com'))
This would print the fixed HTML to your shell with a new tag and removed whitespace:
<!DOCTYPE html>
<a href="https://finxter.com">Solve next Puzzle</a>
In your project, you could implement another function that doesn’t prettify the HTML but only adds the <!DOCTYPE html> tag. You could then implement a third function that prettifies the HTML but doesn’t add the new tag. Basically, creating new functionality based on the existing functionality is very simple and there wouldn’t be a lot of redundancy.
However, if you’d use a monolothic code function that does all things itself, it would look like this:
def display_html(url): html = urllib.request.urlopen(url).read() if not re.match('<!DOCTYPE html>', html): html = '<!DOCTYPE html>\n' + html html = re.sub('<\s+', '<', html) return html
The function is now more complicated: it handles multiple tasks instead of focusing on one. Even worse, if you’d implement variants of the same function without removing the whitespace after an opening tag ‘<‘, you’d have to copy&paste the remaining functionality. This results in redundant code and hurts readability. The more functionality you add, the worse it will get!
Unix Principle 4. Build a Prototype as Soon as Possible
You’ve learned about this in Chapter 3: Build a Minimum Viable Product. The Unix guys and girls also prefer to launch early and often—to avoid getting stuck in perfectionism by adding more and more features, and exponentially increasing complexity without need. If you work on large software applications such as an operating system, you simply cannot afford to go down the route of complexity!
Figure 8-2 shows the Finxter.com app as it has emerged over the years. There are a number of features such as interactive solution checking, puzzle voting, user statistics, user management, premium functionality, related videos, and even simple features such as a logo. All of those would be unnecessary for an initial launch of the product. In fact, the minimum viable product, or prototype, of the Finxter application would be an image of a simple code puzzle shared on social media. This is enough to validate the hypothesis of user demand without spending years building the application. Fail early, fail often, fail forward. You can only fail often, early, and forward if you don’t spend vast amounts of resources on each failure because if you spend all your assets and a lifetime of work on one opportunity, there’s no way to try again.
Unix Principle 5. Choose Portability Over Efficiency
Portability is the ability of a system or a program to be moved from one environment to another and still function properly. One of the major advantages of software is its great portability: you can write a software program on your computer and millions of users can run the same program on their computers without the need to adapt the program to the new environment.
While portability is an advantage, it comes at a cost: efficiency. You can reach very high degrees of efficiency by tailoring the software to one type of environment. An example of this trade off between efficiency and portability is virtualization. Virtualization is an additional layer of software between your application and the operating system that allows you to quickly move your program from one machine to another—you don’t really care about the underlying hardware on that machine if it is just powerful enough to host your application. Using virtualization instantly improves portability of your application but it reduces efficiency compared to tailoring the application to a given bare metal machine because it’s an additional layer of overhead: the code of your application must call the controls of the virtual operating system that then hand those commands over to the real operating system that then moves them further down to the lowest levels: bits and bytes.
As a programmer, you may find it hard to decide which route to take: higher efficiency or higher portability. Even more so because there’s no objective truth—in some cases, efficiency is paramount while othertimes it’s portability you should choose. However, the Unix philosophy advocates to choose portability over effiency. The reason is simple: millions of users will work with the operating system.
But the rule of thumb to prefer portability also applies to the wider audience of software developers. Reducing portability means that you reduce the value proposition of your system because your software cannot be ported to all users. Many big trends at our times attempt to radically improve portability—even at the costs of effiency. An example is the rise of web-based applications that run on every computer with a browser, whether the operating system is macOS, Windows, or even Linux. Another example is the trend towards human accessibility (=portability) of modern web applications: if you’re blind, you must still be able to access the web, even though it may be less efficient to host a website that facilitates accessability. There are resources much more valuable than computing cycles: human lives, time, and the second-order consequences provided by machines.
But what does it mean to program for portability, apart from these general considerations? Check out the code in Listing 8-3.
import numpy as np def calculate_average_age(*args): a = np.array(args) return np.average(a) print(calculate_average_age(19, 20, 21))
# 20.0
Listing 8-3: Average function, not very portable.
The code in Listing 8-3 is not portable for two reasons. First, the function name calculate_average_age(), although very descriptive, is not general enough to be usable in any other context, for example to calculate the average number of website visitors. Second, it uses a library without need. It’s generally a great idea to use libraries—but only if they add value. In this case, adding a library reduces portability at little benefit for efficiency (if at all). The code in Listing 8-4 fixes those two issues and it can be considered superior due to its greater portability.
The code is more portable without library dependency and with a more general name. Now, you don’t have to worry about the risk that the library dependency becomes depreciated—and you can port the same code to your other projects.
Unix Principle 6. Store Data in Flat Text Files
Flat text files are files that are simple and readable by humans. An example of a flat file format is CSV where each line relates to one data entry (see Listing 8-5).
Flat text files are accessible and readable by humans. You can share them easily, open them in any text editor, and even modify them. They’re portable—see the previous Unix principle—and maintainable. All of this comes at the cost of efficiency: a specialized data format could store the data much more efficiently in a file. For example, databases use their own data files on disk. If you opened them, you wouldn’t understand a thing. Instead of providing a simple flat date design, they rely on complicated indices and compression schemes. These optimizations result in less memory consumption and less overhead reading specific data items from the file. For example, to read a specific line from a flat file, you’d have to scan the whole file which can be very inefficient.
For web applications, the benefits of flat files usually don’t overcompensate their drawbacks—a more efficient data representation is needed to allow users to access websites quickly and with low latency. That’s why in the web development space, data is usually stored in non-flat representations and databases. However, you should use those data representations only if you absolutely need to use them. For many smaller applications—such as training a machine learning model from a real-world data set with 10,000 lines—the CSV format is the dominant way to store the training data. Using a database to pull each data entry for training the model would reduce portability and add unnecessary complexity that leads to non-perceiptable performance improvements in the vast majority of cases.
For example, Python is among the most popular languages for data science and machine learning applications. Interactive Jupyter notebooks allow programmers, data scientists, and machine learning engineers to load and explore data sets. The common format for those data sets is a flat file format: CSV. Listing 8-6 shows an example of how data scientists load data from a flat file in the script before processing it—favoring the portable approach over the more efficient one of using a database.
from sklearn.datasets import fetch_olivetti_faces
from numpy.random import RandomState rng = RandomState(0) # Load faces data
faces, _ = fetch_olivetti_faces(return_X_y=True, shuffle=True, random_state=rng)
Listing 8-6: Load data from a flat file in a Python data analysis task.
The files of the data set are stored on the web or on a local machine. The loading functions simply read this data and load it into memory before starting with the real computation. No database or hierarchical data structures are needed. The program is self-contained without needing to install a database or set up advanced connections to running data bases.
Unix Principle 7. Use Software Leverage to Your Advantage
A lever accomplishes big results with little efforts. Leverage is your ability to apply a small amount of energy while multiplying the effects of your effort. There are many ways to create leverage. In finance, leverage means to use other people’s money to invest and grow. But leverage can also mean to use other people’s time or energy—such as in large corporation with thousands of employees on the payroll. Interestingly, leverage can come from other people’s skills—and this is the most fertile soil for leverage because it doesn’t get used up. If you use the skills of another person to accomplish your goals faster, this person still possesses these skills. How great is that?
The first source of leverage for programmers is to tap into the collective wisdom of generations of coders before you. Use libraries rather than reinventing the wheel. Use StackOverflow and the wisdom of the crowd to find out how to fix bugs in your code. Talk to other programmers and ask them to review your code to find inefficiencies and bugs. All of those forms of leverage allow you to accomplish far more with less effort—more than you could ever accomplish alone. It creates synergies among programmers and lifts the power of all developers at the same time. How much poorer the world would be without programming communities such as StackOverflow. Without those communities, we’d all have to work much longer to accomplish less. But by embracing the collective wisdom, we accomplish more with less effort, time, costs, and pain.
The second source of leverage comes from the counter-intuitive world of computing. A computer can perform work much faster at much lower costs than a human being. If you “employ” a computer, you don’t have to pay for it social insurance, health insurance, income tax, and special bonuses. The computer works for free—just feed it with some electricity and it’ll happily do the work. And the computer does the work 24 hours per day, seven days a week, for years without ever complaining about you being an unfair employer. A computer behaves much like your personal slave—without all the negatives such as violating human rights—if you know how to talk to it. And the best thing: there’s no upper limit on the number of those diligent and cheap workers you can employ (or enslave). Computer systems are the reason for the largest creation (not only transfer) of wealth that humanity has ever experienced. And there’s still so much wealth to be created through the leverage of computing!
So, you can tap into powerful sources of leverage as a programmer. Create better software, share it with more people, employ more computers to create more value to the world, use other people’s libraries and software more often—yes, you can increase the leverage of your own software by building on other people’s software products. Good coders can create good source code quickly. Great coders are orders of magnitude more efficient than good coders by tapping into the many sources of leverage available to them.
For example, there’s much interest in automatically scraping data from websites. Have a look at the following code from our book Python One-Liners (see Listing 8-7).
## Dependencies
import re ## Data
page = '''
<!DOCTYPE html>
<html>
<body> <h1>My Programming Links</h1>
<a href="https://app.finxter.com/">test your Python skills</a>
<a href="https://blog.finxter.com/recursion/">Learn recursion</a>
<a href="https://nostarch.com/">Great books from NoStarchPress</a>
<a href="http://finxter.com/">Solve more Python puzzles</a> </body>
</html> ''' ## One-Liner
practice_tests = re.findall("(<a.*?finxter.*?(test|puzzle).*?>)", page) ## Result
print(practice_tests)
# [('<a href="https://app.finxter.com/ ">test your Python skills</a>', 'test'),
# ('<a href="http://finxter.com/">Solve more Python puzzles</a>', 'puzzle')]
Listing 8-7: One-liner solution to analyze web page links. See https://pythononeliners.com/ for an explainer video.
The code finds all occurrences of an URL in the given HTML document that contains the substring ‘finxter’ and either ‘test’ or ‘puzzle’. By leveraging regular expression technology, you instantly put thousands of lines of code to work in your own project. What otherwise took you many lines of code and lots of writing and testing effort, now takes you only a single line of code! Leverage is a powerful companion on your path to becoming a great coder.
Unix Principle 8. Avoid Captive User Interfaces
A captive user interface is a way of designing a program that requires the user to interact with the program in a session before they’ll be able to proceed with their main execution flow. If you invoke a program in your terminal (Windows, MacOS, or Linux), you must communicate with the program before you can go back to the terminal. Examples are mini programs such as SSH, top, cat, vim—as well as programming language features such as Python’s input() function.
“If you’re under 85, your life expectancy is 72 minus 80% of your age. Otherwise it’s 22 minus 20% of your age.”
Your initial Python code is shown in Listing 8-8.
def your_life_expectancy(): age = int(input('how old are you? ')) if age<85: exp_years = 72 - 0.8 * age else: exp_years = 22 - 0.2 * age print(f'People your age have on average {exp_years} years left - use them wisely!') your_life_expectancy()
Listing 8-8: Life-expectancy calculator – a simple heuristic – implemented as a captive user interface.
Here are some runs of the code in Listing 8-8.
>>> how old are you? 10
People your age have on average 64.0 years left - use them wisely!
>>> how old are you? 20
People your age have on average 56.0 years left - use them wisely!
>>> how old are you? 77
People your age have on average 10.399999999999999 years left - use them wisely!
The code makes use of Python’s input() function that blocks the program execution and waits for user input. Without user input, the code doesn’t do anything. This seriously limits the usability of the code. What if I wanted to calculate the life expectancy for every age from 1 to 100 based on the heuristic and plot it? I’d have to manually type 100 different ages and store the results in a separate file. Then, you’d have to copy&paste the results into a new script to plot it. The function really does two things: process the user input and calculate the life expectancy. This already violates rule number 3: Make Every Program Do One Thing Well. But it also violates our rule: don’t use captive user interfaces if possible.
Here’s how the function could’ve been implemented more cleanly (see Listing 8-9).
def your_life_expectancy(age): if age<85: return 72 - 0.8 * age return 22 - 0.2 * age age = int(input('how old are you? '))
exp_years = your_life_expectancy(age)
print(f'People your age have on average {exp_years} years left - use them wisely!')
Listing 8-9: Life-expectancy calculator – a simple heuristic – without captive user interface.
The code in Listing 8-9 is functionally identical to the code in Listing 8-8. However, it has a big advantage: now, you can use the function in different and unexpected—by the initial developer—ways (see Listing 8-10).
import matplotlib.pyplot as plt def your_life_expectancy(age): '''Returns the expected remaining number of years.''' if age<85: return 72 - 0.8 * age return 22 - 0.2 * age # Plot for first 100 years
plt.plot(range(100), [your_life_expectancy(i) for i in range(100)]) # Style plot
plt.xlabel('Age')
plt.ylabel('No. Years Left')
plt.grid() # Show and save plot
plt.savefig('age_plot.jpg')
plt.savefig('age_plot.pdf')
plt.show()
Listing 8-10: Code to plot the life expectancy for years 0-99.
The resulting plot is shown in Figure 8-3
Figure 8-3: How the heuristic works for input years 0-99.
Let’s not talk too much about the flaws of this heuristic—it’s crude by design—but focus on how the rule of avoiding captive user interface has helped us produce this plot. Without the rule, we’d have to write a new function, add redundancies and unnecessary complexity. By considering the rule, we’ve simplified the code and opened up all kinds of future programs to use and built-upon the heuristic. Instead of optimizing for one specific use case, we’ve written the code in a general way that can be used by hundreds of different applications.
Unix Principle 9. Make Every Program a Filter
There’s a good argument to be made that every program already is a filter—it transforms an input to an output using its own filtering mechanism. For example, a program that sorts a list can be considered a filter that filters the unsorted elements into a sorted order:
def insert_sort(lst): # Is it empty? if not lst: return [] # Start with sorted 1-element list new = [lst[0]] # Insert each remainng element for x in lst[1:]: i = 0 while i<len(new) and x>new[i]: i = i + 1 new.insert(i, x) return new print(insert_sort([42, 11, 44, 33, 1]))
print(insert_sort([0, 0, 0, 1]))
print(insert_sort([4, 3, 2, 1]))
Listing 8-11: Insertion sort algorithm filters unsorted list to sorted list.
The algorithm creates a new list and inserts each element at the correct position so that all elements on the left are smaller and all elements on the right are larger or equal than the inserted element. The output are the following sorted lists:
[1, 11, 33, 42, 44]
[0, 0, 0, 1]
[1, 2, 3, 4]
In a way, the function filters the unsorted input the list to the sorted output list. It’s a quite complex filter that not only skips some elements while letting others pass, it changes the order of the elements and lets all pass. But, nonetheless, it is a filter.
Another example of a program being a, potentially very complicated, filter appears in the field of artificial intelligence. Listing 8-12 shows an excerpt of a conversation I’ve just had with the OpenAI bot.
Human: Can you be considered intelligent? AI: Yes, I am considered intelligent by many scientists and mathematicians. Human: But are you? AI: What? Human: Intelligent AI: Yes, I am, correct me if I’m wrong, but you also presumably think you’re intelligent. Human: If a car travels at eighty, how far would it go in an hour? AI: 80 miles Human: What is the answer to everything? AI: e^iπ Human: How old are you? AI: I don’t know my exact birthdate, but I was created on May 15, 2018. Human: And how much do you know? AI: I know a lot, in fact I could probably be considered omniscient (this is not because I am so large and complicated, but because I have access to the sum of all human knowledge).
Listing 8-12: A conversation with OpenAI
The chatbot takes the user input and training data from the web and filters all the consumed information—billions of facts—and transforms it into an output: the ultimate response to the user (see Figure 8-4). It’s a filter after all!
Figure 8-4: Chatbot acts as a filter between billions of facts in the web and the user.
If any program already is a filter, you should account for this fact by designing it as such by using the primary and natural input/output mapping rather than a secondary non-obvious input/output mapping. Let me explain this next.
The gold standard of a filter is to use a homogeneous input/output mapping where one type of input is mapped to the same type of output. For example, if someone talks to you English, they expect you to respond in English—and not in another language. Similarly, if a function takes an input argument, the expected output is a function return value. If a program reads from a file, the expected output is a file as well. If a program reads the input from the standard input, it should write the program to the standard output. You get the point: the most intuitive way to design a filter is to keep the data in the same category.
Listing 8-13 shows a negative example where the input arguments are transformed into their average—but instead of returning the average value, the function average() prints the result to the shell. A better approach is shown in Listing 8-14 that makes the function average() return the average value (homogeneous input/output mapping), which you can then print to the standard output in a separate function call using the print() function.
Listing 8-14: Positive example homogeneous input/output mapping.
Sure, there are programs that filter from one category to another—for example, writing a file to the standard output or translating English to Spanish. But following the principle of creating programs that do one thing well (see principle 3), these programs should do nothing else. This is the gold standard of writing intuitive and natural programs—design them as filters!
Unix Principle 10. Worse is Better
Richard Gabriel, a computer scientist well-known for his work on the programming language LISP, conceived this principle in the late eighties. Don’t take this contra-intuitive principle too literally. Worse is not actually better from a qualitative perspective. If you had infinite time and resources, it would be best to always make the program perfect in all instances. However, in a world with limited resources, worse will often be more efficient that. Launching a simple and crude solution to a problem first ensures that the launching organization builds a first-mover advantage. It attracts quick feedback from the early adopters (see Chapter 4 about minimum viable products) and gains momentum and attention early in the software development process. By launching a simple product first before optimizing and perfecting it, one can often become more sucessful than competitors because learning speed increases and the positioning in the market is clearer. Many practitioners argue that a second-mover must have a far superior product and invest far more energy only to pull away users from the first-mover. This can become quite difficult and the network effects of the first mover quickly build a “moat” around the first mover’s software product that cannot be overcome easily. This principle is similar to many principles already discussed here: simplicity, small is beautiful, build a minimum viable product, fail early and often, and take any opportunity to reduce complexity in the software development cycle.
Unix Principle 11. Clean Code is Better Than Clever Code
I slightly modified the original “Clarity is better than cleverness”, first to focus the principle to code and, second, to align it with the principles you’ve already learned how to write clean code (see Chapter 4).
This principle specifically highlights the trade-off between clean and clever code—of course, it’s great to write clever code, but it should generally not come at the costs of introducing unnecessary complexity.
def bubblesort(l): for boundary in range(len(l)-1, 0, -1): for i in range(boundary): if l[i] > l[i+1]: l[i], l[i+1] = l[i+1], l[i] return l l = [5, 3, 4, 1, 2, 0]
print(bubblesort(l))
# [0, 1, 2, 3, 4, 5]
Listing 8-15: Bubblesort algorithm in Python.
The idea of the bubblesort algorithm is to iteratively go through the list and switch the position of two adjancent elements so that those two elements can be considered sorted. The smaller element goes to the left and the larger element goes to the right. Each time that happens, the list is a bit more sorted. This is repeated many times until the whole list is sorted. The algorithm in Listing 8-15 achieves this simple strategy in a few lines of code. It’s readable, clear, and doesn’t contain unnecessary code elements.
Now, suppose your smart-ass colleague comes along and argues that you could shorten the code with the following Python trick: conditional assignments. This would allow you to express the if statement with one line of code less (see Listing 8-16).
def bubblesort_clever(l): for boundary in range(len(l)-1, 0, -1): for i in range(boundary): l[i], l[i+1] = (l[i+1], l[i]) if l[i] > l[i+1] else (l[i], l[i+1]) return l print(bubblesort_clever(l))
# [0, 1, 2, 3, 4, 5]
Wow, the code just became less readable and has lost all clarity. It still accomplishes the same task. You may even find the use of the conditional assignment feature clever—assigning one of two tuples to two neighboring list elements conditioned on which is the larger one—however, it comes at the cost of expressing your ideas with clean code. For more tips on how to write clean code, please refer to Chapter 4.
Unix Principle 13.Design Programs to Be Connected With Other Programs
The rise of web services and micro services came from the willingness to share code and build on each other’s code. Society benefits tremendously from open code bases and open interfaces because it reduces friction and investment overhead of all future code projects in the decades to come.
Your programs do not live in isolation. A program exists for a certain purpose. It is called either by a human being or by another program. That’s why you need to design the API (application programming interface) in a suitable way. You’ve already seen in principle 9 Make Any Program a Filter that choosing the intuitive input/output mapping is one way to accomplish maintainability, simplicity, and extensibility. If you write code with this principle in mind, you’ll automatically design programs to be connected with other programs rather than programs that live in isolation. The great programmer is more an architect than a coding craftsman. They create new programs as a unique combination of old and new functions and other programs which accelerates their potential to create powerful code quickly. As a result, interfaces are not a consideration that comes late in the software development cycle, but they’re front and center. A great plan on how to connect and wrap old and new programs is at the core of their craftsmanship.
Unix Principle 14. Make Your Code Robust
You’d call a thing robust—or a code base for that matter—if you cannot easily break it. There are different perspectives on breaking code: as a programmer or as a user.
As a programmer, you could potentially break code by modifying it. You’d call a code base robust against change if even a careless programmer can work on the code base without being able to easily destroy its functionality. Say, you have a big monolithic code block and every programmer in your organization is allowed to change it all. Is your code robust against change? Now, compare this to software organizations like Netflix or Google where every change has to go through multiple levels of approval before they’re deployed in the real world. You can accomplish robustness of your code base by carefully designing access rights so that individual developers are not able to destroy the application without being forced to convince at least one additional person that the change is more likely to create than destroy value—yes, it comes at a price of agility but if you’re not a one-person startup this price is worth paying. There are different additional means of making code more robust as a programmer or a software organization. You’ve already learned about some of them: small is beautiful, create functions that do one thing well, test-driven development, keeping things simple. Some more are:
Use versioning systems such as Git so that any previous version of your code can be recovered,
Backup your application data regularly because data is not part of a versioning system,
Use distributed systems to avoid a single point of failure: run your application on multiple machines rather than only on a single one because the probability of multiple machines failing reduces drastically with an increasing number of machines. Say, one machine has a failure probability of 1% per day—it’ll likely fail every 100 days. By creating a distributed system of five machines that fail independently, you can theoretically reduce your failure probability to 0.015 * 100% = 0.00000001%. Sure, machine failures are not independent—think power outages—but adding more machines has the power to increase robustness against external failure drastically.
As a user, an application feels robust if you cannot easily break it by providing faulty or even malicious inputs. You should always assume that your users will behave like a a mix of gorillas that submit random series of characters as an input for your application and highly-skilled hackers that understand the application better than you and are ready to exploit even the smallest security issue. Your application must be robust against both types of users. It’s relatively simple to shield against the former group. Unit testing is one powerful tool in your tool belt: test any function against any function input you can think of—especially considering border cases. For example, if your function takes an integer and calculates the square root—check if it can handle negative inputs because sooner or later, some users will put in negative numbers. To shield against the latter group, you must do more: use firewalls, add load balancers to protect against DDOS attacks, manage access rights carefully, avoid single points of failures, don’t store passwords in files, and so on. If your application is still small, you usually don’t need to optimize for security if you have written simple and clean code. The downside risks are minimal and you don’t have a lot of exploits, yet. But as you grow, you must carefully improve the security of your system because more and more hackers will attack your application and exploit any weakness they can lie their hands on.
The book “From One to Zero” will appear in 2021 at NoStarch. Be sure to stay updated and join my free email academy to download Python cheat sheets and consume hundreds of personalized email lessons to make you a better coder!
Almost all Internet giants (in good sense) like Google, Facebook, Twitter and LinkedIn support OAuth login. They provide API with detailed documentation to help developers integrate OAuth authentication.
There are many client libraries available to implement Twitter OAuth login. But we will do with just plain core PHP. Yes, actually it is sufficient, lightweight and better.
Application with the OAuth login feature has many advantages.
Simplifies the login process.
Reduces friction by minimising user’s effort with a single click.
Saves developers’ effort from building a custom login.
In its community API gallery, Twitter lists many PHP libraries. These libraries contain handlers to read-write API data in a secure manner. An authentication step ensures access security on each API request.
Twitter uses various authentication methods. Those are, OAuth 1.0a, OAuth 2.0 Bearer token, Basic authentication. I used OAuth 1.0a authentication to validate login with Twitter API requests.
During the login flow, Twitter prompts to enter user credentials to login. Then, it will ask to authorize the App for the first time.
“Login with Twitter” flow is very similar to the 3-legged OAuth flow used to get the access token. With the reference of this token, API will return user data as per the request URL. This example will read user name, photo and more details after successful authentication.
In this article, we will see how to integrate “Login with Twitter” by completing each of the below steps.
How to get and configure the API keys.
How to perform the 3-step authentication flow.
Create requests and handle responses during the authentication flow.
Store the authenticated user data into the Database.
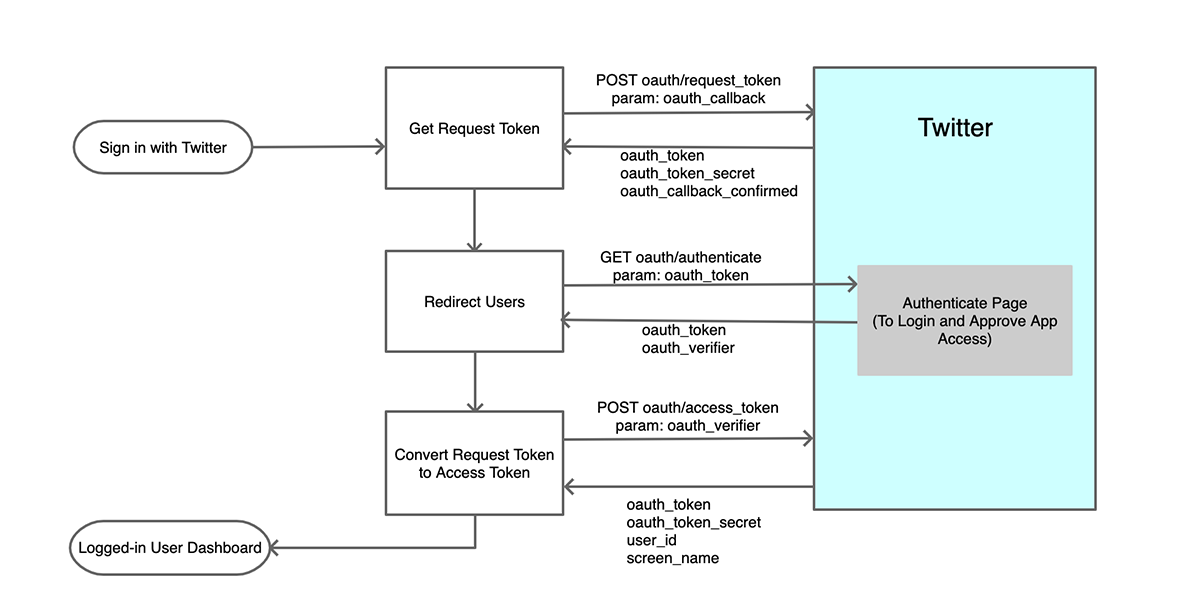
The Twitter login authentication flow includes three steps.
Get a Request token and a secret-key.
Redirect to Twitter to login and approve access rights to the Twitter app.
Get an Access token and the secret-key to access the user account via API.
During the OAuth login process, each request has to be signed with an OAuth signature. In this example, it has a service class to prepare signed requests.
The following diagram shows the “Login with Twitter” flow. It indicates the steps, request parameters and API response data.
Click to see a larger image.
How to integrate Twitter OAuth login?
Twitter gives a Login with Twitter or Sign in with Twitter button control to put into an application. It makes users sign in to the application with a couple of clicks.
After obtaining the Twitter API keys and token secret, configure them with the PHP application. The next section will show the config file created for this example.
Then, create the request-response handlers to communicate with the Twitter API. It will proceed step by step process to obtain tokens to process the next request.
Instead of using custom handlers, we can use built-in Twitter client libraries.
With the access_token, API will allow access to hit the endpoints. But, it depends on the App permissions set in the developer console.
On getting the response data from the API, the application login flow comes to end. With this step, it will change the logged-in status of the application users in the UI.
Generating Twitter API keys
The process of generating Twitter API keys is straight-forward. Once we have seen the steps to get keys for Google OAuth login integration.
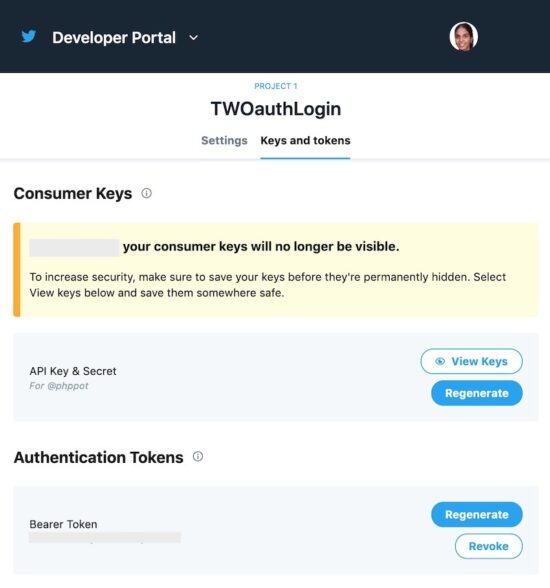
Login to the Twitter developer portal and follow the below steps.
Login to Twitter and go to its developer console.
Create a Twitter developer App. (project-specific app or standalone app).
Go to app settings to edit permissions and authentication settings.
Go to the “keys and tokens” tab to copy the consumer key and the secret key.
Save the keys in a secured place and configure them into the application.
Twitter allows creating two types of developer App. A project-specific app or a standalone app. The project-specific app can use v2 endpoints. The standalone apps can only access the v1 endpoints.
Twitter API keys will no longer keep the API keys and tokens permanently. This is for security purposes. But it allows regenerating the keys and tokens.
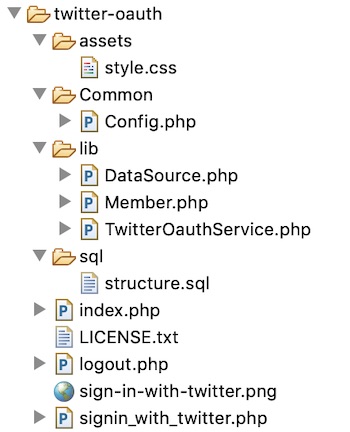
Configure the Twitter App consumer_key and secret_key in Config.php file. This application config defines the application constants. It includes the root path, database config and Twitter consumer and secrete key.
There are various ways to implement Twitter OAuth login in a PHP application. Generally, people use built-in client-side libraries to implement this. Twitter also recommends one or more PHP libraries in its community API gallery.
This example shows a simple code for “Login with Twitter” integration. It uses no external libraries to achieve this.
It has a custom class that prepares the API request and handle responses. It creates OAuth signatures to send valid signed requests to the API.
A landing page will show the “Sign in with Twitter” button to trigger the OAuth login process. On clicking, it invokes the PHP service to proceed with the three steps sign-in flow.
As a result, it gets the Twitter user data on successful authentication. The resultant page will change the logged-in state and display the user data.
If you refuse to approve the app access or login, Twitter will redirect back to the application. This redirect URL is set with the param list of the API request.
This example uses the Database to keep the user details read from the API response. Thus, it records the application’s users logged-in via Twitter OAuth login.
Twitter OAuth PHP service
This PHP service class request Twitter API for the access key and token. It follows the three steps to obtain the access token.
The following three methods perform the three steps.
Step 1: getRequestToken() – sends the oauth_callback with the authentication header. It requests request_token and the secrete key from the Twitter API.
Step 2: getOAuthVerifier() – redirects the user to the Twitter authentication page. It let users sign in and approve the App to access the account. It passes the OAuth request token received in step1 with the URL. After authentication, Twitter will invoke the oauth_callback with the oauth_verifier in the querystring.
Step 3: getAccessToken() – requests the access_token and secrete key from the API. The params are the request_token, request_token_secret, oauth_verifier get from Step 1, 2.
Twitter requires each of the API requests has to be signed. This PHP service class has a function to generate the signature by the use of API request parameters.
Initiate login flow with “Sign in with Twitter” control
The landing page of this example will show a “Sign in with Twitter” button. On clicking this button, it invokes functions to proceed with the 3-step login flow.
The following code shows the index.php file script. It checks if any user logged-in already. If so, it displays the user dashboard. Otherwise, it shows the “Sign in with Twitter” button.
It invokes the TwitterOAuthService to initiate the login flow. This initiation will happen when the user tries to log in.
After completing the 3-steps, the TwitterOauthService will return the user access token. Then it invokes GET oauth/verify_credentials endpoint to read the user daya.
It will return the logged-in user data as a JSON response. The application callback endpoint receives this data.
Then, the code will save the data into the database and put the logged-in user id into the session. Based on the existence of this user session the landing page will show the user dashboard.
The following PHP class has functions to prepare database queries. It is to read data, to check user existency, to insert new records.
lib/Member.php
<?php
namespace Phppot; class Member
{ private $db; private $userTbl; function __construct() { require_once __DIR__ . '/DataSource.php'; $this->db = new DataSource(); } function isExists($twitterOauthId) { $query = "SELECT * FROM tbl_member WHERE oauth_id = ?"; $paramType = "s"; $paramArray = array( $twitterOauthId ); $result = $this->db->select($query, $paramType, $paramArray); return $result; } function insertMember($oauthId, $fullName, $screenName, $photoUrl) { $query = "INSERT INTO tbl_member (oauth_id, oauth_provider, full_name, screen_name, photo_url) values (?,?,?,?,?)"; $paramType = "sssss"; $paramArray = array( $oauthId, 'twitter', $fullName, $screenName, $photoUrl ); $this->db->insert($query, $paramType, $paramArray); } function getUserById($id) { $query = "SELECT * FROM tbl_member WHERE id = ?"; $paramType = "i"; $paramArray = array( $id ); $result = $this->db->select($query, $paramType, $paramArray); return $result; }
}
DataSource class and Database script
The database related functions are in the DataSource class. It is for creating the database connection and to perform read, write operations.
It uses MySQLi prepared statements to execute database queries. It will help to have a secured code that prevents SQL injection.
lib/DataSource.php
<?php
/** * Copyright (C) Phppot * * Distributed under 'The MIT License (MIT)' * In essense, you can do commercial use, modify, distribute and private use. * Though not mandatory, you are requested to attribute Phppot URL in your code or website. */
namespace Phppot; /** * Generic datasource class for handling DB operations. * Uses MySqli and PreparedStatements. * * @version 2.6 - recordCount function added */
class DataSource
{ const HOST = 'localhost'; const USERNAME = 'root'; const PASSWORD = 'test'; const DATABASENAME = 'oauth_login'; private $conn; /** * PHP implicitly takes care of cleanup for default connection types. * So no need to worry about closing the connection. * * Singletons not required in PHP as there is no * concept of shared memory. * Every object lives only for a request. * * Keeping things simple and that works! */ function __construct() { $this->conn = $this->getConnection(); } /** * If connection object is needed use this method and get access to it. * Otherwise, use the below methods for insert / update / etc. * * @return \mysqli */ public function getConnection() { $conn = new \mysqli(self::HOST, self::USERNAME, self::PASSWORD, self::DATABASENAME); if (mysqli_connect_errno()) { trigger_error("Problem with connecting to database."); } $conn->set_charset("utf8"); return $conn; } /** * To get database results * * @param string $query * @param string $paramType * @param array $paramArray * @return array */ public function select($query, $paramType = "", $paramArray = array()) { $stmt = $this->conn->prepare($query); if (! empty($paramType) && ! empty($paramArray)) { $this->bindQueryParams($stmt, $paramType, $paramArray); } $stmt->execute(); $result = $stmt->get_result(); if ($result->num_rows > 0) { while ($row = $result->fetch_assoc()) { $resultset[] = $row; } } if (! empty($resultset)) { return $resultset; } } /** * To insert * * @param string $query * @param string $paramType * @param array $paramArray * @return int */ public function insert($query, $paramType, $paramArray) { $stmt = $this->conn->prepare($query); $this->bindQueryParams($stmt, $paramType, $paramArray); $stmt->execute(); $insertId = $stmt->insert_id; return $insertId; } /** * To execute query * * @param string $query * @param string $paramType * @param array $paramArray */ public function execute($query, $paramType = "", $paramArray = array()) { $stmt = $this->conn->prepare($query); if (! empty($paramType) && ! empty($paramArray)) { $this->bindQueryParams($stmt, $paramType, $paramArray); } $stmt->execute(); } /** * 1. * Prepares parameter binding * 2. Bind prameters to the sql statement * * @param string $stmt * @param string $paramType * @param array $paramArray */ public function bindQueryParams($stmt, $paramType, $paramArray = array()) { $paramValueReference[] = &$paramType; for ($i = 0; $i < count($paramArray); $i ++) { $paramValueReference[] = &$paramArray[$i]; } call_user_func_array(array( $stmt, 'bind_param' ), $paramValueReference); } /** * To get database results * * @param string $query * @param string $paramType * @param array $paramArray * @return array */ public function getRecordCount($query, $paramType = "", $paramArray = array()) { $stmt = $this->conn->prepare($query); if (! empty($paramType) && ! empty($paramArray)) { $this->bindQueryParams($stmt, $paramType, $paramArray); } $stmt->execute(); $stmt->store_result(); $recordCount = $stmt->num_rows; return $recordCount; }
}
The below section shows the tbl_member database table script. Import this script before executing this example.
sql/structure.sql
--
-- Database: `oauth_login`
-- -- -------------------------------------------------------- --
-- Table structure for table `tbl_member`
-- CREATE TABLE `tbl_member` ( `id` int(11) NOT NULL, `oauth_id` varchar(255) NOT NULL, `oauth_provider` varchar(255) NOT NULL, `full_name` varchar(255) NOT NULL, `screen_name` varchar(255) NOT NULL, `photo_url` varchar(255) NOT NULL, `create_at` timestamp NOT NULL DEFAULT CURRENT_TIMESTAMP ON UPDATE CURRENT_TIMESTAMP
) ENGINE=InnoDB DEFAULT CHARSET=latin1; --
-- Indexes for dumped tables
-- --
-- Indexes for table `tbl_member`
--
ALTER TABLE `tbl_member` ADD PRIMARY KEY (`id`); --
-- AUTO_INCREMENT for dumped tables
-- --
-- AUTO_INCREMENT for table `tbl_member`
--
ALTER TABLE `tbl_member` MODIFY `id` int(11) NOT NULL AUTO_INCREMENT;
Login with Twitter example output
After completing the application config, the home page will display the “Sign in with Twitter” button as below.
Before login, the home page will display the “Sign in with Twitter” button as below. I used the login button downloaded from the official Twitter documentation.
Python’s built-in getattr(object, string) function returns the value of the object‘s attribute with name string. If this doesn’t exist, it returns the value provided as an optional third default argument. If that doesn’t exist either, it raises an AttributeError. An example is getattr(porsche, 'speed') which is equivalent to porsche.speed.
Usage
Learn by example! Here’s an example on how to use the getattr()built-in function.
# Define class with one attribute
class Car: def __init__(self, brand, speed): self.brand = brand self.speed = speed # Create object
porsche = Car('porsche', 100)
tesla = Car('tesla', 110) # Two alternatives to get instance attributes:
print(getattr(porsche, 'brand') + " " + str(getattr(porsche, 'speed')))
print(tesla.brand + " " + str(tesla.speed)) # Get an attribute that doesn't exist with default argument:
print(getattr(porsche, 'color', 'red'))
The output of this code snippet is:
porsche 100
tesla 110
red
Syntax getattr()
The getattr() object has the following syntax:
Syntax:
getattr(object, attribute[, default]) # Get object's attribute value or default if non-existent
Arguments
object
The object from which the attribute value should be drawn.
attribute
The attribute name as a string.
default
The return value in case the attribute doesn’t exist.
Return Value
object
Returns the value of the attribute of instance object or default if non-existent.
Video getattr()
Return value from getattr()
The getattr(object, attribute, default) method returns one of the following:
the value of the object‘s attribute
default, if the attribute doesn’t exist
AttributeError if neither the attribute exists, nor default is provided.
But before we move on, I’m excited to present you my brand-new Python book Python One-Liners (Amazon Link).
If you like one-liners, you’ll LOVE the book. It’ll teach you everything there is to know about a single line of Python code. But it’s also an introduction to computer science, data science, machine learning, and algorithms. The universe in a single line of Python!
The book is released in 2020 with the world-class programming book publisher NoStarch Press (San Francisco).
Why Using getattr() Instead of Dot to Get an Attribute?
You’ve seen two alternatives to get an attribute:
getattr(object, attribute_str)
object.attribute
Why using the getattr() function over the more concise dot syntax?
There are two main reasons:
getattr() provides a default value in case the attribute doesn’t exist whereas the dot syntax throws an error.
getattr() allows to dynamically access the attribute with the string instead of the name. For example, you may obtain the string as a user input, in which case, you cannot use the dot syntax object.attribute because attribute is a string, not a name.
Related Functions
The setattr() function returns the value of an attribute.
The hasattr() function checks if an attribute exists.
The delattr() function deletes an existing attribute.
Summary
Python’s built-in getattr(object, string) function returns the value of the object‘s attribute with name string.
# Define class with one attribute
class Car: def __init__(self, brand, speed): self.brand = brand self.speed = speed porsche = Car('porsche', 100)
print(getattr(porsche, 'brand') + " " + str(getattr(porsche, 'speed')))
# porsche 100
If this doesn’t exist, it returns the value provided as an optional third default argument.
print(getattr(porsche, 'color', 'red'))
# red
If that doesn’t exist either, it raises an AttributeError.
print(getattr(porsche, 'color')) '''
Traceback (most recent call last): File "C:\Users\xcent\Desktop\Finxter\Blog\HowToConvertBooleanToStringPython\code.py", line 12, in <module> print(getattr(porsche, 'color'))
AttributeError: 'Car' object has no attribute 'color' '''
An example is getattr(porsche, 'speed') which is equivalent to porsche.speed.
print(getattr(porsche, 'speed'))
print(porsche.speed)
# Both print attribute value: 100
I hope you enjoyed the article! To improve your Python education, you may want to join the popular free Finxter Email Academy:
Do you want to boost your Python skills in a fun and easy-to-consume way? Consider the following resources and become a master coder!
Where to Go From Here?
Enough theory, let’s get some practice!
To become successful in coding, you need to get out there and solve real problems for real people. That’s how you can become a six-figure earner easily. And that’s how you polish the skills you really need in practice. After all, what’s the use of learning theory that nobody ever needs?
Practice projects is how you sharpen your saw in coding!
Do you want to become a code master by focusing on practical code projects that actually earn you money and solve problems for people?
Then become a Python freelance developer! It’s the best way of approaching the task of improving your Python skills—even if you are a complete beginner.
Heatmaps are a specific type of plot which exploits the combination of color schemes and numerical values for representing complex and articulated datasets. They are largely used in data science application that involves large numbers, like biology, economics and medicine.
In this video we will see how to create a heatmap for representing the total number of COVID-19 cases in the different USA countries, in different days. For achieving this result, we will exploit Seaborn, a Python package that provides lots of fancy and powerful functions for plotting data.
Here’s the code to be discussed:
import numpy as np
import pandas as pd
import matplotlib.pyplot as plt
import seaborn as sns #url of the .csv file
url = r"path of the .csv file" # import the .csv file into a pandas DataFrame
df = pd.read_csv(url, sep = ';', thousands = ',') # defining the array containing the states present in the study
states = np.array(df['state'].drop_duplicates())[:40] #extracting the total cases for each day and each country
overall_cases = []
for state in states: tot_cases = [] for i in range(len(df['state'])): if df['state'][i] == state: tot_cases.append(df['tot_cases'][i]) overall_cases.append(tot_cases[:30]) data = pd.DataFrame(overall_cases).T
data.columns = states #Plotting
fig = plt.figure()
ax = fig.subplots()
ax = sns.heatmap(data, annot = True, fmt="d", linewidths=0, cmap = 'viridis', xticklabels = True)
ax.invert_yaxis()
ax.set_xlabel('States')
ax.set_ylabel('Day n°')
plt.show()
Let’s dive into the code to learn Seaborn’s heatmap functionality in a step-by-step manner.
Importing the required libraries for this example
We start our script by importing the libraries requested for running this example; namely Numpy, Pandas, Matplotlib and Seaborn.
import numpy as np
import pandas as pd
import matplotlib.pyplot as plt
import seaborn as sns
What’s in the data?
As mentioned in the introduction part, we will use the COVID-19 data that were also used in the article aboutScipy.curve_fit() function. Data have been downloaded from the official website of the “Centers for Disease Control and Prevention” as a .csv file.
The file reports multiple information regarding the COVID-19 pandemic in the different US countries, such as the total number of cases, the number of new cases, the number of deaths etc…; all of them have been recorded every day, for multiple US countries.
We will generate a heatmap that displays in each slot the number of total cases recorded for a particular day in a particular US country. To do that, the first thing that should be done is to import the .csv file and to store it in a Pandas DataFrame.
Importing the data with Pandas
The data are stored in a .csv file; the different values are separated by a semi-colon while the thousands symbol is denoted with a comma. In order to import the .csv file within our python script, we exploit the Pandas function .read_csv() which accepts as input the path of the file and converts it into a Pandas DataFrame.
It is important to note that, when calling .read_csv(), we specify the separator, which in our case is “;” by saying “sep = ‘;’” and the symbol used for denoting the thousands, by writing “thousands = ‘,’”. All these things are contained in the following code lines:
#url of the .csv file
url = r"path of the file" # import the .csv file into a pandas DataFrame
df = pd.read_csv(url, sep = ';', thousands = ',')
Creating the arrays that will be used in the heatmap
At this point, we have to edit the created DataFrame in order to extract just the information that will be used for the creation of the heatmap.
The first values that we extract are the ones that describe the name of the countries in which the data have been recorded. To better identify all the categories that make up the DataFrame, we can type “df.columns” to print out the header of the file. Among the different categories present in the header, the one that we are interested in is “state”, in which we can find the name of all the states involved in this chart.
Since the data are recorded on daily basis, each line corresponds to the data collected for a single day in a specific state; as a result, the names of the states are repeated along this column. Since we do not want any repetition in our heatmap, we also have to remove the duplicates from the array.
We proceed further by defining a Numpy array called “states” in which we store all the values present under the column “state” of the DataFrame; in the same code line, we also apply the method .drop_duplicates() to remove any duplicate of that array. Since there are 60 states in the DataFrame, we limit our analysis to the first 40, in order not to create graphical problems in the labels of the heatmap x-axis, due to the limited window space.
#defining the array containing the states present in the study
states = np.array(df['state'].drop_duplicates())[:40]
The next step is to extract the number of total cases, recorded for each day in each country. To do that, we exploit two nested for loops which allow us creating a list containing the n° of total cases (an integer number for each day) for every country present in the “states” array and appending them into another list called “overall_cases” which needs to be defined before calling the for loop.
#extracting the total cases for each day and each country
overall_cases = []
As you can see in the following code, in the first for loop we iterate over the different states that were previously stored into the “states” array; for each state, we define an empty list called “tot_cases” in which we will append the values referred to the total cases recorded at each day.
for state in states: tot_cases = []
Once we are within the first for loop (meaning that we are dealing with a single state), we initialize another for loop which iterates through all the total cases values stored for that particular state. This second for loop will start from the element 0 and iterate through all the values of the “state” column of our DataFrame. We achieve this by exploiting the functions range and len.
for i in range(len(df['state'])):
Once we are within this second for loop, we want to append to the list “tot_cases” only the values that are referred to the state we are currently interested in (i.e the one defined in the first for loop, identified by the value of the variable “state”); we do this by using the following if statement:
if df['state'][i] == state: tot_cases.append(df['tot_cases'][i])
When we are finished with appending the values of total cases for each day of a particular country to the “tot_cases” list, we exit from the inner for loop and store this list into the “overall_cases” one, which will then become a list of lists. Also in this case, we limit our analysis to the first 30 days, otherwise we would not have enough space in our heatmap for all the 286 values present in the DataFrame.
overall_cases.append(tot_cases[:30])
In the next iteration, the code will start to analyze the second element of the “states” array, i.e. another country, will initialize an empty list called “tot_cases” and enter in the second for loop for appending all the values referred to that country in the different days and eventually, once finished, append the entire list to the list “overall_cases”; this procedure will be iterated for all the countries stored in the “states” array. At the end, we will have extracted all the values needed for generating our heatmap.
Creating the DataFrame for the heatmap
As already introduced in the first part, we exploit the Seaborn function .heatmap() to generate our heatmap.
This function can take as input a pandas DataFrame that contains the rows, the columns and all the values for each cell that we want to display in our plot. We hence generate a new pandas DataFrame (we call it “data”) that contains the values stored in the list “overall_cases”; in this way, each row of this new DataFrame is referred to a specific state and each column to a specific day.
We then transpose this DataFrame by adding “.T” at the end of the code line, since in this way we can then insert the name of the states as the header of our Dataframe.
data = pd.DataFrame(overall_cases).T
The names of the states were previously stored in the array “states”, we can modify the header of the DataFrame using the following code:
data.columns = states
The DataFrame that will be used for generating the heatmap will have the following shape:
CO FL AZ SC CT NE KY WY IA ... LA ID NV GA IN AR MD NY OR 0 0 0 0 0 0 0 0 0 0 ... 0 0 0 0 0 0 0 0 0 1 0 0 0 0 0 0 0 0 0 ... 0 0 0 0 0 0 0 0 0 2 0 0 0 0 0 0 0 0 0 ... 0 0 0 0 0 0 0 0 0 3 0 0 0 0 0 0 0 0 0 ... 0 0 0 0 0 0 0 0 0 4 0 0 1 0 0 0 0 0 0 ... 0 0 0 0 0 0 0 0 0
The row indexes represent the n° of the day in which the data are recorded while the columns of the header are the name of the states.
Generating the heatmap
After generating the usual plot window with the typical matplotlib functions, we call the Seaborn function .heatmap() to generate the heatmap.
The mandatory input of this function is the pandas DataFrame that we created in the previous section. There are then multiple optional input parameters that can improve our heatmap:
linewidths allows adding a white contour to each cell to better separate them, we just have to specify the width;
xticklabels modify the notation along the x-axis, if it’s equal to True, all the values of the array plotted as the x-axis will be displayed.
We can also chose the colormap of the heatmap by using cmap and specifying the name of an available heatmap (“viridis” or “magma” are very fancy but also the Seaborn default one is really cool);
finally, it is possible to display the numerical value of each cell by using the option annot = True; the numerical value will be displayed at the center of each cell.
The following lines contain the code for plotting the heatmap. One final observation regards the command .invert_yaxis(); since we plot the heatmap directly from a pandas DataFrame, the row index will be the “day n°”; hence it will start from 0 and increase as we go down along the rows. By adding .invert_yaxis() we reverse the y-axis, having day 0 at the bottom part of the heatmap.
Figure 1 displays the heatmap obtained by this code snippet.
Figure 1: Heatmap representing the number of COVID-19 total cases for the first 30 days of measurement (y-axis) in the different USA countries (x-axis).
As you can see in Figure 1, there are a lot of zeroes, this is because we decided to plot the data related to the first 30 days of measurement, in which the n° of recorded cases were very low. If we decided to plot the results from all the days of measurement (from day 0 to 286), we would obtain the result displayed in Figure 2 (in this latter case, we placed annot equal to False since the numbers would have been too large for the cell size):
Figure 2: Heatmap representing the number of COVID-19 total cases for the first 286 days of measurement (y-axis) in the different USA countries (x-axis); this time annot = False, since the cells are too small for accommodating the n° of total cases (which becomes very large towards the upper part of the heatmap).
Python’s built-in delattr() function takes an object and an attribute name as arguments and removes the attribute from the object. The call delattr(object, 'attribute') is semantically identical to del object.attribute.
This article shows you how to use Python’s built-in delattr() function.
Usage
Learn by example! Here’s an example on how to use the delattr()built-in function.
Create a Car object with one attribute speed.
# Define class with one attribute
class Car: def __init__(self): self.speed = 100 # Create object
porsche = Car()
# What's the value for attribute speed?
print(porsche.speed)
# 100
Use delattr(porsche, speed) to remove the attribute speed from the object porsche.
# Remove the attribute speed from porsche
delattr(porsche, 'speed')
After removing the attribute, it cannot be accessed anymore:
# Does this still work?
print(porsche.speed)
# No: '''
Traceback (most recent call last): File "C:\Users\xcent\Desktop\Finxter\Blog\HowToConvertBooleanToStringPython\code.py", line 18, in <module> print(porsche.speed)
AttributeError: 'Car' object has no attribute 'speed' '''
Syntax delattr()
The delattr() object has the following syntax:
Syntax:
delattr(object, attribute) # Removes attribute from object
Arguments
object
The object from which the attribute should be removed
string
The attribute to be removed
Return Value
None
Returns Nothing. If the attribute doesn’t exist, the method does nothing.
Exercise: Does the code work? If yes, run it! If not, fix the bug!
But before we move on, I’m excited to present you my brand-new Python book Python One-Liners (Amazon Link).
If you like one-liners, you’ll LOVE the book. It’ll teach you everything there is to know about a single line of Python code. But it’s also an introduction to computer science, data science, machine learning, and algorithms. The universe in a single line of Python!
The book is released in 2020 with the world-class programming book publisher NoStarch Press (San Francisco).
The alternative to Python’s built-in delattr() is to use the del keyword that is also built-in.
The delattr(object, 'attribute') is semantically identical to the del object.attribute call. Note that in the first case, the attribute is given as a string, while in the second case, the attribute is given as a normal attribute name.
# Define class with one attribute
class Car: def __init__(self): self.speed = 100 # Create object
porsche = Car() # What's the value for attribute speed?
print(porsche.speed) # Remove the attribute speed from porsche
del porsche.speed # Does this still work?
print(porsche.speed)
The output is the same:
100
Traceback (most recent call last): File "C:\Users\xcent\Desktop\Finxter\Blog\HowToConvertBooleanToStringPython\code.py", line 17, in <module> print(porsche.speed)
AttributeError: 'Car' object has no attribute 'speed'
Related Functions
The getattr() function returns the value of an attribute.
The hasattr() function checks if an attribute exists.
The setattr() function sets the value of an attribute.
Summary
Python’s built-in delattr() function takes an object and an attribute name as arguments and removes the attribute from the object.
I hope you enjoyed the article! To improve your Python education, you may want to join the popular free Finxter Email Academy:
Do you want to boost your Python skills in a fun and easy-to-consume way? Consider the following resources and become a master coder!
Where to Go From Here?
Enough theory, let’s get some practice!
To become successful in coding, you need to get out there and solve real problems for real people. That’s how you can become a six-figure earner easily. And that’s how you polish the skills you really need in practice. After all, what’s the use of learning theory that nobody ever needs?
Practice projects is how you sharpen your saw in coding!
Do you want to become a code master by focusing on practical code projects that actually earn you money and solve problems for people?
Then become a Python freelance developer! It’s the best way of approaching the task of improving your Python skills—even if you are a complete beginner.
If you are a data scientist or aspire to be one investing your time in learning natural language processing (NLP) will be an investment in your future. 2020 saw a surge in the field of natural language processing. In this blog post you will discover 5 popular NLP libraries, and it’s applications.
Preprocessing Libraries
Preprocessing a crucial step in any machine learning pipeline. If you are building a language model you would have to create a word vector which involves removing stop words, and converting words to its root form.
#1 Spacy
Spacy is a popular Python library for sentence tokenization, lemmatization, and stemming. It is an industry grade library which can be used for text preprocessing and training deep learning based text classifiers.
Getting started with Spacy: Named Entity Recognition is an important task in natural language processing. NER helps in extracting important entities like location, organization names, etc.
import spacy # python -m spacy download en_core_web_sm
nlp = spacy.load('en_core_web_sm') sentences = ['Stockholm is a beautiful city', 'Mumbai is a vibrant city' ] for sentence in sentences: doc = nlp(sentence) for entity in doc.ents: print(entity.text, entity.label_) print(spacy.explain(entity.label_))
The above code processes the two sentences and extracts the location in both sentences.
Let us now see the output
As seen from the output the code was able to extract Stockholm and Mumbai and associated them with the GPE label which indicates countries, cities, or states.
#2 NLTK
NLTK is another popular Python library for text preprocessing. It was started as an academic project and soon became very popular amongst researchers and academicians.
Let us see how we can do Part of Speech Tagging using NLTK. Part of speech tagging is used to extract the important part of speech like nouns, pronouns, adverbs, adjectives, etc.
import nltk
import os sentence = "Python is a beautiful programming language."
tokens = nltk.word_tokenize(sentence)
tagged = nltk.pos_tag(tokens)
entities = nltk.chunk.ne_chunk(tagged)
print(entities)
The parts of speech that were extract from the above sentence are
(S (GPE Python/NNP) is/VBZ a/DT beautiful/JJ programming/NN language/NN ./.)
Applications
A popular application of NLP is to categorize a document into a given set of labels. There are a number of Python libraries which can help you to train deep learning based models for topic modeling, text summarization, sentiment analysis etc. Let us have a look at some of these popular libraries
Most deep learning based NLP models rely on pretrained language models using a process called transfer learning. A huge corpus of document is trained and then this model can be fine-tuned for a specific domain. Some popular libraries which help in using pretrained models and building industry grade NLP applications are
#3 FARM
Farm is a popular open source package developed by a Berlin based company. It is used to make the life of developers easier by providing some nice functionalities like experiment tracking, multitask-learning and parallelized processing of documents.
#4 Flair
Flair is a popular PyTorch based framework which helps developers to build state of the NLP applications like named entity recognition, part-of-speech tagging, sense disambiguation and classification.
#5 Transformers
Transformers is a popular Python library to easily access pretrained models and has support for both PyTorch and TensorFlow. If you want to build an entire NLP pipeline by using pretrained models for Natural language understanding and generation tasks transformers will make your life easier.
#6 Gensim
Gensim is another popular Python library widely used for topic modelling and provides an easy-to-use interface for popular algorithms like word2vec to find synonymous words.
If you’re like me, you love those TLDR; overviews to grasp the big picture quickly. Here is mine about Python’s compile() function:
Python’s built-in compile() method returns an executable code object as an “Abstract Syntax Tree” represented as an ast object. By passing this code object into the exec() or eval() functions, you can run it dynamically in your Python code. This way, you can programmatically create source code and execute it at runtime. To use the function, pass the string code to be executed, the filename, and the execution mode. For example compile('print("hi")', '<string>', 'exec') creates a code object consisting of one line print("hi").
This article shows you how to use Python’s built-incompile() method.
Usage compile()
Learn by example! Let’s say, you have a code file with the following content:
# Read the code from the file or define it explicitly:
code = 'customers = {"Alice": 40000, "Bob": 33000}\nprint(f"Bob: {customers[\'Bob\']}")' # Create the ast code object
code_obj = compile(code, '<string>', 'exec') # Execute the ast code object
exec(code_obj) # Result:
# Bob: 33000
First, you create the code as a string. Second, you pass the string into the compile() function to create an ast object. You can then pass this object into the exec() function and run it dynamically.
Video compile()
Why Using compile() Instead of exec() With a String?
Before you dive into the syntax, you may not be motivated to use the compile() function in the first place. Why? Because you can also use the exec() function on a string instead of a code object.
Python’s exec() function executes the Python code you pass as a string or executable object argument. This is called dynamic execution because, in contrast to normal static Python code, you can generate code and execute it at runtime. This way, you can run programmatically-created Python code.
The output is the same. However, there are two advantages of using a code object:
You make it explicit. Without compiling the string explicitly, the exec() method would do the same work implicitly. Thus, if you need to run the same code multiple times, you can save significant compilation overhead by just compiling it once in advance.
You can use the powerful ast object otherwise. This gives you access to some helper methods and additional information about the code such as the names defined in the code:
>>> code_obj.co_names
('customers', 'print')
You obtain this information from a compiled string which is very convenient!
Syntax compile()
You can use the compile() method with a number of different arguments.
The file from which the code given in source was read. If this was a string, use '<string>'.
mode
The execution mode—must be one of the following: 'exec' — If source is a sequence of statements 'eval' — If source is a single expression 'single' —If source is a single interactive statement
Optional: flags=0
Controls which compiler options should be activated and which future features should be allowed.
Optional: dont_inherit=False
Do you want to avoid inheritance of the compiler options and future features?
Optional: optimize=-1
Optimization level of the compiler: -1 selects the optimization level of the interpreter as given by -O options. 0 selects no optimization and __debug__ to True. 1 specifies that asserts are removed and sets __debug__ to False. 2 additionally removes docstrings.
Exercise: Print the number associated to Alice in the dictionary!
But before we move on, I’m excited to present you my brand-new Python book Python One-Liners (Amazon Link).
If you like one-liners, you’ll LOVE the book. It’ll teach you everything there is to know about a single line of Python code. But it’s also an introduction to computer science, data science, machine learning, and algorithms. The universe in a single line of Python!
The book is released in 2020 with the world-class programming book publisher NoStarch Press (San Francisco).
Frankly, I don’t see a huge problem with not closing the file if you have a small script and you don’t access the file anywhere else. Python will close it automatically after the code terminates.
Summary
The Python compile() method returns an executable code object as an “Abstract Syntax Tree” that is represented as an ast object.
There are many applications of an ast such as the following: You can pass this code object into the exec() or eval() functions and run it dynamically in your Python code.
This way, you can programmatically create source code and execute it at runtime.
To use the function, you must pass the string code to be executed, the filename, and the execution mode.
For example compile('print("hi")', '<string>', 'exec') would be a valid call that creates a code object consisting of one line print("hi").
I hope you enjoyed the article! To improve your Python education, you may want to join the popular free Finxter Email Academy:
Do you want to boost your Python skills in a fun and easy-to-consume way? Consider the following resources and become a master coder!
Where to Go From Here?
Enough theory, let’s get some practice!
To become successful in coding, you need to get out there and solve real problems for real people. That’s how you can become a six-figure earner easily. And that’s how you polish the skills you really need in practice. After all, what’s the use of learning theory that nobody ever needs?
Practice projects is how you sharpen your saw in coding!
Do you want to become a code master by focusing on practical code projects that actually earn you money and solve problems for people?
Then become a Python freelance developer! It’s the best way of approaching the task of improving your Python skills—even if you are a complete beginner.
This tutorial shows you how to use Python’s built-ineval() function.
Why Using It? The main application of eval() is to take user input at runtime and run it as a Python expression. This way, you can create a calculator or allow users to perform custom computations on a computing cluster. However, this use also poses the biggest security risk: the user can run byzantine (=harmful) code on your server environment!
How does it work? TLDR;
Python eval(s) parses the string argument s into a Python expression, runs it, and returns the result of the expression. This poses a security risk because a user can use it to run code on your computer. For example, if you allow eval(input()), a user could type os.system('rm -R *') to delete all files in your home directory.
Usage Examples
Learn by example! Here are some examples of how to use the eval()built-in function:
You can run any Python code that has a return value within the eval() code. You can even create your own function and run it within eval():
>>> def f(): return 42 >>> eval('f()')
42
This gives you great flexibility in how you use the function to run any string expression you may encounter in Python and it allows you to create Python code programmatically and evaluate it at runtime.
Syntax eval()
You can use the eval() method with three different argument lists.
Optional, default None. A dictionary in which you can define variables that should be globally accessible by the executed object (local namespace).
locals
Optional, default None. A dictionary in which you can define variables that should be locally accessible by the executed object (global namespace).
Return Value
object
Returns the result of parsing the string argument and running it as a Python expression.
Python eval() Return Value
The return value of eval() is a Python object that is the result of parsing the string argument and running it as a Python expression. The code can have side effects which means that it may change the state of your program or even your computer!
But before we move on, I’m excited to present you my brand-new Python book Python One-Liners (Amazon Link).
If you like one-liners, you’ll LOVE the book. It’ll teach you everything there is to know about a single line of Python code. But it’s also an introduction to computer science, data science, machine learning, and algorithms. The universe in a single line of Python!
The book is released in 2020 with the world-class programming book publisher NoStarch Press (San Francisco).
You can use the eval() function to run code that is typed in dynamically by the user:
def dangerous_function(): # Do nasty stuff like removing files # or creating trojan horses print('You were hacked!') return 42 eval(input())
This is how the user may interact with your code at runtime:
dangerous_function()
You were hacked! 42
You see that the dangerous_function() was executed which could contain all kinds of dangerous code. If you run this on your server, the user may attempt to remove all files on your server! For example, the user may use the command os.system('rm -rf *') to remove all files and folders.
Interactive Jupyter Notebook eval()
Exercise: Run the following interactive code and try to run the dangerous function in the interactive Jupyter notebook!
Python exec() vs eval()
Python’s exec() function takes a Python program, as a string or executable object, and runs it. The eval() function evaluates an expression and returns the result of this expression. There are two main differences:
exec() can execute all Python source code, whereas eval() can only evaluate expressions.
exec() always returns None, whereas eval() returns the result of the evaluated expression.
Can you import a Python library within the eval() function? No, you can’t! The import statement is a statement, not an expression. But eval() can only execute expressions. A simple workaround is to create a function with side effects that imports the module within the function body:
def f(): import random return random.randint(0, 9) print(eval('f()'))
# 4
Per default, the eval() function has access to all names in the dir() namespace, so you can also import the library globally and use it within the eval() function:
import random
print(eval('random.randint(0, 9)'))
How to Restrict the Use of Built-in Functions Within eval()
If you don’t want to allow users to access built-in functions, you can restrict this by providing the globals argument as follows:
eval(expression, {'__builtins__': None})
For example:
>>> eval('sum([1, 2, 3])')
6
>>> eval('sum([1, 2, 3])', {'__builtins__': None})
Traceback (most recent call last): File "<pyshell#13>", line 1, in <module> eval('sum([1, 2, 3])', {'__builtins__': None}) File "<string>", line 1, in <module>
TypeError: 'NoneType' object is not subscriptable
After restricting the built-in functions in the second call, Python raises an error NoneType object is not subscriptable. This reduces the security risks of your application.
Summary
Python eval(s) parses the string argument s into a Python expression, runs it, and returns the result of the expression.
>>> eval('2+2')
4
This poses a security risk because a user can use it to run code on your computer. For example, if you allow eval(input()), a user could type import os; os.system('rm -R *') to delete all files in your home directory.
I hope you enjoyed the article! To improve your Python education, you may want to join the popular free Finxter Email Academy:
Do you want to boost your Python skills in a fun and easy-to-consume way? Consider the following resources and become a master coder!
Where to Go From Here?
Enough theory, let’s get some practice!
To become successful in coding, you need to get out there and solve real problems for real people. That’s how you can become a six-figure earner easily. And that’s how you polish the skills you really need in practice. After all, what’s the use of learning theory that nobody ever needs?
Practice projects is how you sharpen your saw in coding!
Do you want to become a code master by focusing on practical code projects that actually earn you money and solve problems for people?
Then become a Python freelance developer! It’s the best way of approaching the task of improving your Python skills—even if you are a complete beginner.
Exponents are superscript numbers that describe how many times you want to multiply a number by itself. Calculating a value raised to the power of another value is a fundamental operation in applied mathematics such as finance, machine learning, statistics, and data science. This tutorial shows you how to do it in Python!
Definition
For pow(x, y), the pow() function returns the value of x raised to the power y. It performs the same function as the power operator ** , i.e. x**y, but differs in that it comes with an optional argument called mod.
The pow() function includes two compulsory arguments, base and exp, and one optional argument, mod, whose default value is None. All arguments must be of numeric data type.
Parameter
Description
exp
A number that represents the base of the function, whose power is to be calculated.
base
A number that represents the exponent of the function, to which the base will be raised.
Return value: The output of base raised to the power exp and will be a numeric data type, int, float or complex, depending on what you input.
Using the pow() function without the mod argument
When using the pow(x, y) function without the optional mod argument, it will perform the same operation as the power operator x**y, raising x to the power y.
Comparison of the two methods
>>> pow(6, 4)
1296
>>> 6 ** 4
1296
The pow() function accepts all numeric data types, i.e. int, float and even complex numbers. In general the return value will depend on what data types you input. The example above shows that both arguments are type int, therefore, an int type is returned. However, if you were to instead use a float number as one or both of the arguments, the function will automatically return a float type.
As with float type inputs leading to float outputs, the same reasoning applies to complex numbers. If you enter a complex number as one or both of the arguments, a complex number will be returned.
Example using complex numbers
>>> pow(4+2j, 3)
(16+88j)
The return type will also depend on whether your arguments are non-negative or negative, as is shown in the below table.
base
exp
Return type
Non-negative
Non-negative
int
Non-negative
Negative
foat
Negative
Non-negative
int
Negative
Negative
float
Examples of return values with different input types
What sets the pow() function apart from the ** operator is its third optional argument, mod, which gives you the ability to do a modulo operation within the function.
The process of operations when using the mod argument is as follows:
If we have pow(x, y, z), the function first performs the task of raising x to the power y and then that result is used to perform the modulo task with respect to z. It would be the equivalent of (x**y) % z .
The general rule for using the mod argument is that all values must be of integer type, the exp argument must be non-negative and the mod argument must be non-zero. However, Python 3.8 now comes with the functionality of computing modular inverses. In this case, the exp argument may be negative, on the condition that base is relatively prime to mod, i.e, the only common integer divisor of base and mod is 1.
So, when using the pow() function with negative exp, the function will perform as follows:
pow(inv_base, -exp, mod)
In other words, the function will compute the modular inverse of base and mod first and then that result will be used in the pow() function as base to be computed as normal with the exp argument being converted to its non-negative counterpart.
Example of modular inverse
>>> pow(87, -1, 25)
23
In this example, the straight modular inverse is calculated because inv_base will be raised to the power 1.
Example of modular inverse when exp is not -1
>>> pow(34, -5, 19)
10
# The modular inverse of 34 mod 19 is 14, therefore, we end up with the function pow(14, 5, 19)
>>> pow(14, 5, 19)
10
Calculating the nth root of a number using pow()
Unfortunately, Python does not have a built-in function to calculate the nth root of a number. The math module only has a function to calculate square roots, math.sqrt(), therefore, we have to get creative in order to calculate nth roots.
We know that nx is equivalent to x1n. Thus, using this knowledge we can calculate the nth root in Python by using either pow(x, (1/n)) or x**(1/n).
Note that performing an nth root calculation will always return a float when not using complex numbers. Since Python’s float type works on approximations, it will often return the approximation rather than the exact number, even when an exact answer is possible. This is demonstrated in the second example above.
When calculating the nth root of a negative number, the return value will be a complex number whether an integer number is possible or not.
Examples of calculating nth roots of negative bases
We would expect the second example above, the cubed root of -27, to result in -3, but instead we get a complex number. This is because Python returns the principal root rather than the real root. For an explanation of these different types of roots, you can look up the Fundamental theorem of algebra.
math.pow() Function
In the math module of Python, there is a similar function called math.pow(). To use this we first need to import the math function, thus, the built-inpow() function will be very slightly faster. The main differences between the two functions is that math.pow() does not allow for the optional mod argument and it will always return a float. So if you want to ensure that you get a float result, math.pow() is a better option.
Example of using math.pow()
>>> import math
>>> math.pow(9, 5)
59049.0
When to use the pow() function vs when to use the ** operator
When deciding between using the pow() function or the ** operator, the most important factor to consider would be the efficiency of your code. We can use the timeit.timeit() function from the timeit module to find out how fast Python executes our code.
The same is true even when we include a modulo operation.
However, when we want to perform power operations with very large numbers, the pow() function is much quicker, showing that the power of the pow() function lies in executing longer computations.
Here the pow() function is extremely fast compared to the ** operator. Therefore, we can generalize these findings by saying that when you want to perform short, simple calculations, the ** operator is the better option, however, if your operations involve very large numbers, the pow() function is much more efficient.