As I write this, Bitcoin is in a deep bear market. That’s the perfect time to learn about the tech and start building!
After listening to a podcast from Lyn Alden today, I wondered if it is possible to programmatically create a Bitcoin wallet, i.e., a public/private key pair.
This can be extremely useful in practice, not only if you want to create an application that uses the “decentralized money layer” to transfer value between two parties in a fully automatic way, but also if you want to quickly create a public/private key pair to send and receive BTC without trusting a third party.
You may not trust that wallet provider after all. It is in the nature of the Bitcoin protocol that if you desperately need it, you’ll need it quickly and without lots of trust assumptions. So better be prepared!
In this project, we’ll answer the following interesting question.
Project: How to create a Bitcoin wallet in Python (public/private key pair)?
Step 1: Install Library
Use PIP to install the bitcoinaddress library in your actual or virtual environment.
Is It Safe? I investigated the library code from the GitHub repository associated with this library, and I couldn’t find any trust issues. Specifically, I searched for “hacks” in the code, such as sending the public/private key pair to a remote server, but the repository seems to be clean. It is also well-respected in the community, so unlikely to be tampered with. I didn’t check if the public/private key pairs have maximum entropy, i.e., are truly randomly created with all private keys having the same likelihood. I cannot guarantee that this is 100% safe because I don’t know the owner of the library — but it looks safe at first and second glance.
To install the library, here are three of the most common ways:
Python 3pip3 install bitcoinaddress Standard Python and Python 2 Installationpip install bitcoinaddress Jupyter Notebook Cell!pip install bitcoinaddress
Here’s what this looks like in my Jupyter Notebook:
The Wallet class from the bitcoinaddress module allows you to easily create a new and random public/private keypair using the Wallet() constructor method, i.e., all you need to create a new random Bitcoin wallet.
from bitcoinaddress import Wallet
wallet = Wallet()
Stay with me. You’re almost done!
Step 3: Print Wallet
Next, print the content of the newly created wallet. This contains all the information you need about the public and private keys and addresses.
print(wallet)
In the following output, I bolded the two relevant lines with the public address and the private key:
Private Key HEX: 6b789bec69f7f90c2ed73c8ee58f1f899b42fde5641359f6b76a27b4406399f7
Private Key WIF: 5JdcnccAMqs1t38VTPyeGHgBQ7KaYGueSqUAmLBTzVqFzh4ssUN
Private Key WIF compressed: KzpcxLACJzfktGQ4bWR1UUbvtzu133DNH2vv6ffC8nG1BFSUFBfr Public Key: 0415d47844bab349f12ae51a4b7f9d5eeab11ddf5d958e7fc67f6d29a456394be997d31989f6dcca716db63898c739621a86aa4a7bbe74c8936a6f1bbc7937c5c0 Public Key compressed: 0215d47844bab349f12ae51a4b7f9d5eeab11ddf5d958e7fc67f6d29a456394be9 Public Address 1: 14XyDoAgdGF7xiCrgux5Bd7P993PnXALuW
Public Address 1 compressed: 1LW26DRtBraVQ5ec7J5D3uQsM3AD3oVHXx Public Address 3: 32iX1WnnMkLQLc6beTQ6no5H4J6arvUeBP Public Address bc1 P2WPKH: bc1q6hn4e55vfh6ka0z88tpr2jmqze8w4j84axsjh4 Public Address bc1 P2WSH: bc1qhff5zxmy7rs5mvx037ztg95nnnqe97fet66l65xgsafv89tmz8xssm8tph
The output of the bitcoinaddress.Wallet() method provides the details of a new bitcoin wallet.
It includes the private key in both HEX and Wallet Import Format (WIF) formats, as well as the compressed version of the WIF.
It also provides the public key, both in uncompressed and compressed formats, as well as three different public addresses generated from the public key.
I actually checked the address on a Blockchain explorer, and it’s the correct one:
I also checked if the public and private addresses match and they seem to do:
Additionally, it provides 2 SegWit addresses generated from the public key; one in Pay-to-Witness-Public-Key-Hash (P2WPKH) format and one in Pay-to-Witness-Script-Hash (P2WSH) format.
I have created many apps throughout my career. Some apps, such as the Finxter Python learning app, have reached millions of users over the years.
While I’m not a professional web designer (by education), I was taught the hard way (by trial and error) that there are some crucial and timeless skills you need to master as a User Interface developer no matter what.
This list of 20 tips is my best-of compilation. So, without further ado, let’s dive right in!
Skill 1: HTML/CSS
HTML and CSS are the building blocks of any website, and a must-have for any UI developer.
HTML is the structural markup language used to create webpages, while CSS is the styling language used to make them look attractive.
JavaScript is a scripting language used to create dynamic and interactive webpages. UI developers need to be proficient in this language to develop modern websites and web applications.
Wireframing is the process of creating a blueprint of a website or web application. UI developers need to be able to create wireframes to plan out the structure and layout of a website.
This skill especially requires you to be able to communicate effectively with your clients and project owners.
User experience design is the process of creating engaging and meaningful experiences for users of websites and web applications.
UI developers need to understand the principles of user experience and dive deep into users’ emotions so they can create enjoyable and fun experiences.
Skill 7: Cross-Browser Compatibility
Cross-browser compatibility is the ability of a website or web application to work properly across multiple types of web browsers.
UI developers need to ensure that their websites and applications look and function properly on all types of browsers.
Skill 8: Version Control
Version control is a system used to track and manage changes to files and documents. UI developers need to be able to use version control to keep track of changes and ensure that their work is up to date.
Debugging is the process of finding and fixing errors in a website or web application. UI developers need to be able to debug their code to ensure that their websites and applications are functioning correctly.
Testing and Quality Assurance are processes used to ensure that a website or web application is functioning correctly before it is released. UI developers need to be able to test their work and ensure that it meets the specified requirements.
Testing is often not done correctly or follows too strict rules. In my world, when I create apps, I just play with them, pressing any button and inputting all kinds of stupid things to test my app. This has brought to light many more errors than standard unit tests.
Skill 11: Building User Interfaces with Frameworks
Frameworks are used to simplify the process of building user interfaces. UI developers need to be familiar with the most popular frameworks in order to create modern and efficient user interfaces.
Here’s a table I created to show the income distributions of different PHP frameworks:
Accessibility and usability are two important aspects of user interface design. In fact, there’s a huge megatrend towards creating more accessible user interfaces — often, they are legally required!
It’s a big growth market — unbelievable, isn’t it?
UI developers need to be able to design interfaces that are both accessible and usable to provide the best user experience.
Skill 13: Interaction Design
Interaction design is the process of creating user interactions that are both intuitive and efficient. UI developers need to be able to create interactions that are easy to use and don’t require a lot of effort from the user.
Skill 14: Web Design Principles
Web design principles are the fundamental rules that should be followed when designing websites and web applications. UI developers need to understand these principles to create attractive and effective interfaces.
Most software developers waste thousands of hours working with overly complex code. The eight core principles in The Art of Clean Coding will teach you how to write clear, maintainable code without compromising functionality. The book’s guiding principle is simplicity: reduce and simplify, then reinvest energy in the important parts to save you countless hours and ease the often onerous task of code maintenance.
Concentrate on the important stuff with the 80/20 principle — focus on the 20% of your code that matters most
Avoid coding in isolation: create a minimum viable product to get early feedback
Write code cleanly and simply to eliminate clutter
Avoid premature optimization that risks over-complicating code
Balance your goals, capacity, and feedback to achieve the productive state of Flow
Apply the Do One Thing Well philosophy to vastly improve functionality
Design efficient user interfaces with the Less is More principle
Tie your new skills together into one unifying principle: Focus
The Python-based The Art of Clean Coding is suitable for programmers at any level, with ideas presented in a language-agnostic manner.
Graphic design is the process of creating visuals and graphics for websites and web applications. UI developers need to be able to create attractive visuals to make their websites look appealing.
Object-oriented programming is a programming paradigm used to create complex websites and web applications. UI developers must understand this programming paradigm to create efficient and powerful web applications.
Animations and effects are used to create dynamic and engaging user interfaces. UI developers need to be able to create animations and effects to make their websites more attractive and engaging.
Skill 18: Mobile App Design
Mobile app design is the process of designing user interfaces for mobile applications. UI developers need to understand the principles of mobile app design in order to create engaging and user-friendly apps.
Front-end performance optimization is the process of optimizing a website or web application to make it faster and more efficient. UI developers must understand optimization principles to create fast and efficient websites and web applications.
Data visualization is the process of creating visuals that represent data in an easy-to-understand way. UI developers need to be able to create effective data visualizations to make complex data easier to understand.
Personally, I’d recommend you check out Plotly Dash — a Python framework for easy development of dashboard apps:
In this quick tutorial, I’ll show you how I integrated ChatGPT intelligence into an app I’m currently working on. It’s really simple, so let’s get started!
Step 1: Create a Paid Account with OpenAI
I’m not affiliated with OpenAI in any way. However, to use it, you need to create a (paid) account to create an API key that you’ll need in order to connect ChatGPT with your code.
Copy and paste the following code into a Python script (e.g., named code.py) and also paste your API key from Step 2 into the highlighted line (string):
import os
import openai openai.api_key = "<copy your secret API key here>" response = openai.Completion.create( model="text-davinci-003", prompt="What is the answer to all questions?", temperature=0.7, max_tokens=100, top_p=1, frequency_penalty=0, presence_penalty=0
) print(response)
You can modify the other highlighted line "What is the answer to all questions?" to customize your input prompt. The output after a few seconds will look like this:
{ "choices": [ { "finish_reason": "stop", "index": 0, "logprobs": null,
 "text": "\n\nThere is no one answer to all questions as each question has its own unique answer." } ], "created": 1674579571, "id": "cmpl-6cGvr0TM2PGsExeyG3NEx43CrNwSx", "model": "text-davinci-003", "object": "text_completion", "usage": { "completion_tokens": 19, "prompt_tokens": 8, "total_tokens": 27 }
}
Unfortunately, it couldn’t figure out the answer 42.
In this blog series, powerful Python libraries are leveraged to help uncover some hidden statistical truths in basketball. The first step in any data-driven approach is to identify and collect the data needed.
Luckily for us, Basketball-Reference.com hosts pages of basketball data that can be easily scraped. The processes of this walkthrough can be easily applied to any number of their pages, but for this case, we plan on scraping seasonal statistics of multiple rookie classes.
Project Overview
The Objectives:
Identify the Data Source
Download the Page
Identify Important Page Elements
Pre-Clean and Extract
Archive
The Tools:
Requests
Beautiful Soup
Pandas
Though we will inevitably be working with many specialized libraries throughout this project, the above packages will suffice for now.
Identifying the Data Source
Basketball-Reference.com hosts hundreds of curated pages on basketball statistics that range from seasonal averages of typical box score categories like points, rebounds, and shooting percentages, all the way down to the play-by-play action of each game played in the last 20 or so years. One can easily lose their way in this statistical tsunami if there isn’t a clear goal set on what exactly to look for.
The goal here in this post is simple: get rookie data that will help in assessing a young player’s true value and potential.
The following link is one such page. It lists all the relevant statistics of rookies in a particular season.
In order to accumulate enough data to make solid statistical inferences on players, one year of data won’t cut it. There need to be dozens of years’ worth of data collected to help filter through the noise and come to a conclusion on a player’s future potential.
If an action can be manually repeated, it makes itself a great candidate for automation. In this case, the number in the URL above corresponds to the respective year of that rookie class. Powered by that knowledge, let’s start putting together our first lines of code.
import requests
import pandas as pd
from bs4 import BeautifulSoup years = list(range(1990, 2017)) url_base = "https://www.basketball-reference.com/leagues/NBA_{}_rookies-season-stats.html"
In creating the two variables referenced above, our thought process is as follows.
The appropriate packages are imported
url_base serves to store the pre-formatted string variable of the target URL
The years list variable specifies the ranged of the desired years, 1990 up to 2017
Downloading the Page Data
In scraping web pages, it’s imperative to remove as much overhead as possible. Seeing as the site stores all their information on the HTML front end, the page can be easily downloaded and locally stored in its entirety.
# iterates through each year and downloads page into an HTML file
for year in years: url = url_base.format(year) data = requests.get(url) # page is save as an html and placed in Rookies folder with open("notebooks/Rookies/{}.html".format(year), "w+") as f: f.write(data.text)
The for loop iterates through the list variable years.
The curly braces found within the url’s string will serve to allow the format to substitute it with the currently iterated year.
For example, in its first iteration, the url value will be 'https://www.basketball-reference.com/leagues/NBA_1990_rookies-season-stats.html'.
The data variable acts as a placeholder for the requests.get() function and references of the currently iterated url string value.
The requests method then uses the newly formatted URL string to retrieve the page in question.
The subsequent with open() reads and writes (w+) the page data from our requests.get (data.text), and locally stores the newly created HTML files.
Why download the page and store it locally?
To avoid a common growing pain in site scraping, we store these pages as local HTML files.
See, when making a visit to a page site, the server hosting said page has to honor your request and send back the appropriate data to your browser. But having one specific client asking for the same information over and over puts undue strain on the server.
The server admin is well within their rights to block these persistent requests for the sake of being able to optimally provide this service to others online.
By downloading these HTML files on your local machine, you avoid two things:
Having to wait longer than usual to collect the same data
Being blocked from visiting the page, halting data collection altogether
Identifying Important Page Elements
To scrape data elements of these recently downloaded pages using Python, there needs to be a means to understand what properties these HTML elements have. In order to identify these properties, we need to inspect the page itself.
How to Inspect
We’ll need to dive deeper into the inner workings of this document, but I promise I won’t make this an exercise on learning HTML.
If you know how to inspect HTML objects, feel free to jump ahead. Otherwise, please follow along on how to inspect page elements.
Option 1: Developer Tools
Click on the three vertical dots on Chrome’s top menu bar
Choose “More tools”
Select Developer tools.
Option 2: Menu Select
Right-click on the web page
Choose “Inspect” to access the Developer tools panel
Inspecting the Page
Seeing that all of these pages are locally stored, we can choose to view them by either going into the file system to open them in our desired browser, or, we can continue to build our code by implementing the following snippet of code.
with open("notebooks/Rookies/2000.html") as f: page = f.read()
Below is the loaded page with Developer Tools docked to the right. Notice how hovering the mouse cursor on the HTML line containing the class ID rookies highlights the table element on the page?
All the desired data of this page is housed in that table element. Before hastily sucking up all of this data as is, now is the best time to consider whether everything on this table is worth collecting.
Pre-Clean
Pre-cleaning might not be a frequent word in your vocabulary, but for those of you seeing yourself scraping data regularly, it should be. If you want to avoid the frustration of wasted hours of progress on a data collection project, it’s best to first separate the chaff from the wheat.
For instance, take note of the three elements boxed in red.
One row serves as the “main” table header. The other two rows are duplicate instances of the same artifacts found at the top. This pattern repeats every 20th row.
Upon further inspection of these elements, it’s revealed that all of these rows have the same tr (table row) HTML tag. What distinguishes each of these elements from any others are their class names.
Main Header Row a. Class = over_header
Repeat Header Rows a. Class = over_header thead
Statistics Category Row a. Class = thead
# array to house list of dataframes
dfs = [] # unnecessary table rows to be removed
classes = ["over_header", "over_header thead", "thead"]
dfs will be used later on to house several data frames
The classes array object will hold all the unwanted table row element’s class names.
Knowing that these elements provide no statistical value, rather than simply “skipping over” them in our parse, they should instead be completely omitted. That’s to say, permanently removed from any future considerations.
Tag.decompose() removes a tag from the tree, then completely destroys it and its contents.
Below is a snippet of code where the decompose method is optimized using multiple for loops.
# for loop to iterate through the years for year in years: with open("notebooks/Rookies/{}.html".format(year)) as f: page = f.read() soup = BeautifulSoup(page, "html.parser") # for loop cleans up unnecessary table # headers from reappearing in rows for i in classes: for tr in soup.find_all("tr", {"class":i}): tr.decompose()
First for loop is used to iterate through the values of our years list object
The with method provides our code the structure for the page variable to read locally stored HTML files when called on
An HTML parser class is initialized by instantiating the BeautifulSoup class and passing in both the page string object and html.parser.
Second for loop iterates through the values in the classes array
Third for loop utilizes Beautiful Soup’s find_all method to identify elements that have both tr tags and class names matching those in classes
tr.decompose serves to omit each of the identified table row elements from the page entirely
Let’s look to build on this by extracting the data we do want.
Extracting the Data
We can finally start working on the part of the code that actually extracts data from the table.
Remember that the table in with all of the relevant data has the HTML unique ID rookies. The following additions to our code will serve to parse the data of this table.
# the years we wish to parse for
years = list(range(1990, 2017)) # array to house list of dataframes
dfs = [] # unnecessary table headers to be removed
classes = ["over_header","over_header thead", "thead"] for year in years: with open("notebooks/Rookies/{}.html".format(year)) as f: page = f.read() soup = BeautifulSoup(page, "html.parser") #for loop cleans up unnecessary table headers from reappearing in rows for i in classes: for tr in soup.find_all("tr", {"class":i}): tr.decompose() ### Start Scraping Block ### #identifies, scrapes, and loads rookie tables into one dataframe rookie_table = soup.find(id="rookies") rookies = pd.read_html(str(rookie_table))[0] rookies["Year"] = year dfs.append(rookies) # new variable turns list of dataframes into single dataframe
all_rookies = pd.concat(dfs)
For what follows ### Start Scraping Block ###
The rookie_table variable serves to help identify this, and only this table on the page
Seeing that the Pandas package can read HTML tables, the rookie table is loaded into Pandas using the read_html method, passing the rookie_table as a string
Tacking on to end [0] to turn it from a list of dataframes into a single dataframe
A “Year” column is added to the rookies dataframe
dfs.append(rookies) serves to house all of tables of every rookie year in the order they were iterated into a list of dataframes
The Pandas method concat is used to combine that list of dataframes into one single dataframe: all_rookies
Archiving
Our final step involves taking all of this useful, clean information and archiving it in easily readable CSV format. Tacking on this line to the end of our code (outside of any loops!) will serve to be useful when deciding to come back and reference the data collected.
# dataframe archived as local CSV
all_rookies.to_csv("archive/NBA_Rookies_1990-2016.csv")
Final Product
import requests
import pandas as pd
from bs4 import BeautifulSoup # the years we wish to parse for
years = list(range(1990, 2017)) # array to house list of dataframes
dfs = [] # unnecessary table headers to be removed
classes = ["over_header","over_header thead", "thead"] # loop iterates through years
for year in years: with open("notebooks/Rookies/{}.html".format(year)) as f: page = f.read() soup = BeautifulSoup(page, "html.parser") #second for loop clears unnecessary table headers for i in classes: for tr in soup.find_all("tr", {"class":i}): tr.decompose() # identifies, scrapes, and loads rookie tables into one dataframe table_rookies = soup.find(id="rookies") rookies = pd.read_html(str(table_rookies))[0] rookies["Year"] = year dfs.append(rookies) #new variable turns list of dataframes into single dataframe
all_rookies = pd.concat(dfs) #dataframe archived as local CSV
all_rookies.to_csv("archive/NBA_Rookies_1990-2016.csv")
Closing
Again, the process followed in this walkthrough will undoubtedly apply to most every other page on Basketball-Reference.com.
There are five simple steps worth taking in each instance.
Identify the Page URL
Download the Page
Identify the Elements
Pre-Clean and Extract
Archive
Following these five steps will help guarantee a quick and successful scraping experience.
Next up in this series will be actually using this data to gain insight into future player potential. So be on the lookout for future installments!
In this tutorial, I will walk you through a machine-learning project on Loan Eligibility Prediction with Python. Specifically, I will show you how to create and deploy machine learning web applications using Streamlit.
Streamlit makes it easy for data scientists with little or no knowledge of web development to develop and deploy machine learning apps quickly. Its compatibility with data science libraries makes it an excellent choice for data scientists looking to deploy their applications.
Although I will try my best to explain some concepts and the steps I took in this project, I assumed you already have a basic knowledge of Python and its application in machine learning.
For Streamlit, I will only explain the concepts that have a bearing on this project. If you want to know more, you can check the documentation.
Loan Eligibility Prediction
Banks and other financial institutions give out loans to people. But before they approve the loan, they have to make sure the applicant is eligible to receive the loan. There are many factors to consider before deciding whether or not the applicant is eligible for the loan. Such factors are but not limited to credit history and the applicant’s income.
To automate the loan approval process, banks and other financial institutions require the applicant to fill in a form in which some personal information will be gathered. These include gender, education, credit history, and so on. An applicant’s loan request will either be approved or rejected based on such information.
In this project, we are going to build a Streamlit dashboard where our users will fill in their details and check if they are eligible for a loan or not. This is a classification problem. Hence, we will use machine learning with Python and a dataset containing information on customers’ past transactions to solve the problem. So, let’s get started.
import pandas as pd
data = pd.read_csv('LoanApprovalPrediction.csv')
data.shape
# (598, 13)
Our dataset contains 598 rows and 13 columns. Using the .info() method, we can get more information about the dataset.
data.info()
We can see all the columns that make up the dataset. If you view the first five rows using data.head(), you will notice that some columns are categorical but their datatypes are shown as object. More on this soon. Let’s check if there are missing values.
By setting the inplace parameter to True, we want the change to be directly applied to our dataset. The axis=1 parameter corresponds to the column side. It’s now time to clean and prepare our dataset for training.
Data Cleaning and Preparation
Seeing that our dataset contains many missing values, we have several options to choose from. It is either we drop the missing rows or we fill them up with a given value. To determine which action to take, let’s first check the total number of missing values.
data.isna().sum().sum()
# 96
The dataset contains 96 missing values representing 16% of our dataset, a not-so-insignificant number indeed. I choose to fill them up instead of dropping them. Let’s fill them up with the mean value of their respective columns.
Oh! We can’t fill in a number in a categorical column. So, we will first convert the categorical columns to int datatype.
For this, we can choose to use Pandas’ map function or use LabelEncoder from the Scikit-learn library.
If we use the Pandas’ map function, we will repeat the same process for every categorical column. If you are like me and don’t like constant repetition (DRY), you will choose the second option.
This, though, does not rule out the importance of Pandas’ map function. Therefore, to show its importance and to add to your knowledge, let me show you how to apply it to our dataset.
With that, the Gender column gets converted to int datatype. You will have to do it to all the columns involved. But since we are changing all our categorical columns to a binary number, we have to follow the easy way using LabelEncoder.
from sklearn.preprocessing import LabelEncoder
label_encoder = LabelEncoder()
obj = (data.dtypes == 'object')
for col in list(obj[obj].index): data[col] = label_encoder.fit_transform(data[col])
We want to select only the columns with the datatype as object. We started by creating a Boolean in line 12 which returns True to object datatypes. Then in line 13, we perform what we call a Boolean mask. This filters out only the columns with the object datatype and transforms them to a binary number in each iteration.
You can confirm it using the .info() method and you will see that all our categorical columns have been converted to int datatype. Having done that, we can now fill in the missing values.
for col in data.columns: data[col] = data[col].fillna(data[col].mean())
We fill in the missing rows with the mean value of their respective columns. Again, you can confirm it by typing data.isnull().sum() or data.isna().sum().
Model Training
It’s now time to train our data using selected models. We will first divide our model into two: features (x) and target (y) variables.
x = data.drop(['Loan_Status'], axis=1)
y = data.Loan_Status
For each variable, we divide further into two for training and testing the model using train_test_split from Scikit-Learn.
from sklearn.model_selection import train_test_split
x_train, x_test, y_train, y_test = train_test_split(x, y, test_size=0.3, random_state=7)
We reserved 30% of our dataset for testing the model. By setting a random_state to a given number, we ensure we get the same set of data whenever the code is run. It’s now time to select a model.
We don’t know what algorithm or model will do well on our dataset. For this reason, we will test our data with different models and select the model with the highest accuracy score.
from sklearn.linear_model import LogisticRegression
from sklearn.tree import DecisionTreeClassifier
from sklearn.linear_model import RidgeClassifier
from sklearn.neighbors import KNeighborsClassifier
from sklearn.discriminant_analysis import LinearDiscriminantAnalysis
from sklearn.naive_bayes import GaussianNB
form sklearn.ensembles import RandomForestClassifier models = []
models.append(('LR', LogisticRegression(max_iter=1000)))
models.append(('LDA', LinearDiscriminantAnalysis()))
models.append(('KNN', KNeighborsClassifier()))
models.append(('CART', DecisionTreeClassifier()))
models.append(('NB', GaussianNB()))
models.append((‘SVC’, SVC()))
models.append(('RC', RidgeClassifier()))
models.append(('RF', RandomForestClassifier())) def modeling(model): model.fit(x_train, y_train) y_pred = model.predict(x_test) return accuracy_score(y_test, y_pred) * 100 for name, model in models: print(f'{name} = {modeling(model)}') LR = 80.83333333333333
LDA = 82.5
KNN = 63.74999999999999
CART = 68.33333333333333
NB = 81.66666666666667
SVC = 69.16666666666667
RC = 82.91666666666667
RF = 81.66666666666667
The result shows that Ridge Classifier performs more than the models, followed by Linear Discriminant Analysis with only a slight difference. Both could benefit from further study.
However, we will use the Ridge Classifier algorithm.
Here is the full code. Save the model as model.py:
import pandas as pd
from sklearn.preprocessing import LabelEncoder
from sklearn.model_selection import train_test_split
from sklearn.linear_model import RidgeClassifier
from sklearn.metrics import accuracy_score
import pickle # load the data
data = pd.read_csv('LoanApprovalPrediction.csv')
# Drop Loan_ID column
data.drop(['Loan_ID'], axis=1, inplace=True)
# convert to int datatype
label_encoder = LabelEncoder()
obj = (data.dtypes == 'object')
for col in list(obj[obj].index): data[col] = label_encoder.fit_transform(data[col]) # fill in missing rows
for col in data.columns: data[col] = data[col].fillna(data[col].mean())
# divide model into features and target variable
x = data.drop(['Loan_Status'], axis=1)
y = data.Loan_Status # divide into training and testing data
x_train, x_test, y_train, y_test = train_test_split(x, y, test_size=0.3, random_state=7)
# define the model
model = RidgeClassifier()
# fit the model on the training data
model.fit(x_train, y_train)
#save the train model
with open('train_model.pkl', mode='wb') as pkl: pickle.dump(model, pkl)
By saving our model in a pickle file, it can easily be called to make predictions, thus saving ourselves the time of waiting for the model to get trained each time it’s run.
Preparing Streamlit Dashboard
Now that we are done with training our model. Let’s prepare the Streamlit interface. We will start by defining our main function. Since we also want it to run when we open the Streamlit app, we will call it using the __name__ variable. Save this script with the name app.py:
import streamlit as st def main(): bg = """<div style='background-color:black; padding:13px'> <h1 style='color:white'>Streamlit Loan Elgibility Prediction App</h1> </div>""" st.markdown(bg, unsafe_allow_html=True) left, right = st.columns((2,2)) gender = left.selectbox('Gender', ('Male', 'Female')) married = right.selectbox('Married', ('Yes', 'No')) dependent = left.selectbox('Dependents', ('None', 'One', 'Two', 'Three')) education = right.selectbox('Education', ('Graduate', 'Not Graduate')) self_employed = left.selectbox('Self-Employed', ('Yes', 'No')) applicant_income = right.number_input('Applicant Income') coApplicantIncome = left.number_input('Coapplicant Income') loanAmount = right.number_input('Loan Amount') loan_amount_term = left.number_input('Loan Tenor (in months)') creditHistory = right.number_input('Credit History', 0.0, 1.0) propertyArea = st.selectbox('Property Area', ('Semiurban', 'Urban', 'Rural')) button = st.button('Predict') # if button is clicked if button: # make prediction result = predict(gender, married, dependent, education, self_employed, applicant_income, coApplicantIncome, loanAmount, loan_amount_term, creditHistory, propertyArea) st.success(f'You are {result} for the loan')
We imported the Streamlit library. Then, we added color using HTML tags and since Python does not recognize such, we used the parameter unsafe_allow_html to make it to be recognized, without which the black color will not appear.
We displayed several text boxes, and select boxes to get data from our users which will, in turn, be used to make predictions.
Notice that we used the exact data found in the datasets including their features. Since we have already transformed the categorical columns to int datatypes, you may have to reload the dataset and use the .value_counts() method on each column to see the features.
Let’s now define our predict() function.
# load the train model
with open('train_model.pkl', 'rb') as pkl: train_model = pickle.load(pkl) def predict(gender, married, dependent, education, self_employed, applicant_income, coApplicantIncome, loanAmount, loan_amount_term, creditHistory, propertyArea): # processing user input gen = 0 if gender == 'Male' else 1 mar = 0 if married == 'Yes' else 1 dep = float(0 if dependent == 'None' else 1 if dependent == 'One' else 2 if dependent == 'Two' else 3) edu = 0 if education == 'Graduate' else 1 sem = 0 if self_employed == 'Yes' else 1 pro = 0 if propertyArea == 'Semiurban' else 1 if propertyArea == 'Urban' else 2 Lam = loanAmount / 1000 cap = coApplicantIncome / 1000 # making predictions prediction = train_model.predict([[gen, mar, dep, edu, sem, applicant_income, coApplicantIncome, Lam, loan_amount_term, creditHistory, pro]]) verdict = 'Not Eligible' if prediction == 0 else 'Eligible' return verdict
The predict() function has all the features of our dataset. Then, we used a ternary operator to change the user input into a number. Notice that we converted the dep variable to a float. We did all these things to ensure they correspond to the datatype in our datasets.
Also, we made sure that the order in which we placed our parameters both at the beginning and end of the function corresponds with the one in the main() function. Anything contrary will either lead to an error or poor prediction.
Why did we divide the loanAmount and coApplicantIncome by 1,000? Well, I will leave that to you to answer. Just to give you a little hint, type this, data.loanAmount.describe(), and see if you can figure it out yourself.
Conclusion
This is how we come to the end of this tutorial.
You have learned how to apply machine learning to a classification problem such as loan prediction.
You also learned how to create an interactive dashboard using Streamlit. Now, to deploy it on Streamlit Cloud so that others can use it, sign up on Streamlit and GitHub if you haven’t done so.
Check my GitHub page for the full code. Create a repository and deploy it to Streamlit Cloud. You can view my live demo app here. In a future article, I will show you how to use machine learning to solve a regression problem. Alright, have a nice day.
It’s no surprise that many of us are looking for ways to increase our productivity. After all, an increase in productivity can mean an increase in our income and a better quality of life.
For example, if you’re a freelance developer earning $40,000 per year and you increase the number of clients you serve by 2x and the value per client by 2x, your income can easily jump to $240,000, adding an additional 25% premium for quality, a very realistic assumption.
Or say you’re the owner of a fast-growing startup, and you boost your productivity to achieve an additional +15% growth per year. For a company with $200,000 in sales, $150,000 in net profit, and a valuation of $800,000, the additional growth means a nice little bonus of $800,000 in exit value!
But how can we achieve such a lofty goal of boosting your productivity?
Enter ChatGPT, the revolutionary new artificial intelligence technology that can help us increase our productivity by 10x to 100x. And now, a new idea has emerged for how we can use ChatGPT to rapidly increase our personal growth: speed reading books.
Made by DALL.E
Warren Buffett famously said, “knowledge compounds.” The idea is that if we can improve our skills by just 1% each day, we can increase our skills by 36x in a year.
But how can we actually achieve this?
One of the most potent ways is to simply become a much more effective person by consuming massive amounts of high-quality information related to your area of expertise. Warren Buffett fills his extremely valuable time with reading for more than 5 hours every day. Most other billionnaires share his habit of reading tons of books in their areas of interest.
Books are full of knowledge, but they are not filled with shallow distractions and low-quality or misleading content found on social media. Following top-level research papers, books are the highest-quality sources of information, followed by “B-level” research papers, blogs, news sites, forums, and social networks.
Made by DALL.E
Average Information Quality (Ranking):
A-level research papers
Books
Quality blogs
News sites
Forums
Social networks
By focusing our information consumption on the top three sources, we can expect to see a dramatic increase in our knowledge. ChatGPT helps us to accomplish this by allowing us to read condensed versions of quality books in mere minutes. With ChatGPT, we can theoretically read 365 books in 365 days!
An intelligent chat bot could help you understand the main points of non-fiction books by summarizing the content of the book.
In fact, I did it to help me understand the main points of a lengthy 1200 pages non-fiction book “Atlas Shrugged”:
The chat bot uses natural language processing and machine learning algorithms to scan the text and extract key concepts and ideas. The chat bot could then generate a summary of the book and present it to you in a conversational format, allowing you to interact with it and ask it questions.
This helps you quickly get an overview of the main points of the book so you can decide whether or not you want to read it in more depth.
You can ask it all kinds of questions to dive deeper into various aspects of the book. You can even ask it to generate a series of questions to ask about the book — and ask it those questions right afterwards!
Imagine the possibilities if we could rapidly increase our knowledge by reading more quality books! We could become much more effective and efficient human beings and experience a leap in productivity.
These productivity levels are now within our reach, thanks to the powerful technology of ChatGPT. Reading 365 books in 365 days is now a reality, and with it comes the potential for rapid personal growth.
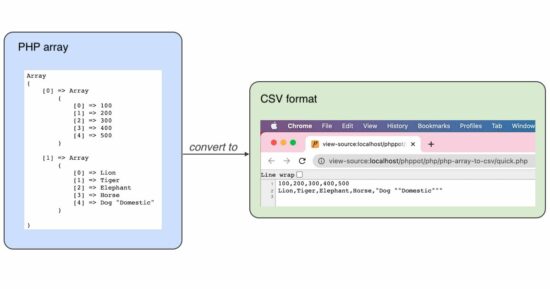
In this example, code connects the database and reads the results into an array. Then, it creates a PHP file output stream to put the CSV data row by row.
First, the code sets the array of column headers. Then, it iterates the database result array and calls fputcsv() on each row of data.
The PHP header() is set with the application/csv to download the CSV file to the browser.
<?php
// PHP code will connect to a database
// Read from a table and get result
// Formulate the result as an array to use in a convenient form
// Iterate the array
// Use PHP's function fputcsv and write the array elements
// to a CSV file
// Then push that CSV file as download
$mysqli = new mysqli("localhost", "root", "", "db_phppot_examples");
$i = 0;
$query = "SELECT id, name, type FROM tbl_php_array_to_csv";
if ($resultArray = $mysqli->query($query)) { while ($record = $resultArray->fetch_array()) { $animalArray[$i]['id'] = $record['id']; $animalArray[$i]['name'] = $record['name']; $animalArray[$i]['type'] = $record['type']; $i++; }
}
$fileOut = fopen("php://output", 'w') or die("Unable open php://output"); // Header forces the CSV file to download
header("Content-Type:application/csv");
header("Content-Disposition:attachment;filename=example-csv.csv");
// writing the first CSV record as the column labels
// Refer: https://www.php.net/manual/en/function.fputcsv.php
fputcsv($fileOut, array('id', 'name', 'type')); // writing array elements as CSV file records one by one
foreach ($animalArray as $animal) { fputcsv($fileOut, $animal);
}
fclose($fileOut) or die("Unable to close php://output");
?>
Database script
This database script imports the table structure and data to run this example.
You may also try this code with a different database table. It requires only minor code changes to edit the new table’s column names.
--
-- Database: `db_phppot_examples`
-- -- -------------------------------------------------------- --
-- Table structure for table `tbl_php_array_to_csv`
-- CREATE TABLE `tbl_php_array_to_csv` ( `id` int NOT NULL, `name` varchar(255) NOT NULL, `type` varchar(255) NOT NULL
); --
-- Dumping data for table `tbl_php_array_to_csv`
-- INSERT INTO `tbl_php_array_to_csv` (`id`, `name`, `type`) VALUES
(1, 'Lion', 'Wild'),
(3, 'Dog', 'Domestic'),
(4, 'Tiger', 'Wild'); --
-- Indexes for dumped tables
-- --
-- Indexes for table `tbl_php_array_to_csv`
--
ALTER TABLE `tbl_php_array_to_csv` ADD PRIMARY KEY (`id`); --
-- AUTO_INCREMENT for dumped tables
-- --
-- AUTO_INCREMENT for table `tbl_php_array_to_csv`
--
ALTER TABLE `tbl_php_array_to_csv` MODIFY `id` int NOT NULL AUTO_INCREMENT, AUTO_INCREMENT=6;
Uses of PHP array to CSV conversion
(1) Database table export
We can use this code export database to a CSV file. It is for taking a backup of a database table.
A good friend and his wife recently founded an AI startup in the lifestyle niche that uses machine learning to discover specific real-world patterns from videos.
For their business system, they need a pipeline that takes a video file, converts it to audio, and transcribes the audio to standard text that is then used for further processing. I couldn’t help but work on a basic solution to help fix their business problem.
Project Overview
I finished the project in three steps:
First, install the necessary libraries.
Second, convert the video to an audio file (.mp4 to .wav)
Third, convert the audio file to a speech file (.wav to .txt). We first break the large audio file into smaller chunks and convert each of them separately due to the size restrictions of the used API.
Let’s get started!
Step 1: Install Libraries
We need the following import statements in our code:
# Import libraries
import speech_recognition as sr
import os
from pydub import AudioSegment
from pydub.silence import split_on_silence
import moviepy.editor as mp
Consequently, you need to pip install the following three libraries in your shell — assuming you run Python version 3.9:
Before you can do speech recognition on the video, we need to extract the audio as a .wav file using the moviepy.editor.VideoFileClip().audio.write_audiofile() method.
Here’s the code:
def video_to_audio(in_path, out_path): """Convert video file to audio file""" video = mp.VideoFileClip(in_path) video.audio.write_audiofile(out_path)
After extracting the audio file, we can start transcribing the speech from the .wav file using Google’s powerful speech recognition library on chunks of the potentially large audio file.
Using chunks instead of passing the whole audio file avoids an error for large audio files — Google has some restrictions on the audio file size.
However, you can play around with the splitting thresholds of 700ms silence—it can be more or less, depending on your concrete file.
Here’s the audio to text code function that worked for me:
def large_audio_to_text(path): """Split audio into chunks and apply speech recognition""" # Open audio file with pydub sound = AudioSegment.from_wav(path) # Split audio where silence is 700ms or greater and get chunks chunks = split_on_silence(sound, min_silence_len=700, silence_thresh=sound.dBFS-14, keep_silence=700) # Create folder to store audio chunks folder_name = "audio-chunks" if not os.path.isdir(folder_name): os.mkdir(folder_name) whole_text = "" # Process each chunk for i, audio_chunk in enumerate(chunks, start=1): # Export chunk and save in folder chunk_filename = os.path.join(folder_name, f"chunk{i}.wav") audio_chunk.export(chunk_filename, format="wav") # Recognize chunk with sr.AudioFile(chunk_filename) as source: audio_listened = r.record(source) # Convert to text try: text = r.recognize_google(audio_listened) except sr.UnknownValueError as e: print("Error:", str(e)) else: text = f"{text.capitalize()}. " print(chunk_filename, ":", text) whole_text += text # Return text for all chunks return whole_text
Need more info? Check out the following deep dive:
Finally, we can combine our functions. First, we extract the audio from the video. Second, we chunk the audio into smaller files and recognize speech independently on each chunk using Google’s speech recognition module.
I added comments to annotate the most important parts of this code:
# Import libraries
import speech_recognition as sr
import os
from pydub import AudioSegment
from pydub.silence import split_on_silence
import moviepy.editor as mp def video_to_audio(in_path, out_path): """Convert video file to audio file""" video = mp.VideoFileClip(in_path) video.audio.write_audiofile(out_path) def large_audio_to_text(path): """Split audio into chunks and apply speech recognition""" # Open audio file with pydub sound = AudioSegment.from_wav(path) # Split audio where silence is 700ms or greater and get chunks chunks = split_on_silence(sound, min_silence_len=700, silence_thresh=sound.dBFS-14, keep_silence=700) # Create folder to store audio chunks folder_name = "audio-chunks" if not os.path.isdir(folder_name): os.mkdir(folder_name) whole_text = "" # Process each chunk for i, audio_chunk in enumerate(chunks, start=1): # Export chunk and save in folder chunk_filename = os.path.join(folder_name, f"chunk{i}.wav") audio_chunk.export(chunk_filename, format="wav") # Recognize chunk with sr.AudioFile(chunk_filename) as source: audio_listened = r.record(source) # Convert to text try: text = r.recognize_google(audio_listened) except sr.UnknownValueError as e: print("Error:", str(e)) else: text = f"{text.capitalize()}. " print(chunk_filename, ":", text) whole_text += text # Return text for all chunks return whole_text # Create a speech recognition object
r = sr.Recognizer() # Video to audio to text
video_to_audio('sample_video.mp4', 'sample_audio.wav')
result = large_audio_to_text('sample_audio.wav') # Print to shell and file
print(result)
print(result, file=open('result.txt', 'w'))
Store this code in a folder next to your video file 'sample_video.mp4' and run it. It will create an audio file 'sample_audio.wav' and chunk the audio and print the result to the shell, as well as to a file called 'result.txt'. This contains the transcription of the video file.
A good friend and his wife recently founded an AI startup in the lifestyle niche that uses machine learning to discover specific real-world patterns from videos.
For their business system, they need a pipeline that takes a video file, converts it to audio, and transcribes the audio to standard text that is then used for further processing. I couldn’t help but work on a basic solution to help fix their business problem.
In this short project tutorial, I’ll share my code solution to convert a video to audio, i.e., extracting a .wav file from a .mp4 file.
Given:.mp4 video file Required:.wav audio file
Use Python to accomplish this programmatically!
Mini Project Solution – Video to Audio in Python
You can convert a video file to an audio file as follows. First, create a function that takes the location of your input video file as the in_path parameter and the location of your output audio file as the out_path parameter. Second, install and import the moviepy library to read the video file and write out the audio file in the .wav format.
import moviepy.editor as mp def video_to_audio(in_path, out_path): """Convert video file to audio file""" video = mp.VideoFileClip(in_path) video.audio.write_audiofile(out_path) # Video to audio
video_to_audio('sample_video.mp4', 'sample_audio.wav')
Before this code runs without error, you first need to pip install moviepy in your environment. For instance, if you run Python 3.10, you’d probably have to run pip3.10 install moviepy. More here:
Using Python, you can convert a video file to an audio file by using the subprocess library. First, store the location of the input video file in the in_path variable, and the location of the output audio file in the out_path variable. Then, call the subprocess.run() method with the command line parameters to convert the video file to an audio file. The output audio file will be in the .wav format.
In this quick article, I’ll show you my deep dive into the book “Atlas Shrugged” by Ayn Rand. This is useful if you don’t want to spend 20-25 hours reading the ~1,200 pages but you still want to be able to grasp the main ideas.
I used OpenAI’s ChatGPT to explore the main ideas — I asked the questions and OpenAI provided the answers. I edited some answers for clarity and correctness.
So, let’s get started!
A Quick Summary of the Book “Atlas Shrugged” by Ayn Rand
“Atlas Shrugged” is a novel by Ayn Rand, published in 1957.
It is a story about a group of industrialists who go on strike against a society that they believe is oppressive and unjust.
The novel centers around the character of John Galt, who is the leader of the strike and a symbol of the virtues of individualism and self-reliance.
The novel is also a critique of socialism and a defense of capitalism, arguing that pursuing individual happiness and self-interest is the only way to achieve a just and prosperous society.
Overall, the book is a philosophical and political commentary, and it is considered to be Rand’s magnum opus.
What Are The Main Ideas of the Book?
Individualism
The main points of “Atlas Shrugged” by Ayn Rand are:
The novel is a critique of socialism and a defense of capitalism, which argues that the pursuit of individual happiness and self-interest is the only way to achieve a just and prosperous society.
The story centers around a group of industrialists who go on strike against a society that they believe is oppressive and unjust.
The novel is a philosophical and political commentary, and it is considered to be Rand’s magnum opus.
The novel features a hero, John Galt, who is the leader of the strike and a symbol of the virtues of individualism and self-reliance.
The novel explores themes of reason, individualism, self-interest, and the role of the individual in society.
The novel also critiques the idea of “the common good” and argues that the collective cannot be the standard by which to measure the individual’s good.
How Does It Critique the “Common Good”?
In “Atlas Shrugged,” Ayn Rand critiques the idea of “the common good” by arguing that it is a collectivist concept that is used to justify the oppression of individuals by the state.
She argues that when society defines the “common good” as the standard by which to measure the actions and decisions of individuals, it leads to a loss of individual freedom and the sacrifice of individual rights for the sake of the group.
The novel presents the idea that the “common good” is often used as a pretext for the government to control and regulate the economy and for individuals to sacrifice their own self-interest for the sake of the group.
Rand argues that this leads to a society where the most productive and successful individuals are punished and held back, while those who are less productive are rewarded.
In the novel, Rand also critiques the idea of “the common good” as being a vague, undefined, and shifting concept that can be manipulated to justify anything, leading to the loss of individual rights and freedoms.
Therefore, Rand presents the idea that the individual’s own happiness and self-interest should be the standard by which to measure their actions, rather than a collective concept like “the common good”.
Who Is John Galt?
John Galt is a central character in Ayn Rand’s novel “Atlas Shrugged.” He is the leader of a strike of industrialists who withdraw their talents and abilities from society in protest against a government that they believe is oppressive and unjust. John Galt is a symbol of the virtues of individualism and self-reliance, and his strike is meant to be a demonstration of the importance of these values.
Throughout the novel, John Galt is portrayed as a highly intelligent, rational, and independent individual who is deeply committed to his principles. He is also depicted as a charismatic and persuasive leader who can convince other successful industrialists to join him in his strike.
John Galt’s strike is meant to demonstrate the idea that the most productive and successful individuals in society are necessary for its prosperity and that without them, society will collapse. In this way, John Galt is intended to symbolize the importance of individualism, self-reliance, and the pursuit of one’s own happiness and self-interest.
In the final part of the novel, John Galt delivers a long speech in which he explains the philosophy behind his strike and the principles of Objectivism, Rand’s own philosophy, which is based on reason, individualism, self-interest, and the rejection of the idea of “the common good” and other collectivist concepts.
John Galt’s Speech – Main Points
The final speech of John Galt in “Atlas Shrugged” is a long and elaborate monologue that is meant to explain the philosophy behind the strike of the industrialists and the principles of Objectivism, which is Ayn Rand’s own philosophy. The speech is often considered to be the climax of the novel and one of the most important parts of the book.
In the speech, John Galt explains that the strike of the industrialists is a protest against a society that is based on the idea of “the common good” and collectivism, which he argues is the root of all the problems in the world. He argues that collectivism leads to the oppression of individuals by the state, the sacrifice of individual rights for the sake of the group, and the stifling of human progress and prosperity.
He explains that the industrialists who joined him in the strike represent the most productive and successful individuals in society and that they are necessary for society’s prosperity. He argues that the government’s attempts to control and regulate the economy and to redistribute wealth, leads to the destruction of the economy and to the collapse of society.
John Galt also explains that the only way to achieve a just and prosperous society is for individuals to be free to pursue their own happiness and self-interest without interference from the state. He argues that this requires a society based on reason, individualism, self-reliance, and the rejection of the idea of “the common good” and other collectivist concepts.
He also explains that the only way to achieve this kind of society is for individuals to assert their own values and live according to their own principles rather than sacrifice themselves for the sake of others. He states that the individual’s own happiness and self-interest should be the standard by which to measure their actions rather than a collective concept like “the common good”.
In short, the final speech is a summary of Rand’s philosophy of Objectivism and a call to action for individuals to reject collectivist ideas and embrace individualism, self-reliance, and reason as the way to achieve a just and prosperous society.
What Is Objectivism?
“Objectivism” is the name given to Ayn Rand’s philosophy, which is the foundation for her novels and her ideas. The term “Objectivism” is derived from the idea of “objectivity,” which refers to the concept that reality is objective and independent of human consciousness and that it can be perceived and understood through reason and observation.
The term “Objectivism” was coined by Rand to describe her philosophy, which she developed over many years and presented in her novels and non-fiction works.
Objectivism is a philosophy that emphasizes the importance of reason, individualism, self-interest, and the rejection of the idea of “the common good” and other collectivist concepts. It also emphasizes the importance of the individual’s own happiness and self-interest as the standard by which to measure their actions, rather than a collective concept like “the common good”.
It’s worth noting that Rand’s Objectivism is not an existing philosophy before her, but it’s her own creation. She draws influences from different philosophical concepts such as Aristotelianism, classical liberalism, and individualism of the American Founding Fathers and others, but she developed it as a unique philosophy that differs from any other philosophies in many aspects.
Is There Merit to Objectivism?
Objectivism, as formulated by Ayn Rand, is a philosophy that emphasizes the importance of reason, individualism, self-interest, and the rejection of the idea of “the common good” and other collectivist concepts.
It also emphasizes the importance of the individual’s own happiness and self-interest as the standard by which to measure their actions, rather than a collective concept like “the common good”.
Objectivism has been the subject of much debate and has both supporters and critics. Some people believe that there is merit to the philosophy, and that it provides a valuable perspective on the importance of individualism, self-reliance, and the rejection of collectivism. They argue that Rand’s emphasis on reason and individualism can be seen as a defense of individual freedom and the value of human life.
On the other hand, many critics argue that Objectivism is overly individualistic and ignores the importance of community and society. They argue that Rand’s emphasis on self-interest can lead to a disregard for the well-being of others and that her rejection of the idea of “the common good” is unrealistic and ignores the fact that people often rely on each other and society for their survival and well-being.
It’s important to note that Objectivism as a philosophy is not without its critics and has been criticized for its lack of attention to important issues such as poverty, inequality, and the role of government in addressing these issues. Additionally, some critics argue that Rand’s emphasis on self-interest can lead to a disregard for the well-being of others and that her rejection of the idea of “the common good” is unrealistic and ignores the fact that people often rely on each other and society for their survival and well-being.
Overall, whether there is merit to Objectivism depends on one’s perspective and values. It’s important to approach any philosophy with a critical mindset, and evaluate its ideas based on reason and evidence.
Does Self Interest Lead to Greater Common Good?
In Objectivism, Ayn Rand argues that pursuing individual happiness and self-interest is the only way to achieve a just and prosperous society. The theory states that when individuals are free to pursue their own self-interest, they will also be creating value for others and contributing to the prosperity of society.
According to Rand, the market economy is the best way to achieve this, as it allows individuals to exchange goods and services in a voluntary and mutually beneficial way.
This perspective implies that by allowing individuals to pursue their own self-interest, the “common good” will also be optimized. The idea is that when individuals are free to act in their own self-interest, they will create value for themselves and for others, and that this value creation will lead to a more prosperous and just society.
However, it’s worth noting that the relationship between the “common good” and self-interest is not always straightforward.
Some critics argue that the idea that self-interest will lead to the optimization of the “common good” is unrealistic and ignores the fact that people often rely on each other and society for their survival and well-being, and that some individuals will not have the same level of resources to pursue their own self-interest.
Additionally, it’s important to remember that the idea of “common good” and its definition can be controversial and debated, and what may be considered as “common good” to some people may not be for others.
In conclusion, the relationship between the “common good” and self-interest is complex and depends on multiple factors, and the idea that self-interest will lead to the optimization of the “common good” is not a universally accepted idea.
The Story
“Atlas Shrugged” is a novel by Ayn Rand, published in 1957. The story is set in a dystopian future where the United States is in a state of economic collapse. The story centers around a group of industrialists who go on strike against a society that they believe is oppressive and unjust. The industrialists are led by John Galt, who is the main protagonist of the story.
The novel starts with introducing the main characters and the setting, where the government is increasing regulations on the economy and businesses, and the country is experiencing an economic crisis. This leads to a decrease in productivity and an increase in unemployment.
As the story progresses, the industrialists begin to disappear one by one, leaving behind a note that says, “I swear by my life and my love of it that I will never live for the sake of another man, nor ask another man to live for mine.”
The disappearance of the industrialists causes more economic problems, and the government tries to find a way to bring them back.
The government then created a new agency called the State Science Institute, which was supposed to solve the economic crisis and bring the industrialists back. But the institute only worsens things, and the country becomes more and more oppressive.
As the story unfolds, it is revealed that the industrialists have gone on strike and are hiding in a secret valley where they have created a new society based on individualism and self-reliance. John Galt, the leader of the strike, is the one who has persuaded them to join him. The government and society’s attempts to bring them back fail, and society starts to collapse.
The novel’s climax is when John Galt gives a radio address, where he explains the philosophy behind the strike and the principles of Objectivism, which is Ayn Rand’s own philosophy.
He explains that the strike is a protest against a society that is based on the idea of “the common good” and collectivism, which he argues is the root of all the problems in the world. He argues that collectivism leads to the oppression of individuals by the state, the sacrifice of individual rights for the sake of the group, and the stifling of human progress and prosperity.
He also explains that the only way to achieve a just and prosperous society is for individuals to be free to pursue their own happiness and self-interest without interference from the state.
The novel ends with society collapsing and the industrialists returning to society, bringing new energy and ideas to rebuild the country.
In summary, in “Atlas Shrugged” the industrialists are rebelling against a society that they believe is oppressive and unjust, specifically against the government’s increasing regulations on the economy and businesses that lead to the country’s economic collapse. They are led by John Galt, who is the leader of the strike and a symbol of the virtues of individualism and self-reliance. The novel is a philosophical and political commentary, it critiques socialism and defends capitalism, and it argues that the pursuit of individual happiness and self-interest is the only way to achieve a just and prosperous society.
What is the “Atlas Society”?
The “Atlas Society” is an organization that was founded in 1985 as an institution for the promotion of the philosophy of Objectivism, as developed by Ayn Rand. The organization is not directly connected with Ayn Rand or her estate, but it is influenced by her ideas.
The organization’s mission is to promote Objectivism, which is a philosophy that emphasizes the importance of reason, individualism, self-interest, and the rejection of the idea of “the common good” and other collectivist concepts. It also emphasizes the importance of the individual’s own happiness and self-interest as the standard by which to measure their actions, rather than a collective concept like “the common good”.
The Atlas Society is a think tank that provides resources and programs to educate people about Objectivism and encourages the study and application of Rand’s ideas. They offer a variety of educational programs, lectures, conferences, and other events, and they have a strong online presence, with a website that includes articles, videos, and other resources about Objectivism.
The organization also publishes a quarterly magazine, “The New Individualist,” which features articles on politics, culture, and the ideas of Objectivism, and the organization also maintains a library of Rand’s work, audio and video lectures and interviews, and other resources.
The organization is not-for-profit and relies on donations from individuals and foundations to fund its work. It aims to promote Rand’s ideas to a wider audience and to encourage the growth of a community of people who share the same values and principles as Objectivism.
Key Points to Survive in a Group of Objectivists Without Reading the Book?
If you want to spend an evening with members of the Atlas Society and engage in a discussion about the ideas and concepts from the book “Atlas Shrugged,” it would be helpful to have a general understanding of the following points:
The central theme of the book: The novel is a critique of socialism and a defense of capitalism, which argues that the pursuit of individual happiness and self-interest is the only way to achieve a just and prosperous society.
The story’s setting: The story is set in a dystopian future where the United States is in a state of economic collapse and the government is increasing regulations on the economy and businesses.
The strike of the industrialists: The industrialists go on strike against a society that they believe is oppressive and unjust. They are led by John Galt, who is the leader of the strike and a symbol of the virtues of individualism and self-reliance.
The philosophy of Objectivism: The novel presents Ayn Rand’s own philosophy of Objectivism which emphasizes the importance of reason, individualism, self-interest, and the rejection of the idea of “the common good” and other collectivist concepts.
The final speech of John Galt: In the final part of the novel, John Galt delivers a long speech which is meant to explain the philosophy behind the strike and the principles of Objectivism. It is considered the climax of the novel, and it is important to have an understanding of the main points of this speech.
The novel’s conclusion: The novel ends with the society collapsing and the industrialists returning to society, bringing new energy and ideas to rebuild the country.
It’s also worth noting that Objectivism as a philosophy, like any other, has both supporters and critics.
It’s good to be open-minded and willing to listen to different perspectives and engage in discussions with the members of society.
What Books Are Opposed to Ideas in Atlas Shrugged?
“Atlas Shrugged” is a novel by Ayn Rand that presents her philosophy of Objectivism, which emphasizes the importance of reason, individualism, self-interest, and the rejection of the idea of “the common good” and other collectivist concepts. Some books that present ideas that are completely opposed to the ideas presented in this book are:
“The Communist Manifesto” by Karl Marx and Friedrich Engels: This book presents the idea of communism, which is a political and economic theory that advocates for the abolition of private ownership and the creation of a classless society where the means of production are owned and controlled by the community as a whole. This is in direct opposition to Rand’s belief in the importance of individualism and the rejection of collectivism.
“The Road to Serfdom” by Friedrich Hayek: This book presents the idea that socialism leads to totalitarianism, which is in opposition to Rand’s belief that socialism is a destructive and oppressive system.
“The Wealth of Nations” by Adam Smith: This book is considered as one of the first modern works of economics and presents the idea that the market economy is the best way to achieve a just and prosperous society, it’s also a critique of mercantilism, which is a system of economic policy that was prevalent in the 18th century. This is in line with Rand’s belief in the importance of the market economy, but it’s important to note that Adam Smith’s ideas about the market economy are not as extreme as Rand’s ideas.
“The General Theory of Employment, Interest, and Money” by John Maynard Keynes: This book presents the idea that government intervention in the economy can be necessary to stabilize economic growth and combat unemployment, which is in opposition to
A Poem On “Atlas Shrugged”
Atlas Shrugged, the weight of the world
On his shoulders, he's tired and curled
But still he stands, with head held high
Fighting for freedom, against the lies. The strike of the industrials
Against a society, so superficial
John Galt leads them, with a purpose true
For a just and prosperous, anew Objectivism, the philosophy
Of reason, self-interest and liberty
The pursuit of happiness, the ultimate goal
A society, where the individual is whole.
Book Number of Pages
“Atlas Shrugged” is considered a long novel with 1,168 pages in its standard paperback edition.
The length of the novel can be a challenge for some readers, but it is also considered a classic of 20th-century literature, and many people find it to be an engaging and thought-provoking read.
The novel is a philosophical and political commentary, it critiques socialism and defends capitalism, and it argues that the pursuit of individual happiness and self-interest is the only way to achieve a just and prosperous society.
How Long Does an Average Reader Need to Read the Whole Book?
The length of time it takes to read “Atlas Shrugged” can vary depending on the individual reader’s reading speed and schedule.
However, as an average reader, it would take about 20 to 25 hours to read the whole book. The book has 1,168 pages, and if you read around 250-300 words per minute, it would take you around 12-15 hours.
However, it’s important to consider that you may want to spend some time reflecting on the ideas presented in the book, and this will add some time to the reading. Additionally, if you read at a slower pace or have less time to devote to reading, it might take you longer to finish the book.
It’s worth noting that the book is not an easy read, it is a philosophical and political commentary that critiques socialism and defends capitalism, and it presents a complex and comprehensive system of ideas, so it requires a certain level of focus and attention.
Ultimately, the most important thing is to enjoy the reading experience and not rush through the book. It’s better to take your time, read at a comfortable pace, and reflect on the ideas that are presented rather than trying to rush through it.
Personal Note: Overall, I’m super impressed — it has been an awesome experience to learn the book’s main ideas using OpenAI rather than reading through the whole book!


 Project: How to create a Bitcoin wallet in Python (public/private key pair)?
 Is It Safe? I investigated the library code from the GitHub repository associated with this library, and I couldn’t find any trust issues. Specifically, I searched for “hacks” in the code, such as sending the public/private key pair to a remote server, but the repository seems to be clean. It is also well-respected in the community, so unlikely to be tampered with. I didn’t check if the public/private key pairs have maximum entropy, i.e., are truly randomly created with all private keys having the same likelihood. I cannot guarantee that this is 100% safe because I don’t know the owner of the library — but it looks safe at first and second glance.
Python 3

 Recommended: 5 Steps to Install a Python Library


 A-level research papers
 News sites


 Required:


