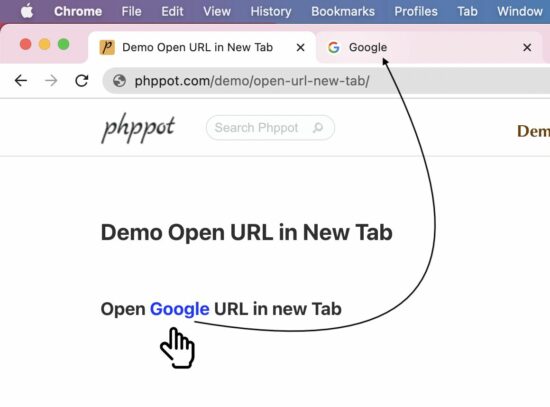
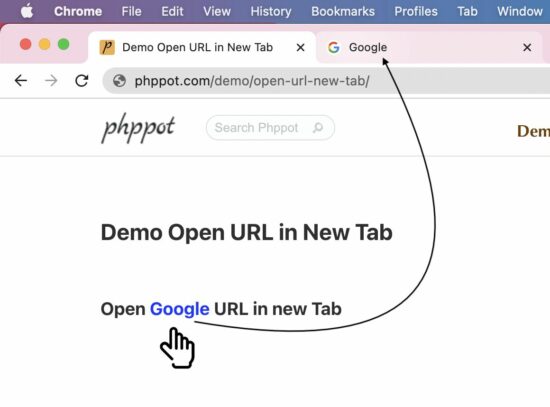
Web pages contain external links that open URLs in a new tab. For example, Wikipedia articles show links to open the reference sites in a new tab. This is absolutely for beginners.
There are three ways to open a URL in a new tab.
HTML anchor tags with target=_blank attribute.
JavaScript window.open() to set hyperlink and target.
JavaScript code to create HTML link element.
HTML anchor tags with target=_blank attribute
This is an HTML basic that you are familiar with. I added the HTML with the required attributes since the upcoming JavaScript example works with this base.
<a href="https://www.phppot.com" target="_blank">Go to Phppot</a>
Scenarios of opening URL via JavaScript.
When we need to open a URL on an event basis, it has to be done via JavaScript at run time. For example,
Show product page from the gallery via Javascript to keep track of the shopping history.
The below two sections have code to learn how to achieve opening URLs in a new tab using JavaScript.
JavaScript window.open() to set hyperlink and target
This JavaScript one-line code sets the link to open the window.open method. The second parameter is to set the target to open the linked URL in a new tab.
Most of the applications have the requirement to upload files to the server. In previous articles, we have seen a variety of file upload methods with valuable features.
For example, we learned how to upload files with or without AJAX, validate the uploaded files, and more features.
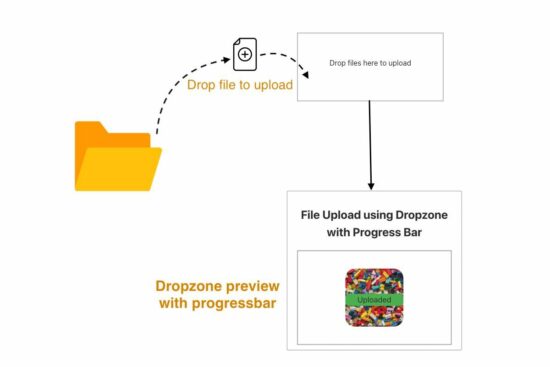
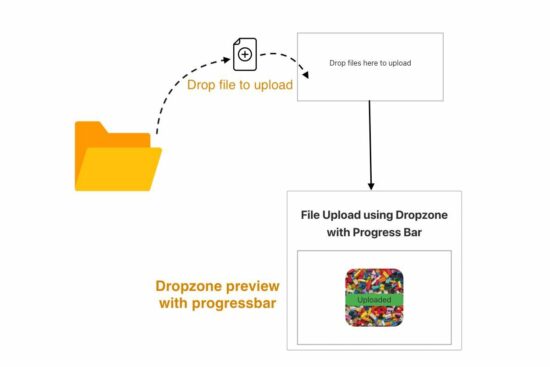
This tutorial will show how to code for file uploading with a progress bar by Dropzone.
To the extreme, websites start showing the progressing percentage of the upload. It is the best representation of showing that the upload request is in progress.
About Dropzone
The Dropzone is a JavaScript library popularly known for file uploading and related features. It has a vast market share compared to other such libraries.
It provides a massive list of features. Some of the attractive features are listed below.
It supports multi-file upload.
It represents progressing state and percentage.
It allows browser image resizing. It’s a valuable feature that supports inline editing of images.
Image previews in the form of thumbnails.
It supports configuring the uploaded file’s type and size limit.
How to integrate dropzone.js to upload with the progress bar
Integrating Dropzone into an application is simple. It is all about keeping these two points during the integration.
Mapping the UI element with the Dropzone initiation.
Handling the upload event callbacks effectively.
Mapping the UI element with the Dropzone initiation
The below code has the HTML view to show the Dropzone file upload to the UI. It includes the Dropzone JS and the CSS via a CDN URL.
This section has the Dropzone library script to include in the view. This script sets the file properties and limits to the upload process. Some of the properties are,
maxFilesize – Maximum size allowed for the file to upload.
paramName – File input name to access like $_FILE[‘paramName here’].
maxFiles – File count allowed.
acceptedFiles – File types or extensions allowed.
The init property of this script allows handling the upload event. The event names are listed below.
uploadprogress – To track the percentage of uploads to update the progress bar.
success – When the file upload request is completed. This is as similar to a jQuery AJAX script‘s success/error callbacks.
Dropzone options have the upload form reference to listen to the file drop event. The callback function receives the upload status to update the UI.
The dropzone calls the endpoint action when dropping the file into the drop area.
The drop area will show thumbnails or a file preview with the progress bar.
Dropzone.options.myDropzone = { paramName: "file", // filename handle to upload maxFilesize: 2, // MB maxFiles: 1, // number of files allowed to upload acceptedFiles: ".png, .jpg, .jpeg, .gif", // file types allowed to upload init: function () { this.on("uploadprogress", function (file, progress) { var progressBar = file.previewElement.querySelector(".progress-bar"); progressBar.style.width = progress + "%"; progressBar.innerHTML = progress + "%"; }); this.on("success", function (file, response) { var progressBar = file.previewElement.querySelector(".progress-bar"); progressBar.classList.add("bg-success"); progressBar.innerHTML = "Uploaded"; }); this.on("error", function (file, errorMessage) { var progressBar = file.previewElement.querySelector(".progress-bar"); progressBar.classList.add("bg-danger"); progressBar.innerHTML = errorMessage; }); } };
PHP file upload script
This a typical PHP file upload script suite for any single file upload request. But, the dependent changes are,
File handle name ($_FILES[‘File handle name’]).
Target directory path for $uploadDir variable.
<?php if ($_SERVER['REQUEST_METHOD'] === 'POST' && isset($_FILES['file'])) { $file = $_FILES['file']; // file to be uploaded to this directory // should have sufficient file permissions $uploadDir = 'uploads/'; // unique file name generated for the uploaded file $fileName = uniqid() . '_' . $file['name']; // moving the uploaded file from temp directory to uploads directory if (move_uploaded_file($file['tmp_name'], $uploadDir . $fileName)) { echo 'File uploaded successfully.'; } else { echo 'Failed to upload file.'; }
}
How to hide the progress bar of uploaded files
By default, the Dropzone JS callback adds a dz-complete CSS class selector to the dropzone element. It will hide the progress bar from the preview after a successful upload.
This default behavior is by changing the progress bar opacity to 0. But the markup will be there in the source. Element hide and show can be done in various ways.
If you want to remove the progress bar element from the HTML preview, use the JavaScript remove() function. This script calls it for the progress bar element on the success callback.
Dropzone.options.myDropzone = { ... ... init: function () { ... ... this.on("success", function (file, response) { var progressBar = file.previewElement.querySelector(".progress-bar"); progressBar.remove(); }); ... ... }
};
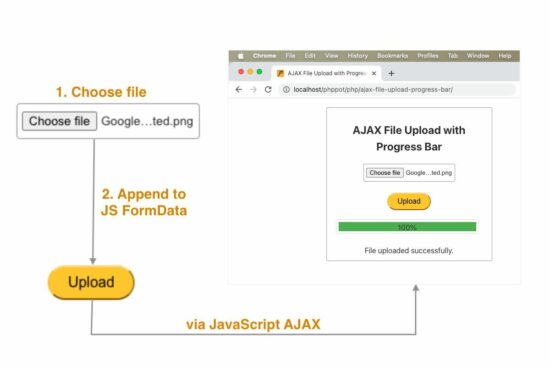
If you want to upload a file using AJAX and also need to show a progress bar during the upload, you have landed on the right page.
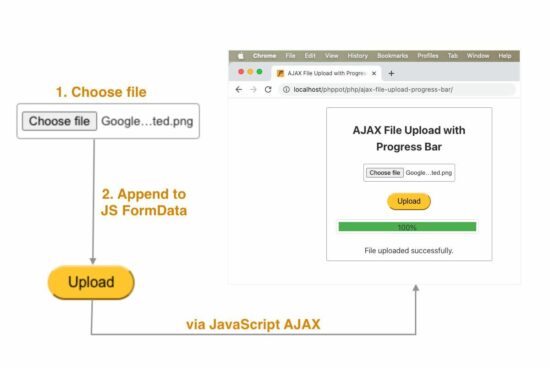
This article has an example code for JavaScript AJAX file upload with a progress bar.
An AJAX-based file upload is a repeatedly needed requirement for a web application.
It is for providing an inline editing feature with the uploaded file content. For example, the following tasks can be achieved using the AJAX file upload method.
Photo or banner update on the profile page.
Import CSV or Excel files to load content to the data tables.
This XMLHttpRequestUpload object tracks the upload progress in percentage.
It creates event listeners to update the progressing percentage and the upload status.
Then finally, it posts the file to the PHP endpoint like usual AJAX programming.
function uploadFile() { var fileInput = document.getElementById('fileUpload'); var file = fileInput.files[0]; if (file) { var formData = new FormData(); formData.append('file', file); var xhr = new XMLHttpRequest(); xhr.upload.addEventListener('progress', function (event) { if (event.lengthComputable) { var percent = Math.round((event.loaded / event.total) * 100); var progressBar = document.getElementById('progressBar'); progressBar.style.width = percent + '%'; progressBar.innerHTML = percent + '%'; } }); xhr.addEventListener('load', function (event) { var uploadStatus = document.getElementById('uploadStatus'); uploadStatus.innerHTML = event.target.responseText; }); xhr.open('POST', 'upload.php', true); xhr.send(formData); }
}
PHP endpoint to move the uploaded file into a directory
This PHP has a standard code to store the uploaded file in a folder using the PHP move_uploaded_file(). The link has the code if you want to store the uploaded file and save the path to the database.
This endpoint creates a unique name for the filename before upload. It is a good programming practice, but the code will work without it, also.
It is for stopping file overwriting in case of uploading different files in the same name.
Note:Create a folder named “uploads” in the project root. Give sufficient write permissions.
<?php if ($_SERVER['REQUEST_METHOD'] === 'POST' && isset($_FILES['file'])) { $file = $_FILES['file']; // file will be uploaded to the following folder // you should give sufficient file permissions $uploadDir = 'uploads/'; // unique file name generated $fileName = uniqid() . '_' . $file['name']; // moving the uploaded file from temp location to our target location if (move_uploaded_file($file['tmp_name'], $uploadDir . $fileName)) { echo 'File uploaded successfully.'; } else { echo 'Failed to upload file.'; }
}
This tutorial will create an example for generating a QR code using PHP. This example uses the Chillerlan QR code library. It is a PHP library with advanced features for creating QR codes, bar codes, and more.
There are two examples in this project. The first is a basic use-case scenario, and the second is an advanced example.
Both will help familiarize this library to send data for QR code rendering.
Quick Example
<?php
require_once '../vendor/autoload.php'; use chillerlan\QRCode\QRCode; // Core class for generating the QR code
$qrCode = new QRCode(); // data for which the QR code will be generated
$data = 'www.phppot.com'; // QR code image generation using render function
// it returns the an image resource.
$qrCodeImage = $qrCode->render($data); // Show the generated QR code image on screen
// following header is necessary to show image output
// in the browser
header('Content-Type: image/png');
imagepng($qrCodeImage);
imagedestroy($qrCodeImage);
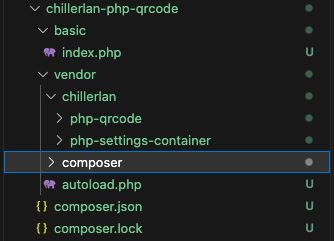
The above code is a quick example of generating a Chillerlan QR code. You should use Composer to download the chillerlan dependency.
This example imports the library class and gives the data to generate the QR code.
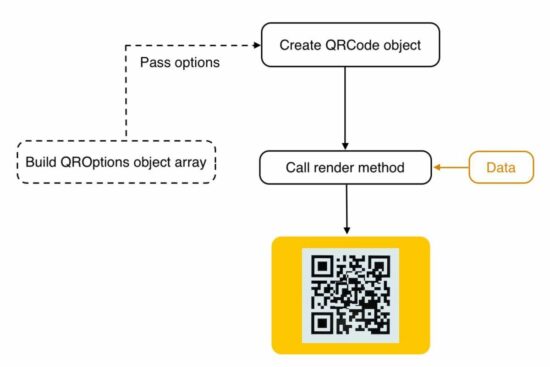
The render() function passes the data to the library with which it will output the QR code image. This output can be returned to a browser or can be saved as a file.
Run the following command in your terminal to install this Chillerlan PHP library.
composer require chillerlan/php-qrcode
Example 2 – How to configure size, EC level, scale
More configurations help to adjust the QR code quality without affecting readability. The below parameters are used, which override the default configurations.
The version is to set the size of a QR code.
ECC level to set the possible values(L, M, Q, H). It is the damage tolerance percentage. We have seen it when coding with phpqrcode library.
Scale sets the size of a QR code pixel. The maximum size increases the QR code’s quality.
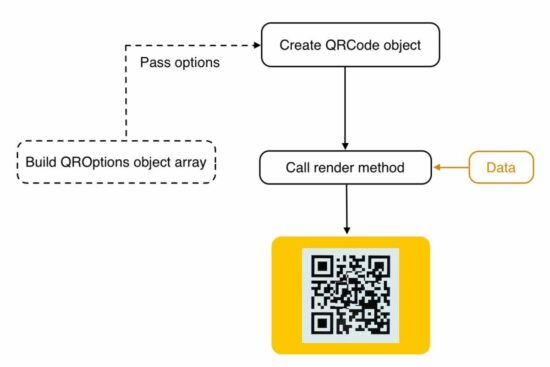
This library has the QROptions class to set the configurations explicitly. When initiating this class, the code below prepares an array of {version, eccLeverl …} options.
This QROptions instance generates the QRCode object to call the render() action handler. As in the above example, the render() uses the data and bundles it into the QR code binary.
<?php
require_once '../vendor/autoload.php'; use chillerlan\QRCode\QRCode;
use chillerlan\QRCode\QROptions; // data to embed in the QR code image
$data = 'www.phppot.com'; // configuration options for QR code generation
// eccLevel - Error correction level (L, M, Q, H)
// scale - QR code pixe size
// imageBase64 - output as image resrouce or not
$options = new QROptions([ 'version' => 5, 'eccLevel' => QRCode::ECC_H, 'scale' => 5, 'imageBase64' => true, 'imageTransparent' => false, 'foregroundColor' => '#000000', 'backgroundColor' => '#ffffff'
]); // Instantiating the code QR code class
$qrCode = new QRCode($options); // generating the QR code image happens here
$qrCodeImage = $qrCode->render($data); header('Content-Type: image/png');
imagepng($qrCodeImage);
imagedestroy($qrCodeImage);
Chillerlan PHP library
This is one of the popular QR Code generators in PHP. It has clean and easily understandable code with proper modularity.
Some of its features are listed below. This feature list represents the capability of being a component of a PHP application.
Features
Creates QR Codes with an improved Model, Version, ECC level, and more configuration
It supports encoding numeric, alphanumeric, 8-bit binary, and more.
It supports QR code output in GD, ImageMagick, SVG markup, and more formats.
It provides QR code readers using GD and ImageMagick libraries.
More about QR code
Hereafter we will see more about the QR code and its evolution, advantages, and usage scenarios.
The QR code, or the quick response code, is a two-dimensional (2D) bar code. The linked article has the code to generate a barcode using PHP.
The QR code is a Japanese invention for the automotive industry. Later it spreads to more domains. Some of the commonly used places are,
Marketing
Linking to service providers
Information sharing
Online payments.
It provides easy access to online information through digital scanners. The QR code contains encoded data that can be decoded with digital scanning. It shares the information, links the service provider or prompts for the payment initiation after scanning.
Example usages of QR code generation and scanning
It shows payee details to ensure and allows one to enter the amount to make a mobile payment.
It facilitates storing location and contact details. It is for marking locations in the Google map while scanning.
When reading the QR code, the application will download v-cards using the contact details stored.
The app developing company shows QR codes in the app store to download mobile apps.
There are more PHP libraries to support this feature. In this tutorial, we will see one of the popular web-scraping components named DomCrawler.
This component is underneath the PHP Symfony framework. This article has the code for integrating and using this component to crawl web pages.
We can also create custom utilities to scrape the content from the remote pages. PHP allows built-in cURL functions to process the network request-response cycle.
About DomCrawler
The DOMCrawler component of the Symfony library is for parsing the HTML and XML content.
It constructs the crawl handle to reach any node of an HTML tree structure. It accepts queries to filter specific nodes from the input HTML or XML.
It provides many crawling utilities and features.
Node filtering by XPath queries.
Node traversing by specifying the HTML selector by its position.
Node name and value reading.
HTML or XML insertion into the specified container tag.
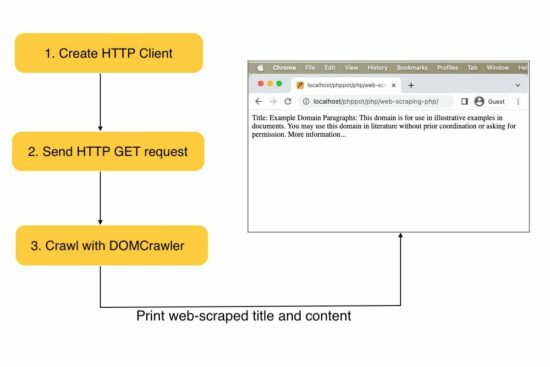
Steps to create a web scraping tool in PHP
Install and instantiate an HTTP client library.
Install and instantiate the crawler library to parse the response.
Prepare parameters and bundle them with the request to scrape the remote content.
Crawl response data and read the content.
In this example, we used the HTTPClient library for sending the request.
Web scraping PHP example
This example creates a client instance and sends requests to the target URL. Then, it receives the web content in a response object.
The PHP DOMCrawler parses the response data to filter out specific web content.
In this example, the crawler reads the site title by parsing the h1 text. Also, it parses the content from the site HTML filtered by the paragraph tag.
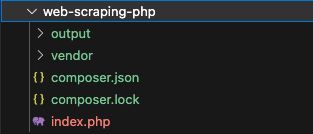
The below image shows the example project structure with the PHP script to scrape the web content.
How to install the Symfony framework library
We are using the popular Symfony to scrape the web content. It can be installed via Composer. Following are the commands to install the dependencies.
After running these composer commands, a vendor folder can map the required dependencies with an autoload.php file. The below script imports the dependencies by this file.
index.php
<?php require 'vendor/autoload.php'; use Symfony\Component\HttpClient\HttpClient;
use Symfony\Component\DomCrawler\Crawler; $httpClient = HttpClient::create(); // Website to be scraped
$website = 'https://example.com'; // HTTP GET request and store the response
$httpResponse = $httpClient->request('GET', $website);
$websiteContent = $httpResponse->getContent(); $domCrawler = new Crawler($websiteContent); // Filter the H1 tag text
$h1Text = $domCrawler->filter('h1')->text();
$paragraphText = $domCrawler->filter('p')->each(function (Crawler $node) { return $node->text();
}); // Scraped result
echo "H1: " . $h1Text . "\n";
echo "Paragraphs:\n";
foreach ($paragraphText as $paragraph) { echo $paragraph . "\n";
}
?>
Ways to process the web scrapped data
What will people do with the web-scraped data? The example code created for this article prints the content to the browser. In an actual application, this data can be used for many purposes.
It gives data to find popular trends with the scraped news site contents.
It generates leads for showing charts or statistics.
It helps to extract images and store them in the application’s backend.
Web scraping is theft if you scrape against a website’s usage policy. You should read a website’s policy before scraping it. If the terms are unclear, you may get explicit permission from the website’s owner. Also, commercializing web-scraped content is a crime in most cases. Get permission before doing any such activities.
Before crawling a site’s content, it is essential to read the website terms. It is to ensure that the public can be subject to scraping.
Installing Auto-GPT is not simple, especially if you’re not a coder, because you need to set up Docker and do all the tech stuff. And even if you’re a coder you may not want to go through the hassle. In this article, I’ll show you some easy Auto-GPT web interfaces that’ll make the job easier!
Tool #1 – Auto-GPT on Hugging Face
Hugging Face user aliabid94 created an Auto-GPT web interface (100% browser-based) where you can put in your OpenAI API key and try out Auto-GPT in seconds.
The example shows the Auto-GPT run of an Entrepreneur-GPT that is designed to grow your Twitter account.
Tool #2 – AutoGPTJS.com
I haven’t tried autogptjs.com but the user interface looks really compelling and easy to use. Again, you need to enter your OpenAI API key and you should create a new one and revoke it after use. Who knows where the keys are really stored?
Well, this project looks trustworthy as it’s also available on GitHub.
Tool #3 – AgentGPT
AgentGPT is an easy-to-use browser based autonomous agent based on GPT-3.5 and GPT-4. It is similar to Auto-GPT but uses its own repository and code base.
AutoGPT UI, built with Nuxt.js, is a user-friendly web tool for managing AutoGPT workspaces. Users can easily upload AI settings and supporting files, adjust AutoGPT settings, and initiate the process via our intuitive GUI. It supports both individual and multi-user workspaces. Its workspace management interface enables easy file handling, allowing drag-and-drop features and seamless interaction with source or generated content.
Some More Comments…
Before you go, here are a few additional notes.
Token Usage and Revoking Keys
To access Auto-GPT, you need to use the OpenAI API key, which is essential for authenticating your requests. The token usage depends on the API calls you make for various tasks.
You should set a spending limit and revoke your API keys after putting them in any browser-based Auto-GPT tool. After all, you don’t know where your API keys will end up so I use a strict one-key-for-one-use policy and revoke all keys directly after use.
3 More Tools
The possibilities with Auto-GPT innovation are vast and ever-expanding.
For instance, researchers and developers are creating new AI tools such as Godmode (I think it’s based on BabyAGI) to easily deploy AI agents directly in the web browser.
With its potential to grow and adapt, Auto-GPT is poised to make an impact on numerous industries, driving further innovation and advancements in AI applications.
AutoGPT Chrome extension is another notable add-on, providing an easily accessible interface for users.
Yesterday I found a new tool called JARVIS (HuggingGPT), named after the J.A.R.V.I.S. artificial intelligence from Ironman, that is an Auto-GPT alternative created by Microsoft research that uses not only GPT-3.5 and GPT-4 but other LLMs as well and is able to generate multimedia output such as audio and images (DALL-E). Truly mindblowing times we’re living in.
Greatness is not about overnight success but multiple periods of repeatable habits. It is not about being better than someone else but about being dependable, disciplined and earned.
Many people want to be great but do not want to put in the effort over a sustained period of time to get there.
Success comes from hard work, consistency and intentional inputs that lead to expected outputs. The best way to achieve this is to focus on small wins consistently rather than trying to achieve perfection. By doing small things a great number of times, one can achieve greatness.
Continuous improvement and developing a habit of progression are essential to achieving greatness. Stop speculating and start taking action, focusing on tangible progress and developing repeatable habits to transform into greatness.
Throughout our lives, we encounter various levels of success and failure. As we accumulate more experiences, it’s natural to wonder which ones were genuinely great and why.
Surprisingly, it’s often not the sudden, dramatic achievements that stand out, but the incremental, sustained efforts that lead to significant achievements over time.
In other words, greatness is not about overnight successes but about periods of repeatable habits.
This article seeks to explore the true nature of greatness, the importance of consistency, and the process of building a habit of progression to rise above mediocrity and achieve lasting success.
The Foundations of Greatness
Before delving into the heart of the article, let’s establish two fundamental principles:
Greatness is not instantaneous.
Greatness is earned.
The following story tries to establish those.
Story Warren Buffett
One of the most clear examples of a person achieving greatness through compounding effort and habits over a long time is Warren Buffett. Warren Buffett is one of the most successful investors in the world, known for his disciplined approach to investment and his philosophy of buying and holding.
Buffett started investing when he was just 11 years old and learned about the power of compounding at a very young age. He was not an overnight success. His wealth and success have grown slowly and steadily over the decades, thanks to his consistent investment habits and the magic of compound interest.
Buffett’s investing principles involve patience, long-term thinking, and a focus on fundamentals, including the quality of the business, its management, and its potential for long-term profitability. This strategy allowed him to make consistent, measured investment decisions, often going against popular trends.
He is known for reading extensively, up to 500 pages per day, to increase his knowledge and understanding of different businesses and industries. This is a habit he developed early in life and has maintained throughout his career.
Additionally, he has been a strong advocate of living frugally and prioritizing saving and investing over excessive consumption. He still lives in the same house in Omaha, Nebraska, that he bought in 1958 for $31,500.
Buffett’s consistent investment strategies and frugal lifestyle habits, sustained over several decades, have allowed his wealth to compound and grow exponentially. As of my last knowledge cut-off in September 2021, Warren Buffett’s net worth was approximately $100 billion, making him one of the wealthiest people in the world. This success story is a testament to the power of compounding effort, disciplined habits, and long-term thinking.
Becoming great starts with acknowledging that you’re not already great and recognizing that greatness is not achieved in a single moment or through a stroke of luck. Instead, greatness is a reflection of consistent effort put in over time.
Additionally, greatness is not about being better than others. It’s about being reliable, disciplined, and continuous progress towards mastery.
In short, greatness is earned through hard work persisted over a long period.
The Role of Consistency in Achieving Greatness
One common misconception is that success or notoriety is achieved through flashy and unconventional methods.
This idea arises from the media’s focus on outliers – events or personalities that deviate from the norm. This portrayal can mislead people into aspiring for notoriety solely for the sake of it, or believing that the success of these outliers is solely due to their unorthodox approaches.
In reality, the most reliable and effective path to success is through consistency. Consistency may not be the easiest way to achieve success, but it provides a higher level of certainty and a more predictable outcome rather than relying on a lucky break or being “discovered.”
Check out the following example that beautifully illustrates these considerations.
The Art Class – Quantity vs Quality
James Clear, the author of “Atomic Habits,” provides an insightful example highlighting the importance of consistency.
A study in a photography class divided students into two groups – “quantity” and “quality.”
The quantity group would be graded based on the number of photographs they submitted, while the quality group would be graded on the excellence of a single image.
Surprisingly, the best photographs were produced by the quantity group. Rather than merely theorizing about perfection, they consistently tested and refined their skills through practice.
Developing a Habit of Progression
The journey to greatness requires the development of a habit of progression. In other words, you need to become accustomed to consistently improving even when faced with obstacles or setbacks. The key here is to ensure that your habits and efforts are focused on the right inputs, as consistency in the wrong direction will still lead you astray.
Nothing goes up into the right forever. Greatness is achieved when pushing forward with action when you doubt your future success the most.
If you’re struggling to identify the right path forward, try creating more opportunities for optimization. Instead of making significant life changes annually, be open to trying new things monthly or even weekly. Test various options and, when you’ve found a path that seems to work, double down.
Simple algorithm: Do more of what works.
Remember, the objective is not perfection but rather continuous and incremental improvements. Learn to be satisfied with being “good” at something and then working towards making those “good” habits second nature.
In time, these small, sustained efforts will be what sets you apart from those who merely aspire to greatness without putting in the necessary work.
Maintaining Patience and Perspective
Another key ingredient in achieving greatness is patience.
Recognize that progress may be slow, and that’s okay. In most cases, significant changes happen incrementally and often without fanfare. The key is to stay dedicated to your practice and improvement, even during periods where it feels like you’re not making any headway.
Additionally, avoid the temptation of getting bogged down in the search for an optimal plan or strategy.
While it’s essential to learn from your experiences and make informed decisions, it’s also crucial not to become paralyzed by the desire for a perfect approach. Focus instead on taking action, learning from the results and iterating your tactics accordingly.
The Power of Repeated Small Wins
One powerful strategy for achieving greatness is to accumulate small, consistent wins.
Rather than aiming for grandiose accomplishments, aim for reliable successes that you can build upon over time. These small and often unremarkable successes might not make headlines, but they add up and compound to significant achievements in the long run.
The Story of British Athlete Sir Chris Hoy
Sir Chris Hoy, one of Britain’s most successful Olympians, is an excellent example of how small, consistent wins can lead to greatness. Hoy didn’t burst onto the scene as an unstoppable force. Instead, his success was built slowly and steadily over time through disciplined training and continuous improvement.
Born in Edinburgh, Scotland, in 1976, Hoy was always athletic but did not start competitive cycling until his late teens. His early career was marked by consistent performances and modest successes, but he was not an immediate superstar.
Hoy’s approach to training emphasized incremental improvements. He followed a principle called the “aggregation of marginal gains,” which was popularized by Dave Brailsford, the British Cycling performance director. The idea was simple: find a 1% margin for improvement in everything you do. Instead of looking for one area to improve by 100%, Brailsford and Hoy sought hundreds of areas to improve by 1%, accumulating small, consistent wins.
From adjusting his training routines and optimizing his sleep patterns to tweaking the ergonomics of his bike, Hoy focused on these marginal gains. These small changes might not have made headlines, but they added up and compounded over time into significant improvements in performance.
The result? Hoy became one of the most decorated cyclists in history. He has six Olympic gold medals and eleven World Championship titles to his name. He was knighted by Queen Elizabeth II for his services to cycling.
Sir Chris Hoy’s story encapsulates the power of small, consistent wins.
His approach underscores the idea that the best things in life and the most successful endeavors are not usually the result of miraculous events, but rather of carefully planned and executed strategies born from dedication, consistency, and gradual improvement.
His story highlights that focusing on the process and developing the right habits can help achieve and sustain greatness.
Remember, the best things in life and the most successful endeavors are typically not miraculous events but carefully planned and executed strategies born from dedication, consistency, and gradual improvement.
By focusing on the process and developing the right habits, you’ll forge yourself into the person who can not only reach but also sustain greatness.
The Pursuit of Greatness …
… is not about achieving sudden, monumental successes but rather about embracing the power of consistency and adopting habits that foster continuous improvement and progression.
By staying focused on the process, learning from your experiences, and remaining patient, you’ll set yourself apart from those who only dream of greatness without ever putting in the work.
Remember: greatness is simply good, repeated consistently over time. By cultivating this mindset and dedicating yourself to the process, you’ll discover the true essence of greatness and see it reflected in your own accomplishments.
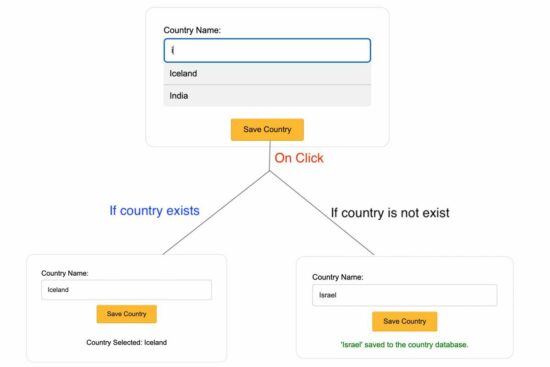
This tutorial will show how to add this feature to a website. The code uses the JQuery library with PHP and MySQL to show dynamic auto-suggestions on entering the search key.
The specialty of this example is that it also allows adding a new option that is not present in the list of suggestions.
On key-up, a function executes the Jquery Autocomplete script. It reads suggestions based on entered value. This event handler is an AJAX function. It requests PHP for the list of related countries from the database.
When submitting a new country, the PHP will update the database. Then, this new option will come from the next time onwards.
Steps to have a autocomplete field with a create-new option
Create HTML with a autocomplete field.
Integrate jQuery library and initialize autocomplete for the field.
Create an external data source (database here) for displaying suggestions.
Fetch the autocomplete suggestions from the database using PHP.
Insert a newly created option into the database.
1. Create HTML with a autocomplete field
This HTML is for creating an autocomplete search field in a form. It is a suggestion box that displays dynamic auto-suggestions via AJAX.
3. Create an external data source (database here) for displaying suggestions
Import this SQL to create to database structure to save the autocomplete suggestions. It has some initial data that helps to understand the autocomplete code during the execution.
database.sql
CREATE TABLE IF NOT EXISTS `democountries` (
`id` int NOT NULL AUTO_INCREMENT, `countryname` varchar(255) NOT NULL, PRIMARY KEY (id)
); INSERT INTO `democountries` (`countryname`) VALUES
('Afghanistan'),
('Albania'),
('Bahamas'),
('Bahrain'),
('Cambodia'),
('Cameroon'),
('Denmark'),
('Djibouti'),
('East Timor'),
('Ecuador'),
('Falkland Islands (Malvinas)'),
('Faroe Islands'),
('Gabon'),
('Gambia'),
('Haiti'),
('Heard and Mc Donald Islands'),
('Iceland'),
('India'),
('Jamaica'),
('Japan'),
('Kenya'),
('Kiribati'),
('Lao Peoples Democratic Republic'),
('Latvia'),
('Macau'),
('Macedonia');
4. Fetch the autocomplete suggestions from the database using PHP
The PHP code prepares the MySQL select query to fetch suggestions based on the search keyword.
It fetches records by searching for the country names that start with the keyword sent via AJAX.
This endpoint builds the HTML lists of autocomplete suggestions. This HTML response is used to update the UI to render relevant suggestions.
searchCountry.php
<?php
$conn = new mysqli('localhost', 'root', '', 'db_autocomplete'); if (isset($_POST['query'])) { $query = "{$_POST['query']}%"; $stmt = $conn->prepare("SELECT countryname FROM democountries WHERE countryname LIKE ? ORDER BY countryname ASC"); $stmt->bind_param("s", $query); $stmt->execute(); $result = $stmt->get_result(); if ($result->num_rows > 0) { while ($row = $result->fetch_assoc()) { echo '<li>' . $row['countryname'] . '</li>'; } }
}
?>
5. Insert a newly created option into the database
The expected value is not in the database if no result is found for the entered keyword. This code allows you to update the existing source with your new option.
The form submits action calls the below PHP script. It checks if the country name sent by the AJAX form submit is existed in the database. If not, it inserts that new country name.
After this insert, the newly added item can be seen in the suggestion box in the subsequent autocomplete search.
addCountry.php
<?php
$conn = new mysqli('localhost', 'root', '', 'db_autocomplete'); if (isset($_POST['countryName'])) { $countryName = "{$_POST['countryName']}"; $stmt = $conn->prepare("SELECT * FROM democountries WHERE countryname =?"); $stmt->bind_param("s", $countryName); $stmt->execute(); $result = $stmt->get_result(); if ($result->num_rows > 0) { echo '<p>Country Selected: ' . $countryName . '</p>'; } else { $stmt = $conn->prepare("INSERT INTO democountries (countryname) VALUES (?)"); $stmt->bind_param("s", $countryName); $stmt->execute(); $result = $stmt->insert_id; if (! empty($result)) { echo $countryName . ' saved to the country database.</br>'; } else { echo '<p>Error adding ' . $countryName . ' to the database: ' . mysqli_error($conn) . '</p>'; } }
}
?>
Different libraries providing Autocomplete feature
In this script, I give a custom autocomplete solution. But, many libraries are available to provide advanced feature-packed autocomplete util for your application.
These libraries give additional features associated with the autocomplete solution.
It allows to select single and multiple values from the autocomplete dropdown.
It reads the option index or the key-value pair of the chosen item from the list.
Advantages of autocomplete
Most of us experience the advantages of the autocomplete feature. But, this list is to mention the pros of this must-needed UI feature intensely.
It’s one of the top time-saving UI utilities that saves users the effort of typing the full option.
It’s easy to search and get your results by shortlisting and narrowing. This is the same as how a search feature of a data table narrows down the result set.
In the realm of AI agents and artificial general intelligence, Auto-GPT and Agent GPT are making waves as innovative tools built on OpenAI’s API. These language models have become popular choices for AI enthusiasts seeking to leverage the power of artificial intelligence in various tasks.
Auto-GPT is an experimental, open-source autonomous AI agent based on the GPT-4 language model. It’s designed to chain together tasks autonomously, streamlining the multi-step prompting process commonly found in chatbots like ChatGPT.
Agent GPT boasts a user-friendly interface that makes AI interaction seamless even for individuals without coding experience.
AgentGPT is more expensive as you need to subscribe to a professional plan whereas with Auto-GPT you only need to provide an OpenAI API key without paying a third party.
While Auto-GPT pushes the boundaries of AI autonomy, Agent GPT focuses on a more intuitive user experience.
I created a table that subjectively summarizes the key similarities and differences:
Feature
Auto-GPT
Agent GPT
Similarities
Differences
Autonomy
Can operate and make decisions on its own
Same. From time to time needs human intervention to operate
Both are powered by GPT technology
Auto-GPT can be fully autonomous. Agent GPT not fully.
User-Friendliness
Less user-friendly compared to Agent GPT
More user-friendly due to its intuitive UI
Both are designed to make AI accessible
Auto-GPT more technical. Agent GPT easier and non-technical.
Functionality
Designed to function autonomously
Can create and deploy autonomous AI agents
Both can generate human-like text
Both worked the same in my case. Auto-GPT more customizable.
Intended use cases
Best suited for individuals with programming or AI expertise
More accessible to individuals without programming or AI expertise
Both can be used for a range of applications, including chatbots and content creation
Auto-GPT for technical users who want more control. Agent GPT ideal for non-technical users
Pricing
OpenAI API pricing ($0.03 per 1000 tokens)
$40 per month for a few agents
Both are relatively cheap for what they provide
AgentGPT free for trial but more expensive than Auto-GPT for non-trivial tasks
Auto-GPT and Agent GPT Overview
In the realm of AI-powered language models, Auto-GPT and Agent GPT are two prominent technologies built on OpenAI’s API for automating tasks and language processing. This section provides a brief overview of both Auto-GPT and Agent GPT, focusing on their fundamentals and applications in various fields.
Auto-GPT Fundamentals
Auto-GPT is an open-source interface to large language models such as GPT-3.5 and GPT-4. It empowers users by self-guiding to complete tasks using a predefined task list. Requiring coding experience to be effectively used, Auto-GPT operates autonomously, making decisions and generating its own prompts .
With core capabilities in natural language processing, Auto-GPT applies to areas like data mining, content creation, and recommendation systems. Its autonomous nature makes it an ideal choice for developers seeking a more hands-off approach to task automation.
In contrast, Agent GPT is a user-friendly application with a direct browser interface for task input. Eliminating the need for coding expertise, Agent GPT provides an intuitive user experience suited for a broader audience. While it depends on user inputs for prompt generation, it still boasts a powerful language model foundation.
Agent GPT finds applications in various fields, including virtual assistants, chatbots, and educational tools. Its user-friendliness and customizability make it an appealing choice for non-technical users seeking artificial general intelligence (AGI) support in their projects.
Technology Comparison
In this section, we will compare Auto-GPT and AgentGPT, focusing on their Language Models and Processing, Autonomy and Workflow, and User Interface and Accessibility. These AI agents have distinct advantages and offer a range of features for different user needs.
Language Models and Processing
Auto-GPT and AgentGPT both utilize OpenAI’s GPT-3 or GPT-4 API, which handles natural language processing and deep learning tasks. As a result, they can handle complex text-based tasks effectively. The primary difference lies in their implementation and target audience.
Autonomy and Workflow
Auto-GPT is designed to function autonomously by providing a task list and working towards task completion without much user interaction. This is ideal for developers with coding experience looking to automate more technical tasks in their workflow.
In contrast, AgentGPT is more user-friendly, requiring input through a direct browser interface. This makes AgentGPT a better choice for those without programming or AI expertise, as it simplifies the adoption and integration of the AI-powered tool in everyday tasks.
Autonomy of both is similar although you can keep Auto-GPT running much longer in your shell or terminal. Having the browser tab open in Agent GPT will only get you so far…
User Interface and Accessibility
Auto-GPT’s open-source nature means that it requires coding experience to be used effectively. While this may be perfect for developers, it can be a barrier for non-technical users.
On the other hand, AgentGPT offers a straightforward browser interface, enabling users to input tasks without prior coding knowledge. This increased accessibility makes it a popular choice for individuals seeking AI assistance in a variety of professional settings.
Key Features
Generative AI and Content Creation
Auto-GPT and AgentGPT are both AI agents used for generating text and content creation, but they have some differences.
Auto-GPT is an open-source project on GitHub made by Toran Bruce Richards. AgentGPT, on the other hand, is designed for user-friendliness and accessibility for those without AI expertise, thus making it perfect for non-programmers.
These AI agents employ advanced natural language processing algorithms to generate and structure content efficiently. They are optimized for various tasks, such as writing articles, creating summaries, and generating chatbot responses.
Machine Learning and Data Analysis
Both Auto-GPT and AgentGPT rely on cutting-edge machine learning algorithms to analyze and process data. Auto-GPT utilizes GPT-4 API for its core functionalities, while AgentGPT doesn’t rely on a specific GPT model.
Through their machine learning capabilities, these AI agents can not only create content but also analyze and process it effectively. This makes them perfect for applications like sentiment analysis, recommender systems, and classifications in a wide range of industries, from marketing to healthcare.
To sum up, Auto-GPT and AgentGPT are powerful and similar AI tools with a minor number of distinct features that cater to different needs. They both excel in generative AI and content creation, as well as machine learning and data analysis.
Personally, I found that AgentGPT is more fun!
Pricing and Costs
AI agents like Auto-GPT and AgentGPT have become increasingly popular for automating tasks, but the security concerns surrounding them and their API access need to be taken into account. In this section, we will discuss securing AI integration and obtaining an OpenAI API key for these AI agents.
AgentGPT is more expensive as you need to subscribe to a professional plan whereas with Auto-GPT you only need to provide an OpenAI API key without paying a third party.
Here’s a screenshot of the product pricing of AgentGPT:
The pricing of OpenAI API is very inexpensive, so Auto-GPT will be much cheaper for larger projects:
Use Cases and Industries
This section explores the distinct applications of Auto-GPT and AgentGPT in various industries, focusing on automation, marketing strategy, and customer service. We will examine how these AI agents can streamline tasks and enhance decision-making, contribute to marketing initiatives, and improve customer service through chatbots.
Automate Tasks and Decision-Making
Auto-GPT excels at autonomous operation, making it a powerful choice for automating tasks and decision-making.
Industries like finance, manufacturing, and logistics can benefit from Auto-GPT’s ability to process vast amounts of data, identify patterns, and execute decisions based on predefined goals.
On the other hand, AgentGPT requires a higher amount of human intervention but excels in more user-friendly applications, providing an intuitive interface that non-experts can easily navigate. I have yet to see somebody running Agent GPT for days whereas it’s easy to do with Auto-GPT.
Marketing Strategy
In the realm of marketing, AgentGPT’s intuitive user interface makes it the more suitable choice for strategizing and creating content.
Digital marketers can leverage the language model to develop relevant and engaging materials for various platforms, including social media, email campaigns, and blog posts.
While Auto-GPT can also generate content, its autonomous nature might not be as ideal for crafting customized and targeted marketing messages.
Development and Future Prospects
In the rapidly evolving field of AI, Auto-GPT and Agent GPT are two key players making significant strides. This section explores their open-source interfaces, repositories, and future research involving GPT-4 and beyond, delving into how these developments might shape the future of large language models.
By the way, if you’re interested in open-source developments in the large language models (LLM) space, check out this article on the Finxter blog!
In the world of artificial intelligence, open-source interfaces facilitate broader access to cutting-edge technology. Auto-GPT is one such agent, available as an open-source project on GitHub.
Developed by Toran Bruce Richards aka “Significant Gravitas”, its accessibility to those with coding experience helps to foster innovation in AI applications.
On the other hand, Agent GPT is a more expensive and user-friendly platform geared toward a wider audience, requiring less technical know-how for utilization.
GPT-4 and Future Research
As AI research continues, the focus has shifted to larger language models—like GPT-4—that are expected to outperform their predecessors.
Auto-GPT, as a self-guiding agent capable of task completion via a provided task list, is primed for incorporation with future GPT iterations. Meanwhile, BabyAGI is another emerging language model, developed simultaneously with agents like Auto-GPT and Agent GPT, in response to the growing generative AI domain.
TLDR; Auto-GPT and Agent GPT contribute to a brighter future in AI research, with the former offering a more technical approach that’s inexpensive and highly customizable and the latter catering to a less code-oriented user base that is willing to pay more for the convenience.
The introduction of GPT-4 represents a step toward more advanced and efficient AI applications, ensuring that the race for better language models continues.
OpenAI Glossary Cheat Sheet (100% Free PDF Download)
Finally, check out our free cheat sheet on OpenAI terminology, many Finxters have told me they love it!
Artificial intelligence has brought us powerful tools to simplify our lives, and among these tools are Auto-GPT and ChatGPT. While they both revolve around the concept of generating text, there are some key differences that set them apart.
Auto-GPT, an open-source AI project, is built on ChatGPT’s Generative Pre-trained Transformers, giving it the ability to act autonomously without requiring continuous human input. It shines in handling multi-step projects and demands technical expertise for its utilization.
On the other hand, ChatGPT functions as an AI chatbot that provides responses based on human prompts. Although it excels at generating shorter, conversational replies, it lacks the autonomy found in Auto-GPT.
In this article, we’ll dive deeper into the distinctions and possible applications of these two groundbreaking technologies.
Overview of Auto-GPT and ChatGPT
This section provides a brief overview of Auto-GPT and ChatGPT, two AI technologies based on OpenAI’s generative pre-trained transformer (GPT) models. We will discuss the differences between these AI tools and their functionalities.
Auto-GPT
Auto-GPT, an open-source AI project, harnesses the power of GPT-4 to operate autonomously, without requiring human intervention for every action.
Developed by Significant Gravitas and posted on GitHub on March 30, 2023, this Python application is perfect for completing tasks with minimal human oversight. Its primary goal is to create an AI assistant capable of tackling projects independently.
This sets it apart from its predecessor, ChatGPT, in terms of autonomy.
ChatGPT
ChatGPT, built on the GPT-3.5 and GPT-4 models, is a web app designed specifically for chatbot applications and optimized for dialogue. It’s developed by OpenAI, and its primary focus lies in generating human-like text conversationally.
By leveraging GPT’s potential in language understanding, it can perform tasks such as explaining code or composing poetry. ChatGPT mainly relies on AI agents to produce text based on input prompts given by users, unlike Auto-GPT, which operates autonomously.
TLDR; While both Auto-GPT and ChatGPT use OpenAI’s large language models, their goals and functionalities differ. Auto-GPT aims for independent task completion, while ChatGPT excels in conversational applications.
Main Features
Auto-GPT and ChatGPT, both AI-driven tools, have distinct features that cater to various applications. Let’s dive into the main features of these two innovative technologies.
Auto-GPT: Autonomy and Decision-Making
Auto-GPT is an open-source AI project designed for task-oriented conversations.
Its core feature is its ability to act autonomously without requiring constant prompts or input from human agents. This enables Auto-GPT to make decisions on its own and efficiently complete tasks.
It leverages powerful language models like GPT-3.5 and GPT-4 to generate detailed responses, making it ideal for applications where automation and decision-making are crucial.
For more information about Auto-GPT, check out this Finxter article:
ChatGPT, on the other hand, is an AI tool optimized for generating general-purpose responses in chatbot applications and APIs.
Although it shares some similarities with Auto-GPT, it requires more detailed prompts from human agents to engage in meaningful conversations. ChatGPT uses large language models (LLMs) like GPT-4 to produce accurate and relevant responses in various dialogue contexts.
Its flexibility and vast knowledge base make it an excellent choice for chatbot applications that need a more human-like touch. You can learn more about ChatGPT here.
While both Auto-GPT and ChatGPT offer unique advantages, their applications differ based on users’ needs. Auto-GPT suits those looking for more automation and autonomy, while ChatGPT caters to developers seeking a more interactive and human-like AI tool.
Technical Details
API and API Keys
Auto-GPT and ChatGPT both utilize OpenAI APIs to interact with their respective systems. To access these APIs, users need an OpenAI API key.
These keys ensure proper usage, security, and authentication for the applications making the requests to the systems. Make sure to obtain the necessary API keys from the service providers to use Auto-GPT or ChatGPT.
Python and Open-Source
Both Auto-GPT and ChatGPT are built on open-source frameworks, making it easier for developers to access and modify the code.
Python is the primary programming language for these projects, as it’s user-friendly and widely adopted in the AI and machine learning community. Using Python enables seamless integration and implementation in various applications.
GitHub and Experimental Projects
For those interested in the cutting-edge developments and experimental projects involving Auto-GPT and ChatGPT, GitHub is the place to go.
Many experimental projects reside on GitHub repositories, allowing users to explore and contribute to the ongoing advancements in these technologies.
Stay curious and engaged to stay ahead in the AI landscape . You can do so by following me regular email tech updates focused on exponential technologies such as ChatGPT and LLMs. Simply download our cheat sheets:
Architecture and Decision-Making
Auto-GPT and ChatGPT are both built on Generative Pre-trained Transformers (GPT), but there are differences in their decision-making abilities and autonomy levels. This section explores these aspects, showing how these AI models differ in terms of software and potential applications.
Auto-GPT is an open-source AI project focused on task-oriented conversations, with more decision-making powers than ChatGPT . It’s designed to break a goal into smaller tasks and use its decision-making abilities to accomplish the objective. Auto-GPT benefits from using GPT-3.5 and GPT-4 text-generating models, providing it with a higher level of autonomy compared to ChatGPT (source).
ChatGPT, on the other hand, is tailored for generating general-purpose responses in a conversational context . It is trained on extensive text data, including human-to-human conversations, and excels at producing human-like dialogue. ChatGPT relies on GPT architecture, but its focus is more on interaction than decision-making (source).
Auto-GPT’s enhanced decision-making capabilities position it as a possible contender in pursuing artificial general intelligence (AGI) . Its better memory and ability to construct and remember longer chains of information make it a formidable tool in more complex tasks (source).
Both Auto-GPT and ChatGPT have their unique strengths and areas of focus. Auto-GPT’s edge lies in its decision-making processes and task-oriented nature, while ChatGPT thrives in generating natural-sounding text for general conversation. The right choice depends on the specific application or requirement in hand.
User Interface and Experience
The user interface and experience allow users to interact with Auto-GPT and ChatGPT more efficiently and effectively. This section covers the various ways users can access and engage with these AI tools to ensure smooth interaction.
Browser Access
Both Auto-GPT and ChatGPT offer convenient browser-based access, enabling users to use these tools without the need for technical knowledge or any additional software installation.
Yeah, you shouldn’t try to install Auto-GPT on your own machine, frankly. You should access it via a browser-based website – just google “Auto-GPT browser” and take the latest one.
A simple visit to their respective websites allows users to start benefiting from the power of these AI models. Experience smooth and efficient conversation with these AI chatbots right on your browser.
Docker and Mobile Accessibility
For those seeking greater flexibility and customization, Docker containerization is an option.
Docker enables users to deploy and manage both Auto-GPT and ChatGPT more efficiently, meeting individual needs and configuration preferences. IN fact, Docker is the recommended way to install Auto-GPT as shown in my article here:
Additionally, mobile accessibility helps users on the go, with platforms like Google’s Android, ensuring personal assistant services are just a tap away.
User-Friendly Platforms
Understanding the importance of user-friendly interfaces, both Auto-GPT and ChatGPT developers emphasize creating straightforward and easily navigable platforms.
This focus on accessibility helps users, including those with limited technical expertise, to interact with the AI models successfully. Clear instructions, well-organized layouts, and intuitive design elements contribute to the overall positive experience.
Applications and Use Cases
Natural Language Processing and Content Creation
Auto-GPT and ChatGPT both excel in natural language processing tasks, making them powerful tools for content creation .
Auto-GPT is designed for multi-step projects and requires programming knowledge, while ChatGPT is more suitable for shorter, conversational prompts, making it a great chatbot solution.
With the help of the Pinecone API, both AI tools can efficiently generate high-quality content for creative and professional needs.
Social Media Management and Multi-Step Projects
In the realm of social media management, AI tools like Auto-GPT can streamline tasks, such as posting updates and engaging with followers .
Its ability to handle multi-step projects makes it an ideal choice for group projects needing assistance with task completion and workflow management.
ChatGPT, on the other hand, works best for fast and natural responses, engaging users and enhancing their experience.
Personal Assistants and Companion Robots
Both Auto-GPT and ChatGPT have the potential to bring personal assistant apps and companion robots to life .
Their language models can be used for password management, credit card information handling, and even Pinecone API key management. While
ChatGPT is driven by human prompts, Auto-GPT’s independence allows it to make decisions and simplify everyday tasks. As AI technology continues to improve, these tools can revolutionize the way we interact with the digital world.
Auto-GPT offers increased autonomy compared to ChatGPT as it doesn’t always require human input. This means it can be more useful for certain tasks where constant human guidance isn’t needed or feasible. However, this autonomy can also lead to an increased likelihood of inaccuracies and mistakes, since there is less human oversight to correct errors (source). Also, it quickly evolves as ChatGPT builds out the plugins functionality.
When it comes to complex projects, Auto-GPT has a slight edge as it is designed to handle more complex and multi-stage projects, unlike ChatGPT which is more suited for short projects and mid-length writing assignments (source).
In terms of ease of use, both Auto-GPT and ChatGPT can be user-friendly, but the level of required technical expertise may vary depending on the specific use case or implementation. Users may find one to be more accessible than the other depending on their technical background and familiarity with AI models. Auto-GPT is also way harder to install.
As for the technological limitations, both Auto-GPT and ChatGPT share similar constraints as they are both built on GPT-based models. These limitations include potential biases, inaccuracies, hallucinations, and issues that stem from the training data used in their development. The complexity of the autonomous Auto-GPT model also leads to specific technical limitations such as getting stuck in infinite loops.
Customer satisfaction may vary depending on the implementation and end-user needs. Users may find value in both models, but ultimately, the satisfaction level will depend on the specific requirements and desired outcomes of their AI-powered projects.
TLDR;
Auto-GPT and ChatGPT each have their pros and cons related to autonomy, scalability, ease of use, technological limitations, and customer satisfaction.
Auto-GPT builds on GPT and designs prompts, then tries to access information from the internet.
The additional complexity leads to possible issues such as infinite action-feedback loops or high costs but it cannot really be held against them—after all, the additional complexity brings a massive advantage: being able to act autonomously and for a long period of time unlike ChatGPT which needs a human prompt.



 Recommended:
  Recommended Reading:


 In short, greatness is earned through hard work persisted over a long period.


 The Story of British Athlete Sir Chris Hoy


 Recommended:


 Recommended:

 .
.





 .
. 
 . It’s designed to break a goal into smaller tasks and use its decision-making abilities to accomplish the objective. Auto-GPT benefits from using GPT-3.5 and GPT-4 text-generating models, providing it with a higher level of autonomy compared to ChatGPT (
 . Its better memory and ability to construct and remember longer chains of information make it a formidable tool in more complex tasks (


 .
. 
 When it comes to complex projects, Auto-GPT has a slight edge as it is designed to handle more complex and multi-stage projects, unlike ChatGPT which is more suited for short projects and mid-length writing assignments (
 In terms of ease of use, both Auto-GPT and ChatGPT can be user-friendly, but the level of required technical expertise may vary depending on the specific use case or implementation. Users may find one to be more accessible than the other depending on their technical background and familiarity with AI models.
  As for the technological limitations, both Auto-GPT and ChatGPT share similar constraints as they are both built on GPT-based models. These limitations include potential biases, inaccuracies,
Share this page