Posted on Leave a comment

Shopify Like Shopping Cart with Sticky Checkout using PHP

Last modified on December 3rd, 2019 by Vincy.

Do you know online consumers in the US spent $517 billion last year? Which is a 15% increase from the previous year? eCommerce is an old domain, but still, it disrupts the tech world.

These days, the live shopping cart software have a remarkable business scope. They are increasing in the number day by day. There is a significant market today to sell products in an online store.
Shopify Like Shopping Cart with Sticky Checkout using PHP

PHP is the main technology that runs the majority of the shopping cart software on the Internet. Developing a full-fledged PHP shopping cart software is not as easy as it looks.

In this article, we are going to see how to create a featured sticky shopping cart script in PHP.  In Shopify like the eCommerce platform, it gives sticky shopping cart checkout as a feature.

I used jQuery and CSS to make the shopping cart unit sticky on a fixed position on page scroll. So, it will make the cart unit be always near to access and encourage the users to checkout.

This article will guide you with simple steps to create a shopping cart in PHP. If you are planning to create a shopping cart with a modern outlook and features,  it will help you to achieve this.

What is inside?

  1. Advantages of sticky shopping cart
  2. PHP sticky shopping cart example overview
  3. File structure
  4. Landing page with product gallery and shopping cart components
  5. Render product tiles in a gallery
  6. Display cart items from PHP Session
  7. Manage Cart actions edit, delete, empty
  8. Product database table SQL script
  9. PHP Shopify like sticky shopping cart example output

eCommerce software with sticky shopping cart checkout has many advantages,

  • It gives an enriched modern feel to the application.
  • It helps users to see the cart status at any moment.
  • It encourages users to checkout and thus increasing the conversion.

This Shopify-like sticky shopping cart software in PHP uses database and PHP sessions. It manages products in the database and shopping cart items in the PHP session.

It has a product gallery, cart HTML table and supports cart actions like add, edit and delete. These action handlers use AJAX to invoke code added with server endpoints. 

The functionalities supported by this example are here with the corresponding description.

Fetching product data from the database:
A PHP MySQL code section accesses product database to read the data like product name, code, price, and preview images. If data found then this will result in an array of products.

Create product gallery with add-to-cart option:
Create a product gallery with an add-to-cart option. A PHP loop iterates product array to form the gallery view. Each product in the gallery has an add-to-cart button.

Manage the cart with PHP session:
I have used the PHP session array to store and manage the cart items.

Handling the add, edit, delete and empty cart:
This example code supports users to add a new product into the cart. A HTML table will display the cart item with edit quantity, remove an entry and more options.

File structure

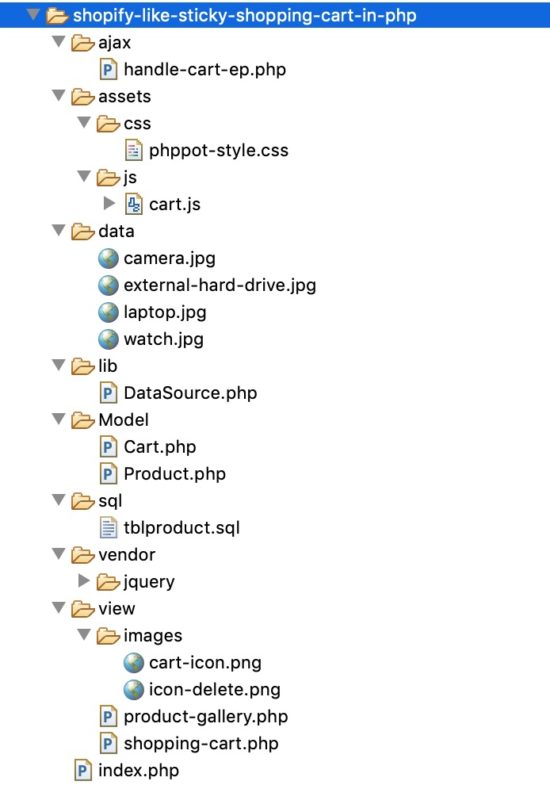
The below screenshot shows the file structure of this example. 
Shopify-Like Sticky Shopping Cart in PHP

  • view/product-gallery.php – It includes a PHP loop to iterate the products to form the gallery.
  • view/shopping-cart.php – It contains a HTML table to display the cart item from the PHP session.
  • css/style.css – It has the styles to showcase product gallery. It helps in shopping cart software design containing appropriate cart action controls.
  • cart.js – This JavaScript file contains action handlers to process requests via AJAX. It also contains code to fix the shopping cart panel in a fixed position while scrolling.
  • handle-cart-ep.php – This is the PHP endpoint invoked from AJAX code to add, edit, remove cart items.
  • tblproduct.sql – This SQL contains product database CREATE and INSERT statements.
  • DataSource.php – This is a generic file we used for our examples requires a database.
  • data – This directory is the product image source used while creating the gallery.

This HTML code includes the PHP source to render product gallery, shopping cart software pagee. It also shows a sticky cart icon with the current cart items count.

By clicking this icon, a script will toggle the shopping cart window.

This HTML includes cart.js JavaScript file. It contains all the jQuery AJAX code needed for performing cart actions and UI update.

<?php namespace Phppot; use \Phppot\Cart; session_start(); require_once 'Model/Cart.php'; $cartModel = new Cart(); ?> <HTML> <HEAD> <TITLE>Shopify like sticky shopping cart in PHP</TITLE> <link href="./assets/css/phppot-style.css" type="text/css" rel="stylesheet" /> <script src="./vendor/jquery/jquery.min.js" type="text/javascript"></script> <script src="./vendor/jquery/jquery-ui.js"></script> </HEAD> <BODY> <?php require_once './view/product-gallery.php'; ?> <div id="floating-cart-container"> <div id="cart-icon-container"> <img id="cart-icon" src="./view/images/cart-icon.png" alt="cartimg"> <div id="count"> <?php echo $cartModel->cartSessionItemCount; ?> </div> </div> <div id="shopping-cart"> <div id="tbl-cart"> <div id="txt-heading"> <div id="cart-heading">Shopping Cart</div> <div id="close"></div> </div> <div id="cart-item"> <?php require_once './view/shopping-cart.php'; ?> </div> </div> </div> </div> <script src="./assets/js/cart.js"></script> </BODY> </HTML> 

The product gallery is a HTML container embedded with PHP-MySQL script. The PHP code prepares MySQL select statement to get the product result in an array.

By iterating this array result with a PHP foreach statement, it reads the database row data. With this product data, it forms the gallery tile on each loop iteration.

The gallery tile shows products name, price and a preview image in a card-like view. Also, it contains an add-to-cart button.

This’s button’s click event invokes AJAX to add the particular product to the cart session. Each product has a unique code which is the reference to create and manage each cart session index.

Below code shows the HTML used to show a gallery view for this shopping cart software example.

<?php require_once __DIR__ . './../Model/Product.php'; $productModel = new Product(); ?> <div id="product-grid"> <div class="txt-heading">Products</div> <?php $productResult = $productModel->getAllProduct(); if (! empty($productResult)) { foreach ($productResult as $key => $value) { ?> <div class="product-item" data-name="<?php echo $productResult[$key]["name"]; ?>" data-price="<?php echo "$" . $productResult[$key]["price"]; ?>"> <div class="product-image"> <img src="<?php echo $productResult[$key]["image"]; ?>" id="<?php echo $productResult[$key]["code"]; ?>"> </div> <div> <strong><?php echo $productResult[$key]["name"]; ?></strong> </div> <div class="product-price"><?php echo "$" . $productResult[$key]["price"]; ?></div> <input type="button" id="add_<?php echo $productResult[$key]["code"]; ?>" value="Add to cart" class="btnAddAction" onClick="cartAction('add', '<?php echo $productResult[$key]["code"]; ?>')" /> </div> <?php } } ?> </div> 

Add-to-Cart from Product Gallery

The add-to-cart button in each product tile is the trigger to add a cart item into the PHP session. When the user clicks on the ‘Add to Cart’ button, it calls the cartAction() function to execute the add action via AJAX.

In this function call, it has the product id as an argument. In PHP the code fetches the product code, price to add to the cart session.

In this example, the switch case handles cart actions. It request and process add, edit (item quantity), remove (single cart item) and empty cart.

In the “add” case I checked if the current cart item already exists in the cart session. If so, I will update its quantity, otherwise, I will push the entire item array into the session index. The product code is the session index of each cart item to keep the uniqueness. The addToCart function has the code to add the cart item into the PHP session.

case "add": $cartModel->addToCart(); break; 

Model/Product.php

<?php use \Phppot\DataSource; class Product { private $ds; function __construct() { require_once __DIR__ . './../lib/DataSource.php'; $this->ds = new DataSource(); } function getAllProduct() { $query = "SELECT * FROM tblproduct ORDER BY id ASC"; $result = $this->ds->select($query); return $result; } } 

Display shopping cart items from PHP Session

This code shows the HTML table containing the list of cart items added by the user. The cart data is dynamic from the PHP session.

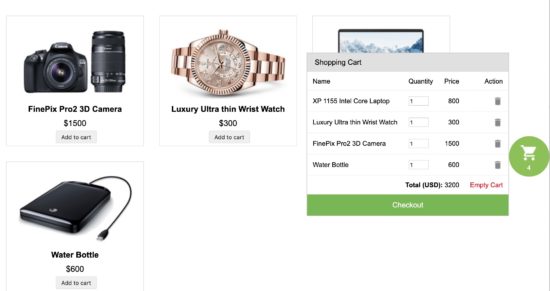
In shopping-cart.php file, it iterates the $_SESSION[“cart”] array and displays the cart row. Each row has data like product title, price, quantity. It also has the option to edit the item quantity and to delete a single item from the cart.

This cart window is sticky that lets the users access the cart and see the status at any time. Also, it shows the total item price by summing up the individual cart items.

<?php namespace Phppot; use \Phppot\Cart; require_once __DIR__ . './../Model/Cart.php'; $cartModel = new Cart(); ?> <input type="hidden" id="cart-item-count" value="<?php echo $cartModel->cartSessionItemCount; ?>"> <?php if ($cartModel->cartSessionItemCount > 0) { ?> <table width="100%" id="cart-table" cellpadding="10" cellspacing="1" border="0"> <tbody> <tr> <th>Name</th> <th>Quantity</th> <th class="text-right">Price</th> <th class="text-right">Action</th> </tr> <?php $item_total = 0; $i = 1; foreach ($_SESSION["cart_item"] as $item) { ?> <tr> <td><?php echo $item["name"]; ?></td> <td><input type="number" name="quantity" class="quantity" value="<?php echo $item['quantity']; ?>" data-code='<?php echo $item["code"]; ?>' size=2 onChange="updatePrice(this)" /> <input type="hidden" class='total' name="total" value="<?php echo $item["price"]; ?>" /></td> <td align=right class="prc" id="price" <?php echo $i;?>><?php echo $item["price"]; ?></td> <?php $i++; ?> <td class="text-right"><a onClick="cartAction('remove','<?php echo $item["code"]; ?>')" class="btnRemoveAction"><img src="./view/images/icon-delete.png" alt="Remove Item" /></a></td> </tr> <?php $item_total += ($item["price"] * $item['quantity']); } ?> <tr id="tot"> <td colspan="3" align=right><strong>Total (USD): </strong> <span id="total"><?php echo $item_total;?></span></td> <td align="right"><a id="btnEmpty" onClick="cartAction('empty', '');">Empty Cart</a></td> </tr> </tbody> </table> <div id="checkout">Checkout</div> <?php } else { ?> <div id="empty-cart">Your cart is empty</div> <?php } ?> 

Handle shopping cart actions edit, remove, empty on checkout page

In each row of the showing cart tabular window, it displays editable quantity with an input box. Users can increment or decrement the cart item quantity of a particular item.

On changing the quantity, and AJAX code will send the data to get the calculated price based on the new quantity. Then, it will update the price in the row.

There is a remove option for each cart item. By clicking the remove action, an ajax call will request PHP code to perform the remove action. It will pass the product code as an argument to clear the particular cart session index.

Also, the shopping cart window has the option to empty the cart with one single click.

The below code shows the switch cases created to trigger and perform cart actions.

cart.js

function cartAction(action, product_code) { var queryString = ""; if (action != "") { switch (action) { case "add": queryString = 'action=' + action + '&code=' + product_code + '&quantity=' + $("#qty_" + product_code).val(); break; case "remove": queryString = 'action=' + action + '&code=' + product_code; break; case "empty": queryString = 'action=' + action; break; } } jQuery.ajax({ url: "ajax/handle-cart-ep.php", data: queryString, type: "POST", success: function (data) { $("#cart-item").html(data); $("#count").text($("#cart-item-count").val()); }, error: function () {} }); } function updatePrice(obj){ var quantity = $(obj).val(); var code = $(obj).data('code'); queryString = 'action=edit&code=' + code + '&quantity=' + quantity; $.ajax({ type: 'post', url: "ajax/handle-cart-ep.php", data: queryString, success: function(data) { $("#total").text(data); } }); } $(document).ready(function () { $("#cart-icon-container").click(function () { $("#shopping-cart").toggle(); }); var top = parseInt($("#shopping-cart").height())/2; $("#shopping-cart").css("margin-top", "-" + top + "px"); }); 

ajax/handle-cart-ep.php

<?php namespace Phppot; use \Phppot\Cart; require_once __DIR__ . './../Model/Cart.php'; $cartModel = new Cart(); session_start(); if (! empty($_POST["action"])) { switch ($_POST["action"]) { case "add": $cartModel->addToCart(); break; case "edit": $totalPrice = $cartModel->editCart(); print $totalPrice; exit; break; case "remove": $cartModel->removeFromCart(); break; case "empty": $cartModel->emptyCart(); break; } } require_once '../view/shopping-cart.php'; ?> 

Model/Cart.php

This is the model class used to create, edit and clear cart sessions.

<?php namespace Phppot; use \Phppot\DataSource; class Cart { private $ds; public $cartSessionItemCount = 0; function __construct() { require_once __DIR__ . './../lib/DataSource.php'; $this->ds = new DataSource(); if (! empty($_SESSION["cart_item"]) && is_array($_SESSION["cart_item"])) { $this->cartSessionItemCount = count($_SESSION["cart_item"]); } } function addToCart() { $query = "SELECT * FROM tblproduct WHERE code = ?"; $paramType = "s"; $paramArray = array($_POST["code"]); $productByCode = $this->ds->select($query, $paramType, $paramArray); $itemArray = array( $productByCode[0]["code"] => array( 'name' => $productByCode[0]["name"], 'code' => $productByCode[0]["code"], 'quantity' => '1', 'price' => $productByCode[0]["price"] ) ); if (! empty($_SESSION["cart_item"])) { if (in_array($productByCode[0]["code"], $_SESSION["cart_item"])) { foreach ($_SESSION["cart_item"] as $k => $v) { if ($productByCode[0]["code"] == $k) $_SESSION["cart_item"][$k]["quantity"] = $_POST["quantity"]; } } else { $_SESSION["cart_item"] = array_merge($_SESSION["cart_item"], $itemArray); } } else { $_SESSION["cart_item"] = $itemArray; } if (! empty($_SESSION["cart_item"]) && is_array($_SESSION["cart_item"])) { $this->cartSessionItemCount = count($_SESSION["cart_item"]); } } function editCart() { if (! empty($_SESSION["cart_item"])) { $total_price = 0; foreach ($_SESSION["cart_item"] as $k => $v) { if ($_POST["code"] == $k) { $_SESSION["cart_item"][$k]["quantity"] = $_POST["quantity"]; } $total_price = $total_price + ($_SESSION["cart_item"][$k]["quantity"] * $_SESSION["cart_item"][$k]["price"] ); } return $total_price; } if (! empty($_SESSION["cart_item"]) && is_array($_SESSION["cart_item"])) { $this->cartSessionItemCount = count($_SESSION["cart_item"]); } } function removeFromCart() { if (! empty($_SESSION["cart_item"])) { foreach ($_SESSION["cart_item"] as $k => $v) { if ($_POST["code"] == $k) unset($_SESSION["cart_item"][$k]); if (empty($_SESSION["cart_item"])) unset($_SESSION["cart_item"]); } } if (! empty($_SESSION["cart_item"]) && is_array($_SESSION["cart_item"])) { $this->cartSessionItemCount = count($_SESSION["cart_item"]); } } function emptyCart() { unset($_SESSION["cart_item"]); $this->cartSessionItemCount = 0; } } 

Product database table SQL script

The following SQL script has the CREATE and the INSERT query. It will help to put the product table in your development environment.

CREATE TABLE IF NOT EXISTS `tblproduct` ( `id` int(8) NOT NULL AUTO_INCREMENT, `name` varchar(255) NOT NULL, `code` varchar(255) NOT NULL, `image` text NOT NULL, `price` double(10,2) NOT NULL, PRIMARY KEY (`id`), UNIQUE KEY `product_code` (`code`) ) ENGINE=InnoDB DEFAULT CHARSET=latin1 AUTO_INCREMENT=14 ; -- -- Dumping data for table `tblproduct` -- INSERT INTO `tblproduct` (`id`, `name`, `code`, `image`, `price`) VALUES (1, 'FinePix Pro2 3D Camera', '3DcAM01', 'product-images/camera.jpg', 1500.00), (2, 'Luxury Ultra thin Wrist Watch', 'wristWear03', 'product-images/watch.jpg', 300.00), (3, 'XP 1155 Intel Core Laptop', 'LPN45', 'product-images/laptop.jpg', 800.00), (4, 'Water Bottle', 'wristWear02', 'product-images/external-hard-drive.jpg', 600.00); 
Shopify-Like Floating Shopping Cart Output

Download

↑ Back to Top

Posted on Leave a comment

Double Opt-In Subscription Form with Secure Hash using PHP

Last modified on September 24th, 2019 by Vincy.

Do you know that the opening rate of emails by double opt-in confirmed subscribers is a staggering 40%? According to CampaignMonitor, email marketing generates $38 in ROI for every $1 spent.

Email marketing delivers the highest among any channel for marketing. Even in comparison with channels like print, TV and social media.

Double Opt-In Subscription Form with Secure Hash using PHP

Email marketing is the way to go. The primary mode to build your list is using a double opt-in subscription form.

What is inside?

  1. Why do we need double opt-in?
  2. What is the role of secure hash?
  3. Double opt-in subscription form in PHP
  4. Sequence flow for double opt-in subscription
  5. Double opt-in Subscription form UI
  6. PHP AJAX for subscription form submission
  7. URL with secure hash
  8. A PHP utility class for you
  9. Store subscription information to database
  10. A database abstraction layer for you
  11. Send confirmation email to users
  12. Subscription confirmation
  13. Conclusion

Use a double opt-in subscription form to signup to a newsletter, blog or a similar service. It has a two-step subscription process.

In the first step, the user will submit his name and email. Then the site will send an email to the user.

In the second step, the user will click the link in the received email. This will confirm his subscription to the site or service.

We call it the double opt-in because the users consent to the subscription twice. First by submitting the information and second by confirming to in by clicking the link in email.

Why do we need double opt-in?

It is the mechanism used to verify if the subscriber owns the input email. You need to do this verification because there is a chance for misuse by submitting emails that they do not own.

Double opt-in vs single opt-in is well debated and results arrived at. Double opt-in wins hands-on in every critical aspect.

What is the role of a secure hash?

In the confirmation email received by the user, there will be a link. This is the second and important step in the opt-in process. The link should be secure.

  • It should be unique for every user and request.
  • It should not be predictable.
  • It should be immune to a brute-force attack.

Double opt-in subscription form in PHP

I will present you a step by step detail on how to build a double opt-in subscription form with a secure hash using PHP.

You will get a production-grade code which you can use real-time in your live website. You can use this to manage your newsletter subscription.

I am releasing this code to you under MIT license. You can use it free even in commercial projects.

Sequence flow for double opt-in subscription

  1. Show a subscription form to the user.
  2. On AJAX submit, insert a new record in the database.
  3. Send an email to the user with a secure hash link.
  4. On click, the of the link, update the subscription status.
  5. On every step, there will be appropriate validations in place.

Double opt-in Subscription form UI

This is where developers get it wrong. Keep it simple and unobtrusive. For the high conversion, you must keep in minimal.

One field email is enough for the subscription. To address the user in a personal way, you need their name. That’s it. Do not ask for much information on a subscription form.

<!doctype html> <html lang="en"> <head> <meta charset="utf-8"> <meta name="viewport" content="width=device-width, initial-scale=1, shrink-to-fit=no"> <meta name="author" content="Vincy"> <link rel="stylesheet" type="text/css" href="assets/css/phppot-style.css"> <title>Double Opt-In Subscription Form with Secure Hash using PHP</title> </head> <body> <div class="phppot-container"> <h1>Double Opt-in Subscription</h1> <form class="phppot-form" action="" method="POST"> <div class="phppot-row"> <div class="label"> Name </div> <input type="text" id="pp-name" name="pp-name" class="phppot-input"> </div> <div class="phppot-row"> <div class="label"> Email * <div id="email-info" class="validation-message" data-required-message="required." data-validate-message="Invalid email."></div> </div> <input type="text" id="pp-email" name="pp-email" class="required email phppot-input" onfocusout="return validateEmail();"> </div> <div class="phppot-row"> <button type="Submit" id="phppot-btn-send">Subscribe</button> <div id="phppot-loader-icon">Sending ...</div> <div id="phppot-message"></div> </div> </form> </div> <script src="vendor/jquery/jquery-3.3.1.js"></script> <script src="assets/js/subscribe.js"></script></body> </body> </html> 

If you ask for much information, it will drive your users away. The same principle applies when you build a contact form. More or less these two behave in a similar aspect. Check how to build a contact form to know more on it.

Double Opt-in subscription form UI

You should leave the name field can as optional and only the email field should be as required. This will encourage the user to submit the form and subscribe for the newsletter.

Needless to say, the form should be responsive. Any page or form you build should work in mobile, tablet, laptop and desktop devices. You should optimize to work on any viewport.

Google parses webpages in mobile mode for indexing in the search result. The desktop is an old story and gone are those days. You should always design for the mobile. Make it mobile-first!

PHP AJAX for subscription form submission

I have used AJAX to manage the submission. This will help the user to stay on the page after subscription. You can position this subscription form in a sidebar or the footer.

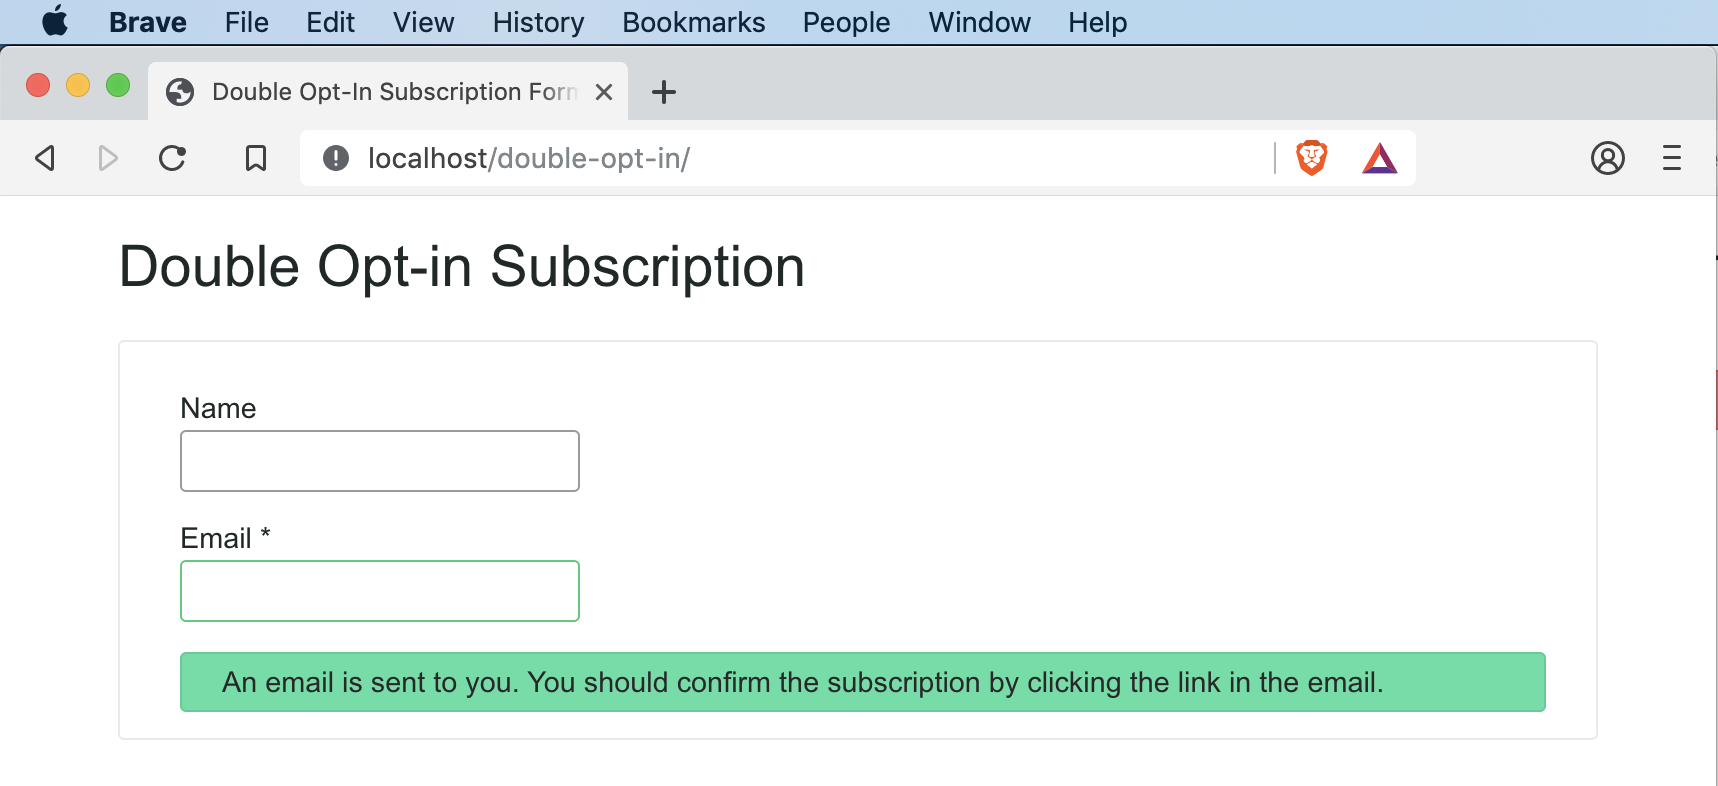
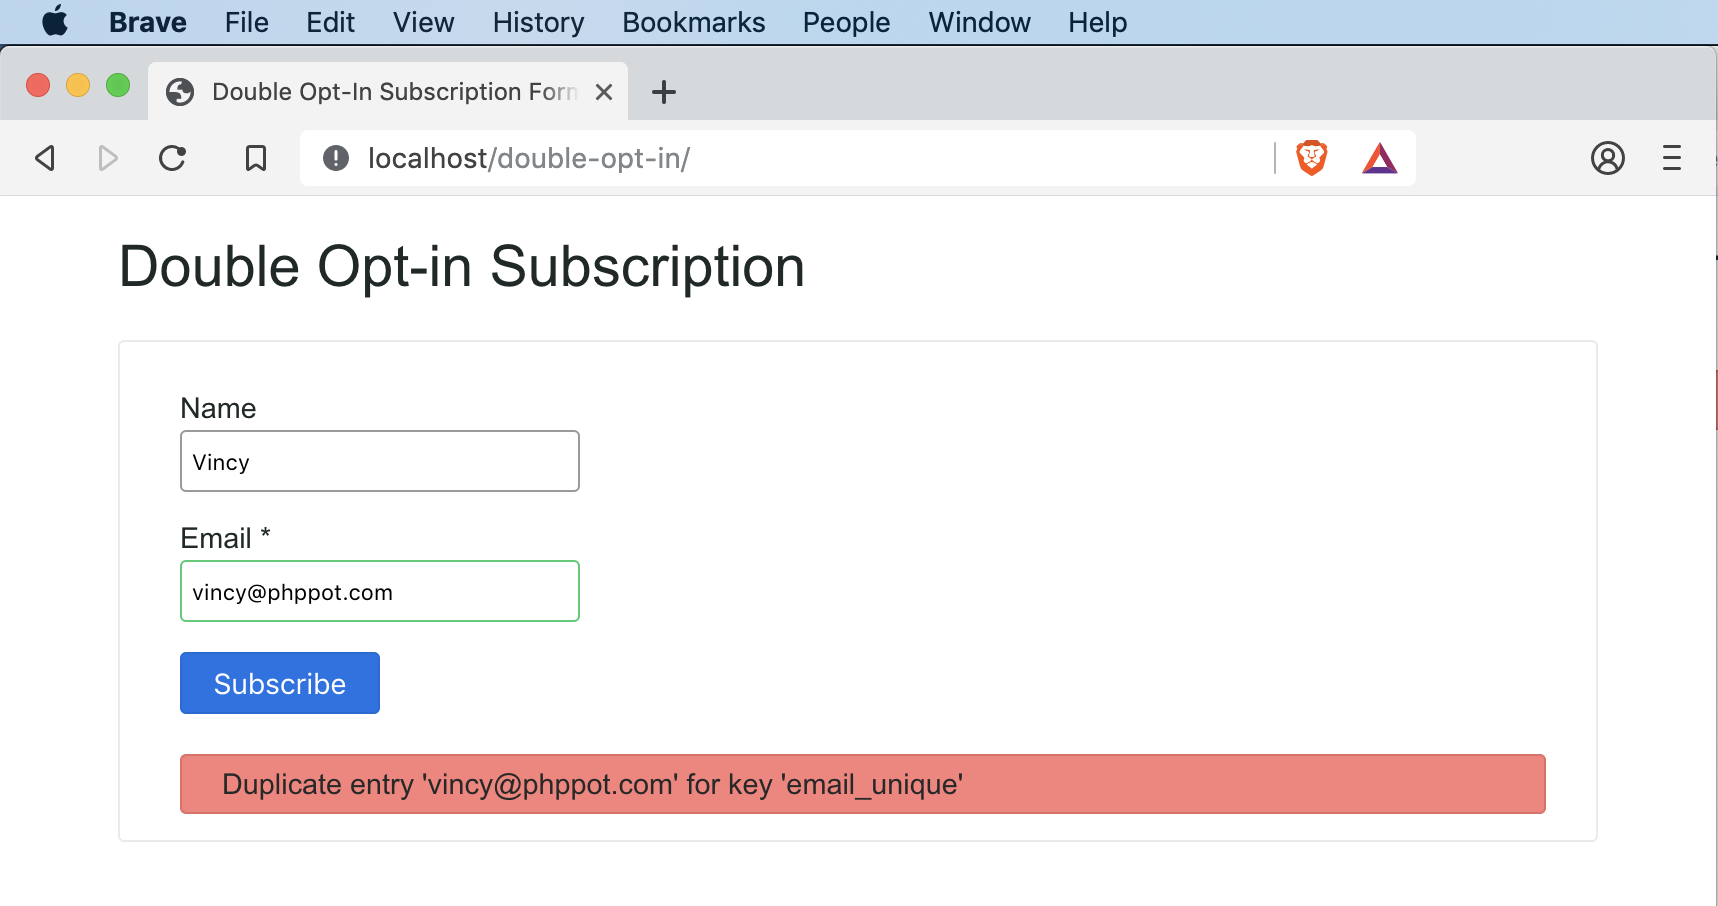
Double Opt-in Subscription Form AJAX Submission

This is a classic example of where you should use the AJAX. I have seen instances where people use AJAX in inappropriate places, for the sake of using it.

Subscription AJAX endpoint

The AJAX endpoint has three major steps:

  1. Verify the user input.
  2. Insert a record in the database.
  3. Send an email with a link for subscription.

subscribe-ep.php is the AJAX endpoint. It starts with an if condition to check if the submit is via the POST method. It is always good to program for POST instead of the GET by default.

<?php use Phppot\Subscription; use Phppot\SupportService; /** * AJAX end point for subscribe action. * 1. validate the user input * 2. store the details in database * 3. send email with link that has secure hash for opt-in confirmation */ session_start(); // to ensure the request via POST if ($_POST) { require_once __DIR__ . './../lib/SupportService.php'; $supportService = new SupportService(); // to Debug set as true $supportService->setDebug(false); // to check if its an ajax request, exit if not $supportService->validateAjaxRequest(); require_once __DIR__ . './../Model/Subscription.php'; $subscription = new Subscription(); // get user input and sanitize if (isset($_POST["pp-email"])) { $userEmail = trim($_POST["pp-email"]); $userEmail = filter_var($userEmail, FILTER_SANITIZE_EMAIL); $subscription->setEmail($userEmail); } else { // server side fallback validation to check if email is empty $output = $supportService->createJsonInstance('Email is empty!'); $supportService->endAction($output); } $memberName = ""; if (isset($_POST["pp-name"])) { $memberName = filter_var($_POST["pp-name"], FILTER_SANITIZE_STRING); } $subscription->setMemberName($memberName); // 1. get a 12 char length random string token $token = $supportService->getToken(12); // 2. make that random token to a secure hash $secureToken = $supportService->getSecureHash($token); // 3. convert that secure hash to a url string $urlSecureToken = $supportService->cleanUrl($secureToken); $subscription->setSubsriptionKey($urlSecureToken); $subscription->setSubsciptionSatus(0); $currentTime = date("Y-m-d H:i:s"); $subscription->setCreateAt($currentTime); $result = $subscription->insert(); // check if the insert is success // if success send email else send message to user $messageType = $supportService->getJsonValue($result, 'type'); if ('error' != $messageType) { $result = $subscription->sendConfirmationMessage($userEmail, $urlSecureToken); } $supportService->endAction($result); } 

I have used the SupportService class to perform common functions.

Input sanitisation is a must. When you collect information using a public website, you should be careful. You could get infected without your knowledge. There are many bots foraging around the Internet and they click on all links and buttons.

To sanitise, do not invent a new function. Use the function provided by PHP and that is safe to use.

URL with secure hash

Generate a unique url for each user subscription. Use this url to confirm the user’s subscription in the second step. Remember, that’s why we call this double opt-in.

I have used a three step process:

  1. Generate a random string token.
  2. Convert the token to secure hash.
  3. Convert the secure hash to safe url.

I have used hexdec, bin2hex and openssl_random_pseudo_bytes to generate random bits. Which forms a random string.

Then to make the random string a secure hash, I have used the PHP’s built-in password_hash function. Never every try to do something on your own. Go with the PHP’s function and it does the job very well.

Before PHP 7, we had the option to supply a user generated salt. Now PHP 7 release has deprecated it. It is a good move because, PHP can generate a better salt than what you will generate. So stick to PHP 7 and use it without supplying your own salt.

The secure hash will contain all sort of special characters. . You can keep those special characters but need to url encode it. But I always wish to keep urls clean and the encoded chars do not look nice.

So no harm in removing them. So I cleanup those and leave only the safe characters. Then as a secondary precaution, I also encode the resultant string.

Thus after going through multi step process, we get a random, hash secure, safe, encoded URL token. Save the user submitted information in database record along with this token.

A PHP utility class for you

This is a utility class which I use in my projects. I am giving it away free for you all. It has functions that I reuse quite often and will be handy in situations. Every method has detailed comments that explain their purpose and usage method.

<?php /** * Copyright (C) 2019 Phppot * * Distributed under MIT license with an exception that, * you don’t have to include the full MIT License in your code. * In essense, you can use it on commercial software, modify and distribute free. * Though not mandatory, you are requested to attribute this URL in your code or website. */ namespace Phppot; class SupportService { /** * Short circuit type function to stop the process flow on validation failure. */ public function validateAjaxRequest() { // to check if its an ajax request, exit if not $http_request = $_SERVER['HTTP_X_REQUESTED_WITH']; if (! isset($http_request) && strtolower($http_request) != 'xmlhttprequest') { $output = $this->createJsonInstance('Not a valid AJAX request!'); $this->endAction($output); } } /** * Last point in the AJAX work flow. * Clearing tokens, handles and resource cleanup can be done here. * * @param string $output * @param boolean $clearToken */ public function endAction($output) { die($output); } public function setDebug($mode) { if ($mode == true) { ini_set('display_errors', 1); set_error_handler(function ($severity, $message, $file, $line) { if (error_reporting() & $severity) { throw new \ErrorException($message, 0, $severity, $file, $line); } }); } } /** * encodes a message string into a json object * * @param string $message * @param string $type * @return \JsonSerializable encoded json object */ public function createJsonInstance($message, $type = 'error') { $messageArray = array( 'type' => $type, 'text' => $message ); $jsonObj = json_encode($messageArray); return $jsonObj; } public function getJsonValue($json, $key) { $jsonArray = json_decode($json, true); return $jsonArray[$key]; } /** * If you are using PHP, this is the best possible secure hash * do not try to implement somthing on your own * * @param string $text * @return string */ public function getSecureHash($text) { $hashedText = password_hash($text, PASSWORD_DEFAULT); return $hashedText; } /** * generates a random token of the length passed * * @param int $length * @return string */ public function getToken($length) { $token = ""; $codeAlphabet = "ABCDEFGHIJKLMNOPQRSTUVWXYZ"; $codeAlphabet .= "abcdefghijklmnopqrstuvwxyz"; $codeAlphabet .= "0123456789"; $max = strlen($codeAlphabet) - 1; for ($i = 0; $i < $length; $i ++) { $token .= $codeAlphabet[$this->cryptoRandSecure(0, $max)]; } return $token; } public function cryptoRandSecure($min, $max) { $range = $max - $min; if ($range < 1) { return $min; // not so random... } $log = ceil(log($range, 2)); $bytes = (int) ($log / 8) + 1; // length in bytes $bits = (int) $log + 1; // length in bits $filter = (int) (1 << $bits) - 1; // set all lower bits to 1 do { $rnd = hexdec(bin2hex(openssl_random_pseudo_bytes($bytes))); $rnd = $rnd & $filter; // discard irrelevant bits } while ($rnd >= $range); return $min + $rnd; } /** * makes the passed string url safe and return encoded url * * @param string $str * @return string */ public function cleanUrl($str, $isEncode = 'true') { $delimiter = "-"; $str = str_replace(' ', $delimiter, $str); // Replaces all spaces with hyphens. $str = preg_replace('/[^A-Za-z0-9\-]/', '', $str); // allows only alphanumeric and - $str = trim($str, $delimiter); // remove delimiter from both ends $regexConseqChars = '/' . $delimiter . $delimiter . '+/'; $str = preg_replace($regexConseqChars, $delimiter, $str); // remove consequtive delimiter $str = mb_strtolower($str, 'UTF-8'); // convert to all lower if ($isEncode) { $str = urldecode($str); // encode to url } return $str; } /** * to mitigate XSS attack */ public function xssafe($data, $encoding = 'UTF-8') { return htmlspecialchars($data, ENT_QUOTES | ENT_HTML401, $encoding); } /** * convenient method to print XSS mitigated text * * @param string $data */ public function xecho($data) { echo $this->xssafe($data); } } 

Store subscription information to the database

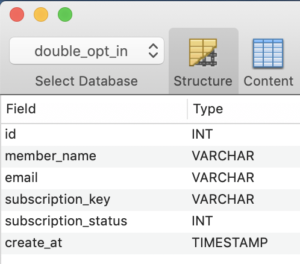
Insert a record to the database on submission of the subscription form. We get the user’s name, email, generate a secure hash token, current time, subscription status.

<?php /** * Copyright (C) 2019 Phppot * * Distributed under MIT license with an exception that, * you don’t have to include the full MIT License in your code. * In essense, you can use it on commercial software, modify and distribute free. * Though not mandatory, you are requested to attribute this URL in your code or website. */ namespace Phppot; use Phppot\DataSource; class Subscription { private $ds; private $memberName; private $email; private $subsriptionKey; private $subsciptionSatus; private $createAt; private $supportService; function __construct() { require_once __DIR__ . './../lib/DataSource.php'; $this->ds = new DataSource(); require_once __DIR__ . './../lib/SupportService.php'; $this->supportService = new SupportService(); } public function getMemberName() { return $this->memberName; } public function getEmail() { return $this->email; } public function getSubsriptionKey() { return $this->subsriptionKey; } public function getSubsciptionSatus() { return $this->subsciptionSatus; } public function getCreateAt() { return $this->createAt; } public function setMemberName($memberName) { $this->memberName = $memberName; } public function setEmail($email) { $this->email = $email; } public function setSubsriptionKey($subsriptionKey) { $this->subsriptionKey = $subsriptionKey; } public function setSubsciptionSatus($subsciptionSatus) { $this->subsciptionSatus = $subsciptionSatus; } public function setCreateAt($createAt) { $this->createAt = $createAt; } /** * to get the member record based on the subscription_key * * @param string $subscriptionKey * @return array result record */ public function getMember($subscriptionKey, $subscriptionStatus) { $query = 'SELECT * FROM tbl_subscription where subscription_key = ? and subscription_status = ?'; $paramType = 'si'; $paramValue = array( $subscriptionKey, $subscriptionStatus ); $result = $this->ds->select($query, $paramType, $paramValue); return $result; } public function insert() { $query = 'INSERT INTO tbl_subscription (member_name, email, subscription_key, subscription_status, create_at) VALUES (?, ?, ?, ?, ?)'; $paramType = 'sssis'; $paramValue = array( $this->memberName, $this->email, $this->subsriptionKey, $this->subsciptionSatus, $this->createAt ); $insertStatus = $this->ds->insert($query, $paramType, $paramValue); return $insertStatus; } public function updateStatus($subscriptionKey, $subscriptionStatus) { $query = 'UPDATE tbl_subscription SET subscription_status = ? WHERE subscription_key = ?'; $paramType = 'is'; $paramValue = array( $subscriptionStatus, $subscriptionKey ); $this->ds->execute($query, $paramType, $paramValue); } /** * sends confirmation email, to keep it simple, I am just using the PHP's mail * I reccommend serious users to change it to PHPMailer and set * appropriate headers */ public function sendConfirmationMessage($mailTo, $urlSecureToken) { // following is the opt-in url that will be sent in email to // the subscriber. Replace example.com with your server $confirmOptInUrl = 'http://example.com/confirm.php?q=' . $urlSecureToken; $message = '<p>Howdy!</p> <p>This is an automated message sent for subscription service. You must confirm your request to subscribe to example.com site.</p> <p>Website Name: example</p> <p>Website URL: http://example.com</p> <p>Click the following link to confirm: ' . $confirmOptInUrl . '</p>'; $isSent = mail($mailTo, 'Confirm your subscription', $message); if ($isSent) { $message = "An email is sent to you. You should confirm the subscription by clicking the link in the email."; $result = $this->supportService->createJsonInstance($message, 'message'); } else { $result = $this->supportService->createJsonInstance('Error in sending confirmation email.', 'error'); } return $result; } } 

The reason for storing the current time is to have an expiry for every link. We can set a predefined expiry for the double opt-in process.

For example, you can set one week as expiry for a link from the moment you generate it. The user has to click and confirm before that expiry period.

Subscription status is by default stored as ‘0’ and on confirmation changed to ‘1’.

A database abstraction layer for you

It is my PHP abstraction for minor projects. This works as a layer between controller, business logic and the database. It has generic methods using which we can to the CRUD operations. I have bundled it with the free project download that is available at the end of this tutorial.

Send confirmation email to users

After you insert the record, send an email will to the user to perform the double opt-in confirmation. The user will have a link in the email which he has to click to confirm.

Keep the email simple. It is okay to have text instead of fancy HTML emails. PHP is capable of generating any email and you can code complex email templates. But the spam engines may not like it.

Subscription information database record with secure hash

If you wish to go with HTML emails, then keep the HTML code ratio to as least as possible. As this is also one factor using which the spam engines flag the emails.

Then remember not to use the spam stop words. There are words like “free”, “win”, “cash”, “promo” and “income”. There is a long list and you can get it on the Internet by searching for “email spam filter word list”.

I have used PHP’s mail() function to send the email. I recommend you to change it to PHPMailer to send SMTP based email if you plan to use this code in production.

Subscription confirmation

Create a public landing page and you may use .htaccess for a neat URL mapping. This URL should map with the URL sent to the user and the PHP file that is going to process the request.

As a first step, GET the token and to verify the user against the database. Check,

  1. if such a token exists,
  2. it is not expired,
  3. the user is not already subscribed
  4. add more validation as you deem fit.
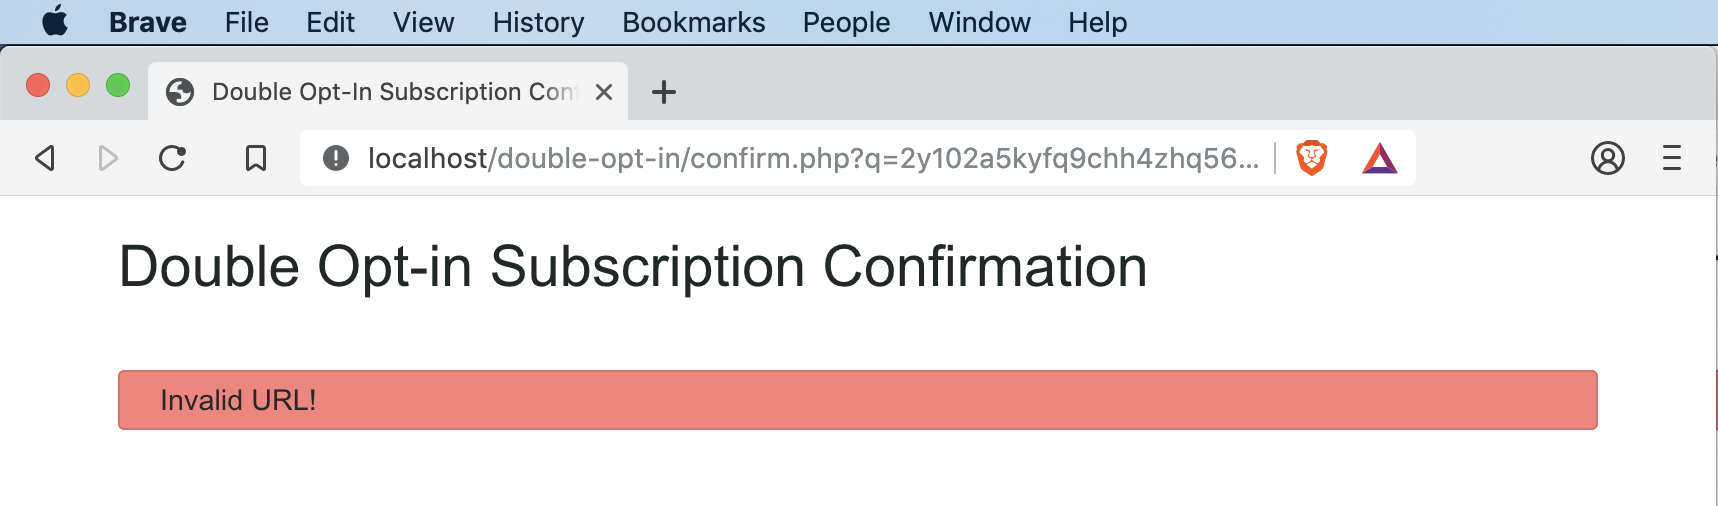
<?php use Phppot\Subscription; use Phppot\SupportService; /** * For confirmation action. * 1. Get the secure has from url * 2. validate it against url * 3. update the subscription status in database accordingly. */ session_start(); // to ensure the request via POST require_once __DIR__ . '/lib/SupportService.php'; $supportService = new SupportService(); // to Debug set as true $supportService->setDebug(true); $subscriptionKey = $_GET['q']; require_once __DIR__ . '/Model/Subscription.php'; $subscription = new Subscription(); $result = $subscription->getMember($subscriptionKey, 0); if (count($result) > 0) { // member found, go ahead and update status $subscription->updateStatus($subscriptionKey, 1); $message = $result[0]['member_name'] . ', your subscription is confirmed.'; $messageType = 'success'; } else { // securiy precaution: do not reveal any information here // play subtle with the reported message $message = 'Invalid URL!'; $messageType = 'error'; } ?> <!doctype html> <html lang="en"> <head> <meta charset="utf-8"> <meta name="viewport" content="width=device-width, initial-scale=1, shrink-to-fit=no"> <meta name="author" content="Vincy"> <link rel="stylesheet" type="text/css" href="assets/css/phppot-style.css"> <title>Double Opt-In Subscription Confirmation</title> </head> <body> <div class="phppot-container"> <h1>Double Opt-in Subscription Confirmation</h1> <div class="phppot-row"> <div id="phppot-message" class="<?php echo $messageType; ?>"><?php echo $message;?></div> </div> </div> </body> </body> </html> 

If validation fails, do not reveal any information to the user. You should only say that it has failed.

Subscription double opt-in confirmation url verification

More important do not say, not such email found. This will allow finding who has subscribed to your service. Whenever a validation fails, the displayed message should not reveal internal information.

On validation success, update the subscription status. Then show a happy success message to the user.

Conclusion

I have presented you with a production-grade double opt-in subscription form. I have followed a most secure hash generation method for confirmation URL email. I present it to you under the MIT license. The intention is to be the most permissible. You can download it free and change the code. You can even use it in your commercial projects. I have used the most secure code as possible. You can use this in your live site to manage newsletter subscription. In the coming part, I will include unsubscribe and enhance it further. Leave your comments below with what sort of enhancements you are looking for.

Download

↑ Back to Top

Posted on Leave a comment

Setting HTTP header attributes to enable Azure authentication/authorization using HTTPRepl

Angelos Petropoulos

Angelos

Posted on behalf of Ahmed Metwally

The HTTP Read-Eval-Print Loop (REPL) is a lightweight, cross-platform command-line tool that’s supported everywhere .NET Core is supported. It’s used for making HTTP requests to test ASP.NET Core web APIs and view their results. You can use the HTTPRepl to navigate and interrogate any API in the same manner that you would navigate a set of folders on a file system. If the service that you are testing has a swagger.json file, specifying that file to HTTPRepl will enable auto-completion.

To install the HTTP REPL, run the following command:

>dotnet tool install -g Microsoft.dotnet-httprepl


For more information on how to use HTTPRepl, read Angelos’ post on the ASP.NET blog. As we continue to improve the tool, we look to add new commands to facilitate the use of HTTPRepl with different types of secure API services. As of this release, HTTPRepl supports authentication and authorization schemes achievable through header manipulation, like basic, bearer token, and digest authentication. For example, to use a bearer token to authenticate to a service, use the command “set header”. Set the “Authorization” header to the bearer token value using the following command:

>set header Authorization “bearer <token_value>”

And replace <token_value> with your authorization bearer token for the service. Don’t forget to use the quotation marks to wrap the word bearer along with the <token_value> in the same literal string. Otherwise, the tool will treat them as two different values and will fail to set the header properly. To ensure that the header in the HTTP request is being formatted as expected, enable echoing using the “echo on” command.

Using the “set header” command, you can leverage HTTPRepl to test and navigate any secure REST API service including your Azure-hosted API services or the Azure Management API. To access a secure service hosted on Azure, you need a bearer token. Get a bearer token for your Azure subscription, using the Azure CLI to get an access token for the required Azure subscription:

>az login

Copy your subscription ID from the Azure portal and paste it in the “az account set” command:

>az account set --subscription "<subscription ID>" >az account get-access-token { "accessToken": "<access_token_will_be_displayed_here>", "expiresOn": "<expiry date/time will be displayed here>", "subscription": "<subscription ID>", "tenant": "<tenant ID>", "tokenType": "Bearer" } 

Copy the text that appears in place of <access_token_will_be_displayed_here>. This is your access token. Finally, run HTTPRepl:

>httprepl
(disconnected)~ connect https://management.azure.com
Using a base address of https://management.azure.com/
Unable to find a swagger definition
https://management.azure.com/~ set header Authorization "bearer <em>&lt;paste_token_here&gt;</em>"
https://management.azure.com/~ cd subscriptions
https://management.azure.com/subscriptions/~ cd <subscription_ID>

For example, to search for a list of your Azure app services, issue the “get” command for the list of sites through the Microsoft web provider:

 https://management.azure.com/subscriptions/<subscription_ID>/~ get providers/Microsoft.Web/sites?api-version=2016-08-01 HTTP/1.1 200 OK Cache-Control: no-cache Content-Length: 35948 Content-Type: application/json; charset=utf-8 Date: Thu, 19 Sep 2019 23:04:03 GMT Expires: -1 Pragma: no-cache Strict-Transport-Security: max-age=31536000; includeSubDomains X-Content-Type-Options: nosniff x-ms-correlation-request-id: <em>xxxxxxxx-xxxx-xxxx-xxxx-xxxxxxxxxxxx</em> x-ms-original-request-ids: <em>xxxxxxxx-xxxx-xxxx-xxxx-xxxxxxxxxxxx;xxxxxxxx-xxxx-xxxx-xxxx-xxxxxxxxxxxx</em> x-ms-ratelimit-remaining-subscription-reads: 11999 x-ms-request-id: xxxxxxxx-xxxx-xxxx-xxxx-xxxxxxxxxxxx x-ms-routing-request-id: WESTUS:xxxxxxxxxxxxxxxx:xxxxxxxx-xxxx-xxxx-xxxx-xxxxxxxxxx { "value": [
<list of azure resources> ] } https://management.azure.com/subscriptions/<subscription_ID>/~

You can use the full list of Azure REST APIs to browse and manage services in your Azure subscriptions. For more details on how HTTPRepl works, please check the ASPNET blog. To use HTTPRepl, download and install the global tool from the .NET Core CLI.

Give us feedback

It’s not HTTPie, it’s not Curl, but it’s also not PostMan. It’s something that you run and stays running and its aware of its current context. We find this experience valuable, but ultimately what matters the most is what you think. Please let us know your opinion by leaving comments below or on GitHub.


Ahmed Metwally, Sr. Program Manager, .NET dev tools @ahmedMsftAhmed is a Program Manager on the .NET tooling team focused on improving web development for .NET developers.

Angelos Petropoulos

Posted on Leave a comment

ASP.NET Core and Blazor updates in .NET Core 3.0

Daniel Roth

Daniel

Today we are thrilled to announce the release of .NET Core 3.0! .NET Core 3.0 is ready for production use, and is loaded with lots of great new features for building amazing web apps with ASP.NET Core and Blazor.

Some of the big new features in this release of ASP.NET Core include:

  • Build rich interactive client-side web apps using C# instead of JavaScript using Blazor).
  • Create high-performance backend services with gRPC.
  • SignalR now has support for automatic reconnection and client-to-server streaming.
  • Generate strongly typed client code for Web APIs with OpenAPI documents.
  • Endpoint routing integrated through the framework.
  • HTTP/2 now enabled by default in Kestrel.
  • Authentication support for Web APIs and single-page apps integrated with IdentityServer
  • Support for certificate and Kerberos authentication.
  • Integrates with the new System.Text.Json serializer.
  • New generic host sets up common hosting services like dependency injection (DI), configuration, and logging.
  • New Worker Service template for building long-running services.
  • New EventCounters created for requests per second, total requests, current requests, and failed requests.
  • Startup errors now reported to the Windows Event Log when hosted in IIS.
  • Request pipeline integrated with with System.IO.Pipelines.
  • Performance improvements across the entire stack.

You can find all the details about what’s new in ASP.NET Core in .NET Core 3.0 in the What’s new in ASP.NET Core 3.0 topic.

See the .NET Core 3.0 release notes for additional details and known issues.

Get started

To get started with ASP.NET Core in .NET Core 3.0 install the .NET Core 3.0 SDK.

If you’re on Windows using Visual Studio, install Visual Studio 2019 16.3, which includes .NET Core 3.0.

Note: .NET Core 3.0 requires Visual Studio 2019 16.3 or later.

There is also a Blazor WebAssembly preview update available with this release. This update to Blazor WebAssembly still has a Preview 9 version, but carries an updated build number. Blazor WebAssembly is still in preview and is not part of the .NET Core 3.0 release.

To install the latest Blazor WebAssembly template run the following command:

dotnet new -i Microsoft.AspNetCore.Blazor.Templates::3.0.0-preview9.19465.2

Upgrade an existing project

To upgrade an existing ASP.NET Core app to .NET Core 3.0, follow the migrations steps in the ASP.NET Core docs.

See the full list of breaking changes in ASP.NET Core 3.0.

To upgrade an existing ASP.NET Core 3.0 RC1 project to 3.0:

  • Update all Microsoft.AspNetCore.* and Microsoft.Extensions.* package references to 3.0.0
  • Update all Microsoft.AspNetCore.Blazor.* package references to 3.0.0-preview9.19465.2

That’s it! You should now be all set to use .NET Core 3.0!

Join us at .NET Conf!

Please join us at .NET Conf to learn all about the new features in .NET Core 3.0 and to celebrate the release with us! .NET Conf is a live streaming event open to everyone, and features talks from many talented speakers from the .NET team and the .NET community. Check out the schedule and attend a local event near you. Or join the Virtual Attendee Party for the chance to win prizes!

Give feedback

We hope you enjoy the new features in this release of ASP.NET Core and Blazor in .NET Core 3.0! We are eager to hear about your experiences with this latest .NET Core release. Let us know what you think by filing issues on GitHub.

Thanks for using ASP.NET Core and Blazor!

Daniel Roth
Daniel Roth

Principal Program Manager, ASP.NET

Follow Daniel   

Posted on Leave a comment

ASP.NET Core and Blazor updates in .NET Core 3.0 Release Candidate 1

Daniel Roth

Daniel

.NET Core 3.0 Release Candidate 1 (RC1) is now available. This release contains only a handful of bug fixes and closely represents what we expect to release for .NET Core 3.0.

Please see the release notes for additional details and known issues.

Get started

To get started with ASP.NET Core in .NET Core 3.0 RC1 install the .NET Core 3.0 RC1 SDK.

If you’re on Windows using Visual Studio, install the latest preview of Visual Studio 2019.

.NET Core 3.0 RC1 requires Visual Studio 2019 16.3 Preview 4 or later.

There is also a Blazor WebAssembly preview update available with this release. This update to Blazor WebAssembly still has a Preview 9 version, but carries an updated build number. This is not a release candidate for Blazor WebAssembly. Blazor WebAssembly isn’t expected to ship as a stable release until some time after .NET Core 3.0 ships (details coming soon!).

To install the latest Blazor WebAssembly template run the following command:

dotnet new -i Microsoft.AspNetCore.Blazor.Templates::3.0.0-preview9.19457.4

Upgrade an existing project

To upgrade an existing ASP.NET Core app to .NET Core 3.0 Preview 9, follow the migrations steps in the ASP.NET Core docs.

Please also see the full list of breaking changes in ASP.NET Core 3.0.

To upgrade an existing ASP.NET Core 3.0 Preview 9 project to RC1:

  • Update all Microsoft.AspNetCore.* package references to 3.0.0-rc1.19457.4
  • Update all Microsoft.AspNetCore.Blazor.* package references to 3.0.0-preview9.19457.4

That’s it You should now be all set to use .NET Core 3.0 RC1!

Give feedback

We hope you enjoy the new features in this preview release of ASP.NET Core and Blazor! Please let us know what you think by filing issues on GitHub.

Thanks for trying out ASP.NET Core and Blazor!

Daniel Roth
Daniel Roth

Principal Program Manager, ASP.NET

Follow Daniel   

Posted on Leave a comment

How to Create Popup Contact Form Dialog using PHP and jQuery

Last modified on September 5th, 2019 by Vincy.

Contact form is an important element in your website. It encourages communication and acts as a bridge between you and your users. It allows users to post their feedback, comments, questions and more.

It helps you to get ideas and opinions that lead your business to growth. It is one among the important aspects that will decide your success.

There are many popup contact form plugins available online. These plugins help to add a contact form in your application with a modern outlook. You should choose them with care.

I have developed a light-weight contact form component named Iris. It is an interactive, integrative component. You can plug-in this component with your application without putting much effort. If you are searching for a secured simple contact form component, then Iris is the one you are looking for.

You should also read through the simple secure spam-free contact form. It details on the critical elements of a contact form and how they should be designed. It is a highly recommended read from me.

How Display PHP Contact Form Dialog using jQuery

View Demo

Developing a PHP contact form is a simple job. We have seen so many examples for creating a contact form in PHP. The simple contact form example has the basic code skeleton. It has minimal fields and a simple mail sending script.

Generally, the contact form has the name, email, message and more fields. The fields may vary based on the application’s nature or its purpose. 

In some application there may be a lengthy contact form with elaborate list of fields phone, fax and more. But, sleek forms with minimal inputs encourage users to interact.

If you want to get more information, then make it via optional custom fields. Contact form with custom fields will help users who have no objection to give extra data.

In this article, we are going how to code for showing a PHP contact form as a popup dialog. I used the jQuery core to display a popup dialog with the contact form HTML.

What is inside?

  1. Purpose of the contact form on a web application
  2. Things to remember while creating a contact form
  3. About this example
  4. File structure
  5. Create HTML interface for the contact form
  6. PHP script to send contact email
  7. PHP contact form popup with jQuery Output
  8. Conclusion

There are various ways to allow users to contact you via your application interface. Contact form is one of a popular component of an application. It lets users contact the website owner or admin.

Generally, contact forms help the users to send their thoughts, doubts. Some of the main purposes of this contact form interface are here as listed below.

  • To collect feedback, comments from the users or customers.
  • For getting the advantages of user interaction with your application.
  • To receive user’s support request.
  • To allow users to send inquiries for paid services or customization.
  • To get biodata, proof and more references as attachments.

While creating a contact form in your application, you have to remember the following. These points will help to create a safe contact for an interface for your application.

IMPORTANT – Read this!

  • Secure your platform from the bots. Yes! Internet is full of automated bots hungry for spreading spam.
  • Prevent abnormal frequent hits which may stress your server.
  • Ensure data sanitization before processing user data
  • Check request origin to prevent automated software to post the form data.
  • Validate on both client and server side.
  • No design is design. Do not thrust the UI upon the users, let its focus be on good communication and ease of use.

As the internet is an open world, it allows anonymous users. So, there is the possibility of malicious access. So, this kind of safety measures will reduce the risk.

It is not only applicable for the contact form but also for all the interfaces that get data from the end-user.

The contact form pops up to collect name, email, subject and message from the users. While running this example, the landing page will not show the popup on page load. Rather, it shows a clickable contact icon.

By clicking this icon, a contact form will popup with the name, email and more fields. For displaying the popup interface, I used jQuery library functions. It will add an overlay on top of the webpage while showing the popup.

In this example, all the contact details are mandatory. I have added a minimal validation script in JavaScript to validate the form data. This script is to check the availability of the contact data before posting it to the server-side.

When the user submits the form, the PHP code will receive the posted form data. Then, it processes the mail function with this contact information.

In this example, I have used the PHP mail function to send the contact email. If you want to send email using SMPT, the linked article has the code for implementing it.

Merits and demerits of a popup contact form dialog

There are both advantages and disadvantages of showing a popup contact form dialog.

The advantage is to let the user stay on his current page with any navigation or page refresh. The popup dialog interface will give a modern outlook for your application

Some web users hate popups. This is the main disadvantages. Also, it is a little bit of effort taking work to make a popup interface mobile friendly.

File Structure

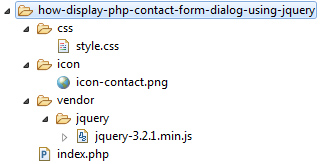
Below screenshot shows the file structure of this PHP contact form example. It shows the custom files and libraries used in this code.

It has a very minimal amount of dynamic code that is for sending the contact email. Other than that, it has more of the HTML, CSS, JavaScript code.

Contact Form Popup File Structure

The index.php is the landing page which contains HTML to display clickable contact icon. It also has a hidden contact form container and a jQuery script to popup the form.

The vendor directory contains the jQuery library source.

This section is to learn how to create HTML to display the contact form interface in a jQuery popup.

It has the code to show the contact icon which popups contact form on its click event. The click event on the outside of the contact form layout will close the popup dialog.

I have added CSS and jQuery script to reflect the appropriate UI changes based on the user’s click action event. It helps to toggle the contact form popup dialog and acknowledge the user accordingly.

<!DOCTYPE html> <html> <head> <title>How to display PHP contact form popup using jQuery</title> <script src="./vendor/jquery/jquery-3.2.1.min.js"></script> <link rel="stylesheet" href="./css/style.css" /> </head> <body> <div id="contact-icon"> <img src="./icon/icon-contact.png" alt="contact" height="50" width="50"> </div> <!--Contact Form--> <div id="contact-popup"> <form class="contact-form" action="" id="contact-form" method="post" enctype="multipart/form-data"> <h1>Contact Us</h1> <div> <div> <label>Name: </label><span id="userName-info" class="info"></span> </div> <div> <input type="text" id="userName" name="userName" class="inputBox" /> </div> </div> <div> <div> <label>Email: </label><span id="userEmail-info" class="info"></span> </div> <div> <input type="text" id="userEmail" name="userEmail" class="inputBox" /> </div> </div> <div> <div> <label>Subject: </label><span id="subject-info" class="info"></span> </div> <div> <input type="text" id="subject" name="subject" class="inputBox" /> </div> </div> <div> <div> <label>Message: </label><span id="userMessage-info" class="info"></span> </div> <div> <textarea id="message" name="message" class="inputBox"></textarea> </div> </div> <div> <input type="submit" id="send" name="send" value="Send" /> </div> </form> </div> </body> </html> 

Below code shows the styles created for this PHP contact form UI. I have used very less CSS for this example to make it generic for any theme. You can override the below style to customize the form design for your website theme.

body { color: #232323; font-size: 0.95em; font-family: arial; } div#success { text-align: center; box-shadow: 1px 1px 5px #455644; background: #bae8ba; padding: 10px; border-radius: 3px; margin: 0 auto; width: 350px; } .inputBox { width: 100%; margin: 5px 0px 15px 0px; border: #dedede 1px solid; box-sizing: border-box; padding: 15px; } #contact-popup { position: absolute; top: 0px; left: 0px; height: 100%; width: 100%; background: rgba(0, 0, 0, 0.5); display: none; color: #676767; } .contact-form { width: 350px; margin: 0px; background-color: white; font-family: Arial; position: relative; left: 50%; top: 50%; margin-left: -210px; margin-top: -255px; box-shadow: 1px 1px 5px #444444; padding: 20px 40px 40px 40px; } #contact-icon { padding: 10px 5px 5px 12px; width: 58px; color: white; box-shadow: 1px 1px 5px grey; border-radius: 3px; cursor: pointer; margin: 60px auto; } .info { color: #d30a0a; letter-spacing: 2px; padding-left: 5px; } #send { background-color: #09F; border: 1px solid #1398f1; font-family: Arial; color: white; width: 100%; padding: 10px; cursor: pointer; } #contact-popup h1 { font-weight: normal; text-align: center; margin: 10px 0px 20px 0px; } .input-error { border: #e66262 1px solid; } 

jQuery Script to show Contact form popup and validate form fields

Below script shows the jQuery callback function added for the document ready event.

It has two event handling functions. One is to show contact form popup dialog on the click event of the contact icon.

The other is to handle the form submit to validate contact data entered by the user.

The validation script focuses on minimalistic filter appliances. It helps to prevent users from sending the form with an empty data or with invalid data (email) format.

<script> $(document).ready(function () { $("#contact-icon").click(function () { $("#contact-popup").show(); }); //Contact Form validation on click event $("#contact-form").on("submit", function () { var valid = true; $(".info").html(""); $("inputBox").removeClass("input-error"); var userName = $("#userName").val(); var userEmail = $("#userEmail").val(); var subject = $("#subject").val(); var message = $("#message").val(); if (userName == "") { $("#userName-info").html("required."); $("#userName").addClass("input-error"); } if (userEmail == "") { $("#userEmail-info").html("required."); $("#userEmail").addClass("input-error"); valid = false; } if (!userEmail.match(/^([\w-\.]+@([\w-]+\.)+[\w-]{2,4})?$/)) { $("#userEmail-info").html("invalid."); $("#userEmail").addClass("input-error"); valid = false; } if (subject == "") { $("#subject-info").html("required."); $("#subject").addClass("input-error"); valid = false; } if (message == "") { $("#userMessage-info").html("required."); $("#message").addClass("input-error"); valid = false; } return valid; }); }); </script> 

There are many ways of sending email in PHP. In this example, I used the in-built mail function to send the contact email.

Before sending the mail, we have to set the header, recipient, and the other parameters.

Below PHP script gets the posted contact form data using $_POST request array. In PHP, it sets the From data with mail header using the name, email posted via the form.

In this code, we can see the PHP filter_var() applied to sanitize the form data before processing.

Once the email sent, the PHP mail() function will return boolean true. If so, it shows a success message to the user.

<?php if (! empty($_POST["send"])) { $name = filter_var($_POST["userName"], FILTER_SANITIZE_STRING); $email = filter_var($_POST["userEmail"], FILTER_SANITIZE_EMAIL); $subject = filter_var($_POST["subject"], FILTER_SANITIZE_STRING); $message = filter_var($_POST["message"], FILTER_SANITIZE_STRING); $toEmail = "to_email@gmail.com"; $mailHeaders = "From: " . $name . "<" . $email . ">\r\n"; if (mail($toEmail, $subject, $message, $mailHeaders)) { ?> <div id="success">Your contact information is received successfully!</div> <?php } } ?> 

In a previous article, we have seen an example to send an email with Gmail SMTP using PHPMailer library.

PHP contact form popup with jQuery Output

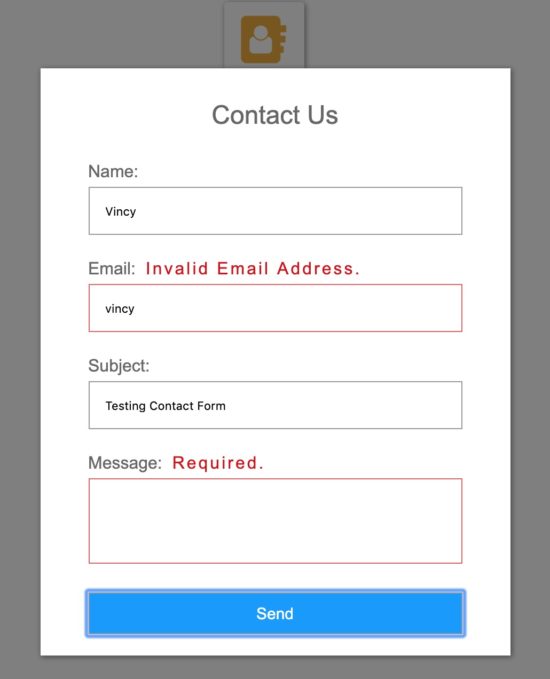
The figure shows the screenshot of the contact form popup dialog. You can see the clickable icon that is behind the overlay.

I have taken this screenshot by sending the form with an empty message and invalid email format. In the following screenshot, you can see the corresponding error message in the popup dialog. This is how this form alerts users about the improper data entered by them.

Contact Form Popup Output

After sending the contact email, this message helps to acknowledge the user. This acknowledgment will toggle off the contact form popup.

Contact Mail Success

Conclusion

Contact form in your application will help to gather information from the user. It will give you valuable feedback, ideas from the end-user to grow your business.

We have seen the advantages and disadvantages of having a popup contact form interface in an application. Also, we have seen lot of information about the purposes, basic need to integrate a contact form in an application.

The example code we have created for this article will reduce your effort to create a contact form for your application. It is a basic solution for the one who wants to deploy a medium to interact with the site users.

View Demo Download

↑ Back to Top

Posted on Leave a comment

ASP.NET Core and Blazor updates in .NET Core 3.0 Preview 9

Daniel Roth

Daniel

.NET Core 3.0 Preview 9 is now available and it contains a number of improvements and updates to ASP.NET Core and Blazor.

Here’s the list of what’s new in this preview:

  • Blazor event handlers and data binding attributes moved to Microsoft.AspNetCore.Components.Web
  • Blazor routing improvements
    • Render content using a specific layout
    • Routing decoupled from authorization
    • Route to components from multiple assemblies
  • Render multiple Blazor components from MVC views or pages
  • Smarter reconnection for Blazor Server apps
  • Utility base component classes for managing a dependency injection scope
  • Razor component unit test framework prototype
  • Helper methods for returning Problem Details from controllers
  • New client API for gRPC
  • Support for async streams in streaming gRPC responses

Please see the release notes for additional details and known issues.

Get started

To get started with ASP.NET Core in .NET Core 3.0 Preview 9 install the .NET Core 3.0 Preview 9 SDK.

If you’re on Windows using Visual Studio, install the latest preview of Visual Studio 2019.

.NET Core 3.0 Preview 9 requires Visual Studio 2019 16.3 Preview 3 or later.

To install the latest Blazor WebAssembly template also run the following command:

dotnet new -i Microsoft.AspNetCore.Blazor.Templates::3.0.0-preview9.19424.4

Upgrade an existing project

To upgrade an existing ASP.NET Core app to .NET Core 3.0 Preview 9, follow the migrations steps in the ASP.NET Core docs.

Please also see the full list of breaking changes in ASP.NET Core 3.0.

To upgrade an existing ASP.NET Core 3.0 Preview 8 project to Preview 9:

  • Update all Microsoft.AspNetCore.* package references to 3.0.0-preview9.19424.4
  • In Blazor apps and libraries:
    • Add a using statement for Microsoft.AspNetCore.Components.Web in your top level _Imports.razor file (see Blazor event handlers and data binding attributes moved to Microsoft.AspNetCore.Components.Web below for details)
    • Add a using statement for Microsoft.AspNetCore.Components.Authorization in your top level _Imports.razor file.
    • Update all Blazor component parameters to be public.
    • Update implementations of IJSRuntime to return ValueTask<T>.
    • Replace calls to MapBlazorHub<TComponent> with a single call to MapBlazorHub.
    • Update calls to RenderComponentAsync and RenderStaticComponentAsync to use the new overloads to RenderComponentAsync that take a RenderMode parameter (see Render multiple Blazor components from MVC views or pages below for details).
    • Update App.razor to use the updated Router component (see Blazor routing improvements below for details).
    • (Optional) Remove page specific _Imports.razor file with the @layout directive to use the default layout specified through the router instead.
    • Remove any use of the PageDisplay component and replace with LayoutView, RouteView, or AuthorizeRouteView as appropriate (see Blazor routing improvements below for details).
    • Replace uses of IUriHelper with NavigationManager.
    • Remove any use of @ref:suppressField.
    • Replace the previous RevalidatingAuthenticationStateProvider code with the new RevalidatingIdentityAuthenticationStateProvider code from the project template.
    • Replace Microsoft.AspNetCore.Components.UIEventArgs with System.EventArgs and remove the “UI” prefix from all EventArgs derived types (UIChangeEventArgs -> ChangeEventArgs, etc.).
    • Replace DotNetObjectRef with DotNetObjectReference.
    • Replace OnAfterRender() and OnAfterRenderAsync() implementations with OnAfterRender(bool firstRender) or OnAfterRenderAsync(bool firstRender).
  • In gRPC projects:
    • Update calls to GrpcClient.Create with a call GrpcChannel.ForAddress to create a new gRPC channel and new up your typed gRPC clients using this channel.
    • Rebuild any project or project dependency that uses gRPC code generation for an ABI change in which all clients inherit from ClientBase instead of LiteClientBase. There are no code changes required for this change.
    • Please also see the grpc-dotnet announcement for all changes.

You should now be all set to use .NET Core 3.0 Preview 9!

Blazor event handlers and data binding attributes moved to Microsoft.AspNetCore.Components.Web

In this release we moved the set of bindings and event handlers available for HTML elements into the Microsoft.AspNetCore.Components.Web.dll assembly and into the Microsoft.AspNetCore.Components.Web namespace. This change was made to isolate the web specific aspects of the Blazor programming from the core programming model. This section provides additional details on how to upgrade your existing projects to react to this change.

Blazor apps

Open the application’s root _Imports.razor and add @using Microsoft.AspNetCore.Components.Web. Blazor apps get a reference to the Microsoft.AspNetCore.Components.Web package implicitly without any additional package references, so adding a reference to this package isn’t necessary.

Blazor libraries

Add a package reference to the Microsoft.AspNetCore.Components.Web package package if you don’t already have one. Then open the root _Imports.razor file for the project (create the file if you don’t already have it) and add @using Microsoft.AspNetCore.Components.Web.

Troubleshooting guidance

With the correct references and using statement for Microsoft.AspNetCore.Components.Web, event handlers like @onclick and @bind should be bold font and colorized as shown below when using Visual Studio.

Events and binding working in Visual Studio

If @bind or @onclick are colorized as a normal HTML attribute, then the @using statement is missing.

Events and binding not recognized

If you’re missing a using statement for the Microsoft.AspNetCore.Components.Web namespace, you may see build failures. For example, the following build error for the code shown above indicates that the @bind attribute wasn’t recognized:

CS0169 The field 'Index.text' is never used
CS0428 Cannot convert method group 'Submit' to non-delegate type 'object'. Did you intend to invoke the method?

In other cases you may get a runtime exception and the app fails to render. For example, the following runtime exception seen in the browser console indicates that the @onclick attribute wasn’t recognized:

Error: There was an error applying batch 2.
DOMException: Failed to execute 'setAttribute' on 'Element': '@onclick' is not a valid attribute name.

Add a using statement for the Microsoft.AspNetCore.Components.Web namespace to address these issues. If adding the using statement fixed the problem, consider moving to the using statement app’s root _Imports.razor so it will apply to all files.

If you add the Microsoft.AspNetCore.Components.Web namespace but get the following build error, then you’re missing a package reference to the Microsoft.AspNetCore.Components.Web package:

CS0234 The type or namespace name 'Web' does not exist in the namespace 'Microsoft.AspNetCore.Components' (are you missing an assembly reference?)

Add a package reference to the Microsoft.AspNetCore.Components.Web package to address the issue.

Blazor routing improvements

In this release we’ve revised the Blazor Router component to make it more flexible and to enable new scenarios. The Router component in Blazor handles rendering the correct component that matches the current address. Routable components are marked with the @page directive, which adds the RouteAttribute to the generated component classes. If the current address matches a route, then the Router renders the contents of its Found parameter. If no route matches, then the Router component renders the contents of its NotFound parameter.

To render the component with the matched route, use the new RouteView component passing in the supplied RouteData from the Router along with any desired parameters. The RouteView component will render the matched component with its layout if it has one. You can also optionally specify a default layout to use if the matched component doesn’t have one.

<Router AppAssembly="typeof(Program).Assembly"> <Found Context="routeData"> <RouteView RouteData="routeData" DefaultLayout="typeof(MainLayout)" /> </Found> <NotFound> <h1>Page not found</h1> <p>Sorry, but there's nothing here!</p> </NotFound>
</Router>

Render content using a specific layout

To render a component using a particular layout, use the new LayoutView component. This is useful when specifying content for not found pages that you still want to use the app’s layout.

<Router AppAssembly="typeof(Program).Assembly"> <Found Context="routeData"> <RouteView RouteData="routeData" DefaultLayout="typeof(MainLayout)" /> </Found> <NotFound> <LayoutView Layout="typeof(MainLayout)"> <h1>Page not found</h1> <p>Sorry, but there's nothing here!</p> </LayoutView> </NotFound>
</Router>

Routing decoupled from authorization

Authorization is no longer handled directly by the Router. Instead, you use the AuthorizeRouteView component. The AuthorizeRouteView component is a RouteView that will only render the matched component if the user is authorized. Authorization rules for specific components are specified using the AuthorizeAttribute. The AuthorizeRouteView component also sets up the AuthenticationState as a cascading value if there isn’t one already. Otherwise, you can still manually setup the AuthenticationState as a cascading value using the CascadingAuthenticationState component.

<Router AppAssembly="@typeof(Program).Assembly"> <Found Context="routeData"> <AuthorizeRouteView RouteData="@routeData" DefaultLayout="@typeof(MainLayout)" /> </Found> <NotFound> <CascadingAuthenticationState> <LayoutView Layout="@typeof(MainLayout)"> <p>Sorry, there's nothing at this address.</p> </LayoutView> </CascadingAuthenticationState> </NotFound>
</Router>

You can optionally set the NotAuthorized and Authorizing parameters of the AuthorizedRouteView component to specify content to display if the user is not authorized or authorization is still in progress.

<Router AppAssembly="@typeof(Program).Assembly"> <Found Context="routeData"> <AuthorizeRouteView RouteData="@routeData" DefaultLayout="@typeof(MainLayout)"> <NotAuthorized> <p>Nope, nope!</p> </NotAuthorized> </AuthorizeRouteView> </Found>
</Router>

Route to components from multiple assemblies

You can now specify additional assemblies for the Router component to consider when searching for routable components. These assemblies will be considered in addition to the specified AppAssembly. You specify these assemblies using the AdditionalAssemblies parameter. For example, if Component1 is a routable component defined in a referenced class library, then you can support routing to this component like this:

<Router AppAssembly="typeof(Program).Assembly" AdditionalAssemblies="new[] { typeof(Component1).Assembly }> ...
</Router>

Render multiple Blazor components from MVC views or pages

We’ve reenabled support for rendering multiple components from a view or page in a Blazor Server app. To render a component from a .cshtml file, use the Html.RenderComponentAsync<TComponent>(RenderMode renderMode, object parameters) HTML helper method with the desired RenderMode.

RenderMode Description Supports parameters?
Static Statically render the component with the specified parameters. Yes
Server Render a marker where the component should be rendered interactively by the Blazor Server app. No
ServerPrerendered Statically prerender the component along with a marker to indicate the component should later be rendered interactively by the Blazor Server app. No

Support for stateful prerendering has been removed in this release due to security concerns. You can no longer prerender components and then connect back to the same component state when the app loads. We may reenable this feature in a future release post .NET Core 3.0.

Blazor Server apps also no longer require that the entry point components be registered in the app’s Configure method. Only a single call to MapBlazorHub() is required.

Smarter reconnection for Blazor Server apps

Blazor Server apps are stateful and require an active connection to the server in order to function. If the network connection is lost, the app will try to reconnect to the server. If the connection can be reestablished but the server state is lost, then reconnection will fail. Blazor Server apps will now detect this condition and recommend the user to refresh the browser instead of retrying to connect.

Blazor Server reconnect rejected

Utility base component classes for managing a dependency injection scope

In ASP.NET Core apps, scoped services are typically scoped to the current request. After the request completes, any scoped or transient services are disposed by the dependency injection (DI) system. In Blazor Server apps, the request scope lasts for the duration of the client connection, which can result in transient and scoped services living much longer than expected.

To scope services to the lifetime of a component you can use the new OwningComponentBase and OwningComponentBase<TService> base classes. These base classes expose a ScopedServices property of type IServiceProvider that can be used to resolve services that are scoped to the lifetime of the component. To author a component that inherits from a base class in Razor use the @inherits directive.

@page "/users"
@attribute [Authorize]
@inherits OwningComponentBase<Data.ApplicationDbContext> <h1>Users (@Service.Users.Count())</h1>
<ul> @foreach (var user in Service.Users) { <li>@user.UserName</li> }
</ul>

Note: Services injected into the component using @inject or the InjectAttribute are not created in the component’s scope and will still be tied to the request scope.

Razor component unit test framework prototype

We’ve started experimenting with building a unit test framework for Razor components. You can read about the prototype in Steve Sanderson’s Unit testing Blazor components – a prototype blog post. While this work won’t ship with .NET Core 3.0, we’d still love to get your feedback early in the design process. Take a look at the code on GitHub and let us know what you think!

Helper methods for returning Problem Details from controllers

Problem Details is a standardized format for returning error information from an HTTP endpoint. We’ve added new Problem and ValidationProblem method overloads to controllers that use optional parameters to simplify returning Problem Detail responses.

[Route("/error")]
public ActionResult<ProblemDetails> HandleError()
{ return Problem(title: "An error occurred while processing your request", statusCode: 500);
}

New client API for gRPC

To improve compatibility with the existing Grpc.Core implementation, we’ve changed our client API to use gRPC channels. The channel is where gRPC configuration is set and it is used to create strongly typed clients. The new API provides a more consistent client experience with Grpc.Core, making it easier to switch between using the two libraries.

// Old
using var httpClient = new HttpClient() { BaseAddress = new Uri("https://localhost:5001") };
var client = GrpcClient.Create<GreeterClient>(httpClient); // New
var channel = GrpcChannel.ForAddress("https://localhost:5001");
var client = new GreeterClient(channel); var reply = await client.GreetAsync(new HelloRequest { Name = "Santa" });

Support for async streams in streaming gRPC responses

gRPC streaming responses return a custom IAsyncStreamReader type that can be iterated on to receive all response messages in a streaming response. With the addition of async streams in C# 8, we’ve added a new extension method that makes for a more ergonomic API while consuming streaming responses.

// Old
while (await requestStream.MoveNext(CancellationToken.None))
{ var message = requestStream.Current; // …
} // New and improved
await foreach (var message in requestStream.ReadAllAsync())
{ // …
}

Give feedback

We hope you enjoy the new features in this preview release of ASP.NET Core and Blazor! Please let us know what you think by filing issues on GitHub.

Thanks for trying out ASP.NET Core and Blazor!

Daniel Roth
Daniel Roth

Principal Program Manager, ASP.NET

Follow Daniel   

Posted on Leave a comment

Redesigning Configuration Refresh for Azure App Configuration

Avatar

Overview

Since its inception, the .NET Core configuration provider for Azure App Configuration has provided the capability to monitor changes and sync them to the configuration within a running application. We recently redesigned this functionality to allow for on-demand refresh of the configuration. The new design paves the way for smarter applications that only refresh the configuration when necessary. As a result, inactive applications no longer have to monitor for configuration changes unnecessarily.
 

Initial design : Timer-based watch

In the initial design, configuration was kept in sync with Azure App Configuration using a watch mechanism which ran on a timer. At the time of initialization of the Azure App Configuration provider, users could specify the configuration settings to be updated and an optional polling interval. In case the polling interval was not specified, a default value of 30 seconds was used.

public static IWebHost BuildWebHost(string[] args)
{ WebHost.CreateDefaultBuilder(args) .ConfigureAppConfiguration((hostingContext, config) => { // Load settings from Azure App Configuration // Set up the provider to listen for changes triggered by a sentinel value var settings = config.Build(); string appConfigurationEndpoint = settings["AzureAppConfigurationEndpoint"]; config.AddAzureAppConfiguration(options => { options.ConnectWithManagedIdentity(appConfigurationEndpoint) .Use(keyFilter: "WebDemo:*") .WatchAndReloadAll(key: "WebDemo:Sentinel", label: LabelFilter.Null); }); settings = config.Build(); }) .UseStartup<Startup>() .Build();
}

For example, in the above code snippet, Azure App Configuration would be pinged every 30 seconds for changes. These calls would be made irrespective of whether the application was active or not. As a result, there would be unnecessary usage of network and CPU resources within inactive applications. Applications needed a way to trigger a refresh of the configuration on demand in order to be able to limit the refreshes to active applications. Then unnecessary checks for changes could be avoided.

This timer-based watch mechanism had the following fundamental design flaws.

  1. It could not be invoked on-demand.
  2. It continued to run in the background even in applications that could be considered inactive.
  3. It promoted constant polling of configuration rather than a more intelligent approach of updating configuration when applications are active or need to ensure freshness.
     

New design : Activity-based refresh

The new refresh mechanism allows users to keep their configuration updated using a middleware to determine activity. As long as the ASP.NET Core web application continues to receive requests, the configuration settings continue to get updated with the configuration store.

The application can be configured to trigger refresh for each request by adding the Azure App Configuration middleware from package Microsoft.Azure.AppConfiguration.AspNetCore in your application’s startup code.

public void Configure(IApplicationBuilder app, IHostingEnvironment env)
{ app.UseAzureAppConfiguration(); app.UseMvc();
}

At the time of initialization of the configuration provider, the user can use the ConfigureRefresh method to register the configuration settings to be updated with an optional cache expiration time. In case the cache expiration time is not specified, a default value of 30 seconds is used.

public static IWebHost BuildWebHost(string[] args)
{ WebHost.CreateDefaultBuilder(args) .ConfigureAppConfiguration((hostingContext, config) => { // Load settings from Azure App Configuration // Set up the provider to listen for changes triggered by a sentinel value var settings = config.Build(); string appConfigurationEndpoint = settings["AzureAppConfigurationEndpoint"]; config.AddAzureAppConfiguration(options => { options.ConnectWithManagedIdentity(appConfigurationEndpoint) .Use(keyFilter: "WebDemo:*") .ConfigureRefresh((refreshOptions) => { // Indicates that all settings should be refreshed when the given key has changed refreshOptions.Register(key: "WebDemo:Sentinel", label: LabelFilter.Null, refreshAll: true); }); }); settings = config.Build(); }) .UseStartup<Startup>() .Build();
}

In order to keep the settings updated and avoid unnecessary calls to the configuration store, an internal cache is used for each setting. Until the cached value of a setting has expired, the refresh operation does not update the value. This happens even when the value has changed in the configuration store.  

Try it now!

For more information about Azure App Configuration, check out the following resources. You can find step-by-step tutorials that would help you get started with dynamic configuration using the new refresh mechanism within minutes. Please let us know what you think by filing issues on GitHub.

Overview: Azure App configuration
Tutorial: Use dynamic configuration in an ASP.NET Core app
Tutorial: Use dynamic configuration in a .NET Core app
Related Blog: Configuring a Server-side Blazor app with Azure App Configuration

Avatar

Software Engineer, Azure App Configuration

Follow    

Posted on Leave a comment

ASP.NET Core and Blazor updates in .NET Core 3.0 Preview 8

Avatar

Sourabh

.NET Core 3.0 Preview 8 is now available and it includes a bunch of new updates to ASP.NET Core and Blazor.

Here’s the list of what’s new in this preview:

  • Project template updates
    • Cleaned up top-level templates in Visual Studio
    • Angular template updated to Angular 8
    • Blazor templates renamed and simplified
    • Razor Class Library template replaces the Blazor Class Library template
  • Case-sensitive component binding
  • Improved reconnection logic for Blazor Server apps
  • NavLink component updated to handle additional attributes
  • Culture aware data binding
  • Automatic generation of backing fields for @ref
  • Razor Pages support for @attribute
  • New networking primitives for non-HTTP Servers
  • Unix domain socket support for the Kestrel Sockets transport
  • gRPC support for CallCredentials
  • ServiceReference tooling in Visual Studio
  • Diagnostics improvements for gRPC

Please see the release notes for additional details and known issues.

Get started

To get started with ASP.NET Core in .NET Core 3.0 Preview 8 install the .NET Core 3.0 Preview 8 SDK

If you’re on Windows using Visual Studio, install the latest preview of Visual Studio 2019.

.NET Core 3.0 Preview 8 requires Visual Studio 2019 16.3 Preview 2 or later

To install the latest Blazor WebAssembly template also run the following command:

dotnet new -i Microsoft.AspNetCore.Blazor.Templates::3.0.0-preview8.19405.7

Upgrade an existing project

To upgrade an existing an ASP.NET Core app to .NET Core 3.0 Preview 8, follow the migrations steps in the ASP.NET Core docs.

Please also see the full list of breaking changes in ASP.NET Core 3.0.

To upgrade an existing ASP.NET Core 3.0 Preview 7 project to Preview 8:

  • Update Microsoft.AspNetCore.* package references to 3.0.0-preview8.19405.7.
  • In Razor components rename OnInit to OnInitialized and OnInitAsync to OnInitializedAsync.
  • In Blazor apps, update Razor component parameters to be public, as non-public component parameters now result in an error.
  • In Blazor WebAssembly apps that make use of the HttpClient JSON helpers, add a package reference to Microsoft.AspNetCore.Blazor.HttpClient.
  • On Blazor form components remove use of Id and Class parameters and instead use the HTML id and class attributes.
  • Rename ElementRef to ElementReference.
  • Remove backing field declarations when using @ref or specify the @ref:suppressField parameter to suppress automatic backing field generation.
  • Update calls to ComponentBase.Invoke to call ComponentBase.InvokeAsync.
  • Update uses of ParameterCollection to use ParameterView.
  • Update uses of IComponent.Configure to use IComponent.Attach.
  • Remove use of namespace Microsoft.AspNetCore.Components.Layouts.

You should hopefully now be all set to use .NET Core 3.0 Preview 8.

Project template updates

Cleaned up top-level templates in Visual Studio

Top level ASP.NET Core project templates in the “Create a new project” dialog in Visual Studio no longer appear duplicated in the “Create a new ASP.NET Core web application” dialog. The following ASP.NET Core templates now only appear in the “Create a new project” dialog:

  • Razor Class Library
  • Blazor App
  • Worker Service
  • gRPC Service

Angular template updated to Angular 8

The Angular template for ASP.NET Core 3.0 has now been updated to use Angular 8.

Blazor templates renamed and simplified

We’ve updated the Blazor templates to use a consistent naming style and to simplify the number of templates:

  • The “Blazor (server-side)” template is now called “Blazor Server App”. Use blazorserver to create a Blazor Server app from the command-line.
  • The “Blazor” template is now called “Blazor WebAssembly App”. Use blazorwasm to create a Blazor WebAssembly app from the command-line.
  • To create an ASP.NET Core hosted Blazor WebAssembly app, select the “ASP.NET Core hosted” option in Visual Studio, or pass the --hosted on the command-line

Create a new Blazor app

dotnet new blazorwasm --hosted

Razor Class Library template replaces the Blazor Class Library template

The Razor Class Library template is now setup for Razor component development by default and the Blazor Class Library template has been removed. New Razor Class Library projects target .NET Standard so they can be used from both Blazor Server and Blazor WebAssembly apps. To create a new Razor Class Library template that targets .NET Core and supports Pages and Views instead, select the “Support pages and views” option in Visual Studio, or pass the --support-pages-and-views option on the command-line.

Razor Class Library for Pages and Views

dotnet new razorclasslib --support-pages-and-views

Case-sensitive component binding

Components in .razor files are now case-sensitive. This enables some useful new scenarios and improves diagnostics from the Razor compiler.

For example, the Counter has a button for incrementing the count that is styled as a primary button. What if we wanted a Button component that is styled as a primary button by default? Creating a component named Button in previous Blazor releases was problematic because it clashed with the button HTML element, but now that component matching is case-sensitive we can create our Button component and use it in Counter without issue.

Button.razor

<button class="btn btn-primary" @attributes="AdditionalAttributes" @onclick="OnClick">@ChildContent</button> @code { [Parameter] public EventCallback<UIMouseEventArgs> OnClick { get; set; } [Parameter] public RenderFragment ChildContent { get; set; } [Parameter(CaptureUnmatchedValues = true)] public IDictionary<string, object> AdditionalAttributes { get; set; }
}

Counter.razor

@page "/counter" <h1>Counter</h1> <p>Current count: @currentCount</p> <Button OnClick="IncrementCount">Click me</Button> @code { int currentCount = 0; void IncrementCount() { currentCount++; }
}

Notice that the Button component is pascal cased, which is the typical style for .NET types. If we instead try to name our component button we get a warning that components cannot start with a lowercase letter due to the potential conflicts with HTML elements.

Lowercase component warning

We can move the Button component into a Razor Class Library so that it can be reused in other projects. We can then reference the Razor Class Library from our web app. The Button component will now have the default namespace of the Razor Class Library. The Razor compiler will resolve components based on the in scope namespaces. If we try to use our Button component without adding a using statement for the requisite namespace, we now get a useful error message at build time.

Unrecognized component error

NavLink component updated to handle additional attributes

The built-in NavLink component now supports passing through additional attributes to the rendered anchor tag. Previously NavLink had specific support for the href and class attributes, but now you can specify any additional attribute you’d like. For example, you can specify the anchor target like this:

<NavLink href="my-page" target="_blank">My page</NavLink>

which would render:

<a href="my-page" target="_blank" rel="noopener noreferrer">My page</a>

Improved reconnection logic for Blazor Server apps

Blazor Server apps require a live connection to the server in order to function. If the connection or the server-side state associated with it is lost, then the the client will be unable to function. Blazor Server apps will attempt to reconnect to the server in the event of an intermittent connection loss and this logic has been made more robust in this release. If the reconnection attempts fail before the network connection can be reestablished, then the user can still attempt to retry the connection manually by clicking the provided “Retry” button.

However, if the server-side state associated with the connect was also lost (e.g. the server was restarted) then clients will still be unable to connect. A common situation where this occurs is during development in Visual Studio. Visual Studio will watch the project for file changes and then rebuild and restart the app as changes occur. When this happens the server-side state associated with any connected clients is lost, so any attempt to reconnect with that state will fail. The only option is to reload the app and establish a new connection.

New in this release, the app will now also suggest that the user reload the browser when the connection is lost and reconnection fails.

Reload prompt

Culture aware data binding

Data-binding support (@bind) for <input> elements is now culture-aware. Data bound values will be formatted for display and parsed using the current culture as specified by the System.Globalization.CultureInfo.CurrentCulture property. This means that @bind will work correctly when the user’s desired culture has been set as the current culture, which is typically done using the ASP.NET Core localization middleware (see Localization).

You can also manually specify the culture to use for data binding using the new @bind:culture parameter, where the value of the parameter is a CultureInfo instance. For example, to bind using the invariant culture:

<input @bind="amount" @bind:culture="CultureInfo.InvariantCulture" />

The <input type="number" /> and <input type="date" /> field types will by default use CultureInfo.InvariantCulture and the formatting rules appropriate for these field types in the browser. These field types cannot contain free-form text and have a look and feel that is controller by the browser.

Other field types with specific formatting requirements include datetime-local, month, and week. These field types are not supported by Blazor at the time of writing because they are not supported by all major browsers.

Data binding now also includes support for binding to DateTime?, DateTimeOffset, and DateTimeOffset?.

Automatic generation of backing fields for @ref

The Razor compiler will now automatically generate a backing field for both element and component references when using @ref. You no longer need to define these fields manually:

<button @ref="myButton" @onclick="OnClicked">Click me</button> <Counter @ref="myCounter" IncrementAmount="10" /> @code { void OnClicked() => Console.WriteLine($"I have a {myButton} and myCounter.IncrementAmount={myCounter.IncrementAmount}");
}

In some cases you may still want to manually create the backing field. For example, declaring the backing field manually is required when referencing generic components. To suppress backing field generation specify the @ref:suppressField parameter.

Razor Pages support for @attribute

Razor Pages now support the new @attribute directive for adding attributes to the generate page class.

For example, you can now specify that a page requires authorization like this:

@page
@attribute [Microsoft.AspNetCore.Authorization.Authorize] <h1>Authorized users only!<h1> <p>Hello @User.Identity.Name. You are authorized!</p>

New networking primitives for non-HTTP Servers

As part of the effort to decouple the components of Kestrel, we are introducing new networking primitives allowing you to add support for non-HTTP protocols.

You can bind to an endpoint (System.Net.EndPoint) by calling Bind on an IConnectionListenerFactory. This returns a IConnectionListener which can be used to accept new connections. Calling AcceptAsync returns a ConnectionContext with details on the connection. A ConnectionContext is similar to HttpContext except it represents a connection instead of an HTTP request and response.

The example below show a simple TCP Echo server hosted in a BackgroundService built using these new primitives.

public class TcpEchoServer : BackgroundService
{ private readonly ILogger<TcpEchoServer> _logger; private readonly IConnectionListenerFactory _factory; private IConnectionListener _listener; public TcpEchoServer(ILogger<TcpEchoServer> logger, IConnectionListenerFactory factory) { _logger = logger; _factory = factory; } protected override async Task ExecuteAsync(CancellationToken stoppingToken) { _listener = await _factory.BindAsync(new IPEndPoint(IPAddress.Loopback, 6000), stoppingToken); while (true) { var connection = await _listener.AcceptAsync(stoppingToken); // AcceptAsync will return null upon disposing the listener if (connection == null) { break; } // In an actual server, ensure all accepted connections are disposed prior to completing _ = Echo(connection, stoppingToken); } } public override async Task StopAsync(CancellationToken cancellationToken) { await _listener.DisposeAsync(); } private async Task Echo(ConnectionContext connection, CancellationToken stoppingToken) { try { var input = connection.Transport.Input; var output = connection.Transport.Output; await input.CopyToAsync(output, stoppingToken); } catch (OperationCanceledException) { _logger.LogInformation("Connection {ConnectionId} cancelled due to server shutdown", connection.ConnectionId); } catch (Exception e) { _logger.LogError(e, "Connection {ConnectionId} threw an exception", connection.ConnectionId); } finally { await connection.DisposeAsync(); _logger.LogInformation("Connection {ConnectionId} disconnected", connection.ConnectionId); } }
}

Unix domain socket support for the Kestrel Sockets transport

We’ve updated the default sockets transport in Kestrel to add support Unix domain sockets (on Linux, macOS, and Windows 10, version 1803 and newer). To bind to a Unix socket, you can call the ListenUnixSocket() method on KestrelServerOptions.

public static IHostBuilder CreateHostBuilder(string[] args) => Host.CreateDefaultBuilder(args) .ConfigureWebHostDefaults(webBuilder => { webBuilder .ConfigureKestrel(o => { o.ListenUnixSocket("/var/listen.sock"); }) .UseStartup<Startup>(); });

gRPC support for CallCredentials

In preview8, we’ve added support for CallCredentials allowing for interoperability with existing libraries like Grpc.Auth that rely on CallCredentials.

Diagnostics improvements for gRPC

Support for Activity

The gRPC client and server use Activities to annotate inbound/outbound requests with baggage containing information about the current RPC operation. This information can be accessed by telemetry frameworks for distributed tracing and by logging frameworks.

EventCounters

The newly introduced Grpc.AspNetCore.Server and Grpc.Net.Client providers now emit the following event counters:

  • total-calls
  • current-calls
  • calls-failed
  • calls-deadline-exceeded
  • messages-sent
  • messages-received
  • calls-unimplemented

You can use the dotnet counters global tool to view the metrics emitted.

dotnet counters monitor -p <PID> Grpc.AspNetCore.Server

ServiceReference tooling in Visual Studio

We’ve added support in Visual Studio that makes it easier to manage references to other Protocol Buffers documents and Open API documents.

ServiceReference

When pointed at OpenAPI documents, the ServiceReference experience in Visual Studio can generated typed C#/TypeScript clients using NSwag.

When pointed at Protocol Buffer (.proto) files, the ServiceReference experience will Visual Studio can generate gRPC service stubs, gRPC clients, or message types using the Grpc.Tools package.

SignalR User Survey

We’re interested in how you use SignalR and the Azure SignalR Service, and your opinions on SignalR features. To that end, we’ve created a survey we’d like to invite any SignalR customer to complete. If you’re interested in talking to one of the engineers from the SignalR team about your ideas or feedback, we’ve provided an opportunity to enter your contact information in the survey, but that information is not required. Help us plan the next wave of SignalR features by providing your feedback in the survey.

Give feedback

We hope you enjoy the new features in this preview release of ASP.NET Core and Blazor! Please let us know what you think by filing issues on GitHub.

Thanks for trying out ASP.NET Core and Blazor!

Avatar

Posted on Leave a comment

Azure SignalR Service now supports Event Grid!

Avatar

Ken

Since we GA’ed Azure SignalR Service in last September, serverless has become a very popular use case in Azure SignalR Service and is used by many customers. Unlike the traditional SignalR application which requires a server to host the hub, in serverless scenario no server is needed, instead you can directly send messages to clients through REST APIs or our management SDK which can easily be used in serverless code like Azure Functions.

Though there is a huge benefit which saves you the cost of maintaining the app server, the feature set in serverless scenario is limited. Since there is no real hub, it’s not possible to respond to client activities like client invocations or connection events. Without client events serverless use cases will be limited and we hear a lot of customers asking about this support. Today we’re excited to announce a new feature that enables Azure SignalR Service to publish client events to Azure Event Grid so that you can subscribe and respond to them.

How does it work?

Let’s first revisit how serverless scenario in Azure SignalR Service works.

  1. In serverless scenario, even you don’t have an app server, you still need to have a negotiate API so SignalR client can do the negotiation to get the url to SignalR service and a corresponding access token. Usually this can be done using an Azure Function.

  2. Client will then use the url and access token to connect to SignalR service.

  3. After clients are connected, you can send message to clients using REST APIs or service management SDK. If you are using Azure Functions, our SignalR Service binding does the work for you so you only need to return the messages as an output binding.

This flow is illustrated as step 1-3 in the diagram below:

Serverless workflow

What’s missing here is that there is no equivalent of OnConnected() and OnDisconnected() in serverless APIs so there is no way for the Azure function to know whether a client is connected or disconnected.

Now with Event Grid you’ll be able to get such events through an Event Grid subscription (as step 4 and 5 in the above diagram):

  1. When a client is connected/disconnected to SignalR service, service will publish this event to Event Grid.

  2. In Azure function you can have an Event Grid trigger and subscribe to such events, then Event Grid will send those events to the function (through a webhook).

How to use it?

It’s very simple to make your serverless application subscribe to SignalR connection events. Let’s use Azure function as an example.

  1. First you need to make sure your SignalR Service instance is in serverless mode. (Create a SignalR Service instance if you haven’t done so.)

    Enable serverless mode

  2. Create an Event Grid trigger in your function app.

    Create Event Grid trigger

  3. In the Event Grid trigger, add an Event Grid subscription.

    Add Event Grid Subscription

    Then select your SignalR Service instance.

    Select SignalR Service instance

Now you’re all set! Your function app is now able to get connection events from SignalR Service.

To test it, you just need to open a SignalR connection to the service. You can use the SignalR client in our sample repo, which contains a simple negotiate API implementation.

  1. Clone AzureSignalR-samples repo.

  2. Start the sample negotiation server.

    cd samples\Management\NegotiationServer
    set Azure__SignalR__ConnectionString=<connection_string>
    dotnet run
    
  3. Run SignalR client.

    cd samples\Management\SignalRClient
    dotnet run
    

    Open the function logs in Azure portal and you’ll see a connected event is sent to the function:

    Azure Function output

    If you stop the client you’ll also see a disconnected event is received.

Try it now!

This feature is now in public preview so feel free to try it out and let us know your feedback by filing issues on Github.

For more information about how to use Event Grid with SignalR Service, you can read this article or try this sample.

Avatar
Ken Chen

Principal Software Engineering Manager

Follow Ken