Posted on Leave a comment

Modernize .NET Anywhere with GitHub Copilot

Modernizing a .NET application is rarely a single step. It requires understanding the current state of the codebase, evaluating dependencies, identifying potential breaking changes, and sequencing updates carefully.

Until recently, GitHub Copilot modernization for .NET ran primarily inside Visual Studio. That worked well for teams standardized on the IDE, but many teams build elsewhere. Some use VS Code. Some work directly from the terminal. Much of the coordination happens on GitHub, not in a single developer’s local environment.

The modernize-dotnet custom agent changes that. The same modernization workflow can now run across Visual Studio, VS Code, GitHub Copilot CLI, and GitHub. The intelligence behind the experience remains the same. What’s new is where it can run. You can modernize in the environment you already use instead of rerouting your workflow just to perform an upgrade.

The modernize-dotnet agent builds on the broader GitHub Copilot modernization platform, which follows an assess → plan → execute model. Workload-specific agents such as modernize-dotnet, modernize-java, and modernize-azure-dotnet guide applications toward their modernization goals, working together across code upgrades and cloud migration scenarios.

What the agent produces

Every modernization run generates three explicit artifacts in your repository: an assessment that surfaces scope and potential blockers, a proposed upgrade plan that sequences the work, and a set of upgrade tasks that apply the required code transformations.

Because these artifacts live alongside your code, teams can review, version, discuss, and modify them before execution begins. Instead of a one-shot upgrade attempt, modernization becomes traceable and deliberate.

GitHub Copilot CLI

For terminal-first engineers, GitHub Copilot CLI provides a natural entry point.

You can assess a repository, generate an upgrade plan, and run the upgrade without leaving the shell.

  1. Add the marketplace: /plugin marketplace add dotnet/modernize-dotnet
  2. Install the plugin: /plugin install modernize-dotnet@modernize-dotnet-plugins
  3. Select the agent: /agent to select modernize-dotnet
  4. Then prompt the agent, for example: upgrade my solution to a new version of .NET

Modernize .NET in GitHub Copilot CLI

The agent generates the assessment, upgrade plan, and upgrade tasks directly in the repository. You can review scope, validate sequencing, and approve transformations before execution. Once approved, the agent automatically executes the upgrade tasks directly from the CLI.

GitHub

On GitHub, the agent can be invoked directly within a repository. The generated artifacts live alongside your code, shifting modernization from a local exercise to a collaborative proposal. Instead of summarizing findings in meetings, teams review the plan and tasks where they already review code. Learn how to add custom coding agents to your repo, then add the modernize-dotnet agent by following the README in the modernize-dotnet repository.

VS Code

If you use VS Code, install the GitHub Copilot modernization extension and select modernize-dotnet from the Agent picker in Copilot Chat. Then prompt the agent with the upgrade you want to perform, for example: upgrade my project to .NET 10.

Visual Studio

If Visual Studio is your primary IDE, the structured modernization workflow remains fully integrated.

Right-click your solution or project in Solution Explorer and select the Modernize action to perform an upgrade.

Supported workloads

GitHub Copilot modernization supports upgrades across common .NET project types, including ASP.NET Core (MVC, Razor Pages, Web API), Blazor, Azure Functions, WPF, class libraries, and console applications.

Migration from .NET Framework to modern .NET is also supported for application types such as ASP.NET (MVC, Web API), Windows Forms, WPF, and Azure Functions, with Web Forms support coming soon.

The CLI and VS Code experiences are cross-platform. However, migrations from .NET Framework require Windows.

Custom skills

Skills are a standard part of GitHub Copilot’s agentic platform. They let teams define reusable, opinionated behaviors that agents apply consistently across workflows.

The modernize-dotnet agent supports custom skills, allowing organizations to encode internal frameworks, migration patterns, or architectural standards directly into the modernization workflow. Any skills added to the repository are automatically applied when the agent performs an upgrade.

You can learn more about how skills work and how to create them in the Copilot skills documentation.

Give it a try

Run the modernize-dotnet agent on a repository you’re planning to upgrade and explore the modernization workflow in the environment you already use.

If you try it, we’d love to hear how it goes. Share feedback or report issues in the modernize-dotnet repository.

Posted on Leave a comment

.NET 10.0.5 Out-of-Band Release – macOS Debugger Fix

We are releasing .NET 10.0.5 as an out-of-band (OOB) update to address a regression introduced in .NET 10.0.4.

What’s the issue?

.NET 10.0.4 introduced a regression that causes the debugger to crash when debugging applications on macOS using Visual Studio Code. After installing .NET SDK 10.0.104 or 10.0.200, the debugger could crash when attempting to debug any .NET application on macOS (particularly affecting ARM64 Macs).

This regression is unrelated to the security fixes included in 10.0.4.

Who is affected?

This issue specifically affects:

  • macOS users (particularly Apple Silicon/ARM64)
  • Using Visual Studio Code for debugging
  • Who have installed .NET SDK 10.0.104 or 10.0.200 or .NET 10.0.4 runtime

Important

If you are developing on macOS and use Visual Studio Code for debugging .NET applications, you should install this update. Other platforms (Windows, Linux) and development environments are not affected by this regression.

Download .NET 10.0.5

Installation guidance

For macOS users with VS Code:

  1. Download and install .NET 10.0.5
  2. Restart Visual Studio Code
  3. Verify the installation by running dotnet --version in your terminal

For other platforms:
You may continue using .NET 10.0.4 unless you prefer to stay on the latest patch version. This release addresses a specific crash issue and does not include additional fixes beyond what was released in 10.0.4.

Share your feedback

If you continue to experience issues after installing this update, please let us know in the Release feedback issue.

Thank you for your patience as we worked to resolve this issue quickly for our macOS developer community.

Posted on Leave a comment

Extend your coding agent with .NET Skills

Coding agents are becoming part of everyday development, but quality of responses
and usefulness still depends on the best context as input. That context comes in
different forms starting from your environment, the code in the workspace, the
model training knowledge, previous memory, agent instructions, and of course
your own starting prompt. On the .NET team we’ve really adopted coding agents as
a part of our regular workflow and have, like you, learned the ways to improve
our productivity by providing great context. Across our repos we’ve adopted our
agent instructions and have also started to use agent skills to improve our
workflows. We’re introducing dotnet/skills,
a repository that hosts a set of agent skills for .NET developers from the team
who is building the platform itself.

What is an agent skill?

If you’re new to the concept, an agent skill is a lightweight package with specialized knowledge an agent can discover and use while solving a task. A skill bundles intent,
task-specific context, and supporting artifacts so the agent can choose better
actions with less trial and error. This work follows the
Agent Skills specification, which defines a common
model for authoring and sharing these capabilities with coding agents. GitHub Copilot CLI, VS Code, Claude Code and other coding agents support this specification.

What we are doing with dotnet/skills

With dotnet/skills, we’re publishing skills from the team that ships the platform.
These are the same workflows we’ve used ourselves, with first-party teams, and
in engineering scenarios we’ve seen in working with developers like yourself.

So what does that look like in practice? You’re not starting from generic
prompts. You’re starting from patterns we’ve already tested while shipping
.NET.

Our goal is practical: ship skills that help agents complete common .NET tasks
more reliably, with better context and fewer dead ends.

Does it help?

While we’ve learned that context is essential, we also have learned not to assume
more is always better. The AI models are getting remarkably better each release
and what was thought to be needed even 3 months ago, may no longer be required
with newer models. In producing skills we want to measure the validity if an
added skill actually improves the result. For each of our skills merged, we run
a lightweight validator (also available in the repo) to score it. We’re also learning the best graders/evals for this type…and so is the ecosystem as well.

Think of this as a unit test for a skill, not an integration test for the
whole system. We measure (using a specific model each run) against a baseline (no skill present) and try to score if the specific skill improved the intended behavior, and by how much. Some of this is taste as well so we’re careful not to draw too many hard lines on a specific number, but look at the result, adjust and re-score.

Each skill’s evaluation lives in the repository as well, so
you can inspect and run them. This gives us a practical signal on usefulness
without waiting for large end-to-end benchmark cycles. We will continue to learn in this space and adjust. We have a lot of partner teams trying different evaluation techniques as well at this level. The real test is you telling us if they have improved.

A developer posted this just recently on Discord sharing what we want to see:

The skill just worked with the log that I’ve with me, thankfully it was smartter[sic] than me and found the correct debug symbol. At the end it says the crash is caused by a heap corruption and the stack-trace points to GC code, by any chance does it ring a bell for you?

This is a great example of how a skill accelerated to the next step rapidly in this particular investigation for this developer. This is the true definition of success in unblocking and accelerating productivity.

Discovery, installation, and using skills

Popular agent tools have adopted the concept of
plugin marketplaces
which simply put are a registry of agent artifacts, like skills. The
plugin definition
serves as an organizational unit and defines what skills, agents, hooks, etc.
exist for that plugin in a single installable package. The dotnet/skills repo
is organized in the same manner, with the repo serving as the marketplace and we
have organized a set of plugins by functional areas. We’ll continue to define
more plugins as they get merged and based on your feedback.

While you can simply copy the SKILL.md files directly to your environment, the
plugin concept in coding agents like GitHub Copilot aim to make that process simpler.
As noted in the
README,
you can register the repo as a marketplace and browse/install the plugins.

/plugin marketplace add dotnet/skills

Once the marketplace is added, then you can browse any marketplace for a set of plugins to install and install the named plugin:

/plugin marketplace browse dotnet-agent-skills
/plugin install <plugin>@dotnet-agent-skills

Copilot CLI browsing plugin marketplace and installing a plugin via the CLI

They are now available in your environment automatically by your coding agent, or you can also invoke them explicitly.

/dotnet:analyzing-dotnet-performance

And in VS Code you can add the marketplace URL into the Copilot extension settings for Insiders, adding https://github.com/dotnet/skills as the location and then you can browse in the extensions explorer to install, and then directly execute in Copilot Chat using the slash command:

Browsing agent plugins in the Extension marketplace

We acknowledge that discovery of even marketplaces can be a challenge and are
working with our own Copilot partners and ecosystem to better understand ways to
improve this discovery flow — it’s hard to use great skills if you don’t know
where to look! We’ll be sure to post more on any changes and possible .NET
specific tools to help identify skills that will make your project and developer
productivity better.

Starting principles

Like evolving standards in the AI extensibility space, skills is fast moving. We
are starting with the principle of simplicity first. We’ve seen in our own uses
that a huge set of new tools may not be needed with well scoped skills
themselves. Where we need more, we’ll leverage things like MCP or scripts, or
SDK tools that already exist and rely on them to enhance the particular skill
workflow. We want our skills to be proven, practical, and task-oriented.

We also know there are great community-provided agent skills that have evolved,
like github/awesome-copilot which
provide a lot of value for specific libraries and architectural patterns for .NET
developers. We support all these efforts as well and don’t think there is a ‘one
winner’ skills marketplace for .NET developers. We want our team to keep focused
closest to the core runtime, concepts, tools, and frameworks we deliver as a
team and support and learn from the community as the broader set of agentic
skills help all .NET developers in many more ways. Our skills are meant to
complement, not replace any other marketplace of skills.

What’s next

The AI ecosystem is moving fast, and this repository will too. We’ll iterate
and learn in the open with the developer community.

Expect frequent updates, new skills, and continued collaboration as we improve
how coding agents work across .NET development scenarios.

Explore dotnet/skills, try the skills in your own workflows, and share
feedback
on things that can improve or new ideas we should consider.

Posted on Leave a comment

Release v1.0 of the official MCP C# SDK

The Model Context Protocol (MCP) C# SDK has reached its v1.0 milestone, bringing full support for the
2025-11-25 version of the MCP Specification.
This release delivers a rich set of new capabilities — from improved authorization flows and richer metadata,
to powerful new patterns for tool calling, elicitation, and long-running request handling.

Here’s a tour of what’s new.

Enhanced authorization server discovery

In the previous spec, servers were required to provide a link to their Protected Resource Metadata (PRM) Document
in the resource_metadata parameter of the WWW-Authenticate header.
The 2025-11-25 spec broadens this, giving servers three ways to expose the PRM:

  1. Via a URL in the resource_metadata parameter of the WWW-Authenticate header (as before)
  2. At a “well-known” URL derived from the server’s MCP endpoint path
    (e.g. https://example.com/.well-known/oauth-protected-resource/public/mcp)
  3. At the root well-known URL (e.g. https://example.com/.well-known/oauth-protected-resource)

Clients check these locations in order.

On the server side, the SDK’s AddMcp extension method on AuthenticationBuilder
makes it easy to configure the PRM Document:

.AddMcp(options =>
{ options.ResourceMetadata = new() { ResourceDocumentation = new Uri("https://docs.example.com/api/weather"), AuthorizationServers = { new Uri(inMemoryOAuthServerUrl) }, ScopesSupported = ["mcp:tools"], };
});

When configured this way, the SDK automatically hosts the PRM Document at the well-known location
and includes the link in the WWW-Authenticate header. On the client side, the SDK handles the
full discovery sequence automatically.

Icons for tools, resources, and prompts

The 2025-11-25 spec adds icon metadata to Tools, Resources, and Prompts. This information is included
in the response to tools/list, resources/list, and prompts/list requests.
Implementation metadata (describing a client or server) has also been extended with icons and a website URL.

The simplest way to add an icon for a tool is with the IconSource parameter on the McpServerToolAttribute:

[McpServerTool(Title = "This is a title", IconSource = "https://example.com/tool-icon.svg")]
public static string ToolWithIcon(

The McpServerResourceAttribute, McpServerResourceTemplateAttribute, and McpServerPromptAttribute
have also added an IconSource parameter.

For more advanced scenarios — multiple icons, MIME types, size hints, and theme preferences — you can
configure icons programmatically via McpServerToolCreateOptions.Icons:

.WithTools([ McpServerTool.Create( typeof(EchoTool).GetMethod(nameof(EchoTool.Echo))!, options: new McpServerToolCreateOptions { Icons = [ new Icon { Source = "https://raw.githubusercontent.com/microsoft/fluentui-emoji/main/assets/Loudspeaker/Flat/loudspeaker_flat.svg", MimeType = "image/svg+xml", Sizes = ["any"], Theme = "light" }, new Icon { Source = "https://raw.githubusercontent.com/microsoft/fluentui-emoji/main/assets/Loudspeaker/3D/loudspeaker_3d.png", MimeType = "image/png", Sizes = ["256x256"], Theme = "dark" } ] } )
])

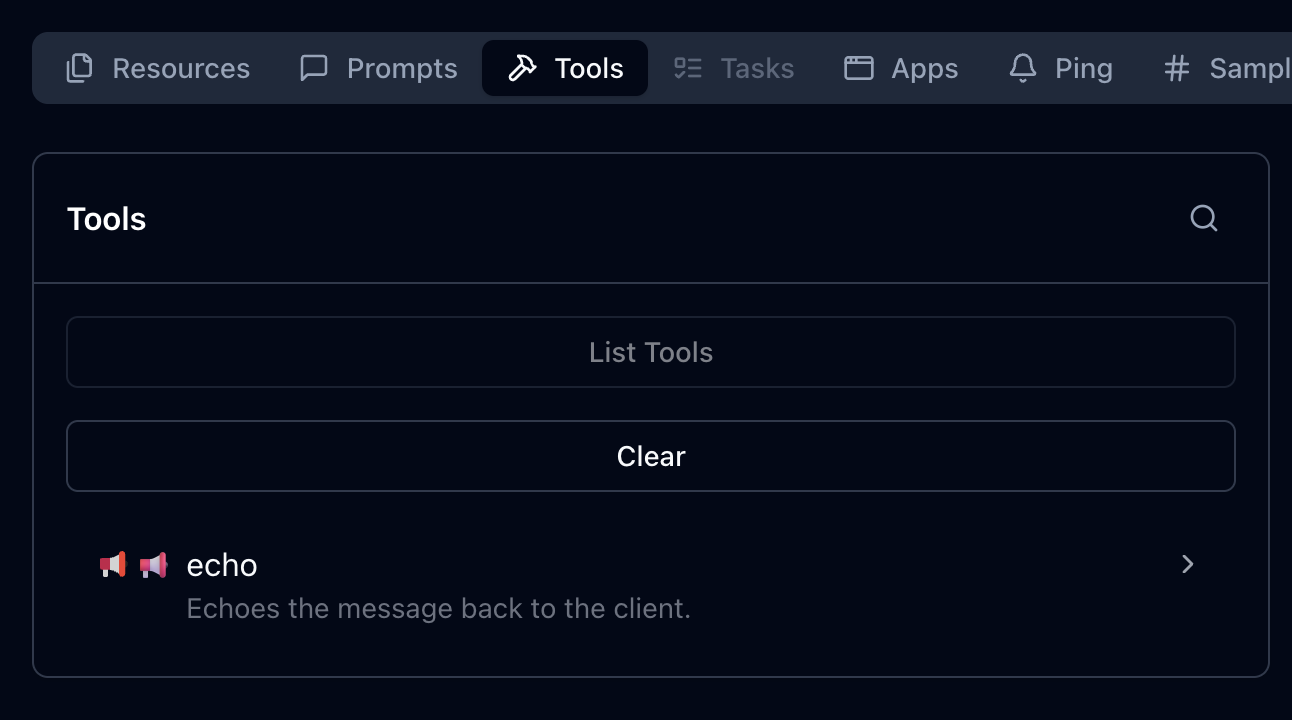
Here’s how these icons could be displayed, as illustrated in the MCP Inspector:

Icons displayed in MCP Inspector showing tool icons with different themes and styles

This placement works well after the code example showing how to configure multiple icons, providing a visual demonstration of how those icons appear in practice.

The Implementation class also has
Icons and
WebsiteUrl properties for server and client metadata:

.AddMcpServer(options =>
{ options.ServerInfo = new Implementation { Name = "Everything Server", Version = "1.0.0", Title = "MCP Everything Server", Description = "A comprehensive MCP server demonstrating all MCP features", WebsiteUrl = "https://github.com/modelcontextprotocol/csharp-sdk", Icons = [ new Icon { Source = "https://raw.githubusercontent.com/microsoft/fluentui-emoji/main/assets/Gear/Flat/gear_flat.svg", MimeType = "image/svg+xml", Sizes = ["any"], Theme = "light" } ] };
})

Incremental scope consent

The incremental scope consent feature brings the Principle of Least Privilege
to MCP authorization, allowing clients to request only the minimum access needed for each operation.

MCP uses OAuth 2.0 for authorization, where scopes define the level of access a client has.
Previously, clients might request all possible scopes up front because they couldn’t know which scopes
a specific operation would require. With incremental scope consent, clients start with minimal scopes
and request additional ones as needed.

The mechanism works through two flows:

  • Initial scopes: When a client makes an unauthenticated request, the server responds with
    401 Unauthorized and a WWW-Authenticate header that now includes a scopes parameter listing
    the scopes needed for the operation. Clients request authorization for only these scopes.

  • Additional scopes: When a client’s token lacks scopes for a particular operation, the server
    responds with 403 Forbidden and a WWW-Authenticate header containing an error parameter
    of insufficient_scope and a scopes parameter with the required scopes. The client then
    obtains a new token with the expanded scopes and retries.

Client support for incremental scope consent

The MCP C# client SDK handles incremental scope consent automatically. When it receives a 401 or 403 with a scopes
parameter in the WWW-Authenticate header, it extracts the required scopes and initiates the
authorization flow — no additional client code needed.

Server support for incremental scope consent

Setting up incremental scope consent on the server involves:

  1. Adding authentication services configured with the MCP authentication scheme:

    builder.Services.AddAuthentication(options =>
    { options.DefaultAuthenticateScheme = McpAuthenticationDefaults.AuthenticationScheme; options.DefaultChallengeScheme = McpAuthenticationDefaults.AuthenticationScheme;
    })
  2. Enabling JWT bearer authentication with appropriate token validation:

    .AddJwtBearer(options =>
    { options.TokenValidationParameters = new TokenValidationParameters { ValidateIssuer = true, ValidateAudience = true, ValidateLifetime = true, ValidateIssuerSigningKey = true, // Other validation settings as appropriate };
    })

    The following token validation settings are strongly recommended:

    Setting Value Description
    ValidateIssuer true Ensures the token was issued by a trusted authority
    ValidateAudience true Verifies the token is intended for this server
    ValidateLifetime true Checks that the token has not expired
    ValidateIssuerSigningKey true Confirms the token signature is valid
  3. Specifying authentication scheme metadata to guide clients on obtaining access tokens:

    .AddMcp(options =>
    { options.ResourceMetadata = new() { ResourceDocumentation = new Uri("https://docs.example.com/api/weather"), AuthorizationServers = { new Uri(inMemoryOAuthServerUrl) }, ScopesSupported = ["mcp:tools"], };
    });
  4. Performing authorization checks in middleware.
    Authorization checks should be implemented in ASP.NET Core middleware instead of inside the tool method itself. This is because the MCP HTTP handler may (and in practice does) flush response headers before invoking the tool. By the time the tool call method is invoked, it is too late to set the response status code or headers.

    Unfortunately, the middleware may need to inspect the contents of the request to determine which scopes are required, which involves an extra deserialization for incoming requests. But help may be on the way in future versions of the MCP protocol that will avoid this overhead in most cases. Stay tuned…

    In addition to inspecting the request, the middleware must also extract the scopes from the access token sent in the request. In the MCP C# SDK, the authentication handler extracts the scopes from the JWT and converts them to claims in the HttpContext.User property. The way these claims are represented depends on the token issuer and the JWT structure. For a token issuer that represents scopes as a space-separated string in the scope claim, you can determine the scopes passed in the request as follows:

    var user = context.User;
    var userScopes = user?.Claims .Where(c => c.Type == "scope" || c.Type == "scp") .SelectMany(c => c.Value.Split(' ')) .Distinct() .ToList();

    With the scopes extracted from the request, the server can then check if the required scope(s) for the requested operation is included with userScopes.Contains(requiredScope).

    If the required scopes are missing, respond with 403 Forbidden and a WWW-Authenticate header, including an error parameter indicating insufficient_scope and a scopes parameter indicating the scopes required.
    The MCP Specification describes several strategies for choosing which scopes to include:

    • Minimum approach: Only the newly-required scopes (plus any existing granted scopes that are still relevant)
    • Recommended approach: Existing relevant scopes plus newly required scopes
    • Extended approach: Existing scopes, newly required scopes, and related scopes that commonly work together

URL mode elicitation

URL mode elicitation enables secure out-of-band interactions between the server and end-user,
bypassing the MCP host/client entirely. This is particularly valuable for gathering sensitive data — like API keys,
third-party authorizations, and payment information — that would pose a security risk
if transmitted through the client.

Inspired by web security standards like OAuth, this mechanism lets the MCP client obtain user consent
and direct the user’s browser to a secure server-hosted URL where the sensitive interaction takes place.

The MCP host/client must present the elicitation request to the user — including the server’s identity
and the purpose of the request — and provide options to decline or cancel.
What the server does at the elicitation URL is outside the scope of MCP; it could present a form,
redirect to a third-party authorization service, or anything else.

Client support for URL mode elicitation

Clients indicate support by setting the Url property in Capabilities.Elicitation:

McpClientOptions options = new()
{ Capabilities = new ClientCapabilities { Elicitation = new ElicitationCapability { Url = new UrlElicitationCapability() } } // other client options

The client must also provide an ElicitationHandler.
Since there’s a single handler for both form mode and URL mode elicitation, the handler should begin by checking the
Mode property of the ElicitationRequest parameters
to determine which mode is being requested and handle it accordingly.

async ValueTask<ElicitResult> HandleElicitationAsync(ElicitRequestParams? requestParams, CancellationToken token)
{ if (requestParams is null || requestParams.Mode != "url" || requestParams.Url is null) { return new ElicitResult(); } // Success path for URL-mode elicitation omitted for brevity.
}

Server support for URL mode elicitation

The server must define an endpoint for the elicitation URL and handle the response.
Typically the response is submitted via POST to keep sensitive data out of URLs and logs.
If the URL serves a form, it should include anti-forgery tokens to prevent CSRF attacks —
ASP.NET Core provides built-in support for this.

One approach is to create a Razor Page:

public class ElicitationFormModel : PageModel
{ public string ElicitationId { get; set; } = string.Empty; public IActionResult OnGet(string id) { // Serves the elicitation URL when the user navigates to it } public async Task<IActionResult> OnPostAsync(string id, string name, string ssn, string secret) { // Handles the elicitation response when the user submits the form }
}

Note the id parameter on both methods — since an MCP server using Streamable HTTP Transport
is inherently multi-tenant, the server must associate each elicitation request and response
with the correct MCP session. The server must maintain state to track pending elicitation requests
and communicate responses back to the originating MCP request.

Tool calling support in sampling

This is one of the most powerful additions in the 2025-11-25 spec. Servers can now include tools
in their sampling requests, which the LLM may invoke to produce a response.

While providing tools to LLMs is a central feature of MCP, tools in sampling requests are fundamentally different
from standard MCP tools — despite sharing the same metadata structure. They don’t need to be implemented
as standard MCP tools, so the server must implement its own logic to handle tool invocations.

The flow is important to understand: when the LLM requests a tool invocation during sampling,
that’s the response to the sampling request. The server executes the tool, then issues a new
sampling request that includes both the tool call request and the tool call response. This continues
until the LLM produces a final response with no tool invocation requests.

sequenceDiagram participant Server participant Client Server->>Client: CreateMessage Request Note right of Client: messages: [original prompt]<br/>tools: [tool definitions] Client-->>Server: CreateMessage Response Note left of Server: stopReason: tool_calls<br/>toolCalls: [tool call 1, tool call 2] Note over Server: Server executes tools locally Server->>Client: CreateMessage Request Note right of Client: messages: [<br/> original prompt,<br/> tool call 1 request,<br/> tool call 1 response,<br/> tool call 2 request,<br/> tool call 2 response<br/>]<br/>tools: [tool definitions] Client-->>Server: CreateMessage Response Note left of Server: stopReason: end_turn<br/>content: [final response]

Client/host support for tool calling in sampling

Clients declare support for tool calling in sampling through their capabilities and must provide
a SamplingHandler:

var mcpClient = await McpClient.CreateAsync( new HttpClientTransport(new() { Endpoint = new Uri("http://localhost:6184"), Name = "SamplingWithTools MCP Server", }), clientOptions: new() { Capabilities = new ClientCapabilities { Sampling = new SamplingCapability { Tools = new SamplingToolsCapability {} } }, Handlers = new() { SamplingHandler = async (c, p, t) => { return await samplingHandler(c, p, t); }, } });

Implementing the SamplingHandler from scratch would be complex, but the Microsoft.Extensions.AI
package makes it straightforward. You can obtain an IChatClient from your LLM provider and use
CreateSamplingHandler to get a handler that translates between MCP and your LLM’s tool invocation format:

IChatClient chatClient = new OpenAIClient(new ApiKeyCredential(token), new OpenAIClientOptions { Endpoint = new Uri(baseUrl) }) .GetChatClient(modelId) .AsIChatClient(); var samplingHandler = chatClient.CreateSamplingHandler();

The sampling handler from IChatClient handles format translation but does not implement user consent
for tool invocations. You can wrap it in a custom handler to add consent logic.
Note that it will be important to cache user approvals to avoid prompting the user multiple times for the same tool invocation during a single sampling session.

Server support for tool calling in sampling

Servers can take advantage of the tool calling support in sampling if they are connected to a client/host that also supports this feature.
Servers can check whether the connected client supports tool calling in sampling:

if (_mcpServer?.ClientCapabilities?.Sampling?.Tools is not {})
{ return "Error: Client does not support sampling with tools.";
}

Tools for sampling can be described as simple Tool objects:

Tool rollDieTool = new Tool()
{ Name = "roll_die", Description = "Rolls a single six-sided die and returns the result (1-6)."
};

But the real power comes from using Microsoft.Extensions.AI on the server side too. The McpServer.AsSamplingChatClient()
method returns an IChatClient that supports sampling, and UseFunctionInvocation adds tool calling support:

IChatClient chatClient = ChatClientBuilderChatClientExtensions.AsBuilder(_mcpServer.AsSamplingChatClient()) .UseFunctionInvocation() .Build();

Define tools as AIFunction objects and pass them in ChatOptions:

AIFunction rollDieTool = AIFunctionFactory.Create( () => Random.Shared.Next(1, 7), name: "roll_die", description: "Rolls a single six-sided die and returns the result (1-6)."
); var chatOptions = new ChatOptions
{ Tools = [rollDieTool], ToolMode = ChatToolMode.Auto
}; var pointRollResponse = await chatClient.GetResponseAsync( "<Prompt that may use the roll_die tool>", chatOptions, cancellationToken
);

The IChatClient handles all the complexity: sending sampling requests with tools, processing
tool invocation requests, executing tools, and translating between MCP and LLM formats.

OAuth Client ID Metadata Documents

The 2025-11-25 spec introduces Client ID Metadata Documents (CIMDs) as an alternative
to Dynamic Client Registration (DCR) for establishing client identity with an authorization server.
CIMD is now the preferred method for client registration in MCP.

The idea is simple: the client specifies a URL as its client_id in authorization requests.
That URL resolves to a JSON document hosted by the client containing its metadata — identifiers,
redirect URIs, and other descriptive information. When an authorization server encounters this client_id,
it dereferences the URL and uses the metadata to understand and apply policy to the client.

In the C# SDK, clients specify a CIMD URL via ClientOAuthOptions:

const string ClientMetadataDocumentUrl = $"{ClientUrl}/client-metadata/cimd-client.json"; await using var transport = new HttpClientTransport(new()
{ Endpoint = new(McpServerUrl), OAuth = new ClientOAuthOptions() { RedirectUri = new Uri("http://localhost:1179/callback"), AuthorizationRedirectDelegate = HandleAuthorizationUrlAsync, ClientMetadataDocumentUri = new Uri(ClientMetadataDocumentUrl) },
}, HttpClient, LoggerFactory);

The CIMD URL must use HTTPS, have a non-empty path, and cannot contain dot segments or a fragment component.
The document itself must include at least client_id, client_name, and redirect_uris.

The SDK will attempt CIMD first, and fall back to DCR if the authorization server doesn’t support it
(provided DCR is enabled in the OAuth options).

Long-running requests over HTTP with polling

At the data layer, MCP is a message-based protocol with no inherent time limits.
But over HTTP, timeouts are a fact of life. The 2025-11-25 spec significantly improves the story
for long-running requests.

Previously, clients could disconnect and reconnect if the server provided an Event ID in SSE events,
but few servers implemented this — partly because it implied supporting stream resumption from any
event ID all the way back to the start. And servers couldn’t proactively disconnect; they had to
wait for clients to do so.

The new approach is cleaner. Servers that open an SSE stream for a request begin with an empty event
that includes an Event ID and optionally a Retry-After field. After sending this initial event,
servers can close the stream at any time, since the client can reconnect using the Event ID.

Server support for long-running requests

To enable this, the server provides an ISseEventStreamStore implementation. The SDK includes
DistributedCacheEventStreamStore, which works with any IDistributedCache:

// Add a MemoryDistributedCache to the service collection
builder.Services.AddDistributedMemoryCache();
// Add the MCP server with DistributedCacheEventStreamStore for SSE stream storage
builder.Services .AddMcpServer() .WithHttpTransport() .WithDistributedCacheEventStreamStore() .WithTools<RandomNumberTools>();

When a request handler wants to drop the SSE connection and let the client poll for the result,
it calls EnablePollingAsync on the McpRequestContext:

await context.EnablePollingAsync(retryInterval: TimeSpan.FromSeconds(retryIntervalInSeconds));

The McpRequestContext is available in handlers for MCP requests by simply adding it as a parameter to the handler method.

Implementation considerations

Event stream stores can be susceptible to unbounded memory growth, so consider these retention strategies:

Tasks (experimental)

Note: Tasks are an experimental feature in the 2025-11-25 MCP Specification. The API may change in future releases.

The 2025-11-25 version of the MCP Specification introduces tasks, a new primitive that provides durable state tracking
and deferred result retrieval for MCP requests. While stream resumability
handles transport-level concerns like reconnection and event replay, tasks operate at the data layer to ensure
that request results are durably stored and can be retrieved at any point within a server-defined retention window —
even if the original connection is long gone.

The key concept is that tasks augment existing requests rather than replacing them.
A client includes a task field in a request (e.g. tools/call) to signal that it wants durable result tracking.
Instead of the normal response, the server returns a CreateTaskResult containing task metadata — a unique task ID, the current status (working),
timestamps, a time-to-live (TTL), and optionally a suggested poll interval.
The client then uses tasks/get to poll for status, tasks/result to retrieve the stored result,
tasks/list to enumerate tasks, and tasks/cancel to cancel a running task.

This durability is valuable in several scenarios:

  • Resilience to dropped results: If a result is lost due to a network failure, the client can retrieve it again by task ID
    rather than re-executing the operation.
  • Explicit status tracking: Clients can query the server to determine whether a request is still in progress, succeeded, or failed,
    rather than relying on notifications or waiting indefinitely.
  • Integration with workflow systems: MCP servers wrapping existing workflow APIs (e.g. CI/CD pipelines, batch processing, multi-step analysis)
    can map their existing job tracking directly to the task primitive.

Tasks follow a defined lifecycle through these status values:

Status Description
working Task is actively being processed
input_required Task is waiting for additional input (e.g., elicitation)
completed Task finished successfully; results are available
failed Task encountered an error
cancelled Task was cancelled by the client

The last three states (completed, failed, and cancelled) are terminal — once a task reaches one of these states, it cannot transition to any other state.

Task support is negotiated through explicit capability declarations during initialization.
Servers declare that they support task-augmented tools/call requests, while clients can declare support for
task-augmented sampling/createMessage and elicitation/create requests.

Server support for tasks

To enable task support on an MCP server, configure a task store when setting up the server.
The task store is responsible for managing task state — creating tasks, storing results, and handling cleanup.

var taskStore = new InMemoryMcpTaskStore(); builder.Services.AddMcpServer(options =>
{ options.TaskStore = taskStore;
})
.WithHttpTransport()
.WithTools<MyTools>(); // Alternatively, you can register an IMcpTaskStore globally with DI, but you only need to configure it one way.
//builder.Services.AddSingleton<IMcpTaskStore>(taskStore);

The InMemoryMcpTaskStore is a reference implementation suitable for development and single-server deployments.
For production multi-server scenarios, implement IMcpTaskStore
with a persistent backing store (database, Redis, etc.).

The InMemoryMcpTaskStore constructor accepts several optional parameters to control task retention, polling behavior,
and resource limits:

var taskStore = new InMemoryMcpTaskStore( defaultTtl: TimeSpan.FromHours(1), // Default task retention time maxTtl: TimeSpan.FromHours(24), // Maximum allowed TTL pollInterval: TimeSpan.FromSeconds(1), // Suggested client poll interval cleanupInterval: TimeSpan.FromMinutes(5), // Background cleanup frequency pageSize: 100, // Tasks per page for listing maxTasks: 1000, // Maximum total tasks allowed maxTasksPerSession: 100 // Maximum tasks per session
);

Tools automatically advertise task support when they return Task, ValueTask, Task<T>, or ValueTask<T> (i.e. async methods).
You can explicitly control task support on individual tools using the ToolTaskSupport enum:

  • Forbidden (default for sync methods): Tool cannot be called with task augmentation
  • Optional (default for async methods): Tool can be called with or without task augmentation
  • Required: Tool must be called with task augmentation

Set TaskSupport on the McpServerTool attribute:

[McpServerTool(TaskSupport = ToolTaskSupport.Required)]
[Description("Processes a batch of data records. Always runs as a task.")]
public static async Task<string> ProcessData( [Description("Number of records to process")] int recordCount, CancellationToken cancellationToken)
{ await Task.Delay(TimeSpan.FromSeconds(8), cancellationToken); return $"Processed {recordCount} records successfully.";
}

Or set it via McpServerToolCreateOptions.Execution when registering tools explicitly:

builder.Services.AddMcpServer() .WithTools([ McpServerTool.Create( (int count, CancellationToken ct) => ProcessAsync(count, ct), new McpServerToolCreateOptions { Name = "requiredTaskTool", Execution = new ToolExecution { TaskSupport = ToolTaskSupport.Required } }) ]);

For more control over the task lifecycle, a tool can directly interact with
IMcpTaskStore and return an McpTask.
This bypasses automatic task wrapping and allows the tool to create a task, schedule background work, and return immediately.
Note: use a static method and accept IMcpTaskStore as a method parameter rather than via constructor injection
to avoid DI scope issues when the SDK executes the tool in a background context.

Client support for tasks

To execute a tool as a task, a client includes the Task property in the request parameters:

var result = await client.CallToolAsync( new CallToolRequestParams { Name = "processDataset", Arguments = new Dictionary<string, JsonElement> { ["recordCount"] = JsonSerializer.SerializeToElement(1000) }, Task = new McpTaskMetadata { TimeToLive = TimeSpan.FromHours(2) } }, cancellationToken); if (result.Task != null)
{ Console.WriteLine($"Task created: {result.Task.TaskId}"); Console.WriteLine($"Status: {result.Task.Status}");
}

The client can then poll for status updates and retrieve the final result:

// Poll until task reaches a terminal state
var completedTask = await client.PollTaskUntilCompleteAsync( taskId, cancellationToken: cancellationToken); switch (completedTask.Status)
{ case McpTaskStatus.Completed: // ... break; case McpTaskStatus.Failed: // ... break; case McpTaskStatus.Cancelled: // ... break;
{ var resultJson = await client.GetTaskResultAsync( taskId, cancellationToken: cancellationToken); var result = resultJson.Deserialize<CallToolResult>(McpJsonUtilities.DefaultOptions); foreach (var content in result?.Content ?? []) { if (content is TextContentBlock text) { Console.WriteLine(text.Text); } }
}

The SDK also provides methods to list all tasks (ListTasksAsync)
and cancel running tasks (CancelTaskAsync):

// List all tasks for the current session
var tasks = await client.ListTasksAsync(cancellationToken: cancellationToken); // Cancel a running task
var cancelledTask = await client.CancelTaskAsync(taskId, cancellationToken: cancellationToken);

Clients can optionally register a handler to receive status notifications as they arrive,
but should always use polling as the primary mechanism since notifications are optional:

var options = new McpClientOptions
{ Handlers = new McpClientHandlers { TaskStatusHandler = (task, cancellationToken) => { Console.WriteLine($"Task {task.TaskId} status changed to {task.Status}"); return ValueTask.CompletedTask; } }
};

Summary

The v1.0 release of the MCP C# SDK represents a major step forward for building MCP servers and clients in .NET.
Whether you’re implementing secure authorization flows, building rich tool experiences with sampling,
or handling long-running operations gracefully, the SDK has you covered.

Check out the full changelog
and the C# SDK repository to get started.

Demo projects for many of the features described here are available in the
mcp-whats-new demo repository.

Posted on Leave a comment

What’s new for the WinForms Visual Basic Application Framework

Klaus Loeffelmann

Melissa Trevino

.NET from version .NET Core 3.1 up to .NET 7 has plenty of advantages over .NET
Framework: it provides performance improvements in almost every area, and those
improvements were an ongoing effort over each .NET version. The
latest improvements in .NET
6
and
.NET
7
are
really worth checking out.

Migrating your Windows Forms (WinForms) Visual Basic Apps to .NET 6/7+ also
allows to adopt modern technologies which are not (or are no longer) supported in .NET
Framework. EFCore is one example: it is
a modern Entity Framework data access technology that enables .NET developers to
work with database backends using .NET objects. Although it is not natively
supported for VB by Microsoft, it is designed in a way that it is easy for the
community to build up on it and provide code generation support for additional
languages like Visual Basic
. In
that context there are also changes and improvements in the new WinForms
Out-of-Process Designer for .NET, especially around Object Data
Sources
.
For the WinForms .NET runtime, there are a series of improvements in different
areas which have been introduced with the latest releases of .NET:

The new Visual Basic Application Framework Experience

In contrast to the project property Application Framework Designer experience in
earlier versions of Visual Studio and for .NET Framework, you will noticed that
the project properties UI in Visual Studio has changed. It’s style is now in
parity with the project properties experience for other .NET project types: we
have invested into modernizing the experience for developers, focusing on
enhancing productivity and a modern look and feel.

Screenshot of the new Visual Basic Application Framework project settings designer.

We’ve added theming and search to the new experience. If this is your first time
you’re working with the new project properties experience in Visual Studio, it’s
a good idea to read up on the the introductory
blog
.

In contrast to C# projects, Visual Basic Application Framework projects use a
special file for storing the Application Framework project settings: the
Application.myapp file. We’ll talk more about the technical details of how
this file connects the project settings to the VB project specific code
generation of the My namespace later, but one thing to keep in mind is how the
UI translates each property’s value to this file:

  • Windows Visual Styles is to determine if the application will use the most
    current version for the Control Library comctl.dll to provide control
    rendering with modern visual styling. This setting translates to the value
    EnableVisualStyles of type Boolean inside of Application.myapp.

  • Single-instance application is to determine if the application will prevent
    users from running multiple instances of the application. This setting is
    switched off by default, which allows multiple instances of the application to
    be run concurrently. This setting translates to the value SingleInstance of
    type Boolean.

  • Save user settings on exit is to determine if the application settings are
    automatically saved when an app is about to shut down. The settings can be
    changed with the settings editor. In contrast to .NET Framework, a new Visual
    Basic Application Framework App doesn’t contain a settings file by default,
    but you can easily insert one over the project properties, should you need
    one, and then manage the settings
    interactively
    .

    Screenshot of the Settings section in the Application Framework project's property pages

    Adding to the list of settings automatically generates respective code, which
    can be easily access over the My object in the Visual Basic Application
    Framework at
    runtime
    .
    This settings translates to the value SaveMySettingsOnExit of type
    Boolean.

  • High DPI mode is to identify the application-wide HighDpiMode for the
    application. Note that this setting can be programmatically overridden through
    the HighDpiMode
    property

    of the ApplyApplicationDefaultsEventArgs of the ApplyApplicationDefaults
    application event. Choose from the following setting:

    • DPI unaware (0): The application window does not scale for DPI changes and
      always assumes a scale factor of 100%. For higher resolutions, this will
      make text and fine drawings more blurry, but may impose the best setting for
      some apps which demand a high backwards compatibility in rendering content.
    • DPI unaware GDI scaled (4): similar to DPI unaware, but improves the
      quality of GDI/GDI+ based on content. Please note that this mode will not
      work as expected, when you have enabled double
      buffering

      for control rendering via OnPaint and related functionality.
    • Per monitor (2): Per-Monitor DPI allows individual displays to have their
      own DPI scaling setting. WinForms doesn’t optimize for this mode, and
      Per-Monitor V2 should be used instead.
    • Per monitor V2 (3): Per-Monitor V2 offers more advanced scaling features
      such as improved support for mixed DPI environments, improved display
      enumeration, and support for dynamically scaling on-client area of windows.
      In WinForms common controls are optimized for this high dpi mode. Please
      note the events
      Form.DpiChange,
      Control.DpiChangedAfterParent
      and
      Control.DpiChangeBeforeParent,
      when your app need to scale up or down content based on a changed DPI
      environment, for example, when the user of your app has dragged a Form from
      one monitor to another monitor with a different DPI setting.
    • System aware (1): The application queries for the DPI of the primary
      monitor once and uses this for the application on all monitors. When content
      in Forms is dragged from one monitor to another with a different HighDPI
      setting, content might become blurry. SystemAware is WinForm’s most
      compatible high-dpi rendering mode for all supported controls.
  • Authentication mode is to specify the method of identifying the logged-on
    user, when needed. The setting translates to the value AuthenticationMode as
    an enum value of type Integer:

    • 0: The WindowsFormsApplicationBase(AuthenticationMode) constructor does
      not automatically initialize the principal for the application’s main
      thread. It’s completely the developer’s task, to manage authentication for
      the user.
    • 1: The WindowsFormsApplicationBase(AuthenticationMode) constructor
      initializes the principal for the application’s main thread with the current
      user’s Windows user info.
  • Shutdown mode is to to indicate which condition causes the application to
    shut down. This setting translates to the value ShutdownMode as an enum
    value of type Integer (Note: Please also refer to the application event
    ShutDown
    and the further remarks down below.):

    • 0: When the main form closes.
    • 1: Only after the last form closes.
  • Splash screen represents the name of the form to be used as a splash screen
    for the application. Note that the file name does not need to include the
    extension (.vb). This setting translates to the value SplashScreen of type
    String.

    Note: you will may be missing the settings for the Splash dialog up to
    Visual Studio 2022 version 17.5. For a workaround, read the comments in
    the section “A look behind the scenes”. To recap: a “Splash” dialog is
    typically displayed for a few seconds when an application is launched.
    Visual Basic has an item template which you can use to add a basic splash
    dialog to your project. It usually displays the logo or name of the
    application, along with some kind of animation or visual effects, to give
    users the impression that the application is loading or initializing. The
    term “splash” in this context is used because the dialog is designed to
    create a splash or impact on the user, drawing their attention to the
    application while it loads.

  • Application Framework is saved both in the Application.myapp file and the
    .vbproj file:

    • Application.myapp saves the setting MySubMain of type Boolean to
      identify if the Application Framework is enabled.
    • .vbproj uses the setting MyType for identifying the usage of the
      Application Framework for a VB project. If the Application Framework is
      enabled, the value is WindowsForms; if the Application Framework is
      disabled, the value is WindowsFormsWithCustomSubMain.
  • Startup object is the name of the form that will be used as the entry
    point, without its filename extension. Note: this property is found in the
    project property Settings under the General section, and not in the
    Application Framework section. This setting translates to the value MainForm of type
    String, when the Application Framework is activated. The start object setting in
    the .vbproj file is ignored in that case – see also the comments below on this
    topic.

Custom constants new look

Screenshot of the new custom constants editor in the project properties UI.

We are introducing a new custom constants-control in the modernized Project
Property Pages for VB Projects, that allows to encode the input to the format
key=”value”. Our goal is that users will be able to input their custom constants
in a more streamlined key-value pair format, thus enhancing their productivity.
Feedback is welcomed – if you have any comments or suggestions, feel free to
reach out to the project system
team
by filing a new issue or
comment on existing ones.

A look behind the scenes of the WinForms VB Application Framework

The way basic properties and behaviors of a WinForms app are controlled and configured is fundamentally different between C# and Visual Basic. In C#, every app
starts with a static method called main which can usually be found in a file
called Program.cs, and in that main method all the setting get applied.

That is different in Visual Basic. Since VB Apps in WinForms are based on the
Application Framework runtime, there are a few features, which aren’t
intrinsically available to C# WinForms apps to begin with, like configuring to
automatically show Splash dialogs (see below) or ensure a single instance
application start. Since you configure most of the parts of your app
interactively in VB with the settings described above at design time, the actual
code which honors or ensures those settings later at runtime is mostly
code-generated and somewhat hidden behind the scenes. The starting point of a VB
app is therefore not so obvious. There are also a series of differences in .NET
Visual Basic apps when it comes to hooking up event code which is supposed to
run, for example when a VB WinForms app starts, ends, or runs into an unhandled
exception – just to name a few examples.

That all said, technically Visual Basic doesn’t break any fundamental rules.
Under the hood, there is of course a Shared Sub Main when you activate the
Application Framework. You just do not write it yourself, and you don’t see it,
because it is generated by the VB compiler and then automatically added to your
Start Form. This is done by activating the VB compiler switch
/main.

At the same time, when you are activating the Application Framework, a series of
conditional compiler constants are defined. One of the constants is called
_mytype. If that constant is defined as Windows then the VB compiler
generates all the necessary infrastructure code to support the Application
Framework. If that constant is defined as WindowsFormsWithCustomSubMain
however, the VB compiler just generates the bare minimum infrastructure code and
doesn’t apply any settings to the WinForms app on startup. The latter happens,
when you deactivate the Application Framework. This setting is stored in the
vbproj project file, along with the Start Form. What’s important to know
though in this context: only in the case of WindowsFormsWithCustomSubMain, so
with the Application Framework deactivated, is the Start Form definition
actually taken from the vbproj file. When the Application Framework is
activated however then that is the case when the aforementioned
Application.myapp file is used as the settings container. Note, that by
default you cannot find that file in the solution explorer.

Screenshot of solution explorer showing the Application.myapp file.

You need to make sure first to show all files for that project (see screenshot
above). Then you can open the My Project-folder and show that setting file in
the editor by double-clicking it in the solution explorer. The content of that
file looks something like this:

<?xml version="1.0" encoding="utf-16"?>
<MyApplicationData xmlns:xsi="http://www.w3.org/2001/XMLSchema-instance" xmlns:xsd="http://www.w3.org/2001/XMLSchema"> <MySubMain>true</MySubMain> <MainForm>Form1</MainForm> <SingleInstance>false</SingleInstance> <ShutdownMode>0</ShutdownMode> <EnableVisualStyles>true</EnableVisualStyles> <AuthenticationMode>0</AuthenticationMode> <SaveMySettingsOnExit>true</SaveMySettingsOnExit> <HighDpiMode>3</HighDpiMode>
</MyApplicationData>

Note: Visual Studio 2022 before version 17.6 (Preview 3) won’t have the
option to pick a Splash Dialog interactively, as mentioned above. We will have
an interactive designer for setting the splash form only from that version on
on. Up to then, you can manually patch the Application.myapp file to trigger
the code generation for the Splash dialog. Insert the following line of code in
that file and save the changes.

<SplashScreen>SplashDialog</SplashScreen>

When you do this, make sure not to include the filename extension (.vb) in
that definition, because otherwise the required code does not get generated.

Application.myapp as the source for code generation

Now, if you take a closer look at that file’s properties in the property
browser, you’ll see that it is triggering a custom tool which is invoked
whenever that file is saved.

Screenshot of solution explorer showing the properties for the Application.myapp file.

And that custom tool generates VB code which you
can find under the Application.myapp node in the Solution Explorer in
Application.Designer.vb. It does the following:

  • It defines a Friend Partial Class MyApplication. With the Application
    Framework enabled, that class is inherited from
    WindowsFormsApplicationBase.
    You don’t see that Inherits statement here and the reason is that the major
    part of that Class’
    definition

    is injected by the Visual Basic compiler based on the earlier defined
    conditional constant _myapp.
  • It generates the code to apply all the settings which were saved in
    Application.myapp file.
  • It creates code for a method which overrides
    OnCreateMainForm.
    In that method, it assigns the Form, which is defined as the start form in the
    Application.myapp file.

Warning: The Application.Designer.vb is not supposed to be edited, as it’s
auto-generated. Any changes will be lost as soon as you make changes to Application.myapp. Instead, use the project properties UI.

Now, the class which is injected by the compiler is also responsible for
generating everything which the Visual Basic Application Framework provides you
via the My namespace. The My namespace simplifies access to frequently used
information about your WinForms app, your system, or simplifies access to
frequently used APIs. Part of the My namespace for an activated Application
Framework is the Application property, and its return type is of exactly that
type which is defined by the class generated based on your Application Settings
and then merged with the injected Visual Basic compiler file mentioned earlier.
So, if you access My.Application you are basically accessing a single instance
of the My.MyApplication type which the generated code defines.

With this context understood, we can move on to how two additional features of
the Application Framework work and can be approached. The first one is extending
the My namespace with additional function areas. We won’t go too much into
them, because there are detailed docs about the My namespace and how to
extend
it
.

An even more important concept to understand are the Application Events which are
provided by the Application Framework. Since there isn’t a good way to intercept
the startup or shut down of an app (since that code gets generated
and sort of hidden inside the main Form) Application Events are the way to be
notified of certain application-global occurrences.

Note in this context, that there is a small breaking change in the UI: while in
.NET Framework, you had to insert a code file named ApplicationEvents.vb via
the Property Settings of the VB project, in a .NET Core App this file will be
there from the start when you’ve created a new Application Framework project.

To wire up the available Application events, you open that ApplicationEvent.vb
code file, and then you select ApplicationEvents from the Object drop-down list,
and the application event you want to write up from the events list:

Animated gif showing how to wire app Application Events in the ApplicationEvent.vb code file

As you can see, the ApplicationEvent.vb code file again extends the MyApplication class – this time by the events handler you place there on demand. The options you have here are:

  • Startup: raised when the application starts, before the start form is created.
  • Shutdown: raised after all application forms are closed. This event is not raised if the application terminates abnormally.
  • UnhandledException: raised if the application encounters an unhandled exception.
  • StartupNextInstance: raised when launching a single-instance application and the application is already active.
  • NetworkAvailabilityChanged: raised when the network connection is connected or disconnected.
  • ApplyApplicationDefaults: raised when the application queries default values to be set for the application.

Note: More general information about the Visual Basic Application Model is provided through the Microsoft Learn Docs about this topic. Also note, that, on top of the extensibility of the My namespace, this Application Model also has extensibility points which are also described in great detail by the respective docs.

Summary

With the new and modernized project properties pages, WinForm’s Application
Framework is ready for new, .NET 6,7,8+ based Visual Basic Apps to develop. It’s
also the right time to think about modernizing your older .NET Framework based
VB Apps and bring them over to .NET 6,7,8+. WinForms and the .NET runtime
deliver countless new features and provide considerable performance improvements
for your apps in almost every area. Visual Basic and the Visual Basic
Application Framework are and continue to be first class citizens and are fully
supported in WinForms. Our plans are to continue modernizing around the VB App
Framework in the future without breaking code for existing projects.

And, as always: Feedback about the subject matter is really important to us, so
please let us know your thoughts and additional ideas! Please also note that the
WinForms .NET and the Visual Basic Application Framework runtime is open source,
and you can contribute! If you have general feature ideas, encountered bugs, or
even want to take on existing issues around the WinForms runtime and submit PRs,
have a look at the WinForms Github repo.
If you have suggestions around the WinForms Designer feel free to file new
issues there as well.

Happy coding!

Posted on Leave a comment

Announcing ASP.NET Core in .NET 5

Daniel Roth

Daniel

.NET 5 is now released! .NET 5 is the next version of .NET Core and the future of the .NET platform. With .NET 5 you have everything you need to build rich, interactive front end web UI and powerful backend services.

ASP.NET Core in .NET 5 is loaded with lots of great new features and improvements. Here’s a sampling:

For a full list of everything that’s new in ASP.NET Core in this release, check out the ASP.NET Core in .NET 5 release notes. See also the .NET 5 release notes for additional details and known issues.

Get started

To get started with ASP.NET Core in .NET 5, install the .NET 5 SDK. .NET 5 is also included with the latest updates to Visual Studio and Visual Studio for Mac, so if you’ve already updated your IDE, then you should be good to go.

Visual Studio 2019 16.8 or later is required to use .NET 5 from Visual Studio. .NET 5 is also supported with Visual Studio for Mac. To use .NET 5 with Visual Studio Code, install the latest version of the C# extension.

Upgrade an existing project

To upgrade an existing ASP.NET Core app from .NET Core 3.1 to .NET 5:

To upgrade an existing ASP.NET Core app from .NET 5 RC2 to .NET 5:

  • Update all Microsoft.AspNetCore.*, Microsoft.Extensions.*, and System.* package references to 5.0.0.

That’s it! You should be all set to enjoy the benefits of .NET 5.

See also the full list of breaking changes in ASP.NET Core for .NET 5.

Performance improvements

With every .NET release a special effort is made to improve all aspects of the performance in ASP.NET Core applications. ASP.NET Core in .NET 5 is the fastest .NET web framework we’ve ever shipped!

.NET 5 contains great performance improvements in the runtime and libraries and for the gRPC components. These improvements, when applied to ASP.NET Core, result in some significant wins in throughput (RPS) and latency. The performance results below are taken from the TechEmpower benchmarks for ASP.NET Core with .NET Core 3.1 and from the latest results for ASP.NET Core with .NET 5.

Troughput (max, in RPS)

Scenario 3.1 5.0 Change
Plaintext Platform 8,593 11,690 +36.0%
Json Platform 872 1,261 +44.6%
Fortunes Platform 344 423 +23.0%
Plaintext 3,993 4,420 +12.4%
Json 743 912 +22.6%
Fortunes 223 259 +16.2%

Latency (mean, in ms)

Scenario 3.1 5.0 Change
Plaintext Platform 1.52 0.82 -46.3%
Json Platform 1.24 0.41 -66.7%
Fortunes Platform 1.57 1.26 -19.7
Plaintext 0.87 0.83 -4.2%
Json 1.52 1.20 -21.1%
Fortunes 1.11 0.87 -21.6

The “platform” tests represent highly optimized benchmark implementations, while the non-platform tests use more typical framework components.

The TechEmpower performance composite score, an index based on all of the TechEmpower benchmarks aggregated together, increased from 5,659 to 6,626 with .NET 5, which represents a 17% increase.

Deploy .NET 5 Web Apps to Azure App Service Today

The ASP.NET and Azure App Service teams have worked tirelessly together throughout the .NET 5 timeline to make sure ASP.NET developers have access to the latest bits of the .NET 5 runtime on day zero. This means that, as soon as you can download .NET 5 and get started building apps with it, you can deploy those .NET 5 apps to App Service using Visual Studio and Visual Studio Code, and you’ll have full support for deploying .NET 5 apps to App Service using GitHub Actions.

This day-zero availability of .NET 5 on App Service will be made possible by their new Early Access Runtime feature, which will enable not only .NET 5 apps, but every subsequent release of .NET from now on. This means no more waiting for the platform to support the runtime – it’ll “just be there” as soon as the runtime is available. You can learn more about the Azure App Service Early Access Runtime technology on the App Service team’s blog.

Whilst Early Access will give you a supported path to deploying your .NET 5 apps to Azure App Service immediately, there are some slight nuances to how Early Access works with which you can familiarize yourself on the App Service Early Access .NET page.

Join us for the .NET 5 release at .NET Conf 2020

Come celebrate with us and learn all about the .NET 5 release at .NET Conf 2020, a FREE, three day virtual developer event co-organized by the .NET community and Microsoft. This year marks the 10th anniversary of the conference, and it will be better than ever with over 80 live sessions from speakers in the community and from the Microsoft product teams. The conference starts today and goes from November 10-12. We hope you can join us!

Thank you!

Thank you to everyone in the community who helped make this release of .NET 5 possible! This release represents the culmination of many GitHub issues, pull requests, design feedback comments and documentation updates contributed by many members of the .NET community. We couldn’t have made it to this point without you!

We hope you enjoy this release of ASP.NET Core in .NET 5. We are eager to hear about your experiences with this latest release. Let us know what you think on GitHub by filing new issues and by commenting on or expressing your support (👍) for existing ones.

Thanks again for trying out ASP.NET Core!

Posted on Leave a comment

Unified Blazor UI in the Mobile Blazor Bindings Preview 5

Eilon Lipton

Eilon

I’m excited to announce that today we are releasing the Mobile Blazor Bindings Preview 5 update that adds support for sharing UI between web apps and mobile/desktop apps. You can now use a Razor Class Library (RCL) to build your UI and app logic once and use it in a Blazor Web app and in a Mobile Blazor Bindings app. This release also includes many other improvements, such as support for Shell with Blazor @page routing, SkiaSharp for rich graphics, gesture recognizers, and a whole lot more!

You can build one UI using Blazor Web and host it in a Blazor Server or Blazor Web Assembly app and also in a Mobile Blazor Bindings hybrid app to target Android, iOS, macOS, and Windows:

Image cat tracker options

These are the major new features in the 0.5 Preview 5 release:

  • Build your UI in a Razor Class Library (RCL) and share the same UI between web app and native app, including static assets such as CSS and images (community contribution from Jan-Willem Spuij)
  • Support for Shell with Routing, including the Razor @page directive (community contribution from Lachlan Gordon
  • Support for SkiaSharp graphics (community contribution from Lachlan Gordon
  • Gesture recognizers (tap, swipe, etc.)
  • Dual-screen device support
  • Added FontImageSource, DatePicker, TimePicker
  • Simplified Grid layout syntax
  • Update to Xamarin.Forms 4.8
  • Nightly package feed
  • OSS docs on GitHub
  • And several bug fixes and other small improvements
  • The full list of closed issues is here: https://github.com/xamarin/MobileBlazorBindings/milestone/5?closed=1

Get started

To get started building a Blazor Hybrid app with Experimental Mobile Blazor Bindings preview 5, install the .NET Core 3.1 SDK, have Visual Studio with the Mobile development with .NET (Xamarin.Forms) and ASP.NET and web development workloads installed, and then run the following command:

dotnet new -i Microsoft.MobileBlazorBindings.Templates::0.5.50-preview

And then create your first project by running this command:

dotnet new blazorhybrid -o MyHybridApp

Note: For additional information on required software, please check the Getting Started article.

Now open it in Visual Studio and run it on Android, iOS, Windows, or macOS. That’s it! You can find additional docs and tutorials on https://docs.microsoft.com/mobile-blazor-bindings/. We have a new tutorial for building a Razor Class Library and including it in a Blazor Server app as well as targeting Android, iOS, macOS, and Windows platforms.

Upgrade an existing project

To update an existing Mobile Blazor Bindings project please refer to the Migrate Mobile Blazor Bindings From Preview 4 to Preview 5 topic for full details.

Razor Class Library support

Razor Class Libraries are a feature of Razor that enable you to package part of your application’s UI and logic into a reusable library. This library can then be reused in multiple web applications. Now in Mobile Blazor Bindings you can use the same library in a Blazor Hybrid application as part of a mobile or desktop app. The web content is hosted in a Web View, just like any hybrid app content, and it can interact with any native parts of the application, and the reverse is true as well. Previous versions included limited support for RCLs, and this version adds improved support for them, particularly support for serving static assets such as CSS and images, as well as support for JSInterop for interop between JavaScript and .NET code.

Shell navigation

To build a great native experience for your app you can use the Shell control that comes from Xamarin.Forms. Starting with Preview 5 you can author native Blazor pages with the @page "/search/{query}" syntax and integrate them with the Shell’s navigation (such as the Back button) and navigate to them using the new NavigationManager.NavigateToAsync($"/search/{query}") API. Pages can use the navigation manager by injecting it from the DI container as in @inject ShellNavigationManager NavigationManager.

SkiaSharp graphics

SkiaSharp is a popular cross-platform graphics library based on Google’s Skia graphics library. In Preview 5 you can directly use SkiaSharp’s Canvas APIs to render rich high-performance graphics directly in your Mobile Blazor Bindings app.

Here’s what a simple canvas might look like:

<ContentView> <StackLayout Padding="20"> <SKCanvasView OnPaintSurface="PaintSurface"/> </StackLayout>
</ContentView> @code
{ void PaintSurface(SKPaintSurfaceEventArgs e) { var canvas = e.Surface.Canvas; canvas.Clear(SKColors.Green); var paint = new SKPaint { Color = SKColors.SkyBlue, }; canvas.DrawLine(0, 0, 200, 200, paint); }
}

And here’s what a more complex canvas might render as:

SkiaSharp rendering a graph in Mobile Blazor Bindings on iOS

More information

Thank you to contributors

This release had several major contributions from community contributors:

  • Jan-Willem Spuij added support for Razor Class Libraries with static assets. He stayed up late (his time) on calls with me several times and I appreciate his hard work!
  • Lachlan Gordon added support for Shell navigation and SkiaSharp. His patience in playing time-zone ping-pong (Australia vs. USA) is most appreciated and resulted in high quality contributions!

Thanks you to Jan-Willem, Lachlan, and everyone else who contributed to this release!

What’s next? Let us know what you want!

This project relies on your feedback to help shape the future of Blazor for native and hybrid scenarios. Please share your thoughts on this blog post or at the GitHub repo so we can keep the discussion going.

Posted on Leave a comment

gRPC performance improvements in .NET 5

Avatar

James

gRPC is a modern open source remote procedure call framework. There are many exciting features in gRPC: real-time streaming, end-to-end code generation, and great cross-platform support to name a few. The most exciting to me, and consistently mentioned by developers who are interested in gRPC, is performance.

Last year Microsoft contributed a new implementation of gRPC for .NET to the CNCF. Built on top of Kestrel and HttpClient, gRPC for .NET makes gRPC a first-class member of the .NET ecosystem.

In our first gRPC for .NET release, we focused on gRPC’s core features, compatibility, and stability. In .NET 5, we made gRPC really fast.

gRPC and .NET 5 are fast

In a community run benchmark of different gRPC server implementations, .NET gets the highest requests per second after Rust, and is just ahead of C++ and Go.

gRPC performance comparison

This result builds on top of the work done in .NET 5. Our benchmarks show .NET 5 server performance is 60% faster than .NET Core 3.1. .NET 5 client performance is 230% faster than .NET Core 3.1.

Stephen Toub discusses dotnet/runtime changes in his Performance Improvements in .NET 5 blog post. Check it out to read about improvements in HttpClient and HTTP/2.

In the rest of this blog post I’ll talk about the improvements we made to make gRPC fast in ASP.NET Core.

HTTP/2 allocations in Kestrel

gRPC uses HTTP/2 as its underlying protocol. A fast HTTP/2 implementation is the most important factor when it comes to performance. Our gRPC server builds on top of Kestrel, a HTTP server written in C# that is designed with performance in mind. Kestrel is a top contender in the TechEmpower benchmarks, and gRPC benefits from a lot of the performance improvements in Kestrel automatically. However, there are many HTTP/2 specific optimizations that were made in .NET 5.

Reducing allocations is a good place to start. Fewer allocations per HTTP/2 request means less time doing garbage collection (GC). And CPU time “wasted” in GC is CPU time not spent serving HTTP/2 requests.

.NET Core 3.1 memory graph

The performance profiler above is measuring allocations over 100,000 gRPC requests. The live object graph’s sawtooth shaped pattern indicates memory building up, then being garbage collected. About 3.9KB is being allocated per request. Lets try to get that number down!

dotnet/aspnetcore#18601 adds pooling of streams in a HTTP/2 connection. This one change almost cuts allocations per request in half. It enables reuse of internal types like Http2Stream, and publicly accessible types like HttpContext and HttpRequest, across multiple requests.

Once streams are pooled a range of optimizations become available:

There are many smaller allocation savings. dotnet/aspnetcore#19783 removes allocations in Kestrel’s HTTP/2 flow control. A resettable ManualResetValueTaskSourceCore<T> type replaces allocating a new object each time flow control is triggered. dotnet/aspnetcore#19273 replaces an array allocation with stackalloc when validating the HTTP request path. dotnet/aspnetcore#19277 and dotnet/aspnetcore#19325 eliminate some unintended allocations related to logging. dotnet/aspnetcore#22557 avoids allocating a Task<T> if a task is already complete. And finally dotnet/aspnetcore#19732 saves a string allocation by special casing content-length of 0. Because every allocation matters.

.NET 5 memory

Per-request memory in .NET 5 is now just 330 B, a decrease of 92%. The sawtooth pattern has also disappeared. Reduced allocations means garbage collection didn’t run at all while the server processed 100,000 gRPC calls.

Reading HTTP headers in Kestrel

A hotpath in HTTP/2 is reading and writing HTTP headers. A HTTP/2 connection supports concurrent requests over a TCP socket, a feature called multiplexing. Multiplexing allows HTTP/2 to make efficient use of connections, but only the headers for one request on a connection can be processed at a time. HTTP/2’s HPack header compression is stateful and depends on order. Processing HTTP/2 headers is a bottleneck so has to be as fast as possible.

dotnet/aspnetcore#23083 optimizes the performance of HPackDecoder. The decoder is a state machine that reads incoming HTTP/2 HEADER frames. The approach here is good, the state machine allows Kestrel to decode frames as they arrive, but the decoder was checking state after parsing each byte. Another problem is literal values, the header names and values, were copied multiple times. Optimizations in this PR include:

  • Tighten parsing loops. For example, if we’ve just parsed a header name then the value must come afterwards. There is no need to check the state machine to figure out the next state.
  • Skip literal parsing all together. Literals in HPack have a length prefix. If we know the next 100 bytes are a literal then there is no need to inspect each byte. Mark the literal’s location and resuming parsing at its end.
  • Avoid copying literal bytes. Previously literal bytes were always copied to an intermediary array before passed to Kestrel. Most of the time this isn’t necessary and instead we can just slice the original buffer and pass a ReadOnlySpan<byte> to Kestrel.

Together these changes significantly decrease the time it takes to parse headers. Header size is almost no longer a factor. The decoder marks the start and end position of a value and then slices that range.

private HPackDecoder _decoder = CreateDecoder();
private byte[] _smallHeader = new byte[] { /* HPack bytes */ };
private byte[] _largeHeader = new byte[] { /* HPack bytes */ };
private IHttpHeadersHandler _noOpHandler = new NoOpHeadersHandler(); [Benchmark]
public void SmallDecode() => _decoder.Decode(_smallHeader, endHeaders: true, handler: _noOpHandler); [Benchmark]
public void LargeDecode() => _decoder.Decode(_largeHeader, endHeaders: true, handler: _noOpHandler);
Method Runtime Mean Ratio Allocated
SmallDecode .NET Core 3.1 111.20 ns 1.00 0 B
SmallDecode .NET 5.0 71.90 ns 0.65 0 B
LargeDecode .NET Core 3.1 49,083.00 ns 1.00 0 B
LargeDecode .NET 5.0 98.68 ns 0.002 0 B

Once headers have been decoded, Kestrel needs to validate and process them. For example, special HTTP/2 headers like :path and :method need to be set onto HttpRequest.Path and HttpRequest.Method, and other headers need to be converted to strings and added to the HttpRequest.Headers collection.

Kestrel has the concept of known request headers. Known headers are a selection of commonly occuring request headers that have been optimized for fast setting and getting. dotnet/aspnetcore#24730 adds an even faster path for setting HPack static table headers to the known headers. The HPack static table gives 61 common header names and values a number ID that can be sent instead of the full name. A header with a static table ID can use the optimized path to bypass some validation and quickly be set in the collection based on its ID. dotnet/aspnetcore#24945 adds extra optimization for static table IDs with a name and value.

Adding HPack response compression

Prior to .NET 5, Kestrel supported reading HPack compressed headers in requests, but it didn’t compress response headers. The obvious advantage of response header compression is less network usage, but there are performance benefits as well. It’s faster to write a couple of bits for a compressed header than it is to encode and write the header’s full name and value as bytes.

dotnet/aspnetcore#19521 adds initial HPack static compression. Static compression is pretty simple: if the header is in the HPack static table then write the ID to identify the header instead of the longer name.

Dynamic HPack header compression is more complicated, but also provides bigger gains. Response header names and values are tracked in a dynamic table and are each assigned an ID. As a response’s headers are written, the server checks to see if the header name and value are in the table. If there is a match then the ID is written. If there isn’t then the full header is written, and it is added to the table for the next response. There is a maximum size of the dynamic table, so adding a header to it may evict other headers with a first in, first out order.

dotnet/aspnetcore#20058 adds dynamic HPack header compression. To quickly search for headers the dynamic table groups header entries using a basic hash table. To track order and evict the oldest headers, entries maintain a linked list. To avoid allocations, removed entries are pooled and reused.

Wireshark HTTP/2 response

Using Wireshark, we can see the impact of header compression on response size for this example gRPC call. .NET Core 3.x writes 77 B, while .NET 5 is only 12 B.

Protobuf message serialization

gRPC for .NET uses the Google.Protobuf package as the default serializer for messages. Protobuf is an efficient binary serialization format. Google.Protobuf is designed for performance, using code generation instead of reflection to serialize .NET objects. There are some modern .NET APIs and features that can be added to it to reduce allocations and improve efficiency.

The biggest improvement to Google.Protobuf is support for modern .NET IO types: Span<T>, ReadOnlySequence<T> and IBufferWriter<T>. These types allow gRPC messages to be serialized directly using buffers exposed by Kestrel. This saves Google.Protobuf allocating an intermediary array when serializing and deserializing Protobuf content.

Support for Protobuf buffer serialization was a multi-year effort between Microsoft and Google engineers. Changes were spread across multiple repositories.

protocolbuffers/protobuf#7351 and protocolbuffers/protobuf#7576 add support for buffer serialization to Google.Protobuf. This is by far the biggest and most complicated change. Three attempts were made to add this feature before the right balance between performance, backwards compatibility and code reuse was found. Protobuf reading and writing uses many performance oriented features and APIs added to C# and .NET Core:

  • Span<T> and C# ref struct types enables fast and safe access to memory. Span<T> represents a contiguous region of arbitrary memory. Using span lets us serialize to managed .NET arrays, stack allocated arrays, or unmanaged memory, without using pointers. Span<T> and .NET protects us against buffer overflow.
  • stackalloc is used to create stack-based arrays. stackalloc is a useful tool to avoid allocations when a small buffer is required.
  • Low-level methods such as MemoryMarshal.GetReference(), Unsafe.ReadUnaligned() and Unsafe.WriteUnaligned() convert directly between primitive types and bytes.
  • BinaryPrimitives has helper methods for efficiently converting between .NET primitive types and bytes. For example, BinaryPrimitives.ReadUInt64LittleEndian reads little endian bytes and returns an unsigned 64 bit number. Methods provided by BinaryPrimitive are heavily optimized and use vectorization.

A great thing about modern C# and .NET is it is possible to write fast, efficient, low-level libraries without sacrificing memory safety. When it comes to performance, .NET lets you have your cake and eat it too!

private TestMessage _testMessage = CreateMessage();
private ReadOnlySequence<byte> _testData = CreateData();
private IBufferWriter<byte> _bufferWriter = CreateWriter(); [Benchmark]
public IMessage ToByteArray() => _testMessage.ToByteArray(); [Benchmark]
public IMessage ToBufferWriter() => _testMessage.WriteTo(_bufferWriter); [Benchmark]
public IMessage FromByteArray() => TestMessage.Parser.ParseFrom(CreateBytes()); [Benchmark]
public IMessage FromSequence() => TestMessage.Parser.ParseFrom(_testData);
Method Runtime Mean Ratio Allocated
ToByteArray .NET 5.0 1,133.82 ns 1.00 184 B
ToBufferWriter .NET 5.0 589.05 ns 0.51 64 B
FromByteArray .NET 5.0 409.88 ns 1.00 1960 B
FromSequence .NET 5.0 381.03 ns 0.92 1776 B

Adding support for buffer serialization to Google.Protobuf is just the first step. More work is required for gRPC for .NET to take advantage of the new capability:

  • grpc/grpc#18865 and grpc/grpc#19792 adds ReadOnlySequence<byte> and IBufferWriter<byte> APIs to the gRPC serialization abstraction layer in Grpc.Core.Api.
  • grpc/grpc#23485 updates gRPC code generation to glue the changes in Google.Protobuf to Grpc.Core.Api.
  • grpc/grpc-dotnet#376 and grpc/grpc-dotnet#629 updates gRPC for .NET to use the new serialization abstractions in Grpc.Core.Api. This code is the integration between Kestrel and gRPC. Because Kestrel’s IO is built on top of System.IO.Pipelines, we can use its buffers during serialization.

The end result is gRPC for .NET serializes Protobuf messages directly to Kestrel’s request and response buffers. Intermediary array allocations and byte copies have been eliminated from gRPC message serialization.

Wrapping Up

Performance is a feature of .NET and gRPC, and as cloud apps scale it is more important than ever. I think all developers can agree it is fun to make fast apps, but performance has real world impact. Lower latency and higher throughput means fewer servers. It is an opportunity to save money, reduce power use and build greener apps.

.NET Core 3.1 vs .NET 5 results

As is obvious from this tour, a lot of changes have gone into gRPC, Protobuf and .NET aimed at improving performance. Our benchmarks show a 60% improvement in gRPC server RPS and a 230% improvement in gRPC client RPS.

.NET 5 RC2 is available now, and the official .NET 5 release is in November. To try out the performance improvements and to get started using gRPC with .NET, the best place to start is the Create a gRPC client and server in ASP.NET Core tutorial.

We look forward to hearing about apps built with gRPC and .NET, and to your future contributions in the dotnet and grpc repos!

Posted on Leave a comment

ASP.NET Core updates in .NET 5 Release Candidate 2

Daniel Roth

Daniel

.NET 5 Release Candidate 2 (RC2) is now available and is ready for evaluation. .NET 5 RC2 is a “go live” release, meaning it’s supported in production. This prerelease of .NET 5 is very close to what we expect to ship for the .NET 5 release.

Here’s what’s new in this RC2 release:

  • CSS isolation improvements
  • Blazor WebAssembly debugging improvements
  • Browser platform compatibility tooling

ASP.NET Core in .NET 5 contains lots of great new functionality and improvements! The list below summarizes the many improvements we’ve made in ASP.NET Core for .NET 5 that you can try out in this release:

See the .NET 5 release notes for additional details and known issues.

Get started

To get started with ASP.NET Core in .NET 5 RC2, install the .NET 5 SDK. .NET RC2 also is included with Visual Studio 2019 16.8 Preview 4.

Visual Studio 2019 16.8 Preview 4 or later is required to use .NET 5 RC2 from Visual Studio. .NET 5 RC2 is also supported with the latest preview of Visual Studio for Mac. To use .NET 5 with Visual Studio Code, install the latest version of the C# extension.

Upgrade an existing project

To upgrade an existing ASP.NET Core app from .NET 5 RC1 to .NET 5 RC2:

  • Update all Microsoft.AspNetCore.* package references to 5.0.0-rc.2.*.
  • Update all Microsoft.Extensions.* package references to 5.0.0-rc.2.*.
  • Update System.Net.Http.Json package references to 5.0.0-rc.2.*.
  • Update Microsoft.AspNetCore.Components.Web.Extensions package references to 5.0.0-preview9.20513.1.
  • Remove any package references to Microsoft.AspNetCore.Components.ProtectedBrowserStorage
  • Update Microsoft.AspNetCore.Components.ProtectedBrowserStorage namespace to Microsoft.AspNetCore.Components.Server.ProtectedBrowserStorage.
  • Remove unnecessary service registrations for ProtectedLocalStorage and ProtectedSessionStorage.
  • Rename JSObjectReference to IJSObjectReference.
  • In Blazor apps, replace CSS references to _framework/scoped.styles.css and _content/{project_name}/_framework/scoped.styles.css with {project_name}.styles.css.

That’s it! You should be all ready to go.

See also the full list of breaking changes in ASP.NET Core for .NET 5.

What’s new?

Blazor CSS isolation improvements

In .NET 5 Preview 8 we introduced support for CSS isolation for Blazor components. Based on user feedback, we’ve made a number of improvements to CSS isolation in this release.

Previously, all component scoped CSS files including files from referenced projects or packages were compiled into a single bundle, scoped.styles.css. We now produce one bundle per referenced project or package and include those bundles into the app bundle through CSS @import statements.

The bundle names are now based on the project names: {project_name}.styles.css. Each bundle can be referenced from the root path of the app by default. This makes the path of the app bundle the same for both Blazor Server and Blazor WebAssembly projects:

<link href="BlazorApp1.styles.css" rel="stylesheet" />

Component specific styles can also now use normal wwwroot-relative paths to refer to related assets, like images. We’ve updated Razor Class Library template to make use of component specific styles following this pattern.

Component1.razor.css

.my-component { border: 2px dashed red; padding: 1em; margin: 1em 0; background-image: url('background.png');
}

We also fixed some issues with how scoped CSS styles get built so that changes are correctly picked up with each build in Visual Studio instead of requiring a full rebuild.

Blazor WebAssembly debugging improvements

.NET 5 includes a variety of improvements to Blazor WebAssembly debugging:

  • Various reliability improvements, including fixing the port conflict issue from RC1
  • Improved support for stepping over and out of async methods
  • Inspect locals or object properties in many previously unsupported situations:
    • For inherited members
    • For multicast delegates
    • For boxed values
    • For Nullable<T> values
    • Within reflection based calls
  • Support for debugging lazy loaded assemblies

Browser platform compatibility tooling

The core framework libraries in .NET 5 have now been annotated to indicate which APIs are supported in browser scenarios. The platform compatibility analyzer uses this data to give appropriate warnings when using APIs from a Blazor WebAssembly app that are not supported when running in a browser on WebAssembly.

Browser compatibility check

Learn more about how you can use the new platform compatibility analyzer to discover cross-platform compatibility issues.

Give feedback

We hope you enjoy this release of ASP.NET Core in .NET 5! We are eager to hear about your experiences with this latest .NET 5 release. Let us know what you think by filing issues on GitHub.

Thanks for trying out ASP.NET Core!

Posted on Leave a comment

Azure Static Web Apps with .NET and Blazor

aapowell

Aaron

Azure Static Web Apps is a service that automatically builds and deploys full stack web apps from a GitHub repository. Azure Static Web Apps consist of a static web frontend, and an Azure Functions based backend. When you create a Static Web Apps resource, Azure sets up a GitHub Actions workflow in the app’s source code repository that monitors a branch of your choice. Every time you push commits to the watched branch, the GitHub Action automatically builds and deploys your app and its API.

As of today, Azure Static Web Apps now has first-class support for Blazor WebAssembly and .NET Functions in preview, available in all supported regions. This was one of the top user requests since Static Web Apps was announced at Build. You can develop and deploy a frontend and a serverless API written entirely in .NET.

Let’s give it a try!

Getting Started

To help you get started, we’ve created a GitHub repository template, which you can use as a starting point for your own projects.

In GitHub, click on the Use this template button to create a new GitHub repository using the template, providing it a name of your choosing (we’ll use my-blazor-app here) and click Create repository from template.

There are three folders in the template:

  • Client: The Blazor WebAssembly sample application
  • API: A C# Azure Functions API, which the Blazor application will call
  • Shared: A C# class library with a shared data model between the Blazor and Functions application

To run the app locally, start both the API and Client projects. The “Fetch data” page in the Blazor app requests weather forecast data form the backend Function API and display it on the page.

To run the app from the command-line, you’ll need to install the Azure Functions Core Tools for your platform of choice.

Deploying to Static Web Apps

To deploy this app as an Azure Static Web App, log into your Azure account (sign up for a free one here) and search for Static Web Apps.

Static Web Apps in the portal

Click Create, provide a Subscription, Resource Group and name for the application.

Next, sign into GitHub and locate your GitHub repo (my-blazor-app) and select the branch you wish to deploy.

Finally, select Blazor from the Build Presets, which will populate the App location, API location and App artifact location with Client, API and wwwroot. The first and second values are the path within the Git repository to where the project files for the Blazor and Functions app resides, so if you’ve modified the structure of the Git repository, make sure these values are updated to reflect. The third value is the output path that Blazor will compile into and doesn’t need updating.

Azure Static Web App wizard

Complete the wizard and Static Web Apps will create the GitHub Actions workflow file for you and deploy your application to Azure.

gif of Action completing and then going to the portal to open the deployed app

Summary

We started by forking a GitHub repository (but you could’ve also used a project created in Visual Studio/Visual Studio Code/etc.), created a Static Web App in Azure, and it setup a GitHub Actions workflow for us, automatically building and deploying our Blazor and Functions application. We’ve now got a statically hosted application with a serverless backend, ready to scale for our demands.

Additional Resources

To learn more about Blazor WebAssembly and .NET Functions on Static Web Apps, check out the quickstart docs, the Microsoft Learn module, as well as the comprehensive Static Web Apps docs.

Give Feedback

We’re excited to have Blazor WebAssembly and .NET Functions supported by Azure Static Web Apps, and can’t wait to see what you build with them. Let us know what you think by filing an issue on GitHub.