It is possible to buy an Intel Mac Pro and give it enough upgrades to beat a more modern M3 Max MacBook Pro in a selected video task. You probably shouldn’t do it.
The last Intel Mac Pro isn’t the workhorse it once was.
At the time of its release, the Intel Mac Pro was the most powerful Mac you could buy. With extensive upgrade options, high-specification configurations, and the ability to add more PCIe cards and memory after purchasing, it was a device with a considerable amount of potential in the right hands.
However, with the influx of Apple Silicon and devices like the Mac Studio taking its place in creative businesses around the world, it’s lost a lot of its attractiveness. The switch over to Apple Silicon and the loss of user-serviceable memory didn’t help matters either.
However, owners of the last Intel Mac Pro can still get a lot of performance out of the now-classic hardware. But, only in specific circumstances and with an absurd amount of work and money to get the job done in 2026.
YouTube channel CircuitBoredd did just this, pushing a 2019 Intel Mac Pro to its limits by adding as many upgrades as possible. The project worked, but also demonstrated how much value you get from modern hardware compared to what was top-of-the-line over six years ago.
The project started with a fairly typical 7,1 Mac Pro, which was upgraded with a better processor than the 16-core chip it initially shipped with. The Mac Pro supported at most a 28-core 2.5GHz Intel Xeon W with 56 threads, which was acquired and installed into the Mac Pro.
Secondhand, today, this processor alone costs around $1,050.
The Mac Pro was also known for having the capacity to max out at 1.5 terabytes using 12 128GB DDR ECC DIMMs. While not the maximum, the project did use an absurdly large 768GB of memory.
Ignoring the current state of memory inflation, second-hand sticks of 128GB ECC DDR4 memory cost about $500 to $800 apiece, which would be a $3,000 to $4,800 upgrade. This is the cheapest way of getting to the figure, as 64GB modules are not much cheaper on eBay individually, and you would still need 12 modules instead of six for the 128GB method.
Continuing the upgrades, the machine was then installed with a pair of Radeon Pro Vega II Duo MPX Modules. Each module had a pair of GPUs, so the upgrade equated to four GPUs in total.
This also gave it 128 gigabytes of video memory to work with, which is an absurd amount to have on hand.
A search of eBay shows second-hand Radeon Pro Vega II Duo MPX modules selling for about $2,900 apiece. At launch, one card had a list price of $4,400.
It also used an Afterburner card, Apple’s add-on that cost $2,000 at the time of launch. Afterburner was a programmable Application-Specific Integrated Circuit (ASIC) designed for video production purposes.
The modern-day second-hand price of Afterburner has also come down, to about $400.
Rounding out the upgrades list are new SSDs. The videos don’t specify what drive is in use, but an M.2 to PCIe adapter card is involved in the process. Assuming that it is a hefty 8TB NVMe SSD to match the rest of the upgrades, that would be another $1,300 to $1,600 brand new, and less than $10 for that adapter card.
The result of all of the upgrades was a close to top-specification Intel Mac Pro, which the videos say cost close to $50,000 to acquire in 2019. The hardware has certainly lost most of its value over the years, though.
The project and its upgrades cost around $5,000, according to the YouTuber. Similar builds could be acquired for double that price, at about $10,000.
Based on the individual upgrade prices, and a barebones Mac Pro being found for $1,000 to start from, the total cost should really be in the region of $11,250 at a minimum. The $5,000 claimed cost is very ambitious and quite low compared to everyday pricing, but it’s plausible that some exceptional deals were made in amassing the parts.
Expensive but kinda fast
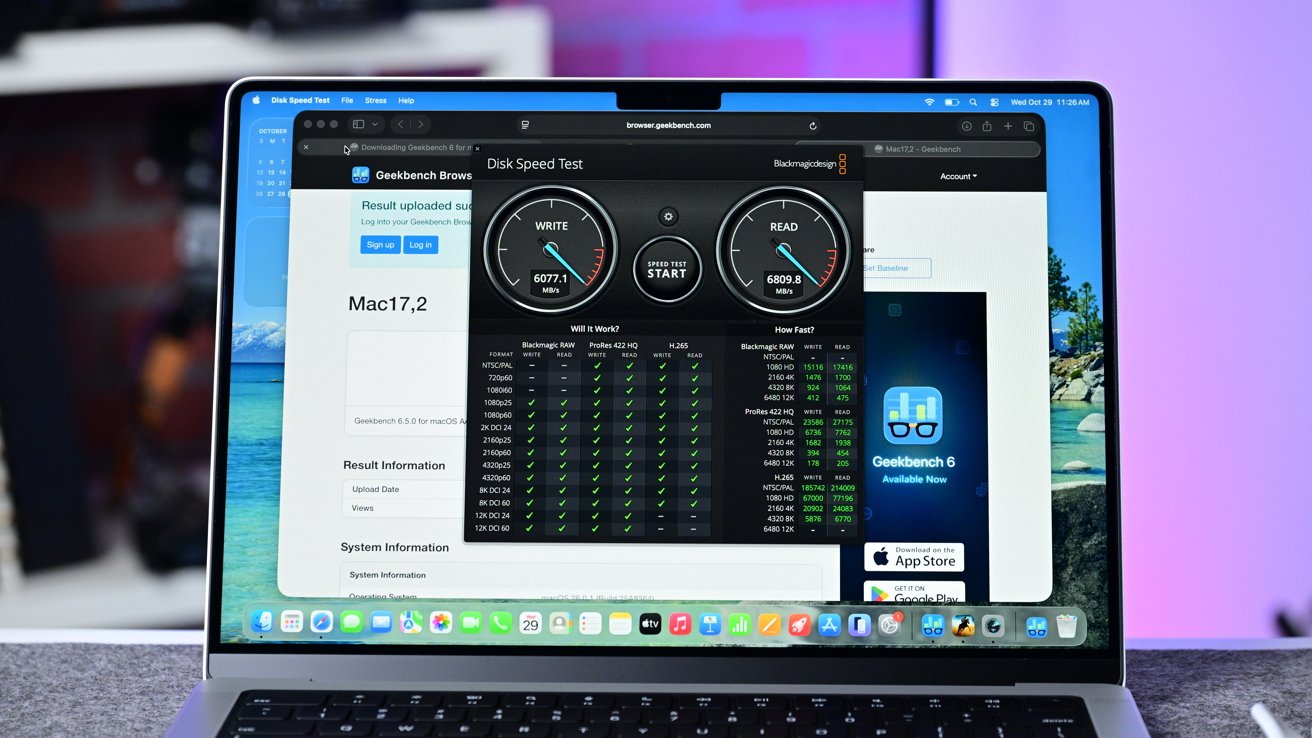
To test out the relevance of the now-upgraded Intel Mac Pro, it was put to work encoding a 17-gigabyte video project. This was a commercial project, including various titles, graphics, and effects that would tax most systems.
For the modern-day comparison, it was put against an M3 Max MacBook Pro, though its specifications were not advised in the video.
The result was that the Mac Pro was faster at crunching through the project, at about half a minute to a minute for the M3 Max. A MacBook Pro with M3 Max started from $3,199 or $3,499 at launch, depending on the size, and can be found on eBay from $2,500 and up.
Setting aside nearly every other factor or workflow, this does seem like a big win for the Intel Mac Pro in the wake of the Apple Silicon transition. That big win fades when you consider how much effort and expense went into getting the Mac Pro to this state in the first place.
You can buy a new Mac Studio with the M4 Max and 128GB of memory for $3,499 as a new device, and get pretty similar results. You could also splash out on a Mac Studio with an M3 Ultra chip with 32 cores and 256GB of memory for $7,499, if you need that many cores.
We wouldn’t buy either of these today. Mac Studio upgrades are likely in mid-2026.
Anyway, both are equipped with the Media Engine, onboard successors to the Afterburner card that are designed for video encoding and decoding, without the added accessory.
Also, the test is very much video production-based, so is skewed towards that specific goal. For almost every other task, it’s nowhere near as good as an entry-level Apple Silicon Mac.
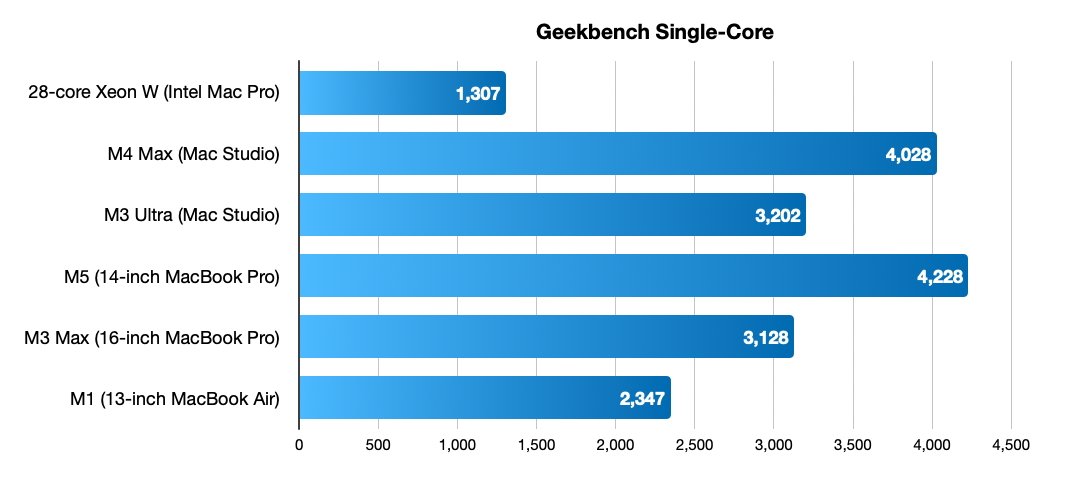
Single-core Geekbench listings for the last 28-core Intel Mac Pro and a selection of Apple Silicon devices.
Using Geekbench figures, we can also see a considerable difference in performance in general. Results for the 28-core Intel Mac Pro gives it single-core performance at 1,307 and multi-core at 10,795. In this very specific workflow, the Afterburner card, and interconnected video cards are doing nearly all of the heavy lifting.
For reference, the 14-inch MacBook Pro with M5 gets 4,228 for single-core and 17,459 for multi-core tests. An M3 Max 16-inch MacBook Pro can get to 3,128 for single-core and 20,961 for multi-core.
For video editing specifically, going for the M3 Ultra gains double the Media Engine capacity of its M3 Max counterpart. It may not cut the time down to be comparable to the claimed 30 seconds of the upgraded Intel Mac Pro, but it would be very close.
Ultimately, upgrading the Intel Mac Pro as far as possible is a great experiment and demonstrates that there is still some usable performance in pre-Apple Silicon hardware. But at the same time, you could just spend the same amount on brand new hardware for a similar effect.
And when you do, you end up with something more useful for everyday life, outside of the one particular task.