[embedded content]Note. The music in this trailer is some generic Trek-like fare, but don’t worry — the proper TNG theme is present and correct in the game itself.
Alongside the launch of the Marvel collection, Pinball FX has now ventured to the final frontier with an all-new DLC package containing Williams’ legendary Star Trek: The Next Generation table.
The package is now available to download from the Switch eShop for £8.99 / $9.99 and you can get a taste of the U.S.S. Enterprise’s long-awaited arrival to the virtual-pinball realm by checking out the above launch trailer.
The table includes original music and voices from the series as well as a good number of Easter eggs for even the biggest Trekkies out there. While keeping the machine’s game running, you will have to fire torpedoes to defend the starship, survive the Shuttle Simulation and more.
You can find a full rundown of the DLC’s features below.
Table Features:
– Warp through eight U.S.S. Enterprise-D Missions – Enjoy the original music and voiceovers by eight cast members – Fire Photon Torpedoes to defend the starship – Get ahead of the competition with the Warp Speed ball delivery sequence – Survive the Shuttle Simulation in the Holodeck – Reach Warp Factor 9.9 for unique rewards – Find secret modes hidden from the galaxy. Become an honorary Starfleet officer today!
Have you picked up the new DLC yet? Let us know in the comments.
Since The Super Mario Bros. Movie launched earlier this year, talk among Nintendo fans has inevitably shifted towards the plausibility of a Legend of Zelda movie.
Nintendo itself has been pretty forthcoming about its intentions to make further movies based on its IP, and the success of The Super Mario Bros. Movie has even caused Eiji Aonuma to express interest in a Zelda adaptation, so it seems only a matter of time before the green light is flicked to the ‘on’ position.
Naturally, however, fans are concerned about a potential Zelda movie’s artistic direction. Could it go down the same route as the Mario Movie and put its focus on slapstick humour? Surely not. How about a Ghibli-esque animation? Heck, we’d be up for that.
Writer and video editor Dom Nero has something quite different in mind and has created a fan-made mashup trailer of what he deems to be the most appropriate vision for a Zelda movie (thanks, Polygon). By splicing together footage from existing movies (with a particular focus on the work of puppeteer Jim Henson), Nero has crafted a Zelda trailer that looks like it’s been plucked straight from the ’80s. It’s actually quite remarkable.
It goes without saying, of course, that if Nintendo were to make an official Zelda movie, it probably wouldn’t look anything like Nero’s trailer. We’re betting it’ll be some sort of animation in collaboration with Illumination again; after all, rumours earlier this year pointed to a potential deal being struck between Nintendo and Universal that’ll give Illumination another crack at a Nintendo movie.
What do you make of this fan-made Zelda movie trailer? What kind of direction do you think Nintendo should go down with an official movie? Let us know with a comment.
To convert MIDI to MP3 in Python, two great ways is using the pydub and fluidsynth libraries:
pydub is a high-level audio library that makes it easy to work with audio files.
fluidsynth is a software synthesizer for generating audio from MIDI.
Here are three easy steps to convert MIDI to MP3 in Python:
Step 1: Install the pydub and fluidsynth libraries:
pip install pydub
You also need to install fluidsynth (see below, keep reading this article). The installation process for fluidsynth varies by operating system. For example, on Ubuntu, you can install it via apt:
sudo apt-get install fluidsynth
Step 2: Download a SoundFont file.
SoundFont files contain samples of musical instruments, and are required by fluidsynth to generate audio from MIDI. A popular free SoundFont is GeneralUser GS, which can be downloaded from the schristiancollins website.
Step 3: Convert MIDI to MP3.
Use the following Python code to convert a MIDI file to MP3:
import os
from pydub import AudioSegment def midi_to_mp3(midi_file, soundfont, mp3_file): # Convert MIDI to WAV using fluidsynth wav_file = mp3_file.replace('.mp3', '.wav') os.system(f'fluidsynth -ni {soundfont} {midi_file} -F {wav_file} -r 44100') # Convert WAV to MP3 using pydub audio = AudioSegment.from_wav(wav_file) audio.export(mp3_file, format='mp3') # Remove temporary WAV file os.remove(wav_file) # Example usage:
midi_file = 'input.mid'
soundfont = 'path/to/GeneralUser GS.sf2'
mp3_file = 'output.mp3'
midi_to_mp3(midi_file, soundfont, mp3_file)
Replace 'input.mid', 'path/to/GeneralUser GS.sf2', and 'output.mp3' with the appropriate file paths. This script will convert the specified MIDI file to MP3 using the specified SoundFont.
Let’s explore some background information and alternatives next.
MIDI files store musical information as digital data, such as note sequences, instrument choices, and timing instructions. MIDI files are the digital representations of musical compositions and store essential data, such as notes, pitch, and duration. These files play a significant role in music production, education, and research.
In contrast, MP3 files store compressed audio data, typically captured from a live performance or created synthetically.
Converting MIDI files to MP3 files allows you to play music on various devices, share them easily, and store them in a more accessible format. Plus, MP3 files are typically smaller in size compared to MIDI files, making them more suitable for distribution.
When converting from MIDI to MP3, your computer uses a software synthesizer to generate audio based on the MIDI data and then compress it into an MP3 file.
To perform this conversion using Python, you can utilize libraries such as midi2audio and FluidSynth synthesizer to process MIDI files, generate audio, and eventually save it in a desired format, like MP3. The midi2audio library provides a convenient command-line interface for fast conversions and batch processing.
Note: There’s an essential difference in how MIDI and MP3 files store and represent audio data. While MIDI files provide instructions for recreating the music, MP3 files directly store the audio data, compressed for efficient storage and playback. This distinction shapes the conversion process, which requires synthesizing and compressing audio data from the digital instructions contained in the MIDI file.
Introduction to FluidSynth
FluidSynth Overview
FluidSynth is a powerful and easy-to-use software synthesizer that allows you to convert MIDI files into audio format with high-quality output. It is an open-source project and can be easily integrated into various applications, including Python projects, to generate music by processing MIDI events. With FluidSynth, you can load SoundFont files (usually with the extension .SF2) to define instruments and customize the sound generation process.
As a Python developer, you can leverage FluidSynth to add audio processing capabilities to your projects. By using a simple Python interface, you can create everything from command-line applications to more complex, GUI-based solutions. Example:
The core of FluidSynth is its software synthesizer, which works similarly to a MIDI synthesizer. You load patches and set parameters, and then send NOTEON and NOTEOFF events to play notes. This allows you to create realistic audio output, mimicking the sound of a live performance or an electronic instrument.
To get started with FluidSynth in Python, consider using the midi2audio package, which provides an easy-to-use interface to FluidSynth. With midi2audio, you can easily convert MIDI files into audio format, or even play MIDI files directly, through a simple yet powerful API.
In your Python code, you’ll import FluidSynth and midi2audio, then load a SoundFont file to define your instrument. Once that’s done, you can send MIDI events to the synthesizer and either play the generated audio immediately or save it to a file for later playback.
To get started with converting MIDI to MP3 files in Python, you’ll need to install a few essential packages. First, you will need the midi2audio package. You can install it using pip by running the following command in your terminal or command prompt:
pip install midi2audio
This package will provide you with the necessary tools to easily synthesize MIDI files and convert them to audio formats like MP3 1.
Command Line Usage
Once you have installed the midi2audio package, you can start using its command-line interface (CLI). The CLI allows you to perform MIDI to audio conversion tasks quickly without having to manually write a Python script.
Here’s an example of a basic command that converts a MIDI file to an audio file:
midi2audio input.mid output.wav
By default, the output file will be in WAV format. If you want to generate an MP3 file instead, you’ll need to add an extra step. First, install the FFmpeg utility on your system. You can find the installation instructions here.
After installing FFmpeg, you can convert the WAV file to MP3 using the following command:
ffmpeg -i output.wav output.mp3
Now you have successfully converted a MIDI file to MP3 using the command-line tools provided by midi2audio and FFmpeg. With these powerful packages and CLI, you can easily automate and batch process multiple MIDI to MP3 conversions as needed.
Converting Midi to Audio with Midi2Audio
Using Midi2Audio
Midi2Audio is a helpful Python library that simplifies converting MIDI to audio files using the FluidSynth synthesizer. To start using Midi2Audio, first, you need to install it by running pip install midi2audio. Once installed, you can use the library’s Python and command-line interface for synthesizing MIDI files to audio or for just playing them.
Here is an example of how to use Midi2Audio in a Python script:
from midi2audio import FluidSynth fs = FluidSynth()
fs.midi_to_audio('input.mid', 'output.wav')
In this example, you are configuring a FluidSynth instance and then using the midi_to_audio() method to convert an input MIDI file to an output WAV file.
Batch Processing
Midi2Audio shines when it comes to batch processing, allowing you to convert multiple MIDI files to audio in a single operation. To achieve this, you can simply iterate over a collection of MIDI files and call the midi_to_audio() method for each file.
For example:
from midi2audio import FluidSynth
import os input_folder = 'midifiles/'
output_folder = 'audiofiles/' fs = FluidSynth() for file in os.listdir(input_folder): if file.endswith('.mid'): input_file = os.path.join(input_folder, file) output_file = os.path.join(output_folder, file.replace('.mid', '.wav')) fs.midi_to_audio(input_file, output_file)
Here, you are iterating through all the MIDI files in the “midifiles” directory and converting them into WAV audio files within the “audiofiles” directory.
Converting Midi to MP3 using Timidity
TiMidity++ is a powerful tool that can handle various Midi formats and transform them into MP3 files. Here, you’ll find information on the pros and cons of using TiMidity++, followed by a step-by-step process for conversion.
Pros and Cons of Using Timidity
Pros:
Confidence in output quality: TiMidity++ is widely known for producing high-quality MP3 files from Midi input.
Cross-platform support: It works seamlessly on Windows, Linux, and macOS, making it accessible to many users.
Free and open-source: As a free and open-source tool, you don’t need to worry about licensing fees or limitations on its use.
Cons:
Command-line interface: TiMidity++ has a command-line interface (CLI) which might prove challenging for users unfamiliar with command line tools.
Less user-friendly: Due to the CLI nature of TiMidity++, it may not be as user-friendly as other software options that have a graphical user interface (GUI).
Step-by-Step Process
Install TiMidity++: Download and install TiMidity++ on your system. You can find installation instructions for various platforms on its official website.
Obtain your Midi file: Make sure you have the Midi file you’d like to convert to MP3 ready on your computer.
Open the command prompt or terminal: In your command prompt or terminal, navigate to the directory containing your Midi file.
Run the TiMidity++ command: Execute the following command in your command prompt or terminal, replacing <input.mid> with your Midi file and <output.mp3> with the desired output file name:
Enjoy your MP3 file: Once the process completes, you will find the converted MP3 file in the same directory as your original Midi file.
That’s it! You have now successfully converted a Midi file to MP3 using TiMidity++.
Additional Tools and Libraries
In this section, we’ll discuss some additional tools and libraries that can help you convert MIDI to MP3 in Python.
SOX and FFMPEG
SOX is a command-line utility that can process, play, and manipulate audio files. It supports various audio formats and can be used alongside other libraries to perform the MIDI to MP3 conversion. To use it in your project, you can either install its command line tool or use it as a Python library.
FFMPEG, on the other hand, is a powerful multimedia tool that can handle audio, video, and images. It also supports numerous formats, so you can use it to convert your MIDI files to MP3 or other formats.
Combine SOX and FFMPEG to effectively process and convert your MIDI files. First, use SOX to convert the MIDI files to an intermediary audio format, such as WAV. Then, utilize FFMPEG to convert the WAV files to MP3. This workflow ensures a smooth, efficient conversion process.
Libsndfile and Channels
Another useful library to consider is libsndfile, which is a C library for reading and writing files containing sampled sound. It supports many common audio formats, including WAV, AIFF, and more.
For Python developers, there is a wrapper library called pysoundfile that makes it easy to use libsndfile in your Python projects. Incorporating libsndfile with other MIDI processing libraries can help you build a complete MIDI to MP3 conversion solution.
When working with audio, you may also encounter different channels in audio files, such as mono, stereo, and surround sound. Libraries such as SOX, FFMPEG, and libsndfile can manage different channel configurations, ensuring your output MP3 files have the desired number of channels and audio quality.
Considerations for Different Operating Systems
When working with Python to convert MIDI to MP3 files, it’s essential to consider the differences and requirements for various operating systems. In this section, we’ll discuss specific considerations for Windows OS, Linux, and Ubuntu 20.04.
Windows OS
On Windows systems, you can use a package like midi2audio to easily convert MIDI files to audio formats like MP3. To install this package, run:
pip install midi2audio
Keep in mind that this package requires FluidSynth to work. You can install FluidSynth for Windows from here, and remember to set up your environment variables to enable the package to find FluidSynth’s libraries and executables. Finally, don’t forget to download a suitable soundfont file, as this will significantly impact the quality of the converted audio.
Linux
For Linux users, the process is similar to Windows. First, install midi2audio using pip:
pip install midi2audio
Next, you’ll need to install FluidSynth through your distribution’s package manager. For example, on Debian-based systems like Ubuntu, execute the following command:
sudo apt-get install fluidsynth
As with Windows, ensure you have a soundfont file that suits your needs. You can find several free soundfont files online. If you’re searching for an alternative command-line tool, consider using SoX – Sound eXchange as it’s versatile and well-suited for scripting and batch processing.
Ubuntu 20.04
In Ubuntu 20.04, the process is, for the most part, the same as other Linux distributions. Since Ubuntu is based on Debian, you can follow the installation process mentioned in the Linux section above.
To reiterate, install midi2audio using pip:
pip install midi2audio
Then, use the package manager to install FluidSynth:
sudo apt-get install fluidsynth
Remember to download your desired soundfont file to achieve the best audio quality for the converted MP3 files.
Frequently Asked Questions
How can I use FluidSynth to convert MIDI to MP3 in Python?
To use FluidSynth for MIDI to MP3 conversion in Python, first, you need to install the midi2audio library, which acts as a wrapper for FluidSynth. You can install this package using pip install midi2audio. Now, use the following code to perform the conversion:
from midi2audio import FluidSynth fs = FluidSynth()
fs.midi_to_audio('input.mid', 'output.mp3')
What are the best Python libraries for MIDI to MP3 conversion?
The most popular Python libraries for MIDI to MP3 conversion are FluidSynth, which can be used with the midi2audio package, and Timidity++. FluidSynth is known for its ease of use and non-realtime synthesis. Timidity++ usually requires additional setup and configuration, but it is a powerful solution that is often used in Linux-based systems.
How do I extract notes from MIDI files using Python?
To extract notes from MIDI files, you can use the mido library. First, install it via pip install mido. The following code will help you to extract notes from a MIDI file:
import mido midi_file = mido.MidiFile('input.mid')
for msg in midi_file.play(): if msg.type == 'note_on': print('Note:', msg.note, 'Velocity:', msg.velocity)
Can I convert MIDI to MP3 using VLC or Audacity with a Python script?
Yes, you can use VLC or Audacity for MIDI to MP3 conversion through a Python script. You can use the subprocess module to execute command-line arguments for both applications. However, these solutions require additional installations and might not be as streamlined as using dedicated Python libraries like FluidSynth.
Are there any free Python tools for MIDI to MP3 conversion?
There are several free Python libraries that offer MIDI to MP3 conversion. Some of the popular options include FluidSynth combined with the midi2audio package, Timidity++, and using subprocess to interact with command-line applications like VLC or Audacity.
How can I read text from MIDI files using Python?
To read text from MIDI files, you can again rely on the mido library. The following code snippet demonstrates how to extract text from a MIDI file:
import mido midi_file = mido.MidiFile('input.mid')
for track in midi_file.tracks: for msg in track: if msg.type == 'text': print(msg.text)
By using mido, you can access various types of MIDI messages, including text events, and manipulate the MIDI data as needed.
Python offers utilities like Mido to help you analyze and transform MIDI files seamlessly. Using Mido, you can read, write, and edit MIDI files effectively. It enables you to extract valuable information, such as note sequences, instrument details, and timing data.
Mido provides a powerful interface to work with MIDI data. It is well-suited for dealing with MIDI processing-related tasks and can be integrated seamlessly into your Python projects.
Apple’s Game Porting ToolKit can be a bit tricky to install onto macOS. Now there’s a third-party installer that makes the process much simpler.
At WWDC ’23 Apple introduced the Apple Game Porting Toolkit (AGPT) – a new SDK which allows game developers to port existing Windows-based DirectX games to the Mac via a translation layer.
Our original article on how to install the Game Porting ToolKit showed you how to install the AGPT using the macOS Terminal, but for many users the process is complex and error-prone.
Now InstallAware – traditionally a maker of Windows installer tools – has created a macOS installer for AGPT which allows you to install the software with just a few clicks from a traditional macOS installer.
Below we’ll walk you through how to use InstallAware’s installer for AGPT.
Getting started
This walkthrough assumes you already have the git source code control system installed on your Mac. If not, get the installer from git-scm.com and run it to install git.
First, you’ll want to gather all the pieces for the installer from InstallAware’s GitHub repository: the sources, the .dmg, and the installer which is contained on the .dmg.
To do so, make a local folder to hold all the files on your Mac’s drive where you would normally keep all your downloads and sources. We’ll use the working name “AGPT” for the folder.
Next, open the Terminal app in the Utilities folder on your Mac. Change the directory to the folder you just created using the cd command followed by a space, then drag the new AGPT folder into the Terminal window to add the path.
Press Return. This changes your present working directory in Terminal to the AGPT folder.
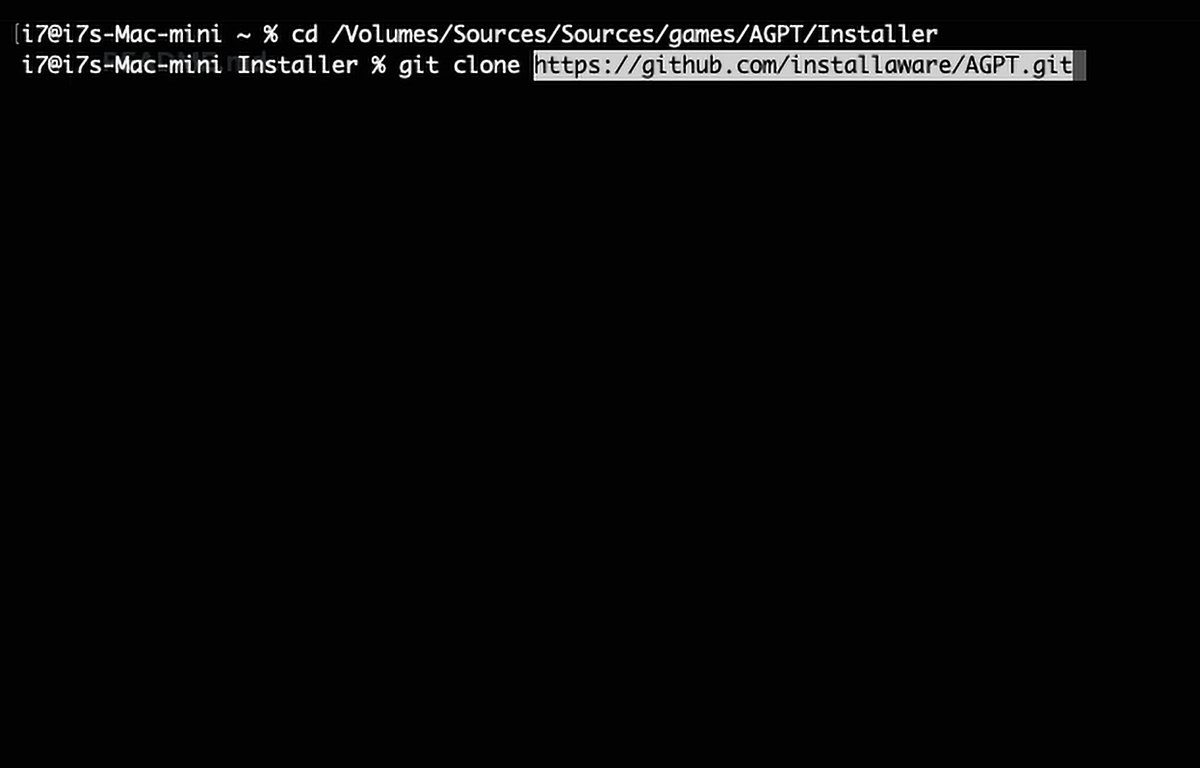
Next, go to InstallAware’s AGPT GitHub page and click the Code button, then the small clipboard icon button to copy the URL to clone the repository into the new AGPT folder:
https://github.com/installaware/AGPT.git
Back in Terminal, on a new line type git clone, a space, then paste in the GitHub repo line you copied above.
Press Return.
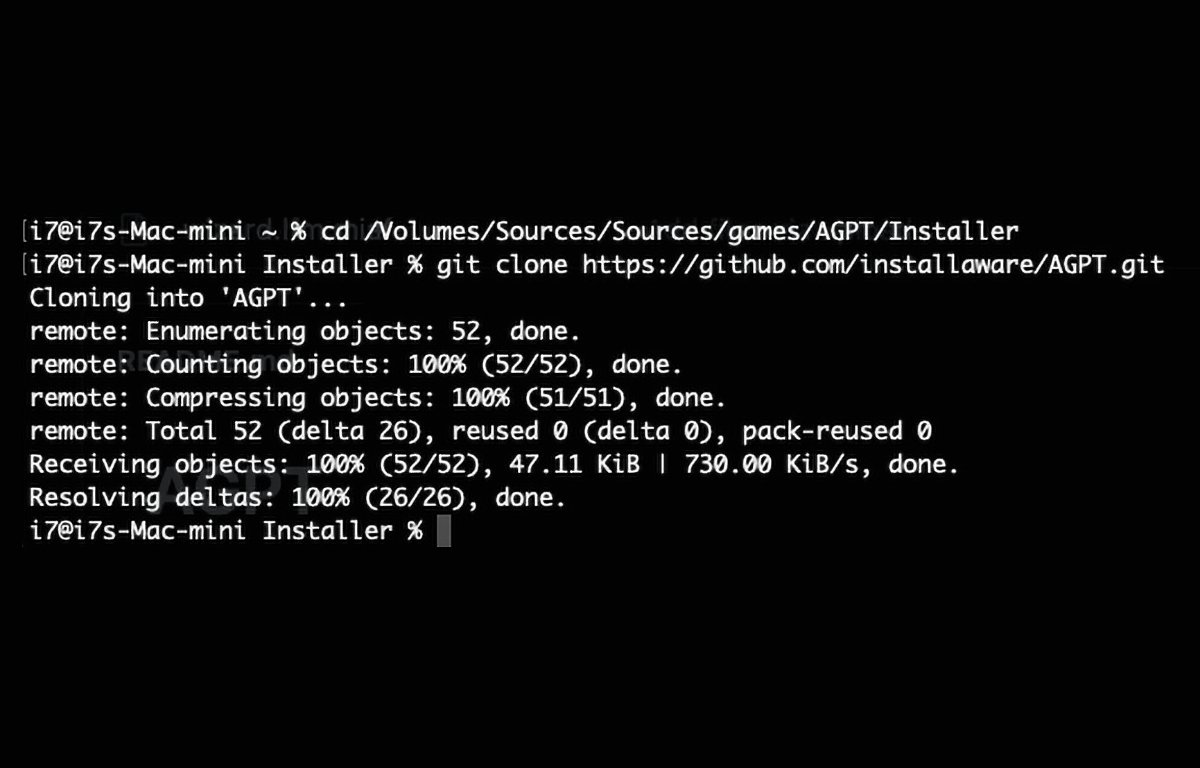
If all goes well, git will fetch the AGPT remote repo into your AGPT folder on your Mac’s drive. This leaves you with the contents of the remote repository for the InstallAware installer in the AGPT folder you created.
The git clone command completes.
Get the installer
Next, scroll down the GitHub repo’s page a bit to just above the screenshot and click the link to get the installer’s .dmg file from www.installaware.com/iamp/agpt.dmg
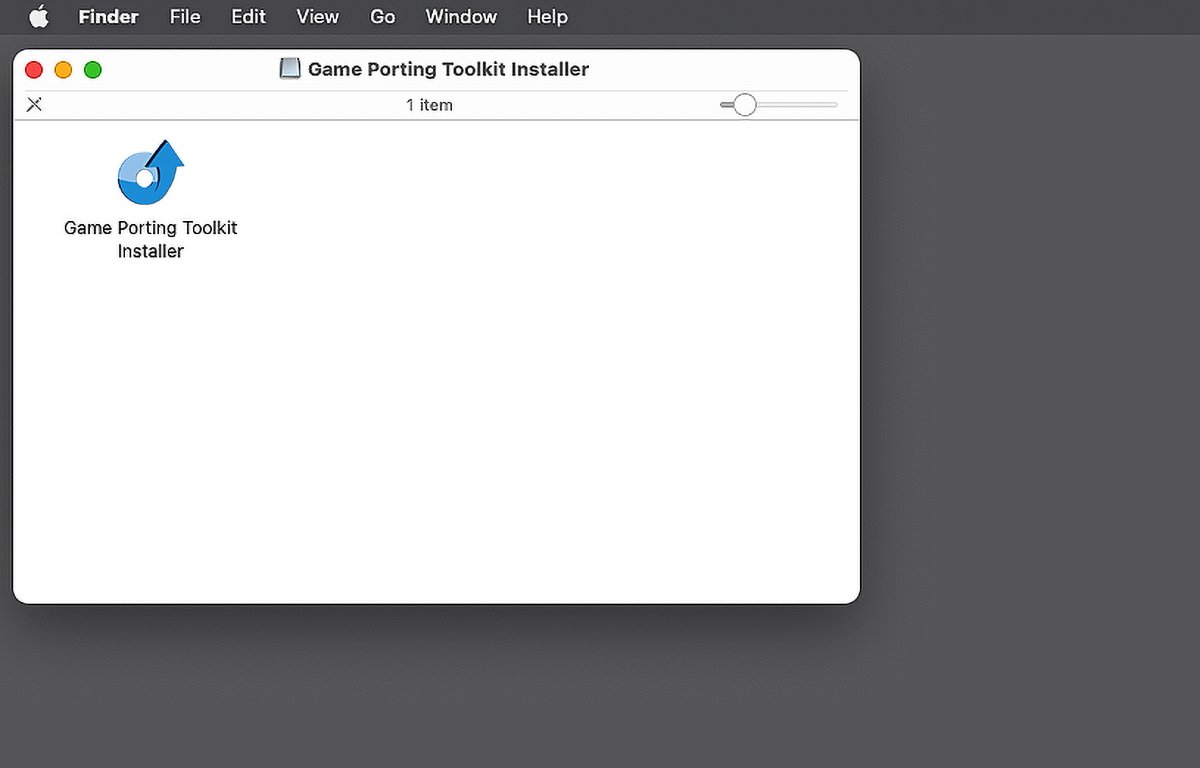
Once downloaded, in Finder manually drag the .dmg file into the AGPT folder you made. Now double-click it in Finder to open the .dmg.
If you like, you can also copy the installer into the AGPT folder to copy it to your Mac’s drive, or just double-click it from the .dmg to open it:
The InstallAware installer.
If you get a warning about “Game Porting Toolkit Installer” being an app you downloaded from the internet, just click “Open” to open it anyway.
Run the installer
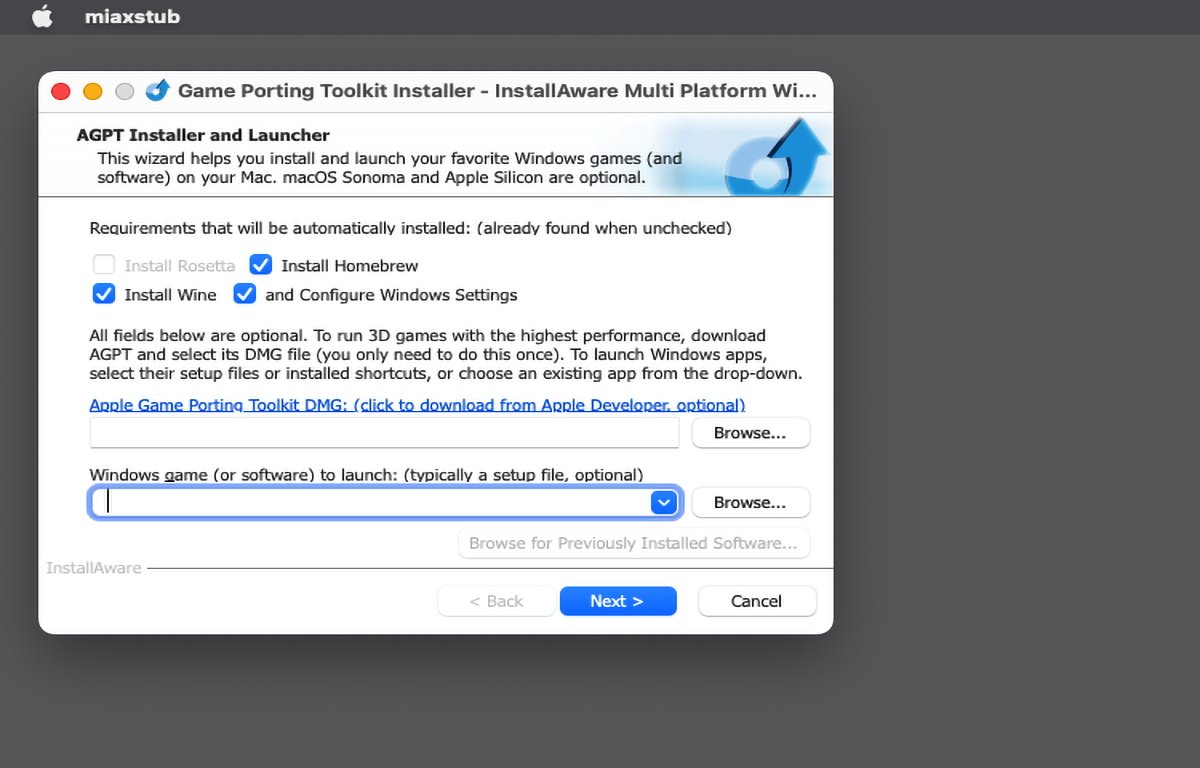
Once you double-click the installer you get a window with several options (several of which the installer says are optional).
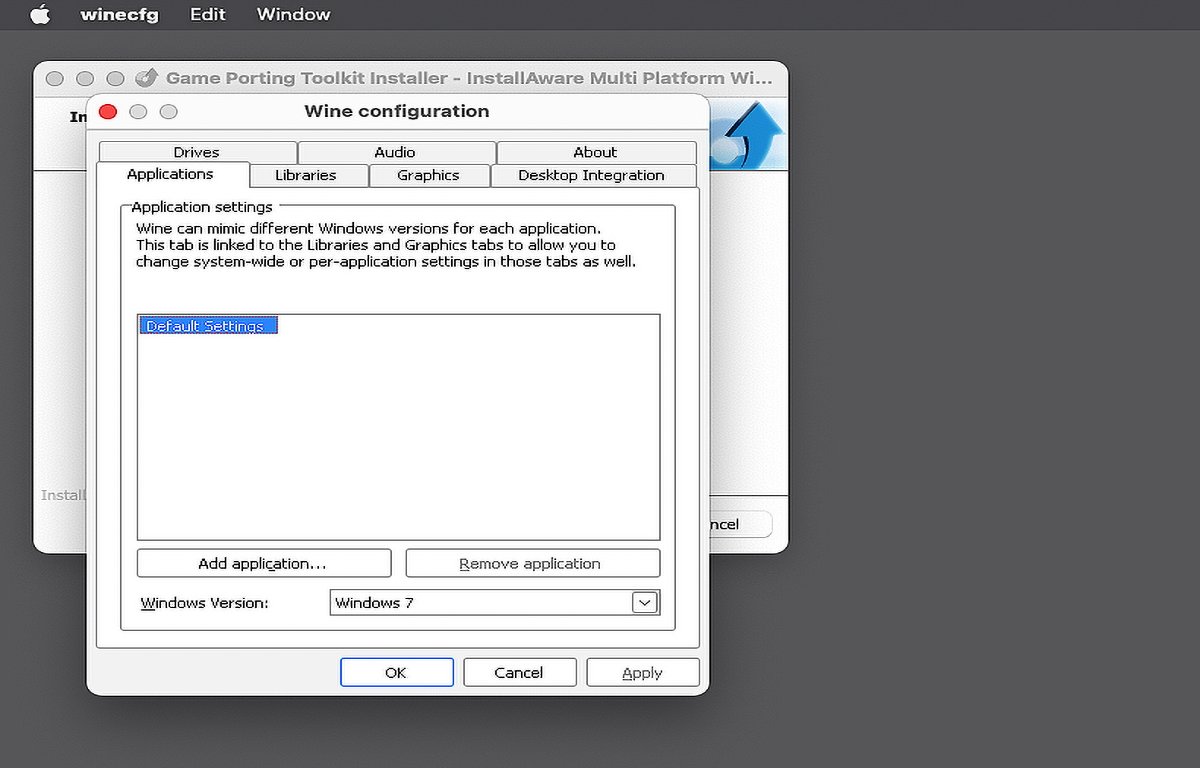
At the top are options to install the Homebrew package manager, the Wine translation layer, and configure Windows settings. The installer says it auto-detects if these options are already installed, but on our Mac, it didn’t uncheck the Homebrew option even though we already had it installed.
If this happens, and you already have Homebrew installed, go ahead and uncheck that option.
In the field below, you have the option to select which Apple Game Porting Toolkit .dmg the installer will use by clicking the Browse button – if you’ve already downloaded one from Apple, but this step is optional. The installer knows how to find the Apple Game Porting Toolkit .dmg on the internet on its own.
If you don’t already have the .dmg for the Apple Game Porting Toolkit downloaded to your Mac, click the small link above the top text field to download it:
Click the text link to download Apple’s game Porting Toolkit.
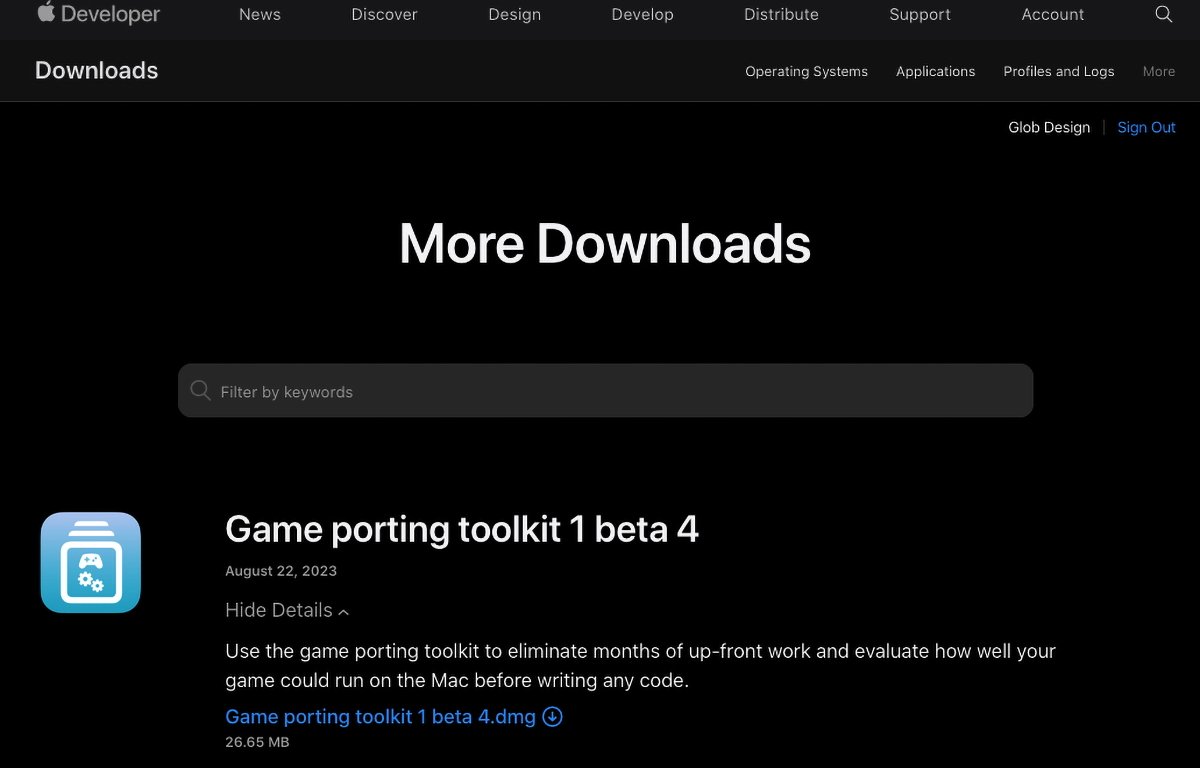
This will open the More Downloads section on Apple’s Developer website, but you’ll first need to sign in with your Apple ID.
Once signed in, expand the Game Porting Toolkit item by clicking the View Details link, then click the .dmg download button. This will download Apple’s Game Porting Toolkit .dmg to your Mac:
Download Game Porting Toolkit from Apple’s website.
Once downloaded, the .dmg should auto-mount on your Mac’s desktop, but go ahead and copy it to your AGPT folder for future reference.
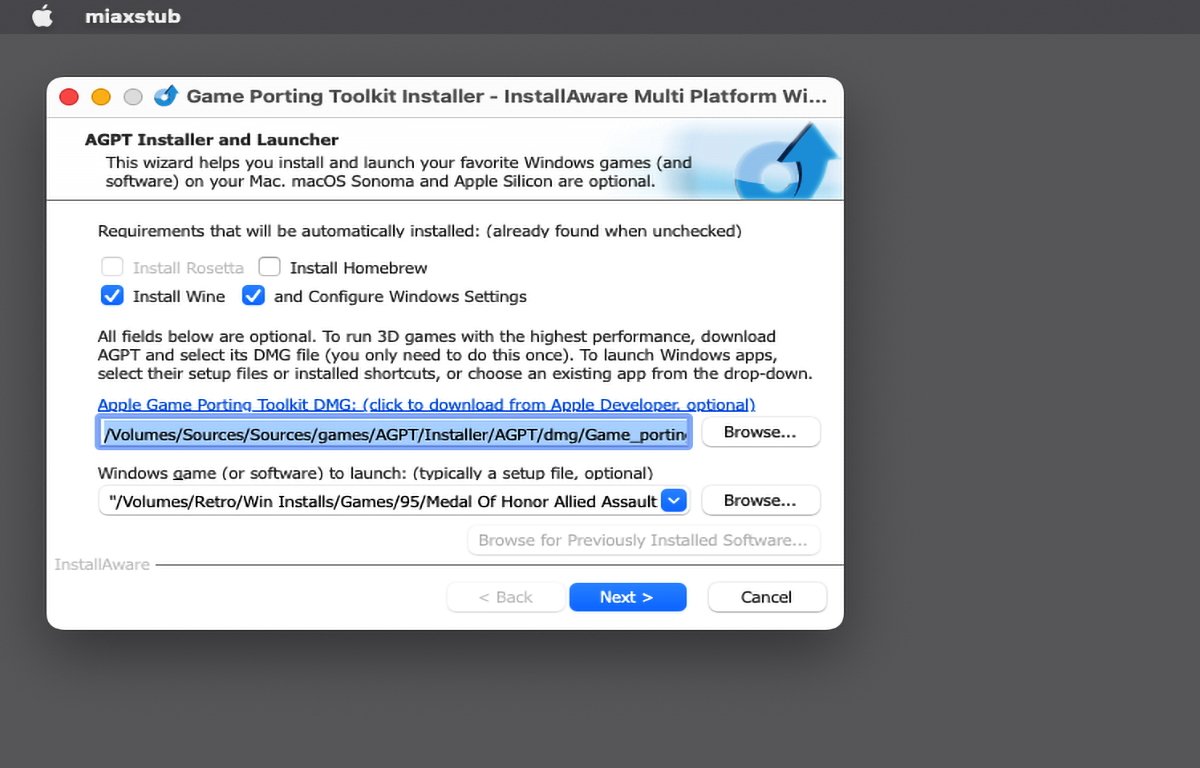
Now head back to the InstallAware installer app, which should still be running, and click the Browse button next to the text field. Navigate to Apple’s Game Porting Toolkit .dmg you downloaded and select it by clicking the Open button.
Set a Windows app to install
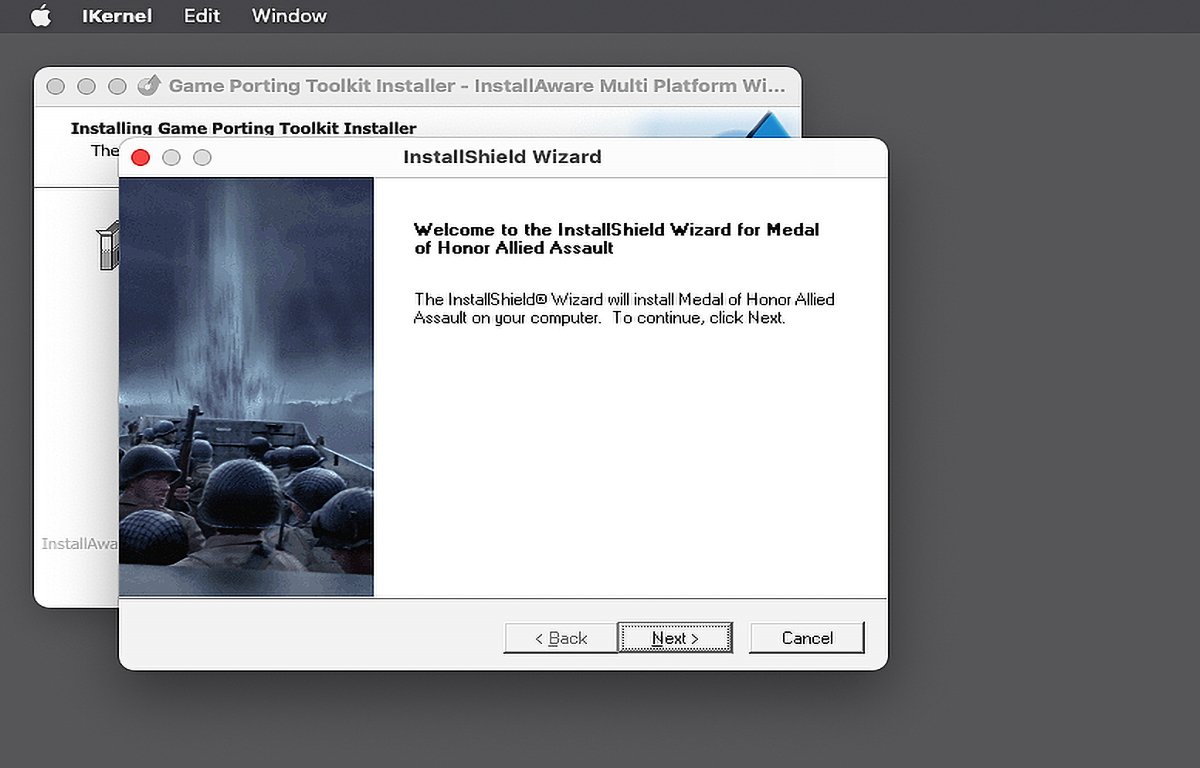
The next step is optional but if you also want to set up a Windows app while installing the Game Porting ToolKit, click the second Browse button below the first one, and select any compatible Windows .exe setup file from disk. In this example we’ll install Medal of Honor: Allied Assault:
Select a third-party app to install.
Now you’re finally ready to install everything. Click the Next button to start the installation.
If you get the error “Tapping Apple Homebrew Failed!” with Error code -1, you’ll need to either turn on the Homebrew option at the top of the original installer window or else manually tap the Apple Homebrew formula in Terminal with:
brew tap apple/apple http://github.com/apple/homebrew-apple
And press Return.
But as we stated in our original article, this may take a long time – up to an hour on an Apple Silicon machine. So you may just want to check the Homebrew option in InstallAware’s installer and try again.
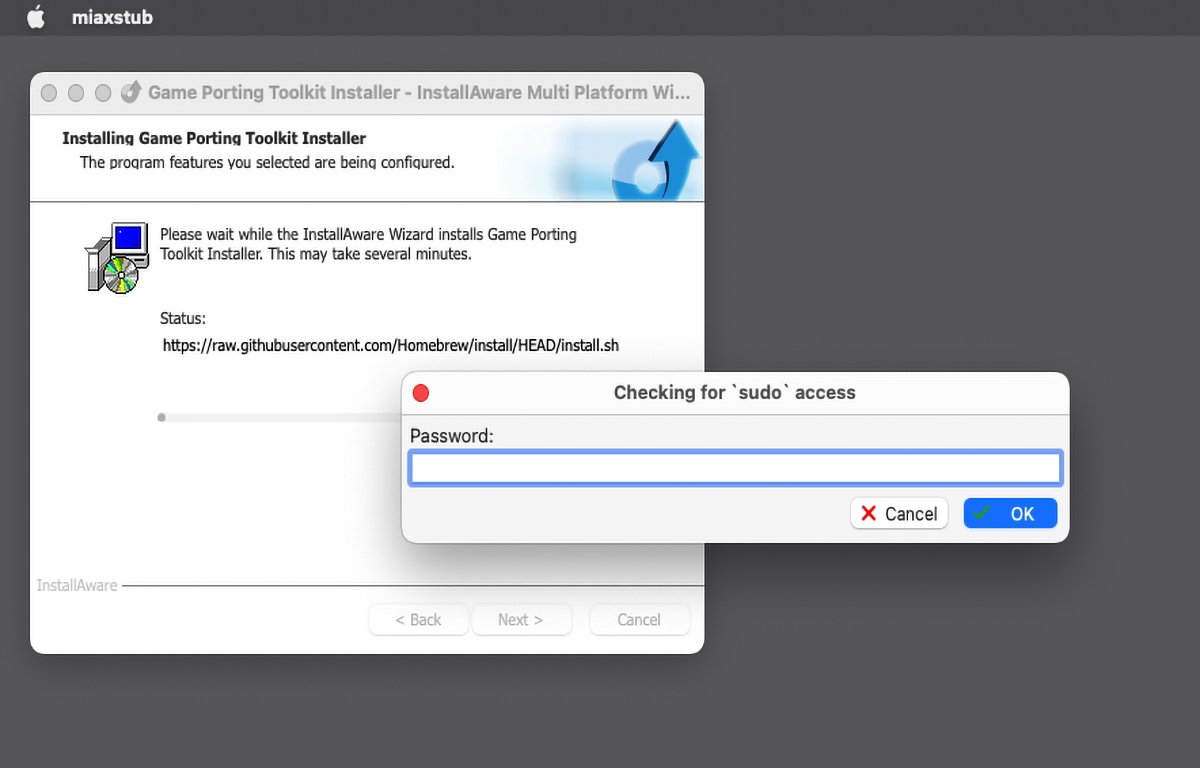
As the installer starts running, it will ask you for your Mac’s admin password with a “Checking for sudo access” prompt. You’ll need to enter an admin password for your Mac to proceed:
Enter an admin password.
You won’t see any progress indicators, so it’s best just to let the installer run which can take quite a while. When done you’ll be prompted for Wine and other settings. Just use the defaults:
Prompt for optional settings’ change.
Finally, if you selected any third-party software to install, the installer will run that installer last and you’ll need to step through it. If you’re installing commercial software, you’ll need a serial number for your installer:
Game installer running.
Once any third-party installer finishes, you’re done. Click the Done or Finish button and you’re finished.
We’ve already covered how to run third-party games in Game Porting Toolkit in our previous article, so check out that article for instructions.
InstallAware’s installer does make installing the Game Porting Toolkit easier with far fewer steps and far fewer commands in the Terminal – even if it does seem to have a few glitches or idiosyncrasies here and there.
Metal Slug Awakening is the latest mobile entry in the classic run-and-gun arcade game series and developer VNGGames is always adding new powerful weapons and characters. That’s why we made this Metal Slug Awakening tier list so you can keep up to date with the best loadouts for your team.
After a cross-platform play update in December last year, Warframe developer Digital Extremes has now provided new details about cross-platform saves.
At Tennocon 2023, it was revealed the team behind the online free-to-play is “aiming” to deliver this “long requested feature” to “all platforms” at some point this year. A “final release date announcement” will be shared in the coming months. Here’s a bit about it:
“This feature will allow you to access your account on every platform — taking your Mastery Rank, Focus, Rewards, Equipment, and more wherever you want to play!”
Apart from this, Tennocon 2023 also shared a number of other Warframe-related updates and announcements celebrating the game’s 10th anniversary. Here’s the rundown, direct from the PR:
HEIRLOOM COLLECTIONS (TODAY): to celebrate 10 years of Warframe, the team has released limited edition Heirloom Collections – distinctive, unique skins for Frost and Mag designed by Warframe’s original Art Director, Mynki, along with an entirely new class of customization, the Signa.
WHISPERS IN THE WALLS (WINTER 2023): the beginning of an epic new narrative arc for Warframe that brings a new cinematic storyline answering questions players have had since the game’s origin.
ABYSS OF DAGATH (OCTOBER 2023): the faceless rider Dagath, the 54th Warframe arrives as part of our Abyss of Dagath seasonal update – a new weapon, seasonal content and a suite of QoL improvements await.
WARFRAME: 1999 (2024): a major 2024 update which will take players back to the beginning – featuring classic Warframe hack and slash action and a licensed track from Nine Inch Nails – discover who Arthur is in Excalibur’s suit and more at next year’s TennoCon.
WARFRAME MOBILE (2024): the same high-quality experience console and PC players have been known to expect comes to mobile in 2024. Mobile iOS preorders will be live today.
Have you given this game a go on the Switch yet? Looking forward to this new cross-platform save feature? Tell us below.
Hello folks, and welcome to another edition of Box Art Brawl!
Last week, we took a look at one of the many, many entries in the Mega Man franchise with Mega Man 7 for the SNES. While it was probably a bit closer than we were perhaps expecting, the Japanese box art took home the prize with 68% – it’s definitely better, right?
This time, with the news of Excitebike 64‘s impending arrival on Nintendo Switch Online + Expansion Pack, we thought it prudent to check out the original box art for the N64 release. Launched back in 2000, it always surprises us when we remember that it’s only the second game in the Excitebike series, arriving 16 years after the original Excitebike release in Japan for the NES.
Europe and North America share very similar designs for this one, with just minor differences in the overall layout. So, with that in mind, it’s going to be another Duel this week as the two regions fight it out against Japan.
Let battle commence!
Be sure to cast your votes in the poll below; but first, let’s check out the box art designs themselves.
Europe / North America
Image: Nintendo
The Western design for Excitebike 64 does a great job of representing what the game is all about: performing mindblowing leaps of faith off a ramp as you tear around the race course.
Granted, there’s a lot of unused space in this one that’s haphazardly covered up by a bunch of logos in the bottom right, so we’re not overly keen on that, but all in all, it’s a pretty great box art.
Japan
Image: Nintendo
Japan’s approach, meanwhile, is a lot more stylised, putting the portrait orientation to full use. Here, we’ve got a red and black background with an image of a racer dominating front and center, the front wheel of the bike taking up the lion’s share of the composition.
It’s incredibly eye-catching, but does it beat out the Western design? Well, that’s up to you.
Which region got the best Excitebike 64 box art? (1,480 votes)
North America / Europe36%
Japan64%
Thanks for voting! We’ll see you next time for another round of the Box Art Brawl.
Wrap a string: Use wrap() or fill() functions from the textwrap module in Python. wrap() returns a list of output lines, while fill() returns a single string with newline characters.
Truncate a string: Use the shorten() function from the textwrap module to truncate a string to a specified length and append a placeholder at the end if needed.
TextWrapper object: An instance of the TextWrapper class from the textwrap module, which provides methods for wrapping and filling text. You can customize the wrapping behavior by modifying the properties of the TextWrapper object.
Understanding Textwrap Module
The textwrap module in Python provides various functions to efficiently wrap, fill, indent, and truncate strings. It helps in formatting plain text to make it easily readable and well-structured. Let’s discuss a few key functions in this module.
Functions in Textwrap
wrap()
The wrap() function is used to wrap a given string so that every line is within a specified width. The resulting output will be a list of strings, where each entry represents a single line. This function ensures that words are not broken.
Here’s an example:
import textwrap text = "Python is a powerful programming language."
wrapped_text = textwrap.wrap(text, width=15)
for line in wrapped_text: print(line)
The output will be:
Python is a
powerful
programming
language.
fill()
The fill() function works similarly to wrap(), but it returns a single string instead of a list, with lines separated by newline characters. This can be useful when you want to maintain the output as a single string but still have it wrapped at a specific width.
For instance:
import textwrap text = "Python is a powerful programming language."
filled_text = textwrap.fill(text, width=15)
print(filled_text)
Output:
Python is a
powerful
programming
language.
Working with Strings
The textwrap module is specifically designed for wrapping and formatting plain text by accounting for line breaks and whitespace management.
Manipulating Strings with Textwrap
When dealing with strings in Python, it is often necessary to adjust the width of text or break lines at specific points. The textwrap module provides several functions that can be useful for manipulating strings. Here are some examples:
Wrapping a string: The wrap() function breaks a long string into a list of lines at a specified width. The fill() function works similarly, but instead, it returns a single string with line breaks inserted at the appropriate points. These functions can be helpful when dealing with large amounts of text and need to ensure the characters per line do not exceed a certain limit. For instance,
import textwrap long_string = "This is a long string that needs to be wrapped at a specific width."
wrapped_lines = textwrap.wrap(long_string, width=20)
print(wrapped_lines) filled_string = textwrap.fill(long_string, width=20)
print(filled_string)
Truncating a string: The shorten() function trims a string to a specified width and removes any excess whitespace. This is useful when dealing with strings with too many characters or unwanted spaces. Here’s an example of how to use shorten():
import textwrap example_string = "This string has extra whitespace and needs to be shortened."
shortened_string = textwrap.shorten(example_string, width=30)
print(shortened_string)
Handling line breaks and spacing: The textwrap module also accounts for proper handling of line breaks and spacing in strings. By default, it takes into consideration existing line breaks and collapses multiple spaces into single spaces. This feature ensures that when wrapping or truncating strings, the output remains clean and readable.
TLDR: The textwrap module provides a simple and effective way to manipulate strings in Python. It helps with wrapping, truncating, and formatting strings based on desired width, characters, and spacing requirements. Using the wrap(), fill(), and shorten() functions, developers can efficiently manage large strings and improve the readability of their code.
Textwrapper Object Configuration
The textwrap module’s core functionality is accessed through the TextWrapper object, which can be customized to fit various string-manipulation needs.
Customizing Textwrapper Settings
To create a TextWrapper instance with custom settings, first import the textwrap module and initialize an object with desired parameters:
width: The maximum length of a line in the wrapped output.
initial_indent: A string that will be prepended to the first line of the wrapped text.
subsequent_indent: A string that will be prepended to all lines of the wrapped text, except the first one.
expand_tabs: A Boolean indicating whether to replace all tabs with spaces.
tabsize: The number of spaces to use when expand_tabs is set to True.
These additional parameters control various string-handling behaviors:
replace_whitespace: If set to True, this flag replaces all whitespace characters with spaces in the output.
break_long_words: When True, long words that cannot fit within the specified width will be broken.
break_on_hyphens: A Boolean determining whether to break lines at hyphenated words. If True, line breaks may occur after hyphens.
drop_whitespace: If set to True, any leading or trailing whitespace on a line will be removed.
The TextWrapper object also offers the shorten function, which collapses and truncates text to fit within a specified width:
shortened_text = wrapper.shorten("This is a long text that will be shortened to fit within the specified width.")
print(shortened_text)
By customizing the settings of a TextWrapper instance, you can efficiently handle various text manipulation tasks with confidence and clarity.
Managing Line Breaks and Whitespace
When working with text in Python, you may often encounter strings with varying line breaks and whitespace. This section will explore how to effectively manage these elements using the textwrap module and other Python techniques.
Controlling Line Breaks
The textwrap module provides functions for wrapping and formatting text with line breaks. To control line breaks within a string, you can use the wrap() and fill() functions. First, you need to import the textwrap module:
import textwrap
Now, you can use the wrap() function to split a string into a list of lines based on a specified width. Here’s an example:
text = "This is a very long line that needs to be wrapped at a specific width."
wrapped_text = textwrap.wrap(text, width=20)
print(wrapped_text)
Output:
['This is a very long', 'line that needs to', 'be wrapped at a', 'specific width.']
For a single string with line breaks instead of a list, use the fill() function:
This is a very long
line that needs to
be wrapped at a
specific width.
In Python, line breaks are represented by the line feed character (\n). To control line breaks manually, you can use the splitlines() and join() functions in combination with the range() function and len() for iterating over elements:
lines = text.splitlines()
for i in range(len(lines)): lines[i] = lines[i].strip()
result = '\n'.join(lines)
print(result)
Feel free to experiment with the different functions and techniques to manage line breaks and whitespace in your Python scripts, making them more readable and well-formatted.
Working with Dataframes
When working with dataframes, it is common to encounter situations where you need to wrap and truncate text in cells to display the information neatly, particularly when exporting data to Excel files. Let’s discuss how to apply text wrapping to cells in pandas dataframes and Excel files using Python.
Applying Textwrap to Excel Files
To wrap and truncate text in Excel files, first, you’ll need to install the openpyxl library. You can learn how to install it in this tutorial. The openpyxl library allows you to work with Excel files efficiently in Python.
Once you have installed openpyxl, you can use it along with pandas to apply text wrapping to the cells in your dataframe. Here’s an example:
import pandas as pd
from openpyxl import Workbook
from openpyxl.utils.dataframe import dataframe_to_rows # Sample dataframe
data = {'A': ["This is a very long string", "Short string"], 'B': ["Another long string", "Short one"]}
df = pd.DataFrame(data) # Create a new Excel workbook
wb = Workbook()
ws = wb.active # Add dataframe to the workbook
for r in dataframe_to_rows(df, index=False, header=True): ws.append(r) # Apply text_wrap to all cells
for row in ws.iter_rows(): for cell in row: cell.alignment = cell.alignment.copy(wrapText=True) # Save the workbook
wb.save('wrapped_text.xlsx')
This code reads a pandas dataframe and writes it to an Excel file. It then iterates through each cell in the workbook, applying the text_wrap property to the cell’s alignment. Finally, it saves the wrapped text Excel file.
When working with more complex dataframes, you might need to apply additional formatting options such as index, sheet_name, and book to properly display your data in Excel. To do this, you can use pandas‘ built-in function called ExcelWriter. Here’s an example:
# Export dataframe to Excel with specific sheet_name and index
with pd.ExcelWriter('formatted_data.xlsx', engine='openpyxl') as writer: df.to_excel(writer, sheet_name='Sample Data', index=False)
This code exports the dataframe to an Excel file with the specified sheet_name and without the index column.
The combination of pandas and openpyxl allows you to efficiently wrap and truncate text in dataframes and Excel files. With the appropriate use of ExcelWriter, sheet_name, and other parameters, you can craft well-formatted Excel files that not only wrap text but also properly display complex data structures.
Frequently Asked Questions
How can I use textwrap for string truncation?
To use textwrap for string truncation in Python, you can use the shorten function from the module. Here’s an example:
What are common methods for wrapping text in Python?
Common methods for wrapping text in Python include using the wrap and fill functions from the textwrap module. Here’s an example using fill:
import textwrap text = "Lorem ipsum dolor sit amet, consectetur adipiscing elit."
wrapped_text = textwrap.fill(text, width=20)
print(wrapped_text)
How does textwrap interact with openpyxl for Excel?
textwrap can be used alongside openpyxl to format text in Excel cells. You can use the wrap or fill functions from the textwrap module to prepare your text and then write the formatted text to an Excel cell using openpyxl. However, remember to install openpyxl with pip install openpyxl before using it.
Why is textwrap dedent not functioning properly?
textwrap.dedent might not function properly when the input string contains mixed indentation (spaces or tabs). Make sure that the input string is consistently indented using the same characters (either spaces or tabs).
What distinguishes textwrap fill from wrap?
The wrap function returns a list of wrapped lines, while the fill function returns a single string with the lines separated by newline characters. Here’s an example comparing both functions:
import textwrap text = "Lorem ipsum dolor sit amet, consectetur adipiscing elit."
wrap_output = textwrap.wrap(text, width=20)
fill_output = textwrap.fill(text, width=20) print(wrap_output)
print(fill_output)
How do I implement the textwrap module?
To implement the textwrap module in your Python code, simply import the module at the beginning of your script, and then use its functions, such as wrap, fill, and shorten. For example, to wrap a long string:
import textwrap text = "Lorem ipsum dolor sit amet, consectetur adipiscing elit."
wrapped_text = textwrap.wrap(text, width=20) for line in wrapped_text: print(line)
Remember to adjust the width parameter as needed and explore other options in the documentation for more customization.
Video game peripheral maker PDP has announced a new line of officially licensed Sonic-themed Nintendo Switch controllers that contain a “collectible figurine inside the grip”.
This product is part of the “REALMz” accessory line, which also includes headsets. Here’s a bit about this latest creation from the official website:
“REALMz takes the worlds of your favorite games and transports them into a controller or headset. You can collect, display, and play with these eye-catching gaming accessories, and explore the stories built inside each one.”
Apart from Sonic, there are also Tails and Knuckles controllers. Switch fans can choose between wired ($39.99 USD) and wireless ($59.99 USD) versions of the “REALMz” controller, and all models come with customisable LED lighting. Pre-orders are available now.
This line will also be extended to other series – with a Pikmin-themed one scheduled to arrive this winter. Here’s a look:
While these third-party controllers include some added features like an audio jack, it’s worth mentioning they may be missing certain features you would find on a first-party Nintendo Switch Pro controller.
What do you think of this new accessory line from PDP? Comment below.
If you missed the initial announcement, this is a remaster of the 8-bit Sunsoft Game Boy title that was originally released in Japan in 1992 and then in Europe in 1993. The original game has also previously been made available on the 3DS Virtual Console service.
This brand new color version of the “experience” platformer adds additional features like a museum mode, music player, “sleek new presentation”, and art and has been developed and designed alongside the original game director Yuichi Ueda. It’s priced at $19.99 USD (or your regional equivalent).
Here’s some more information about Trip World DX along with some screenshots, courtesy of Nintendo’s website:
Travel across four fantastic lands and Mount Dubious in Trip World DX! Our hero Yakopoo’s adventure begins when the Maita flower, a symbol of world peace and happiness, is stolen, throwing Trip World into chaos! Fly through the air, traverse over the land, and swim through the water, collecting special items to help you find the flower and restore Trip World. Use Yakopoo’s shapeshifting powers to save Trip World from darkness! Race across the ground as a ball. Grow a tail to hit enemies—or a flower to make your enemies friendly!
This new version collects the classic handheld adventure Trip World in its original form, as well as the brand new COLOR version bringing all new life to the world of YAKOPOO! Discover how the game was made and all new secrets in the museum mode including development documents and video interviews, or go listen to one of the greatest game soundtracks ever made in the music player!
Will you be trying this game out when it arrives on the Switch eShop next week? Tell us below.





 Step 1: Install the
 MIDI files store musical information as digital data, such as note sequences, instrument choices, and timing instructions. MIDI files are the digital representations of musical compositions and store essential data, such as notes, pitch, and duration. These files play a significant role in music production, education, and research.
 Note: There’s an essential difference in how MIDI and MP3 files store and represent audio data. While MIDI files provide instructions for recreating the music, MP3 files directly store the audio data, compressed for efficient storage and playback. This distinction shapes the conversion process, which requires synthesizing and compressing audio data from the digital instructions contained in the MIDI file.