Moleskine and Nintendo join forces to bring the 8-bit world of Super Mario to life on paper
Mario has delighted generations of fans for decades by embodying the spirit of a true hero who never gives up. Moleskine celebrates this iconic character with a new Limited Edition series of notebooks. The vibrant and colorful world of Super Mario has also been captured on paper in a whimsical video using hand-crafted drawings and stop-motion animation where pixels transform into a Mario made up of Moleskine notebooks. It’s a newstalgic mixture of contemporary technology and timeless paper.
It is somewhat fitting that Moleskine and Mario’s paths have crossed. Notebooks are where ideas are born, and Mario was born of an idea. Classic and simple story telling gave birth to one of the most successful and beloved characters in the history of video games. Mario continues to be one of the most popular characters despite the plethora of characters who have been introduced since he first came on the scene.
The collection is a nod to the original Super Mario Bros.™ video game. Two pocket-sized notebooks reproduce the physical elements of the game: the cartridge which showcases a replica of the original label and the nostalgic and instantly recognizable Game Boy™ with its simple and easy to use buttons and original imagery. The two larger notebooks capture the screens of the early gameplay: one with a sky-blue background and the other with a black background featuring controller details (the highlighted buttons are those that make Mario jump).
With lined pages, a ribbon bookmark and the signature silhouette with rounded corners, the Super Mario Limited Edition notebooks serve as gifts to others and to oneself, to fill with stories and ideas, inspired notions and silly thoughts, for Mario aficionados the world over.
Play as Champion’s Tunic Link in Mario Kart 8 Deluxe today!
A new update to the Mario Kart™ 8 Deluxe game is available now! Race like a champion with the Master Cycle Zero and Champion’s Tunic Link from the Legend of Zelda™: Breath of the Wild game. This update also includes the Ancient Tires and the Paraglider parts.
Nintendo Power Podcast is the official podcast of Nintendo of America, in which guests such as Nintendo employees and developers discuss the world of Nintendo each month.
In Episode 7, host Chris Slate (previously editor-in-chief of the Nintendo Power™ magazine) is joined by two guests from Nintendo Of America – Doug Bowser, head of Sales & Marketing, and Katie Casper from the Publisher and Developer Relations group – to discuss recent and upcoming games for the Nintendo Switch™ system, plus the debut of Nintendo Power magazine 30 years ago. Chris also chats with Phil Duncan and Olie De-Vine from Ghost Town Games about the creation of the Overcooked! Special Edition game and its upcoming sequel, Overcooked! 2.
I’m Yasunori Nishiki, the composer for Octopath Traveler. Octopath Traveler is a labor of love developed by a team that grew up in the golden age of RPGs, and was determined to update the classic RPG for the modern age. To that end, my goal was to create a soundtrack with memorable melodies and lavish soundscapes that incorporated live orchestral performances. From the main theme to battle and cutscene music, I strove for clear melodies and powerful yet not overly complex songs that would rise to the level of the evolved HD-2D graphics.
Also central to the game is the concept of a journey. With the various overworld and town themes, I wanted players to be able to feel the many living, breathing locales that they reach in their travels. If you could stop along the way from time to time and take in the sounds of the world along with its nostalgic sights, nothing would make me happier.
Keisuke Miyauchi, Director, ACQUIRE Octopath Traveler is an RPG centered around the idea of a journey. To make sure that all players could enjoy their own journey, we focused on three points in particular:
The first is the glorious visuals rendered in “HD-2D.” We took inspiration from the pixel art of the RPGs we ourselves used to play, updating them with modern technology to create rich and varied landscapes that we believe players will find to be both nostalgic and freshly beautiful.
The second is the interactivity, with each character able to interact with the residents of Orsterra through their Path Actions. We hope you’ll enjoy getting to know the people, with their sometimes tragic, sometimes heartwarming stories and pasts.
The last point we paid special attention to was freedom. From your starting character to the course you chart across the realm, the choices are in your hands. We encourage you to spin a tale of adventure all your own.
Masashi Takahashi, Producer, SQUARE ENIX At long last, the release date is here! Whether you’ve been following this project from the start, discovered it with the demo versions, or heard of it only recently, we’re truly happy to finally be able to bring you this tale of eight brave souls.
We hope that with Octopath Traveler you’ll enjoy talking to each other about how far along you’ve gotten, how you picked up certain powerful items along the way, and the like—just like the good old days of classic pixel art RPGs.
Releasing the game simultaneously around the world was a significant challenge for us, but the tremendous reception we’ve received has made all the struggles along the way worth it. Just thinking that fans in all corners of the world will be enjoying Octopath Traveler at the same time truly blows me away. I hope you all enjoy the journey!
Banner illustration by Naoki Ikushima, Character Design, SQUARE ENIX. Thanks to one and all! Happy travels!
Ready for adventure? Captain Toad: Treasure Tracker is now available!
The fearless Captain Toad has explored his way to the Nintendo Switch™ system and the Nintendo 3DS™ family of systems in his very own puzzle-filled adventure. Summon your courage to dodge dangers, outwit enemies, and track treasures across many trap-filled courses. This quest will span smoldering volcanoes, hazardous steam engines, spooky haunted houses, and new courses based on the Super Mario Odyssey™ game. Treasure awaits!
Features
Track treasure through maze-like courses.
Explore new courses inspired by Super Mario Odyssey. Play through the game to unlock these stages, or unlock immediately by tapping a Super Mario Odyssey series amiibo™ figure (sold separately).
You can share the fun with a friend in two-player co-op mode, exclusive to the Nintendo Switch version of the game.
Unearth secrets and collect goodies by viewing worlds from every angle.
New to Fortnite? The start of Season 5 is a perfect time to try it out!
This Season features new changes to the map like a Viking ship, a desert outpost, and ancient statues! Also, now you can zip across the island in style with your squad and uncover the mysteries of Season 5 in the first four-person vehicle – the All-Terrain Kart (ATK)!
The start of a Season means that you’ll have a ton of time to complete Challenges and earn rewards like outfits, emotes, toys and more. Rewards change each Season, so check out the Battle Pass tab in the game to see what can be earned.
Speaking of the Battle Pass, players who want more rewards can get the Battle Pass in-game for 950 V-Bucks. You’ll instantly unlock two exclusive outfits, then play to level up your Battle Pass to earn up to 100 rewards worth over 25,000 V-Bucks. Remember to complete Weekly Challenges to level up faster!
Jump in now and play Fortnite for free. Good luck out there!
Nintendo Labo Creators Contest: New Winners Announced!
Thank you to all the My Nintendo members who submitted so many great creations to the Nintendo Labo Creators Contest. We’re happy to announce that the winning entries have now been selected in the Best Toy-Con Mod using Toy-Con Garage and Best Original Invention using Toy-Con Garage categories! You can see the six winning creations on the Nintendo Labo Creators Contest Winners’ page.
If you didn’t get the chance to enter this time, take a look at the upcoming Nintendo Labo Creators Contest No. 2 starting July 19 at 11 a.m. PT. Categories include Best Toy-Con Musical Instrument and Best Gaming Experience using Toy-Con Garage. Check out the official site for all the details.
And in more good news, did you know that the Toy-Con Motorbike from the Nintendo Labo: Variety Kit is now compatible with the Mario Kart 8 Deluxe game? You can steer your kart in an all-new way! Learn more on the official site.
Void where prohibited. Open to legal residents of the U.S. and Canada (excluding Quebec), ages 13+. Nintendo Switch system and Nintendo Labo kit required. Contest begins 11AM PT on 7/19/18 and ends at 10:59AM PT on 8/20/18. To enter, upload a video of your Toy-Con creation or invention as detailed in the Official Rules. 2 Grand Prize winners will each receive one (1) collectible Nintendo Switch system (ARV: $ $1,000 USD), one (1) Nintendo Labo Creators Jacket (ARV: $ 70.00 USD), and one (1) award certificate (ARV: $ 70.00 USD). 8 Runner-Up winners will each receive one (1) collectible pair of Joy-Con controllers, one (1) Nintendo Labo Creators Jacket (ARV: $ 70.00 USD), and one (1) award certificate (ARV: $ 70.00 USD). Total ARV of all prizes: $3,640 USD. Chances of winning a prize depend on eligibility and quality of entries received, and how well each meets the judging criteria. Details and restrictions apply. For Official Rules, visit https://labo.nintendo.com/share/#!/contest-rules/. Sponsor: Nintendo of America Inc.
Pokémon: Let’s Go, Pikachu! and Pokémon: Let’s Go, Eevee! will both feature a variety of exclusive Pokémon which are unique to each game. In Pokémon: Let’s Go, Pikachu! Trainers will be able to capture Pokémon including Oddish, Sandshrew and Growlithe; while players of Pokémon: Let’s Go, Eevee! will be able to capture Pokémon such as Bellsprout, Vulpix and Meowth.
At the start of players’ adventures, they will receive their first partner Pokémon, either Pikachu or Eevee. Unlike regular Pokémon, their first partner Pokémon is not interested in evolving and instead prefers to stay out of its Poké Ball. It will travel with players throughout their journey by hanging on their shoulder or riding on their head. Players can become best friends with their Pikachu or Eevee and can pet, feed and even tickle them. Not only that, but players can dress up their Trainer and partner Pokémon in a wide variety of cool and cute outfits, accessories and even hairstyles to become the perfect style duo with their new best friend.
As players travel throughout the Kanto region, they will meet some familiar faces as well as a few new ones. Professor Oak returns, alongside a new Rival, to present the Pokédex—a high-tech encyclopedia that records data on any new species of Pokémon that players catch in the games. Players will be able to battle Gym leaders across Kanto, including fan favorites Brock, the Gym Leader of Pewter City, and Misty, the Gym Leader of Cerulean City, as they strive to become the Pokémon League champion. In-game Pokémon Trainers aren’t the only ones who can be battled. Players will be able to connect with other players online* or via local wireless communication between Nintendo Switch systems to enjoy intense Pokémon battles. They will also be able to trade Pokémon with each other using these communication features to help complete their Pokédex.
For the first time in a mainline Pokémon game, two people can now play together on one system! By gently shaking a second Joy-Con controller, another player can join the fray. There are some real benefits to adventuring together as well, including making it easier to catch Pokémon and even battling against tough Trainers as a tag team in Pokémon battles. Grab a friend, explore Kanto and experience an adventure like no other.
The Poké Ball Plus device can be used to play Pokémon: Let’s Go, Pikachu! and Pokémon: Let’s Go, Eevee! in place of a Joy-Con or alongside the Pokémon GO app instead of the Pokémon GO Plus accessory**. Poké Ball Plus also allows players to bring one of their Pokémon from Pokémon: Let’s Go, Pikachu! or Pokémon: Let’s Go, Eevee! with them as they explore the real world. The Mythical Pokémon Mew will be available in the Poké Ball Plus, and players will be able to transfer it to their version of these new games.*** Poké Ball Plus will be available to purchase separately at retail alongside Pokémon: Let’s Go, Pikachu! and Pokémon: Let’s Go, Eevee! on November 16.
Pokémon: Let’s Go, Pikachu! and Pokémon: Let’s Go, Eevee! will release exclusively on Nintendo Switch on November 16, 2018. For more information, please visit: www.pokemon.com.
* Nintendo Account required. Online services and features, including online gameplay, are free until the paid Nintendo Switch Online Service launches in 2018. ** Using as a Pokémon GO Plus requires installation of the Pokémon GO application on a compatible smartphone. See www.pokemongo.com for details.
***Nintendo Account and Internet connection required. At the time of its release, Poké Ball Plus will only be compatible as a controller for Pokémon: Let’s Go, Pikachu! and Pokémon: Let’s Go, Eevee! It cannot be used for other Nintendo Switch software titles.
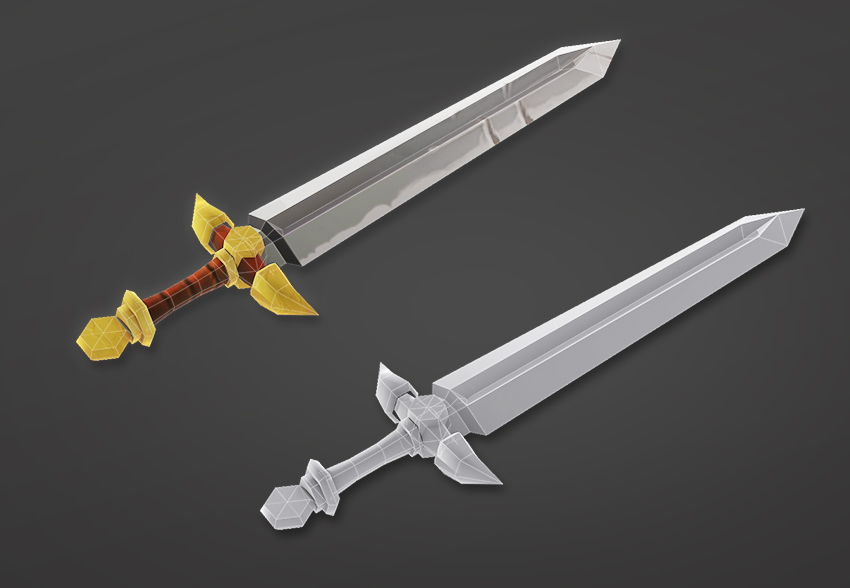
Follow this tutorial step-by-step to create a low poly sword model that you can use in video games, graphic design and illustration projects whilst learning 3D Studio Max quickly.
Some of the skills you’ll learn in this tutorial include creating basic 3D shapes, modelling techniques and preparing topology for texturing.
In this, the second part of the the tutorial series, I’ll show you how to:
Unwrap the UVs
Create a UV Map
Create a Texture Map in Photoshop
05. UVW Remove
Step 1
In this section of the tutorial I’ll go through how to prepare the model so that I can unwrap it. Both UVW Remove and Reset Xform must be performed before attempting to unwrap any of the sword parts.
Ensure you have selected the sword part that you want to unwrap (blade, handle, hand guard etc.). The object must now be converted into an editable mesh. To do this Right Click on the object and select Convert to Editable Mesh.
Convert to Editable Mesh
Step 2
Then go to the Utilities Tab and click on the More button. Scroll down the menu and select UVW Remove.
Select UVW Remove
Step 3
Click on the UVW button that appears under Parameters to apply this to the selected object.
Click on the UVW Button
Step 4
Once UVW Remove has been applied, Right Click on the object and select Convert to Editable Poly.
Convert to Editable Poly
06. Reset XForm
Step 1
Ensure that you’ve selected the sword part that you want to unwrap (blade, handle, hand guard etc.). Go to the Utilities Tab and click on the Reset XForm button and then click on the Reset Selected button.
Click on Reset Xform
Step 2
Click on the Modify Tab and right click on XForm> Collapse All to apply this to your object.
Secondary click on XForm and then Collapse All
07. Unwrapping the Blade
Step 1
To begin unwrapping the blade, ensure you’ve selected it and ensure you’ve followed both sections five and six of this tutorial—UVW Remove and Reset XForm.
To make the next step easier ensure that you’re viewing the blade from the side view.
Turn the Blade model
Step 2
Delete one half of the blade using the Vertex Selection tool.
Delete half of the blade
Step 3
Make sure that the blade is an editable poly by right clicking on it and then selecting Convert to Editable Poly.
Convert to Editable Poly
Step 4
Go to the Modifier List drop down menu and select Unwrap UVW.
Select Unwrap UVW
Step 5
In the Modify Tab under the Edit UVs section select Open UV Editor.
Select Open UV Editor
Step 6
The Edit UVSs window appears. Use the Move Tool and the Scale Tool located in the top right of the window to move the object within the square. Once the object is within the square, click on the Reset Peel button.
Select Reset Peel
Step 7
After clicking on the Reset Peel button, use the Move Tool to move the blade inside the border of the square.
Move the blade in the UV Editor
Step 8
Use the tools on the top left of the Edit UVWs window (Move, Rotate, Scale) and place it on the right side of the square within the border.
Edit the UVs in the UV Editor
Step 9
Close the Edit UVWs window. Ensure the blade is selected and go to the Modify tab. Right Click on the Unwrap Modifier and select Collapse All.
If it becomes an Editable Mesh, convert it into an Editable Poly. Secondary Click > Convert to Editable Poly.
Right click and Collapse All
08. Duplicate the Blade UVs
Step 1
Use the Edge Selection Tool and select one of the outer most edges of the blade.
Select an edge of the sword
Step 2
In the Modifier List, scroll down and select Symmetry.
Select Symmetry from the list
Step 3
Under the Parameters section, select the following:
Mirror Axis: Y
Flip
Edit the mirror parameters
Step 4
Once the parameters have been selected, your blade should be whole again.
Mirror the blade
Step 5
Convert the blade back into an Editable Poly by selecting the blade with Secondary Click > Convert to Editable Poly.
Convert to Editable Poly
Step 6
To check that the UVWs have been duplicated correctly, apply the Unwrap UVW modifier on the blade again by selecting it from the Modifier List.
Select Unwrap UVW
Step 7
Move the UVWs in the Edit UVWs window to ensure that the blade shapes sit on top of each other nicely.
Check the UVs
09. Unwrapping the Hand Guard
Step 1
Select the hand guard. The aim of this section is to remove half of each shape, so that they can be mirrored and so that they take up less space on the UVW Map.
Delete half of the hand guard
Step 2
Select the middle tube shape and using the Vertex Selection tool, select and delete half of the shape.
Delete half of the shape
Step 3
Select the middle shape and using the Vertex Selection tool, select and delete half of the shape.
Delete half of the shape
Step 4
Repeat the same process for the horns. However I’ll only need one half as this will be duplicate four times because we only need one half for the texture map.
Delete 34 of the horns
Step 5
Select all the hand guard shapes and select Unwrap UVW from the Modifier List.
Select Unwrap UVW
Step 6
Using the same process as what was done for the blade, Reset Peel and arrange the shapes within the square. Ensure all the objects are attached to one another.
Arrange UVs in the UVW Editor
Step 7
Convert the shapes back into an Editable Poly by selecting the blade and going Right Click > Convert to Editable Poly. Using the same process as what was done with the blade, use the Symmetry modifier to make the hand guard whole again.
Select symmetry from the menu
Step 8
Ensure that the symmetry modifier gives you the correct results by choosing the right parameters. You can also apply Unwrap UVW modifier again to check the UVWs are placed on top of each other like the blade.
Delete half of the hand guard
10. Unwrapping the Handle
Step 1
Select the middle section of the handle.
Select the middle section
Step 2
Using the Vertex Selection tool, delete half of the handle.
Delete half of the handle
Step 3
Repeat the same steps as above to remove half of the handle for all the objects.
Delete half of all the handle objects
Step 4
Ensure all the objects are attached to each other and apply the Unwrap UVW modifier.
Select Unwrap UVW from the menu
Step 5
Using the same process as what was done for the blade and the hand guard, Reset Peel and arrange the shapes within the square.
Arrange the UVs in the UVW Editor
Step 6
Convert the shapes back into an Editable Poly by selecting the blade and going Secondary Click > Convert to Editable Poly.
Using the same process as what was done with the blade and hand guard, use the Symmetry modifier to make the handle whole again.
Select Symmetry from the menu
Step 7
Ensure the symmetry modifier gives you the correct results by choosing the right parameters. You can also apply Unwrap UVW modifier again to check the UVWs are placed on top of each other like the blade.
Apply the symmetry modifier to the handle
11. Render UVW Map
Step 1
Attach all the objects together with Secondary Click > Attach, then apply the Unwrap UVW modifier.
Select Unwrap UVW fromt he menu
Step 2
Open the UV Editor and ensure all the shapes are arranged within the square and are not overlapping each other. You can still edit them at this stage using the Move, Scale or Rotate tool.
Arrange the UVs in the UVW Editor
Step 3
Once you are happy with the arrangement of the UVs go to Tools > Render UVW Template.
Select Render UVW Template
Step 4
Select the dimensions you would like to render the UV Map to and then click the Render UV Template button.
Edit dimensions to render the UV Map
Step 5
Once the map has been generated, save it to a location using the save button on the top left hand corner of the window.
Save the UV Map
12. Create Texture Map
Step 1
Import the UV map into Photoshop and create a new background layer below the UVs.
Import UV Map to Photoshop
Step 2
You can make the UVs easier to see by changing the colour of the lines. To do this, right click on the UV layer and select Blending Options.
Select Blending Options
Step 3
Select Colour Overlay and choose a white colour.
Select Colour Overlay and choose white
Step 4
Create a new layer underneath the UVs and create a colour map so that you can select the shapes efficiently.
Create a colour map
Step 5
Using the UVs and the colour map, create a new layer and create some base colours for the blade.
Create the base colours for the blade
Step 6
On a separate layer, create some base colours for the handle.
Create the base colours for the handle
Step 7
You can create a new layer on top of your base colours to create some details to the sword. You can add some highlights, cracks and battle damage to make it look more interesting.
Create some details for the texture map
Step 8
Once you are happy with the results, save your Texture Map as an image file.
Save the texture map
13. Apply the Texture Map
Step 1
Ensure you have the sword selected and then click on the Material Editor button on the top menu bar.
Select the Material Editor
Step 2
Once the Material Editor window appears go to Mode > Compact Material Editor.
Select the Compact Material Editor
Step 3
Select one of the spheres that you want the texture map to appear on and then click on the empty box next to Diffuse.
Select the Diffuse
Step 4
Scroll up to the top of the Material/Map Browser and select Bitmap.
Choose bitmap from the menu
Step 5
Select the Texture Map image that was created in Adobe Photoshop.
Select the texture map
Step 6
Ensure the sword model is selected and then click on Assign Material to Selection and then click on Show Shaded Material in Viewport.
Apply the texture map
Step 7
This should apply the texture map to the 3D Sword Model.
The texture map has been applied to the sword model
Conclusion
And with that, the 3D Low Poly Sword is complete. Feel free to share the own creations below. Explore different objects, shapes and colours to find out what works best for your model.
You can also render the model and export it to Adobe Photoshop to create an image for your portfolio.
This tutorial is different from my earlier tutorials as this one is oriented towards game jams and game prototyping, specifically card games. We are going to create a 2D playing card deck in Unity without using any art—purely with code.
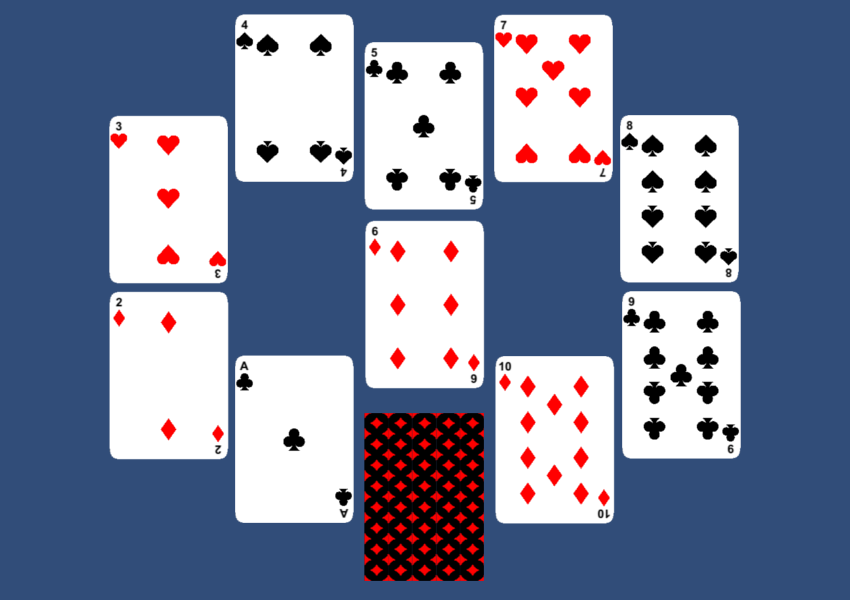
1. Components of a Playing Card Deck
A playing card deck has a total of 52 cards with 13 cards each of 4 different symbols. In order to create one using code, we will need to create these 4 symbols, the rounded rectangular base for the card, and the design on the back of the card.
The design on the back of the card can be any abstract pattern, and there are numerous ways to create one. We will be creating a simple tileable pattern which will then be tiled to create the design. We won’t have any special design for the A, K, Q, and J cards.
2. Alternative Solutions
Before we start, I have to mention that there are easier solutions out there which we can use to create a deck of cards. Some of those are listed below.
The obvious one is to use pre-rendered art for all the designs.
The font-based solution is the fastest and easiest one if you want to do quick prototypes.
3. Creating Textures During Runtime
The first step is to learn how to create a Texture2D using code which can then be used to create a Sprite in Unity. The following code shows the creation of a 256×256 blank texture.
The idea is to draw all the designs onto the texture before we use the Apply method. We can draw designs onto the texture pixel by pixel using the SetPixel method, as shown below.
texture.SetPixel(x, y, Color.white);
For example, if we wanted to fill out the entire texture with a color, we could use a method like this.
private void PaintRectangle(Texture2D texture, Rect rectBounds, Color color)
{ for (int i=(int)rectBounds.x;i<rectBounds.x+rectBounds.width;i++){ for (int j=(int)rectBounds.y;j<rectBounds.y+rectBounds.height;j++){ texture.SetPixel(i, j, color); } }
}
//
PaintRectangle(texture,new Rect(0,0,256,256),Color.red);
Once we have a Texture2D created, we can use it to create a Sprite to be displayed on screen.
Sprite sprite = Sprite.Create(texture, new Rect(0.0f, 0.0f, texture.width, texture.height), new Vector2(0.5f, 0.5f),1);
The complicated part in all this is the creation of the necessary designs on the texture.
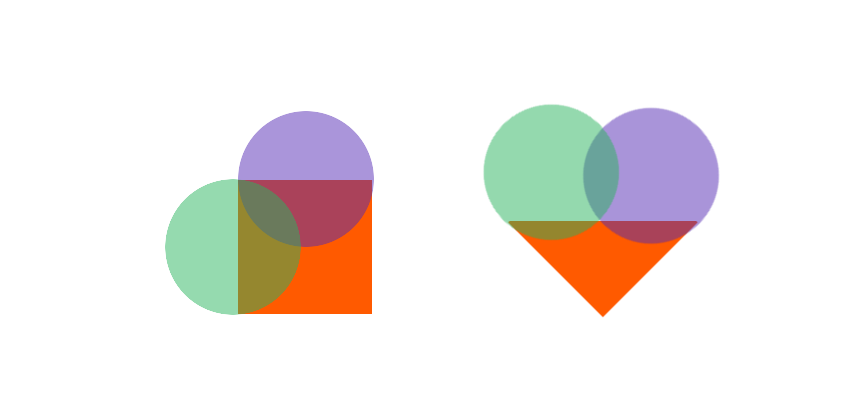
4. Creating the Heart Shape
When it comes to the creation of the heart shape, there are many different approaches which we could use, among which are some complicated equations as well as simple mixing of shapes. We will use the mixing of shapes method as shown below, specifically the one with the triangle.
As you have observed, we can use two circles and a square or a triangle to create the basic heart shape. This means it would miss those extra beautiful curves but would fit our purpose perfectly.
Painting a Circle
Let’s brush up on some equations to paint a circle. For a circle with centre at origin and radius r, the equation for the point (x,y) on the circle is x2 + y2 = r2. Now if the centre of the circle is at (h,k) then the equation becomes (x-h)2 + (y-k)2 = r2. So if we have a square bounding box rectangle then we can loop through all the points within that rectangle and determine which points fall inside the circle and which do not. We can easily create our PaintCircle method based on this understanding, as shown below.
private void PaintCircle(Texture2D texture,float radius, Vector2 midPoint, Color color){ Rect circleBounds=new Rect(); circleBounds.x=Mathf.Clamp(midPoint.x-(radius),0,resolution); circleBounds.y=Mathf.Clamp(midPoint.y-(radius),0,resolution); circleBounds.width=Mathf.Clamp(2*radius,0,resolution); circleBounds.height=Mathf.Clamp(2*radius,0,resolution); float iValue; for (int i=(int)circleBounds.x;i<circleBounds.x+circleBounds.width;i++){ for (int j=(int)circleBounds.y;j<circleBounds.y+circleBounds.height;j++){ iValue=(Mathf.Sqrt(radius*radius-((j-midPoint.y)*(j-midPoint.y)))); if(i>midPoint.x-iValue&&i<midPoint.x+iValue){ texture.SetPixel(i, j, color); } } }
}
PaintCircle(texture,radius,mid,Color.red);
Once we have the PaintCircle method, we can proceed to create our heart shape as shown below.
void PaintHearts(Texture2D texture){ //2 circles on top float radius =resolution*0.26f; Vector2 mid=new Vector2(radius,resolution-radius); PaintCircle(texture,radius,mid,Color.red); mid=new Vector2(resolution-radius,resolution-radius); PaintCircle(texture,radius,mid,Color.red); //triangle at bottom float width=resolution*0.58f; int endJ=(int)(resolution*0.65f); int startJ=(int)(resolution*0.1f); float delta=(width/endJ); float midI=resolution*0.5f; for (int i=0;i<resolution;i++){ for (int j=startJ;j<endJ;j++){ if(i>(midI-(delta*(j-startJ)))&&i<(midI+(delta*(j-startJ)))){ texture.SetPixel(i, j, Color.red); } } }
}
The variable resolution is the width and height of the texture.
5. Creating the Diamond Shape
We will discuss two ways to draw the diamond shape.
Painting a Simple Diamond
The easiest one is to extend the code used for the triangle and add an inverted triangle on the top to create the necessary shape, as shown below.
The second one is to use another equation to create a better, curvy version of our diamond shape. We will be using this one to create the tiling design for the back side of our card. The equation for a circle derives from the original equation of an ellipse, which is (x/a)2 + (y/b)2 = r2.
This equation is the same as that of the circle when the variables a and b are both 1. The ellipse equation can then be extended into a superellipse equation for similar shapes just by changing the power, (x/a)n + (y/b)n = rn. So when n is 2 we have the ellipse, and for other values of n we will have different shapes, one of which is our diamond. We can use the approach used to arrive at the PaintCircle method to arrive at our new PaintDiamond method.
private void PaintDiamond(Texture2D texture, Rect rectBounds, Vector2 midPoint, Color color, float n=0.8f)
{ float iValue; int a=(int)(rectBounds.width/2); int b=(int)(rectBounds.height/2); float nRoot=1/n; float delta; float partialOne; rectBounds.width=Mathf.Clamp(rectBounds.x+rectBounds.width,0,resolution); rectBounds.height=Mathf.Clamp(rectBounds.y+rectBounds.height,0,resolution); rectBounds.x=Mathf.Clamp(rectBounds.x,0,resolution); rectBounds.y=Mathf.Clamp(rectBounds.y,0,resolution); for (int i=(int)rectBounds.x;i<rectBounds.width;i++){ for (int j=(int)rectBounds.y;j<rectBounds.height;j++){ delta=Mathf.Abs(j-midPoint.y); partialOne=Mathf.Pow(b,n)-Mathf.Pow(delta,n); iValue=((a/b)*Mathf.Pow(partialOne,nRoot));//+mid.x if(i>midPoint.x-iValue && i<midPoint.x+iValue){ texture.SetPixel(i, j, color); } } }
}
Painting a Rounded Rectangle
The same equation can be used to create our rounded rectangle card base shape by varying the value of n.
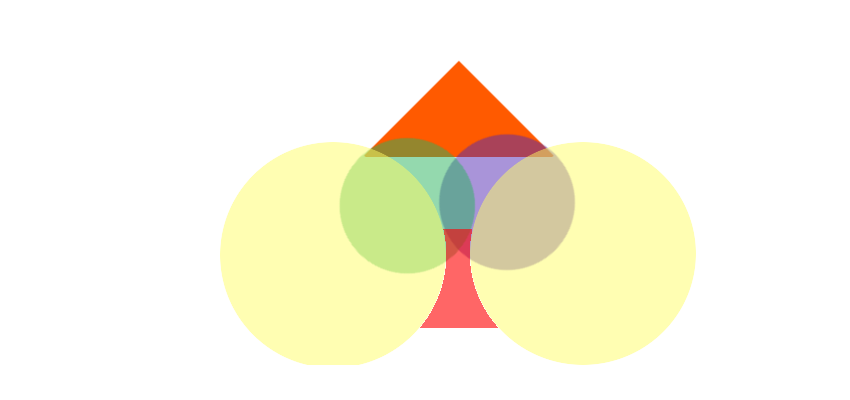
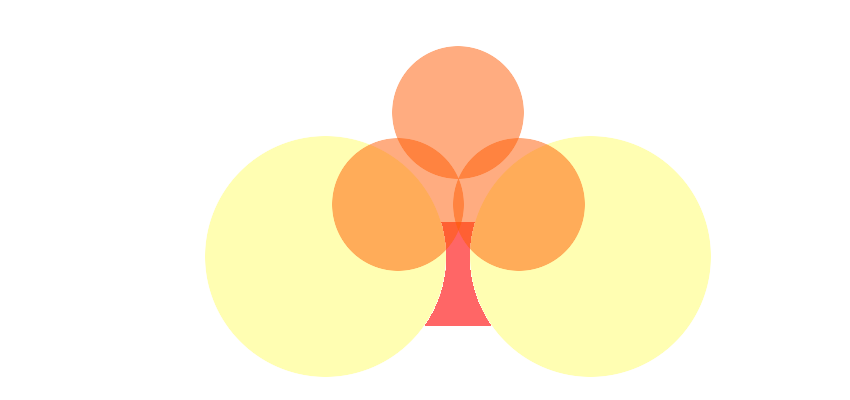
The spades shape is just the vertical flip of our heart shape along with a base shape. This base shape will be the same for the clubs shape as well. The below figure illustrates how we can use two circles to create this base shape.
The PaintSpades method will be as shown below.
void PaintSpades(Texture2D texture){ //2 circles on middle float radius =resolution*0.26f; Vector2 mid=new Vector2(radius,resolution-2.2f*radius); PaintCircle(texture,radius,mid,Color.black); mid=new Vector2(resolution-radius,resolution-2.2f*radius); PaintCircle(texture,radius,mid,Color.black); //triangle at top float width=resolution*0.49f; int startJ=(int)(resolution*0.52f); float delta=(width/(resolution-startJ)); float midI=resolution*0.5f; int alteredJ; radius=resolution*0.5f; float midJ=resolution*0.42f; float iValue; for (int i=0;i<resolution;i++){ //top triangle for (int j=startJ;j<resolution;j++){ alteredJ=resolution-j; if(i>(midI-(delta*alteredJ))&&i<(midI+(delta*alteredJ))){ texture.SetPixel(i, j, Color.black); } } //bottom stalk for (int k=0;k<resolution*0.5f;k++){ mid=new Vector2(0,midJ); iValue=(Mathf.Sqrt(radius*radius-((k-mid.y)*(k-mid.y))));//+mid.x; if(i>mid.x+iValue){ mid=new Vector2(resolution,midJ); iValue=(Mathf.Sqrt(radius*radius-((k-mid.y)*(k-mid.y))));//+mid.x; if(i<mid.x-iValue){ texture.SetPixel(i, k, Color.black); } } } }
}
7. Creating the Clubs Shape
At this point, I am sure that you can figure out how easy it has become to create the clubs shape. All we need are two circles and the base shape we created for the spades shape.
If you explore the Unity source files for this project, you’ll find a TextureManager class which does all the heavy lifting. Once we have created all the necessary textures, the TextureManager class uses the PackTextures method to combine them into a single texture, thereby reducing the number of draw calls required when we use these shapes.
Using the packedAssets array, we can retrieve the bounding boxes of individual textures from the master texture named packedTexture.
public Rect GetTextureRectByName(string textureName){ textureName=textureName.ToLower(); int textureIndex; Rect textureRect=new Rect(0,0,0,0); if(textureDict.TryGetValue(textureName, out textureIndex)){ textureRect=ConvertUVToTextureCoordinates(packedAssets[textureIndex]); }else{ Debug.Log("no such texture "+textureName); } return textureRect;
}
private Rect ConvertUVToTextureCoordinates(Rect rect)
{ return new Rect(rect.x*packedTexture.width, rect.y*packedTexture.height, rect.width*packedTexture.width, rect.height*packedTexture.height );
}
Conclusion
With all the necessary components created, we can proceed to create our deck of cards as it is just a matter of properly laying out the shapes. We can either use the Unity UI to composite cards or we can create the cards as individual textures. You can explore the sample code to understand how I have used the first method to create card layouts.
We can follow the same method for creating any kind of dynamic art at runtime in Unity. Creating art at runtime is a performance-hungry operation, but it only needs to be done once if we save and reuse those textures efficiently. By packing the dynamically created assets into a single texture, we also gain the advantages of using a texture atlas.
Now that we have our playing card deck, let me know what games you are planning to create with it.