Welcome, Guest
You have to register before you can post on our site.

Username
  

Password


Search Forums

(Advanced Search)

Forum Statistics
» Members: 20,946
» Latest member: blackopsdlc
» Forum threads: 22,007
» Forum posts: 22,974

Full Statistics

Online Users
There are currently 3265 online users.
» 0 Member(s) | 3260 Guest(s)
Applebot, Baidu, Bing, Facebook, Google

Latest Threads
What is Celestial Codex i...
Forum: PC Discussion
Last Post: xSicKxBot

» Replies: 0
» Views: 6
[WoW Retail News] Xal'ata...
Forum: World of Warcraft
Last Post: xSicKxBot

» Replies: 0
» Views: 24
[Ubuntu News] Scaling And...
Forum: Linux, FreeBSD, and Unix types
Last Post: xSicKxBot

» Replies: 0
» Views: 17
[WoW Retail News] Comment...
Forum: World of Warcraft
Last Post: xSicKxBot

» Replies: 0
» Views: 18
How to unlock Maya Aguina...
Forum: PC Discussion
Last Post: xSicKxBot

» Replies: 0
» Views: 23
[Steam Release] The Unive...
Forum: New Game Releases
Last Post: xSicKxBot

» Replies: 0
» Views: 27
[DevBlog MS] Creating a m...
Forum: C#, Visual Basic, & .Net Frameworks
Last Post: xSicKxBot

» Replies: 0
» Views: 32
[WoW Retail News] Fixed C...
Forum: World of Warcraft
Last Post: xSicKxBot

» Replies: 0
» Views: 33
[PS.Blog] Fading Echo mak...
Forum: Sony Discussion
Last Post: xSicKxBot

» Replies: 0
» Views: 31
[Steam Release] Cowbots a...
Forum: New Game Releases
Last Post: xSicKxBot

» Replies: 0
» Views: 37

 
  [Tut] How to Print Underlined Text in Python?
Posted by: xSicKxBot - 05-18-2022, 06:23 AM - Forum: Python - No Replies

How to Print Underlined Text in Python?

4.5/5 – (2 votes)

You can change your text to bold, italic, and underlined in Python. Not only can you play around with the style of your code but also change its color with the help of specific packages and modules in Python.

Interesting! Isn’t it?

There are different ways of doing this. By the end of this tutorial, you will be equipped with all the instruments to play around with the style of your code.

Related Tutorials:

So, without further delay, let the games begin!

⚙ Problem Formulation: Given a string. How to print the string as underlined text in Python?

Method 1: Enclosing String in ANSI Escape Sequence \x1B[3m’ and \x1B[0m’


The most straightforward way to print underlined text in Python is to enclose a given string text in the special ANSI escape sequence like so: print("\x1B[4m" + text + "\x1B[0m").

Here’s a minimal example:

# Print Underlined Text
text = "abc"
underlined_text = "\x1B[4m" + text + "\x1B[0m"
print(underlined_text)
print(text)

You can try this yourself in our interactive Jupyter notebook:


? Interactive: Try it yourself in Google Colab

Note that this escape sequence will not work in all editors and IDEs. For example, I made it work in Jupyter Notebooks but not in my IDLE shell.


Let’s dive into some further explanations to see why this works next.

Some terminals support the capacity to pass in unique escape sequences to modify the tone, color, and appearance of the content being printed.

These escape sequences are called ANSI escape sequences that got named after the ANSI standard that indicates their use.

Thus, you can utilize the built-in ANSI escape sequence to make the content or a specific text bold, underlined, italic, and even colored. To print the underlined text in Python using the ANSI escape sequence, we use: '\x1B[4m' + text + '\x1B[0m'.

  • '\x1B[4m' makes it underlined
  • '\x1B[1m' makes it bold
  • '\x1B[1;4m' makes it bold and underlined
  • '\x1B[0m' is the closing tag

So, you can chain together multiple text formatting specifiers by separating them with a semicolon. This is shown in the following example where the text is made bold and underlined:

Method 2: Make Text Bold and Underlined with Escape Sequence


Example 1: Escape-Sequence to print bold and underlined text for Windows Users

You may have to call the os.system() module if you are using a Windows OS to make the ANSI escape sequence work properly.

import os
os.system("color")

To make text bold and underlined, you can enclose the text in the escape sequence '\033[1;4m' and '\033[0m'.

  • '\x1B[1m' makes it bold
  • '\x1B[4m' makes it underlined
  • '\x1B[1;4m' makes it bold and underlined
  • '\x1B[0m' is the closing tag
# Print Bold and Underlined Text
print('\033[1;4m' + 'This text is bold and underlined' + '\033[0m')

Output:


? NOTE: The code '\033[0m' is used to end the bold and underlined text format. If you forget to add the ANSI code sequence to enclose the specific line of code, the following statements will also be printed in underlined format because you didn’t close the formatted special text.

Method 3: Using The simple_color Package


This is one of the easiest methods to print underlined text in Python. The simple_colors package includes many colors like blue, black, green, magenta, red, yellow, and cyan.

You can also format your text in various styles like bold, dim, italic, bright, underlined, reverse and blink that are included in the package.

Since the simple_color package isn’t a part of Python’s standard library; you need to install it before utilizing it. To install the simple_color package, copy the following code on your terminal:

pip install simple-colors

or,

python -m pip install simple-colors

After you have successfully installed the module, you can follow the syntax given in the example below to customize/style your code.

Example: The following example demonstrates how you can add color, format, and make the text bold or even underline it using the simple_colors module.

from simple_colors import * # normal and colored text
print('Normal:', blue('Welcome Finxters!')) # print underlined and colored text
print('underlined: ', green('Welcome Finxter!', 'underlined')) # print italic and underlined and colored text
print('Italic and Underlined: ', red('Welcome Finxter!', ['italic', 'underlined']))

Output:


Amazing! ?

Method 4: Using termcolor Module


In Python, termcolor is a module utilized for the ANSII color formatting.

The module comes with various properties for various terminals and certain text formatting properties. It also includes various text colors like blue, red, and green and text highlights like on-magenta, on-cyan, and on-white.

Hence, we will use the bold property from the text attributes.

? Note: termcolor module isn’t a part of Python’s standard library. Thus, you need to install it before utilizing it. To install the termcolor module copy the following code on your terminal:

pip install termcolor

After installing the module, let’s visualize how you can use it to print the text in bold format.

Example:

from termcolor import colored # Underlined Text
text = colored('Hello and Welcome to FINXTER!', attrs=['underline']) print(text) # Underlined + Blue Text
text2 = colored('This text will be printed in underlined and blue color', 'blue', attrs=['underline'])
print(text2)

Output:


Method 5: Create an HTML Object 


Prompt_toolkit includes a print_formatted_text() function that is compatible (as much as possible) with the built-in print() function. It also supports colors and formatting.

HTML can be utilized to demonstrate that a string contains HTML based formatting. Thus, the HTML object recognizes the essential tags for bold, italic and underline: <b>, <i> and <u>.

from prompt_toolkit import print_formatted_text, HTML print_formatted_text(HTML('<b>This text is bold</b>'))
print_formatted_text(HTML('<i>This text is italic</i>'))
print_formatted_text(HTML('<u>This text is underlined</u>'))

Output:


Conclusion


We have finally conquered the art of printing bold texts in Python. Not only did we learn how to print bold texts, but we also learned how to style the code using colors and other formatting styles like underline and italics. I hope this article helped you.

Please stay tuned and subscribe for more interesting articles!

Thank you, Rashi Agarwal, for helping me with this article.

The Complete Guide to PyCharm

  • Do you want to master the most popular Python IDE fast?
  • This course will take you from beginner to expert in PyCharm in ~90 minutes.
  • For any software developer, it is crucial to master the IDE well, to write, test and debug high-quality code with little effort.

Join the PyCharm Masterclass now, and master PyCharm by tomorrow!


https://www.sickgaming.net/blog/2022/05/...in-python/

Print this item

  (Indie Deal) Neptunia x SENRAN KAGURA, Idea Factory Sale
Posted by: xSicKxBot - 05-18-2022, 06:23 AM - Forum: Deals or Specials - No Replies

Neptunia x SENRAN KAGURA, Idea Factory Sale

Nacon Giveaways
[www.indiegala.com]

https://www.youtube.com/watch?v=zkSlpiy6Ezc
Idea Factory Publisher Sale, up to 80% OFF
[www.indiegala.com]
https://www.youtube.com/watch?v=_yQXey6t_0o
Stay Inside, Stay Safe and Enjoy Good Games.
Check out IndieGala on Twitter, YouTube & Facebook[www.facebook.com]


https://steamcommunity.com/groups/indieg...2657872431

Print this item

  PC - Kapital: Sparks of Revolution
Posted by: xSicKxBot - 05-18-2022, 06:23 AM - Forum: New Game Releases - No Replies

Kapital: Sparks of Revolution


Sandbox economic simulation game about class struggle. European country is in a deep crisis. You are the mayor of the capital. Social unrest is inevitable. What price will you pay to save your people from anarchy?

Publisher: 1C Entertainment

Release Date: Apr 28, 2022


https://www.metacritic.com/game/pc/kapit...revolution

Print this item

  News - Check Out This Adorable Set Of Lego-Esque Kirby Figures
Posted by: xSicKxBot - 05-18-2022, 06:23 AM - Forum: Lounge - No Replies

Check Out This Adorable Set Of Lego-Esque Kirby Figures

If you're wrapping up Kirby and the Forgotten Land but need more of the pink blob in your life, consider checking out these adorable figurines from Nanoblock at Amazon. The set comes with six characters (including Kirby, Waddle Dee, and Meta Knight), and each one is composed of approximately 70 nanoblocks that are easy to piece together.

Kirby might be among the cutest Nanoblock sets on the market, but it's far from the only one. If you love the look of this set but aren't a Kirby fan, consider checking out one of the other Nanoblock products available.

Best Nanoblock sets


https://www.gamespot.com/articles/check-...01-10abi2f

Print this item

  [Oracle Blog] JDK 15.0.1, 11.0.9, 8u271, and 7u281 Have Been Released!
Posted by: xSicKxBot - 05-17-2022, 12:37 PM - Forum: Java Language, JVM, and the JRE - No Replies

JDK 15.0.1, 11.0.9, 8u271, and 7u281 Have Been Released!

The Java SE 15.0.1, 11.0.9, 8u271, and 7u281 update releases are now available. You can download the latest JDK releases from the Java SE Downloads page. OpenJDK 15.0.1 is available on http://jdk.java.net/15/. New Features, Changes, and Notable Bug Fixes For information about the new features, chang...

https://blogs.oracle.com/java/post/jdk-1...n-released

Print this item

  [Tut] Maximum Recursion Depth in Python
Posted by: xSicKxBot - 05-17-2022, 12:37 PM - Forum: Python - No Replies

Maximum Recursion Depth in Python  

Rate this post

What is Recursion?


Recursion in programming is a problem-solving concept.

In recursion, a function finds the solution by calling itself once or many times. This function call can be explicit or implicit.

?Info: Recursion, according to (Tang 2013), is when a function or algorithm calls itself one or more times. These calls occur until the program meets a specified condition. When met, processing of repeated calls from the last one called to the first happens.

See below an example of a recursive factorial function.

def factorial(n): """ Calculate n! Args: n(int): factorial to be computed Returns: n! """ if n == 0: return 1 return n * factorial(n-1) print(factorial(3))
# 6

In the highlighted line in the above snippet the factorial function calls itself. This function calls itself again and again.

This continues until the condition on line 10 is fulfilled.

Then, the previous function calls are evaluated up to the initial call. The condition n == 0 is a base case.

? Info: A base case is very important in a recursive function since it defines the end of the recursive calls. If there exists a faulty base case or a non-existent one in a recursive function, the function calls would go on indefinitely, akin to an infinite while loop.

Recursion utilizes stacks in function calls. Hence, indefinite function calls lead to a C (programming language) stack overflow. This stack overflow, in turn, crashes Python. A size limit introduced to the python interpreter stack prevents potential stack overflow.

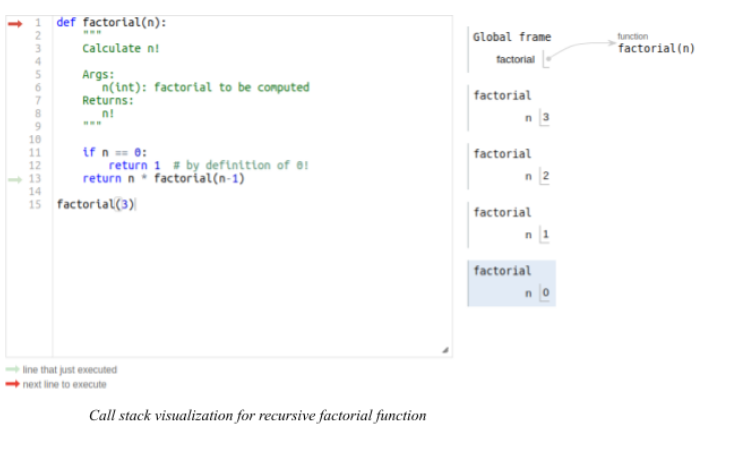
See also: sys — System-Specific Parameters and Functions and below for the call stack in the global frame when the last line evaluates.

You can try it yourself in the memory visualizer:

Or you just have a look at the screenshots taken from my execution flow:


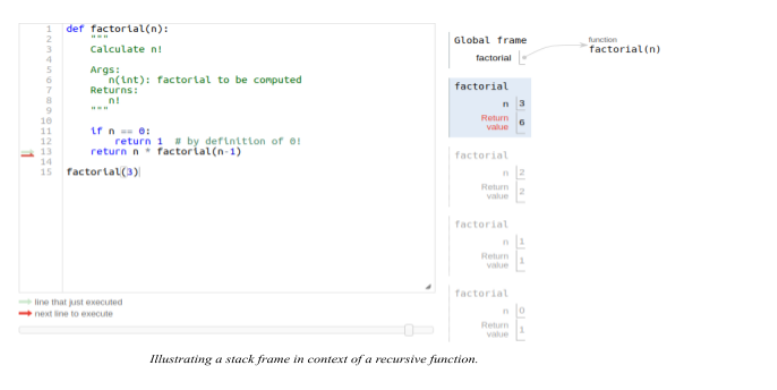
A stack frame from a recursive call is a data structure. It contains the variable of a function call parameters at the specific function call. It holds the state of the recursive function at an instance, with specific arguments.

As highlighted below, the return value of each successive call changes according to the argument passed into the recursive call.

When the argument is 0 the return value is 1. When the argument is 1 the return value is 1, and so on until the initial argument of 3, which has a return value of 6.


Types of Recursions


There are mainly two types of recursion. These types are direct and indirect recursion.

For direct recursion, the recursive call is explicitly declared (see code snippet below).

def direct_recursion(n): if n == 0: return 0 return direct_recursion(n-1)
direct_recursion(4)

Yet, in indirect recursion, the recursive function calls another function which in turn calls it.

For example, we define a new function named indirect_recursion(n). indirect_recursion(n) calls a function called other_function(3). Inside other_function(n) we call indirect_recursion(n) again.

This is a case of indirect recursion.

def indirect_recursion(n): if n == 0: return 0 return n - other_function(n-1) def other_function(n): if n > 0: n -= 2 return indirect_recursion(n) indirect_recursion(3)

Besides the above, there are other types of recursion.

There is also tail recursion and head recursion.

  • Head recursion, refers to when the recursive call is at the beginning of a function.
  • Tail as the name suggests refers to the scenario where the recursive call is the last line of the function.

In the direct recursion snippet above, the last line in the function is a sole recursive call.

This is an example of a tail-recursive function. Hence, tail recursion is a particular example of a direct recursion type.

Note, in our recursive factorial function, the last line contains the recursive call. But, it does not qualify to be tail-recursive. This is because the very last operation in that function is multiplication.

Tail call optimization


A tail call is not unique to recursive functions.

It refers to the last action that is finally performed by a function or a procedure.

As explained above, if the final action is recursive then the tail call can is a tail-recursion.

Some programming languages like scheme put in place tail call optimization. Tail call optimization ensures constant stack space usage. In (“Tail Call” 2022), tail call optimization, the call stack receives no more stack frames.

Since most of the current function state is no longer needed, hence replaced by the stack frame of the tail call.

As highlighted in the image illustration of a stack frame in the context of a recursive function. Instead of each call generating a new stack frame. This is achieved by modifying the current frame to align with the current argument. This is a powerful technique that allows for the conservation of memory.

Hence, preventing stack overflow in cases of tail recursion functions. As highlighted in this answer (Cronin 2008). The amount of space required for a recursive factorial function is constant for any value argument.

Tail Call Optimization in Python


By design, python, unlike languages like scheme, does not support tail call optimization.

This is true for all tail calls, including tail-recursive calls. The main reason for this is python’s emphasis on having complete debug information. This debug information relies on stack traces.

We lose debug info in discarded stacks by implementing tail call optimization. This renders stack trace useless.

Currently, Python, by default, allows for 1000 recursion calls.  After exceeding these calls, Python raises a RecursionError: maximum recursion depth exceeded.

How to Get the Current Recursion Limit in Your System in Python?


The code listing below shows how to find out the current recursion limit in your system.

import sys
print(sys.getrecursionlimit())

The default is usually 1000 but it depends on the set-up one is running.

In my current set-up using Anaconda, the recursion limit is 3000.

Recursion limit refers to the number of function calls python allows when recursing.

How to Set the Recursion Limit in Python?


It is possible to change the recursion limit. By adding the following code we get rid of RecursionError if the solution lies within the set limit.

sys.setrecursionlimit(3500)

It is important to note that increasing the recursion limit does not change the C-stack size.

Hence, even with increasing the limit stack overflow might still occur since the limit is a safety measure to prevent stack overflow.

The better option might be refactoring the solution. For example, using an iterative solution using loops, and other built-in Python sequences.

References


https://www.sickgaming.net/blog/2022/05/...in-python/

Print this item

  [Tut] Create JavaScript Shopping Cart with Add to Cart Code
Posted by: xSicKxBot - 05-17-2022, 12:37 PM - Forum: PHP Development - No Replies

Create JavaScript Shopping Cart with Add to Cart Code

by Vincy. Last modified on May 16th, 2022.

Do you want a shopping cart built entirely in JavaScript? With session / storage everything! With no PHP or server-side code, then read on and rock on.

Earlier I have written a lot of PHP shopping cart code using server-side sessions. Now let us see a similar concept on the client-side to build a JavaScript shopping cart.

The Window.sessionStorage is the right solution to create a session-based shopping cart. It is free from PHP or other server-side code, unlike previous eCommerce examples.

What is sessionStorage?


The sessionStorage is one of the standard JavaScript concepts of WebStorage API. It is a client-side session object that tends to set, get and clear data with respect to it. This object’s persistence is based on the browser’s session availability.

How to build a JavaScript shopping cart using sessionStorage?


The JavaScript shopping cart implementation is possible with sessionStorage like as below. The below table shows the mapping of sessionStorage capability with shopping cart features.

  • setItem() – Add to cart from the shopping gallery by referring to the purchased product id. It also is used to edit a cart item by replacing the value array.
  • getItem() – Read and display the cart items by iterating the sessionStorage object array.
  • removeItem() – Remove a single item from the cart by specifying the item index.
  • clear() – Empty the cart by unsetting the sessionStorage instance.

Shopping cart – checkout – payment


This section shows the execution flow of the JavaScript shopping cart code. It covers “add to cart” to check out and to the payment step.

  • Step 1: On “add to cart” action the sessionStorage object builds the purchased item array.
  • Step 2: Then, it gets the buyer’s payment details on a checkout form.
  • Step 3: Can renders payment options like PayPal with the request parameter array. This array contains purchased items and the buyer’s payment details.
  • Step 4: An alternate to step 3, that is, an email checkout. This suits the shopping cart not dealing with instant payment on the flow.

In this tutorial, we will see steps 1 and 2 of a JavaScript shopping cart. You can integrate with the payment options coded with different articles. Example: Integrate PayPal checkout into the eCommerce website.

JavaScript shopping cart example


This example provides bare minimal features of a Javascript shopping cart. It supports performing the “add to cart” and “clear cart” functionalities via JavaScript.

This code also builds and supplies product gallery HTML from JavaScript.

It is a jQuery-based client-side implementation with the use of JavaScript sessionStorage.

HTML code to display shopping cart UI


This HTML code has placeholders to load UI for the following from JavaScript.

When this document is ready, a JavaScript code prepares HTML for the product grid.

In the product grid, it contains inputs to select a quantity and post to perform the “add to cart” operation.

The cart.js handles the client-side code to perform the shopping cart operations. It will be included in this template.


<div class="container"> <!-- Shopping cart table wrapper --> <div id="shopping-cart"> <div class="txt-heading"> <h1>Shopping cart</h1> </div> <a on‌Click="emptyCart()" id="btnEmpty">Empty Cart</a> <table class="tbl-cart" cellpadding="10" cellspacing="1"> <thead> <tr> <th>Name</th> <th class='text-right' width="10%">Unit Price</th> <th class='text-right' width="5%">Quantity</th> <th class='text-right' width="10%">Sub Total</th> </tr> </thead> <!-- Cart table to load data on "add to cart" action --> <tbody id="cartTableBody"> </tbody> <tfoot> <tr> <td class="text-right">Total:</td> <td id="itemCount" class="text-right" colspan="2"></td> <td id="totalAmount" class="text-right"></td> </tr> </tfoot> </table> </div> <!-- Product gallery shell to load HTML from JavaScript code --> <div id="product-grid"> <div class="txt-heading"> <h1>Products</h1> </div> <div id="product-item-container"></div> </div> </div>

Client-side code to perform JavaScript shopping cart actions


This script performs the following.

  1. Load product gallery from JSON data.
  2. “Add to cart” action to move a product into the cart table.
  3. Load and change the shopping cart status on each cart action.
  4. Update total cart items and total price on each change.
  5. Empty the cart by clearing the session.

Load product gallery from JSON data


The productItem contains the product JSON data. It contains a row of product data with name, price and photo path.

The showProductGallery method iterates this productItem JSON and builds the product gallery HTML.

In this gallery, each product tile contains the option “add to cart”. It moves the selected product to the cart session by clicking the “Add to cart” button.

The JavaScript code uses for each loop to iterate theproductItem JSON.


$(document).ready(function() { var productItem = [{ productName: "FinePix Pro2 3D Camera", price: "1800.00", photo: "camera.jpg" }, { productName: "EXP Portable Hard Drive", price: "800.00", photo: "external-hard-drive.jpg" }, { productName: "Luxury Ultra thin Wrist Watch", price: "500.00", photo: "laptop.jpg" }, { productName: "XP 1155 Intel Core Laptop", price: "1000.00", photo: "watch.jpg" }]; showProductGallery(productItem);
}); function showProductGallery(product) { //Iterate javascript shopping cart array var productHTML = ""; product.forEach(function(item) { productHTML += '<div class="product-item">'+ '<img src="product-images/' + item.photo + '">'+ '<div class="productname">' + item.productName + '</div>'+ '<div class="price">$<span>' + item.price + '</span></div>'+ '<div class="cart-action">'+ '<input type="text" class="product-quantity" name="quantity" value="1" size="2" />'+ '<input type="submit" value="Add to Cart" class="add-to-cart" on‌Click="addToCart(this)" />'+ '</div>'+ '</div>'; "<tr>"; }); $('#product-item-container').html(productHTML);
}

“Add to cart” action to move a product into the cart table


This “add to cart” JavaScript handler is a core functionality of the example. This code initiates the JavaScript sessionStorage object.

On clicking the “Add to cart” button on the product tile, this function is invoked.

It reads the product details from the product grid where the clicked “Add to cart” is placed. For example, it gets the product name, quantity and other details.

Using these details, this code prepares the JSON instance of the cart item row. Then, it appends the newly added items to the existing cart sessionStorage object.


function addToCart(element) { var productParent = $(element).closest('div.product-item'); var price = $(productParent).find('.price span').text(); var productName = $(productParent).find('.productname').text(); var quantity = $(productParent).find('.product-quantity').val(); var cartItem = { productName: productName, price: price, quantity: quantity }; var cartItemJSON = JSON.stringify(cartItem); var cartArray = new Array(); // If javascript shopping cart session is not empty if (sessionStorage.getItem('shopping-cart')) { cartArray = JSON.parse(sessionStorage.getItem('shopping-cart')); } cartArray.push(cartItemJSON); var cartJSON = JSON.stringify(cartArray); sessionStorage.setItem('shopping-cart', cartJSON); showCartTable();
}

Empty the cart by clearing the session


This JavaScript shopping cart code contains an option to empty the cart table.

It explicitly clears the sessionStorage instance created to have the cart items.

At the end of both “Add to cart” and the “clear cart” actions, the cart table UI is rebuilt with the latest session data.

The showCartTable function is called for updating the cart table UI and the total count.


function emptyCart() { if (sessionStorage.getItem('shopping-cart')) { // Clear JavaScript sessionStorage by index sessionStorage.removeItem('shopping-cart'); showCartTable(); }
}

Load cart row, item count, the total amount from sessionStorage object


This code displays the logic of showCartTable() to rebuild cart HTML and update UI.

It initiates variables to hold the following data. These are used in the JavaScript shopping cart code.

  • Cart table HTML.
  • A total number of items added to the cart.
  • A total amount of the purchased cart items.

It checks cart sessionStorage and iterates the array if exists. During the iteration, it builds the cart table HTML and computes the total count and price.

The cart sessionStorage data is pushed to the UI via this JavaScript function. It reflects the latest cart state to the end-users.


function showCartTable() { var cartRowHTML = ""; var itemCount = 0; var grandTotal = 0; var price = 0; var quantity = 0; var subTotal = 0; if (sessionStorage.getItem('shopping-cart')) { var shoppingCart = JSON.parse(sessionStorage.getItem('shopping-cart')); itemCount = shoppingCart.length; //Iterate javascript shopping cart array shoppingCart.forEach(function(item) { var cartItem = JSON.parse(item); price = parseFloat(cartItem.price); quantity = parseInt(cartItem.quantity); subTotal = price * quantity cartRowHTML += "<tr>" + "<td>" + cartItem.productName + "</td>" + "<td class='text-right'>$" + price.toFixed(2) + "</td>" + "<td class='text-right'>" + quantity + "</td>" + "<td class='text-right'>$" + subTotal.toFixed(2) + "</td>" + "</tr>"; grandTotal += subTotal; }); } $('#cartTableBody').html(cartRowHTML); $('#itemCount').text(itemCount); $('#totalAmount').text("$" + grandTotal.toFixed(2));
}

JavaScript shopping cart output screenshot


The output will be familiar to whom already have seen my older shopping cart code created in PHP.

It is designed as a single-page shopping cart solution. It shows both the gallery and cart on the same page.
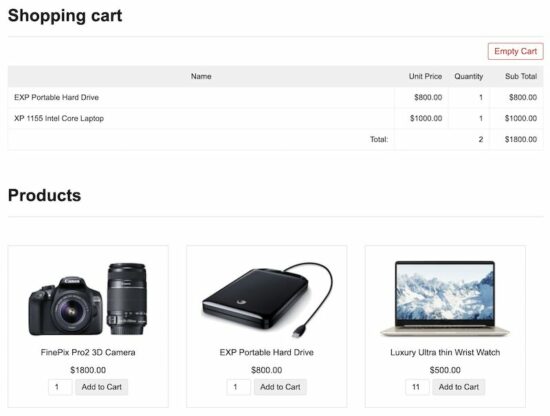
javascript shopping cart output

Persistent JavaScript shopping cart with localStorage instance


The WebStorage API’s sessionStorage will be expired when the browser is closed. This API provides one more storage object which is localStorage.

The localStorage object is similar to sessionStorage. The only difference is that the localStorage keeps data until explicit action.

So, this concept helps to have a persistent cart. That is to retain the customers’ cart items even if they closed the browser.

The source code uses sessionStorage for this JavaScript shopping cart code. Include the following file instead of cart.js if you want to use the localStorage object.

cart-local-storage.js


$(document).ready(function() { var productItem = [{ productName: "FinePix Pro2 3D Camera", price: "1800.00", photo: "camera.jpg" }, { productName: "EXP Portable Hard Drive", price: "800.00", photo: "external-hard-drive.jpg" }, { productName: "Luxury Ultra thin Wrist Watch", price: "500.00", photo: "laptop.jpg" }, { productName: "XP 1155 Intel Core Laptop", price: "1000.00", photo: "watch.jpg" }]; showProductGallery(productItem); showCartTable();
}); function addToCart(element) { var productParent = $(element).closest('div.product-item'); var price = $(productParent).find('.price span').text(); var productName = $(productParent).find('.productname').text(); var quantity = $(productParent).find('.product-quantity').val(); var cartItem = { productName: productName, price: price, quantity: quantity }; var cartItemJSON = JSON.stringify(cartItem); var cartArray = new Array(); // If javascript shopping cart session is not empty if (localStorage.getItem('shopping-cart')) { cartArray = JSON.parse(localStorage.getItem('shopping-cart')); } cartArray.push(cartItemJSON); var cartJSON = JSON.stringify(cartArray); localStorage.setItem('shopping-cart', cartJSON); showCartTable();
} function emptyCart() { if (localStorage.getItem('shopping-cart')) { // Clear JavaScript localStorage by index localStorage.removeItem('shopping-cart'); showCartTable(); }
} function removeCartItem(index) { if (localStorage.getItem('shopping-cart')) { var shoppingCart = JSON.parse(localStorage.getItem('shopping-cart')); localStorage.removeItem(shoppingCart[index]); showCartTable(); }
} function showCartTable() { var cartRowHTML = ""; var itemCount = 0; var grandTotal = 0; var price = 0; var quantity = 0; var subTotal = 0; if (localStorage.getItem('shopping-cart')) { var shoppingCart = JSON.parse(localStorage.getItem('shopping-cart')); itemCount = shoppingCart.length; //Iterate javascript shopping cart array shoppingCart.forEach(function(item) { var cartItem = JSON.parse(item); price = parseFloat(cartItem.price); quantity = parseInt(cartItem.quantity); subTotal = price * quantity cartRowHTML += "<tr>" + "<td>" + cartItem.productName + "</td>" + "<td class='text-right'>$" + price.toFixed(2) + "</td>" + "<td class='text-right'>" + quantity + "</td>" + "<td class='text-right'>$" + subTotal.toFixed(2) + "</td>" + "</tr>"; grandTotal += subTotal; }); } $('#cartTableBody').html(cartRowHTML); $('#itemCount').text(itemCount); $('#totalAmount').text("$" + grandTotal.toFixed(2));
} function showProductGallery(product) { //Iterate javascript shopping cart array var productHTML = ""; product.forEach(function(item) { productHTML += '<div class="product-item">'+ '<img src="product-images/' + item.photo + '">'+ '<div class="productname">' + item.productName + '</div>'+ '<div class="price">$<span>' + item.price + '</span></div>'+ '<div class="cart-action">'+ '<input type="text" class="product-quantity" name="quantity" value="1" size="2" />'+ '<input type="submit" value="Add to Cart" class="add-to-cart" on‌Click="addToCart(this)" />'+ '</div>'+ '</div>'; "<tr>"; }); $('#product-item-container').html(productHTML);
}

Security caution


Until the “add to cart” step, the client-side handling is fine. When proceeding with checkout, it is preferable to use server-side middleware.

It is for safety purposes to handle security loopholes. It will do the sanitization, validation of data authenticity and more verification process.

Conclusion


So, we have created a JavaScript shopping cart code using the sessionStorage object. And also, we saw one more option to add the cart item persistency with the localStorage object.

The client-side shopping cart implementation is not a complete solution. But, it has the advantages of minimalism. It will suit the thin static cart available online.

It is suitable for the shops having client-side integrations connected with hosted services.
Download

↑ Back to Top


https://www.sickgaming.net/blog/2022/05/...cart-code/

Print this item

  (Indie Deal) Donuts Call Bundle, Star Wars Flash Sale & Giveaways
Posted by: xSicKxBot - 05-17-2022, 12:37 PM - Forum: Deals or Specials - No Replies

Donuts Call Bundle, Star Wars Flash Sale & Giveaways

Donuts Call Bundle | 6 Steam Games | 93% OFF
[www.indiegala.com]
Want to fill the donut hole in your mundane life? We hear you and are answering the call with 6 Steam Games at 93% OFF in one whole bundle.

May the 4th be with you: Star Wars Sales and Giveaways
[www.indiegala.com]
[www.indiegala.com]
https://www.youtube.com/watch?v=aQjOebmf2ug
Stay Inside, Stay Safe and Enjoy Good Games.
Check out IndieGala on Twitter, YouTube & Facebook[www.facebook.com]


https://steamcommunity.com/groups/indieg...6759892384

Print this item

  PC - Kaiju Wars
Posted by: xSicKxBot - 05-17-2022, 12:37 PM - Forum: New Game Releases - No Replies

Kaiju Wars


Play out a Kaiju movie as the (hopelessly) outclassed military in this stylish 2D turn-based strategy game. Construct buildings and defend your city with cannon-fodder tanks, jets and more as the devastating kaiju grow in power with every attack.

Publisher: Foolish Mortals Games

Release Date: Apr 28, 2022


https://www.metacritic.com/game/pc/kaiju-wars

Print this item

  News - HDMI Used To Simplify Our Home Theaters, Now It's Adding Confusion
Posted by: xSicKxBot - 05-17-2022, 12:37 PM - Forum: Lounge - No Replies

HDMI Used To Simplify Our Home Theaters, Now It's Adding Confusion

This month, I tried to upgrade my home theater setup with an LG C1 OLED television and an HDMI 2.1 receiver. Tried. In doing so, I discovered what a nightmare HDMI 2.1's definition of "compatibility" is. When HDMI arrived on the scene almost 20 years ago, it seemed like a godsend: Instead of having to plug in five cables to get a 480p image with stereo audio, you could just plug in one cable. It was universal, had a directional configuration to make sure you couldn't plug it in upside down, and it just worked. Two decades later, though, HDMI is alive and well but has somehow become needlessly confusing. Instead of a simple spec with complex cables, we're now saddled with one simple cable and a truly baffling set of specs. Listen ye to my cautionary tale and beware the dark woods of HDMI.

What is HDMI 2.1?

No Caption Provided

HDMI 2.1 is the latest version of the High-Definition Multimedia Interface connector first unveiled in 2002. The initial HDMI 2.1 spec represented a big jump forward for the connector, allowing a bunch of new features. The HDMI 1.0-to-1.2a jump offered a 4.95 Gbps transmission rate. 1.3 bumped that up to 10.2 Gbps, and 2.0 brought it to 18.0 Gbps. It takes a lot of bandwidth to facilitate some of the modern advancements we've seen, such as 120 frames per second at 4K resolution; HDMI 2.1 is a huge leap forward that enables this, offering support for up to 48 Gbps. The more features you want to pass through that cable, the more bandwidth you need.

Along with that 48 Gbps bandwidth, HDMI 2.1 brings a variety of features. Some are for general use, but a bunch are specifically focused on gaming. General features include the introduction of the enhanced Audio Return Channel, or eARC, which offers easier connection between HDMI displays and audio devices, with greater compatibility across most modern audio formats. HDMI Cable Power lets HDMI devices transmit power through the cable for devices that require extra power to transmit the 48 Gbps bandwidth; this will mostly be a background thing that you won't notice. Quick Media Switching allows for faster transitions between media with the same resolution but different frame rates--for example, a television show filmed at 24 frames per second and a sports broadcast that airs at 60 frames per second, both running at 4K resolution.

Continue Reading at GameSpot

https://www.gamespot.com/articles/hdmi-u...01-10abi2f

Print this item